
Don't wanna be here? Send us removal request.
Statistics
We looked inside some of the posts by liujing-z5364991 and here's what we found interesting.
Average Info
Notes Per Post
126
Likes Per Post
60
Reblog Per Post
0
Reply Per Post
66
Time Between Posts
6 days
Number of Posts By Type
Text
11
Last Seen Tumblr Blogs


Fun Fact
Celebrities use Tumblr as well.
Text
Week 10 - Completing the loop
Lectures and tutorials in this course provide a wide range of knowledge and learning opportunities in design techniques, communication and iterative design processes. The practical skills learned in this course are invaluable, and I will insist that I practice hand sketching and digital modeling regularly for many years to come. For me, every time I step out of my comfort zone, I may feel anxious and nervous. I always had difficulty at the beginning stage, such as how to draw front views and engineering drawings, because they are obviously precise and professional. So my biggest problem is that it's hard to start from scratch. Through this, I also learned how to deal with the stress of learning new things and implement different work methods, such as breaking down tasks and staying focused longer when tackling challenging tasks. I can clearly see that my sketching and drawing skills have improved a lot, and it's great to see me applying what we've learned in orthographic drawing in other courses. It's great that I have access to a wider range of tools for digital work. To my surprise, the process of learning digital model making was also more enjoyable than expected. In addition to tangible improvements in hands-on skills, the communication of design has also been enhanced in the most important part - design thinking. There are many ways in which I can present and express my ideas, resulting in more radical thinking and a creative approach to design thinking. At the same time, the course taught me to reflect and learn from the experiences of others. Before taking this course, I didn't spend a lot of time reflectively thinking. However, I have started to embrace this new skill. Reflecting on and responding to classmates helped me gain a deeper understanding of what, why, and how things were created. It provided a great learning opportunity to review the process I took and find alternative ways of handling future tasks. Finally, I would like to say that this course was very challenging and interesting for me. I learned a lot of practical knowledge in this class. The instructor grasped the rhythm of the course and let me learn step by step, from floor plans to 3D models to computer models. I enjoy the joy of weekly progress, recording difficulties and progress each week. Even though I'm still taking online classes, I can feel the connection between me and my classmates. Thank you to every student and mentor.
15 notes
·
View notes
Text
Week 9 - Prototyping
PRE-CLASS ACTIVITES I found this video useful discussing the use of models in mug development. Andrew's video has many similarities and some differences between my experience using the model for his mug project and the Olay concept model I did. A stark contrast between Andrew's workflow and my own is the importance of his concepts. It can be seen that his concept has more physical material and product concepts, holding the cup in the process and introducing parts by hand for pointing out. Digital software cannot enable such an experience, and in particular, weight and design may affect how we hold our cups and grip the handles. In his studio, the feel of glass, ceramics and even holes is tested. In such a process, countless variations and adventurous ideas have been tested for interactive purposes. In contrast, I did not delve into the material and other attempts. I can only do my best to simulate in 3ds max, I rarely feel objects through physical objects, but as a designer it is very good to do more physical models, because these things provide feedback on the feel of the design body.
IN-CLASS ACTIVITIES
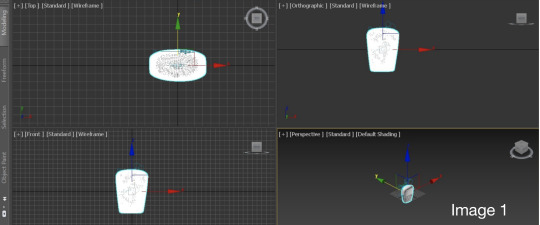
During modeling, I wanted my bottle to be symmetrical. So, after fixing the dent, I used the Symmetry Tool and I made a symmetry modification along the X axis to make the left and right sides of the bottle symmetrical (Image 1). It would be easier to use modifiers if I had this feature for the first two weeks. Two other very practical tips are using Relax to remove foam and symmetry imperfections. Symmetry makes a lot of sense for hand-drawn or hand-crafted models, greatly reducing the burden of hand-drawing (Image 2+3).

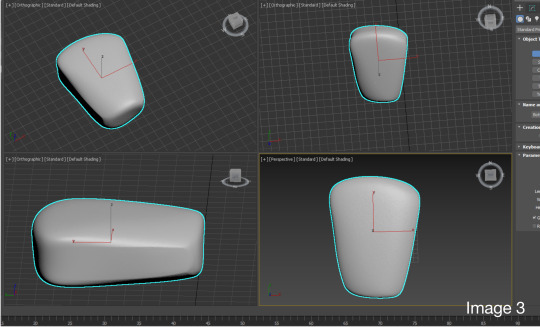
At the end I added the color, applied shader (Image 4). This makes it easier to see the imperfections of the model, some dents are not completely eliminated, and the bottom of the bottle looks strange from this angle. This leads me to discover that CAD models force you to imagine and be exact with all kinds of difficult details. But keep experimenting, experimenting with different materials, colors, and finishes at the click of a button, and digital modeling really excels in this case.

For digital iteration and 3D printing of 3D scans, unfortunately I am an online student, and while I can still complete the process and print my designs remotely at the Design Futures Lab, I will only be able to pick it up when I arrive on campus next year.
POST-CLASS ACTIVITES Reflection:In this assignment, I combined my previous experience to save files every so often to avoid computer crashes during modeling. This week's assignment was more difficult than I expected, but it made me realize that I need to spend more time learning the software later on, as the basic skills I've learned so far can only produce a simple modeling and render. I will also spend time researching different materials to see how this affects the design. My goal is to become more confident and proficient at every stage of design, and I've found learning and gaining experience from elders in the industry very helpful and really fun.
7 notes
·
View notes
Text
Week 8 Studio Tutorial – Digital Iteration
Before the start of this week, I went to study Andrew's video, and then I realized the importance of modeling, because many times when designing a product, the sketch does not consider the importance of the shape, proportion, ergonomics and user interaction of the design product. In my opinion, this is a process from high-fidelity to low-fidelity, from accurate high-quality material to fast production. A low-fidelity mockup will help determine the size and proportions that will best fit the product. However, it will lack the ergonomics and details of a high-fidelity design. I was pretty apprehensive about the new software when trying out CAD this week, but found it to be an exciting journey after getting out of my comfort zone. Through tutorials online, I found that this software is not difficult to learn, working with meshes can be a tedious and idiosyncratic process at times, but it's really fun to create something with no end goal. Start experimenting with the object types in the standard primitives that the software has (Image 1+Image 2). My favorite part of the exercise is learning polygon modeling in 3ds Max. Polygonal modeling is a core part of most 3D modeling programs, and skills are often transferable to each other. There are some great modeling tools in 3ds Max that make the modeling process a pleasure.

Image 1

Image 2
Pulled up irregular objects, made a love cup to try to improve the quality and speed of my modeling (Image 1), and improved my familiarity with the software by making simple extrusions, shrinking rings and other small things.

Image 3
It's worth noting that we have to save files occasionally. Because the app crashes easily when rendering starts. Of course, being a good industrial designer requires a lot of patience and care. All modeling software can only be used more proficiently through the accumulation of learning time, and then can be perfected by practice slowly. It's been a very long learning process and I'm looking forward to my next homework.
11 notes
·
View notes
Text
Week 7 Studio Tutorial – Physical Model Making (foam)
This week's events are very fun and exciting. I've done foam models before with bad results, but this time I'm ready to use better tools to get the task right.
In the first exercise, I created a sketch of the bottle (Image 1) and used a ruler to scale it to match the size of the original bottle. When roughly shaping the foam, I found the orthographic view very useful (Image 2) to be able to stick the view on top to make sure I cut the correct shape.

I started by marking the foam block itself as a guide for the cutting operation (Image 3). I want to transfer the lines directly from the front view to the top view to keep the alignment. When copying the pattern onto the foam block, I used the retractable break-off knife to cut the initial shape, it took a lot of force to start the cut as it kept getting stuck and forcing the blade through the foam would just cause the foam to tear, As well as small pieces of foam breaking. Because the home office tools and equipment are not enough, we can only slowly master the cutting force and use the existing tools more proficiently. But I am very happy that I left a distance of about 20mm in length, width and height so that I have some room for mistakes (Image 4). I will definitely keep this point in mind when doing models in the future, to leave more room when the model is cut, because it is irreversible.

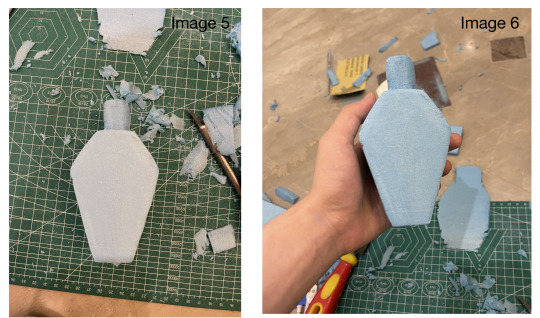
Finally, slowly use a file and sandpaper to smooth out the model (Image 5+6). After this time, I deeply realized that the choice of tools and materials is very important, and it has a very important impact on the speed and accuracy of material removal.
The latter two models are made according to the same steps as the first model (Image 8+9). I would like to see which one works better as a moisturizer bottle after many attempts (Image 10).


The part of this exercise that struck me the most was exploring how different shaped bottles feel in the hand. The ergonomics of the design cannot be properly represented in the sketches. But the resulting model helps me to touch my own ideas more intuitively and can create a better overall feeling.
19 notes
·
View notes
Text
Week 6 - Digital Sketching
During the non-teaching week, we are going to use Photoshop to generate some digital concept renders for the Olay moisturiser bottle. This task looked very interesting, but since I had almost zero experience sketching in Photoshop, it was a bit stressful at first. But I quickly realized that maybe it wasn't as hard as I thought, just taking the first step found it to be a really fun exercise and taught me a lot of skills that will be useful in the future.
I first found some ideas on Pinterest, learned from various sketches made by experienced people (image 1+2+3), and learned some lessons and inspirations to apply to my work.
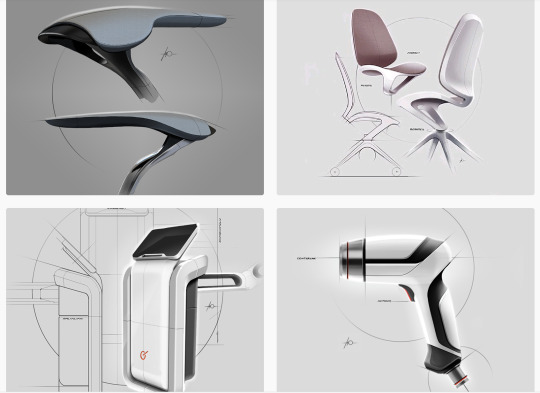
Image 1:Drawings by Filip Chaeder
Sources: https://www.behance.net/filipchaeder

Image 2:Drawings by Behance
Sources: https://www.pinterest.co.uk/behance/
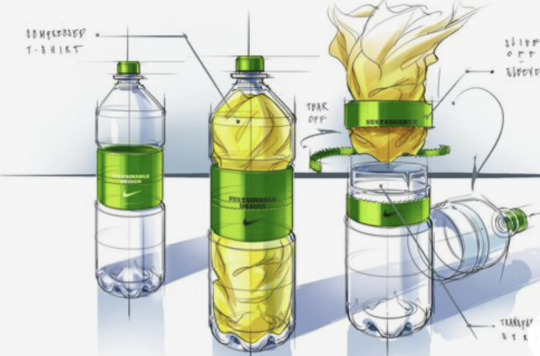
Image 3:Drawings by Squidbone
Sources: https://www.pinterest.co.uk/pin/104568022591742497/
The basic skills for creating digital sketches are similar to using pen and paper. Instead of technical information like using layer masks and clipping masks, I found more procedural and artistic design options, and I got the most insight from these tutorials. Using digital media like Photoshop has many ways to speed up or improve my workflow compared to traditional sketching. This task requires patience, concentration, and eye and hand coordination. I found the whole digital sketching process enjoyable.
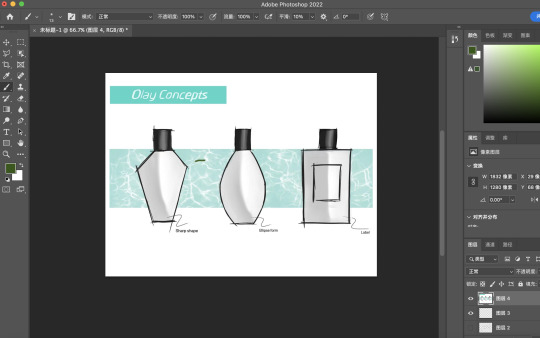
Image 4
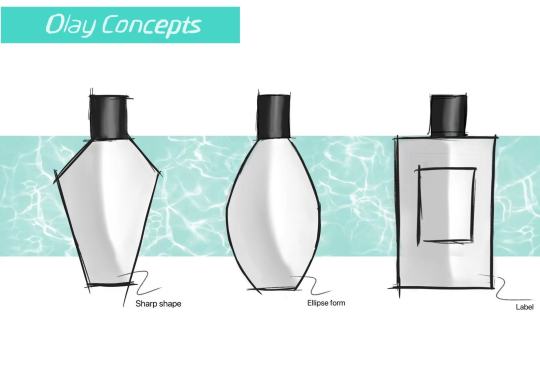
Image 5
In general, I need to work harder on a lot of things, I think my lines could be more refined, and the colours and renderings I chose didn't impress me. After that, I will focus on my lines and colouring. Overall, I feel that my drawing has improved a lot in the past 6 weeks and I am looking forward to further development.
8 notes
·
View notes
Text
Week 5 Studio Tutorial – Sketching
Week 5 exercises focus on sketching. I found the warm-up sketching exercise to be fun and informative. The warm-up exercises were a great start to this tutorial, they definitely brought hand-drawing skills into focus and immediately made me realize how much I relied on the tools from previous lessons. Hand drawing definitely adds skill and difficulty. The line practice made me realize the importance of grip strength, posture and positioning when drawing. I experimented with the speed and control of the pen, and I found that placing my hand down the middle of the pen reduced my jitters (image 1).

Part 1: 2D Orthographic Thumbnails This week's task is to redesign the Olay hydration bottle. I find myself recalling the various bottles I've seen before because I think they're a great way to get inspiration. Did some research on the Olay line and their bottles have a very simple and curved shape without a lot of squeezing and rough edges (image 2). I experimented with adding different shades and tints to the bottle, shading with a pencil and tinting with yellow and grey markers on the bottom two lines. Keep experimenting with different tools and shades to see which one performs better (image 3).

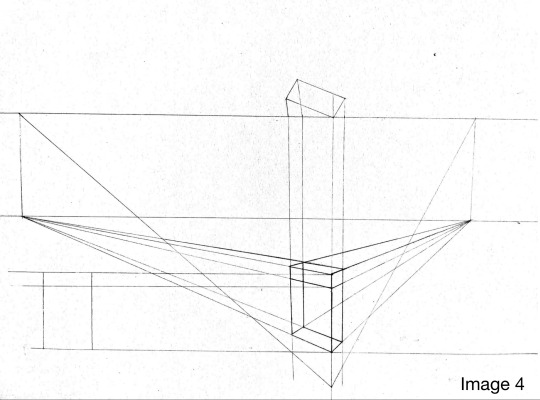
Part 2: Perspective sketch The second exercise begins very similarly to the fourth week (image 4). Using perspective techniques to draw bounding box templates works well. Let's apply the perspective construction knowledge to the freehand sketch, but I started to have some problems when adding shading and tinting to the bottle, the coloring part was little noticed when I contacted in the first part, when I applied the tint to a large area I noticed that my coloring was uneven (image 5).

Overall, there is a lot of room for improvement. If I were to redo this activity, it would be more practice to create contour lines to connect shades and tones. I want to continue to develop these skills and create my own style. This is indeed the skill I am most looking forward to developing as a designer.
5 notes
·
View notes
Text
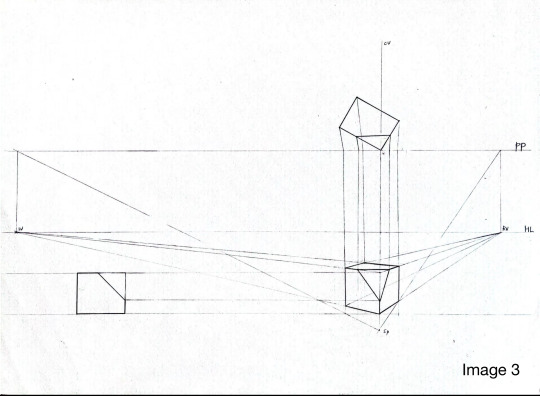
Week 4 Studio Tutorial – Perspective Drawing
I found this week's tasks challenging on multiple occasions. The step-by-step guide helps create part 1 of the exercise if you follow it correctly. I didn't do this on my first try, which meant I spent more time erasing and redrawing part 1. Later, I did a lot of external research as well as looking at the slides to fully understand the second auxiliary projection. I keep the paper model at my desk to make it easier to understand how the form is rotated (image 1), as well as to mark points in the auxiliary views for the top and front views. I found it really helpful to have the chamfer cube in front of me when I was finishing the first activity. I put it on the table and pick it up so that my view is roughly aligned with the content on the page (image 2).

I realize it doesn't matter how far I place PP and HL, but the final perspective is based on how far HL is from GL. The picture below is the finished drawing of the first part (image 3).
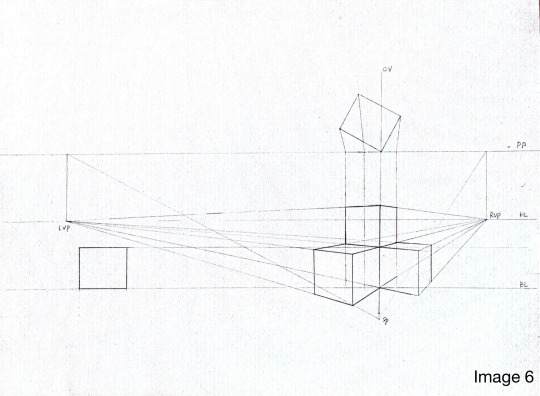
Part 2 uses the same basic two-point perspective drawing technique as Part 1, which means the whole process is easier to complete. Basically follow the exact same steps as the first exercise. Sometimes the intersection of lines can be difficult to determine, and the slight deviation of each line's intersection can lead to inaccurate plots.

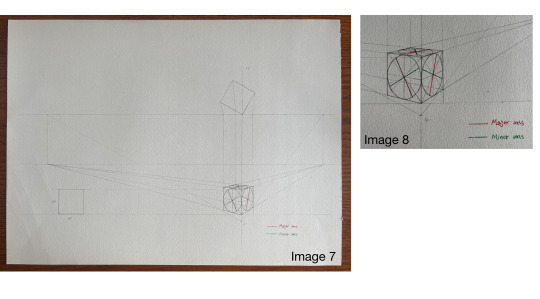
The last activity is to create a layout on the cube's page to practice the ellipse in perspective (image 7+8). I decided to try to make the page layout and time more efficient by drawing multiple cubes at different distances from the horizon. I think it's definitely been a very helpful exercise, and with more practice, I hope to eventually use it with better precision (image 9).

Overall, this exercise has been very helpful to me. After doing all these exercises, I realized that there is a lot of room for improvement in technical drawing.
9 notes
·
View notes
Text
Week 3 - Section and Auxiliary Views
Week 3 exercises provide drawing exercises for third-angle orthographic projections, section views, and auxiliary views. The first time I saw shapes, I struggled with the concept and visualization of auxiliary views. I have spent a lot of time going online to learn and understand the concept and importance of assistive views.
I'm drawing the third angle view, the section A-A view, and the partial auxiliary view to give a clear guide to the shape. However, I started out with a rough sketch on A4 paper (Image 1), but when I drew it 1:1 on A3 paper, it didn't match the size of the final draft, so my final sketch layout was a bit crowded.

Image 1

Image 2
Drawing each view and adding dimensions is easier and faster than last week. Although I've only practiced it once, I think I'm better able to remember and utilize the standards. I planned everything out in the initial rough sketch, more accurate than last week, so the process is much better than before. Since last week, I've been unhappy with the thickness of the lines I'm writing, so this week I've used a thinner pen to fix my line drawing problems. This time I also made sure to align the dimensions to make it look neater and more uniform. What I need to improve is creating thicker and darker lines on the paper, as the scanned file doesn't accurately show the difference in the lines.

Image 3
Overall, I am satisfied with the final sketch as it provides practice for the skills learned in the previous weeks, and summarizes the experience of the first two weeks very well.
9 notes
·
View notes
Text
Week 2——Orthogonal Projection & AS1100 Standards
Week 2 courses focus on orthographic projection and AS1100 drafting standards. The item I chose was a charging head for an Apple computer, as an orthographic projection that I built in the tutorial.
Part 1. Construct a 5 sided box to fit over your chosen object
Part 1 of the exercise, which involves building a box. Part 1 provides a good review of the equipment and skills learned in Week 1, and also provides exercises for Part 3. Draw the drawing size on A3 paper (image 1).
image 1
The labels are placed on the top, front, left, and right sides of the network, and then assembled and placed on the object (image 2).

image 2
Part 2. Sketch a third angle orthographic drawing of your object (3 views)
After completing the tasks of the first part, I started the second part to draw the orthographic view (3 views) of the third angle of the object. I think this stage is critical when hand-drawing technical drawings, as it allows experimentation with page layouts and ensures that tables look correct when projected onto the page (image 3). During the calculation I found that there were also multiple small curves in the item that were difficult to measure, so I found another way and used math to calculate the radius from the sagittal and chord lengths of the arcs.

image 3
Part 3. Construct the orthogonal drawing accurately using using your drafting equipment
Finally do the hardest part, the third angle projection to create a dimensionally accurate 1:1 technical drawing of the charger(image 4). I used a pencil to draw the line first, then a pen to draw it at the end, but when I drew the curve, because I didn't know the radian to draw, I kept drawing it repeatedly, and the last part of the curve was very thick. When marking the size, the pen used is too thick. Next time I will use a thinner pen to mark.

image 4
Overall, I am very pleased with the progress of the tutorial activity. If I were to redo these tasks, I would be more careful and document the data more clearly. I love engineering drawing to practice this important skill.
13 notes
·
View notes
Text
Week 1—Drawing Instrument Exercises
Part 1
I had a basic understanding of engineering drawing instruments and techniques during the first week of tutorial exercises and reading "Engineering drawing."
As I was doing the practice assignments for the first part of the week, I found that for all circles, finding the center point is the most important thing. When drawing the second pattern, there are four irregular patterns in it, and I am not very good at grasping the radian.

Image 1 (left); Image 2 (right)
Part 2
The second part of the homework is to make 4 identical patterns to be inlaid together. When drawing this figure, we can use many methods. For example, we can draw several small equilateral triangles to form this figure, or we can directly draw a large equilateral triangle to draw the small triangles that need to be subtracted, which is more convenient. There are many ways to complete this graph, which allows me to learn to solve a problem from different ideas, and learn that the small details must be handled well when cutting the pattern, otherwise there will be subtle discrepancies when splicing.

Image 3

Image 4
18 notes
·
View notes
Text
Self introduction
Hello everyone, my name is Liujing Yu, I am very happy to meet you here. I love industrial design because it gives me the opportunity to realize my ideas. I hope to study hard with you and make progress together.

12 notes
·
View notes