
Statistics
We looked inside some of the posts by lloyd-mills-blog and here's what we found interesting.
Average Info
Notes Per Post
3
Likes Per Post
3
Reblog Per Post
0
Reply Per Post
0
Time Between Posts
1 day
Number of Posts By Type
Text
17
Last Seen Tumblr Blogs


Fun Fact
There were a total of 171.5 billion posts on Tumblr in 2019.
Text
Final Major Project - Timetable

This is the timetable I planned to have for this project. I wanted to maximize the amount of time I got in college to try and be as successful as possible. I tried to balance out the subjects as different teachers taught different things, Lizzy with blogs, Rachael with GameMaker: Studio and Carlie & Danielle with Graphic design. I found out that I could not go in on Mondays because they’re the year 2 priority day. For a while, I stuck to my normal rooms and didn’t go in on tuesdays up until mid-production where I started cycling in on Tuesdays. I stayed in the same rooms because I was still getting lots of work done in each of them. The custom timetable wasn’t all too helpful because of how much I stuck to my original one and I always went to H109 because that was the only room I needed.
2 notes
·
View notes
Text
Final Major Product - Final Production List
Here’s my final production list

And here’s my initial Production List to compare it to


So, there is a vast amount of parts to the game that I had to cut out, and a few that I added along the way. I never reached most things to do here due to how long most tasks took, and being limited on time to do everything, it came down to making sure the game had its base mechanics and could still be played. I also cut a few things out because I either didn’t know how to make them at all or I didn’t find them fitting for the game. I feel like I could have gotten alot more done granted I was more organised, focused and had more time. I often got worked up between making the next animation and making the next mechanic, and worrying if I was missing out something else. I wondering if this could be resolved by making a gantt chart listing all contents and mechanics. I do believe that my game would be much more outstanding if I managed to complete more of this production list. The hardest thing to do in this list was the attacks, I feel like I could avoid this by researching how people have done this and if other methods than the one I picked are easier, more effective and finer.
0 notes


Text
Final Major Project - Final Gantt Chart

So far, according to my final Gantt chart, I have gotten nearly everything that I need to get done, done. The few left that are not ‘complete’ is Audio, my Blog and Research. I left Audio blank because I didn’t produce a single byte of audio for my game. My Blog and Research however, I have done plenty of and should have put in as green or deep blue but It’s already been handed in on moodle. I also feel like I left them blank because I felt like there was so much more left I could have put in my blogs and much, much more research could have been done too.
1 note
·
View note
Text
Final Major Project - Evaluation
Research:
EGX 2017 Rezzed (Public Event): Though I did get some nice information and details about a few developers and games, I feel like I did not get the most out of the time I had at the event, I did spend a while talking to the OCTAHEDRON developer about his game but hardly spent as much time talking to the makes of speed Jogging or EaldorLight. I even missed out the careers section which would have been really good for looking at alternate careers if working alone doesn’t work well. – I wasn’t feeling good at all there either later, so I was slowed down for the event even more.
I will improve my research in public events by stopping by and talking to more people, visiting as many various areas as possible and writing so many more notes down like what kind of games and companies you can find here.
Starbound: I researched another game called Starbound, which I picked because of its numerous similarities to my game such as its target audience and themes.
Looking at this game was a very effective research for me since it taught me effective ways to make combat less violent and various details about biomes and environment (freezing cold places were not just a desert of snow and ice, they had trees made of ice and crystals shining).
Source code: One of my great research areas that would be the most challenging but helpful was source code analysis, where I could develop greater knowledge of coding in GameMaker: Studio (GM: S for short). There was previous a humble bundle offer where if you donated a certain amount of money, you’d receive various codes for things, a GameMaker bundle came up offering GM:S Pro, various modules and a bunch of games with their source code. I took this bundle and looked at the source code for their most popular game, INK, because it was an eye-catching platformer. I first adopted INK’s coding standard for labelling, if something is a sprite then its name starts with s, objects start with o etc. I looked at the code and tried to determine what things meant and how they worked, but I fell back badly here. What I did in the end was try to understand some bits of code there, and if I’d try to apply that code to my game, this was mainly gravity and movement which looked very basic and simple, I thought I could type it up in a notepad doc and put it in my game but it didn’t work and set me back a little in production.
From this, I now know that I need to be much more professional when studying source code like this. I should write down notes and log about areas, take snippets and talk about them like what they mean and what they do – and If I don’t know what they do then I should teach myself via YouTube or the GM: S help menu
YouTube: One of the most useful research sources was YouTube, where I watched tutorials made by Shaun Spalding who has loads of knowledge, skill and experience with GameMaker: Studio. The tutorials he had that I used for my game included platformer tutorial, camera tutorial.
I watched these tutorials only when I needed them. I could and should improve this by watching Shaun’s tutorials on other things, like particle effects, in my own time which should help me develop even more knowledge and ideas in my games.
So, I have looked at various research sources that cover a variety of areas of my project, I looked at public speakers, similar products and tutorials, and I have researched my age rating, my theme and the software that I’ll be using. I feel like I could have done a lot more research though, like looking at more sources whether they’re new or old to me, and look more into parts of my game in general.
Pre-Production:
What you did: Pre-Production started off developing the basic idea for my game furthermore with details such as where the game is based exactly (A huge island in the middle of the Northern Atlantic Ocean, I chose here after I looked into locations and ecosystems like this via wiki). I made a Gantt chart to help plan and coordinate my time, however I didn’t stick to it all that well at first. Soon I updated it by colour coding the tasks to label the progress or state of the work, such as later, to begin, near completion, complete or progressing. -This proved to be exceptionally helpful as I could open up the Gantt chart at the start of a lesson and straight away know what I need to work on. I’d update it once I complete said work or the lesson finishes. As of for ‘later’, I’d label things I don’t need to work on yet as ‘later’ such as production and evaluation tasks. *I also cut off a couple tasks that I originally added but were not relevant to my project.
I went onwards to produce some concept art to show off some ideas for my game, one of a ‘fragment’ and another of a ‘gemstone’. Producing these helped shape more ideas and concepts for the story and gameplay, I went onwards to produce documents like my One Sheet, Game Design Documents, Character Profile, Script, Mind Maps, each progressed when looking at my Gantt Chart but took longer than I thought they’d take which made times spill over and got a little stressful once production was coming close. The other extremely useful document I made was a list about all the aspects and mechanics of a game that I intended to add, and all the visuals that I would require for the game too. Just like the Gantt chart, this made it very easy to pick up where I was and what I needed to do.
I could avoid time spill-over by working on documents as soon as I can, and avoid leaving things to do exactly when I say to.
Production:
What you did: In production, I created 2D platformer game that went fairly well. In this, I develop a greater understand of GameMaker: Studio and its programming language, GML, The start of the game worked very poorly, as I produced a lot of code based off of the source code of a game I researched, this code followed different coding standards than I was used to, since the programmer must have been an insanely more experienced than me. Since I wasn’t all too sure about the code and functions I used, the game hardly worked to start off. I however quickly overcame this by watching Shaun Spalding’s YouTube tutorial for a platformer. I followed a production list of everything I needed to make, game with its mechanics and everything plus what key decisions did you make There weren’t really many ‘key’ decisions that I made.
Challenges and overcoming them:
The usual challenge that came up for me was setting up mechanics that I’ve never done before, usually I would look up previous work for functions that I could use, or the f1 key in GM: S which brings up a whole help menu that comes with an index that I use to search up functions and aspects of GM: S – This help menu was a vital asset I used for learning various functions but it’s downside came to having to search by the keyword, it could either bring you exactly the function you’re looking for or some random feature of GM: S. I also only used the index in this menu, so in future I should try looking for other things.
End product and audience: I find that my final product is very suitable for my audience, the game and its controls are easy to understand and follow End product and initial idea: My final product ended up very similar to my initial idea, the main differences were that I missed out some of the small ideas and concept that I thought of, they were cut due to running short of time and focusing on more important parts of my game.
Improvements to end product: My production could have been improved by performing more research on relevant software before production began, and tested the new code I wanted to use before production. I did not include audio for this project again, I focus really hard on developing my game and it’s mechanics in class while I spend ages at home creating the pretty visuals, leaving sound as a forgotten aspect. In future, I need to use sounds from royalty free sound sites, quickly go on field trips with my phone to record more sounds, and edit them with Adobe Audition or Audacity.
What to do next time: Next time I make a game, I would have most likely done my research looking at lots of new elements and areas of GM: S (like the tutorials from Shaun Spalding), so hopefully I would have expanded my knowledge greatly which should allow me to both create mechanics I made before even faster and probably better, and create mechanics that are new to me.
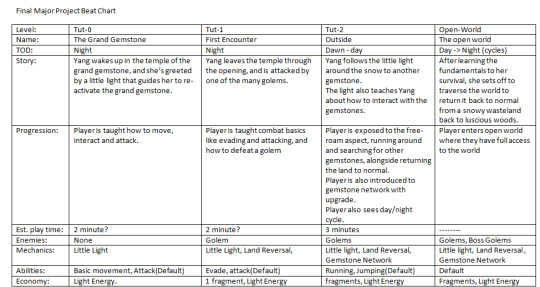
Conclusion: What I learnt: From this project, I’ve learned of new documents that are necessary, or just helpful to the project, such as beat charts and Gantt Charts. I’ve also developed some more knowledge for digital art in Adobe Photoshop from friends in lesson which got me into viewing tutorials on YouTube. I also need to stick to YouTube for researching code for the time being, later I will start to look at source codes of other games and develop a stronger understanding of their logic.
Favourite Part: My favourite part was watching people playtest my game especially when it was nearly complete. I believe the game is the most important thing about a project like this because it is the fruit of your labour, still all the production documents and drawings are pretty neat to look at but the game is what people are mainly after. I enjoyed seeing how people were amazed when they saw the trees grow when they walked past them, it’s like magic to them but it’s so simple to me because I made it. -I’m usually very critical of my work, so praise helps me appreciate my effort a little.
Most challenging part of the project: The most challenging was the problems in coding that I discussed earlier.
0 notes
Text
Final Major Project - Playtest Survey
I decided to have a couple people go through a playtest survey for my game. This would be good for seeing which areas of my game are better and things that need improving. The Survey:

From this, I can get an idea of what people think of my visuals, combat system, clarity of objective and details on bugs. There’s also space for suggestions and an overall rating that people can give for my game. The Results I managed to get 5 people to play my game and fill in the survey, and the results came to:

The people who encountered bugs said: Attack animation only plays if the player is moving (ALL 3 of them mentioned this. Got stuck between tree and block of land (just one mention). The suggestions to improve the game includes: End screen Menu screen Ranged attacks for enemy/Player variety of enemies and landscape Growing grass animation different enemy Give info on game stating the objective Polish combat. Conclusions: Since all 5 playtesters stated that my visuals looks very good, I’m pretty sure that the sprites in my game look very good - this good rating means that I have done well making my visuals assets and I do not need to meddle with this area furthermore. -I do not need to work on my visuals. It is evident that my combat is far from perfect however, because 3 people voted “meh”, one said it was good and another said it was a little bad - So I need to work on my combat. The suggestions left by the testers help with this but I have a good idea of what exactly needs changing too. -I need to work on combat within my game as the players aren’t so impressed with the combat. I will improve it by taking on their feedback by fixing common combat related bugs like the player not attacking while idle, and tweak other components that have a great effect on the combat. when asking players if the objective was clear, 3 said pretty clear, another said kinda and the last one said not really. This indicates that a majority of players catch on the what they need to do or where they need to go. Some however still didn’t catch on so well or just didn’t think it wasn’t effective at all. -I think a score/currency system will be a good way to nudge the player in the right direction, like giving the player points for exploring new land. My other method that I have in mind is putting up lights for the player to follow. *I might have to stick to the score system for how quickly I can add it with the small time window I have left. The majority of players have described the bugs that they encountered, all with a common bug apart from one. Not everyone had a bug, or they didn’t find this common bug noteworthy, so these bugs are so much of a problem but still something that most players will notice. These bugs are vital for me to work on because of their effects on the game. All advice from the players I got to improve the game would prove to be very helpful in making my game better. -Once I fix the bugs that players reported, I’ll work on the suggestions left by playtesters since they are promising ideas to improve my game. This survey would be better if i had more playtesters so that I would have alot more data on these questions, which would improve the reliability of the conclusions I drew - 5 votes for one option is the majority of people in the survey but that number doesn’t compare to the number of people that could play the game.
0 notes
Text
Final Major Project - Production Diary - 07/06/2017


Today started off making more sprites for the game, one for each of the three stat bars (health, stamina, energy), and for the score/currency. I also tried animating two of these, but forgot to save one of them after animating which is a shame but wasn’t much progress to lose at all. When the next lesson came around, I added the icons I made earlier to the sprites and coded them so that they would be drawn next to their corresponding bars (health, stamina, energy). I then noticed that they were really big and hardly fit in their spaces, so I went to piskel, made duplicates of each icon which would have their sizes reduced from 64x64 to 16x16. Then when I went to export these, I realized that the scale was set to 2x, so the icons were originally imported as 124x124, which would explain why they appeared so big in my game. I duplicated the original ones again and reduced them to 32x32 so that they’d fit in with the bars perfectly. Later I worked on polishing the combat and the issues related. When the player is hit by the enemy, they are knocked a little in the air upwards and away from the golem. This is intended for a knock back effect but the player is able to be thrown into walls where they will be stuck and unable to move. I worked on this furthermore so that the script checks if the location that they play is going to be moved to is free first. I based the if statement for this on the if statement used to check the player’s ground collision. I also tried fixing a bug the player object has where if they attack but aren’t moving, the attack animation doesn’t play but still works - I keep testing this and tweaking it but I can’t figure out a way to make it work.
0 notes
Text
Final Major Project - Production Diary - 06/06/2017
Today, I came into college to work on my game, though a third of the way through I have to leave for physiotherapy then come back to work but then leave again later for an appointment and go home hopefully where I will continue working. On today’s agenda, I’m going to work on the combat a little, with the player’s knockback and effect, and the effect of the player’s attack on the golem. For knockback, I managed to get it working mostly at the end of my last lesson, the player is knocked back but only vertically so far, I will fix this with some horizontal knockback.

^Snippet of knockback with the code in the player’s collision event with the enemy’s attack. This is the knockback so far, line 7 updates the ‘vsp’ variable and line 8 makes the knockback happen by changing the y variable so that the player moves. the effect of this code is that when the player is hit by the golem, they are thrown directly upwards in the air a little bit. I guess I could add the horizontal effect by putting in h += hsp. I already had some code in trying to make some sort of horizontal knockback but it didn’t seem to work yet. Note that it didn’t seem to work, it actually moved the player but it was hardly noticeable, I figured this out because I turned off the vertical knockback and the player moved to the left a little bit. I increased the amount that the player moved when knocked back and it worked.

After that, I tweaked the walk sprites by stretching them - doubling their frames so that they’re slower. I then duplicated those and undid the stretch so that they had a faster version too to be a sprint animation. I then put it in and had to leave for physiotherapy.
While I was waiting at physiotherapy, I got alot of code ideas and wrote them down

I got so many nice ideas that I could use like random foliage placement, the shrine code, attack and currencies. I should try to implement these soon if I can.

Later in the day, I made some more assets, such as a little effect for when the player is damaged and one for the when the golem is damaged, plus the golem turns purple when it is hit (I do however feel like there is a better way to do this because it disabled the golem and leaves it to have no retaliation time.
0 notes
Text
Final Major Project - Production Diary - 05/06/2017


I made some new grass and snow sprites, I took the previous one and filled in gaps around the edge to make presentation look better (it might have been better to make the sprites larger so that they overlap). There are three images grass and three for snow, one is a still image, one for the sprite growing and one more for the sprite disappearing. I made the disappear one by taking the image and moving it down 2 or 3 pixels a time until it’s outs the image completely. To make the grow version, I took the disappear version and reversed the animation. Overall these were quick and very easy to make, and their addition to my game should be very nice and appealing for the visuals.
0 notes
Text
Final Major Project - Production Diary - 02/06/2017
Lots of people loved the addition of the tree growing and the attack animation but people complained that the range was too short.

So, I decided to try and lengthen the reach of the spear. I first thought about making the player animation for throwing the spear and the spear a separate asset, but after making it, i realized it might be a ineffective and not work. I duped the animation again and made the spear reach further in the animation.
0 notes
Text
Final Major Project - Production Diary - 01/06/2017
I had a friend playtest my game and he had some suggestions, the two I took on board was environment and player’s attack animation.

I made some trees, an aesthetic that was quick and easy to make. I inserted these two images as sprites and made an object to be a tree. Now, the trees have a 1/10 chance of being made when upon the creation of each grass object. The interesting thing with this is that respite it being a ‘random’ chance, the trees will spawn in the same place depending on the how many times the room has restarted. If you start the game twice, all the trees will be in the same place until the room restarts. The tree object will also check the grass object that it’s sitting on, so if it’s snowy, it’s a dead tree but if it’s grass, it’s a leafy tree.

Later on, I improved this asset even more, making the tree less smooth and more pointy, and gave it a full growth animation for all the leaves growing out of it. I also had made a sketch of an attack animation, mainly involving the arm and the lunge of a spear made of energy.

I also then worked on some attack animations for the player. Each one kinda progresses along. 0.2 has Yang just move her arms to attack, in 0.3 she moves her leg and in 0.3.5 she casts the spear.

The animation could honestly do alot better, her right leg(behind) doesn’t move one bit, and looks mildly silly. Making the right leg move would be pretty hard to do, because I’d need to move her entirely which doesn’t work well at all with the number of layers I see there.
0 notes
Text
Final Major Project - Production Diary - 31/05/2017
This morning I planned on making more visual assets but it turned out that we were going to walk to a theater where other students were showing off the production of their game and gathering lots of research. That meant that I couldn’t work on any more visual assets for the first lesson. Once the second lesson came around, I started working on my attack mechanic for the golems. First, I need to make the golem stop moving when the player moves close enough. This took some time to get going as sometimes the golem wouldn’t resume moving and such.
0 notes
Text
Final Major Project - Production Diary - 30/05/2017
So today, I’m going to focus on most essential components I need for the the game, such as the golem enemy attacking the player, levels, checkpoints and a level. First though, I ran a little playtest to see how the game ran and find any errors, I first found that the player often got their back stuck on walls that they land on. I was suspicious that this was due to a difference in the player sprite masks and they were different, but very slightly. I matched them all up then tested it and found the walls to be bug free. Now for attacking the player, I’m going to need to make up “Roam”, “chase” and “attack” states which will define the movement and action of the golem - Roam will have the golem wander the land aimlessly by default, Chase will have the golem move towards the player once they enter a certain range but if the player gets far enough the golem should return to roam. If the player gets close enough, the golem will initiate an attack. I plan to make a state variable that will say either “roam”, “chase” and “attack”, roam by default, and an if statement for moving the player will need to determine which is true. I started off by making distance check statement to check the distance that the golem has between the player, so far if the player is less than 100 pixel the golem stops moving, which is good but I need him to move again after. I’ve tried a couple methods like storing the move speed in a separate variable. Later today, I started working hard on the golem Attack visual which was made in a couple steps. Firstly, I drew out what the animation should look like, which is a very helpful practice I used before.

Next was making the golem literally step by moving each leg limb and the body on the spot. After this, I drew in a big circle with two lines going through to make a cross and I positioned it by the cross to sit on his shoulder, this circle would work as the arc circle showing the maximum length of his arm. I then drew squares along the circle to go around the circle, bit by bit in the animation, these are markers for where the arm needs to be positioned in the animation.

After doing that, I got rid of the squares, circle, baseline and duplicated the image as a backup and worked more on this one. my focus was to centre the asset in the image which I managed to do by putting the golem in a box that is the same size throughout the animation and holds all of the golem in. Then I centred that box then resized the image gradually until it just cut out the box. I then make another duplicate with the backup, switched the layers around and flipped it for the Left version and then repeated the box method for centring it. This was a pretty effective method for centralising the asset since it worked really well, just took a little bit of time to do though. So now, I had two complete attack animations for the golem, left and right
0 notes
Text
Final Major Project - Production Diary 25/05/2017
Today for the production of my game, I planned to focus on the areas of the golem enemy and shrine re spawn points. I could also work on other things like the snow to grass conversation ability for the player and smoothing out terrain movement.
So far I have the golem as an object and set up their variables already, copied and pasted lots of code from the player’s scripts for variables, collisions and movement. I have also put in the idle and walk sprites for it, both left and right, and set them up the object to use them already.

So far the golem successfully moves along the ground but I’m still trying to figure out a way to make them change direction when walking into wall. Currently, the movement direction depends on the value of ‘move’, -1 is left, 1 is right and 0 is neither, I’ve set him up to collide with a wall when walking right, now I need to sort out when the golem’s move value is changed. The golem has vertical collision and horizontal collision statements, I suppose I could change the movement value here. Upon doing this, I found that the golem would attempt to move left, but would get stuck on the edge - This is probably due to the masks being different, a mistake that caused a lot of problems in my previous project. I adjusted the mask for the left idle sprite and wrote down the mask areas as Left 62, Right 80, Top 20, Bottom 124, however once I applied this to the right version of this sprite, the box did not match up with the visual at all. So this is a problem with the sprite itself, the golem visual is not centered on the image, so i’ll have to go into Piskel and center the visuals for the golem. These visuals have a couple of layers in Piskel, I’ll duplicate the original assets, merge all the layers and the center every single frame. This way, the assets are consistent with their size and placement in each image.

I replaced the sprites in the game with the updated versions again and upon testing the game, it work perfectly as intended. Since I centered the sprites, I was able to make their masks the exact same position and doing so made it so that the object would not clip into objects and walls when the sprite changes. Luckily the code already was making this work perfectly so I didn’t need to make further changes with that. Now that I have this done, I think I’ll work on a more fundamental part of my game, which is fighting these golems, next lesson.
0 notes
Text
Final Major Project - Production Diary 24/05/2017
Today’s morning started off with me working on my visuals. I decided to work on the sprites for the ground since I planned to work on code for said ground later. I started off with making the grass using Piskel. I made the image size 64x64, half the size of the player and golem’s base sprite size, The player changes the land of snow to grass one object at a time, and this size would be a good area to cover. The images here are exported to 200% scale, typically 64x64 to 128x128.

My first attempt with the grass, made up of 4 layers of grass going from back,crowded & dark to front, light and scattered. It isn’t bad but I don’t think it will work in the game so well (this is probably due to it before animating). I had a crack at making it in Adobe Photoshop instead, by creating a small size image (64x64) and using the pencil tools. I decided to use the grass Brush Preset because all of the options it has selected could produce a good low resolution image. I set the brush size low, around 10-15, selected my green and a darker green then built up the three layers from the back, each layer has a less darker green. -Photoshop doesn’t export scaled images in the way that I hope, so I imported the finished 64x64 one to Piskel and exported it to 2x scale.

I like how this turned out quite a bit, but I’m going to have another try, as I feel like it’s built up too much to the back, too round and resembles a bush too much. I tried tweaking the brush around a little bit, reducing the roundness and changing the angle, it produced thinner pieces of grass which I used to build up some kind of spikiness to the grass which will be very fitting. I also used only one background layer of grass for the buildup which workes nicely.

I then moved on to trying to make snow, and I used a very similar method. I got the same brush with the same setting of a small brush size, and chose the colours very light, pale blue and white, dragged one line across the screen and already, a pretty adequate snow.

Just for good measure, I’m gonna make a second one, one that covers up more of the sprite.

My idea for making the ground will be the object ground, upon creation it will create an instance of ‘land’ on top which will start off as ‘snow’. When the player touches the snow, it will melt and grow grass. I’m gonna aim to see if I can make these land object overlap each other to reduce gaps in the land, and it might help make the land conversation look smoother too. Now into implementing this into the game. I’ll follow my plan on lining the ground with an object which spawns another object above each segment. I had to search through the help index to remember the instance_create statement and I learned about ‘depth’, it determines the layer that the object sits on visually, higher being further back and lower being further infront.

Ok, maybe it would be a much smarter idea to just place the snow manually, and code it so that contact with the player changes the sprite to grass.

My teacher, Rachael, had a look at my game and suggested that I lower the gravity, smooth out terrain and add my enemies. I’ll start by lowing the gravity, terrain smoothness can wait until later where I’ll make better levels, but I should add enemies as soon as possible. With making the enemies, they’ll need all the platformer related variables like gravity, and mechanical ones like health, and even modes for Roam & Pursue. A majority of code for the golem can be copy and pasted from the player, like the collision. I have set up the golem with the code it will need from the player with some slight tweaks. When playtesting, the golem successfully moves around on the ground, but it’s very slow and will only walk until it hits a wall. I’m going to leave this for me to do tomorrow where Ill have more time and it should be easier to focus on making the golems.
0 notes