
Don't wanna be here? Send us removal request.
Statistics
We looked inside some of the posts by loadghost139 and here's what we found interesting.
Average Info
Notes Per Post
1
Likes Per Post
1
Reblog Per Post
0
Reply Per Post
0
Time Between Posts
45 seconds
Number of Posts By Type
Text
3
Last Seen Tumblr Blogs


Fun Fact
Tumblr Inc. has $15.1M in annual revenue.
Text
Speed Up My Mac For Free
Speed Up Computer Mac
How To Speed Up My Mac For Free
Speed Up Mac Os
Keep it lean: Do a fresh install of the macOS and only install apps you absolutely need. In particular, think twice about installing apps that use an installer, because those often install extensions and the like that will run all the time, eve. These troubleshooting steps will help you speed up a slow Mac and further improve performance. Whether your Mac has a slow startup, apps are not loading, vid. Feb 14, 2020 Now, the next time you power on your Mac, the startup time should be much better without all those programs and applications trying to start with the operating system startup. This also increases your boot time speed and will free up working memory while your Mac is running enabling your Mac to run faster and other applications to run faster.
Enough mountain climbing, it's time for desert heat! Recently, Apple has taken Mac users to the warmer places by killing its series of mountain themes and naming the newest macOS version after Mojave desert.
Apart from the new name and appearance (which, by the way, can be changed), macOS 10.14 is packed with lots of goodies that should give your Mac a performance boost. Dark Mode, Stacks, Continuity Camera – these are only some of the awesome improvements you'll find in macOS Mojave, which is now available as a free update in the Mac App Store.
From preparing your Mac for the update to the moment you can start enjoying the blackness of the Dark Mode, it should take you less than two hours to make the install. But not everything is lightning fast in macOS 10.14. As it often happens with new updates, you may find yourself falling asleep in the attempt to open an app on your Mac.
Online forums and communities are buzzing with discussions, which all reflect upon the same issue – Mojave freezing or running extremely slow. Clearly, the new OS hampering your Mac's performance is simply not fun. But hey, we are all a little slow when it comes to doing something new.
Quick Problem Navigation
Why is Mojave running slow?
Prior to making any conclusions and cursing at Mojave, try to get to the root of the problem. Here's the list of major reasons why an upgrade to macOS Mojave is impossible or leaves you with a slow Mac:
Compatibility issues
Not enough free disk space
Too many apps running at the background
Some apps are outdated
Hardware problems (SMC or PRAM could be corrupted)
Mojave's new display effects cause slow performance
Malware
How to find out what is slowing Mojave down?
If your Mac runs slow on Mojave, this guide should help you get things right. Check out the most common problems with macOS 10.14 performance to ensure none of that is affecting your Mac.
Speed up your Mac with Setapp
Get a huge pack of top apps to improve macOS performance. Best utilities in one pack, give it a go!
macOS Mojave won't download
Did you recieve the error messages when trying to download Mojave? It's possible your Mac simply won't download the macOS 10.14 Mojave installer and shows error messages like 'macOS Mojave download has failed' or 'try again later.' Re-downloading Mojave over and over again won't always help and, besides, could be quite irritating.
What could be wrong?
Mojave won't download for a variety of reasons. It could be that too many people are trying to download it at the same time. Poor internet connectivity is another possible cause. Lastly, the download will fail in case there's not enough storage space on you Mac.
How to fix Mojave download error?

That being said, there are three fixes one of which should apply to your download problem:
Check Wi-Fi connection. In case there are any connectivity issues, raise your complaint to Internet Service Provider.
Look into the live status of the Apple server to ensure it's all good on Apple's side.
Ensure you have enough storage space: Apple menu > About This Mac > Storage. There should be at least 12,5 GB free, so that you could make the download.
macOS Mojave installation failed
The issue: Mac won't finish installing
Why does Mojave fail to install? What to do if your Mac freezes during software installation? In this case, you'll most likely see the message like 'Installation of macOS couldn't continue.'
What could be wrong?
The model of your device is incompatible with the macOS Mojave, or there's less than 4 GB of RAM and/or less than 15 GB of free disk space.
How to fix Mojave install stuck
You need to have a supported Mac version. That's the rule number one and if you fail to follow it, you simply won't get to experience Mojave perks. Seems like a no-brainer, but compliance is the first thing you should check.
As a rule of thumb, all the Macs released before 2012 are incompatible with macOS 10.14. These oldies simply don't have the required graphics power and are technically not fit for the newest macOS. So, if your Mac is older than 6 years, sorry – you won't be able to enjoy the darkness of Mojave.
If you're using a supported Mac version, check RAM and available storage:
Apple menu > About This Mac > Overview (for RAM) / Storage (for free disk space).
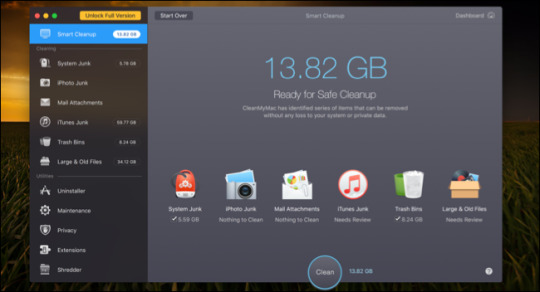
As necessary, you'll need to buy some extra RAM and / or reclaim more storage – easy to do with CleanMyMac X. On any Mac, there's a whole bunch of outdated cache files, app leftovers and logs, eating up a large amount of disk space.
Ideally, before you upgrade to the new macOS, you should clear up all system junk on your Mac. There are two ways to empty the caches: manually – by deleting file by file, or with just a few clicks – through a cleaning software like CleanMyMac. This app can remove all the junk from every corner of your hard drive. What's more, you can pick specific kinds of material that should be cleared away: mail attachments, photo junk, useless old downloads, etc. The whole process is really a three-click deal.
To delete junk files in seconds use CleanMyMac X:
Open the app
Click Smart Scan
Remove the junk from suggested folders.
The issue: Installation stops at 99%
You know what hurts the most? When the installation is almost finished and your Mac, suddenly, gets stuck on the message 'About a minute remaining.'
What could be wrong
Most likely, Mojave won't install on your Mac, because you've been using an older version of OS.
How to complete Mojave installation?
You'll need to update your OS to the newest version available and then switch to Mojave. For instance, if you've been using macOS Sierra 10.12.4, try upgrading to Sierra 10.12.6 before you update your Mac to macOS 10.14.
Mojave is running slow after the update
The issue: Mojave seems really slow to boot/startup
When things go wrong right from the start, that's frustrating. Slow macOS startup is the common problem for those making acquaintance with macOS 10.14. For sure, if you have to spend over two minutes on booting your Mac, productive work is out of the question. But don't rush into downgrading – one quick-fix solution can give your Mac blazing speed.
What could be wrong
There could be different reasons why your Mac is running slow on startup. If you think you're waiting too long, one of the following could be the issue:
There are too many auto-runs hampering your Mac's performance.
Some hidden launch items affect the startup speed.
The startup disk is almost full.
A Solid State Drive is required.
Unless you're a slow life fan, all of these issues with startup speed should be fixed. The good news is, if you know where to look, that's quite easy.
How to speed up Mojave boot time
Step 1. Close auto-run programs
Unnecessary apps running at the background when you try to login or boot the Mac can be root of all problems. Because there are many auto-run programs that launch automatically during startup, your Mac is under pressure here. Not only is it booting your OS, but a range of other programs – most of which you don't need – as well. Obviously, this makes your Mac stop or delay while starting up.
To prevent programs from starting automatically just disable them:
Go to System Preferences.
Open Users & Groups.
On the right side of the screen, you'll see your username.
After selecting the username, click Login Items on the left side of the screen.
Decide what programs shouldn't launch during startup and check boxes next to them.
Click – (minus) at the bottom of the screen.
Step 2. Identify and remove hidden launch agents
While closing auto-runs seems easy-peasy, it's a bit more tricky with hidden items. There are some small satellite apps or other software products that will launch each time you're trying to boot the Mac, but won't show themselves. These hidden launch agents may cause your Mac slow down significantly, although everything seems fine on the surface.
With CleanMyMac X, you get rid of hidden junk in a matter of seconds:
Open the app.
Select Optimization under the Speed module.
Click Launch Agents and you'll see the list of hidden launch agents.
Use check boxes to disable or remove the items.
Step 3. Free up startup disk space
A full (or almost full) startup disk may be another reason why your Mac isn't running at full speed after the update. For sure, without solving the 'startup disk full' problem, you can't fix slow Mojave. To free up as much disk space as possible, you can either go for a long-term solution – CleanMyMac X is tidying up your disk automatically – or make a range of quick fixes:
Clean up cache files.
Remove localization files. Many localized apps that support different languages come in 'language packs.' Since you most likely don't need all the files from the pack, you can remove them: Open Finder > Applications > Ctrl + click on an app > Show package contents > Contents > Resources. From there, move unnecessary files ending in lproj. to trash.
Get rid of old iOS and iTunes library backups. Keeping backups on your Mac is, clearly, a waste of space. To remove any backup folder, go to Finder, click Go > Go to Folder, and select the type of backup files you don't need on your Mac (Music/iTunes libraries, Application Support, MobileSync, etc.)
Remove the apps you don't use.
Delete iOS software updates from Mac. Once any of your devices gets updated, you no longer need the files, downloaded previously on this device. Find the updates that can be removed from Mac here: Finder > Go > Go to Folder > Library/iTunes/iPad (iPhone) Software Updates.
Remove photo junk. It's not only tons of selfies that cause the problem – you also have to get rid of service files and caches, generated each time you use Photos for Mac or iPhoto. Again, CleanMyMac X is the best option for cleaning up your photo gallery. Not only does it save your precious time, the app helps determine what can be removed safely, without harming your OS or losing an important system file. If you have too much time on your hands, you can also remove photo junk manually – file by file: open Finder, then go to Photos library and click Show Package Contents. In the Master/Modified/Original/Preview folders, you'll find photos that have the copies you can choose to remove.
Delete or archive movies and music downloads. You don't have to tell us, removing the best series of Game of Thrones from your Mac is painful. But with tons of downloads, the chances your new OS gets a speed boost are close to zero. Go through your music and movie downloads, deleting everything you don't need. If saying goodbye is too much, you can also archive some files, by turning them into compressed versions: Ctrl + click the file > click Compress.
Clean up your desktop. Yes, everything that is kept on your desktop also takes up RAM space. If you're too busy to sort it all out, there's a smart desktop organizer for you – Spotless app, so that you could keep the front page of your Mac nice and tidy.
Step 4. Get flash-based solid state drive (SSD)
In case you're using an oldie – a device equipped with Fusion drives or HDD – no wonder it's taking forever to startup. To expand storage and add some serious speed, switch to a SSD and see how it gives your Mac better performance and durability.
The issue: The apps are running slow after the update
Your new OS isn't able to run all apps at full speed – that's a pretty common problem.
What could be wrong?
The apps you have in your Mac should also be compatible with Mojave, so that they don't slow down the overall performance. On top of that, power-hungry apps could also cause problems with speed.
Mojave fixes in a single pack
Here's all you need to keep your macOS in a good shape. Grab the best utilities to fix Mojave problems.
How to fix apps freezing and crashing
Step 1. Update outdated apps
If you're using Setapp, you don't have to care, because all the updates are made automatically, by default. In other cases, you'll have to ensure third-party apps are compatible with Mojave: Go to the Mac App Store, click on Updates and you'll see all apps that are available for update at the moment. If there are more than one, just click Update All and you won't have to bother anymore.
Step 2. Close power-hungry apps
Power-hungry apps running in the background can be another reason attributed to slow Mac performance. Because too much RAM and CPU is occupied by these apps, there's little left to Mojave. If that's the case, Activity Monitor is your key to solving the problem here.
Here's a quick primer on how to stop resource-hungry apps from slowing down your Mac:

Go to Applications and select Utilities.
Open the Activity Monitor.
Click on the CPU option.
View applications that are taking up most of the CPU in '%CPU' column list.
To close the app, click on the 'X' at the left top corner.
In case you want to close all the apps, you can click Quit or Force Quit. Choose the first option to save changes before closing the apps (could take a while), or shut down all apps through Force Quit if you don't care about the unsaved changes.
The issue: Slow performance is complemented by battery drain
On top of Mojave running slow, users often experience battery drain problems after the update.
What could be wrong?
The new Dynamic Desktop feature, as well as improved display effects, affect Mac's performance.
The 'dark-light-dark-repeat' mode is fun – no question. And while the new macOS 10.14 is packed with lots of useful features, Dynamic Desktop is, probably, the most lightweight yet most exciting of all. In case you didn't know, this is the feature that makes your desktop change from dark to light mode, depending on the time of the day. Sadly, Dynamic Desktop can also be the reason why Mojave runs slow.
Another problem relates to improved display effects like transparency and motion. For sure, Mojave became not only the most solid, but also the most visually-pleasing OS. But that which glitters is not always gold, right? Fancy display effects exhaust your Mac, which, eventually, causes slow performance in Mojave.
How to fix battery drain issues?
Step 1. Disable Dynamic Desktop
Below are the simple steps to disable Dynamic Desktop on your Mac:
Go to System Preferences.
Select Desktop and Screen Saver.
Pick a wallpaper you want to use.
Step 2. Change display settings
If speed is your priority, you can change display settings in a few steps:
Go to System Preferences.
Click Accessibility.
Select Display.
Check mark boxes next to Reduce motion and Reduce transparency.
If none of that works and Mojave is still running slow?
Apart from what was mentioned, slow performance can also be caused by malware or hardware problems.
Here are the last-resort measures that could help you solve the problem.
Reset SMC and PRAM
System Management Controller (SMC) and PRAM are two powerful mechanisms, governing a range of functions on your Mac – from battery management to screen resolutions. Basically, anytime when your Mac is behaving strangely, resetting SMC and PRAM could be a good idea.
To reset SMC:
Plug in the power source to the device.
Press and hold Control + Shift + Option + Power.
Turn on the power button to reset SMC.
To reset PRAM:
Power your Mac down and then switch it on in few seconds.
Press and hold Option + Command + P + R.
Hold the keys down until the Mac restarts.
Reinstall Mojave
There's another ridiculously simple solution: reinstall the macOS. There are two ways to give Mojave a fresh start:
Install a new copy of macOS over the existing one
Clean install Mojave.
Speed Up Computer Mac
Although the latter will fully erase your startup disk and you'll have to reinstall the apps, it's usually much more efficient.
Check if your Mac has adware or malware
In case Mojave won't speed up, the good idea is to scan your Mac for malware. Use the tools like MalwareBytes for Mac or run a one-click scan with Malware Removal available on CleanMyMac X.
As you see, many perks that you gain with Mojave come at the expense of dealing with slow Mac performance issues. The good news is you can solve all of them.
How To Speed Up My Mac For Free
There are many users who, amazed by Dark mode and other Mojave goodies, rushed into the new system unprepared. And it's very likely that most of them have already rolled back to High Sierra. While each OS has its pros and cons, we recommend you fully experience the capabilities of Mojave, which could only be possible if your Mac is ready for the update.
First of all, check device compatibility – not every Mac model is fit for the newest version of macOS. Clean up your hard drive, deleting all old files, app leftovers, and downloads to make enough room for Mojave. Lastly, perform a system backup to ensure no important files will get lost in the shuffle after the update. You can set up the backup process, using Time Machine, or choose a third-party app called Get Backup Pro – an awesome utility with four different backup modules: simple copy, clone, incremental, and versioned.
You know what they say – failing to plan is planning to fail. So before you give up on the new macOS 10.14, ensure your Mac is really in a good shape for the update. After all, poor preparation of your device could be the key reason of slow performance.

Speed Up Mac Os
Mojave has excellent tools that could skyrocket productivity and organisation for Mac users. Using all the tips above should help you make the most of the new macOS – lightning fast. Setapp has you covered with a range of apps, making your Mac run at full speed after the update – including CleanMyMac X, Get Backup Pro, and Spotless mentioned in this article.
Setapp uses cookies to personalize your experience on our website. By continuing to use this site, you agree to our cookie policy.
0 notes
Text
Best Free Painting Software For Mac

Pixelmator is a photo editing for Mac app developed by two Lithuanian brothers and based on a combination of open source and Mac OS X technologies. This software has many features, including more than 40 tools for selection, painting, retouching, navigation, color correction, and color management, GPU-powered image processing, pixel-accurate. Free Best Drawing Software for MAC - Drawing is an art where a person makes use of varieties of illustration materials to express themselves in a particular medium.ContentsWhy Looking for. The Five Best Free Drawing Apps for Mac February 2021 Arch Read more June 3, 2021 Digital art has made it easier than ever before for creatives to get to work on their passion projects, but unfortunately, premium professional art tools still cost an arm and a leg. It’s FREE, but GREAT! FireAlpaca is the free Digital Painting Software that is available in 10 languages and compatible with both Mac and Windows. Simple tools and controls let you draw an illustration easily. New convenient tools will be added one after another! Download FireAlpaca right now!
Best Free Painting Software For Mac Computers
Free Paint Program For Mac
Microsoft Paint For Mac
Best Free Painting Software For Mac Free
Free Painting Software
Formerly known as “Paintbrush for Windows”, Paint is a simple graphics painting program pre-installed on all versions of Microsoft Windows. This nifty tool from Windows gained much popularity due to its ease of usage and simple graphics editing tools. However, the major downside of Paint is that it is only available to all Microsoft Windows users. This means that Apple fan boys wanting the same application should look for program like Paint for Mac.
On its early years, Apple has had the same application called MacPaint. It was released together with the first Macintosh PC on January 1984. It was then sold separately but due to decline sales, the distributor stopped selling the product. Since then, MacPaint never made a comeback to modern PCs. If you are a mac user currently in search for a simple editing tool just like Microsoft’s Paint, check out these great alternatives below.
Review of Top Programs like Paint for Mac
#1. Online Image Editor
The Online Image Editor is a free, no-installation needed application that features a very similar interface as with Microsoft’s Paint. This program can crop images, add texts, insert symbols, pick colors, remove red eye, select background colors, add gradient effects and all other things you could usually do with Paint. Additionally, you can add layers as well as amazing effects to further beautify your picture.
Top versatility makes the Online Image Editor one of the best Paint equivalent for Mac. This program comes totally free of charge and it works with all browsers as well as operating systems. Whether you use Firefox, Chrome, Safari, Opera and the likes, rest assured that the Online Image Editor will work the same way.
#2. Paintbrush
One particular application that is very similar to Microsoft’s Paint is Paintbrush. This software works just like Paint, the only difference is that it is made exclusively for Mac users. It features several editing tools like airbrush, rounded rectangle, eyedropper, zoom, image resizing, cropping, transparent selection and all others. If you need quick photo edits on your Mac, Paintbrush works like a charm.
This Paint alternative on Mac comes free and it has two variants available depending on your Mac OS version. First is the Paintbrush 2.1.1 for Mac OS X 10.5 or higher, then the Paintbrush 1.2 for Mac OS X 10.4 or higher.
#3. Scribbles
Scribbles is yet another Microsoft Paint for Mac. It is said to be designed especially for kids but due to its utmost usefulness when it comes editing images, it has made it into the hearts of adults as well. This application is equipped with different graphic tools such as paintbrush, spray can, calligraphy brushes, eraser, various effects, zoom functions, direct publishing of works, etc.
Although, bear in mind that Scribbles doesn’t come free. It has a price of tag $19.95 but free to try. Additionally, it runs on Mac OS X 10.4 and 10.5. Sadly, support for Scribbles has already been discontinued by the developer.
#4. Pixelmator
For a more advanced graphic editing tool, Pixelmator is a must to try. This Paint alternative for Mac is actually leaning towards the Adobe Photoshop side in terms of features and functionalities. With it, you can quickly remove unwanted objects using the repair tool, distort images with move tool, paint realistically, add texts, create color adjustments, and all others.
Recommended for professional image editors, Pixelmator is priced at $29.99 which is quite steep compare to other programs like Paint for Mac. The most recent version of this software requires Mac OS X 10.9.1 or later as well as 64 bit processor.
#5. Seashore
Best Free Painting Software For Mac Computers
Created by Mark Pazolli, Seashore is a simple Paint equivalent for Mac. It is an easy-to-use image editing tool equipped with powerful editing features. It has all the basic functionalities of Paint with some tools similar to Adobe Photoshop. You can use it to insert texts, change color backgrounds, create layers, zoom images, crop photos, add effects, and many more.
Seashore is free to use and it has several versions openly available for downloads. The most stable version is the 0.1.9 that works with Mac OS X 10.3 to 10.5 while the most updated one is the Seashore 0.5.1 with compatibility to Mac OS X 10.4.11 or later.
There are many programs that functions just like Microsoft Paint for Mac, some of them are free while others are paid. If you only need basic image editing, it is advised to use free online applications that need not to be installed. They have a very similar functionality as with paint and it will not slow down or bulk up your system. Premium software are good as they are packed with extra features but why splurge on them when you can have free applications that works just like Microsoft Paint.
Related posts:
Best apps live in Setapp
Replace Mac defaults and discover new gems in one suite.
If you've been using PCs all your life and have recently switched to a Mac, you wouldn't miss a lot. But you've probably felt that there is one missing program which has inadvertently won the hearts of PC users worldwide — Microsoft Paint.
It's true that objectively MS Paint is not the best raster graphic editor around. It's clunky, slow, not accessible to beginners, and at the same time doesn't offer enough for pro-level users. Still, Windows Paint might be the most widely used graphic software around. And lots of people wish there was Paint for Mac as well.
Is there Paint for Mac? Well, not really. Official Microsoft Paint for Mac doesn't exist. But there are in fact more accessible alternatives that allow you to do better things and present much less of a learning curve at the same time. One of them is already installed on your Mac by default, only that its toolkit is hidden inside the app called Preview.

Get a Paint replacement with Setapp
Missing Paint on Mac? Download, Setapp, the curated package of Mac apps that take your drawing to the new level.
Best MS Paint Alternatives For Mac
Free Paint Program For Mac
Since its inception, Mac has been the operating system of choice for creative enthusiasts and professionals around the globe. So it's no wonder that macOS is the primary destination for the best new drawing, painting, image and video editing, and sketching applications.
As mentioned above, beginning your journey with Preview will cover all your basic needs that Windows Paint used to do. To get a specific result, you can try apps with more to offer, such as Tayasui Sketches for painting or Capto for working on images.
Annotate and edit images with ease
Not everyone knows that Mac's default Preview application is not only an image viewer but also provides a basic painting and annotating toolkit that's just enough for it to be a decent substitute for Microsoft Paint for Mac. Here's how to access it.
Right-click on any image and choose Open With > Preview
Locate the marker icon in the upper-right corner of the app window
Click on it to open all available tools
All the tools in Preview are fairly close to what you used to see in MS Paint. There are three broad functionality groups separated by vertical dividers: selection, creation, and modification.
Microsoft Paint For Mac
Using Preview is just as intuitive as it was with MS Paint. Let's say you want to draw a circle around an object on one of your images to bring someone's attention to it:

Select the Sketch tool (third from the left)
Simply draw around the object. By default Preview will autocomplete the shape you've drawn, getting it to a perfect oval, square, or triangle. You can, however, choose to keep the line freehand by selecting such option from a small pop-up menu.
If you want to modify your line, choose Shape Style (fourth from the right) to pick the appropriate line thickness and Border Color (third from the right) to alter the color of the line itself
And yes, Preview has the bucket tool as well. If you've drawn an enclosed shape, you can select the Fill Color tool (second from the right) and choose to fill your object with any color.
Just like that feel free to explore all the other tools Preview has to offer, such as Shapes, Text, Sign, Adjust Color, etc. We guarantee you won't miss MS Paint one bit.
But why limit yourself in the first place? Since you're switching to a new platform altogether, pick the tools that will serve you in any situation, such as producing a high-quality tutorial, for example. For this, you'd need a more powerful app, such as Capto.
Unlike Preview and Windows Paint, which offer bare-minimum functionality in terms of annotating your images, Capto is the top app for recording your screen, whether it's just grabbing a screenshot or making a video, and modifying all the resulting files afterward.
Starting with Capto couldn't be easier:
In the app's Organizer window, where all Capto's images and videos are kept, you can either grab a new screenshot using the tools in the top bar (Screen, Area, Window, etc.) or import any image you already have on your Mac just by dragging and dropping it onto the app's window.
To modify an image, double-click on it to open
Choose the tool you need from the left-side bar. Beside the basic tools you might be familiar with from MS Paint and Preview, Capto features more advanced ones, such as Spotlight, Numbering, Blur, and Callout.
To use a Numbering tool, for example, simply select it from the menu, choose the Type, Style, and Color, and leave the sequence of numbers on your image by clicking on the appropriate locations
Try any other features offered by Capto in a similar way. This app is indispensable in nearly any line of work when we think about the easy ways of explaining to our colleagues how to do something. Taking 45 seconds to create a quick tutorial on Capto can save you hours of walking around the office or endless instant messages.
One of the best features of Capto, and one of the ones you wish Microsoft Paint for Mac would have, is its extensive sharing capabilities. As the app is mostly used to show someone how to do something, you also need an easy way to send the explanation to them.
To share your creation with Capto:
When you're done with your image, click Share in the top-right corner of the app's window
By default, you have a selection of Mail, Messages, or AirDrop. Choose one of these or click Configure for more options.
In the new menu, select one of the options you'd like to set up, from Dropbox to your own server, and follow the login instructions on the right. Now you'll be able to share images from Capto through your favorite platform in no time.
Finally, don't forget that Capto goes beyond images and lets you record, edit, and share video tutorials as well. The process is largely the same. Just choose Record from the top menu bar to start, use the same tools to edit, and share in the preferred way you've set up above.
Paint at any level right from the get-go
When it comes to drawing and painting, a lot of people are used to MS Paint mostly for the lack of accessible alternatives. Macs, on the other hand, have plenty. And one of them is Tayasui Sketches.
Tayasui Sketches is a lot more than just Microsoft Paint for Mac. It combines natural drawing experience you're so used to with a near unlimited selection of beautiful digital brushes and colors.
Starting with Tayasui Sketches is just as easy as picking up a pen in real life — simply choose the paper type, select one of the tools in the left sidebar, and begin to draw.
Quickly you'll realize how none of the MS Paint's artistic brushes can compare to the flow and realistic beauty of the tools available in Tayasui Sketches. At the same time, the app doesn't require you to go through lengthy workshops and spend hours in settings, which positively distinguishes it from other professional alternatives.

It's likely that Tayasui Sketches will serve you for many years to come. It remains an indispensable tool for lots of professional artists. And even if you decide to switch to a different professional drawing app in the future, the foundational functionality would probably remain the same.
Pick the right tool for the job
As you can see, there is no need to try to download Microsoft Paint for Mac as soon as you discover there is no exact counterpart within macOS. There are plenty of tools that copy and even surpass both the functionality and ease of use that MS Paint used to offer.
Sometimes you might be using Preview for the simplest tasks around. More likely, you might find yourself relying on Capto more and more, as its diverse toolkit is able to perform the majority of annotating and editing tasks at the highest level in no time. Finally, when you feel really creative, you can easily switch to Tayasui Sketches and really express that creativity with beautiful pens and watercolors.
Best of all, these apps are not going to set you back financially at all. Preview is already installed on your Mac by default, and Tayasui Sketches and Capto are both available for a free trial through Setapp, a platform of over 150 useful apps and utilities for any scenario. Let your creative side shine!
Best Free Painting Software For Mac Free
Setapp uses cookies to personalize your experience on our website. By continuing to use this site, you agree to our cookie policy.
Free Painting Software
0 notes
Text
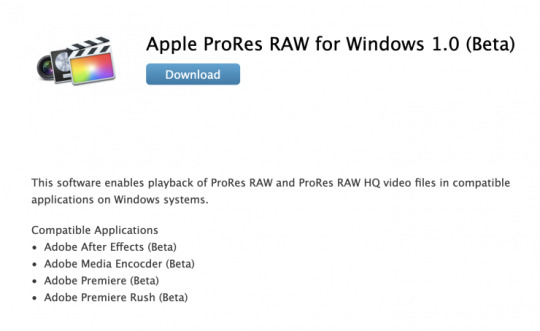
Apple Prores Download Mac
Apple Prores Download Mac Download
Prores Raw For Windows
Apple Prores For Windows
Apple Prores Codec For Windows
” I have footages in QT h.264 codec, 1920×1080 24p, but I found that FCP struggles with these MOV files. Any solution?”
” I was wondering if anyone knows if there is a way to work with the H.265 .mov files from DJI Inspire 2 in FCPX? They come up all black with no image. Any help is appriciated.”
Lisa Wilson on Apple Prores 4444 Xq Codec Mac venesafa. Dec 4, 2020 — ProRes XQ (or ProRes 4444 XQ) was released in June 2014 as an expansion to the already very robust ProRes 4444. Work at a faster clip. With its modern Metal engine, Final Cut Pro allows you to edit more. Apple ProRes is a high quality, lossy video compression format developed by Apple Inc. For use in post-production that supports video resolution up to 8K.It is the successor of the Apple Intermediate Codec and was introduced in 2007 with Final Cut Studio 2.
A MOV file is a common multimedia container file format developed by Apple and compatible with both Macintosh and Windows platforms. It may contain multiple tracks that store different types of media data and is often used for saving movies and other video files. MOV files commonly use the MPEG-4 codec for compression.
ProRes is a line of intermediate codecs, which means they are intended for use during video editing, and not for practical end-user viewing. Apple ProRes 422 is a common video encoding format used for broadcast. This codec offers nearly all the benefits of Apple ProRes 422 (HQ), but at 66 percent of the data rate for even better multistream, real-time editing performance.
Want to get MOV to FCP X/7/6 editing? Want to convert h.265/hevc to prores codec? You need a ProRes converter on Mac or Windows. This guide will do you a big favor. Below content will show you the simple steps on converting MOV to ProRes codec on Mac or Windows.

Until recently, Windows/PC users have struggled to encode MOV to ProRes 422. Thanks to a program called U2USoft Video Converter Ultimate, this is not an issue anymore! It is an easy-to-use yet professional MOV encoder and decoder is highly recommended. This program features high efficiency and seamless conversion.

With it, you can effortlessly convert MOV video to ProRes encoded MOV files. In addition, the program can also help you transcode MOV files to Apple Intermediate Codec, DNxHD, MPEG-2, AVI, WMV, FLV, MP4, etc. for smoothly editing or playback with iMovie, Avid MC, AdobePremiere, FCP, etc. If you are windows user, please turn to U2USoft Video Converter Ultimate. Below is the detailed guide on transcoding MOV to ProRes on Mac or Windows.
Download HEVC/H.265 Video Converter for Windows:
Download HEVC/H.265 Converter for Mac:
How to convert MOV to Apple ProRes codec?
Step 1. Import MOV videos
Apple Prores Download Mac Download
Install the MOV to ProRes Converter and run it. Drag the H.265 files to the software. Or you can also click “Add” button on the top of the main interface to import video to the program. (Note: batch conversion is supported, so you can load more than one file to save time.)
Step 2. Choose ProRes as the output video format
Now click the Profile icon to reveal output panel. And and mouse cursor to “Editing Software” category. You’ll find several ProRes formats are provided. Generally, ProRes or ProRes LT are suitable choices for H.265 videos shot with camcorders. ProRes HQ is usually for film based source media.
Tip: By clicking the Settings icon, you can adjust video and audio parameters like codec, bit rate, frame rate, sample rate, etc., in that way, you can take charge of the size and quality of the output files. In principle, the larger input values, the better output quality, but the corresponding larger file size.
Step 3. Start converting MOV to ProRes
At this point, you can change the output filename or output path if you wish. If you feel satisfied with your options, Just hit the Convert button to activate MOV file to ProRes conversion.
When all conversions completed, you’ll get a pop-up notice. Just click “Open” button, you can fast find where your converted files are saved.
Popular Downloads
Top Sellers
Prores Raw For Windows
Support
Hot Articles
Apple Prores For Windows
Best Blu-ray Ripper, 4K Video Converter, XAVC Converter, ProRes Converter, Edit MP4 in FCP X, Import MTS into iMovie, 4K Blu-ray Ripper, Edit H.265 in FCP X, BRAW Video Converter, 4K Blu-ray Ripper, H.265 Video Converter, Xbox Series X MKV, Edit MXF in Premiere Pro CC, Edit MXF in FCP X
Secured Shopping All transactions are protected by VeriSign.
30-day Money Back Come with a up to 30-day Money Back Guarantee.
Automatic Updates Automatically check and download the latest updates
Customer Service Email help within 24 hrs.
Apple Prores Codec For Windows
Copyright © 2021 Acrok Studio All Rights Reserved.
1 note
·
View note