
DISCLAIMER: I am NOT a CC creator or modder. These CC tutorials are written for my own reference in the future.
Don't wanna be here? Send us removal request.
Statistics
We looked inside some of the posts by love-of-learning and here's what we found interesting.
Average Info
Notes Per Post
24
Likes Per Post
18
Reblog Per Post
5
Reply Per Post
1
Time Between Posts
4 months
Number of Posts By Type
Text
9
Last Seen Tumblr Blogs


Fun Fact
12.7% of mobile users access Tumblr.
Text
Posing in Blender 103
Checked December 2024, Blender v4.3.2
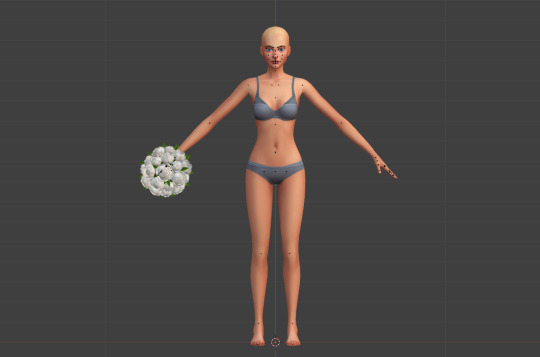
In this tutorial we will create a custom Pose with an Accessory.
1. Import Accessory
Select the blend file, go into the Object folder, and then select one of the s4studio_mesh_x, if the item doesn't show up then try another numbered s4studio mesh.
Feel free to remove the big circles called bone_bone_shape.001, but you don't have to.
2. Connect Accessory to Rig
If we start to create the pose we will notice that the accessory will stay in it's original place even when moving the parts it's supposed to be connected to.

To connect the item to the sim you need to select the accessory, and go to Modifiers (wrench icon). In the Object field, change it to the sim rig (probalby called "rig" as it's the original rig).
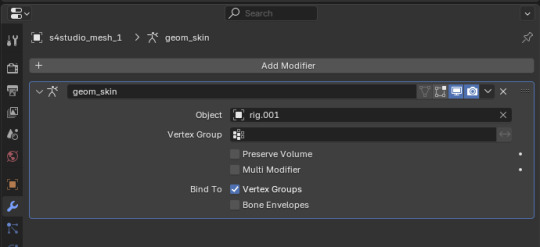
Now when you move the part the accessory is connected to, the item will move along with it.

3. Make your pose
Then you continue as you usually would, ending with the LocRot thing. Some items (but not all?) can be moved and rotated independently of the sim, making posing with it even easier.
You don't need to do anything special about the accessory, it is just there.
0 notes
Text
Posing in Blender 102
Checked December 2024, Blender v4.3.2
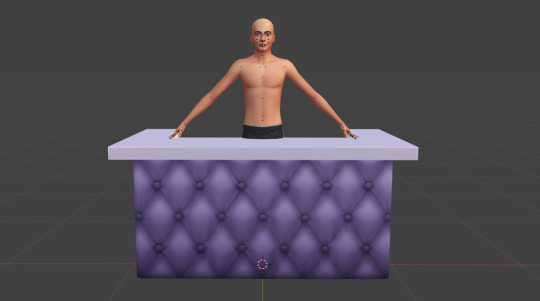
In this tutorial we will create a custom Pose with an Object.
1. Import Object
Select blend file, go into the Object folder, and then select one of the s4studio_mesh_x, if the item doesn't show up then try another numbered s4studio mesh.
Feel free to remove the big circles called bone_bone_shape.001, but you don't have to.
The location of the sim vs object is where the Sim Teleporter should be when using the pose. Probably the middle of the object.
2. Lock the object
To not accidentaly move or edit the object, you could disable it from selection by deselcting the Selectable ("arrow") icon in the scene collection.

If you don't see it, add it from the Restriction Toggles in the filter popup at the top right of the scene collection area.

3. Make your pose
Then you continue as you usually would, ending with the LocRot thing.
You don't need to do anything special about the object, it is just there.
0 notes
Text
Posing in Blender 101
Checked December 2024, Blender v4.3.2 (+ v3.3.0 + v2.67)
In this tutorial we will create a custom Pose in blender, make sure you know the basics of Blender usage first (selection of nodes, rotation, movements, etc).
Make sure your S4S Blender setting points to the same version as the one you created your pose in, or newer, or you will only get the default pose in game.
The most basic thing is to ensure your are in "Pose Mode" in Blender, with the sim's rig selected.
Inverse Kinematics
When opening up a blank rig from S4S there is one thing to make posing much easier; Inverse Kinematics. This makes it so nodes connected "towards" the base also moves when moving ("grabbing") the node with an IK constraint.
So instead of the node stretching and moving independently.
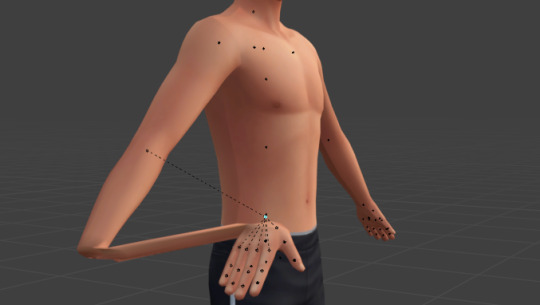
You can have a few nodes adjust their positions to have a more natural movement.

To add Inverse Kinematics you select the node (the bone) and select Bone Constraints (the bone with a circle-ish in v3.3/4.3, or the bone with a chain link in v2.76).


Click to add a new Bone Constraint, and select Inverse Kinematics.
The setting you are interested in is the Chain Length value, you most likely want it to be 3, but it depends on the node. The number is how many nodes should be affected. If you add IK to the wrist, and up the Chain Length to 4, for example, it will move the shoulder too. Feel free to test and experiment to see what you like best.

Add IK to relevant nodes, for example the wrists, finger tips, and ankles.
Remember that this is affected when moving (G) nodes around, but not when rotating (R).
Finalise the pose
Once you've done with posing, you need to select all nodes in the rig with A, then click I. In v4.3 this is enough, but in 3.3/2.67 it "only" opens the Insert Keyframe Menu and you then need to select Location & Rotation (or LocRot in v2.67).
I'm not sure about this, but I think this is to add the pose into the animation timeline, since all poses in Sims 4 are animations "behind the scenes".
3 notes
·
View notes
Text
Sims 4 Studio
Checked May 2022
This post will cover the basics and get started with Sims 4 Studio by Andrew & Orangemittens. S4S can be used for many things regarding CC creation.
Get it working
Start with downloading it from their webpage. Then, install it like any other standard program; that is the case for the Windows version, which is the only one I've used. The first time you start it, after an update of either the game Sims 4 or the software S4S itself, it will need to index the files, so make sure you have some time to do that.
Here I will be using the windows version 3.1.5.8.
Getting started
When you first open the program, there will be many options that might be strange for you. But we will go over them soon. In the lower right corner is an empty input where you can put your creator name for when you start creating your CC.

I'm not going to go through all the options in the menubar cause I don't know them myself—so that need to be a later post. But the main page has many buttons and options we can look at.
The right "column" starts with a button opening up your "Projects folder" (for me, My Documents), and under it will be the latest packages you've opened. Next, the "My CC" buttons open your Mods folder in a window so you can look through them all in The Sims 4 Studio. And then some links to online help.
But the left side is more interesting for actually creating CC.
Animation - this is for when you're creating animations or poses for the game. One example is the CAS poses; they replace an in-game animation for a specific trait.
Build - when creating CC for build mode (ish), e.g. wallpapers or floors.
CAS - when you're creating CC for CAS, e.g. dresses or hair.
Object - when creating CC for buy mode (ish), e.g. beds or doors.
Select the type in the radio buttons and then click the button (the heading-thing) to select something.
Animation
If you select the Override option, you will first have to choose which animation you want to override before being prompted for a filename. You will then have the option to upload the pose files (Blender) or download the basic rig (object, mesh) of different sim types - gender and ages and sim/pet - for which you want to do the pose.
But that is about it, you select the pose/animation file, and that's the override done.
Selecting Clip Pack instead, you will be prompted to give your file's name immediately and then enter the "Clip Pack edit screen".

The first view allows you to specify details about your clip pack, such as a name and an icon.
The more interesting view is the second tab called Clips.

This tab is where you will manage all the clips. You can also download the rig for different sims here and upload the pose or animation and give it a name and an icon. You can also rearrange the clips in the top area to your liking.
Build
Regardless of which option you choose, the next page is pretty much the same. So let's look at the difference between the options first.
Say you want to have a new colour (aka swatch) of a wallpaper, the different behaviour of each option would be the following:
Standalone Recolor - your swatch will be a separate item in the build catalogue with only your colour.
Add Swatches - your swatch will be added to the existing object in the build catalogue, mixed with EA's default colours.
Override - your swatch will be the only one available, replacing the EA ones.
Build mode has no "meshes"; it only colours the walls or floors (I think).
When you've chosen your type, you will get prompted for which item you want to base your CC on. After that, you can select one or more swatches of the same thing or hold SHIFT when clicking to select all swatches for that item. The one exception is the Override option, which automatically adds all swatches always. Next, you specify the filename before going to the Studio view.

The first tab on the right, Catalog, is for specifying the name, description, and price.
The second tab, Texture, is where you select the colours to appear in the catalogue and the small square above the tabs. You can select up to three colours per swatch. You can also upload a thumbnail for the swatch and import the actual texture files (and export them).
The third tab, Tags, is the metadata. Here you specify data for filtering options, such as colours or material. For wallpaper, for example, some Gameplay Effects can be specified.
CAS
CAS is very similar to Build with one (large) exception - the "Create 3D Mesh". The others are pretty much the same:
Create CAS Standalone = Standalone Recolor
Add CAS Part Swatch = Add Swatches
Override = Override
The last option, Create 3D Mesh, is similar to the Standalone one. It will show up as a separate item in the catalogue; the difference is that Standalone requires the original mesh to work.
If you do a recolour of a Snowy Escape item, you need Snowy Escape for the recoloured item to work. While if you use the Create 3D Mesh you can use the item without the original mesh cause it will (can) be included in the recolour file. I haven't tried this, but I think including the mesh isn't automatic but is something you need to specify.
Create 3D mesh is the way to go if you plan to make your mesh. I think.
Like the Build version, you start by selecting the item you want to base your CC off, give a filename, and enter the Studio view.

But similar to the Build version, this also has a tab for Texture - the swatch colours, thumbnail, and the actual texture files.
The Meshes tab is where you can import (or export) the mesh for changes. This view also gives you information about the polygons and vertices count. This count can affect performance; many polygons can negatively affect performance (above 30 000 polys tend to be bad, below 15 000 is fine, and below 5 000 is ideal).
The last tab, Categories, is the metadata. Here you specify the information for filters; feminine vs masculine fashion choice, colours, and textures. But it also includes which frame it's based on. It can block for "opposite frame" you can "disallow for random", reducing the number of townies to spawn with the item. You also specify the category it will show up on; Fullbody > Short dress, Gloves, or even Skin Details > Dimple (Left).
Object
This one is pretty much the same as CAS and Build. It is like Build but with meshes, as the layout and tabs are more like it since it has the Catalog tab and a different design of its Tag tab compared to CAS's Categories tab.
Since it is so similar, I'm not going to go into it again.
The one new thing is the Selective Clone, and to be honest, I'm confused about the difference between this and the Create 3D Mesh option. I might have misunderstood the Create 3D Mesh; I don't know. Sorry about that. I might update this post with the information if I figure it out sometime in the future.
1 note
·
View note
Text
Blender
Updated December 2024, Blender v4.3.2 (+ v3.3.0 + v2.67)
This post will cover the basics, like moving around the space and basic interactions with objects, in Blender. Blender can be used when creating CC for both CAS and BB, as well as poses and various other 3D modelling things.
Before starting
A common program used when creating CC and mods is Sims 4 Studio, which has some restrictions for Blender. The most important thing to note is that not all versions of Blender are compatible with Sims 4 Studio. Make sure you use versions 2.79, 2.76, or 2.70. Later (and earlier, I suppose) versions are not currently working together with Sims 4 Studio. Still, I’m sure they will announce it on their webpage if that changes.
Here I will be using Blender v2.76.
New versions of Sims 4 Studio supports newer versions of Blender; for example both v3.3 and v4.3 are supported (with a few in between them as well)
Moving around
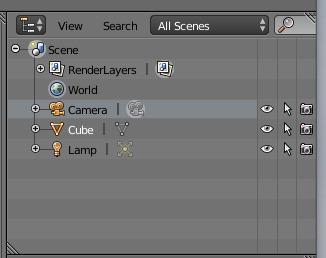
When you first open the program, it will show a cube on a grid.

A quick introduction to the main components of this image: The cube is the object we are working with, the green/red/blue lines and arrows are the axis of the grid, the black triangle and strange shape is the “camera”, while the black dot with dashed circles around is the light source.
The first thing you might want to be able to do is moving around this space.
The scroll wheel zooms just like in many other programs.
Press and hold the middle mouse button (or scroll wheel) and drag it around to rotate. When rotating, the origin will be the centre of your screen.
Hold the shift button while holding the middle mouse button to move around. The direction you move in will depend on the rotations you’ve made since you are moving around using 2D methods in a 3D scene.
You can have multiple cameras in your scene. By pressing CTRL and 0 on your Numpad, you will set the selected camera as the view to use when pressing 0 (on your Numpad) and when rendering.
To select any objects in the scene, right-click on them. The selected object will have an orange outline in the scene and a white text in the Overview. Pressing A on your keyboard is a shortcut for selecting or deselecting everything. To select everything inside a box, press B and drag a box around the objects you want to select.
To exclude something from being selected, use the Overview to toggle such settings on and off for each object.
The three columns to the right toggle, in order, visibility in the viewport, disallowing selecting and excluding from being rendered.
The object
The cube is a simple 3D object, or mesh, composed of 6 sides - 6 polygons. Higher polygon counts require higher graphics. To create CC that runs smoother on lower-end computers, try to keep your polycount low.
Selecting nodes can be done by right clicking on the “dot”. [Left click as default in v3.3] You can also select multiple nodes in various ways; C and then “paint” over the nodes to select, A to select all of them, or B and mark a “box” to selct all nodes inside the marked area.
The first way to move the object around is by having it selected and then right-clicking and dragging it around. You do not need to keep holding the right mouse button as the object will keep moving anyway. To commit to the change, press the left mouse button or the enter key. If you want to revert to the original position, press the right mouse button again or ESC.
You can also move it along only one specific axis by clicking on the coloured arrows and drag in the direction you want to move it.
Another way to enter "move-mode" is to press G on your keyboard. And another way to move along only one axis is to press that corresponding letter (X, Y, Z) when in "move-mode" and then move your mouse.
To rotate the object, press R on your keyboard and move your mouse around. To turn around one specific axis, press that letter (X, Y, or Z) while in "rotation mode". The specified axis will be highlighted to show which axis the rotation will happen around. Left-click to commit to the rotation, and right-click to discard.
To scale the object, press S on your keyboard and move your mouse around. To scale only in one direction, press a specific axis letter (X, Y, or Z) and move your mouse around. Left-click to commit to the rotation, and right-click to discard.
To reset a move, rotation, or scaling, press ALT and the corresponding letter (G, R, S) to reset it to the object's default settings.
If having a limited amount of nodes rather than the whole object selected, there is one more setting to consider; the Pivot Point.

It’s hard to show on a cube, but if you have a person-model, and want to move the eyes the same way, if you have the default Median Point still on:

The eyes will rotate around the middle point between the nodes. But if you switch to Individual Origins each node will rotate around it’s own axis.

2 notes
·
View notes
Text
Create Custom Aspiration 103
Checked April 2021, Patch 1.72
Using: The Sims 4 Mod Constructor by Zerub
In this tutorial we will create a custom Aspiration that uses custom Aspiration Steps and belongs to an existing Aspiration Category.
I will assume you are familiar with what I did in 101, or check that out first since I will not explain any inputs that are the same as in that one. Which is pretty much everything apart from the actual step details.
1. Setup
Fill in everything but the Object Sets as directed in Creating an Aspiration 101.
2. Creating the Aspiration
Adding two steps to the Objective Sets just as in Creating an Aspiration 101, but instead of Game Reference we will go with New Elements and use the Open Element: Value.
The first step will use a Game Reference as part, while the second will be new. The first I do is add an Objective Set Info, otherwise the game doesn’t have a name for that step. I don’t bother entering a description or an icon since they won’t be used.

And for the Objectives I select an existing Game Reference, eg. Become an Adult. The last two, Complete Only In Sequence and Screen Slam on Completion I just leave on default values.
The other way is to create your own objectives, lets say you want to have a “Earn §300 000″ which is similar to Fabulously Wealthy’s “Earn §200 000″ to be reasonably sure to be possible. When creating a New Element a text as well as the amunt of aspiration points to be rewarded upon completion needs to be entered.

To specify the actual details press the Open Element: Value and add a few components; General → Tooltip (optional), Objective Types → Total Money Earned Objective.
The Display Text is prefilled with the text you entered in the previous step, but can be changed here for what to actually show in the UI. The Tooltip is the text that shows up when you hover over an objective to help with how to complete it.
Aspiration Points is prefilled if you speficied any in the previous view, and missing if you didn’t. And then the actual check and important part - Total Money Earned Objective. Select Greater Or Equal or Greater and then specifiy the amount 300,000 and we are done!

Repeat this for as many steps and objectives as you want to have, and look through the components for objectives to find things you can use to create the aspiration you want to have (Might make another tutorial on the options later, but that would be a ore advanced one).

3. Done!
And then export the aspiration as a package-file!
One thing worth noting before we end this: I never manage to make it work with just one Objective Set (aka one step), so there is something I’m not understanding. It should be possible since the Lifetime mod as only one step, but it is made directly in the XML so not sure I’m doing something wrong, or if the Mod Constructor can’t handle it.
Happy modding!
8 notes
·
View notes
Text
Create Custom Aspiration 102
Checked April 2021, Patch 1.72
Using: The Sims 4 Mod Constructor by Zerub
In this tutorial we will create a custom Aspiration that uses existing Aspiration Steps and belongs to an custom Aspiration Category.
I will assume you are familiar with what I did in 101, or check that out first since I will not explain any inputs that are the same as in that one. Which is pretty much everything apart from the new category + trait.
1. Setup
Fill in everything as directed in Creating an Aspiration 101.
2. Creating the Category
Start with adding the Aspiration Category as a new element in the left-hand list. The process to add an Aspiration Category is the same as adding an Aspiration Track, so Add Element and select 2: Intermediate → Aspiration Category and don’t forget the possibility to name it when creating it.
It is prefilled with the name of the element, but feel free to rename it - it will not rename the name of the category inside the Mod Constructor though.

There is only two things to input - a name and an icon. This is what shows up in CAS, and the name has only very limited amount of space, so make sure not to choose a too long name.

And that is all that is needed for the Category part, lets move on to the trait selecting aspirations inside this category will get.
3. Creating the Trait
You may choose to utilize an ingame trait, if so you can just skip this step. If you do wish to have a custom trait, there is a bit more job here than for the custom category.
Again add a new element on the left, I like to name it Aspiration Trait and not just the default Trait, and the first to do is remove the component Personality Trait and add instead Trait Types → Aspiration CAS Trait to have the right type of trait. (The order doesn’t really matter, so you can rearrange them as you wish)
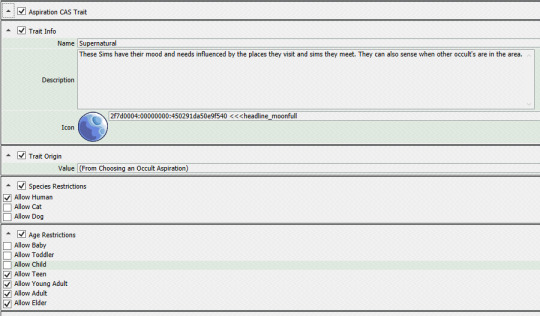
The basics are the same as pretty much all the other things we have added, and the information under Trait Info is visible in CAS.
[IMAGE]
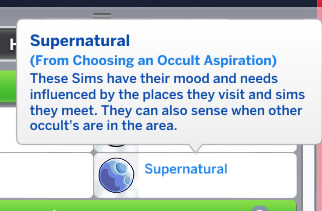
Trait Info and Trait Origin are what the Simology (Y) tab shows ingame.
But you might want the trait to actually do something as well.
The first thing is the Core Buffs which are things that are always active, even if it is possible to add a component called “Duration” it will be ignored when placed inside a Core Buff.
Let’s see how to add a constant emotional buff and a skill gain buff.
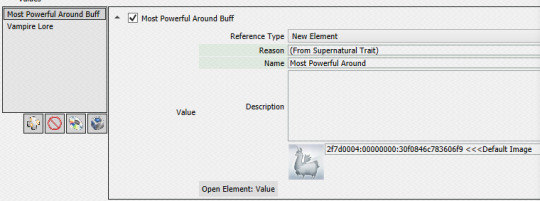
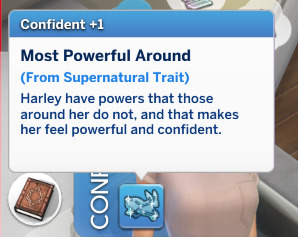
The important part here is the Reason which is what will show up under the name on a visible buff (aka buff with an emotion). But the real information is added in the Open Element: Value view.
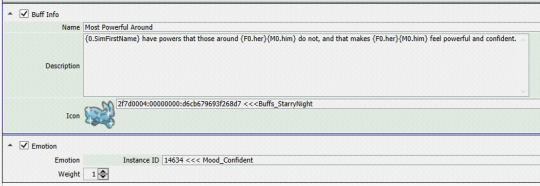
So add the text to show for the buff, and the settings, in this case and +1 Confident moodlet.
Another option is to add a hidden buff, and lets make our sim learn Vampire Lore twice as fast as other sims do. Since it is hidden, it isn’t really necessary to give a reason but I entered one anyway if it might be visible in some hidden area I’m not aware off.

You can also select to decrease it, or only increase it a little bit. It can be applied to more than just skills as stated in the image; careers, needs, etc.
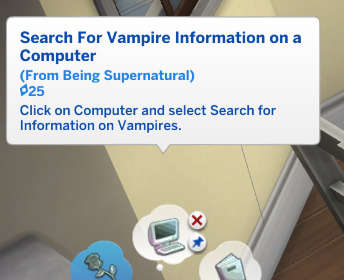
Another part that might be of interest is to add whims; wishes you sims wants to do.
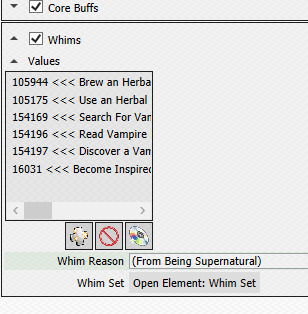
There is a wide arrange of whims to choose from, and by specifying the Whim Reason it will show up on the whim bubble.
When selecting texts to write I try to look at ingame existing texts and copy their format.
Deeper details of what can be done with traits might be covered in a later lesson, focusing on custom traits instead of the aspiration part.
4. Done!
The last small thing is to select these on your Aspiration Track; select Existing Element for Aspiration Category under Aspiration Info and then again for CAS Trait.
And then export the aspiration as a package-file, etc.
One thing worth noting before we end this: I didn’t see the new category ingame, only in CAS, so I couldn’t see the tracks and such, not sure why.
Happy modding!
3 notes
·
View notes
Text
Create Custom Aspiration 101
Checked April 2021, Patch 1.72
Using: The Sims 4 Mod Constructor by Zerub
In this first step we will create a super simple Aspiration to get familiar with The Sims 4 Mod Constructor. We will create a custom Aspiration that uses existing Aspiration Steps and belongs to an existing Aspiration Category.
1. Setup
First step is preparing the Mod Constructor, if you are unfamiliar I give some help over on The Sims 4 Mod Constructor-post.
To add a new Aspiration select the element 2: Intermediate → Aspiration Track and don’t forget the possibility to name it when creating it.

2. Creating the Aspiration
With the basics setup for us, we can jump right into creating a custom aspiration. We have three areas to complete: Aspiration Info, Objective Sets, and Reward on Completion.
The first part is information shown in eg. CAS when selecting an aspiration.

We fill in the texts, select an icon, and choose Game Reference for an existing Aspiration Category. The name is prefilled with what you named the element, but changing the name here has no effect on the element name.
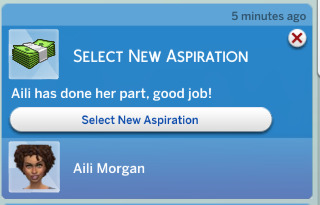
The last input under Aspiration Info is the texts that shows up in the notification that the aspiration has been completed and to select a new one.

It is only this text that are changeable in the notification, nothing else in it.
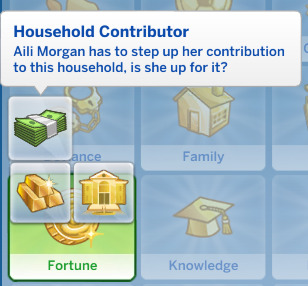
The second part is the Objective Sets which is the actual tracks or steps in the aspiration to complete. We will select two pre-made ones, the final step (Fabulously Wealthy) in the Fabulously Wealthy Aspiration, and the first one (Readily a Parent) in the Family Aspirations.

This will set the “Screen Slam” to those icons and such, which is fine for this 101 version. It will say “X has completed [Step Name] of the [Name] Aspiration!” so it will say the right aspiration regardless, but it will use the “original” aspiration icon.
The third section is Reward on Completion and what happens when the aspiration is completed, not just one of the step.
Add text and icon for this. When I tried to take a game reference for the reward it told me “there is none”, so I assume you have to create a new one but it re-uses the same inputs from other places.

This should be information about what the sim will receive upon completing the aspiration, most likely a new trait. It doesn’t have to be the same icon/name/text as the trait though, but most existing aspirations have the same (or at least similar).
Not tested: Why did it take the trait icon and not the one I specified the one time I went to take a print screen?

The strange thing about this is the Reward Trait need to be set to None, nothing happened when I had only this so leave it to none and click the Open Element: Value instead and we will enter a bit more information for the reward before we are done.
The first section is a copy of the previous texts/icon, if you change them then the Reward UI Info is the text that will show up ingame.
Then we want to add new components for Trait Reward as well as Reward Notification. You can also add other rewards, eg. money added to the household.

Write your texts, add icons, and select the trait. The last three inputs in the Reward Notification might need a bit more explaining, so lets look at them a bit closer.
What you select here will decide how the notification will look, there is basically two ways it can look, and what differs is where the sim’s profile is placed. (Or I guess you could have no sim profile as well, which makes it more than two options.)
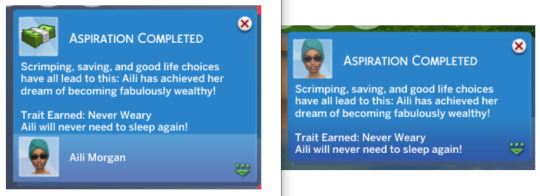
The existing aspirations have the aspiration icon as the Primary Icon, and the sim as the secondary (footer/bottom), so I would recommend that settings, which is what I have in the above image of example inputs.
3. Done!
With that done, all the necessary stuff are added and the new aspiration is ready! Press the button Export Package at the very top to create a package file you can add to your Sims 4 Mods-folder.
One thing worth noting before we end this: the trait reward will say the original source (eg. “Reward trait” if you select at buyable one like I did in the example above).
Happy modding!
4 notes
·
View notes
Text
The Sims 4 Mod Constructor
Downloaded and tested as of April 2021
This post will cover the basics and getting started with The Sims 4 Mod Constructor by Zerub. This program can be used as sole source when creating mods such as traits, careers, aspirations, social events, and much more, or it can be the base you build on to if it feels too limiting.
Get it working
Start with downloading it from Zerub’s tumbr, extracting it and locating the Constructor.exe file to run it. I had trouble running it so make sure it has write access to the folder it is located in and that the properties for Content/StandardContent.dll file is unblocked (tip from mod the sims forums that helped me getting started).
Getting started
One thing I didn’t understand the first time I ran the program was that it auto-saves, and you CAN get back to a previously made mod after quitting the program. On the starting screen will be a list of Mods you have previously created. So remember to use a good name since it will be in the list the next time you open an instance of Mod Constructor. I’m not sure you can rename the whole mod later on, so be aware!

To remove a previously saved mod (or maybe moving them between computers) check the Mods folder in the same folder as the Constructor.exe file is located.
After naming it and clicking Create Mod you should see the base for a new mod.

To add a new things to the mod use the Add Element and select what you wish to create (trait, aspiration, career, etc) and it will show up on the left under Roots. When creating new elements you get the option to name them, if you leave it blank it will default to the the type you add.
When you are done with whatever you want to do, just klick Export Package at the top to generate a .package file you can just drop into your Mods folder for TS4.
Various tips and tricks
Lets start with some terminology that I use when talking about different parts of the software. Element is what I call the things that appear in the left-hand column, the Roots. This is mostly because the button says “Add Element”. Components are any box that appear in the right-hand column, eg. Trait Info is a component and Core Buffs is another one.

If you miss the opportunity to name something you add (or that are added automatically for you) you can stand on the component or element and select the Set Label option at the top. This opens the opportunity to set the label for the current “tab” as shown on the line above. To rename a sub-component select the arrow on the right for that component and select Set Label from there instead.
Inside the same “Mod project” you can add multiple things of the same type - you may add multiple traits to the same project and export them all into one .package-file. This can be helpful if you for example wish to create multiple aspiration with their own (same) custom category.
3 notes
·
View notes