
Last Seen Blogs

schuylersparkles
eliza, i’ve never felt so

jinugicom-blog
제목 없음

lostigerone
The Tigers Lair

celestialcollisions-blog
WHEN WE COLLIDE
Text
A little useful tutorial to get Sims 4 to load faster without merging! :)
I actually came across this neat program a while back that someone recommended for Sims 2 files, but I never used it until today! I got tired of spending hours (actually, weeks!) merging packages and then there would still be something messing my game up!
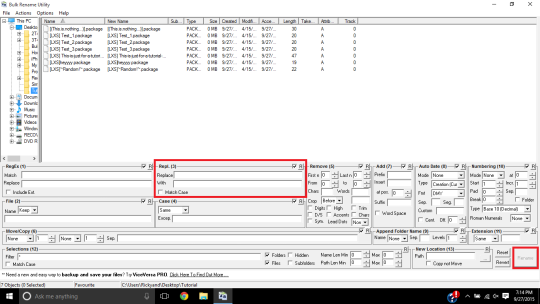
I learned that when a package name has a character/symbol in it, or even a space, it makes the game run and load slower because your computer has to take extra time to process those names. So I used “Bulk Rename Utility” to change the names of all of my CC packages at the same time, by replaces those symbols I currently have only done CAS stuff because I just really wanted to make some Sims and do lookbooks, so I did this with 3,500 packages all at the same time and the program was super quick, like 3 seconds to rename all of those! Soooo.. here’s how you do it. :)
You need: Bulk Rename Utility and your packages that you want to “fix”.
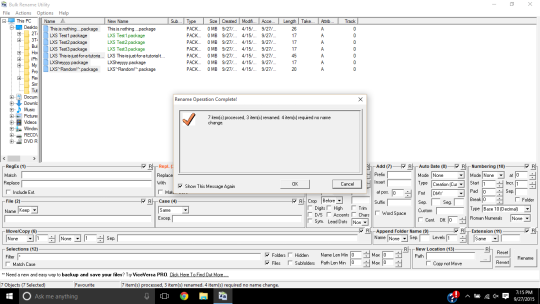
1. Open the program and find the folder with the packages, your mods folder or whatever! If it’s thousands, it may take a second for them all to load. Then highlight everything or go to Actions > Select All.
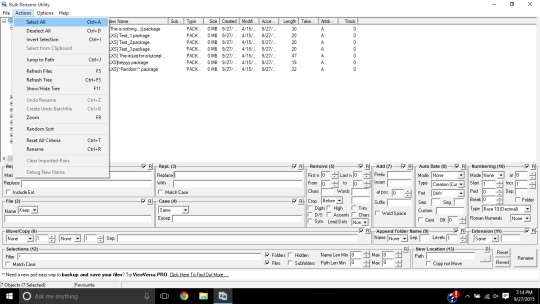
2. You’ll be using the box that says “Repl. (3)”, that’s where you will type in the special characters (one at a time!) that you see in any of your package files. Leave blank space next to “with”, just leave blank. *Make sure for parenthesis and stuff like that, to do both the left and right sides, at separate times. And apparently hyphens, underscores, and spaces are like worst! Sorry, I forget those in the picture below!
3. Press “Rename” over to the righthand side of the screen, and a pop-up will tell you how many files it processed, how many were changed, and how many didn’t need to be changed.
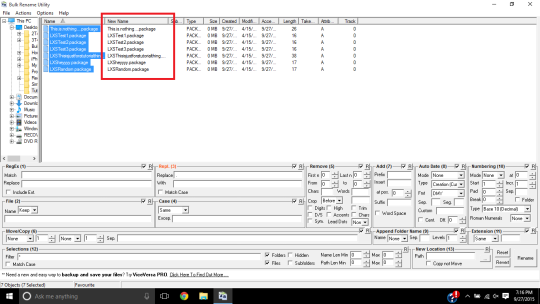
4. Then you’re pretty much done! It will show the new names with no special characters/symbols/spaces, just one long name. And you’ll still able to sort through everything and tell who the creator is! Now your game will run a lot better without having to spend that terrible time merging everything! :)
2K notes
·
View notes
Video
youtube
Blender Texture Painting Tutorial
Created by: CG Cookie
104 notes
·
View notes
Text
Туториал: Как сделать пресет для лица TS4 (RU)
Нам понадобится MorphMaker и Blender(v 2.78)
Я прикрепил архив с пустым бленд файлом и текстурными картами, он удобен для последующей работы => КЛИК
Упрощенная версия (только в скринах) => КЛИК
English version => HERE
Читать дальше
55 notes
·
View notes
Photo
!!!!

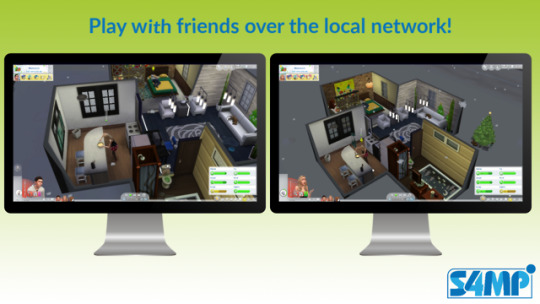
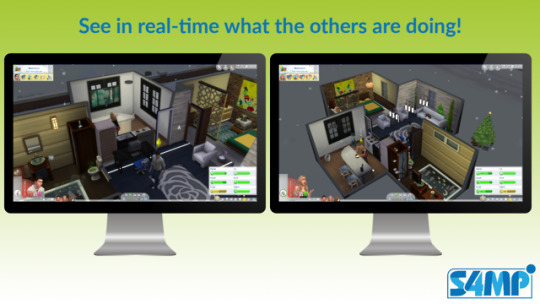
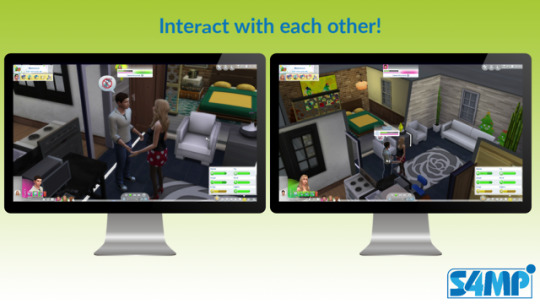
Sims 4 Multiplayer Mod
Created for: The Sims 4 by sims4multiplayer
With The Sims 4 Multiplayer mod you can play The Sims 4 real-time over the network and “live together” with other players on the same household. See what the others are doing, interact with them and have fun together!
What does this mod do?
This mod allows multiple players to play together with the same save file at the same time over the local network. It’s a
full script mod
packaged with a server application which should be run on one of the PCs participating in the game.
Conflicts
There are currently no known conflicts with other mods. (It might conflict with other full script mods though.) Important thing is to have all players the same set of mods/EPs.
How to install
It is necessary to already have a save file with all the Sims created, the house should be built, and all the necessary items should be bought beforehand since currently only Live mode is supported, build & buy mode are in experimental phase. (features might work but there is no guarantee) It is also important to have a save with time paused.
The following steps should be completed on both PCs:
1. Remove all mods from your mod folder (Electronic Arts\The Sims 4\mods)
2. Make sure you have the same save file on both PCs
3. Copy the S4MP_release.ts4script file to your mods folder
One of the PCs will act as a server and should do the following additional steps:
1. Start server.exe
2. Take note of the server IP address in the console since it will be needed for the remote client to connect
3. Start Sims 4, load the save file and enter your household
4. Ensure the game is loaded with the time paused
5. Open the console (by pressing Ctrl + Shift + C) and type in ‘mp.c true’
6. You should see a notification verifying your game has successfully connected to the server
7. Close the console
8. Wait for the remote client to complete the steps
The other PC will act as remote client and should do the following additional steps:
1. Start Sims 4, load the save file and enter your household
2. Ensure the game is loaded with the time paused
3. Open the console (by pressing Ctrl + Shift + C) and type in ‘mp.c false <server machine local IP address collected earlier>’
4. You should see a notification verifying your game has successfully connected to the server.
5. Close the console.
At this point you’re all set up, feel free to start the time and enjoy the multiplayer Sims 4 experience! (please note that only the server’s player can control the time)
For more info please refer to the step by step instructions in the ReadMe.pdf in the mod archive. (different for server and client machines!)
Download: https://modthesims.info/d/629316/sims-4-multiplayer-mod.html
Get featured: https://maxismatchccworld.tumblr.com/
268 notes
·
View notes
Text
Мод на покраску потолка / ts4 ceiling mod
Нашла интерересный мод, который до сих пор работает. Мод на покраску потолка. (Видимость только в режиме tab) Ссылочка на автора: нажми Надеюсь когда-нибудь разработчики все же добавят эту функцию в игру..

0 notes
Text
Cullen house / Дом из фильма Сумерки
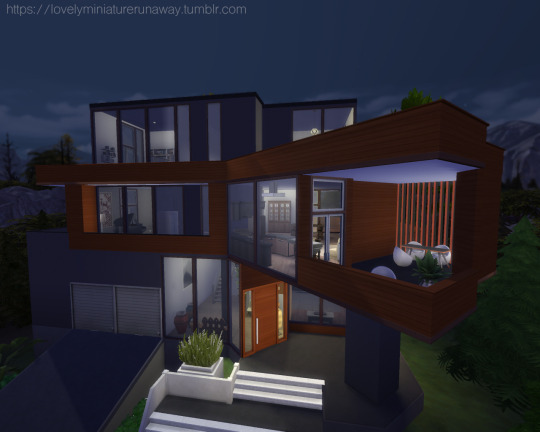
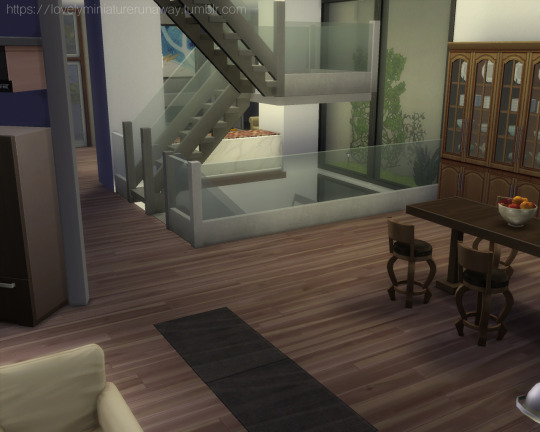
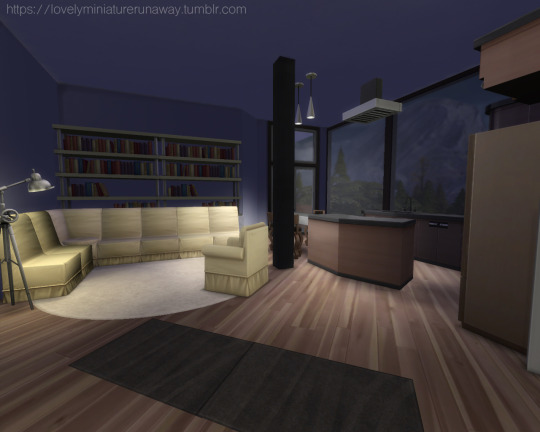
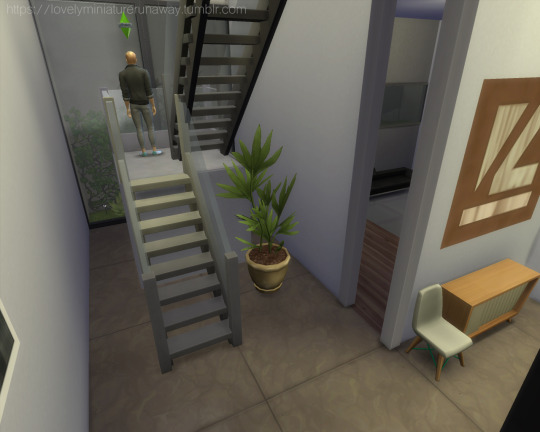
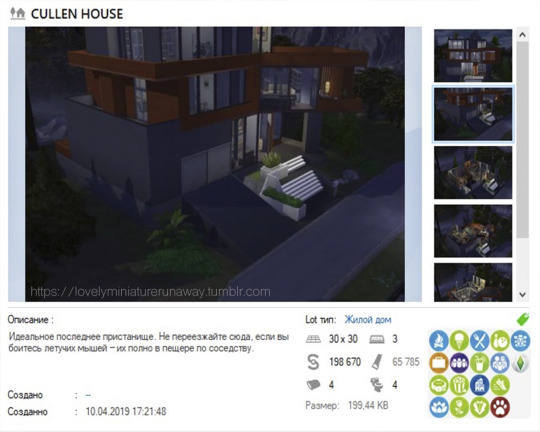
Дом Калленов без дополнительного контента
Дом Калленов из фильма «Сумерки». Для строительства особняка, специально пересмотрела фильмы и выяснилось, что почти в каждой части саги у дома меняется интерьер. Дом вышел просторным и светлым. Построила я его в Форготн Холлоу на участке 30Х30
Дом полностью играбельный. Без допов. Перед установкой используйте код bb.moveobjects on и bb.showhiddenobjects
TOU : Пожалуйста не перезаливайте и не загружайте на сторонние сайты без ссылки на источник. Вы можете отметить меня или использовать @, если хотите, чтобы я увидела ваш пост. Вы можете сделать репост, так я пойму, вам это интересно и построю что-нибудь еще.
___________________________________________________
Cullen house no CC
The Cullen house or the Twilight house sports a dreamy look with glass doors and excellent forest views. The credit of the design goes to architect Jeff Kovel from Skylab Architecture and interior designer Lucy Metcalf. (which is actually called Hoke’s House)
Playtested as usual, use bb.moveobjects on and
bb.showhiddenobjects before placing them.
TOU: If you download, please consider reblogging. Please don’t re-upload or share without credit. Thank you!
Download (sfs, no ad-fly) - here
@sssvitlans
#s4cc#s4lot#s4lot no CC#ts4mm#s4lot 30x30#s4cullen#s4twillighthouse#ts4twillight#ts4cullenhouse#s4 vampires#s4vampire
142 notes
·
View notes
Text
Creating Non-Default Eyes Tutorial
windenburgwitch
Just a quick tutorial for sims-everlasting!
What You Need: Photoshop*, DDS Plugin, Sims4Studio
*As a note, you can probably do any editing in any other image program, but you need to open it in Photoshop afterwards and save as the DDS file. I use SAI for my painting, but it doesn’t have DDS support.
OKAY SO. Never written a tutorial before, so if you have any questions, feel free to message.
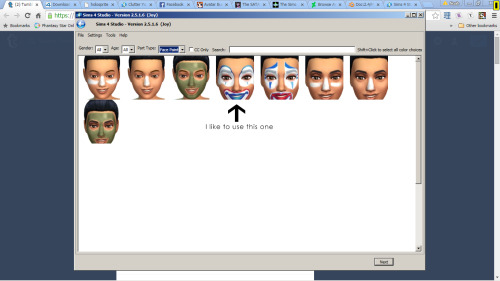
1. Non-default contacts are just face paint. Open Sims4Studio and select “Create CAS Standalone.” When it asks what item to clone, find the facepaint and pick one of the two clown face paints.
2. Save the package file somewhere safe when S4S asks, and it’ll move you on to the import/export areas.
Even though these are just eyes, all makeup utilizes the full body texture. If you need a template for the body, download it here: http://sims4studio.com/thread/243/sim-body-texture-templates
3. The alpha is what makes it only show the eye. In Photoshop (after you’ve edited your texture), go to the Channels tab on the right hand side, where your layers are.
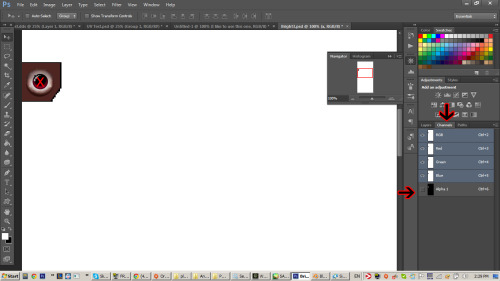
Dont hit the checkbox, just click the Alpha 1 layer entirely. The whole image will turn black, and the only white or gray parts will be the clown mask.
For reference when editing alpha: Black means that part of the texture won’t show up, White means it will show up, and all variations of gray between are different variations of transparency.
4. On the clown paint, while on the Alpha layer, take a brush and black color (pure black black #000000 ) and paint over it completely.
5. Switch back to your texture (RGB) layer now, and go back to the layers tab. Use the selection tool now to select the box where the eye is, including the sclera.
6. Once you have the box selected, don’t deselect it, but switch BACK to the Channels tab and the Alpha layer. Your selection box should still be intact.
7. Using pure white (#ffffff) and a brush, color the box in on the alpha layer and you should have something like this:
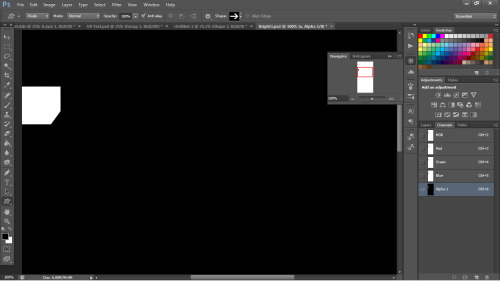
That’s it. Nothing else on the alpha should be any color but pure black. You can switch back to the layers tab now and keep editing your texture if you need to. Nothing you edit will effect the Alpha layer and you don’t need to worry about the Red/Green/Blue layers.
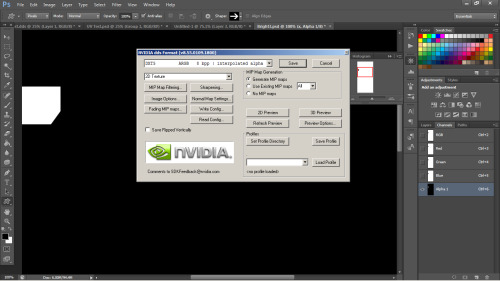
8. Once you are done editing, save your texture as a DDS format. Use the DTX5 settings:
9. Import your texture into S4S and see how you did!
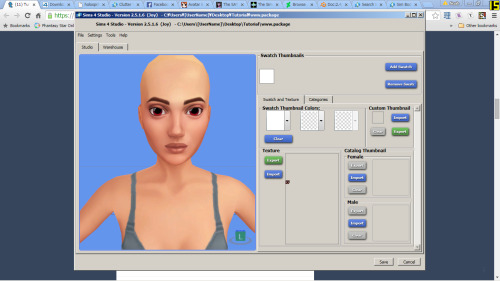
That’s all there is to it! Save your package after you add all your swatches (It’s always good to have a layered PSD on hand if you want to just use the hue slider in Photoshop to change color or paint over or whatever) and put your package in-game.
Unless you put a custom catalog icon in S4S (the two boxes on the right there that say “male” and “female”, it is 140x148 if you want to make one) they will just show up on a default sim head and might be hard to see at first. I used to panic and thought my eyes weren’t showing up at all.
96 notes
·
View notes
Text
Tuto
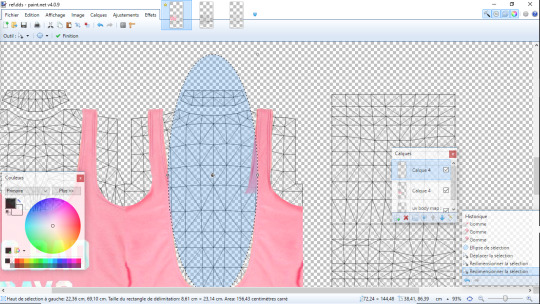
How to make a Swimsuit texture
You will need
Sims 4 Studio
An Image editor
Choose your swimsuit in Google (make sure to have the front and back) (and a big size more than 800x800)
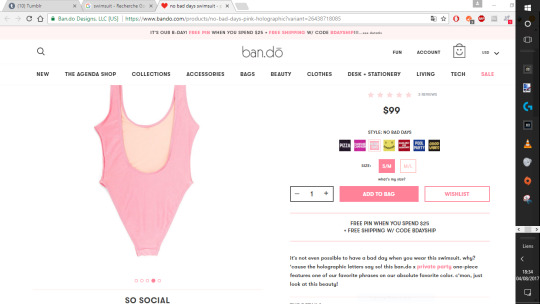
Now open your image editor me I use that one (free)
And Open Your Skin texture or Uv Map (Make sure it’s 2048x4096)
And add a layer with your swimsuit and delete the background abd the visible parts of the back
and make it fit with the Uv map or the body texture

do the same thing with the back now and delete the Uv Map and save your texture as png or dds

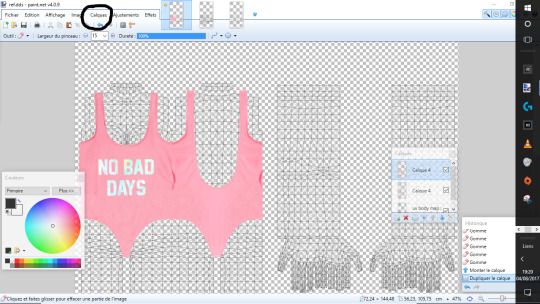
Cas

Select the corset as base mesh
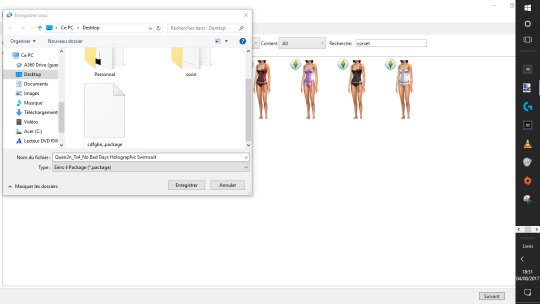
And Save your Package
Now Import your texture

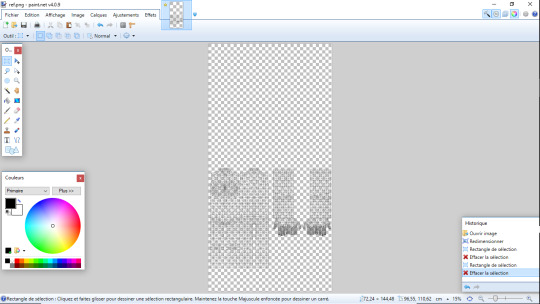
Its looks weird but we’re going to fix this
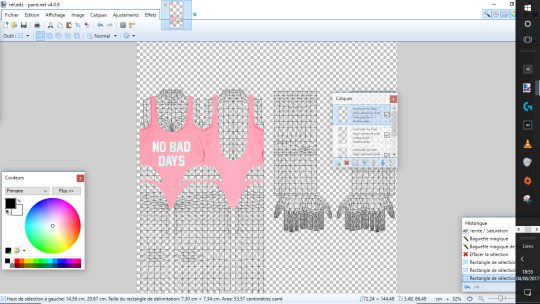
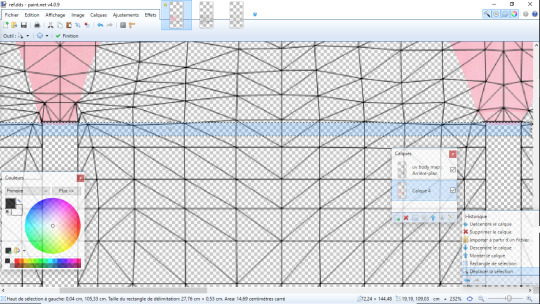
duplicate the swimsuit layer and Modify the texture like that
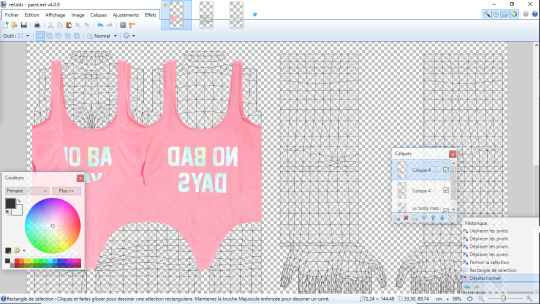
now select a square of texture and add a new layer and duplicate your texture that you selected and pasted on the new layer until the whole bodysuit is filled with it.
now put the layer beyond the 2 last layers (between the uv map and the 2 textures of the bodysuit)
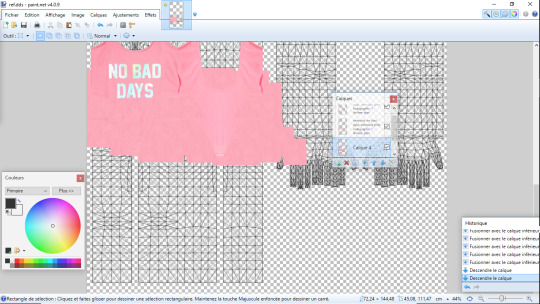
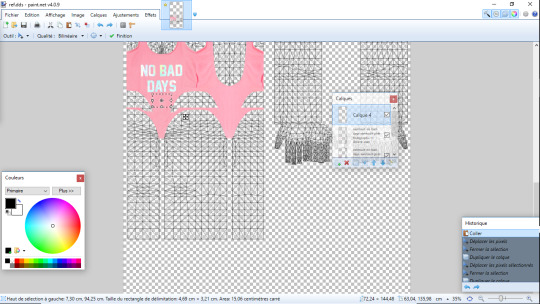
you should have 4 layers select the 1st swimsuit layer and set the hardness of your brush to 0 and try to make the swimsuit fit the most with the other layers

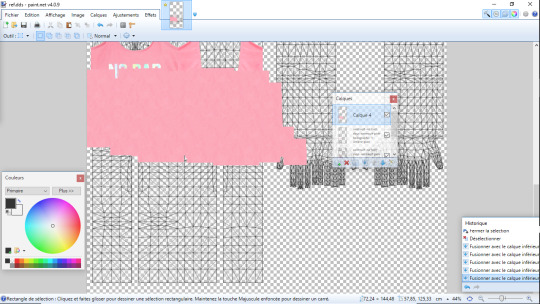
and merge all the layers (not the uv or the body texture) and make the texture looks like that and delete the body texture or the uv map

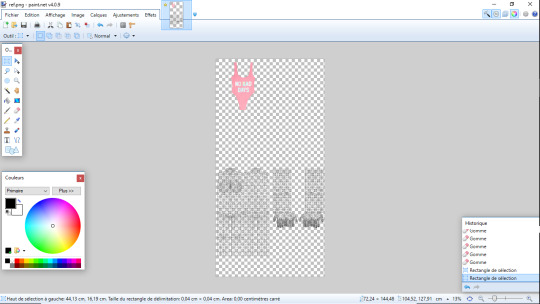
and seletct the side of the “sleeves" and erase the selected part and do that until the middle dot is in the end of the swimsuit (and do the same thing for the other side)


now save your texture and check the Issues


We’re going to fix that
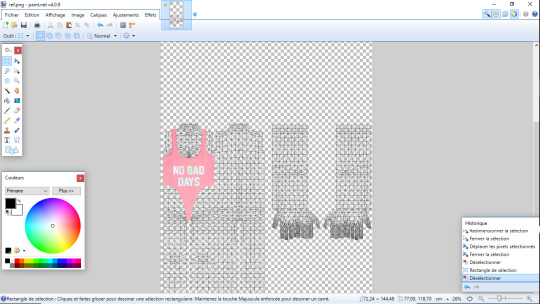
open your texture and duplicate the layer of the teture and reverse it (layer_reverse layer)
and make it looks like that (image up) abd delete everything but the “shoulder straps”
and make em fit.
for the other problem (between legs) do that
*delete*
and erase the sides
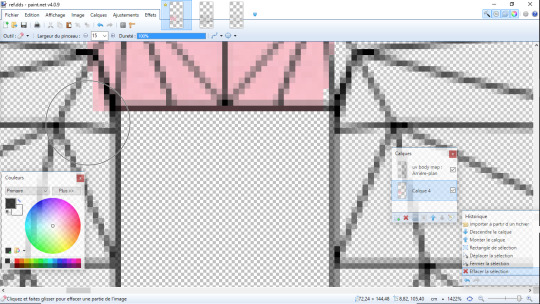
for the side issue use the same process than for the “sleeves”
Now it’s done save your texture as .png or .dds (don’t forget to delete the uv or the skin texture)
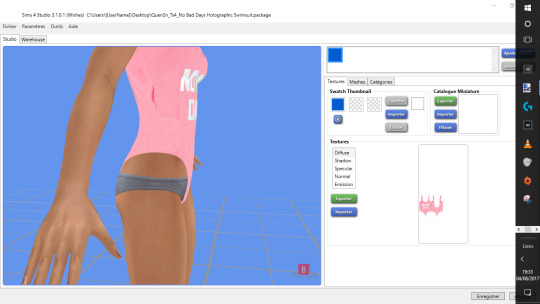
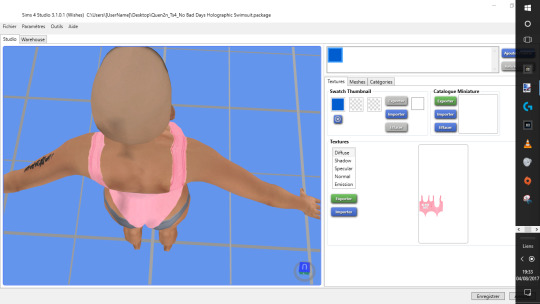
now put your custom thumb and “make blank” the shadow the specular and the normal map
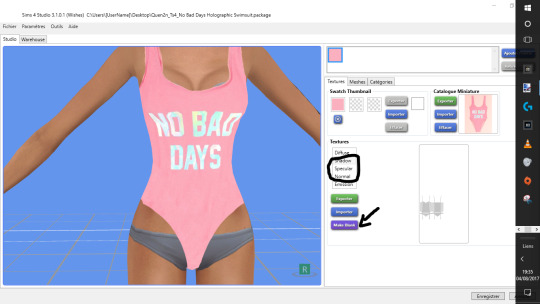
save the swimsuit and it’s done
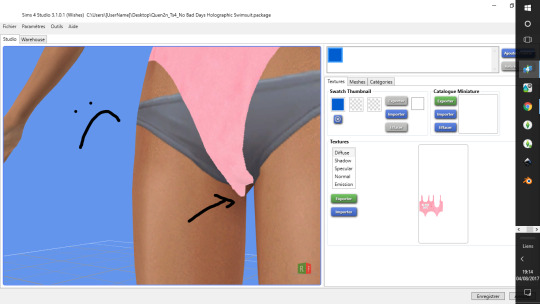
get the swimsuit here
788 notes
·
View notes
Video
youtube
youtube
youtube
youtube
youtube
youtube
Video tuttorial of how to animate objects in the sims 4 n_n
283 notes
·
View notes
Text
blender tutorial on undo history
was gonna say a s4 tut but that’s not exactly the case… but well, since we use blender with most of our stuff anyway.. so okay picture you working on your mesh and ladedaa it’s finished and looking fffin- OHNO, you’ve messed up a teeny part of the mesh and when u want to undo your mistakes, it doesn’t go all the way back, right? like, it’ll only allow you to undo to a certain point.
if you’re wondering what I’m yapping about, it’s this lil popout fella ↓
(shortcut for the undo history window to popout btw ctrl+alt+z)

so, to increase the ‘steps’ of how much u can go back on your undo history, all ye gotta do is go to file> user preference (or ctrl+alt+u)> editing tab> undo> steps> by default the number should be 32 (which means you’re only able to undo 32 steps back) anyyywayy, I’ve read that max is 64 butttt i had mine on 100 and there’s no probs for me so it’s up to you on what you wanna put the amount on> save user settings anddd you’re good to go.
images (instructions) below ↓
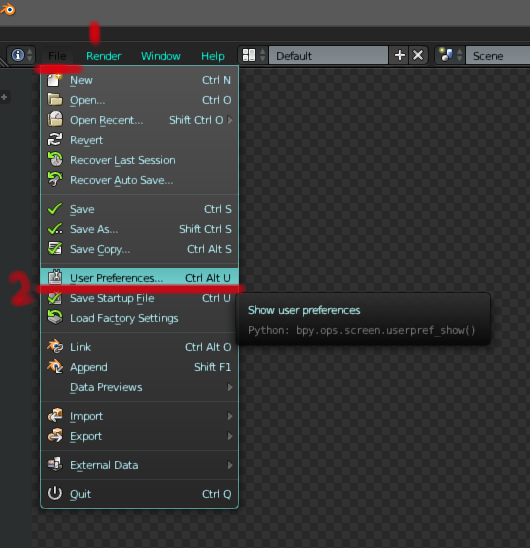
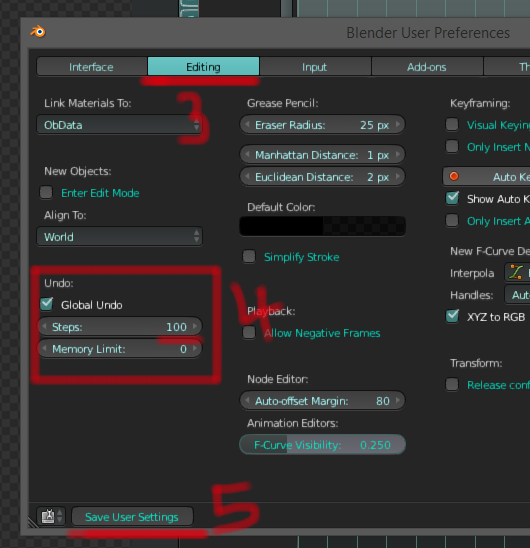
and that’s pretty much it; let me know if there’s any issue you don’t understand kkk bye.
177 notes
·
View notes
Text
Дом Зачарованных / Halliwell Manor
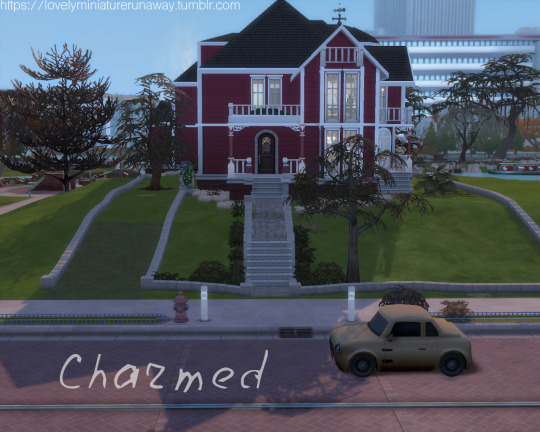


Дом Зачарованных для The Sims 4 No CC
(Ru) Мне хотелось воссоздать (в рамках возможностей симс, понятное дело) дом из своего любимого сериала, особенно повторить ландшафт, первый этаж, включая эту милую лестницу из гостиной, подвал и чердак. Загвоздка была в том, что только э��стерьер настоящего дома использовался для съемок в сериале. А всё внутреннее убранство, по сути, набор декораций из разных павильонов, поэтому дом только приближенно похож на тот, что фигурирует в сериале.
Дом полностью играбельный. Без допов. Перед установкой используйте код bb.moveobjects on и bb.showhiddenobjects
TOU : Пожалуйста не перезаливайте и не загружайте на сторонние сайты без ссылки на источник. Вы можете отметить меня или использовать @, если хотите, чтобы я увидела ваш пост. Вы можете сделать репост, так я пойму, вам это интересно и построю что-нибудь еще.
______________________________________________________________
Halliwell Manor for The Sims 4 No CC
(Eng) This painted Victorian is instantly recognizable to most of us as Halliwell Manor from the popular TV series “Charmed”
Playtested as usual, use bb.moveobjects on and
bb.showhiddenobjects before placing them.
TOU: If you download, please consider reblogging. Please don’t re-upload or share without credit. Thank you!
Info : 50x40 lot
Download Free (Google drive) - here
@sssvitlans
#s4cc#s4lot#s4lot no cc#halliwell manor#s4lot50#s4lot 50x40#s4halliwellmanor#s4charmed#ts4mm#S4HALLIWELL
57 notes
·
View notes
Photo

Guys! Who is not indifferent to sssvitlans.tumblr.com support! Huskies and reposts in support of what Tumbler would remove from sssvitlans NSFW !!!! This post will be sent to the support service Tumbler with the request of all of us not to close our favorite blog!
@staff
********************************************
Ребята! Кто не безразличен к sssvitlans.tumblr.com поддержите! Лайки и репосты в поддержку того что бы Тамблер снял с sssvitlans NSFW!!!! Данный пост будет направлен в службу поддержки Тамблер с просьбой нас всех не закрывать любимый блог!
@staff
7K notes
·
View notes
Photo
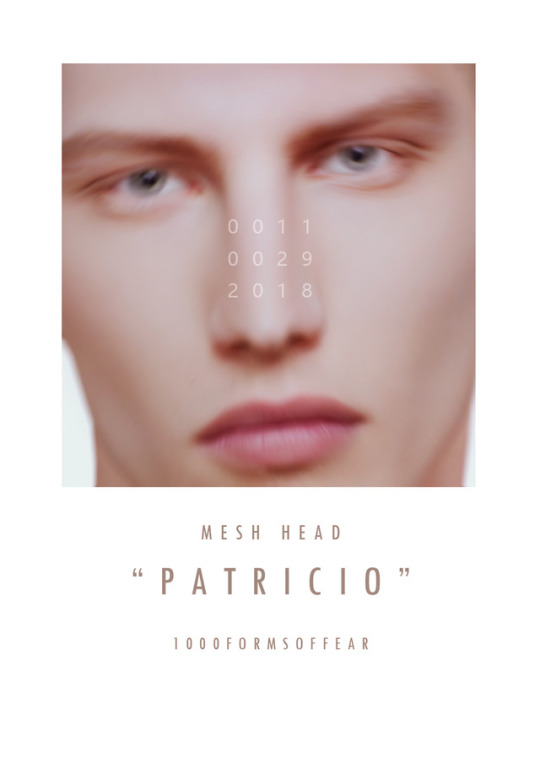
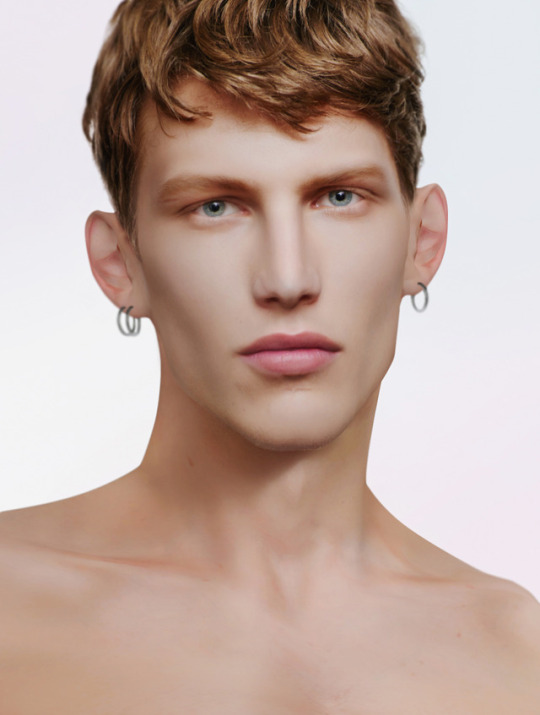
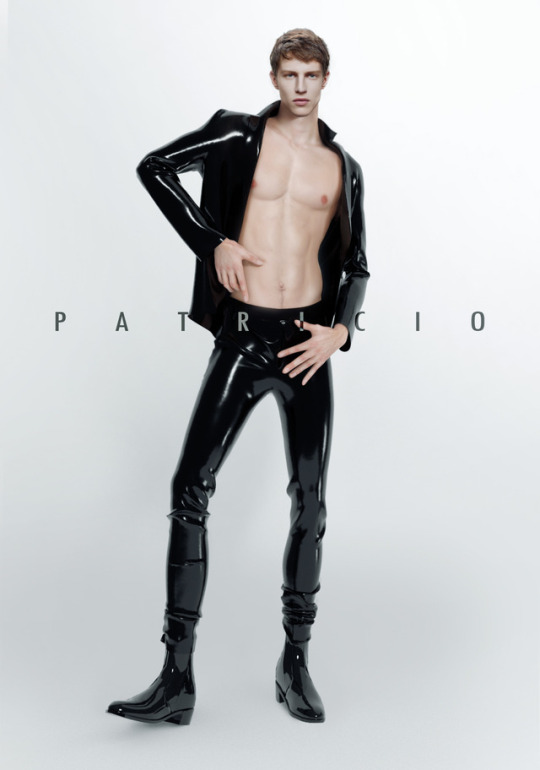
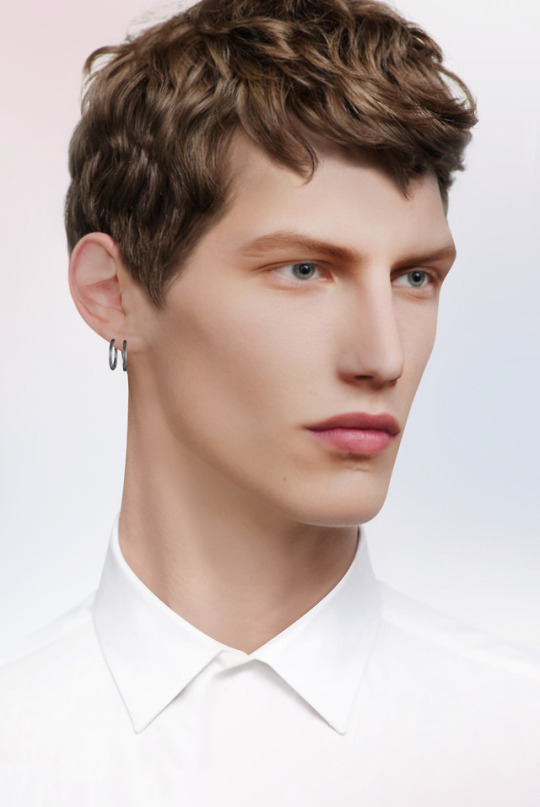
MESH HEAD PROJECT: PATRICIO
Include:
Mesh Head
Male skin
Contact
Sim(Tray)
DL (Early access at patreon )
Compatible with HQ mod , Previews were done with HQ mod .
735 notes
·
View notes
Photo


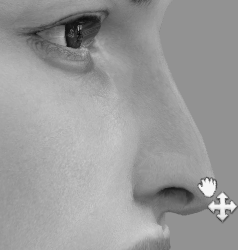

DL 7 sliders for nose (early access at patreon)
Public Access on 30 November
Thanks for supporting me! ♥
8K notes
·
View notes
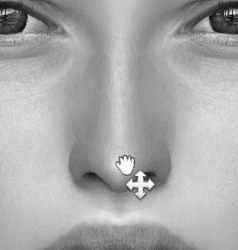
Photo
DL 7 sliders for nose (early access at patreon)
Public Access on 30 November
Thanks for supporting me! ♥
8K notes
·
View notes
Text
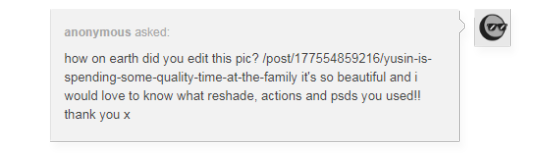
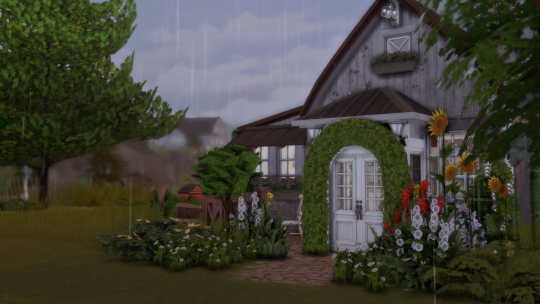
Okay, nonny, here’s the outdoor pic edit of mine. (I’ll do the indoor one later)
1. This is the before the edits pic which was taken with Whiisker SoftDreams reshade preset. I think I had the “ambient light” setting off, or what ever causes the pretty pinkish tone in this preset.
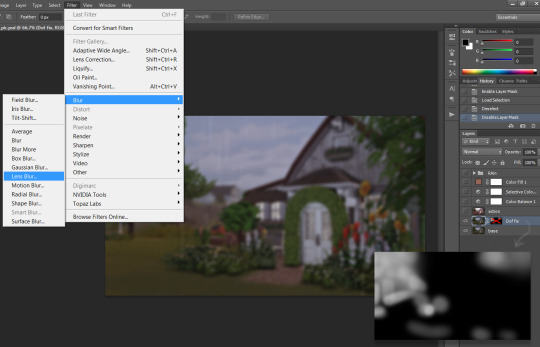
2. I duplicated the layer and added a field blur. Then I painted a mask to define what areas I needed blurred exactly. I did this to get a better control for the depth of field since the reshade didn’t do it exactly the way I wanted.
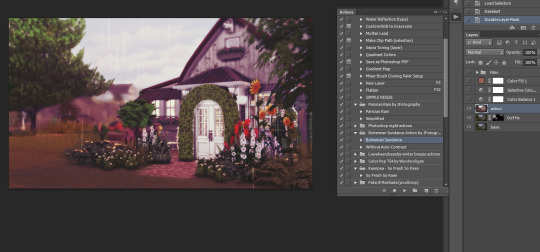
3. Then I used Bohemian Sundance action. I don’t usually use this action for sim pics, but I randomly tried it and it gave this image much more interesting feel so I kept it.
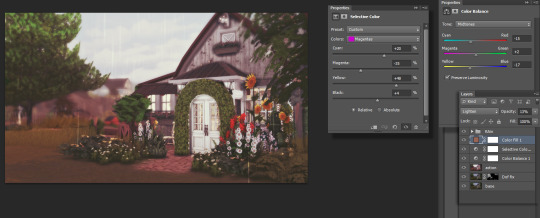
4. I added a couple of adjustment layers to fix the tones because the action made it too purple. Color balance + Selective color to lessen the magenta. (You can right click the image and open it as a new tab to see the settings closely) Lastly I added a color-fill adjustment layer with a ‘Lighten’ mode.
5. Next I added more rain with free rain and splash brushes because there wasn’t enough rain in that pic. I adjusted opacity of the rain layers and masked away anything I didn’t want!


And that is it! This is in no way a pro editing method of any kind, it’s just my trial and error of trying different things 。^‿^。 Feel free to ask for a clarification if something was unclear~
300 notes
·
View notes
Photo


COCONUT TREE INFANT HAIR
Conversion - Mesh Edit - Mashup
Compatible with HQ Mod
Category: Hair
Custom Thumbnail
All LOD’s
Mesh “included” - Mashup of Cazy’s Joey Hair (TS3) and BFlySims Hair 081 (TS3) - All mesh credits goes to Cazy’s \ Butterfly Sims so you can download and support the original creator, without them this work wouldn’t have been possible! ♥
♦ @redheadsims-cc tag on your photos, and let me see! thx. ❥


COCONUT INFANT HAIR | DOWNLOAD - (no adfly)

COCONUT FULL HAIR | DOWNLOAD - (no adfly)

COCONUT TREE INFANT HAIR | DOWNLOAD - (no adfly)

COCONUT TREE FULL HAIR | DOWNLOAD - (no adfly)

♡ [PAYPAL] | [PATREON] ⇠ my own contents in early access only.

♡ Thanks for all that helped
♡ Thank you for using
♡ Thanks for the original Creator
♡ Thanks for all CC creators
♡ Thank for support me

× Do not put in any pack
× Do not re-upload
× Recolor Allowed
× Conversion Allowed

LINK BROKEN, ORIGINAL MESH CREDITS OR ANY PROBLEM PLEASE CONTACT ME BY MESSAGE.
1K notes
·
View notes