
Don't wanna be here? Send us removal request.
Statistics
We looked inside some of the posts by manish12jugran-blog and here's what we found interesting.
Average Info
Notes Per Post
1
Likes Per Post
1
Reblog Per Post
0
Reply Per Post
0
Time Between Posts
5 days
Number of Posts By Type
Text
13
Last Seen Tumblr Blogs


Fun Fact
Tumblr has a 66 index score for customer satisfaction in the US.
Text
Temp and Humidity Alert Using AWS and ESP32

In this tutorial, we will measure different temperature and humidity data using Temp and humidity sensor. You will also learn how to send this data to AWS.
Hardware
ESP-32: The ESP32 makes it easy to use the Arduino IDE and the Arduino Wire Language for IoT applications. This ESp32 IoT Module combines Wi-Fi, Bluetooth, and Bluetooth BLE for a variety of diverse applications. This module comes fully-equipped with 2 CPU cores that can be controlled and powered individually, and with an adjustable clock frequency of 80 MHz to 240 MHz. This ESP32 IoT WiFi BLE Module with Integrated USB is designed to fit in all ncd.io IoT products. Monitor sensors and control relays, FETs, PWM controllers, solenoids, valves, motors and much more from anywhere in the world using a web page or a dedicated server. We manufactured our version of the ESP32 to fit into NCD IoT devices, offering more expansion options than any other device in the world! An integrated USB port allows easy programming of the ESP32. The ESP32 IoT WiFi BLE Module is an incredible platform for IoT application development. This ESP32 IoT WiFi BLE Module can be programmed using the Arduino IDE.
IoT Long Range Wireless Temperature and Humidity Sensor: Industrial Long Range Wireless Temperature Humidity Sensor. Grade with a Sensor Resolution of ±1.7%RH ±0.5°C. Up to 500, 000 Transmissions from 2 AA Batteries. Measures -40°C to 125°C with Batteries that Survive these Ratings.Superior 2-Mile LOS Range & 28 miles with High-Gain Antennas.Interface to Raspberry Pi, Microsoft Azure, Arduino and More
Software Used
Arduino IDE
AWS IoT
Library Used
PubSubClient Library
Wire.h
AWS_IOT.h
Uploading the Code to ESP32 using Arduino IDE
Download and include the PubSubClient Library and Wire.h Library.
Download the Zip file of AWS_IoT, from the given link and after extracting, paste the library in your Arduino library folder.
You can get the Arduino code here.
You must assign your unique AWS MQTT_TOPIC, AWS_HOST, SSID (WiFi Name) and Password of the available network.
MQTT topic and AWS HOST can get inside Things-Interact at AWS-IoT console.


Compile and upload the ESP32_AWS.ino code.
Before uploading the code add a certificate inside the AWS_IOT folder to aws_iot_certficates.c, which is done in further steps.
To verify the connectivity of the device and the data sent, open the serial monitor. If no response is seen, try unplugging your ESP32 and then plugging it again. Make sure the baud rate of the Serial monitor is set to the same one specified in your code 115200.
Serial Monitor Output

Making the AWS Work
youtube
Create Thing and Certificate
THING: It is a virtual representation od your device.
CERTIFICATE: Authenticates the identity of a THING.
Open AWS-IoT
Click on manage -THING -Register THING.
Click on create a single thing.
Give the Thing name and type.
Click on next.
Now your certificate page will open, click on Create Certificate.
Download these Certificates, mainly private key, a certificate for this thing and root_ca and keep them in a separate folder.
Inside root_ca certificate click on Amazon root CA1-Copy it-Paste it to notepad and save it as a root_ca.txt file in your certificate folder.
Create Policy
youtube
It defines which operation a device or user can access.
Go to the AWS-IoT interface, Click on Secure-Policies.
Click on Create.
Fill all the necessary details such as policy name, Click Create.
Now go back to the AWS-IoT interface, Click on Secure-Certificates and attach the policy created just now to it.
Add Private key, Certificate and root_CA to Code
Open your downloaded certificate in your text editor(Notepad++), mainly private key, root_CA and certificate of thing and edit them as the format of aws_iot_certficates.c inside AWS_IOT folder.
Now open your AWS_IoT folder in your Arduino library -My Document. Go to C:\Users \xyz\Documents\Arduino\libraries\AWS_IOT\src, click on aws_iot_certficates.c, open it on an editor and paste all the edited certificate their at the required place, save it.


Getting Output
youtube
Go to test in the AWS_IoT console.

Fill your MQTT topic to Subscription topic in your test credentials.

Now you can view your temp and humidity data.
Output

Steps to Make Mail Alerts
youtube
You set up Amazon Simple Notification Service (Amazon SNS) for creating mail alert to receivers address for different temperature and humidity readings.
Go to AWS IoT console -Click on Act.
Don't have any rule -Click on create a rule.
On this page Name the rule i.e AlertTempEsp32, also provide the description(Creating mail alert of Temp and Humidity sensors data).
Now create Rule Query Statement(SQL statement for processing data from source).In this the statement used is
SELECT*FROM'$aws/things/Temp_Humidity_esp32/shadow/update'
$aws/things/Temp_Humidity_esp32/shadow/update, Go to AWS IoT Console -Manage-Thing-Click on your created Thing -Interact.
To choose an action Click on ADD Action.
Select send a message as an SNS push notification.
Now Configure Action selected. for SNS target-choose Create. Enter a name for the SNS topic, such as Temp_Humidity_Esp32Topic.Message Format -Raw. Create role -Temp_Humidity_Esp32TopicRole.
Add Action.
Create a rule.
Create Amazon SNS to send the messages through your Amazon SNS topic to your email inbox. Click on Services.
youtube
Search SNS. Click on SNS.
In Amazon SNS -Click on Subscription. Select the topic ARN.Protocol-Email -Give your email Address on which alert to be sent.
Now click on Create Subscription.
After clicking the Create Subscription. You have to confirm Subscription by clicking on the mail, that is sent to your registered mail ID.

Confirm Subscription link.

OUTPUT

0 notes
Text
Monitoring-Temp-and-Humidity-using-AWS-ESP32

In this tutorial, we will measure different temperature and humidity data using Temp and humidity sensor. You will also learn how to send this data to AWS.
Hardware :
ESP-32: The ESP32 makes it easy to use the Arduino IDE and the Arduino Wire Language for IoT applications. This ESp32 IoT Module combines Wi-Fi, Bluetooth, and Bluetooth BLE for a variety of diverse applications. This module comes fully-equipped with 2 CPU cores that can be controlled and powered individually, and with an adjustable clock frequency of 80 MHz to 240 MHz. This ESP32 IoT WiFi BLE Module with Integrated USB is designed to fit in all ncd.io IoT products. Monitor sensors and control relays, FETs, PWM controllers, solenoids, valves, motors and much more from anywhere in the world using a web page or a dedicated server. We manufactured our own version of the ESP32 to fit into NCD IoT devices, offering more expansion options than any other device in the world! An integrated USB port allows easy programming of the ESP32. The ESP32 IoT WiFi BLE Module is an incredible platform for IoT application development. This ESP32 IoT WiFi BLE Module can be programmed using the Arduino IDE.
IoT Long Range Wireless Temperature And Humidity Sensor: Industrial Long Range Wireless Temperature Humidity Sensor. Grade with a Sensor Resolution of ±1.7%RH ±0.5° C.Up to 500,000 Transmissions from 2 AA Batteries.Measures -40°C to 125°C with Batteries that Survive these Ratings.Superior 2-Mile LOS Range & 28 miles with High-Gain Antennas.Interface to Raspberry Pi, Microsoft Azure, Arduino and More
Long-Range Wireless Mesh Modem with USB Interface
Software Used:
Arduino IDE
AWS
Library Used:
PubSubClient Library
Wire.h
AWS_IOT.h
Uploading the code to ESP32 using Arduino IDE:
Download and include the PubSubClient Library and Wire.h Library.
Download the Zip file of AWS_IoT, from the given link and after extracting, paste the library in your Arduino library folder.
You must assign your unique AWS MQTT_TOPIC, AWS_HOST, SSID (WiFi Name) and Password of the available network.
MQTT topic and AWS HOST can get inside Things-Interact at AWS-IoT console.
Compile and upload the ESP32_AWS.ino code.
To verify the connectivity of the device and the data sent, open the serial monitor. If no response is seen, try unplugging your ESP32 and then plugging it again. Make sure the baud rate of the Serial monitor is set to the same one specified in your code 115200.
Serial monitor output.

Making the AWS work.
CREATE THING AND CERTIFICATE
THING: It is a virtual representation od your device.
CERTIFICATE: Authenticates the identity of a THING.
Open AWS-IoT


Click on manage -THING -Register THING.
Click on create a single thing.

Give the Thing name and type.

Click on next.

Now your certificate page will open, Click on Create Certificate.

Download these Certificates, mainly private key, a certificate for this thing and root_ca and keep them in a separate folder.

Inside root_ca certificate click on Amazon root CA1-Copy it-Paste it to notepad and save it as a root_ca.txt file in your certificate folder.

Create Policy
It defines which operation a device or user can access.
Go to the AWS-IoT interface, Click on Secure-Policies.

Click on Create.

Fill all the necessary details such as policy name, Click Create.
Now go back to the AWS-IoT interface, Click on Secure-Certificates and attach the policy created just now to it.


Add Private key, Certificate and root_CA to code.
Open your downloaded certificate in your text editor(Notepad++), mainly private key, root_CA and certificate of thing and edit them as given below.

Now open your AWS_IoT folder in your Arduino library -My Document. Go to C:\Users \xyz\Documents\Arduino\libraries\AWS_IOT\src, click on aws_iot_certficates.c, open it on an editor and paste all the edited certificate they're at the required place, save it.
Getting Output-
Go to test in the AWS_IoT console.

Fill your MQTT topic to Subscription topic in your test credentials.

Now you can view your temp and humidity data.
OUTPUT

0 notes
Text
ThingSpeak, IFTTT, Temp and Humidity Sensor and Google Sheet
Story

In this project, we will measure temperature and humidity using NCD temperature and humidity sensor, ESP32, and ThingSpeak. We will also send different temperature and humidity readings to Google Sheet using ThingSpeak and IFTTT for analyzing the sensor data.
Hardware
ESP-32: The ESP32 makes it easy to use the Arduino IDE and the Arduino Wire Language for IoT applications. This ESP32 IoT Module combines Wi-Fi, Bluetooth, and Bluetooth BLE for a variety of diverse applications. This module comes fully-equipped with 2 CPU cores that can be controlled and powered individually, and with an adjustable clock frequency of 80 MHz to 240 MHz. This ESP32 IoT WiFi BLE Module with Integrated USB is designed to fit in all ncd.io IoT products. Monitor sensors and control relays, FETs, PWM controllers, solenoids, valves, motors and much more from anywhere in the world using a web page or a dedicated server. We manufactured our own version of the ESP32 to fit into NCD IoT devices, offering more expansion options than any other device in the world! An integrated USB port allows easy programming of the ESP32. The ESP32 IoT WiFi BLE Module is an incredible platform for IoT application development. This ESP32 IoT WiFi BLE Module can be programmed using the Arduino IDE.
IoT Long Range Wireless Temperature and Humidity Sensor: Industrial Long Range Wireless Temperature Humidity Sensor. Grade with a Sensor Resolution of ±1.7%RH ±0.5°C. Up to 500, 000 Transmissions from 2 AA Batteries. Measures -40°C to 125°C with Batteries that Survive these Ratings.Superior 2-Mile LOS Range & 28 miles with High-Gain Antennas.Interface to Raspberry Pi, Microsoft Azure, Arduino and More
Long-Range Wireless Mesh Modem with USB Interface
Software Used
Arduino IDE
ThingSpeak
IFTTT
Library Used
PubSubClient Library
Wire.h
Arduino Client for MQTT
This library provides a client for doing simple publish/subscribe messaging with a server that supports MQTT
For more information about MQTT, visit mqtt.org.
Download
The latest version of the library can be downloaded from GitHub
Documentation
The library comes with a number of example sketches. See File > Examples > PubSubClient within the Arduino application. Full API Documentation.
Compatible Hardware
The library uses the Arduino Ethernet Client API for interacting with the underlying network hardware. This means it Just Works with a growing number of boards and shields, including:
Arduino Ethernet
Arduino Ethernet Shield
Arduino YUN – use the included YunClient in place of EthernetClient, and be sure to do a Bridge.begin() first
Arduino WiFi Shield - if you want to send packets greater than 90 bytes with this shield, enable the MQTT_MAX_TRANSFER_SIZE option in PubSubClient.h.
Sparkfun WiFly Shield – when used with this library
Intel Galileo/Edison
ESP8266
ESP32The library cannot currently be used with hardware based on the ENC28J60 chip – such as the Nanode or the Nuelectronics Ethernet Shield. For those, there is an alternative library available.
Wire Library
The Wire library allows you to communicate with I2C devices, often also called "2 wire" or "TWI" (Two Wire Interface), can download from Wire.h
Basic Usage
Wire.begin()Begin using Wire in master mode, where you will initiate and control data transfers. This is the most common use when interfacing with most I2C peripheral chips.
Wire.begin(address)Begin using Wire in slave mode, where you will respond at "address" when other I2C masters chips initiate communication.
Transmitting
Wire.beginTransmission(address)Start a new transmission to a device at "address". Master mode is used.
Wire.write(data)Send data. In master mode, beginTransmission must be called first.
Wire.endTransmission()In master mode, this ends the transmission and causes all buffered data to be sent.
Receiving
Wire.requestFrom(address, count)Read "count" bytes from a device at "address". Master mode is used.
Wire.available()Returns the number of bytes available by calling receive.
Wire.read()Receive 1 byte.
Uploading the Code to ESP32 using Arduino IDE
Before uploading the code you can view the working of this sensor at a given link.
Download and include the PubSubClient Library and Wire.h Library.
You must assign your API key, SSID (WiFi Name) and Password of the available network.
Compile and upload the Temp-ThinSpeak.ino code.
To verify the connectivity of the device and the data sent, open the serial monitor. If no response is seen, try unplugging your ESP32 and then plugging it again. Make sure the baud rate of the Serial monitor is set to the same one specified in your code 115200.
Serial Monitor Output

Output

Create an IFTTT Applet
To send data to ThingSpeak you can view it at this link.
IFTTT is a web service that lets you create applets that act in response to another action. You can use the IFTTT Webhooks service to create web requests to trigger an action. The incoming action is an HTTP request to the webserver, and the outgoing action is an email message.
First, create an IFTTT account.
Create an applet. Select My Applets.

Click the New Applet button.

Select the input action. Click the word this.

Click the Webhooks service. Enter Webhooks in the search field. Select the Webhooks.


Choose a trigger.
Complete the trigger fields. After you select Webhooks as the trigger, click the Receive a web request box to continue. Enter an event name.

Create trigger.

Now the trigger is created, for resulting action click That.

Enter “Google Sheets” in the search bar, and select the “Google Sheets” box.

If you have not connected to Google Sheet, then connect it first. Now choose action. Select add a row to a spreadsheet.

Then, complete the action fields.

Your applet should be created after you press the Finish.
Retrieve your Webhooks trigger information. Select My Applets, Services and search for Webhooks. Click Webhooks and Documentation button. You see your key and the format for sending a request. Enter the event name. The event name for this example is VibrationAndTempData.You can test the service using the test button or by pasting the URL into your browser.


Create a MATLAB Analysis
You can use the result of your analysis to trigger web requests, such as writing a trigger to IFTTT.
Click Apps, MATLAB Analysis and select New.

Select Trigger Email from IFTTT in the Examples section. The code below is prepopulated in your MATLAB analysis window.


Name your analysis and modify the code.

Save your MATLAB Analysis.
Create a Time Control to Run Your Analysis
Evaluate your ThingSpeak channel data and trigger other events.
Click Apps, TimeControl, and then click New TimeControl.


Save your TimeControl.

Output

0 notes
Text
Alert-using-ThingSpeak+ESP32-Wireless-Temp- Humidity-Sensor
Story

In this tutorial, we will measure different temperature and humidity data using Temp and humidity sensor. You will also learn how to send this data to ThingSpeak. So that you can create a temp alert in your mail at a particular value.
Hardware :
ESP-32: The ESP32 makes it easy to use the Arduino IDE and the Arduino Wire Language for IoT applications. This ESp32 IoT Module combines Wi-Fi, Bluetooth, and Bluetooth BLE for a variety of diverse applications. This module comes fully-equipped with 2 CPU cores that can be controlled and powered individually, and with an adjustable clock frequency of 80 MHz to 240 MHz. This ESP32 IoT WiFi BLE Module with Integrated USB is designed to fit in all ncd.io IoT products. Monitor sensors and control relays, FETs, PWM controllers, solenoids, valves, motors and much more from anywhere in the world using a web page or a dedicated server. We manufactured our own version of the ESP32 to fit into NCD IoT devices, offering more expansion options than any other device in the world! An integrated USB port allows easy programming of the ESP32. The ESP32 IoT WiFi BLE Module is an incredible platform for IoT application development. This ESP32 IoT WiFi BLE Module can be programmed using the Arduino IDE.
IoT Long Range Wireless Temperature And Humidity Sensor: Industrial Long Range Wireless Temperature Humidity Sensor. Grade with a Sensor Resolution of ±1.7%RH ±0.5° C.Up to 500,000 Transmissions from 2 AA Batteries.Measures -40°C to 125°C with Batteries that Survive these Ratings.Superior 2-Mile LOS Range & 28 miles with High-Gain Antennas.Interface to Raspberry Pi, Microsoft Azure, Arduino and More
Long-Range Wireless Mesh Modem with USB Interface
Software Used:
Arduino IDE
ThingSpeak
IFTTT
Library Used:
PubSubClient Library
Wire.h
Arduino Client for MQTT
This library provides a client for doing simple publish/subscribe messaging with a server that supports MQTT
For more information about MQTT, visit mqtt.org.
Download
The latest version of the library can be downloaded from GitHub
Documentation
The library comes with a number of example sketches. See File > Examples > PubSubClient within the Arduino application. Full API Documentation.
Compatible Hardware
The library uses the Arduino Ethernet Client API for interacting with the underlying network hardware. This means it Just Works with a growing number of boards and shields, including:
Arduino Ethernet
Arduino Ethernet Shield
Arduino YUN – use the included YunClient in place of EthernetClient, and be sure to do a Bridge.begin() first
Arduino WiFi Shield - if you want to send packets greater than 90 bytes with this shield, enable the MQTT_MAX_TRANSFER_SIZE option in PubSubClient.h.
Sparkfun WiFly Shield – when used with this library
Intel Galileo/Edison
ESP8266
ESP32The library cannot currently be used with hardware based on the ENC28J60 chip – such as the Nanode or the Nuelectronics Ethernet Shield. For those, there is an alternative library available.
Wire Library
The Wire library allows you to communicate with I2C devices, often also called "2 wire" or "TWI" (Two Wire Interface), can download from Wire.h
Basic Usage
Wire.begin()Begin using Wire in master mode, where you will initiate and control data transfers. This is the most common use when interfacing with most I2C peripheral chips.
Wire.begin(address)Begin using Wire in slave mode, where you will respond at "address" when other I2C masters chips initiate communication.
Transmitting
Wire.beginTransmission(address)Start a new transmission to a device at "address". Master mode is used.
Wire.write(data)Send data. In master mode, beginTransmission must be called first.
Wire.endTransmission()In master mode, this ends the transmission and causes all buffered data to be sent.
Receiving
Wire.requestFrom(address, count)Read "count" bytes from a device at "address". Master mode is used.
Wire.available()Returns the number of bytes available by calling receive.
Wire.read()Receive 1 byte.
Uploading the code to ESP32 using Arduino IDE:
Before uploading the code you can view the working of this sensor at a given link.
Download and include the PubSubClient Library and Wire.h Library.
You must assign your API key, SSID (WiFi Name) and Password of the available network.
Compile and upload the Temp-ThinSpeak.ino code.
To verify the connectivity of the device and the data sent, open the serial monitor. If no response is seen, try unplugging your ESP32 and then plugging it again. Make sure the baud rate of the Serial monitor is set to the same one specified in your code 115200.
Serial monitor output.

OUTPUT

Create an IFTTT Applet
To send data to ThingSpeak you can view it at this link.
IFTTT is a web service that lets you create applets that act in response to another action. You can use the IFTTT Webhooks service to create web requests to trigger an action. The incoming action is an HTTP request to the webserver, and the outgoing action is an email message.
First, create an IFTTT account.
Create an applet. Select My Applets.

Click the New Applet button.

Select the input action. Click the word this.

Click the Webhooks service. Enter Webhooks in the search field. Select the Webhooks.

Choose a trigger.

Complete the trigger fields. After you select Webhooks as the trigger, click the Receive a web request box to continue. Enter an event name.


Create trigger.
Now the trigger is created, for resulting action click That.

Enter email in the search bar, and select the Email box.

Now choose action. Select the Send me an email box and then enter the message information.


Retrieve your Webhooks trigger information. Select My Applets, Services and search for Webhooks. Click Webhooks and Documentation button. You see your key and the format for sending a request. Enter the event name. The event name for this example is Vibration And TempData. You can test the service using the test button or by pasting the URL into your browser.

Create a MATLAB Analysis
You can use the result of your analysis to trigger web requests, such as writing a trigger to IFTTT.
Click Apps, MATLAB Analysis and select New.


Select Trigger Email from IFTTT in the Examples section. The code below is prepopulated in your MATLAB analysis window.

Name your analysis and modify the code.

Save your MATLAB Analysis.
Create a Time Control to Run Your Analysis
Evaluate your ThingSpeak channel data and trigger other events.
Click Apps, TimeControl, and then click New TimeControl.

Save your TimeControl.


OUTPUT

0 notes
Text
ThingSpeak-ESP32-and-Long-Range-Wireless-Temp-and-Humidity

In this tutorial, we will measure different temperature and humidity data using Temp and humidity sensor. You will also learn how to send this data to ThingSpeak. So that you can analyze it from anywhere for different applications.
Hardware
ESP-32: The ESP32 makes it easy to use the Arduino IDE and the Arduino Wire Language for IoT applications. This ESp32 IoT Module combines Wi-Fi, Bluetooth, and Bluetooth BLE for a variety of diverse applications. This module comes fully-equipped with 2 CPU cores that can be controlled and powered individually, and with an adjustable clock frequency of 80 MHz to 240 MHz. This ESP32 IoT WiFi BLE Module with Integrated USB is designed to fit in all ncd.io IoT products. Monitor sensors and control relays, FETs, PWM controllers, solenoids, valves, motors and much more from anywhere in the world using a web page or a dedicated server. We manufactured our own version of the ESP32 to fit into NCD IoT devices, offering more expansion options than any other device in the world! An integrated USB port allows easy programming of the ESP32. The ESP32 IoT WiFi BLE Module is an incredible platform for IoT application development. This ESP32 IoT WiFi BLE Module can be programmed using the Arduino IDE.
IoT Long Range Wireless Temperature And Humidity Sensor: Industrial Long Range Wireless Temperature Humidity Sensor. Grade with a Sensor Resolution of ±1.7%RH ±0.5°C. Up to 500, 000 Transmissions from 2 AA Batteries. Measures -40°C to 125°C with Batteries that Survive these Ratings.Superior 2-Mile LOS Range & 28 miles with High-Gain Antennas.Interface to Raspberry Pi, Microsoft Azure, Arduino and More
Long-Range Wireless Mesh Modem with USB Interface
Software Used
Arduino IDE
ThingSpeak
Library Used
PubSubClient Library
Wire.h
Arduino Client for MQTT
This library provides a client for doing simple publish/subscribe messaging with a server that supports MQTT
For more information about MQTT, visit mqtt.org.
Download
The latest version of the library can be downloaded from GitHub
Documentation
The library comes with a number of example sketches. See File > Examples > PubSubClient within the Arduino application. Full API Documentation.
Compatible Hardware
The library uses the Arduino Ethernet Client API for interacting with the underlying network hardware. This means it Just Works with a growing number of boards and shields, including:
Arduino Ethernet
Arduino Ethernet Shield
Arduino YUN – use the included YunClient in place of EthernetClient, and be sure to do a Bridge.begin() first
Arduino WiFi Shield - if you want to send packets greater than 90 bytes with this shield, enable the MQTT_MAX_TRANSFER_SIZE option in PubSubClient.h.
SparkFun WiFly Shield – when used with this library
Intel Galileo/Edison
ESP8266
ESP32The library cannot currently be used with hardware based on the ENC28J60 chip – such as the Nanode or the Nuelectronics Ethernet Shield. For those, there is an alternative library available.
Wire Library
The Wire library allows you to communicate with I2C devices, often also called "2 wire" or "TWI" (Two Wire Interface), can download from Wire.h
Basic Usage
Wire.begin()Begin using Wire in master mode, where you will initiate and control data transfers. This is the most common use when interfacing with most I2C peripheral chips.
Wire.begin(address)Begin using Wire in slave mode, where you will respond at "address" when other I2C masters chips initiate communication.
Transmitting
Wire.beginTransmission(address)Start a new transmission to a device at "address". Master mode is used.
Wire.write(data)Send data. In master mode, beginTransmission must be called first.
Wire.endTransmission()In master mode, this ends the transmission and causes all buffered data to be sent.
Receiving
Wire.requestFrom(address, count)Read "count" bytes from a device at "address". Master mode is used.
Wire.available()Returns the number of bytes available by calling receive.
Wire.read()Receive 1 byte.
Uploading the Code to ESP32 Using Arduino IDE
Before uploading the code you can view the working of this sensor at a given link.
Download and include the PubSubClient Library and Wire.h Library.
You must assign your API key, SSID (WiFi Name) and Password of the available network.
Compile and upload the Temp-ThinSpeak.ino code.
To verify the connectivity of the device and the data sent, open the serial monitor. If no response is seen, try unplugging your ESP32 and then plugging it again. Make sure the baud rate of the Serial monitor is set to the same one specified in your code 115200.
Serial Monitor Output

Making ThingSpeak Work
Create the account on ThnigSpeak.
Create a new channel, by clicking on Channels.

Click on My Channels.

Click New Channel.

Inside New Channel, name the channel.

Name the Field inside the Channel, Field is the variable in which the data is published.


Now save the Channel.

Now you can find your API keys on the dashboard. Go to the tap on the homepage and find your 'Write Api Key' which must be updated before uploading the code to ESP32.

Once Channel is created you would be able to view your temperature and Humiditydata in private view with Fields you created inside the Channel.

To plot a graph between Temp and Humidity data, you can use MATLAB Visualization.

For this go to App, Click on MATLAB Visualization.
Inside it selects Custom, in this, we have select plot temperature and wind speed on two different y-axes 8 as an example. Now click create.

MATLAB code will be autogenerated as you create visualization but you have to edit field id, read channel id, can check the following figure.

Then save and run the code.

You would see the plot.
Output

0 notes
Text
Temp/Humidity Data Analysis Using Ubidots and Google-Sheets
Story

In this tutorial, we will measure different temperature and humidity data using temperature and humidity sensor. You will also learn how to send this data to Ubidots. So that you can analyze it from anywhere for different applications. Also by sending this data to google sheets, predictive analysis can be achieved.
Hardware
ESP-32: The ESP32 makes it easy to use the Arduino IDE and the Arduino Wire Language for IoT applications. This ESp32 IoT Module combines Wi-Fi, Bluetooth, and Bluetooth BLE for a variety of diverse applications. This module comes fully-equipped with 2 CPU cores that can be controlled and powered individually, and with an adjustable clock frequency of 80 MHz to 240 MHz. This ESP32 IoT WiFi BLE Module with Integrated USB is designed to fit in all ncd.io IoT products. Monitor sensors and control relays, FETs, PWM controllers, solenoids, valves, motors and much more from anywhere in the world using a web page or a dedicated server. We manufactured our own version of the ESP32 to fit into NCD IoT devices, offering more expansion options than any other device in the world! The integrated USB port allows easy programming of the ESP32. The ESP32 IoT WiFi BLE Module is an incredible platform for IoT application development. This ESP32 IoT WiFi BLE Module can be programmed using the Arduino IDE.
IoT Long Range Wireless Temperature and Humidity Sensor: Industrial Long Range Wireless Temperature Humidity Sensor. Grade with a Sensor Resolution of ±1.7%RH ±0.5°C. Up to 500, 000 Transmissions from 2 AA Batteries. Measures -40°C to 125°C with Batteries that Survive these Ratings.Superior 2-Mile LOS Range & 28 miles with High-Gain Antennas. Interface to Raspberry Pi, Microsoft Azure, Arduino and more.
Software Used
Arduino IDE
Ubidots
Library Used
PubSubClient Library
Wire.h
Arduino Client for MQTT
This library provides a client for doing simple publish/subscribe messaging with a server that supports MQTT.
For more information about MQTT, visit mqtt.org.
Download
The latest version of the library can be downloaded from GitHub
Documentation
The library comes with a number of example sketches. See File > Examples > PubSubClient within the Arduino application. Full API Documentation.
Compatible Hardware
The library uses the Arduino Ethernet Client API for interacting with the underlying network hardware. This means it Just Works with a growing number of boards and shields, including:
Arduino Ethernet
Arduino Ethernet Shield
Arduino YUN – use the included YunClient in place of EthernetClient, and be sure to do a Bridge.begin() first
Arduino WiFi Shield - if you want to send packets greater than 90 bytes with this shield, enable the MQTT_MAX_TRANSFER_SIZE option in PubSubClient.h.
Sparkfun WiFly Shield – when used with this library
Intel Galileo/Edison
ESP8266
ESP32The library cannot currently be used with hardware based on the ENC28J60 chip – such as the Nanode or the Nuelectronics Ethernet Shield. For those, there is an alternative library available.
Wire Library
The Wire library allows you to communicate with I2C devices, often also called "2 wire" or "TWI" (Two Wire Interface), can download from Wire.h
Basic Usage
Wire.begin()Begin using Wire in master mode, where you will initiate and control data transfers. This is the most common use when interfacing with most I2C peripheral chips.
Wire.begin(address)Begin using Wire in slave mode, where you will respond at "address" when other I2C masters chips initiate communication.
Transmitting
Wire.beginTransmission(address)Start a new transmission to a device at "address". Master mode is used.
Wire.write(data)Send data. In master mode, beginTransmission must be called first.
Wire.endTransmission()In master mode, this ends the transmission and causes all buffered data to be sent.
Receiving
Wire.requestFrom(address, count)Read "count" bytes from a device at "address". Master mode is used.
Wire.available()Returns the number of bytes available by calling receive.
Wire.read()Receive 1 byte.
Uploading the Code to ESP32 Using Arduino IDE
Before uploading the code you can view the working of this sensor at a given link.
Download and include the PubSubClient Library and Wire.h Library.
You must assign your unique Ubidots TOKEN, MQTTCLIENTNAME, SSID (WiFi Name) and Password of the available network.
Compile and upload the temp_humidity.ino code.
To verify the connectivity of the device and the data sent, open the serial monitor. If no response is seen, try unplugging your ESP32 and then plugging it again. Make sure the baud rate of the Serial monitor is set to the same one specified in your code 115200.
Serial Monitor Output

Making the Ubidots Work
Create the account on Ubidots
Go to my profile and note down the token key which is a unique key for every account and paste it to your ESP32 code before uploading.
Add a new device to your Ubidots dashboard name ESP32.

Click on devices and select devices in ubidot.

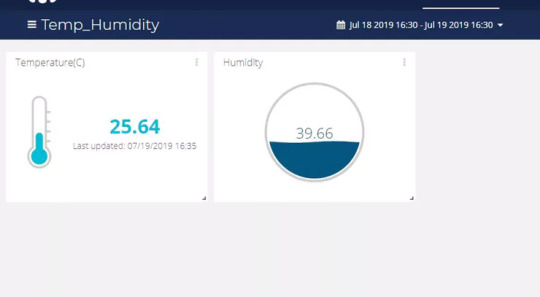
Now you should see the published data in your Ubidots account, inside the device called "ESP32".
Inside the device create a new variable name sensor in which your temperature reading will be shown.

Now you are able to view the Temperature and other sensors data which was previously viewed in serial monitor .This happened because the value of different sensor readings is passed as a string and store in variable and publish to variable inside device esp32.
Create a Dashboard in Ubidots
Click on add a new dashboard.

Name your dashboard.


Now select Widget.

Now select all required option and your widget will create. On which you can view your temp and humidity data.

Output
Export Your Ubidots Data to Google Sheets
In this, we can extract the data stored in the Ubidots cloud for further analysis. The possibilities are enormous; for instance, you could create an automatic report generator and send them to your customers every week.
Another application would be device provisioning; if you have thousands of devices to deploy, and their information is in a Google Sheet, you could create a script to read the sheet and create a Ubidots data source for every line on the file.
Steps to do this:
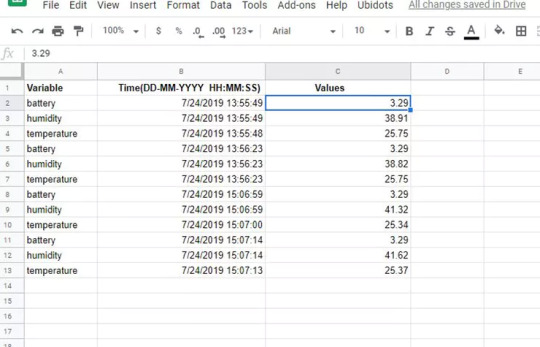
Create a Google Sheet and add two sheets to it with these names:
Variables
Values
From your Google Sheet, click on "Tools" then "Script Editor...", then "Blank Project":
Open the Script Editor:

Add the code below (in the code section) to the script Script.
Also add the Token Id, device Id taken from your Ubidots account to the following code.

Done! now open your Google Sheet again and you'll see a new menu to trigger the functions.

Result
0 notes
Text
Creating-Alert-Using-Ubidots-ESP32+Temp and Humidity Sensor
In this tutorial, we will measure different temperature and humidity data using Temp and humidity sensor. You will also learn how to send this data to Ubidots. So that you can analyze it from anywhere for different applications. Also by creating email alerts for different temperature and humidity data we could be notified about various changes occurring on any system temperature.

Hardware :
ESP-32: The ESP32 makes it easy to use the Arduino IDE and the Arduino Wire Language for IoT applications. This ESp32 IoT Module combines Wi-Fi, Bluetooth, and Bluetooth BLE for a variety of diverse applications. This module comes fully-equipped with 2 CPU cores that can be controlled and powered individually, and with an adjustable clock frequency of 80 MHz to 240 MHz. This ESP32 IoT WiFi BLE Module with Integrated USB is designed to fit in all ncd.io IoT products. Monitor sensors and control relays, FETs, PWM controllers, solenoids, valves, motors and much more from anywhere in the world using a web page or a dedicated server. We manufactured our own version of the ESP32 to fit into NCD IoT devices, offering more expansion options than any other device in the world! An integrated USB port allows easy programming of the ESP32. The ESP32 IoT WiFi BLE Module is an incredible platform for IoT application development. This ESP32 IoT WiFi BLE Module can be programmed using the Arduino IDE.
IoT Long Range Wireless Temperature And Humidity Sensor: Industrial Long Range Wireless Temperature Humidity Sensor. Grade with a Sensor Resolution of ±1.7%RH ±0.5° C.Up to 500,000 Transmissions from 2 AA Batteries.Measures -40°C to 125°C with Batteries that Survive these Ratings.Superior 2-Mile LOS Range & 28 miles with High-Gain Antennas.Interface to Raspberry Pi, Microsoft Azure, Arduino and More
Long-Range Wireless Mesh Modem with USB Interface
Software Used:
Arduino IDE
Ubidots
Library Used:
PubSubClient Library
Wire.h
Arduino Client for MQTT
This library provides a client for doing simple publish/subscribe messaging with a server that supports MQTT
For more information about MQTT, visit mqtt.org.
Download
The latest version of the library can be downloaded from GitHub
Documentation
The library comes with a number of example sketches. See File > Examples > PubSubClient within the Arduino application. Full API Documentation.
Compatible Hardware
The library uses the Arduino Ethernet Client API for interacting with the underlying network hardware. This means it Just Works with a growing number of boards and shields, including:
Arduino Ethernet
Arduino Ethernet Shield
Arduino YUN — use the included YunClient in place of EthernetClient, and be sure to do a Bridge.begin() first
Arduino WiFi Shield — if you want to send packets greater than 90 bytes with this shield, enable the MQTT_MAX_TRANSFER_SIZE option in PubSubClient.h.
Sparkfun WiFly Shield — when used with this library
Intel Galileo/Edison
ESP8266
ESP32The library cannot currently be used with hardware based on the ENC28J60 chip — such as the Nanode or the Nuelectronics Ethernet Shield. For those, there is an alternative library available.
Wire Library
The Wire library allows you to communicate with I2C devices, often also called “2 wire” or “TWI” (Two Wire Interface), can download from Wire.h
Basic Usage
Wire.begin()Begin using Wire in master mode, where you will initiate and control data transfers. This is the most common use when interfacing with most I2C peripheral chips.
Wire.begin(address)Begin using Wire in slave mode, where you will respond at “address” when other I2C masters chips initiate communication.
Transmitting
Wire.beginTransmission(address)Start a new transmission to a device at “address”. Master mode is used.
Wire.write(data)Send data. In master mode, beginTransmission must be called first.
Wire.endTransmission()In master mode, this ends the transmission and causes all buffered data to be sent.
Receiving
Wire.requestFrom(address, count)Read “count” bytes from a device at “address”. Master mode is used.
Wire.available()Returns the number of bytes available by calling receive.
Wire.read()Receive 1 byte.
Steps to send data to Labview temperature and humidity platform using IoT Long Range Wireless Temperature And Humidity Sensor and Long Range Wireless Mesh Modem with USB Interface-
First, we need a Labview utility application which is ncd.io Wireless Temperature And Humidity Sensor.exe file on which data can be viewed.
This Labview software will work with ncd.io wireless Temperature sensor only
To use this UI, you will need to install following drivers Install run time engine from here 64bit
32 bit
Install NI Visa Driver
Install LabVIEW Run-Time Engine and NI-Serial Runtime
Getting started guide for this product.
Uploading the code to ESP32 using Arduino IDE:
Download and include the PubSubClient Library and Wire.h Library.
You must assign your unique Ubidots TOKEN, MQTTCLIENTNAME, SSID (WiFi Name) and Password of the available network.
Compile and upload the temp_humidity.ino code.
To verify the connectivity of the device and the data sent, open the serial monitor. If no response is seen, try unplugging your ESP32 and then plugging it again. Make sure the baud rate of the Serial monitor is set to the same one specified in your code 115200.
Serial monitor output.

Making the Ubidot work:
Create the account on Ubidots.
Go to my profile and note down the token key which is a unique key for every account and paste it to your ESP32 code before uploading.
Add a new device to your Ubidots dashboard name esp32.

Click on devices and select devices in Ubidots.

Now you should see the published data in your Ubidots account, inside the device called "ESP32".
Inside the device create a new variable name sensor in which your temperature reading will be shown.


Now you are able to view the Temperature and other sensors data which was previously viewed in the serial monitor. This happened because the value of different sensor readings is passed as a string and store in a variable and publish to a variable inside device esp32.
Create a dashboard in Ubidots
Click on add a new dashboard.

Name your dashboard.


Now select Widget.


Now select all required option and your widget will create. On which you can view your temp and humidity data.

OUTPUT

Creating events in Ubidots:
Select Events (from the Data dropdown).

Now click on Create Event.

Types of EventsUbidots support already integrated events to allow you to send Events, Alerts, and Notifications to those who need to know when they need to know. Ubidots’ prebuilt integrations include:
1. Email notifications
2. SMS notifications
3. Webhook events — learn more
4. Telegram notifications
5. Slack notifications — learn more
6. Voice Call notifications — learn more
7. Back to Normal notification — learn more
8. Geofence notifications — learn more
Then choose a device and associating variable that indicates the devices’ “values”.

Now select a threshold value for your event to trigger and compare it to device values and also select time to trigger your event.
Now, create action type by clicking plus sign.

Establish and configure which actions are to be executed and the message to the receiver: Send SMS, Email, Webhooks, Telegrams, Phone Calls, SLACK, and webhooks to those who need to know.

Now fill all the required fields.


Determine the activity window the events may/may not be executed.


Confirm your Events.
The output of the event in your mail

0 notes
Text
Esp32-Ubidots-Wireless-long-range temperature-And-Humidity
In this tutorial, we will measure different temperature and humidity data using Temp and humidity sensor. You will also learn how to send this data to Ubidots. So that you can analyze it from anywhere for different applications.

Hardware :
ESP-32: The ESP32 makes it easy to use the Arduino IDE and the Arduino Wire Language for IoT applications. This ESp32 IoT Module combines Wi-Fi, Bluetooth, and Bluetooth BLE for a variety of diverse applications. This module comes fully-equipped with 2 CPU cores that can be controlled and powered individually, and with an adjustable clock frequency of 80 MHz to 240 MHz. This ESP32 IoT WiFi BLE Module with Integrated USB is designed to fit in all ncd.io IoT products. Monitor sensors and control relays, FETs, PWM controllers, solenoids, valves, motors and much more from anywhere in the world using a web page or a dedicated server. We manufactured our own version of the ESP32 to fit into NCD IoT devices, offering more expansion options than any other device in the world! The integrated USB port allows easy programming of the ESP32. The ESP32 IoT WiFi BLE Module is an incredible platform for IoT application development. This ESP32 IoT WiFi BLE Module can be programmed using the Arduino IDE.
IoT Long Range Wireless Temperature And Humidity Sensor: Industrial Long Range Wireless Temperature Humidity Sensor. Grade with a Sensor Resolution of ±1.7%RH ±0.5°C. Up to 500, 000 Transmissions from 2 AA Batteries. Measures -40°C to 125°C with Batteries that Survive these Ratings.Superior 2-Mile LOS Range & 28 miles with High-Gain Antennas.Interface to Raspberry Pi, Microsoft Azure, Arduino and More
Long-Range Wireless Mesh Modem with USB Interface
Software Used:
Arduino IDE
Ubidots
Library Used:
PubSubClient Library
Wire.h
Arduino Client for MQTT
This library provides a client for doing simple publish/subscribe messaging with a server that supports MQTT
For more information about MQTT, visit mqtt.org.
Download
The latest version of the library can be downloaded from GitHub
Documentation
The library comes with a number of example sketches. See File > Examples > PubSubClient within the Arduino application. Full API Documentation.
Compatible Hardware
The library uses the Arduino Ethernet Client API for interacting with the underlying network hardware. This means it Just Works with a growing number of boards and shields, including:
Arduino Ethernet
Arduino Ethernet Shield
Arduino YUN — use the included YunClient in place of EthernetClient, and be sure to do a Bridge.begin() first
Arduino WiFi Shield — if you want to send packets greater than 90 bytes with this shield, enable the MQTT_MAX_TRANSFER_SIZE option in PubSubClient.h.
Sparkfun WiFly Shield — when used with this library
Intel Galileo/Edison
ESP8266
ESP32The library cannot currently be used with hardware based on the ENC28J60 chip — such as the Nanode or the Nuelectronics Ethernet Shield. For those, there is an alternative library available.
Wire Library
The Wire library allows you to communicate with I2C devices, often also called “2 wire” or “TWI” (Two Wire Interface), can download from Wire.h
Basic Usage
Wire.begin()Begin using Wire in master mode, where you will initiate and control data transfers. This is the most common use when interfacing with most I2C peripheral chips.
Wire.begin(address)Begin using Wire in slave mode, where you will respond at “address” when other I2C masters chips initiate communication.
Transmitting
Wire.beginTransmission(address)Start a new transmission to a device at “address”. Master mode is used.
Wire.write(data)Send data. In master mode, beginTransmission must be called first.
Wire.endTransmission()In master mode, this ends the transmission and causes all buffered data to be sent.
Receiving
Wire.requestFrom(address, count)Read “count” bytes from a device at “address”. Master mode is used.
Wire.available()Returns the number of bytes available by calling receive.
Wire.read()Receive 1 byte.
Steps to send data to LabVIEW temperature and humidity platform using IoT Long Range Wireless Temperature And Humidity Sensor and Long Range Wireless Mesh Modem with USB Interface-
First, we need a Labview utility application which is ncd.io Wireless Temperature And Humidity Sensor.exe file on which data can be viewed.
This Labview software will work with ncd.io wireless Temperature sensor only
To use this UI, you will need to install following drivers Install run time engine from here 64bit
32 bit
Install NI Visa Driver
Install LabVIEW Run-Time Engine and NI-Serial Runtime
Getting started guide for this product.
Uploading the code to ESP32 using Arduino IDE:
Download and include the PubSubClient Library and Wire.h Library.
You must assign your unique Ubidots TOKEN, MQTTCLIENTNAME, SSID (WiFi Name) and Password of the available network.
Compile and upload the temp_humidity.ino code.
To verify the connectivity of the device and the data sent, open the serial monitor. If no response is seen, try unplugging your ESP32 and then plugging it again. Make sure the baud rate of the Serial monitor is set to the same one specified in your code 115200.
Serial monitor output.

Making the Ubidot work:
Create the account on Ubidots.
Go to my profile and note down the token key which is a unique key for every account and paste it to your ESP32 code before uploading.
Add a new device to your Ubidots dashboard name esp32.

Click on devices and select devices in ubidot.

Now you should see the published data in your Ubidots account, inside the device called "ESP32".
Inside the device create a new variable name sensor in which your temperature reading will be shown.


Now you are able to view the Temperature and other sensors data which was previously viewed in the serial monitor. This happened because the value of different sensor reading is passed as a string and store in a variable and publish to a variable inside device esp32.
Create a dashboard in Ubidots
Click on add a new dashboard.


Name your dashboard.

Now select Widget.


Now select all required option and your widget will create. On which you can view your temp and humidity data.
OUTPUT

0 notes
Text
IoT-ThingSpeak+ESP32-Long Range Wireless Vibration and Temp
In this project, we will measure vibration and temperature using NCD vibration and temperature sensor, ESP32, and ThingSpeak.

Story
Vibration is truly a to and fro movement — or oscillation — of machines and components in motorized gadgets. Vibration in the industrial system may be a symptom, or motive, of a hassle, or it can be associated with everyday operation. For instance, oscillating sanders and vibratory tumblers depend upon vibration to feature. Internal combustion engines and tools drive, then again, revel in a sure amount of unavoidable vibration. Vibration can imply a hassle and if left unchecked can cause harm or expedited deterioration. Vibration can be resulting from one or extra factors at any given time, the maximum not unusual being an imbalance, misalignment, put on, and looseness. This damage can be minimized by analyzing the temperature and vibration data on ThingSpeak using ESP32 and NCD wireless vibration and temperature sensors.

Hardware Required
ESP-32: The ESP32 makes it easy to use the Arduino IDE and the Arduino Wire Language for IoT applications. This ESp32 IoT Module combines Wi-Fi, Bluetooth, and Bluetooth BLE for a variety of diverse applications. This module comes fully-equipped with 2 CPU cores that can be controlled and powered individually, and with an adjustable clock frequency of 80 MHz to 240 MHz. This ESP32 IoT WiFi BLE Module with Integrated USB is designed to fit in all ncd.io IoT products.
IoT Long Range Wireless Vibration and Temperature Sensor: The IoT long-range wireless vibration and temperature sensor is battery operated and wireless, meaning that current or communication wires need not be pulled to get it up and operating. It tracks the vibration information of your machine constantly and captures and operating hours at full resolution together with other temperature parameters. In this, we are using NCD’s long-range IoT Industrial wireless vibration and temperature sensor, boasting up to a 2-mile range using a wireless mesh networking architecture.
Long-Range Wireless Mesh Modem with USB Interface
Software Used:
Arduino IDE
ThigSpeak
Library Used:
PubSubClient Library
Wire.h
Arduino Client for MQTT
This library provides a client for doing simple publish/subscribe messaging with a server that supports MQTT
For more information about MQTT, visit mqtt.org.
Download
The latest version of the library can be downloaded from GitHub
Documentation
The library comes with a number of example sketches. See File > Examples > PubSubClient within the Arduino application. Full API Documentation.
Compatible Hardware
The library uses the Arduino Ethernet Client API for interacting with the underlying network hardware. This means it Just Works with a growing number of boards and shields, including:
Arduino Ethernet
Arduino Ethernet Shield
Arduino YUN – use the included YunClient in place of EthernetClient, and be sure to do a Bridge.begin() first
Arduino WiFi Shield - if you want to send packets greater than 90 bytes with this shield, enable the MQTT_MAX_TRANSFER_SIZE option in PubSubClient.h.
Sparkfun WiFly Shield – when used with this library
Intel Galileo/Edison
ESP8266
ESP32The library cannot currently be used with hardware based on the ENC28J60 chip – such as the Nanode or the Nuelectronics Ethernet Shield. For those, there is an alternative library available.
Wire Library
The Wire library allows you to communicate with I2C devices, often also called "2 wire" or "TWI" (Two Wire Interface), can download from Wire.h
Basic Usage
Wire.begin()Begin using Wire in master mode, where you will initiate and control data transfers. This is the most common use when interfacing with most I2C peripheral chips.
Wire.begin(address)Begin using Wire in slave mode, where you will respond at "address" when other I2C masters chips initiate communication.
Transmitting
Wire.beginTransmission(address)Start a new transmission to a device at "address". Master mode is used.
Wire.write(data)Send data. In master mode, beginTransmission must be called first.
Wire.endTransmission()In master mode, this ends the transmission and causes all buffered data to be sent.
Receiving
Wire.requestFrom(address, count)Read "count" bytes from a device at "address". Master mode is used.
Wire.available()Returns the number of bytes available by calling receive.
Wire.read()Receive 1 byte.
Steps to send data to LabVIEW vibration and temperature platform using IoT Long Range Wireless Vibration and Temperature Sensor and Long Range Wireless Mesh Modem with USB Interface:
First, we need a Labview utility application which is ncd.io Wireless Vibration and Temperature Sensor.exe file on which data can be viewed.
This Labview software will work with ncd.io wireless Vibration Temperature sensor only
To use this UI, you will need to install following drivers Install run time engine from here 64bit
32 bit
Install NI Visa Driver
Install LabVIEW Run-Time Engine and NI-Serial Runtime
Getting started guide for this product.
Uploading the code to ESP32 using Arduino IDE:
Download and include the PubSubClient Library and Wire.h Library.
You must assign your API key, SSID (WiFi Name) and Password of the available network.
Compile and upload the ESP32-ThinSpeak.ino code.
To verify the connectivity of the device and the data sent, open the serial monitor. If no response is seen, try unplugging your ESP32 and then plugging it again. Make sure the baud rate of the Serial monitor is set to the same one specified in your code 115200.
Serial Monitor Output

Making the ThingSpeak Work
Create the account on ThigSpeak.
Create a new channel, by clicking on Channels.

Click on My Channels.

Click New Channel.

Inside New Channel, name the channel.

Name the Field inside the Channel, Field is the variable in which the data is published.


Now save the Channel.

Now you can find your API keys on the dashboard. Go to the tap on the homepage and find your 'Write Api Key' which must be updated before uploading the code to ESP32.

Once Channel is created you would be able to view your temperature and vibration data in private view with Fields you created inside the Channel.

To plot a graph between different vibration data, you can use MATLAB Visualization.
For this go to App, Click on MATLAB Visualization.

Inside it select Custom, in this, we have select create 2-D line plots with y-axes on both left and right sides. Now click create.

MATLAB code will be autogenerated as you create visualization but you have to edit field id, read channel id, can check the following figure.
Then save and run the code.

You would see the plot.
Output

0 notes
Text
IoT- Ubidots- ESP32+Long-Range-Wireless-Vibration-And-Temp
In this project, we will measure vibration and temperature using NCD vibration and temperature sensors, Esp32, Ubidots.

Story
Vibration is truly a to and fro movement—or oscillation—of machines and components in motorized gadgets. Vibration in the industrial system may be a symptom, or motive, of a hassle, or it can be associated with everyday operation. For instance, oscillating sanders and vibratory tumblers depend upon vibration to feature. Internal combustion engines and tools drive, then again, revel in a sure amount of unavoidable vibration. Vibration can imply a hassle and if left unchecked can cause harm or expedited deterioration. Vibration can be resulting from one or extra factors at any given time, the maximum not unusual being an imbalance, misalignment, put on, and looseness. This damage can be minimized by analyzing Temperature and Vibration Data on Ubidots using esp32 and NCD wireless vibration and temperature sensors.

Hardware required:
ESP-32: The ESP32 makes it easy to use the Arduino IDE and the Arduino Wire Language for IoT applications. This ESp32 IoT Module combines Wi-Fi, Bluetooth, and Bluetooth BLE for a variety of diverse applications. This module comes fully-equipped with 2 CPU cores that can be controlled and powered individually, and with an adjustable clock frequency of 80 MHz to 240 MHz. This ESP32 IoT WiFi BLE Module with Integrated USB is designed to fit in all ncd.io IoT products.
IoT Long Range Wireless Vibration And Temperature Sensor: IoT Long Range Wireless Vibration And Temperature Sensor are battery operated and wireless, meaning that current or communication wires need not be pulled to get it up and operating. It tracks the vibration information of your machine constantly and captures and operating hours at full resolution together with other temperature parameters. In this, we are using NCD’s Long Range IoT Industrial wireless vibration and temperature sensor, boasting up to a 2 Mile range using a wireless mesh networking architecture.
Long-Range Wireless Mesh Modem with USB Interface
Software Used:
Arduino IDE
Ubidots
Library Used:
PubSubClient Library
Wire.h
Arduino Client for MQTT
This library provides a client for doing simple publish/subscribe messaging with a server that supports MQTT
For more information about MQTT, visit mqtt.org.
Download
The latest version of the library can be downloaded from GitHub
Documentation
The library comes with a number of example sketches. See File > Examples > PubSubClient within the Arduino application. Full API Documentation.
Compatible Hardware
The library uses the Arduino Ethernet Client API for interacting with the underlying network hardware. This means it Just Works with a growing number of boards and shields, including:
Arduino Ethernet
Arduino Ethernet Shield
Arduino YUN – use the included YunClient in place of EthernetClient, and be sure to do a Bridge.begin() first
Arduino WiFi Shield - if you want to send packets greater than 90 bytes with this shield, enable the MQTT_MAX_TRANSFER_SIZE option in PubSubClient.h.
Sparkfun WiFly Shield – when used with this library.
Intel Galileo/Edison
ESP8266
ESP32The library cannot currently be used with hardware based on the ENC28J60 chip – such as the Nanode or the Nuelectronics Ethernet Shield. For those, there is an alternative library available.
Wire Library
The Wire library allows you to communicate with I2C devices, often also called "2 wire" or "TWI" (Two Wire Interface), which can download from Wire.h.
Basic Usage
Wire.begin()Begin using Wire in master mode, where you will initiate and control data transfers. This is the most common use when interfacing with most I2C peripheral chips.
Wire.begin(address)Begin using Wire in slave mode, where you will respond at "address" when other I2C masters chips initiate communication.
Transmitting
Wire.beginTransmission(address)Start a new transmission to a device at "address". Master mode is used.
Wire.write(data)Send data. In master mode, beginTransmission must be called first.
Wire.endTransmission()In master mode, this ends the transmission and causes all buffered data to be sent.
Receiving
Wire.requestFrom(address, count)Read "count" bytes from a device at "address". Master mode is used.
Wire.available()Returns the number of bytes available by calling receive.
Wire.read()Receive 1 byte.
Steps to send data to LabVIEW vibration and temperature platform using IoT Long Range Wireless Vibration And Temperature Sensor and Long Range Wireless Mesh Modem with USB Interface-
First, we need a Labview utility application which is ncd.io Wireless Vibration and Temperature Sensor.exe file on which data can be viewed.
This Labview software will work with ncd.io wireless Vibration Temperature sensor only
To use this UI, you will need to install following drivers Install run time engine from here 64bit
32 bit
Install NI Visa Driver
Install LabVIEW Run-Time Engine and NI-Serial Runtime.
Getting started guide for this product.
Uploading the code to ESP32 using Arduino IDE:
Download and include the PubSubClient Library and Wire.h Library.
You must assign your unique Ubidots TOKEN, MQTTCLIENTNAME, SSID (WiFi Name) and Password of the available network.
Compile and upload the Ncd__vibration_and_temperature.ino code.
To verify the connectivity of the device and the data sent, open the serial monitor. If no response is seen, try unplugging your ESP32 and then plugging it again. Make sure the baud rate of the Serial monitor is set to the same one specified in your code 115200.
Serial monitor output.

Making the Ubidot work:
Create the account on Ubidot.
Go to my profile and note down the token key which is a unique key for every account and paste it to your ESP32 code before uploading.
Add a new device to your Ubidots dashboard name esp32.

Click on devices and select devices in Ubidots.

Now you should see the published data in your Ubidots account, inside the device called "ESP32".
Inside the device create a new variable name sensor in which your temperature reading will be shown.

Create New variable

Now you are able to view the Temperature and other sensors data which was previously viewed in the serial monitor. This happened because the value of different sensor readings is passed as a string and store in a variable and publish to a variable inside device esp32.
Create a dashboard in Ubidots.

Go to data select dashboard and inside dashboard create different widgets and add a new widget to your dashboard screen.
OUTPUT

0 notes
Text
Creating-Alert-Using-ThingSpeak+ESP32 and Vibration Sensor
Story

Vibration is truly a to and fro movement—or oscillation—of machines and components in motorized gadgets. Vibration in the industrial system may be a symptom, or motive, of a hassle, or it can be associated with everyday operation. For instance, oscillating sanders and vibratory tumblers depend upon vibration to feature. Internal combustion engines and tools drive, then again, revel in a sure amount of unavoidable vibration. Vibration can imply a hassle and if left unchecked can cause harm or expedited deterioration. Vibration can be resulting from one or extra factors at any given time, the maximum not unusual being an imbalance, misalignment, put on, and looseness. This damage can be minimized by analyzing Temperature and Vibration Data on ThingSpeak using esp32 and NCD wireless vibration and temperature sensors.
Hardware
ESP-32: The ESP32 makes it easy to use the Arduino IDE and the Arduino Wire Language for IoT applications. This ESp32 IoT Module combines Wi-Fi, Bluetooth, and Bluetooth BLE for a variety of diverse applications. This module comes fully-equipped with 2 CPU cores that can be controlled and powered individually, and with an adjustable clock frequency of 80 MHz to 240 MHz. This ESP32 IoT WiFi BLE Module with Integrated USB is designed to fit in all ncd.io IoT products.
IoT Long Range Wireless Vibration And Temperature Sensor: The IoT long-range wireless vibration and temperature sensor is battery operated and wireless, meaning that current or communication wires need not be pulled to get it up and operating. It tracks the vibration information of your machine constantly and captures and operating hours at full resolution together with other temperature parameters. In this, we are using NCD’s long-range IoT Industrial wireless vibration and temperature sensor, boasting up to a 2-mile range using a wireless mesh networking architecture.
Long-Range Wireless Mesh Modem with USB Interface
Software Used
Arduino IDE
ThigSpeak
IFTTT
Library Used
PubSubClient Library
Wire.h
Arduino Client for MQTT
This library provides a client for doing simple publish/subscribe messaging with a server that supports MQTT
For more information about MQTT, visit mqtt.org.
Download
The latest version of the library can be downloaded from GitHub
Documentation
The library comes with a number of example sketches. See File > Examples > PubSubClient within the Arduino application. Full API Documentation.
Compatible Hardware
The library uses the Arduino Ethernet Client API for interacting with the underlying network hardware. This means it Just Works with a growing number of boards and shields, including:
Arduino Ethernet
Arduino Ethernet Shield
Arduino YUN – use the included YunClient in place of EthernetClient, and be sure to do a Bridge.begin() first
Arduino WiFi Shield - if you want to send packets greater than 90 bytes with this shield, enable the MQTT_MAX_TRANSFER_SIZE option in PubSubClient.h.
Sparkfun WiFly Shield – when used with this library
Intel Galileo/Edison
ESP8266
ESP32The library cannot currently be used with hardware based on the ENC28J60 chip – such as the Nanode or the Nuelectronics Ethernet Shield. For those, there is an alternative library available.
Wire Library
The Wire library allows you to communicate with I2C devices, often also called "2 wire" or "TWI" (Two Wire Interface), which can download from Wire.h.
Basic Usage
Wire.begin()Begin using Wire in master mode, where you will initiate and control data transfers. This is the most common use when interfacing with most I2C peripheral chips.
Wire.begin(address)Begin using Wire in slave mode, where you will respond at "address" when other I2C masters chips initiate communication.
Transmitting
Wire.beginTransmission(address)Start a new transmission to a device at "address". Master mode is used.
Wire.write(data)Send data. In master mode, beginTransmission must be called first.
Wire.endTransmission()In master mode, this ends the transmission and causes all buffered data to be sent.
Receiving
Wire.requestFrom(address, count)Read "count" bytes from a device at "address". Master mode is used.
Wire.available() Returns the number of bytes available by calling receive.
Wire.read()Receive 1 byte.
Steps to send data to LabVIEW vibration and temperature platform using IoT Long Range Wireless Vibration and Temperature Sensor and Long Range Wireless Mesh Modem with USB Interface:
First, we need a Labview utility application which is ncd.io Wireless Vibration and Temperature Sensor.exe file on which data can be viewed.
This Labview software will work with ncd.io wireless Vibration Temperature sensor only
To use this UI, you will need to install following drivers Install run time engine from here 64bit
32 bit
Install NI Visa Driver
Install LabVIEW Run-Time Engine and NI-Serial Runtime
Getting started guide for this product.
Uploading the Code to ESP32 Using Arduino IDE
Download and include the PubSubClient Library and Wire.h Library.
Compile and upload the ESP32-ThinSpeak.ino code.
You must assign your API key, SSID (WiFi Name) and Password of the available network.
To verify the connectivity of the device and the data sent, open the serial monitor. If no response is seen, try unplugging your ESP32 and then plugging it again. Make sure the baud rate of the Serial monitor is set to the same one specified in your code 115200.
Serial Monitor Output

Making the ThingSpeak Work
Create the account on ThingSpeak
Create a new channel, by clicking on channels

Click on My Channels.

Click New Channel.

Inside New Channel, name the channel.

Name the Field inside the Channel, Field is the variable in which the data is published.

Now save the Channel.

Now you can find your API keys on the dashboard. Go to the tap on the homepage and find your 'Write API Key' which must be updated before uploading the code to ESP32.

Once Channel is created you would be able to view your temperature and vibration data in private view with Fields you created inside the Channel.

To plot a graph between different vibration data, you can use MATLAB Visualization.
For this go to App, Click on MATLAB Visualization.

Inside it select Custom, in this, we have select create 2-D line plots with y-axes on both left and right sides. Now click create.


MATLAB code will be autogenerated as you create visualization but you have to edit field id, read channel id, can check the following figure.
Then save and run the code.

You would see the plot.
Output

Create an IFTTT Applet
IFTTT is a web service that lets you create applets that act in response to another action. You can use the IFTTT Webhooks service to create web requests to trigger an action. The incoming action is an HTTP request to the webserver, and the outgoing action is an email message.
First, create an IFTTT account.
Create an applet. Select My Applets.

Click the New Applet button.

Select the input action. Click the word this.

Click the Webhooks service. Enter Webhooks in the search field. Select the Webhooks.

Choose a trigger.

Complete the trigger fields. After you select Webhooks as the trigger, click the Receive a web request box to continue. Enter an event name.

Create trigger.

Now the trigger is created, for resulting action click That.

Enter email in the search bar, and select the Email box.

Now choose action. Select the Send me an email box and then enter the message information.


Retrieve your Webhooks trigger information. Select My Applets, Services and search for Webhooks. Click Webhooks and Documentation button. You see your key and the format for sending a request. Enter the event name. The event name for this example is VibrationAndTempData.You can test the service using the test button or by pasting the URL into your browser.

Create a MATLAB Analysis
You can use the result of your analysis to trigger web requests, such as writing a trigger to IFTTT.
Click Apps, MATLAB Analysis and select New.
Select Trigger Email from IFTTT in the Examples section. The code below is prepopulated in your MATLAB analysis window.


Name your analysis and modify the code.

Save your MATLAB Analysis.
Create a Time Control to Run Your Analysis
Evaluate your ThingSpeak channel data and trigger other events.
Click Apps, TimeControl, and then click New TimeControl.

Save your TimeControl.

Output
At last Mail, an alert is created.

0 notes
Text
ThingSpeak-IFTTT-ESP32-Predictive-Machine-Monitoring
Predictive analysis of machine vibration and temp by creating mail events and a record of vibration in google sheet using ThingSpeak.

Story
In this project, we will measure vibration and temperature using NCD vibration and temperature sensor, ESP32, and ThingSpeak. We will also send different temperature and vibration readings to Google Sheet using ThingSpeak and IFTTT for analyzing vibration sensor data.
Vibration is truly a to and fro movement—or oscillation—of machines and components in motorized gadgets. Vibration in the industrial system may be a symptom, or motive, of a hassle, or it can be associated with everyday operation. For instance, oscillating sanders and vibratory tumblers depend upon vibration to feature. Internal combustion engines and tools drive, then again, revel in a sure amount of unavoidable vibration. Vibration can imply a hassle and if left unchecked can cause harm or expedited deterioration. Vibration can be resulting from one or extra factors at any given time, the maximum not unusual being an imbalance, misalignment, put on, and looseness. This damage can be minimized by analyzing Temperature and Vibration Data on ThingSpeak using esp32 and NCD wireless vibration and temperature sensors.
Hardware
ESP-32: The ESP32 makes it easy to use the Arduino IDE and the Arduino Wire Language for IoT applications. This ESp32 IoT Module combines Wi-Fi, Bluetooth, and Bluetooth BLE for a variety of diverse applications. This module comes fully-equipped with 2 CPU cores that can be controlled and powered individually, and with an adjustable clock frequency of 80 MHz to 240 MHz. This ESP32 IoT WiFi BLE Module with Integrated USB is designed to fit in all ncd.io IoT products.
IoT Long Range Wireless Vibration And Temperature Sensor: The IoT long-range wireless vibration and temperature sensor is battery operated and wireless, meaning that current or communication wires need not be pulled to get it up and operating. It tracks the vibration information of your machine constantly and captures and operating hours at full resolution together with other temperature parameters. In this, we are using NCD’s long-range IoT Industrial wireless vibration and temperature sensor, boasting up to a 2-mile range using a wireless mesh networking architecture.
Long-Range Wireless Mesh Modem with USB Interface
Software Used
Arduino IDE
ThingSpeak
IFTTT
Library Used
PubSubClient Library
Wire.h
Arduino Client for MQTT
This library provides a client for doing simple publish/subscribe messaging with a server that supports MQTT
For more information about MQTT, visit mqtt.org.
Download
The latest version of the library can be downloaded from GitHub
Documentation
The library comes with a number of example sketches. See File > Examples > PubSubClient within the Arduino application. Full API Documentation.
Compatible Hardware
The library uses the Arduino Ethernet Client API for interacting with the underlying network hardware. This means it Just Works with a growing number of boards and shields, including:
Arduino Ethernet
Arduino Ethernet Shield
Arduino YUN – use the included YunClient in place of EthernetClient, and be sure to do a Bridge.begin() first
Arduino WiFi Shield - if you want to send packets greater than 90 bytes with this shield, enable the MQTT_MAX_TRANSFER_SIZE option in PubSubClient.h.
Sparkfun WiFly Shield – when used with this library
Intel Galileo/Edison
ESP8266
ESP32 – The library cannot currently be used with hardware based on the ENC28J60 chip – such as the Nanode or the Nuelectronics Ethernet Shield. For those, there is an alternative library available.
Wire Library
The Wire library allows you to communicate with I2C devices, often also called "2 wire" or "TWI" (Two Wire Interface), can download from Wire.h
Basic Usage
Wire.begin()Begin using Wire in master mode, where you will initiate and control data transfers. This is the most common use when interfacing with most I2C peripheral chips.
Wire.begin(address)Begin using Wire in slave mode, where you will respond at "address" when other I2C masters chips initiate communication.
Transmitting
Wire.beginTransmission(address)Start a new transmission to a device at "address". Master mode is used.
Wire.write(data)Send data. In master mode, beginTransmission must be called first.
Wire.endTransmission()In master mode, this ends the transmission and causes all buffered data to be sent.
Receiving
Wire.request From(address, count)Read "count" bytes from a device at "address". Master mode is used.
Wire.available() Returns the number of bytes available by calling receive.
Wire.read()Receive 1 byte.
Steps to send data to the LabVIEW vibration and temperature platform using IoT Long Range Wireless Vibration and Temperature Sensor and Long Range Wireless Mesh Modem with USB Interface.
First, we need a Labview utility application which is ncd.io Wireless Vibration and Temperature Sensor.exe file on which data can be viewed.
This Labview software will work with ncd.io wireless Vibration Temperature sensor only
To use this UI, you will need to install following drivers Install run time engine from here 64bit
32 bit
Install NI Visa Driver
Install LabVIEW Run-Time Engine and NI-Serial Runtime
Getting started guide for this product.
Uploading the Code to ESP32 Using Arduino IDE
Download and include the PubSubClient Library and Wire.h Library.
You must assign your API key, SSID (WiFi Name) and Password of the available network.
Compile and upload the ESP32-ThinSpeak.ino code.
To verify the connectivity of the device and the data sent, open the serial monitor. If no response is seen, try unplugging your ESP32 and then plugging it again. Make sure the baud rate of the Serial monitor is set to the same one specified in your code 115200.
Serial Monitor Output

Making the ThingSpeak Work
Create the account on ThigSpeak.
Create a new channel, by clicking on Channels.

Click on My Channels.

Click New Channel.

Inside New Channel, name the channel.

Name the Field inside the Channel, Field is the variable in which the data is published.

Now save the Channel.

Now you can find your API keys on the dashboard. Go to the tap on the homepage and find your 'Write Api Key' which must be updated before uploading the code to ESP32.

Once Channel is created you would be able to view your temperature and vibration data in private view with Fields you created inside the Channel.

To plot a graph between different vibration data, you can use MATLAB Visualization.
For this go to App, Click on MATLAB Visualization.


Inside it select Custom, in this, we have select create 2-D line plots with y-axes on both left and right sides. Now click create.

MATLAB code will be autogenerated as you create visualization but you have to edit field id, read channel id.
Then save and run the code.
You would see the plot.

Output

Create an IFTTT Applet
IFTTT is a web service that lets you create applets that act in response to another action. You can use the IFTTT Webhooks service to create web requests to trigger an action. The incoming action is an HTTP request to the webserver, and the outgoing action is an email message.
First, create an IFTTT account.
Create an applet. Select My Applets.

Click the New Applet button.

Select the input action. Click the word ‘this’.

Click the Webhooks service. Enter Webhooks in the search field. Select the Webhooks.

Choose a trigger.

Complete the trigger fields. After you select Webhooks as the trigger, click the Receive a web request box to continue. Enter an event name.

Create trigger.

Now the trigger is created, for resulting action click That.

Enter “Google Sheets” in the search bar, and select the “Google Sheets” box.

If you have not connected to Google Sheet, then connect it first. Now choose action. Select add a row to a spreadsheet.

Then, complete the action fields.

Your applet should be created after you press the Finish

Retrieve your Webhooks trigger information. Select My Applets, Services and search for Webhooks. Click Webhooks and Documentation button. You see your key and the format for sending a request. Enter the event name. The event name for this example is VibrationAndTempData.You can test the service using the test button or by pasting the URL into your browser.


Create a MATLAB Analysis
You can use the result of your analysis to trigger web requests, such as writing a trigger to IFTTT.
Click Apps, MATLAB Analysis and select New.

Make Trigger data from IFTTT 5 to Google Sheet code. You can take help from Trigger Email from IFTTT in the Examples section.

Name your analysis and modify the code.
Save your MATLAB Analysis.
Create a Time Control to Run Your Analysis
Evaluate your ThingSpeak channel data and trigger other events.
Click Apps, TimeControl, and then click New TimeControl.


Save your TimeControl.

Output
At last, data is retrieved in Google Sheet.

0 notes
Text
Ubidots + ESP32- Predictive Machine Monitoring
Predictive analysis of machine vibration and temp by creating mail events and a record of vibration in google sheet using Ubidots.

Story
Predictive Maintenance and Machine Health Monitoring
The rising of new technology i.e, the Internet of Things, heavy industry has started adopting sensor-based data collection to solve its biggest challenges, principal among them process downtime in the form of shutdowns and process delays. Machine monitoring also called predictive maintenance or condition monitoring is the practice of monitoring electrical equipment through sensors in order to accumulate diagnostic data. To achieve this, data acquisition systems and data loggers are used to monitor all kinds of equipment, such as boilers, motors, and engines. Following condition are measured:
Temperature and Humidity Data Monitoring
Current and Voltage Monitoring
Vibration Monitoring: In this article, we will read Temperature, vibration and publish the data in Ubidots. Ubidots supports graphs, UI, notifications, and emails. These features make it ideal for predictive maintenance analysis. We will also get the data in google sheets which will make predictive maintenance analysis more easier.
Hardware:
ESP-32
IoT Long Range Wireless Vibration And Temperature Sensor
Long-Range Wireless Mesh Modem with USB Interface
Software Used:
Arduino IDE
Ubidots
LabView Utility
Library Used:
PubSubClient Library
Wire.h
Arduino Client for MQTT
This library provides a client for doing simple publish/subscribe messaging with a server that supports MQTT
For more information about MQTT, visit mqtt.org.
Download
The latest version of the library can be downloaded from GitHub
Documentation
The library comes with a number of example sketches. See File > Examples > PubSubClient within the Arduino application.Full API Documentation.
Compatible Hardware
The library uses the Arduino Ethernet Client api for interacting with the underlying network hardware. This means it Just Works with a growing number of boards and shields, including:
Arduino Ethernet
Arduino Ethernet Shield
Arduino YUN – use the included YunClient in place of EthernetClient, and be sure to do a Bridge.begin() first
Arduino WiFi Shield - if you want to send packets greater than 90 bytes with this shield, enable the MQTT_MAX_TRANSFER_SIZE () option in PubSubClient.h.
Sparkfun WiFly Shield – when used with this library
Intel Galileo/Edison
ESP8266
ESP32The library cannot currently be used with hardware based on the ENC28J60 chip – such as the Nanode or the Nuelectronics Ethernet Shield. For those, there is an alternative library available.
Wire Library
The Wire library allows you to communicate with I2C devices, often also called "2 wire" or "TWI" (Two Wire Interface), can download from Wire.h
Basic Usage
Wire.begin()Begin using Wire in master mode, where you will initiate and control data transfers. This is the most common use when interfacing with most I2C peripheral chips.
Wire.begin(address)Begin using Wire in slave mode, where you will respond at "address" when other I2C masters chips initiate communication.
Transmitting
Wire.beginTransmission(address)Start a new transmission to a device at "address". Master mode is used.
Wire.write(data)Send data. In master mode, beginTransmission must be called first.
Wire.endTransmission()In master mode, this ends the transmission and causes all buffered data to be sent.
Receiving
Wire.requestFrom(address, count)Read "count" bytes from a device at "address". Master mode is used.
Wire.available()Returns the number of bytes available by calling receive.
Wire.read()Receive 1 byte.
Steps to send data to Labview vibration and temperature platform using IoT long-range wireless vibration, temperature sensor and long-range wireless mesh modem with USB interface:
First, we need a Labview utility application which is ncd.io Wireless Vibration and Temperature Sensor.exe file on which data can be viewed.
This Labview software will work with ncd.io wireless Vibration Temperature sensor only
To use this UI, you will need to install following drivers Install run time engine from here 64bit
32 bit
Install NI Visa Driver
Install LabVIEW Run-Time Engine and NI-Serial Runtime
Getting started guide for this product.
Uploading the code to ESP32 using Arduino IDE:
Download and include the PubSubClient Library and Wire.h Library.
You must assign your unique Ubidots TOKEN, MQTTCLIENTNAME, SSID (WiFi Name) and Password of the available network.
Compile and upload the Ncd__vibration_and_temperature.ino code.
To verify the connectivity of the device and the data sent, open the serial monitor. If no response is seen, try unplugging your ESP32 and then plugging it again. Make sure the baud rate of the Serial monitor is set to the same one specified in your code 115200.
Serial Monitor Output:

Data on serial monitor of Arduino IDE.
Making the Ubidot Work:
Create the account on Ubidot.
Go to my profile and note down the token key which is a unique key for every account and paste it to your ESP32 code before uploading.
Add a new device to your Ubidot dashboard name ESP32.


Now you should see the published data in your Ubidots account, inside the device called "ESP32".
Inside the device create a new variable name sensor in which your temperature reading will be shown.


Now you are able to view the Temperature and other sensors data which was previously viewed in the serial monitor. This happened because the value of different sensor readings is passed as a string and store in a variable and publish to a variable inside device esp32.
Create a dashboard in ubidots.

Go to data select dashboard and inside dashboard create different widgets and add a new widget to your dashboard screen.
OUTPUT
Now as the temperature/vibration increases and decreases new data available inside the various variable.

Creating Events in Ubidots

1) Select Events (from the Data dropdown).

2) To create a new event, click the yellow plus icon in the upper right corner of the screen.
Types of Events: Ubidots support already integrated events to allow you to send Events, Alerts, and Notifications to those who need to know when they need to know. Ubidots' prebuilt integrations include:
Email notifications
SMS notifications
Webhook events - learn more
Telegram notifications
Slack notifications - learn more
Voice Call notifications - learn more
Back to Normal notification - learn more
Geofence notifications - learn more
3) Then choose a device and associating variable that indicates the devices' "values".

4) Now select a threshold value for your event to trigger and compare it to device values and also select time to trigger your event.
5) Establish and configure which actions are to be executed and the message to the receiver: Send SMS, Email, Webhooks, Telegrams, Phone Calls, SLACK, and webhooks to those who need to know.

6) Configure the Event notice.

7) Determine the activity window the events may/may not be executed.

8) Confirm your Events.
The output of Event in Your Mail:

Export Your Ubidots Data to Google Sheets:
In this, we can extract the data stored in the Ubidots cloud for further analysis. The possibilities are enormous; for instance, you could create an automatic report generator and send them to your customers every week.
Another application would be device provisioning; if you have thousands of devices to deploy, and their information is in a Google Sheet, you could create a script to read the sheet and create a Ubidots data source for every line on the file. Steps to do this-
Create a Google Sheet and add two sheets to it with these names:
Variables
Values
From your Google Sheet, click on "Tools" then "Script Editor...", then "Blank Project".
Open the Script Editor.

Add the code below (in the code section) to the script Script.
Done! now open your Google Sheet again and you'll see a new menu to trigger the functions.

Result:

1 note
·
View note