
Don't wanna be here? Send us removal request.
Statistics
We looked inside some of the posts by manjeeth-salian and here's what we found interesting.
Average Info
Notes Per Post
1
Likes Per Post
1
Reblog Per Post
0
Reply Per Post
0
Time Between Posts
6 days
Number of Posts By Type
Text
17
Last Seen Tumblr Blogs


Fun Fact
There are dozens of funny blogs to kill time on Tumblr.
Text
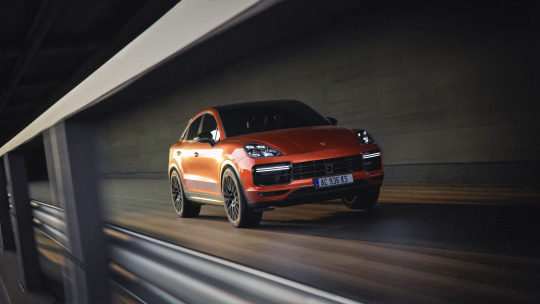
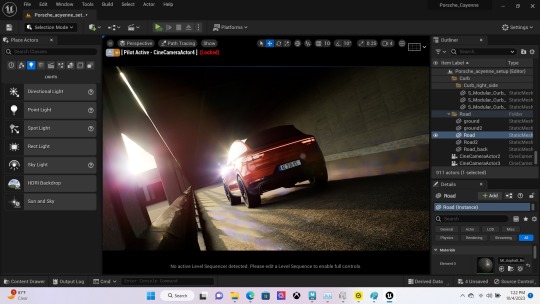
Porsche Cayenne Coupe Pathtracing Render Part -3
As I advanced further in the project, my primary focus remained on refining the scene's lighting to achieve a photorealistic appearance. One critical aspect contributing to the scene's overall appeal involved enabling the bloom effect within the Post Process Volume. A key enhancement was changing the bloom method from the standard setting to convolution, a shift that made a significant difference in the overall visual impact of the scene.

Throughout the project, I encountered a persistent issue related to the background's creation. It had been a source of frustration since the beginning. All the Megascans models, specifically the nanite-based ones, exhibited jagged edges when rendered using Path Tracing, while appearing fine in Lit mode. Recognizing that this was not a problem with the models themselves but rather a rendering issue, I embarked on a quest for a solution.

Guard rail of the left shows the jagged edges
After extensive research, I discovered that adjusting the "Fallback Relative Error" setting in the static mesh details of the nanite models from one to zero resolved the problem. This adjustment needed to be applied to all the nanite models, considering that nanite is not supported in Path Tracing.


Guard rail had no more jagged edges
With this hurdle overcome, my focus shifted to fine-tuning the materials and lighting. Once I achieved a satisfactory lighting setup, material application, and the desired overall look for the scene, I proceeded to create the animation of the car's movement. This animation was executed using the Level Sequencer, with prior tire movement animation completed in Maya before importing the car into the scene.
Upon finalizing all animations, I activated motion blur within the Post Process Volume. The rendering settings were fairly straightforward: a 4K resolution at 24fps, aligned with the animation's frame rate. Rendering at 24fps was chosen because it lent a realistic quality to the motion blur. Antialiasing settings were adjusted as per individual preferences, with a slight increase due to the 4K resolution. Notably, I refrained from using denoiser, as it tended to produce a blotchy, unrealistic appearance within the scene.

With the rendering process completed, the next phase involved post-production work in Photoshop. Tasks included color correction, noise reduction, and subtle contrast adjustments. The final result of these efforts is presented below.

Making Video
0 notes
Text
Porsche Cayenne Coupe Pathtracing Render Part -2
In the preceding section, I shared the initial stages of how the concept for this project took shape and the progress I made in crafting the background. However, there's much more to this creative journey.
Continuing with the development of the background, I expanded on the scene by introducing the side wall and the roof with beams. These structural elements played a crucial role in bringing the background closer to its completion. They provided the necessary framework for the cinematic scene I was striving to achieve.
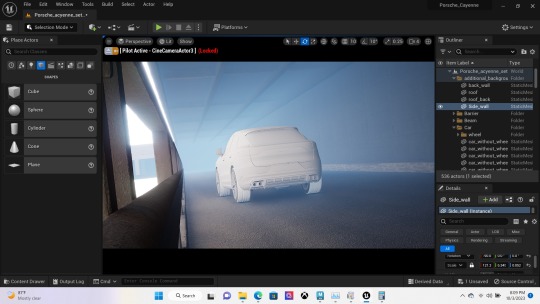
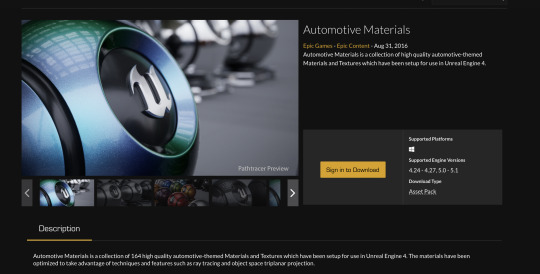
As the background neared its final form, I shifted my focus to enhancing the car's visual appeal. To accomplish this, I incorporated the car paint material, sourced from the readily available automotive material pack found on the marketplace. This step significantly elevated the car's aesthetics, adding a layer of authenticity to its appearance.

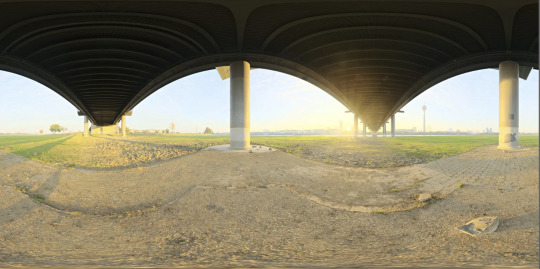
To infuse the scene with even more life and vibrancy, I proceeded to download a suitable HDRI (High Dynamic Range Image) from the resourceful repository of PolyHeaven. This HDRI not only improved the scene's visual quality but also contributed to its overall atmosphere, making it more immersive and captivating.
Moving forward, I turned my attention to refining the car's details by applying various materials. These included materials for plastics, rubber components, and other finer details that collectively contribute to the car's realism and overall visual impact. The intricate application of these materials played a pivotal role in making the car come to life within the cinematic environment.
In essence, this project has been a meticulous endeavor, with each step carefully executed to bring about a captivating and realistic cinematic experience. The journey, as detailed so far, has been a testament to the creative process and the dedication involved in crafting a compelling visual narrative.
Source: Reference:
Zaal, G. (n.d.). Under Bridge HDRI • Poly Haven. [online] Poly Haven. Available at: https://polyhaven.com/a/under_bridge.
Unreal Engine. (n.d.). Automotive Materials in Epic Content - UE Marketplace. [online] Available at: https://www.unrealengine.com/marketplace/en-US/product/automotive-material-pack.
0 notes
Text
Porsche Cayenne Coupe Pathtracing Render Part -1
This project came into being after the completion of my cinematic video using Lumen render in Unreal. Despite finishing the initial project, I wasn't entirely content with the result, which I attributed to the tight deadline under which it was produced. Given the luxury of time, I set my sights on a path tracing render.
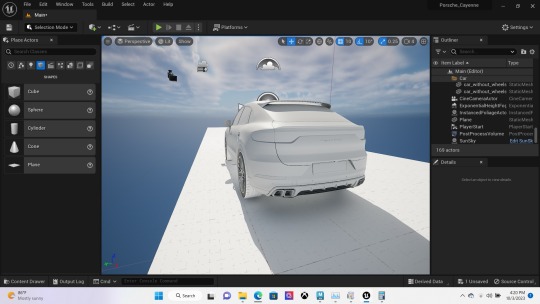
Before delving into this new project, I conducted some research on the Porsche Cayenne Coupe. Here's what I discovered about this vehicle: It isn't an extreme off-roader; rather, it falls into the category of a "soft-roader" with sporty characteristics but not quite a sports car. Essentially, it's designed for urban environments and long-distance journeys, prioritizing comfort. Being a high-performance vehicle, I decided to create a dynamic shot with motion blur to capture its swiftness. Given its urban nature, I envisioned a parking lot as the perfect background. The final concept took shape as a scene where the car gracefully navigates through a parking lot, providing me with a clear vision for the background.

I began by importing the car into Unreal, positioning it, and establishing a basic camera angle. It's important to note that this initial camera angle won't be the final one; however, it provides me with valuable insights into the amount of background content I'll need to create.
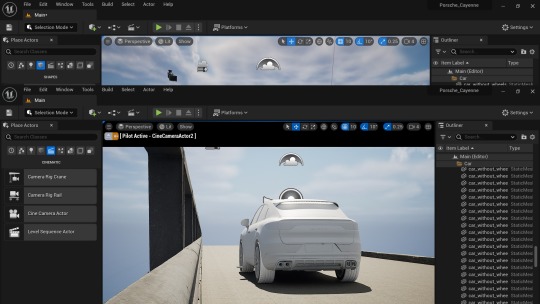
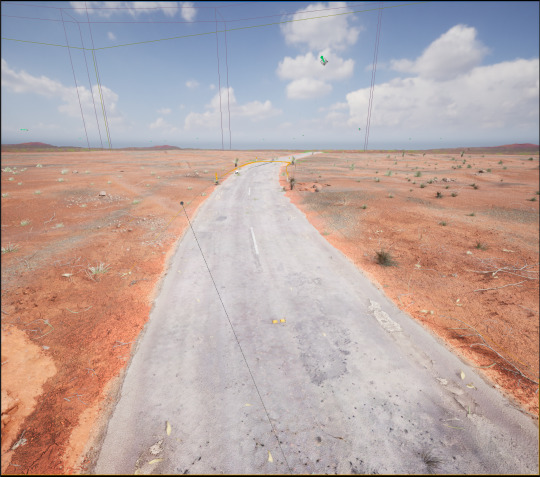
For the background development, I primarily relied on Megascan assets. Initially, I downloaded the guardrails and positioned them. This step provided me with a better sense of perspective and how the scene would evolve, especially in terms of capturing motion blur.
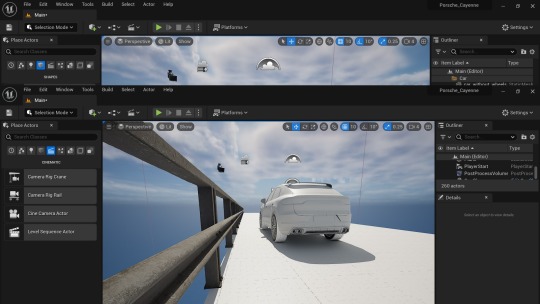
Following this, I introduced the road and curb elements. You can view a screenshot of the progress below.
Source: Reference:
WhichCar. (2019). 2020 Porsche Cayenne Turbo Coupe Review. [online] Available at: https://www.whichcar.com.au/reviews/porsche-cayenne-turbo-coupe-review [Accessed 19 Oct. 2023].
0 notes
Text
Nvidia Omniverse: Transforming Automotive Design and Collaboration
Innovation is essential to staying ahead of the curve in the dynamic world of automobile design and production. A ground-breaking platform called Nvidia Omniverse has become a potent instrument with the potential to completely change the automotive sector. In this post, we'll look at how Nvidia Omniverse is transforming automotive design, simulation, and teamwork and transforming how automobiles are imagined, created, and realized.
Nvidia Omniverse's release A dynamic platform called Nvidia Omniverse combines photorealistic graphics, powerful simulations, and real-time collaboration to build a virtual workspace for seamless cooperation among automobile industry specialists. By providing real-time interactions, dynamic simulations, and improved visualization, Omniverse can transform the automobile design process by leveraging cutting-edge Nvidia technology.
youtube
Use Cases in Automotive Design Omniverse enables automotive designers to visualize their ideas in realistic, lifelike settings for design iteration and visualization. Designers may evaluate how cars appear under various lighting scenarios using real-time ray tracing and dynamic lighting simulation, which helps them improve designs and reach wise conclusions.
youtube
Real-time collaboration with Omniverse's Collaborative Development capability is a game-changer for automotive teams working remotely. Regardless of distance, stakeholders, engineers, and designers may collaborate in real time. This shortens iteration times, improves collaboration, and streamlines the development process.
Automotive engineers can mimic real-world situations using Omniverse's AI-driven capabilities and physics simulation tools. These capabilities enable effective testing and validation of vehicle designs and components before the physical prototype stage, including crash tests and aerodynamics simulations.
Nvidia Omniverse acts as a virtual sandbox for prototyping automobile technology. Engineers can virtually build and test parts to evaluate their fit, functionality, and integration. As a result, fewer physical prototypes are required, which lowers costs and shortens the development process.
youtube
The Automotive Industry Will Benefit Time and money savings are made possible by the real-time collaboration and simulation features of Omniverse. Rapid iterations eliminate the need for numerous physical prototypes and drawn-out testing procedures.
Enhanced Creativity: In a virtual environment free from the restrictions of physical space, designers can experiment with novel concepts. This promotes innovation and permits more risk-taking design decisions.
Better Decision Making Photorealistic visualizations help designers and developers make better decisions by giving a clear grasp of the design choices they have made.
Sustainability & Environmental Impact: By lowering the requirement for physical prototypes and test cars, Omniverse helps the automobile industry adopt a more environmentally friendly strategy while reducing material waste and carbon emissions.
Future Consequences The impact of Omniverse on the automobile sector is expected to increase as Nvidia continues to improve and expand its capabilities. Design, engineering, and stakeholder collaboration on the platform can result in quicker innovation cycles, increased vehicle safety, and even more engaging customer experiences.
Conclusion By providing a complete virtual collaboration, design, and simulation solution, Nvidia Omniverse is revolutionizing the automobile sector. How vehicles are conceptualized, designed, and tested is changing as a result of its real-time capabilities, dynamic simulations, and photorealistic visualization. Nvidia Omniverse is a testament to the revolutionary potential of cutting-edge technology as the automobile industry progresses towards a future that is more digitally connected and networked.
Source: Reference:
www.youtube.com. (n.d.). NVIDIA AI and Omniverse Empower Automakers to Digitalize and Transform Their Workflows. [online] Available at: https://www.youtube.com/watch?v=wy-lZan4dSE [Accessed 14 Aug. 2023].
www.youtube.com. (n.d.). WPP Transforms Automotive Marketing Services with NVIDIA Omniverse Cloud. [online] Available at: https://www.youtube.com/watch?v=UJYyCvxjULE&t=87s [Accessed 14 Aug. 2023].
www.youtube.com. (n.d.). WPP Builds DENZA’s 3D Car Configurator with NVIDIA Omniverse Cloud. [online] Available at: https://www.youtube.com/watch?v=3Bv-7H15hfc [Accessed 14 Aug. 2023].
www.exxactcorp.com. (n.d.). What is NVIDIA’s Omniverse? [online] Available at: https://www.exxactcorp.com/blog/HPC/nvidia-omniverse-overview [Accessed 14 Aug. 2023].
UUUSoftware. (n.d.). What is Nvidia Omniverse and how can it benefit businesses? [online] Available at: https://uuusoftware.com/blog/nvidia-omniverse-what-it-is-and-how-it-can-benefit-your-business [Accessed 14 Aug. 2023].
NVIDIA. (n.d.). Omniverse Platform for Virtual Collaboration. [online] Available at: https://www.nvidia.com/en-gb/omniverse/.
1 note
·
View note
Text
Runway Gen 2: The Future of Video Creation - A Creative Playground with Room for Growth
Runway Gen 2 is an exciting machine learning platform that offers users the opportunity to unleash their creativity through the creation of custom ML models. With a user-friendly interface, it caters to both beginners and experienced developers, making it accessible to a wide range of users. Let's dive into the positive aspects of Runway Gen 2 before discussing some areas that could use improvement.
One of the platform's standout features is its ability to generate new content based on existing data. This capability opens up a world of creative possibilities, such as generating unique artwork, music, and virtual environments. The generated content maintains consistency throughout different frames, even during movement, showcasing the platform's impressive capabilities.
Furthermore, Runway Gen 2 avoids the common issue of flickering or style changes that many other ML-based platforms struggle with. The style remains consistent and coherent, even if it doesn't always produce perfect results. Additionally, the platform's rendering speed is commendable since it operates on their servers, alleviating the need for users to rely on their own GPU power.

A low angle shot of a man walking down a street, illuminated by the neon signs of the bars around him. Driving Prompt
Another remarkable aspect is the platform's collaborative nature, allowing users to work together on projects and share their models. This fosters a community of creators who can inspire and support each other in their artistic endeavors.
Despite these commendable features, there are some areas where Runway Gen 2 falls short. One limitation is the current experimental nature of the generated videos, which lack the quality needed for use in finished products. Although it shows promise, it may not yet meet the standards of professional projects.
youtube
Additionally, the videos generated are limited to just four seconds, restricting their potential applications. While this duration may be suitable for certain creative projects, longer video output would greatly enhance the platform's usability and appeal.
One notable drawback is the simplicity of the user interface. While it is designed to be user-friendly, it lacks the depth of control found in other ML-based platforms like de forum or Kaiser. Users have limited settings to adjust, restricting their artistic expression and creative vision.
Another concerning aspect is the pricing model. To access more minutes for video creation, users must subscribe, but the available minutes remain quite limited, even with a paid plan. This pricing structure may discourage some users from fully embracing the platform, particularly those who desire more creative freedom and control.
In conclusion, Runway Gen 2 is undoubtedly an innovative and promising machine learning platform that provides an accessible creative outlet for users of all skill levels. Its ability to generate content based on existing data is impressive, and the collaborative environment adds value to the platform.
However, there are areas where improvements could be made, such as increasing video duration and refining the quality of the output. Moreover, providing users with more control and flexibility in the interface would enhance their ability to express their artistic vision fully.
Overall, Runway Gen 2 represents a glimpse into the future of AI-powered creativity, but it is still a work in progress. As the technology continues to advance, it will be fascinating to witness the evolution of Runway Gen 2 and how it addresses its current limitations, making it an even more powerful and beloved tool for creative expression.
Source: Reference:
Bhatt, D. (2023). Runway Gen 2: The Next Step Forward for Generative AI(An Introduction). [online] Medium. Available at: https://medium.com/@dbhatt245/runway-gen-2-the-next-step-forward-for-generative-ai-an-introduction-b85bc90d3e45 [Accessed 5 Aug. 2023]. K.sabreena (2023). From Words to Clips: Runway Gen-2 Opens Its Doors to Everyone. [online] Analytics Vidhya. Available at: https://www.analyticsvidhya.com/blog/2023/06/from-words-to-clips-runway-gen-2-opens-its-doors-to-everyone/ [Accessed 5 Aug. 2023].
Runway. (n.d.). Gen-2 by Runway. [online] Available at: https://research.runwayml.com/gen2. www.youtube.com. (n.d.). GEN-2 Text to Video AI by Runway :: Public access. How good is it really? Review and Demo. [online] Available at: https://www.youtube.com/watch?v=TMXQNCVO7Bw [Accessed 5 Aug. 2023].
Cloudfront.net. (2023). Available at: https://d3phaj0sisr2ct.cloudfront.net/research/gen1/videos/eugene/eugene.webm [Accessed 5 Aug. 2023].
Cloudfront.net. (2023). Available at: https://d3phaj0sisr2ct.cloudfront.net/research/eugene.jpg [Accessed 5 Aug. 2023].
0 notes
Text
Self-Reflection: Evaluating My Learning Process
Learning is a continuous journey, and as individuals, we encounter various challenges and triumphs along the way. In this blog, I will reflect on my experiences during the 3D modeling and texturing phases of two projects: AMG ONE and MAD MAX – Buzzard Car. I will also explore the importance of efficient time management, goal setting, and the impact of seeking guidance and feedback in the learning process.
Value of Efficient Time Management: During the AMG ONE project, I learned the importance of efficient time management. By setting challenging yet achievable goals and creating weekly milestones, I was able to monitor my progress effectively. Dedication to investing a significant amount of time in my trade allowed me to excel in my work. However, I faced challenges during the lighting phase, where I struggled to visualize the desired outcome. This additional time investment taught me that sometimes, certain aspects of a project require more attention, and that's okay, as long as it contributes to the overall quality of the work.
Embracing Challenges: The MAD MAX – Buzzard Car project tested my time management skills due to balancing part-time and full-time work. Despite this challenge, I remained committed to my self-imposed deadline. It also provided me with an opportunity to focus on honing my weaker skill—texturing. Each day, I dedicated myself to improving my texturing abilities, seeking excellence in every detail. Embracing these challenges pushed me to grow and improve as an artist.
Seeking Guidance and Feedback: Throughout my learning journey, I have come to appreciate the significance of seeking guidance and feedback from industry experts, colleagues, and professors. In the AMG ONE project, I struggled with the studio lighting aspect. However, by recalling advice from a previous project, I experimented with the golden hour setup and found success. This experience reinforced the value of learning from others' insights and experiences, leading to better results.
Overcoming Obstacles and Perseverance: Both projects taught me the importance of overcoming obstacles and persevering to achieve my goals. Whether it was the uncertainty in the lighting phase or the challenges of balancing work and deadlines, determination and discipline were key. By staying focused and committed, I was able to complete both projects successfully and surpass my own expectations.
The Significance of Developing a Solid Concept: One crucial lesson that emerged from these projects is the importance of developing a clear concept before diving into the work. Although I successfully created stills of the car, I realized that placing the car in a suitable environment requires a well-thought-out concept. Understanding the location and the reason behind it plays a pivotal role in enhancing the overall artwork's impact.
Conclusion: Reflecting on my individual learning processes throughout these projects has been an enriching experience. I have learned the value of efficient time management, the significance of embracing challenges, seeking guidance and feedback, and the power of perseverance and finally the importance of developing a strong concept.. These lessons have not only helped me grow as a 3D artist but also as an individual dedicated to continuous learning and improvement. As I move forward in my artistic journey, I will carry these reflections with me, using them as stepping stones to reach new heights in my creativity and skill. Remember, learning is a dynamic process, and every obstacle we overcome is an opportunity for growth and success.
0 notes
Text
A Time Management: Completing my Third Major Project
Introduction: In this blog post, I will share the final chapter of my journey in managing time and completing my third major project. As mentioned in my previous time management blog, I had set a personal deadline to finish this project within 15 days, leaving me with enough time for edits and documentation before the official final submission deadline, which was about 20 days away. Join me as I recount the final two days of intense work, setting up the scene, adding the truck, post-processing, rendering, and receiving a minor edit that led to the successful completion of all three major projects.
The Final Countdown: With only two days remaining to meet my self-imposed deadline, I was determined to stay on target. I kicked off the final stretch of work by setting up the scene meticulously, ensuring every detail was in place.
Adding the Truck and Post-Processing: As the time ticked away, I focused on adding the truck to the scene, making sure it seamlessly fit into the MAD MAX-inspired environment. Post-processing work was crucial in elevating the overall look and feel of the scene. Each adjustment was carefully considered to enhance the visual impact and bring my creative vision to life.
Rendering and Showcase: With the scene meticulously set up and the truck perfectly integrated, it was time to render the final result. As I watched the progress of the render, eager to see the culmination of days of hard work and dedication. When the render completed, I was met with a sense of pride and satisfaction.
A Minor Edit: The final showcase to my colleagues and professor was met with appreciation and admiration for the hard work and creativity invested. However, as with any project, there was a minor edit suggested. But this feedback served as an opportunity to refine and polish the project further, rather than a setback.
Triumph in Time Management: I am delighted to share that I embraced the minor edit with enthusiasm and completed it within 2 dayS. With this final touch, all three of my major projects were successfully finished well ahead of the scheduled deadline I had set for myself.
Conclusion: My journey in time management and completing the third major project has been a fulfilling and enriching experience. Through careful planning, dedication, and a passion for 3D artistry, I managed to achieve my self-imposed deadline while delivering a project that exceeded expectations. The process of managing time effectively, along with the support and feedback from my colleagues and professor, has been invaluable in my growth as a 3D artist.
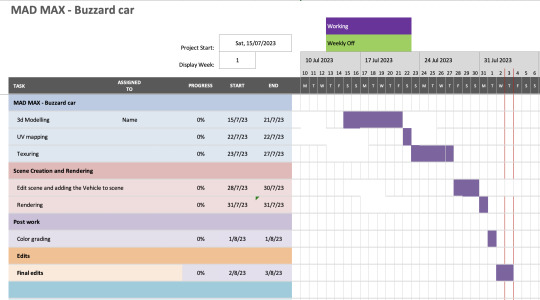
I want to acknowledge that this project took approximately 2 to 3 more days than I had initially estimated, mainly due to the edits I received. The Gantt chart below illustrates the timeline for the project.
0 notes
Text
Unlocking a World of Possibilities with NVIDIA's Neuralangelo: Turning 2D Videos into 3D Structures
In the fast-evolving world of 3D modeling and digital art, NVIDIA research is at the forefront of innovation with its groundbreaking AI model, Neuralangelo. This cutting-edge technology is revolutionizing the creative process by transforming 2D videos into intricate 3D structures. With Neuralangelo, artists can now bring lifelike virtual replicas of real-world objects, buildings, sculptures, and more into existence, ushering in a new era of creative possibilities.
From 2D Videos to Realistic 3D Structures:
Neuralangelo leverages Instant Neural Graphics Primitives, the same technology powering NVIDIA's Instant Neural Radiance Fields (NeRF), which transforms 2D images into 3D models. This powerful AI model enables artists to create detailed 3D representations from 2D videos. The resulting assets can then be seamlessly integrated into design applications, opening up an array of applications in art, video game development, robotics, and industrial digital twins.
The Neuralangelo Process:
To generate a 3D structure, the system begins by selecting multiple frames from the 2D video, determining the camera position of each frame, and creating an initial 3D representation of the scene. This preliminary structure is then further optimized to add sharpness and intricate detail, resulting in highly realistic 3D models.
Presenting the Future at CVPR:
Demonstrating the immense potential of Neuralangelo, NVIDIA Research will present two papers on the topic at the Conference on Computer Vision and Pattern Recognition (CVPR) on June 18, 2022. The first paper focuses on applying Neuralangelo to generate high-quality 3D models from 2D video footage, while the second paper delves into using the model to generate video sequences from 3D scenes.
Here is the link to the papers.
Revolutionizing the 3D Modeling and Digital Art Industry:
As 3D modeling and digital art continue to gain popularity and accessibility, NVIDIA's Neuralangelo is set to transform the industry. Its ability to rapidly and accurately convert 2D videos into intricate 3D structures opens up a world of possibilities for artists and designers. The technology's potential to seamlessly integrate real-world objects into virtual environments brings a new dimension of creativity to various domains.
youtube
The provided link offers a comprehensive and insightful explanation of Neuralangelo.
In conclusion NVIDIA's Neuralangelo is a groundbreaking AI model that empowers artists and designers to bridge the gap between the 2D and 3D realms. By turning 2D videos into lifelike 3D structures, Neuralangelo opens up exciting possibilities in art, video game development, robotics, and beyond. As the technology continues to evolve and shape the future of 3D modeling and digital art, NVIDIA's Neuralangelo is set to revolutionize the creative landscape, inspiring new levels of innovation and imagination for artists and designers worldwide.
Source: Reference:
NVIDIA Technical Blog. (2022). Getting Started with NVIDIA Instant NeRFs. [online] Available at: https://developer.nvidia.com/blog/getting-started-with-nvidia-instant-nerfs/. research.nvidia.com. (n.d.). Neuralangelo. [online] Available at: https://research.nvidia.com/labs/dir/neuralangelo/. Salian, I. (2023). Neuralangelo Research Reconstructs 3D Scenes. [online] NVIDIA Blog. Available at: https://blogs.nvidia.com/blog/2023/06/01/neuralangelo-ai-research-3d-reconstruction/ [Accessed 1 Aug. 2023].
www.youtube.com. (n.d.). Digital Renaissance: Neuralangelo by NVIDIA Research Reconstructs 3D Scenes from 2D Video Clips. [online] Available at: https://www.youtube.com/watch?v=PQMNCXR-WF8&t=57s [Accessed 1 Aug. 2023].
www.youtube.com. (n.d.). Nvidia’s NEW 'AI NEURALANGELO Takes the Industry By STORM! (NOW ANNOUNCED!). [online] Available at: https://www.youtube.com/watch?v=lC2uPDfaTcE [Accessed 1 Aug. 2023].
0 notes
Text
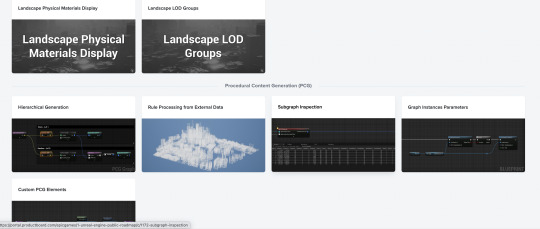
"Embracing Innovation: Exploring Unreal Engine 5.3's Cutting-Edge Features and Enhancements"
Only a few months old, Unreal Engine 5.2 paved the way for the intriguing roadmap of Unreal Engine 5.3, which is brimming with intriguing features in the areas of rendering, world-building, procedural content generation (PCG), developer integration, character animation, virtual production, simulation, audio systems, content pipeline, framework engine contents, and templates. Instead of only using Unreal Engine as a rendering engine for games, animations, and virtual productions, Epic Games wants to turn it into a flexible Digital Content Creation (DCC) tool.

Notably, Nanite gets major upgrades, now supporting explicit tangents in runtime and data format. Additionally, a 20% speedup for rasterized and max foliage is coming, as well as an experimental version of nanite spline meshes. Additionally, flickering problems with TSR or TAA enabled nanite object selection won't exist in Unreal Engine 5.3.
The real-time global illumination system, Lumen, is also improved. Lumen reflections can now be used individually for situations with static illumination without Lumen GI and multiple bounces with hardware retracing. Improved orthographic rendering and sparse textures greatly expand Lumen's potential.
Unreal Engine 5.3 offers the first capability for tracing heterogeneous volumes like smoke, fire, and clouds in the field of ray tracing. Improvements have been made to the substrate material and subsurface scattering effectiveness, and DBuffer decal shading nodes are now supported. Additionally, new outputs that are tailored for use with the path tracer are provided via post-process material buffers.
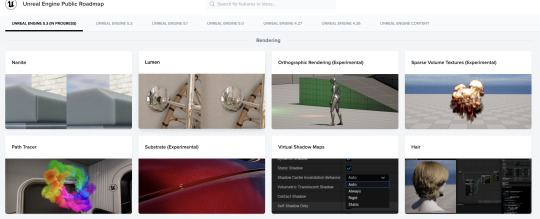
The changes encompass PCG, visual shadow mapping, hair, and other areas as well. An important change is the addition of groom streaming support for groom and groom binding assets, which improves performance when many grooms occupy a limited area of the screen. The potential for character creation is increased by the introduction of experimental support for haircuts with specific features.
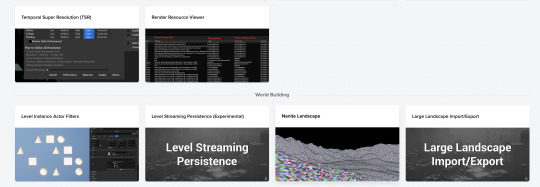
The UV tools in Unreal Engine are also given attention, with the introduction of UV automatic layout and UV editor distortion display. Unreal Engine 5.3 is a game-changer for Mac users because to Nanite's support for MacM2 devices, which is one of the most exciting aspects for many. In contrast to the experimental support in Unreal Engine 5.2, the production-ready support for Nanite rendering technology on Apple Silicon M2 devices is now enabled by default in the Unreal Engine Mac OS libraries, giving Mac users a considerable advantage.
Overall, Unreal Engine 5.3 adds a variety of cutting-edge features and enhancements, reaffirming its status as a top engine in the video game and content creation industries. Developers and content producers may anticipate using their creativity to create breathtaking experiences for players and audiences around the world.
Source: Reference:
Cloudfront.net. (2023). Available at: https://d3kjluh73b9h9o.cloudfront.net/original/4X/4/a/a/4aa394c81be26fbef8aa430f621e4dbbdde7576a.png [Accessed 1 Aug. 2023]. Productboard.com. (2023). Available at: https://portal.productboard.com/epicgames/1-unreal-engine-public-roadmap/tabs/88-unreal-engine-5-3-in-progress [Accessed 1 Aug. 2023].
0 notes
Text
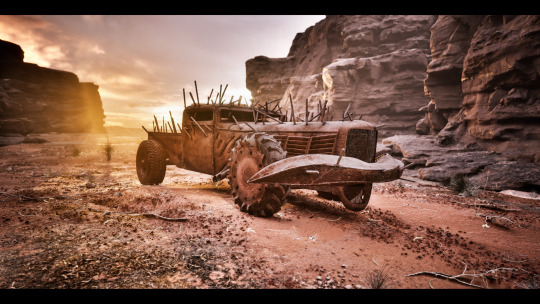
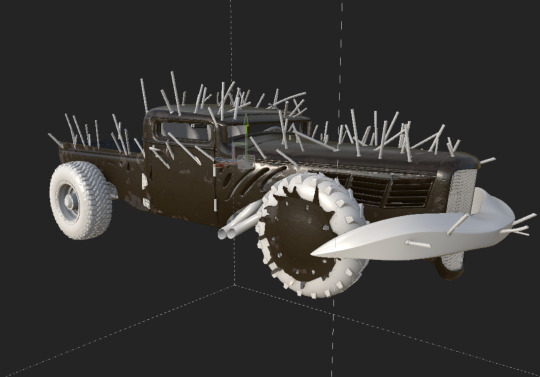
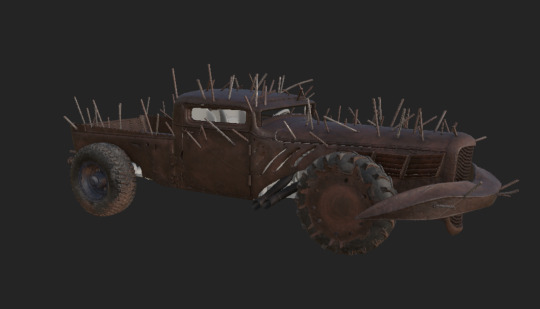
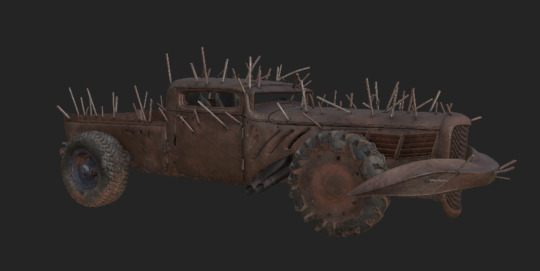
Creating a Mad Max-Style Vehicle Part – 14
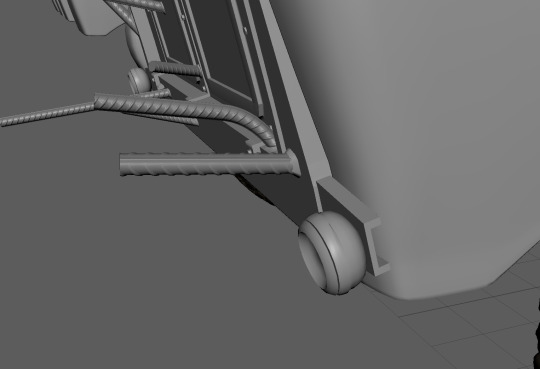
After completing the texturing process, I proceeded to incorporate it into a scene. My choice was to use the Megascan contents to build the scene, so I began by opening a scene in Unreal and adding the truck to it. Then, I created the master material and generated instances of it, loading up all the necessary textures.
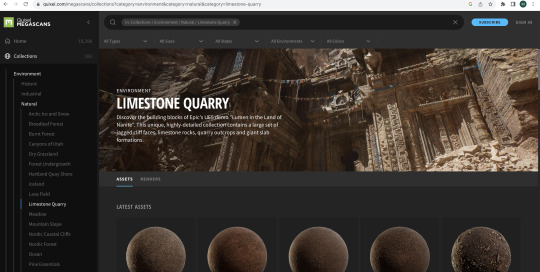
To enhance the scene's look, I downloaded surfaces and Megascan content from Quixel, opting for the "Limestone Quarry" pack.
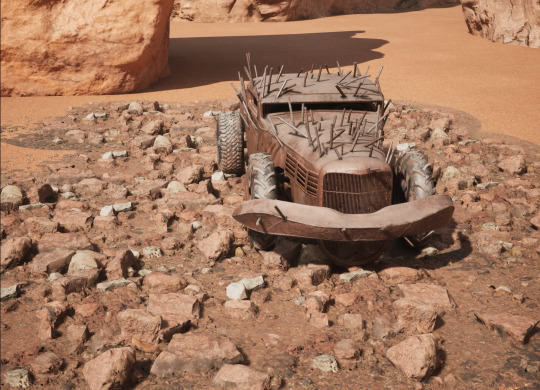
I obtained rocks and cliffs to give the scene a fitting ambiance for the truck. The resulting appearance of the truck after some basic lighting adjustments is shown below.

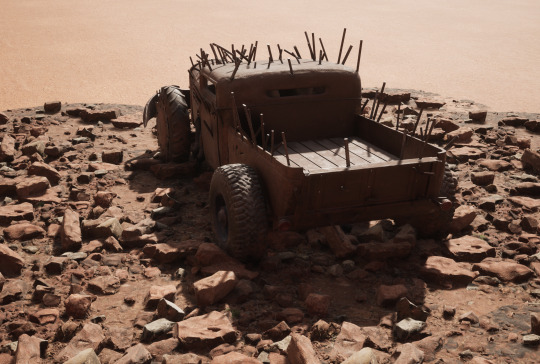
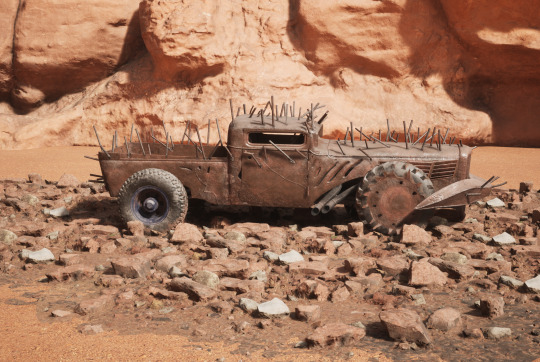
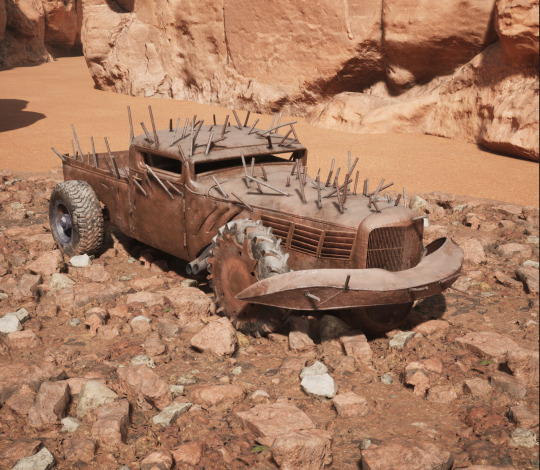
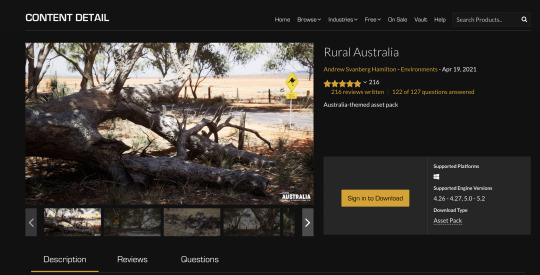
Later, I realized that it would be better to work on the "Rural Australia" scene available for free on the marketplace, as it already had cliffs and dirt that could better complement the vehicle.
So, I proceeded to work on this scene. Initially, I removed all the roads from the spline-based scene and integrated the cliffs from the second scene included in this package.
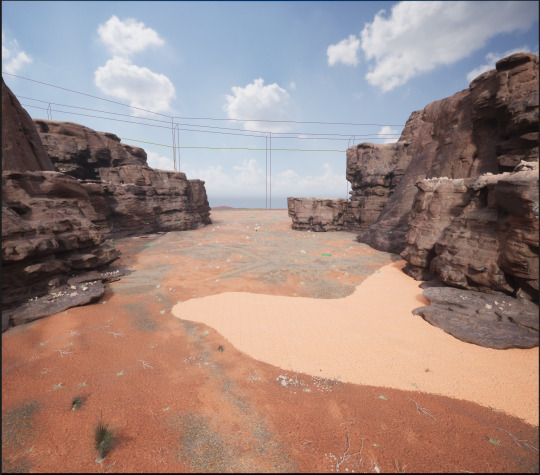
Once the truck was in place, I adjusted the dirt and cliff colors to ensure they matched seamlessly.
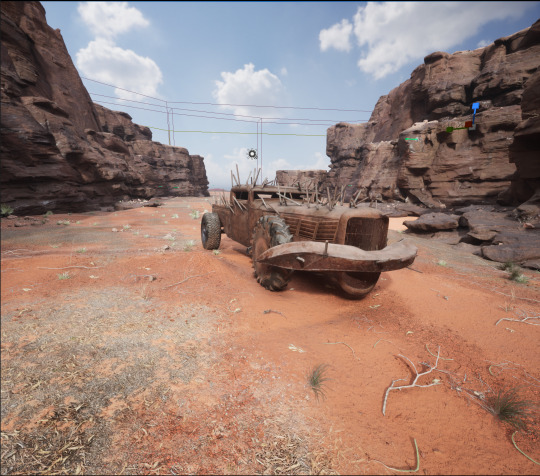
To improve the lighting, I found a suitable HDRI in Poly heaven and loaded it into the skylight, slightly lowering its intensity. This brought a significant improvement to the scene's overall look.
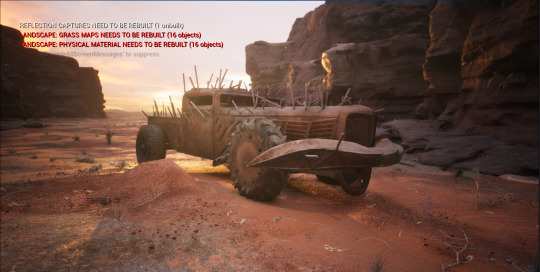
For capturing the scene, I decided on having around 3 to 4 shots and used the IMAX 70mm camera. I carefully set the camera angles, adjusted the focal length to 55, and introduced a bit of depth of field by tracking the truck. Additionally, I enabled vignette and applied a slight brown tint to the camera's gamma.
With all the adjustments completed, I fine-tuned the scene to ensure everything was just right. The final result is displayed below.


Source: Reference:
Unreal Engine. (n.d.). Rural Australia in Environments - UE Marketplace. [online] Available at: https://www.unrealengine.com/marketplace/en-US/product/rural-australia.
Quixel Megascans. (n.d.). Quixel Limestone Quarry. [online] Available at: https://quixel.com/megascans/collections?category=environment&category=natural&category=limestone-quarry [Accessed 1 Aug. 2023].
Zaal, G. (n.d.). The Sky Is On Fire HDRI • Poly Haven. [online] Poly Haven. Available at: https://polyhaven.com/a/the_sky_is_on_fire.
0 notes
Text
Creating a Mad Max-Style Vehicle Part – 13
Once the modeling was done, I moved on to the UV mapping, which, as usual, wasn't complicated but quite time-consuming. It took me a while to complete, but eventually, I got it done. Here are some screen grabs of the UV maps.

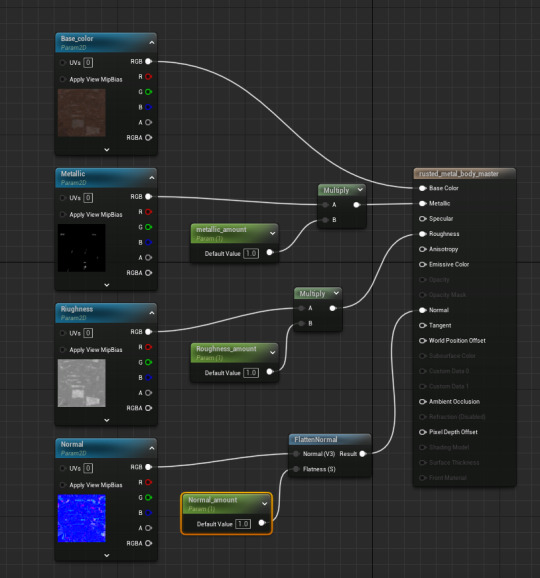
With that done, it was time to jump into texturing using Substance Painter. I imported the fbx file and started working on the main metal body first.
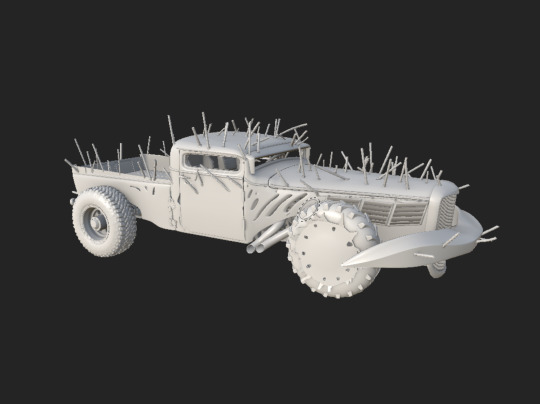
I applied the paint metal, then added the rust and adjusted the rust color to my liking.
Next, I duplicated the rust layer, darkened it, and added a black mask. Using the fur soft brush, I opened up some areas to make it look more natural. Similarly, I followed the process for areas that needed lighter highlights.
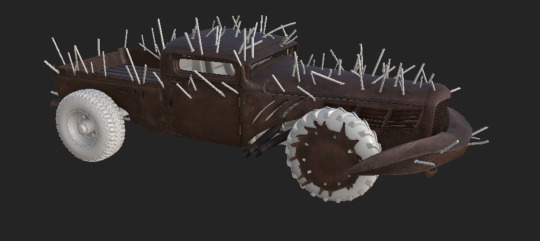
Since most of the truck is rusted, I repeated the exact process for the rest of the metal parts. Once that was complete, I moved on to the tires. Luckily, Substance Painter had a tire dirty material that worked quite well. I made some adjustments by painting into the mask to reduce the dust amount.
Next on the list were the welds. Thankfully, the weld brush in Painter made it much easier. I simply painted the welds where needed in the 2D view and added rust in the layer above. By adjusting the opacity and using masks, I achieved the desired effect.
For the metal rods, I noticed in the concept drawing that there were both rusted and cleaner metal rods. So, I applied the same process for the rusted ones, and then added a layer of rough steel. Using masks, I opened up areas to make them look cleaner. Additionally, I added small details of dark burnt areas on the metal rods that occur during welding. This involved duplicating the rust effect, darkening the color, adding a black mask, and selectively opening up areas using a brush.
The same weld process was followed for the remaining areas of the truck.
Moving on to the interior, it was relatively straightforward. I applied a black color and then added a dust layer using mask painting wherever needed. Below, you'll find a screen grab from Substance Painter showcasing the final result. Let me know what you think!
0 notes
Text
Time Management: Modeling and Texturing the MAD MAX Buzzard Car
Introduction:
In this blog post, I will share my experience of managing time during the modeling and texturing stages of the MAD MAX Buzzard Car project. What started as a simple suggestion from my professor quickly evolved into one of my major projects for my masters. Through efficient multitasking and diligent time management, I navigated the challenges of working on multiple projects simultaneously.
From Inspiration to Major Project: The journey began when my professor recommended creating a MAD MAX-style vehicle. Scouring Artstation for inspiration, I stumbled upon the Buzzard Car, a captivating truck that resonated with both my professor and me. In that moment, I knew I had to create it. Initially, I had intended to work on the Buzzard Car as a part-time project, but a subsequent discussion with my professor led to the decision of making it one of my major projects, becoming my third for the masters' program.
Balancing Part-Time and Full-Time Commitments: Taking on this new major project while managing my other two projects required effective time management. I embraced multitasking, dedicating myself to the Buzzard Car during rendering breaks for my AMG One project. This approach allowed me to optimize my productivity and ensure no time was wasted.
The Modeling and Texturing Journey: The modeling stage, spanning 15 days, proved challenging yet rewarding. Balancing part-time and full-time work on the project made it difficult to track exact hours spent, but I was committed to meeting my self-imposed deadline of July 31st for all major projects. During this stage, I emphasized dedicating more time to texturing, a skill I sought to improve as it was my weaker point compared to modeling. Each day, I honed my texturing skills, striving for excellence in every detail.
Staying Focused on the Deadline: To achieve my target delivery date, I remained determined and focused. I understood that any potential edits or revisions could extend the timeline by an additional 4 to 5 days, impacting my overall schedule. As such, adhering to the deadline was paramount. I had to strike a balance between perfecting the project and allocating time for other crucial aspects like personal videos and presentations.
Conclusion: The journey of modeling and texturing the MAD MAX Buzzard Car has been a testament to effective time management and multitasking. What started as an inspiration from Artstation turned into a major project that pushed me to excel in both modeling and texturing. Through meticulous time allocation, I successfully met my self-imposed deadline while honing my skills and producing a remarkable final outcome. The MAD MAX Buzzard Car serves as a reminder that with dedication and strategic time management, one can achieve great heights in the world of 3D artistry.
0 notes
Text
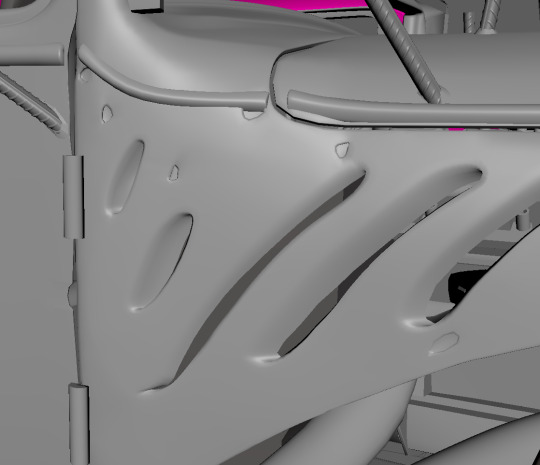
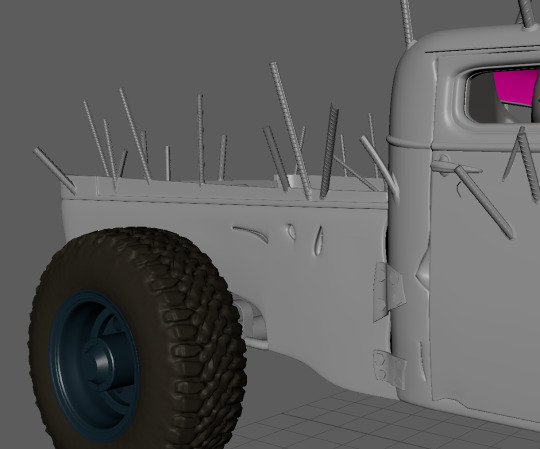
Creating a Mad Max-Style Vehicle Part – 12
After completing the majority of the model work, I proceeded to focus on adding finer details such as the welds. I had two options for accomplishing this: using a texture or creating a separate model. Creating a model using plugins like Weldit 3.0 in Maya was one possibility, but it would significantly increase the polygon count due to the numerous areas requiring welding.
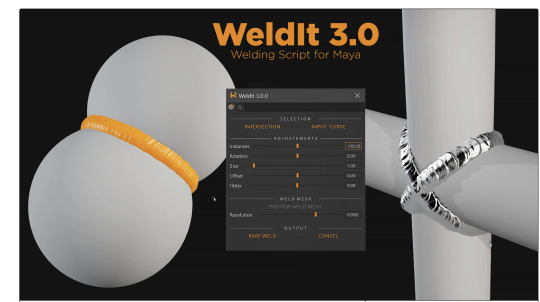
Therefore, I opted to go with the texture approach. To achieve this, I needed an additional surface that connects the two surfaces being welded, such as a metal rod and a hood. This additional surface would then be assigned the weld texture.
Moving forward with the creation of this connecting surface, I experimented with various methods. The one I eventually settled on provided me with greater control over the surface and was more efficient in terms of polygon count, although it did involve a tedious process.
Here is the method I employed: First, I duplicated the rods and surface.
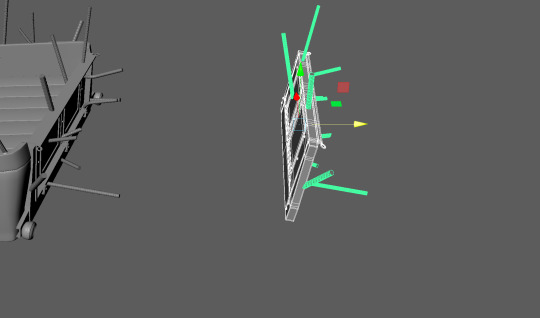
Next, I performed a Boolean operation to ensure the rods had precise cuts.
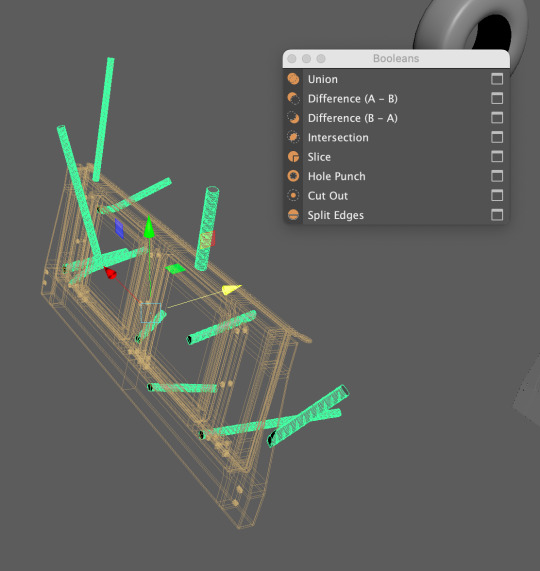
Then, I duplicated the Booleaned rods to have two copies. I pushed the second copy back to its original position, which allowed for the removal of unnecessary polygons inside the surface. Afterward, I selected the end faces of the rod, extruded them, pulled them out, and scaled them slightly.

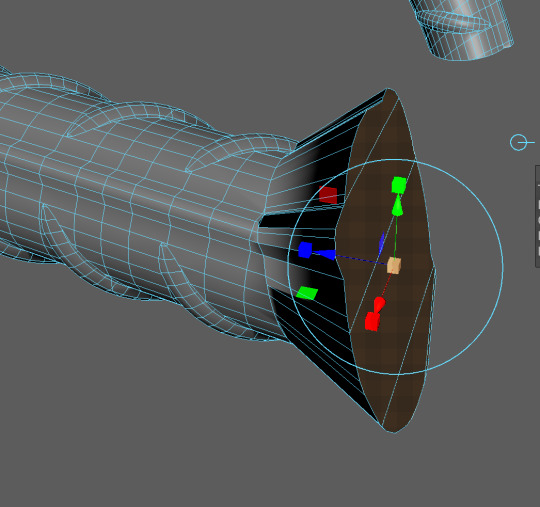
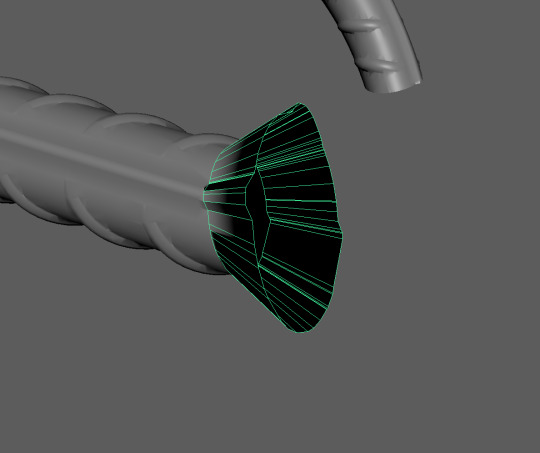
Subsequently, I deleted the edge faces and extracted the extruded surface. To reduce the polygon count of the extracted surface, I used the mesh reduce function and positioned the surface accordingly. That's it for creating the additional surface. To reduce the polygon count of the extracted surface, I used the mesh reduce function and positioned the surface accordingly. That's it for creating the additional surface.
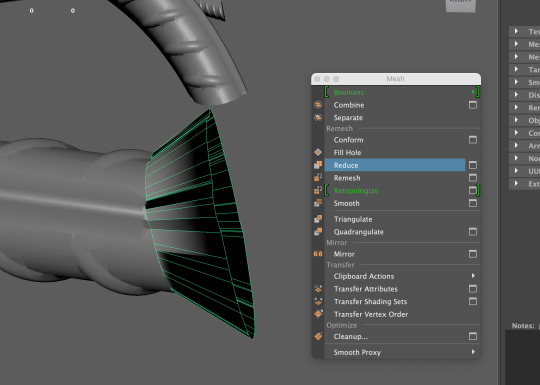
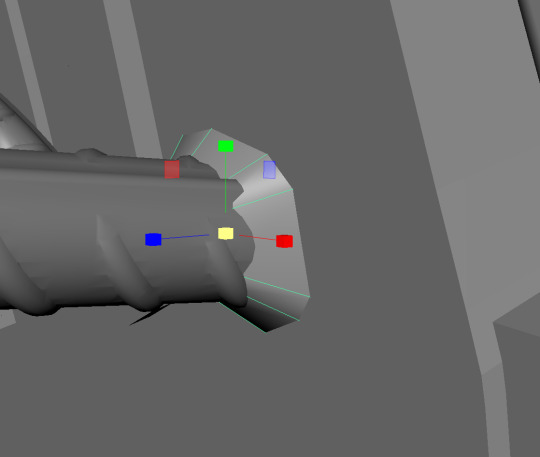
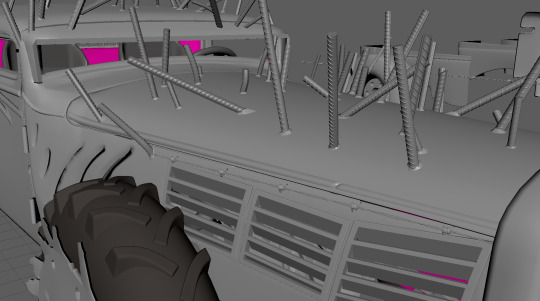
The next step involved adding small dents and holes, which was a relatively straightforward process. I simply selected the faces and extruded them inward. For dents, I randomly manipulated the vertices by pushing or pulling them to achieve the desired effect.
Source: Reference:
Gumroad. (n.d.). Script - WeldIt 3.0 for Maya. [online] Available at: https://wzx.gumroad.com/l/weldit [Accessed 14 Jul. 2023].
0 notes
Text
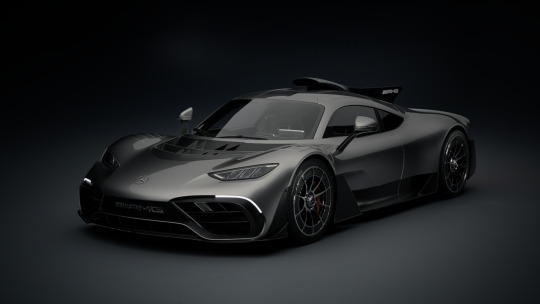
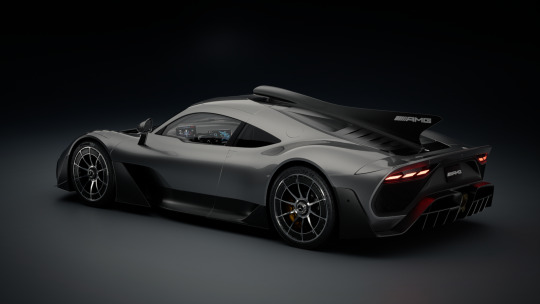
Time Management: Creating a Stunning Studio Setup (AMG ONE)
Introduction: In this blog post, I will be sharing my journey through time management during my second project, where I set out to create a captivating video render of the AMG ONE car in a studio setup. With the exterior of the car already textured and materials in place, my focus was solely on designing the studio environment to bring the car to life. I had allocated 14 days, starting from July 1st to July 14th, for the completion of this project before moving on to my next venture, the MAD MAX - Buzzard car. Join me as I delve into my planning process and how I navigated through the challenges of lighting and animation during this ambitious project.
Planning for Success: With a clear vision in mind, I meticulously planned each step of the project, consulting my updated Gantt chart to keep me on track. I divided the timeline into two main phases, allocating 7 days for lighting and animation and 7 more days for background work, rendering, and post-processing. My goal was to create an awe-inspiring studio setup that would accentuate the car's beauty and create an impactful visual experience.
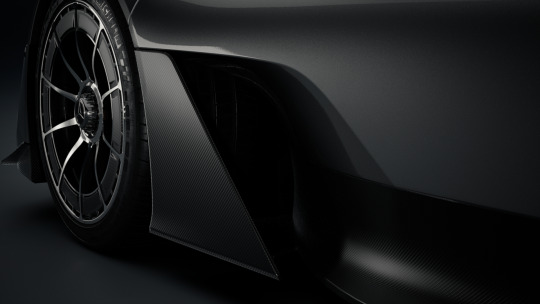
The Studio Lighting Quest: As I delved into the studio lighting aspect, I quickly realized that this phase would be more complex than anticipated. Experimenting with various studio lighting setups, I sought the perfect balance to showcase the car's elegance and intricate details. The pursuit of excellence in lighting became an engaging challenge that required additional time and effort to find the ideal lighting scheme.
Animation: Beyond lighting, animation was a vital component of the project. Breathing life into the AMG ONE car within the studio environment demanded meticulous attention to detail. Each movement had to be carefully choreographed to complement the lighting and add dynamism to the scene. The animation phase proved to be time-consuming but essential to achieving a seamless and captivating video render.
Progress and Perseverance: Throughout the project, I remained vigilant about adhering to my timeline and milestones. Despite the challenges, my dedication to the craft and unwavering commitment to excellence pushed me forward. As I made progress, the project gradually took shape, with each element finely tuned to perfection.
Conclusion: The process of creating a stunning studio setup for the AMG ONE car has been a testament to the power of time management and perseverance. Through careful planning, dedication, and continuous learning, I successfully navigated through the complexities of studio lighting and animation to achieve my objectives. As I approach the culmination of this project and prepare to embark on my next project, the MAD MAX - Buzzard car, I am filled with anticipation and excitement.
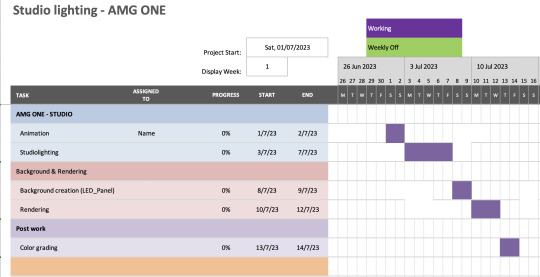
Here is the screenshot of the Gantt chart that I used to plan my project. While some aspects of the project took more time than initially expected, I successfully compensated for it by dedicating extra hours every day to ensure I stayed on track.
0 notes
Text
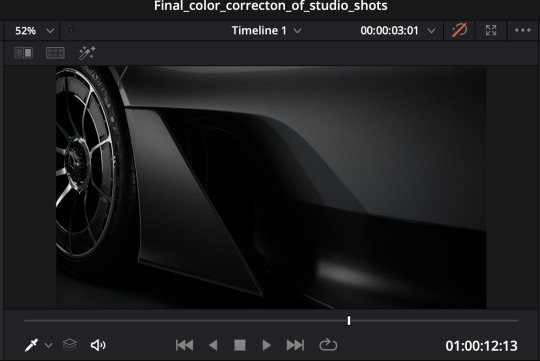
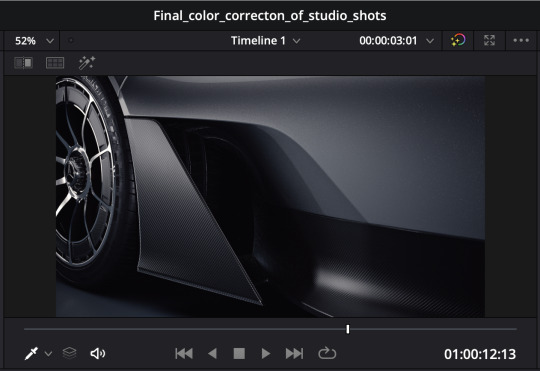
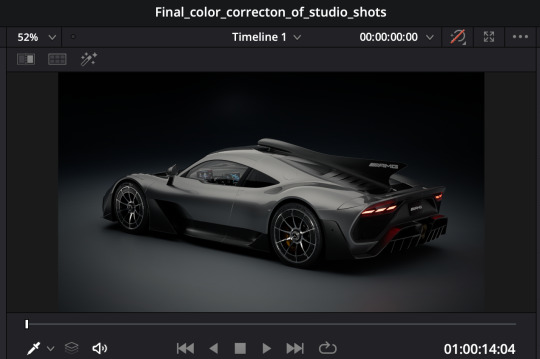
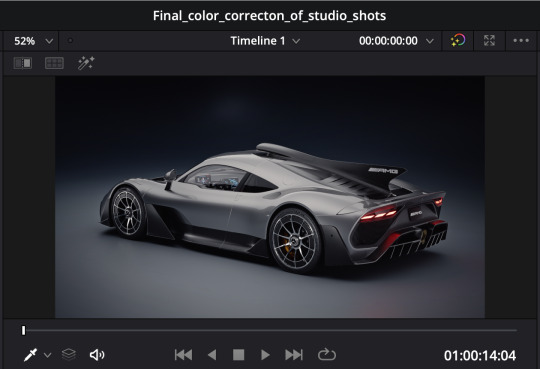
MERCEDES AMG ONE STUDIO LIGHTING UNREAL - Part 07
After being satisfied with the lighting and other elements, I proceeded to finalize the render, which was quite time-consuming due to the path tracing technique and the inclusion of approximately 1400 frames. Once the rendering process concluded, my attention turned towards the crucial task of color grading. Utilizing the remarkable capabilities of DaVinci Resolve, an exceptional tool known for its ability to significantly enhance video quality,
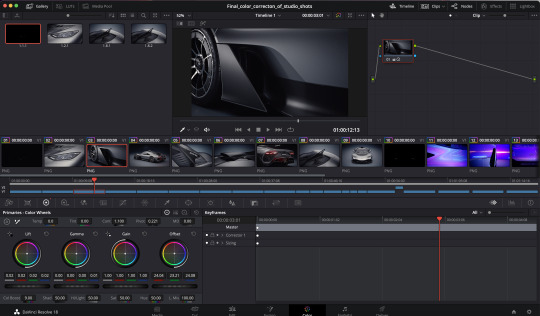
I diligently applied color adjustments to perfect the visual aesthetics. Following the color grading stage,
Before and After
Before and After
I utilized After Effects to seamlessly combine all the shots, synchronize them with the audio, and incorporate the necessary end credits for a polished final product.
Without further ado, presented below is the culmination of these efforts—the final video.
For an enhanced experience, I recommend viewing the content with audio.
Source: Reference:
Topgear.com. (2023). Available at: https://www.topgear.com/sites/default/files/images/news-article/carousel/2016/09/4ef60c936b9cffa21cd26d430a5c6542/mercamg.jpg?w=1784&h=1004 [Accessed 12 Jul. 2023].
Mzstatic.com. (2023). Available at: https://is1-ssl.mzstatic.com/image/thumb/Purple122/v4/e6/87/44/e6874434-8b9f-6612-5c34-89a59b3fd813/AppIcon-0-0-1x_U007emarketing-0-0-0-7-0-0-sRGB-0-0-0-GLES2_U002c0-512MB-85-220-0-0.png/460x0w.webp [Accessed 12 Jul. 2023]. www.youtube.com. (n.d.). ROYALTY FREE Epic Trailer Music | Cinematic Trailer Background Music by MUSIC4VIDEO. [online] Available at: https://www.youtube.com/watch?v=wr0iJf0ASH0.
open.spotify.com. (2023). Destiny. [online] Available at: https://bit.ly/3peEuxe [Accessed 12 Jul. 2023].
upload.wikimedia.org. (n.d.). Unreal Engine logo. [online] Available at: https://upload.wikimedia.org/wikipedia/commons/d/da/Unreal_Engine_Logo.svg [Accessed 12 Jul. 2023].
0 notes
Text
MERCEDES AMG ONE STUDIO LIGHTING UNREAL - Part 06
After completing the basic setup, my focus shifted to fine-tuning the details of each shot.
In the first half of the video, I noticed that there were some lighting issues that required adjustments. Certain parts of the car appeared too dark or overexposed, so I had to address these concerns on a shot-by-shot basis. Fortunately, since I had already completed the basic rendering earlier, I knew exactly where the problems were. I began working from the beginning of the video, adding extra lights to highlight areas that required more illumination. This process was repeated for each shot, ensuring that the lighting was improved. Below, you'll find some images showcasing the updated lighting.
Moving on, I had to tackle the strobe light background video. My vision was to create a visual effect similar to LED screens playing in the background. To achieve this, I utilized Adobe After Effects and applied the ccball effect to mimic the appearance of pixels. Additionally. The result was a background video that resembled LED screens. Attached is a screen grab showcasing the updated background video.


Before and After
These adjustments and enhancements brought the project closer to its desired outcome, ensuring that both the lighting and the background video aligned with the overall aesthetic.
0 notes
Text
Revolutionizing Background Creation: The Power of AI
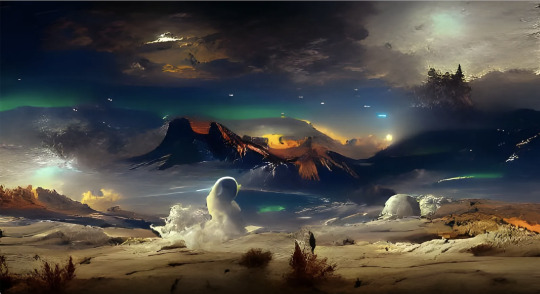
Engaging backgrounds are essential for drawing viewers into visual medium. Artificial intelligence (AI) has made it possible to create beautiful backgrounds at previously unheard-of levels. In this blog article, we'll look at how AI is redefining background creation to transform the industry. AI gives artists the ability to create extremely realistic backgrounds that perfectly capture the essence of varied places by utilising deep learning algorithms and enormous datasets. This technical development encourages artistic expression and improves the visual experience as a whole.
The Power of AI in Background Creation: Traditional background creation techniques required a lot of work and time. However, AI has changed the game by giving artists strong tools to speed up and improve the process. AI systems can comprehend and mimic the patterns, textures, lighting, and perspectives present in real-world situations by training on a variety of visual data. As a result, AI is able to create backgrounds that are incredibly accurate, saving artists considerable time and effort. Whether it's a natural environment or a future cityscape, artists can quickly create incredibly realistic backgrounds with a wide range of possibilities.

Customization and Artistic Flexibility: AI-driven background generation delivers unmatched personalization and creative freedom. To create the ideal mood or atmosphere, artists might employ AI algorithms to change variables like colors, lighting, and composition. This degree of adaptability enables artists to broaden their creative vision, try out new concepts, and challenge the conventions of visual narrative. Artists can modify the created backdrops to better suit their individual artistic styles thanks to AI's seamless integration of user inputs and preferences into the background generation process. The unlimited possibilities created by this collaborative interplay between human creativity and AI support establish a symbiotic relationship that improves artistic expression.
Efficiency and Time Savings: The potential of AI to improve efficiency and save time is one of the key benefits of background development. Artificial intelligence (AI) systems quickly and reliably create backdrops, requiring less manual labor during development or rendering. This improved productivity enables artists to concentrate on honing their creative conceptions and testing out various ideas, ultimately producing higher-quality pictures within constrained production timelines. AI gives artists the freedom to explore new artistic horizons and realize their vision by facilitating more effective work practices.
The Future of Background Creation with AI: The future of background production promises fascinating possibilities as AI technology develops further. Greater realism, interactivity, and customization will be possible because to improvements in AI algorithms and processing power. The ability to generate backgrounds and render them instantly may become standard, promoting a dynamic creative process that encourages quick iterations and experiments.
Conclusion: AI has ushered in a new era of background creation, giving artists more freedom than ever to express their visual creativity. The industry has changed due to AI-driven background creation's efficiency, adaptability, and realism, which has improved the visual experience as a whole. We can anticipate notable innovations that push the limits of visual imagination to new heights as AI technology develops further.
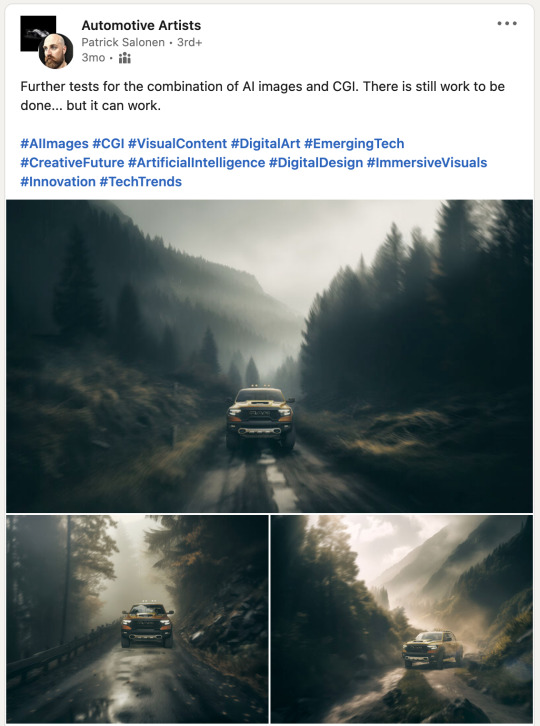
One notable example of automotive visualization that demonstrates the power of AI is the work of artist Patrick Salonen. Through his expertise in AI technology, Salonen has successfully created breathtaking backgrounds and seamlessly composited them with CGI cars, resulting in stunning visual compositions.
Source: Reference:
Goswami, S. (2023). 7 AI Background Generators to Revolutionize Your Design Process. [online] Geekflare. Available at: https://geekflare.com/ai-background-generators/ [Accessed 9 Jul. 2023]. nuroum.com. (n.d.). How to Generate Virtual Background With AI Content Generators. [online] Available at: https://nuroum.com/blog/how-to-generate-virtual-background-with-ai-content-generators [Accessed 9 Jul. 2023]. Chen, B.X. (2023). How to Use A.I. to Edit and Generate Stunning Photos. The New York Times. [online] 2 Jun. Available at: https://www.nytimes.com/2023/06/02/technology/ai-photo-editing.html. Wallpaperaccess.com. (2023). Available at: https://wallpaperaccess.com/full/9070071.png [Accessed 9 Jul. 2023]. Nightcafe.studio. (2023). Available at: https://images.nightcafe.studio/jobs/unExFkJietPLs3eCIxP5/unExFkJietPLs3eCIxP5_4x.jpg?tr=w-1600 [Accessed 9 Jul. 2023]. www.linkedin.com. (n.d.). Sign Up | LinkedIn. [online] Available at: https://www.linkedin.com/feed/update/urn:li:activity:7049736011345489920/?utm_source=share&utm_medium=member_desktop [Accessed 9 Jul. 2023].
0 notes