
Don't wanna be here? Send us removal request.
Statistics
We looked inside some of the posts by manxfile84-blog and here's what we found interesting.
Average Info
Notes Per Post
0
Likes Per Post
0
Reblog Per Post
0
Reply Per Post
0
Time Between Posts
3 days
Number of Posts By Type
Text
17
Last Seen Tumblr Blogs


Fun Fact
Tumblr was attacked by a cross-site scripting worm deployed by the Internet troll group GNAA on Dec 3, 2012.
Text
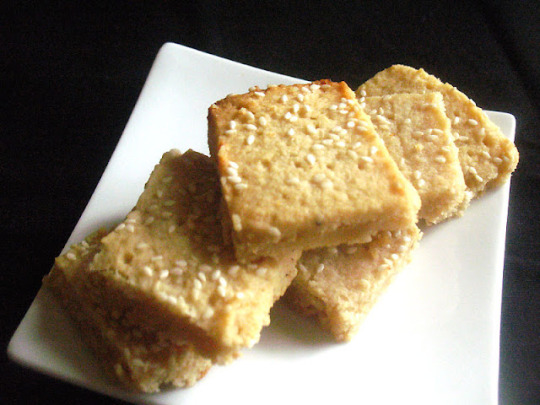
Miso Sesame Shortbread Cookies
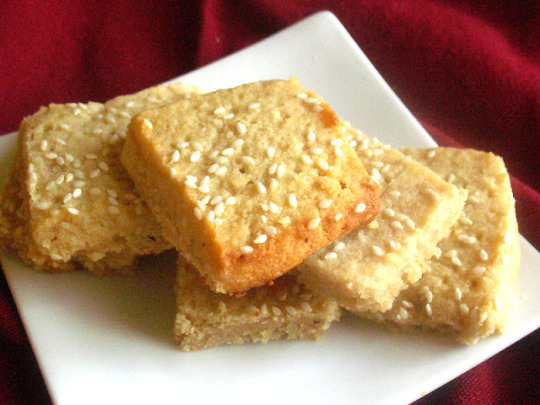
I can honestly say that these must be the best shortbread cookies I have ever tasted. And they're made with miso too! If that sounds surprising, the miso adds only a hint of saltiness that actually enhances the sweetness of the maple syrup-sweetened shortbread. Light, flaky and buttery, sesame seeds on the outside of the cookies add a nice contrast and a little delightful sesame flavor too.
An added bonus is that these shortbread cookies are easy to make too. They're made sheet-style, meaning that you press the dough down onto a prepared baking sheet and cut into square shapes, pushing them slightly apart, but the cookies will still be baked closely together.
Although the recipe is easy, it's not quite so easy to stop oneself from over-indulging. But they do keep well in the refrigerator for a good week or so in a covered container, and they freeze well too.

Miso Sesame Shortbread CookiesRecipe by Lisa Turner Adapted from What's Cooking Good Looking Published on December 30, 2018
Easy, soft and flaky sweet buttery shortbread cookies with a hint of miso

Print this recipe
Ingredients:
1 cup (2 sticks) unsalted butter, softened
1/2 cup maple syrup
2 1/2 tablespoons white (shiro) miso
2 1/2 cups almond meal
1 cup tapioca starch
pinch of sea salt
1 1/2 tablespoons sesame seeds
Instructions:
Line a baking sheet with parchment paper.
Using a stand mixer or electric hand mixer, cream together the butter and maple syrup on high speed for about 3 minutes until light and fluffy. Add the miso and process on high for another minute.
Add the almond meal, tapioca starch and sea salt and mix on low speed until just incorporated. Don't overmix. The dough should be crumbly, but somewhat sticky.
Spoon the batter onto the prepared baking sheet and place a piece of parchment paper on top of that. Press down firmly using the palms of your hands to form a rectangle roughly 1/4 inch thick. Let the dough sit in the refrigerator for at least 1 hour or longer.
Preheat an oven to 350°.
Cut the dough into roughly 1 1/2 inch squares and move each cookie slightly apart. You can also use a cookie cutter to cut into other shapes The extra edges from the rectangle can be trimmed off and shaped into squares or whatever shape you like, such as rounds. Sprinkle the sesame seeds over the tops of the cookies.
Bake in the preheated oven for about 20 to 25 minutes, turning the pan half way through the baking time. When the edges begin to brown, remove from the oven. Let the cookies cool on the baking sheet for 40 minutes or even longer, and then when they are firmer, transfer to a wire rack to cool completely. Serve them up and store any remainders in a covered container in the refrigerator for up to a few weeks, or longer in the freezer.
Makes about 30 cookies
Other shortbread recipes to enjoy from Lisa's Kitchen: Italian Lemon Cornmeal Shortbread Peanut Butter and Blueberry Shortbread Bars Spicy White Cheddar Shortbread Crackers Savory Coriander, Black Pepper and Cheese Shortbread Rosemary Parmesan Shortbread Jalapeño Cheddar Shortbread
Source: https://foodandspice.blogspot.com/2018/12/miso-sesame-shortbread-cookies.html
0 notes
Text
Roasted Tomato Chutney
Great as a dip or spicy marinade! Give this a try.
This one is a real crowd pleaser. Not only is it amazing used as a dip for crudites or papadums, it also makes a delicious marinade and sauce for grilled meats and fish. I was introduced to the fantastic chutney by Chef Sheak Sahaban Ali, Head Chef at the Panoramic View Hotel near Munnar. Now, I always have some on hand for those last minute, unexpected guests. It keeps really well in the fridge for up to a week.
Note: The photos for this recipe don’t match the written recipe below. Both work!!
Order now on Amazon!
Toast the chana lentils until they are light brown in colour.
Roast your tomatoes on the BBQ, on a gas hob or under the broiler.
Grind the roasted lentils and then blend the roasted tomatoes.
Infuse the whole spices with the oil and then add the green chillies and garlic to fry for a minute or two.
Add the ground spices and bring this all to a simmer for about five minutes.
Add the coriander and lentils and cook for a further 5 minutes. Then blend it all up. Add a tablespoon or more yoghurt.
Roasted Tomato Chutney
Author: Dan Toombs
Recipe type: Marinade and side
Cuisine: Keralan
Prep time: 10 mins
Cook time: 10 mins
Total time: 20 mins
Serves: 250ml
Ingredients
5 medium to large tomatoes
50g Bengal gram (chana lentils)
1 tsp rapeseed (canola) oil
1 tsp roasted cumin
2 cloves garlic – smashed and roughly chopped
2 green chillies
3 tbsp chopped coriander leaves
1 tsp Kashmiri chilli powder
1 tsp chaat masala
½ tsp amchoor (dried mango powder)
Salt to taste
1 tsp lemon juice
Instructions
Roast the tomatoes in a large pan or, better yet, directly over a gas or open fire flame until blackened. You will need to turn regularly while doing this. Set aside to cool slightly and then dice them. Now, in a dry frying pan over medium heat, toast the Bengal gram (chana lentils) for about five minutes, stirring regularly until toasted and brown in colour. Transfer to a plate to cool.
Meanwhile, add one teaspoon oil to the pan and stir in the cumin and garlic cloves and sauté well for about a minute. Add the green chillies, coriander leaves, roasted Bengal gram and diced, roasted tomatoes and bring to a simmer. Add the chilli powder, chaat masala and amchoor (mango powder). Stir well and then add the yoghurt. Blend this to a smooth paste. Stir in the lemon juice and season with salt to taste.
Try the chutney. If you find that it is too spicy, stir in more yogurt until you are happy with the spice level.
3.4.3177

Source: https://greatcurryrecipes.net/2019/03/14/roasted-tomato-chutney/
0 notes
Text
Cuban Black Beans and Rice
Cuban Black Beans and Rice is a simple, satisfying side dish packed with protein and bursting with Latin flavors like garlic, oregano and cumin.
One of the many reasons I love to travel is because it exposes me to cuisines from around the world. After recent visits to Miami and Puerto Vallarta, I was inspired to get in my home kitchen to recreate one of my favorite Cuban dishes: black beans and rice.
Don’t let the humble nature of this dish fool you: the combination of black beans and rice is one of the most nutritious, well-rounded dishes you can serve. In fact, I remember reading once that the oldest living population in the world (located in Southern Africa) starts every morning with beans and rice.
For this Cuban recipe I like to start with dried black beans and soak them overnight. Of course, if you don’t have time to do that just use canned beans but be sure to drain and rinse them to remove any excess starchy liquid. This will also allow you to control the salt content better.
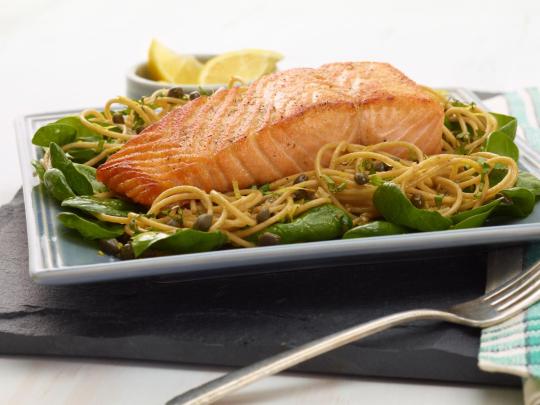
While you can certainly enjoy these black beans and rice as is, I love to top it with grilled shrimp, roasted salmon or pork tenderloin.
What are your favorite dishes from around the world? I’d love to hear from you.
Your fork is waiting.
Cuban Black Beans and Rice is a simple, satisfying side dish bursting with Latin flavors like garlic, oregano and cumin.
<![CDATA[.wprm-recipe-rating .wprm-rating-star.wprm-rating-star-full svg * fill: #ffffff; ]]> Print Pin Rate
Course: Side Dish
Cuisine: Cuban, Latin American
Keyword: black bean, brown rice
Prep Time: 8 hours
Cook Time: 2 hours
Total Time: 10 hours
Servings: 10
Calories: 220kcal
Author: Liz DellaCroce
Ingredients
1 pound black beans - dried or 4 (four 15-ounce cans rinsed and drained)
3 cloves garlic
4 bay leaves divided
2 tablespoons olive oil
1 medium onion diced
1 red pepper seeded and diced
2 cloves garlic minced
1 tablespoon salt
1 tablespoon cumin
1 tablespoon dried oregano
1 teaspoon pepper
1/2 teaspoon cayenne
2 cups long grain white rice rinsed
4 cups chicken broth low sodium
minced cilantro and lime wedges to serve
Instructions
Soak beans overnight to soften and remove any small hard stones. The next day, strain and rinse soaked beans with fresh water.
To cook beans, place in a large pot and add enough water to cover the beans by two inches. Carefully smash whole garlic cloves with the back of a knife and add to the pot of beans alone with 2 of the bay leaves.
Bring pot to a boil then reduce heat to low and simmer until tender (90 minutes or up to two hours.) Set aside once cooked.
Next, in a large Dutch oven, heat olive oil over medium high heat and sauté onions, peppers and garlic. Add spices (salt through cayenne) and continue stirring until vegetables have softened, 4-6 minutes.
Stir in rinsed (uncooked) rice and sauté for 2 minutes so that the rice starts to toast and lightly brown.
Pour in chicken broth and add reserved, cooked black beans along with bay leaves. Stir once then bring to a boil. Stir a second time then reduce heat to low and place tightly fitting lid on the pot. Cook until liquid has been absorbed, about 15 minutes.
Use a fork to loosen the rice and bean mixture then serve with fresh cilantro and lime wedges.
Notes
Canned black beans will work if you're short on time but I highly suggest dried black beans for added texture, flavor and less additives.
Nutrition Facts
Cuban Black Beans and Rice
Amount Per Serving
Calories 220 Calories from Fat 14
% Daily Value*
Total Fat 1.6g 2%
Saturated Fat 0.2g 1%
Trans Fat 0g
Polyunsaturated Fat 1.4g
Cholesterol 0mg 0%
Sodium 724mg 30%
Total Carbohydrates 51.3g 17%
Dietary Fiber 13.1g 52%
Sugars 2g
Protein 10.7g 21%
* Percent Daily Values are based on a 2000 calorie diet.
Want more mouthwatering meatless recipes? Check out my Pinterest board!
You May Also Like:
<![CDATA[ /* general yuzo style */ .yuzo_pro .relatedthumb cursor:pointer; .yuzo_pro overflow: hidden; padding: 10px 0; margin: 10px 0; width: 100%; display: block; /*float: left;*/ /*problem with other plugins*/ clear: both; .yuzo_pro .yuzo_clearfixed, .yuzo_widget_wrap .yuzo_clearfixedclear: both;display: block;margin: 5px 0; .yuzo_pro .text-center text-align:center;margin:0 auto;display:block; .yuzo_pro h3 margin-bottom: 0!important .yuzo_pro .relatedposts margin: 0 0 20px 0; float: left; font-size: 12px; .yuzo_pro .relatedposts h3 font-size: 20px; /*margin: 0 0 5px 0;*/ .yuzo_pro .relatedthumb margin: 0 1px 0 1px; float: left;line-height: 15px;text-align: left; /*padding: 5px;*/ .yuzo_pro .relatedthumb img margin: 0 0 3px 0; padding: 0; .yuzo_pro .relatedthumb a overflow: hidden; text-decoration: none; display:block; padding:0;background-image: none;background-color:transparent; .yuzo_pro .yuzo_text margin-top: 10px; display: block; .yuzo_pro .relatedthumb .yuzo-img-wrap margin-bottom: 4px; .yuzo_pro .yuzo__bf_textmargin:10px auto; .yuzo_pro .yuzo__title--centered text-align:center;display:block;margin:0 auto; #wp-admin-bar-admin_yuzo_views .yuzo_menu_bar_icons margin-left: 5px;width: 20px;height: 26px;background-image:url('https://thelemonbowl.com/wp-content/plugins/yuzo-pro/assets/images/fires3.png');background-repeat: no-repeat; position: absolute;top: 0;left: 0; #wp-admin-bar-admin_yuzo_views .ab-item position: relative; padding-left: 26px!important; #wp-admin-bar-admin_yuzo_views .yuzo_menu_bar_icons.color_normal background-position: -3px 5px; #wp-admin-bar-admin_yuzo_views .yuzo_menu_bar_icons.color_flare_hot background-position: -22px 5px; #wp-admin-bar-admin_yuzo_views .yuzo_menu_bar_icons.color_flare_hot2 background-position: -43px 5px; #wp-admin-bar-admin_yuzo_views .yuzo_menu_bar_icons.color_flare_hot3 background-position: -62px 5px; #wp-admin-bar-admin_yuzo_views .yuzo_menu_bar_icons.color_flare_hot4 background-position: -83px 5px; ]]><![CDATA[ /* theme standar style */ .yuzo_pro .relatedthumb.box_shadow_related .yuzo-img /*box-shadow: 1px 1px 3px rgba(227, 227, 227, 1);*/ box-shadow: 0 1px 4px rgba(0, 0, 0, 0.2) !important; ]]><![CDATA[ .yuzo_pro img width:47.6px !important; height:200px !important; .yuzo_pro .relatedthumb line-height:inherit;background:#ffffff; .yuzo_pro .relatedthumb:hover background:#FFFFD3 !important; -webkit-transition: background 0.2s linear; -moz-transition: background 0.2s linear; -o-transition: background 0.2s linear; transition: background 0.2s linear;;color:!important; .yuzo_pro .relatedthumb a color:!important;text-decoration:none;outline:none;border-bottom:0; .yuzo_pro .relatedthumb a:active,.yuzo_pro .relatedthumb a:focus,.yuzo_pro .relatedthumb a:-webkit-any-link color:!important;text-decoration:none;outline:none;border-bottom:0; .yuzo_pro .relatedthumb:hover a color:!important; .yuzo_pro .relatedthumb:hover .yuzo__text--title color:!important; .yuzo_pro .yuzo_text, .yuzo_pro .yuzo_views_post color:#919191!important; .yuzo_pro .relatedthumb:hover .yuzo_text, .yuzo_pro:hover .yuzo_views_post color:!important; .yuzo_pro .relatedthumb box-sizing: border-box; margin: 0% 1% 0% 0%!important; padding: 5px 5px 5px 5px; .yuzo_pro .relatedthumb .icon_middle_only_style_1 display:none; .yuzo_pro .relatedthumb .yuzo_meta margin:2px 2px 2px 2px;;font-size: 12px;color: #c4c4c4; text-align: left ; ;line-height:12px; .yuzo_pro .relatedthumb .yuzo_meta .yuzo_meta_view, .yuzo_pro .relatedthumb .yuzo_meta .yuzo_meta_date, .yuzo_pro .relatedthumb .yuzo_meta .yuzo_meta_category, .yuzo_pro .relatedthumb .yuzo_meta .yuzo_meta_author display:inline; margin:0 5px; .yuzo_pro .relatedthumb .yuzo_meta > div:nth-child(1) margin-left: 0!important; text-align: left; margin-right: 0!important; .yuzo_pro .relatedthumb .yuzo_meta .yuzo_meta_view:before content:''; font-family: 'Fontawesome'; font-size:13px;padding-right: 1px; .yuzo_pro .relatedthumb .yuzo_meta .yuzo_meta_date:before content:''; font-family: 'Fontawesome'; font-size:13px;padding-right: 1px; .yuzo_pro .relatedthumb .yuzo_meta .yuzo_meta_category:before content:''; font-family: 'Fontawesome'; font-size:13px;padding-right: 1px; .yuzo_pro .relatedthumb .yuzo_meta .yuzo_meta_author:before content:''; font-family: 'Fontawesome'; font-size:13px;padding-right: 1px; .yuzo_pro .relatedthumb .yuzo-img .yuzo_pro .relatedthumb:hover .yuzo-img -webkit-filter: brightness(1.5);filter: brightness(1.5); /* for widgets */ .yuzo_pro.ycolumns-widget .yuzo_pro.ycolumns-widget .relatedthumb /*width: 100%;*/ width:47.6px; .yuzo_pro .yuzo_wrapsmargin-top:5px; /* responsive */ .yuzo_pro.ycolumns-8 .relatedthumb width:47.6%; .yuzo_pro.ycolumns-7 .relatedthumb width:47.6%; .yuzo_pro.ycolumns-6 .relatedthumb width:47.6%; .yuzo_pro.ycolumns-5 .relatedthumb width:47.6%; .yuzo_pro.ycolumns-4 .relatedthumb width:47.6%; .yuzo_pro.ycolumns-3 .relatedthumb width:47.6%; .yuzo_pro.ycolumns-2 .relatedthumb width:47.6%; @media all and (max-width: 1170px) .yuzo_pro.ycolumns-8 .relatedthumb width: 18%!important; @media all and (max-width: 1024px) .yuzo_pro.ycolumns-8 .relatedthumb width: 23%!important; @media all and (max-width: 899px) .yuzo_pro.ycolumns-4 .relatedthumb width:47.6%; .yuzo_pro.ycolumns-8 .relatedthumb width: 23%!important; @media all and (max-width: 750px) .yuzo_pro.ycolumns-4 .relatedthumb width:47.6%; .yuzo_pro.ycolumns-5 .relatedthumb width:47.6%; .yuzo_pro.ycolumns-6 .relatedthumb width:47.6%; .yuzo_pro.ycolumns-7 .relatedthumb width:47.6%; .yuzo_pro.ycolumns-8 .relatedthumb width:22%!important; .yuzo_pro.ycolumns-5.yrows-1 .yuzo_wraps .relatedthumb:nth-child(5) display: none; @media all and (max-width: 700px) .yuzo_pro.ycolumns-8 .relatedthumb width:30%!important; @media all and (max-width: 550px) .yuzo_pro.ycolumns-3 .yuzo_wraps .relatedthumb, .yuzo_pro.ycolumns-4 .yuzo_wraps .relatedthumb width:48.6%; .yuzo_pro.ycolumns-3 .yuzo_wraps .relatedthumb .yuzo-img-wrap , .yuzo_pro.ycolumns-4 .yuzo_wraps .relatedthumb .yuzo-img-wrap, .yuzo_pro.ycolumns-3 .yuzo_wraps .relatedthumb .yuzo-img , .yuzo_pro.ycolumns-4 .yuzo_wraps .relatedthumb .yuzo-img , .yuzo_pro.ycolumns-5 .yuzo_wraps .relatedthumb .yuzo-img , .yuzo_pro.ycolumns-6 .yuzo_wraps .relatedthumb .yuzo-img , .yuzo_pro.ycolumns-7 .yuzo_wraps .relatedthumb .yuzo-img , .yuzo_pro.ycolumns-8 .yuzo_wraps .relatedthumb .yuzo-img /*height:160px!important;*/ /*height:100%!important;*/ .yuzo_pro.ycolumns-4 .yuzo_wraps .relatedthumb .yuzo-img-wrap height:100%!important; .yuzo_pro.ycolumns-4 .yuzo_wraps .relatedthumb height:250px!important; .yuzo_pro.ycolumns-4 .yuzo_wraps .relatedthumb .yuzo-img height: 180px!important; .yuzo_pro.ycolumns-8 .relatedthumb width:48.10%!important; @media all and (max-width: 420px) .yuzo_pro.ycolumns-3,.yuzo_pro.ycolumns-4,.yuzo_pro.ycolumns-2,.yuzo_pro.ycolumns-5, .yuzo_pro.ycolumns-6, .yuzo_pro.ycolumns-7, .yuzo_pro.ycolumns-8 margin:0 auto; .yuzo_pro.ycolumns-3 .relatedthumb,.yuzo_pro.ycolumns-4 .relatedthumb,.yuzo_pro.ycolumns-2 .relatedthumb,.yuzo_pro.ycolumns-5 .relatedthumb,.yuzo_pro.ycolumns-6 .relatedthumb, .yuzo_pro.ycolumns-7 .relatedthumb, .yuzo_pro.ycolumns-8 .relatedthumb width:48.10%!important; margin:5px; .yuzo_pro.ycolumns-3,.yuzo_pro.ycolumns-4,.yuzo_pro.ycolumns-2,.yuzo_pro.ycolumns-5, .yuzo_pro.ycolumns-6, .yuzo_pro.ycolumns-7, .yuzo_pro.ycolumns-8 margin:0 auto; .yuzo_pro.ycolumns-3 .relatedthumb,.yuzo_pro.ycolumns-4 .relatedthumb,.yuzo_pro.ycolumns-2 .relatedthumb,.yuzo_pro.ycolumns-5 .relatedthumb,.yuzo_pro.ycolumns-6 .relatedthumb, .yuzo_pro.ycolumns-7 .relatedthumb, .yuzo_pro.ycolumns-8 .relatedthumb width:100%!important; .yuzo_pro.theme_standar-style-1 .yuzo_text display: block; ]]><![CDATA[.yuzo_pro .yuzo_pro .relatedthumb]]>
Source: https://thelemonbowl.com/cuban-black-beans-and-rice-recipe/
0 notes
Text
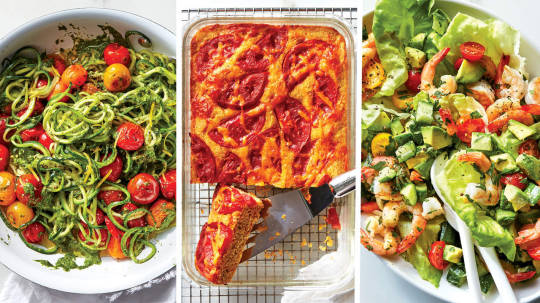
WEEKLY MENU PLAN (#209)
WEEKLY MENU PLAN (#209) – A delicious collection of dinner, side dish and dessert recipes to help you plan your weekly menu and make life easier for you!
In these menu plans, we will be sharing some of our favorite recipe ideas for you to use as you are planning out your meals for the week. Just click any of the recipe titles or pictures to get the recipe.
A little about how we plan our week and our menu plan:
Mondays are soup and salad. Tuesdays we are bringing you delicious Mexican cuisine. Wednesdays are a taste of Italy. Thursdays are designed around yummy sandwiches, burgers, and wraps. Fridays are a no cook day around here. Going out with friends and loved ones is something that we think is important. It’s your night off from cooking- enjoy! Saturdays are an exotic food night, it’s a great night to try something new, from cooking with seafood, to trying Indian or Thai dishes. Sundays are a traditional old fashioned all American family dinner- think meat and potatoes. 🙂
There will also always be a couple of delectable desserts to use any day you wish. A new weekly menu plan will be posted every SUNDAY morning so be sure to check back each week!
CLICK ON THE LINKED RECIPE TITLES OR PHOTOS TO GET THE FULL RECIPE
WEEK #209
This makes the BEST sandwiches!
* DATE NIGHT *
CRAVING MORE? SIGN UP FOR THE DIETHOOD NEWSLETTER FOR FRESH NEW RECIPES DELIVERED TO YOUR INBOX! FOLLOW DIETHOOD ON FACEBOOK, TWITTER, PINTEREST AND INSTAGRAM FOR ALL OF THE LATEST CONTENT, RECIPES AND UPDATES.
SUBSCRIBE TO GET FREE UPDATES & A FREE ECOOKBOOK!
GET AN EMAIL WHEN THERE'S A NEW RECIPE

Source: https://diethood.com/weekly-menu-plan-209/
0 notes
Text
This is America’s best hot dog
There are plenty of good reasons why hot dogs are such a popular treat: They’re tasty, they’re cheap, and they’re incredibly easy to prepare. But there’s a big difference between a boiled hot dog on a nondescript bun and the ones that we annually round up for our ranking of the 75 best hot dogs in America.
The Best Burger in Every State
On our quest to round up America’s best hot dogs, we take into account local and national renown, the quality of the ingredients, the care taken to ensure that each dog is a work of culinary art (and a great hot dog certainly can be considered a work of art), and the overall hot dog eating experience. And no hot dog rose to quite the level of glory attained by our winner: the Ripper from Rutt’s Hut in Clifton, New Jersey, which has been going strong since 1928 and is one of America’s best old-school restaurants.
The Ripper, a pork-and-beef Thumann’s link that earns its name by being deep-fried in beef fat until it rips apart, attains a crispy skin during its time in the fryer, making us wonder why more hot dog stands don’t emulate it. It’s easily one of the most iconic dishes in America.
This roadside shack is also a pitch-perfect place to down a hot dog or three: There’s a long counter in its chairless dining room as well as an adjoining wood-paneled tap room where you can drink cheap beer and chat with old-timers and fellow pilgrims, propelling Rutt’s Hut to legendary status. Whether you order an In-And-Outer (just a quick dunk in the oil), a Ripper, a well-done Weller, or the crunchy, porky, almost-overcooked Cremator, make sure you get it “all the way”: topped with mustard and a spicy, sweet, onion-and-cabbage-based relish. If you can't make it all the way to New Jersey, don't worry, you can easily seek out the best hot dog in your state.

Source: https://www.thedailymeal.com/eat/americas-best-hot-dog
0 notes
Text
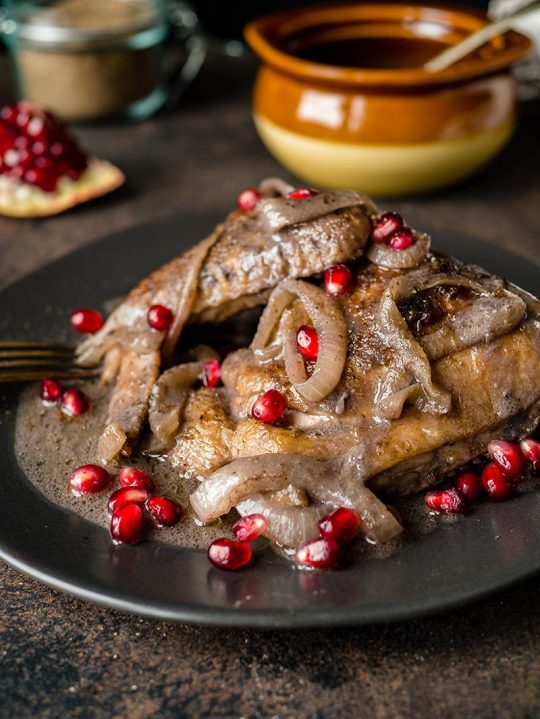
Pork Chops with Boozy Blueberry Compote & Polenta
We made this meal over a week ago and haven’t stopped talking about it since. Everything went together so beautifully and the blueberry compote was so dang good that I’m thinking about canning it so I can gift it to folks for Christmas presents this year. This meal also was a good reminder to get back on the polenta wagon. We haven’t cooked polenta in forever and it was the perfect starch to serve with the juicy pork chops and sauce. I hope you all enjoy this simple recipe as much as we do. If you end up with extra sauce it tastes great served over anything from meat to ice cream. Go wild!
Cheers from Tumbleweed Farm
Pork Chops with Boozy Blueberry Compote & Polenta
Prep Time: 15 minutes Cook Time: 30 minutes Serves: 4
Blueberry Compote
1 cup fresh or frozen blueberries (if frozen no need to thaw)
1/4 cup honey
1/2 cup bourbon
1 tablespoon fresh thyme
pinch of salt
Polenta
4 cups water
1 teaspoon salt
1 cup polenta
3 tablespoons butter, divided
1/2 cup grated parmesan cheese (or another salty hard cheese)
salt and pepper
Pork Chops
1-2 tablespoons cooking fat (we used ghee)
4 bone in pork chops
salt and pepper
minced parsley for serving
Preparation
Prepare the blueberry compote by adding all the ingredients to a saucepan and bring to a boil. Reduce heat to medium-low and simmer, stirring occasionally, until the sauce has thickened, about 8-10 minutes. Taste for seasonings and adjust as needed.
Prepare the polenta by brining the water and salt to a boil in a saucepan. Pour in the polenta slowly, whisking constantly until all the polenta is stirred in the there are no lumps. Reduce the heat to low and simmer, whisking often, until the polenta starts to thicken, about 5 minutes. Cover, and cook for about 25 minutes, whisking every 5 minutes or so. When polenta is too thick to whisk add 2 tablespoons of the butter and the grated cheese. Cover and let stand for 5 minutes to thicken a bit more. Just before serving add the remaining 1 tablespoon of butter and the salt and pepper.
Prepare the pork chops by heating the ghee (or cooking fat of choice) in a large cast iron skillet over medium high heat. Sprinkle the pork chops with salt and pepper. Sear the chops for about 3-4 minutes on each side.
Serve the chops with the polenta and the blueberry compote. Sprinkle with the minced parsley.
Notes
*The cooking time will very on the polenta so check specific instructions on your package

Source: http://dishingupthedirt.com/recipes/entree/pork-chops-boozy-blueberry-compote-polenta/
0 notes
Text
Ultimate Peanut Butter Cake (and Something You Should Know About Me)

Ultimate Peanut Butter Cake
There’s something I want you to know about me. I’ve wrestled for quite awhile about how to say this, but I’ve never wrestled with whether or not it needs to be said. If you don’t know this, you don’t know me. And if this space isn’t a space to share myself and learn about you, it’s nothing to me.

If you’ve been around for my stories over the years (thank you, thank you, thank you), you know by now that I’m a teacher, a Christian, a turtle and dog owner, an antiracist feminist. What you might not know (unless you saw my announcement yesterday on Instagram) is that I’m bisexual.
I’m married to a man. You may wonder why it matters to me that anyone knows. But if you taught kids? You’d know why it mattered for them to know people with their identity exist in their every day lives. If you were in churches? You’d know why it mattered for queer people to share that, no really, they have a relationship with Christ. The world is very, very heterosexual, and for some this means they feel silenced and alienated. For others it can mean they are literally in physical danger.
Since being more open about my journey as a Christian who is affirming of LGBTQ people and since carefully becoming more open about who I am, numerous friends and even strangers have connected with me for support. I won’t stay silent when we need each other.
Kids are out there being gay in a world with almost no queer representation in books or movies, much less in their every day lives. They have no model for how to be who they are, and growing up is scary enough when you’re trying to grow into dominant identities. When one of your identities might result in you being ostracized by friends and family, the stakes become higher than any kid should have to deal with on their own.
Christians are out there being gay in a world that tells them they don’t exist or are dishonoring the God who made them who they are, who has known and loved them since before the foundation of the world, and who has given everything to allow them to live in freedom and love. They’re trying to reconcile their identity and faith in a society where homophobia has been weaponized by individuals seeking to manipulate the voting bloc that is the evangelical church into giving them political power and profit. They’re literally being abandoned by friends and family because of one sentence Paul said in an entire letter designed to encourage unity between Jews and Gentiles.
For these reasons, speaking up as a queer Christian and owning this part of my identity means a lot to me. So now you know! Happy Pride Month!
One year ago: Easy Strawberry Cheesecake Tart Two years ago: Ultimate Tres Leches Cookies and Cream Cake Three years ago: Strawberry Sour Cream Kuchen Four years ago: Fresh Summer Pasta with Plugra Ricotta Sauce Five years ago: Gooey Chocolate Coconut Cream Skillet Cake Six years ago: Sweet Orange Florentines Seven years ago: Caramel Cream Croquembouche

Peanut Butter Cake
Author: Willow Bird Baking
1/2 cup butter
1/2 cup water
1 cup + 2 tablespoons cake flour
1 cup white sugar
1 egg, lightly beaten
1/4 cup sour cream
1/4 teaspoon almond extract
1/4 teaspoon vanilla extract
1/2 teaspoon baking soda
1/2 teaspoon salt
1/2 cup peanut butter
1 tablespoon powdered sugar
6 tablespoons cup milk
2 tablespoons light corn syrup
1/2 cup butter, softened
1 cup creamy peanut butter
3 tablespoons milk, or as needed
2 cups confectioners' sugar
chopped peanuts or gold sprinkles for topping, optional
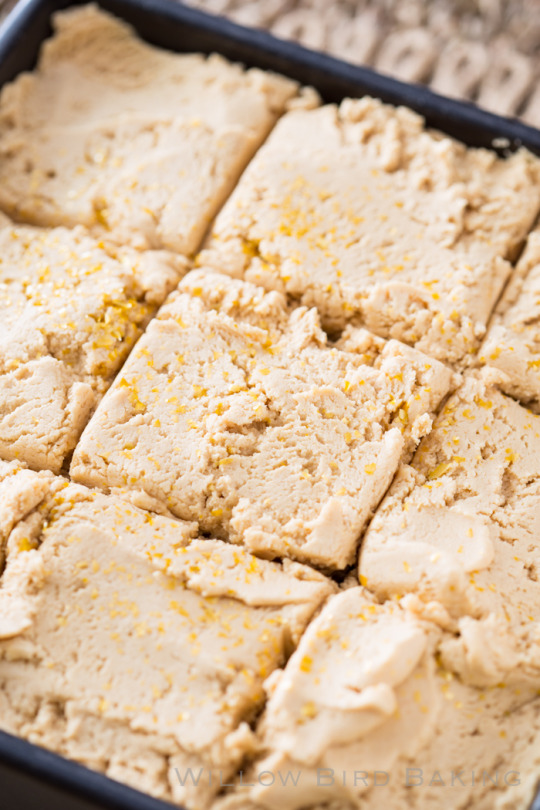
Make the cake: Preheat the oven to 375 degrees and grease an 8-inch square baking pan (I use Wilton's Cake Release to grease my whole pan and then place a sheet of greased parchment in the bottom of the pan). In a medium saucepan over medium heat, bring the butter and water to a boil. In the meantime, in a separate large bowl, whisk together the cake flour and sugar before adding the egg, sour cream, almond extract, vanilla extract, baking soda, and salt. Mix to combine. While mixing, slowly pour in the boiling butter and water mixture. Mix to combine completely. Your batter will be very runny. Pour the batter into the prepared baking pan. Bake at 375 degrees for 17-22 minutes or until a toothpick inserted in several places comes out with a few moist crumbs. Poke holes in the cake with the handle of a wooden spoon.
Make the peanut butter sauce: Heat the peanut butter in a medium bowl for about 30 seconds. Whisk in powdered sugar and enough milk to reach pouring consistency (I had to use the full amount. It should be sauce-like, so don't be shy about adding more liquid). Pour over the cake and cool completely (I stuck mine in the fridge and it was cool in about an hour).
Make the peanut butter icing: Beat the butter and peanut butter together in a medium bowl until combined. Gradually beat in the powdered sugar. Add milk one tablespoon at a time until all of the sugar is mixed in and the frosting is thick but still spreadable (I needed the full amount). Beat for a few minutes until it’s super fluffy. Spread it on completely cooled cake -- it's not the smoothest or prettiest, but it is the most delicious! Top with chopped peanuts or gold edible sprinkles!
3.2.2925
June 23, 2018 by Julie Ruble | 37 Comments
Source: http://willowbirdbaking.com/2018/06/23/peanut-butter-cake/
0 notes
Text
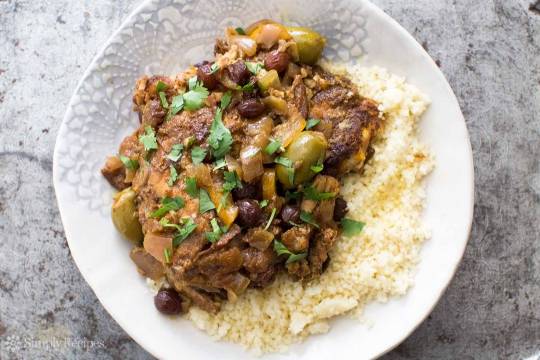
Short Rib Ragu Recipe
August 28, 2018 // no comments »
Short Rib Ragu Recipe
When a friend gave me a can of San Marzano tomatoes I knew it was time to prepare a short rib ragu. I decided to use beef short ribs and let the slow cooker do all of the work for me. This ragu gets a lot of flavor from the short ribs, San Marazano tomatoes, wine, and thyme. Additonal flavor comes from onion, garlic and carrot. The type of pasta used in this recipe is pappardella but you could use other types such as linguini. I like to serve this dish with garlic bread and ricotta cheese.
Print Recipe
Short Rib Ragu
Yield: 4 Servings
Ingredients:
2 lbs boneless beef short ribs
salt and pepper
1/2 onion (chopped)
1 carrot (peeled and chopped)
4 garlic cloves (chopped)
1 (28 ounce) can peeled whole San Marazano Tomatoes (crushed with your hands)
1 cup dry red wine
1 cup low-sodium beef broth
2 bay leaves
3 sprigs fresh thyme
pinch of red pepper flakes
3/4 lb pappardella pasta
freshly grated parmesan
italian parsley (chopped)
fresh basil (chopped)
Directions:
Season the short ribs on both sides with salt and pepper. Add to the bottom of a slow cooker. Add in onion, carrot, and garlic. Add in crushed tomatoes, wine, beef broth, bay leaves and fresh thyme. Season with salt, pepper, and a pinch of red pepper flakes. Cover and cook on low for 8 hours. Remove the short ribs and shred them using two forks. Discard bay leaves and thyme sprigs. Return the beef to the slow cooker and mix well.
Cook the pappardella pasta according to package directions. Drain and mix with the sauce stirring to coat. Serve with parmesan, parsley, and basil on top.
Beef, Main Course, Italian Recipes, Recipes
no comments »
Yum
Related Posts
April 29, 2009 Shrimp Fried Rice Recipe
February 16, 2016 Ritz Chicken Casserole Recipe
November 27, 2009 Kiwi Salsa Recipe
Name (required)
Mail (required - will not be published)
Website URL
Comment
Source: https://blogchef.net/short-rib-ragu-recipe/
0 notes
Text
Why do we wear green on St. Patrick’s Day?
Green clothes, green decorations, green beer, green doughnuts… It’s all green everything on St. Patrick’s Day. And everyone knows if you don’t wear green, you’re in danger of getting pinched! But protection from pinching isn’t the only reason you don green-colored clothing on this Irish holiday. The history of why you wear green on St. Patrick’s Day runs much deeper.
The Best Chain Restaurant St. Patrick’s Day Deals
There are many iterations of the story that binds the Irish, St. Patrick’s Day, and the color green, ranging in tone from decades of political revolt to myths of mischievous leprechauns. But here are a few of the more popular versions.
St. Patrick’s Day always occurs on March 17, the day many believe that St. Patrick, foremost patron saint of Ireland, died. One of the explanations for the sea of green you see every St. Patrick’s Day revolves around Saint Patrick himself. Legend has it, he used a shamrock (a plant that is, of course, green) to explain the Holy Trinity to the pagan Irish. There is no evidence to support this tale; but many works of art depicting Saint Patrick portray him with a cross in one hand and a sprig of shamrocks in the other.
Another tale dates back to the early 1700s when, rumor has it, Irish Americans (who held some of the first St. Patrick’s Day parades and created many modern St. Patrick’s Day traditions) spread folklore about leprechauns. It was said that wearing green would make you invisible to the little conniving creatures — if you didn’t wear green, a leprechaun would jump out and pinch you. That's a tale we’d truly only believe after imbibing a few too many green colored cocktails. But it also helps to explain the pinching.
The color has quite the documented political history, as well. It was used as nationalistic representation for the Irish in quite a few revolts for independence, and now still remains as one of three colors in the Irish flag.
One of the last theories says that the color is associated with Irish nationalism because of the nickname for Ireland, the “Emerald Isle.” Ireland got this name for its lush, green landscape — which, to this day, is really quite magical!

Source: https://www.thedailymeal.com/holidays/why-green-st-patricks-day
0 notes
Text
Resurrection Rolls
Sharing is caring!
Resurrection Rolls are so easy to make with crescent roll dough and marshmallows. Also known as Empty Tombs, these Easter rolls represent the empty tomb following the resurrection of Jesus.
These rolls are a little bit sweet due to the marshmallows and some cinnamon sugar. They make a wonderful addition to Easter breakfast. Resurrection Rolls are absolutely delicious and only take 8 to 10 minutes to bake. They are an Easter tradition your kids will love.
These rolls are perfect for teaching your kids the Easter story. Each ingredient has symbolism. The marshmallow represents Jesus. The butter and cinnamon represent the oils and spices used to annoint Jesus’s body and the crescent roll dough being wrapped around the marshmallow represents Jesus being wrapped in his burial clothes.
On the third day, the tomb was found empty. As the Resurrection Rolls bake, the marshmallow disappears and the rolls become hollowed out. Such a great visual lesson for young children!
Pinching the dough well around the marshmallow is key. Otherwise gaps will open up as they bake and the marshmallows will ooze out.
This recipe can easily be doubled.
Best eaten soon after baking.
To prevent the rolls from sticking to the baking sheet, use parchment paper.
More Easter Recipes:
Resurrection Rolls are so easy to make with crescent roll dough and marshmallows. Also known as Empty Tombs, these Easter rolls represent the empty tomb following the resurrection of Jesus.
1 (8-count) tube crescent rolls
8 large marshmallows
3 tablespoons melted butter
3 tablespoons granulated sugar
2 teaspoons cinnamon
Preheat oven to 375 degrees and line a baking sheet with parchment paper.
Unroll crecent roll dough and separate into triangles.
Combine sugar and cinnamon in a small bowl.
Dip each marshmallow in butter and then coat in cinnamon sugar. Place in the middle of a piece of dough.
Roll dough around marshmallow, sealing the seams really well. Position so seam is facing down. Sprinkle a little more cinnamon sugar on top.
Bake for 8 to 10 minutes.
* Percent Daily Values are based on a 2000 calorie diet.

Source: https://spicysouthernkitchen.com/resurrection-rolls/
0 notes
Text
Caprese Balsamic Baked Chicken Breasts Recipe
Incredibly juicy chicken breasts smothered in a sweet, balsamic sauce with cherry tomatoes, onions, and melty mozzarella cheese. Low carb, Keto-friendly, and amazing!
Caprese Balsamic Baked Chicken Breasts is a 30-minute dinner FULL of flavor prepared with balsamic oven-baked chicken, tomatoes and cheese.
I have to say, the cherry tomatoes are the most perfect sweet-tart compliment to this cheesy chicken. We knew that, though, judging by one of our top recipes for years 👉 One Dish Chicken Bake.
Friends, I saw the sun. Not the sign… the SUN. My 1990’s crew will get that cheesy joke. HA! 🙂
So, I haven’t seen the sun in a long while because, Winter. I would totally move to a warmer State, but then I’d really miss Fall/Winter fashion. Is that even a good reason to decide where you will live?! Possibly not, but really, I’d miss wearing tall boots, big scarves, and warm, fuzzy sweaters. And the extra 5+ winter-pounds.
But, back to the sun. I made this for dinner just last week because the sun was out ALL day! I thought I saw Summer, so I made us a Summer-ish meal. 🌞
You see, when you’ve had a winter with -25F degrees, and then, overnight, it hits +45F degrees, THAT feels like Summer! I was outside in short sleeves and loved it.
On the flip side, come October’s 45F degrees, I’ll be bundled up in a fur coat. You know how all that goes.
Anywho. Balsamic Baked Chicken with a Caprese twist is our topic of the day. This is a healthy dinner, it is a quick one, as well, and one of you will be slurping up the last bit of that balsamic sauce at the bottom of the pan.
Caprese Balsamic Baked Chicken Breasts
Dinner doesn’t get any easier than this; it’s just deliciously seasoned chicken breasts baked atop a bed of cherry tomatoes with a sweet balsamic glaze.
First, we start with cutting up the tomatoes and arranging them in a 9×13 baking dish.
Next step is to slice up a small red onion and place those slices over the tomatoes. Season with salt, pepper, and dried basil.
Season chicken with salt, pepper, dried oregano, and dried basil; rub minced garlic over each chicken breast, and place over the tomatoes. Set aside.
In a small mixing bowl combine some balsamic vinegar with a sweetener; I use 1 packet of stevia sweetener which is equal to 1/2 teaspoon.
Then, take the balsamic sauce and pour it over the chicken and tomatoes; flip chicken over to coat on all sides.
Bake in a 425F degree oven for about 25 minutes, or until chicken is done.
Add shredded mozzarella cheese on top of chicken and continue to cook for 3 to 4 minutes, or until cheese is melted.
Remove from oven; let stand 5 minutes.
Garnish with basil and serve.
This is a great go-to dinner recipe because it’s perfect for busy weeknights, and because no one has ever complained about it to me… I hope the same goes for you and your family. 🙃
WHAT TO SERVE WITH BALSAMIC BAKED CHICKEN BREASTS
If you’re keeping it on the low-carb side, serve a big green salad like this Avocado Feta Kale Salad. Or, you can spiralize some zucchini and make these Creamy Ricotta Zucchini Noodles.
For those that aren’t worried about the carbs and Keto, welcome to my Pasta shrine.
HOW TO STORE LEFTOVERS
Store leftovers in an airtight container and refrigerate for 3 days.
MORE BALSAMIC CHICKEN RECIPES
ENJOY!
Caprese Balsamic Baked Chicken Breasts Recipe
Incredibly juicy chicken breasts smothered in a sweet, balsamic sauce with cherry tomatoes, onions, and melty mozzarella cheese. Low carb, Keto-friendly, and amazing!
Course: Dinner
Cuisine: Italian, Mediterranean
Keyword: baked chicken breasts, balsamic chicken, caprese recipes, keto dinner idea, low carb recipe
Servings: 4 serves
Calories: 276 kcal
Ingredients
2 cups cherry tomatoes, halved
1 small red onion, thinly sliced
salt and fresh ground pepper, to taste
1/2 teaspoon dried basil
4 (1 pound total) boneless, skinless chicken breasts
1/2 tablespoon olive oil
salt and fresh ground pepper, to taste
1/2 teaspoon dried basil
1/2 teaspoon dried oregano
4 cloves garlic, minced
3 tablespoons balsamic vinegar
1/2 teaspoon sweetener (I use 1 Stevia packet)
1 cup shredded mozzarella cheese
chopped fresh basil dried basil, or chopped fresh parsley, for garnish
Instructions
Preheat oven to 425F.
Lightly spray a 9x13 baking dish with cooking spray.
Arrange prepared tomatoes and red onions on the bottom of the baking dish; season with salt, pepper, and dried basil. Stir and set aside.
Drizzle olive oil over chicken breasts.
Season chicken breasts with salt, pepper, basil, and oregano.
Take the minced garlic with your fingers and rub it all over each chicken breast, rubbing in the seasonings at the same time.
Arrange the chicken breasts over the tomatoes; set aside.
In a small mixing bowl, combine balsamic vinegar and sweetener; whisk until well incorporated.
Drizzle the balsamic vinegar over the chicken and tomatoes; flip chicken over to coat all around.
Bake for 23 to 25 minutes, or until chicken is done. Depending on the thickness of your chicken, it may need less or more time to cook through.
Remove from oven and add shredded cheese over each chicken breast.
Continue to bake for 3 to 4 minutes, or until cheese is melted.
Remove from oven and let stand 5 minutes.
Drizzle sauce over chicken.
Garnish with basil or parsley, and serve.
Recipe Notes
WW FREESTYLE POINTS: 4
Use Fat Free Shredded Mozzarella and reduce your points down to 1.
HOW TO STORE LEFTOVERS
Store leftovers in an airtight container and refrigerate for 3 days.
Nutrition Facts
Caprese Balsamic Baked Chicken Breasts Recipe
Amount Per Serving (6 ounces)
Calories 276 Calories from Fat 108
% Daily Value*
Total Fat 12g 18%
Saturated Fat 5g 25%
Cholesterol 129mg 43%
Sodium 292mg 12%
Potassium 529mg 15%
Total Carbohydrates 10g 3%
Dietary Fiber 1g 4%
Sugars 5g
Protein 29g 58%
Vitamin A 11.6%
Vitamin C 23.1%
Calcium 18.6%
Iron 11.9%
* Percent Daily Values are based on a 2000 calorie diet.
SUBSCRIBE TO GET FREE UPDATES & A FREE ECOOKBOOK!
GET AN EMAIL WHEN THERE'S A NEW RECIPE
Source: https://diethood.com/caprese-balsamic-baked-chicken-breasts/
0 notes
Text
Pink Power: Dragon Fruit & Coconut Pops!

These dragon fruit pops are so pretty in pink! Simple to make they are a combination of red dragon fruit, coconut and honey and make a wonderfully refreshing, naturally coloured treat!
I have to admit the main motivation for these was trying to achieve the perfect pink colour. I became obsessed with getting a certain shade of pink one afternoon. Dragon fruit or pitaya has become a very popular fruit over the past year or two and you can even buy it frozen in cubes at the supermarket so please don't feel like I am sending you on a wild goose chase to find red dragon fruit.
Mr NQN loved these to a ridiculous level. They're so simple and refreshing and given how long our summer is stretching, they're the perfect way to cool down.

Speaking of keeping cool, I recently lost my cool a little. I don't know if it's a recent thing in the last decade as a result of global warming but it happened during one of Sydney's wild storms. I was out at lunch and all of a sudden within the space of an hour, everything changed. There was thunder, lightning and torrential rain. It was close to the end of the day so I asked Mr NQN if he would like me to pick him up. He had Mochi with him and it's a bit awkward carrying her in her bag in the rain onto the bus.
I drove from Newtown to the CBD to pick them up and the rain was so heavy all of the cars were driving around 15kms per hour. Suddenly I realised that I had driven over the lines of the intersection and the light turned yellow. I was going to reverse but the reverse camera was obscured and I literally couldn't see anything behind me and I was worried that because the light was now red people had started to cross and I didn't want to hit anyone. I was just a little over the line and wasn't obstructing traffic the other way so I just sat there.

But then a few weeks later I got myself a big fat fine in the mail. The fine was over $400 for running a red light. I logged in and tried to argue that from the photos that the camera had taken I was actually stationary and had been for a while. I pleaded my case and held my breath. Because not only was I very unhappy about a $440 fine, I was also going to lose 3 of my precious driver license points. And if you know me, you'll know that I'm very proud of my unblemished driving record (yes I'm a NERD!).
The answer came through shortly after. It was a form response of course and I was not granted an exception. So I paid the $440 and lost my three points! And that day I definitely needed something like these pops to cool me down!
So tell me Dear Reader, have you ever gotten yourself a massive fine or lost points?
An Original Recipe by Lorraine Elliott
Preparation time: 10 minutes plus freezing time
Cooking time: 0 minutes
1/4 red dragon fruit
200ml/7flozs. cream
200ml/7flozs. coconut cream
Honey to taste (I used 3-4 tablespoons)
1 fig, cut into slices
Step 1 - Puree the dragon fruit in a food processor until smooth. Then add the cream and coconut cream and honey. Taste for sweetness adding more honey if needed.

Step 2 - Place a slice of fig in the ice cream mold and then place the popsicle sticks into the holes. Pour over with the cream mixture and then place on a baking tray in the freezer and allow to set completely.

Source: https://www.notquitenigella.com/2019/03/09/dragon-fruit-pops-ice-cream/
0 notes
Text
Dream Kitchen Tour (VIDEO)
Finally!! Welcome to our dream kitchen! I’m convinced this is the best kitchen layout. Watch the new kitchen video tour where we opened cabinets, drawers and even took a look under the kitchen sink. Whether you are building, remodeling, or love kitchen eye candy, I hope you are are inspired by our gourmet kitchen.
From ground breaking, through the building process, and when we invited you to our Christmas Home Tour – thank you so much for being part of the Natasha’s Kitchen family and sharing in our joy. We are so blessed by you our readers, every single day and we are more pumped and excited than ever to create more videos and recipes for you.
This post may contain affiliate links. Read my disclosure policy.
The Kitchen Tour (See Video Below):
We designed our beautiful white kitchen to be super functional, stewing over all the details from the subway tile, to the two-tone quartz counters and even placement of the outlets. I’m so happy with the way it turned out and have no regrets. This is absolutely my dream kitchen and I thank God for it every day. Cooking in this space feels like cooking in a Food Network kitchen and it’s in our very own house (still pinching myself)!
Dream Kitchen Details:
Drawer Organizers:
Rev-A-Shelf spice rack drawer inserts – cut these to fit any drawer and are perfect for all of our favorite McCormick spices.
Counters:
Dark grey quartz for the counters along the wall
Calacatta quartz for the island (looks like marble but doesn’t stain like marble).
Appliances:
Coffee Station:
Jura S8 Espresso Machine (the coffee dream machine!) and the glass coffee cups are right here.
Decor:
We hired Irina of Mint and Pine Design to decorate our kitchen and she did an amazing job!
This tray is from Target and the mugs are from Sur La Table.
Tile:
“Ice White” 3×6 subway tile with “TEC” brand “Silverado” grout
Sinks & Faucets:
Cabinets, Island and Floating Shelves:
White craftsman style fronts – all soft close with white melamine interior lining
Jeffrey Alexander brand “Sutton” (635-128SN) drawer pulls in brushed nickel
Jeffery Alexander (431SN) square knobs in brushed nickel.
Island and Floating Shelves in knotty alder wood with charcoal stain
Floors:
Hallmark Ventura Seashell (engineered wood floor)
Lighting:
2 Pendants over island are “Seagull Perrytown 5215004-839” We have the matching chandeliers for the dining room and entry.
Our Builder:
Christensen Homes; Chad is the builder and his wife, Kate is was helpful with coordinating and assisting in the design and selection process.
Kitchen Tools:
See all of our favorite cooking tools in Natasha’s Shop.
Watch Our Video Kitchen Tour:
I hope you are enjoying all of the recipe videos in the new kitchen, starting with this shrimp fried rice. If you haven’t already, please subscribe to our Youtube Cooking Channel (and click the bell icon to get notifications when we post a new video). We are so excited that we will crack 500k subscribers this week!! Thank you thank you thank you!! 🙂
P.S. If you have a suggestion for barstools that are pretty and practical (imagine young kiddos with spaghetti meatballs), I am all ears. We still haven’t found the right bar stools.
Also, let me know in the comments if you would also be interested in seeing a pantry or refrigerator tour.
Source: https://natashaskitchen.com/dream-kitchen-tour/
0 notes
Text
Black Bean Taco Salad with Shrimp + Weekly Menu
My work has a private Facebook group for employees and a few weeks ago, someone posted a picture of my cookbook on the shelves of Sam’s Club. This is all still so crazy to me! There was a ton of encouraging comments from people I know and plenty from those I don’t. It was very humbling to be recognized so “publicly”.
I’ve said it before and it remains true – self-promotion is not my strong suit. At hockey, people get helmet head (false sense of confidence and strength) and I’d say a keyboard is somewhat similar. I am more comfortable with quietly seeping into people’s lives…into their emails, their social media feeds, onto their Kindles. I’m good with all of that.
And yet, it doesn’t always happen that way and I always have this moment of panic. I think I shared not too long ago that someone locally recognized me in a frozen yogurt shop (hi, Nikki!). We’ve followed one another for years and it was a bit surreal. I had to think seriously as to what she probably already knew about me – like the fact that she knew it was my daughter, Shea, who was with me. No introductions required!
Last week in my leadership cohort, someone let the cat out of the bag about my blog. Many of them had known about the cookbook thing, but to find out about the blog was a whole new level of interest. I repeated the URL as people jotted it down and a few went straight to the web browser on their phone. Totally flattered. Hi to any of my coworkers who are new to reading!
Whenever someone new finds out about my little corner of the web, I always do a quick “oh crap!” recollection of what I last posted about as it relates to my life and so as a general rule, I keep things pretty appropriate. A bit toned down from how someone may experience me (though I’ve been told I talk and act just as I do on my blog…for whatever that’s worth).
So, being that I am on strike this week from anything new in the culinary world, I want to be sure my new readers don’t think all my family eats is pasta. I’ve got QUITE A FEW pasta recipes in queue (sorry, not sorry). After all, I am a dietitian and balance is the name of the game. This recipe, however, is a total gem. SO SIMPLE and made with HEALTHY ingredients most of us have on hand. While some of my coworkers can’t appreciate the glory of avocado (I’m trying not to hold it against them…), they could probably appreciate the simplicity and good health that goes with this recipe. Enjoy! And thanks for reading 😉
Black Bean Taco Salad with Shrimp
Author: Nicole Morrissey
Prep time: 10 mins
Cook time: 6 mins
Total time: 16 mins
Serves: 4 servings (1/4 salad and dressing with 4 oz shrimp)
Ingredients
Salad:
1 tsp olive oil
1 lb raw shrimp, peeled and deveined
1 Tbsp taco seasoning
2 heads Romaine lettuce, washed and chopped
1 (15 oz) can reduced sodium black beans, drained and rinsed
1 (15 oz) can whole kernel corn, drained
6 mini sweet bell peppers, cut into rings
¼ red onion, chopped
Dressing:
½ cup 2% plain Greek yogurt
⅓ cup salsa
2 tsp taco seasoning
Instructions
Heat olive oil in a large, nonstick skillet over medium heat. One hot, add the shrimp and sprinkle with taco seasoning. Cook 4-5 minutes or until pink and cooked through.
Meanwhile, mix together the dressing ingredients in a small bowl until well-combined.
Place lettuce in a large bowl and add the dressing; use tongs to toss well. Add black beans, sweet corn, peppers, and onion; toss gently.
Place ¼ of the salad on each of 4 plates. Top each plate with ¼ of the prepared shrimp and serve immediately.
Nutrition Information
Serving size: ¼ salad and dressing with 4 oz shrimp Calories: 318 Fat: 3.8 Carbohydrates: 42.3 Sugar: 8.5 Sodium: 869 Fiber: 14.0 Protein: 29.3 Cholesterol: 128
3.5.3251
Weekly Menu: February 24th – 28th
Sunday: picnic lunch at the hockey rink
Monday: Linguine with Pesto, Turkey Sausage, Asparagus, and Brussels Sprouts
Tuesday: Work dinner for me, fish sticks and mixed veggies for the kids
Wednesday: Beef tacos and/or taco salads with guacamole
Thursday: Roasted sweet potatoes with BBQ rotisserie chicken and diced avocado
Be well,

Source: https://preventionrd.com/2019/02/black-bean-taco-salad-with-shrimp-weekly-menu/
0 notes
Text
This heart-shaped ravioli from Costco is the perfect Valentine's Day treat
If you’re planning on wooing your sweetheart by cooking them a Valentine’s Day dinner, you might want to head to Costco. Not only are they offering a 24-pound cake made entirely out of cheese, the bulk chain is also selling the most adorable-looking heart-shaped ravioli from an artisanal-quality pasta producer.
20 Things You Didn’t Know About Costco
The Italian four cheese heart-shaped raviolis are made by Nuovo and include a blend of ricotta, mozzarella, Parmesan, and aged Asiago cheeses. One side of each pasta pocket is colored red, for love. Awww.
Plus, they’re a steal at Costco right now at two 20-ounce packages for $9.79.
These romantic-looking ravioli are currently being sold at Costco locations nationwide for a limited time. However, customers should definitely check with their local stores to see if they have the ravioli in stock. It seems like it might become a cult-favorite Costco item!
There are certain foods you should always buy at Costco, including pasta, because the chain will frequently sell specialty brands like Nuovo — which also happens to be sold at upscale grocers like Whole Foods — at a bargain price. That's just one of the Costco super shopper secrets we live by.
Source: https://www.thedailymeal.com/eat/costco-heart-shaped-ravioli/020519
0 notes
Text
Kimchi Cauliflower Fried Rice Keto, Paleo, Whole30
Easy Keto Kimchi Cauliflower Fried Rice comes together with your favorite protein and it’s ready it just about 15 minutes. This easy and quick Kimchi Cauliflower Fried Rice recipe is also paleo, Whole30 with vegan options. If you have never had Kimchi Cauliflower Fried Rice, life is about to change. Don’t miss this simple Keto Kimchi Cauliflower Fried Rice recipe, made extra easy with my secret weapon!
To know me, it to know my excitement for all things food! More importantly, beyond my simplistic love of food and cooking, it’s the real special things, like knowing where my food comes from, why it’s good for me, the impact that my food choices make on the environment and my health – that’s where I get real giddy. It’s just a true nerdy love affair, from top to bottom.
Anytime I can connect with my food on a deeper level, I jump at the chance. The wonder of the whole process is truly so special to me and I find each bite tastes so much better and each meal is so much more meaningful when I can slow down and acknowledge the full process and the full journey the food took to my plate. Our food is so much more than seeds, soil, sun and water. It’s love, it’s passion and it’s so so much work! We cannot ever take for granted the amount of energy that goes into our food.
I am so excited that in just a few weeks I will be up in the Pacific North West touring Cascadian Farm’s amazing land, learning about their process, the love, care and passion that goes into growing their food and to connect with my food on that deeper level. To me, these socially conscious companies are the true innovators in the food industry right now, they are the stewards of our planet, doing the extraordinary when it’s so easy to just opt for prioritizing automation, bottom lines and mass food production. Can I get an amen?!
I will certainly be taking you all along for the ride at Cascadian Farm over on my Instagram, so make sure you are following along there, and I will absolutely be sharing more after my trip here, along with another recipe, for sure.
In the meantime, I want to share a recipe that I just LOVE to make on busy weeknights. Cauliflower Fried Rice is a staple around here and there are so many iterations of this recipe in our household, at this point. I gave my standard Cauliflower Fried Rice recipe a bit of makeover for this Kimchi Cauliflower Fried Rice, by adding another layer of flavor, plus the benefits of fermented kimchi. (Since cooking fermented foods will kill most of the probiotics, I do recommend adding additional uncooked kimchi on top to maximize the benefits)
Using Cascadian Farm’s Recipe Cauliflower Blend with Stir Fry Vegetables, this Kimchi Cauliflower Fried Rice recipe is an absolute breeze, it’s actually kind of stupid how easy this is. Start to finish it’s ready in just about 15-20 minutes and it’s take-out level delicious, without the junk. You are getting plethora of veggies, which means a beautiful array of nutrients and colors!!
Excited to share more with about my upcoming trip, but in the meantime, make this super easy Kimchi Cauliflower Fried Rice, cherish each bite, celebrate the work that went into every meal you enjoy and never stop being in awe of your food!
Kimchi Cauliflower Fried Rice
2 tablespoons ghee, avocado oil or other cooking fat
1 cup kimchi (more or less to taste), cut into bite-sized pieces
2 cloves garlic, finely minced
1 tablespoon fresh ginger, finely minced
1 - 2 cups cooked protein, chicken, pork, beef cut into bite-sized pieces or shredded, other options: shrimp or 3 eggs, scrambled
5 cups Cascadian Farms Frozen Riced Cauliflower Blend with Stir-Fry Vegetables* (1.5 packages)
2 tablespoons kimchi juice
1 tablespoon coconut aminos (you can also use soy sauce or tamari)
sea salt, to taste
Additional kimchi, cut into bite-sized pieces
1 fried egg (per person)
1-2 tablespoons chili paste or sriracha for topping
sesame oil and/or sesame seeds for topping
crispy / roasted seaweed, cut into thin pieces
thinly sliced scallions
microgreens
To a wok or a large skillet over medium-high heat, add ghee or other cooking oil, add the chopped kimchi, garlic and ginger. Cook for several minutes until the kimchi starts to brown a little, 3 to 5 minutes. Add any cooked protein (not scrambled eggs or shrimp). Heat through. Give it a couple minutes.
Add the Cascadian Farms Frozen Riced Cauliflower Blend with Stir-Fry Vegetables, along with the Kimchi juice and coconut aminos. Reduce heat to medium. Cover the wok or skillet and cook for 3 minutes. You want the veggies to be no longer frozen and barely tender but definitely not mushy.
Take the lid off, increase the heat to medium-high, cook another minute, add scrambled eggs if using or cooked shrimp. Turn off the heat. Taste and add sea salt to taste, if necessary (likely it will not be).
Serve the Kimchi Cauliflower Fried Rice topped with a fried egg, sesame oil, toasted seaweed or nori sheets, srirarcha or sesame oil, scallions, microgreens, etc
if using straight up frozen cauliflower rice, I recommend using 3 cups cauliflower rice and adding approximately 2 cups of additional frozen or already cooked veggies, stir-fry veggies like broccoli, mushrooms, carrots, peppers, onion, etc. Add at the same time as the cauliflower.
If you are gluten-free, be sure to buy a kimchi that is gluten-free and always look for hidden sugar or other shady ingredients. Better yet, find an amazing recipe online and make your own.
3.5.3229
This post was created in partnership with Cascadian Farm and the Feedfeed. I’m proud to work with brands that care about the health of its consumers and the planet. As always, all opinions and text are my own.
Source: http://tasty-yummies.com/kimchi-cauliflower-fried-rice/
0 notes
Text
Double Chocolate Zucchini Muffins
With a whirlwind of a summer behind me—planning a wedding, getting married (!), and taking a full load of graduate credits at the same time—I feel like I haven't had time to catch my breath before the back-to-school season set in.
As a teacher, the start of a new school year keeps me on my toes as I get my classroom and lessons in order. When classes begin, there is an adjustment period where my feet have to get used to the long hours of standing, my throat has to adapt to a steady stream of talking in the classic teacher voice, and my brain has to refocus on jumping between ideas at a rapid pace.
As my students and I find our new routine, the high energy required in the first couple weeks of school can be draining. This makes weekends a welcome time to recover.
I stayed close to home last weekend, enjoying a couple walks around the neighborhood, catching up on summer TV shows, and savoring the quiet before another work week. For the first time in what feels like weeks, I also spent some real time in the kitchen.
While the self-watering planters I built this summer did not turn out as planned (only the herbs, green beans, and bell peppers were spared from root rot), luckily the CSA (community supported agriculture) I support has been particularly fruitful.
With an abundance of zucchini filling the drawers of my refrigerator, I baked four loaves of zucchini bread before creating something a little more decadent in these double chocolate zucchini muffins.
These Double Chocolate Zucchini Muffins take advantage of the late season squash. The muffins feature plenty of chocolate chunks and a hint of cinnamon for a warmer touch. I prefer to heat these up for a few seconds in the microwave until the chocolate just begins to melt. With a large glass of milk, these muffins make for a perfect afternoon snack after a long day at school.
Pro tip: Reserve a couple ounces of chocolate to sprinkle over the top to make the muffins look extra delicious.
One Year Ago: Plum Almond Tart Three Years Ago: Blueberry Honey Scones Four Years Ago: Homemade Chocolate Hazelnut Spread Five Years Ago: Vanilla Ice Cream Cake, Honeyed Apricot Granola Bars, & Chocolate Banana Chip Cookies Six Years Ago: Rum Raisin Oatmeal Cookies, Banana Rum Bread, Zucchini Chocolate Chip Muffins, & Pear Chocolate Muffins Seven Years Ago: 3 Milk Coconut Cake, Tomato Basil Tart, & Whole Wheat Irish Soda Bread Eight Years Ago: Cinnamon Chocolate Chip Banana Bread
Double Chocolate Zucchini Muffins
Yields 1 dozen muffins
3/4 cup (150 grams) granulated sugar 1/2 cup (118 ml) vegetable oil 1 large egg 1 teaspoon vanilla extract 1 cup (about 180 grams) grated zucchini, lightly packed 1/2 teaspoon ground cinnamon 1/2 teaspoon baking soda 1/2 teaspoon baking powder 1/2 teaspoon salt 1 1/4 cup (150 grams) all-purpose flour 1/4 cup (21 grams) cocoa powder 6 ounces (170 grams) semi-sweet chocolate, coarsely chopped (or 1 cup semi-sweet chocolate chips)
Preheat oven to 350 degrees F (175 degrees C). Line a muffin pan with baking cups.
In a large bowl, whisk together the sugar, vegetable oil, egg, and vanilla until well combined. Stir in the grated zucchini. Mix in the cinnamon, baking soda, baking powder, and salt. Fold in the flour and cocoa powder, mixing until the batter becomes uniform. Stir in the chopped chocolate.
Fill baking cups 3/4 full and bake for 18-22 minutes, or until a tester inserted in the center comes out clean. For best texture, let the muffins cool before eating.
Source: https://www.pastryaffair.com/blog/double-chocolate-zucchini-muffins
0 notes