
As a Web Programmer / Application Developer, my objective is to make a positive impact on clients, co-workers, and the Internet using my skills and experience to design & develop compelling and attractive websites, web apps & mobile apps. I enjoy working on projects that involve a mix of web and graphic design, web development, mobile application development, database management and programming.
Don't wanna be here? Send us removal request.
Statistics
We looked inside some of the posts by mbaljeetsingh and here's what we found interesting.
Average Info
Notes Per Post
2
Likes Per Post
2
Reblog Per Post
0
Reply Per Post
0
Time Between Posts
26 days
Number of Posts By Type
Text
17
Last Seen Tumblr Blogs


Fun Fact
Mobile US users spent an average of 115.8 minutes on Tumblr app monthly.
Text
Scope and Closures in JavaScript – Explained with Examples
You may have come across or written code similar to this when writing JavaScript:
function sayWord(word) { return () => console.log(word); } const sayHello = sayWord("hello"); sayHello(); // "hello"
This code is interesting for a couple of reasons. First, we can access word in the function returned from sayWord. Second, we have access to word’s value when we call sayHello – even though we call sayHello where we do not otherwise have access to word.
In this article, we’ll learn about scope and closures, which enable this behavior.
Introducing Scope in JavaScript
Scope is the first piece that will help us understand the previous example. A variable’s scope is the part of a program where it is available for use.
JavaScript variables are lexically scoped, meaning that we can determine a variable’s scope from where it is declared in the source code. (This is not entirely true: var variables are not lexically scoped, but we will discuss that shortly.)
Take the following example:
if (true) { const foo = "foo"; console.log(foo); // "foo" }
The if statement introduces a block scope by using a block statement. We say that foo is block-scoped to the if statement. This means it can only be accessed from within that block.
If we try to access foo outside of the block, we get a ReferenceError because it is out of scope:
if (true) { const foo = "foo"; console.log(foo); // "foo" } console.log(foo); // Uncaught ReferenceError: foo is not defined
Block statements in other forms, such as for and while loops, will also create a scope for block-scoped variables. For instance, foo is scoped within a function body below:
function sayFoo() { const foo = "foo"; console.log(foo); } sayFoo(); // "foo" console.log(foo); // Uncaught ReferenceError: foo is not defined
Nested Scopes and Functions
JavaScript allows nested blocks and therefore nested scopes. Nested scopes create a scope tree or scope chain.
Consider the code below, which nests multiple block statements:
if (true) { const foo = "foo"; console.log(foo); // "foo" if (true) { const bar = "bar"; console.log(foo); // "foo" if (true) { console.log(foo, bar); // "foo bar" } } }
JavaScript also allows us to nest functions:
function foo(bar) { function baz() { console.log(bar); } baz(); } foo("bar"); // "bar"
As expected, we can access variables from their direct scope (the scope where they get declared). We can also access variables from their inner scopes (the scopes that nest within their direct scope). That is, we can access variables from the scope they get declared in and from every inner scope.
Before we go further, we should clarify the difference in this behavior between variable declaration types.
Scope of let, const, and var in JavaScript
We can create variables with the let, const, and var declarations. For let and const, block scoping works as explained above. However, var behaves differently.
let and const
let and const create block-scoped variables. When declared within a block, they are only accessible within that block. This behavior was demonstrated in our previous examples:
if (true) { const foo = "foo"; console.log(foo); // "foo" } console.log(foo); // Uncaught ReferenceError: foo is not defined
var
Variables created with var are scoped to their nearest function or the global scope (which we will discuss shortly). They are not block scoped:
function foo() { if (true) { var foo = "foo"; } console.log(foo); } foo(); // "foo"
var can create confusing situations, and this information is only included for completeness. It is best to use let and const when possible. The rest of this article will pertain only to let and const variables.
If you’re interested in how var behaves in the example above, you should check out my article on hoisting.
Global and Module Scope in JavaScript
In addition to block scopes, variables can be scoped to the global and module scope.
In a web browser, the global scope is at the top level of a script. It is the root of the scope tree that we described earlier, and it contains all other scopes. Thus, creating a variable in the global scope makes it accessible in every scope:
<script> const foo = "foo"; </script> <script> console.log(foo); // "foo" function bar() { if (true) { console.log(foo); } } bar(); // "foo" </script>
Each module also has its own scope. Variables declared at the module level are only available within that module – they are not global:
<script type="module"> const foo = "foo"; </script> <script> console.log(foo); // Uncaught ReferenceError: foo is not defined </script>
Closures in JavaScript
Now that we understand scope, let’s go back to the example that we saw in the introduction:
function sayWord(word) { return () => console.log(word); } const sayHello = sayWord("hello"); sayHello(); // "hello"
Recall that there were two interesting points about this example:
The returned function from sayWord can access the word parameter
The returned function maintains the value of word when sayHello is called outside the scope of word
The first point can be explained by lexical scope: the returned function can access word because it exists in its outer scope.
The second point is because of closures: A closure is a function combined with references to the variables defined outside of it. Closures maintain the variable references, which allow functions to access variables outside of their scope. They “enclose” the function and the variables in its environment.
Examples of Closures in JavaScript
You have probably encountered and used closures frequently without being aware of it. Let’s explore some more ways to use closures.
Callbacks
It is common for a callback to reference a variable declared outside of itself. For example:
function getCarsByMake(make) { return cars.filter(x => x.make === make); }
make is available in the callback because of lexical scoping, and the value of make is persisted when the anonymous function is called by filter because of a closure.
Storing state
We can use closures to return objects from functions that store state. Consider the following makePerson function which returns an object that can store and change a name:
function makePerson(name) { let _name = name; return { setName: (newName) => (_name = newName), getName: () => _name, }; } const me = makePerson("Zach"); console.log(me.getName()); // "Zach" me.setName("Zach Snoek"); console.log(me.getName()); // "Zach Snoek"
This example illustrates how closures do not just freeze the values of variables from a function’s outer scope during creation. Instead, they maintain the references throughout the closure’s lifetime.
Private methods
If you’re familiar with object-oriented programming, you might have noticed that our previous example closely resembles a class that stores private state and exposes public getter and setter methods. We can extend this object-oriented parallel further by using closures to implement private methods:
function makePerson(name) { let _name = name; function privateSetName(newName) { _name = newName; } return { setName: (newName) => privateSetName(newName), getName: () => _name, }; }
privateSetName is not directly accessible to consumers and it can access the private state variable _name through a closure.
React event handlers
Lastly, closures are common in React event handlers. The following Counter component is modified from the React docs:
function Counter({ initialCount }) { const [count, setCount] = React.useState(initialCount); return ( <> <button onClick={() => setCount(initialCount)}>Reset</button> <button onClick={() => setCount((prevCount) => prevCount - 1)}> - </button> <button onClick={() => setCount((prevCount) => prevCount + 1)}> + </button> <button onClick={() => alert(count)}>Show count</button> </> ); } function App() { return <Counter initialCount={0} />; }
Closures make it possible for:
the reset, decrement, and increment button click handlers to access setCount
the reset button to access initialCount from Counter's props
and the “Show count” button to display the count state.
Closures are important in other parts of React, such as props and hooks. Discussion about these topics is out of scope for this article. I recommend reading this post from Kent C. Dodds or this post from Dan Abramov to learn more about the role that closures play in React.
Conclusion
Scope refers to the part of a program where we can access a variable. JavaScript allows us to nest scopes, and variables declared in outer scopes are accessible from all inner ones. Variables can be globally-, module-, or block-scoped.
A closure is a function enclosed with references to the variables in its outer scope. Closures allow functions to maintain connections with outer variables, even outside the scope of the variables.
There are many uses of closures, from creating class-like structures that store state and implement private methods to passing callbacks to event handlers.
Let's connect
If you’re interested in more articles like this, subscribe to my newsletter and connect with me on LinkedIn and Twitter!
Acknowledgements
Thanks to Bryan Smith for providing feedback on drafts of this post.
Cover photo by Karine Avetisyan on Unsplash.
via freeCodeCamp.org https://ift.tt/M4sX1a6
0 notes
Text
Demystifying Grids For Developers and Designers
Designers and developers each have their own individual definition and use of grids, making the concept a relatively nebulous and unclear concept to all. To some, grids could mean layout and structure, while to others grids refer to interactive tables that manage data. Understanding the target audience is key here because there might not be a universally understandable direction which can lead designers to be misguided during the cross-collaboration process. When given the time, developers and designers can fully evaluate the user story and create a thoughtful user experience together through the use of grids. But first, we need to find common ground to work from.
Identifying a Grid
As we mentioned, it is important to know your audience when talking about Grids. If you come from a typical design background, the word “Grid” instantly brings you to think about layout (either print or online). The term has even penetrated CSS with the Grid Layout. As you can see in this article, that demonstrates the use of the term “Grid” generically for design layout purposes.
via DZone Web Dev Zone https://ift.tt/zOXYu6qIs
1 note
·
View note
Text
How Web Workers Work in JavaScript – With a Practical JS Example
In this article, I will walk you through an example that will show you how web workers function in JavaScript with the help of WebSockets.
I think it's helpful to work with a practical use case because it is much simpler to understand the concepts when you can relate them to real life.
So in this guide, you will be learning what web workers are in JavaScript, you'll get a brief introduction to WebSockets, and you'll see how you can manage sockets in the proper way.
This article is quite application/hands-on oriented, so I would suggest trying the example out as you go along to get a much better understanding.
Let’s dive in.
Table of contents
Prerequisites
Before you start reading this article, you should have a basic understanding of the following topics:
What are web workers in JavaScript?
A web worker is a piece of browser functionality. It is the real OS threads that can be spawned in the background of your current page so that it can perform complex and resource-intensive tasks.
Imagine that you have some large data to fetch from the server, or some complex rendering needs to be done on the UI. If you do this directly on your webpage then the page might get jankier and will impact the UI.
To mitigate this, you can simply create a thread – that is a web worker – and let the web worker take care of the complex stuff.
You can communicate with the web worker in a pretty simple manner which can be used to transfer data to and fro from the worker to the UI.
Common examples of web workers would be:
Dashboard pages that display real-time data such as stock prices, real-time active users, and so on
Fetching huge files from the server
Autosave functionality
You can create a web worker using the following syntax:
const worker = new Worker("<worker_file>.js");
Worker is an API interface that lets you create a thread in the background. We need to pass a parameter, that is a <worker_file>.js file. This specifies the worker file the API needs to execute.
NOTE: A thread is created once a Worker call is initiated. This thread only communicates with its creator, that is the file which created this thread.
A worker can be shared or used by multiple consumers/scripts. These are called shared workers. The syntax of the shared worker is very similar to that of the above mentioned workers.
const worker = new SharedWorker("<worker_file>.js");
You can read more about SharedWorkers in this guide.
History of web workers
Web workers execute in a different context, that is they do not execute in a global scope such as window context. Web workers have their own dedicated worker context which is called DedicatedWorkerGlobalScope.
There are some cases where you can't use web workers, though. For example, you can't use them to manipulate the DOM or the properties of the window object. This is because the worker does not have the access to the window object.
Web workers can also spawn new web workers. Web workers communicate with their creator using certain methods like postMessage, onmessage, and onerror. We will look into these methods closely in the later sections of this article.
Brief Introduction to Web Sockets
A web socket is a type of communication that happens between two parties/entities using a WebSocket protocol. It actually provides a way to communicate between the two connected entities in a persistent manner.
You can create a simple web socket like below:
const socket = new WebSocket("ws://example.com");
Over here we have created a simple socket connection. You'll notice that we have passed a parameter to the WebSocket constructor. This parameter is a URL at which the connection should be established.
You can read more about web sockets by referring to the Websockets link in the prerequisites.
Use Case Description
NOTE: Context, Container, and Class diagrams drawn in this blog post don't accurately follow the exact conventions of these diagrams. They're approximated here so that you can understand the basic concepts.
Before we start, I would suggest reading up on c4models, container diagrams, and context diagrams. You can find resources about them in the prerequisites section.
In this article, we are going to consider the following use case: data transfer using web workers via socket protocol.
We are going to build a web application which will plot the data on a line chart every 1.5 seconds. The web application will receive the data from the socket connection via web workers. Below is the context diagram of our use case:

Container Diagram
As you can see from the above diagram, there are 4 main components to our use case:
Person: A user who is going to use our application
Software system: Client App – This is the UI of our application. It consists of DOM elements and a web worker.
Software system: Worker system – This is a worker file that resides in the client app. It is responsible for creating a worker thread and establishing the socket connection.
Software system: Server application – This is a simple JavaScript file which can be executed by node to create a socket server. It consists of code which helps to read messages from the socket connection.
Now that we understand the use case, let's dive deep into each of these modules and see how the whole application works.
Project Structure
Please follow this link to get the full code for the project that I developed for this article.
Our project is divided into two folders. First is the server folder which consists of server code. The second is the client folder, which consists of the client UI, that is a React application and the web worker code.
Following is the directory structure:
├── client │ ├── package.json │ ├── package-lock.json │ ├── public │ │ ├── favicon.ico │ │ ├── index.html │ │ ├── logo192.png │ │ ├── logo512.png │ │ ├── manifest.json │ │ └── robots.txt │ ├── README.md │ ├── src │ │ ├── App.css │ │ ├── App.jsx │ │ ├── components │ │ │ ├── LineChartSocket.jsx │ │ │ └── Logger.jsx │ │ ├── index.css │ │ ├── index.js │ │ ├── pages │ │ │ └── Homepage.jsx │ │ ├── wdyr.js │ │ └── workers │ │ └── main.worker.js │ └── yarn.lock └── server ├── package.json ├── package-lock.json └── server.mjs
To run the application, you first need to start the socket server. Execute the following commands one at a time to start the socket server (assuming you are in the parent directory):
cd server node server.mjs
Then start the client app by running the following commands (assuming you are in the parent directory):
cd client yarn run start
Open http://localhost:3000 to start the web app.
Client and Server Application
The client application is a simple React application, that is CRA app, which consists of a Homepage. This home page consists of the following elements:
Two buttons: start connection and stop connection which will help to start and stop the socket connection as required.
A line chart component - This component will plot the data that we receive from the socket at regular intervals.
Logged message - This is a simple React component that will display the connection status of our web sockets.
Below is the container diagram of our client application.
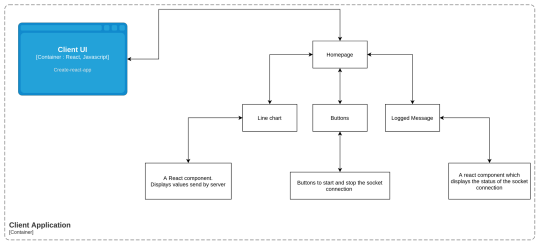
Container Diagram: Client Application
Below is how the UI will look:
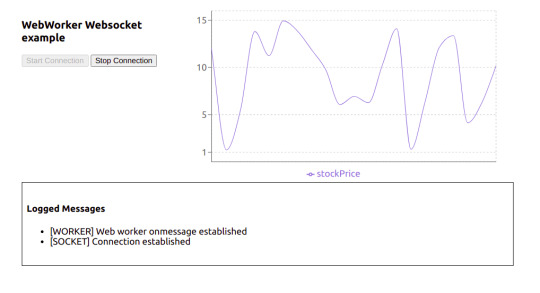
Actual UI
To check out the code for the client UI, go to the client folder. This is a regular create-react-app, except that I have removed some boilerplate code that we don't need for this project.
App.jsx is actually the starter code. If you check this out, we have called the <Homepage /> component in it.
Now let's have a look at the Homepage component.
const Homepage = () => { const [worker, setWorker] = useState(null); const [res, setRes] = useState([]); const [log, setLog] = useState([]); const [buttonState, setButtonState] = useState(false); const hanldeStartConnection = () => { // Send the message to the worker [postMessage] worker.postMessage({ connectionStatus: "init", }); }; const handleStopConnection = () => { worker.postMessage({ connectionStatus: "stop", }); }; //UseEffect1 useEffect(() => { const myWorker = new Worker( new URL("../workers/main.worker.js", import.meta.url) ); //NEW SYNTAX setWorker(myWorker); return () => { myWorker.terminate(); }; }, []); //UseEffect2 useEffect(() => { if (worker) { worker.onmessage = function (e) { if (typeof e.data === "string") { if(e.data.includes("[")){ setLog((preLogs) => [...preLogs, e.data]); } else { setRes((prevRes) => [...prevRes, { stockPrice: e.data }]); } } if (typeof e.data === "object") { setButtonState(e.data.disableStartButton); } }; } }, [worker]); return ( <> <div className="stats"> <div className="control-panel"> <h3>WebWorker Websocket example</h3> <button id="start-connection" onClick={hanldeStartConnection} disabled={!worker || buttonState} > Start Connection </button> <button id="stop-connection" onClick={handleStopConnection} disabled={!buttonState} > Stop Connection </button> </div> <LineChartComponent data={res} /> </div> <Logger logs={log}/> </> ); };
As you can see, it's just a regular functional component that renders two buttons – a line chart, and a custom component Logger.
Now that we know how our homepage component looks, let's dive into how the web worker thread is actually created. In the above component you can see there are two useEffect hooks used.
The first one is used for creating a new worker thread. It's a simple call to the Worker constructor with a new operator as we have seen in the previous section of this article.
But there are some difference over here: we have passed an URL object to the worker constructor rather than passing the path of the worker file in the string.
const myWorker = new Worker(new URL("../workers/main.worker.js", import.meta.url));
You can read more about this syntax here.
If you try to import this web worker like below, then our create-react-app won’t be able to load/bundle it properly so you will get an error since it has not found the worker file during bundling:
const myWorker = new Worker("../workers/main.worker.js");
Next, we also don’t want our application to run the worker thread even after the refresh, or don’t want to spawn multiple threads when we refresh the page. To mitigate this, we'll return a callback in the same useEffect. We use this callback to perform cleanups when the component unmounts. In this case, we are terminating the worker thread.
We use the useEffect2 to handle the messages received from the worker.
Web workers have a build-in property called onmessage which helps receive any messages sent by the worker thread. The onmessage is an event handler of the worker interface. It gets triggered whenever a message event is triggered. This message event is generally triggered whenever the postMessage handler is executed (we will look more into this in a later section).
So in order for us to send a message to the worker thread, we have created two handlers. The first is handleStartConnection and the second is handleStopConnection. Both of them use the postMessage method of the worker interface to send the message to the worker thread.
We will talk about the message {connectionStatus: init} in our next section.
You can read more about the internal workings of the onmessage and postMessage in the following resources:
Since we now have a basic understanding about how our client code is working, then let's move on to learn about the Worker System in our context diagram above.
Worker System
To understand the code in this section, make sure you go through the file src/workers/main.worker.js.
To help you understand what's going on here, we will divide this code into three parts:
A self.onmessage section
How the socket connection is managed using the socketManagement() function
Why we need the socketInstance variable at the top
How self.onmessage works
Whenever you create a web worker application, you generally write a worker file which handles all the complex scenarios that you want the worker to perform. This all happens in the main.worker.js file. This file is our worker file.
In the above section, we saw that we established a new worker thread in the useEffect. Once we created the thread, we also attached the two handlers to the respective start and stop connection buttons.
The start connection button will execute the postMessage method with message: {connectionStatus: init} . This triggers the message event, and since the message event is triggered, all the message events are captured by the onmessage property.
In our main.worker.js file, we have attached a handler to this onmessage property:
self.onmessage = function (e) { const workerData = e.data; postMessage("[WORKER] Web worker onmessage established"); switch (workerData.connectionStatus) { case "init": socketInstance = createSocketInstance(); socketManagement(); break; case "stop": socketInstance.close(); break; default: socketManagement(); } }
So whenever any message event is triggered in the client, it will get captured in this event handler.
The message {connectionStatus: init} that we send from the client is received in the event e. Based on the value of connectionStatus we use the switch case to handle the logic.
NOTE: We have added this switch case because we need to isolate some part of the code which we do not want to execute all the time (we will look into this in a later section).
How the socket connection is managed using the socketManagement() function
There are some reasons why I have shifted the logic of creating and managing a socket connection into a separate function. Here is the code for a better understanding of the point I am trying to make:
function socketManagement() { if (socketInstance) { socketInstance.onopen = function (e) { console.log("[open] Connection established"); postMessage("[SOCKET] Connection established"); socketInstance.send(JSON.stringify({ socketStatus: true })); postMessage({ disableStartButton: true }); }; socketInstance.onmessage = function (event) { console.log(`[message] Data received from server: ${event.data}`); postMessage( event.data); }; socketInstance.onclose = function (event) { if (event.wasClean) { console.log(`[close] Connection closed cleanly, code=${event.code}`); postMessage(`[SOCKET] Connection closed cleanly, code=${event.code}`); } else { // e.g. server process killed or network down // event.code is usually 1006 in this case console.log('[close] Connection died'); postMessage('[SOCKET] Connection died'); } postMessage({ disableStartButton: false }); }; socketInstance.onerror = function (error) { console.log(`[error] ${error.message}`); postMessage(`[SOCKET] ${error.message}`); socketInstance.close(); }; } }
This is a function that will help you manage your socket connection:
For receiving the message from the socket server we have the onmessage property which is assigned an event handler.
Whenever a socket connection is opened, you can perform certain operations. To do that we have the onopen property which is assigned to an event handler.
And if any error occurs or when we are closing the connection then, we use onerror and onclose properties of the socket.
For creating a socket connection there is a separate function altogether:
function createSocketInstance() { let socket = new WebSocket("ws://localhost:8080"); return socket; }
Now all of these functions are called in a switch case like below in the main.worker.js file:
self.onmessage = function (e) { const workerData = e.data; postMessage("[WORKER] Web worker onmessage established"); switch (workerData.connectionStatus) { case "init": socketInstance = createSocketInstance(); socketManagement(); break; case "stop": socketInstance.close(); break; default: socketManagement(); } }
So based on what message the client UI sends to the worker the appropriate function will be executed. It is pretty self-explanatory on what message which particular function should be triggered, based on the above code.
Now consider a scenario where we placed all the code inside self.onmessage.
self.onmessage = function(e){ console.log("Worker object present ", e); postMessage({isLoading: true, data: null}); let socket = new WebSocket("ws://localhost:8080"); socket.onopen = function(e) { console.log("[open] Connection established"); console.log("Sending to server"); socket.send("My name is John"); }; socket.onmessage = function(event) { console.log(`[message] Data received from server: ${event.data}`); }; socket.onclose = function(event) { if (event.wasClean) { console.log(`[close] Connection closed cleanly, code=${event.code} reason=${event.reason}`); } else { // e.g. server process killed or network down // event.code is usually 1006 in this case console.log('[close] Connection died'); } }; socket.onerror = function(error) { console.log(`[error] ${error.message}`); }; }
This would cause the following problems:
On every postMessage call made by the client UI, there would have been a new socket instance.
It would have been difficult to close the socket connection.
Because of these reasons, all the socket management code is written in a function socketManagement and catered using a switch case.
Why we need the socketInstance variable at the top
We do need a socketInstance variable at the top because this will store the socket instance which was previously created. It is a safe practice since no one can access this variable externally as main.worker.js is a separate module altogether.
Communication between the UI and the socket via web worker
Now that we understand which part of the code is responsible for which section, we will take a look at how we establish a socket connection via webworkers. We'll also see how we respond via socket server to display a line chart on the UI.

End-to-end flow of the application
NOTE: Some calls are purposefully not shown in the diagram since it will make the diagram cluttered. Make sure you refer to the code as well while referring to this diagram.
Now let's first understand what happens when you click on the start connection button on the UI:
One thing to notice over here is that our web worker thread is created once the component is mounted, and is removed/terminated when the component is unmounted.
Once the start connection button is clicked, a postMessage call is made with {connectionStatus: init}
The web worker’s onmessage event handler which is listening to all the message events comes to know that it has received connectionStatus as init. It matches the case, that is in the switch case of main.worker.js. It then calls the createSocketInstance() which returns a new socket connection at the URL: ws://localhost:8080
After this a socketManagement() function is called which checks if the socket is created and then executes a couple of operations.
In this flow, since the socket connection is just established therefore, socketInstance’s onpen event handler is executed.
This will send a {socketStatus: true} message to the socket server. This will also send a message back to the client UI via postMessage({ disableStartButton: true}) which tells the client UI to disable the start button.
Whenever the socket connection is established, then the server socket’s on('connection', ()=>{}) is invoked. So in step 3, this function is invoked at the server end.
Socket’s on('message', () => {}) is invoked whenever a message is sent to the socket. So at step 6, this function is invoked at the server end. This will check if the socketStatus is true, and then it will start sending a random integer every 1.5 seconds to the client UI via web workers.
Now that we understood how the connection is established, let's move on to understand how the socket server sends the data to the client UI:
As discussed above, socket server received the message to send the data, that is a random number every 1.5 second.
This data is recieved on the web worker’s end using the onmessage handler.
This handler then calls the postMessage function and sends this data to the UI.
After receiving the data it appends it to an array as a stockPrice object.
This acts as a data source for our line chart component and gets updated every 1.5 seconds.
Now that we understand how the connection is established, let's move on to understand how the socket server sends the data to the client UI:
As discussed above, socket server recieved the message to send the data, that is a random number, every 1.5 seconds.
This data is recieved on the web worker’s end using the socket's onmessage handler.
This handler then calls the postMessage function of the web worker and sends this data to the UI.
After receiving the data via useEffect2 it appends it to an array as a stockPrice object.
This acts as a data source for our line chart component and gets updated every 1.5 seconds.
NOTE: We are using recharts for plotting the line chart. You can find more information about it at the official docs.
Here is how our application will look in action:
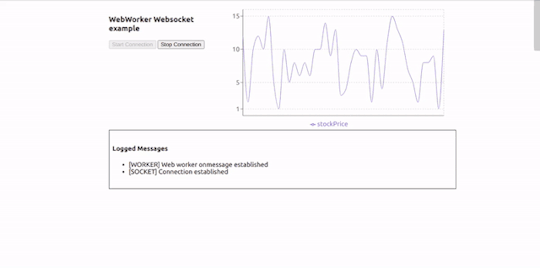
Working Example
Summary
So this was a quick introduction to what web workers are and how you can use them to solve complex problems and create better UIs. You can use web workers in your projects to handle complex UI scenarios.
If you want to optimize your workers, read up on the below libraries:
Thank you for reading!
Follow me on twitter, github, and linkedIn.
If you read this far, tweet to the author to show them you care.
1 note
·
View note
Text
5 Big Web Design Predictions for 2022

Every year, at this time, blogs like this one like to try and predict what’s going to happen in the year ahead. It’s a way of drawing a line under the archive and starting afresh. A rejuvenation that, as humans, we find life-affirming.
Ten years ago, I would have had high confidence in these predictions — after all I was eventually right about SVG adoption, even if it took a decade. But the last few years have shown that web design is tightly interwoven with the muggle world, and that world is anything but predictable.
So as we look at what might occur in the next year (or five), think of it less as a set of predictions and more as a wishlist.
Last Year’s Predictions
When I write this post every January, I like to keep myself honest by glancing back at the previous year’s predictions to gauge how accurate (or not) my predictions have been.
Last year I predicted the long-term trend for minimalism would end, WordPress would decline, cryptocurrency would go mainstream, and then hedged my bets by saying we’d make both more and fewer video calls.
Gradients, maximalism, and the nineties revival pulled us away from minimalism. It’s still popular, just not as dominant.
WordPress is still the biggest CMS in the world and will continue to be for some time. But the relentless grind of no-code site builders at the low end, and being outperformed by better CMS at the high end, mean that WordPress has passed its peak.
Over-inflated predictions for BitCoin reaching $100k by December 2021 turned out to be a damp squib. In the end, Bitcoin only tripled in value in 2021. However, with micro-tipping and major tech companies moving into the arena, it’s clear digital currency arrived in the public consciousness in 2021.
And how could I be wrong about more but also fewer video calls? So I’m calling that my first clean sweep ever. With that heady boast, let’s take a look at the next twelve months.
What Not to Expect in 2022
Do not expect the Metaverse to be significant in anything but marketing speak. Yes, the hardware is slowly becoming more available, but the Metaverse in 2022 is like playing an MMORPG on PS5: theoretically, great fun, until you discover that absolutely none of your friends can get their hands on a console.
Ignore the blog posts predicting a noughties-era retro trend. All those writers have done is looked at the nineties-era trend and added a decade. Fashions aren’t mathematical; they’re poetic. Retro happens when people find a period that rhymes with present-day hopes and fears. After the last couple of years, if we revisit a decade, it’s likely to be the late-forties.
Finally, don’t expect seismic change. Material design, parallax scrolling, and jQuery are still with us and are still valid choices under the right circumstances. Trends aren’t neat; they don’t start in January and conclude in December.
5 Web Design Predictions for 2022
Predictions tend to be self-fulfilling. So we’ve limited ourselves to five trends that we believe are either positive or, at worst harmless. Of course, there are no guarantees, but if these come to pass, we’ll be in good shape for 2023.
1. The Blockchain is Coming
Underpinning the cryptocurrency industry are blockchains. In simple terms, they’re a set of data that can be appended to but can’t be edited or deleted. Think of it as version control for data.
As with most technology, the first wave has been a way to make a fast buck. However, the exciting development is blockchain technology itself and the transformative nature of the approach. For example, Médecins Sans Frontières reportedly stores refugees’ medical records on the blockchain.
Imagine the Internet as a set of data, editable for a micro-fee, and freely accessed by anyone anywhere. Instead of millions of sites, a single, secure, autonomous source of truth. Someone somewhere’s working on it.
2. Positivity & Playfulness & A11y
Even before world events descended into an endless tirade of grim news, time was running out for dull, corporate, geometric sans-serif design.
We added gradients, we added personality, we embraced humor. And contrary to the established business logic, we still make money. Over the past few years, there have been extraordinary efforts by designers and developers to examine, test, and champion accessibility, and thanks to them, inclusive design is no longer reliant on the lowest common denominator.
In 2022 you can get experimental without obstructing 10%+ of your users.
3. Everything Green
Green is a fascinating color, the primary that isn’t (except in RGB, when it is).
Green has the same visual weight as blue, is substantially more flexible, and yet to date, has been radically underutilized in digital design.
Green has a prominent cultural association with the environment. At a time when tech companies are desperate to emphasize their ethical credentials, marketing companies will inevitably begin promoting a brand color shift to green as a quick fix for all those dumped chemicals, strip mines, and plastic-filled seas.
We’ve already seen earthy hues acquire popular appeal. At the other end of the vibrancy scale, neons are popular. Green spans both approaches with everything from calm sages to acidic neons.
In 2022, if you’re looking for a color to capture the moment, look to green.
4. Hero Text
A picture is supposed to be worth 1000 words, although I’m not sure anyone has actually tried to measure it. The problem is that sites increasingly rely on stock images, so the 1000 words that we’re getting may or may not accurately reflect 100% of our message.
In 2022, a handful of well-chosen words will be worth more than an image, with hero images taking a back seat to large hero text. This is aided by a number of minor trends, the most notable of which is the willingness of businesses to look beyond the geometric sans-serif to a more expressive form of typography.
Reading through the prediction posts on sites other than this, almost everyone agrees on large hero text replacing images, which virtually guarantees it won’t happen. Still, at the start of 2022, this seems to be the direction we’re taking.
5. Bring the Noise
One of the unexpected consequences of the past couple of years has been a renewed connection with nature. The effortless complexity in nature is endlessly engaging.
We’ve already begun to popularise gradients — there are no flat colors in nature — and the next logical step is the addition of noise.
In visual terms, noise is the grainy texture that sits so beautifully in vector illustrations. Noise has dipped in and out of trends for years, hampered a little by the leap in file size it creates. However, with WebP and Avif file types, noise is now usable on production sites.
Designing in 2022, when in doubt, throw some noise at it.
Featured image via Unsplash.
Source
The post 5 Big Web Design Predictions for 2022 first appeared on Webdesigner Depot.
via Webdesigner Depot https://ift.tt/gPuemDhTy
0 notes
Text
Creating a Typography Motion Trail Effect with Three.js
Framebuffers are a key feature in WebGL when it comes to creating advanced graphical effects such as depth-of-field, bloom, film grain or various types of anti-aliasing and have already been covered in-depth here on Codrops. They allow us to “post-process” our scenes, applying different effects on them once rendered. But how exactly do they work?
By default, WebGL (and also Three.js and all other libraries built on top of it) render to the default framebuffer, which is the device screen. If you have used Three.js or any other WebGL framework before, you know that you create your mesh with the correct geometry and material, render it, and voilà, it’s visible on your screen.
However, we as developers can create new framebuffers besides the default one and explicitly instruct WebGL to render to them. By doing so, we render our scenes to image buffers in the video card’s memory instead of the device screen. Afterwards, we can treat these image buffers like regular textures and apply filters and effects before eventually rendering them to the device screen.
Here is a video breaking down the post-processing and effects in Metal Gear Solid 5: Phantom Pain that really brings home the idea. Notice how it starts by footage from the actual game rendered to the default framebuffer (device screen) and then breaks down how each framebuffer looks like. All of these framebuffers are composited together on each frame and the result is the final picture you see when playing the game:
youtube
So with the theory out of the way, let’s create a cool typography motion trail effect by rendering to a framebuffer!
Our skeleton app
Let’s render some 2D text to the default framebuffer, i.e. device screen, using threejs. Here is our boilerplate:
const LABEL_TEXT = 'ABC' const clock = new THREE.Clock() const scene = new THREE.Scene() // Create a threejs renderer: // 1. Size it correctly // 2. Set default background color // 3. Append it to the page const renderer = new THREE.WebGLRenderer() renderer.setClearColor(0x222222) renderer.setClearAlpha(0) renderer.setSize(innerWidth, innerHeight) renderer.setPixelRatio(devicePixelRatio || 1) document.body.appendChild(renderer.domElement) // Create an orthographic camera that covers the entire screen // 1. Position it correctly in the positive Z dimension // 2. Orient it towards the scene center const orthoCamera = new THREE.OrthographicCamera( -innerWidth / 2, innerWidth / 2, innerHeight / 2, -innerHeight / 2, 0.1, 10, ) orthoCamera.position.set(0, 0, 1) orthoCamera.lookAt(new THREE.Vector3(0, 0, 0)) // Create a plane geometry that spawns either the entire // viewport height or width depending on which one is bigger const labelMeshSize = innerWidth > innerHeight ? innerHeight : innerWidth const labelGeometry = new THREE.PlaneBufferGeometry( labelMeshSize, labelMeshSize ) // Programmaticaly create a texture that will hold the text let labelTextureCanvas { // Canvas and corresponding context2d to be used for // drawing the text labelTextureCanvas = document.createElement('canvas') const labelTextureCtx = labelTextureCanvas.getContext('2d') // Dynamic texture size based on the device capabilities const textureSize = Math.min(renderer.capabilities.maxTextureSize, 2048) const relativeFontSize = 20 // Size our text canvas labelTextureCanvas.width = textureSize labelTextureCanvas.height = textureSize labelTextureCtx.textAlign = 'center' labelTextureCtx.textBaseline = 'middle' // Dynamic font size based on the texture size // (based on the device capabilities) labelTextureCtx.font = `${relativeFontSize}px Helvetica` const textWidth = labelTextureCtx.measureText(LABEL_TEXT).width const widthDelta = labelTextureCanvas.width / textWidth const fontSize = relativeFontSize * widthDelta labelTextureCtx.font = `${fontSize}px Helvetica` labelTextureCtx.fillStyle = 'white' labelTextureCtx.fillText(LABEL_TEXT, labelTextureCanvas.width / 2, labelTextureCanvas.height / 2) } // Create a material with our programmaticaly created text // texture as input const labelMaterial = new THREE.MeshBasicMaterial({ map: new THREE.CanvasTexture(labelTextureCanvas), transparent: true, }) // Create a plane mesh, add it to the scene const labelMesh = new THREE.Mesh(labelGeometry, labelMaterial) scene.add(labelMesh) // Start out animation render loop renderer.setAnimationLoop(onAnimLoop) function onAnimLoop() { // On each new frame, render the scene to the default framebuffer // (device screen) renderer.render(scene, orthoCamera) }
This code simply initialises a threejs scene, adds a 2D plane with a text texture to it and renders it to the default framebuffer (device screen). If we are execute it with threejs included in our project, we will get this:
See the Pen Step 1: Render to default framebuffer by Georgi Nikoloff (@gbnikolov) on CodePen.0
Again, we don’t explicitly specify otherwise, so we are rendering to the default framebuffer (device screen).
Now that we managed to render our scene to the device screen, let’s add a framebuffer (THEEE.WebGLRenderTarget) and render it to a texture in the video card memory.
Rendering to a framebuffer
Let’s start by creating a new framebuffer when we initialise our app:
const clock = new THREE.Clock() const scene = new THREE.Scene() // Create a new framebuffer we will use to render to // the video card memory const renderBufferA = new THREE.WebGLRenderTarget( innerWidth * devicePixelRatio, innerHeight * devicePixelRatio ) // ... rest of application
Now that we have created it, we must explicitly instruct threejs to render to it instead of the default framebuffer, i.e. device screen. We will do this in our program animation loop:
function onAnimLoop() { // Explicitly set renderBufferA as the framebuffer to render to renderer.setRenderTarget(renderBufferA) // On each new frame, render the scene to renderBufferA renderer.render(scene, orthoCamera) }
And here is our result:
See the Pen Step 2: Render to a framebuffer by Georgi Nikoloff (@gbnikolov) on CodePen.0
As you can see, we are getting an empty screen, yet our program contains no errors – so what happened? Well, we are no longer rendering to the device screen, but another framebuffer! Our scene is being rendered to a texture in the video card memory, so that’s why we see the empty screen.
In order to display this generated texture containing our scene back to the default framebuffer (device screen), we need to create another 2D plane that will cover the entire screen of our app and pass the texture as material input to it.
First we will create a fullscreen 2D plane that will span the entire device screen:
// ... rest of initialisation step // Create a second scene that will hold our fullscreen plane const postFXScene = new THREE.Scene() // Create a plane geometry that covers the entire screen const postFXGeometry = new THREE.PlaneBufferGeometry(innerWidth, innerHeight) // Create a plane material that expects a sampler texture input // We will pass our generated framebuffer texture to it const postFXMaterial = new THREE.ShaderMaterial({ uniforms: { sampler: { value: null }, }, // vertex shader will be in charge of positioning our plane correctly vertexShader: ` varying vec2 v_uv; void main () { // Set the correct position of each plane vertex gl_Position = projectionMatrix * modelViewMatrix * vec4(position, 1.0); // Pass in the correct UVs to the fragment shader v_uv = uv; } `, fragmentShader: ` // Declare our texture input as a "sampler" variable uniform sampler2D sampler; // Consume the correct UVs from the vertex shader to use // when displaying the generated texture varying vec2 v_uv; void main () { // Sample the correct color from the generated texture vec4 inputColor = texture2D(sampler, v_uv); // Set the correct color of each pixel that makes up the plane gl_FragColor = inputColor; } ` }) const postFXMesh = new THREE.Mesh(postFXGeometry, postFXMaterial) postFXScene.add(postFXMesh) // ... animation loop code here, same as before
As you can see, we are creating a new scene that will hold our fullscreen plane. After creating it, we need to augment our animation loop to render the generated texture from the previous step to the fullscreen plane on our screen:
function onAnimLoop() { // Explicitly set renderBufferA as the framebuffer to render to renderer.setRenderTarget(renderBufferA) // On each new frame, render the scene to renderBufferA renderer.render(scene, orthoCamera) // 👇 // Set the device screen as the framebuffer to render to // In WebGL, framebuffer "null" corresponds to the default // framebuffer! renderer.setRenderTarget(null) // 👇 // Assign the generated texture to the sampler variable used // in the postFXMesh that covers the device screen postFXMesh.material.uniforms.sampler.value = renderBufferA.texture // 👇 // Render the postFX mesh to the default framebuffer renderer.render(postFXScene, orthoCamera) }
After including these snippets, we can see our scene once again rendered on the screen:
See the Pen Step 3: Display the generated framebuffer on the device screen by Georgi Nikoloff (@gbnikolov) on CodePen.0
Let’s recap the necessary steps needed to produce this image on our screen on each render loop:
Create renderTargetA framebuffer that will allow us to render to a separate texture in the users device video memory
Create our “ABC” plane mesh
Render the “ABC” plane mesh to renderTargetA instead of the device screen
Create a separate fullscreen plane mesh that expects a texture as an input to its material
Render the fullscreen plane mesh back to the default framebuffer (device screen) using the generated texture created by rendering the “ABC” mesh to renderTargetA
Achieving the persistence effect by using two framebuffers
We don’t have much use of framebuffers if we are simply displaying them as they are to the device screen, as we do right now. Now that we have our setup ready, let’s actually do some cool post-processing.
First, we actually want to create yet another framebuffer – renderTargetB, and make sure it and renderTargetA are let variables, rather then consts. That’s because we will actually swap them at the end of each render so we can achieve framebuffer ping-ponging.
“Ping-ponging” in WebGl is a technique that alternates the use of a framebuffer as either input or output. It is a neat trick that allows for general purpose GPU computations and is used in effects such as gaussian blur, where in order to blur our scene we need to:
Render it to framebuffer A using a 2D plane and apply horizontal blur via the fragment shader
Render the result horizontally blurred image from step 1 to framebuffer B and apply vertical blur via the fragment shader
Swap framebuffer A and framebuffer B
Keep repeating steps 1 to 3 and incrementally applying blur until desired gaussian blur radius is achieved.
Here is a small chart illustrating the steps needed to achieve ping-pong:
So with that in mind, we will render the contents of renderTargetA into renderTargetB using the postFXMesh we created and apply some special effect via the fragment shader.
Let’s kick things off by creating our renderTargetB:
let renderBufferA = new THREE.WebGLRenderTarget( // ... ) // Create a second framebuffer let renderBufferB = new THREE.WebGLRenderTarget( innerWidth * devicePixelRatio, innerHeight * devicePixelRatio )
Next up, let’s augment our animation loop to actually do the ping-pong technique:
function onAnimLoop() { // 👇 // Do not clear the contents of the canvas on each render // In order to achieve our ping-pong effect, we must draw // the new frame on top of the previous one! renderer.autoClearColor = false // 👇 // Explicitly set renderBufferA as the framebuffer to render to renderer.setRenderTarget(renderBufferA) // 👇 // Render the postFXScene to renderBufferA. // This will contain our ping-pong accumulated texture renderer.render(postFXScene, orthoCamera) // 👇 // Render the original scene containing ABC again on top renderer.render(scene, orthoCamera) // Same as before // ... // ... // 👇 // Ping-pong our framebuffers by swapping them // at the end of each frame render const temp = renderBufferA renderBufferA = renderBufferB renderBufferB = temp }
If we are to render our scene again with these updated snippets, we will see no visual difference, even though we do in fact alternate between the two framebuffers to render it. That’s because, as it is right now, we do not apply any special effects in the fragment shader of our postFXMesh.
Let’s change our fragment shader like so:
// Sample the correct color from the generated texture // 👇 // Notice how we now apply a slight 0.005 offset to our UVs when // looking up the correct texture color vec4 inputColor = texture2D(sampler, v_uv + vec2(0.005)); // Set the correct color of each pixel that makes up the plane // 👇 // We fade out the color from the previous step to 97.5% of // whatever it was before gl_FragColor = vec4(inputColor * 0.975);
With these changes in place, here is our updated program:
See the Pen Step 4: Create a second framebuffer and ping-pong between them by Georgi Nikoloff (@gbnikolov) on CodePen.0
Let’s break down one frame render of our updated example:
We render renderTargetB result to renderTargetA
We render our “ABC” text to renderTargetA, compositing it on top of renderTargetB result in step 1 (we do not clear the contents of the canvas on new renders, because we set renderer.autoClearColor = false)
We pass the generated renderTargetA texture to postFXMesh, apply a small offset vec2(0.002) to its UVs when looking up the texture color and fade it out a bit by multiplying the result by 0.975
We render postFXMesh to the device screen
We swap renderTargetA with renderTargetB (ping-ponging)
For each new frame render, we will repeat steps 1 to 5. This way, the previous target framebuffer we rendered to will be used as an input to the current render and so on. You can clearly see this effect visually in the last demo – notice how as the ping-ponging progresses, more and more offset is being applied to the UVs and more and more the opacity fades out.
Applying simplex noise and mouse interaction
Now that we have implemented and can see the ping-pong technique working correctly, we can get creative and expand on it.
Instead of simply adding an offset in our fragment shader as before:
vec4 inputColor = texture2D(sampler, v_uv + vec2(0.005));
Let’s actually use simplex noise for more interesting visual result. We will also control the direction using our mouse position.
Here is our updated fragment shader:
// Pass in elapsed time since start of our program uniform float time; // Pass in normalised mouse position // (-1 to 1 horizontally and vertically) uniform vec2 mousePos; // <Insert snoise function definition from the link above here> // Calculate different offsets for x and y by using the UVs // and different time offsets to the snoise method float a = snoise(vec3(v_uv * 1.0, time * 0.1)) * 0.0032; float b = snoise(vec3(v_uv * 1.0, time * 0.1 + 100.0)) * 0.0032; // Add the snoise offset multiplied by the normalised mouse position // to the UVs vec4 inputColor = texture2D(sampler, v_uv + vec2(a, b) + mousePos * 0.005);
We also need to specify mousePos and time as inputs to our postFXMesh material shader:
const postFXMaterial = new THREE.ShaderMaterial({ uniforms: { sampler: { value: null }, time: { value: 0 }, mousePos: { value: new THREE.Vector2(0, 0) } }, // ... })
Finally let’s make sure we attach a mousemove event listener to our page and pass the updated normalised mouse coordinates from Javascript to our GLSL fragment shader:
// ... initialisation step // Attach mousemove event listener document.addEventListener('mousemove', onMouseMove) function onMouseMove (e) { // Normalise horizontal mouse pos from -1 to 1 const x = (e.pageX / innerWidth) * 2 - 1 // Normalise vertical mouse pos from -1 to 1 const y = (1 - e.pageY / innerHeight) * 2 - 1 // Pass normalised mouse coordinates to fragment shader postFXMesh.material.uniforms.mousePos.value.set(x, y) } // ... animation loop
With these changes in place, here is our final result. Make sure to hover around it (you might have to wait a moment for everything to load):
See the Pen Step 5: Perlin Noise and mouse interaction by Georgi Nikoloff (@gbnikolov) on CodePen.0
Conclusion
Framebuffers are a powerful tool in WebGL that allows us to greatly enhance our scenes via post-processing and achieve all kinds of cool effects. Some techniques require more then one framebuffer as we saw and it is up to us as developers to mix and match them however we need to achieve our desired visuals.
I encourage you to experiment with the provided examples, try to render more elements, alternate the “ABC” text color between each renderTargetA and renderTargetB swap to achieve different color mixing, etc.
In the first demo, you can see a specific example of how this typography effect could be used and the second demo is a playground for you to try some different settings (just open the controls in the top right corner).
Further readings:
How to use post-processing in threejs
Filmic effects in WebGL
Threejs GPGPU flock simulation
The post Creating a Typography Motion Trail Effect with Three.js appeared first on Codrops.
via Codrops https://ift.tt/3BshHiM
0 notes
Text
How to Scrape Websites with Node.js and Cheerio
There might be times when a website has data you want to analyze but the site doesn't expose an API for accessing those data.
To get the data, you'll have to resort to web scraping.
In this article, I'll go over how to scrape websites with Node.js and Cheerio.
Before we start, you should be aware that there are some legal and ethical issues you should consider before scraping a site. It's your responsibility to make sure that it's okay to scrape a site before doing so.
The sites used in the examples throughout this article all allow scraping, so feel free to follow along.
Prerequisites
Here are some things you'll need for this tutorial:
You need to have Node.js installed. If you don't have Node, just make sure you download it for your system from the Node.js downloads page
You need to have a text editor like VSCode or Atom installed on your machine
You should have at least a basic understanding of JavaScript, Node.js, and the Document Object Model (DOM). But you can still follow along even if you are a total beginner with these technologies. Feel free to ask questions on the freeCodeCamp forum if you get stuck
What is Web Scraping?
Web scraping is the process of extracting data from a web page. Though you can do web scraping manually, the term usually refers to automated data extraction from websites - Wikipedia.
What is Cheerio?
Cheerio is a tool for parsing HTML and XML in Node.js, and is very popular with over 23k stars on GitHub.
It is fast, flexible, and easy to use. Since it implements a subset of JQuery, it's easy to start using Cheerio if you're already familiar with JQuery.
According to the documentation, Cheerio parses markup and provides an API for manipulating the resulting data structure but does not interpret the result like a web browser.
The major difference between cheerio and a web browser is that cheerio does not produce visual rendering, load CSS, load external resources or execute JavaScript. It simply parses markup and provides an API for manipulating the resulting data structure. That explains why it is also very fast - cheerio documentation.
If you want to use cheerio for scraping a web page, you need to first fetch the markup using packages like axios or node-fetch among others.
How to Scrape a Web Page in Node Using Cheerio
In this section, you will learn how to scrape a web page using cheerio. It is important to point out that before scraping a website, make sure you have permission to do so – or you might find yourself violating terms of service, breaching copyright, or violating privacy.
In this example, we will scrape the ISO 3166-1 alpha-3 codes for all countries and other jurisdictions as listed on this Wikipedia page. It is under the Current codes section of the ISO 3166-1 alpha-3 page.
This is what the list of countries/jurisdictions and their corresponding codes look like:

You can follow the steps below to scrape the data in the above list.
Step 1 - Create a Working Directory
In this step, you will create a directory for your project by running the command below on the terminal. The command will create a directory called learn-cheerio. You can give it a different name if you wish.
mkdir learn-cheerio
You should be able to see a folder named learn-cheerio created after successfully running the above command.
In the next step, you will open the directory you have just created in your favorite text editor and initialize the project.
Step 2 - Initialize the Project
In this step, you will navigate to your project directory and initialize the project. Open the directory you created in the previous step in your favorite text editor and initialize the project by running the command below.
npm init -y
Successfully running the above command will create a package.json file at the root of your project directory.
In the next step, you will install project dependencies.
Step 3 - Install Dependencies
In this step, you will install project dependencies by running the command below. This will take a couple of minutes, so just be patient.
npm i axios cheerio pretty
Successfully running the above command will register three dependencies in the package.json file under the dependencies field. The first dependency is axios, the second is cheerio, and the third is pretty.
axios is a very popular http client which works in node and in the browser. We need it because cheerio is a markup parser.
For cheerio to parse the markup and scrape the data you need, we need to use axios for fetching the markup from the website. You can use another HTTP client to fetch the markup if you wish. It doesn't necessarily have to be axios.
pretty is npm package for beautifying the markup so that it is readable when printed on the terminal.
In the next section, you will inspect the markup you will scrape data from.
Step 4 - Inspect the Web Page You Want to Scrape
Before you scrape data from a web page, it is very important to understand the HTML structure of the page.
In this step, you will inspect the HTML structure of the web page you are going to scrape data from.
Navigate to ISO 3166-1 alpha-3 codes page on Wikipedia. Under the "Current codes" section, there is a list of countries and their corresponding codes. You can open the DevTools by pressing the key combination CTRL + SHIFT + I on chrome or right-click and then select "Inspect" option.
This is what the list looks like for me in chrome DevTools:

In the next section, you will write code for scraping the web page.
Step 5 - Write the Code to Scrape the Data
In this section, you will write code for scraping the data we are interested in. Start by running the command below which will create the app.js file.
touch app.js
Successfully running the above command will create an app.js file at the root of the project directory.
Like any other Node package, you must first require axios, cheerio, and pretty before you start using them. You can do so by adding the code below at the top of the app.js file you have just created.
const axios = require("axios"); const cheerio = require("cheerio"); const pretty = require("pretty");
Before we write code for scraping our data, we need to learn the basics of cheerio. We'll parse the markup below and try manipulating the resulting data structure. This will help us learn cheerio syntax and its most common methods.
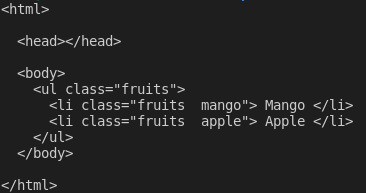
The markup below is the ul element containing our li elements.
const markup = ` <ul class="fruits"> <li class="fruits__mango"> Mango </li> <li class="fruits__apple"> Apple </li> </ul> `;
Add the above variable declaration to the app.js file
How to Load Markup in Cheerio
You can load markup in cheerio using the cheerio.load method. The method takes the markup as an argument. It also takes two more optional arguments. You can read more about them in the documentation if you are interested.
Below, we are passing the first and the only required argument and storing the returned value in the $ variable. We are using the $ variable because of cheerio's similarity to Jquery. You can use a different variable name if you wish.
Add the code below to your app.js file:
const $ = cheerio.load(markup); console.log(pretty($.html()));
If you now execute the code in your app.js file by running the command node app.js on the terminal, you should be able to see the markup on the terminal. This is what I see on my terminal:
How to Select an Element in Cheerio
Cheerio supports most of the common CSS selectors such as the class, id, and element selectors among others. In the code below, we are selecting the element with class fruits__mango and then logging the selected element to the console. Add the code below to your app.js file.
const mango = $(".fruits__mango"); console.log(mango.html()); // Mango
The above lines of code will log the text Mango on the terminal if you execute app.js using the command node app.js.
How to Get the Attribute of an Element in Cheerio
You can also select an element and get a specific attribute such as the class, id, or all the attributes and their corresponding values.
Add the code below to your app.js file:
const apple = $(".fruits__apple"); console.log(apple.attr("class")); //fruits__apple
The above code will log fruits__apple on the terminal. fruits__apple is the class of the selected element.
How to Loop Through a List of Elements in Cheerio
Cheerio provides the .each method for looping through several selected elements.
Below, we are selecting all the li elements and looping through them using the .each method. We log the text content of each list item on the terminal.
Add the code below to your app.js file.
const listItems = $("li"); console.log(listItems.length); // 2 listItems.each(function (idx, el) { console.log($(el).text()); }); // Mango // Apple
The above code will log 2, which is the length of the list items, and the text Mango and Apple on the terminal after executing the code in app.js.
How to Append or Prepend an Element to a Markup in Cheerio
Cheerio provides a method for appending or prepending an element to a markup.
The append method will add the element passed as an argument after the last child of the selected element. On the other hand, prepend will add the passed element before the first child of the selected element.
Add the code below to your app.js file:
const ul = $("ul"); ul.append("<li>Banana</li>"); ul.prepend("<li>Pineapple</li>"); console.log(pretty($.html()));
After appending and prepending elements to the markup, this is what I see when I log $.html() on the terminal:

Those are the basics of cheerio that can get you started with web scraping.
To scrape the data we described at the beginning of this article from Wikipedia, copy and paste the code below in the app.js file:
// Loading the dependencies. We don't need pretty // because we shall not log html to the terminal const axios = require("axios"); const cheerio = require("cheerio"); const fs = require("fs"); // URL of the page we want to scrape const url = "https://en.wikipedia.org/wiki/ISO_3166-1_alpha-3"; // Async function which scrapes the data async function scrapeData() { try { // Fetch HTML of the page we want to scrape const { data } = await axios.get(url); // Load HTML we fetched in the previous line const $ = cheerio.load(data); // Select all the list items in plainlist class const listItems = $(".plainlist ul li"); // Stores data for all countries const countries = []; // Use .each method to loop through the li we selected listItems.each((idx, el) => { // Object holding data for each country/jurisdiction const country = { name: "", iso3: "" }; // Select the text content of a and span elements // Store the textcontent in the above object country.name = $(el).children("a").text(); country.iso3 = $(el).children("span").text(); // Populate countries array with country data countries.push(country); }); // Logs countries array to the console console.dir(countries); // Write countries array in countries.json file fs.writeFile("coutries.json", JSON.stringify(countries, null, 2), (err) => { if (err) { console.error(err); return; } console.log("Successfully written data to file"); }); } catch (err) { console.error(err); } } // Invoke the above function scrapeData();
Do you understand what is happening by reading the code? If not, I'll go into some detail now. I have also made comments on each line of code to help you understand.
In the above code, we require all the dependencies at the top of the app.js file and then we declared the scrapeData function. Inside the function, the markup is fetched using axios. The fetched HTML of the page we need to scrape is then loaded in cheerio.
The list of countries/jurisdictions and their corresponding iso3 codes are nested in a div element with a class of plainlist. The li elements are selected and then we loop through them using the .each method. The data for each country is scraped and stored in an array.
After running the code above using the command node app.js, the scraped data is written to the countries.json file and printed on the terminal. This is part of what I see on my terminal:
Conclusion
Thank you for reading this article and reaching the end! We have covered the basics of web scraping using cheerio. You can head over to the cheerio documentation if you want to dive deeper and fully understand how it works.
Feel free to ask questions on the freeCodeCamp forum if there is anything you don't understand in this article.
Finally, remember to consider the ethical concerns as you learn web scraping.
If you read this far, tweet to the author to show them you care.
0 notes
Text
Beginner JavaScript Notes
Wes has a heck of a set of “notes” for learning JavaScript. It’s organized like a curriculum, meaning if you teach JavaScript, you could do a lot worse. It’s actually more like 85 really fleshed-out blog posts organized into sections and easily navigable. If you want to be walked through it via video, then buy the course. Smart.
If you’re looking for other curriculum for JavaScript, your best bets are:
Frontend Masters bootcamp (free) and other great courses (paid)
MDN Guides
Vets Who Code have an open source curriculum getting into JavaScript by Week 6.
Like any other learning experience in life, the best way to learn is multiple angles. If HTML & CSS are more your target, we have a bunch of suggestions there.
Direct Link to Article — Permalink
The post Beginner JavaScript Notes appeared first on CSS-Tricks. You can support CSS-Tricks by being an MVP Supporter.
via CSS-Tricks https://ift.tt/3uK7Foo
0 notes
Text
Microservices Architecture – Explained in Plain English
Over the last few years, microservices have gone from an overhyped buzzword to something you should understand as a software engineer.
According to an O'Reilly developer survey in 2020:
61% of companies have been using microservices in the last year
29% say at least half of their company systems are built using microservices
74% say their teams own the build/test/deploy phases of their applications
These numbers will only continue to increase over time as the ecosystem around microservices matures and makes adoption even easier.
This doesn't mean you need to be an expert on microservices to get a job, but it is definitely a bonus to at least understand the basic fundamentals.
The truth is, microservices aren't that hard to understand when you boil it down to the basics. The biggest problem is that most of the resources available are written to impress readers instead of actually educating them.
Another reason is that there isn’t even a true concrete definition about what a microservice is. The result is that there are tons of overlapping definitions and jargon which leads to confusion for people trying to learn about microservices.
In this article I will cut through all the chaff and focus on the core concepts of what microservices actually are. I'll use a variety of real world examples and metaphors to make abstract concepts and ideas easier to understand.
Here's what we'll cover:
Brief history of software design
Benefits and downsides of monoliths
Benefits and downsides of microservices
4 Minute Microservice Summary
If you prefer a quick introduction to microservices, you can watch this video first:
youtube
How to Understand Microservices with an Analogy of Starting Your Own Business
Let's say you are a software engineer and decide to start freelancing to earn some money. At the beginning you have a few clients and things go smoothly. You spend most of your time writing code and clients are happy.
But over time you start to slow down as the business grows. You spend more and more of your time doing customer service, answering emails, making minor changes for past customers, and other tasks that don't move the needle for you in terms of revenue.
You realize that you aren't optimizing your time as a software engineer so you hire a dedicated employee to handle customer service.
As you continue to grow you add more employees with specialized skills. You hire a marketer to focus on attracting new customers. You add project managers, more software engineers, and eventually an HR department to help with all these employees.
This was all necessary for your business to grow beyond what you could do by yourself as a single person, but there are of course growing pains.
Sometimes there are miscommunications between teams or departments and clients get upset when details slip through the cracks. There is the direct cost of having to pay employee salaries, internal rivalries between teams, and numerous other issues that arise when a company grows larger.
This example is somewhat representative of how a software company might move from a monolith to a microservice type architecture. What starts out with one person doing all the work gradually becomes a collection of specialized teams working together to achieve a common goal for the company.
This is very similar to how tech companies with monoliths have migrated to microservice architectures. While these examples aren't a perfect 1-1 match for microservices, the general problems are the same:
Scaling – Ideally you want to be able to quickly hire new employees and linearly scale how productive your company is.
Communication - Adding more employees adds the overhead of needing to coordinate and communicate across the organization. There are numerous strategies that companies try to use to make this efficient, especially in this era of remote work.
Specialization - Allowing certain groups in the organization to have autonomy to solve problems the most efficient way possible rather than trying to enforce a standard protocol for all situations. Certain customers might have different needs than others, so it makes sense to allow teams to have some flexibility in how they handle things.
How to Go from a Monolith to Microservices

To understand the present it helps to understand the past. Traditionally, software was designed in a monolithic style, and everything ran together as a single application. Like everything else in life, there are some pros and cons to this style of application.
Monoliths aren't inherently bad – and many microservice advocates actually recommend starting out with a monolith and sticking with it until you start running into problems. You can then break your monolith into microservices naturally over time.
Advantages of a Monolith Architecture
Faster development time initially
With a small team, development speed can be extremely fast when you're just starting off.
This is because the project is small, everybody understands the entire app, and things move smoothly. The members of the team know exactly how everything works together and can rapidly implement new features.

Simple deployment
Because monoliths work as a single unit, things like testing and logging are fairly simple. It's also easier to build and deploy a single monolith compared to a bunch of separate microservices.
Disadvantages of a Monolith Architecture
Despite the early benefits of monoliths, as companies grow they often encounter several problems on organizational and technical levels as a result of their monolithic application.
Tight-coupling of modules
Most companies with monolithic applications try to logically break the monolith into functional modules by use case to keep things organized. Think things like Authentication, Comments, Users, and Blog posts.

The problem is that this requires extreme engineering discipline to maintain long term. Established rules often get thrown out the window when a deadline approaches. This results in shortcuts being taken during a crunch and tangled interconnected code that accumulates as technical debt over time.
Real world example - Trying to stay disciplined with monoliths is a lot like sticking to an exercise routine or diet. Many people get excited and can stay disciplined with their diet for a few weeks, but eventually life gets in the way and you revert back to your normal routine. Trying to enforce loose coupling with monoliths is like that – there's just too much temptation to cut corners when you get in a time crunch.
Onboarding new hires becomes hard

For new hires, becoming productive often takes much longer because they need to learn how all the interconnected pieces of the monolith work together before they can risk modifying any single part of the application.
It's not unheard of for new hires to say it takes months for them to truly feel comfortable with a massive code base. And there's always the underlying fear that any time you push new code it might blow up the entire app.
Real world comparison - Training somebody to do a single task like hammer nails vs training somebody to do every single possible task on a construction site. Having to teach a new hire absolutely everything about the entire job increases the cost of hiring new employees.
Conflicting resource requirements
In a monolith, different modules might have different hardware requirements. Some tasks might be CPU-heavy calculations, others might require a lot of RAM.
But because the entire application has to run on the same server, you can't use the type of hardware specialized for a certain task.
Real world example - Certain types of vehicles are better suited for certain tasks. If you are going on a road trip, a car with great fuel economy would be the best choice so you save money on gas. If you are moving into a new apartment, it would be good to have a vehicle with more space for storage so you don't have to make as many trips.
A single bug can take down the entire app

Because the application is deployed as a single unit, that means that any team can accidentally create a bug that takes down the entire monolith.
Real world example - To prevent a single leak from sinking an entire ship, bulkheads are used to seal off sections if they start to flood. Microservices work in a similar way – each service is deployed independently from others, which can reduce the chances of a bug taking down the entire app.
Limits experimentation
When building a monolith, you are pretty much stuck using the ecosystem of the programming language the monolith was written in. A simple example would be the tradeoffs of low level programming languages and higher level programming languages.
With a microservice architecture, if a certain service is struggling to scale, you have the option to rewrite it in a higher performance language like C++ or Go.
For other services where performance isn't a huge factor, you can improve development speed by using higher level languages like Python or JavaScript.
A monolith architecture can also blind a team from seeing alternative ways to solve a problem. When you only have a hammer, everything looks like a nail.
Real world comparison - Pizza is great, but you probably wouldn't want to eat pizza every meal for the rest of your life. Plus in some situations it would also just be inconvenient to cook and eat pizza rather than something else. Sometimes it would be nice to just grab a quick snack or eat something a little healthier.
Deployments can become slow

One of the strengths of the monolith listed above can eventually become a weakness. The fact the entire app is deployed together can become a problem for massive monoliths because it can result in taking a long time to deploy the entire service. This reduces how fast a team can iterate and make changes to the app.
Each time they make even a minor change they are forced to wait for the app to build and deploy for testing.
Real world example- Your dream is to make the world's best cookies. The fastest way to accomplish this goal would be to test as many batches of cookies as possible while gradually changing and improving the recipe until it was perfect. Now imagine you only have 1 oven. The rate at which you can test out different cookie recipes is much slower compared to having 10 ovens.
Advantages of Microservices
So now that you know the pros and cons of the monolith architecture style, let's examine microservices.
Development Speed Improves
Because you are no longer deploying a monolith, teams are able to move faster when it comes to adding features. Teams can have independent release schedules and don't have to worry about coordinating with other teams as much.
As long as the external interface that other microservices use to interact with the team's service stays the same, a development team could completely rewrite the system in another programming language if they wanted.

Another benefit of each service being deployed independently is that builds are faster due to each build being smaller. This means that iteration time is also improved just due to builds being faster.
Real world example - When you buy food from a restaurant you don't really care if anything changed behind the scenes as long as the food tastes good. Maybe they got new ovens or fryers, but as long as the food tastes the same you don't worry about it. As an external consumer the only thing that matters is the end product.
Faster onboarding for new hires
New employees can learn a single system to start and begin contributing. Over time they can continue learning more about the entire application but that isn't necessary right away.
Real world example - The assembly line revolutionized production by breaking things down. Instead of each employee having to know how to create an entire product from scratch, they just needed to learn the single part they worked on. This cut down on training time for new employees and allowed better scale.
Fault Tolerance
While microservices often do depend on each other to complete tasks, a properly designed microservice architecture will have built-in redundancy and fail safes to prevent failure of the entire system if another service goes down.
Often this involves retrying requests with an increasing wait period between requests or a default fallback value to return if the service isn't available.
Real world example - If Netflix's recommendation service breaks, it doesn't make sense to return a complete failure message to users. Instead Netflix could just return a default set of popular movies and in the background keep retrying the recommendation service until it is able to return the user's customized recommendations.
Flexible Scalability
Because each service is deployed independently you can also replicate and scale each service on its own. With a monolith the company would be forced to scale the entire application, despite only a single feature getting more traffic than usual.

With a microservice architecture, a company can specifically scale only the service that needs to handle more traffic, which is more efficient and can save money because it reduces wasted resources.
Real world example- Let's consider something like Cyber Monday for Amazon, way more orders than usual will be placed but most people probably already selected what they wanted and put it in their cart. So while the Orders Service will be getting way more traffic than usual, things like the Search Service and other features might be around normal usage rates.
This is especially useful if a service is particularly heavy for a certain resource and can use specialized hardware for that task.
If a service needs a ton of CPU resources but not much RAM, the company can save money by not using general purpose servers. A company using a pure monolith has no choice but to scale using "jack of all trades" type servers.
Disadvantages of Microservices
Microservices are far from perfect. Shifting from monolith to microservices eliminates some problems while creating new ones.
Overall Complexity
While each individual service is easier to understand, the entire system itself is complicated. This additional complexity led to the rise of tools like Docker and Kubernetes to abstract away as much of it as possible.
The goal of these tools is to allow software engineers to not worry about anything other than building features like they normally would, without worrying about how it all works behind the scenes.
Communication
One of the biggest issues with microservices is figuring out how they communicate with each other.
A single external request from a user might require several services working together to fulfill that request. Let's use placing an order online as an example of how this might work:
User places order in app
Load balancer forwards request to services that are available to process the request
Shopping cart service gives list of items in the order
Inventory service confirms that items are in stock
Shipping service calculates estimated cost and delivery time
Payment service confirms that customer's payment is valid
Recommendation service uses items ordered to generate new recommendations for the customer in the future
Review service schedules an email to ask the customer to leave a review
At any of the above stages a single service failing could result in the entire order process failing or annoyance for the user, which would quickly make for some angry customers.
Handling how all these services interact and deal with partial failures is a huge challenge with microservice architectures.
Handling Data
One of the most difficult challenges with microservices is how to handle requests that span multiple services and require making updates to data.
What happens if a request fails part way through the sequence with data updated in one service but not the rest? You don't want to bill a user but then have them not receive what they paid for because the service was down.
In a monolith you can rely on ACID transactions to rollback a database change if something goes wrong. With microservices there is much more complexity involved with what are known as distributed transactions across services.
Development environment
Most tools were designed with monoliths in mind and development in general becomes more difficult with a microservice architecture.
Testing requires being able to simulate interactions with other services, Debugging is more difficult because things are no longer happening inside a single process, and logging must be done across multiple services.
Even something simple like trying to track why a blog is loading slowly is more difficult than you might expect.
Let's say you notice on your analytics that all of a sudden it's taking 5 seconds for pages to load on your blog. With a monolith it would be pretty easy to track down the problem, but with a microservice architecture you need specialized tools to track external requests as they are processed by different services.
Conclusion
Hopefully this article gave you a decent understanding of the what and why of microservices and an intuitive understanding of how they work, even if you don't understand all the technical details under the hood.
If you are interested in seeing future videos and articles on microservices be sure to subscribe on YouTube or follow on Twitter so you don't miss anything.
If you read this far, tweet to the author to show them you care.
0 notes
Text
Full Stack Development with Next.js and Supabase – The Complete Guide
Supabase is an open source Firebase alternative that lets you create a real-time backend in less than two minutes.
Supabase has continued to gain hype and adoption with developers in my network over the past few months. And a lot of the people I've talked to about it prefer the fact that it leverages a SQL-style database, and they like that it's open source, too.
When you create a project Supabase automatically gives you a Postgres SQL database, user authentication, and API. From there you can easily implement additional features like realtime subscriptions and file storage.
In this guide, you will learn how to build a full stack app that implements the core features that most apps require – like routing, a database, API, authentication, authorization, realtime data, and fine grained access control. We'll be using a modern stack including React, Next.js, and TailwindCSS.
I've tried to distill everything I've learned while myself getting up to speed with Supabase in as short of a guide as possible so you too can begin building full stack apps with the framework.
The app that we will be building is a multi-user blogging app that incorporates all of the types of features you see in many modern apps. This will take us beyond basic CRUD by enabling things like file storage as well as authorization and fine grained access control.
You can find the code for the app we will be building here.
By learning how to incorporate all of these features together you should be able to take what you learn here and build out your own ideas. Understanding the basic building blocks themselves allows you to then take this knowledge with you in the future to put it to use in any way you see fit.
Supabase Overview
How to Build Full Stack Apps
I'm fascinated by full stack Serverless frameworks because of the amount of power and agility they give to developers looking to build complete applications.
Supabase brings to the table the important combination of powerful back end services and easy to use client-side libraries and SDKs for an end to end solution.
This combination lets you not only build out the individual features and services necessary on the back end, but easily integrate them together on the front end by leveraging client libraries maintained by the same team.
Because Supabase is open source, you have the option to self-host or deploy your backend as a managed service. And as you can see, this will be easy for us to do on a free tier that does not require a credit card to get started with.
Why Use Supabase?
I've led the Front End Web and Mobile Developer Advocacy team at AWS, and written a book on building these types of apps. So I've had quite a bit of experience building in this space.
And I think that Supabase brings to the table some really powerful features that immediately stood out to me when I started to build with it.
Data access patterns
One of the biggest limitations of some of the tools and frameworks I've used in the past is the lack of querying capabilities. What I like a lot about Supabase is that, since it's built on top of Postgres, it enables an extremely rich set of performant querying capabilities out of the box without having to write any additional back end code.
The client-side SDKs provide easy to use filters and modifiers to enable an almost infinite combination of data access patterns.
Because the database is SQL, relational data is easy to configure and query, and the client libraries take it into account as a first class citizen.
Permissions
When you get past "hello world" many types of frameworks and services fall over very quickly. This is because most real-world use cases extend far beyond the basic CRUD functionality you often see made available by these tools.
The problem with some frameworks and managed services is that the abstractions they create are not extensible enough to enable easy to modify configurations or custom business logic. These restrictions often make it difficult to take into account the many one-off use cases that come up with building an app in the real-world.
In addition to enabling a wide array of data access patterns, Supabase makes it easy to configure authorization and fine grained access controls. This is because it is simply Postgres, enabling you implement whatever row-level security policies you would like directly from the built-in SQL editor (something we will cover here).
UI components
In addition to the client-side libraries maintained by the same team building the other Supabase tooling, they also maintain a UI component library (beta) that allows you to get up and running with various UI elements.
The most powerful is Auth which integrates with your Supabase project to quickly spin up a user authentication flow (which I'll be using in this tutorial).
Multiple authentication providers
Supabase enables all of the following types of authentication mechanisms:
Username & password
Magic email link
Google
Facebook
Apple
GitHub
Twitter
Azure
GitLab
Bitbucket
Open Source
One of the biggest things it has going for it is that it is completely open source (yes the back end too). This means that you can choose either the Serverless hosted approach or to host it yourself.
That means that if you wanted to, you could run Supabase with Docker and host your app on AWS, GCP, or Azure. This would eliminate the vendor lock-in issue you may run into with Supabase alternatives.
How to Get Started with Supabase
Project setup
To get started, let's first create the Next.js app.
npx create-next-app next-supabase
Next, change into the directory and install the dependencies we'll be needing for the app using either NPM or Yarn:
npm install @supabase/supabase-js @supabase/ui react-simplemde-editor easymde react-markdown uuid npm install tailwindcss@latest @tailwindcss/typography postcss@latest autoprefixer@latest
Next, create the necessary Tailwind configuration files:
npx tailwindcss init -p
Now update tailwind.config.js to add the Tailwind typography plugin to the array of plugins. We'll be using this plugin to style the markdown for our blog:
plugins: [ require('@tailwindcss/typography') ]
Finally, replace the styles in styles/globals.css with the following:
@tailwind base; @tailwind components; @tailwind utilities;
Supabase project initialization
Now that the project is created locally, let's create the Supabase project.
To do so, head over to Supabase.io and click on Start Your Project. Authenticate with GitHub and then create a new project under the organization that is provided to you in your account.

Give the project a Name and Password and click Create new project.
It will take approximately 2 minutes for your project to be created.
How to create a database table in Supabase
Once you've created your project, let's go ahead and create the table for our app along with all of the permissions we'll need. To do so, click on the SQL link in the left hand menu.

In this view, click on Query-1 under Open queries and paste in the following SQL query and click RUN:
CREATE TABLE posts ( id bigint generated by default as identity primary key, user_id uuid references auth.users not null, user_email text, title text, content text, inserted_at timestamp with time zone default timezone('utc'::text, now()) not null ); alter table posts enable row level security; create policy "Individuals can create posts." on posts for insert with check (auth.uid() = user_id); create policy "Individuals can update their own posts." on posts for update using (auth.uid() = user_id); create policy "Individuals can delete their own posts." on posts for delete using (auth.uid() = user_id); create policy "Posts are public." on posts for select using (true);
This will create the posts table that we'll be using for the app. It also enabled some row level permissions:
All users can query for posts
Only signed in users can create posts, and their user ID must match the user ID passed into the arguments
Only the owner of the post can update or delete it
Now, if we click on the Table editor link, we should see our new table created with the proper schema.

That's it! Our back end is ready to go now and we can start building out the UI. Username + password authentication is already enabled by default, so all we need to do now is wire everything up on the front end.
Next.js Supabase configuration
Now that the project has been created, we need a way for our Next.js app to know about the back end services we just created for it.
The best way for us to configure this is using environment variables. Next.js allows environment variables to be set by creating a file called .env.local in the root of the project and storing them there.
In order to expose a variable to the browser you have to prefix the variable with NEXT_PUBLIC_.
Create a file called .env.local at the root of the project, and add the following configuration:
NEXT_PUBLIC_SUPABASE_URL=https://app-id.supabase.co NEXT_PUBLIC_SUPABASE_ANON_KEY=your-public-api-key
You can find the values of your API URL and API Key in the Supabase dashboard settings:
Next, create a file called api.js in the root of the project and add the following code:
// api.js import { createClient } from '@supabase/supabase-js' export const supabase = createClient( process.env.NEXT_PUBLIC_SUPABASE_URL, process.env.NEXT_PUBLIC_SUPABASE_ANON_KEY )
Now we will be able to import the supabase instance and use it anywhere in our app.
Here's an overview of what it looks like to interact with the API using the Supabase JavaScript client.
Querying for data:
import { supabase } from '../path/to/api' const { data, error } = await supabase .from('posts') .select()
Creating new items in the database:
const { data, error } = await supabase .from('posts') .insert([ { title: "Hello World", content: "My first post", user_id: "some-user-id", user_email: "[email protected]" } ])
As I mentioned earlier, the filters and modifiers make it really easy to implement various data access patterns and selection sets of your data.
Authentication – signing up:
const { user, session, error } = await supabase.auth.signUp({ email: '[email protected]', password: 'example-password', })
Authentication – signing in:
const { user, session, error } = await supabase.auth.signIn({ email: '[email protected]', password: 'example-password', })
In our case we won't be writing the main authentication logic by hand, we'll be using the Auth component from Supabase UI.
How to Build the App
Now let's start building out the UI!
To get started, let's first update the app to implement some basic navigation and layout styling.
We will also configure some logic to check if the user is signed in, and show a link for creating new posts if they are.
Finally we'll implement a listener for any auth events. And when a new auth event occurs, we'll check to make sure there is currently a signed in user in order to show or hide the Create Post link.
Open _app.js and add the following code:
// pages/_app.js import Link from 'next/link' import { useState, useEffect } from 'react' import { supabase } from '../api' import '../styles/globals.css' function MyApp({ Component, pageProps }) { const [user, setUser] = useState(null); useEffect(() => { const { data: authListener } = supabase.auth.onAuthStateChange( async () => checkUser() ) checkUser() return () => { authListener?.unsubscribe() }; }, []) async function checkUser() { const user = supabase.auth.user() setUser(user) } return ( <div> <nav className="p-6 border-b border-gray-300"> <Link href="/"> <span className="mr-6 cursor-pointer">Home</span> </Link> { user && ( <Link href="/create-post"> <span className="mr-6 cursor-pointer">Create Post</span> </Link> ) } <Link href="/profile"> <span className="mr-6 cursor-pointer">Profile</span> </Link> </nav> <div className="py-8 px-16"> <Component {...pageProps} /> </div> </div> ) } export default MyApp
How to make a user profile page
Next, let's create the profile page. In the pages directory, create a new file named profile.js and add the following code:
// pages/profile.js import { Auth, Typography, Button } from "@supabase/ui"; const { Text } = Typography import { supabase } from '../api' function Profile(props) { const { user } = Auth.useUser(); if (user) return ( <> <Text>Signed in: {user.email}</Text> <Button block onClick={() => props.supabaseClient.auth.signOut()}> Sign out </Button> </> ); return props.children } export default function AuthProfile() { return ( <Auth.UserContextProvider supabaseClient={supabase}> <Profile supabaseClient={supabase}> <Auth supabaseClient={supabase} /> </Profile> </Auth.UserContextProvider> ) }
The profile page uses the Auth component from the Supabase UI library. This component will render a "sign up" and "sign in" form for unauthenticated users, and a basic user profile with a "sign out" button for authenticated users. It will also enable a magic sign in link.
How to create new posts
Next, let's create the create-post page. In the pages directory, create a page named create-post.js with the following code:
// pages/create-post.js import { useState } from 'react' import { v4 as uuid } from 'uuid' import { useRouter } from 'next/router' import dynamic from 'next/dynamic' import "easymde/dist/easymde.min.css" import { supabase } from '../api' const SimpleMDE = dynamic(() => import('react-simplemde-editor'), { ssr: false }) const initialState = { title: '', content: '' } function CreatePost() { const [post, setPost] = useState(initialState) const { title, content } = post const router = useRouter() function onChange(e) { setPost(() => ({ ...post, [e.target.name]: e.target.value })) } async function createNewPost() { if (!title || !content) return const user = supabase.auth.user() const id = uuid() post.id = id const { data } = await supabase .from('posts') .insert([ { title, content, user_id: user.id, user_email: user.email } ]) .single() router.push(`/posts/${data.id}`) } return ( <div> <h1 className="text-3xl font-semibold tracking-wide mt-6">Create new post</h1> <input onChange={onChange} name="title" placeholder="Title" value={post.title} className="border-b pb-2 text-lg my-4 focus:outline-none w-full font-light text-gray-500 placeholder-gray-500 y-2" /> <SimpleMDE value={post.content} onChange={value => setPost({ ...post, content: value })} /> <button type="button" className="mb-4 bg-green-600 text-white font-semibold px-8 py-2 rounded-lg" onClick={createNewPost} >Create Post</button> </div> ) } export default CreatePost
This component renders a Markdown editor, allowing users to create new posts.
The createNewPost function will use the supabase instance to create new posts using the local form state.
You may notice that we are not passing in any headers. This is because if a user is signed in, the Supabase client libraries automatically include the access token in the headers for a signed in user.
How to view a single post
We need to configure a page to view a single post.
This page uses getStaticPaths to dynamically create pages at build time based on the posts coming back from the API.
We also use the fallback flag to enable fallback routes for dynamic SSG page generation.
We use getStaticProps to enable the Post data to be fetched and then passed into the page as props at build time.
Create a new folder in the pages directory called posts and a file called [id].js within that folder. In pages/posts/[id].js, add the following code:
// pages/posts/[id].js import { useRouter } from 'next/router' import ReactMarkdown from 'react-markdown' import { supabase } from '../../api' export default function Post({ post }) { const router = useRouter() if (router.isFallback) { return <div>Loading...</div> } return ( <div> <h1 className="text-5xl mt-4 font-semibold tracking-wide">{post.title}</h1> <p className="text-sm font-light my-4">by {post.user_email}</p> <div className="mt-8"> <ReactMarkdown className='prose' children={post.content} /> </div> </div> ) } export async function getStaticPaths() { const { data, error } = await supabase .from('posts') .select('id') const paths = data.map(post => ({ params: { id: JSON.stringify(post.id) }})) return { paths, fallback: true } } export async function getStaticProps ({ params }) { const { id } = params const { data } = await supabase .from('posts') .select() .filter('id', 'eq', id) .single() return { props: { post: data } } }
How to query for and render the list of posts
Next, let's update index.js to fetch and render a list of posts:
// pages/index.js import { useState, useEffect } from 'react' import Link from 'next/link' import { supabase } from '../api' export default function Home() { const [posts, setPosts] = useState([]) const [loading, setLoading] = useState(true) useEffect(() => { fetchPosts() }, []) async function fetchPosts() { const { data, error } = await supabase .from('posts') .select() setPosts(data) setLoading(false) } if (loading) return <p className="text-2xl">Loading ...</p> if (!posts.length) return <p className="text-2xl">No posts.</p> return ( <div> <h1 className="text-3xl font-semibold tracking-wide mt-6 mb-2">Posts</h1> { posts.map(post => ( <Link key={post.id} href={`/posts/${post.id}`}> <div className="cursor-pointer border-b border-gray-300 mt-8 pb-4"> <h2 className="text-xl font-semibold">{post.title}</h2> <p className="text-gray-500 mt-2">Author: {post.user_email}</p> </div> </Link>) ) } </div> ) }
Let's test it out
We now have all of the pieces of our app ready to go, so let's try it out.
To run the local server, run the dev command from your terminal:
npm run dev
When the app loads, you should see the following screen:

To sign up, click on Profile and create a new account. You should receive an email link to confirm your account after signing up.
You can also create a new account by using the magic link.
Once you're signed in, you should be able to create new posts:
Navigating back to the home page, you should be able to see a list of the posts that you've created and be able to click on a link to the post to view it:

How to Edit Posts
Now that we have the app up and running, let's learn how to edit posts. To get started with this, let's create a new view that will fetch only the posts that the signed in user has created.
To do so, create a new file named my-posts.js in the root of the project with the following code:
// pages/my-posts.js import { useState, useEffect } from 'react' import Link from 'next/link' import { supabase } from '../api' export default function MyPosts() { const [posts, setPosts] = useState([]) useEffect(() => { fetchPosts() }, []) async function fetchPosts() { const user = supabase.auth.user() const { data } = await supabase .from('posts') .select('*') .filter('user_id', 'eq', user.id) setPosts(data) } async function deletePost(id) { await supabase .from('posts') .delete() .match({ id }) fetchPosts() } return ( <div> <h1 className="text-3xl font-semibold tracking-wide mt-6 mb-2">My Posts</h1> { posts.map((post, index) => ( <div key={index} className="border-b border-gray-300 mt-8 pb-4"> <h2 className="text-xl font-semibold">{post.title}</h2> <p className="text-gray-500 mt-2 mb-2">Author: {post.user_email}</p> <Link href={`/edit-post/${post.id}`}><a className="text-sm mr-4 text-blue-500">Edit Post</a></Link> <Link href={`/posts/${post.id}`}><a className="text-sm mr-4 text-blue-500">View Post</a></Link> <button className="text-sm mr-4 text-red-500" onClick={() => deletePost(post.id)} >Delete Post</button> </div> )) } </div> ) }
In the query for the posts, we use the user id to select only the posts created by the signed in user.
Next, create a new folder named edit-post in the pages directory. Then, create a file named [id].js in this folder.
In this file, we'll be accessing the id of the post from a route parameter. When the component loads, we will then use the post id from the route to fetch the post data and make it available for editing.
In this file, add the following code:
// pages/edit-post/[id].js import { useEffect, useState } from 'react' import { useRouter } from 'next/router' import dynamic from 'next/dynamic' import "easymde/dist/easymde.min.css" import { supabase } from '../../api' const SimpleMDE = dynamic(() => import('react-simplemde-editor'), { ssr: false }) function EditPost() { const [post, setPost] = useState(null) const router = useRouter() const { id } = router.query useEffect(() => { fetchPost() async function fetchPost() { if (!id) return const { data } = await supabase .from('posts') .select() .filter('id', 'eq', id) .single() setPost(data) } }, [id]) if (!post) return null function onChange(e) { setPost(() => ({ ...post, [e.target.name]: e.target.value })) } const { title, content } = post async function updateCurrentPost() { if (!title || !content) return await supabase .from('posts') .update([ { title, content } ]) router.push('/my-posts') } return ( <div> <h1 className="text-3xl font-semibold tracking-wide mt-6 mb-2">Edit post</h1> <input onChange={onChange} name="title" placeholder="Title" value={post.title} className="border-b pb-2 text-lg my-4 focus:outline-none w-full font-light text-gray-500 placeholder-gray-500 y-2" /> <SimpleMDE value={post.content} onChange={value => setPost({ ...post, content: value })} /> <button className="mb-4 bg-blue-600 text-white font-semibold px-8 py-2 rounded-lg" onClick={updateCurrentPost}>Update Post</button> </div> ) } export default EditPost
Now, add a new link to our navigation located in pages/_app.js:
// pages/_app.js { user && ( <Link href="/my-posts"> <span className="mr-6 cursor-pointer">My Posts</span> </Link> ) }
When running the app, you should be able to view your own posts, edit them, and delete them from the updated UI.
How to enable real-time updates
Now that we have the app running it's trivial to add real-time updates.
By default, Realtime is disabled on your database. Let's turn on Realtime for the posts table.
To do so, open the app dashboard and click on Databases -> Replication -> 0 Tables (under Source). Toggle on Realtime functionality for the posts table. Here is a video walkthrough of how you can do this for clarity.
Next, open src/index.js and update the useEffect hook with the following code:
useEffect(() => { fetchPosts() const mySubscription = supabase .from('posts') .on('*', () => fetchPosts()) .subscribe() return () => supabase.removeSubscription(mySubscription) }, [])
Now, we will be subscribed to realtime changes in the posts table.
The code for the app is located here.
Next Steps
By now you should have a good understanding of how to build full stack apps with Supabase and Next.js.
If you'd like to learn more about building full stack apps with Supabase, I'd check out the following resources.
If you read this far, tweet to the author to show them you care.
0 notes
Text
How to Use Closures in JavaScript – A Beginner's Guide
Closures are a confusing JavaScript concept to learn, because it's hard to see how they're actually used.
Unlike other concepts such as functions, variables, and objects, you don't always use closures conscientiously and directly. You don't say: Oh! Here I will use a closure as a solution.
But at the same time, you might have already used this concept a hundred times. Learning about closures is more about identifying when one is being used rather than learning a new concept.
What is a closure in JavaScript?
You have a closure when a function reads or modifies the value of a variable defined outside its context.
const value = 1 function doSomething() { let data = [1,2,3,4,5,6,7,8,9,10,11] return data.filter(item => item % value === 0) }
Here the function doSomething uses the variable value. But also the function item => item % value === 0 can then be written like this:
function(item){ return item % value === 0 }
You use the value of the variable value that was defined outside of the function itself.
Functions can access values out of context
As in the previous example, a function can access and use values that are defined outside its "body" or context, for example:
let count = 1 function counter() { console.log(count) } counter() // print 1 count = 2 counter() // print 2
This allows us to modify the value of the count variable from anywhere in the module. Then when the counter function is called, it will know how to use the current value.
Why do we use functions?
But why do we use functions in our programs? Certainly it is possible – difficult, but possible – to write a program without using functions we define. So why do we create proper functions?
Imagine a piece of code that does something wonderful, whatever, and is made up of X number of lines.
/* My wonderful piece of code */
Now suppose you must use this wonderful piece of code in various parts of your program, what would you do?.
The "natural" option is to put this piece of code together into a set that can be reusable, and that reusable set is what we call a function. Functions are the best way to reuse and share code within a program.
Now, you can use your function as many times as possible. And, ignoring some particular cases, calling your function N times is the same as writing that wonderful piece of code N times. It is a simple replacement.
But where is the closure?
Using the counter example, let's consider that as the wonderful piece of code.
let count = 1 function counter() { console.log(count) } counter() // print 1
Now, we want to reuse it in many parts, so we will "wrap" it in a function.
function wonderfulFunction() { let count = 1 function counter() { console.log(count) } counter() // print 1 }
Now what do we have? A function: counter that uses a value that was declared outside it count. And a value: count that was declared in the wonderfulFunction function scope but that is used inside the counter function.
That is, we have a function that uses a value that was declared outside its context: a closure.
Simple, isn't it? Now, what happens when the function wonderfulFunction is executed? What happens to the variable count and the function counter once the parent function is executed?
The variables and functions declared in its body "disappear" (garbage collector).
Now, let's modify the example a bit:
function wonderfulFunction() { let count = 1 function counter() { count++ console.log(count) } setInterval(counter, 2000) } wonderfulFunction()
What will happen now to the variable and function declared inside wonderfulFunction?
In this example, we tell the browser to run counter every 2 seconds. So the JavaScript engine must keep a reference to the function and also to the variable that is used by it. Even after the parent function wonderfulFunction finishes its execution cycle, the function counter and the value count will still "live".
This "effect" of having closures occurs because JavaScript supports the nesting of functions. Or in other words, functions are first class citizens in the language and you can use them like any other object: nested, passed as an argument, as a value of return, and so on.
What can I do with closures in JavaScript?
This is a technique that was used a lot in the ES5 days to implement the "module" design pattern (before this was natively supported). The idea is to "wrap" your module in a function that is immediately executed.
(function(arg1, arg2){ ... ... })(arg1, arg2)
This lets you use private variables that can only be used by the module itself within the function – that is, it's allowed to emulate the access modifiers.
const module = (function(){ function privateMethod () { } const privateValue = "something" return { get: privateValue, set: function(v) { privateValue = v } } })() var x = module() x.get() // "something" x.set("Another value") x.get() // "Another Value" x.privateValue //Error
Function Factory
Another design pattern implemented thanks to closures is the “Function Factory”. This is when functions create functions or objects, for example, a function that allows you to create user objects.
const createUser = ({ userName, avatar }) => ({ id: createID(), userName, avatar, changeUserName (userName) { this.userName = userName; return this; }, changeAvatar (url) { // execute some logic to retrieve avatar image const newAvatar = fetchAvatarFromUrl(url) this.avatar = newAvatar return this } }); console.log(createUser({ userName: 'Bender', avatar: 'bender.png' })); { "id":"17hakg9a7jas", "avatar": "bender.png", "userName": "Bender", "changeUsername": [Function changeUsername] "changeAvatar": [Function changeAvatar] } */c
And using this pattern you can implement an idea from functional programming called currying.
Currying
Currying is a design pattern (and a characteristic of some languages) where a function is immediately evaluated and returns a second function. This pattern lets you execute specialization and composition.
You create these "curried" functions using closures, defining and returning the inner function of the closure.
function multiply(a) { return function (b) { return function (c) { return a * b * c } } } let mc1 = multiply(1); let mc2 = mc1(2); let res = mc2(3); console.log(res); let res2 = multiply(1)(2)(3); console.log(res2);
These types of functions take a single value or argument and return another function that also receives an argument. It is a partial application of the arguments. It is also possible to rewrite this example using ES6.
let multiply = (a) => (b) => (c) => { return a * b * c; } let mc1 = multiply(1); let mc2 = mc1(2); let res = mc2(3); console.log(res); let res2 = multiply(1)(2)(3); console.log(res2);
Where can we apply currying? In composition, let's say you have a function that creates HTML elements.
function createElement(element){ const el = document.createElement(element) return function(content) { return el.textNode = content } } const bold = crearElement('b') const italic = createElement('i') const content = 'My content' const myElement = bold(italic(content)) // <b><i>My content</i></b>
Event Listeners
Another place you can use and apply closures is in event handlers using React.
Suppose you are using a third party library to render the items in your data collection. This library exposes a component called RenderItem that has only one available prop onClick. This prop does not receive any parameters and does not return a value.
Now, in your particular app, you require that when a user clicks on the item the app displays an alert with the item's title. But the onClick event that you have available does not accept arguments – so what can you do? Closures to the rescue:
// Closure // with es5 function onItemClick(title) { return function() { alert("Clicked " + title) } } // with es6 const onItemClick = title => () => alert(`Clcked ${title}`) return ( <Container> {items.map(item => { return ( <RenderItem onClick={onItemClick(item.title)}> <Title>{item.title}</Title> </RenderItem> ) })} </Container> )
In this simplified example we create a function that receives the title that you want to display and returns another function that meets the definition of the function that RenderItem receives as a prop.
Conclusion
You can develop an app without even knowing that you are using closures. But knowing that they exist and how they really work unlocks new possibilities when you're creating a solution.
Closures are one of those concepts that can be hard to understand when you're starting out. But once you know you're using them and understand them, it allows you to increase your tools and advance your career.

🐦 Follow me on Twitter ✉️ Join to the newsletter ❤️ Support my work
If you read this far, tweet to the author to show them you care.
0 notes
Text
Notion API
The Public Beta of the Notion API dropped! Woot! Here’s their guide. I’ve been a Notion user and fan for a long time, for both personal and professional team use. They even sponsored a few videos around here a while back that are still a great representation of how I use Notion. Because Notion is so workflow-oriented, it’s a perfect app to have API integrations with, making this release feel like it was a long time coming.
🚧 Notion's API is now in public beta 🚧 It's the first step towards a brand new set of building blocks, so that you can tailor software to your own workflows. We can't wait to see what you build! https://t.co/RZoHkEPiCa
— Notion (@NotionHQ) May 13, 2021
This is a full-blown API, so you can do things you’d expect to be able to do, like cURL for users, the content of pages, and manipulate databases. They have detailed documentation, expected barriers like rate limits, and even a JavaScript SDK.
This changes the game on some existing services. For example, Super was always a pretty neat way to make a Notion-powered website, but it felt a little risky to me. What if Notion didn’t like that usage and cut it off somehow? Or released their own similar tool? Meh, not risky anymore. Apps like Super can rest easy knowing there is a real API for this so they don’t have to do whatever workaround they were doing before (scraping?) and this kind of usage is likely encouraged, if anything.
I also think it was super smart of Notion to include pre-built integrations with other services people are definitely going to want. For example, you can connect a form on TypeForm to a Notion database so that new entries are automatically placed there. Even better, they have Zapier and Automate integrations, so you can wire up just about any app-to-app integration to you can think of.
I was ready to get using this API right away. On ShopTalk Show we have an ask question form and we sent those submissions to Trello as a way to put them somewhere where we could reference and organize them. But we don’t really use Trello much these days; but we’ve used Notion for planning for ages. I’ve long wanted a way to pipe questions from that form right into Notion. I was all ready to write a little code to do it, but I didn’t have to thanks to the Zapier integration.
Here’s how I got that working. The ShopTalk form exists in Wufoo:
Which we embed on our WordPress site:
I set up a Zapier trigger to fire when that form is submitted:
To make sure it can go somewhere in Notion, I had to create a new Integration on the Notion side:
This next part is very important! You have to explicitly share the database with the integration, as if the integration was a user.
Once you’ve done that, you can see the Notion database on the Zapier side, and map the Wufoo form fields to the Notion database fields.
Now when the form is filled out, we get the new questions immediately over in Notion, which is where we do our show planning anyway! No more copy and pasting crap from other places!
I was very happy to get this all done literally on day one of having this API in public beta. Great job Notion!
The post Notion API appeared first on CSS-Tricks.
You can support CSS-Tricks by being an MVP Supporter.
via CSS-Tricks https://ift.tt/3f2BsnW
0 notes
Text
Monorepos with Ionic, Vue, and npm

This is part three of a new series on monorepos. By the end of the series, you’ll have the tools you need to adopt monorepo setups in your organization.
Rounding out our series on monorepos, we take a look at an old friend, but a newcomer to the monorepo game, npm. Npm has long been the de-facto solution for managing dependencies, and it only makes sense that, with the release of npm 7.0, we finally have a built-in solution for creating a monorepo without relying on external tools. Compared to other solutions, however, npm workspaces lack a few features and still have some rough edges. While it is possible to build something with it, for simplicity, I’d suggest looking at Lerna as an alternative. With that being said, let’s look at how we can configure an npm workspace to work with Ionic and Vue.
Scaffolding
To set the scene, what we’re going to build is an Ionic Vue app and a second project that contains a Vue hook. The hook is borrowed from the vue-composable project.
Let’s get started by first creating our base directory and initializing both a package.json and an ionic.config.json. For the package.json, run:
mkdir vue-monorepo cd vue-monorepo npm init -y
From here, we can also create a base Ionic project with the ionic init command.
ionic init --multi-app
We can also create a directory that will hold all the packages. For this, a directory called packages will do, but the name can be whatever you’d like. packages is just a common convention that people have settled around.
mkdir packages cd packages
With this done, we’re going to create a single Ionic Vue project and a minimal utility package.
mkdir utils ionic start client-app tabs --type vue --no-deps --no-git
Currently, even if you pass the --no-deps flag, dependencies will be installed when Capacitor is set up. Just cd client-app and delete the node_modules folder from the project.
Setting up the Utils
For our utils package, we’re going to do a bit more manual work to set up a minimal package of hooks for our Vue project.
cd packages/utils npm init -y mkdir src touch tsconfig.json
Open your package.json and paste the following:
{ "name": "@client/hooks", "version": "0.1.0", "private": true, "main": "dist/index.js", "module": "dist/index.js", "scripts": { "build": "tsc -p tsconfig.json", "watch": "tsc -p tsconfig.json --watch" }, "dependencies": { "vue": "^3.0.0" }, "files": ["dist/"], "devDependencies": { "typescript": "~4.1.5" } }
Then, open your tsconfig.json and paste the following:
{ "compilerOptions": { "target": "ES5", "outDir": "dist", "module": "CommonJS", "strict": true, "importHelpers": true, "moduleResolution": "node", "skipLibCheck": true, "esModuleInterop": false, "declaration": true, "allowSyntheticDefaultImports": true, "sourceMap": true, "lib": ["esnext", "dom", "dom.iterable"] }, "include": ["src/**/*.ts"], "exclude": ["node_modules"] }
From here, we can make a file, src/index.ts, and paste the following code.
/* eslint-disable */ import { ref, Ref } from 'vue'; // useOnline composable hook. // Adapted from https://github.com/pikax/vue-composable const PASSIVE_EV: AddEventListenerOptions = { passive: true }; let online: Ref<boolean> | undefined = undefined; export function useOnline() { const supported = 'onLine' in navigator; if (!supported) { online = ref(false); } if (!online) { online = ref(navigator.onLine); window.addEventListener( 'offline', () => (online!.value = false), PASSIVE_EV ); window.addEventListener('online', () => (online!.value = true), PASSIVE_EV); } return { supported, online }; }
Now we can leave the utils directory and get back to the root project.
Setting up the Workspace
With the initial code created, we can now set up the workspace. For npm, workspaces are just an entry in the root package.json. Since all of our packages are in the packages directory, we can add the following to the root package.json.
{ "name": "ionic-vue-npm-workspaces", "version": "1.0.0", "description": "", "scripts": {...}, "license": "MIT", "workspaces": [ "packages/*" ] }
The workspaces entry allows us to declare what packages are available from this top level. Since we want to expose all packages in the packages directory, we can use the packages/* to get all of them.
With this completed, run npm install from the top level. With our workspace set up to include all the sub-packages, our install will actually install all dependencies used in both projects in one top-level node_modules directory. This means we can have better control over what dependencies we are using in which project and unifies all duplicated dependencies to one version.
With the dependencies installed, how do we go about actually building our sub-packages? This can be done by calling the script we want to run, followed by the --workspace=<package-name>. If we want to build the utils directory, we use the name entry from the package.json (@client/hooks) as the value for the workspace. So our final command looks like this:
npm run build --workspace=@client/hooks
The same logic would be applied if we want to build/serve our app: we pick the script we want to run and pass the name to the workspace.
Including a Package
So far, we have our packages set up and building, but we’re not making use of them, which kind of defeats the point of having a monorepo. So how can we consume our utils packages in our main app? To do this, we’ll reference the package in our app.
In the client-app project, let’s open our package.json and add a line to our dependencies for @client/hooks:
{ "dependencies": { "@capacitor/core": "3.0.0-rc.1", "@client/hooks": "0.1.0", "@ionic/vue": "^5.4.0", "@ionic/vue-router": "^5.4.0", "core-js": "^3.6.5", "vue": "^3.0.0-0", "vue-router": "^4.0.0-0" } }
Then we can add a reference to @client/hooks in our project in the client-app/src/views/Tab1.vue component.
<template> <ion-page> <ion-header> <ion-toolbar> <ion-title>Tab 1</ion-title> </ion-toolbar> </ion-header> <ion-content :fullscreen="true"> <ion-header collapse="condense"> <ion-toolbar> <ion-title size="large">Tab 1</ion-title> </ion-toolbar> </ion-header> <h1>Is the App online?</h1> <p></p> <ExploreContainer name="Tab 1 page" /> </ion-content> </ion-page> </template> <script lang="ts"> import { IonPage, IonHeader, IonToolbar, IonTitle, IonContent } from '@ionic/vue'; import ExploreContainer from '@/components/ExploreContainer.vue'; import { useOnline } from '@client/hooks'; export default { name: 'Tab1', components: { ExploreContainer, IonHeader, IonToolbar, IonTitle, IonContent, IonPage }, setup() { const { online } = useOnline(); return { online }; }, } </script>
We can save and go back to the terminal, and from the root, run:
npm install npm run serve --workspace=client-app
When we open the browser to localhost:8080, our app should include the code from our second package.
Parting Thoughts
Of all of the options available, npm workspaces include the fewest features when compared to yarn/Lerna or nx. But that could be beneficial to you and your team if you want to have more control over how your monorepos work. This could be perfect for a team that likes to tinker with things, or wants to assemble their own monorepo infrastructure. Either way, it’s great to see npm enter the monorepo game, and we can’t wait to see how workspaces evolve over time.
0 notes
Text
Node.js Async Await Tutorial – With Asynchronous JavaScript Examples
One of the hardest concepts to wrap your head around when you're first learning JavaScript is the asynchronous processing model of the language. For the majority of us, learning asynchronous programming looks pretty much like this

If your first time working with async wasn't like this, please consider yourself a genius
As hard as it is to pick up, async programming is critical to learn if you want to use JavaScript and Node.js to build web applications and servers – because JS code is asynchronous by default.
Asynchronous Programming Fundamentals
So what exactly is the asynchronous processing model, or the non-blocking I/O model (which you've likely heard of if you're a Node.js user)?
Here's a TL;DR description: in an async processing model, when your application engine interacts with external parties (like a file system or network), it doesn't wait until getting a result from those parties. Instead, it continues on to subsequent tasks and only comes back to those previous external parties once it's gotten a signal of a result.
To understand the default async processing model of Node.js, let's have a look at a hypothetical Santa's workshop. Before any work can begin, Santa will have to read each of the lovely letters from kids around the world.

He will then figure out the requested gift, translate the item name into the Elvish language, and then pass the instruction to each of our hard working elves who have different specialisations: wooden toys for Red, stuffed toys for Blue, and robotic toys for Green.

This year, due to the COVID-19 pandemic, only half Santa's elves can come to his workshop to help. Still, because he's wise, Santa decides that instead of waiting for each elf to finish preparing a gift (that is, working synchronously), he will continue translating and passing out instructions from his pile of letters.

So on and so forth...

As he is just about to read another letter, Red informs Santa that he has completed preparing the first gift. Santa then receives the present from Red, and puts it to one side.

And then he continues translating and passing instructions from the next letter.

As he only needs to wrap a pre-made flying robot, Green can quickly finish preparation and pass the present to Santa.

After a whole day of hard and asynchronous work, Santa and the elves manage to complete all present preparation. With his improved asynchronous model of working, Santa's workshop is finished in record time despite being hard-hit by the pandemic.

So that's the basic idea of an asynchronous or non-blocking I/O processing model. Now let's see how it's done in Node.js specifically.
The Node.js Event Loop
You might have heard that Node.js is single-threaded. However, to be exact, only the event loop in Node.js, which interacts with a pool of background C++ worker threads, is single-threaded. There are four important components to the Node.js processing model:
Event Queue: Tasks that are declared in a program, or returned from the processing thread pool via callbacks. (The equivalent of this in our Santa's workshop is the pile of letters for Santa.)
Event Loop: The main Node.js thread that facilitates event queues and worker thread pools to carry out operations – both async and synchronous. (This is Santa. 🎅)
Background thread pool: These threads do the actual processing of tasks, which might be I/O blocking (for example calling and waiting for a response from an external API). (These are the hardworking elves 🧝🧝♀️🧝♂️ from our workshop.)
You can visualize this processing model as below:

Diagram courtesy of c-sharpcorner.com
Let's look at an actual snippet of code to see these in action:
console.log("Hello"); https.get("https://httpstat.us/200", (res) => { console.log(`API returned status: ${res.statusCode}`); }); console.log("from the other side");
If we execute the above piece of code, we would get this in our standard output:
Hello from the other side API returned status: 200
So how does the Node.js engine carry out the above snippet of code? It starts with three functions in the call stack:
"Hello" is then printed to the console with the corresponding function call removed from the stack.
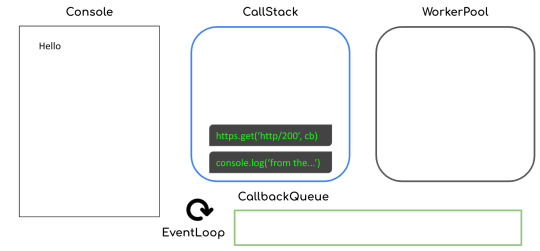
The function call to https.get (that is, making a get request to the corresponding URL) is then executed and delegated to the worker thread pool with a callback attached.
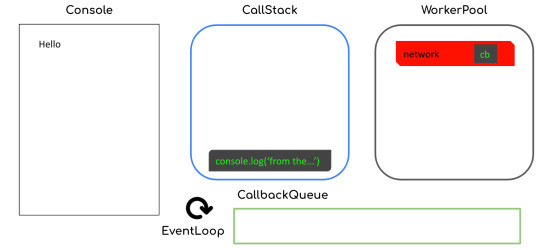
The next function call to console.log gets executed, and "from the other side" is printed to the console.

Now that the network call has returned a response, the callback function call will then get queued inside the callback queue. Note that this step could happen before the immediate previous step (that is, "from the other side" getting printed), though normally that's not the case.

The callback then gets put inside our call stack:

and then we will see "API returned status: 200" in our console, like this:
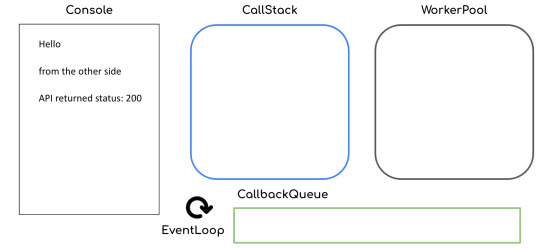
By facilitating the callback queue and call stack, the event loop in Node.js efficiently executes our JavaScript code in an asynchronous way.
A synchronous history of JavaScript & Node.js async/await
Now that you have good understanding of asynchronous execution and the inner-workings of the Node.js event loop, let's dive into async/await in JavaScript. We'll look at how it's worked through time, from the original callback-driven implementation to the latest shiny async/await keywords.
Callbacks in JavaScript
The OG way of handling the asynchronous nature of JavaScript engines was through callbacks. Callbacks are basically functions which will be executed, usually, at the end of synchronous or I/O blocking operations.
A straightforward example of this pattern is the built-in setTimeout function that will wait for a certain number of milliseconds before executing the callback.
setTimeout(2000, () => { console.log("Hello"); });
While it's convenient to just attach callbacks to blocking operations, this pattern also introduces a couple of problems:
Callback hell
Inversion of control (not the good kind!)
What is callback hell?
Let's look at an example with Santa and his elves again. To prepare a present, Santa's workshop would have to carry out a few different steps (with each taking different amounts of time simulated using setTimeout):
function translateLetter(letter, callback) { return setTimeout(2000, () => { callback(letter.split("").reverse().join("")); }); } function assembleToy(instruction, callback) { return setTimeout(3000, () => { const toy = instruction.split("").reverse().join(""); if (toy.includes("wooden")) { return callback(`polished ${toy}`); } else if (toy.includes("stuffed")) { return callback(`colorful ${toy}`); } else if (toy.includes("robotic")) { return callback(`flying ${toy}`); } callback(toy); }); } function wrapPresent(toy, callback) { return setTimeout(1000, () => { callback(`wrapped ${toy}`); }); }
These steps need to be carried out in a specific order:
translateLetter("wooden truck", (instruction) => { assembleToy(instruction, (toy) => { wrapPresent(toy, console.log); }); }); // This will produced a "wrapped polished wooden truck" as the final result
As we do things this way, adding more steps to the process would mean pushing the inner callbacks to the right and ending up in callback hell like this:

Callbacks look sequential, but at times the execution order doesn't follow what is shown on your screen. With multiple layers of nested callbacks, you can easily lose track of the big picture of the whole program flow and produce more bugs or just become slower when writing your code.
So how do you solve this problem? Simply modularise the nested callbacks into named functions and you will have a nicely left-aligned program that's easy to read.
function assembleCb(toy) { wrapPresent(toy, console.log); } function translateCb(instruction) { assembleToy(instruction, assembleCb); } translateLetter("wooden truck", translateCb);
Inversion of Control
Another problem with the callback pattern is that you don't decide how the higher-order functions will execute your callbacks. They might execute it at the end of the function, which is conventional, but they could also execute it at the start of the function or execute it multiple times.
Basically, you are at the mercy of your dependency owners, and you might never know when they will break your code.
To solve this problem, as a dependency user, there's not much you can do about it. However, if you're ever a dependency owner yourself, please always:
Stick to the conventional callback signature with error as the first argument
Execute a callback only once at the end of your higher-order function
Document anything out-of-convention that is absolutely required and always aim for backward compatibility
Promises in JavaScript
Promises were created to solve these above mentioned problems with callbacks. Promises make sure that JavaScript users:
Stick to a specific convention with their signature resolve and reject functions.
Chain the callback functions to a well-aligned and top-down flow.
Our previous example with Santa's workshop preparing presents can be rewritten with promises like so:
function translateLetter(letter) { return new Promise((resolve, reject) => { setTimeout(2000, () => { resolve(letter.split("").reverse().join("")); }); }); } function assembleToy(instruction) { return new Promise((resolve, reject) => { setTimeout(3000, () => { const toy = instruction.split("").reverse().join(""); if (toy.includes("wooden")) { return resolve(`polished ${toy}`); } else if (toy.includes("stuffed")) { return resolve(`colorful ${toy}`); } else if (toy.includes("robotic")) { return resolve(`flying ${toy}`); } resolve(toy); }); }); } function wrapPresent(toy) { return new Promise((resolve, reject) => { setTimeout(1000, () => { resolve(`wrapped ${toy}`); }); }); }
with the steps being carried out nicely in a chain:
translateLetter("wooden truck") .then((instruction) => { return assembleToy(instruction); }) .then((toy) => { return wrapPresent(toy); }) .then(console.log); // This would produce the exact same present: wrapped polished wooden truck
However, promises are not without problems either. Data in each eye of our chain have a different scope and only have access data passed from the immediate previous step or parent scope.
For example, our gift-wrapping step might want to use data from the translation step:
function wrapPresent(toy, instruction) { return Promise((resolve, reject) => { setTimeout(1000, () => { resolve(`wrapped ${toy} with instruction: "${instruction}`); }); }); }
This is rather a classic "memory sharing" problem with threading. To solve this, instead of using variables in the parent's scope, we should use Promise.all and "share data by communicating, rather than communicate by sharing data".
translateLetter("wooden truck") .then((instruction) => { return Promise.all([assembleToy(instruction), instruction]); }) .then((toy, instruction) => { return wrapPresent(toy, instruction); }) .then(console.log); // This would produce the present: wrapped polished wooden truck with instruction: "kcurt nedoow"
Async/Await in JavaScript
Last but definitely not least, the shiniest kid around the block is async/await. It is very easy to use but it also has some risks.
Async/await solves the memory sharing problems of promises by having everything under the same scope. Our previous example can be rewritten easily like so:
(async function main() { const instruction = await translateLetter("wooden truck"); const toy = await assembleToy(instruction); const present = await wrapPresent(toy, instruction); console.log(present); })(); // This would produce the present: wrapped polished wooden truck with instruction: "kcurt nedoow"
However, as much as it's easy to write asynchronous code with async/await, it's also easy to make mistakes that create performance loopholes.
Let's now localise our example Santa's workshop scenario to wrapping presents and loading them on the sleigh.
function wrapPresent(toy) { return Promise((resolve, reject) => { setTimeout(5000 * Math.random(), () => { resolve(`wrapped ${toy}`); }); }); } function loadPresents(presents) { return Promise((resolve, reject) => { setTimeout(5000, () => { let itemList = ""; for (let i = 0; i < presents.length; i++) { itemList += `${i}. ${presents[i]}\n`; } }); }); }
A common mistake you might make is carrying out the steps this way:
(async function main() { const presents = []; presents.push(await wrapPresent("wooden truck")); presents.push(await wrapPresent("flying robot")); presents.push(await wrapPresent("stuffed elephant")); const itemList = await loadPresents(presents); console.log(itemList); })();
But does Santa need to await for each of the presents to be wrapped one by one before loading? Definitely not! The presents should be wrapped concurrently. You might make this mistake often as it's so easy to write await without thinking about the blocking nature of the keyword.
To solve this problem, we should bundle the gift wrapping steps together and execute them all at once:
(async function main() { const presents = await Promise.all([ wrapPresent("wooden truck"), wrapPresent("flying robot"), wrapPresent("stuffed elephant"), ]); const itemList = await loadPresents(presents); console.log(itemList); })();
Here are some recommended steps to tackle concurrency performance issue in your Node.js code:
Identify hotspots with multiple consecutive awaits in your code
Check if they are dependent on each other (that is one function uses data returned from another)
Make independent function calls concurrent with Promise.all
Wrapping up (the article, not Christmas presents 😂)
Congratulations on reaching the end of this article, I tried my best to make this post shorter, but the async topic in JavaScript is just so broad.
Here are some key takeaways:
Modularise your JavaScript callbacks to avoid callback hell
Stick to the convention for JS callbacks
Share data by communicating through Promise.all when using promises
Be careful about the performance implication of async/await code
We ❤️ JavaScript :)
Thank you for reading!
Last but not least, if you like my writings, please head over to my blog for similar commentaries and follow me on Twitter. 🎉
If you read this far, tweet to the author to show them you care.
0 notes
Text
How to Deploy a Node.js App – From Server Setup to Production
In this tutorial, we are going to learn everything we need to know before deploying a Node app to a production server.
We will start by renting a server on Digital Ocean. Then we'll configure this server, connect to it, install Nginx and configure it, pull or create our Node app, and run it as a process.
As you can see, there is a lot to do and it will be an action-packed tutorial. So let's get started without wasting any time.
You should have some basic knowledge on how the Terminal works and how to work in Vi/Vim before getting started. If you are not familiar with basic commands, I would advise you to read up on them a bit.
I will run the commands in MacOS. If you want to follow this tutorial in Windows, you can use Powershell or some other Unix emulator of your choice.
Although I will use Node.js as the platform of our example application, most of the steps are the same for any web application.
Why Digital Ocean?
I choose Digital Ocean because it is cheap and the interface is really easy to use, compared to the likes of AWS. Also, a $100 credit is included in the GitHub student pack so you do not have to pay anything for a couple of months. It is ideal for deploying a course or hobby project.
It has a concept called Droplets, which is basically your share of a server. You can think of the server as an apartment in which you own or rent a flat.
Droplets work with the help of Virtual Machines which run on the server. So a Droplet is your Virtual Machine on a shared server. Since it is a VM, its CPU and memory share can be easily increased, usually by throwing more money at your provider.
How to Create a Digital Ocean Project

I am assuming that you have already signed up and logged in to Digital Ocean before proceeding. We should first create a project that will contain our droplets. Let's click on the new project button on the left side menu. It will ask you to name your project.

Enter whatever name you want. It will also ask you if you want to move any resources, but for now just click Skip – we will create the droplet later.
How to Create a Droplet on Digital Ocean
Let's create our droplet by clicking the Get Started button.

After clicking the button, it will ask us to choose a VM image.

Choosing an Image
On this page, I will select Ubuntu 20.04 since it is the latest LTS version at the time I am writing this post. LTS means "Long Term Support". It is best to go with the LTS version for actual projects, because the provider guarantees that it will be supported and maintained for a long time. This means you will not have problems in the long run.
I have chosen Ubuntu, and would recommend it to you since it is the most commonly used Linux distribution. This means it's also the easiest to find answers to your future questions.
You can also choose to have a Dedicated CPU if you need it. If you are building your own startup or any business project, I would recommend reading this post which contains detailed instructions about how to pick the right option for you.
I will go with the cheapest option in this case.
Then you will need to select a Datacenter region. You should pick the one that is closest to you to minimize network delay.

Select a Datacenter
Next let's select SSH Keys as the Authentication Method, since it is much more secure than basic password authentication.

Authentication Method
To connect to the server we need to generate a new SSH key on our own device and add it to Digital Ocean.
How to Generate an SSH Key
I will generate the key on my macOS device. If you are using Windows you can refer to this article. Open your terminal and move into the ssh folder:
cd ~/.ssh
Then create your SSH key:
ssh-keygen
If your computer says that it does not know this command, you should install it via brew.

It will ask you to name the file and enter a passphrase. Do not enter a name, just press enter and go with the defaults. You should have these files generated. I have named mine digital-ocean-ssh in this screenshot, so do not get confused by that.
❯ lsid_dsa id_rsa known_hosts
Our public key is the id_dsa and the id_rsa is our private key. If you forget which one is private, you can always print one of them to see.
How to Add Your SSH Key to Digital Ocean
Now we want to copy our public key and upload it to Digital Ocean so they will know which key to use in authentication.

Copy this whole key including the ssh-rsa part.
Click on "New SSH Key":

Paste the key in the textbox that appears after you click the button and you should see your SSH key.

How to Connect to the Server
We will use the terminal to connect to our server with SSH. You can also take a look at Termius for a nice interface if you want.
Run this command in your terminal after replacing the IP_ADDRESS with your server's IP address (you can look it up from Digital Ocean's panel).
ssh root@IP_ADDRESS
If everything goes well, now you should be in the server's terminal. We have successfully connected to server. If there is any error, you can debug it by running the command with the "-v" option or "-vv" for even more verbosity.
How to Set Up the Server
We need to do some initial setup before deploying the Node app to the server.
Update and Upgrade Software
We want to update the server's software to make sure we are using the latest versions.
Many servers are vulnerable to attacks because they are using older versions of software with known vulnerabilities. Attackers can search for the vulnerabilities in those software and try to exploit them in order to gain access to your server.
You can update Ubuntu's software using the "apt update" command.
apt updateHit:1 https://repos.insights.digitalocean.com/apt/do-agent main InReleaseGet:2 http://mirrors.digitalocean.com/ubuntu focal InRelease [265 kB] Hit:3 http://mirrors.digitalocean.com/ubuntu focal-updates InRelease Get:4 http://security.ubuntu.com/ubuntu focal-security InRelease [109 kB]Hit:5 http://mirrors.digitalocean.com/ubuntu focal-backports InReleaseFetched 374 kB in 1s (662 kB/s) Reading package lists... DoneBuilding dependency tree Reading state information... Done96 packages can be upgraded. Run 'apt list --upgradable' to see them.
If you read the message, it says that "96 packages can be upgraded". We have installed the new software packages but we have not upgraded our software to those versions yet.
To do that, let's run another command:
apt upgrade
Type y when it prompts you and it will upgrade the software.
Create a User
We have connected to the server as the root user (the user with the highest privileges). Being the root is dangerous and can open us up to vulnerabilities.
Therefore we should create a new user and not run commands as root. Replace $username with a username of your choice.
whoamiroot
adduser $username
You need to enter a password for the user. After that point, it will ask a bunch of questions, so just input y until the prompting is over.
The new user has been created but we also need to add this new user to the "sudo" group so that we can perform any action we need.
usermod -aG sudo $USERNAME
We add group with the -aG (add group) option, and we add the group name sudo to our username.
We are still root, so let's switch our user to the newly created user, using the su (switch user) command.
su $USERNAME
After this point, if you run whoami command, you should see your username. You can confirm the existence of the sudo group by running this command:
sudo cat /var/log/auth.log
Only superusers can view this file and OS will ask for your user password after you run this command.
Copy the SSH Key
We have successfully created the user but we have not enabled SSH login for this new user yet.
Therefore, we have to copy the public key that we previously created on our local computer and paste it into this user's SSH folder so SSH can know which key should it use to authenticate our new user.
mkdir -p ~/.ssh
The -p argument creates the directory if it does not exist.
vi ~/.ssh/authorized_keys
We will use vi or vim to create a file and call it authorized_keys.
Copy your public key (`id_dsa` file) then press "i" to go into insert mode. Then just paste it into this file with CMD + V.
Press esc to quit insert mode, type :wq to save and quit.
If you have any problems about using Vim-Vi, you can check out one of the many tutorials that explain how to use it.
Connect to Server as New User
Now we should be able to connect to the server without any problems using ssh. You can use this command to connect, just remember to insert your username and IP_ADDRESS.
ssh $USERNAME@IP_ADDRESS
If you are having any problems at this point, you should just delete the droplet and start over. It does not take a lot of time to start over but debugging server problems can be difficult.
How to Disable Root Login
It is a good practice to disable Root login as a security precaution, so let's do that now.
It can be useful to change the file permission just in case so that we won't run into problems regarding permissions in the future.
chmod 644 ~/.ssh/authorized_keys
Let's now open our sshd_config file:
sudo vi /etc/ssh/sshd_config
Find this line and change the yes to no in the same way we did earlier with vi.
PermitRootLogin no
Save and quit vi.
How to Install Node.js and Git
We can now go ahead and install Node.js and Git:
sudo apt install nodejs npm
sudo apt install git
We are now ready to create a Node app and run it. You can either pull your Node project from Github or create a Node app here just to test if it works.
Move to a directory of your choice and create an "app.js" file:
sudo vi app.js
You can paste the following snippet into your app.js file:
const express = require('express');const app = express();const port = 3000;app.get('/', (req, res) => { res.send('Hello World');});app.listen(port, () => console.log(`Example app listening on port ${port}!`));
Now we can run it with the command:
node app.js
You should see "Example app listening on port 3000!" on your terminal.
We can confirm that it is working by sending a request to our server:
GET http://IP_ADDRESS:3000/
Send this request either from an HTTP client like Postman or your browser and you should see the "Hello World" message.
At this point, you should notice that something is wrong: Regular users do not know how to send requests to port 3000.
We should redirect the requests that come to our web server from our IP to port 3000. We can accomplish this with the help of Nginx.

How to Install and Configure Nginx
We will use Nginx as a Reverse Proxy to redirect the requests to our Node app.

Nginx as a Reverse Proxy
Let's install Nginx:
sudo apt install nginx
Start the Nginx service:
sudo service nginx start
We can test to see if it is working by sending a request to our server's IP address from the browser. Type your server's IP address to your browser and you should see this:

It is important to know that Nginx serves from "/var/www/html" by default and you can find this HTML file in that directory as well.
I also advise you to create a folder under "/var/www", call it app, and move your Node app to that folder so it will be easy to find.
How to Configure the Nginx Reverse Proxy
We will edit the Nginx config file to configure a reverse proxy:
sudo vi /etc/nginx/sites-available/default
In this file you need to find the location / block and change it as follows:
location / { # First attempt to serve request as file, then # as directory, then fall back to displaying a 404. proxy_pass http://127.0.0.1:3000/; }
The proxy_pass directive proxies the request to a specified port. We give the port that our Node application is running on.
Let's restart Nginx so the changes can take effect:
sudo service nginx reload
After this step, we should be able to see the message when we send a request to our server. Congratulations, we have completed the minimum number of steps to deploy a Node app!

But I still advise you to complete the following bonus step as well, as I believe it's quite important.
If you can't see the hello world message, you can check if your app and Nginx are running and restart them.
How to Run your App as a Process
We do not want to start our application manually every time something goes wrong and our app crashes. We want it to restart on its own. Also, whenever the server starts, our app should start too.
To make this happen, we can use PM2. Let's install PM2 and configure it.
sudo npm i -g pm2
We are installing pm2 globally by using the "-g" option so that it will be accessible from every folder.
pm2 start app.js
This makes sure that the app will restart if it exits due to an error.
Let's save the current process list.
pm2 save
We also need to convert it to a daemon that runs whenever the system starts:
pm2 startup systemd
As a reminder, in this tutorial, I'm using the commands for Ubuntu. If you are using any other Linux distro, you should replace systemd in this command.
We can confirm that the service is getting restarted by rebooting the server and sending a request without running app.js by hand:
sudo reboot
After sending a request as we did earlier, you should be able to see the hello world message.
Conclusion
In this tutorial we started from scratch, rented a server for ourselves, connected to it, and configured it in a way that it serves our Node.js app from port 80.
If you have followed along and were able to complete all steps, congratulations! You can be proud of yourself, as this was not the easiest topic :). I hope that you have learned a lot. Thank you for your time.
I am planning to explore this topic further by connecting the server to a domain name, then connecting it to CircleCI for continuous integration. I'll also go through the required steps to make your Node.js/React app production ready. This post had already gotten long enough, though, so those topics are reserved for another post :)
If you have enjoyed reading and want to get informed about my future posts, you can subscribe to my personal blog. You can see my previous posts there if you are interested in reading more. I usually write about web development-related topics.
0 notes
Text
Learn CSS Grid by Building 5 Layouts in 17 minutes
CSS Grid is a tool you can use to help create layouts for your website. It's especially useful if you need to think about the position, layers, or sizes of different elements.
CSS Grid is complicated and there are many things to learn. But the good news is that you don't need to know everything all at once.
In this tutorial, we will build 5 different layouts (which are explained as five separate tasks below) with CSS Grid. At the end of the tutorial, you will be ready to use CSS Grid in your next projects.
If you want to code along, be sure to download the resources:
Here's a video you can watch if you want to supplement this article:
youtube
CSS Grid
Here are the first two layouts we'll build:
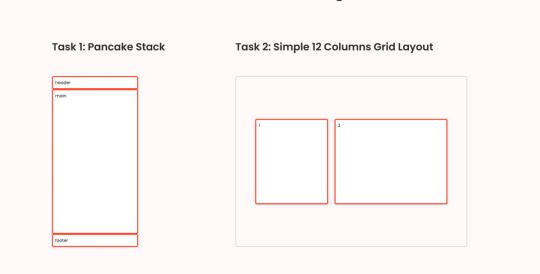
Task 1 and task 2
1: How to Build a Pancake Stack with CSS Grid
For task number one, we need to create a pancake stack layout. To create this layout, we can make three rows by using grid-template-rows: auto 1fr auto. The second row with a value of 1fr will expand as much as it can, whereas the other two only have enough space by wrapping their content.
So to achieve this layout, all we have to do is to give the container the following parameters:
.task-1.container { display: grid; height: 100vh; grid-template-rows: auto 1fr auto; }
and you can see this layout everywhere, for example, in one of my tutorials:

Here's the YouTube link if you want to watch and code along.
2: How to Build a Simple 12 Column Grid Layout with CSS Grid
The basic 12 column grid layout has been around forever. And with CSS Grid, it's even easier to use. In this simple task we need to give item-1 four columns and items-2 six columns.
First, we need to create 12 columns. We can do that with grid-template-columns: repeat(12, 1fr);:
.task-2.container { display: grid; height: 100vh; grid-template-columns: repeat(12, 1fr); column-gap: 12px; align-items: center; }
Notice here that we also have the 12px gap between every column. Similar to Flex, we also can use align-items and justify-content.
The next thing we need to do is to tell which column(s) the items should take up:
For item 1, we want it to start from column 2 and end at number 6. So we have:
.task-2 .item-1 { grid-column-start: 2; grid-column-end: 6; }
Notice that the item will not include column number 6, only columns 2, 3, 4, and 5.
We can also have the same affect by writing:
.task-2 .item-1 { grid-column-start: 2; grid-column-end: span 4; }
or
.task-2 .item-1 { grid-column: 2 / span 4; }
With the same logic, we will have the following for item 2:
.task-2 .item-2 { grid-column: 6 / span 6; }
You can see 12 column layout are everywhere – here is a tutorial where I use this technique.

Here's the YouTube link if you want to watch and code along.
3: How to Build a Responsive Layout with and without grid-template-areas
I am going to show you two options here. For the first option, we are going to use the 12 column grid that we learned from the 2nd task.
For the second option, we going to use a property called grid-template-areas.

The First option: How to Use the 12 Column Grid
Mobile
This is quite straightforward. We can use what we learned from task number one, and make the main section expand. We can also give the grid a gap: 24px as in desktop. There will be columns, not just rows:
.task-3-1.container { display: grid; height: 100vh; grid-template-rows: auto auto 1fr auto auto auto; gap: 24px; }
Tablet
On a tablet, where the screen is wider than 720px, we want to have 12 columns and 4 rows. The third row will expand as much as it can:
@media (min-width: 720px) { .task-3-1.container { grid-template-columns: repeat(12, 1fr); grid-template-rows: auto auto 1fr auto; } }
Now that we have 12 columns, we need to tell how many columns should each item take up:
@media (min-width: 720px) { // The header section takes 12 columns .task-3-1 .header { grid-column: 1 / span 12; } // The navigation section also takes 12 columns .task-3-1 .navigation { grid-column: 1 / span 12; } // The main section takes 10 columns start from column 3 .task-3-1 .main { grid-column: 3 / span 10; } // The sidebar takes 2 columns start from column 1 .task-3-1 .sidebar { grid-column: 1 / span 2; grid-row: 3; } // The ads section takes 2 columns start from column 1 .task-3-1 .ads { grid-column: 1 / span 2; } // The footer section takes 10 columns start from column 3 .task-3-1 .footer { grid-column: 3 / span 10; } }
Notice here that we need to give .task-3-1 .sidebar grid-row: 3; because sidebar is after the main section in the DOM.
Desktop
For the desktop view, we will work with a screen that is bigger than 1020px. As we already have 12 columns, now we only need to tell how many columns it should use:
@media (min-width: 1020px) { // The navigation takes 8 columns starting from column 3 .task-3-1 .navigation { grid-column: 3 / span 8; } // The main section takes 8 columns starting from column 3 .task-3-1 .main { grid-column: 3 / span 8; } // The sidebar starts from column 2 and ends at column 4 .task-3-1 .sidebar { grid-column: 2 / 4; } // The ads section takes 2 columns starting from column 11 // it also takes 2 rows starting from row 2 and ending at row 4 .task-3-1 .ads { grid-column: 11 / span 2; grid-row: 2 / 4; } // The footer section takes 12 columns start from column 1 .task-3-1 .footer { grid-column: 1 / span 12; } }
Real life example
You can actually find a similar layout on Dev.to's homepage:

The Second Option: How to Use grid-template-areas
Before using grid-template-areas, we need to define the area of the item using grid-area:
.task-3-2 .header { grid-area: header; } .task-3-2 .navigation { grid-area: nav; } .task-3-2 .ads { grid-area: ads; } .task-3-2 .sidebar { grid-area: sidebar; } .task-3-2 .main { grid-area: main; } .task-3-2 .footer { grid-area: footer; }
After the item areas are defined, all we have to do is to give the container the position by using grid-template-areas:
Mobile
.task-3-2.container { display: grid; height: 100vh; gap: 24px; // Creating 6 rows and 3rd row expands as much as it can grid-template-rows: auto auto 1fr auto auto auto; // Defining the template grid-template-areas: "header" "nav" "main" "sidebar" "ads" "footer"; }
So on mobile, we create 1 column and 6 rows. And row number 3, which is the main row, should expand as much as it can.
This also makes it easy if, later on, you want to change the order/position of the item. For example, if we want to have navigation before the header we can do:
... grid-template-areas: "nav" "header" "main" "sidebar" "ads" "footer"; ...
Tablet
@media (min-width: 720px) { .task-3-2.container { // Creating 4 rows and the 3rd row expands as much as it can grid-template-rows: auto auto 1fr auto; // Defining the template (3 columns) grid-template-areas: "header header header" "nav nav nav " "sidebar main main" "ads footer footer"; } }
With the code above, if the screen is wider than 720px we want to create 3 columns and 4 rows. The header and the navigation both take up 3 columns.
On the third and fourth row, the sidebar and ads take 1 column, whereas, the main and footer take 2 columns.
Desktop
@media (min-width: 1020px) { .task-3-2.container { // Creating 4 rows and the 3rd row expands as much as it can grid-template-rows: auto auto 1fr auto; // Defining the template (4 columns) grid-template-areas: "header header header header" "sidebar nav nav ads" "sidebar main main ads" "footer footer footer footer"; } }
Here we find similar logic to tablet view. For the desktop, we create 4 columns and 4 rows and the placement according to the value of grid-template-areas.
Which should you choose?
Using the 12 Column Grid:
➕ Easy and fast to start ➕ Easy to maintain for column-focused layouts ➖ Difficult to arrange items in complex layouts
You should use 12 Column Grid for less complex layouts that focus mainly on the arrangement of the columns.
Using grid-template-areas:
➕ Flexible for complex layouts ➕ Easy to visualize ➖ Takes more time to implement
You should use grid-template-areas for more complex layouts where you need to care about positions or sizes of many elements.
Both options have pros and cons, but you should choose the one that's easier for you and makes sense in your particular scenario.

It is surprisingly simple to do this. We can make it happen with one line of code: grid-template-columns: repeat(auto-fill, minmax(150px, 1fr));, like this:
.task-4.container { display: grid; gap: 24px; grid-template-columns: repeat(auto-fill, minmax(150px, 1fr)); }
We just created a flexible column layout and specified that the column should never be less than 150px and should share the space evenly.
5: How to Build a 12 x 12 Chess Grid with CSS Grid
For the last task, I want to show you that, not only we can define the number of columns, but we can also define the number of rows using CSS Grid.
.task-5.container { display: grid; height: 100vh; grid-template-columns: repeat(12, 1fr); grid-template-rows: repeat(12, 1fr); }
Now, we can place the items anywhere we want. So to create this layout:
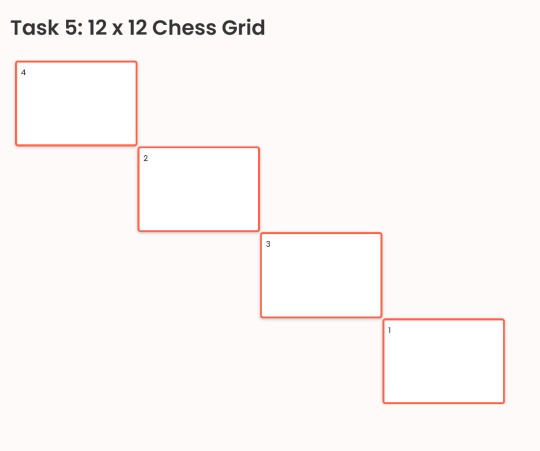
We can do this:
... // First item starts from column 1 and expand 3 columns // and from row 1 and expand 3 columns .task-5 .item-1 { grid-row: 1 / span 3; grid-column: 1 / span 3; } // Second item starts from column 4 and expand 3 columns // and from row 4 and expand 3 columns .task-5 .item-2 { grid-row: 4 / span 3; grid-column: 4 / span 3; } // First item starts from column 7 and expand 3 columns // and from row 7 and expand 3 columns .task-5 .item-3 { grid-row: 7 / span 3; grid-column: 7 / span 3; } // First item starts from column 10 and expand 3 columns // and from row 10 and expand 3 columns .task-5 .item-4 { grid-row: 10 / span 3; grid-column: 10 / span 3; }
Conclusion
Thanks for reading this article. This topic belongs to the series of videos that I will update on Learn.DevChallenges.io. So to say updated, follow me on social media or subscribe to my Youtube Channel. Otherwise, happy coding and see you in the next video and articles 👋.
__________ 🐣 About me __________
I am a full-stack developer, a UX/UI designer and a content creator. We can get to know me more in this short video:
youtube
0 notes
Text
Upload Files from Ionic Angular to Firebase Storage.
Nowadays Google Firebase is my most favorite application. This is offering great web solutions like hosting, authentication, storage and database in a simple way. This article explains how to upload images(supports video) into Firebase storage with Ionic and Angular applications. This covers the user authentication part to protect storage uploads and improving default Firebase security rules. Take a look at the quick demo and try to upload under 1 mb JPEG or PNG.
Live Demo Video Tutorial
youtube
System Requirements
Node JS
Angular Cli
Ionic Cli
Install Ionic
$npm install -g ionic
Create Ionic Project
Choose Angular and tabs.
$ionic start ionicStorage --tabs
Install Firebase Plugins
We need to install Angular Fire modules Change project directory
$cd ionicStorage
Install @angular/fire
$npm install @angular/fire
Install Firebase - Need this for social provider options.
$npm install firebase
Create Components
Create a new login page component for user authentication.
$ng generate component login
Generate Login Module for lazy loading.
$ng generate module login
login-routing.module.ts Create a routing module for login component.
import { NgModule } from '@angular/core';
import { RouterModule, Routes } from '@angular/router';
import { LoginComponent } from './login.component';
const routes: Routes = [
{
path: '',
component: LoginComponent,
},
];
@NgModule({
imports: [RouterModule.forChild(routes)],
exports: [RouterModule],
})
export class LoginRoutingModule {}
login.module.ts Import the login component here.
import { CommonModule } from '@angular/common';
import { NgModule } from '@angular/core';
import { IonicModule } from '@ionic/angular';
import { LoginRoutingModule } from './login-routing.module';
import { LoginComponent } from './login.component';
@NgModule({
declarations: [LoginComponent],
imports: [CommonModule, IonicModule, LoginRoutingModule],
})
export class LoginModule {}
app-routing.module.ts Introduce new route path for login page.
import { NgModule } from '@angular/core';
import { PreloadAllModules, RouterModule, Routes } from '@angular/router';
const routes: Routes = [
{
path: '',
loadChildren: () =>
import('./tabs/tabs.module').then((m) => m.TabsPageModule)
},
{
path: 'login',
loadChildren: () =>
import('./login/login.module').then((m) => m.LoginModule)
},
];
@NgModule({
imports: [
RouterModule.forRoot(routes, { preloadingStrategy: PreloadAllModules }),
],
exports: [RouterModule],
})
export class AppRoutingModule {}
Launch Ionic Project Launch the application and validate https://localhost:8100/login
$ionic serve
Getting started with Firebase Google Firebase is a web application, using this you can solve complex problems.. Create a Firebase application Select web for configuration details. Application name. Firebase configuration details. Create a config directory and create a config file. Firebase Config Constants file for Firebase application keys.
export const firebaseConfig = {
apiKey: 'api key',
authDomain: "domain address",
databaseURL: "database URL",
storageBucket: "storage bucket us",
messagingSenderId: "Message Sender ID",
appId: "#######"
};
Firebase Authentication You will find this option is sidebar menu. Enable Google Login Create an application for Google OAuth. Make sure Google status should be enabled. app.module.ts Import Angular fire auth module and storage module. Initiliza with AngularFirebaseModule
import { NgModule } from '@angular/core';
import { AngularFireModule } from '@angular/fire';
import { AngularFireAuthModule } from '@angular/fire/auth';
import { BrowserModule } from '@angular/platform-browser';
import { RouteReuseStrategy } from '@angular/router';
import { SplashScreen } from '@ionic-native/splash-screen/ngx';
import { StatusBar } from '@ionic-native/status-bar/ngx';
import { IonicModule, IonicRouteStrategy } from '@ionic/angular';
import { AppRoutingModule } from './app-routing.module';
import { AppComponent } from './app.component';
import { firebaseConfig } from './config/firebase.config';
import { AngularFireStorageModule } from '@angular/fire/storage';
@NgModule({
declarations: [AppComponent],
entryComponents: [],
imports: [
BrowserModule,
IonicModule.forRoot(),
AppRoutingModule,
AngularFireModule.initializeApp(firebaseConfig),
AngularFireAuthModule,
AngularFireStorageModule
],
providers: [
StatusBar,
SplashScreen,
{ provide: RouteReuseStrategy, useClass: IonicRouteStrategy },
],
bootstrap: [AppComponent],
})
export class AppModule {}
Firebase Auth Service Create a service for Firebase social authentication
$ng generate service services/firebaseAuth
Firebase Auth Service Here method firebaseSocialLogin deals with Firebase API and storing the user response into browser local storage.
import { Injectable } from '@angular/core';
import { AngularFireAuth } from '@angular/fire/auth';
import { Router } from '@angular/router';
import { firebase } from '@firebase/app';
import '@firebase/auth';
@Injectable({
providedIn: 'root',
})
export class FirebaseAuthService {
constructor(private angularFireAuth: AngularFireAuth, public router: Router) {}
firebaseSocialLogin(provider) {
this.angularFireAuth.signInWithPopup(provider).then((res: any) => {
localStorage.setItem('user', JSON.stringify(res.user));
this.router.navigate(['']);
});
}
googleLogin() {
const provider = new firebase.auth.GoogleAuthProvider()
return this.firebaseSocialLogin(provider);
}
getUser(){
const userData = localStorage.getItem('user');
return JSON.parse(userData);
}
logout() {
this.angularFireAuth.signOut();
localStorage.setItem('user', null);
localStorage.removeItem('user');
this.router.navigate(['login']);
}
}
Guards Create guards for protecting application routes from accessing directly. auth.guard.ts This guard product the home(tabs) route, only authenticated users can upload images.
import { FirebaseAuthService } from './../services/firebase-auth.service';
import { Injectable } from '@angular/core';
import { CanActivate, Router } from '@angular/router';
@Injectable({
providedIn: 'root'
})
export class AuthGuard implements CanActivate {
constructor(public firebaseAuthService: FirebaseAuthService, public router: Router) {}
canActivate(): boolean {
if (!this.firebaseAuthService.getUser()) {
this.router.navigate(['login']);
return false;
}
return true;
}
}
login.guard.ts Opposite to auth.guard, it validates the user data in local storage.
import { Injectable } from '@angular/core';
import { CanActivate, Router } from '@angular/router';
import { FirebaseAuthService } from '../services/firebase-auth.service';
@Injectable({
providedIn: 'root'
})
export class LoginGuard implements CanActivate {
constructor(public firebaseAuthService: FirebaseAuthService, public router: Router) {}
canActivate(): boolean {
if (this.firebaseAuthService.getUser()) {
this.router.navigate(['']);
return false;
}
return true;
}
}
app-routing.module.ts Connect with guards a new route for login page. Include routing hashing for production deployments useHash:true
import { NgModule } from '@angular/core';
import { PreloadAllModules, RouterModule, Routes } from '@angular/router';
import { AuthGuard } from './guards/auth.guard';
import { LoginGuard } from './guards/login.guard';
const routes: Routes = [
{
path: '',
loadChildren: () =>
import('./tabs/tabs.module').then((m) => m.TabsPageModule),
canActivate: [AuthGuard],
},
{
path: 'login',
loadChildren: () =>
import('./login/login.module').then((m) => m.LoginModule),
canActivate: [LoginGuard],
},
];
@NgModule({
imports: [
RouterModule.forRoot(routes, { useHash: true, preloadingStrategy: PreloadAllModules }),
],
exports: [RouterModule],
})
export class AppRoutingModule {}
login.component.html Connected with Google social login button.
<ion-header [translucent]="true">
<ion-toolbar>
<ion-title>
Firebase Storage
</ion-title>
</ion-toolbar>
</ion-header>
<ion-content>
<ion-card>
<ion-card-header>
<ion-card-title>Welcome to Firebase Storage</ion-card-title>
</ion-card-header>
<ion-card-content>
<ion-button color="primary" expand="block" (click)="firebaseAuthService.googleLogin()">Google Login</ion-button>
</ion-card-content>
</ion-card>
</ion-content>
Child Components Create a components directory under application source(src). Components Generate a components module for lazy loading integration.
$ng generate module components
Photo Upload Component Generate a photo upload component.
$ng generate component components/photoUpload
Photos Preview List Generate a photos list preview component.
$ng generate component components/photosList
components.module.ts Export child components here.
import { IonicModule } from '@ionic/angular';
import { PhotosListComponent } from './photos-list/photos-list.component';
import { NgModule } from '@angular/core';
import { CommonModule } from '@angular/common';
import { PhotoUploadComponent } from './photo-upload/photo-upload.component';
@NgModule({
declarations: [PhotosListComponent, PhotoUploadComponent],
exports: [PhotosListComponent, PhotoUploadComponent],
imports: [CommonModule, IonicModule],
})
export class ComponentsModule {}
tab1.module.ts Import components module for accessing all of the child components .
import { CommonModule } from '@angular/common';
import { NgModule } from '@angular/core';
import { FormsModule } from '@angular/forms';
import { IonicModule } from '@ionic/angular';
import { ComponentsModule } from './../components/components.module';
import { Tab1PageRoutingModule } from './tab1-routing.module';
import { Tab1Page } from './tab1.page';
@NgModule({
imports: [
IonicModule,
CommonModule,
FormsModule,
ComponentsModule,
Tab1PageRoutingModule,
],
declarations: [Tab1Page],
})
export class Tab1PageModule {}
tab1.page.ts On page load calling the getUser and assigning to userProfileData.
import { Component, OnInit } from '@angular/core';
import { FirebaseAuthService } from './../services/firebase-auth.service';
@Component({
selector: 'app-tab1',
templateUrl: 'tab1.page.html',
styleUrls: ['tab1.page.scss'],
})
export class Tab1Page implements OnInit {
userProfileData: any;
constructor(private firebaseAuthService: FirebaseAuthService) {}
ngOnInit() {
this.userProfileData = this.firebaseAuthService.getUser();
}
logoutAction() {
this.firebaseAuthService.logout();
}
}
tab1.page.html Display user data and include app-photo-upload component.
<ion-header [translucent]="true">
<ion-toolbar>
<ion-title>
Photo Upload
</ion-title>
<ion-button color="primary " slot="end" (click)="logoutAction()" >Log out</ion-button>
</ion-toolbar>
</ion-header>
<ion-content [fullscreen]="true">
<ion-header collapse="condense">
<ion-toolbar>
<ion-title size="large">Photo Upload</ion-title>
</ion-toolbar>
</ion-header>
<ion-card>
<ion-card-header>
<ion-card-title>Welcome to </ion-card-title>
</ion-card-header>
<ion-card-content>
<app-photo-upload></app-photo-upload>
</ion-card-content>
</ion-card>
</ion-content>
Firebase Storage Click on storage and setup. Storage default security rules Choose the storage region. Create an uploads folder. Firebase upload service Generate upload service for uploading files.
$ng generate service services/firebaseUpload
firebase-upload.service.ts Here storeImage is a promise method and this will return with Firebase file download URL.
import { Injectable } from '@angular/core';
import { AngularFireStorage } from '@angular/fire/storage';
@Injectable({
providedIn: 'root',
})
export class FirebaseUploadService {
location = 'uploads/';
constructor(private angularFireStorage: AngularFireStorage) {}
/* Image name generator time */
imageName() {
const newTime = Math.floor(Date.now() / 1000);
return Math.floor(Math.random() * 20) + newTime;
}
async storeImage(imageData: any) {
try {
const imageName = this.imageName();
return new Promise((resolve, reject) => {
const pictureRef = this.angularFireStorage.ref(this.location + imageName);
pictureRef
.put(imageData)
.then(function () {
pictureRef.getDownloadURL().subscribe((url: any) => {
resolve(url);
});
})
.catch((error) => {
reject(error);
});
});
} catch (e) {}
}
}
photo-upload.component.ts Image upload component sends the file data to storeImage method.
import { Component, OnInit } from '@angular/core';
import { FirebaseUploadService } from './../../services/firebase-upload.service';
@Component({
selector: 'app-photo-upload',
templateUrl: './photo-upload.component.html',
styleUrls: ['./photo-upload.component.scss'],
})
export class PhotoUploadComponent implements OnInit {
barStatus = false;
imageUploads = [];
constructor(private firebaseUploadService: FirebaseUploadService) {}
ngOnInit() {}
// Upload image action
uploadPhoto(event) {
this.barStatus = true;
this.firebaseUploadService.storeImage(event.target.files[0]).then(
(res: any) => {
if (res) {
console.log(res);
this.imageUploads.unshift(res);
this.barStatus = false;
}
},
(error: any) => {
this.barStatus = false;
}
);
}
}
photo-upload.component.html User input type file for uploading files. You can change the extension if you are working with videos or documents.
<div>
<form method="post" enctype="multipart/form-data">
<div>
<div><b>Upload photo</b></div><br/>
<input type="file" (change)="uploadPhoto($event)" accept=".png,.jpg" multiple="true" />
</div>
</form>
</div>
<div *ngIf="barStatus">
Uploading.....
</div>
<app-photos-list [imageUploads]="imageUploads"></app-photos-list>
photos-list.component.ts Here imageUploads is an input atribute.
import { Component, Input } from '@angular/core';
@Component({
selector: 'app-photos-list',
templateUrl: './photos-list.component.html',
styleUrls: ['./photos-list.component.scss'],
})
export class PhotosListComponent {
@Input() imageUploads: any;
constructor() {}
}
photos-list.component.html Use *ngFor and display.
<div id="photoPreview">
<div *ngFor="let image of imageUploads">
<img loading="lazy" [src]="image" class="preview" />
</div>
</div>
Firebase Storage Security Rules Wathc the video demos for better understanding.
rules_version = '2';
service firebase.storage {
match /b/ionicfirebasestorage-c1d6d.appspot.com/o {
match /uploads/{imageId} {
allow write: if request.auth != null && request.resource.size < 1 * 1024 * 1024
&& request.resource.contentType.matches('image/.*');
}
match /uploads/{imageId} {
allow read: if request.auth != null;
}
}
}
via 9lessons Programming Blog https://ift.tt/3b8Ormh
0 notes
Text
Tailwind versus BEM
Some really refreshing technological comparison writing from Eric Bailey. Like, ya know, everything in life, we don’t have to hate or love everything. Baby bear thinking, I like to say. There are benefits and drawbacks. Every single bullet point here is well-considered and valid. I really like the first in each section, so I’ll quote those as a taste here:
Tailwind Benefit: “The utility CSS approach creates an API-style approach to thinking about CSS, which helps many developers work with it.”
Tailwind Drawback: “You need to learn Tailwind class names in addition to learning CSS property names to figure out the visual styling you want. Tailwind is reliant on, and will be outlived by CSS, so it is more long-term beneficial to focus on CSS’ capabilities directly.”
BEM Benefit: “BEM will allow you to describe any user interface component you can dream up in a flexible, extensible way. As it is an approach to encapsulate the full range of CSS properties, it will allow you to style things Tailwind simply does not have classes for—think highly art directed experiences.”
BEM Drawback: “BEM runs full-tilt into one of the hardest problems in computer science—naming things. You need to not only describe your component, but also all its constituent parts and their states.”
And remember, these certainly aren’t the only two choices on the block. I covered my thoughts on some other approaches here.
Direct Link to Article — Permalink
The post Tailwind versus BEM appeared first on CSS-Tricks.
You can support CSS-Tricks by being an MVP Supporter.
via CSS-Tricks https://ift.tt/2Gc3O0m
0 notes