
milkmadeicecream
Adventures in Ice Cream
MilkMade Ice Cream 2009-2019. Now sharing some old recipes to get you through quarantine.
891 posts
Don't wanna be here? Send us removal request.
Last Seen Blogs

cbaytekinaslan
CB Aytekin ASLAN

jall-stallumbko
Untitled
jall-stallumbko
Untitled

cammieanime
One Psychological Drama After Another

Text
Strawberry Ice Cream
Requests for strawberry have come in the past couple weeks and I’m glad they did because I almost missed strawberry season here in California. My local farm had their last pick this week and I made it just in time.
Before sharing this recipe, I wanted to first test it at home to make sure I had scaled it down properly for a 1 quart yield. I also wanted to make sure this is the strawberry recipe I should share. It’s my original strawberry ice cream recipe I made in 2011 that we used for MilkMade’s Strawberry Shortcake flavor. It’s a Philly style ‘scream, meaning it doesn’t have eggs. I use cream cheese to act as a stabilizer and to help thicken the base. Most strawberry ice creams I’ve tasted are pretty icy. This one is not. BUT, the cream cheese does offer a slight tang. I think it brings out the brightness of the strawberries, but I had to be sure. I tested a few different iterations of eggless vs cream cheese vs custard bases, as well as bases with the strawberries cooked vs uncooked. My original recipe still came out the winner so here it is below.

Ingredients
2 c strawberries*
1 c sugar
1 c cream
0.75 c milk
3 oz cream cheese
Instructions
1. Wash and dry, then hull and cut strawberries into quarters.
2. Cook strawberries and 1/2 c sugar over medium heat, stirring constantly until strawberries begin to get juicy and sugar is dissolved. Cook, stirring constantly, until strawberries soften and begin to break down.
3. Remove ¼ c of berries and store separately in refrigerator (these will be your mix-in). Immersion blend remaining berries, then transfer to a bowl and allow to cool. (If you don’t have a blender, you can just whisk the berries well and push them against the sides of the pot to break them down.)
4. In a separate medium saucepan, heat milk, cream and remaining 1/2 c sugar over medium heat, stirring regularly until sugar is dissolved.
5. Separately, cut cream cheese into quarters and place in a bowl. Add cream mixture to cream cheese and immersion blend to combine. (Without a blender, slowly add the cream mixture to the cream cheese, whisking well to combine.)
6. Add strawberry mixture to cream cheese mixture, whisking to combine. Place bowl over an ice bath and stir until cool. Refrigerate to chill thoroughly (8 hrs or preferably overnight).
7. Whisk the base but do not strain. Freeze the base in your ice cream maker according to manufacturer’s instructions. For your strawberry mix-in, strain out the juice (you can save this for a different use like maybe a strawberry daiquiri) and add strawberries into the ice cream in the last 30 seconds of churning. Reserve a few to add as needed while scooping out the ice cream.
8. Scoop ice cream into a freezer-safe container. Place in freezer to set (about 4 hours).
Notes from Diana:
* I really really REALLY recommend using fresh, local strawberries if you can get your hands on them. The quality of this ice cream will depend on the quality of your berries, and Driscoll’s just won’t yield great results. Also.
* Recipe is 2 cups of strawberries once they are husked and quartered. So that’s about 1.5 pints of whole strawberries.

132 notes
·
View notes
Text
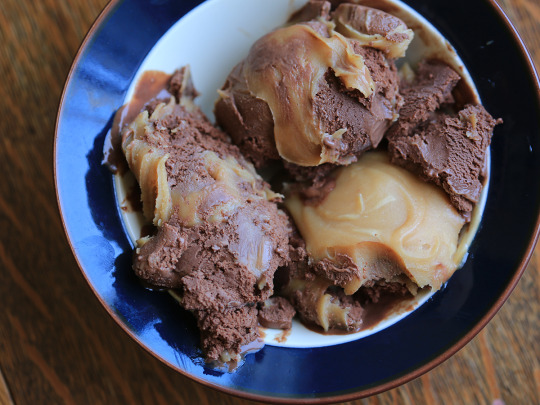
Chocolate Peanut Butter Ice Cream
Chocolate peanut butter is my favorite flavor of ice cream. It’s the flavor I get whenever I buy ice cream in pints or at a scoop shop, and is also the flavor by which I judge other ice cream shops. Oddly, we never had it on our menu and rarely featured it as a Seasonal ‘Scream. Not sure why. But we did offer it to Members one year under the name, Yuanfen.
I discovered the word Yuanfen in a list of words about love that have no real English translation. It’s a Chinese word means a relationship by fate or destiny. A “binding force” that links two persons together in any relationship. It’s beautiful. And of course my first thought when I read it was, “What a great name for an ice cream flavor.” So Yuanfen, chocolate peanut butter, was Flavor #80, delivered to Members in February of 2013.
This is the original recipe for our chocolate ice cream. We later adjusted it to exclude eggs, but I’m sharing this one because I think it’s an easier at-home approach.
I really recommend using high quality dark chocolate and cocoa powder for this - something around 70% cacao. You CAN use anything, but you’ll see a difference in taste and texture with a high quality chocolate bar.
Ingredients
1 c cream
1.5 c milk
0.5 c sugar*
0.25 tsp salt
3 egg yolks
0.5 tsp vanilla extract
4 oz dark chocolate
0.25 c cocoa powder
Instructions
1. In a double boiler, whisk together ½ c of cream and the cocoa powder until combined. Add dark chocolate and cook until chocolate has melted. Set bowl aside to cool to room temperature.
2. In a separate medium saucepan, heat milk, remaining cream, sugar, and salt over medium heat, stirring regularly until sugar is dissolved.
3. Separately, whisk together the egg yolks in a small bowl. Once the cream mixture begins to simmer, gradually pour some (like ¼ cup) of the mixture into the egg yolks, whisking the yolks constantly as you pour. Then scrape the warmed yolks back into the saucepan, whisking constantly.
4. Cook over low heat, stirring constantly and scraping the bottom until the custard thickens enough to coat the spatula or it reaches 160°F.
5. Pour the custard through a strainer into the bowl of melted chocolate. Pour about ¼ c at a time to temper the chocolate, whisking thoroughly until incorporated. Place the bowl over an ice bath and stir until cool. Add vanilla extract, stirring to combine. Refrigerate to chill thoroughly (8 hrs or preferably overnight).
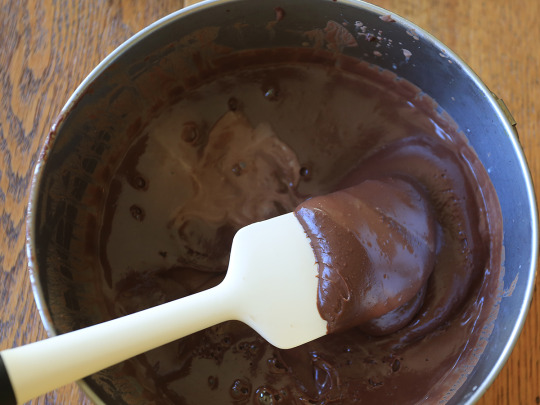
6. Whisk but don’t strain this one. It should be a very thick pudding like in the photo below. Freeze the base in your ice cream maker according to manufacturer’s instructions.
7. Scoop ice cream into a freezer-safe container, (OPTIONAL) adding layers of peanut butter sauce. Place in freezer to set (about 4 hours).
Mix-in: Peanut Butter Swirl
Ingredients
0.5 cup cream
0.5 cup sugar
0.25 tsp salt
0.25 cup peanut butter (creamy, not natural)
Instructions
1. Cook cream sugar, and salt over medium heat stirring constantly until sugar and salt are dissolved, almost to a boil.
2. Remove from heat and gradually pour cream mixture into peanut butter, whisking to combine.
3. Cool completely in refrigerator.
4. Sauce should be at room temperature to add as a mix-in to churned ice cream.
Notes from Diana:
* Again, you want to use high quality chocolate and high quality cocoa powder for this recipe. I recommend a ~70% chocolate bar - break it into pieces before you melt it down. Also, if you want to experiment with single origin bars, this recipe will really allow the different flavor profiles of the chocolate shine. It’s really amazing that the taste will differ just based on the origin of the cacao beans. (I don’t recommend using flavored chocolate bars though.)
* Regarding the * by sugar, I ended up using 0.75 c sugar in the recipe I made at home. That’s because I could only find a cocoa powder that was 100% unsweetened cocoa. It resulted in a rather bitter tasting base, so I wanted to mask that with a little more sugar. Again, just like I said with the fruity flavors, variability in ingredients requires that you to make small adjustments as you go.
* For the peanut butter swirl, be sure to use creamy, not natural peanut butter. The natural stuff just doesn’t work for a good swirl. Sadly. I used Skippy for mine.
* This is a gooey peanut butter swirl, but you can also make this with a peanut butter ripple (those hard pieces that melt in your mouth). If you’re interested, ask me for that recipe.
61 notes
·
View notes
Text
Key Lime Pie Ice Cream
I knew I was doing my job right at MilkMade when I could make a recipe for a flavor of ice cream that I didn’t like, but I still knew it was good. That’s what Key Lime Pie was for me. Though not MY favorite flavor, it definitely was one of yours. It’s one of the most lauded Seasonal ‘Screams we had and the second most requested recipe.
The secret to our key lime pie ice cream is simple: Steve’s Authentic Key Lime Pies. If you know, you know. Steve’s is a Brooklyn-based producer of truly authentic key lime pies. Steve and his wife Victoria run a small operation at the very end of Van Dyke street, right on the water in Red Hook, Brooklyn. In front of their bakery they have a small (smaller than MilkMade small) take-out counter where you’re transported to the Florida Keys the moment you walk through the door. The decor is as authentic as their pies, which they make using only fresh squeezed key limes they source from Mexico (where most key limes are grown now, but Steve is trying to put some key limes back in the Keys). Since 2011, when I first released this flavor for Members, we’ve partnered with Steve’s to source not only their amazing pies, but also their fresh squeezed juice. They made it easy for us.
Steve’s is open for takeout and soon will resume it’s online shipping across the US. Because I’ve just relocated to California to be near family, I couldn't get my hands on a pie so I made this flavor without the mix-in (but the recipe for Steve’s Key Lime Pie is included below).
Definitely use key limes if you can get your hands on them - they are less acidic, a bit sweeter, and more aromatic than regular limes. And DEFINITELY juice your own limes either way (as annoying as it is with the tiny key limes!). As Steve says, “no bottled mystery juice.” Here we go:

Ingredients:
2 c cream
1 c milk
1 c sugar
4 egg yolks
⅛ tsp salt
¼ c lime juice
2 tsp lime zest
Instructions:
1. Cook ¼ c of the sugar, the lime juice and zest over medium heat. Bring to a boil, stirring until sugar has dissolved. Transfer to a bowl and allow to cool.
2. In a separate medium saucepan, heat milk, cream, remaining sugar (¾ c), and salt over medium heat, stirring regularly until sugar is dissolved.
3. Separately, whisk together the egg yolks in a small bowl. Once the cream mixture begins to simmer, gradually pour some (like ¼ cup) of the mixture into the egg yolks, whisking the yolks constantly as you pour. Then scrape the warmed yolks back into the saucepan, whisking constantly.
4. Cook over low heat, stirring constantly and scraping the bottom until the custard thickens enough to coat the spatula or it reaches 160°F.
5. Pour the custard through a strainer into the bowl of lime simple syrup. Pour a little at a time and whisk thoroughly until incorporated. Place bowl over an ice bath and stir until cool. Refrigerate to chill thoroughly (8 hrs or preferably overnight).
6. Whisk then strain the custard to remove lime zest. Push the zest with your spatula to remove any excess liquid. Freeze the base in your ice cream maker according to manufacturer’s instructions.
7. Scoop ice cream into a freezer-safe container, adding chunks of frozen key lime pie (about 5 pieces per pint). Place in freezer to set (about 4 hours).
Mix-in: Steve’s Authentic Key Lime Pie
Courtesy of Steve Tarpin via Food Network
Ingredients:
Crust:
8 oz graham crackers, crushed
4 oz butter, melted
Filling:
1 c canned sweetened condensed milk, chilled
4 egg yolks*, cold
½ c key lime juice, cold
Instructions:
1. Preheat oven to 325 degrees F.
2. To make the crust, combine the ingredients in a bowl and mix well for 2 minutes. Mold the mixture into a greased, 10-inch pie shell and bake for 8 minutes or until golden brown. Remove the crust from the oven and allow to cool.
3. To make the filling, combine the milk and the egg yolks and mix well. Slowly add the key lime juice and mix just until incorporated. Do not overmix or the pie will not set-up in the refrigerator. Pour the mix into the pre-baked pie shell and refrigerate until set.
4. For the ice cream mix-in, place pie in freezer for at least an hour until hardened. Remove from freezer and cut into 1” cubes. Place in freezer until ready to mix-into ice cream.
*Consumption of raw or undercooked eggs, shellfish and meat may increase the risk of foodborne illness.
Some notes (and pics) from Diana:
* With my very old school juicer, it took about 15 key limes to yield 1/4c of juice (I ended up hand-squeezing them, check out this juicer). It took just shy of 3 key limes to yield 2 tsp of zest.

* To zest your key limes, you’ll want to use a very fine grater - a microplane is perfect. Make sure you do not zest too hard to get to the rind. You want just the lime skin, the green part. Example of the right (left) and wrong (right) way is below.

* Making ice cream with fruit can be difficult because there is so much variability with every piece of fruit. When I made this recipe at home, I tasted the base after combining the lime simple syrup with the custard. It didn’t taste quite there (and I knew it wouldn’t get there - I’ve tasted lots of key lime bases!). So I ended up adding whatever zest I had left from my three zested key limes (an additional ~1/2 tsp whisked right into the base). It worked out great though was very close to being too bitter (because of too much zest). With fruity flavors, I recommend tasting as you go and adjusting your recipe based on taste. Keep in mind the base should always taste a little too sweet and a little too strong in flavor. Once frozen, the sweetness and the flavor will not be as strong.
64 notes
·
View notes
Text
Salted Caramel Ice Cream
I think Salted Caramel is the most magical of ice creams to make. The way the sugar liquefies, turns deeper and deeper amber, smokes and bubbles up, and then strickens into hard candy shoestrings when greeted with heavy cream... it's witchcraft really.
Salted Caramel was our 6th flavor ever created for Members back in February of 2010. Back then, Salted Caramel blew people's minds. When we delivered our pints that month, we received immediate texts and emails of minds blown. I screenshotted a bunch and still have them filed away. Here's one:

The glory! Now, however, Salted Caramel is so ubiquitous, it’s regarded as the new vanilla. I personally agree, but not in the way you think. As I'll get into in a later post, vanilla is anything but plain. Anyway, here’s the recipe for MilkMade’s Amagansett Sea Salted Caramel. I will also share some photos and videos on Instagram of me making it at home this week.

Ingredients
1 c milk
1.5 c cream
1 c sugar
1 tsp sea salt
½ tsp vanilla
4 egg yolks
Instructions
1. Cook 1/2 of the sugar in a saucepan over medium heat, swirling the pan occasionally. When sugar begins to clump, scrape the sides of the saucepan with a heatproof spatula. When sugar becomes evenly dark amber (I like it *very* dark), add remaining 1/2 of sugar, folding the caramel sides into the sugar with a heatproof spatula. When sugar becomes dark amber again, remove from heat and carefully add cream. Magic ensues.
2. Return to heat, add milk, and stir over medium heat to let hardened caramelized sugar pieces dissolve and become evenly incorporated.
3. Separately, whisk together the egg yolks in a small bowl. Once the caramel mixture begins to simmer, gradually pour some (like ¼ cup) of the mixture into the egg yolks, whisking the yolks constantly as you pour. Then scrape the warmed yolks back into the saucepan, whisking constantly.
4. Add salt and cook over low heat, stirring constantly and scraping the bottom until the custard thickens enough to coat the spatula or it reaches 160°F.
5. Pour the custard through a strainer into a bowl over an ice bath and stir until cool. Add vanilla. Refrigerate to chill thoroughly (8 hrs or preferably overnight).
6. Whisk then strain the base. Freeze the base in your ice cream maker according to manufacturer’s instructions.
7. Scoop ice cream into a freezer-safe container. Place in freezer to set (about 4 hours).
A few notes from Diana:
a. You get to decide how dark or light you like your salted caramel to be. If you prefer a light caramel taste (a la Wurther’s candy), cook the sugar to a medium amber color. If you like a robust taste, cook the sugar to a dark amber color. Note that the taste of the caramel will be far lighter than you think it will once you add in the dairy.
b. The reason I do my sugar in two stages is to achieve a more complex taste. I really burn the hell out of the first sugar, and just when it’s about to go into no man’s land, I add the second portion of sugar. Then I cook the whole thing together to a lighter brownish amber color. I think this gives a more layered taste experience - like a mix of robust burnt caramel and a lighter sweeter caramel. You can easily omit this step and just cook all the sugar at once if you prefer.
c. Caramel can be tricky the first time you make it. Or the 100th time. I have burnt many, many batches over the years, and it’s usually because I wasn’t paying close enough attention. I recommend paying close attention to the cooking process.
d. Finally - be careful! Sugar melts at 320°F so your caramel will be very, very hot. It may sputter up when you pour the cream in, so please do so very carefully.
50 notes
·
View notes
Text
Peanut Butter Ice Cream
Peanut butter was the very first flavor of ice cream I made. MilkMade was not even a figment of my imagination at the time, back in the summer of 2009 when I made bought that Cuisinart home machine I mentioned and made it in the tiny kitchenette of my East Village apartment. I just wanted better ice cream than what I was finding in my local bodega’s freezer and since that didn’t exist elsewhere, I decided to make it myself.
My first batch was terrible to be honest. It was slimy and filmy and somehow still icy. But I still found it to be magic. I’d cooked and baked plenty before this time, but making ice cream was just magic for me.
Since that day I worked hard to create a peanut butter ice cream recipe I could be proud of for MilkMade. Judging by the requests for the recipe, I may have succeeded with our Fingerlakes PBnJ flavor. Here’s the recipe:

Ingredients
2 c milk
1 c cream
1 c sugar
¾ tsp salt
⅔ c peanut butter (natural, smooth)
3 egg yolks
Instructions
1. In a medium saucepan, heat milk, cream, sugar, and salt over medium heat, stirring regularly until sugar is dissolved.
2. Separately, whisk together the egg yolks in a small bowl. Once the cream mixture begins to simmer, gradually pour about 1/4 c of the mixture into the egg yolks, whisking the yolks constantly as you pour. Then scrape the warmed yolks back into the saucepan, whisking constantly.
3. Cook over low heat, stirring constantly and scraping the bottom until the custard thickens enough to coat the spatula or it reaches 160°F.
4. Pour the custard through a strainer into a bowl of the peanut butter. Pour a little at a time and whisk thoroughly until incorporated.
5. Place bowl over an ice bath and stir until cool. Refrigerate to chill thoroughly (8 hrs or preferably overnight).
6. Whisk then strain the custard to remove tiny peanut bits. Strain twice if needed, depends on the peanut butter you use.. Freeze the base in your ice cream maker according to manufacturer’s instructions. (Or do the freeze and stir method like I’m doing without a machine.)
7. Scoop ice cream into a freezer-safe container, (OPTIONAL) adding layers of completely cooled fruit swirl. Place in freezer to set (about 4 hours).
Mix-In: Fruit Swirl
This one is delicious as is so you can leave it sans mix-ins if you’d like. Or you can add chocolate chips or a chocolate swirl for that yuanfen combo. For true peanut butter jelly time, like we had at MM, the recipe is below. You can use any fruit you’d like and the recipe should translate well enough. It can be fresh or frozen. You could also just skip it all and open up a jar of jam and use that. Anything goes these days!
Ingredients
2 c fruit
1 c sugar
1 Tbsp cornstarch
Instructions
1. Toss all ingredients together and macerate overnight.
2. Next day, re-toss the mixture and strain through a sieve to extract the juice. (You can save this to use in something else, like a cocktail mixer?)
3. Place fruit in a deep baking dish and bake at 300F, tossing every 15 min until it is bubbly and thick, about 1 hour.
4. Cool at room temperature for about an hour, then chill in refrigerator until chilled (about 4 hours).
5. To layer in ice cream, scoop about 2” of ice cream into a freezer-safe container, then top with a spoonful of fruit sauce. Repeat. Do not stir! Store in freezer to set (about 4 hours).
Some notes from Diana
* For best results, use a natural creamy unsalted peanut butter. Stuff like regular Jiff or Skippy will turn out greasy. This recipe was perfected for Saratoga Peanut Butter’s Plain Jane peanut butter. I found that the results different with every different type/brand of peanut butter that I tested.
* I like this one salty, but you may prefer to change the salt to 1/4 tsp for just a non-salted peanut butter taste. It kind of depends on the peanut butter you use, so taste the base once the peanut butter has been incorporated. If you want to add more, throw about 1/2 c of the base back in the pot with the additional salt and heat on low, stirring regularly until dissolved - that’s an easy hack to adjust ratios or fix mistakes.
* Any fruit will do. At MilkMade, we liked to use whatever was in season, whatever we could get that week at the Greenmarket. You can use fresh fruit or frozen. I WAS going to use some random frozen blueberries I have and omit cornstarch since I don’t have any at home - but I totally gave up and opened a jar of blackberry jam :)
34 notes
·
View notes
Text
Making Ice Cream without a Machine
I am quarantining sans ice cream machine right now so had to make our Cobbler Hill flavor with the old stir and freeze method. Here’s how it’s done. Photos below include timestamp so you can see my process.
Instructions
1. Prepare ice cream base (here’s the Cobbler Hill recipe), then refrigerate to chill thoroughly (8 hours of preferably overnight).
2. Whisk then strain the base to remove any clumps of cinnamon.
3. Place base in a deep baking dish or stainless steel bowl and place in the freezer. (You want something with more surface area. I didn’t have a baking dish with me, so used this stainless steel bowl which worked just fine.)
4. After about an hour, pull the bowl out of the freezer and stir vigorously. The base will start to freeze near the edges, and you want to stir those frozen sections in with the rest of the base to break them up. Really break them up. You can use a spatula, a whisk, or even a hand mixer or stick blender. Return to freezer immediately.
5. Continue to pull and stir, then return to freezer every 30 minutes. Once the base is frozen and can hold its form when scooped, it is ready. It usually takes about 3 hours, but you’ll see below that mine took 6 hours (I was distracted with my kid).
6. Add apple cobbler mix-in layer by layer, and place in a freezer-safe container. Place in freezer to set (about 4 hours)

ᐧ7:22am the liquid custard base that has cooled for 8 hrs in the fridge. place in freezer

8:24 some frozen parts just on the sides, scrape them off and vigorously mix into the rest of the base

8:57, more frozen parts mostly on the side, whisk them into the rest of the base

9:40 getting a little fluffier

10:22 even more frozen thick pieces on the side

11:03 thick with lots of small ice crystals forming

11:48 almost soft serve consistency, starting to stick to form

12:54 nearly done, but still a little soft and loose

1:48 thick, frozen, and able to hold a form. ready for mixins.

1:49 I like to layer the mixins for something chunky like this. One 2″ layer of ice cream, then a spoonful of cobbler, then another layer of ice cream, then cobbler, repeat.
73 notes
·
View notes
Text
Cinnamon Sugar Ice Cream (aka Cobbler Hill)
I’m back with my second quarantine recipe. By request, it’s the recipe for Cobbler Hill, probably the most popular flavor we served at our shop. It’s a simple ingredient list and a pretty easy mix-in. I had apples at home so decided to share our apple cobbler recipe, but you can use any fruit you’d like.

Ingredients
1 c milk
2 c cream
0.75 c dark brown sugar
⅛ tsp salt
2 tsp cinnamon
3 egg yolks
Instructions
1. In a medium saucepan, heat 1 cup of the cream, sugar, and salt over medium heat, stirring regularly until sugar is dissolved.
2. Whisk in cinnamon. Cook to a rolling boil, then add remaining milk and cream.
3. Separately, whisk together the egg yolks in a small bowl. Once the cream mixture begins to simmer again, gradually pour some (like ¼ cup) of the mixture into the egg yolks, whisking the yolks constantly as you pour. Then scrape the warmed yolks back into the saucepan, whisking constantly.
4. Cook over low heat, stirring constantly and scraping the bottom until the custard thickens enough to coat the spatula or it reaches 160°F.
5. Pour the custard into the bowl over an ice bath and stir until cool (don’t strain yet). Refrigerate to chill thoroughly (8 hrs or preferably overnight).
6. Whisk then strain the custard to remove any cinnamon clumps. Freeze the custard in your ice cream maker according to manufacturer’s instructions.
7. Scoop ice cream into a freezer-safe container, (OPTIONAL) adding layers of completely cooled fruit cobbler. Place in freezer to set (about 4 hours).
Mix-In: Fruit Cobbler
If you’re eating this at home (and you are right now), I recommend simply serving the ice cream over your fruit cobbler, rather than adding the cobbler as a mix-in. You can use any fruit and any cobbler/crisp/buckle recipe you’d like. Or pair it with another dessert like pie, cake, cookies - it really will go with anything. ( I recommend a snickerdoodle for a home version of Snick or Treat.) Freezing pieces of fruit in an ice cream is really hard because the water content varies with literally every piece of fruit. So without the proper tools to measure how much sugar should be added, it’s hard to get the fruit/cobbler to freeze well. That being said - here’s a nice recipe for cobbler which works nicely as a mix-in. I scaled it down for very small home batch. The streusel is going to appear a little sandier than your normal cobbler recipe, but don’t fret.
Ingredients
4 Tbsp butter (cool but not cold, unsalted, cut into cubes)
½ c flour
½ c light brown sugar
⅛ c sugar
½ tsp Cinnamon
⅛ tsp Salt
3 apples
½ c sugar
1 tsp cinnamon
Instructions
1. Peel, core, and dice apples. Mix apples with sugar and cinnamon. Pour into a buttered medium baking dish.
2. For the streusel topping, mix the flour, brown sugar, sugar, cinnamon and salt in a mixer with a whisk attachment until combined.
3. With the mixer on medium, add butter cubes a few at a time. Mix until the mixture looks sandy and some small chunks have formed.
4. Scatter the streusel evenly over apples and bake for 1 hour at 350°F.
5a. To serve a la mode, serve warm with ice cream that has set in freezer for at least 4 hours.
5b. To add as a mix-in, allow cobbler to completely cool. While transferring ice cream to a freezer-safe container, layer in chunks of cobbler. You can just scoop spoonfuls of cobbler and spread it in the container as a thin layer, then add more ice cream (about 2” worth), then more cobbler, repeat. Place in freezer to set (about 4 hours).
68 notes
·
View notes
Text
What’s the best at home ice cream maker?
I get this question a lot so I’ll share my answer here.
My favorite compact home ice cream machine is the Cuisinart ICE-30BC 2 Quart machine. This is the first machine I ever used, and I still have it for testing recipes at home. It’s in the lower price bracket (actually, it used to be around $50, but now I see lowest price at $74 at Walmart & Amazon), and reliably produces great home-quality ice creams. Do I consider it my best friend? This old photo indicates yes.

I’ve used a variety of home ice cream machines, though, including a gelato maker my parents received as a wedding gift 45 years ago, and most will get the job done.
The only annoyance of this model is the freezer bowl situation. It MUST be totally frozen before you make each batch. Their manual says it takes between 6 and 22 hours to freeze... quite a range. I found about 8 hours is sufficient. And the freezer bowl situation also means you can only make one ~1qt batch at a time. Then you have to refreeze it for another 8 hours. Most inexpensive home machines have this same freezer bowl feature.
If you’re looking for something a bit more complex, a bit more expensive, and for a continuous churn (many batches of ice cream in a row), the Cuisinart ICE-100 ($300) or the Breville Smart Scoop BCI600 ($500). I have a discontinued Cuisinart model similar to the ICE-100 (this one), so I imagine the updated model is very similar. Mine is a workhorse! I also have that Breville, which I think I like better. I keep this one at my parent’s house so I can make ice cream for family gatherings in California. It has a lot of features that I don’t really use like setting the “hardness” (soft serve, sorbet, frozen yogurt, gelato or ice cream) and it beeps to tell you when to add mix-ins. Both of these machines are great for the more ambitious home ice cream maker.
I also indicated that you can make ice cream WITHOUT AN ICE CREAM MAKER. It’s true. I mean, it will definitely not be as good. But desperate times, man. I happen to be quarantining without an ice cream machine right now, so in my next post I will attempt to show you how to make ice cream sans machine.
19 notes
·
View notes
Text
Basil Chip Ice Cream
Been a while on Tumblr but I decided to rev our page back up to share some ice cream recipes during this time of isolation. I closed MilkMade last November after ten years in business. It was a difficult decision and we had a bittersweet closing weekend. But, man, I am especially glad I chose to do it then.
I do regret that we can’t deliver our ice cream during this time, though. So I encourage those who can to try to make ice cream at home. Everyone’s bragging about their sourdough starter, but ice cream is just as magical and gratifying. More so, if you ask me. I’ve decided to share some of our recipes to help you get started. Eventually I’ll put them all together in cookbook of sorts, but for now: Basil Chip Ice Cream.
This recipe calls for fresh basil, so I hope you can find some at your grocery store. I haven’t been able to get any all month. You can use any kind, but the original recipe is for Genovese Basil. And for the mix-in, it’s your choice of chocolate chips or a stracciatella, which are like mini melt-in-your-mouth chocolate specs. Ideally you’ll use a high quality dark chocolate for either, but honestly anything will do these days. Here’s the step by step. Questions are welcome. Ask me anything. Probably easier on twitter @dihard .

Ingredients
1 cup milk
2 cup cream
0.5 cup sugar
1/8 tsp salt
1 cup basil (de-stemmed)
3 egg yolks
2 oz chocolate chips
1 Tbsp coconut oil (for stracciatella mix-in, optional)
Instructions
1. First set up an ice bath. Fill a large bowl with ice and water, then place a medium sized bowl on top. Set aside.
2. In a medium saucepan, heat milk, cream, sugar, salt, and basil leaves over medium heat, stirring regularly. Do not allow the basil to wilt or turn black. (Okay, it will slightly wilt, but don’t let it do more than that.)

3. Once the mixture begins to simmer, remove from heat, cover, and set aside for 30 minutes for the basil to steep. Then strain out basil leaves (but keep them for later) and return cream mixture to medium heat.
4. Separately, whisk together the egg yolks in a small bowl. Once the cream mixture begins to simmer, gradually pour some of the mixture into the egg yolks, whisking the yolks constantly as you pour. Then scrape the warmed yolks back into the saucepan..
5. Cook over low heat, stirring constantly and scraping the bottom until the custard thickens enough to coat the spatula.
6. Strain the custard into the bowl over the ice bath. Add the basil leaves back in and stir until cool. Refrigerate to chill thoroughly (8 hrs or preferably overnight).
7. Whisk then strain the custard to remove the basil leaves. Freeze the custard in your ice cream maker according to manufacturer’s instructions.
Mix-ins
For chipped chocolate (an easy mix-in):
1. Before spinning the ice cream, chop your chocolate into mini pieces, smaller than chocolate chips. I prefer to use a knife to chip, or almost shave, a premium dark chocolate bar.
2. Once the ice cream has set in the ice cream maker, just before you stop the machine, add chipped chocolate to the ice cream, reserving a handful to add later. Allow the machine to mix the chips in for about 30 seconds.
3. Scoop ice cream into a freezer-safe container, adding additional chocolate chips when needed.
For a stracciatella magic shell situation (slightly more work but far more magical):
1. About 30 min before spinning the ice cream, heat the chocolate over a double boiler. (You can also flash heat this in a microwave, doing a few 10 second bursts while stirring well in between, but I always seem to burn the chocolate when I try this.) Once chocolate has melted, remove from heat and add coconut oil, stirring until fully melted. Transfer chocolate into a small zipclock bag and set aside to cool (to about 70 degrees).
2. Once the ice cream has set in the ice cream maker, just before you stop the machine, cut a small hole in the corner of the chocolate bag and drizzle the chocolate sauce onto the ice cream as it spins, reserving about 1/4 of the sauce to add later. The chocolate should harden immediately and chips will spread throughout the ice cream.
3. Scoop ice cream into a freezer-safe container, adding additional layers of chocolate sauce when needed.
*Note: I’ve shared this recipe before with 1.5c milk and 1.5c cream and 4 eggs, but adjusted it to be a little creamier.
99 notes
·
View notes
Photo

Summer Survival
It’s the final days of summer. And for once, we’re preparing for summer’s end. As an ice cream company, our summers are typically endless (cue The Sandals “Theme from Endless Summer”). This year however, we’re closing shop for the season.
It was another great summer of scoops and Grady’s Affogatos and Konery cones and, of course, our famous Tasting Flights.
But this summer was different. We had a stroke of bad luck. Literally. I had a stroke. (Yes, strokes can happen to young people too.)
It was my second stroke in three years, and because I am a 33 year old healthy lady, it has required an immediate and intense investigation to figure out the cause. It’s like I am a detective in my own murder mystery - everyone is a suspect and I am eliminating them test by test, MRI by MRI, with a team of doctors I’ve brought onto the case. (More about my stroke, more about stroke symptoms!)
As a result, I’ve become the CEO of my health, and have had to push my role of CEO of MilkMade to nights and weekends. We halted our Membership service in Spring and, while the shop has remained open, on some days we’ve been short staffed or low in ice cream.
But - in a hope not to speak too soon, a few days shy of Labor Day - we totally survived.
Our Scoopistas Mary, Morgan, Julia, Emma, Shannon, Caitlyn, and Amy (who joined us all the way from Ireland this summer) have held down the fort with style. Nova, our intern, stepped up to keep up our social engagement. And yall - our Members, our shop neighbors, our friends - have given us grace, understanding, and continued support like you have for years.
So we’re closing up shop for the season. We WILL be back, and better than ever as you know. But you’ll have to stay tuned for announcements about our Membership relaunch and our Tasting Room reopening.
Until then, come party with us and let’s blow this popsicle stand in style. Saturday, September 10 from 5-10pm. Come in for a scoop and we’ll pair it with a craft brew from our neighbors down the road at Other Half Brewing Co.
<00,
Diana + the Milkmaids
A few photos from the summer. More @milkmade.
38 notes
·
View notes

Photo

Um hi. Been a while.
At the end of the year (2015), we decided to break from the social game and focus on the business game. It was intended to be a couple week break over the holidays. But it felt just so good, and then better, and henceforth even better. Too good. To just ghost and ghost free. And just work and work free and not tell you what we’re up to every day.
But you asked and called and even texted our personal lines to say hey what’s up. So here is what’s up. March Flavors of the Month. We’re in production this week and flavors go out starting Monday.
#149 Sugar Fever
maple ice cream with maple chunks and a maple swirl
#150 Hamantashen
lemon poppy seed ice cream with hamantaschen cookies
67 notes
·
View notes
Photo

December’s Membership Flavors are in the making. We are decking them halls for real this year with our two flavors of the month:
flavor #143: Partridge in a Pear Tree
burnt honey ice cream with poached pear and ginger spice
flavor #144: Gløgg
mulled wine ice cream with brandied raisins
40 notes
·
View notes
Photo

Well, that was a summer.
As the temps dip and trees grow barren, we reflect on our first summer at the Tasting Room.
It all started in March, when we officially took over the lease at the old Hay Rosie ice cream shop in Brooklyn. We originally thought it would solely be our factory for producing pints for the Membership Subscription, but people kept knocking on the door looking for ice cream. Our neighbors were pretty insistent upon us offering scoops (really, we got some threatening letters) that we decided to open our first shop - our Brooklyn Tasting Room.
We transformed the front of the factory into our parlor. I really wanted it to feel like home -- cupboards for storage, houseplants courtesy of our friends at The Sill, copious MilkMade collector’s magnets on the door. With the finishing touch, Pavla and I painted the interior ourselves. Pink trim, of course.
We launched with a gathering of our dearest friends and Members at the end of May. And boom! Thereafter, Lauren, our production manager, and I have been racing to keep up.
Our scoopistas, Candice, Mary, Michelle, Bryce, and Hannah, are what fueled this place. We received so many comments about their awesome service this summer. Our interns, Nova and Nora, subbed in from time to time (intern takeover!!), and, along with Pavla, kept on our social media game, keeping our community up to date on our adventures. For all of these ladies, I am grateful.
The overwhelming favorite flavor at the shop was our Rock Rock Rockaway Road, followed by our Cobbler Hill, and our Strawberry Shortcake. Or maybe it was Basil Chip. We rotated through over 50 flavors this summer, it’s hard to keep up! Though people do call in daily to make sure we haven’t run out of Rockaway Road.
My favorite offering is our Tasting Flights. With custom mini-cones from The Konery, you choose five mini scoops to try. I’ve always taken inspiration from microbreweries when developing MilkMade. And this is an ode to my hometown favorite, The Bruery. With custom wooden flight holders made by my friend Will. Below is our Halloween Flight.
We subsisted on ice cream lunches and Grady’s Cold Brew, which we have on tap at the Tasting Room. That’s right, Grady’s Cold Brew coffee on tap. Thanks to Joyride Coffee. And more recently, our Cookie and Cream - piping hot-outta-the-oven fresh baked cookies with a scoop of ‘scream on top.
It certainly was a summer. And another great chapter in our Adventures in Ice Cream. Oh! And we got some awards. Village Voice named us the Best New Ice Cream Shop for 2015. Business Insider named us one of NYC’s Coolest New Businesses (cool, we hope. not just because we make ice cream). We even made it to New York Magazine’s Approval Matrix - brilliant/low-brow. We’ll take it!
The Tasting Room remains open through the winter - with full ice cream service on the weekends, and pints for sale along with coffee service by our neighbors King’s Coffee on weekdays.
MilkMade Tasting Room is located at 204 Sackett Street, Brooklyn, NY 11231.
Winter/Holiday Hours are as follows:
Monday - Friday: 7am-3pm (full coffee service. pint sales only)
Saturday & Sunday: 8am-9pm (full coffee service & full ice cream service)
Closed Thanksgiving & TG weekend. Closed Christmas Eve & Christmas Day. Closed New Year’s Eve & New Year’s Day.
108 notes
·
View notes
Photo

The making of Flavor of the Month # 142, Leftovers
cranberry ice cream with candied cashews, bourbon-sweet potato pie, and a marshmallow swirl
Step 1: Those real, good for you, cranberries. We called up our friends at Cape Cod Select and asked them to send us a box of their freshest crans. The next day, these bbs showed up.

Step 2: We cook the cranberries down until they POP. Of course, we add a little sugar until it’s this shockingly sweet cranberry puree.

Step 3: We turn that cranberry puree into cranberry ice cream base by adding our milk, cream, eggs, sugar and running it through our pasteurizer. It’s so pink! And then, once cooled, throw it into our ‘scream machine to churn it up into ice cream.
Step 4: Meanwhile, we make our mix-ins. House-made marshmallow (sans gelatin), bourbon-sweet potato pies, and sweet candied cashews.

Step 5: Add the mix-ins to the freshly churned ‘scream and pack those pints

130 notes
·
View notes
Photo

Spotlight on November’s Flavor of the Month #142, Leftovers
cranberry ice cream with candied cashews, bourbon-sweet potato pie, and a marshmallow swirl
We promise you won't get sick of these Leftovers. This is the ultimate Thanksgiving pint. Cranberry ice cream with candied cashews, bourbon-sweet potato pie, and a marshmallow swirl. It's a wild mashup of all the dishes that inevitabily fill your fridge for days after Thanksgiving. Except the turkey; we left that one out.
THREE THINGS about Leftovers:
Potato pancakes. Cranberry and stuffing stacked grilled cheeses. Turkey sandos for days. Pumpkin pie at every meal! But never an ice cream. Until now.
Our crans come from Cape Cod Select, a 70+ year old family farm in the heart of "Cranberry Country", Southeastern Mass. Best cranberries you can get your hands on. Truly, they are beaaautiful.
Did you know - we make our own mallow sauce? It’s the freshest fluff you’ll ever have. AND it’s vegetarian. No gelatin! Take that!
This pint is best enjoyed following a turkey sandwich, accompanied by a piece of pumpkin pie, and with your leftover apple cider.
57 notes
·
View notes
Photo

The making of Flavor of the Month # 141, Cobbler Hill
cinnamon sugar ice cream with pumpkin cobbler
Step 1: First we make a cinnamon sugar spiced base. With plenty of sugar and spice.
Step 2: Then we prep the pumpkin cobbler. Fresh sugar pumpkins that we scooped out one by one and baked. Plus that oaty crumbly cobbler topping.

Step 3: Churn the ‘scream and add the cobbler right on top.

Step 4: Pack those pints (and milkmade minis!). We pack each pint by hand, ensuring each has the right proportion of cobbler : scream.

199 notes
·
View notes