
Don't wanna be here? Send us removal request.
Statistics
We looked inside some of the posts by mjmotors and here's what we found interesting.
Average Info
Notes Per Post
61
Likes Per Post
41
Reblog Per Post
20
Reply Per Post
0
Time Between Posts
2 months
Number of Posts By Type
Photo
17
Last Seen Tumblr Blogs


Fun Fact
Premium Tumblr themes are available from anywhere between $9 to $49.
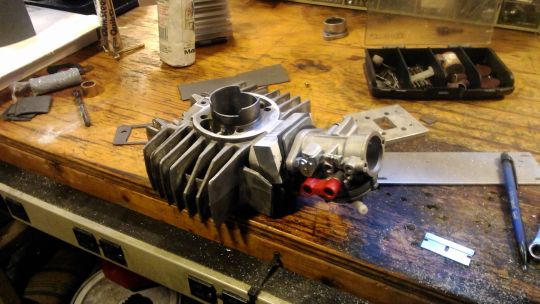
Photo


Just got this rare Franco Morini Metrakit from Spain for a friend’s AV7 build.
Cylinder: Big exhaust port, bridged transfers, interesting intake and boost arrangement, Boyesen ports, and cast iron liner with over molded aluminum. Huge fins, huge reeds, huge piston, and the transfer tunnels look like a Much cleaner puch hero kit with higher timings.
Piston: Fairly plain, 47mm two ring, 12mm wrist pin piston.
Reeds: Big rubber coated fiberglass 4 petal gilardoni reeds. VERY nice, Metrakit brand. Intake casting is like, 90% clean, could totally be used as is with a PHBG.
Cylinder head: Absolutely beautiful, but Very broad, shallow squish with a sharp edge and a Deep combustion chamber.
Somebody petition Airsal to make a slightly altered version of this kit for Motobecanes? I’m going to be doing most of the R&D anyways, and I’ll gladly share just so these kits are available again.
Because they could charge $250 for the cylinder/head combo if they included an engine mount. That’s the bugaboo here, but I think some coupling nuts and cleverness will help. Need to figure out a better vibration isolation system too, the stock mounts tend to tear out in a year or so, and poly bushings break engine mount bolts.
3 notes
·
View notes


Photo


Completely custom motobecane 50V.
X-1 engine built up from cut down Tomos A55 cases, Hero Puch cylinder, Gorgon cylinder head, and GY6 variator. Aluminum welding, and cylinder machining were the only operations outsourced to professionals.
Custom leather seat and tank graphics by Karen Macfarlane, Paint accents and marauder trim inspired by George Miller.
2 notes
·
View notes
Photo


Almost there! Carb still leans out as soon as the throttle is opened, throttle cable still sticks, and the fork seal is leaking ATF.
But the pullstarter has been debugged, the ignition is sparking strong (JOG scooter box and Motobecane CDI ignition coil running off a Hero Puch CDI ignition rotor on Tomos cases and crank) but it still leans out. It’d be a cinch to make up an intake for one of the PHBGs I have lying around, but I want to discover the secrets of the tillotson carb for myself.
Perhaps it needs restriction on the airbox...
4 notes
·
View notes
Photo
Post rally troubleshooting and re-assembly. Pulse duct for the carb was blocked, head was leaking, pull starter needed major repair and modification, and I had head contact (And thus a thicker head gasket)
But saturday afternoon, it propelled my physical form across asphalt. Considering it was Dead on saturday morning, I’m notmad that it went to bits At the rally.


7 notes
·
View notes
Photo


Further progress on The X-1 engine.
That doppler ball joint has been cut with a chamfer all the way around to crush the annealed 12 awg wire loop as a sealing surface. Works well it seems like, we’ll see how well it seals.
6 notes
·
View notes
Photo


6 notes
·
View notes
Photo


1979 Puch Maxi. Won it at Metal Ponies Rally #5 to the chant of ‘Shitty moped! Shitty Moped!”
I think I lost the ‘Before’ Pics, but it was in pretty sorry shape. Not so Shitty now, after a bearing and seal job, hone on the cylinder, fresh cylinder rings, bored out carb and intake, Boost ported (Transfer And Intake) stock cylinder with AV10 reed valve mod, Techno Circuit pipe, and 3 shoe clutch with blue springs. Oh, and copper accents added simply for visual Flair, not at all intended to cover any crappy looking areas.
The Bicycle seat is actually really comfortable, and the engine has quite a bit of power for a 50cc stock cylinder. Revs out very cleanly with the lowcomp stock head, great distance cruiser.
But I live in New Bedford, so it has to Go! Asking $650 delivered, in RI and eastern mass!
4 notes
·
View notes
Photo


Something I cooked up to show my solidworks skills to a prospective employer.
0 notes
Photo


POS maxi resurrection, copper hammered paint.
1 note
·
View note
Photo


Puch hero Carnage
1 note
·
View note
Photo

The Alternative to the minarelli would be to build up an Awesome French engine and run that power straight through This... though it's more money and machinework then I really want to do, it would be Awesome.
2 notes
·
View notes
Photo


Mock-up of a project I'm considering attempting.
Yes, that is a Minarelli P6 70cc monster engine. Yes, it says Indian on the side. It needs a new Carb, piston and bore, but looks mechanically sound.
It's either mount that sucker up, or go with an AV14 top end on an AV7 bottom end, Monstrobecane head, Scooter Variator, and custom made Clutch/Variator pulley. Not certain which I want more, Uber Automatic engine or Uber Manual...
0 notes
Photo


2004-ish Hero Puch Turbo Sport.
Hero Motors group in India licensed a bunch of tech from Piaggio to build in India. Amongst this tech was the Puch I.P., along with the advances that Piaggio made with the Korrado motor. The Hero Puch Turbo Sport is an Indian made Puch Austro-daimler copy (The Austro-daimler was a puch moped designed by Porche) with the Korrado large transfer kickstart engine.
This particular moped includes a port matched and cleaned up 65cc Hero Puch cylinder kit , Treats CDI, 19mm PHBG, Black and Gold expansion chamber, and does a respectable 45MPH.
All side covers are present, they just need to be stripped down and repainted, previous owner did a crap spray job. Asking price is $900.
1 note
·
View note
Photo


So, Uh, The Tomos Streetmate I just bought came with a Surprise inside!
Just when I have reached a supposed minimum in Faith in humanity, they surprise me again. Yes, that gear in photo 1 should have teeth on it.
The clutches have exploded, the gears have stripped, there's aluminum Welded to the clutch bell and shrapnel was all over the inside of the cases.
And yes, I can rebuild it. stay tuned.
7 notes
·
View notes
Photo


This was a major rebuild I did for a customer and friend on Moped Army. His case seals were shot on a motor I rebuilt and ported the top end on last year. Now it's getting a reed block and a fresh bottom end.
The rebuild went predictably: They were some unpleasant surprises, some parts that needed persuasion, and of course some Dremel Action to get everything right. Even so, the engine apparently developed some air leaks resulting from the use of gaskets made from material that was Bone Dry, and a Gen1 reed block on a 1977 cylinder kit. Gen2 reed blocks (Retail Version) have a reduced port window to ensure compatibility with all cylinders. Even so, make sure you do a leakdown test, something I Verymuch failed to do.
In my Defense, I was 60 miles from home on a housecall, in his Basement. Lugging an air compressor to Cambridge was not an option.
Steps for installation:
You will need: Gen2 Reed Block, Athena AV10 Reed assembly, Bendy SHA or PHBG intake, AV7 intake gasket, AV7 Base Gasket, AV10 intake and reed gasket, 2X 25mm M6 Socket head cap screw, 4X 20mm Socket head cap screw. Loctite is suggested for Screws.
I am going to assume (Perhaps wrongly) that anyone purchasing this product has proficiency in moped engine performance tuning and possesses the tools and skills required for basic cylinder porting.
1: Disassemble AV7 engine top end, and isolate Cylinder and piston. Remove rings, circlips and wrist pin from Piston. Remove old intake from cylinder, and remove Studs.
2: Remove old gasket material from all sealing surfaces and check sealing surfaces for flatness. Commercially available intake and reed gaskets may be used with Gen2 Reed blocks.
3: Cutting cylinder/piston for longer intake duration and/or boost porting is entirely optional. Greater power gains will be realized with a piston window cut to allow mix to flow from the intake to the cases even at bottom dead center.
Note: A 15* boost port cut into the rear wall of the cylinder is also suggested, either as a supplement to the piston window, or to be used without a window, on high suction pipes. This falls into the realm of end user design intent. Only you know what you're tuning for. Port matching reed block to cylinder is suggested.
4: Once porting has been done, assemble reed block to cylinder using AV7 intake gasket and 25mm M6 screws. Loctite is suggested to prevent screws from backing out. See Photo # 7. (Note, reed block was not port matched to cylinder)
5: Assemble Athena reed to reed block as shown in photo #8. Attach intake and intake gasket as shown in photo #9 with 4X 20mm M6 screws. Again, loctite is suggested.
6: Re-assemble engine and Check For Air Leaks. Reed blocks have been flycut flat, but due to manufacturing variances in cylinder intake surfaces, I cannot assure they will seal in every situation.
AV7s were never designed to have reeds, and humans were never designed to exceed 20MPH in a straight line. Nevertheless, this reed block will help you exceed both limitations with relative ease. It won't magically transform an American Bike into a European model, but if you already have an AV7 you've sunk some money into, or just a stock cylinder you want some more bang out of, they do their job of adding more torque, allowing for Boost ports and preventing blowback.
You can -Always- Contact me at [email protected] with any questions regarding this, or any of my products.
8 notes
·
View notes
Photo


WARNING: RESULTS MAY VARIATE
Experimental prototype of a Motobecane/Peugeot rear variator/Clutch pulley. 100% compatible with GY6 clutch cores, bells, and springs. Because that's what I gorram made it out of.
Sized for BX belts for now, an AX variant would be easy to manufacture. I've designed it to require minimal modification to the frame, just the removal of the pedal crank bushings and replacement with a Bearing Cartridge. You'll lose the pedals, but this should increase rideability by a Huge margin.
7 notes
·
View notes