
Statistics
We looked inside some of the posts by moths-whimsy and here's what we found interesting.
Average Info
Notes Per Post
482K
Likes Per Post
275K
Reblog Per Post
207K
Reply Per Post
375
Time Between Posts
3 days
Number of Posts By Type
Text
17
Last Seen Tumblr Blogs


Fun Fact
In Q3 of 2020, 31% of US users access the Tumblr app daily.

Text
DIY notebook/junk journal tutorial for people on a budget

I found myself watching a lot of bookbinding videos recently & had the realization: I could probably do that at home, for free. And I was right. So before an influencer convinces you to drop 50 dollars on a book press and a fancy bonefolder, here's how:
STEP 0: MATERIALS

Cardstock - This can be any slightly thicker paper. I've been using postcards and blank greeting cards, because they're already around the size I want, but you can even use the cardboard from a cereal box if you want something sturdier.
Scissors/Xacto knife - You need at least the scissors, but the Xacto knife makes things a lot easier. If you have an actual paper cutter, use that instead.
Glue - your choice, I've been using modpodge but you can use a glue stick, etc instead.
Sturdy tape - duct tape, electrical tape, masking tape, etc. It needs to hold up to wear and tear; washi/scotch tape will not work.
Binder or Paper clips - binder clips are my preference but large paper clips work in a pinch
Ruler(s) - If you have them, I recommend using two rulers: one metal (if you're cutting paper with an xacto knife), one plastic or wood (this will be your bonefolder).
Pen or pencil
Paper scraps - These will be the pages of your notebook. You want them to be the same size or bigger than your covers. You can use literally anything; I've been using the last blank pages of old planners and notebooks, end pages of old books, and various scraps that would otherwise be thrown away.
Safety pin - Awl substitute
Needle and thread
ADDITIONALLY you should have a) a surface to glue on and b) a surface to cut on. A piece of scrap cardboard works well for both.
--
STEP 1: DECORATING THE COVER
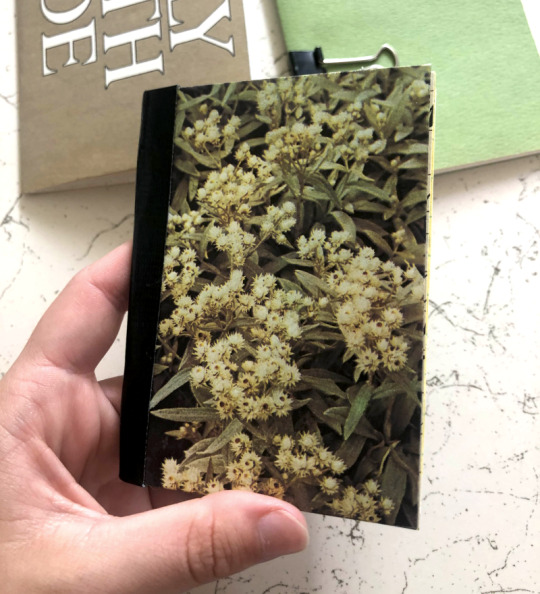
Take the cardstock you want to use for your cover, cut it to size if you need to, and fold it in half, using the side of your wooden/plastic ruler to flatten the crease. If you want to decorate it, take a magazine clipping or paper scrap of your choice and glue it on one side ( shown below). Avoid gluing anything onto the crease.

Flip it over and trim the sides down. Cut off the corners, then glue and fold the sides over. Use the ruler on anything you need to crease.

Flip back over and repeat for the other side! Make sure to leave a gap at the 'spine'.
STEP 2: CREATING A SIGNATURE
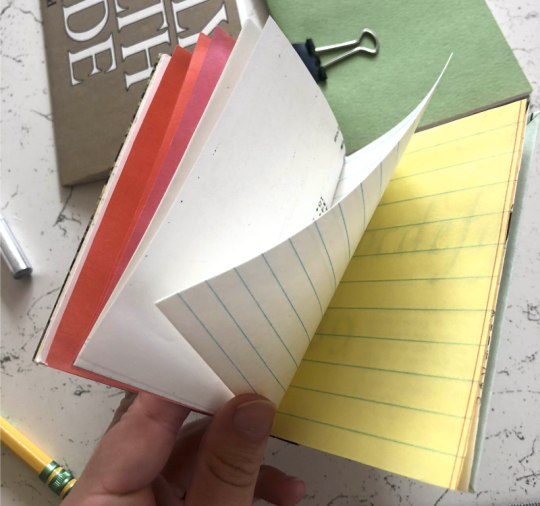
A "signature" is a stack of folded papers, aka, your notebook's pages. Take the papers you wish to use, fold each of them in half, and nest them together. I've been using 10 sheets of paper for mine, which will become 40 pages total. It might be harder to fit more than this into a small-sized notebook. Also, I try to arrange the sheets so that the CLEAN EDGES line up at the BOTTOM of the stack, with the rough edges at the top. This way you'll only have to trim 2 sides instead of 3.

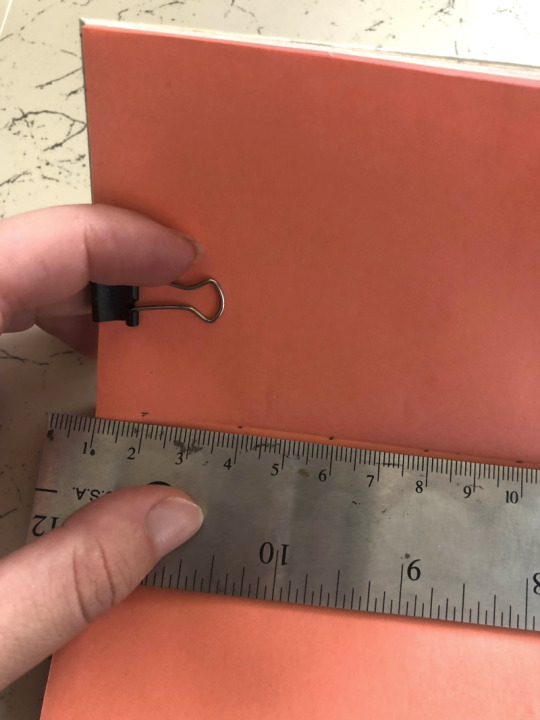
Line your cover up with the signature's bottom edge, making sure everything inside is aligned neatly. Then slap on a binder clip and trim off some of the excess material with scissors, if needed.

Use a ruler to mark where the edge of the cover is, then remove the cover to avoid damaging it (but keep the binder clip). Hold the ruler firmly in place slightly to the left of the line you just made. Carefully make repeated, even strokes with your xacto knife along the side of the ruler to cut straight through the layers of paper. Repeat with the top of the signature. A metal ruler is recommended for this step because a sharp xacto knife WILL CUT THROUGH PLASTIC AND WOODEN RULERS. I learned this the hard way, but if you're careful it should be fine. If you have access to an actual paper cutter, skip this step and use that instead!! it's way faster and safer!!


The finished signatures should be the same size as your cover now.
STEP 3: PUTTING IT TOGETHER
Stick your signature into the cover, align everything, then open to the center page. Clip the pages to the cover at the top or bottom, one on each side, in this 'open' position. Make a few marks along the center crease with even spacing.
Awl time. Using your marks as a guide, CAREFULLY push your safety pin through your signature and out through notebook's spine. You might want to use a thumbtack to make things easier on your fingers.

The next step is to sew the sheets together through the holes you made. Unfortunately this is not a sewing tutorial, so if you don't know how to thread a needle you might want to pause here and look that up. I'm using a simple saddle stitch, keeping the knots on the outside. There are many ways to do the actual book binding, including just stapling it, but this is how I do it.

You can remove the binder clips at this point. The only thing left to do is reinforce the spine. Trim the thread and fold your Sturdy Tape of choice over the spine, leaving some excess at both ends. The goal here is mainly to cover up the loose thread. Split the excess along the dotted lines shown below...

...Then stick it down on the insides of the front and back cover.

And you're done!!!!!
Enjoy your cool new handmade notebook!
3K notes
·
View notes
Text


stimtober (catchup) day 5: ghosts vs witches !!
⤷ div | 1, 2, 3, - 4, 5, 6, - 7, 8, 9.
95 notes
·
View notes
Text


now 2 beanie baby dragons are crossing your dash together :3
85K notes
·
View notes

Text
"you should be at the club" I should be working on my fanfic
75K notes
·
View notes

Text


Tolkientober 2020 flashback! These prompts were 'best friends' and 'a character in our world'

166 notes
·
View notes
Text

the only time of the year this can be posted
32K notes
·
View notes


Text
“I can’t carry it for you, but I can carry you,” is one of the rawest lines in all of fiction and it pierces me like a blade every time I hear it
12K notes
·
View notes
Text

And I’m coming with you (my art 🎨: ball point pen : black, red, green, blue, turquoise)
2K notes
·
View notes
Text
There are multiple posts saying that Legolas is the Texan amongst the Fellowship of the Ring and you’re all wrong it’s Gandalf. It’s 1000% Gandalf. Gandalf followed a wild horse for two days to tame it and would regularly ride up to the Shire with a cart full of homemade fireworks. Gandalf's the Texan.
33K notes
·
View notes

Text
The fact that Tolkien realized he’d created inconsistency for LotR with the first published version of The Hobbit and then retconned it with the in universe explanation of “Bilbo is a liar,” is never going to stop being both equal parts brilliant and funny.
34K notes
·
View notes