
Dominic Myers has loads of stuff here: http://dominicmyers.uk/
Don't wanna be here? Send us removal request.
Statistics
We looked inside some of the posts by mouseannoying and here's what we found interesting.
Average Info
Notes Per Post
0
Likes Per Post
0
Reblog Per Post
0
Reply Per Post
0
Time Between Posts
22 days
Number of Posts By Type
Link
15
Audio
2
Last Seen Tumblr Blogs


Fun Fact
The most popular pages on Tumblr are about Minecraft, GIFs, and David J. Peterson.
Link
We've got an MVAS (well, we've got two, but only one team to manage the one) in Witchford, and I'm part of the team that manages it.
Last Of The Summer Wine Britbox GIFfrom Last Of The Summer Wine GIFs
I hold ladders and carry batteries, and it's not all that hard a task, quite good fun. One chap downloads the data and lets me cast my eye over it (it's stored as in SQLite database). He went on holiday a little while back, so I had to collect the data. That meant there was an issue with the data integrity between his copy of the DB and mine. Thus, I was left with a need to merge two SQLite DBs; with the help of SQLiteStudio, it was pretty easy to resolve. Each DB has three tables: campaign, campaign_details and measure.
Thinking about it, after going through this process, I realised I just needed to copy over the entirety of my DB to him; it had the same data apart from the latest readings... but hindsight is a beautiful thing.
Anyway, there was an extra row in campaign - so that was easy to copy using some SQL; there were an additional 13 rows in campaign_details - again, dead easy to copy over using a bit of SQL. But, there were an extra 17K+ rows in measure...
I got in touch with my mate Oliwia to see if she could help, but she was busy, so I had to cobble together my SQL; this is what I came up with:
INSERT INTO original.measure SELECT * FROM new.measure a WHERE a.meas_id NOT IN ( SELECT meas_id FROM original.measure b )
Not pretty, but it worked! I blame the heat for not realising sooner
0 notes
Link


By Ivan Naunov
I noted before that my Donut Component has a bug in it when it comes to drawing segments with a value over 50% of the total - such a pain!
I was hoping to avoid using SVGs for this component, but I think that is what I'll have to do - not such a bad thing, TBH, but still annoying!
0 notes
Link


By Israel Martínez Valdés
I wrote last week about GZipping JSON for localStorage and, over the weekend, I decided to do some checks on the efficacy of this approach. I noted that the larger the payload, the more significant the space saving; smaller payloads often negated any saving, with the gzipped file being significantly larger than the original JSON for smaller JSON payloads.
I didn't only compare the original JSON and the gzipped JSON though, I decided to take a wee look into IndexedDB, with the help of PouchDB.
I worked with three JSON files:
bodies.json (330 KB)
employees.json (2284 KB)
family.json (2 KB)
As you'll be able to see from the code, I do a fair bit of computation using both console.time() and performance.now().
The results are output to the developer console (I did try using a Donut Chart - but I discovered a bug in my Component - I'll fix it this week, hopefully!).
The following are my results for saving on Firefox:
Time taken to save bodies using localStorage: 0ms
Time taken to save bodies with Pako: 20ms
Time taken to save bodies with PouchDB: 34ms
Time taken to save employees using localStorage: 0.002ms
Time taken to save employees with Pako: 69ms
Time taken to save employees with PouchDB: 149ms
Time taken to save family using localStorage: 0ms
Time taken to save family with Pako: 2ms
Time taken to save family with PouchDB: 157ms
And these are my results for retrieving the data on Firefox:
Time taken to get bodies using localStorage: 2ms
Time taken to get bodies with Pako: 10ms
Time taken to get bodies with PouchDB: 45ms
Time taken to get employees using localStorage: 12ms
Time taken to get employees with Pako: 25ms
Time taken to get employees with PouchDB: 22ms
Time taken to get family using localStorage: 1ms
Time taken to get family with Pako: 1ms
Time taken to get family with PouchDB: 43ms
The following are my results for saving on Chrome:
Time taken to save bodies using localStorage: 0ms
Time taken to save bodies with Pako: 6.5ms
Time taken to save bodies with PouchDB: 185.1ms
Time taken to save employees using localStorage: 0ms
Time taken to save employees with Pako: 54ms
Time taken to save employees with PouchDB: 143.89ms
Time taken to save family using localStorage: 0ms
Time taken to save family with Pako: 0.4ms
Time taken to save family with PouchDB: 178.5ms
And these are my results for retrieving the data on Chrome:
Time taken to get bodies using localStorage: 0.9ms
Time taken to get bodies with Pako: 4.29ms
Time taken to get bodies with PouchDB: 39.6ms
Time taken to get employees using localStorage: 5.19ms
Time taken to get employees with Pako: 27.9ms
Time taken to get employees with PouchDB: 19.2ms
Time taken to get family using localStorage: 0ms
Time taken to get family with Pako: 0.19ms
Time taken to get family with PouchDB: 34.69ms
The results (in chart form) are here:
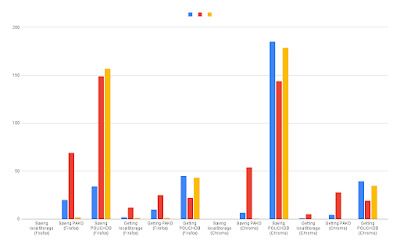
I think we can probably all tell that localStorage wins, and wins handsomely. Though the limitations of space in localStorage means that IndexedDB still has a place; perhaps not for smaller data sets though.
I'm happy that I've taken the time to find this out; it certainly means that I have evidence for future decisions - I'd be interested in analysing it further, though, especially as there are discrepancies between the different browsers. Saving to IndexedDB on Firefox seems much faster than on Chrome, though the situation is reversed when retrieving data from IndexedDB.
0 notes
Link
Quite frankly, we're in a pretty terrible situation in this country, and I've been trying to think of how we could get out of it. Last week I got to thinking about how to remove our MP (Lucy Frazer); I've written to her a couple of times in the past and always received a reply - she even sent a follow up when it came to Ukraine, so I sort of have semi-positive vibes about her (despite her political party). After reading up though, it seems as though there's no way I, as a constituent, can remove her, despite being the one to pay her wages; the PM can, but not I as someone who she's is supposed to represent. The salient parts of the Recall of MPs Act 2015:
...the Speaker of the House of Commons would trigger the recall process, namely:
A custodial prison sentence (including a suspended sentence)
Note that MPs imprisoned with sentences greater than one year are automatically removed due to the Representation of the People Act 1981
Suspension from the House of at least 10 sitting days or 14 calendar days, following a report by the Committee on Standards;
A conviction for providing false or misleading expenses claims.
As I noted, though, I don't hate her, I wouldn't say I like her policies and her support for our disaster of a PM, but she always struck me as being reasonable; misguided perhaps, but generally pretty decent. But things are getting serious now.
So, we can't remove her unless she seriously messes up according to the Recall of MPs Act 2015, but what else would trigger a by-election?
According to parliment:
A by-election is held when a seat becomes vacant. This can happen when an MP:
resigns or dies
is declared bankrupt
takes a seat in the House of Lords
is convicted of a serious criminal offence.
A by-election does not have to take place if an MP changes political party.
Let's take those one-by-one - I don't want her dead, and I can't see her resigning soon. I can't see her being short of a few bob. I can't see her moving into the Lords or being convicted of a serious criminal offence. It's that there last sentence, though. I'm pretty sure the Liberal Democrats would welcome her - and in light of the probably local voting pattern in any future election - it's likely to be the only way she can retain her seat in the Commons. And what's more, no by-election would be triggered either.
Now, who's shell-like should I whisper this to?
Why leave it at that - the current working majority is 75 - we'd only need a few Conservatives to either see the writing on the wall - or grow a conscience - before we could oust our PM. Christian Wakeford did it and 148 have no confidence in Johnson, if only a third of those voted with their feet and joined another party, then we might be on the start of recovering.
Might it be time for our MPs to stand up for their constituents rather than bolstering the reign of lying Johnson (I do like Rory Stewart - the Tories messed up by not electing him!)?
0 notes
Link


By Suparerg Suksai
I've written before about trimming JSON before but I've recently been thinking about how we can trim it even further.
I came across the fantastic pako earlier in the week and decided to try it out with some data. You'll see from the repo that we're testing two different JSON files, one was quite small (and was, indeed, the example I used earlier), the other is significantly larger.
If you download and run the repo, you'll see I've added a check to see if the data retrieved from localStorage is the same as the data retrieved from the file system - it is!
You'll also notice something interesting in the developer console: the smaller JSON ends up being larger (119.93%) when gzipped compared to the stringified JSON; the larger JSON file was 37.49% the size of the stringified JSON.
That sort of makes sense, though, doesn't it? Gzipping a file adds some overhead (hash table), and that overhead might end up making the final gzipped file larger. Not that I know a great deal about the process: I'm cribbing this from an answer on Quora.
The compressAndStore process is quite interesting, with these steps:
The JSON is fetched form a .json file as a string
The fetched string is ocnverted into a JSON object
The JSON is stringified (IKR - we've only just converted into an object)
The stringified JSON is defalted with pako
The resulting Uint8Array is converted into a regular array
The array is saved to localStorage, along with the original stringified JSON
async function compressAndStore(file, name) { // Get our data const response = await fetch(file) const fetchedJSON = await response.json() // Convert our JSON to a string const stingifiedJSON = JSON.stringify(fetchedJSON) // Deflate our data with Pako const deflatedStringifiedJSON = pako.deflate(stingifiedJSON) // Convert the resulting Uint8Array into a regular array const regularArray = Array.from(deflatedStringifiedJSON) // Store our data (both deflated and the original) localStorage.setItem(`${name}Array`, JSON.stringify(regularArray)) localStorage.setItem(`${name}JSON`, stingifiedJSON) }
The retrieveAndDecompress process is almost a direct reverse:
The array is retrieved from localStorage as a string
That string is converted back into an array
The array is converted into a Uint8Array array
The Uint8Array is inflated with pako
The inflated Uint8Array is decoded and then converted back into a JSON object.
The original file is compared with the retrieved and decompressed file
async function retrieveAndDecompress(file, name) { // Get our data for later testing const response = await fetch(file) const fetchedJSON = await response.json() // Get our data from localStorage const retrievedData = localStorage.getItem(`${name}Array`) // Convert it into an array again using JSON.parse() const retrievedArray = JSON.parse(retrievedData); // Convert the array back into a Uint8Array array const retrievedTypedArray = new Uint8Array(retrievedArray); // inflate the Uint8Array array using Pako const deflatedTypedArray = pako.inflate(retrievedTypedArray) // convert it back into the original data const json = JSON.parse(new TextDecoder().decode(deflatedTypedArray)) console.info(`Is the fetched ${file} the same as the retrieve and decompressed ${name}Array: ${JSON.stringify(fetchedJSON) === JSON.stringify(json)}`) const regularArraySize = (localStorage[`${name}Array`].length * 2) / 1024 const stingifiedJSONSize = (localStorage[`${name}JSON`].length * 2) / 1024 console.log(`${name}Array (${regularArraySize}) is ${((regularArraySize / stingifiedJSONSize) * 100).toFixed(2)}% of the size of ${name}JSON ${stingifiedJSONSize}`) }
0 notes
Link


By Diego Tovar
About three months back I saw a CodePen by Hilario Goes and I was inspired to convert it into a Web Component. That I did but it ended up being really messy:
<wc-donut-chart id="test" part-1-value="5" part-1-name="Part 1" part-1-color="#E64C65" part-2-value="5" part-2-name="Part 2" part-2-color="#11A8AB" part-3-value="5" part-3-name="Part 3" part-3-color="#4FC4F6" animation-duration="3" hole-color="#394264"></wc-donut-chart>
(you can see it in action if you download the repo and run index.html.)
It worked, but it relied upon a mechanism I developed a little while back for injecting CSS into components, and the code was all over the place. It also went against a best practice I read a little while back regarding components doing too much.
The segments of the doughnut chart didn't need to be created by the doughnut but could - instead - be their own concern - so I made the dm-donut-part Component:
(() => { const mainSheet = new CSSStyleSheet() mainSheet.replaceSync(` :host { --end: 20deg; } * { box-sizing: border-box; } .segment-holder { border-radius: 50%; clip: rect(0, var(--dimension), var(--dimension), calc(var(--dimension) * 0.5)); height: 100%; position: absolute; width: 100%; } .segment { border-radius: 50%; clip: rect(0, calc(var(--dimension) * .5), var(--dimension), 0); height: 100%; position: absolute; width: 100%; font-size: 1.5rem; animation-fill-mode: forwards; animation-iteration-count: 1; animation-timing-function: ease; animation-name: rotate; } @keyframes rotate { from { transform: rotate(0deg); } to { transform: rotate(var(--end)); } } `) class DonutPart extends HTMLElement { static get observedAttributes() { return [ 'name', 'color', 'rotate', 'duration', 'start' ]; } constructor() { super() this.shadow = this.attachShadow({ mode: 'open' }) this.shadow.adoptedStyleSheets = [mainSheet]; this.shadow.innerHTML = ` <div class="segment-holder"> <div class="segment"></div> </div> ` this.render() } render() { const sheet = new CSSStyleSheet() sheet.replaceSync( ` :host { --end: ${this.end}; } .segment-holder { transform: rotate(${this.rotate}); } .segment { background-color: ${this.color}; animation-delay: ${this.delay}; animation-duration: ${this.duration}; } `) this.shadowRoot.adoptedStyleSheets = [mainSheet, sheet] } get end() { return this.getAttribute('end') || '120deg' } get color() { return this.getAttribute('color') || '#000000' } get delay() { return this.getAttribute('delay') || '0s' } get duration() { return this.getAttribute('duration') || '0s' } get rotate() { return this.getAttribute('rotate') || '0deg' } get title() { return this.getAttribute('title') || null } attributeChangedCallback(name, oldValue, newValue) { if((oldValue !== newValue)){ this.render() } } } window.customElements.define('dm-donut-part', DonutPart) })()
These parts are injected into the parent dm-donut-chart in a slot and the parent dm-donut-chart interogates them in order to populate their attributes.
(() => { const mainSheet = new CSSStyleSheet() mainSheet.replaceSync(` :host { --dimension: 200px; } * { box-sizing: border-box; } .donut-chart { position: relative; width: var(--dimension); height: var(--dimension); margin: 0 auto; border-radius: 100% } .center { position: absolute; top:0; left:0; bottom:0; right:0; width: calc(var(--dimension) * .65); height: calc(var(--dimension) * .65); margin: auto; border-radius: 50%; } `) class DonutChart extends HTMLElement { static get observedAttributes() { return [ 'duration', 'color', 'delay', 'diameter', 'dimension' ]; } constructor() { super() this.shadow = this.attachShadow({ mode: 'open' }) this.shadow.adoptedStyleSheets = [mainSheet]; this.shadow.innerHTML = ` <div class="donut-chart"> <slot name='segments'></slot> <div class="center"></div> </div> ` this.render() } render() { const segments = [...this.querySelectorAll('dm-donut-part')] const total = segments.reduce((p, c) => p + Number(c.getAttribute('value')), 0) let durationTotal = this.delay; let rotationTotal = 0 const totalDegree = 360/total segments.forEach(segment => { const currentRotation = totalDegree * Number(segment.getAttribute('value')) const animationDuration = currentRotation / (360/Number(this.duration)) segment.setAttribute('end', `${currentRotation}deg`) segment.setAttribute('rotate', `${rotationTotal}deg`) segment.setAttribute('delay', `${durationTotal}s`) segment.setAttribute('duration', `${animationDuration}s`) rotationTotal += currentRotation durationTotal += animationDuration }) const sheet = new CSSStyleSheet() sheet.replaceSync( ` :host { --dimension: ${this.dimension}px; } .center { background-color: ${this.color}; width: calc(var(--dimension) * ${this.diameter}); height: calc(var(--dimension) * ${this.diameter}); } `) this.shadowRoot.adoptedStyleSheets = [mainSheet, sheet] } get color() { return this.getAttribute('color') || '#000000' } get duration() { return Number(this.getAttribute('duration')) || 4.5 } get delay() { return Number(this.getAttribute('delay')) || 0 } get diameter() { return Number(this.getAttribute('diameter')) || .65 } get dimension() { return Number(this.getAttribute('dimension')) || 200 } } window.customElements.define('dm-donut-chart', DonutChart) })()
A much cleaner approach, and it allowed me to slim down the code and remove the need for the DomHelpers (though I do love them).
I also got a chance to play with replaceSync, which is brilliant and even works on Safari with a suitable polyfill.
This is how I invoke the doughnut:
<dm-donut-chart color="#394264" duration="4.5" delay="2" diameter=".6" dimension="200"> <div slot="segments"> <dm-donut-part color="#E64C65" value="5"></dm-donut-part> <dm-donut-part color="#11A8AB" value="5"></dm-donut-part> <dm-donut-part color="#4FC4F6" value="5"></dm-donut-part> </div> </dm-donut-chart>
I'm still not overly happy with having to have a hole within the doughnut - I'll do some more work and see if I can use arcs instead of squares - but I guess, without the hole, the doughnut chart acts like a regular pie chart.
0 notes
Link


By Inzamam Talukder
I'm doing a fair bit with localStorage at the minute; and I need to clear it out regularly. Opening the chrome://settings can get boring real quick, so I spent a happy 5 minutes researching the subject and clocked that a Bookmarklet would work a treat; here it is Clear Local Storage, feel free to use it. Here's the JS should you need to adapt it for your purposes:
javascript:(() => { localStorage.clear(); console.info('Local Storage Cleared'); })();
0 notes
Link


By Maksim Chernyshev
We just had a work based session on unconscious bias, and while I didn't contribute, I got to thinking about my own unconscious bias. I believe my unconscious bias has been mostly burnt out; let me explain: The good and bad thing about being from Yorkshire (and being raised by my Ma) is that I grew up hating everyone! It wasn't a race, religion, ability or gender thing; it was everyone: people from other countries, counties, towns or villages; even people who lived on different streets or who lived on our street in a different house, sometimes even people in our home, and quite possibly, ourselves.
It was only once I left Yorkshire (and grew up some more) that I clocked that, on the whole, I like everyone. This realisation was firmed up by my early career and the odd personality test, which indicated I was more gregarious than curmudgeonly.
0 notes
Link


By Dona Faye Saulog
I've been doing a fair bit with jQuery's serialize() recently but found myself looking for a way to display the values before submitting them via an ajax() request. A friendly and straightforward method is to take advantage of console.table() to do the heavy lifting:
console.table(Object.fromEntries(new URLSearchParams($form.serialize())))
0 notes
Link
If you ever look me up on Goodreads, you'll find that I took an age to read The Fizz Buzz Fix: Secrets to Thinking Like an Experienced Software Developer.. I was primarily interested in reading about the FizzBuzz problem and found the rest exhausting (I wonder if they do it as an audio version?). Anyway, I found myself pondering it again recently and came across this version by Brandon Morelli:
for(let i=0;i<100;)console.log((++i%3?'':'fizz')+(i%5?'':'buzz')||i)
Aye, it's brilliant, but all approaches seem to end up using a For loop, and I got to thinking about alternatives. Thanks to messing about with other coding challenges, I clocked the way of generating an array, then thought about using that generated array with a forEach:
Array.from({length: 100}, (_, i) => i + 1).forEach(i => { console.log((i%3 && i%5) ? `${i}` : `${i} ${(i%3 ? '' : 'Fizz') + (i%5 ? '' : 'Buzz')}`) })
This method has the benefit of not adding an extra space after the number for those numbers that aren't divisible by three or five. The forEach seems as fast for numbers up to 100 during testing and faster for numbers up to 1000.
0 notes
Audio
(Btrax)
0 notes
Link
It's that time of year when I have a little time to piddle about, so I decided to do a little research, prompted by reading this post from Andrea Giammarchi. I've written loads about DataTables over the years, so think about grabbing data from APIs probably far too much for someone to be sane. I'm also old enough to remember that AJAX was initially designed to get XML from data sources rather than the JSON we currently, mainly, acquire and process. There's a section in my book (pp. 143-147) about the costs and benefits of both data formats.
Andrea prompted my examination of JSONH, which - in turn - pointed me to JSONDB, and then I found Devon Govett's implementation. I got to thinking about making JSON even smaller!
In an early draft, I compared the relative sizes of both the XML and JSON used as an example; I thought it'd be interesting to fiddle with the family's data I use to get to grips with the adapted CoffeeScript implementation of JSONDB. I also tweaked it to consider nested arrays of objects because why wouldn't you? Anyway, this is the data I'll be comparing:
const familyJSON = { family: [ { title: "Dr", forename: "08", surname: "08", dateOfBirth: "08/08/0808", hairColour: "brown", eyeColour: "brown", handedness: "left", something: [ { one: 1, two: 2, three: [1, 2] }, { one: 2, two: 4, three: [2, 4] } ] }, { title: "Dr", forename: "09", surname: "09", dateOfBirth: "09/09/0909", hairColour: "white", eyeColour: "silver", handedness: "ambidextrous", something: [ { one: 3, two: 4, three: [3, 4] }, { one: 6, two: 8, three: [6, 8] } ] }, { title: "Dr", forename: "10", surname: "10", dateOfBirth: "10/10/1010", hairColour: null, eyeColour: null, handedness: "ambilevous", something: [ { one: 5, two: 6, three: [5, 6] }, { one: 10, two: 12, three: [10, 12] } ] }, { title: "Dr", forename: "11", surname: "11", dateOfBirth: "11/11/1111", hairColour: "brown", eyeColour: "brown", handedness: "right", something: [ { one: 7, two: 8, three: [7, 8] }, { one: 14, two: 16, three: [14, 16] } ] } ] }
And this is the helper class I created:
class JSONDB { static isObject = o => o instanceof Object && o.constructor === Object static pack = records => { const keys = Object.keys(records[0]); const ret = ['JSONDB', keys.length, ...keys] for (let i = 0; i < records.length; i++) { for (const key in records[i]) { const record = records[i][key] ret.push(Array.isArray(record) && record.every(el => this.isObject(el)) ? this.pack(record) : record) } } return ret; }; static unpack = array => { if (array[0] !== 'JSONDB') { return array; } const numKeys = array[1]; const pos = numKeys + 2; const keys = array.slice(2, pos); const ret = []; let cur = {}; const iterable = array.slice(pos); for (let i = 0; i < iterable.length; i++) { let val = iterable[i]; if(Array.isArray(val)){ val = this.unpack(val) } if ((i > 0) && ((i % numKeys) === 0)) { ret.push(cur); cur = {}; } const key = keys[i % numKeys]; cur[key] = val; } ret.push(cur); return ret; } }
This example shows the saving of 339 characters.
This is the compressed data:
[ "JSONDB", 8, "title", "forename", "surname", "dateOfBirth", "hairColour", "eyeColour", "handedness", "something", "Dr", "08", "08", "08/08/0808", "brown", "brown", "left", [ "JSONDB", 3, "one", "two", "three", 1, 2, [ 1, 2 ], 2, 4, [ 2, 4 ] ], "Dr", "09", "09", "09/09/0909", "white", "silver", "ambidextrous", [ "JSONDB", 3, "one", "two", "three", 3, 4, [ 3, 4 ], 6, 8, [ 6, 8 ] ], "Dr", "10", "10", "10/10/1010", null, null, "ambilevous", [ "JSONDB", 3, "one", "two", "three", 5, 6, [ 5, 6 ], 10, 12, [ 10, 12 ] ], "Dr", "11", "11", "11/11/1111", "brown", "brown", "right", [ "JSONDB", 3, "one", "two", "three", 7, 8, [ 7, 8 ], 14, 16, [ 14, 16 ] ] ]
I'm wondering where I can implement this approach now; it would seem to offer significant savings in terms of the size of the payload while still returning something that will be relatively quick to convert back into JSON.
0 notes
Link


By Andreas Steidlinger
I love working with designers; they constantly challenge me to develop new designs to implement. They have their lovely pixel-based programs and design beautiful things, which I then convert into different formats. This conversion is often relatively easy, but recently I had to create an email with the content within a rounded container, a rounded container with a drop shadow.
Let me tell you, that was a pain! I did a fair bit of research and found excellent ways of generating rounded corners (not least my own from back in the day). AE Writer has an article on drop shadow for HTML email, which sort of confirmed my thoughts on needing to use tables. Alejandro Vargas has an article up on Medium about HTML email rounded corners. I spent a fair few hours over last weekend taking a screengrab of a container into The Gimp and playing with contrast to generate the appropriate data format for a chunk of JS to generate the appropriate nested divs within a table.
Given this table row:
<tr data-row="5" data-description="6->3-fe->2-fd->2-fc->1-fb->1-fd->ff">
This code:
(()=>{ const setStyles = (element, declarations) => { for (const prop in declarations) { if(declarations.hasOwnProperty(prop)){ const property = prop.split(/(?=[A-Z])/).join('-').toLowerCase() element.style[property] = declarations[prop] } } } document.querySelectorAll('tr').forEach(tr => { if(tr.dataset.description){ const description = tr.dataset.description.split('->') let target = tr const td = document.createElement('td') td.setAttribute('align', 'center') setStyles(td, { paddingLeft: `${description[0]}px`, paddingRight:`${description[0]}px`, }) if(!tr.dataset.main){ setStyles(td, { height:'1px', lineHeight:'1px', fontSize:'1px' }) } target.appendChild(td) target = td description.shift() for(let i = 0; i < description.length; i++){ const parts = description[i].split('-') const div = document.createElement('div') setStyles(div, { display:'block', paddingLeft:'0px', paddingRight:'0px', backgroundColor:`#${parts[0].repeat(3)}`, width: '100% !important', minWidth: 'initial !important', }) if(parts.length !== 1){ setStyles(div, { paddingLeft: `${parts[0]}px`, paddingRight:`${parts[0]}px`, backgroundColor:`#${parts[1].repeat(3)}`, }) }else{ setStyles(div, { backgroundColor:`#${parts[0].repeat(3)}`, }) } if(!tr.dataset.main){ setStyles(div, { height:'1px', lineHeight:'1px', fontSize:'1px' }) } target.appendChild(div) target = div } } }) })()
Would generate this markup:
<tr data-row="5" data-description="6->3-fe->2-fd->2-fc->1-fb->1-fd->ff"> <td align="center" style="padding-left: 6px; padding-right: 6px; height: 1px; line-height: 1px; font-size: 1px;"> <div style="display: block; padding-left: 3px; padding-right: 3px; background-color: rgb(254, 254, 254); height: 1px; line-height: 1px; font-size: 1px;"> <div style="display: block; padding-left: 2px; padding-right: 2px; background-color: rgb(253, 253, 253); height: 1px; line-height: 1px; font-size: 1px;"> <div style="display: block; padding-left: 2px; padding-right: 2px; background-color: rgb(252, 252, 252); height: 1px; line-height: 1px; font-size: 1px;"> <div style="display: block; padding-left: 1px; padding-right: 1px; background-color: rgb(251, 251, 251); height: 1px; line-height: 1px; font-size: 1px;"> <div style="display: block; padding-left: 1px; padding-right: 1px; background-color: rgb(253, 253, 253); height: 1px; line-height: 1px; font-size: 1px;"> <div style="display: block; padding-left: 0px; padding-right: 0px; background-color: rgb(255, 255, 255); height: 1px; line-height: 1px; font-size: 1px;"> </div> </div> </div> </div> </div> </div> </td> </tr>
That whole manual process was boring, though, so I decided to automate the process. Especially as, knowing designers, I just knew that the box-shadow or border-radius would need to change in the future.
I knew that libraries for generating images from DOM elements were available, so I tried a couple. html2canvas wasn't quite what I was looking for, but dom-to-image worked a treat!
I decided to take an incremental approach and started by copying the dom to a png image format and placing that png within a canvas element of the same size as the element. This process is the code within the Immediately Invoked Function Expression (IIFE) at the bottom of the file. One thing to take note of is the onload function. I ran into all sorts of issues with the subsequent scripts failing until I clocked that the img wasn't loaded when I tried to manipulate it. Once we've set drawn the image atop the canvas, we add some data attributes using the getDimension function - I wouldn't've bothered with this except WebStorm kept complaining about the amount of repeated code I had.
trim, invoked at the end of the IIFE, strips out the remaining white space around the image, leaving us with an image that has only grey-scale colours surrounding it (except at the corners). It trims the rows and columns which contain only white colour values by referencing the values from getDimension. getDimension was clever and checked the values from iterating over the data from getImageData, if any value was not 255 then we had something what was not pure white. The array from getImageData should be chunked into sub-arrays of four as each lump of four values represent the RGBA value from a single pixel.
Once we have a trimmed image, we can build the values that equate with the data attribute we had in the original implementation. I created a simple class for this as a simple array wouldn't work here as I needed more than just the array of values; I needed to know which was the repeating row, so we had a placeholder for the actual content.
We chunk the data into sub-arrays of four and grab the hex colour value from each chunk. If the preceding HEX value is identical, the preceding classes incidence count is incremented; if not, it's added to the row array. If the row is not identical to the preceding row, then it's added to the rows as a Row object; if it is identical then the preceding Row has it's main value changed to true - this will be our placeholder.
We then build our table using the array of Row objects (rows) using code that is very similar to the one above but that is ever so slightly more nuanced and places a placeholder table within the main row. Nice eh? I'm quite pleased with it.
GitHub Repo
Repl
0 notes
Link


By Silvia Ribeiro
Being a fan of JavaScript and now working with SFRA, colleagues told me that we're using Rhino under the hood rather than NodeJS (as I'd assumed from looking at the controllers). Further, from doing a little research, I found out that we're using Rhino 1.7R5. As such, we're a little limited in terms of the JS we can use; proper ES5.
0 notes

Link


By Elena Bayda
"Simply a drop in replacement" was what I was told... It so wasn't, but it was a fantastic opportunity to mess about with a new library and get it working like another one; learning something new is always worthwhile, especially if it's better for the business. I wanted to estimate three weeks but then plumped for two instead - fixing the bugs meant that it was at least three, and maybe even a little more.
We used Slick Slider for carousels, but there were questions about the amount of time the JS took to run. We read an article by Javier Villanueva titled Javascript sliders will kill your website performance. He was particularly dismissive of Slick Slider while being less dismissive of Keen Slider, despite keen-slider lacking some of Slick Sliders built-in features. While reading his article, I also found several resources suggesting that we should avoid carousels like the plague:
Joe Rinaldi's Why Homepage Carousels Are Bad (& 3 Alternatives to Try Instead)
Jon MacDonald's Why Image Carousels Are Almost Always A Bad Idea
Peep Laja's Image Carousels and Sliders? Don't Use Them. (Here's why.)
David Miles's Why Website Carousels Are a Bad Idea
Andrew Folts's Carousels Are Killing Your Conversion Rate: Here's How to Fix That
Envato's Design debate: are image carousels UX assets or liabilities? is a good discussion
Jared Smith's Should I use a carousel is an excellent example of using a carousel to explain why you shouldn't use a carousel
I'd suggest reading those articles and following any pertinent links to decide whether or not you want to use carousels, but do that before you implement carousels on your site! If you've already implemented them, and your internal clients are still keen on them (despite being asked to read the links above), then this post details my experiences of moving most - if not all - of our Slick Slider carousels to keen-slider. Be prepared though, I decided to go all ES6 classy - and it's all the better for being that way too!
I decided to use classes because Slick Slider did an awful lot for us to place items. Let me elaborate. If we had two items and the Slick Slider was set to display three, then the two items would be shrunk and inserted from left to right at the correct width, a third of the container's width. That meant a gap on the right was 33.33% wide, and that seemed to be the accepted way of doing it. I changed this and aligned the items in the centre of the container but at the correct width. This change caused a bug to be raised, ah well. It's worth noting that by default, a keen-slider will make the items fit the container.
So anyway, we needed to read some extra data, provided as data attributes, for some carousels. We also needed to be aware that not all carousels were present on page load and that some would be inserted or removed at various points during the customer's journey through the site. Some carousels would only be carousels on mobile devices - that was fun. And to top all that off, we needed to be aware of rotation changes on mobile devices.
Anyway, this is our base class:
class KeenCarousel { constructor(element){ this.element = element } createButton(text) { const button = Helpers.createAndPopulate('button', 'Previous', { 'class': `${text === 'Previous' ? 'slick-prev': 'slick-next'} slick-arrow`, 'aria-label': text, 'type': 'button' }) button.addEventListener('click', () => (text === 'Previous') ? this.slider.prev() : this.slider.next()) return button } createButtonHandler(text) { const button = Helpers.createAndPopulate('button', 'Previous', { 'class': `${text === 'Previous' ? 'slick-prev': 'slick-next'} slick-arrow`, 'aria-label': text, 'type': 'button' }) button.addEventListener('click', () => (text === 'Previous') ? this.handleChange('prev') : this.handleChange('next')) return button } createButtonListener(text) { const button = Helpers.createAndPopulate('button', 'Previous', { 'class': `${text === 'Previous' ? 'slick-prev': 'slick-next'} slick-arrow`, 'aria-label': text, 'type': 'button' }) button.addEventListener('mouseover', () => this.autoplay(false)) button.addEventListener('mouseout', () => this.autoplay(true)) button.addEventListener('click', () => (text === 'Previous') ? this.slider.prev() : this.slider.next()) return button } createDots(instance) { const dots_ul = Helpers.createAndPopulate('ul', null, { 'class': 'slick-dots', 'role': 'tablist' }) this.element.parentNode.insertBefore(dots_ul, this.element.nextSibling) ;[...this.element.querySelectorAll(this.options.slides)].forEach(function (_, index, arr) { const dot_li = Helpers.createAndPopulate('li', null, { 'role': 'presentation' }) if(!index){ dot_li.classList.add('slick-active') } dots_ul.append(dot_li) const button = Helpers.createAndPopulate('button', index + 1, { 'type': 'button', 'role': 'tab', 'aria-label': `${index + 1} of ${arr.length}`, 'tabindex': !index ? '0' : '-1' }) if(!index){ button.setAttribute('aria-selected', 'true') } button.addEventListener('click', function(){ instance.moveToSlide(index) }) dot_li.append(button) }) } updateDots(instance) { const slide = instance.details().relativeSlide const ul = this.element.parentNode.querySelector('.slick-dots') if(ul){ ;[...ul.querySelectorAll('li')].forEach((li, index) => { index === slide ? li.classList.add('slick-active') : li.classList.remove('slick-active') const button = li.querySelector('button') button.setAttribute('aria-selected', index === slide) button.setAttribute('tabindex', index === slide ? '-1' : '0' ) }) } } getTarget(breakpoints) { const target = window.innerWidth return breakpoints.find(breakpoint => { if(breakpoint.min && breakpoint.max) { if(target >= breakpoint.min && target <= breakpoint.max){ return true } } else { if(breakpoint.min){ if(target >= breakpoint.min){ return true } } else { if(target <= breakpoint.max) { return true } } } }).slides } buildBreakpoints(breakpoints) { return breakpoints.reduce((acc, breakpoint) => { if(breakpoint.min && breakpoint.max){ acc[`(min-width: ${breakpoint.min}px) and (max-width: ${breakpoint.max}px)`] = { 'slidesPerView': breakpoint.slides } } else { if(breakpoint.min) { acc[`(min-width: ${breakpoint.min}px)`] = { 'slidesPerView': breakpoint.slides } } else { acc[`(max-width: ${breakpoint.max}px)`] = { 'slidesPerView': breakpoint.slides } } } return acc }, {}) } }
You'll see that I used some utility methods which were in a Helper class, so I should share those here too:
class Helpers { static createElement(element) { return document.createElement(element) } static setText (element, text) { return element.appendChild(document.createTextNode(text)) } static createAndPopulate(element, text = null, attributes = null, styles = null) { const el = this.createElement(element) text && Helpers.setText(el, text) attributes && Helpers.setAttributes(el, attributes) styles && Helpers.setStyles(el, styles) return el } static setAttributes(element, attributes) { for (const attr in attributes) { if(attributes.hasOwnProperty(attr)) { // converts camelCase to hyphen-separated, lowercase, string // e.g. "dataId" becomes "data-id" const attribute = attr.split(/(?=[A-Z])/).join('-').toLowerCase() element.setAttribute(attribute, attributes[attr]) } } } static setStyles(element, declarations) { for (const prop in declarations) { if(declarations.hasOwnProperty(prop)){ const property = prop.split(/(?=[A-Z])/).join('-').toLowerCase() element.style[property] = declarations[prop] } } } static removeElements(elms) { elms.forEach(el => el.remove()) } }
I've used these in multiple projects, and I'm quite happy with their performance. The fun things to note in the KeenCarousel class are those methods associated with breakpoints. We're mobile-first, so we need to be aware of screen sizes and different resolutions. We set our breakpoints at initialisation like this:
this.breakpoints = [ { min: 1440, slides: 4 },{ max: 1439, min: 810, slides: 3 },{ max: 809, min: 750, slides: 2 },{ max: 749, slides: 1 } ]
Then provide them to Keen like this:
this.options = { loop: true, duration: 300, slides, breakpoints: this.buildBreakpoints(this.breakpoints), }
Those options semi-map to the options Slick Slider accepts; for instance, loop is equivalent to infinite. Some things don't work in the same way, and that's why we have so much more code. It's going to be laborious to go through all the child classes, so we'll only look at a few here; they all inherit from KeenCarousel, though.
class PromotionCarousel extends KeenCarousel{ constructor(element, parent){ super(element, element) const slides = '.slick-carousel-item' this.children = this.element.querySelectorAll(slides) this.slidesNumber = this.children.length window.addEventListener('resize', () => this.checkWidth()) this.breakpoints = [ { min: 980, slides: 4 },{ max: 979, min: 540, slides: 3 },{ max: 539, slides: 2 } ] this.options = { loop: true, slides, breakpoints: this.buildBreakpoints(this.breakpoints), } this.resizeTimer = null this.checkWidth() } handleChange(direction) { const relativeSlide = this.slider.details().relativeSlide const slidesPerView = this.slider.options().slidesPerView if(direction === 'prev'){ if(this.slidesNumber >= (slidesPerView * 2)){ this.slider.moveToSlideRelative(relativeSlide - slidesPerView, true) }else{ this.slider.prev() } }else{ if(this.slidesNumber >= (slidesPerView * 2)){ this.slider.moveToSlideRelative(relativeSlide + slidesPerView, true) }else{ this.slider.next() } } } checkWidth() { if (this.resizeTimer){ clearTimeout(this.resizeTimer); } this.resizeTimer = setTimeout(() => { const breakpointSlide = this.getTarget(this.breakpoints) if(this.slidesNumber > breakpointSlide) { if(!this.slider){ this.slider = new KeenSlider(this.element, this.options) this.element.parentNode.insertBefore(this.createButtonHandler('Previous'), this.element.parentNode.firstChild) this.element.parentNode.append(this.createButtonHandler('Next')) } }else{ this.slider && this.slider.destroy() Helpers.removeElements(this.element.parentNode.querySelectorAll('.slick-arrow')) this.slider = null setTimeout(() => { this.children.forEach(slide => { slide.setAttribute('style', `width: ${(100 / breakpointSlide).toFixed(2)}%`); }) }, this.options.duration * 2) } this.resizeTimer = null this.element.parentNode.classList.remove('opacity-0') }, 100) } }
This class is the last one I've worked on, so it's fresh in my mind. It's also worth bearing in mind that the carousel is contained within a _holder div with a small amount of padding to the left and right to hold the arrows which the user can click on to move through the carousel - though dragging works by default, which is nice.
We've added functionality to that movement: if more than twice as many children can be displayed (according to the breakpoints), then the carousel moves the same number of items as the breakpoint for the carousel. Meaning that if there are three items in the carousel, and we're only showing two, then clicking on the arrow moves the carousel one item along. Should there be four or more items, then it moves two items at a time. I like this mechanism, and the logic is in the handleChange method. We use the parent class's createButtonHandler method to create those buttons, and they're attached to the parent _holder element rather than to the carousel itself. We don't initialise the carousel within the constructor method. Instead, we call the checkWidth method - we also add an event listener to the window, which will call checkWidth. checkWidth is the method where most of the heavy lifting occurs.
Upon developing this carousel, I noticed that it was firing multiple times. We make sure to do a sort of debounce using a setTimeout - it's a little bit of a hack, but it works a treat and saves using an external library which - in all likelihood - would do something similar but hide it from us.
After getting the number of items to be displayed, we check it against the number of children elements - which we set during the construction of the class. We know that the items all have a class of slick-carousel-item, so we use a querySelectorAll to get them all from the element (we might need them later) and store their number in the classes slidesNumber property.
If the slidesNumber is higher than the current breakpoint slide number, and we don't currently have a slider in play, we initialise the keen-slider and store it in our slider property. If we don't need to kick off a keen-slider, we destroy the slider if it exists, remove its buttons, and tweak the items within a setTimeout (see, it was a good idea to store them when we initialised the carousel) so that they display appropriately. The carousel element is a horizontal flex-box with overflow hidden, so items automatically float to the left.
We carry on listening, though and, should the resize event occur again, we'll run checkWidth all over again. Neat eh?
On our product display page, we have several images. We have the primary image associated with the product and any other pictures or resources (such as videos). The main carousel only shows one item and another carousel, directly under it, contains thumbnails of that image and any other images or links. Clicking on the thumbnails moves the primary carousel to the appropriate image. As such, one acts as the ParentCarousel; the other is the ChildCarousel. In terms of their relationship, the parent invokes the child but then listens to it; the child only exists to direct the parent and - by default - shows four images.
Let's look at the parent:
class ParentCarousel extends KeenCarousel { constructor(element, passedOptions = {}, rejig = false){ super(element, element) this.passedOptions = passedOptions const slides = '.parent-element' this.children = this.element.querySelectorAll(slides) this.rejig = rejig this.hasButtons = false this.options = { loop: this.children.length > 1, duration: 1000, slides, controls: true, created: () => this.element.parentNode.classList.remove('opacity-0'), mounted: () => setTimeout(() => this.slider.resize(), 3000), afterChange: element => { ;[...this.element.querySelectorAll('iframe')].forEach( iframe => iframe.contentWindow.postMessage(JSON.stringify({ event: "command", func: "stopVideo", args: "" }), '*') ) const slideIdx = element.details().relativeSlide const slide = this.children[slideIdx] const img = slide.querySelector('.parent-carousel_image') if(img && !slide.classList.contains('zoomable')){ slide.classList.add('zoomable') $(slide).zoom({ url: $(slide).data('enlarge-img'), on: 'click', magnify: 0.75, touch: true }) } } } ;[...this.element.querySelectorAll('iframe')].forEach(iframe => { const src = decodeURIComponent(iframe.src) iframe.src = `${src}${!!~src.indexOf('?') ? '&enablejsapi=1' : '?enablejsapi=1'}` }) this.slider = new KeenSlider(element, this.options) this.child = document.querySelector(this.passedOptions.asNavFor) if(this.child){ this.child = new ChildCarousel(this.child, this) } if(this.rejig){ Helpers.removeElements(this.element.parentNode.querySelectorAll(".slick-arrow")) } if(this.children.length > 1){ this.element.parentNode.insertBefore(this.createButtonHandler('Previous'), this.element.parentNode.firstChild) this.element.parentNode.append(this.createButtonHandler('Next')) } this.enableZoom() } handleChange(direction) { if(direction === 'prev'){ this.slider.prev() }else{ this.slider.next() } } }
It's quite similar to the previous carousel except for adding the zoomable class and triggering some jQuery to elements just coming into view - this saves us loads as larger images are only downloaded when required. It also does some fancy stuff with YouTube links which might already have query parameters. If there are already query parameters, we append the new parameter with an ampersand (&); if not, we add it with a question mark (?). That particular issue took a good couple of hours trying to figure out why YouTube videos didn't stop when they were out of view on the carousel. We also have some logic on the backend that links the two carousels - the parent has a data attribute of data-as-nav-for that links to a thumbnail carousels class attribute. We need to check it's there before invoking it:
class ChildCarousel extends KeenCarousel{ constructor(element, parent){ super(element, element) const slides = '.child-element' this.children = this.element.querySelectorAll(slides) const slidesPerView = 4 this.parent = parent this.options = { loop: true, slidesPerView, slides, mounted: () => this.element.parentNode.classList.remove('opacity-0'), } if(this.children.length > 3){ this.slider = new KeenSlider(this.element, this.options) if(this.children.length > 3){ this.element.parentNode.insertBefore(this.createButtonHandler('Previous'), this.element.parentNode.firstChild) this.element.parentNode.append(this.createButtonHandler('Next')) } }else{ this.element.classList.add('justify-content-center') ;[...this.children].forEach((child) => { child.classList.add('w-33') }) this.element.parentNode.classList.remove('opacity-0') } this.handleChildClicks() } handleChildClicks() { ;[...this.children].forEach((child, index) => { child.addEventListener('click', e => { this.parent.slider.moveToSlideRelative(index, true) }) }) } handleChange(direction) { if(direction === 'prev'){ this.slider.prev() }else{ this.slider.next() } } }
Again, we do clever stuff about whether or not we invoke the child carousel's slick-slider. We also add event listeners to the child elements in handleChildClicks, which tells the parent to moveToSlideRelative.
Carousels are marked up with the class of opacity-0, which sets the element to have an opacity of 0. We remove the class once the carousel is initialised (whether or not it's a keen-slider). We sometimes also add an initialised class to ensure we don't re-initialise existing carousels. The opacity-0 class prevents Cummulative Layout Shift - the elements are there; they're invisible! I like this way of doing things - we hide them until they're ready.
These are just three of the carousel classes we use; there are another nine, some of which have dots underneath (which also act as navigation between the elements). Those carousels were fun, and I dare say you can see evidence of them in the keenCarousel classes createDots method.
Replacing Slick Slider with keen-slider was a mammoth task but thoroughly enjoyable. I pondered turning them into components like I considered doing for my interview, but I don't think we're ready for that just yet; perhaps the next time I have to look into this, I'll do just that, though.
0 notes