lu ; #usermyr — creations“dumb of ass, huge bitch, profound kindness”the dark!jps to my liar!lu ♡
Last active 60 minutes ago
Don't wanna be here? Send us removal request.
Statistics
We looked inside some of the posts by myrcella-lannister and here's what we found interesting.
Average Info
Notes Per Post
10K
Likes Per Post
7K
Reblog Per Post
4K
Reply Per Post
3
Time Between Posts
1 hour
Number of Posts By Type
Text
16
Photo
1
Last Seen Tumblr Blogs


Fun Fact
Tumblr has 4 main sources of revenue.
Text


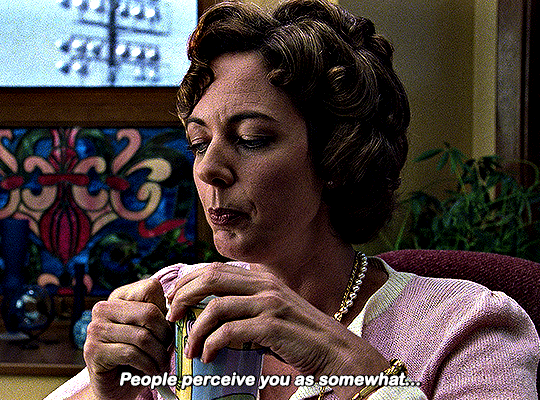
TRUE BLOOD 1.01 | "Strange Love"
3 notes
·
View notes
Text


ELIZABETH GILLIES for ELLE (July 2025)
21 notes
·
View notes
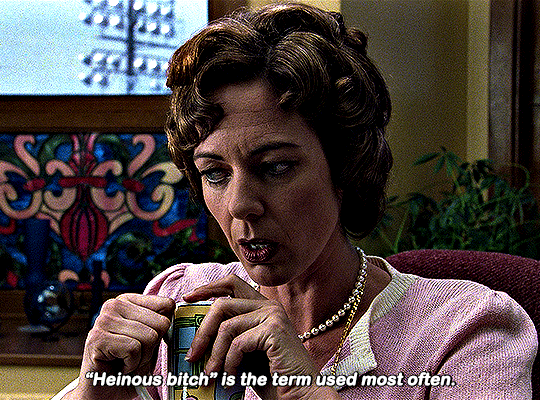
Text


TRUE BLOOD 2.04 | "Shake and Fingerpop"
75 notes
·
View notes
Text


Pride & Prejudice (2005) dir. Joe Wright
1K notes
·
View notes
Text


MEAN GIRLS 2004, dir. Mark Waters
214 notes
·
View notes
Text


KRISTEN STEWART AS BELLA SWAN TWILIGHT (2008)
#twilight#twilightedit#kristen stewart#bella swan#dailyflicks#moviegifs#filmgifs#dailywomen#dailytvfilmgifs#fantasyblr#mine#usersilene#usertana#usermina#she is so cute
53 notes
·
View notes
Text


Kate Winslet as Rose DeWitt Bukater TITANIC (1997)
703 notes
·
View notes
Text

Hi! I got asked if I have an icon tutorial so I thought I'd do my best to go through my (probably way too long) process :) I'm going to show how I made that icon up there 👆
When I first started making icons I used this great tutorial by @/strwrs and then slowly added my own preferences to make this chaotic process 💕
First for getting screencaps of things i normally just google "[name of show/movie] screencaps" but one of the ones I use a lot is this site.
1. Open the pic in photoshop and crop it
Here's the full image:

Here's where I'm cropping it:

I like to make the size of my icons 250x250 but it can be more of a preference thing, a lot of people use 200x200 or I've seen 100x100 too.
I also like to crop a little above the image sometimes to give more space above the head
2. Removing the background
Removing the background is way easier on animation than on real people sometimes so I can show 2 examples even though I do it the same way...
First I go to select > select and mask:

Then I use the quick selection tool to select as much of the head as i can and the brush tool to remove/re-add parts that got missed so it should look like this:


(is the quick selection tool great? not all the time but when it works well it's great 🤡)
For something like this where her hair has a lot of texture in it and it's difficult to get a good outline, I'll zoom in really far and use the brush tool to get as many of the big pieces as I can so it looks a little more natural when the background color is added

Sometimes there can be a white/black line around the icon that got missed from erasing the background and you can use the brush tool to erase that as well.
3. resizing and sharpening
Now everything should look like this:

I'm going to go to the right where my layers are at and create a new group by clicking on the folder at the bottom
Then I drag the layer mask up to link it to the group instead of just the image and drag the image into the folder:

Next I like to sharpen before I resize the image so I open the group and highlight the image layer and then go filter > convert for smart filters and then for sharpening: filter > sharpen > smart sharpen with these settings:

Now with the image layer still highlighted i go to image > image size and set it to 250x250

4. the fun part ✨
Now we can add the background color and everything else ✌️
I have a lot of previous templates saved to save me time so what I normally do is open a psd template I have then highlight the group layer i just made then right click > duplicate group and have the destination be the psd and then I can just change the colors of gradients i've already made (For this tutorial though I'll show you how I make the gradients/paint layers)
For coloring this is pretty much what my process usually looks like (im probably going way overboard with it but oh well lol) it really depends on the pic being used, some don't need to be colored as much.
I have found that over brightening/upping the vibrance isn't necessarily a bad thing sometimes (not all the time though) because of how small the icons are it kind of helps the image stand out more when they're used but it's up to you!
(I also put all the adjustment layers into one group because it gets a little chaotic if I don't)

Next we're going to make a gradient ✨ first i go to the adjustment fill button (?) and pick gradient

Then I just pick one of the generic photoshop options that kind of has the look I want ( it doesn't matter too much since it will be edited so it can be any color)

Now to change the color of the gradient click on the color part in the gradient section and you'll see this

I deleted the bottom middle square because I didn't want it, but to change the colors double click on the bottom left or right squares and a color wheel will pop up.
When I pick the lighter color i normally just go up to a lighter section above the darker color
This is the change i made, you can move the middle diamond slider to have the darker or lighter color be more prominent

Next is playing with the angle/scale until it's how you want it, these are what mine ended up being

I also normally adjust the angle so that the lightest part of the gradient is in the top corner where the light source is coming from in the icon pic to make it look more natural
Next I add a solid color layer over the coloring layers with a color that's similar to the background gradient color im using and switch to the brush tool with black paint and with the layer mask selected on the solid color layer paint over everything i don't want colored with black
Then I do a second solid color layer set to a lightish brown, normally on just the hair, to add a bit more contrast

then i set the color fill layer that matches the background to either overlay, soft light, or color (depending on which one looks best for the image) and adjust the opacity/fill to where I want it.
I always set the brown layer to soft light with the opacity at around 80%
And NOW just when you think I might be done...I'm not...because I have to make this process as long as possible 😂
Now I do another color fill layer but this time over the entire image group layer. I normally make the color a slightly lighter color than the darkest part of the background color, set it to soft light, lower the opacity/fill to about 50% or lower, (depending on how much it changes the pic) and then right click > create clipping mask so it only effects the image and not the background
This kind of just tints the image a little with the color to bring it together a little more

Now the icon looks like this:

You can add more fun stuff like doodles/background textures i've used these and these but there's a lot of resource blogs like @/completeresources and @/allresources that have long lists of different textures
If i wanted to add a texture though i would put it over the gradient layer and set it to overlay or soft light


And to add a doodle you just put it at the very top of everything and resize it/turn it using the move tool :)


Then you're done! you can go file > export > quick export as png and thats it 👏
Hopefully this makes sense! I've uploaded the template i made in the tutorial here if that's easier to follow but feel free to ask if you have any questions!
83 notes
·
View notes
Text


COURTNEY EATON Unknown, 2020
#courtney eaton#these healed me!!!!#so so beautiful#look at this angel#tagged#thank you for tagging me silene!!!#you post the prettiest things always ❤
55 notes
·
View notes
Text


— I have protected the papacy against her enemies when none other would stand his ground. I have made my family strong in the face of those who would weaken it. I have brought low the heretic Savonarola and outwitted the army of the French King, and all this, Father, all this, I have done for Rome and the Church… and for you.
#phew...#love this show#rodrigo borgia#cesare borgia#the borgias#tagged#thank you for tagging me tha!
97 notes
·
View notes
Text


She is your story, Ben. HAPPY ANNIVERSARY TO TWISTERS!
311 notes
·
View notes
Text


Actually, for the premiere in London, all my friends and all my family were coming and so I wanted to like bring them into the line dancing world so I hired a line dancing instructor to take us through a dance. So we started doing it at the premiere after party which was fun. Glen Powell and Daisy Edgar-Jones on "Twisters" Easter Eggs, Life Advice, and Line Dancing
42 notes
·
View notes
Text

DAISY EDGAR-JONES as KATE CARTER TWISTERS (2024)
418 notes
·
View notes
Text


Charlie Vickers as Kieran Elliot in THE SURVIVORS (2025)
358 notes
·
View notes
Text


JENNIFER'S BODY 2009 ― Dir. Karyn Kusama
1K notes
·
View notes
Photo


10 THINGS I HATE ABOUT YOU (1999) dir. Gil Junger
4K notes
·
View notes
Text
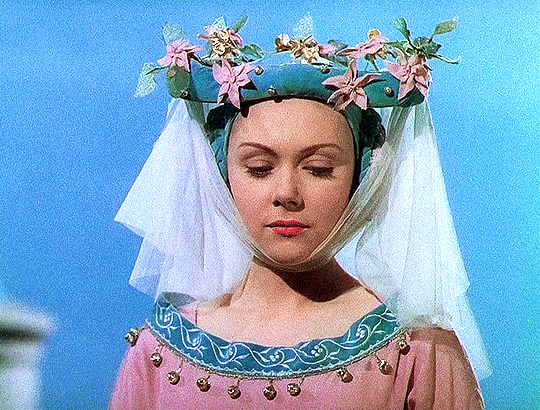


RENÈE ASHERSON as Princess Katherine HENRY V 1944 | dir. Laurence Olivier
671 notes
·
View notes