
Everything I’ve learned about being a veterinarian from volunteering at Burkeview Animal Hospital, Burnaby, B.C
Don't wanna be here? Send us removal request.
Statistics
We looked inside some of the posts by myveterinaryexperience and here's what we found interesting.
Average Info
Notes Per Post
37
Likes Per Post
30
Reblog Per Post
7
Reply Per Post
0
Time Between Posts
13 days
Number of Posts By Type
Text
17
Last Seen Tumblr Blogs


Fun Fact
Tumblr was the first site to host the blog for President Barack Obama in 2011.
Text
Preparing Surgical Draped & Towels for Steam Cleaning

In order to sterilize the towels and drapes for a surgery, our clinic puts them into a steam cleaner. Before putting them in, however, we must wrap them in a protective towel. The picture above shows all the supplies needed.
1. Take a lint roller and roll it across the surface (table, mat, etc) that you will be using to ensure there are no hairs or dust that will get on the towels or drapes. During surgery, these things can get inside the wound and cause problems like infections.

2. Use the lint roller to gather any hair or dust on every one of the cloth being used for the same reason as the one stated above. Make sure to roll over the front and the back. Most of the deb cannot be seen, and you may find a surprising amount of it as shown below.


3. Fold the drape or towel in half (in the landscape way) and then fold it into a small square using the accordion method (fold once front, and fold once backwards). Then place the towel or drape the protective towel so that it is in the centre of the protective towel.

4. Bring in the edges of the outer towel to the middle, starting from the bottom one (closet to you), then to the sides, creating a pocket to tuck the top edge into. Ensure it is tight, as you want it to be as tightly packaged as possible to fit into the steam machine.

5. Seal the crack with a special tape (it changes colour once it as been steamed, so we know what has been sterilized and what has not). Label the name, date, and type of tool inside (towel, drape, surgical tools, etc)
*If the objects inside are surgical tools, make sure to add the little strip of paper shown in the first picture, as they are also indicators that they’ve been cleaned.


0 notes
Text
Managing Chicken Coups


Here is a rundown of how we keep a safe and clean environment for our rescued chickens to thrive on Happy Herd Farm Animal Sanctuary.

1. Using a scoop and bucket, clean out any wet shedding (likely contaminated with urine), dropping and feathers. This helps keep disease or infections from spreading.


2. Clean & Change the water, making sure the chickens always have plenty to drink!

3. Refill the dish with chicken feed from the feeding tub, taking care to close the tub’s lid after, as mice (or the chickens) loved to get in there and knock the thing over.


#animals#veterinarian#veterinary#vetblr#animal facts#farm#farm animals#cleaning#chicken#farm managing#chciken#birds
2 notes
·
View notes
Text
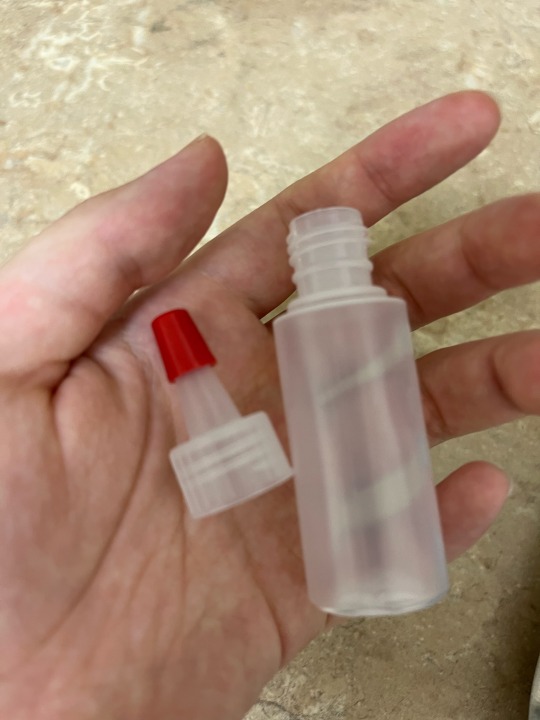
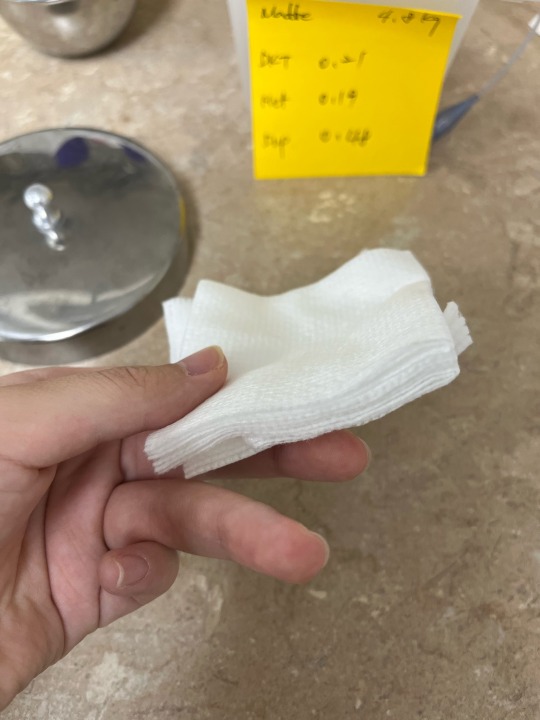
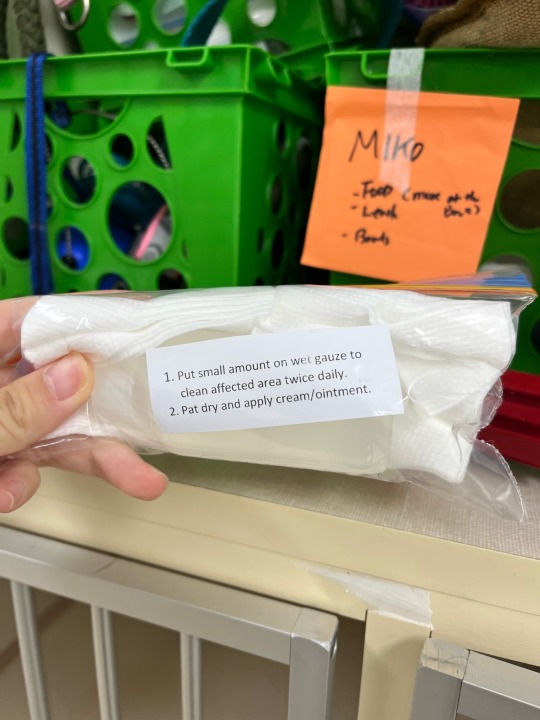
Portable Clean-Kits
Sometimes, the dog or cat will have an injury that needs to be cleaned regularly at home. In that case, our clinic makes a clean-kit so that the owners can take care of their pets properly. The following is how we make them.
1. Prepare the materials: containers, Germi-Stat (an anti-septic solution), gauzes, and plastic bags.
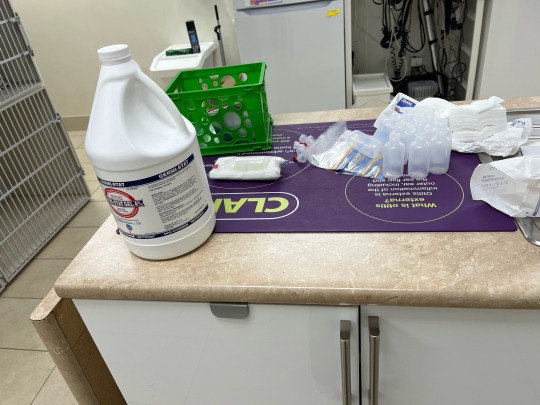
2. Pour the Germi-Stat solution into the plastic containers. It is recommended to use a funnel.


3. Take ten of the gauzes, and make two piles of five.
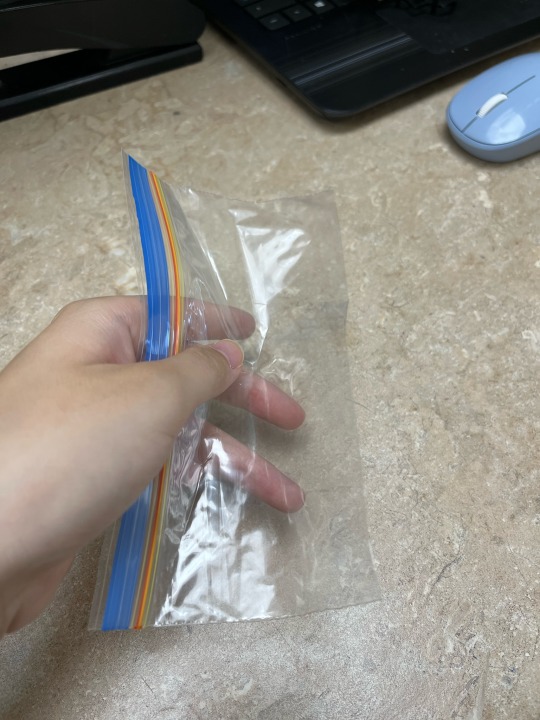
4. Place the container with the solution into the plastic bag, followed by the gauzes on each side as shown below. Our clinic likes to place instructions inside the bag to make using it easier for the owners
#animals#veterinarian#veterinary#vetblr#animal facts#vet#disinfecting wipes#vet stuff#animal cleaning#animal care
1 note
·
View note
Text

2 notes
·
View notes
Text
How to clean syringes
These are the steps I take when cleaning out the used syringes in the veterinary clinic. Note that any syringes with blood or other such material inside will be thrown out, not reused.
1. Give the syringes a quick rinse before drawing in some of the disinfectant liquid and soaking it in the tray for a few hours.


2. Take out the syringe, eject the disinfectant back into the tray and wash its inside. You can do this by either drawing in some water and pushing it out a few times, or pulling apart the syringe and running the parts under running water for a few seconds (I find that the latter is much faster).


3. Lastly, leave the separate parts of the syringe to dry on a towel for another few hours.

0 notes
Text
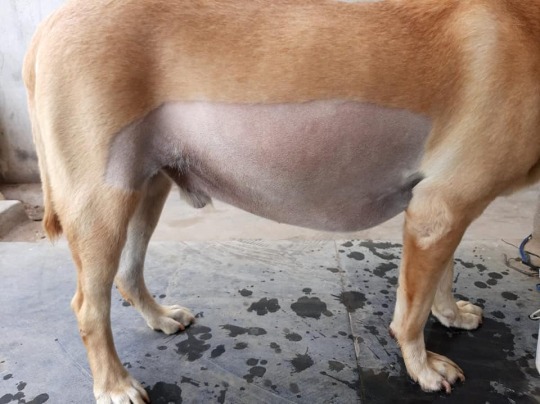
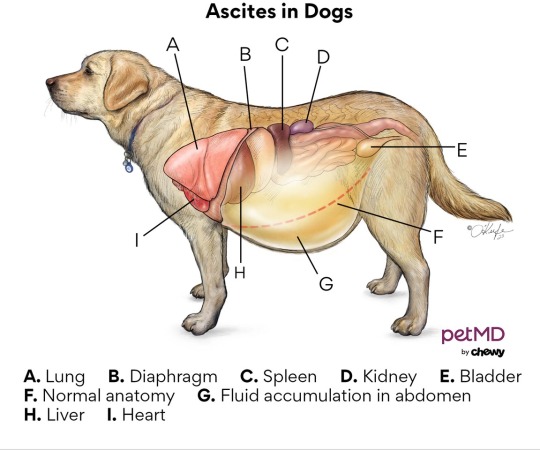
Ascites in Dogs
(Source: Mobile Vet Clinic)
Definition
Ascites (also known as Malignant Ascites, Abdominal Effusion or Free Abdominal Fluid) is a condition in which fluid fills up the space of a dog’s abdomen. This condition had the potential to be life threatening, as the buildup of the fluid exerts pressure onto the chest cavity, which causes difficult in breathing and leading to other negative symptoms. Additionally, though the ascites fluid is generally made up of a combination of lipids, bile acids and proteins, closely examining the composition can tell the veterinarian what the underlying cause may be.
Causes
There are various causes of ascites— most of them related to an organ failure —including, but not limited to:
(Source: PetND)
1. Right side heart failure
2. Heartworm disease or dialated cardiomyopathy
3. Liver disease (hepatitis, portal hypertension, etc)
4. Infection in the abdominal lining (Peritonitis)
5. Ingestion of poison or toxins
6. Lack of protein
7. Presence of cancer or tumours
Symptoms
Should a dog display the following symptoms for a concerning amount of time, take it to a veterinarian for an examination.
1. Lethargy/Weakness
2. Decreased appetite
3. Excessive bloating of stomach/abdomen
4. Sudden weight gain
5. Excessive panting or difficulty breathing
6. Pale or discoloured gums
7. Coughing
8. Diarrhea
Examination, Diagnosis & Treatment
During the physical examination, the veterinarian can use ultrasound, x-rays, chemistry panel, CBC (complete blood count), palpating (touch) and urinalysis, along with examining the fluid contents to diagnose and determine the cause of the ascites.
The treatment for ascites has multiple steps. First, the veterinarian drains the fluid to facilitate the dog’s breathing and for its comfort (this is only a temporary solution, as the fluid will build back up). This is done by inserting a needle into the dog’s abdomen and using an attached tube to draw out the fluid.


Then, the vet needs to address the underlying causes. For instance, if the dog has a tumour or damaged organs, a surgery may be required. Or if the problem is that the dog lacks protein, then a transfusion or special diet is recommended.
Unfortunately, there are some cases where the condition cannot be cured. This is especially common for older dogs.
#dogblr#doglover#animals#veterinarian#veterinary#animal facts#vetblr#doggo#veterans#animal medicine#medicine#vet#animal health#dog tips
3 notes
·
View notes
Text


Chickens & Lameness
Definition
Lameness is a phenomenon in which the individual has problems using one or both feet to move around, which could be due to malformation, disease, or or factors. This post will specifically focus on the lameness in chickens.
Causes
Some causes of lameness in chicken are as follows:
Sprain, Injury, Strain or Breakage
The chicken may have injured their leg or feet, resulting in difficulty moving. Check to see if there are any visible swelling or misalignments of the leg, and take the bird to a local farm vet if necessary.
Genetic Issues/GMO
Sometimes, the lameness is inherent to the chicken due to a mutation. GMO chickens may be especially prone to this.
Diseases and Infections (both viral and bacterial)
Lameness is commonly caused by diseases and infections, prime examples of which being Bumblefoot, scaly leg mites, Hock disease, worms or parasites, Marek’s disease, arthritis, just to name a few. These definitely require the attention of a professional, and the chicken should be taken to a veterinarian as soon as possible.
Diet Deficiencies/Intake of Toxic substance/Poor Living Conditions
What the chicken eats or where the chicken lives may impact their health negatively, resulting in a limp. Ingested toxins could cause difficulty in motor function, balanced and other health problems.
Caretaking
Lame chickens will usually have accommodations and additional requirements on top of the usual needs of an average chicken. For example, chickens with Bumblefeet or Scaly Leg Mite will need routine checkups and treatment. Consult a local farm veterinarian for treatment options.
It is advised to keep the lame chickens separately, as the other chickens may bully or harass them, which may cause the lame chicken stress, malnutrition, or further injury.

#farm#animals#veterinarian#veterinary#animal facts#farm animals#chicken#chimken#chicken facts#vetblr
1 note
·
View note
Text
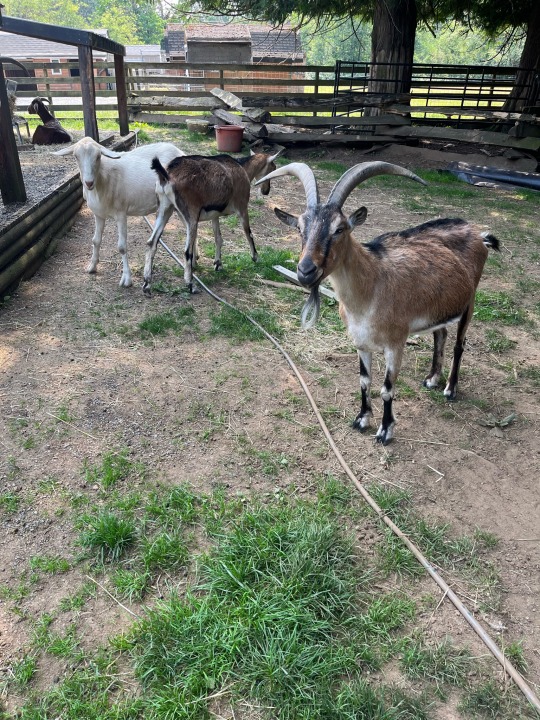
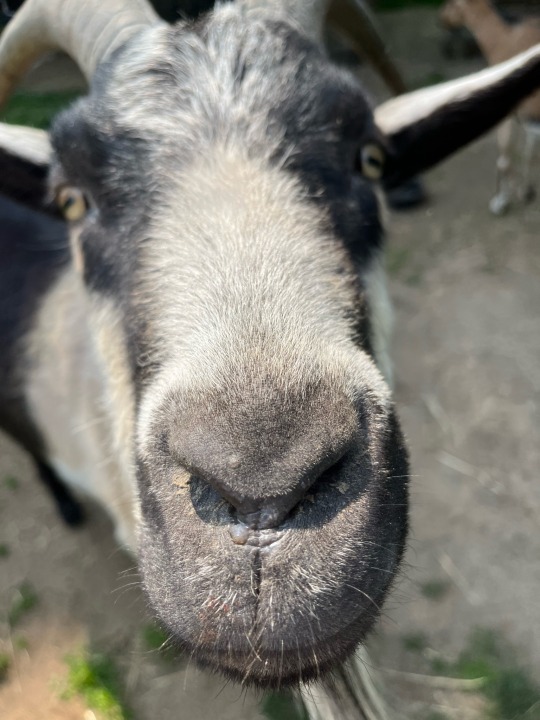
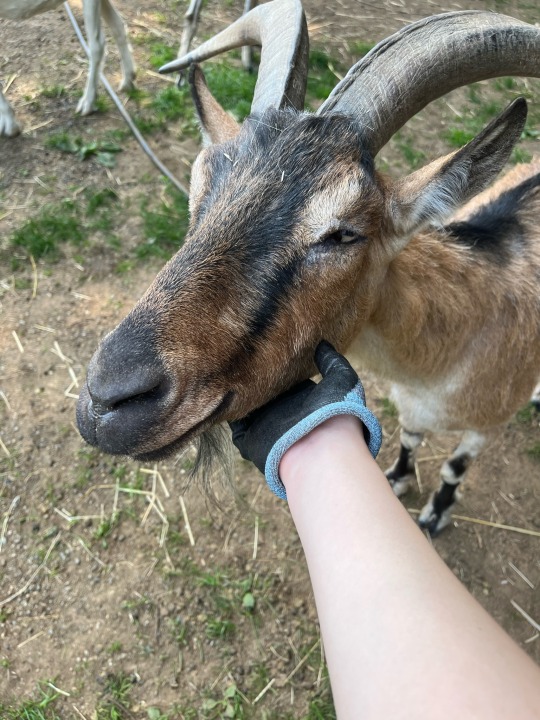
Goats
A documentation of my experience with Goats at the Happy Herd Farm Animal Sanctuary.
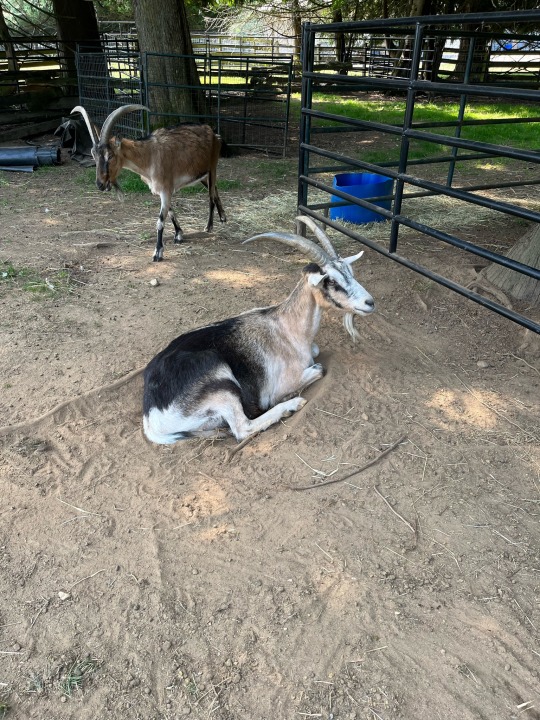
General Information
The goat is a livestock animal that comes from the Capra genus (Binomial Nomenclature: Capra hircus) They appear similar to sheep, in that they have horizontal, thin pupils, live in herds, the males have horns, but goats have a thinner coat, tufts of hair (or beards) under their chin, and less curled horns. Like cows and antelope, goats are a type of mammals called ruminants, meaning they have a four chambered stomach, allowing them to break down even low-quality feed. They were domesticated for their milk, hide, meat, and fur 10 000 years ago, and now there are around goat 300 species in the world today.
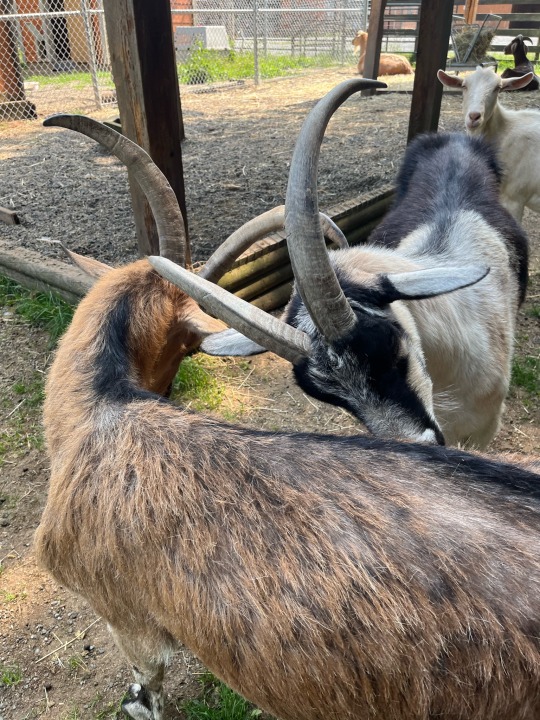
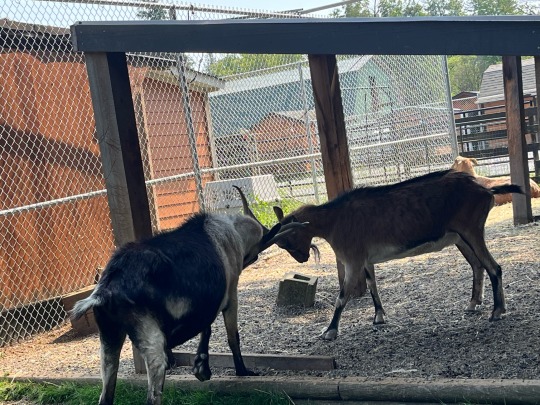
Behaviour
Goats are social with both other goats and people, but they can also be very independent and curious compared to other herd animals like sheep. They are clever animals, and can often be found escaping their enclosures— usually by jumping — just for the sake of a challenge.
They can be aggressive, even if in my experience, they’re very friendly towards humans. Though both sheep and goats use their horns to headbutt their opponents, goats stand on their hind legs to ram downwards. Goats also often stand in this manner to feed on higher up foods like leaves or twigs. There is a strict social hierarchy among goats based on age, body size and horn size, and it is generally recommended to wait until they approach you first. If a goat likes you, it will slowly walk up to you, and they may even rub their head against your leg or lean on you.
Care
Goats are relatively easier to care for compared to other animals like horse or cows, as they can graze on almost any plants
As mentioned before, goats are herd animals, so they work best in spacious areas with other goats to keep them company. About 15-20 square feet per goat is recommended for indoor areas (depending on their individual size) while 25–50 square feet per doe, 32–97 square feet bucks, and 5–32 square feet per kid (according to backyardgoats.iamcountryside.com). Straw or bedding is optional, as though it provides insulation but can also be expensive. Similarly, a decent shelter to serve as a cover from any storms or rain is appreciated.
Goats are famous for their ability to jump, so fences must be constructed appropriately. To be safe, fences should be over four and a half feet for larger goats, and over four feet for the miniature ones. Goats can also be smarter than we think, and here on Happy Herd Sanctuary, we have routine attempts of these escape artists chewing through the softer wires or dashing out the gate when people enter.
As for food, goats generally feed on whatever weed or grass growing from the ground, but they do need a steady supply of hay. Goats in heat or rut can also require supplemental feed, which can be found in feed or pet stores. Lastly, to ensure the goats’ health, extra minerals and vitamins are recommended. A constant supply of clean water is also a must, so their water buckets must be changed at least three times throughout the day.
On Happy Herd, we regularly clean, feed and brush our goats to fight off disease and ensure they stay healthy. Vaccinations, hoof trims, and worm prevention is also integral to the goats’ health. A livestock veterinarian can be consulted on such matters.
#goat#farm#veterinary#veterinarian#animals#animal facts#farm animals#goatblr#goat care#goat facts#vetblr#vet
1 note
·
View note
Text


This is Noodle the baby goat. He has a neurological disorder so he walks in a lopsided manner and can’t swallow grass yet, but chews it anyway. So every now and then I have to force the chud of grass out of his mouth.
0 notes
Text
Veterinary Clinic Cleanup
After a long day at the clinic, there is still a cleaning routine that must be complete before closing. Here is what the typical cleanup looks like.
1. Garbage Disposal
To avoid carrying five garbage bags at once, I usually take out and replace the biggest trash bag first, then place all the other, smaller garbage bags into the first one.


2. Feeding the animals
In our clinic, we have two cats and two dogs that we raise in the building, as well as any patients who have to stay overnight. They’re fed about 30 minutes before closing time, and they all have to be separated or they’ll steal each other’s food.


3. Laundry & Backroom cleanup
Any laundry from earlier that day is taken out and folded, and the used towels, cloths and blankets are washed/dried for the next day.
The laundry room also happens to be where we keep the dogs during working hours (or else they’ll bark at every other pet that comes in) so this is when we also clean up any messes they’ve made during the day.


4. Vacuum & Mopping
Just before we leave, we vacuum and mop down the entire clinic to clean up any dirt, fur, or grim left during the day.

0 notes
Text
Cat Teeth types

(Credit: Hunterville)

(Credit: AZ Animals)
Cat (Adult)
1. Incisors
- Cats have 12 incisors (6 each on the upper and lower jaws)
- Located between the canines, in the front.
- Used for holding or grasping food, keeping tongue inside the mouth, and grooming.
- First of the adult teeth to form

(Credit: Pictures of Cats.org)
2. Canines
- Cats have 4 canines
- Located beside the incisors. It very prominent and notable as it is longer than other teeth.
- Used for hunting (biting and killing prey) holding or grasping food & keeping tongue inside the mouth.
- Adult canines emerge at about 5 months

(Credit: AZ Animals)
3. Premolars
- Cats have 10 premolars
- Located behind the canines and in front of the molars
- Used for chewing food and breaking it into smaller pieces
- Emerge at about 4-6 months of age

(Credit: Colostate.edu)
4. Molars
- Cats have 4 molars
- Located at the very back of the mouth
- Used to chew tougher material like bone
- Kittens don’t have these, only adult cats do.

(Credit: Banning Veterinary Hospital)
*30 teeth in total
Cat (Kitten)
Like many baby animals, kittens have less teeth than their adult counterparts, and grow new ones over their lifetime.
1. Incisors
- Kittens have 12
2. Canines
- Kittens have 4
3. Premolars
- Kittens have ten
26 teeth in total (these are often called milk teeth)
During teething, kittens often drool, or their tongues hang out slightly.
#cat#cat teeth#informative#animal facts#cat facts#veterinary#vetblr#vet stuff#catfacts#interesting#information#veterinarian
27 notes
·
View notes
Text
Pugs & BOAS

While the pug remains to be a favoured breed among families, recent studies have shown that their signature flat faces and rolls of loose skin are the result of inbreeding and selective breeding, which have made the pugs prone to all sorts of diseases.
For example, their skin folds can get damp and become breeding ground for bacteria and infection; not to mention pugs are one of the most common dog breeds to have Hemivertebrae (bulging of the spinal cord). However, their most famous defect is their respiratory issues: pugs, along with French bulldogs, British bulldogs, and many terriers, have been noted by many researchers as especially vulnerable to respiratory problems like BOAS.
BOAS, also known as Brachycephalic Obstructive Airway Syndrome, is defined by the National Institutes of Health as a “chronic, lifelong, debilitating, primarily obstructive airway disease.” The term “Brachycephalic” refers to the flattened head of the dog with BOAS, as back in the day, people bred those shortened jaws to make it easier for the dogs to clamp down on prey. However, the shrunken skull now had a disproportionate amount of tissue attached to it, leading to a deformed upper and lower respiratory tract that causes respiratory difficulties.
Some of these deformities include:
* Stenotic nares— the nostrils become narrower, leading to difficulty in nose breathing and increased panting (why noisy breathing and snoring is so common within pugs and similar breeds)
* Aberrant nasopharyngeal turbinates— extension of nasal turbinates (anatomical structures in the nose) into the nasopharyngeal meatus.
* An abnormally long, thick palate (roof of the mouth)— the palate then intrudes into the airway, and interferes with air moving into the larynx.
* Everted Laryngeal Saccules — tissue just in front of the vocal cords are pulled into the windpipe, partially blocking it.
* Narrow trachea— the windpipe is abnormally narrow
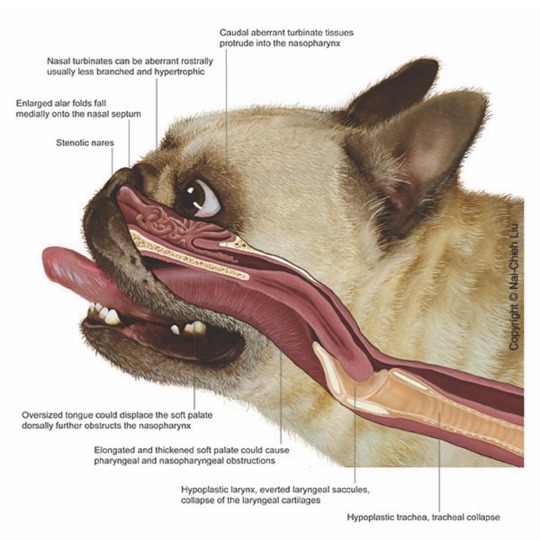
(Credit to UCD Veterinary Hospital)
The causation of BOAS in breeds like pugs are mostly attributed to their
stunted head size, but Jeffery Schoenebeck at the University of Edinburgh has also proposed that these problems may be genetic. He found that the Norwich terrier, which have better proportioned skulls compared to pugs, were affected with BOAS and similar respiratory diseases. According to the Smithsonian, Schoenebeck found upon further research that there were gene mutations—especially the ADAMTS3– that could cause dogs to have “fluid retention and swelling around the lungs” when possessing two mutated alleles.
Luckily, technology like genetic screening and breathing tests for puppies can identify the individuals most likely to develop respiratory problems and thereby reduce its prevalence on future generations. Already, Schoenebeck reports that the number of Norwhich terriers coming down with BOAS and similar breathing issues were on a decline since 1990; on a related note, “Retro Pugs”— a cross between a regular pug and Jack Russel Terrier— and “Puggles— a cross between a pig and a beagle—are being bred with the intent to create healthier pugs with more normal head proportions, which may help with the respitory deformities mentioned above.
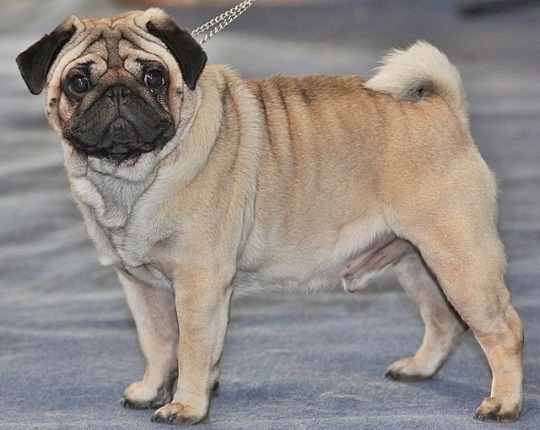
Regular Pug
(Credit to Wikipedia)
Retro-pug

(Credit to Dogtime.com)
Puggle

(Credit Kookypugs.com)
0 notes
Text
C. A. R. E. S Cat Shelter
Recently I joined the C.A.R.E.S Cat Shelter for stray, rescued, and lost cats, and it was the highlight of my weekend! The ladies running it were very kind, and the system was very well organized: there was a hospital room to isolate sick cats, “runs” or big enclosures that held cats that matched well with each other, and “Quiet Rooms” for the ones that need peace and silence to settle in.
I helped with the daily cleaning of the enclosures, and here were the steps:
1. Using a cloth and a spray bottle of Viraclean, wipe down any surface (except the floor). Place the cloth near the sink afterwards.
2. Take a hair removal brush and brush through any item made with cloth: blankets, beds, and scratching posts. Place the brush near the sink afterwards.
3. With a broom and dustpan, sweep the floor of the enclosure of any dust, hair, or food items. Make sure any items on the ground (food bowl, toys, bedding) is put somewhere else beforehand. Afterwards, place both broom and dustpan near the sink for washing.
4. Using a mop and a bucket of soap solution, mop the floor of the enclosure well. The mop goes near the sink after, but the bucket can simply be rinsed and reused since the cleaning solution would take care of any bacteria.
5. Empty, clean, and refill the litter boxes.
6. Throw out the old food and put the bowl in the sink for washing. Fill a new bowl according to how many cats there are in one enclosure and what special diets they may require (usually at least 2/3 cup of kibble is needed per cat). Do the same with water
*Any equipment can only be used ONCE, after which in it placed near the sink to wash (everything is cleaned with bleached all at once in the end) to avoid contamination. Preventing the spread of bacteria and illness is crucial, as it can quickly pass around in an enclosed space like a shelter.
*Every time before entering a new enclosure, volunteers must spray their feet with a bottle of Viraclean and sanitize their hands to reduce risk of spreading disease.
Finally, some pictures and videos


#cat facts#animals#veterinarian#veterinary#animal facts#pretty cats#cute cats#catfacts#animal shelter#cat shelter
0 notes
Text
This is Gigi!

She used to be the house cat of an elderly couple, but because of her aggression, her owners ended up having to give her up. (Gigi sent one of them to the hospital because of her bites and scratches). While the AFA (Action For Animals) is reviewing her case, she’s staying here at Burkeview.
Gigi arrived last week, and from the beginning she began attacking the staff and jumping around on the shelves, and it got to the point where she needed to be sedated in order to get her into her cage. She also had trouble relieving herself and refused to eat or drink. Everybody thought that we had to put her down.
BUT a week later, Gigi’s gotten much better. She eats regularly (we’ve found a snack brand she loves!), uses her litter regularly (no apparent issues in her urine or feces) and has mellowed down significantly. Gigi still hisses and bites randomly (especially in a noisy environment), but there’s been significant improvements made! Now we need to find her an experienced owner to give her a home.

0 notes
Text
DipQuick Stain Kit

Purpose:
The DipQuick Stain is used to detect traces of bacterium or fungi in the sample by colouring the infection. While other staining methods, like Gram Stains, may be use feces or blood, the DipQuick commonly takes samples from the skin or ear. As the name suggests, the procedure is relatively short.
Procedure:
1. Use a swab to rub against the surface of the ear or infected area, then transfer the contents onto the microscope slide. Allow the slide to dry.
*Some veterinarians prefer to heat the sample up with a dryer or a lighter
*Tip: Mark the side of the slide with the sample on it with a check mark at the handle. This will help differentiate where the sample is located on.
2. Put on a pair of gloves, then open the fixative bottle marked #1 (the light blue one) and repeatedly dip the slide into it about 10-15 times. Try to immerse as much of the slide as you can.
*Make sure you know what side the sample is on
3. Tap the slide gently against the rim of the container and get as much of the fixative off as possible. Then open the bottle labeled fixative #2 (the red one) and repeat the process.
4. Repeat for fixative #3 (the purple one)
5. Afterwards, flip the slid onto the back (the side with no sample on it) and wash the dye off under a gentle flow of water
*If the water is too strong, it might wash the sample off the slide, and everything must be done again.
6. Gently blot-dry the sample with a paper towel or electric dryer, then put under a microscope. If there is an infection, it will appear a stark violet (usually comical bacteria)
*Tip: when drying with an electric dryer, hold the sample sideways in the middle of the dryer’s opening so it dries both side of the slide simultaneously. (Shown below)
This is what the result might look like when looked through a microscope


0 notes
Text
Yeast Infection in Dog’s Ears
Yeast
Yeast is a type of unicellular fungi that can be found in the skin, paws, and ears of a dog. There is always some yeast present in the ears, which, if kept in control, will not harm your dog. However, if the yeast levels rise above the normal amount, it could start irritating your pet.
There are multiple types of yeast, such as Candida or Malassezia, that may infect your pet’s ear. Different types of yeast prefer different conditions; Candida are drawn to dogs that have a poor, carbohydrate-based diet of processed foods, while Malassezia like oily, moist environments.


Causes of yeast ear infections
- Trapped moisture & Humidity
- Dogs with bigger ears or dogs who like to swim are at particular risk
- Diet
- Processed kibbles are mostly digested into glucose and sugars, which may encourage yeast growth
- Oily skin
- Not only ears, but also arms pits and groins
- Overuse of antibiotics
- Medications for allergy drugs can kill off “good bacteria”, leading to overgrowth of yeast.
- Allergy drugs in particular can suppress the immune system, causing yeast levels to rise out of control.
- Heavy Metals & Other Toxins
- This could also kill off the “good bacteria”
- Not cleaning or checking the ear enough
*The yeast infection could be mistaken as a simple allergy. When in doubt, bring your pet to an available vet.
*Yeast infection in a dog’s ear can be a sign of other health problems, such as hormone imbalances or foreign substances in the ear.
Identifying Yeast Ear Infection
- Brown, waxy, smelly discharge from the ears
- Constant itching, scratching, pawing the ears
- Excessive shaking of head
- Inflamed ear
- Cheesy odour
- Loss of hearing or balance
- Reluctance to chew or open mouth
- Abnormal crusting or scabbing around the ear
*Veterinarians will frequently use gram staining (and a microscope) to identify yeast infections in an ear wax sample
How to treat Yeast Ear Infection
- Regular cleaning of the ears with a medicated wash
- Apple Cider Vinegar (diluted in a 1:1 ratio with water)
- Apply gently with a q-tip or cotton ball
- Medications prescribed by your veterinarian
- Anti-inflammatory medications
- Anti-fungal medications
- Improve your pet’s diet (remove carbohydrates and starchy vegetables from foods)
- Add yeast-fighting supplements (Ex. Probiotics, Garlic, Omega-3 Fatty Acid)
- Identify and address any underlying health problems that may be causing the yeast infection
*NEVER PUT STRONG CHEMICALS LIKE PEROXIDE INTO THE DOG’S EAR
*If possible, always take your pet to the vet, as a professional will have better means of treating the patient.
*If your dog is very aggressive, take it to the vet. Irritating an aggressive dog may pose a risk to your safety. The veterinarians will be able to safely clean and treat the infection.
#animals#veterinarian#veterinary#vetblr#animal facts#vet#animal ear cleaning#animal cleaning#dog care#infection#yeast infection
0 notes
Text
CPR for Cats & Dogs
1. Discovery
CPR for a dog or cat may be required is they are…
- Not responsive
- Clap/make noise at the animal to see if it responds
- If they do not respond to sound, touch the animal (near the rear) to see if it responds
- Not breathing
- Lacking a heartbeat
- Check for the pulse underneath the hind leg
*Ensure that the scene is safe, and approach the animal from the rear. That way, if it is startled awake, it will have less of a chance at biting/scratching you.
*CALL A VETERINARIAN OR OTHER PROFESSIONAL FOR HELP BEFORE YOU START. CPR is meant to sustain the animal long enough until it can be given proper medical care. It is not meant to be the solution, rather to buy time for the solution to arrive.
2. Open the Airway
Open the animal’s mouth. If there is an object blocking the airway, pull it out (However, if it is too far in, wait for the arrival of a professional). If nothing can be seen, gently pull its tongue out. This will open up the air ways. Close the mouth with the tongue hanging out of the side.
3. Rescue Breaths
For larger animals, (over 30 pounds) grasp the snout, give two rescue breaths (exhale) into the nose. Check for the pulse (under the hind leg).
For smaller animals, (under 30 pounds) give the rescue breaths into both the mouth and the nose.
If the animal has a pulse, give a rescue breath every 3-5 seconds.
If the animal does not have a pulse, begin CPR
4. CPR
Lay the animal down on its right side (due to location of heart). If it is a large animal, (over 30 pounds) kneel behind it; if it is a small animal, (under 30 pounds) kneel in front of it near the stomach.
For larger animals, lock in the elbows and use the palm to press down press down about 3 inches down. Depending on how big it is, two hands may be required. For smaller animals, place one hand underneath the animal for support, and press down about 1 inch with one hand (you may use finger or palm, depending on how small it is). As a general rule, the larger the dog or cat is, the deeper and harder you push.
Give 30 chest compressions for about 100-120 per minute (to the beat of the song “Staying Alive). After 30 compressions, give two rescue breaths. Repeat for two minutes (after about 5-7 cycles).
If there is a pulse, see step 2.
If there is no pulse, repeat step 4 for another 2 minutes.
*If you are unsure whether or not if you are pressing deep enough, press deeper for safe measures.
5. Details
For dogs, the breed and chest shape may change where you press down.
- Narrow-chested (Cats and small dogs)
Press heel of the palm directly over the heart. To avoid pushing too far, only use one hand.
- Deep-chested (greyhounds, Dobermans, Great Danes)
Lay down on their side and directly over the heart and try to squeeze it. May require more force than others.
- Flat/Barrel-chested (pugs, boxers, Labrador Retriever)
Flip the dog onto its back. Aim for the broadest part of the chest (breastbone/sternum).
*IF THE ANIMAL AWAKES, THEY MUST BE BROUGHT TO A HOSPITAL AFTERWARDS, NO MATTER HOW FINE THEY APPEAR TO BE AFTERWARDS
6. Other resources
youtube
0 notes