
Statistics
We looked inside some of the posts by namelesswanderers and here's what we found interesting.
Average Info
Notes Per Post
4
Likes Per Post
4
Reblog Per Post
0
Reply Per Post
0
Time Between Posts
1 month
Number of Posts By Type
Text
12
Last Seen Tumblr Blogs


Fun Fact
28.6 is the average number of monthly visits per US mobile user.
Text
MTiP Project
(Note: A synth called omnisphere is used in this project, so the project might not be able to load up correctly. Other effects plugins, mixer channels, etc... should load normally)
Why I chose to perform solo
The main reason why I chose to perform solo is because I have more control. Everybody has their own strengths, and the main focus of my work here is improvisation, so I feel like going solo might be the best because my strength is improvisation. And I don’t intend to record live samples because of the song type of my project, therefore I feel like the project is more suited to one person performing than a group of person performing.
Song Structure
The performance song is an ethnic song fused with hardcore (hardstyle) elements. The song is divided into two parts: the first part consists of only ethnic and other acoustic instruments, and the second part is more drum-heavy, consisting of both hardstyle and ethnic elements.
Instruments used in the song
In the first part, a marimba, lute (in tremelo), piano, choir is used. There are also some ambient soundscapes used in the performance. For drums, only a kick and snare is used, for more simplicity. A solo rock guitar is also used. In the second part, in addition to the instruments used in the first part, a hardstyle/frenchcore kick, hi-hats, a second set of kick and snare, Rhodes piano, a pluck and some sound effects are used. I mainly use omnisphere, a software synth for this project.
Pre-Performance
I set up a lot of things before the performance, on the project file. First of all, I wanted to do a fixed length looping in my performance. When I press the record button to record something, I have to initially press the record button again to stop recording, and that produces a problem. When what I play on the keyboard is very busy and using both hands, I do not have a third hand to press the record button. I used a external plugin that is created by max msp, in .amxd format. When I set the clip length, it automatically stops recording after a certain length after I press the record button to record something. For example, when I set the clip length to 4 bars, it will stop recording after 4 bars after I press the record button. I also set the bar length on the top left corner to 4 bars. This means that after I press the recording button, it will wait a 4-bar period until it starts recording. Say I press record at 2.1.1, it will wait till 5.1.1 to start recording. Since the 4-bar period is from 1.1.1 – 4.4.4, 5.1.1 – 8.4.4, etc… I set instrument racks to help reduce the number of tracks needed. For example, in my hardstyle kick track, there are two samples inside the track: a Frenchcore kick sample and a hardstyle kick sample. I do this to allow myself to play the two samples at the same time, and also that I do not need to record the Frenchcore kick and the hardstyle kick separately. This is also used in the lute/rhodes track and rock guitar/bass guitar track, so that I can play two instruments at the same time (this was the original plan). And I also used the instrument rack for stacking sfx together, that way I can play two sfx as the same time with one key on the keyboard.
I did some simple mixing and mastering. For the piano, I added a high pass filter at around 500hz to it to avoid muddiness. For the marimba, I cut a little bit of the lows to also avoid muddiness and increase clarity of the instrument. For kick and snare, I cut off anything drastically under 50hz. I put a very, very slight reverb on the hardstyle/frenchcore kick track, and cut off anything at around 500-600 hz to allow some space for other instruments to kick in. High pass filters are also used on the pluck, the lute and the Rhodes piano. For the
ambient soundscape, I also applied a high pass filter at around 300hz, then cut off the highs at around 5k slightly, this is because there are certain effects used on the soundscape and I don’t want it to interfere with other instruments that much when I play with the effects, since the frequency content will change. For the drums including kick drum, hi hats and snare, I used compression to help bring out the punchiness. Also for the choir, the kick is sidechained to the choir to give the choir a ducking effect. On the master track I put a multiband compressor to squash dynamics. I made the low end louder in volume since the low end is the source of fullness and I have to balance it out since I used a lot of high pass filters on individual tracks. The multiband compressor is used to make the track sound fuller. Then I put a limiter at the end of the chain at -2 db ceiling, 3db gain, to avoid over loudness, since velocity sensitivity is enabled some instruments might be played louder than other instruments.
I used a simpler to cut the breakcore drum loop into different pieces so that each key in the keyboard triggers a different kind of drum, e.g. hi-hat, kick drum, snare etc.
I used effect rack for the lute/rhodes track. I grouped different effect plugins together. I set different knobs to macros for better control: a flanger and transmission plugin is used in that track, the phaser depth controls macro 1, the phaser rate controls macro 2, the transmission LFO rate controls macro 3, and macro 4 is the knob which decides which effect is affecting the sound - the chain selector. I applied fade in/fade out for the effects, so that when I switch from one effect to the other using macro 4, the action is done smoothly. I then map the knobs to the APC40, which I am using for the performance. Knob 1 controls macro 1, knob 2 controls macro 2, and so on. I also inserted a grain delay on the ambient soundscape track. Knob 1 and 2 controls the grain delay parameters. Finally I inserted a reverb on the rock guitar track. When I stop playing the rock guitar, at that moment I want the reverb tail present, so I mapped the reverb decay knob to the APC40 so that when I stop playing, I turn the knob all the way up and create a long reverb tail.
Finally, I set an aggregate device combining the headphones and the speakers, so that only the headphones will play the metronome, but the speakers will not. Cue out is the headphones, and master out is the speakers.
During Performance
During Performance, I am using the APC40 and an 88-key keyboard. The 88-key keyboard is for me improvising (the rock guitar part). When I play two instruments at the same time, if I use a keyboard that is not as big as an 88-key keyboard, things will be very limited. Also, it is better to use an 88-key keyboard for a typical performance like mine because I use a lot of instruments at different (pitch) registers, for example the bass is at low registers of the keyboard, whilst the rock guitar is at mid-high registers of the keyboard. There is no need to adjust the pitches of the instruments on the synth manually. The APC40 is used to control the record buttons. Since everything is auto mapped to ableton live, there is no need to set up MIDI routing manually.
Technical Difficulties
There are a few technical difficulties that I encounter when I am doing this project. The main problem is that the fixed recording length plugin (that one which is made with max msp) has bugs. Sometimes it happens and sometimes it doesn’t - the plugins sometimes forgets to stop recording after the fixed length. I tried to tackle this using different methods such as trying out follow actions but they don’t work the way I wanted it to work. Therefore, I will just use the plugin and hope for the best that it doesn’t bug during the performance. Also, when I play a note on the keyboard, it plays twice sometimes. One time when I press the key, and another time when I release the key. I tried troubleshooting it and I think this might relate to a bug in ableton, or some MIDI setting issues - but I still do not know the solution to fix this.
There is not much time for me to book studios and practice also, so it’s a bit hard to adapt to the APC40.
During performance there are more technical difficulties that I encounter:
Speakers were too bassy so I couldn’t hear the rhythm well (this doesn’t happen when I am practicing for the performance).
The fixed length recording length plugin bugged numerous times during my performance, which again doesn’t happen that much when I am practicing in the studios (I did test run the plugin a lot of times, the bug only happens roughly once or twice every one performance)
Also, I cannot set the metronome audio signal going to the headphones, so a hi-hat is used instead, which is played through the speaker. This creates a problem: when the hi-hat is blended in with other instruments, I cannot hear the hi-hat at all.
These problems made the performance rather unsuccessful.
I had to stop the performance because there were files missing from my computer and I cannot continue the song without these samples, since these samples are the most important features (and most of the features) of the second part of the song.
I should’ve checked if the samples are online in my computer before performing (which I didn’t think of at that time). It’s good that I have brought a backup hard drive for the missing samples.
I could’ve also used the speakers to practice when in the studios, and could’ve set the cue out and master out earlier.
3 notes
·
View notes
Text
How To Make A Mix Sound Fuller (self-researching)
So I kind of have a headache of why my mixes sound a bit thin, and I came across a technique called parellel compression.
Parallel compression is basically sending all the instruments to a bus then compress it, then blending it with the original signal.
To get the best results, try to compress the bus signal to around 8 db. Set the attack and release of the compressor to around medium knob level.
Then pull the bus fader till the compressor reads that the signal is compressed at around 8 db. The bus fader determines the amount of signal sent through to the bus.
Parallel compression is the last thing that we should do for mixing and mastering.
There are different uses to parallel compression, from limiting the dynamic range of a sound, to beefing up sounds and making the sound aggressive.
A website on parellel compression:
https://www.musicianonamission.com/parallel-compression-guide/
0 notes
Text
Redbone Childish Gambino Song Remake
Our group did a studio session for the song remake project. Due to wifi issues, we cannot record instruments into logic pro - so we did some jamming on the song to get a grasp of what the final product would sound like. We planned to put an electric guitar, drums, keys, strings and some more on the song. I did the piano part.
For the piano, I improvised on the piano to get the basic structure, then manually adjust the velocities of the notes to make it sound more human. Different chords have different velocities, and also in a single chord different notes can also have different velocities. Though the final product is kind of rushed, the basic work is done.
The chords of the song is C D Em. I altered the chords a little bit. I added sevenths and ninths into the chords, and also changed the chord Em to Esus4. The piano part plays basic chord harmonic skeleton, but I added some rhythmic changes (some ornaments) into it.
For the timbre of the piano, I chose an upright piano for a better sound. Most instruments in the song sound less sharp, so a sharper-sounding piano might give some contrast to the song. Since I don’t have a lot of piano presets, this is the only choice I have for an upright piano.
Alfie did the mixing - he used some compression on the piano. Also, he added a high pass at 100hz to filter out all the unnecessary low end and used a plugin called vitamin to boost the high end, to give it more tone and colour.
0 notes
Text
Equalizers
I learnt about how equalizers work briefly - I have some knowledge on EQ before the lesson, but I also discovered some new EQ modes and types of EQ.
In real life few sounds produce pure tones in the real world, sounds usually are composed by fundemental frequency, harmonics, and maybe some overtones. So that is why we need to use EQ in songs, because certain instruments might have unwanted frequencies clashing together, using EQ can give space for other instruments to join in.
Types of EQ range from passive EQ to graphic EQ to parametric EQ, and parametric & graphic EQ should be the most common ones. Parametric EQ is the most flexible one as the user can move the bands’ frequency setting. Usually the frequency range of EQ is set to 20-20000hz, which is the human hearing range.
There are 5 major types of eq modes (low shelf, high shelf, hpf, lpf, bpf). I personally do not use low shelf/high shelf eq, so I am not familiar with those two, but they are useful in some way. In low shelf/high shelf, frequencies above/below a certain point are cut/boost the same amount. The curve of shelf eq and lo/high/band pass eq is different. In lpf/hpf/bpf, some frequencies below/above a certain point is cut completely instead.
a really helpful website about high and low shelf eqs -
https://rebootrecording.com/high-and-low-shelf/
0 notes
Text
Effects
So I learned about effects in the stuthep classes, typically reverb and delay. There are many effects out there that have a lot of uses, but the most commonly used effects are distortion, reverb and delay (for me at least).
There are two types of effects application, destructive and non-destructive. Typically for a destructive use of effect the audio is recorded with the fx on to make a new audio file. Non-destructive use on audio means that the audio is routed through the FX only. For most people non-destructive use is the common one, but destructive use also have some benefits like saving cpu power.
Inserts and sends are important to adding effects to an instrument - using sends work as a cpu saving method because when the fx is inserted into a send and multiple instruments are routed to that send track, we don’t need to insert multiple same fx units on different channels different instruments are in.
Reverbs can emulate spaces and fill out the empty parts of a song. There are different types of reverbs out there, including chamber reverb, plate reverb, spring reverb...etc. In chamber reverb, sound goes from a speaker to an echo chamber then microphones record the sound with reverb. But in plate and spring reverb, the signal goes through a transducer and the vibrations caused by the sound are picked up by the microphones, and the sound picked up by the microphones are combined with the original dry signal to form the new signal with reverb.
Reverb is created through sounds bouncing off the wall. The sound source bounces to the wall then reflects back to the listener. Early reflections travel in more diverse directions and create more chaos, which forms late reflections. (we hear more late reflections than early reflections when we are faraway from sound source)
There are certain aspects of reverb that we could control, for example pre delay (pre delay is the time difference from the sound source starting to travel, to the occurence of early reflections). Sound source travels to the wall and bouonces back to the listener which makes the pre delay double the distance between the sound source and the wall. (where 1ft = 1ms). And there is also the length of the tail of the reverb (the “decay”), it can be determined by the frequency of the sound. Generally low frequency sounds have long waveforms and they travel further than high frequency sounds.
There are some tips and tricks to using reverb, for example using reverb on low frequencies/high frequencies can make the mix sound bad, then we can use EQ to cut the low/high end of the reverb to solve this problem. Also to avoid cluttering the mix we can tempo-sync the pre delay/decay time.
As for delay, the delay model types range from analogue delay to digital delay, early types of analogue delay uses tape to operate. There are also different modes of delay e.g. normal delay, inverted delay, ping pong delay...etc. Flanger and reverb are different forms of delay-based effects. Usually we use delay by adjusting the delay speed and feedback volume. Sometimes the delay is tempo-synced to avoid cluttering the mix.
0 notes
Text
January: Mixing & Mastering (Compression & ADSR)


This year, we started to go through mixing and mastering, starting with compression.
COMPRESSION
compressor limits the dynamic range of sound. We can achieve an more even level with compression, as it makes parts of signal that goes over the threshold quieter.
Threshold - signal that goes over the threshold will be compressed.
Ratio - the ratio of compression (e.g. when a signal goes over the threshold by 3db, and the ratio is 3:1, then the signal will be compressed to only 1db over the threshold)
LIMITING
Limiting is very similar to compression, but limiting means that the all signal that is over the threshold will be cut to under the threshold.
Since compression and limiting lowers some of the signal (gain reduction), the output level in general is lowered, therefore we sometimes need to use makeup gain to increase the whole output signal level.
ADSR
Stands for “attack decay sustain release”, it’s an automation that can control filter level, volume and much more. The x axis indicates time and the y axis indicates level of the knob being controlled. For example we control the volume of the sound, and we want to make a pluck, then we should set the attack & sustain down for the transience.
Because I was learning a bit about multiband compression, I found this website which helped me a lot about what compression is and how to use it:
https://www.musicianonamission.com/multiband-compressors/
0 notes
Text
November & December: guitar amp miking & drum miking
We went through miking setups even further, what factors we should consider when setting up mics, what mics we should use, etc.
1. GUITAR AMP MIKING
Guitar amp miking is determined by many factors, e.g. room characteristics, choice of microphone, types of guitar amps, etc.
TYPES OF GUITAR AMPS
There are generally 2 types of guitar amps - twin-speaker and single-speaker amp.
ROOM CHARACTERISTICS
If room sound is good, then an omnidirectional condenser mic can be considered, but otherwise isolating sound other than the instrument might be better, using mic modes that isolate unwanted ambient noise. It is usually determined by the size of the room.
CHOICE OF MIC
Since different microphones have different characteristics like frequency responses, and they have different polar patterns which determine the isolation of sounds in certain areas, mic choice is important as different guitars have different timbre, and also the guitar amp and room can affect what’s being recorded into the signal.
Some mics also have switches that helps alter the signal that goes through to the daw, e.g. KSM137 has a mic attenuation pad & a filter to reduce distortion/proximity effect
MIC LOCATION & OTHER
Mic distance:
farther away means that bass signal is reduced, and more ambience is created (sometimes this is used for matching the mics that record the dry signal for a more realistic effect)
Number of same mics put together:
As the speaker has less mid-high range at its edge, putting the mic at its edge can omit some mid-high range frequencies. Putting multiple mics in front of the same speaker can record a more wholesome signal.
Number of different mics put together:
As different mics have different characteristics, sometimes it’s good to choose another mic to record certain frequencies of the instruments that the mic that records the basic tone of the instruments can’t record.
Mic placement:
As previously mentioned the speaker has less mid-high range at its edge, therefore when the mic is more off-axis more high end is omitted and the sound will generally have a warmer texture.
Phase problems
Putting a mic at the back of the speaker will create a phase problem because the mic at the back is always further away from the speaker, therefore we should adjust the phase in the daw.
2. DRUM MIKING
Recording different drums require different specific placements of the mics and different mic types.
Kick - We can place the mic completely inside the drum, inside the drum halfway through, or outside the drum, depending on the sound we want.
Usually placing the mic outside the drum provides a more boomy sound.
Hi-hats - Usually we use mics that are placed on top of the hi-hats (overheads)
(there are 3 main techniques used for hi-hat miking)
Condenser mics are good for high frequency-sitting and delicate sounds like hi-hats
Snare - The mics should usually be cardioid because snare drums are close to other drums
Toms - toms have a bassy and boomy sound so dynamic mics are generally better for toms
We can choose to either use one or two mics for the toms, this will decide the distance between the mic(s) and the tom. Generally if only one mic is used we put it between the two toms, and the distance between the mic and the toms are greater.
There are certain things that we should keep track of when setting up drum mics...
3-finger rule - place the microphone at least 3 fingers’ length from the drum (for the snares)
Don’t place the mics too close to or too far away from the drums because it will affect the quality of the signal.
The microphones should usually be pointed at the head of the snare & tom. For the hi-hat place it at the edge of the hi-hat.
Some effects could be used before the signal enters the daw, e.g. EQ out the low & mids of the hi-hat to filter out unwanted noise
The mics for recording the drums set up below are done in the group podcast’s studio session, we followed most of the drum miking procedure mentioned above.

0 notes
Text
November: General Mic Setups
There are some general mic setups for some instruments/sound sources, e.g. guitar amps, voice, etc.
MIKING SETUPS
When we hear a stereo signal, the audio that goes to the left ear and the right ear are different, sometimes they can be very little in difference.
The difference can be in loudness, tonality and timing.
Coincident - close proximity mics
Spaced - mics distance from each other
Baffled - using mic baffles for recording
Coincident setups
E.g.
x-y pair
2 cardioids, usually placed approximately a 135 degrees between each other.
Blumlein pair
2 figure-of-8s, because the sound in the regions opposite of the instrument is also recorded there might be some ambient noise, so it can’t be used in some rooms. Used 90 degrees between each mic.
Mid side
A figure-of-8 mic under a cardioid mic, the phase of the L or R signal that was recorded with the figure-of-8 mic should be reversed
Spaced setups
E. g. Spaced mics recording different instrument with 3:1 rule, the rule applies to a lot of polar patterns
Baffled setups
E.g. Jecklin Disk Technique - creating a difference between left and right ear by using two seperate mics each placed on the left and right with a mic baffle seperating the mics
Here is a very detailed explanation of some of the mic setups mentioned here
0 notes
Text
November: polar patterns
In November, our teachers went through different microphone topics in depth.
POLAR PATTERNS
I learnt that there are mainly 5 polar patterns, each suited for different kinds of use:
Cardioid, supercardioid & hypercardioid can isolate background ambient noise and feedback, with hypercardioid being the most effective mode for doing so.
The signal of the microphone is played by the speaker, then the sound played by the speaker is picked up by the microphone again, forming an infinite feedback loop, and it’s unwanted so it might be better to isolate sound that’s out of the region.
Omnidirectional mode picks up sound 360 degrees, and is most prone to ambient noise & other unwanted signals, but it is useful when we want to record ambient recordings, so that the recording sounds more realistic.
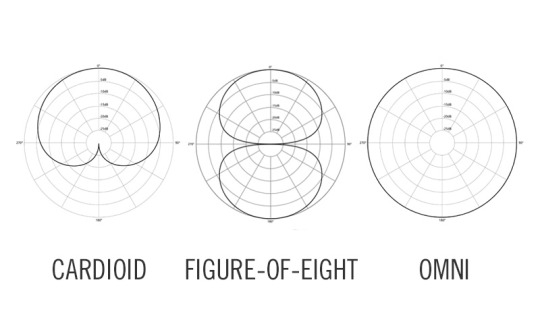
Bidirectional (figure-of-eight) mode captures equal amount of sound from the back and the front, not from the sides, for picking up sound sources from 2 opposite sides. It’s extremely good at isolating sound like the hypercardioid mode, therefore requiring very precise mic placement.
microphones have some specific frequency responses that makes each of them suitable for picking up different sound sources - e.g. SM57 is good for recording snares because snares sit at a high-mid frequency spectrum, and SM57 has a nearly flat frequency response at around 200hz while having a prominent frequency response at around 10000hz (a presence bump).
There are two types of mics - dynamic and condenser mic.
Dynamic mics are used for loud sounds that sits in a relatively low-frequency spectrum.
Dynamic mics are not good at recording delicate quality sounds, and they are not sensitive to quiet sounds. They are also weak in recording high-frequency sounds.
Condenser mics is capable of record a full range of frequencies, and they can record delicate sounds with good quality, the downside of condenser mics is that it cannot record loud sounds properly and they are relatively more expensive. Condenser mics require Phantom Power - which is a process of a change in capacitance.
Proximity Effect
The proximity effect occurs when the microphone moves forward to the sound source, and an increase in bass frequency responsiveness happens.
Proximity effect can either facilitate music production, or it could be unwanted. For example in many radio shows the increase in bass adds power to the voice of the people who are speaking into the mic - but we do not want the sound to become overly bassy.
Proximity effect only happens when the microphone is directional (cardioid).
Here’s a website that I went through for useful info.
https://www.lewitt-audio.com/blog/polar-patterns
0 notes
Text
October: Studio mixer basic controls

I went to the studio in studio session and learnt that there are some basic controls for the mixer in the studio.
“mic line in”
- green button indicates that you are controlling desk not daw
“channel selection”
Selected in blocks (only continous blocks)
Make sure “input/flip” button is green before recording.
“mix bus”
Assign channel to mix bus.
RECORDING:
“inserts”
Insert some EQ or limiting before recording
To do this press Channel selection - enable monitor - send channel to record bus - select DAW input
PLAYBACK
For playback press Channel selection - take channel out of record bus - turn off monitor - flip desk input becomes red
(turn off the insert to avoid DOUBLE PROCESSING)
Artist button - to allow the people from the recording room hear what you say.
Artist button dims the voice of the speakers.
When released the artist button, they will not be able to hear what the people in the main studio are saying, but the people in the main studio can hear the sounds from the recording room all along
For recording, press the recording button on pro tools (on that specific track), mute all other tracks, press record on mixer and press play button on mixer.
0 notes
Text
Group 6 Podcast Assignment


Our group podcast mainly talks about our specific microphone setup for the different instruments used in the background song played in the podcast, and a brief introduction of different polar patterns of microphone and what they are used for.
We decided to do a simple four-chord song that loops and put it in the podcast as the background music. My teammates did some fade in fade outs and mastering.
Each of us is responsible for our instrument part, and also responsible for controlling the studio mixer and daw to interact with the instrument player.
We recorded the instruments separately since there isn’t enough room for us to play our instruments together, and considering there might be unwanted signal from other instruments if we record our parts altogether.
I took part in the mic setup of the piano, and I played the piano. I chose an omnidirectional mic because the piano is a full-range instrument, and since I use a relative large range of the piano, I set up the mic as shown in the photo. Since I could not set the microphone in the right place as I am sitting in the middle playing the piano, the position of the microphone is not as desired, but the piano recording was mostly clear.
There were a few hardships that we went through - one of the main problem is that the mixer is somewhat complicated to use and it might be a little bit confusing to understand how to get things right. And there are certain studio tool limitations, particularly the size of the room. And sometimes microphones pick up unwanted sound too easily (e.g. jacket noise) so a lot of the content that we already recorded had to be abandoned.
I’ve had certain chronic health issues so I wasn’t able to participate in all of our group’s studio sessions - and there is a lot of improvement I could make, particularly in the familiarity of the studio mixer controls. I didn’t get much chance to get hands-on the studio mixer, and I was very unfamiliar with hardware, so it’s somewhat hard for me to keep track with what my groupmates were doing.
I also think that the fade in fade outs of the podcast could be improved, and the quality of the piano recording could be better.
Some photos here were taken from our group podcast studio sessions.
0 notes
Text
First Group Project.
We worked in groups of four. My groupmate had some old song that was made about 3 years ago, and we decided to remix it. It’s a very simple idea with the chord progression Cm - Bb - Ab. I did the intro which was about 20 seconds long, and my groupmates did the guitar, the vocals, drums & mixing.
So, I focused on how to make my intro fit into the whole song. Though the instruments used in my intro are completely different from the rest of the song, the timbre of the instruments used between my part and others’ part are quite similar, they’re less aggressive to the ear. I threw in some traditional instruments (piano & strings), and put loads of reverb on it. I also added bird sounds to create an atmospheric effect. I still wanted the intro to sound a bit more interesting though, so I did some effects processing, e.g. cutting some vocals & retriggering it rapidly until it’s unrecognizable and do some slight panning to make a smooth transition to an other part of the song, putting crusher on the main strings, put an LFO on the white noise and some dark gritty pad together and turn the LFO frequency down slowly to create an uplifter effect, etc. I did find out some interesting new ways to play with effects.
1 note
·
View note