
Statistics
We looked inside some of the posts by nikhileshmohan and here's what we found interesting.
Average Info
Notes Per Post
34
Likes Per Post
29
Reblog Per Post
2
Reply Per Post
3
Time Between Posts
7 days
Number of Posts By Type
Video
8
Photo
9
Last Seen Tumblr Blogs


Fun Fact
In Q3 of 2020, 31% of US users access the Tumblr app daily.
Video
tumblr
Week 9 - Arduino
This is the video clip of my sheikhabot greeting us with the phrase “Hello World” in morse code.
1 note
·
View note
Video
tumblr
Week 9 - Arduino
Module D
The second phase of module D gave us the opportunity to give life to our mechanical structures we developed last week through the use of arduino.
Over the course of the week I had a great exploring and understanding how to code for actuators and sensors giving the opportunity to code real time actions rather than simulations.
My final idea was to develop a version of the sheikhabot that can communicate and talk to us through morse code, ideally helping to bridge the gap between communication.
Link to my code: h
ttps://docs.google.com/document/d/17HR5VroHrRlE-fa-WoPL6rakwwM85iGo5J4avCjiarY/edit?usp=sharing
Refrences:
Arduino morse code translator, https://www.youtube.com/watch?v=3WjNiJOcVaM&t=315s
Code developed and provided by Raffi Tachkerian
0 notes
Video
tumblr
Week 8 - Scissor Structure
Module D
This is the video of my working sheikhabot.
1 note
·
View note
Photo


Week 8 - Scissor Structures
This module was a very interesting introduction to the realm of mechanics in the form of scissor structures. We were given clear guides on how to produce a template on rhino and then prepare it for laser cutting the pieces to assemble.
After recreating the given profile curves into a physical form, we were given the chance to create our own legs for the sheikha bot which is a combination of a 3d printed body and the laser cut legs we have created.
this was a great learning experience and an opportunity to branch out from this and develop our robopets!!
0 notes
Video
tumblr
Machine Learning - Week 7
This week’ s challenge was to incorporate machine learning and AI based on the features provided by ML5 (Posenet, which detects our body parts and their positions on the screen) to our previous explorations in processing.
This time we shifted from Java and Processing to JavaScript and P5 programming which broadened the possibilities of our code.
Last week I created an AR replica of the Iron Man arm and that enables us to shoot projectiles but was unable to create objects to shoot at. Unfortunately, Posenet does not detect depth and the idea of creating an iron man experience shifted to coming up with a new age version of the famous 80′s game ‘DEFENDER’.
The possibilities of this game are endless and I foresee this becoming an active and intuitive form of gaming as compared to the current passive form of gaming.
Code: https://docs.google.com/document/d/1a7wvRA-7GKO_yNpZi7gih1lkw2slrM2j7IbsH31DL4o/edit
Refrences: https://www.youtube.com/watch?v=EA3-k9mnLHs&t=2225s
13 notes
·
View notes
Video
tumblr
Augmented Reality - Week 6
This week was all about coding and diving into its creative side with the use of Processing. We were introduced to the basics of the Java language and later went on to use the ‘nyar4′ plugin to incorporate AR concepts.
When it came to creating our own AR experience it was a great opportunity for me to bring to life something I have always dreamt off, being Iron Man !!
The logic behind the code is having one AR marker display the hand and the second AR marker shoot the projectiles to certain distance and return back to its initial position, when the second marker is covered it stops shooting.
Code and functions: https://docs.google.com/document/d/1a7wvRA-7GKO_yNpZi7gih1lkw2slrM2j7IbsH31DL4o/edit?usp=sharing
Resources: Dali Lomo, Iron Man glove template, https://dali-lomo.blogspot.com/2015/02/iron-man-hand-diy-with-cereal-box-free.html
free3d.com, Iron Man 3D model, https://free3d.com/3d-model/ironman-rigged-original-model--98611.html
2 notes
·
View notes
Photo


Bio Plastics - Week 5
This week we explored the process of producing plastics and attempting to create an environmental friendly solution to plastics.
Utilizing various recipies and different ratios to find the best combination of glycerol, starch/gelatine and acid to find the optimal result.
The process of creating the plastic involves mixing Water, Glycerol, Acid (Vinegar) and Starch/Glycerol in certain ratios to create plastics with different characteristics.
The best result we came up with, was ‘Test 5′ as it was the most rigid and condensed plastic.
4 notes
·
View notes
Video
tumblr
Programming & Processing - Week 6 (Prep)
Screen recording of the Program
Link:
http://hello.processing.org/display/#@-LZEDbsS9BTvlyWdJ2Vo
2 notes
·
View notes
Photo


Programming & Processing - Week 6 (Prep)
Ideally I just spent some of the most productive hours of my life learning coding from ‘The hour of code’ tutorials and had some great fun throughout the process. The best part was how just a few lines of code can transform into something so creative and intuitive.
I cannot wait to explore what comes our way in the world of coding !!
A link to the Blinking Iron giant I created along the tutorial: (click using the mouse to see iron giant blink)
http://hello.processing.org/display/#@-LZEDbsS9BTvlyWdJ2Vo
Feel free to download the code and tweak it to create your own!!
1 note
·
View note
Photo

Textiles & Weaving - Week 4
We began our 4th session with Megan our fashion expert, by exploring a whole range of textiles starting from naturally occuring to highly synthetic and man made. It was very interesting to refelct on how something we use daily has evolved and reached its current stage.
Later we were given the opportunity to weave our own piece of fabric using laser cut tools which was an exciting blend of machine and handmade production. The process started off by creating a linear net and later inter weaving different fabrics to it to create our piece. Initially I began weaving through 1 string at a time with a 5mm gap between each string and later switched onto weaving through 3 strings at a time and no gaps which created a rough to smooth transition on the piece.
Being a complete alien to the fashion world it was very very exciting to go through this learning process !!
1 note
·
View note
Photo


Parametric Design - Week 3
Part 2
Preparing our tiles for CNC machining.
In-order to prepare our files for CNC machining we create a boundary around our tile and a plane boundary on the surface and loft both the curves to obtain an object with volume which can later be sent to the CNC machine.
4 notes
·
View notes
Photo


Parametric Design - Week 3
Part 1
Preparing our tiles for Laser cutting.
This is being done by using various sets of code on grasshopper that contour our tiles and project them as patterns in order to be fed to the laser cutter for printing.
1 note
·
View note
Photo
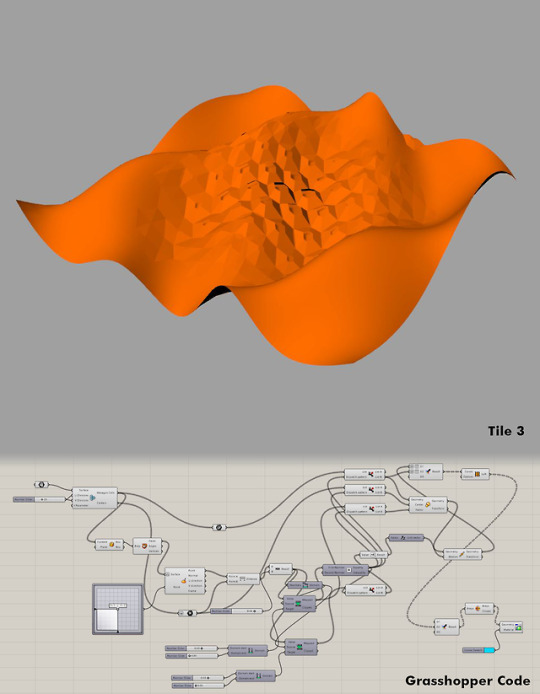
Parametric design - Week 2
Part 2
On further exploring grasshopper I generated a tile that consists of hexagonal projection with higher embossing on the centre and descending depths toward the edges following youtube tutorials.
Link to tutorial:
[Grasshopper] 0029 Lowpoly Attractor (Slow ver.) https://www.youtube.com/watch?v=lJs5mudGElo&t=203s
1 note
·
View note
Photo

Parametric Design - Week 2
Exploring the relams of Grasshopper !!
1 note
·
View note
Photo

NERO - Part 0
Starting our project for semester 2, an exciting fusion of nature and tech. Nero is an attempt at visualising our deep sea nature through terminator lenses !!
2 notes
·
View notes