
Don't wanna be here? Send us removal request.
Statistics
We looked inside some of the posts by oceanicsources and here's what we found interesting.
Average Info
Notes Per Post
4K
Likes Per Post
3K
Reblog Per Post
1K
Reply Per Post
1
Time Between Posts
2 months
Number of Posts By Type
Note
1
Text
14
Photo
2
Last Seen Tumblr Blogs


Fun Fact
Tumblr Inc. is using 66 technologies for its website.
Note
I have things to Tell you about themes as we are both theme makers. The coded Pages are Dead. In other words. Tumblr KILLED the coded Pages. Forever. Because they are putos. TUMBLR SO PUTO. TE FOLLEN TUMBLR CULIAO and still couldn't make the poo ups to work. Tumblr KILLED the JavaScript too 🙃. So for anyone that wants to make themes. They have to be normal ones until a solution is given. ALSO LAPIS I LOVE YOU! 💋💋💋

//I don't consider myself a theme maker per say but I do have some mutuals that tweaks with codes and stuff (like I do), so this is quite literally some heartbreaking news. I didn't have time to check on the newest update logs so ty for the heads-up Bel!!
I don't know why tumblr is doing this because it makes things difficult for theme makers, therefore, if you are seeing this and you're a theme maker? I'm giving permission to reblog this post since that's fucked up.
3 notes
·
View notes
Text
tutorial: removing tumblr app button on mobile themes

for anyone making responsive themes, the tumblr app button popping up on mobile devices and then having to manual close it each time can be annoying, so i figured out a way to remove it.
just copy and paste the following to your css section (can be through the ‘Add Custom CSS’ feature in your tumblr theme editor or between the <style> and </style> tags in your code)
.tmblr-iframe--app-cta-button { display: none!important; }
and that’s it, you’re done!
620 notes
·
View notes
Text
Beeb boop please help a guy on the internet
Hey everyone! For those who don’t know me, my name is Lapis and I’m opening graphic commissions to get some money to help me with debts and to get a personal thing for me as well (mainly help with debts of course!)
Before commissioning from me, please be aware that 1) I’m pretty new to this commissioning stuff (especially graphic commissions) and 2) depending on your demand I might be either fast or slow due to irl stuff going on. The longer I can go with that is either one week or two when a date is not specified (of course with communication in between), though I’ll say that if there’s a specific date on the board I might charge you a little extra for placing your order higher in my list. Don’t worry, I won’t charge you extremely high since I’ll look for being fair!
Oh, and I’ll accept payments (and donations if you’re willing to help in other way) through my Kofi! Any questions just DM me! Reblogs are always appreciated to spread the word!

Icon borders: $5 for a base format / $10 for a blockquote format! Any size and format is on the table!
Icon pack (no extra payment for doing the border needed!): $10 for 50 icons / $15 for 100 icons / $20 or higher for more than 100 icons at a time


Blog theme background (NOT THE CODING): $25 (might change depending on complexity)

Promos: $30 (might change depending on complexity)


Graphic Pack (all of the above + post divider and mobile header as an option): $55 (might change depending on complexity)
16 notes
·
View notes
Text
Coding Basics: A Do It Yourself Guide
Post Hover Reveal Tutorial
This coding is a collaboration between myself, @noodlehelps and @ofthesouthernisles. I tweaked a few things to make it work better for me but Cam and Alex get my eternal thanks for teaching me how to do it.
It’s pretty simple effect and I’ll do my best to explain it to you but if you have any questions just ask. I like to give my codes cute names of Frozen characters but you can change it to whatever you like. Just be sure to keep the titles matching or the code won’t work.
Firstly, there is no image placed over the posts, it’s the opacity of the posts that is changed with this coding to make it appear like they’re hiding under the image that is actually part of the background.
Step #1)
Paste the following above your #container or whatever you’ve named it like in the image below.
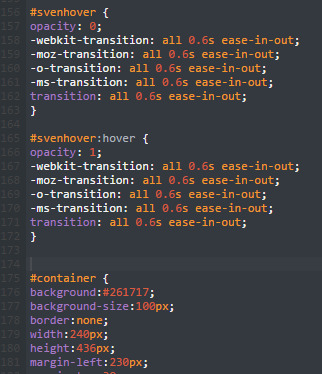
#svenhover { opacity: 0; -webkit-transition: all 0.6s ease-in-out; -moz-transition: all 0.6s ease-in-out; -o-transition: all 0.6s ease-in-out; -ms-transition: all 0.6s ease-in-out; transition: all 0.6s ease-in-out; }
#svenhover:hover { opacity: 1; -webkit-transition: all 0.6s ease-in-out; -moz-transition: all 0.6s ease-in-out; -o-transition: all 0.6s ease-in-out; -ms-transition: all 0.6s ease-in-out; transition: all 0.6s ease-in-out; }
Don’t change the opacity settings here or the efect won’t work for you.
Step #2
Below </head> paste the following code above the <div> for your container like in the image. This is what tells the theme where to keep the hover effect so it doesn’t muck up the whole thing.
<div id=“svenhover”>

Step #3
Now you’re going to change the background color of you #container to the same as the part of the background image you’re using so it appears to ‘cover’ the posts until you hover over that spot. Add background-size:100px; (you can make the size to your preferences but for a 250px container I found 100px to work best for coverage) to the #container section, from there you’ll have to tweak with the container size and margin positions to place the container in the right spot for your layout.
As always if you have any questions feel free to ask me; I also recommend asking other people too. My knowledge is still at a novice level and there are people who know more than I do, @ofthesouthernisles is a very good coder and extremely helpful with tutorials on how things work and why, so you have a greater understanding of how pieces of coding work together to create a fluid functional theme of your own.
14 notes
·
View notes
Text
Sound on Hover
An example of this is here // get sound effects here
In this tutorial, I’m going to go over how to include sound on hover while hovering over navigation links.
Be sure to retype all quotation marks!
Continuar lendo
12 notes
·
View notes
Text

apparently i have written quite a few guides/tutorials - O_O - here’s a list of the code tutorials so far… no doubt, this will be added to - make sure to check the ‘resources & tutorials’ page for more…
g d o e s a t h i n g - how to make a tumblr theme from scratch;
theme 101 part 1 - basic html, styling body, styling and positioning posts
theme 101 part 2 - the padding function, the margin function, permalinks, tags and styling
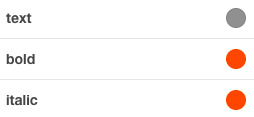
theme 101 part 3 - styling general links, styling bold and italic, styling blockquotes, images
theme 101 part 4 - styling sidebar, navigation links, headings and pagination
theme 101 part 5 - index and permalink pages, float, post info, styling asks and quotes.
theme 101 part 6 - adding images, backgrounds, sidebar graphics, etc.
theme 101 part 7 - container theme, scrollbar, overflow, hover effects.
[ parts 6 & 7 come with full base codes… ]
c o d i n g & t h e m e s
popups;
how to add ‘popups’ - a detailed tutorial
how to style popups - adding link styles and info etc.
how to style popups - styling & moving the text/images/title within a popup.
custom fonts and text effects;
how to add custom fonts to your theme
how to add a ‘glow’ or ‘shadow’ effect to text on your blog
editing links and permalinks;
how to make ‘scattered’ links
how to add ‘hover links’ ( using symbols and tooltips )
how to rotate/spin links ( or other objects )
how to change your ‘like/reblog/via/source’ etc to hover symbols
how to add font-awesome icons to your theme
how to make internal links/menus/internal navigation on a page
theme backgrounds;
theme backgrounds - how to position them
how to add a background to other parts of your theme
how to make a container theme background ( photoshop + code )
making a background for a container theme & making sure it doesn’t ‘slip’…
other and misc;
basic html + theme stuff - adding links/images/music players, changing text styles etc.
billyplayer & dropbox tutorial - music players for blogs…
billyplayer & kiwi6 tutorial - music players for blogs…
greyscale fix for firefox
adding ‘particles’ to your theme
the lazy coders guide
how to add images/gifs up to 5mb to your theme
how to add borders to theme objects, e.g. curved blockquotes etc.
how to change post sizes to something other than the tumblr defaults
2K notes
·
View notes
Photo


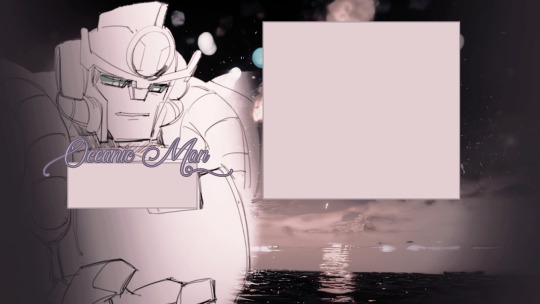
Theme #3 — Objection!
Preview // Code // PSD
╰──➢ ✧;── features ──; ✧
╭ ⁞ ❏. 300px posts, images, and videos ┊ ⁞ ❏. Scattered navigation links ┊ ⁞ ❏. Boxed permalinks ┊ ⁞ ❏. Boxed tooltips ┊ ⁞ ❏. Symbol permalinks ┊ ⁞ ❏. Pop-up ask and information boxes ┊ ⁞ ❏. Pop-up boxes with background ┊ ⁞ ❏. Update / Description box ╰ ⁞ ❏. Fitted for 1366 x 768 screens ; can be zoomed in if on larger screens
╰──➢ ✧;── notes ──; ✧
╭ ⁞ ❏. Not a base code ┊ ⁞ ❏. Free ! ╰ ⁞ ❏. ♡︎ or ↺
╰──➢ ✧;── support ──; ✧
┊ ⁞ ❏. Want to support my work? Send a KO-FI !
2 notes
·
View notes
Text
meta tags - how to add basic customisation options into your theme
for example giving options to change colour:
add text:

add images:
etc… tutorial under the cut!
Continuar lendo
172 notes
·
View notes
Text

Simple Theme #1
For my 2022 resolution I've decided to finally create a proper portfolio of my work, but none of the themes I found were what I wanted to use, so I said screw it and made my own. I'm proud of how it turned out so I decided to go ahead and share it with everyone! You can see the theme at work on my art blog, @pandappuccino!
Features
Twenty-one (!!) color options
Toggles for various optional features
Compatible with built-in Tumblr pages (a little drop-down menu will appear with each link!)
Four external links using Font Awesome brand icons
Update window with five slots
Affiliates window with four slots (can be toggled as needed)
Custom scrollbar
Pop-up contact window with built-in ask and submit boxes
Two additional pop-up windows
Notes About This Theme
This theme was tested using Google Chrome on a 1920x1080 screen.
The two extra links in the Navigation pane use "Font Awesome 5 Free" icons, while the four external links use "Font Awesome 5 Brands" icons. They do not work in each other's place, unless you edit the "fas"/"fab" in the HTML to the opposite class.
When changing Font Awesome icons, write the full icon name (ie. "fa-link" or "fa-twitter") in the blog settings.
THIS IS MY FIRST THEME. There are a lot of things that are probably not written in a particularly optimal way. You are more than welcome to make fixes/adjustments as you need it, so long as you aren't reposting the edited theme elsewhere.
196 notes
·
View notes
Text
Hey hey, my life is being shitty right now so I'm now taking small commissions up to $15 for icon borders and $20 for tumblr theme background edit <3 I accept payments through my K.ofi, as well as simple donations!
31 notes
·
View notes
Text
As a veteran roleplayer on this website, previously there was a feature that allowed you to keep the title from any thread regardless if you crop. Nowadays, seems like an easy task for those who use desktop and xkit to trim everything and just add the title afterwards which, unfortunately, doesn't work for us mobile role players. But I came with a quick and easy solution!

When you normally remove previous reblogs on mobile, the very first post is permanent, meaning that there's no way to remove it from the post as if it was an ask post. We'll use this to our favor today!
Make your first post as the title of your thread! This will be the main post that'll never be deleted without xkit and will help us further. Remember, post just the title, do not mention your partner yet!

After that, tap the reblog button and save it as a draft! Go back to your main post and feel free to private it, do not delete it before posting your starter if you wish to do so!
If you're done with your starter, post it as usual. You're safe to keep your private post since it'll never be shown to anyone else except you.
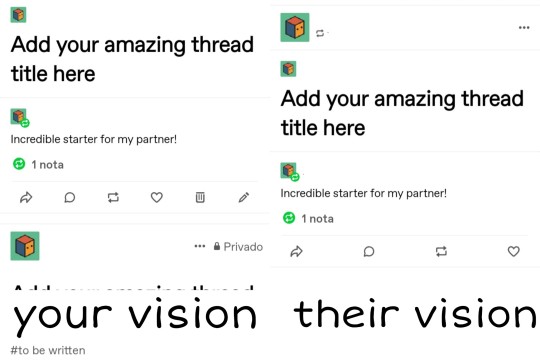
The next time you and your partner will write a reply you can see the red x button appearing next to previous reblogs that will delete everything aside from the main post, a.k.a your thread title! Just be aware to not delete it with xkit accidentally if you/they are on desktop.


Hope you liked this tutorial! Let me know if there's anything I forgot to add or if you have any questions. Have a happy roleplaying!
55 notes
·
View notes
Text
Not me squeaking in joy,,, I'm so glad y'all found my tutorial useful 🥺
0 notes
Text
HOW TO FORMAT YOUR REPLY ON MOBILE
As we all know, this hellsite doesn't support the html formatting on new post editor mobile regardless of our mobile browser, meaning that we can't either get our replies to keep an aesthetic or even trim our replies like those who uses their desktop for such... until now.
On March 17th, @rpclefairy blessed us with her amazing tutorial on how to trim blogs on mobile which is truly amazing and helpful. But, there was one problem. The trimming method in that tutorial isn't the same as xkit since it doesn't save your partner's reply formatting and such. With that in mind I, as a main mobile RPer, did some research on the matter and found out an easy method to save you some time!
This blog will be separated in three topics: small preparation, basic formatting and complex formatting (with icons!) and it's an easy to medium difficulty tutorial, depending on your needs.

Small preparation
We don't get to spend every day of our lives in the same computer since things gets to happen and we have to drive away from it. With that in mind, there's a small list of things you should have in your phone:
Notepad with all the spacing and cute emojis for your aesthetic
A trustworthy website for your custom font
A few icons of your preference exported to your gallery or make your own small set of icons via your mobile!
This step is optional, but if you have a set of post headers, you can always save the 'Answered' banner and a divider, if you have one!
Keep in mind that if you pick to make a small set of icons on your phone, it doesn't have to be that complex like the ones you did on your computer! But you can use this neat trick to keep the aesthetic!
Basic formatting
With everything ready, first you need to pick your partner's reply to do the trick; but it will get difficult based on your partner's style of formatting. For this tutorial, I'll be using my own rp blog since I have a diversity of mutuals.
If their formatting doesn't go further than the one used in rich text editor and they doesn't have any icons (also if your writing style matches theirs), then this'll be the easiest way to do!
Using your main browser or tumblr app, open your partner's reply, copy their reply (I suggest using your browser to copy their reply if it's more than one paragraph of length), add your own and save as draft.
Following clefairy's tutorial you will open Puffin browser (links in her tutorial as well for both android and iOS), open your partner's reply, tap lightly on the blog to remove the previous reblogs and save as draft. It'll look like this:
If there's a weird spacing in the bottom like mine, you can fix it now as well as the double blockquote glitch but I suggest you wait to fix this little issue in your normal browser.
Going back to your main browser, you can now open your drafted reply to see if everything seems alright and fix a thing here and there! If there's a top reblog, just remove it again.
Complex formatting
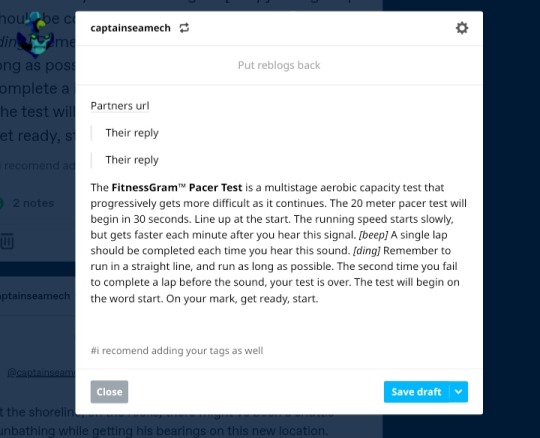
Now, let's say you are the type of roleplayer that always uses icons and colored text and your partner's reply has spacing and colored text. Following what I said above, you can also add your icon in your body reply that it'll automatically convert itself in a link, so there's no worry about that!
In your browser, you'll open your partner's reply before you trim it away and copy everything from the reply, then trim it. Now, open byluna's color text generator and paste your text. But be aware that it won't work correctly unless you select the third paste option with a W on it. Activating desktop mode is not necessary.

After you format everything in your partner's reply (you can also do the same on yours) there's a container below the text box with the html coding. Click Copy to Clipboard and paste everything in your drafted post and boom, you're set!

Now, let's say that both you and your partner (or only them) uses icons/dividers together with formatted text. There's two ways to do that, but both get in the same result.
After drafting their reply, if your phone supports opening an app on divided screen, you can use both your browser and Puffin at the same time. It's the same as using your computer or two monitors, let's say. This is how it looks on my phone:

Opening byluna's text generator in your main browser (or on Puffin), you can do the same trick of copying your partner's reply and paste it after opening a blockquote, but do not copy the icon too or it'll be contained and glitch your code! Instead, open your partner's icon in a separated tab and copy the link (do the same with yours), hit the little image button and paste the image url.

If your phone cannot divide like mine or you have no clue how to do so, it's not that complicated to do but it takes a little bit longer.
Before drafting your partners reply, save their icons/borders to your gallery and add them to your reply body. You can add your own as well with your reply if you wish. I suggest doing it twice for the sake of trimming only the one you are going to post afterwards.
After you trim one of the posts, go back to your main browser and copy the image link presented in the code of your draft.
Open your text generator and add your image via image url (shown below)
Format everything as you please and you're done!
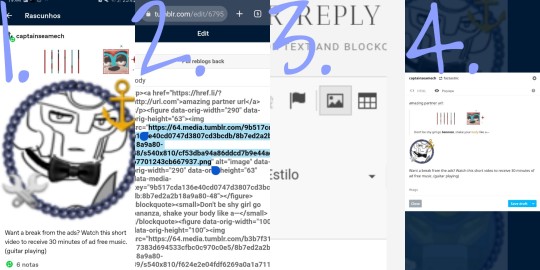
Credits to my friend (in the picture) for letting me use their icon for this tutorial <3
And that's basically it!! Let me know if you were confused in any part or if you have anything else to say! Hope this tutorial helps and you're more than free to ask if you have any questions!
#rp tutorial#rp guide#rp resources#dearindies#rpt#rpc#rph#long post#🌊 | mine: all#🌊 | mine: tutorials#[ I'M FINALLY DONE. SORRY IF IT'S TOO LONG ]
447 notes
·
View notes
Text
Can't believe I spent hours doing a tutorial. All by my phone.
0 notes
Photo


Theme #6 — Soaring.
Preview // Code // PSD
Features —
500px posts, images, and videos
Scattered navigation links
Fade-in on hover for posts
Boxed permalinks
Symbol permalinks
Pop-up ask and information boxes
Pop-up boxes with background
Update / Description box in Star
Fitted for 1366 x 768 screens ; can be zoomed in if on larger screens
Notes —
Not a base code
Free !
♡︎ or ↺
Support —
Want to support my work? Send a KO-FI !
2 notes
·
View notes
Text

PSD COLORING #2 — Green Anger
Free download
Features:
Lowers bright colors and creates more contrast
Has a green atmosphere with a bit of a blue tone.
Notes:
Will make all colors greener
May vary from scene to scene.
♡︎ or ↺ would help a ton!
7 notes
·
View notes
Text
I’M SEEING THE “ how to keep your partner’s formatting / colored text ” in-tact post make the rounds on my dashes again , & i just want to let people know there’s an easier way ! i do have new xkit installed so that replies are editable but other than that , you should be good to go !

first off , click reblog on your partner’s reply !

click the little edit icon on the left & type your reply & do any formatting ( bold , italics , etc that doesn’t requite html ) ! make sure to NOT TOUCH anything in your partners reply. do not ! i repeat ! do not delete your old reply from above theirs yet either or you will lose the colored text !
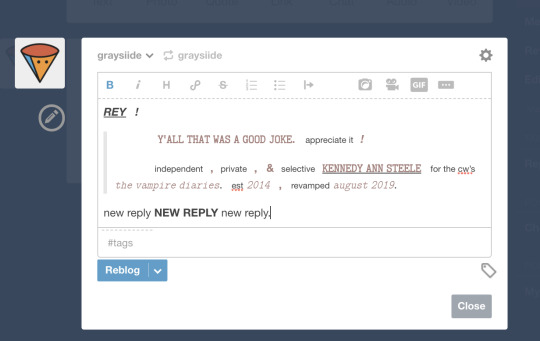
now click the settings tool & edit in html.

delete the html featuring your previous reply & add the colored text to your newest reply.

click preview to make sure everything is intact & then post !

TA-DA ! hope this helps !

198 notes
·
View notes