
An educational campaign for my BA Y3 Video for the Web module at Goldsmiths University. A huge thanks to Jin Choi and my tutor Tassia Kobylinska
Don't wanna be here? Send us removal request.
Statistics
We looked inside some of the posts by offscreen2017-blog and here's what we found interesting.
Average Info
Notes Per Post
0
Likes Per Post
0
Reblog Per Post
0
Reply Per Post
0
Time Between Posts
3 hours
Number of Posts By Type
Text
7
Last Seen Tumblr Blogs


Fun Fact
Tumblr is available in 18 languages.
Text
About #Offscreen
Anjali Lal’s Blog
Jin Choi: Director/Cinematographer and editor Anjali Lal: Producer/ Assistant to the Director and editor

My final project for this year’s Video for the Web BAY3 module at Goldsmiths, was to make an educational campaign on the effects off too much screen time.
My partner for this project, Jin Choi, and I both noticed that we spend up to 6-7 hours a day looking at a screen. Be it for work, tv watching or scrolling through Facebook and other sites, we both started to realise that it consumed a large part of our day. We then spoke with our peers to ask them what their daily screen usage is like and we came to the conclusion that teens and younger adults who have smart phones, laptops or even tv’s at home, tend to spend a lot of their free time on their devices. We did some research and reading to find out more about how screen time risks mental health and found these two very informative articles: “Screen Time v Play Time: what tech leaders won’t let their own kids do” -The Guardian and “Limit children’s screen time, expert urges” - BBC
After gathering enough intel and insight we decided to go ahead with an educational campaign that would be broken down into 3 mini series. The first series was of 5 young adults aged between 18-25 (which is also our intended target audience) who responded to a set of questions about their general screen time usage and they reflected on how their screen time has an effect on their day-to-day activities. The second series featured a specialist who we interviewed for our film and the objective of the second series was to shed light on the social, emotional and physical effects related to too much screen time. Lastly, our third series listed alternatives to screen time. Other than spending free time on a screen, why not go for a run or read a book? Listing out the alternatives was equally important so that any of our viewers who are constantly on their devices can learn of other ways to spend their time. In the last part of series 3 we introduced our campaign and its connection to social media. Jin and I wanted to add an element of digital visibility by incorporating the hashtag. As theory suggests:
“The web offers more participation-more power and involvement- to the user than TV does to its audiences” (Coyer, Dowmunt and Fountain, 2007: 5).
Since our video is intended for the web, why not offer some form of viewer participation. We could possibly build and grow the #Offscreen tag by encouraging more uses to part take.
We ended the film by encouraging our viewers to take a selfie of themselves while consciously doing any activity (or any of the alternatives suggested in series 3) that does not involve a screen and post it to social media using the tag: ’#offscreen’. Not only would this help them make an effort to reduce their screen time but also increase our hashtag’s visibility.
Scroll down to learn more about the creative process and understand the various stages of production work...
0 notes
Text
The Creative Process and Varying Production Stages

My biggest contributions to the creative process were the following:
1. Create an outline: I had to create an outline that explained in detail what each of our series would be about (scroll down to the next post to find out more) and brainstorm on what kind of content would be engaging for our viewers to watch.
2. Find inspirational videos: I suggested a few Buzzfeed videos for Jin to watch (the one we found most interesting is listed down below). I thought it would be a good idea to use their comedic style and cross it with our theme of educational.
3. Implement the end campaign Jin initially came up with the title of our film and used a hashtag in the name itself, so I decided to expand on her idea and come up with a campaign at the end. I suggested that we have some sort of viewer participation that would be revealed at the end of the film in series 3 and I managed to come up with a well connected selfie campaign at the end which linked with our film’s name.
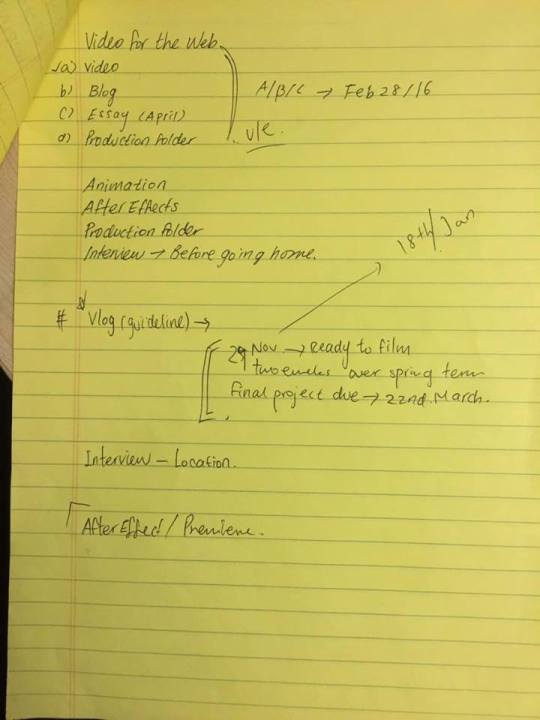
Our project required Jin and I to manage pre production, production and postproduction work… and boy was it a lot! We had from September 2016 till March 2017 to complete our film and have it ready for screening on the 24th of March 2017.
These three stages of work really helped us learn new skills, improve on any weaknesses and of course gave us great insight and experience in to what industry level film making is all about.
Pre production work began with our conceptual development and included: crew casting, scheduling, expert tutorials, coming up with an equipment list and creating a production folder. Creating the production folder was a large part of the project and pre production work and it included a whole host of documents that helped bring together everything we needed from start to finish. There were 5 sub sections in our production folder and they included: research, pre production documents, production documents, postproduction documents and distribution and beyond. Our folder was extremely detailed but here’s a quick list of what sort of documents were under these sub sections. 1. A short summery of what our project was about, Jin’s original treatment, A list of team and crew members, who our characters and participants were and formal invitations inviting participants to be part of our film. 2. Sub section 1: Pre production Work A detailed calendar with various important dates. ie. shoot dates, editing dates, studio time etc. Schedule: A production schedule outlining various production and post production dates. Storyboards. Jin and I created a rough storyboard drawing which depicted exactly what would be in each of our series. We sat with our teacher took her through our storyboards to get approval before filming. Insurance documents for the equipment we checked out. Risk assessments for each of the shoot locations. Call sheets detailing when and where each shoot would take place. A template budget that was primarily done for us to learn how to write a budget Booking requests for equipment from our tech office at Goldsmiths. Contacts sheet including onsite contacts of our participants, crew members and tutors. Section 2: Production work A checklist of all the equipment we used during the shoots Release forms for our participants to fill out Shot lists for each of the series and a camera floor plan Section 3: Post production work Transcripts of all the dialogue in series 1 and 2 Details regarding color correction and audition editing Copyright forms. All our music and images were copy right free An edit decision list detailing what sort of fonts and transitions our film entailed Section 4: Distribution and Beyond The last section of our production folder was information on different festivals (such as: Screen Test Fest and the London Short Film Festival) that were currently going on that we could send our film in for. We also wrote up a little section on social media strategies and opportunities for us to get our film out to the public and build a community of individuals who can share their experiences with reduced screen usage
In December of 2017, we had an industry guest lecturer, who gave us key tips of how we should get our films into festivals, advised us on publicity, self marketing as well as how to create the perfect application form. This was extremely handy for us to hear and learn about so that Jin and I could get a better understanding of what to do and where to go if we want our film to be part of any short film festivals. Jin and I wanted our video to have the potential to go “viral” on social media, and therefore we integrated the “#” into our film multiple times so that it could engage our viewers to come up with their own content and take a selfie and post it online using our film’s name: #offscreen
Scroll down to read about the pre production stage of our project...
0 notes
Text
Pre Production: Everything You Need to Know About the Planning and Paperwork
The pre production phase of our project was where all the initial planning took place before the cameras started rolling. Jin and I found that the groundwork was extremely important in setting the overall vision of our film.
Locking Down on the Conceptual Idea (November 1 2016)
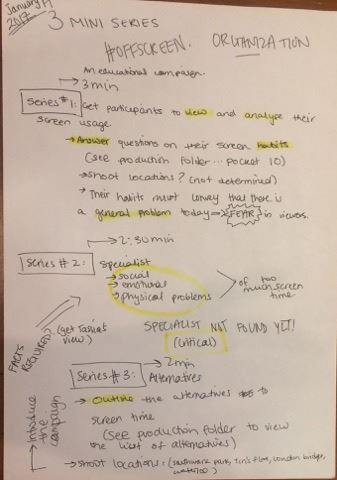
Jin’s initial pitch of her idea was to make a film which would delineate the big issue faced by teens and young adults in the 21st century of social media addiction. I had initially come up with a plan to make a mini series on comparative advertising however that fell through as nobody in my class wanted to do my idea so instead I decided to work with Jin. After much debate and planning, Jin and I decided to tweak her idea and instead of make a film on social media and Internet addiction we decided to do it on a broader topic of screen usage. Before locking down on exactly what our film would look like, Jin and I struggled to figure out what aspects of screen usage we would like to have in our film. Would we like to make it a story? Should we have statistics in our film? What sort of a flow would our series have? Finally, after much help from our teacher, we decided to split our three series into short yet effective sequences, that on a holistic level, depicted the issue of too much screen time.
Series 1: “What is the issue?”: This series addressed and brought to light the issue of too much screen usage amongst teens and young adults. This series consisted of interviews with friends aged between 18-25 years of age, and they responded to questions answering what their screen usage is which ultimately brought to light just how “addicted” they really are.
Series 2: “A specialists view point” The second series was on a specialist confirming the physical, emotional and social problems occur as a result of too much screen time. This gave our viewers a little insight into the actual damages done to ourselves when we are on the screen too much.
Series 3: “Digital detox/ alternatives” The third series captured the alternatives to screen time and then introduced the ‘#offscreen’ campaign. The #offscreen campaign invited our viewers to take a selfie of themselves while deliberately doing an activity (or any of the alternatives suggested in series 3) that does not involve a screen and post it to social media using the tag: ’#offscreen’
Style and Artistic Approach
While the conceptual idea came together, Jin and I started to discuss what sort of style our video would have. After much thought, we looked online to see what sort of examples we could follow. Here are a few links that are worth watching in order to get a better understanding of the sort of look we were going for. We every now and then referred to these exact videos in order to mimic their styles.
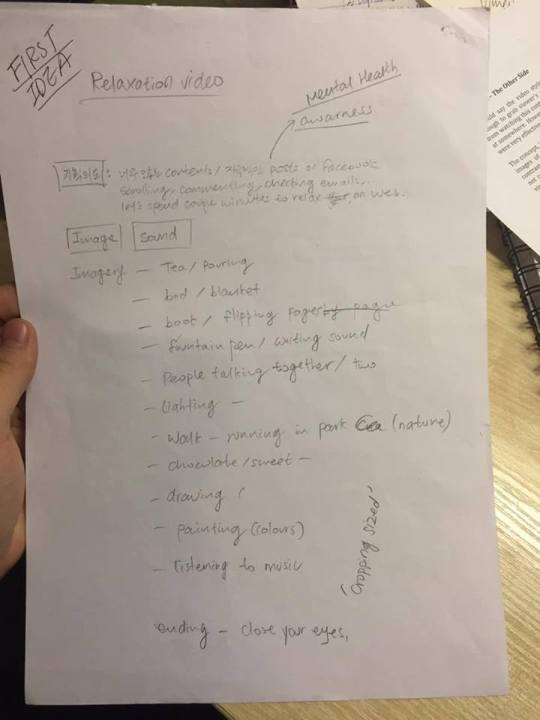
1. Muji to relax:
youtube
The Muji brand is a retail company that sells a wide variety of household goods. This video was the first video that Jin and I watched and we fell in love with the artistic and visual aspects of the advert. These were the main aspects from this video that we wanted to imitate in our own film:
· The slow motion effect (done in post production)
· Over exposed shots
· Strong depth of focus
· Extreme color correction
· Appropriate music
After analysing the video we realised that most of theses looks would only be achieved during the postproduction part of the project in Premiere.
2. Your phone is now a refugee’s phone:
youtube
This striking film has some wonderful visual effects that bring to life how a refugee would use his or her phone. These were the main highlights of the video that we were hoping to use in our film:
· The on screen mobile phone that was used as part of the narrative
· The noises of the cellphone (vibrations, camera noises, text message alerts, phone calls, pings etc.)
· The strong colour grading
Just like the Muji video, we came to the conclusion that achieving most of this would only be done in the editing stage.
3. Buzzfeed: 33 questions white people have for white people:
youtube
Ultimately, the general style implemented across all buzzfeed videos were what Jin and I decided to go for. This video has certain elements that we were extremely keen on reproducing in our film:
· The motion graphics
· Bold on screen text
· Different angles of the interviews
· Consistent text and colours
· Strong and emphasised sound effects (comedic effect)
Once we had a set idea of the sort of style we wanted, it was time to move onto crew casting.
(Outline made just after finally deciding out main ideas for series 1,2 and 3)
(A few idea for series 3)
(Various tasks we had to complete)
Gathering Our Crew and Cast Members (December 6 2016)
After doing lots of research, we found out that teens and young adults aged between 18-25 are the most effected by screens today. Jin and I have a few friends in London who fall in that age group and who were willing to be participants in our film for series 1. We had prepared a list of questions for them to answer regarding their screen usage and had planned to film their responses. Our questions were strategically framed so that by the end of series 1, our viewers would get a sense of just how big an issue excessive screen time is.
For series 2 we needed a specialist who was ideally a doctor or a psychologist to explain in his or her words what the down sides are off too much screen time. This was honestly the toughest part of our pre production work. We got in touch with NHS facilities around London, psychologists from our university, friends who were still in medical school as well as private doctors we knew personally. We got rejection after rejection and the main reason was because these specialists and the clinic or hospital they work in, could possibly have been liable if they provided any miss information. Jin and I understood where they were coming from, but it was just extremely frustrating :( ! Despite the rejections, the other participants who we needed for series 1 were on board with our request to film them. We were now ready to shoot series 1!
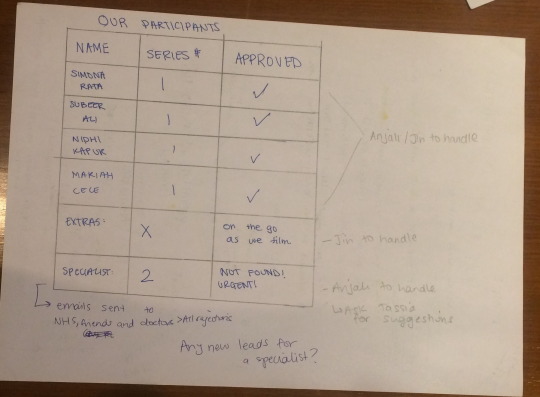
(Table created confirming which of our participants were available)
Production Folder: My Learnings From Assembling all the Paperwork (January 10 2017)
My second biggest contribution other than some filming and editing was creating all the paperwork for the production folder. As listed in the previous post, the documents for the production folder came in handy during our shoot days. Compiling a production folder taught me the importance of the formalities of filmmaking. While the actual film itself was a large part of the main submission, the preliminary work of filling out paper work was what made the filming a lot easier. Coordinating and pre organising shoot locations, dates, and various other aspects made the entire filming process a breeze. If we had any issues while filming, or had authorities ask us if we had permission to film, we had all the answers in the production folder.
In second year the production folder that I made was not as extensive and detailed at this one. I was able to build up the skills to produce, what my partner and I think, is a semi professional production folder that could be used at industry level. What was so different to the production folder from the year before was the in-depth research we had to do before filling out any paperwork. While the pre production section of our production folder was mainly the conceptual development, in order to complete the production paperwork for the production section of the folder, we had to do vast amounts of research. Before completing any call sheets or filling out risk assessments, we had to do a complete recce of all our shoot locations and ensure that we were not going to be liable or injure anybody while filming. Jin and I took a day out to travel to Southwark Park, Canada Water, Landale House, parts of Goldsmiths campus, London bridge, Waterloo and Canary Wharf to do a little bit of filming as well as see if these locations were suitable locations for some of our main shots. Doing a recce allowed us to not only determine if these were safe areas to shoot but also gave us an opportunity to understand if we required any permission to shoot in these areas.
We had to also fill out insurance documents and a budget before starting to film. In the year before, I had not learned how to write a budget or fill out insurance documents so for me this was a huge learning. The purpose of writing a budget was to help us understand where exactly money would be allocated were we given a budget. In the industry, most film production companies are allocated a budget in which they must work with. Our teacher suggested that we look at BECTU rate cards to see how much a lighting person or a sound person would cost for a day in the industry and make a hypothetical budget for our film. Jin and I had no idea how expensive each unit would cost for pre production, production and postproduction and by doing a budget we familiarised ourselves with what sort of a spending plan film producers and directors work by.
Scroll down to read about filming and on set experiences...
0 notes
Text
Production Work: The cameras are rolling!
For all of our filming, we used Jin’s Nikon D80 as well as her dolly and slider. The tripod, and external lighting kits were all borrowed from the university.
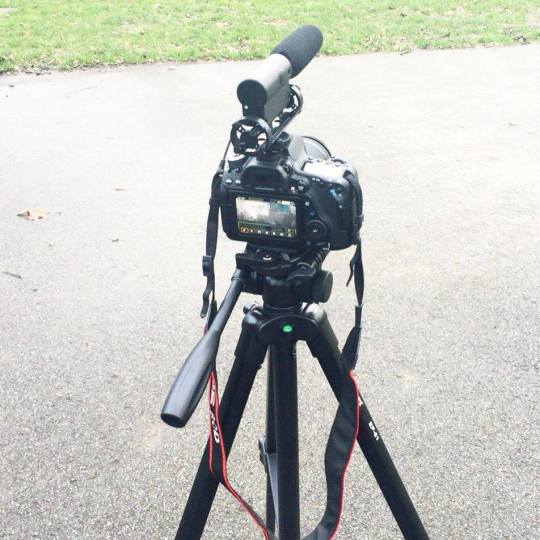
(Jin’s Canon D80)
General Filming Overview (January 20 2017)
Jin and I had multiple different shoot dates across January and February. Because all of the participants for series 1 were confirmed, we went ahead and shot the interviews for each of them. Jin’s phenomenal camera work managed to capture the interviews using different angels and we positioned each of the participants differently after answering a question. Instead of just placing them in front of a boring white wall, Jin and I tested out various spots for our interviewees to sit in while we filmed them so that the background complimented the video appropriately (see the fonts/colour scheme section down below in postproduction). We shot each of the interviews on our university campus and in different flats of friends we know. While Jin handled the camera, my contribution was to prep the participants and manage the lighting. Several months before shooting we had master classes on both sound and light techniques that we used during our shoot sessions. Brendan Crehan, an industry professional led a workshop to teach us more on the use of diegetic and non-diegetic sound. He helped us prep for interviews and went in depth about various mic placements for effective sound recording. During these classes, Jin and I practiced constructing our shots and used appropriate lighting and microphones to practice setting up for our interviews. As theory suggests, “A lavalier microphone is the small mic you often see attached to the lapel, tie or blouse of news anchors. These small mics are ideal for recording audio from a single individual during an interview or presentation. The pickup pattern of a lav mic is generally omnidirectional, but because it is placed so close to the speaker’s mouth, nominal background noise be unnoticed once the levels are set on the recording device” (Harrington, 2011: 43).
It was clear that we had to use a lav mic for our interviews but Brendan gave us a tutorial of how to use shot gun mics so we could get a feel of how both mics work.
The trickiest part of shooting was trying our best not to capture the background noise. All of our interviews were in locations where there was air conditioning and as a result, the sound that we captured was not as clear as we hoped because of the excessive background noise. Luckily, we managed to fix that in the postproduction stage in Audition. For all of our participant’s interviews, we wanted them to be placed in different backgrounds that had neutral colours. Jin and I had agreed that our film would stick with a certain colour scheme and we wanted to make sure that our footage would gel well with the text on screen. My contribution in the actual shooting of the film was to ensure that the lights and backgrounds were perfect for the shot, placed the microphones onto each of our participants and help Jin by placing the cameras in different angles.
On Set Experience
My experience on set was simply fantastic. I personally found it to be the most fun and I enjoyed seeing my film come together in real time. Jin and I experimented around a little with backgrounds and move things here and there to ensure that we made best use of the space and so that we could get a clearer shot of our participants.
I also suggested to Jin that we should film our participants from different angles as it was one of the features we liked from the above Buzzfeed video and so that our viewers could focus on our interviewees but not get bored of the same exact view. We integrated a bit of theory while onset to help us frame out interview shots. As suggested in Shoot to sell, “staying on the same shot, like a medium shot, of even the most interesting person soon gets boring. If a person is using their hands to communicate, include them, they help tell the story. During more intense or intimate times, slowly zoom in for a drastic effect. Frequently you see the shot framed so that the interviewee is looking not at the viewer but off axis, at the interviewer who is out of the frame. In this case there should be more space in the frame in front of the interviewee’s face than behind their head, otherwise they will look claustrophobic. In other words, they should be looking out of the frame with more room in front” (Smith and Miller, 2012: 133).
We used framing tips to help guide us and set up our camera in order to shoot our participants.
Shooting series 1: We used some of these rules from the above book and found them to be quite useful as they helped us get very good and “not so boring” interview shots. The whole point of series 1 was to instil in the viewers that there is a problem of too much screen time and so focusing in on the interviewees and capturing what they had to say was extremely important. A combination of good angles, strong lighting and neutral backgrounds ensured that we got clean and professional looking footage. Each participant was placed in one spot against a background that we liked for the entire interview. All we simply did was change the angle of the camera so that we captured their responses from different perspectives. However, on set we realised that the air conditioning was a big problem and caused our audio to have a lot of unnecessary background noise despite using good quality lav mics. Unfortunately, one of our interviews with Mariah (one of our participants) was shot outside on a very windy day and as a result, we had to re film her indoors because the sound quality was just terrible. After filming our participants for series 1, we were ready to move into filming series 3. Unfortunately, we still did not find a specialist for series 2 but decided to worry about that only after filming series 3.
Shooting series 3:
Series three was all about alternatives to screen time and we had to travel around London to get good footage to complete this series. Jin and I travelled to: Canary Wharf, Canada Water Library, Southwark Park, Sky Gardens, London bridge and even did a bit of filming in Jin’s flat. Before going out to film, we had made a set list of alternatives to put in the last series and that list generated our list of shots needed. From making tea to going for a run to even exploring local hotspots, Jin and I had a great time going around London to capture and film the various alternatives however, it was a bit more challenging than filming the first series. How so? Jin and I had to film a few scenes outdoors, and the weather along with background noises were all unpredictable. Jin and I planned each outdoor shoot by checking the weather in advance and tried to position ourselves in all of these locations where there were fewer people and cars. We were delighted to know that the footage we captured did not have too much unwanted background noise and since we planned on putting some music on in the background for series 3, we did not have to clean too much of the audio for this series in Audition. My biggest contribution for filming series 3 was organising the locations for the shoot and filming most of the shots at Southwark Park. Jin also introduced some new equipment for us to use while filming: a dolly and a slider. The camera work included moving the camera in unique ways for which we required this apparatus. For instance, one of the alternatives was to visit a local hotspot in the area and so we visited Sky Gardens in London to capture some gorgeous footage of greenery and flowers. We used a slider to capture flowers from inside plant pots and found it to be a successful way of of adding visual creativity to our shots. We also used a dolly as platform on the surface of a rocky concrete floor to create smooth movements of someone posting a letter inside a postbox.
Finally after obtaining footage for series 1 and 3, we were ready to start editing what we had. And.. there was finally hope in finding a specialist.
Shooting series 2:
FINALLY and LUCKILY, a week before moving everything into Premiere, I managed to get in touch with a friend of mine who works for a technology company and has a minor in psychology. He was the perfect person to ask! It was extremely silly of me to have not remembered contacting him before. After very little persuasion, my friend Akash Hirani agreed to be our specialist. We filmed Akash in a meeting room at Landale House in Canada Water, with orange and yellow sofas and the background fit very well with our colour scheme… (see the fonts/colour scheme section down below). We filmed Akash from different angles and I helped brief him on what sort of information we were looking for. I had also set up the lighting kits around Akash because the room in which we filmed him in was fairly dark. Akash gave us some insightful views on what too much screen time does to our eyes and outlined the social, physical and emotional (three subtopics) caused by too much screen time. Each of these subtopics was shot at different angles so that our viewers would not get bored and this way it would give them a three dimensional immersive experience. Jin and I planned to incorporate graphics and icons with each of the subtopics discussed and therefor planned our interview with Akash such that there was a little headroom as well as some empty white wall space in our footage so that we would place these icons smoothly in postproduction.
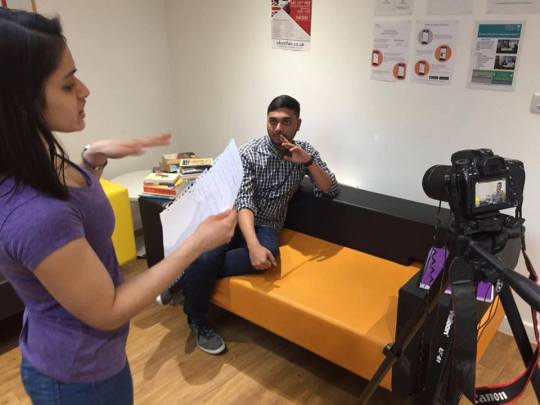
(Me briefing Akash)
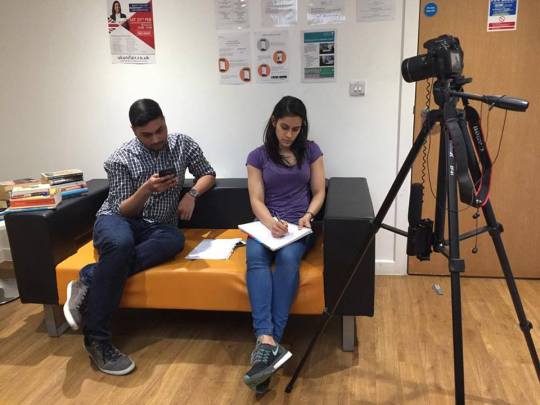
(The sofas that we used at Landale House to shoot out specialist on)
Scroll down to read more about editing...
0 notes
Text
Postproduction: the Defining Stage That Brought it all Together

The postproduction part of the entire journey was the most important and meticulous part for us. In order to achieve the style we wanted we had to really focus on the editing part. Jin and I split up the work so that I would edit series 3 and she would edit series 1, and together we would work on series 2.We were assigned to use Premiere Pro and were quite familiar with the software however, Jin was more comfortable than I.I learnt a lot about the software this year than I did the previous year. Learning about colour correcting to creating titles and adding funky transitions, slowly built my confidence is using this software. Our film was going for a slick and fast paced look and we had to ensure that Premiere would allow us to do so. However, for a few of our scenes, Jin suggested that we use After Effects to achieve some really creative and specific editing. For instance, we had to create a scene in which the screen of a standard iPhone would play the entire video of series 2. We had to place a screen within a screen. While confusing as it may seem, we simply just wanted to embed series 2 into the view of an iPhone but unfortunately, it was way to advanced for either Jin or I to create. However, we were able to successfully tweak that part of our storyline so that we could end up only using Premiere.
Premiere: My Experience with this Software (February 8 2017)
Going through rough footage and then to log and label everything was fairly quick and simple. Jin and I knew exactly which shots we did want and which we did not. We started by creating our individual sequences in Premiere and to be completely honest, my editing skills at the start of this project were not as great as I had hoped they would be. There were a few things that I was still a little unfamiliar with but luckily my partner was a pro at using the software and helped me with a few things like adding effects and transitions, inserting text that would either crawl or roll over clips, adding in sound effects and even colour correcting clips to make our raw footage more warm. I handled editing series 3 and the MUJI example up above was what I referred to every now and then to gain inspiration in creating the sequence for series 3. Just to give you a sense of what we had, some of the alternatives that we shot included: making tea, going to the library, going for a bike ride, cooking a meal, writing a letter to a friend, posting mail, visiting a local hotspots, studying, and a couple of others. I had arranged the alternatives in a practical sequence however; the footage that we acquired for each alternative was roughly 40-50 seconds and they were longer than we needed them to be. For this series, we envisioned each of the alternatives to be shown on screen for a maximum of 10 seconds. My job was mainly to trim each of the clips down to only a few seconds so that it was clear enough for the viewers to know what the alternative is. Additionally, I had to write out each alternative on top of its corresponding scene however I suggested to the Jin that we integrate a creative hashtag for each of the alternatives so that it leads up to the big reveal of the main campaign at the end. For instance, instead of the words “go for a walk” directly floating on top of the scene that depicts someone going for a walk in the park, we made it: “#burncalories”. I completed the rough cuts for series 3 and while Jin was working towards finishing series 1, the two of us began to work on series 2.
Series 2 took a lot of work as it required vast amounts of statistical facts that supported Akash’s points as well as graphics that supported Akash’s points as well as graphics that corresponded with the topics discussed in series 2 and rough cuts of our own. For example, Akash discussed how too much screen time can lead to short sightedness, and so we had to find appropriate graphics to compliment the topic of short sightedness and find a statistical fact showing how many people suffer from short sightedness as well as use our own footage of a zoomed in eye. Akash also spoke about how too much texting can lead to Carpal tunnel syndrome, over weight problems, and antisocial tendencies. For each of these points we had to get a fact, rough cuts and a graphic and managed to integrate them all into series 2. Jin and I had fiddled with the transparency levels of the graphics to make sure that Akash was still in focus while the icons flashed on top of his interview footage. And, when we had to place quick rough cuts in between, we made sure that the transitions were smooth and quick. However, keeping in mind that we wanted our fonts and colours to be consistent, Jin and I did some research to pick out an appropriate font and a classy colour scheme that would fit well with our series.

(editing footage in Premiere)
Fonts and Color Schemes
Premiere had a vast number of fonts that were available for us to use in our titles in series 1, 2, and 3. Jin and I decided to use different shades of black, grey and yellow across all three series. We didn’t want to take away form the fact that the topic of our film was fairly serious, so we decided to go with a very neutral and basic font that would not be too funky and add an element of silliness. We went with Arial Black across all three series.

(a sample of what Arial Black looks like)
In series 1, we had text that highlighted some of the important parts of what our participants had said along with a few icons and graphics. We also had some facts and statistics showing how much people use their phones and laptops and other various screens. In series 2, we used text to introduce our specialist and add a few facts supporting his arguments, as well as to highlight anything striking that he said during the interview. Lastly, in series 3, we used text to explain what the alternative was on screen. All of the titles were in Arial Black with the same size font, and depending on the colours in a particular scene, the colour of the font would compliment the scene and be either a form of black, grey or yellow. Another reason as to why Jin and I chose Arial Black is because while surfing through sample videos of interviews with doctors and specialists, we noticed that the fonts in those videos were fairly basic as well. Ranging from Calibri, to Comic Sans to even Times New Roman, the generic fonts used were fairly plain in these videos.
Colour Correcting (March 1 2017)
As mentioned above, Jin and I wanted all our footage to have rich saturated colours instead of a dull muted look. We essentially adjusted the tones of the footage which added more vibrance overall. Colour correcting all of our footage really elevated our shots from good to stronger and more striking (and in my honest opinion outstanding) quality images. Colour correcting really adds more life to footage and has an effect on the overall mood and fell of a film. We found that some of our shots looked a little “flat” and colour correcting really helped bring life to our shots and made them look more warm This was all a huge learning experience for me. I had never colour corrected before however, one of our tutors: Rory Cheal, gave us a 1 hour crash course on how to colour correct our footage. Rory’s session was extremely useful and helped me not only understand the power of colour correction but also taught me how Premiere specifically allowed us to adjust colour levels and RGB curves. Instead of just adding templates, we individually went into each scene and adjusted the colour balance and saturation by using the slider controls under the three way colour corrector effects and even altered the colour and luminance of our shots by adjusting the RGB curves and luma curves until all of our footage had a consistent look. We pushed all the blue tones of our raw footage into red and that was the perfect way of getting our images to look less dull. We successfully managed to ensure that all of the footage in series 1 looked consistent and were slightly over saturated in certain areas and that in series 2 that interview shots all looked the same but has a slight red and orange tint to the overall look and lastly, in series 3, we colour corrected all the dull looking footage that was captured due to the grey weather and poor source of lighting outdoors. We were now ready for audition.
Audition (March 17 2017)
As mentioned above, we had some issues with our audio from interviews mainly because of unwanted background noises from the air conditioning. Rory also gave us an informative session on how to clean up our audio using Audition. Luckily Audition and Premiere worked in sync and allowed us to select the audio track that needed correcting in Premiere and then directly open it in Audition to reduce the background noise and then save it back in the same place in Premiere. Because we had some music playing in the background in series 1 , 2 and 3, it was necessary for us to have all the audio from these interviews to be crisp and clear. Adobe Audition is a great application for voice recording and editing any sound. For all of our interview shots Rory helped us manually reduce background noises by applying noise reduction effects. We captured the frequency of the background noises and simply removed that frequency from the main audio track. It essentially removed all the air conditioning noise and boosted the clarity of our interviewees voices. We were able to identify those frequencies on the waveforms for our audio because in certain areas of the footage where none of our participants were talking because they were either taking a few seconds break in between each sentence, the frequency levels of the air conditioning were at its highest and easily identifiable.
*A big thanks to Rory for cleaning up our audio. We hope that Snickers Bar was fair payment :) *
Audio editing was the last piece left before exporting our film. After we colour corrected and cleaned out the audio we watched our film over and over again to ensure that there were no spelling errors or any glitches in the individual series. Questions like: “Are the music levels to loud? Are there any fuzzy clips? Any poor transitions? Any last minute changes?” were running through our heads but luckily we had only 2-3 minor changes that had to be made. Jin and I went through a final checklist to make sure our film was ready to be handed in along with the production folder. On Wednesday March 22nd Jin and I handed our project in. Relieved that it was done, we both were so proud of all the hard work and effort we had put into this :)
0 notes
Text
A General Reflection and a Big Thank You!
This has been one of my favourite yet most intense modules at university this year! A combination of the desire to do well as well as the rush and adrenaline pumping feelings we had, were the source of what made us work hard. Jin was a fantastic person to work with and to be extremely honest, has some outstanding camera work skills.
*Calling out to any media production houses looking for a candidate.. Please consider Jin Choi*
Our strong teamwork and friendship developed throughout the course and since this project is a large part of our final year grade, we knew we had to trust and rely on each other to do well and make a fantastic film.
As a budding media and communications student, I can definitely say that my skills this year have really grown in terms of editing and filming. Before beginning this module I was a little afraid of the postproduction part of the project as my Premiere skills were not the best. I had a basic understanding of how to edit clips by trimming, adding a simple font, using effects templates and even adjusting music tracks. However, slowly through the course, Jin and my tutor Tassia (who I’d like to thank separately) really helped brush up my previous skills and boost my confidence levels to learn new ones too. Colour correcting was completely new to me. I had never learnt how to colour correct on Premiere before and this for me was a huge learning. Additionally, working with Audition and learning the importance of high quality sound was new to me as well. Rory did help us a lot in clearing up the audio however, I would have very much liked for him to have talked us through the process of how he did it in depth so that I can confidently use the program again completely by myself in the future. Additionally, filming shots from trickier angles using new equipment like a dolly and slider were new for me as well but I slowly realised just how effective these pieces of equipment were in obtaining smooth and clean footage.
Strengths and Weaknesses
Strengths of our film include the use of special sound effects, sliding text, and a mix of jazz music in Premiere to help make the film look slick and “techie”. Also, we used an advanced camera and Jin’s great camera skills helped us get very focused shots which made the look more professional. Lastly, colour correcting brought the whole film together and helped add to our over all theme of a fun (buzzfeed like) educational video. Strong teamwork was also a strength of ours. Jin and I would not have been able to pull this off if we hadn’t cooperated well together. Not only did our skills develop, but so did our friendship.
Our biggest weakness was that we did not pay enough attention to the audio levels during the interviews. We failed to monitor the audio level which effected the clarity of our interviewees and instead the mics captured the background air conditioning noise.
Thank You Tassia :)
Here is a special thanks to my teacher Tassia. This all could not have happened without her. She was a great mentor and a friend who helped us bring our film together. She did critiques for all the students in our class, which in my opinion were fairly constructive and helped better our films. Our teachers have all been working in the industry for several years and so it was a great way for us students to learn about film making from tutors as advanced as them. Tassia’s ability to give us useful advice be it to change the angle of which we filmed something to or to adjust the placement of text on the screen, it was all in our best interest. The only feedback that I had to give for the course as a whole was the fact that some aspects of Premiere had to be self taught or learnt through tutorial videos on YouTube. It would have been great if we could have gotten a refresher course or had individual tutorials with our tutors on what we were still unclear on with software. Or as suggested by Jin, have a mini manual or an equivalent of “Premiere for dummies.”
Thank You Tassia for all your help and advice. Jin and I wish you the best of luck and hope to see you in either India or Korea sometime soon.
0 notes
Text
Bibliography
BBC Media Action, (2016). Your phone is now a refugee's phone. [video] Available at: https://www.youtube.com/watch?v=m1BLsySgsHM [Accessed 9 Apr. 2017].
Buzzfeed Boldly, (2015). 33 Questions White People Have For White People. [image] Available at: https://www.youtube.com/watch?v=z1PviSrWYqw [Accessed 9 Apr. 2017].
Collective Evolution, (2016). Screen eyes. [image] Available at: http://cdn3.collective-evolution.com/assets/uploads/2016/01/screen-eye.jpg [ Accessed 5 Apr. 2017].
Common Sense Media (2012). https://d2e111jq13me73.cloudfront.net/sites/default/files/styles/blog_art icle/public/blog/csm-blog/deviceaddiction-blog-569x329.jpg?itok=2D7q0jOe. [image].
Coyer,K., Dowmunt, T. and Fountain, A. (2007). The alternative media handbook. 1st ed. London: Routledge.
Dehut, C. (2014). The Best Camera Angles for a Video Interview - 12 Stars Media. [online] 12 Stars
Media. Available at: https://12starsmedia.com/video-production/best-camera-angles-video-interview [Accessed 9 Apr. 2017].
Fleming, A. (2017). Screen time v play time: what tech leaders won't let their own kids do. [online] the Guardian. Available at: https://www.theguardian.com/technology/2015/may/23/screen-time-v-play- time-what-tech-leaders-wont-let-their-own-kids-do [Accessed 5 Apr. 2017].
Getty Images, (2011). LCD screens. [image] Available at: https://aos.iacpublishinglabs.com/question/aq/700px-394px/can-done- scratches-lcd-screens_178787b8c65553aa.jpg?domain=cx.aos.ask.com [Accessed 5 Apr. 2017].
Harrington, R. (2011). Professional web video. 1st ed. London: Focal Press.
Muji, (2015). Muji To Relax. [video] Available at: https://www.youtube.com/watch?v=TMw4kIJJLDs [Accessed 9 Apr. 2017].
New York Times, (2014). Internet. [image] Available at: http://graphics8.nytimes.com/images/2015/07/14/opinion/RFDinternet/RFDinte rnet-sfSpan.jpg [Accessed 5 Apr. 2017].
Richardson, H. (2012). Limit children's screen time, expert urges - BBC News. [online] BBC News. Available at: http://www.bbc.com/news/education- 19870199 [Accessed 5 Apr. 2017].
Smith, R. and Miller, K. (2012). Shoot to sell. 1st ed. California. Focal Press
0 notes