
All I do here is write fanfics and make my own fan-updates to games I like. You'll find Pokemon, Animal Crossing, and Smash Bros. stuff here, and also my fanfics and drabbles here. Reblogs go on my other blog down there.
Last active 60 minutes ago
Don't wanna be here? Send us removal request.
Statistics
We looked inside some of the posts by ohthehypocrisy and here's what we found interesting.
Average Info
Notes Per Post
26
Likes Per Post
22
Reblog Per Post
3
Reply Per Post
1
Time Between Posts
10 days
Number of Posts By Type
Text
16
Note
1
Last Seen Tumblr Blogs


Fun Fact
Tumblr has a low social media market share in South America.
Text
Alcremie for Pokemon Unite! (obsolete draft)
Alcremie has made it to Aeos Island and is now playable in Pokemon Unite! This is a big win for fans of Fairy Type pokemon in general, myself included, but I am feeling a bit down about it.
In case you don't know, when Alcremie was revealed alongside Suicune and Alolan Raichu, I made a post celebrating it, as well as revealing that Alcremie was going to be in Season 4 of my Pokemon Unite posts. Because of that, I had to replace Alcremie with another Supporter from my Drafts.
Don't get me wrong, I'm glad Alcremie is in Pokemon Unite. However, you can be sad about hitting a target but not getting a bull's eye.
You'll understand what I mean. I'm gonna do my due diligence and reveal the original draft in all its unedited glory. My own commentary will be italicized so that you can better understand my thought process.
Also, a quick heads up about Season 4 of my Pokemon Unite posts. The next post will be delayed for a week as I've been busy with work. All I've got for the next pokemon is the bare basics, so I need more time to flesh it out and bring it up to my standards.

(One of the hit or miss parts of the drafting process is finding a suitable GIF to use as the eyecatcher of the post. Sometimes Tumblr has a good or great GIF to use, sometimes it doesn't. I try to use Tumblr GIFs if I can help it, but if nothing comes up, I pull from the broader internet in general to find something worthwhile. It's much easier to find GIFs for pokemon that have been featured in animation or commercials, but sometimes I have to make do with 'good enough' GIFs. I'm not a GIF maker, and I'd prefer to share someone else's work if I can help it.)
-
Supporter
-
Basic Attack - Ranged/Sp. Attack
(Didn't have anything written here. I had a broad idea with what Alcremie was going to do, and usually these posts start with a fully fleshed out basic attack or end with them. In this case, I didn't have a full concept for Alcremie's kit, so I left this part blank and was planning to fill it in later when the game plan was realized.)
-
Ability: Sweet Veil
Weakens the effects of debuffs and slightly increases the Movement Speed of ally pokemon nearby. If the user starts spinning, the pokemon will blend itself, mixing the cream in its body. This starts expanding the area of effect and strengthens the debuff weakening effect and Movement Speed boost granted to nearby ally pokemon. After a while, the area of effect shrinks and loses effectiveness until it resets back to normal.
(In Pokemon Unite, Alcremie uses Aroma Veil as opposed to Sweet Veil. Now, it's all the same to me what Abilities these pokemon have in Pokemon Unite, but Aroma Veil is a Hidden Ability, and pokemon with Hidden Abilities are intentionally much more difficult to get ahold of in game. I try to keep it kosher by picking out a pokemon's natural Abilities, unless they have something much more suitable and thematic.)
(Also, this was a fun Ability that played with the whole 'spinning' thing players like to do when they meet each other on the battlefield. I wanted to have a pokemon that could amplify its supportive effects by spinning and blending the cream within itself. Alcremie and Milcery are not the only pokemon that can spin for fun effects, but I wanted to present the idea through Alcremie first since it evolves in game when the player spins.)
-
Move 1: Sweet Kiss
The user blesses an ally with a sweet kiss, curing them of hindrances and grants them a small shield. Sweet Kiss will also impart the effects of Sweet Veil onto the ally pokemon for a short while. 7s cooldown.
(The whole 'spinning and blending' gimmick wasn't going to be just for fun, it was also going to be able to share its boons with allies, since the pokemon likes to share its sweet stuff with others. The buff granted to allies would be weaker or stronger depending on the blend power of Sweet Veil, which allowed Alcremie the ability to support allies with a buff before sending them on their way.)
-
Move 2: Sweet Scent
Reduces the Movement Speed and basic attack speed of opposing pokemon for a while. Enemies hit directly by the attack will be Stunned briefly. 6s cooldown.
(Of course, no self respecting Supporter comes to Unite without annoying hindrances and debuffs.)
-
Move 1a: Decorate
The user decorates an ally with sweets and fondant, increasing their Attack, Sp. Attack, Goal Scoring Speed, and transfers some of your Aeos Orbs into the ally's Score Pocket. Decorate also imparts the effects of Sweet Veil onto the ally pokemon for a short while. Up to 3 uses can be held in reserve. 3s cooldown.
(In order to give Alcremie a unique flavor when compared to other Supporters, I decided to focus on the ability to support an ally's scoring potential. Decorate would have buffed an ally by increasing their damage and Goal Scoring Speed and even give them some Aeos Orbs to use that buffed Goal Scoring Speed with. The specifics of the move hadn't been worked out yet, but the initial idea was that multiple allies could've been buffed to score faster. This one might have been changed later on in development.)
-
Move 1b: Acid Armor
The user covers an ally with hard cream, protecting them from opposing pokemon. It grants a shield that prevents their Goal Scores from being interrupted while the shield is active. It will also impart the effects of Sweet Veil onto the ally pokemon for short while. 8s cooldown.
(Shield and recovery effects are slightly similar and can achieve the same results. However, recovery effects are permanent whereas shields can give an ally more HP figuratively. It's my go-to when designing Supporters. However, as Decorate improves the speed of scoring, Acid Armor was supposed to help prevent Goal Scores from being interrupted. It was a free Goal Shield and gave Alcremie a unique duality to work with. How do you want to win, with quick scores, or big, unstoppable scores?)
-
Move 2a: Misty Explosion
The user sprays a sweet smell all around itself with such force, nearby opposing pokemon are Stunned briefly. Their Movement Speed and basic attack speed are also reduced slightly. The closer the opposing pokemon were to the user, the stronger these effects. 8s cooldown.
(The effects of Sweet Veil were designed to expand when you spin around, protecting allies by weakening the effects of debuffs used against them from the opposing team. Everything else was to be handled by your moves, buffing their damage output or by giving them shields. If the area of Sweet Veil were to shrink over time at an inopportune moment, you would be either forced to retreat or use Misty Explosion to hinder the enemy. The attack deals damage in a large area and debuffs the enemy slightly, with the power of these debuffs increasing the closer the enemy was to Aclremie. Of course, Alcremie itself was going to be fragile on the defensive side of things so using Misty Explosion optimally would have been very risky, but well worth the effort if pulled off successfully.)
-
Move 2b: Aromatic Mist
The user sprays a sweet, creamy aroma in the designated direction. Ally Pokemon have their Sp. Defense increased drastically whereas opposing pokemon have their Sp. Attack reduced considerably. 9s cooldown.
(OK, so, just by reading this move's effect, you can understand exactly how useful this move can be and how often. Buffing an ally's Sp. Defense and debuffing an enemy's Sp. Attack will effectively neutralize the damage opposing Sp. Attackers can do, but this will only work against teams with a high concentration of Sp. Attack based Burst Damage potential. Against any other composition, Aromatic Mist will never be chosen, but that's the idea. If Sp. Attackers ever become broken, Alcremie would have been the roadblock with Aromatic Mist.)
(But at the same time, Aromatic Mist will be a 'throw pick', so to speak, against a mostly Attack based team composition. I almost never make one-sided moves like this, that's usually a mistake for the developers to make. But these specialized moves should exist to promote healthy diversity in the meta, because Arceus forbid Mr. Mime or Gengar become dominant ever again.)
-
(Also, there wasn't a Unite Move made yet either. I don't remember if I had a concept in mind, but I think the entirety of this draft was done in a single day. I was simply stricken with inspiration and had to put it all down before the taste left my mouth. Well, that's what I get for having dessert before dinner.)
(Heh, even in a draft, I still have puns aplenty. Delicious.)
0 notes
Text
Hisuian Decidueye for Pokémon Unite!

Season 1
Season 2
Season 3
Prev: Iron Valiant - Primarina - Garganacl - Passimian - Incineroar - Cofagrigus - Glimmora - Galarian Stunfisk - Krookodile - Kricketune - Magearna - Turtonator - Farigiraf - Spinda - Darmanitan - Slaking
Here's an interesting bit of trivia about Decidueye. It is based on an extinct species of owl that was native to the Hawaii islands, hence its Ghost Typing. As such, when Pokemon Legends Arceus was revealed, savvy fans expected Rowlet to evolve into something different from regular Decidueye, since the game is set in the past, and the owl pokemon would not have 'gone extinct yet', so to speak.
And thus, the Hisuian form of Decidueye came to light, sporting a Fighting Typing as a testament to its athletic skills in combat and archery. Surely, such an interesting pokemon should have a fair shot in Pokemon Unite next to its Alolan cousin, right? Let's see if it can make the cut.
-
In addition to being a distant relative of the islander owl, Hisuian Decidueye shares many of its base stat patterns with Alolan Decidueye. They're almost too similar, though, and many of the tweaks and shifts in base stats are so minor they're almost negligible. Lower Speed for higher HP, slightly higher Defense in exchange for slightly lower Sp. Defense, and a slightly reduced proficiency in Sp. Attack in exchange for Attack. I'll be honest, I'm not sure where they were going with this spread. But since Hisuian Decidueye is a Fighting Type, that makes it a pokemon well suited to fast paced fights, as well as long range attacks and enough bulk to shrug off a hit or two. On that note, I designate Hisuian Decidueye with the role of an...
All-Rounder
-
Basic Attack - Melee/Attack
Becomes a boosted attack after two hits. The boosted basic attack has the user dash forward and swipe with its sharp wing, slinging sharp leaves outward to deal damage in a small area.
The basic attack has Rowlet and Dartrix attack with their beaks and talons. Hisuian Decidueye attacks with only its talons.
The boosted basic attack has the pokemon dash forward and use their wings like a sword, swinging in a wide arc forward. The attack sends a small volley of sharp leaves or leaf quills outward in a conical area, with each leaf adding an extra bit of damage to opposing pokemon caught in the attack.
Naturally, since there is already a Decidueye on the roster in Pokemon Unite, Hisuian Decidueye must make itself different and unique in order to stand out. The easiest way to do that is to do things that regular Decidueye cannot do, and that would be to engage in close combat.
It's still a sharpshooter, though, so the basic attack has an extra bonus attack tacked on to it. When boosted, Hisuian Decidueye will charge in and deliver a swipe with its wing, letting fly loose leaves and quills from its feathers. This covers a surprising amount of space and is great for charging into a horde of enemies.
However, there is a limit to the number of sharp leaves and quills that can be launched out, and that limit is your HP. More specifically, your HP as it ties to your Ability.
-
Ability: Overgrow
The lower the user's HP, the more sharp leaves and quills the user unleashes during its attacks.
All of your attacks and moves summon sharp leaves and quills, the amount of which can be increased by the Overgrow Ability. This includes your Unite Move.
An extra leaf quill projectile is launched for each 10% of your max HP missing.
Again, in order to differentiate from Decidueye, it was decided for Hisuian Decidueye to have a different ability. Thankfully, not only does it suit the pokemon, but it helps the bird excel in what it is meant to do.
As stated, all of your moves and attacks launch extra projectiles when used. They might be sharp leaves if you're playing as Rowlet or Dartrix, but they're leaf quills when you fully evolve into Hisuian Decidueye, and I'll be referring to them exclusively as such.
The leaf quills vary in area of damage and how many are shot out, but the amount is influenced by your HP. The lower it gets, the more leaf quills are shot out. At low HP, those caught in your attacks will be suddenly overwhelmed by the sheer number of leaf quill projectiles, magnifying the potential damage. It makes Hisuian Decidueye dangerous to fight up close, but it's only as powerful as its moves allow.
Speaking of which, let's start going over the moves now, shall we?
-

At the beginning of the game, Hisuian Decidueye will start out as Rowlet. You can choose between Aerial Ace and Razor Leaf as your first move. By Level 3, you'll have learned both.
-
Move 1: Aerial Ace (Dash)
The user dashes forward with its wings stretched out. If the user hits an enemy, the user will jump back and deliver a second swipe with its wings, dealing damage in a wide area. 8s cooldown.
When the pokemon dashes back, it covers half the distance of the initial dash forward. The leaf quills are shot out in a conical pattern on the rebound.
The name of the move Aerial Ace is based on a real life sword technique called the Swallowtail Cut. It is where you slash with the sword, then, in one quick motion, reverse the blade and swing backwards to cut the opponent that dodged your attack. The sheer weight of the sword makes this an incredibly difficult technique to pull off, but it is often the killing blow for dispatching the enemy caught unaware. Also, that is why the attack is a Flying Type attack, since it is named after a bird.
And bird you are. It is sort of odd to see a Rowlet get very physical, especially since the Alolan version prefers to stick to long range. On that note, Rowlet still shares the same fragile stats as its distant cousin, so this attack is treated more like a hit-and-run tactic.
It covers a bit of range, though, both the Dash attack and the sharp leaves that are shot out. It helps in both starting a fight or catching an enemy on the retreat, and can also be used for retreating as well, even though your jump back is at a reduced distance. Against melee attackers, this is serviceable, but ranged attackers will have too much space to work with.
Good thing you have another Dash move to close the gap.
-
Move 2: Razor Leaf (Dash)
The user dashes forward, cutting down enemies with sharp leaves from its wings. If the user uses a boosted basic attack shortly after attacking, this move can be used again. This attack has a high chance to deal critical hits. 7.5s cooldown.
You have 1.5 seconds to use a boosted basic attack shortly after using Razor Leaf to reset the move. This effect will not repeat the second time and will go on cooldown afterwards.
The Critical Hit Rate of each hit of Razor Leaf is 12.5%.
As adorable as Rowlet is, do not forget that it is an owl, one of the more efficient birds of prey in the real world. They move quickly and silently, and always seek to get their kills in one hit.
But Rowlet is still just a baby, so it doesn't quite have that killer instinct quite yet. It does have the capacity for brutal damage, though, and that is where its Razor Leaf attack comes into play. As Rowlet charges forward, it lets loose sharp leaves from its wings that cover the area. It's functionally identical to Aerial Ace without the rebound jump, which makes it useful as an extension to your combo.
I say combo specifically because of how the move interacts with your boosted basic attack. If you use it shortly after using Razor Leaf, you get to use Razor Leaf one more time to attack again. Keep in mind that the move has a high critical hit rate, and that affects each individual sharp leaf let loose during the attack. The odds are low, but never low enough that it won't happen, especially if you can repeat the effect. Sadly, you only get one loop of Razor Leaf in this way, but Rowlet needs it, since it is just as frail as its islander cousin.
It does make you much better equipped at getting KO's. And the easier it is for you to KO the enemy, the easier it will be to Level up.
-

At Level 5, Rowlet will evolve into Dartrix.
-

At Level 7, Dartrix will evolve into Hisuian Decidueye. At the same time, Aerial Ace becomes either Triple Arrows or Reversal.
-
Move 1a: Triple Arrows (Dash/Sure-Hit)
The user jumps forward and delivers a flying heel strike. If the user hits an enemy, it will jump backwards and load three arrow quills into its wing bow. The arrows will be fired shortly afterwards, locking onto the enemy and damaging them and any opposing pokemon caught in the attack. The attack button can be held to charge and increase the damage dealt by these arrows. 9s cooldown.
At Level 12, Triple Arrows becomes Triple Arrows+.
The jump distance of the attack on advance and on retreat is lengthened. In addition, the arrow attack can be charged for a little longer for even more damage.
Triple Arrows sends Hisuian Decidueye forward with a jumping heel strike. On hit with an enemy, Hisuian Decidueye will jump backwards and load arrows into its wing bow. The arrows are then fired, flying in a conical formation but then quickly hone in on the enemy damaged by the initial attack. The move deals damage to all opposing pokemon caught in the attack.
While airborne, the move button can be held to charge the attack for up to 1.5 seconds. The charge time increases the damage dealt by the flying arrows and lets Hisuian Decidueye linger in the air for a bit. Triple Arrows+ extends the potential charge time to 2 seconds and appropriately further increases the damage that can be dealt.
Extra leaf quills are launched out in a conical area from Hisuian Decidueye, and these projectiles will not hone in on the target. The amount of leaf quills shot out is determined by the power of Overgrow.
Triple Arrows+ sends Hisuian Decidueye flying further when it attacks and when it jumps back into the air.
While Rowlet and Dartrix both evolve at the same Level as their Alolan contemporary, their stats are slightly tweaked due to the specialized training they've undergone to fulfill the All-Rounder role. It's called 'EV Training', and I would advise against looking into it as pokemon is just a game. None of that 'VGC' stuff is important here.
What is important, however, is how to use and master Triple Arrows, the signature move of Hisuian Decidueye. The attack sends you rushing forward with a flying heel kick, same as it goes in Pokemon Legends Arceus. All the same, Hisuian Decidueye then flies back and nocks three arrows into its wing bow and then fires at the target.
Triple Arrows is a 'hit confirm' attack, where if the flying heel kick misses or fails to deal damage to a viable enemy target, the pokemon will stay in the spot they land in and the move will go on cooldown. It works well enough as a Dash move outside of combat, especially if you're in a hurry and got somewhere to be, but the high cooldown makes it inconvenient to use for anything other than combat.
When it does land its mark, the move is a powerful asset in a fight. First, whoever the flying kick hits becomes the target of the rest of the attack, and anyone caught in between will be damaged by the arrows when they fly out. The arrows, also, hone in on the target, no matter where they go, so the farther they retreat, the more distance this attack covers, barring extreme cases. This move is most damaging when targeting slippery enemies like Speedsters and mobile Defenders like Blastoise and Greedent, who don't know how to stay still.
Sometimes, though, the enemy will prefer to stay close. If they have the bulk to survive the attack, they will not needlessly endanger their allies. Of course, in a team fight, you are not the only one dealing high damage, as the enemy will have to contend with your allies threatening to KO the opposing team. Again, the move is most effective with distance, so an ally Defender like Snorlax can force the target back with Block.
Also, staying close to Hisuian Decidueye is not the safest spot either, as extra leaf quills are shot out in a conical pattern when the arrows fly loose. Only the three big ones have homing capabilities, though, but the area the attack covers is more than enough to ward off aggressors.
It is a bit on the weak side, but that's a compromise for ease of use and safety. The alternative is a bit more risky, though.
-
Move 1b: Reversal (Dash/Ranged)
The user charges forward with its talons held out. On hit with an enemy, the user jumps away and can start launching arrow quills repeatedly, aiming in the designated direction. The attack button can be pressed repeatedly to fire multiple arrows until the move ends, damaging multiple enemies. This stalls the user's descent, allowing it extra time to attack. 8.5s cooldown.
At Level 12, Reversal becomes Reversal+.
Makes it easier to fire more arrows during the attack.
Just like with Triple Arrows, Reversal has Hisuian Decidueye flying forward and dealing damage on hit before jumping back in order to load arrows into wing bow and then firing.
However, unlike Triple Arrows, the followup attack is aimed and used at the player's discretion. Using the attack button repeatedly has Hisuian Decidueye launch arrow after arrow in the designated direction, which can also be aimed. The more arrows fired, the longer Hisuian Decidueye can linger in the air.
Extra leaf quills are launched with each arrow fired in a very tight angle. It is hard to tell how many arrows are being shot at once until the arrows land on the ground.
Reversal+ shortens the draw time of each arrow being nocked, making it easy to fire more arrows during the attack.
Most of the time, when a pokemon uses an attack, you have to suspend your disbelief and just enjoy the fantastical side of the games. I mean, with all those leaf quills Decidueye fires out, you'd wonder if it will eventually run out of feathers and end the battle looking like a plucked chicken.
Funny as that would be, we should be grateful that there isn't an ammo system in this game and nock arrow after arrow at our leisure. Hisuian Decidueye is definitely grateful, since it needs all the projectiles it can get to use Reversal. The move sends Hisuian Decidueye flying forward, just like with Triple Arrows. However, when the hit connects, instead of launching three arrows, you'll launch as many arrows as your fingers can muster.
Now, the move Reversal is exclusive to the TM Shop in Pokemon Scarlet and Violet. While I could have come up with something more thematic, it's not exactly clear what kind of attack Reversal is supposed to be, so I've taken to creative liberties in designing this move. The attack also best describes the function of the move, so it's fitting, in a sense. Seems like you can teach an old dog new tricks.
Anyway, once you hit an enemy with Reversal, Hisuian Decidueye performs a similar song and dance to Triple Arrows, where it jumps back and nocks arrows to attack with. However, as stated, the number of arrows you can shoot will be determined by your ability to mash the attack button. You'll only have enough hang time to fire 8 or so arrows, and that's with diligent mashing, but you can aim each shot until you are forced to touch down.
The single arrow of each shot doesn't scale all that high with your Attack stat, but that's where the Overgrow Ability comes into play. In addition to the one arrow you fire, Hisuian Decidueye will shoot out a lot more arrows in secret. They come out in a tight conical area in the direction you are facing, dealing damage along with the arrow you fire. The lower your HP, the more arrows you fire, as per your Overgrow Ability. Letting loose this many projectiles in such a small space will amplify the damage you can deal, but the risk comes at fighting while at low HP, hence the move Reversal being chosen for this moveset.
This works very well with Hisuian Decidueye's ability to handle fights at close range, since it can dash about with its boosted basic attack and Razor Leaf. Speaking of which, comboing Razor Leaf with your boosted basic attack helps you cover a lot of distance in a team fight, slinging damaging leaf projectiles in every which way. You'll most definitely get beaten up and brought low, but Hisuian Decidueye is built for this kind of stuff.
Although, you're gonna need something sharper than Razor Leaf to cut it here.
-
At Level 8, Razor Leaf becomes either Leaf Blade or Brave Bird.
-
Move 2a: Leaf Blade (Dash)
The user rushes forward, cutting everything down around it with its sharp leaf wings. This move has a high critical hit rate. If the user uses a boosted basic attack shortly after using Leaf Blade, the cooldown of the move is reset. The user's basic attack will become boosted again if the user damages a different enemy. 9s cooldown.
At Level 13, Leaf Blade becomes Leaf Blade+.
Expands the range of the sharp leaf quills that are shot out from this attack.
Leaf Blade sends Hisuian Decidueye dashing forward while cutting in a circular shape all around itself. At the same time, a set amount of leaf quills are shot out from the pokemon during the attack. Additional leaf quills are shot as per the Overgrow Ability.
Leaf Blade+ extends the distance these leaf quills are shot out by 15%.
You have 2 seconds to use a boosted basic attack to refresh the use of Leaf Blade. If successful, your basic attack will become boosted again if you damage an enemy that was a different pokemon from the previous attack. This recursive loop can persist as long as you target a new enemy each time, similar to Lucario's Extreme Speed move in function.
The Critical Hit Rate of Leaf Blade is 15%. This applies to each leaf quill shot out as well.
I'm certain it was on purpose, but I really dig how Hisuian Decidueye looks more like a swordsman from old Japan, what with that leaf hat taking on a particular shape, almost like a kasa.
And just like a swordsman, Hisuian Decidueye is not only well versed in archery but also swordsmanship. It truly is a well rounded pokemon, a perfect fit for the All-Rounder archetype.
Leaf Blade has Hisuian Decidueye attack all around itself as it dashes towards the designated area. At the same time it does this, loads of leaf quills are shot out all around itself, covering a large area. The move has a Critical Hit Rate of 15%, meaning not only will the dash attack potentially deal a lot of damage, but so will each leaf quill shot out from the pokemon's sleeves. And that's a lot of projectiles, especially if Leaf Blade is used at low HP, as per its Overgrow Ability.
However, just like Razor Leaf, Leaf Blade has some bonus synchronization effects with your basic attack, amped up. If you're familiar with how Lucario's Extreme Speed works, the concept is similar. Basically, you can use Leaf Blade again if you use your boosted basic attack, and your basic attack will become boosted again if you hit a different target. The combo of Leaf Blade and your boosted attack can loop so long as you have fresh targets in the area.
All the while, each use of Leaf Blade will continue to sling barrage after barrage of leaf quills, each one with a heightened critical hit rate. If you're adept enough to use this move proficiently during a fight, the number of leaf quills shot out will increase as you take damage from the enemy, exponentially boosting your damage output.
Just be sure that you don't miss. This move is easy to use repeatedly if used effectively, but if you miss, you'll have to deal with the high cooldown and find some way to get out of the mess you got yourself in. I can't imagine a Hisuian Decidueye lasting long in a horde of enemies tired of its arrow slinging antics.
Don't shy away from fights. You should be brave, like a bird. A brave bird.
-
Move 2b: Brave Bird (Dash)
The user charges forward in a veil of sky energy, rushing through opposing pokemon. Each time an enemy is damaged, Brave Bird extends in duration and distance. The user loses a bit of HP for each target hit, whereas the user restores HP for each opposing pokemon KO'd by this attack. 8s cooldown.
At Level 13, Brave Bird becomes Brave Bird+.
Deals increased damage.
Brave Bird sends you charging forward with your wings stretched out. The leaf quills of this attack are shot out backwards in a fan shape pattern.
When an opposing pokemon is damaged from this attack, Brave Bird extends in distance and duration slightly.
The pokemon loses 6.25% of its max HP in piercing damage for each opposing pokemon you hit. However, you restore 7% of your HP for each opposing pokemon you KO, 9%, if that pokemon was on the enemy team.
Brave Bird+ increases the damage dealt by 30%.
Bravery isn't the absence of cowardice. It is the ability to act in spite of cowardice. For most birds, colliding with something head on is a death sentence, so doing so deliberately can be called either bravery or stupidity. We're gonna give these pokemon the benefit of the doubt and call it bravery, even if you were to charge recklessly into fights with this move without a plan in mind.
For Hisuian Decidueye, it isn't just colliding with an enemy with Brave Bird, it is running through them. Of course, this is a video game, so it's not to be taken literally, but the metaphor is an apt description of how Brave Bird interacts with opposing pokemon. Brave Bird sends you charging forward recklessly and, when you hit an enemy, you lose a bit of HP from the exchange, just like in the games.
However, this loss of HP is a tradeoff as the attack powers on from the impact. Hitting an enemy causes the attack to persist afterwards, extending its dash distance and duration. Basically, Brave Bird goes the extra mile on hit with an enemy, which not only helps in starting fights, but also leaving them.
And each confirmed hit continues to extend the dash distance and duration of Brave Bird, kind of like how Mimikyu's Shadow Sneak extends in distance if it is targeted through walls and tall grass. Of course, each hit cuts into your HP, so maybe you should manage that a bit carefully.
Or don't. Losing HP means more leaf quills you launch during your attacks, including Brave Bird. Granted, the quills come out behind you at the start of the move, but for attacks like Triple Arrows and Reversal, it's like a minor buff to your damage output.
The combo can also work in reverse, as Brave Bird can heal you instead if you KO an enemy with it. The amount of HP healed varies depending on if the target was a Wild Pokemon or not, but it is an option to go for when you and the enemy are at low HP.
It's easy to be brave when you can end fights as easily as you start them. Having an easy escape option also helps. Speaking of easy escape options...
-
Unite Move: Bow Out (Area)
The user lets loose a flurry of autumn leaves and sharp leaf feathers that cover the pokemon's escape. The user then reappears in the designated area before unleashing multiple arrow quills in a large area at the spot where it disappeared from. Opposing pokemon damaged by the feather foliage will take increased damage from the attack. 120s cooldown
Target an area. That area will be where Hisuian Decidueye appears at the end of the attack. When the area is chosen, the pokemon jumps into the air before revealing a pile of autumn leaves from its cloak, it then jumps into the pile and disappears. Opposing pokemon hit by the flurry of leaves will be marked with an orange leaf icon, but receive no damage. The user is Invincible during this sequence until it reappears in the designated area.
If you target an area that is mostly blocked off by obstacles or borders, Hisuian Decidueye will appear close to the original area of effect it jumped away from.
The flurry of leaf quills cover a massive area centered on the original spot the pokemon jumped from. A base number of leaf quills is shot and the amount can be increased by the Overgrow Ability.
Opposing pokemon marked by the initial attack will receive 75% more damage from the arrows.
To solidify the difference in playstyle between Alolan Decidueye and Hisuian Decidueye, we have to achieve the same thing Decidueye's Unite Move, Nock Nock, does but in a different way. Alolan Decidueye shoots volley after volley of arrows in the designated direction, capable of dealing gradual damage to targets if they linger for too long in the path of attack.
Hisuian Decidueye decidedly deploys its entire depot of darts in a designated destination.
As an All-Rounder, Hisuian Decidueye is a mix between a Speedster and an Attacker, with some extra bulk to glue it all together. As such, it needs crafty tricks to help it out of sticky situations a Speedster might find itself in. Using a Unite Move for such an occasion is an expensive option, to be sure, but this is another case of how the Overgrow Ability amplifies the entire moveset for the pokemon in Unite.
First, Hisuian Decidueye opens up its cloak and drops a pile of orange and brown leaves onto the ground. It then does what we've all wanted to do and dive into it and disappear, with onlookers none the wiser as to where you've gone. Hisuian Decidueye then reappears in the spot you've selected to appear in, with a slew of arrows already nocked on its bow, then launches them towards the pile of leaves, covering the entire area in arrows.
It's quick, it's flashy, and it's powerful, provided you hit the enemy with the swirl of leaves on your way out. Bow Out marks enemies hit by the flash of leaves with an orange leaf icon, the kind of shape and color that makes you think of autumn. If a marked enemy gets hit by the flurry of arrows from the followup attack, they will see drastically increased damage. A marked enemy will not only want to run away, but they have to choose carefully about where to go, since you could reappear anywhere during the attack.
A healthy All-Rounder or Defender may feel bold enough to tank the followup attack, so this move is best used during the middle of a fight, when you have pelted the enemy with loads of arrows and lowered their HP significantly. Granted, this means that you might have a move on cooldown, but securing the KO is often more important.
Just watch out for enemies with faster reaction times. There is a brief moment in between the leaf attack and the surprise arrow barrage where an opposing pokemon can briefly disappear or dodge the move, like with Talonflame's Fly or Zoroark's Unite Move, Nightfall Daze, or cancel your surprise attack altogether with Slowbro's Unite Move, Slow Beam. You are invincible during the disappearing act, yes, but not when you reappear, so watch out for that.
Remember, Alolan Decidueye is the Ghost Type, don't try to act like one yourself.
-
Achievements
Deal a total of 15,00 damage in a single match with your Overgrow Ability.
Because of the way the Overgrow Ability augments every single one of your attacks, this is one of the easier Achievements to earn. However, it's not that simple, since the leaf quills scale very low to your Attack and you would need to be fighting at half or low HP to get any meaningful damage from the Ability.
For starters, you don't shoot out any extra leaf quills at max HP, since the Ability adds a projectile for each 10% of your max HP missing. Another thing to consider is the cooldown of your moves, as not a single one is shorter than 8 seconds, barring Razor Leaf, which is a starting move. Speaking of which...
Both Razor Leaf and Leaf Blade have the ability to be used repeatedly with clever combat skills, but it is a Dash move that forces you to engage in fights very closely. Brave Bird, on the other hand, deals great damage at the cost of HP, which ends up powering Overgrow when you resort to your other move, your basic attacks, and your Unite Move.
Regardless, as an All-Rounder, you need to be involved in fights, especially in fights you can win. Losing HP is what makes you stronger, just as the Overgrow Ability does in the games, which makes you much more threatening against slower enemies who have trouble dashing away from danger. Spreading damage in this way makes it harder for the enemy to maintain their position, even if it's not a lot of damage.
To earn this Achievement, you must be constantly engaged in fights, as the extra damage from Overgrow is worth every bit of HP you lose in each conflict. Of course, it's risky to be brought so low, but it's also when you are at your strongest, as the slew of arrows you shoot out cover a wide area and can deal so much damage when aimed just right.
It's also quite the tall order to deal so much damage with just your Ability. For example, if you end a battle with 75,000 damage, you will earn this Achievement if your Overgrow Ability was responsible for a fifth of that. Even getting to that number without Overgrow requires everything to go right, even for other All-Rounders, which is why this Achievement insists that you constantly engage in fights at half or low HP.
Some trainers seek glory, but Hisuian Decidueye seeks honor. If you share that desire, you will bestow honor unto the pokemon and also yourself.
-
Holowear
Most pokemon are analogous to animals, and as such, they are not always well suited for clothing, even the holographic ones we make here. However, Hisuian Decidueye is a lot more humanoid than you would expect an owl to be, as it's not only wearing a hat, but a cowl as well, all part of its look. I bring this up because there is enough space on its body to put pants on this pokemon, fashionable pants even, and that is an opportunity we must take.
First up, Armored Style Holowear gives Hisuian Decidueye the layered armor of a samurai, giving it spaulders, a cuirass, greaves, tassets, and a waist sash. Western Style Holowear flips the style from East to West and gives it jeans and chaps, a sheriff's star pinned to its chest, and an ascot hanging around its neck. With Hunter Style Holowear, Hisuian Decidueye wears a fur cowl over its shoulders, has a quiver with toy arrows strapped to its back, and brown short pants with satchels tied to its waist. Wanderer Style Holowear gives it a large, flowing cloak tied to its shoulders, somewhat raggedy pants, and a utility belt with pouches and stuff. Lastly, Dark Hero Style Holowear gives Hisuian Decidueye a specialized face mask that covers its beak, a flowing cape, cool bell bottom pants, and a belt with a pokeball belt buckle design.
Pants on pokemon are such a rare sight as most of them are designed with stubby legs, you ever notice that?
-
Strategy
The number one important distinction between Alolan Decidueye and Hisuian Decidueye is the playstyle, along with, well, everything else. Alolan Decidueye is a long range fighter, preferring to stay out of reach while dealing damage from afar, and can use Leaf Storm or Shadow Sneak to maintain that safe distance.
Hisuian Decidueye, meanwhile, gets most of its value from engaging in close combat with the opposing team, thanks mostly in part to its Overgrow Ability. As all of its moves launch extra leaf quill projectiles depending on the amount of HP it is missing, Hisuian Decidueye gets stronger the less HP it has. This makes it well suited to fights against multiple opposing pokemon. It can even stomach some Burst Damage and retaliate with a whole barrage of leaf quills from all of its attacks.
As such, Hisuian Decidueye can get a lot of value out of certain held items. Weakness Policy is an obvious pick, but so is Rocky Helmet and Focus Band. Also, each leaf quill scales very low with your Attack stat, but the sheer amount you can unleash at low HP means that any buff to your Attack stat will magnify the damage dealt by Overgrow. As such, Attack Weight is also a decent choice, along with Choice Scarf and Muscle Band.
Anyway, Hisuian Decidueye really likes getting up close and personal, as is evident by its different basic attack. Its boosted basic attack is a dash attack, just like other pokemon, but the attack covers a deceptively wide range thanks to all the leaf quills it shoots out. Like I mentioned before, Hisuian Decidueye excels in combat against multiple opposing pokemon, so its boosted attack not only is difficult to evade, but can deal unexpectedly high damage if Overgrow is powered up.
One thing I have to bring up is how all of your attacks sling leaf quills when they come out, but each attack has a base number of leaf quills that are used. By that I mean, every attack shoots out a small number of leaf quills without the extra ammunition unleashed by Overgrow. This is so that, even at full HP, Hisuian Decidueye can cover a large area with its attacks. It's not a lot of damage, potentially, but it makes the start of fights easier and less dependent on your overall HP amount.
Another thing I have to point out is that, while Alolan Decidueye and Hisuian Decidueye have slightly different stats, Hisuian Decidueye is tougher, can take more hits and is a lot faster too. That doesn't make it a bulky All-Rounder like Buzzwole. It's got average defenses like Lucario, which make it seem way bulkier than Alolan Decidueye in comparison. It's better to think of it as an All-Rounder trained to deal damage like an Attacker with the speed of a Speedster, leaving its defensive potential untouched for the most part.
Now, since Hisuian Decidueye likes to engage in fights with multiple opposing pokemon, the most effective moves it can use depend on the composition of the opposing team. If there are Supporters on the opposing team, you can expect each engagement to consist of about 2 or 3 enemies, which makes Triple Arrows the optimal choice in these fights. Likewise, Leaf Blade is also a great option, as the combo of Leaf Blade and your boosted basic attack can easily tear the enemy team to shreds if you hit your marks.
Alternatively, if the Supporters are really good at healing, Brave Bird might be the better attack to lead with. Healer Supporters are typically not very strong, but they can make their teammates difficult to KO thanks to their powerful healing moves. This is what Brave Bird is designed for, as a dead-on hit with Brave Bird reduces your HP, dealing more damage to yourself than the enemy Supporter can deal, which in turn powers up Overgrow. This, in turn, improves your damage output considerably, helping you deal more damage than the enemy can heal, finishing the fight with a KO streak.
Against Defenders and bulky All-Rounders, Brave Bird is also a good option to use to escape rather than to engage with, as Hisuian Decidueye has long cooldown on its moves, which can also be stifled with Hindrances. Defenders and All-Rounders are notorious abusers of Hindrances that can incapacitate their enemies, so Brave Bird is a handy option to disengage from the fight. Disengage, not retreat, as Hisuian Decidueye still has to win the fight. It's just much more lucrative to avoid the Hindrance attacks than it is to charge at them head-on. Step out of reach with Brave Bird, then step back into the fight while these disruptive attacks are on cooldown, dealing damage while you have the advantage.
Speaking of stepping out of reach, both Triple Arrows and Reversal showcase some fancy footwork and archery skills, using momentum to attack, jump away, then launch multiple projectiles. The difference between the two attacks is a bit more nuanced than that, as both have different utilities to take advantage of.
For one, Triple Arrows locks on to the enemy hit by the flying kick, launching multiple arrows at them regardless of where they go during the charge. Any enemy caught in between will be collateral, but that's the optimal outcome, as you want this move to cover as much distance as possible. Triple Arrows is best used against flighty Attackers and Speedsters, as they expand the range of the attack as they move away from you and your teammates during a team fight. Landing the initial hit is the hard part, but if you get the lock-on effect successfully, you can hold the charge of the attack, letting the enemy create more distance, before you released the nocked arrows.
Admittedly, this is very matchup dependent, as certain team compositions get stronger or weaker, and certain archetypes get better or worse with time. That's why you can't go wrong with Reversal, which does something similar to Triple Arrows, but doesn't require hitting specific targets to be effective. With a similar song and dance, Reversal jumps and attacks and sends Hisuian Decidueye flying backwards from the point of impact. But instead of nocking three arrows, it nocks one arrow, repeatedly, one after the other, at your discretion. You can mash out the arrows and Hisuian Decidueye will try to keep up, shooting arrow after arrow in whichever direction you're aiming at.
All of your attacks launch extra leaf quills when used, and Reversal is no exception. It's just really hard to see how many extra projectiles are being shot out with Reversal because of how compact the area of damage is. It's not hard to guess, though, as Overgrow damage scales up the less HP you have, but it does require you to be more accurate. To be specific, Hisuian Decidueye is airborne as it is launching arrows, during which time you have to aim your attack as you're launching volley after volley of arrows. It's technically your longest reaching attack, but it can only be used when connecting the initial hit of Reversal.
Ahh, but that's the irony of it all, isn't it? In Pokemon Unite, most All-Rounders have issues fighting at long range. Hisuian Decidueye is also condemned to the same burden of lacking in range, despite being proficient in archery. It's the cost of multitasking, or multi-classing for you geeks, in that, in order to patch up its flimsy bulk, Hisuian Decidueye sacrificed its long range potential. It plays a bit more like a warrior than an archer, but with some quick draw boons in its skill set.
That is made abundantly clear with its Unite Move, Bow Out, where it pulls off some secret ninjustu technique, disappears into a pile of leaves, then reappears with its bow already nocked and loaded before spraying a hail of arrows at its enemies. Like with all attacks, the amount of arrows you can fire can be increased with its Overgrow Ability, and since the Unite Move is structured like an escape move, it can be used to get out of a really bad situation, especially thanks to the Invincibility you have until you reappear.
When the Unite Move is used, you select the area where you are to reappear. Hisuian Decidueye will then scatter the leaves all around itself, disappear into a pile of leaves, and then reappear at the chosen area. You are Invincible throughout this entire event up until you pop back up to attack, so don't be afraid to be daring. Let your HP whittle down before pulling off this disappearing act, as the hail of arrows becomes more damaging thanks to Overgrow responding to your HP decreasing. But if you move predictably, you will be surrounded by the enemy by the time your quiver is empty. Naturally, the enemy will want to evacuate the immediate area when you start the attack, but the bulkier enemies will want to ambush you at your escape path, so try not to make your showstopper predictable.
I've already mentioned before that Hisuian Decidueye, as an All-Rounder, has issues with fighting at range, which is why it is so adept at fighting in close proximity to the enemy. That said, it is just as susceptible to Hindrances as any other pokemon, especially since it doesn't have a way to muscle past them like other All-Rounders can, like Falinks or Urshifu. And because of the high cooldown of its moves, it cannot really afford to be stifled by these Hindrances midfight, so it is best to play patiently.
Bait the enemy into throwing their attacks out, then move in when they've exhausted their offensive and defensive options. Once you're in range, move swiftly, deftly, with the intent to make it quick and painless. Different opponents require different approaches, different plans of attack. As an All-Rounder, Hisuian Decidueye is well equipped to handle all kinds of situations, but it does not excel in all of them, especially in extreme cases. Identify the correct path to victory, and walk with honor.
A true warrior changes his fighting style with the enemy, like the earth when seasons come and go.
-
And that's Hisuian Decidueye for Pokemon Unite! I, for one, am hoping that if a Hisuian pokemon joins the roster, it would be Hisuian Decidueye. It'd be kind of funny to have two slightly different pokemon on the same roster, kind of like what they did with Pokken Tournament, giving us two Pikachus and two Mewtwos. Heh.
Anyway, that'll be it for now. The next pokemon is actually gonna be a request someone sent to me. And given the...drastic change in roster, I have to oblige. Here's a hint.

Until then, see ya.
0 notes
Text
Slaking for Pokemon Unite!

Season 1
Season 2
Season 3
Prev: Iron Valiant - Primarina - Garganacl - Passimian - Incineroar - Cofagrigus - Glimmora - Galarian Stunfisk - Krookodile - Kricketune - Magearna - Turtonator - Farigiraf - Spinda - Darmanitan
It has often been said that society is the biggest cage we humans live in. There are rules to follow, obligations to fulfill, and one must constantly subject themselves to employment and capitalism to provide value to others as well as to ensure survival. If only we could be free of our burdens and lounge about like Slaking here.
It has no worries, no fears, no doubts, no higher power it must answer to other than its own hunger. Oh, to be like a Slaking, truly free from responsibility and strife.
Well, this Slaking is joining Pokemon Unite on the whims of its trainer, but other than that, it basically does what it wants. Don't get it twisted, it's still free, it just lives under a different kind of liberty. Work for food, tit for tat, quid pro quo, and all that.
-

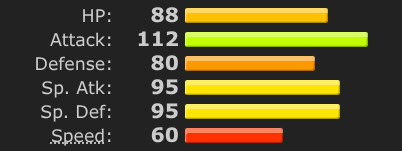
Now, right away, Slaking's stats are monstrously high. Sky high HP and Attack make this thing an absolute beast of a pokemon on the battlefield. The reason why you don't see Slaking used all that much, and the reason why it's not as overpowered as it may seem, is because of its Truant Ability holding it back. Yeah, it's strange for Game Freak to design a pokemon with a built in drawback in exchange for these impressive stats, but they tried to balance personality with balance, and I find their efforts admirable. Misguided sometimes, but admirable.
Still, since this is Pokemon Unite, Slaking and its previous evolution stages are expected to pull their weight, so we have to work around this limitation and turn it into a strength. For that reason, I designate Slaking with the role of an...
All-Rounder
-
Basic Attack - Melee/Attack
Becomes a boosted attack after two hits, dealing increased Piercing damage. The boosted basic attack will stay boosted and will not disappear until it is used or the user receives a hindrance. In addition, the boosted attack gains power the longer it remains boosted.
The boosted basic attack deals Piercing damage in addition to dealing extra damage.
The boosted attack will not fade away until it is used or the user receives a Hindrance that incapacitates it, like Sleep or Stun.
Additionally, the boosted attack gains 20% attack power a second before it is used, maxing out to 300%. This boost clears when the boosted attack is used or cleared.
How's that saying go? Slow and steady wins the race, but bursts of speed get first place. I think that's the one, because Slaking and its contemporary evolutionary stages are perfectly capable of building up power, but true damage comes from patience, followed by an explosion of strength.
The basic attack works just like any other basic attack, except the boosted attack has the ability to deal Piercing Damage. By itself, this is already a powerful attack, as it means that the enemy cannot rely on their shields in prolonged battles against Slaking.
However, Slaking is a pokemon that gets its strength from its laziness. There's a reason it lounges about, and that's because it is storing its power for bursts of damage in situations like this. As such, when the basic attack becomes boosted, Slaking can simply choose not to attack right away, opting to store up power for when it decides to use the basic attack.
The boosted attack gains 20% damage for each second that passes by while it is boosted, maxing out to 300% after 15 seconds. That's a lot of time to build up a lot of power, so you'll never see this attack hit for maximum damage outside of ambushes and such. In other situations, stalling the attack for a second or two is the most feasible way to get more power out of this attack. And since the boost doesn't go away, you can use your other moves to further stall out the boosted basic attack until it is time to use it.
That said, it is very risky to wait out the power boost in a fight, as the boosted attack can be disarmed if the pokemon receives a hindrance that incapacitates it, like Sleep or Stun. These kinds of hindrances are available to just about every team combination you can go up against, so you'll need to be careful in how you maneuver around the enemy while you're waiting for the boosted attack to power up.
It'll be worth the wait, as the resulting damage is also Piercing Damage, meaning you can launch an attack with a powerful opener on the opposing team on their own Goal Zone. It's bold, but no other pokemon can do it like Slaking can, thanks to its unique Ability Truant.
As weird as that sounds.
-
Ability: Truant/Vital Spirit
Truant (Slakoth/Slaking)
The pokemon starts restoring HP when out of combat and while standing still. When the Pokemon's Level is an odd number, its Attack, Defense, and Movement Speed are greatly increased. When this Pokemon's Level is an even number, its healing potential is increased but its Movement Speed is reduced.
Vital Spirit (Vigoroth)
When the pokemon is affected by a debuff, the debuff effects are ignored and its Attack, basic attack speed, and Movement Speed are increased instead.
In Pokemon Unite, Slakoth and Slaking walk on all fours like chimps. This is to make it clear the visual effects of the Ability Truant.
Truant begins to restore HP when the user is out of combat for 5 seconds, restoring 1.5% HP a second. It also restores HP at the same rate while standing still. When both effects occur, Slakoth and Slaking will adopt their 'Relaxed' stance and start lounging about, and their healing increases to 3% a second. The healing reverts to its normal rate when the pokemon moves or is affected by a Hindrance.
Truant boosts the pokemon's Attack and Defense by 35% and its Movement Speed by 25% when your Level is an Odd Number (1, 3, 9, 11, etc.). When the pokemon's Level becomes an Even Number (2, 8, 10...) these boosts go away and its healing potential increases by 50%. Its Movement Speed decreases by 20%, however.
Vital Spirit negates the effects of debuffs received and increases the pokemon's Attack and basic attack speed by 25%, and Movement Speed by 30%. This effect does not stack when the pokemon is under the effect of multiple debuffs.
Truant holds Slaking back by limiting the amount of turns it can act in. This is to balance out its insanely high attacking power along with its high HP and average Speed stat. This severely limits Slaking's potential in a turn based RPG, but this is Pokemon Unite we're playing, ain't nobody taking turns here.
I've decided to make Truant and its potential effects tie in to the Pokemon's Level as opposed to turn order. Since its loafing nature is easy to take advantage of in the mainline games, something similar can be achieved in Pokemon Unite, since both your allies and your opponents can tell when Truant is at its strongest and when you are at your weakest.
But before that, a lot of what I have to say about Truant applies to Slaking just as well as it does to Slakoth, since both have the same Ability but different potential. And then there's Vigoroth, with a completely different Ability to take advantage of. We'll go over Vital Spirit in a moment.
Ahem, so. Truant gives the pokemon a boost when its Level is at an Odd Number. At Levels 7, 9, 11, 13, and 15, Slaking will see a boost to its Attack, Defense, and Movement Speed. This makes its monstrous stats even more monstrous, and your enemies will be wary of engaging you in combat when they see the Level you're at.
However, if your Level is an Even Number, not only do you lose out on the boosts, but all you get from Truant is increased healing potential and a Movement Speed debuff. This means that Slaking will never be at a 'normal' Movement Speed pace compared to other pokemon, which forces it to take defensive measures or to farm EXP to get back to an Odd Level for the Truant boost.
It's not all bad, though. Regardless of the level, Truant also provides passive recovery, though far less effective than the Leftovers Item. Still, it can be activated whenever, and can be stacked with other passive healing effects, like Leftovers and the restoring effects of an Ally Goal Zone. Also, this healing receives the full benefits of the increased healing potential from Truant when your Level is Even.
The idea here is that, when your HP is at an Odd Number, you dive into the opposing team and bring the house down. Whether you succeed or fail, you'll most likely Level Up from getting a KO or two, at which point, you can then retreat and rest up in preparation for the next confrontation. That's the ideal scenario this Ability was modeled for, but even the best laid plans can go awry, which is when your mettle as a player will be tested.
Also, we're glossing over the fact that both Slakoth and Slaking are in a battle stance in order to be playable in Pokemon Unite. It seems very discordant to have a Slakoth and Slaking running around like lethargic monkeys, but that's the compromise that has to be made to give them a spot on the roster. Not to worry, though, as Truant can also give them reprieve when they need to decompress and relax after battle.
If there are no immediate threats in your vicinity, or if you need to take a breather, you can hold still to further amplify the healing effects of Truant. Hold your position without moving for a bit, and Slakoth and Slaking will both adopt their 'Relaxed' stance and start lounging about, taking on their more familiar pose of loafing about on the battlefield. This passively heals the pokemon for all its lounging efforts and can be further amplified by the Truant Ability if your Level is an Even number.
Both Slakoth and Slaking will hold this Relaxed state until you move or receive a hindrance, in which case it reverts back to its regular healing power. In the case of receiving a hindrance, this triggers the 'fight' state, nullifying the passive healing effect of Leftovers and Truant alike, since the hindrance is most likely coming from an enemy. Ain't no rest for the wicked, I suppose.
Now, we gotta talk about Vital Spirit, or Vigoroth, in detail before we move on. I mean, it's a little awkward, since Vigoroth happens on the way to Slaking, and the Ability, while good, is quickly given up to get Truant back.
Because of the short time you spend as Vigoroth, the Ability, Vital Spirit, is meant to be serviceable to your endeavors, a means to an end. When you get hit with a debuff, the debuff effect is ignored and your Attack, basic attack speed, and Movement Speed gets a boost.
That's pretty basic, but at least you are always boosted as long as the debuff is in effect. You effectively turn opposing Slow Smoke into a power boost for yourself, and given how common Razor Claw and other debuff effects are in the early game, you'll have plenty of opportunities to fight at full power.
Still, you'll be missing out on the damage potential of Truant. You don't have to deal with the Movement Speed debuff when you're at an Even Numbered Level, but you won't have the continuous stat boosts or the increased healing potential, not to mention the passive HP recovery.
A little laziness can be good sometimes. This is a lesson Slakoth and Slaking take to heart.
-

At the beginning of the game, Slaking will start out as Slakoth. You can choose between Yawn and Scratch as your first move. By Level 2, you'll have learned both.
-
Move 1: Yawn (Hindrance)
The user exhales and lets out a drowsy breath. Any enemy hit will fall Asleep a short time later, interrupting any action. 8.5s cooldown.
The pokemon exhales a small puff of sleep inducing breath, affecting opposing pokemon close by in front of the pokemon. 3 seconds later, opposing pokemon hit by Yawn will fall Asleep for 2 seconds.
The effect can be cleared before the affected pokemon falls asleep with any Hindrance Clearing effect.
Slakoth is the picture of total relaxation, and it emanates such a strong sense of laziness that just looking at it makes you drowsy. That's not something I made up, that's an actual PokeDex entry.
Now, if you actually start to feel sleepy, that might be because you saw it use Yawn. The move causes Slakoth to exhale a puff of soporific air, and the feeling of drowsiness intensifies if you breathe it in. In Pokemon Unite, hitting enemies with this move won't put them to sleep right away, but it will after a short delay. This sensation of sleep is so strong, it interrupts whatever move the enemy was using and causes them to doze off for a short while.
Amazing, Slakoth has weaponized laziness as a protective measure.
The high cooldown of the move works against you if you miss, but the slow pace of Slakoth means that you can't take advantage of the hindrance, even if you land a hit with this attack. Yawn induces Sleep, yes, but only after 3 seconds, so it's not a move you can rely on during fast paced fights.
The hindrance takes control away from the opponent, though, even if they aren't attacking. Since the Sleep Hindrance interrupts whatever attack the enemy is using, that means that the enemy cannot safely rely on their moves for the next 3 seconds. Not even moves that provide Hindrance Resistance or Immunity, like Jiggylpuff's Defense Curl or Swinub's Tackle, will help, since the order of operations follows the logic of first canceling the move before inflicting Sleep, bypassing these safeguards. Even HP restoring effects like Snorlax's Rest or Slowpoke's Slack Off will get interrupted, negating HP restoration.
However, Yawn is still a Hindrance Move, and its effects can be cleared with a simple Full Heal and other Hindrance Clearing effects. On the upside, since it takes a while for Yawn to kick in, you can go on the offensive for 3 seconds. As a refresher, the Sleep Hindrance hastens in duration when the afflicted pokemon is attacked. Yawn bypasses this by delaying the Hindrance, meaning you can attack unabated before Sleep kicks in.
Hmm, I can see why the sloth is recognized as one of the 7 deadly sins. How reprehensible.
-
Move 2: Scratch (Dash)
The user jumps with its claws stretched outward, dealing damage to enemies. The less HP you have, the more damage this move deals. 8s cooldown.
The attack deals damage at the end of the jump. The damage dealt is boosted by the percentage of missing HP, ie 50% missing HP equals a 50% boost to damage.
Remember that, for Pokemon Unite, Slakoth and Slaking are standing upright in order to be playable. That said, the idea of a slow sloth suddenly lunging at you with its big, curved claws is not a pleasant image.
It's not out of the realm of possibility, as these pokemon are lounging about, storing energy specifically for big bursts of power like this. Scratch is far from the most impressive attack to resort to when it's time to actually attack, but this is Slakoth we're talking about. It gets a pass. It's trying its best.
Still, desperation begets hidden power within. The lower your HP gets, the more energy Slakoth draws in order to use Scratch. It's not a major boost, but the high HP stat of the pokemon means it has a lot of HP to spare and clutch with compared to other pokemon. It's not without its risks though...
You'll see what I mean. It's time to shake off that truancy and get into the vital spirit of things.
-

At Level 4, Slakoth will evolve into Vigoroth. At the same time, Yawn becomes either Swagger/Counter or Slack Off/Sucker Punch.
-
Move 1a: Swagger/Counter (Debuff/Melee)
The user huffs at enemies, enraging them and forcing them to target only the user with their moves and basic attacks. Affected enemies will have their buffs negated as well for the duration of the move. For a short while afterwards, Swagger becomes Counter, which can be activated to deliver a wide swing all around the user, greatly damaging all enemies within range. Before Counter is used, it builds up power for each hit of damage received. 9.5s cooldown.
At Level 11, Swagger/Counter becomes Swagger+/Counter+.
Extends the duration of Swagger and increases the damage dealt by Counter.
When learned, the move starts out as 'Swagger', but then becomes 'Counter' after use for 3 seconds. Swagger+/Counter+ extends the duration to 4 seconds.
Enemies hit by the exhale will be inflicted with 'Fury', a status effect that forces the pokemon to target the enemy that afflicted them with the status effect. Afflicted pokemon can still move and attack, but only the enemy that inflicted 'Fury' can be targeted by basic attacks and moves until the effect wears off. If the 'Fury' target is not on screen, attacks cannot be used until the status effect wears off. Fury lasts for 2 seconds.
'Fury' does not prevent the use of Buffs and self-target attacks like Venusaur's Petal Dance or Crustle's Shell Smash.
Swagger also negates the buffs active on the affected pokemon for 2 seconds.
When Counter is used, it attacks all around the pokemon in a wide area around itself. Counter deals an extra 10% damage for each hit received while the move is ready to use. There is no limit to this boost. The base damage of the move is increased by 25% with Counter+.
Something I want to point out real quick is that, due to how the Truant Ability reacts to your Level, I made the executive decision to have Slakoth evolve into Vigoroth at Level 4 and into Slaking at Level 7. I know this will skew with the typical balance of power throughout the game, as having an All-Rounder evolve so soon can throw off the pace of the battle, especially one as bulky as Slaking. However, I did not like the idea of Slakoth having to struggle with the reduced Movement Speed of Truant at Level 4 just to evolve. All the same, it wouldn't have been fair to evolve into Slaking and have Truant working against you right away at Level 8.
To that end, Slaking was designed to have very clear strengths as well as very exploitable weaknesses to compensate for this easy Level gain. The latter of which will be explained in due time, but for now, let's go over the combo of Swagger and Counter.
Because of how adaptable the Normal Type is, Vigoroth and Slaking are equipped with two moves in one. Now, normally this would be because of some sort of gimmick, like one I've made before for Farigiraf or Mawile, or even Plusle & Minun. Well, there really isn't any particular reason for Slaking having two moves in one slot, it's just built different.
OK, I lied a bit. I had a particular idea about how I wanted Slaking to play, and the only way to achieve that was by combining two moves in one slot. The theme of the pokemon was basically 'immovable object which can easily and quickly become an unstoppable force', which is why Swagger and Counter and the other move option function the way they do.
Enough digressing, Swagger has the user to give off a hearty taunt at opposing pokemon in range. The enemy will be left so flabbergasted by the audacity of the user, they'll be inflicted with the 'Fury' Status Effect, a new effect unique to Vigoroth and Slaking. It's similar to the Taunt Status effect usable by Clefable's Follow Me, but the execution is much different. The effect causes affected opposing pokemon to be forced to target the user with their moves and basic attack. They can still move about and self buff and self heal, but they cannot attack unless the target is you.
Swagger also negates the buffs the affected pokemon has, though that is an effect of the move itself and not the Fury Status effect. It's an extra effect to help with Counter, a move you can use for a short while after using Swagger. When Counter is used, Vigoroth attacks all around itself, dealing more damage the more hits it receives. Because of the risk to yourself, there is no limit to the upper damage Counter can do, though keep in mind that the enemy does not have to engage, despite being afflicted with Fury.
When used together, Swagger and Counter are an effective combo for diving into the enemy team. Swagger fully distracts the enemy, as they are forced to target you with their attacks, and Counter converts the number of hits received into one powered up strike. This is an invaluable asset to the team as it draws in the enemy fire away from your more fragile allies as well as Objectives.
But the move does have its weaknesses. As I mentioned before, the Fury Status Effect does not stop the enemy from walking away, as opposed to the Taunt effect that Wigglytuff and Clefable can use. On that note, the range of Counter is large, but not expansive, as the enemy can easily retreat to a safe zone away from the followup attack of Counter. With that in mind, ranged Attackers can also keep up the offensive pressure easily by attacking from a distance, since the Fury Status Effect fades away when you are KO'd, which can happen if you draw in too much enemy fire all at once.
And besides, your HP stat is very high, but your defensive stats are average and can be exploited. Although, high enough HP can make any pokemon a veritable tank, and the more annoying tanks are the ones that can easily sleep off the damage.
Of course, they call this pokemon Slaking, not Sleepking or anything silly like that.
-
Move 1b: Slack Off/Sucker Punch (Recovery/Melee)
The user reclines and nods off, restoring HP for a short while. Before the move ends, Sucker Punch can be used, which has the user get up from its sleeping position and deliver a wide swing all around itself. If Sucker Punch is used at near the same time an attack from the opposing team lands, the user becomes invincible for the attack and deals massive damage to all enemies nearby. 8s cooldown.
At Level 11, Slack Off/Sucker Punch becomes Slack Off+/Sucker Punch+.
Restores more HP during Slack Off and widens the area of Sucker Punch.
Slack Off has the pokemon take up its sleeping position when the move is used. Vigoroth reclines back and sleeps sprawled out, facing upwards, whereas Slaking does its characteristic sideways napping stance. In this stance, Slaking is visibly snoring, which makes it visually different from its Truant induced nap.
Slack Off lasts for 4 seconds, during which time, Sucker Punch can be used. Slack Off restores the pokemon's HP by 3.5% a second. Slack Off+ increases the amount of HP restored to 4.5%.
When Sucker Punch is used, the attack hits all in a wide area around the pokemon. Sucker Punch+ expands the size of this attack by 15%.
If the move is used before 5 frames of receiving an attack, the pokemon becomes Invincible for 0.5 seconds and deals 4x more damage with the attack.
Have you ever pulled a prank on someone while they're sleeping? First of all, that's not cool, not everyone likes being bothered at their most vulnerable. Secondly, you should never try pulling such a prank on a pokemon like Vigoroth or Slaking, since they are most likely napping, not sleeping, and there's a difference. These pokemon are full of such boundless energy, they can snap into a fight at a moment's notice. That is what they're storing energy for, anyway.
Although, yes, the pokemon is taking a quick siesta during Slack Off, but that's just in its nature. The ability to find solace anywhere is a skill unique to the Slaking line, but that mostly has to do with its lazy disposition. Still, recovering HP is a very handy trick for an All-Rounder.
It's not a lot of HP though, but that's for balancing purposes. The pokemon already has the ability to restore HP naturally during Truant, so any more healing would be excessive. Speaking of which, Truant can further enhance the pokemon's healing potential from Slack Off when its Level is an Even Number, so it has that going for it.
Your opponents won't be too keen on you taking reprieve wherever you please, especially during a team fight. Fortunately, this is where the adaptive nature of the Normal Type comes into play, and when Slaking reveals its capacity for deceit. While restoring HP during Slack Off, you can use the move Sucker Punch to end the healing effect early and deliver a wide swing all around yourself. Talk about a bait and switch, this pokemon intentionally lures in the enemy with an easy target, only to right itself quickly in order to land a cheap hit.
The timing is all on you, though, and Sucker Punch has great damage potential depending on how risky you play the move. If you use Sucker Punch at the same time you would receive an attack, you evade damage and effects from the incoming move and become totally Invincible for the brief second Sucker Punch comes out. Not only that, the resulting attack deals 4 times more damage, scaling very high with Slaking's Attack stat.
Much of the damage output hinges on how well you time the attack, and given the vast variety of attacks to counter with Sucker Punch, it makes Swagger slash Counter a more appealing option. That said, Slack Off and Sucker Punch have less cooldown and has a more reliable effect of healing HP, whereas Swagger forces the opposing team to attack you through its Fury Status Effect. Both moves are risky in their own right, but they also have useful applications to consider.
That said, at this point during the game, you only have Scratch as an attack to approach opposing pokemon with. It has shallow range and is easy to dodge, especially since Vigoroth can only boost with Vital Spirit by being afflicted with a debuff. At least the move combos well with either Swagger/Counter or Slack Off/Sucker Punch, both moves help modulate your HP stat to some degree.
It's time to pick up the pace, by...taking it easy, I think.
-

At Level 7, Vigoroth evolves into Slaking. At the same time, Scratch becomes either Hammer Arm or Giga Impact.
-
Move 2a: Hammer Arm (Area)
The user brings up its arms and swings them down, greatly damaging all enemies caught in the resulting shock wave. The less HP the user has, the more damage dealt. The attack can be held down, allowing the user to move around while holding their arms up. While charging, the user becomes Unstoppable. 11s cooldown.
At Level 13, Hammer Arm becomes Hammer Arm+.
Reduced cooldown.
Slaking raises up both of its arms before bringing them down, dealing damage with a large shock wave. The damage dealt is increased relative to the amount of missing HP the user has.
The button can be held for up to 4 seconds, stalling the attack and allowing Slaking to move about at 30% reduced Movement Speed. In this stance, Slaking is Unstoppable.
Hammer Arm+ reduces the cooldown of the move by 3 seconds.
Just a quick reminder, Slaking is walking upright when being controlled in Pokemon Unite, very much like a gorilla. I mean, Slaking is much more like an ape than it is a sloth, but I'm not here to discuss Pokemon Logic. I'm here to tell you about the awesome power of Hammer Arm and how to use it.
When Slaking raises its arms up, it's best to clear the area as quickly as possible. That is because the move is closer to Earthquake in execution than anything else, as the range makes it difficult to avoid. It's a bit slow to come out, given Slaking's lax nature, but trying to challenge the slack king with attacks and hindrance is futile, as Hammer Arm also renders the pokemon Unstoppable during the attack, and the charge.
While Slaking takes its sweet time to windup the Hammer Arm attack, you can hold the move to charge it for longer, but your Movement Speed suffers for it. Charging the attack in this way actually doesn't make the attack any stronger, but it causes the Unstoppable status to persist until the move ends, which is at your discretion. It's useful for muscling past all the attacks and hindrances the opposing team throws out, but that's not its only boon.
The move can deal extra damage based on the amount of HP you have missing, just like Scratch. If the enemy chooses to challenge your attack, they do so at their own peril, as each percentage of HP lost in the engagement only makes Hammer Arm hit harder. Also, the attack hits in a wide range around the pokemon, meaning nothing short of a lightning fast Dash move can get them out of range of the slam.
The only downside to this attack is the high cooldown and limited effectiveness against ranged attackers. The high cooldown gets reduced a bit when the move upgrades to Hammer Arm+, but there's nothing you can do about dealing with ranged attackers, especially since the attack reduces your Movement Speed while charging the move. You're limited to surprise attacks with this choice.
Luckily, you can make an impact with the other option instead.
-
Move 2b: Giga Impact (Dash/Recovery)
The user jumps suddenly and crashes at the designated area, dealing great damage to all opposing pokemon caught in the attack. When the user lands, it lounges about in its spot, resting from unleashing such a powerful attack. While lounging about, the cooldown of the move hastens. The cooldown of Giga Impact is also reduced when an opposing pokemon is KO'd by the attack. 12s cooldown.
At Level 13, Giga Impact becomes Giga Impact+.
Reduced cooldown.
Giga Impact deals damage in a large area around the point of impact. Upon landing, if you do not move, Slaking will start to yawn and groom itself, speeding up the cooldown timer by 25%. This means that Giga Impact will fully reset after 9 seconds, or 7.5 seconds when the move is upgraded to Giga Impact+.
Also, the cooldown of Giga Impact is reduced by 3 seconds if you KO an opposing pokemon with the attack.
This lounging effect immediately activates Truant. The lounging effect ends when the user moves and can be interrupted by opposing Hindrances.
Giga Impact+ reduces the cooldown of the move by 2 seconds.
I want you to imagine Slaking pulling off a flying elbow drop. Off the top rope, and shaking the ground when it lands. That's what it looks like when Slaking uses Giga Impact in Pokemon Unite. It looks brutal, yes, but it's also a little funny when the big guy turns off the aggression shortly after landing and just starts loafing about.
Giga Impact is a jumping attack that reaches far and deals massive damage, but the high cooldown of the attack makes it difficult to use reliably against ranged attackers. That's why you target frail Attackers with the move specifically, as landing a KO with Giga Impact reduces the cooldown by 3 seconds. That would still leave you with a lengthy wait time of 9 seconds afterwards, but if you upgrade the move to Giga Impact+, it will get reduced to 10 seconds, which then gets reduced to 7 seconds after a KO, which is much more manageable.
However, Slaking finds the resting position very comfortable after the attack, so it will take a quick nap, if allowed to, and start restoring HP by activating Truant right away. The gall of the beast, dozing off during battle. Well, it ends up working out, as not only does Truant kick in right away, but it triggers a cooldown hastening effect for the move.
So, after attacking, Slaking starts to loaf around, which not only causes its HP to begin restoring passively through Truant, but the cooldown of Giga Impact to hasten, resetting fully after 9 seconds or less, depending on certain conditions. This does require Slaking to hold fast to its position in order to rest up, but given the high damage scaling of the attack and the ability to drastically reduce the cooldown of Giga Impact with KO's and certain Item and Emblem loadouts, it makes the move far, far stronger than anyone can prepare for.
However, this is far from the easiest boon to take advantage of, as the attack has Slaking literally divebombing onto the opposing team, right into the thick of it. And believe it or not, there are pokemon that can tank a Giga Impact from Slaking, and can return the favor in kind if Slaking tries to loaf about in front of them. Slaking can only safely loaf about after using Giga Impact if the attack successfully KO'd all remaining enemies in the area. Sure, it could ignore the fly bites from opposing Supporters, but it will lose the Truant recovery from the engagement.
Still, it is the most powerful option Slaking has to deal with ranged Attackers and Speedsters unawares. Well, it would be, if it weren't for the Unite Move.
-
Unite Move: Peerless Pulverizer (Buff)
Upon activation, the user becomes Unstoppable and its Truant Ability becomes supercharged. Afterwards, the Unite Move can be used again to have the user jump into the air to build up immense power before crashing down with both fists, dealing massive damage to all enemies in range. The more damage you take, the more damage you deal. 125s cooldown.
Peerless Pulverizer makes Slaking Unstoppable for 8 seconds and its Truant Ability goes into overdrive. It activates all of the positive boons of the ability (increased Attack, Defense, Sp. Defense, Movement Speed, and healing potential) without the negative effects (reduced Movement Speed).
The Unite Move can be used again to send Slaking into the air to build up power before crashing back down and unleashing a massive shock wave that deals major damage to all enemies caught in the attack. The power of the attack deals additional damage 3x equal to the amount of HP lost during the Unite Move buff.
This. This is what Slaking has been conserving all of its energy for.
Have you ever heard about how we humans have natural inhibitors in our body? If all the muscles in our body could focus on a single point, we'd be able to move cars. You could rip off your own arm with the other one, or bury your teeth back into your jaw if it weren't for these inhibitors. There's a very good reason that we don't always operate at 100% power, as the energy need is far too great, and our body would destroy itself trying to maintain that power.
Slaking obeys the same laws of limitation on its body that we do, which is why it lounges about so much. Its hidden power is so great, that it must constantly hold itself back or else it would destroy something, if not itself. But if you were to remove these limitations, hoo boy, I don't even want to think about the damage this pokemon could do.
Thankfully, the Aeos Energy that the island is flooded with operates as a suitable power substitute for this burst of energy, so Slaking isn't in any danger to itself when it uses Peerless Pulverizer. Its opponents, ehh, not so much, they'll probably feel that in the morning.
When Peerless Pulverizer is activated, it becomes Unstoppable and its Truant Ability goes all out. By that I mean that its positive effects activate all at once (Attack boost, Movement Speed up, healing potential increase, etc.) with none of the downsides. By itself, this Unite Move is very useful for bypassing the negatives of Truant when you're at Level 10 and such, but then there's the extra attack at the end. When activated, Peerless Pulverizer unleashes its namesake, a powerful attack where Slaking builds up immense power before unleashing it all around itself, greatly damaging opponents in a large area around itself.
If that weren't enough, the move also has a damage multiplier on it. Yes, Slaking can be even stronger still, though that's mostly due to the desperate strength that can be summoned when you've lost a lot of HP. For each percentage of HP lost, the Unite Move deals 3 times more damage, and Slaking has a LOT of HP to lose. And since the Unite Move renders it Unstoppable, nothing will prevent Slaking from unleashing the attack at low HP, barring really powerful Hindrances from opposing Unite Moves.
Of course, you can opt to fight it out until the last moment, as the boosts go away when the attack is used. I mean, why not, right? With a heightened Attack and basic attack speed boost, you can put a massive dent in the enemy team's defensive fortifications until the last moment. As powerful as the attack is, there are some pokemon well equipped to tank the brunt of the attack and keep fighting, so putting offensive pressure before finishing it off with the super attack is the optimal way to go.
There's also a bit of special wording at play. Peerless Pulverizer deals extra damage based on the amount of HP lost, but it doesn't specify your max HP or anything like that. No, it turns out that the Unite Move tracks the amount of HP you lose during the boost, and doesn't use your current HP over your max HP for the damage multiplier. This is because it allows the player to utilize the healing potential buff without sacrificing power if it had worked the other way. Basically, losing HP powers up Peerless Pulverizer, and it doesn't get subtracted by HP being restored. Therefore, during intense team fights, losing HP is just as important as healing for this attack, so all you need to abuse this power boost is a reliable healer supporting you from the back lines.
Results may vary.
-
Achievements
Restore 80,000 HP without being KO'd.
The secret to living a long life is living healthily. Now, I will not endorse or enable a life of slothfulness, but given how much HP Slaking has, it may be on to something.
Sadly, this is a difficult philosophy to follow in Pokemon Unite, as the objective of the game is to score, and that is much easier to accomplish when the enemy is KO'd. Still, as an All-Rounder, it is your job to be involved in the engagement whenever they happen, but there's only so much you can do by yourself.
This is why Slaking employs healthy self care and takes breaks whenever it can. All that fighting and fending and defending is exhausting and energy consuming, so Slaking has maximized its napping potential for the purpose of Unite Battles. When it isn't engaged in battle, it will need to pull back to recover. Thankfully, this is the easiest part, as Truant has a built-in Leftovers effect allowing Slaking to restore HP easily when it has a moment's rest.
As such, you might think this Achievement is easy to get, but in order to have HP to restore in the first place, you need to be engaged in combat, and often, to reach this high HP restoration number. And since it only counts HP restored in a single life, you must survive every engagement you get involved in. That can get risky really quick with Slaking's weakness to ranged attacks and Sp. Attack moves.
The best way to earn this Achievement is to get into fights you can win, back off to restore HP, rinse and repeat. You might be able to alleviate the burden of healing yourself with the help of a Supporter, but Slaking's High HP stat makes it difficult to fully benefit from flat HP restoring effects (like Sitrus Berries and Potions). As a form of irony, Slaking is best suited to recovering HP when its Level is at an Even Number, when it is at its weakest. The increased healing potential at this number, coupled with Truant and moves like Slack Off and Giga Impact, makes this the most reliable situation to heal yourself, with an ally Defender helping you, of course.
You have to be careful not to oversleep, as you and your team have a game to win, and sometimes you need to go full throttle without a rest stop. Take the opportunity of respite, but recognize when it is optimal to do so.
Sleep is the brother of death, you know.
-
Holowear
Slaking has plenty of fun and fitting holowear choices to choose from, but we only have room for 5 on this post. Starting things off, we've got Cozy Style Holowear, which has it wear some form fitting beige pajamas, blue slippers, and a night cap on its head. Then, Police Style Holowear gives it a deep blue work shirt, utility belt, pants, and hat that makes it look very good at enforcing the law, despite not doing anything. Camping Style Holowear gives it an outdoorsy hat, a vest with front pockets stuffed full, and a large backpack full of camping gear. For a more refined look, Ruins Style Holowear gives Slaking a set of laurels on its head, a toga, and golden bracelets and brooches to tie the whole thing together. Lastly, Regal Style Holowear makes Slaking look like royalty, with a big, puffy garb, flashy belt, and a big crown with a pokeball design sitting on its admittedly big head.
It's a good thing the PokeDex gave us the measurements needed to model these holowears. Would've been tedious trying to get the data ourselves, what with Slaking's habit of not moving.
-
Strategy
Slaking as a pokemon is bound by its Ability Truant, which decides the flow of battle. It's constricting, in a sense, but it offers great power in exchange for consistency. You will not always be at the peak of power needed to win the engagement, but when you are, you can easily turn the tides of battle in your favor.
The problem is that the enemy will be privy to your power level just as well as you are, since everyone can see what Level you're at. Likewise, your allies should also accommodate you when your Level shows you are at a lesser power level, since Truant increases your healing potential at Even Numbered Levels. That said, you are expected to pull your weight when you are at an Odd Numbered Level, since that is when Slaking is at its most powerful.
To that end, you must understand how best to use your moves when your power is at its peak. Of course, the most important choice in the game happens before the round starts, as you need to decide which Lane you should start out with. Since Slakoth also has Truant, you'll be able to manage your power fairly well as long as your EXP grinding is consistent, Arceus forbid you get paired up with a greedy teammate that won't share the spoils of farming.
Calling dibs on the Central Area isn't a bad call, though, as Slakoth evolves at Level 4 and can manage without Truant for a while. Vigoroth has much less damage potential than Slaking, obviously, but that's just the nature of the pokemon. Turning debuffs into buffs is a fun trick, though, and can easily be used to conquer a Lane when you show up to either one. Just remember that your stats are nowhere near as high as they will be when you evolve into Slaking.
Before evolving into Slaking, though, you learn either Swagger/Counter or Slack Off/Sucker Punch, and both moves help you out in close combat. Swagger inflicts the Fury status effect, which forces affected enemies to target you with their attacks. This is to help boost the power of Counter when used subsequently, but Vigoroth's Defense and Sp. Defense aren't high enough to take this excessive abuse from multiple opposing pokemon. One on one is manageable, but don't make the mistake of overextending and diving into a horde of enemies just to make a big impact with Counter.
Swagger/Counter are meant to be used defensively and to lean into a more vanguard playstyle as an All-Rounder, since the move distracts the enemy away from your teammates and Objectives. When you're just Vigoroth, you won't have the bulk needed to take advantage of this, but it will work well enough against smaller hordes of enemies, unless they have an opposing Speedster that is at a higher Level than yours. Still, a moment's distraction is all your team might need to gain the upper hand, especially if it's for an Objective like the Regi Trio or Regieleki with one Goal Zone broken.
Slack Off/Sucker Punch, on the other hand, accomplishes the same strategy but in a different way. It is the most reliable way to heal yourself when chosen, even though it doesn't heal for much, but with how strong and bulky you can potentially be, the enemy will be pressured to not let you get away with free healing. As such, if you are seen trying to sneak in some shut-eye, the enemy will be inclined to interrupt your nap time, and that's when you surprise them with Sucker Punch.
Sucker Punch has a built-in counterattack immunity window for those who are good at timing the attack. If used to successfully dodge an incoming attack, the resulting Sucker Punch attack is much, much stronger, and you are invincible during the swing. Of course, the timing is tight and you need to predict the incoming attack, but the reward is worth it, as Sucker Punch has a very high damage multiplier if successful.
Both of these move combos are very effective on Vigoroth, but even more effective when you evolve into Slaking, not only is your damage potential much higher, but your HP and defenses increase, making you much more resilient to repeated damage necessary for pulling off these attacks.
That said, I need to remind you of the basic attack and its effect, as it ties the whole kit together in an unexpected way. When boosted, the attack deals Piercing Damage, which is already pretty powerful. However, two other effects push it over the edge; the fact that it doesn't fade away like other boosted attacks, and that it gets stronger the longer the boost is held on for.
The drawback, however, is that the boost can be forcefully removed if the pokemon receives a hindrance, which is everywhere in Pokemon Unite. Saving it just to punch a hole through the opposing Defender is one of the riskier things you can do, since Defenders are typically stocked with Hindrance inducing moves to incapacitate a melee attacker like Slaking. It might seem like it won't be worth the effort it takes to hold your fire, but you need to look at the bigger picture.
When you evolve into Slaking, one of the two moves you can learn is Hammer Arm, an attack that deals damage in a wide area around you. It's big damage, yes, but its most useful perk is the Unstoppable status effect it grants you if you charge the move before unleashing it. You see where this is going? If your basic attack has been boosted for some time, you can use Hammer Arm to close the distance without losing the boost thanks to the Unstoppable boon. Your Movement Speed is reduced while charging the move, but if you're on the defensive, you can tank a few hits, eat the hindrances your enemies will throw at you, let loose Hammer Arm, then finish the enemy off with a super powered boosted basic attack that pierces their defenses.
You can also opt to avoid the hindrance attack with a well timed Sucker Punch attack, but that's much riskier. The best time to charge your boosted basic attack would be during your Unite Move, Peerless Pulverizer, but we're getting ahead of ourselves.
Back to Hammer Arm, you deal damage in a wide area, with a lengthy windup charge that can absorb hindrances and effects. This makes the attack powerful on the offensive or when defending, especially when Truant is powered up. In contrast, the move is much less effective when Truant powers you down, as the Movement Speed debuff effects stack. Ideally, you take this moment to recover, since your healing potential is much greater at this Level, but it will suck to be forced to retreat if you Leveled Up before the team fight ended.
The other option to Hammer Arm is Giga Impact, and, as mentioned before, it is Slaking's best and only option against ranged Attackers. With a big jump, Slaking slams onto the ground and deals big damage to whoever it lands on. It hits hard, yes, but Slaking exerts itself using this attack, so it will lounge about after landing, at the player's behest. If the attack KO'd the only enemy in the area, it might be ideal to let Slaking rest for a while. Giga Impact has a lengthy cooldown in exchange for big damage, but this cooldown can be reduced with a short break.
When Slaking dozes off after using Giga Impact, it is hastening the cooldown of Giga Impact by 25% cooldown speed. This shrinks the wait time of 12 seconds to 9 seconds, and when upgraded to Giga Impact+, shrinks it down from 10 seconds to 7.5 seconds. Also, the cooldown of the move is reduced if the attack KO'd an opposing pokemon, reducing it down even further. Of course, you can't always afford to wait out the whole cooldown by just napping, but Slaking is so exhausted from using the attack that it actually triggers Truant right away, skipping the wait time.
Just a quick reminder, Truant powers you up when your Level is at an Odd Number, but increases your healing potential when at an Even Number, at the cost of Movement Speed. However, the Ability grants passive healing at all Levels when you are out of combat, which is increased when you switch into your 'Relaxed' Stance. It takes 5 seconds of waiting out of combat, and you can only switch into your Relaxed Stance if you don't move, but Giga Impact activates this accelerated relaxation effect immediately when the move ends. That means, if you took a beating before finishing off the enemy with Giga Impact, you can very quickly heal back to full if you lounge around for a bit, getting you back into tiptop shape without needing to retreat back to Home Base.
This does, however, reveal a fatal flaw in Slaking's damage potential, and it goes beyond its Truant Ability. Yes, Giga Impact is a far reaching sudden jump attack that is very likely to KO opposing pokemon. It has high cooldown to balance it out, but it can be lowered by landing a KO and resting afterwards. Even so, this highlights how Slaking NEEDS to do this to have a consistent way to deal with ranged attackers, since all of its other options are only good at close range.
There's also the fact that Slaking has low Sp. Defense. Like, really low, you saw the BST graph earlier, right? In addition to Truant working against you at Even Numbered Levels, Slaking has a very short life expectancy when pitted against opposing Sp. Attack based pokemon. Whether it be the chilling winds of an Alolan Ninetales or the watery repelling of Blastoise and its pump attacks, Slaking will find itself worn down very quickly from these attacks. Even Supporters like Mr. Mime and Eldegoss can give it trouble with their Stun effects, on top of all the surprise damage it takes.
In games where Slaking has to fight against a whole team of Sp. Attackers, its only saving grace would be its Unite Move, Peerless Pulverizer. The Unite Move makes Slaking Unstoppable and launches a huge attack when used a second, but the real power comes from the damage it takes during the boost. Peerless Pulverizer increases the damage the attack deals by factoring in the amount of HP Slaking loses while buffed, and to be specific, this is factoring in HP lost, not its HP amount.
The more HP Slaking loses, the stronger it gets, but at the same time, its healing potential is heightened, so any HP it restores and then loses continues to contribute to the power of Peerless Pulverizer. But with how high Slaking's base HP is, it cannot reliably use flat HP restoring effects like Potions to exceed this damage potential on its own, so it would prefer to have a teammate Supporter keeping its HP topped off. Ideally, you'll want to lose more than 100% of your HP to see Peerless Pulverizer do some real damage, but it's not unrealistic to get KO'd by a bevy of Burst Damage thrown your way.
Oh, but looping back around to your basic attack and its boosted power for a second. Since Peerless Pulverizer makes you Unstoppable for 8 seconds, that's extra time for your boosted basic attack to build up power. You can use it during or after the Unite Move, but you'll need to have it primed some time before. The longer the better, but that carries with it some risk, as mentioned before. Optimally, you should pop the boosted attack after using the Unite Move, since the enemy team can respond to your attack with a shielding effect of their own, mostly to save their own skin. A boosted attack in this circumstance can easily seal the deal for you.
Slaking has a lot of positives going for it, but it also has a lot of negatives too. I've mentioned multiple times here that Slaking can circumvent these issues with reliable teammates, but you often don't hear about All-Rounders relying on their teammates like a crutch, usually it's the other way around.
One of Slaking's best partners in a Lane would be Blissey, as it can provide the giant sloth with either healing or hindrance immunity and can put itself between Slaking and opposing Sp. Attackers, since Slaking has very poor Sp. Defense. Eldegoss is another good pick, as its Pollen Puff can help it secure KO's in a fight, or its Leaf Tornado can help it push or retreat.
It can also employ the help of fellow Attackers and Speedsters to cover its issues with range, since Slaking has very limited options for dealing with long ranged fights. And with a Defender at the forefront, Slaking can chill to the max with Truant healing it as it naps, tagging in for the Defender when needed.
If Slaking is supported properly, Slaking will provide results. Hey, that's just like how it works in the mainline Pokemon games! Some assets are powerful, but need to be developed and nurtured, whereas others need to be played to their strengths. Slaking is the latter, as its lazy nature is part of its character, but when push comes to shove, Slaking shoves hard.
It's SlaKING. Not Sla-prince or Sla-duke. Sla-KING. All hail.
-
And that's Slaking for Pokemon Unite! I'll never get tired of turning gimmicks and detrimental Abilities from the pokemon games and turning them into something unique and powerful for Unite. It's not always a good idea to base an Ability gimmick off the Level (ahem, Mewtwo...) but I think it was the only way to work Truant as an Ability here.
That'll be it from me. I'm a bit excited about the next pokemon coming up. Here's a hint.

Until then, see ya.
0 notes
Text
Darmanitan for Pokemon Unite!

Season 1
Season 2
Season 3
Prev: Iron Valiant - Primarina - Garganacl - Passimian - Incineroar - Cofagrigus - Glimmora - Galarian Stunfisk - Krookodile - Kricketune - Magearna - Turtonator - Farigiraf - Spinda
I gotta be honest about something regarding Darmanitan. As great as Gen 5 was for the Pokemon franchise, the design and decision to throw in a pokemon based on the daruma dolls was questionable to me. I mean, the Unova games were based on the East Coast of the Americas in real life, I wasn't expecting oriental pokemon to show up in what is effectively New York, New York.
But then again, America was called the Melting Pot of the World once upon a time, where a vast array of cultures and ideals mixed together to create something new and different, which I believe was the goal. I give pokemon like Cofagrigus and Gothitelle a pass for their creative designs, so I shall extend the same courtesy to Darmanitan and its zen culture.
And now, the Melting Pot is boiling in Aeos Island. Will Darmanitan turn up the heat, or chill out with its zen state of mind? Let's find out.
-

Darmanitan is fueled by a raging inferno in its heart, which powers up its attacks. One questions just how hot or raging this fire truly is, because Darmanitan packs an absolutely overwhelming Attack stat of 140. The rest of its stats look a bit unimpressive, in comparison, what with 105 HP and 95 Speed to back up its frightening attack power. Its HP ends up being inconsequential due to its paltry defenses, so it is relegated to one specific role.
However, this is only half of the big picture, as Darmanitan is actually yet another gimmick pokemon, one with a(n optional) form change.

When Zen Mode activates, the burning fury quells into a controlled flame, and the pokemon completely transforms. It's no longer the fast powerhouse of an ape it once was, now it is a living statue that neither hears, speaks, nor sees evil. Its fierce attacking prowess has been converted into heightened mental forces, drastically boosting its Sp. Attack. It has forfeited the use of its legs in order to attain powerful defenses. Zen Mode Darmanitan is effectively a different pokemon now.
Of course, it's still a gimmick, and I use that term both affectionately and derogatorily. I mean, it's cool, but it's so darn useless in battle. In case you're wondering why you've never seen anyone use Zen Mode Darmanitan before, particularly the Fire/Psychic Type version, there's a good reason why. In battle, Darmanitan needs to have the Zen Mode Ability, and then it needs to fall to 50% HP or less, then it will transform.
Here's the problem, or problems, if you will. Regular Darmanitan is a physical attacker, whereas Zen Mode is specialized in Special Attacks. If you wanted to use Zen Mode optimally, you would need at least 1 Physical Attack for Darmanitan to rely on, and one Special Attack for Zen Mode to use. That means both forms will always have one suboptimal move they can't use until the form change happens. Don't even get me started on how restricted items and boosts become, because guess what, trying to take advantage of both facets of the attacking spectrum severely limits your true potential. A Darmanitan that is trained to hit with both Physical and Special Attacks will never hit as hard and fast as one that is purely trained solely for Physical Attacks.
Yeah, this is a gimmick that will never see serious play, but at least Darmanitan has more reliable Abilities it can use. For Pokemon Unite, we can make it work much, much better here. In order to fully realize this, we must build around Darmanitan first and exemplify its strengths. As such, I give Darmanitan the role of a...
Speedster
-
Basic Attack- Melee/Attack
The pokemon locks onto a nearby enemy and jumps towards them, landing with a wave of fire that deals damage in a small area around the user. The attack can be held to increase the area of damage.
In Zen Mode, waves of psychic power emit from the user in a moderate area around itself. The damage dealt to opposing pokemon increases the longer they are within the area of effect.
The basic attack locks onto opposing pokemon and charges at them. At the time the basic attack comes out, it sends the pokemon forward and jumps at the target pokemon's location instead of tracking them. The target is capable of moving out of the way and this jump attack covers a short distance.
Upon landing, a small wave of fire is unleashed. This attack can be charged, but the charge time is extremely short. To simplify things, the basic attack has three charge levels; No charge - small area of damage Mild charge, between 0.2 and 0.9 seconds of holding the basic attack button - 25% increase in size Fully charged, 1 second of holding the basic attack button - 50% size increase
The pokemon holds still while charging the basic attack. The basic attack unleashes automatically after 1 second of charge.
In Zen Mode, the basic attack comes out as a wave of psychic energy that deals damage in a moderate area around the pokemon. The damage dealt increases by 30% a second to opposing pokemon that linger in the area of effect, maxing out to 300%. The pokemon's Movement is unaffected while attacking.
Darmanitan is a wild and ferocious pokemon, so it stands to reason that its basic attack isn't all that refined. When it uses its basic attack, Darmanitan will leap at the target and land with a wave of flame, hoping to catch them in the attack.
It can charge the basic attack to increase the size of the fire quake in order to damage multiple enemies at once. Given how short this charge time is, there are only three charge levels at your discretion. Without any charge, you won't see any change in the size of the fire wave. With a slight charge, the wave increases in size slightly. After a full second of charge, the fire wave expands by a whole 50%.
The most efficient charge for repeated use would be the mild charge, seeing as it requires only 0.2 seconds of holding the basic attack button and is easy to time. A full charge is useful when diving into a horde of enemies, but that's very risky for a Speedster to manage. Well, Speedsters other than Darmanitan.
More on that later, as it has to do with your Zen Mode and Ability. Speaking of which, during Zen Mode, your basic attack changes to a short ranged wave of psychic energy that builds up damage on enemies that linger within the area of effect. Given the change in stats, and the requirements needed to shift forms, it doesn't seem feasible to effectively use these short range waves against the opposing team.
Well, you'd be wrong. We're completely flipping the script on this Zen Mode gimmick, as you'll soon find out.
-
Ability: Inner Focus/Zen Mode
Inner Focus (Darumaka)
The pokemon becomes Resistant to Hindrances while using its moves and attacks. The attack also deals more damage when Inner Focus activates.
Zen Mode (Darmanitan)
The pokemon is Resistant to Hindrances while using its moves and attacks, dealing increased damage when attacked. When the pokemon's HP reaches 50% or less, the user becomes Immune to Hindrances. While the user's HP is at this threshold, Zen Mode can be activated to change the user's form for a while. In Zen Mode, the user is completely Invincible and its Moves will change, but its Movement Speed is reduced. This ability goes on cooldown afterwards.
Both Inner Focus and Zen Mode render the pokemon Resistant to Hindrances while its Moves are active, including its basic attack. When activated, Inner Focus increases the damage dealt by these moves by 25%, whereas Zen Mode increases it by 50%.
Zen Mode grants the pokemon Hindrance Immunity when its HP reaches 50% or less. This boon resets to Hindrance Resistance when your HP restores up to 51% or more.
At 50% HP or less, Zen Mode can be activated by pressing in the Left Control Stick, just like Hoopa's Magician Ability. When activated under these circumstances, Darmanitan will change into its Zen Form for 10 seconds. Afterwards, you cannot change form again for 60 seconds.
In Zen Mode, your moves change to Fire Blast and Psychic, regardless of which moves you've chosen. Your damage also changes from Attack to Sp. Attack, though the conversion factors in your items and Emblems, meaning you will still receive all the benefit of Attack specific boosting items like Razor Claw and Muscle Band.
Darmanitan cannot Score while in Zen Mode. Your Movement Speed is also reduced by 50%.
Darmanitan is also completely Invincible during Zen Mode, though this also means that it cannot receive beneficial effects from allies.
How do you stop a wild Darmanitan from charging? By taking away its debit card of course! ...wait, wild pokemon don't use money. Uh oh.
Both Darumaka and Darmanitan gain Hindrance Resistance when they are in the middle of using their moves. This means they cannot be Stunned, Thrown, Frozen, or put to Sleep while throwing out their attacks. These moves also gain a power boost, as fierce combat excites them, though Darmanitan has the better Ability in that regard, naturally.
The crux of the pokemon itself lies in its Zen Mode Ability and the conditions required to change forms. Firstly, when Darmanitan reaches 50% max HP or less, its Hindrance Resistance becomes a permanent Hindrance Immunity, so long as its HP remains at this threshold. For some Speedsters, the HP stat can be the difference between surviving a glancing blow or going down in one hit. Although with frail defenses, there may not be much of a difference between 1% and 100%, depending on who you ask. It depends on how Darmanitan's Moves work together. More on that later.
I digress. At 50% HP, you are unstoppable in all but the literal sense, but running around at half HP is very risky. You no longer have to worry about Stun or Freeze stopping you in your tracks, you only have to worry about your dramatically reduced longevity on the battlefield. The Hindrance Immunity is useful for escaping or securing Objectives, but Scoring is dangerous if there are still enemies nearby. I mean, the Hindrance Immunity will keep your Score from being interrupted, but a half health Speedster being forced to stay still is just asking to be KO'd for all their efforts.
The alternative would be to transform your body through a zen state of mind. By activating Zen Mode, Darmanitan shrinks its body into a stout, blue, statue-like figure. Its arms and legs are tucked in, but its psychic powers increase drastically. In the pokemon games, this form shift requires incredible patience and preparation in order to pull off any meaningful results. In Pokemon Unite, the Zen Mode form comes with full on Invincibility at the cost of the ability to Score points.
To clarify, Zen Mode is fully Invincible, meaning it cannot be damaged or affected by any effects from the opposing team. Not even powerful Binding effects like Slowbro's Unite Move, Slow Beam, or Mimikyu's Play With Me can affect Darmanitan while it's in this state. That said, it also means that your allies cannot heal or buff you, or even target you with their Unite Moves, like Blissey's Bliss Assistance or Lapras's Lapras Express. And also, like I mentioned before, you cannot Score while in Zen Mode, which only makes the form best suited for fights.
That said, Zen Mode only lasts for 10 seconds, after which you cannot change form again for a whole 60 seconds. Since this form change cooldown is tied to the Ability, it cannot be modified by items or Emblems, so you're forced to wait out the whole minute before Zen Mode comes back online. Therefore, when you reach 50% HP with Darmanitan, you shouldn't activate Zen Mode right away. If you can finish the fight without using Zen Mode, then finish it. If your odds of winning the fight are better with a Supporter or Defender boosting you, then hold off on the form change, as Zen Mode cannot receive supportive effects from allies. If there is a Goal Zone nearby that is a few points shy from being broken, then go for the goal, as Zen Mode cannot Score until the change is reverted.
Otherwise, it is optimal to activate Zen Mode to change forms if you can end the engagement with a team wipe while preserving your own life. But that requires truly understanding what your moves can do at their full potential, before and after Zen Mode.
We'll get to that in just a minute. For now, take a deep breath and feel the zen inside of yourself. Feel it bubbling, like a pot of soup. Mmm, soup. Could go for a nice hot bowl right about now. How about you?
-

At the beginning of the game, Darmanitan will start out as Darumaka. You can choose between Bite and Headbutt as your first move. By Level 3, you'll have learned both.
-
Move 1: Bite (Melee)
A short ranged biting attack that briefly Stuns enemies. 3.5s cooldown.
Bite Stuns enemies for 0.5 seconds.
Darumaka is such a jovial little guy. Look at 'im hopping around like the ground is on fire. I think I'm gonna call you chili bean.
You wouldn't know it from appearances alone, but Darumaka is an extremely feisty pokemon that loves fighting. It has to do with the fire in its belly getting it excited and stuff. It literally cannot sleep until it has quelled the fiery spirit within itself, so it either runs about or picks fights with other pokemon to wear itself out.
That makes Darumaka a bit like an overzealous kitten, huh? Complete with a penchant for biting unprovoked. Well, at least here it's supposed to be biting other pokemon on purpose. Bite is a short ranged attack that Stuns briefly and has low cooldown. That makes it very well suited to dealing damage quickly and consistently during fights in the early game.
Of course, being in close combat with opposing pokemon also puts you at risk, especially since you're supposed to be a Speedster. And the shallow range of Bite won't help you out much against ranged attacks and opposing pokemon that like to keep themselves at a distance.
But, of course, you're also a Speedster, so naturally you have a way to close the gap, even at this lower power level.
-
Move 2: Headbutt (Dash)
A daring charge attack with the user's head. This move can be used while on cooldown at the cost of some HP. 8s cooldown.
Headbutt sends the pokemon charging forward. It can be used while the move is on cooldown, but the pokemon loses 6.25% of its HP in Piercing Damage.
In real life, doing a head butt attack is extremely risky, since that's the part of your body with the brain in it, and any reckless damage endangers the delicate parts inside. For the most part, you'll only see head butt attacks in free form fights where the individual grabs and binds their target before reeling back and whacking them with the thickest part of the skull. All the momentum comes from the neck, anything more than that risks brain damage. That doesn't make it any less brutal when pulled off.
Of course, these fantastical creatures don't care much about realism. As long as the attack looks cool, they'll butt heads with each other like bald deer. Darumaka is a lot more into it than other pokemon, though, as its use of Headbutt comes with the unfortunate side effect of losing HP if the move is used while on cooldown.
Now, there is an upside to using moves freely without having to worry about cooldown. As this is a Dash Move, Darumaka can cover a lot of distance at the cost of some HP. It's handy for a Speedster to retreat to safety with this move, but the healing provided by Ally Goal Zones is minor, so quick healing will be greatly desired. That said, your teammates would be miffed at you for taking the Sitrus Berries all for yourself, just for you to heal off the damage you inflicted on yourself by using Headbutt repeatedly, so maybe be a bit more responsible with the move, yeah?
Offensively, Headbutt is great for securing KO's early on, especially against frail enemies that are prone to getting picked off. And while Headbutt can deal damage to multiple enemies at once, it does not inflict any inhibiting effects like Stun or any debuffs, raw damage is all you get. That makes it very risky to use against multiple opposing pokemon without Bite at the ready. It's like fighting a 2-v-1, with one of your opponents being yourself, or your own recklessness, if the boot fits.
It's important to keep in mind that, after evolving, Darmanitan will be using this move, and it can use Headbutt to lower its own HP deliberately to trigger Zen Mode sooner. However, as just Darumaka, it can only rely on Inner Focus preventing the use of Headbutt from being interrupted by Hindrances that stall you. You should take the opportunity to learn about self control while at this stage, as Darumaka is a fierce fighter up close, but can be prone to overestimating itself and getting into fights it cannot win.
Zen and Rage are two sides of the same coin. In the middle, there is a controlled blaze, focusing the power of anger with the wisdom of peace. A very dangerous combination, to be sure, but it's one that has been honed by Darmanitan.
And now, it's yours to command.
-
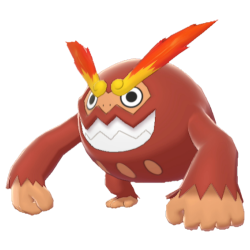
At Level 7, Darumaka will evolve into Darmanitan. At the same time, Bite becomes either Hammer Arm or Fire Punch.
-
Move 1a: Hammer Arm (Buff)
When used, the user slams the ground with its big, beefy arms, dealing damage around itself. The user's basic attack changes to become a ranged quake attack from the user's arm swings, which reduces opposing pokemon's Movement Speed briefly. Each attack has a slight chance to Stun opposing pokemon. 9s cooldown.
At Level 11, Hammer Arm becomes Hammer Arm+.
Widens the area of effect.
Hammer Arm starts with a wide ranged quake attack. This quake attack has no special effects.
Afterwards, your basic attack changes into a quaking slam attack that deals damage all around you, just like how Tyranitar's Unite Move, Tyrannical Rampage, changes its basic attack.
Enemies hit by the quake will have their Movement Speed reduced by 65% for 1 second, resetting with repeated blows. Each hit also has a 30% chance to Stun the enemy for 0.25 seconds.
Darmanitan does not stop moving while using its basic attack while it is boosted by Hammer Arm. The buff lasts for 5 seconds.
Hammer Arm+ expands the range of the quake attack by 20%.
One of the many differences between humans and monkeys is the disproportionate lengths in our arms and legs. We lost a lot of strength when our arms got shorter, but it gave us the ability to throw, carry stuff much better, and improved our ability to walk upright. With big gorilla arms, Darmanitan is very top heavy, so it makes the most of its power with wide, dangerous swinging, making it an expert at using Hammer Arm.
With a big smash, Darmanitan unleashes a wave of fighting power all around itself, but this spirited strike does more than just spread damage all around itself. Remember what I said about Darumaka's fiery spirit? Yeah, it only got hotter when it evolved into Darmanitan, and using Hammer Arm channels that focused fury into its fists.
Just a quick recap, your basic attack chases down the targeted enemy, jumps towards them, and lands with a wave of fire that can damage multiple enemies. The fire wave can expand in size with a brief charge of the basic attack button, but the attack is surprisingly inaccurate against speedy opponents. Hammer Arm changes the basic attack, losing out on the jump attack but gaining much more in return.
Now, the basic attack becomes much wider in range, forgoing the need for the jump to chase down enemies. It also debuffs the enemies' Movement Speed consistently, reducing their ability to get away from you. Not only that, Darmanitan can attack nonstop while moving, and each attack has a slight chance to Stun opposing pokemon on hit.
All of this combines to turn Darmanitan into a dangerous beast to fight up close, as Hammer Arm covers a wide area, making it easy to hit the enemy with. Losing out on the jump attack hurts your range, though, but at this stage of leveling up, you still have Headbutt to chase down opposing pokemon with. Some of the longer ranged enemies will give you trouble, though, like Inteleon or Cinderance, but the ease of Movement granted by Hammer Arm means you can take full advantage of Movement Speed buffs like X Speed or Eldegoss's Leaf Tornado.
Just keep in mind that Hammer Arm is a buff to your range, not damage. You aren't hitting much harder with this move than you would with Fire Punch, the alternative.
-
Move 1b: Fire Punch (Melee)
A short ranged punch with the user's fist cloaked in flames. The cooldown of the move is reset on hit with an enemy. Each hit Burns the enemy, and repeated hits reset the duration of Burn and aggravate the damage-over-time dealt. 2.5s cooldown.
At Level 11, Fire Punch becomes Fire Punch+.
Opposing pokemon are Burned for longer and receive more damage over time.
On hit, Fire Punch Burns the enemy for 2 seconds. Each repeated hit increases the damage of the Burn damage-over-time hindrance by 10%, maxing out to 150%.
The cooldown of Fire Punch is reset on hit with a pokemon on the opposing team.
Fire Punch+ extends the duration of Burn to 2.5 seconds and increases the base damage of the damage-over-time hindrance by 50%.
Fire Punch has Darmanitan perform a punch combo visually, starting with a straight, then a mild uppercut, followed by a hook, and ending with a haymaker. This affects the range of the attack slightly and loops with each use, though it resets after 3 seconds of no use.
It's a little surprising to see Darmanitan pull off some intricate punches like it was a boxer. See, boxing is sort of unique to humans due to our body shape, the most complex move a gorilla can do is a quick punch combo before their upper body weight forces them back to their neutral position. But as I said before regarding Headbutt, these pokemon don't care about realism, so its fiery fists fly free with unfettered ferocity.
By itself, Fire Punch is a short ranged Melee attack with the ability to Burn. Due to its extremely low cooldown, Fire Punch doesn't have high damage scaling, but the Burn damage-over-time dealt more than makes up for that, especially with the second effect of Fire Punch.
On hit with an enemy, the already low cooldown of Fire Punch resets, allowing you to quickly attack again. Each successive hit of Fire Punch resets the duration of Burn and increases the damage dealt by the Status effect. It becomes like a second basic attack when each hit connects, with the Burn damage becoming stronger if the enemy doesn't get away in time.
But that's going to be an issue, as Darmanitan stays in place while using Fire Punch. It's only for a very brief moment, but that's enough time for the enemy to make some space away from the blazing monkey. That's why it's important to sparse out the use of Fire Punch with other attacks like your basic attack and Headbutt, both of which can help maintain close distance with the enemy. If you miss, it's no big deal, as you only have to wait 2.5 seconds for the move to come off of cooldown, but the Burn Status effect only lasts for 2 seconds, so the damage-over-time multiplier will reset by the time you use Fire Punch again.
Darmanitan really likes being close to enemies for its fights, given how Hammer Arm and Fire Punch operate. However, these moves have low damage scaling due to their ease of use. It leaves a lot to be desired, especially with only Headbutt to work with to close the distance.
Sometimes, Speedsters really need a power boost, even ones with ridiculous Attack power like Darmanitan. Not for nothing, of course, but how much are you willing to sacrifice? What are you willing to give up to attain victory? For Darmanitan, the answer is obvious.
Everything.
-
At Level 8, Headbutt becomes either Belly Drum or Flare Blitz.
-
Move 2a: Belly Drum (Buff)
The user beats its chest rhythmically, reducing its own HP. The move can be held to extend the chest beating, reducing even more HP. The user's damage and Movement Speed increase relative to the amount of HP sacrificed. At the end of the chest beating, the user will be cleared of all Debuffs. 11s cooldown.
At Level 13, Belly Drum becomes Belly Drum+.
Also grants the user a shield if the user's HP is reduced to 50% or less.
Belly Drum takes a minimum of 10% of your max HP in Piercing Damage when used. The button can be held to continue chest beating, depleting another 10% of your max HP each second. Your HP cannot be lowered past 10% from this move, and the move will end if you are brought down or past this threshold.
At the end of the move, your Attack, Sp. Attack, and Movement Speed increase by 3% for each 1% of your HP sacrificed from this move. At minimum, you will see a 30% increase to your stats. The maximum possible boost, using Belly Drum at full HP, totals out to a 270% boost to Attack, Sp. Attack, and Movement Speed.
The boost lasts for 6.5 seconds.
You will be cleared of all Debuffs at the end of the move. As Zen Mode protects Darmanitan with Hindrance Resistance, which turns all Hindrances received into a Movement Speed debuff, Darmanitan is very well protected from all methods of incapacitation during Belly Drum.
Darmanitan cannot heal HP during Belly Drum until the move ends. This is so that it cannot use Belly Drum while being healed at Home Base to massively boost its stats. If Darmanitan is interrupted by a powerful Hindrance during Belly Drum, the HP will be lost but no boost will be gained.
Belly Drum+ grants Darmanitan a 15% shield if the HP lost during Belly Drum lands at or below 50% max HP.
So, the description for the move states that Darmanitan is beating its chest during Belly Drum, which is a slight misnomer. The chest is not the same as the belly, but on Darmanitan's body, the two are so close together, it might as well be.
When used, Belly Drum sacrifices a minimum of 10% of your Max HP in exchange for a 30% boost to your Attack and Movement Speed. If you were to hold the button instead, Belly Drum keeps going, sacrificing more HP for stronger Attack and Movement Speed boosts.
Compared to Headbutt, Belly Drum is a much more stable method of losing HP to activate Zen Mode. The Movement Speed boost also helps greatly in closing the gap between you and ranged attackers, especially if you have a Hammer Arm boost active. Also, the drastic boosts to your Attack will easily power through opposing Defenders and All-Rounders, which helps out in that matchup.
If the enemy wants to stall your offensive pressure, they would have to hinder you with a Stun or something, but that's not going to work because of how Belly Drum is an attack that is protected by Zen Mode. Any and all Hindrances are converted into a Movement Speed debuff while Belly Drum is in use, and when the move ends is at the player's discretion.
Also, Belly Drum clears all debuffs when the move ends, so the Movement Speed debuff is cleared shortly afterward. This also patches up one of Zen Mode's flaws in that, while it protects Darmanitan from Hindrances, it doesn't protect from debuffs, so the automatic debuff refresh compensates for forcing you to stay in place while using Belly Drum.
Now, one flaw of Belly Drum, aside from the HP loss, is that you cannot be healed during the move. This may seem questionable, but it's to control how much Belly Drum is allowed to boost your stats by limiting how much HP you can sacrifice. I mean, otherwise, you could spam Belly Drum while sitting in the Home Base, being healed endlessly and receiving basically infinite Attack and Movement Speed boost. There's no cap on the boosts because the HP you can sacrifice is regulated by the blocked healing.
Of course, the whole healing during Belly Drum at Home Base is a super specific situation, but even so, with Supporters on your team, you could be healed for more than what is allowed. Yeah, if the healing is mistimed, you'll miss out on recovering what you sacrificed during Belly Drum, so try to coordinate with your teammates.
Also, Belly Drum takes a while to get going. Each second that passes takes away 10% of your Max HP, so the more boosts you want, the longer you'll have to wait. Since the minimum amount of HP you can be brought down to by Belly Drum is 10%, that means you can lose 90% of your HP to Belly Drum, which totals 9 whole seconds of drumming. You can heal back up with a Potion Item or a Berry, but 9 seconds is enough time for things to go wrong, or for the fight to finish without you. It'll be better to moderate your boosting with what you can afford to lose versus how much boost power you'll need to finish the fight without getting KO'd.
That's another thing, you can still get attacked during Belly Drum, but Zen Mode will prevent the move from being interrupted. That's fine and all, but the HP lost from being attacked does not contribute to the boost Belly Drum grants at the end. And also, you're a Speedster, you don't have a lot of HP to spare anyway, so watch your surroundings while using Belly Drum. If melee attackers are approaching, stop the drumming and work with what you have. If ranged attackers are in the area, you shouldn't have started using Belly Drum, admittedly, but you should stop drumming regardless and hunt them down if they're a fragile Attacker.
Darmanitan is good at chasing down enemies, but choosing Belly Drum limits a lot of your options for combat. If you pick Belly Drum, what you have to work with is just your Basic Attack and either Hammer Arm or Fire Punch. Oh, and your Unite Move. And also your Zen Mode Ability if you choose to activate it. Notice how Belly Drum also boosts your Sp. Attack?
More on that later. Belly Drum is a weighted choice and requires careful planning and coordination to make the most of its boons. Perhaps you'd feel more comfortable with Flare Blitz instead.
-
Move 2b: Flare Blitz (Dash)
The user tackles in a blaze of glory, dealing heavy damage to all enemies hit with a grand explosion. This move can be used again while on cooldown at the cost of some HP. 9.5s cooldown.
At Level 13, Flare Blitz becomes Flare Blitz+.
Extends the dash distance and increases the size of the explosions.
Flare Blitz sends Darmanitan charging forward in explosive fire. The dash attack runs through enemies and creates a moderate explosion on each hit, damaging all enemies caught in the blast. The explosions can overlap, multiplying the damage.
While the move is on cooldown, Flare Blitz can still be used. Each use of Flare Blitz while on cooldown costs 7.5% of your max HP in Piercing Damage.
Flare Blitz+ extends the dash distance by 20% and increases the size of the explosions by 15%.
If you ever have the misfortune of seeing a Darmanitan lash about, you might walk away with the impression that it is a wild and ruthless animal, destroying everything indiscriminately. That is, if you manage to walk at all. Darmanitan may appear brutish, but it isn't dumb at all. That's what makes these pyro primates so scary. It can get angry, it can attack with blinding rage, but it harbors within itself a zen sense of calm and direction.
It knows its angry, it knows it must vent its frustration and rage. Therefore, it knows what to strike and how much fire to use. It's lashing out on purpose, because anger is an emotion to be experienced. Rage is a power that propels its attacks. That's why it's always smiling, because it's in control of its emotions.
Flare Blitz perfectly embodies this focused rage. A blazing tackle that explodes on hit with the enemy, it's a power that many pokemon have, but not many can control themselves as well as Darmanitan can. While all other pokemon wear themselves out after using Flare Blitz, Darmanitan is well composed enough that it can use the move again, even though it's supposed to be on cooldown.
Just like with Headbutt, though, using Flare Blitz again so soon comes at the cost of some HP. Flare Blitz has all the upsides of Headbutt, though, along with a few extra bonuses. For one, the blast radius is large enough that you can catch multiple opposing pokemon at a time. And each enemy you hit generates a blast, and these blasts can overlap, dealing extra damage to those caught within multiple explosions.
Flare Blitz also deals a lot more damage and covers more distance, but it costs slightly more HP to use while the move is on cooldown. The move also retains some negative aspects as well, such as a lack of extra effects on hit with an enemy. This means that you are dashing towards the enemy with nothing but grit and determination, so you better hope the fight ends quickly.
Looking at all possible situations, this move is not ideal to use against Defenders and Bulky All-Rounders. Due to their high endurance, they can tank repeated hits from Flare Blitz and your other chosen move, while you are losing HP from using Flare Blitz over and over again, as well as their counterattacks. Flare Blitz is best used against Attackers and Speedsters, as the move is highly damaging to them and can KO them quickly without sacrificing too much HP in the process. In contrast, Belly Drum is preferable to use in combat against bulky opposing pokemon, as the power boost can help break through their defenses.
Flare Blitz can also be used to run away to safety, but the problem is figuring out how much HP you have to lose before you realize you are in danger. Remember, it costs HP to use Flare Blitz while it's on cooldown, so if your HP is already low, you won't get far before you get KO'd from the recoil, or from an opposing ranged attack. Without any backup, half HP is considered to be the danger zone for you, so make a hasty retreat when that happens, especially if Zen Mode is on cooldown.
Speaking of which, it's time to talk about Zen Mode. Darmanitan evolves at Level 7, so that's the soonest you'll have access to the Ability and the two other moves that come with the form change.
-

The pokemon changes form with the activation of its Zen Mode Ability. Its moves change to Fire Blast and Psychic.
-
Move 1: Fire Blast (Ranged)
An intense wall of fire is made and shot forward, Shoving and damaging enemies and Burning them as it passes through. 3s cooldown.
Fire Blast becomes Fire Blast+ if either Hammer Arm or Fire Punch have been upgraded.
The fire wall travels further.
Fire Blast takes 0.5 seconds to form before shooting outward. On hit, opposing pokemon will be damaged, Shoved a fair distance, and Burned for 3 seconds.
Fire Blast+ extends the projectile travel distance by 20%.
To recap, Zen Mode can only be activated while Darmanitan is at 50% HP or less. When activated, Darmanitan changes into its Zen form, where its Attack damage converts to Sp. Attack damage, it is completely Invincible and cannot be Hindered in any way, but it has a 50% Movement Speed reduction for 10 seconds. Also, Darmanitan cannot score while in this form, and it cannot receive any helpful effects from allies until the form change is reverted. It also cannot heal until then.
The short form duration contributes to the extremely low cooldown of its moves, especially Fire Blast. When used, Fire Blast creates a wall of fire and launches it in the designated direction. The move Burns enemies as it passes through and also Shoves them a bit in the direction it is thrown towards.
Now, while the move is mildly powerful, Fire Blast is meant to be used defensively, as Darmanitan will be vulnerable when the form change is reverted. Basically, if a troublesome enemy like an opposing Speedster is threatening to KO Darmanitan immediately when Zen Mode wears off, it needs to create some distance between itself and the opposing pokemon. The Movement Speed reduction hinders you and limits your options to retreat, so this is where you would rely on your teammates for help. The Shove and Burn power of Fire Blast will both threaten the enemy with damage and can hinder them a bit by forcing them out of position. It also helps to stall an enemy with a Hindrance so that your teammates can pick up the KO.
Fire Blast can also be used offensively as well around Objectives, as the Burn and Shove effect can turn the tables in a team fight. However, the move is best used in combination with Psychic.
-
Move 2: Psychic (Area)
The user targets an area and concentrates its psychic power there. As the psychic power builds up, a stream of psychic energy flows from the user into the designated area, damaging enemies. When the psychic power is filled all the way, the designated area erupts with psychic power, damaging and Stunning enemies in a wide area. 3.5s cooldown.
Psychic becomes Psychic+ if either Belly Drum or Flare Blitz have been upgraded.
Expands the area of effect.
Psychic targets the designated area and fills it with sparkling, explosive power, not unlike fireworks. The psychic power damages enemies in the area.
Psychic lasts for 2 seconds, during which time, a psychic stream of energy feeds into the area of effect from the pokemon's head. This psychic stream also damages enemies caught in between.
Darmanitan can move and use its basic attack and Fire Blast while Psychic is active. There is a limit to how far Darmanitan can be from the targeted area of effect, but it's very far and can only realistically be reached through the use of auxiliary effects like Hoopa's Hyperspace Hole or Lapras's Unite Move, Lapras Express. If this happens, the move ends without an explosion.
At the end of the move, Psychic causes an explosion at the targeted area of effect, dealing damage to all enemies in a wide range and Stunning them for 0.75 seconds. The move then goes on cooldown.
Psychic+ expands the range of damage of the move before and during the explosion.
In real life, when humans are pushed to their limit, they experience a rush of adrenaline that removes their natural inhibitors, giving them a massive power boost. For Darmanitan, the reverse happens, where its body atrophies in exchange for heightened brain power. This increased brain activity manifests as psychic abilities. Combine that with powerful pyrokinesis, and you've got a real firecracker of a pokemon.
Psychic targets a designated area and plants a mental conduit that Darmanitan feeds psychic power into. As it does so, the conduit crackles with pyrokinetic fire sparks, and any enemy near the designated area or caught by the psychic beam in between will be damaged continuously. After 2 seconds, the psychic conduit explodes in a flash of crackling fire, damaging and Stunning enemies caught by the blast.
While using Psychic, Darmanitan can continue to attack and move about, so it's great for applying offensive pressure or to dissuade attackers from approaching. However, Darmanitan has greatly reduced Movement Speed while in Zen Mode, so it isn't feasible to create much distance with this attack. The vast area that this attack covers, however, is enough to ward off enemies from lingering too close, since the explosion is much bigger than expected. Therefore, Psychic is best used during team fights, as it creates a zone of danger that you and your allies can hide within.
Because of the duration of the attack combined with its cooldown, Psychic will only be used up to two times during Zen Mode. It's a very strong attack that must be used confidently, but quickly. It has just as much range as any other area attack, but due to the time limit of Zen Mode, you need to make the most of Psychic and pick a good spot to use it in. Where that is depends wholly on the battle situation, so keep a keen eye on things while you have the Invincibility boon.
Don't forget about your basic attack, as it is a short ranged wave of psychic energy that builds up damage against enemies caught within. Using both at once is a great way to limit the amount of safe space for your opponents. Don't forget, you can also use Fire Blast to Shove the enemy into the volatile area of Psychic when it explodes.
But this is far from Darmanitan's full power. The true potential of Zen is the ability to call forth one's true power, harnessed by the fury of rage or the focus of wisdom.
Fire, the power to change the world, or destroy it.
-
Unite Move: Pyroclastic Punch (Area)
The user jumps into the air and becomes engulfed in a fireball of intense heat. The user's HP drops to 50% during the jump. The user then lands in the designated area, dealing major damage in a wide area. The damage of the explosion increases relative to the amount of HP the user lost using this move.
In Zen Mode, the user shoots a blast of intense fire at the designated area before returning to its spot. The damage of the explosion increases relative to the amount of missing HP the user has. 160s cooldown.
Pyroclastic Punch has two different effects depending on which form Darmanitan has taken. In its regular form, Darmanitan will jump and land at the chosen area at the end of its Unite Move. In Zen Mode, Darmanitan will only attack the designated area with Pyroclastic Punch before returning to its original position.
In its Regular Form, Darmanitan will jump into the air and hold its position briefly, while it is beating its chest and surrounded in a bubble of intensely glowing fire. During this time, Darmanitan's max HP decreases to 50%. It will then land at the designated area, dealing damage relative to the amount of HP Darmanitan sacrificed during the jump. For each 1% of HP lost, the Unite Move deals 2.5x more damage, maxing out to a potential 250% damage increase. No damage potential is lost if Darmanitan is below 50% HP.
In Zen Mode, Darmanitan will also jump into the air, but it will not sacrifice any HP. Instead, it will deal additional damage relative to the amount of HP Darmanitan is missing, dealing 2.25x more damage for each percentage of max HP missing.
The cooldown of Zen Mode is reset afterwards. The duration of Zen Mode is also reset if used while Darmanitan has changed form.
The mind is the most powerful weapon we humans have, but that all depends on how it is focused. A simple mind can be deceived, so true discipline and fortitude are required to make thought into action. The zen thoughts of Darmanitan are beyond our comprehension, but the results of its destructive power made manifest through its mind are clear.
Pyroclastic Punch sends Darmanitan airborne briefly, before it shoots down at the designated area and lands with a massive explosion. It's a powerful attack, but the scary part is that it can be stronger. See, while Darmanitan is in the air, it beats its chest and surrounds itself with intense fire. This fire actually hurts Darmanitan, but it does so on purpose, as the lost damage is converted into extra power for Pyroclastic Punch.
To be specific, the Unite Move sets your HP down to 50% and uses the sacrificed HP as a power multiplier for the attack. The more you give up, the stronger the attack. Obviously, it doesn't boost very much if you were to use Pyroclastic Punch at or below 50%, as there's nothing to sacrifice there. In that case, you should activate Zen Mode, as the Unite Move is a bit different in that form.
In Zen Mode, no HP is sacrificed, but the amount of missing HP you have is converted into extra damage. The damage multiplier is weaker, but you have much higher damage potential in this form. Plus, the Unite Move deals Sp. Attack damage, which means it has better KO potential against opposing pokemon with higher Defense than Sp. Defense.
The high cooldown of Zen Mode makes this a rare occurrence, but worth the wait. If you're good enough to not rely on Zen Mode for most of the match, then Zen Mode Pyroclastic Punch is a reliable and safe attack, since Darmanitan uses the Unite Move as a projectile instead of a dash attack.
Speaking of cooldown, after the Unite Move is used, the cooldown of your Zen Mode form change ability is reset. This opens up the option for you to activate the Ability right after using Pyroclastic Punch, since your HP will be at or below 50% from the Unite Move. In contrast, if you were in Zen Mode during the Unite Move, the duration of your form change is reset, giving you another 10 seconds of Invincibility to work with. Keep in mind, Zen Mode cuts down your Movement Speed by a whole 50%, so you aren't getting anywhere in a hurry before and after Pyroclastic Punch is used.
A major downside of the Unite Move is its very high cooldown. 160 seconds of cooldown put it very high on the list of Unite Move cooldown numbers. It's on par in length with Unite Moves like Cinderace and Decidueye so you'll be seeing Pyroclastic Punch used in battle at least once or twice. And while the attack covers a wide area, there is a brief pause between the jump and the attack where the enemy can make for cover. The loud noise Darmanitan makes when it uses the Unite Move doesn't help with its discretion.
Well, it's a Unite Move, it's supposed to be flashy, you know.
-
Achievements
While at 50% HP or less, get a KO streak of 3 or more.
Zen Mode passively grants you Hindrance Resistance while you are using a move, and even gives the attack a mild damage boost for all your trouble. Of course, the attack boost is nice, but you don't want to bank on it in every fight, what with you being a Speedster and all.
No, your job is to use your high damage potential and speed to take out key targets on the opposing team. Most Speedsters are good at this, some are even designed for it, but Darmanitan has a bit of trouble in that regard due to its surprising lack of mobility. Well, it has good mobility, actually, but using it effectively costs HP. Using Flare Blitz repeatedly sacrifices HP, and you have to give up a lot of HP to use Belly Drum in exchange for a sizable Attack and Movement Speed boost.
Darmanitan as a Speedster is readily able to make these sacrifices thanks to its Ability Zen Mode, which can turn a risky situation into a rewarding turnabout play. Yes, I'm talking about the Zen Mode form change, but also about the Hindrance Immunity you get when your HP falls at or below 50%. Many Speedsters fall short of a KO just because their enemy pulled out a hindrance just in time to save their skin, so Zen Mode is good at negating that factor in engagements.
Of course, the option to activate Zen Mode is always on the table, but that is up to the player on when and how they use it. Risking half of your HP just to guarantee a KO is not a gamble many players are willing to make, but Darmanitan offers greater rewards for it than other Speedsters. And while the Achievement specifies that you have to get a 3 KO streak while your HP is at 50% or less, it doesn't require you to activate the form change to get it.
As such, earning this Achievement requires understanding how Darmanitan as a pokemon changes when it reaches 50%. You can use your Hindrance Immunity to muscle through your enemy's attempts to incapacitate you, but you'll have to be at half health to use this boon, so the results better be worth the gambit. If it's too risky to try and go for a 3 KO streak, there's no shame in retreating and trying again later.
You could also just activate Zen Mode and clean house with your Invincibility, but I'm speaking practically here, as the form change has a short duration and a 60 second cooldown that cannot be modified by any effects. It won't always be available to you, so it's best to learn how to fight without it. And when you are able to use the form change, it should not be taken for granted, as the Invincibility gives you a lot of time to breathe, as well as some firepower. Fire Blast and Psychic cover a wide area and are deadly when used together, but the reduced Movement Speed limits your ability to reposition yourself, and you won't have a lot of time to calculate the best spot to use these attacks.
Darmanitan plays a different game compared to other Speedsters when its HP drops to 50% or less. At full HP, it's just like every other Speedster, all the power and speed at your disposal with everything to gain. But when brought down to its knees and backed into a corner, that's when it becomes the most terrifying, when it has nothing to lose.
Zen is the road to inner peace, to let go of your earthly desires and limitations, and to be free spiritually. Become one with the heat of the universe.
-
Holowear
Because Darmanitan is another pokemon with a form change gimmick, it has to have holowear made for both the base form and Zen Mode. Well, maybe the Zen Mode can go undressed, but only for the less grand holowear options here.
To start off, Training Style Holowear fits Darmanitan in a yellow gi that monks in training commonly wear. Musical Style Holowear gives Darmanitan a top hat and a suit with musical notes and symbols pinned all over the clothes. Adding on to this, Fashionable Style Holowear gives it a fedora, sharp suit, a fiery brooch, and a gold plated watch on one arm. Upping the quality a bit, Festive Style Holowear gives Darmanitan a big red snow hat, a red coat, and a fake mustache and beard, whereas the Zen Mode form keeps all of this and adds a wreath hooped on its head. Finally, Mythical Style Holowear gives Darmanitan gold oriental bands on its head and arms as well as some armor that would befit a pokemon inspired by the 'monkey-king', sharing these accents with the Zen Mode as well, of course.
Talk about fiery fashion.
-
Strategy
Before we go in-depth on the strategy of using Darmanitan, I need to break the notion that playing as a gimmick pokemon means you're playing as two different pokemon at different times. That might be true for pokemon like Urshifu and Scizor, but not so much so for pokemon like the Mewtwo pair and Aegislash. Darmanitan falls into the latter category, in that it is a pokemon that combos with its gimmick rather than working independently of it. You'll see what I mean.
First off, let's recap. Darmanitan is a Speedster with a Zen Mode form change and Ability that grants it a variety of boons at 50% HP or less. Due to its low defenses, reaching this 50% HP benchmark is a risky endeavor in and of itself, which is why it has the ability to manually lower its HP through Belly Drum and Flare Blitz. Deliberately lowering your HP for the Zen Mode boost is not without risk, though, as after everything is all said and done, you'll still have a huge chunk of HP missing, and you'll be vulnerable to retaliation from any opposing pokemon that survived your onslaught.
As such, you mustn't forget that you are a Speedster with a role to fulfill, and that you must fulfill it to be a valuable asset to the team. It's KO or be KO'd here, and Darmanitan has many advantages that set it apart from other Speedsters in this regard. It also has some disadvantages, but that's called balance, and it's something we all have to deal with.
The Invincibility of the Zen Mode form change is perhaps one of the biggest boons to take advantage of, but it comes at a hefty cost. As I've explained, you will only have access to this form change when you are at 50% HP or less. Also, the Ability is exclusive to Darmanitan after it evolves, so you'll need to reach Level 7 as soon as possible in order to actually attain this power boost. And even when you are in range of activating Zen Mode, the high cooldown of the form change makes it a weighted choice on whether or not to activate the Ability.
To capitalize the most out of the form change, you must take stock of the situation and decide whether the Zen Mode change will improve your position or not. One of these factors would be the enemy's Defense stat versus your Attack stat, and if switching forms would improve your matchup in that regard. Zen Mode doesn't just make you invincible, it also flips the damage spectrum of your attacks, converting your Attack based damage into Sp. Attack based damage. And as a quick little refresher, the conversion is based on damage dealt, not your actual attacking stats, so your Attack boosting items like Razor Claw and Muscle Band will still boost your stats, even while in Zen Mode.
Anyway, some pokemon in Unite have higher Defense than they do Sp. Defense, and vice versa. An opposing Crustle will challenge Darmanitan out of Zen Mode happily, but the matchup becomes much more favorable when you transform and start attacking its more vulnerable Sp. Defense stat. In contrast, opposing Blissey can put themselves between you and your targets and comfortably stomach all of your attacks, and can even nullify your effects with the Hindrance Clearing boon of Safeguard. Of course, when Zen Mode wears off, you'll scramble that egg like an ugly omelette, but you'll have missed out on an important KO if the Blissey was able to save their teammate, putting you in a disadvantageous position.
Don't forget that the Zen Mode form change also nerfs your Movement Speed greatly, cutting it down by 50%. This nerf affects your raw stat, so you can't nullify it with an X Speed or anything like that, but you can buff it with items and Emblems. The Invincibility effect will keep you alive for 10 whole seconds, but you will not outrun the enemy in this form, making the form change suitable only for you to make grand last stands. It's not a matter of if you survive the fight, but that you must, because if you are outnumbered, the enemy will very easily put you down when the form change is reverted.
You might think that you can stall for backup in this form, and it's a feasible option, what with how powerful your moves and hindrances are in this form. However, the Invincibility boon also affects your teammates and how they can support you, because they won't be able to. Darmanitan cannot receive supportive effects from its allies while it's in this form, it cannot even score. That's not a deliberate choice, it's how the game treats the Invincibility buff.
In the game proper, there are two times when you can become Invincible without any auxiliary effects, when you respawn and when you successfully score. You may have noticed that, in both of these moments, any buffs you try to give to allies will fail to follow through. It's because the game grants Invincibility by removing hurtboxes from pokemon that are under the effect of the boon. This removal of hurtbox prevents the pokemon from being attacked, affected by moves, hindrances, it can't be targeted by attacks either. It keeps the pokemon on the field no matter what, but it also means that they cannot be targeted by allies trying to heal and buff them. It can also happen a few times when a Cinderace uses Feint, but that's their prerogative to use a move with such a high cooldown.
Thankfully, self buffing effects still work, which is why the effects of Held Items and Battle Items like Float Stone and X Speed still buff you, but the point I'm trying to make here is that, for the 10 seconds Zen Mode has your form changed, you're on your own. Hopefully you understand the weight of the sacrifice you're making when you activate Zen Mode.
Without Zen Mode off cooldown, Darmanitan is a Speedster that seeks to win the fight, no matter the risk to itself. Its basic attack is a jump attack that creates a wave of fire upon landing. This makes it an ideal attack to use to ambush the enemy team, or to maintain a bead on one individual enemy. Zen Mode also maintains a passive effect of granting your moves Hindrance Resistance in the brief moment they are used, so your offenses cannot be stifled by your enemy's attacks.
This also applies to your regular attacks as well. Hammer Arm starts off with the quake wave from Darmanitan swinging its arms down, but after that, it repeats the attack with each use of the basic attack button. Each attack is protected by Zen Mode, granting each strike Hindrance Resistance in the brief moment it is used. However, Fire Punch is much faster and stronger, as each hit Burns on contact and resets the cooldown of the move, making it easy to use repeatedly. But if you miss, you'll be missing out on a lot of damage potential as the Burn damage-over-time hindrance will wear off before the next Fire Punch attack comes out.
Both Hammer Arm and Fire Punch deal great damage to enemies caught nearby, but they offer little in the way of closing the distance against opposing pokemon. You can remedy this with careful use of Belly Drum and Flare Blitz, but not without significant sacrifice. With Belly Drum, you choose how much HP to give up to receive the Attack and Movement Speed buff, making it much more feasible to chase down and KO enemies. Flare Blitz, on the other hand, is raw speed and power rolled up into one attack. When used off cooldown, it's a powerful attack, but on cooldown, it can be used again and again, as much as you like, so long as you have the HP to spare.
Both of these moves cost HP to be used optimally, which is why I hesitate to say that Darmanitan has movement options available to it like any other Speedster. It CAN get moving, but not without losing a lot of HP in the process. But because you sacrifice so much, you get a whole lot of dividends paid back to you, as long as you invest wisely. Moves that cost HP in Pokemon Unite tend to have a lot to offer because of what they sacrifice, like Talonflame's Brave Bird and Trevenant's Curse, even though I think the design philosophy is a little flawed and could use a bit of rework.
I digress, the point is, because of the blood, sweat, and tears Darmanitan puts into its attacks, they have a lot more oomph to them, which lends to the pokemon's high damage output. Of course, this comes at a cost to longevity, but in tandem with the Zen Mode Ability, this serves to synergize with the pokemon instead of working against it. If a scuffle leaves Darmanitan at less than 50% HP, and you are willing to wait out the lengthy cooldown of the form change, then you should use Zen Mode to change forms to finish the fight. Assuming it's the best possible time and place to use Zen Mode, you'll be able to secure a KO against the most problematic pokemon on the opposing team or you can easily help secure an Objective, like Regieleki or Rayquaza.
To that effect, Zen Mode's form change replaces both of your moves with Fire Blast and Psychic, regardless of which combination you've learned. On that note, there really is only one plan of attack with this form change, and that would be to cover the area with as much volatile damage as possible. Fire Blast launches a wall of fire forward, which Burns and Shoves enemies away. This is useful for displacing the enemy or to prevent them from approaching an Objective. Psychic, on the other hand, targets an area and fills the space with crackling psychic energy, dealing damage continuously to opposing pokemon caught within the area of effect or by the beam that links the designated area to Darmanitan. The psychic attack explodes shortly afterwards, which Stuns enemies for a while, but until that happens, you can keep moving and attacking with your other effects. You can even use Fire Blast to Shove the enemy into this attack, or use your new basic attack to limit the amount of safe space there is for the opposing team.
However you go about it, just remember that this Invincible form change only lasts 10 seconds, and your Movement Speed stat is cut in half during this time. The enemy cannot do anything to you in this form, but they can wait for it to wear off. Since the requirement to activate Zen Mode needs you to be at 50% HP or less, you are prime for pickings, as they say, for an easy KO when the form change reverses. Before Zen Mode wears off, if you're worried about getting KO'd in retaliation, you should use your attacks to try and deal damage to opposing pokemon that threaten you the most outside of the form change. Since your HP is so low, you cannot readily use Belly Drum or Flare Blitz to make some distance, so opposing Attackers and Speedsters are your biggest enemies. Defenders will also be able to muscle through your attacks and walk up to you, ready to use their most debilitating moves to Stun you into submission. Come to think of it, All-Rounders can also finish the job, as many of them can dash around your moves or power through them, like Urshifu or Tyranitar. Heck, I think even Supporters can finish the job if your HP is low enough...
You get what I mean. If you end your form change without a substantial number of KO's, don't expect to return to Home Base in one piece. Yeah, Zen Mode is a great commitment that requires a decent showing to make the most of it, unless you've dealt so much overall damage that the opposing team cannot afford to challenge you without risking themselves. That usually means targeting the opposing Supporters first in a bid to KO them before they can reverse the damage you deal.
The last thing I'm gonna go over is the Unite Move, Pyroclastic Punch, and how its application changes between forms. In its regular form, Darmanitan jumps up and crashes down onto the designated area, dealing damage in a wide radius around itself. In Zen Mode, however, Darmanitan shoots out a large fireball in its stead, dealing damage from safety. Both versions of the moves have their positives, leaning heavily into the HP stat.
When Pyroclastic Punch is used by Darmanitan in its normal form, Darmanitan will have its HP cut down to 50%. This is meant to synergize with Zen Mode and is intended to make it more accessible to the player, even resetting the cooldown of the Ability so that you can change forms right after. However, in this form, Pyroclastic Punch is at its strongest when the move is used while at full HP, as cutting your HP down to half should give you more bang for your buck. The Unite Move takes the lost HP into account and converts it into damage using a high multiplier.
Obviously, if you're already at or below 50% HP, you won't see any damage bonus, since there's nothing to work with, so it's better to instead use Zen Mode to change form and use the other version of Pyroclastic Punch. Although, if the Ability is on cooldown and you need big damage right away, or your life is in danger, it might be acceptable to use the Unite Move to reset the cooldown and use the Invincibility of Zen Mode to save yourself. Mind the high cooldown of the Unite Move, though.
In Zen Mode, the damage multiplier takes into account all the HP you have lost thus far. The multiplier is slightly weaker in this mode, but there is much more potential damage output all things considered. Also, this version is much safer since Darmanitan doesn't jump into the designated area. That said, if you find yourself in prime position to make the biggest ambush play of all time, here's how you would do it. You would need to be running Belly Drum over Flare Blitz, and also have full HP in order to catch the enemy team unawares. All you'd have to do is Belly Drum all the way down to low HP, then use Zen Mode to change form before popping Pyroclastic Punch. This will do massive damage, as Belly Drum is also boosting your Sp. Attack, specifically for big plays like this.
After that, regardless of how it turns out, the duration of the Zen Mode form change will reset, giving you another 10 seconds of Invincibility to do anything you want to do. Well, anything except scoring, or running, or being healed, but other than that, just about anything. Do expect a swift, prejudiced response from the enemy team for all your troubles, especially if this play stole the last hit from Rayquaza or something.
Speedsters are defined by their ability to deal high damage very quickly, and Darmanitan accomplishes this very effectively, even targeting itself, ironically enough. By sacrificing HP, it can deal heavy damage, as no price is too high for victory here. Its ability to turn into the Invincible Zen Mode form is one of its greatest assets in a fight, turning its self-damaging effects from a liability to a powerful gambit. Of course, it needs to be used responsibly, but the player will have more than one opportunity to to get this Burst Damage off.
Whether it gets a KO or not, though, Darmanitan will be at its most vulnerable shortly after getting KO's with its Zen Mode form. Losing HP consistently to your own moves is not the healthiest game plan, and leaving even one opposing pokemon alive and kicking makes you vulnerable to counterattacks, or even to getting KO'd in return. Of course, you have allies that can back you up, and they can keep you safe when the Zen Mode form change wears off, but the enemy team will respawn well before your Ability comes off of cooldown. Even if you play patiently, your Unite Move, Pyroclastic Punch, has one of the longer cooldown timers among all other Unite Moves, meaning you'll only see this explosive attack twice or maybe even three times per round.
There's also the fact that more experienced players can easily defuse your explosive attacks before you can do any real damage. Your attacks are powerful, but they do have weak points to them. While Zen Mode can prevent your moves from being stifled thanks to the automatic Hindrance Resistance they get while being used, it is still possible to Stun Darmanitan with a lucky shot. And with your low defenses, a Stun can last long enough to KO you before you can activate Zen Mode.
Remember what I said about how Darmanitan has limited movement options without sacrificing HP? If you do try and use these moves to increase your battle aptitude, you might get a KO or two, but there isn't any room for error here. Your sacrificed HP better be worth the attempt, as missing your attacks or overextending will just make the enemy team's job easier. By that I mean you'll be contributing to their total KO's without making any meaningful impact on your part.
Darmanitan is not a pokemon for rookies. It requires a fundamental understanding of risk versus reward, sacrifice for susbstance, results over refuge. Perhaps the same can be said for the teachings of zen, as it can be understood, but cannot be achieved by just anyone.
The mind is like a gentle flame. Infinite destructive potential, but can forge and create if controlled. It is the breath of life, of the universe, it is the spark of something that is alive. To command it, all you have to do is temper it.
So warm...
-
And that's Darmanitan for Pokemon Unite! The goal behind this post was to see if we could give a Pokemon an Invincibility gimmick and make it fair, and I like to think that I got close. Of course, the whole losing HP thing had more to do with keeping it flavorful with the Zen Mode Ability rather than making it balanced. Still, I can't imagine Darmanitan in Pokemon Unite without utilizing its Zen Mode form, so I'm happy with the results here.
Anyway, that'll be it from me for now. Sorry this came out late. Have been busy with things in real life. The next post should come out on time though. Here's a hint.

Until next time, see ya.
1 note
·
View note
Text
Spinda for Pokemon Unite!
Season 1
Season 2
Season 3
Prev: Iron Valiant - Primarina - Garganacl - Passimian - Incineroar - Cofagrigus - Glimmora - Galarian Stunfisk - Krookodile - Kricketune - Magearna - Turtonator - Farigiraf
Pokemon is really good at taking an existing animal and combining it with a trait or aspect and taking it up to 11. I'm sure that's how we got Spinda, a red panda pokemon that loves to feel dizzy. These kinds of design philosophy ran rampant all through Gen 3 and persisted since then, and that's what I like about modern Pokemon as a whole.
These silly little guys make a name for themselves by sticking to a gimmick, and I love them for it. But can this gimmick carry Spinda as it stumbles onto Aeos Island? Let's find out.
-
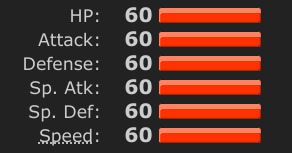
Game Freak is pretty good at making pokemon, but they're also well known for leaving humorous little quirks in the Base Stats of said pokemon. If you were to add up these numbers, they would total 360, which is the total number of degrees a circle has. If you were to rotate yourself 360 degrees, you would make a full spin. Do this multiple times, and you'll feel just as dizzy as Spinda looks.
Funny joke, but Spinda is a horrendous pokemon to battle with, on account of its stats being so low. Good thing Spinda doesn't seem to mind, as it's so busy spinning and stuff, but I'd imagine it could do with a bit of a buff to its stats or something.
Well, in Pokemon Unite, it can pull its weight by helping out its teammates with its dizzying diversions and distractions. As such, I designate Spinda with the role of a...
Supporter
-
Basic Attack - Ranged/Attack
The pokemon launches a dizzying spell at opposing pokemon. Each hit builds up a Dizzy Counter, which is cleared when affected pokemon are hit with a Stun Hindrance. The Stun effect duration is extended for each Dizzy Counter removed.
When the basic attack hits an enemy, a Dizzy Counter is set over the affected opposing pokemon's head. The graphic is a simple spiral pattern with a number next to it. The Dizzy Counter maxes out to 5.
When opposing pokemon with Dizzy Counters receive a Stun Hindrance, the Dizzy Counters are removed and an extra 0.1 second of Stun is added for each Dizzy Counter removed.
The Dizzy Counter lingers for 10 seconds before disappearing without receiving any basic attacks.
Stun is such a controversial effect in Pokemon Unite, because if there are too many of these in one battle, it is possible to be Stun Locked into a KO from a well coordinated team. I mean, the first time it happens, you have to be impressed, but if it's too easy to pull off, you'll suck the fun and joy out of the game.
So let's make it a pseudo-passive for Spinda! How fun!
A Dizzy Counter is added to enemies each time the basic attack hits, maxing out to 5. By itself, it doesn't do anything, but it only kicks in when the victim is hit by a Stun Hindrance. When this happens, the Dizzy Counter is cleared, and the enemy will be Stunned by an additional 0.1 seconds for each mark cleared. When maxed out, it adds 0.5 seconds.
The average Stun duration in Pokemon Unite is about 0.5 seconds to 0.75 seconds. When a full Dizzy Counter is cleared, it ups the duration to about 1 second, which is forever in the fast paced battles of Unite. Utilizing the Dizzy Counter, mild Stun effects become great, and great Stun effects become insufferable. It's almost unfair, really.
However, since Spinda is so, so weak, it gets a pass. It kind of needs it, since Spinda is gravely threatened by just about everything. Hitting a target 5 times with a basic attack is a tall order for this Supporter, so it needs to make itself useful somehow, despite the risks.
As weak as it is, Spinda's greatest strength lies in Pokemon Unite's own polarizing Stun Effects. Did you know that Spinda's whole gimmick, being terminally dizzy, is all a facade?
-
Ability: Own Tempo
When the pokemon receives a Stun Hindrance, the effect is negated and reflected back at all opposing pokemon nearby. The pokemon also ignores Movement Speed reduction effects for 5 seconds. The Ability goes on cooldown afterwards.
The pokemon sways about as it moves and has a set chance of evading Sure-Hit attacks. These odds increase during the use of its Moves.
When Spinda receives a Stun Hindrance, the effect is negated. The negated Hindrance is reflected to all opposing pokemon in a small area around itself, inflicting the same amount of Stun that was negated.
For example, a Stun Hindrance of 0.5 seconds will be negated and reflected to Stun all nearby enemies for 0.5 seconds.
At the same time this Ability activates, Spinda becomes immune to Movement Speed Debuffs for 5 seconds afterwards.
The Ability will only activate when Spinda is hit by a Stun Hindrance and will not prevent its Movement Speed from being debuffed until then.
Own Tempo goes on cooldown for 5 seconds afterwards.
When Spinda walks, it will sway, leaning forward, to the right, backwards, all at random. This is a visual effect.
However, Spinda has a 10% chance to avoid being hit by opposing Sure-Hit moves. This effect applies to all hits of a Sure-Hit Move, such as Inteleon's Liquidation. When using moves, these odds increase to 15%. Unite Moves are unaffected.
The drunken dance Spinda are well known for is mostly an act. It is an evolutionary skill that allows it to easily dodge attacks by deceiving enemies. It's the same philosophy as Drunken Boxing, or Zui Quan, which makes you wonder why Spinda isn't a Fighting Type. I guess it would've been a bit too on the nose.
We're glossing over how the whole 'stupefied stance' Spinda takes on is all an act. This is referenced in its PokeDex entries where the world it perceives is normal, but it clearly looks inebriated. This unpredictable dance helps it evade attacks and allows Spinda to deliver counter punches and kicks when the enemy least expects it. Again, it's all a facade, as Spinda is severely lacking in many areas of strength, so it has to survive using cheap tricks.
If it were to get hit, though, Spinda would be in trouble, as it is very much lacking in Defense and Sp. Defense needed to take more than one attack. In contrast, it is perfectly in tune with its dizzying deception that a stunning hit actually rebounds off of it. This is its Own Tempo Ability, which activates when it receives a Stun Hindrance. When activated, Spinda nullifies the Hindrance received and reflects it back at all opposing pokemon in a small area around itself. The Stun Hindrance reflected back inflicts the same amount of Stun duration Spinda would have received, though it does not reduce damage received.
Two caveats to this Ability; it only affects enemies very close by to Spinda, so Melee attackers have to be wary, but ranged attacks will not be affected by the reflected Stun effect. Also, the Stun reflection effect goes on cooldown for 5 seconds, so Spinda will be vulnerable to another Stun attack for a short while afterwards.
On the upside, the Ability will also prevent your Movement Speed from being reduced for 5 seconds, the same amount of time as the cooldown of the Ability. The idea is that, after you reflect a Stun Hindrance, you move away from the fight to reposition yourself better. Spinda has low HP and defenses, so you should be moving out of the way anyway before the enemy snaps out of it and chases you down.
This Ability is most effective during team fights, where the enemy team is huddled together, especially during hotly contested engagements, such as around Objectives. It goes like this, most ambushes lead with a Stun attack to minimize the response time of the defending team, so if Spinda were to take the initial strike, it will ignore and reflect the Stun, turning around the advantage against the enemy team. Granted, Spinda will need to quickly retreat to avoid the followup strike from the rest of the enemy team, but your allies will greatly appreciate you taking the fall.
One other quirk of Own Tempo is how Spinda sways about as it walks. You'll see it lean forward, back, sideways, and every other way in between. This is to trick the enemy into feigning which direction you'll move to, as its leaning tricks the brain into thinking it will move in that particular direction. The only sure-fire way to landing a clean hit on Spinda is with Sure-Hit attacks, but even that isn't guaranteed, thanks to the other boon of Own Tempo.
Spinda has an innate Evasion chance of 10% when receiving damage from Sure-Hit moves. This Evasion chance applies to all hits in a Sure-Hit attack, such as Inteleon's Liquidation. This doesn't apply to basic attacks or Unite Moves, therefore, moves that buff basic attacks like Decidueye's Razor Leaf or Goodra's Right As Rain Unite Move will still land dead-on, but the fact that this effect is present on Spinda from the start of the game makes it surprisingly effective.
But not too effective, which is why it's only a 10% chance per hit. If Spinda was using a move, the chance bumps up to 15%, which isn't much, but it encourages you to use your moves as effectively as possible, as often as possible.
What kind of moves will Spinda even use in Pokemon Unite anyway? Let's give it a whirl.
-

At the beginning of the game, you can choose between Feint Attack and Hypnosis as your first move. By Level 2, you'll have learned both.
-
Move 1: Feint Attack (Dash)
The user stumbles and trips over itself as it moves forward, bumping and Stunning opposing pokemon along the way. The path the pokemon takes is random. 5.5s cooldown.
Spinda charges forward a short distance when it uses Feint Attack. If it hits an opposing pokemon, they will be Stunned for 0.25 seconds.
The path it takes is random. However, the area Spinda can possibly cover during Feint Attack is limited to a conical area in front of itself.
Spinda will 'trip' and fall at the end of the attack, before getting up immediately afterwards.
When you're committed to the bit as an inebriated animal, you better be ready to do anything to keep up appearances. That includes drunkenly tripping forward and planting your face onto the ground in spectacular fashion. Of course, you don't want to hurt yourself for real, which is what separate the amateurs from the pros, like Spinda here.
Of course, Spinda is a little too good at its dizzy deception, as the path it takes during Feint Attack is random. Neither you nor the enemy will know in what way Spinda will dash forward during Feint Attack, so there's no telling how this move will turn out offensively. If used defensively, it's a bit more valuable, as the enemy cannot guarantee that their skill shot attacks (Moves that have to be aimed as opposed to Sure-hit attacks) will land true during its retreat.
Unfortunately, the Stun effect that triggers from being hit by Feint Attack is one of the weakest in the game, as 0.25 seconds of Stun will hardly stop the enemy from throwing out a move in time. Believe it or not, this is for balancing reasons, as Spinda has a Dizzy Counter tied to its basic attack, which is meant to aggravate Stun Hindrances used by you or an ally. If you can't tell, you'd much prefer to rely on a teammate to trigger the Stun for you, since Spinda needs a full Dizzy Counter to incapacitate the enemy for any meaningful amount of time.
Still, the low cooldown makes it worth the low Hindrance potential. It's not unreasonable to max out the Dizzy Counter by the time Feint Attack comes off of cooldown. Although, that depends on who you're fighting mano a mano, but this is Spinda we're talking about. The number of pokemon in Unite it can reliably take on solo can be counted on one hand.
Well, at least it learns its second move very soon at the start of the game. Supporters tend to get special treatment to accommodate their very low damage potential.
-
Move 2: Hypnosis (Debuff)
The user casts a hypnotic effect around itself, slowing down nearby enemies. Opposing pokemon are more vulnerable to Stun effects while within the area of effect. 8s cooldown.
Spinda will 'spin' and unleash a spiral wave of psychic energy in an area around itself. As the psychic waves swirl, opposing pokemon will have their Movement Speed reduced by 20% and any Stun Hindrances inflicted on opposing pokemon within the area of effect will have their duration increased by 0.2 seconds. This stacks with the additional Stun duration inflicted by the clearing of its Dizzy Counters.
Hypnosis lasts for 4 seconds.
In addition to its dizzy act, don't forget that Spinda is also a pokemon, a Normal Type Pokemon to be specific. Spinda has a plethora of options to defend itself, such as Hypnosis, which it gets early on in life.
When used, Hypnosis casts a hypnotic effect all around itself, weakening nearby enemies. This hypnotic effect is actually active at all times, which is why you get dizzy if you stare at a Spinda in real life for too long. It's also why the move passively exacerbates Stun effects the enemy receives, as the move Hypnosis is amplifying this dizzying power.
The move covers a large area, but it doesn't last long and does little to inhibit the enemy's attack power. It lowers their Movement Speed, yes, but that debuff wears off as soon as the enemy leaves the area of effect. It also has a lot of cooldown, so it does very little in actually protecting Spinda from harm.
Instead, Hypnosis is meant to worsen the Stun effects inflicted by you and your allies. Starting out, you just have the unreliable Feint Attack to hinder the enemy with, but in the beginning of the game, your teammates will have effects like Dwebble's Rock Slide or Squirtle's Skull Bash Stunning the enemy into submission. 0.2 seconds of cooldown is far from the most effective buff to Stun effects, but it stacks with your Dizzy Counter at least, which maxes out to 0.7 seconds of Stun combined.
This does mean you have to be up close to the enemy to entangle them in the area of effect, but this move can be used offensively, in a mean way. The Movement Speed reduction limits the enemy's ability to retreat, but most pokemon aren't threatened by a Spinda by themselves. That's the thing, you're a Supporter, you're never by yourself, at least, you're not supposed to be. Even a mildly underleveled Defender or All-Rounder can be quite threatening if their Stun effects last longer than they're supposed to, which can put them on the fast track to the Respawn Screen.
But as I said, Hypnosis doesn't last long, only lasting 4 seconds, and goes on 10 seconds of cooldown afterwards, so it's a gambit that shouldn't be squandered early on. Also, ranged attackers can simply fight from afar, and it's not safe for you or your ally to commit to a fight if it means leaving the safety of an Ally Goal Zone. In case you haven't noticed, Spinda as a Supporter is rather lacking in the ability to heal, just like Sableye and Psyduck, so it's not safe for you and your teammate to go diving, if you know what I mean.
Thankfully, Spinda doesn't have an evolution (yet) so it has an easier time Leveling Up to evolve its Moves instead of itself.
-
At Level 5, Feint Attack becomes either Dizzy Punch or Sucker Punch.
-
Move 1a: Dizzy Punch (Ranged)
The user launches a punch made of concentrated dizzying energy, Stunning and damaging multiple enemies as it passes through them. Opposing pokemon will be Stunned for a random amount of time. 6s cooldown
At Level 10 Dizzy Punch becomes Dizzy Punch+.
Dizzy Punch will not clear Dizzy Marks from opposing pokemon.
Dizzy Punch launches a fist shaped projectile forward. The projectile damages and passes through multiple enemies. The projectile doesn't travel very far.
Opposing pokemon will be Stunned for a random amount of time, anywhere between 0.15 seconds to 0.50 seconds.
Dizzy Punch+ will trigger the extra Stun effect from clearing Dizzy Marks made with your basic attack, but will not clear them. This allows the Dizzy Counter to affect another Stun Hindrance afflicted later on.
So, fun fact, I originally started this post with Spinda as a physical Supporter. It was meant to synergize with its close range effects like Hypnosis and its Ability, but the idea of a frail, physical pokemon that was supposed to help the team by hindering the enemy up close was a bad, bad idea, I realized. Dizzy Punch was also a physical Dash move, which would've made Spinda even worse than before. Don't worry, I snapped out of it, something must've scrambled my senses back then. I wonder what...
Anyway, turning Dizzy Punch into a safe projectile was a no-brainer, as it allowed Spinda the Ability to Stun the enemy from afar. Compared to other long range Stun attacks like Gardevoir's Moonblast, Dizzy Punch has shallow range and is rather weak, and it doesn't even Stun for all that long. Again, Spinda as a Supporter relies on its Ability to distract the enemy with its bonus Stun effects, so Spinda's own Ability to hinder the enemy has to be muted a bit in order to make it fair.
To remedy this, Dizzy Punch randomizes the amount of Stun it can inflict on the enemy. It can hinder them for as little as 0.15 seconds or as much as half a second. Since Dizzy Punch can pass through multiple enemies, there's a good chance someone will be stuck in place for a while. Of course, if you're fending for yourself against multiple enemies, something has gone terribly wrong. See you back at Home Base, Spinda.
The random Stun effect can be annoying to deal with, but it's also annoying to reliably use. That's why it has low cooldown, but it also doesn't have a lot of range, to make things fair for the enemy team. Any meaningful amount of Hindrance inflicted on the enemy will come from the Dizzy Counter being cleared by Dizzy Punch. Remember, it adds an extra 0.1 seconds of Stun when triggered, so a maxed out Dizzy Counter being cleared by Dizzy Punch will Stun the enemy for a minimum of 0.65 seconds. But if you're really lucky, it'll be extended to as much as 1 second, which is forever in the fast paced battles of Pokemon Unite.
Most of the time, though, the Dizzy Counter will be cleared by an ally, but if you're really good at Kiting and surviving, you'll benefit a lot from the upgrade. Dizzy Punch+ will not clear the Dizzy Counters from afflicted enemies, but it will still add extra Stun time from each activation. This means you can start the battle with Dizzy Punch+ against an enemy with 1 or so Dizzy Counters, then hit them once more with an easy maxed out Dizzy Counters to Stun the enemy in place.
Of course, this means you'll have to survive the cooldown timer in between each use, but clever application of Battle Items have led frailer Supporters like Comfey and Sableye to victory before. I'm sure you can manage.
If you're not that good at dodging attacks, then maybe you should go with the buff that does the dodging for you.
-
Move 1b: Sucker Punch (Buff/Dash)
The pokemon enters a stupefied trance in which it sways more than usual as it walks. This swaying increases the pokemon's Evasion for a while. The move can be used again to send the user charging forward, Stunning opposing pokemon on hit. 7.5s cooldown.
At Level 10, Sucker Punch becomes Sucker Punch+.
Further increases the pokemon's Evasion.
Sucker Punch increases your Evasion from 0% to 15% for 5 seconds. This is in addition to the Evasion boost of Own Tempo potentially dodging Sure-Hit attacks.
During the buff, Sucker Punch can be used again to send Spinda charging forward in the designated direction to attack. It is completely Invulnerable during this brief dash attack and will Stun enemies for 0.5 seconds. The Buff persists afterwards.
Sucker Punch+ increases the Evasion buff to 20%.
Hey so, fun fact, the move Sucker Punch is not a direct translation from what the move is called in Japan. It's closer to the term 'Cheap Shot' which is why it isn't classified as a Punch move for Iron Fist. It's also why so many pokemon can learn the move, despite many of them lacking arms or fists to use Sucker Punch.
Because of Spinda's fumbling facade, it is an expert at dishing out surprise attacks when the enemy least expects it. Of course, it's not the most honorable attack, which makes sense as to why Spinda learns Sucker Punch. However, no pokemon in Unite will use the same move the same way. In Spinda's case, it operates more as a Buff to its evasive endeavors.
Remember that Spinda has an innate Evasion boost against Sure-Hit attacks, thanks to its Ability Own Tempo. As for regular attacks, you're supposed to swerve and dodge them, as Spinda has a tendency to sway about in whatever way it pleases, which will throw off the aim of the enemy team. However, some attacks are too big to dodge, like Duraludon's Dragon Pulse or Venusaur's Petal Dance, and these big attacks, literally and metaphorically, can be too much for Spinda to handle as a glancing blow.
As such, Spinda has to rely on fighting dirty to try and outlast the enemy, and it's not above dubious dancing just to survive. Sucker Punch increases Spinda's base Evasion from 0% to 15%, and this applies to all attacks received, not just Sure-Hit Moves. Actually, the Evasion buff stacks with the evasion boon of Own Tempo, turning the already shaky accuracy of Sure-Hit moves from 10% to 25%. And remember, the Evasion boost increases by another 5% when Spinda is holding a move ready to use, including the Dash attack part of Sucker Punch.
During the buff, you can use Sucker Punch a second time to send Spinda dashing forward. This dash attack makes Spinda completely invincible during the attack, and will Stun enemies for 0.5 seconds. If you clear a Dizzy Counter, you'll add more Stun time to the enemy, resulting in a max potential Stun time of 1 second. The Evasion boost persists afterwards, so you will receive the full benefit of Sucker Punch whether you attack early or late into the buff. This is a deliberate choice, as Spinda would be needlessly condemning itself to the retaliatory attacks of the enemy team without the Sucker Punch boost.
It's basically Shadow Sneak Sableye, but without the invisibility buff.
Sucker Punch is a risky gamble for Spinda as it offers a great Evasion boost over Dizzy Punch, but the issue is that it's not a guarantee you'll avoid every hit. Dizzy Punch offers safety, but it isn't consistent with how often it'll Stun the enemy, but at least it has low cooldown. In contrast, Sucker Punch lets Spinda be a bit more bold in charging in to distract the enemy, but you're putting a lot of faith into chance, gambling on Sucker Punch to evade damage for you. The move only buffs Evasion, so any funny feints will have to be made on your part.
Speaking of funny, Hypnosis is a great move to disorient multiple enemies at once, but it offers little defensive utility for you, only exacerbating the Stun effects you inflict on the enemy. It's good that it persists during Dizzy Punch or Sucker Punch, synergizing with either chosen move, but its high cooldown, low duration, and shallow area of effect holds it back for the most part.
You must master true dizziness. Don't just make the enemies experience vertigo, become vertigo itself.
-
At Level 7, Hypnosis becomes either Teeter Dance or Psych Up.
-
Move 2a: Teeter Dance (Buff/Debuff)
The user performs a rhythmic dance that causes all other opposing pokemon to feel dizzy and slow down. Opposing pokemon are more vulnerable to Stun effects whereas your allies are more resilient to Stun effects while within the area of effect. 8.5s cooldown.
At Level 12, Teeter Dance becomes Teeter Dance+.
Expands the area of effect.
Teeter Dance creates a large zone with a swirling spiral visible while Spinda 'shuffles' and dances. Within the area of effect, allies will receive 0.25 less seconds of Stun whereas opposing pokemon will gain 0.25 seconds from Stun Hindrances received.
If an ally would receive a total of 0 seconds of Stun from Teeter Dance, the effect is negated.
Teeter Dance will also lower the Movement Speed of opposing pokemon by 25%. Teeter Dance lasts for 5 seconds.
Teeter Dance+ expands the area of effect by 30%.
Teeter Dance is kind of a special move, when you think about it. Status inducing moves aren't uncommon, but Teeter Dance is unique in that it inflicts all pokemon in a given area with the Confusion Status effect. As far as I can tell, it's one of the few moves that can inflict multiple enemies at once with Status.
Well, Spinda has lived its whole life in confusion, so it's very well versed in its ability to distribute vertigo to pokemon around itself. In fact, it's so good at this, it can actually guard its allies against the effects of incapacitation caused by Stun Hindrances. Moreso, Spinda can exacerbate the effects of Stun against opposing pokemon caught within Teeter Dance. All of this, just with a groovy dance. Right on, you funky little red panda.
Breaking it down, Spinda's Teeter Dance reduces the duration of Stun inflicted on allies by 0.25 seconds. If this reduction would total 0 seconds, the hindrance is effectively negated. In contrast, enemies will take an extra 0.25 seconds of Stun if afflicted while within Teeter Dance. It's actually a 0.05 second buff over Hypnosis, so it's not by much, but the defensive utility provided to allies is worth the effort.
It also reduces the Movement Speed of opposing pokemon, just like Hypnosis, though it's hardly that much stronger. Still, the application is the same, slow down the enemy while you're increasing their vulnerability to Stun effects. If you partner up with a reliable All-Rounder or Defender, you can increase their effectiveness by making them more resilient to Stun. It's not an immunity effect, like what you would have with Blissey's Safeguard, but Teeter Dance covers a wide area, giving you enough space to defend multiple allies while also entangling multiple enemies, all at the same time.
So yeah, Teeter Dance covers a wide area, and it's even wider when it upgrades to Teeter Dance+, but the thing about tricking the eye is how it draws the gaze to the center, where Spinda happens to be. I mean to say that Spinda will most likely be targeted by the enemy since it is always at the center of Teeter Dance for as long as it is active. The enemy will certainly be motivated to take it out if Spinda has allies nearby that are good at inflicting Stun, reliably at that. Sure, Spinda can take cover behind its allies, but again, Teeter Dance offers no protection to Spinda itself, so a lucky hit can put the dizzy bear in critical condition if it's not careful.
Spinda wears itself thin trying to protect multiple allies from Stun effects, but the sheer size of Teeter Dance makes it a valuable asset to the team. That said, not every engagement will require a full scale protection effort from Spinda. Depending on how the opposing team is laid out, it might be better to focus your defensive efforts on buffing a single ally and protecting them with your other move.
You know, psyche them up.
-
Move 2b: Psych Up (Buff)
The user links with ally Pokemon, sharing with them its Own Tempo Ability. The user also buffs the linked Ally's stats with some of its own. 7s cooldown.
At Level 12, Psych Up becomes Psych Up+.
Further buffs linked allies.
Psych Up links Spinda to an ally and shares with it the boons of its Own Tempo Ability for 6.5 seconds. Specifically, allies will negate and reflect Stun Hindrances received and become immune to Movement Speed debuffs for a while afterwards.
Additionally, Psych Up buffs an ally's stats by using a set percentage of Spinda's own stats. Psych Up will buff an ally by increasing their Defense and Sp. Defense equal to 30% of Spinda's own Defense and Sp. Defense stat, respectively. 30% of Spinda's Attack stat increases the linked ally's damage dealt. Psych Up+ increases the buff percentage by 50% instead.
The buff given to allies can be increased in battle using Held Items, Emblems, and Level Up stat boosts.
Remember what I said about Spinda being able to manipulate vertigo and create feelings of dizziness in the enemy? Well, it turns out that Spinda can do this in reverse. It does this a little bit when using Teeter Dance as well as to protect itself using its Own Tempo Ability. Through the move Psych Up, Spinda can also impart this dizzy protection effect onto an ally, plus a little extra.
When Psych Up is used, it links an ally to Spinda's sense of vertigo, of which it has none, which makes the ally immune to Stun effects for a while. Actually, the ally will basically gain the Own Tempo Ability, which includes the ability to negate Stun Hindrances and then reflect them back at all nearby opposing pokemon. It even includes the Movement Speed debuff immunity for 5 seconds afterwards.
It does not, however, share the swaying effect of Own Tempo, that's all on Spinda. The ally will be just as susceptible to getting hit by Sure-Hit attacks just like everyone else. Well, except for Spinda, but that's a quirk of the pokemon more than anything.
To make up for that, Spinda will also share some of its stats with the linked ally as well. It will give them a percentage of its defenses and add them to the ally, and take some of its Attack power and convert it into a damage boost for their attacks. Unfortunately, Spinda's own stats are pathetically low, so the resulting buffs are rather moderate. Psych Up does use the active stats to buff an ally, meaning that Held Items, Emblem Loadouts, and even your Level will increase the static boosts granted to the ally.
Compared to Teeter Dance, Psych Up better supports a single ally than a whole squad of teammates. The range and potential of Teeter Dance to help out the whole team may be more worthwhile, depending on your coordination, but Psych Up puts a lot of faith into one ally. It's best used to power up a pokemon with the ability to self-sustain, like Buzzwole or Ceruledge, especially since these pokemon would appreciate having consistent ways to negate and reflect hindrances.
This does put a massive target on your back, though, especially since Psych Up requires a constant link to boost your friends, in the same way Mr. Mime's Power Swap tethers it to other pokemon. Spinda has to be close by to constantly use Psych Up, since the duration of the move is almost as long as the cooldown, so there's incentive to stay close by. And while the boosts are worthwhile, they are based on Spinda's own stats, which are very poor, no matter how much you boost them. You would be depending on the linked ally to save and defend you while you're making progress, breaking Goal Zones and such. However, your ally is only as strong as you are healthy, so a coordinated ambush with you as the target will leave your teammate worse for wear if they succeed.
If the enemy is too well coordinated, you won't even get the chance to link up to an ally. If only there was some way to scramble the enemy in this scenario.
-
Unite Move: Dizzying Dilly-Dallying (Hindrance)
The user will charge forward in a random path, damaging and rushing through any opposing pokemon. Opposing pokemon damaged by this Unite Move will have their controls scrambled for a short while. 95s cooldown.
Spinda will rush forward in a random path in a set conical area in front of itself. It will pass through walls while dashing and is Immune to Hindrances during the Unite Move.
Any opposing pokemon hit will have their controls randomized for a while.
To be more specific, since the Control Stick and Movement tied to it are Directional as opposed to Analog, it's more like the directional wheel is spun, warping the cardinal directions of movement, like an askew compass on a map. Getting technical, this means Left can become Up and Left can become Down, since that is the cardinal directions being rotated back and forth. However, Left can never be Up while Right is Left. This is because this effect will influence all directions of movement in between. It's better to imagine turning a steering wheel, and thus the orientation of all directions turning with it.
This scrambling effect is called Disorientated and lingers for 10 seconds. It can be cured by Hindrance Clearing Effects.
You ever have that fumbling moment where you trip over yourself and you try to straighten yourself out before you eat the floor? You try and you try, but you just keep stumbling and tumbling, stepping all over yourself to try to right yourself before you fall down, if you don't crash into a wall first. Well, Spinda doesn't experience vertigo like we do, but that's because its sense of stability is mildly scrambled thanks to its dizzy nature. As such, it can infect others with an extremely nauseating case of the fumbles with its Unite Move, Dizzying Dilly-Dallying.
The direction Spinda travels during its Unite Move is random, just like its Feint Attack move. However, the Unite Move covers a greater potential distance and does more than just Stun enemies. It will also scramble their movement, turning left into right and up into down. This is classified as a new Status Effect called Disorientated, where it modifies the direction afflicted pokemon can move.
However, as it is a Status Effect, that means it can be cleared by curing effects like Full Heal, or blocked by Hindrance Protection, like Blissey's Safeguard. That may invalidate this Unite Move as a whole, but Spinda's moveset here is full of Stun and Stun amplifying effects, so opposing pokemon will most likely exhaust their Hindrance blocking methods by the time Dizzying Dilly-Dallying is used. As for the pokemon that can use Hindrance Protection, well, your allies can and should take them out before you use your Unite Move anyway.
The Status Effect, Disorientated, lasts for a whole 10 seconds, which is enough time for you and your allies to take advantage of their confusion. However, it is also enough time for the enemy to acclimate to the new controls, especially since there is a limited number of possible control schemes that Disorientated can scramble them too. Not only that, Disorientated has no effect on Aim Controls, so move aiming will remain unchanged for the most part.
It's rather easy to play around Dizzying Dilly-Dallying, especially since it's not guaranteed to hit all opposing pokemon at once with the charge. The big upside to this is how short the cooldown is compared to other Unite Moves. With enough Unite Move Charge Reduction effects, you'll get access to this scrambling effect every other minute, which is a lot of dilly-dallying. Also, Spinda moves very fast while attacking, it is Immune to Hindrances while doing so, and can run through walls like most other Dash Moves. Basically, almost nothing can stop Spinda when it does its dizzying dash dance, and it's dangerous to try, as being close to Spinda guarantees that you'll be run through with Dizzying Dilly-Dallying.
What a perplexing performance.
-
Achievements
By having your Dizzy Counters cleared, extend the duration of Stun effects by a total of 7.5 seconds in one battle.
To recap, Spinda has a pseudo passive ability in its basic attacks where it applies a Dizzy Counter with each hit. As each basic attack deals damage, a Dizzy Counter is applied, which maxes out to 5. The Dizzy Counter clears when the afflicted pokemon receives a Stun Hindrance from you or an ally. Each Dizzy Counter removed adds 0.1 seconds of Stun to Stun Hindrances inflicted on the target, which can max out to 0.5 seconds.
As such, the math reads that you'll need your Dizzy Counter maxed out and cleared 15 times in total in one match, or a grand total of 75 Dizzy Counters cleared overall. In order to earn this Achievement, you must be contributing to battle often with your basic attack, as well as your other moves when applicable. That's easy, for the most part, but Spinda is far from the strongest Supporter, and trying to earn this Achievement all by yourself is rather torturous, admittedly.
That's why you are best equipped to earn this Achievement by supporting an ally. Spinda has plenty of ways to inflict Stun, but they're very muted, mostly in part due to how effective its Dizzy Counters are. Stun effects used by other pokemon are much stronger, and they can be amplified by taking advantage of your Dizzy Counter, but only if you fight with them.
There are actually very few pokemon in the game without a Stun effect, like Sylveon and Glaceon, and for these cases, you will have to inflict the Stun hindrances yourself when an opening presents itself. But for the most part, you'll be giving the ally backup while you cover for them with Dizzy Punch and Teeter Dance and such. Do this often enough and you'll have earned this Achievement in no time.
You think the Stun Hindrances are your ally, but you merely adopted the dizzy effects. Spinda was born in it, molded by it. Spinda had not experienced true clarity until it had reached Aeos Island, and by then, it was nauseating.
...I don't really watch movies, in case you're wondering.
-
Holowear
With how much swaying Spinda does, you'd think the tailors would have a hard time getting the measurements right for its holowear. Well, yeah, Spinda has a hard time sitting still, but we were able to get our numbers thanks to a neat little trick called, inhale, waiting for it to fall asleep. That, and the PokeDex gave us its measurements easily. At least it's good for something.
Starting things off, Ribbon Style Holowear covers Spinda in a swirling spiral of glittering ribbon, from ears to toe. Then, there's Relaxed Style Holowear, giving Spinda a loosely buttoned work shirt, a work tie hanging off its head and leaning to the side, and a pair of shorts tied up with a belt. Festival Style Holowear gives it a casual kimono, a stick of cotton candy in one hand, and a swirly lollipop in the other, since Spinda doesn't fight with its fists in Unite. Ballerina Style Holowear gives it a tutu and frilly skirt and a pair of ballerina slippers. Finally, Lucky Style Holowear gives it a dress coat with the face of a slot machine on the front, a roulette style hat sitting on its head with the ear poking through the center, and a Joker Card pinned on the other ear.
The Joker Card in question being a picture of Spinda's face.
-
Strategy
Before we begin going over how best to utilize Spinda and its disruptive efforts, you must keep in mind that Spinda is an extremely weak pokemon with very poor stats. That's why it is relegated to the role of a Supporter, as it's too weak to be an Attacker, too frail to be a Defender, too slow to be a Speedster, and too niche to be an All-Rounder.
It is a gimmick pokemon, and it is a pokemon that embraces its gimmick strongly. To that end, Spinda is designed as a Supporter to help the team with its Stun effects as well as the ability to amplify Stun effects through its basic attack. To recap, each hit of the basic attack adds a Dizzy Counter, which is cleared when the enemy receives Stun, and the Dizzy Counter adds a bit of Stun time for each one removed. Spinda or an ally can trigger the removal of Dizzy Counters by inflicting Stun. In contrast, Spinda can weaken or nullify Stun effects received from the opposing team through its Own Tempo Ability, as well as through Teeter Dance or Psych Up.
Spinda is a very weak pokemon that utilizes the most powerful Hindrance effect in the game, so playing as Spinda effectively requires the player to play the most dangerous game of ding dong ditch. The ideal plan of attack would be for Spinda to add Dizzy Counters to the enemy by attacking with its basic attack, Stunning the enemy when the opportunity presents itself with Dizzy Punch or Sucker Punch, all the while protecting allies with either Teeter Dance or Sucker Punch. It's rather straightforward, but longevity is the issue, as Spinda is very easy to take down.
By itself, Spinda can only use its Stun effects defensively, as it cannot deal enough damage by itself to KO even the weakest pokemon, like Comfey. If Spinda is all alone after losing its allies, it cannot hope to defend a Goal Zone or secure an Objective, so the only play you can make is to retreat. Even so, opposing Speedsters and fleet-footed Attackers can easily bypass your desperate efforts to escape. Some might even be bold enough to target you during team fights, so it's best to steer clear and stay alert when they're in the area.
Spinda is most dangerous when it is supporting a powerful ally as well as when it is being supported by said ally. Your teammates will appreciate your stunning display of talents, but you can only do so much while not in danger of being KO'd. It's a two way street with Spinda, as both you and your teammates can achieve great things, but only if you keep each other alive. And given how annoying Stun can be, your opponents will want to expunge Spinda from the battlefield as soon as it is spotted.
That's the hard knock life of a Supporter, as it makes good pokemon great, but it also makes great pokemon even greater. They're supposed to struggle when they're forced to fight by themselves, which is the tradeoff for the boons and utility they provide for their team. If you play a Supporter, you're in for a rough time, as a poorly coordinated team can and will render your supportive efforts for naught. But hey, that's what you've signed up for, right?
Thankfully, Spinda has a few tricks to help it out of sticky situations. I've already mentioned the Dizzy Counter and how it extends Stun effects on afflicted opposing pokemon, but I've glossed over how it activates on all Stun effects inflicted, even the ones reflected through Own Tempo. As weak as Spinda is, it can cheat death with a decently sized shield. And with a shield equipped, it becomes the enemy of Stun attackers, as its Own Tempo Ability can negate any Stun Hindrance inflicted on it and then reflect it back at all enemies nearby.
There's a reason why Spinda has weak Stun effects, two reasons, actually. For one, its ability to extend Stun duration through its basic attack would make it unfair for the enemy to try and muscle through its attacks otherwise, even if it were to clear one Dizzy Counter each hit. Secondly, it doesn't need powerful Stun effects if it can just stomach an attack and reflect the Hindrance back at the attacker. Even so, both of these effects come with stipulations so that Spinda cannot easily Stun the enemy into submission, with the first being that it requires Spinda to fight, putting itself at risk, and with the other reason being that it has to survive a hit in order to reflect the Hindrance back, further risking itself.
Its Own Tempo Ability doesn't make Spinda invincible, though it tries its darnedest. After reflecting a Stun Hindrance, you have 5 seconds to make some space between you and the attacker, as the Ability is on cooldown and you can actually be Stunned during this time. On the upside, you have a Movement Speed Debuff immunity, so you cannot be slowed down while escaping. Not only that, the swaying shuffle Spinda performs makes it very difficult for enemies to accurately aim at you with their skill shots, or attacks that have to be aimed. Normally, Sure-Hit attacks would bypass this issue, but Spinda has an Evasion buff against such attacks, which activates against each individual hit of a move. Well, except for Unite Moves...
This evasive maneuvering can be improved with Sucker Punch, which increases your Evasion and stacks with Own Tempo. The Evasion Boost doesn't guarantee that you'll dodge every attack, but for a frail pokemon like Spinda, it needs every edge against the opponent it can get. The tricky Dash attack you can use is a plus, and the Evasion boost persists afterwards, but try not to overextend yourself and avoid diving towards the enemy just as the boost runs out.
The alternative to Sucker Punch is Dizzy Punch, a much safer projectile attack for Spinda, but not as reliable. I say not as reliable in the sense that the duration of Stun it can inflict is random, and it is also shallow in range. But for what it's worth, it has low cooldown and combos with your Dizzy Counter, and can also Stun multiple enemies at once, if you're lucky. Ideally, you'll be launching Dizzy Punch while tucked safely behind an ally's frontal assault, supporting them as you go.
The shallow range of Dizzy Punch, along with the Evasion boost of Sucker Punch, make both Moves a solid combo with Teeter Dance, which creates a dizzying zone where your allies are more resilient to Stun effects, but your opponents are more vulnerable to them. Because it is an area effect that follows Spinda, it has the greatest influence on the battlefield when active, greatly amplifying the impact it has on opposing pokemon regarding Stun. To clarify, your allies receive less Stun from Stun attacks and your enemies will receive longer Stun effects. This stacks with your Dizzy Counter as well as your Own Tempo Ability, though chances are your teammates have stronger, better, safer Stun effects they can use to spread within Teeter Dance, like Pikachu's Thunderbolt or Blastoise's Hydro Pump. Your teammates will also appreciate not being Stunned into oblivion with the improved Stun resistance provided by Teeter Dance.
Resistance, not immunity, that's a very important distinction. A well timed Stun can cancel attacks if the enemy is persistent, or lucky, enough. Own Tempo is what provides Spinda Stun immunity, which it can share with an ally through Psych Up, but only to one teammate at a time. Whoever you link up with through Psych Up better be worth the effort, as Spinda has to remain close to them to maintain the Psych Up link.
The move also boosts their stats, though instead of a flat percentage, how much you power up the ally depends on how well trained your stats are. Since these raw numbers are typically much higher than what other buffs may provide, the boost is far greater, at least they would be, if it weren't for Spinda's low base stats. You can at least improve these stats with Items and Emblems, even Leveling up will passively boost the Psych Up buff. Compared to Teeter Dance, the coverage is considerably worse, but the tradeoff is a way better buff to one ally.
Neither move will increase Spinda's survivability, but both attacks require allies nearby to take advantage of the buffs you can offer. With Psych Up, you can greatly buff an ally, but it's not unreasonable for them to be focused down with a concentrated attack from the enemy team, leaving you defenseless. That said, Teeter Dance isn't much better, as the effect is highly visible and highlights Spinda in the center, like a ringed target.
Any close calls and lucky breaks will have to come from the player and their clever use of moves and Stun effects, and Spinda has all that it needs to make these plays. Unfortunately, that kit doesn't include a high HP stat, or much defenses, or a lot of attack power with its moves, so your contributions to the team will come from you inhibiting the enemy while also enabling your allies. In a sense, your job is the same as a Speedster, as you have to single out problematic enemies with your attacks during teamfights, and do it quickly, before the enemy lets loose their tricks and traps to hinder your allies.
One of the most effective ways to do that is with your Unite Move, Dizzying Dilly-Dallying. Now, the path Spinda takes during its Unite Move is random, but it covers a wide potential area and Spinda cannot be stopped by walls or Hindrances while dashing. Whoever you hit will be incapacitated for a bit and get their controls scrambled, which lasts for quite a while. The Unite Move also has very low cooldown, which makes it easy to use over and over again during a match. The problem is that the Status Effect the Unite Move inflicts, called Disorientated, is easy to work around, as it can be cured by any Hindrance clearing effect, and the scrambling effect doesn't affect Aiming Controls, meaning move use is unimpeded for the most part.
This ends up working to your advantage for the most part, as Spinda's Stun effects forces frequent use of Hindrance clearing effects. Basically, Full Heal is not reliable to use to muscle through Spinda's Stun effects since Spinda can constantly apply Stun through either Dizzy Punch or Sucker Punch. By the time your Unite Move comes online, Full Heal will most likely be on cooldown. Other Hindrance clearing effects are constrained, like how Blissey can only protect one ally at a time with Safeguard, and moves that power through Hindrances typically have longer cooldown than Spinda's moves. Of course, you don't want to be on the receiving end of said moves as a Spinda, but if you're good at baiting these attacks away from the team, you'll be a more valuable teammate that way.
One last thing I gotta talk about is the 'swaying' effect of Spinda's walking. Like it says, Spinda sways in random directions as it moves, which causes it to lean in particular directions. This swaying tricks the enemy into thinking you are moving in that direction, when in actuality you cannot control this swaying effect. This makes it harder for the enemy to hit you dead on with their attacks, which forces the enemy to rely on their Sure-Hit attacks to secure the hit. But as I've mentioned before, Spinda has an Evasion buffer against Sure-Hit moves, being able to potentially dodge these attacks. This Evasion buffer increases while you're preparing an attack, and increases even more during Sucker Punch.
It's a cheap trick, but a necessary one for Spinda, as any stray strong hit will have a good chance to put it down. Of course, you can't rely on the swaying swagger to do all the dodging for you. You have to lean into it, figuratively and literally, or else you'll become too predictable. And a predictable Spinda is a dead Spinda.
You spin me right 'round, baby. Right 'round. Like a record, baby.
-
And that's Spinda for Pokemon Unite! The potential for any pokemon, no matter how weak they are, to work in Pokemon Unite is one of my favorite things about writing these posts. It's much more inclusive and helps the game reach a wider audience by eventually including someone's favorite pokemon. That's what unites us, ironically enough.
Anyway, sorry for the late post. Last week was Easter, and while I could have had this post finished by then, I was really busy that day. I ended up getting sick the day after, and by the time I recovered, the post would have been finished and released on a Wednesday or later. I figured it would've been much better to wait until the next Sunday to post this, which gives me a bit more time to work on the next post.
Speaking of which, here's a hint for the next pokemon.

Until next time, see ya.
0 notes
Note
thanks for writing age indifference. the worst shit i ever did in my life was try to recreate that high i got from reading that fic before i finished watching the show but it made me believe i was doing something right for a short while. made maybe 50 bad ripoffs of it which id be honored if any of them managed to connect with others who felt how i did when i found that story.
seriously, i became active here because i wanted to try to whiteknight for that pairing a whole decade late. it got me back into reading serious novels when it couldnt work for me in high school even for assignments. some people here i was glad to have around id never meet if it hadnt gotten me back into fandom for a short time. if i wanted to remember a good thing (lol) i encountered in my life in the past couple years, that fic is one thing. against all better judgment, theyre still my favorite people in fiction together
thank you genuinely and im sorry this ask isnt about pokemon.
First of all, I want to apologize for the delayed response. I needed some time to formulate a response to your ask.
I'll start by saying thank you for the kind words. If there's any one thing all writers ask for, it's to change people with their words. I've written fanfiction for nearly all of my teenage years, and I'll also concede to the sentiment that my stories got me in touch with people and friends that have also changed my life, for better or worse.
I'll admit, back when I was actively writing and posting, nothing was more motivating than reading the reviews of my peers. It genuinely spurred me to continue writing and improve myself. Age Indifference is the culmination of this drive and experience of mine, so I'm extremely grateful that you feel so strongly for the fic.
I do understand your dilemma, and I must confer onto you one piece of advice. It's something I've told you before, and something I've told thousands of others as well.
Keep writing.
Humanity improves upon itself by sharing its feelings and ideas with one another, whether that be good opinions or bad takes. A clash of ideas begets knowledge and change, but that can only happen when we speak our minds and share our thoughts with one another. For many, the ability to convey thoughts is difficult, especially for neurodivergent people like me. This is why I thrive on internet space, where I am allowed time and space to express myself with other people. In real life, I keep to myself, but I am at odds with my own brain, also veering into new thoughts and ideas.
But I relish it.
I am host to a hive of stories and ideas that I must share with others, but I am limited by the time allotted to me in a given day, as well as the speed of my hands and fingers. The same brain that plagues me with ideas also haunts me with distracting thoughts and urges, so I am held back in that regard.
However, there are other people out there that do not have the same problems as me. They just need the drive to get started perfecting their craft. That is why I end many of my old stories and posts with the term 'Keep writing', as a way to motivate the reader into response and communication with me through their comments and reviews.
But it's also a command to myself.
I cannot go a day without expressing myself, but past experiences and trauma limit my opportunities in real life. I am not in the most amicable position to tell my stories to a wider audience, but that doesn't mean I will give up. One day, I will come across an opportunity to tell the greatest story never told, and I must be ready for it. It's not too late for me, and it certainly isn't too late for you.
I cannot go into much detail regarding the fanfic you are referring to in the Ask, as I will be making this reply public, if you don't mind. That said, you are welcome to continue sending me Asks about the fanfic, and I will oblige with what I can. I can also live chat with you, but I much prefer sending and receiving Asks.
As for the whole 'pokemon' stuff, don't sweat it. I'm a writer first, a fan second. I'm always willing to talk to others about fanfiction and writing in general. It's just what I'm most obsessed with at the moment, as I have to share these Pokemon Unite ideas I have with everyone, as I've explained before.
I have one more piece of advice. I maintain the quality of writing in my Pokemon Unite posts, despite the extremely low engagement here on Tumblr. Granted, I would like to have more Likes on these posts, but I cannot control what fandoms Tumblr obsesses over.
You might think it's disheartening for me, and yeah, it kind of is, but at the end of the day, I don't care who reads it or if anyone reads it at all. I write my Pokemon Unite posts for myself. If someone reads it, then I will have achieved more than enough. If no one reads it, then it doesn't matter what I write, does it? I operate under a specific subset of nihilism where my freedom of expression makes me free and happy, and I am perfectly content to put my thoughts out into the world, whether someone reads it now, or in the future, or never at all. All that matters is that I did.
Keep writing.
2 notes
·
View notes
Text
Farigiraf for Pokemon Unite!

Season 1
Season 2
Season 3
Prev: Iron Valiant - Primarina - Garganacl - Passimian - Incineroar - Cofagrigus - Glimmora - Galarian Stunfisk - Krookodile - Kricketune - Magearna - Turtonator
Of all the pokemon in Gen 2 to get a new evolution, I certainly wasn't expecting Girafarig to get one in Scarlet/Violet. But then again, if the games really needed a true giraffe pokemon, it was better to evolve the one we already had than make a new one. For what we got, I'd say it's a great improvement, as the one note tail head gimmick evolved along with the pokemon, turning around the phrase 'two heads are better than one'.
Well, as it turns out, one head is better than two, especially when their brains have linked together to enhance its psychic powers. Let's see if that psychic power is enough to overcome the challenges of Aeos Island.
-
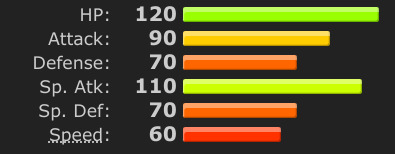
For a double-headed giraffe, the stats are rather oddly placed. High HP may make it seem bulky, but its poor defenses of base 70 make it frailer than it seems. Still, high Sp. Attack, backed up by average Attack, seem to allude to the pokemon's two-faced nature, as its cute profile is overshadowed by those blank eyes and teeth. It seems to lure you in with its gentle disposition before biting down at the slightest provocation. This fickle front lends Farigiraf to the role of an...
Attacker
-
Basic Attack - Ranged/Sp. Attack
The user launches a psychic beam that deals increasing damage to all enemies in range. Passively reduces the cooldown of Early Bird or Armor Tail as it deals damage. The tail head will automatically bite enemies within range, dealing Piercing damage.
The basic attack launches a psychic beam that locks onto the target for as long as the button is held. The damage of the beam increases by 2% every 0.5 seconds, up to a maximum of 20%. It will also deal damage to enemies caught in between you and the target.
As the beam deals damage, the cooldown of Early Bird or Armor Tail is reduced by an extra 1 second for each second that passes while the beam is in effect.
The beam will stop if the enemy disappears or moves out of range.
While fighting as Girafarig, the tail head will bite nearby enemies automatically, dealing Piercing Damage. While fighting as Farigiraf, the two heads will reach down to bite. This can also happen during Moves. This biting attack will not trigger items like Razor Claw or Drain Crown.
Some people look at Girafarig and wonder why it is Normal/Psychic instead of Normal/Dark or something. I'll let you in on a little secret, the tail is actually the Normal half of the pokemon, all the psychic power is at the front, where the giraffe part is.
Don't believe me? The bigger brain of the two resides at the front, and is responsible for most of the pokemon's psychic functions. The PokeDex itself states that the tail has a brain too, but it's much smaller, and can't do a whole lot by itself, it can't even speak. No, all the brain power resides at the front half, which is where the basic attack shoots from.
When you lock on to an enemy with your basic attack, a psychic beam is made, tagging the enemy for as long as the button is held. Damage is dealt continuously, but the Sure-Hit nature of the attack means that the beam scales low with your Sp. Attack. Not to worry, as it builds up power the longer it is maintained, though the attack will end if you lose sight of the enemy.
Also, the tail can and will attack nearby enemies, though this will happen automatically, but at least it deals Piercing damage. Of course, when Girafarig evolves into Farigiraf, the tail head moves to the front, but it will still automatically attack nearby enemies. This changes the positioning dynamic of the pokemon, where it has some way to discourage enemies chasing from behind, before evolving. After evolving, the tail head bites down on enemies automatically as the pokemon approaches, and Farigiraf is not a small pokemon, it takes up quite a bit of space.
A little too much space, actually. Girafarig is small, for a giraffe, but Farigiraf is very tall, taller than Mamoswine, but nowhere near as long as Gyarados. Even so, Farigiraf is gonna be a big target on the battlefield, and being a frail Attacker will do it no favors on the defensive front.
Well, this is where the psychic powers of this giraffe come into play. They're very good at maintaining their focus, you know, what with having two heads and such.
-
Ability: Early Bird/Armor Tail
Early Bird (Girafarig)
Upon activation, the ability speeds up the duration of all hindrances. The ability goes on cooldown afterwards.
Armor Tail (Farigiraf)
Upon activation, the armor tail closes, protecting the user from Stun and Sleep. In addition, all hindrances and debuffs have their duration hastened. The user’s Sp. Attack and basic attack speed increase as well. The ability goes on cooldown afterwards.
Both Early Bird and Armor Tail have to be activated to take effect. When activated, both Abilities will speed up the duration of all Hindrances received by 2x speed for 7.5 seconds. Both Abilities will also go on cooldown for 30 seconds afterwards.
Armor Tail also grants protection against Sleep and Stun Hindrances inflicted on Farigiraf. The 2x duration speed also applies to Debuffs received.
Armor Tail also increases your Sp. Attack by 25% and basic attack speed by 20% for 7.5 seconds. Basic attack speed modifiers affect the rate of damage of the psychic beam.
The Ability to maintain stalwart focus in stressful situations is something very few people have. And who can blame them? What mental defense do you have against surprise attacks or mind tricks like reverse psychology? Humans are very easy to trick thanks in part to their brains needing to process every single detail.
Girafarig and Farigiraf have no such weakness. That's because the tail head cannot be fooled, despite having a small brain. Actually, that small brain is precisely why it cannot be deceived, as autonomous reactions cannot be fooled or tricked, like a robot. You could distract the front half with a sleight of hand trick, but the tail head will still bite if it senses danger nearby. In actuality, the tail head is responsible for the stable mental state of this giraffe pokemon.
As such, both of its Abilities help Girafarig and Farigiraf keep a cool head during fights by keeping its mental state stable. However, it would be a little unfair if the Ability was always active, so as a compromise, both Early Bird and Armor Tail have to be activated to give yourself any form of stability.
In the beginning, you only have Early Bird, which is far from the worst Ability to have to guard against Hindrances. The power of halving the duration of most Hindrances may not seem all that impressive, but it greatly cuts down Stun time and drastically cuts down the damage potential of damage-over-time Hindrances like Burn or Poison. These Hindrances are not uncommon at the beginning of the game and would normally hinder your ability to score points early on, so being able to deflect most of these incapacitation methods early on is a powerful boon.
When you evolve into Farigiraf, the tail head moves to the front and can protect the pokemon from even more Hindrances when Armor Tail is activated. It will straight up prevent Stun and Sleep from afflicting you and will even accelerate the duration of Debuffs. Even with low Attacker defenses, being able to shrug off most defensive reduction debuffs makes you a lot more durable, thanks to your high HP stat. Shedding off Movement Speed debuffs easily is also a solid plus.
Also, because the two brains have joined together, Armor Tail grants extra boosts to your Sp. Attack stat and your basic attack speed. To recap, while Armor Tail is active, Farigiraf has increased resistance to most Hindrances, can easily shrug off all Debuffs inflicted on it, and can hit harder for a short while. Wow, two heads really are better than one, even though they're cramped into one cranium.
The only caveat is that you have to activate the Ability in anticipation of a fight in order for it to be effective. If it goes to waste, you have to wait out the 30 seconds of cooldown before the Ability can be activated again. However, Farigiraf is an Attacker, so it has the ability to reduce the cooldown of Early Bird and Armor Tail just by dealing damage with its basic attack. Who says tenacity isn't rewarding?
Ah, but your basic attack actually requires a viable target within visible range, which makes it difficult to use, especially in crowded fights. Not to worry, as the two heads have ways of dealing with hordes of enemies.
-

At the beginning of the game, Farigiraf will start out as Girafarig. You can choose between Psybeam and Stomp/Assurance as your first Move. By Level 3, you'll have learned both.
-
Move 1: Psybeam (Ranged)
Launches a beam of psychic power from the user’s front and back side. Dealing damage with both beams reduces the cooldown of Early Bird. 6s cooldown.
A beam is launched from both heads of Girafarig. Both beams can be aimed, with one shooting in the direction Girafarig is facing, and the other beam shooting towards the designated direction. The backwards beam defaults to the opposite direction you are facing.
If both beams damage an enemy, whether it be two different targets or the same target, the cooldown of Early Bird will be reduced by 7.5 seconds.
I know I said that the tail half of the pokemon was the Normal Type half, so why are both ends shooting psychic beams? First off, Normal Types are notorious for learning way too many types of moves. And secondly, Girafarig connects its brain waves with the tail head to amplify its psychic power, so the second beam is more like energy run-off being redirected for more damage, if that makes sense.
All that matters is that you've got two beams for the price of one, but you will have to aim both when you use Psybeam. The beams have a decent range to them, but nothing crazy for an Attacker. However, because Girafarig has the ability to fortify its mind with Early Bird, range won't be as much of an issue when going up against Defenders or Supporters.
Without Early Bird, Psybeam still has merit. If you hit enemies with both beams, the cooldown of your Ability will be reduced by 7.5 seconds, which is a quarter of the wait time for the cooldown of Early Bird. And with the low cooldown of Psybeam, you can reduce it again with another double shot, and maybe even a third time to fully reset it. This allows Girafarig to be way more involved in fights than normal, especially for an Attacker.
I mean, it is a two-headed giraffe, there's an expected degree of normalcy to reach here.
-
Move 2: Stomp/Assurance (Melee)
The user jumps and deals a damaging shock wave at the designated area, followed by a wide sweep with the user’s tail. The second hit deals more damage if it damages an enemy a second time. The cooldown of either Early Bird or Armor Tail is reduced greatly if an enemy was KO’d by this move. 9.5s cooldown.
Girafarig jumps a short distance, damaging all enemies nearby upon landing. Immediately afterwards, Girafarig then swings its tail in a circle, dealing damage a second time.
The damage of the second hit deals 250% more damage to enemies struck a second time by this move combo.
The cooldown of Early Bird or Armor Tail is reduced by 10 seconds if this move combo KO's an enemy.
Ok so, how is it fair for a pokemon to have two moves in one slot? Easy, because the tail head fights with Girafarig, so it has to pull its weight during battle.
Now, the combination of Stomp and Assurance is classified as a Melee attack, even though Girafarig jumps a short distance to use this combo. Dashing attack moves are not uncommon for Attackers, but I'm pretty sure not a single one of them has a 'Melee' type move in their repertoire. Therefore, it's difficult to imagine an actual Melee attack to be of any benefit for a pokemon like Girafarig.
Because of the risk associated with using Stomp/Assurance, there is a great reward for pulling off the attack perfectly. First, when you start the attack, Stomp sends Girafarig forward a very short distance and deals damage in a moderate area around itself. Then, Assurance is used, making Girafarig spin in place to whack all enemies in range with the tail head. If both hits connect, the second hit deals 2.5x more damage.
That high damage potential leads into the other boon of Stomp/Assurance. If this combo KO's an enemy, the cooldown of Early Bird is greatly reduced, by a whole 10 seconds. That's a third of the cooldown of the Ability. Granted, you'd rather have Early Bird active while using this move combo, but more often than not, you'll be fishing for KO's with this attack. Landing a KO on a weakened enemy will be easy if you land both hits, but if you miss, you'll most likely be KO'd yourself for the attempt.
High risk, high reward, this is what Stomp/Assurance offers you in the early stages of the game. It's what you'll have for a while, as Girafarig is one of those late-bloomers and won't evolve until much later.
-
At Level 5, Psybeam becomes either Twin Beam or Double Hit.
-
Move 1a: Twin Beam (Ranged)
The user launches two psychic beams, one directly straight forward, the other in the designated direction. If the user damages two enemies on the opposing team with both beams, the cooldown of the move is reduced. If an enemy is hit by both beams, they will be Stunned. Each hit reduces the cooldown of Early Bird or Armor Tail for each enemy damaged. 8s cooldown.
At Level 11, Twin Beam becomes Twin Beam+.
Deals increased damage.
Two beams are launched from the pokemon's ossicones, one shooting directly in front of the pokemon, the other in the designated direction. Both beams are launched at the same time.
If each beam deals damage to a different enemy on the opposing team, the cooldown of Twin Beam is reduced by 5 seconds.
If an enemy is hit by both beams at the same time, they will be Stunned for 0.75 seconds.
Both beams reduce the cooldown of Early Bird or Armor Tail by 4 seconds each.
Twin Beam+ increases the damage of the move by 25%.
Are you aware of the fact that your brain has two halves to it? It's common knowledge, but have you ever wondered why that is? We have two hands, two eyes, two ears, and two legs for a variety of legitimate reasons, but why must our brains be split in two as well? I'm not all that well versed in medical knowledge, but I imagine it has much to do with how our brains process information and direct the body to perform its functions.
I know that a pokemon like Girafarig should have a total of four halves to its brain, which means that its psychic capabilities are potentially quadrupled when using double attacks like Twin Beam. That's the only explanation I have for why Twin Beam has so many effects when it attacks opposing brain waves.
Twin Beam has more power and range than Psybeam, but also comes with a greater variety of boons to take advantage of. It is much easier to reduce the cooldown of Early Bird or Armor Tail as a hit with either beam will activate the reduction effect. Even if one misses, the other will reduce the cooldown of your Ability by 4 seconds. Of course, you'd prefer to hit both beams, but you will have a lot of range to work with.
Now, while you have a wide area of coverage to work with, you can choose to focus the two hits on one enemy. In this case, Twin Beam will Stun the enemy in place for 0.75 seconds. Given the range of the attack, this can affect one or multiple enemies who happen to be lined up, though don't count on this happening at every engagement. Still, the Stun effect can hinder an enemy's ability to run away or approach an Objective, but you will need to aim with both sticks to get this Hindrance off.
One last thing I gleaned over is how the move can reduce its own cooldown if it hits an enemy on the opposing team. However, the stipulation is that both beams have to hit two enemies, one for each shot. If you get the double shot off, you'll reduce the cooldown of Twin Beam by 5 seconds, leaving only 3 seconds of cooldown afterwards. This makes the move very easy to use repeatedly when fighting against crowds, but in smaller congregations, you'll have to choose between the Stun effect of hitting with both beams at once, or the cooldown reduction effect of hitting two different enemies at once with both beams.
Or you could get lucky and hit two enemies at the same time with both shots as they're lined up. But nobody's that fortunate.
-
Move 1b: Double Hit (Melee)
The user swings its mighty head in a wide angle directly forward. If this move damages an enemy, it can be used again. The second time this move deals damage to an enemy, that enemy will receive increased damage and will be Shoved and Stunned briefly. Each hit reduces the cooldown of Early Bird or Armor Tail. 6.5s cooldown.
At Level 11, Double Hit becomes Double Hit+.
Reduced cooldown.
Double Hit makes the pokemon swing their head in a wide arc forward. When the pokemon evolves into Farigiraf, the area of effect greatly increases.
After Double Hit deals damage, Double Hit can be used again for the followup attack. You have 5 seconds to use this followup attack before the move goes on cooldown. If you miss, the move will go on cooldown anyway.
The second hit of Double Hit will deal 350% more damage, Shove, and Stun enemies for 0.5 seconds, only if they have been hit a second time by the move.
Each hit of Double Hit reduces the cooldown of Early Bird or Armor Tail by 4.5 seconds each.
Double Hit+ reduces the cooldown of the move by 1.5 seconds.
When you go out shopping, what's the best deal to take advantage of? I myself am drawn to the Clearance Sale, where everything is dirt cheap because of a lack of demand. I also use coupons and measure competing products by weight and quantity against their price, because it's always rewarding to save. The best deals, objectively speaking, are the two-for-one deals, bonus points if it were something on my shopping list.
Yes, the best things in life come in twos, just like the move Double Hit, deal damage two times for the price of one. Now, there are more refined ways of using Double Hit, but Girafarig and Farigiraf are, well, giraffes, so it's full on head swings for them, nothing classy.
When Double Hit is used, the pokemon attacks by swings its head and long neck forward. At first, only basic damage is dealt, and no extra effects kick in. But like I said before, good things come in pairs, so only something good will happen for you if you land the second hit of Double Hit. If you land the shot, you get another use of Double Hit for a short while, where the pokemon makes a stronger swing in the opposite direction.
If this second swing hits an enemy...well, actually, hang on. It depends if it's the same enemy you got the first time. If you hit an enemy a second time with the second hit of Double Hit, the damage dealt will be massively increased, by 3.5x. Plus, the enemy will be Stunned for a bit and Shoved away. All of this in addition to each strike reducing the cooldown of your Ability, Early Bird or Armor Tail.
This is a powerful move with a lot of boons to take advantage of, but only if you land both hits. As it is a Melee attack, there's a lot of risk for you, as an Attacker, to use this move. Oh sure, a wide reaching physical attack loaded with positive effects for you and hindrances for the enemy may not sound fair, but you are also a frail Attacker, and you need to get close to enemies to use this move. And unfortunately, Girafarig and Farigiraf are rather fond of their personal space.
The low cooldown of the move is another selling point, especially when it upgrades to Double Hit+. Although, to be honest, it's more of a pity boon than anything else, as picking Double Hit over Twin Beam will force you to get physical with opposing pokemon. You are already risking a lot by approaching enemies to use Double Hit, but that's what your Ability, Early Bird or Armor Tail, are for. Of course, you'll be using Double Hit plenty of times while the Ability is on cooldown, so most close engagements will be mandatory.
Well, the range is wide, at least. Speaking of which, Girafarig uses a smaller version of the move due to its shorter neck in comparison to Farigiraf. When it evolves, the range of Double Hit greatly expands, which makes it easier for connecting the two hits of the move.
Speaking of two hits, Farigiraf knows some powerful move combos. Let's look at them with both of our eyes.
-

At Level 7, Girafarig evolves into Farigiraf. At the same time, Stomp/Assurance becomes either Zen Headbutt/Crunch or Psychic/Psychic Fangs.
-
Move 2a: Zen Headbutt/Crunch (Melee)
The user strikes the designated area with a headbutt focused with psychic powers, Stunning opposing pokemon for a while. The user then bites at the area with its Armor Tail head, dealing damage and reducing the Sp. Defense of opposing pokemon for a while. The cooldown of Armor Tail is reduced greatly if an opposing pokemon was KO'd. 8s cooldown.
At Level 13, Zen Headbutt/Crunch becomes Zen Headbutt/Crunch+.
Deals increased damage.
The pokemon swings its head downward like an angry hammer, with the Armor Tail closed and protecting the head, of course. This head bash Stuns enemies in a small area around the impact point for 0.5 seconds.
Immediately after attacking, the head descends once again and bites with the Armor Tail's sharp teeth. Opposing pokemon have their Sp. Defense reduced by 35% for 5 seconds afterwards.
The cooldown of Armor Tail is reduced by 12 seconds if this move combo KO'd an opposing pokemon.
Zen Headbutt/Crunch+ increases the base damage of the move combo by 25%.
The move combination of Zen Headbutt and Crunch forces Farigiraf to move very quickly using its head and neck. If you're worried about this pokemon overexerting itself using such attacks, don't be. Real life giraffes are known to swing their heads about when fighting each other. It actually looks rather goofy. It also makes them rather dizzy, but being part Psychic, Farigiraf has a natural sense of stability, thanks in part to the tail head protecting it.
Speaking of which, both Farigiraf and the Armor Tail head work together to use this move, just like with Stomp/Assurance. Farigiraf reaches down to swing its round head forward like a hammer. On impact, any enemy will be Stunned for a brief moment, but immediately afterwards, the Armor Tail head reaches down again to use Crunch, biting down at all nearby enemies. If this biting attack connects, enemies will be hit with a powerful Sp. Defense debuff for 5 seconds.
Now, as a Melee attack, this move has an unfair amount of range, it's almost cheating given how long Farigiraf's neck is. The attack in total takes about 1 second, but during that time, Farigiraf cannot move and is vulnerable to attacks and Hindrances used on it by opposing pokemon. Sure, the Stun effect of the Zen Headbutt part is supposed to keep the enemy still so that Crunch can connect, but most of the time the enemy won"t be alone and can surround you while attacking.
As long as you get a KO, it'll be worth it, as KO's made by this move combo reduce the cooldwn of your Ability by 12 seconds. If you fully reset it in this way, you can then activate the Ability to make your getaway or continue your assault unabated. Remember, your Sp. Attack increases when Armor Tail activates, and survivors of this attack will have their Sp. Defense reduced for a while. This will put the opposing team at the mercy of you and your Armor Tail head for a short while afterwards, what with your basic attack firing a consistent beam that locks onto enemies and either Twin Beam or Double Hit to aggravate an assault.
Still, a Melee attack like this may be unwise to use against certain pokemon, especially those who thrive in very close combat. Well, you're an Attacker, and you can never go wrong with a creative psychic attack.
-
Move 2b: Psychic/Psychic Fangs (Area)
The user targets the designated area with psychic power, damaging enemies and Pulling them in. Afterwards, large fangs made of psychic energy rise up and bite down, dealing damage to all enemies within. The cooldown of Armor Tail is reduced for each opposing pokemon KO'd by this move. 8.5s cooldown.
At Level 13, Psychic/Psychic Fangs becomes Psychic/Psychic Fangs+.
Expands the area of effect.
A field of psychic power is made at the designated area, which then blasts enemies and Pulls them in towards the center. Immediately afterwards, the psychic energy takes the form of large teeth, closing down around the caught enemies like a bear trap, dealing damage.
The cooldown of Armor Tail is reduced by 5 seconds for each opposing pokemon KO'd by this attack.
Psychic/Psychic Fangs+ expands the area of damage by 20%.
Quick little note, Farigiraf will tilt its head down when projecting the psychic power on the ground, then tilt straight up and close its Armor Tail when the psychic maw appears and bites down.
The move 'Psychic' and the Type 'Psychic' are contextually different things, but that doesn't make it less weird when talking about pokemon casually. It'd be more accurate to call the move something like 'Psychic Blast' or 'Psychic Force', but no, tradition is one of the strongest long-standing curses holding the Pokemon franchise together. At least it doesn't detract from all the cool new moves they come up with, like Psychic Fangs.
Just like with Stomp/Assurance and Zen Headbutt/Crunch, both the main head and the Armor Tail head work together to use this move combo. Farigiraf targets an area with Psychic, using its powers of manipulation to try and Pull in enemies close to the center of the attack. Right away, the Armor Tail head follows up with Psychic Fangs, turning the residual psychic energy left behind and forming it into a set of sharp teeth, closing down on the enemies like a bear trap. I specify that the Armor Tail head is using the leftover psychic power to use Psychic Fangs since the head normally cannot produce psychic attacks on its own, but its input is required to give shape to the psycho energy waves. It's not a coincidence that the teeth of Psychic Fangs look like the ones belonging to the Armor Tail head.
As an attack, Farigiraf has a lot going for it when it picks this move over Zen Headbutt/Crunch. As it is an area attack, Farigiraf can hit multiple enemies at once and hinder them with the Pull effect. The Pull effect of Psychic is necessary to connect the bite attack of Psychic Fangs, as without it, it would be extraordinarily difficult to land both hits, because of the large variety of Dash moves the enemy can use to evade the follow-up attack, even if it landed dead on. The only enemies who can avoid this attack are those who have activated any Hindrance blocking effects beforehand or have fast enough reflexes to zip out of the way of the Psychic Fangs biting chomp.
It's an alright attack, but it's better if it manages to KO two or more enemies at once. For one KO, you reduce the cooldown of Armor Tail by 5 seconds. That's a paltry amount of cooldown reduction, as even one hit of Double Hit can match that amount barely.
However, Psychic/Psychic Fangs is the only effect you can use to reduce the cooldown of your Ability more than two times in one attack. Knocking Out two pokemon at once with this move reduces your cooldown by a total of 10 seconds, and knocking out 3 gives you a total cooldown reduction of 15 seconds. A whole team wipe reduces the cooldown by 25 seconds, almost a whole refill, but that's a little ambitious, even for a hard-hitting Attacker like yourself.
Just scoring 2 or more KO's at once with this move is worth the attack, especially since the enemy will be hindered by the Pull effect, making it safe to use against crowds. Of course, it won't land a clean hit on every single player, some of the more skilled opponents can zip out of the attack in time, before the teeth close down. And if they can do that, they can most definitely close the distance between themselves and you. Farigiraf has sort of a bad matchup against Speedsters, in that it doesn't matter if it sees them coming, they'll be too fast to pin down with your attacks.
That's one of the downsides of evolving. Girafarig had a reliable little tail head keeping watch of things in the back, protecting it from surprise attacks and cheap shots from behind. With both heads fused together, their psychic powers have increased, but it reduced their perception a bit. Sure, their psychic powers keeps them in tune with the array of brain waves in the region, but some pokemon are too fast for that, and being on alert all day every day is mentally exhausting.
Well, with a proper Unite Move, Farigiraf no longer has to worry about surprise attacks anywhere.
-
Unite Move: Psycho Chomper (Buff)
The user creates a second tail head made out of psychic power for a while. The psychic tail head will dash in and bite on nearby opposing pokemon, Stunning them briefly, and deal Piercing Damage. Armor Tail also fully kicks in at the start of the move. 105s cooldown.
Psycho Chomper creates a second tail head that resembles the one Girafarig had on its tail before it evolved. The tail is notably larger, has a longer 'leash', and will always look towards where the nearest enemy on the opposing team is, even if they're under Stealth effects. Psycho Chomper lasts for 7.5 seconds.
When an enemy is within range, Psycho Chomper will dash in and bite down on the enemy. This bite Stuns the enemy for 0.75 seconds and deals Piercing Damage. The Psycho Chomper tail retreats before attacking again 1.5 seconds later.
Armor Tail activates automatically, regardless of the amount of cooldown. This activation effect is separate from the cooldown of the Ability.
The peculiar shape of the tail head reminds you of a certain fictional creature, doesn't it? You know, a hard-headed canid who's only bound by a chain, lest it chomp down anyone nearby. So it only makes sense that, for its Unite Move, I gave Farigiraf a visage of the creature made out of its own psychic energy. Down, boy, down.
As a Unite Move, Psycho Chomper is far from the most powerful or impressive attack to use, especially compared to other Attackers. No big projectile to throw out, no flurry of attacks, it's not even a big burst of damage in a large area around itself, it's just a psychotic dog on a leash running around you. Yeah, it's classified as a Buff, and a few Attackers have Buff type Unite Moves, but Farigiraf doesn't actually experience any stat increases from Psycho Chomper, aside from the universal buffs from using a Unite Move.
It's better to think of Psycho Chomper as a powerful minion that fights by your side when summoned. As Psycho Chomper is made of psychic energy, it will hone in on enemies by reading for nearby brain waves. This works even if the enemy is invisible, and the Psycho Chomper will keep their eyes glued to their position, waiting for them to approach.
When an enemy does get too close to Psycho Chomper, the psychotic beast will lunge forward to bite at them. Now, even though the tail is also made of psychic energy, this dashing bite has a range limit, so it cannot reach very far. Just know that the range of attack for the Psycho Chomper is greater than the melee basic attack range of opposing pokemon.
On hit, the enemy will be Stunned for 0.75 seconds, afterwards the Psycho Chomper retreats. It will attack again after a brief cooldown of 1.5 seconds, so there's plenty of time for the enemy to run away before the Psycho Chomper attacks again. However, the Stun time actually cuts this window of opportunity in half, so the enemy will have to move quickly if they don't want to get chewed up by the Psycho Chomper excessively. The biting attack also deals Piercing Damage, so the enemy will have no way to protect themselves without egregious healing effects at the ready. This is on top of Farigiraf also taking part in the fight, so the Psycho Chomper will lunge and bite while the giraffe will launch its psychic attacks at the hapless victim.
Speaking of which, the Ability, Armor Tail, will be activated automatically when Psycho Chomper is used. The activation is separate from the cooldown of Armor Tail, so you are able to activate your Ability well before or after the Unite Move is used. This basically means that you become immune to Stun and Sleep Hindrances, speed up the duration of other Hindrances and Debuffs, and also get a big boost to your Sp. Attack during Psycho Chomper. However, the Unite Move only lasts for 7.5 seconds, which is as long as the duration of Armor Tail. It's hardly enough time to work with for long drawn out fights, but the Hindrance protection effects are meant to shield you during a full on assault, which Psycho Chomper is very well equipped to do.
With this Unite Move and Armor Tail, Farigiraf is surprisingly adept at close combat, for an Attacker. Granted, it still has its flaws of being frail and vulnerable to specific weaknesses and archetypes, but it sets itself apart with its unique set of tools and effects. For what Farigiraf is designed for, the Unite Move patches up a lot of its shortcomings, which is why the cooldown is lower than average.
Sadly, that is its weak point that is easy to exploit. Farigiraf is wholly dependent on its Armor Tail shielding it from Hindrances, it sacrifices power and potential in exchange for reliable recycling of the cooldown of its Ability.
You'll get what I mean when we go through the Strategy section, but for now, let's look under the hood for its Achievement.
-
Achievements
Block a total of 20 or more Hindrances with Armor Tail in one match.
To recap, Armor Tail has to be activated, which causes the Armor Tail head to close down over Farigiraf's face. Not to worry, as both heads can still see just fine by increasing their psychic tuning. It's like those hoodies with the plastic see-through bits, Farigiraf is using its psychic power to see through the eyes of the Armor Tail head, like using a periscope in a submarine.
And since the Armor Tail head has a smaller brain, it is much more resistant to Hindrances that affect the mind, like Stun and Sleep. It also applies a mild placebo effect that hastens the duration of all other Hindrances and Debuffs. And since the two heads are fully synchronized for a short while, their psychic power increases, translating to a Sp. Attack boost for 7.5 seconds.
However, doubling the brain power in this way also causes an overload of information, as both brains are perceiving everything two times at once. This is why there's a hefty 30 second cooldown when the Ability ends, as both heads need to mentally refresh before rejoining. Thankfully, using their psychic moves in just the right way causes a discharge of psychic stress, which lowers the cooldown of Armor Tail by relieving some of the mental strain. To that effect, every part of Farigiraf's toolkit is centered around lowering the cooldown of its Ability.
As such, in order to master Farigiraf and earn this Achievement, you have to use the Ability to block Hindrances. It sounds simple, but there's always a little devil in the details. It requires you to get hit, which is something no Attacker wants to do, lest they get instantly KO'd, but that's what this Achievement is asking of you. Now, that doesn't mean you should use Armor Tail to bait a Hindrance inducing attack 20 times, no, it's a lot more intuitive than that.
Think of it like this, the Acheivement wants you to get hit, so you might as well earn your lumps by doing something productive with it. The enemy will want to use Hindrances to stop you from scoring, taking Objectives, or running away, so you keep all of this in mind when the match starts. But as you play, you realize, this pokemon can easily become unstoppable with Armor Tail, since all of its moves contribute to lowering the cooldown of the Ability.
Knowing this, you become a lot more threatening in team fights as you cannot be stopped by Hindrances, meaning your attacks cannot be stopped. You can secure an Objective with Twin Beam, whittle the enemy down with Double Hit, stun them in place with Zen Headbutt/Crunch, or control crowds with Psychic/Psychic Fangs. When you get good at lowering the cooldown of Armor Tail often enough that you're using your Ability at every engagement, then you'll have truly earned the Achievement.
Two heads really are better than one.
-
Holowear
Listen, a giraffe is more than just an exaggerated neck, in the same way Farigiraf is more than just an extra tall psychic horse. Giraffes are fascinating creatures with a rich history and cultural significance in their home region of Africa. The whole 'long neck' thing is just a side effect of their adaptation to eating from tall trees.
However, there aren't really any tall trees in Paldea, so the whole long neck thing is sort of out there for Farigiraf, huh?
Well, that just means we have more space to work with for Holowear. Starting things off, Warm Style Holowear wraps a very, very long scarf around Farigiraf's neck, running from the head all the way down to the body. Then, Starry Night Style Holowear wraps a glittery ribbon around the neck, along with loads of star pins of varying shapes and sizes plastered around the body. Speaking of ribbons, Ribbon Style Holowear wraps a beautiful ribbon around the neck, while also feeding into bow ties around the body. OK, enough with the pole decor, let's get this party started with Celebration Style Holowear, where both faces have big glitzy glasses, there's a flower necklace and some colorful beads around its neck, and a glamorous top hat balanced precariously on top of its tall head. Lastly, Festive Style Holowear gives it an ugly Christmas sweater, a long wreath coiled around its neck, some baubles hanging off of the wreath, and a large star crown which shines brightly.
OK, so the Holowear options treat Farigiraf as some sort of bland column that needs to be decorated, but really, how often do we get a tall pokemon like this in Unite?
-
Strategy
Attackers are very hard to design for in Pokemon Unite. I mean, how hard is it to make a moveset for a pokemon that can hit hard? It's actually not that hard, which is the problem. New Attackers need so many gimmicks to differentiate themselves from each other. Even the Attackers in the base roster had to have gimmicks, like the tagging effect of Cinderace's basic attack, or Greninja having both melee and ranged basic attacks.
As such, when coming up with something unique for Farigiraf, I decided to lean into its double headed duality and make it a mix of ranged and melee style offense. You'll find this pokemon to be well equipped for both ranged combat as well as physical combat, but does not excel in either. That's because both heads are rather indecisive on how to allocate their strengths.
Speaking of heads, the crux of Farigiraf's potential lies in its Armor Tail Ability, an effect that has to be activated manually during combat. Normally, Attackers aren't all that bothered by Hindrances, because if they get hit, they get KO'd, and if they aren't getting hit, they are Kiting very well, attacking relentlessly from the reach of the opposing team. However, Farigiraf lacks a lot of range for such a large pokemon, so it needs the protective mental barrier provided by the Armor Tail in order to fight uninhibited.
This is also why all of its moves and effects are tuned to help reduce the cooldown of Armor Tail after it has been used. This actually results in these moves lacking in damage potential, but the upside is that they have lower than average cooldown, turning Farigiraf into a more relentless Attacker than normal. That's the idea, anyway, as you use Armor Tail to barge into fights, immune to just about all Hindrances and resist any debuffs thrown at you, deal damage in a large area, before bailing to wait out the cooldown of the Ability.
Let's start from the top. At the beginning of the game, Girafarig can go either Top or Bottom Lane, but can also work in the Center Lane for easy EXP. Getting to Level 5 lets you quickly learn either Twin Beam or Double Hit to make the engagement with the enemy team easier. However, because of your low overall damage output, it might be better to try and go for stacking in the early game with Sp. Attack Specs in Top or Bottom Lane. You're gonna have to choose between a greater Sp. Attack edge or higher Level advantage early on, provided your teammates coordinate with you, of course.
You'll want to Level up as soon as possible, as Girafarig doesn't have any Hindrance effects until it reaches Level 5, which is why calling the Central Lane can be so appealing. In fact, your Ability, Early Bird, doesn't fully protect you from Hindrances until you evolve, as all it does is hasten the duration of all hindering effects. Being able to shrug off Stun and Burn is nifty, especially since these effects will be weaker due to the lower power level of the game early on, but they can still keep you from scoring Goals in order to stack Sp. Attack Specs. Also, you have to manually activate the Ability in anticipation of these effects, so you can get caught off guard by an ambush.
When you do get to Level 5, you'll have to pick between Twin Beam and Double Hit. It should be noted that Double Hit will see a significant range increase when you evolve into Farigiraf, but we'll be talking about the move at its greatest potential regardless. Twin Beam has a great variety of effects, but they are only relevant when you actually land the beams on opposing pokemon. Double Hit, on the other hand, covers a wide area and offers bonus effects on opposing pokemon that were hit a second time. Twin Beam is much more reliable with the range it covers, but Double Hit has the lowest cooldown of your entire move kit, due to the risk of it being a Melee move.
The choice between the two attacks is a lot more nuanced than just 'physical versus ranged', mostly due to the benefits both moves offer you in different circumstances. Twin Beam lowers the cooldown of your Ability when a beam hits, so you'll want to hit with both beams for the full effect. If both beams hit the same pokemon at once, they'll be Stunned for a bit. However, if both beams hit two different opposing pokemon, the cooldown of the move will be reduced by 5 seconds afterwards, meaning you can use Twin Beam again much, much sooner than normal. You will only see both effects activate at once if you line up two enemies with both shots at the same time, so this will rarely happen, unless the enemy is grouped up together. This makes Twin Beam intrinsically better against teams that group together, such as Supporters and Defenders, who like to stick close to allies during fights for the Objective.
And because Twin Beam will have an easier time reducing its own cooldown when fighting against crowds, this also means that you will very quickly reduce the cooldown of Armor Tail. Of course, a horde of opposing pokemon have a wide variety of Hindrances and Debuffs to throw at you, so it's a smart idea to lead with Armor Tail activated before going in guns blazing with Twin Beam.
Double Hit is a lot more straightforward as an attack, but that's because of the high risk, high reward nature of the move being used by a ranged Attacker. When Double Hit lands with both attacks, the enemy will be Stunned, Shoved away, and your Ability will have its cooldown reduced by a total of 9 seconds. The low cooldown of the move makes it easy to spam, especially when it upgrades to Double Hit+, but the only caveat to Double Hit is that the first hit has to connect, or else the whole combo falls apart and the move goes on cooldown. This makes Double Hit better suited to surprise attacks, but also gives Farigiraf a better match-up against opposing pokemon that have to fight close, making Double Hit easy to connect. The wording, however, means that the extra effects of the second hit will only apply to those struck by the first hit, so trying to Stun and Shove an entire crowd of enemies is extremely risky, at least, not without Armor Tail active.
Keep in mind that these moves scale only moderately in power with your Sp. Attack stat. There's a reason I always include the pokemon's Base Stat spreads in every post, to give the reader a scale of its power and ability in Pokemon Unite. Farigiraf's Sp. Attack is mildly above average, but its large body, which gives it high HP, makes it difficult for Farigiraf to maneuver around in order to sling hard hitting attacks, like Cinderace or Inteleon can. Decidedly, instead of investing heavily into hard hitting attacks, Farigiraf is trained for harsh physical and mental combat, focused on fortifying its mental resistance and maintaining its personal space with ranged and melee attacks.
Speaking of which, when you reach Level 7, Girafarig evolves into Farigiraf, and you can then choose between Zen Headbutt/Crunch or Psychic/Psychic Fangs. Now, while Zen Headbutt/Crunch is a melee attack, it has a surprising amount of range with how tall your neck is. It makes itself look equal in range to Psychic/Psychic Fangs, though the area of effect is much smaller in comparison. Still, both moves are guaranteed to hinder the enemy in some way, so you can't go wrong with either attack.
Between the two attacks, Zen Headbutt/Crunch is slightly better due to how it hinders the enemy. The first strike, Zen Headbutt, Stuns the enemy in place on hit. The Stun typically lasts long enough for the second part of the attack, Crunch, to follow through, though resistance to Hindrances can cause it to miss. Even so, if the biting attack connects, opposing pokemon will be afflicted with a strong Sp. Defense Debuff for a while, meaning Farigiraf can easily followup with another attack for the KO. But if the move itself secured a KO instead, it will reduce the cooldown of your Ability by a whopping 12 seconds, the most you can get from a single enemy. And the low cooldown makes it feasible, but remember, your damage scales moderately to your Sp. Attack, so you'll need a momentary buff to make it happen.
Psychic/Psychic Fangs are much better for handling crowds, though. The initial blast, Psychic, hits multiple opposing pokemon in an area and Pulls them in towards the center, or at least it tries to. There's very little you can do about enemies with Hindrance Resistance easily dodging this attack. For the enemies that don't have Hindrance protection, they'll have very little time to try and dodge the second attack, Psychic Fangs, from forming and closing in on them to deal damage. It's not a lot of damage, but hindering enemies in a large area is very valuable for an Attacker. And if you do get off a KO or two, the cooldown of your Ability is reduced by 5 seconds for each KO.
I need to quickly point out how moves like Double Hit and Zen Headbutt/Crunch have the ability to reduce the cooldown of Armor Tail when they activate, but the trigger is stringent on connecting a single attack. Allow me to clarify, each hit of Double Hit reduces the cooldown of your Ability, but it doesn't matter if you hit one enemy or multiple enemies, a hit is a hit. Same deal for Zen Headbutt/Crunch, you'll get the massive cooldown reduction if the move KO'd an opposing pokemon, but only once. Even if the move combo somehow KO'd 2 enemies at once, the criteria only requires the move to get at least 1 KO.
I didn't bring up Twin Beam as being able to reduce the cooldown of Armor Tail multiple times is one of the gimmicks of the attack. Actually, this makes Twin Beam and Psychic/Psychic Fangs a great combo to use, as the Pull effect of Psychic can line up the shot needed to hit Twin Beam multiple times in one go, provided you Pulled multiple enemies at once.
Even without Twin Beam, Psychic/Psychic Fangs is rather effective against frail Attackers and Speedsters, who are very easy to KO if caught off guard. Heck, it doesn't even have to be Attackers or Speedsters, this combo will be most effective during team fights, when your allies expend their Burst Damage attacks, allowing you to use Psychic/Psychic Fangs to finish off the stragglers and prevent any potential counterplay. You'll have to time it just right, but the size of the attack makes it easy to connect.
Speaking of team up attacks, your Unite Move, Psycho Chomper, is rather unique for an Attacker. You've basically summoned a wild, rabid dog on a long leash that lingers at your side, ready to charge at the nearest enemy who comes a little too close. It doesn't stick around for long, only 7.5 seconds, but it offers so much value that it's worth making the most of the short walk through the park.
Firstly, your Ability, Armor Tail, is activated, and this activation effect is separate from the cooldown of the ability. This basically means that Armor Tail will be in full effect for you, even if the Ability was used up recently. It also means that you can activate Armor Tail again when the Unite Move ends, as the cooldown and activation effects are separate from your manual effects. And keep in mind, Armor Tail not only gives you increased protection from Hindrances, but it's also powering up your Sp. Attack, so you and Psycho Chomper will be doing much more damage than expected while it's in effect.
In addition to that, Psycho Chomper will always have a constant read on nearby enemies when they are present, even if they are invisible. The Psycho Chomper will be facing in the direction of nearby enemies, rendering Stealth effects useless for the duration of the Unite Move. This makes Farigiraf impossible to sneak up on, and since you don't have any Sure-Hit attacks, barring your basic attack, you can fire off any attack freely to initiate the first strike. Of course, Farigiraf is a bit lacking in range, but Psycho Chomper has a limited reaction range anyway, so if Psycho Chomper sees something, you can hit it.
To recap, Farigiraf is hard carried by its Ability, Armor Tail, protecting it from the Hindrances and Debuffs that would normally impede an Attacker from dealing big damage. However, it is balanced out by having below average damage output, for an Attacker, in exchange for low cooldown on its attacks. This makes Farigiraf not that threatening in major team fights, but it can be very persistent and difficult to KO reliably, especially when an Objective is at stake. Farigiraf is really good at maintaining composure and securing KO's from long, drawn out fights, which gives it an edge over other Attackers who cannot commit to fights long term if they get hit once.
Unfortunately, Farigiraf has a few issues to overcome, such as lower than average firepower, shallow range, and large hitbox. Plus, its overreliance on its Ability, Armor Tail, hinges on the player's ability to land hits with its moves repeatedly and often, as without it, it is just as vulnerable to status effects as other pokemon. Now, given the low cooldown of its moves, these shortcomings are not a dealbreaker, but Farigiraf will be at a severe disadvantage if these issues flare up all at once.
Farigiraf's Armor Tail is its greatest strength but also its greatest weakness. When active, the tail head will actually close, like a snug hoodie, which looks cute, but is a visual indicator to the enemy team that the Ability is active. Savvy enemies will know that this means it isn't safe to engage Farigiraf until the Ability wears off, as it is also passively boosting the pokemon's Sp. Attack. And when the Ability does go away, Farigiraf can very easily reduce the cooldown by hitting the enemy with its moves.
That is, IF you can connect those moves.
This is where the short range and below average firepower come to inhibit Farigiraf. Moves like Twin Beam and Psychic/Psychic Fangs can catch nearby enemies off guard, but Farigiraf will struggle the most against opposing pokemon that do not need to approach, like Attackers. And even if you do manage to get a lucky shot, the attack might not be strong enough to get the KO. If you miss, you'll most likely get KO'd before Armor Tail comes off of cooldown, not like it'll help you much anyway. The Ability protects against Hindrances and Debuffs, but not raw damage. Farigiraf, as an Attacker can very easily be broken through with powerful attacks, which will be easy given its size.
Against melee attackers, it's supposed to use Armor Tail to control when and where its engagements favor itself the most. An enemy Buzzwole or Machamp can stop Farigiraf in its place easily, so you block the Hindrances they inflict with Armor Tail, retreat, and bring the fight to an Ally Goal Zone or towards a teammate for backup. This works against Defenders and Supporters, who rely on Hindrances and Debuffs to stifle the opposing team's advancements. Against Speedsters, it depends, as pokemon like Gengar and Dodrio love to pelt their enemies with Hindrances and cheap shots, which Farigiraf is well guarded against with Armor Tail.
Attackers will have no such problems putting Farigiraf down. Yeah, it has a lot of HP and it can tank a few hits, but most enemy Attackers have the range advantage and are good at keeping their distance, out of Farigiraf's personal space. The worst they'll have to watch out for is its basic attack, which is a Sure-Hit beam that slowly increases damage the longer it is maintained, but it can easily be broken with distance. Yeah, they may not have high defenses themselves, but at full HP, they can stomach a lucky shot from Farigiraf once. At low HP, Farigiraf will want to finish the fight with either Zen Headbutt/Crunch or Psychic/Psychic Fangs, but Attackers dance with death at nearly every engagement, so they're used to these risky clashes with other Attackers.
Ironic, a Farigiraf player would be the only person who would hate to run into a 5-Attacker team comp.
As grievous as these shortcomings are, Farigiraf has a multitude of positives that must be taken advantage of in order to excel with the pokemon. An impeccable close range set of tools, a powerful Ability that can block and reduce the effectiveness of many Hindrances and Debuffs, and a variety of ways to reduce the cooldown of the Ability, making it easy to reuse. Of course, you have to land the attacks to get the cooldown reducing effect, but when you play as a specialist, you pick your battles carefully.
At least, I would hope so. Not everyone has a voice in their head directing their conscience. Farigiraf, definitely does, but only because it always needs a second opinion.
-
And that's Farigiraf for Pokemon Unite! This was originally a post for Girafarig, but the draft was made before Pokemon Scarlet and Violet was released and Farigiraf was revealed in upcoming trailers. I had wanted to scrap the post, but instead decided to further develop my original idea for the Girafarig post. I'm glad I did, as we always need more outlandish choices for Pokemon Unite.
That'll be it from me for now. Here's a hint for the next pokemon.

Until then, see ya.
3 notes
·
View notes
Text
Turtonator for Pokemon Unite!

Season 1
Season 2
Season 3
Prev: Iron Valiant - Primarina - Garganacl - Passimian - Incineroar - Cofagrigus - Glimmora - Galarian Stunfisk - Krookodile - Kricketune - Magearna
Dragons are rare, mystical, and supposedly legendary. But the thing about dragons is that they aren't all the same. Some have two wings and four legs, others have no wings, and then you get the weird landmine turtles that stretch the definition of what it means to be a dragon.
This reflects the stories of dragons in real life, as just about every culture has stories about dragons, but they aren't always the same type of dragon. As such, when the Pokemon franchise began setting its regions in places outside of Japan, we started seeing a much greater variety of Dragon pokemon popping up, like Haxorus and Hydreigon.
And hey, dragon turtles are cool too, especially when they can explode and stuff.
-

Now, it goes without saying that turtle pokemon are expected to have high defensive stats, and Turtonator is no different. However, its high 135 Defense is offset by its low 60 HP, so it's a little less bulky than you would expect. As such, the pokemon's attacking stats play a big part in its defensive playstyle, as it uses its bulk to take a hit before retaliating with powerful flames. That's the plan of attack for this pokemon when it uses its Signature Move, Shell Trap, and that isn't going to change in Pokemon Unite either. I hereby give Turtonator the role of a...
Defender
-
Basic Attack - Ranged/Sp. Attack
Becomes a boosted attack after 2 hits. The boosted attack shoots a stream of fire that deals damage to all enemies in range, Burning them for a short while. The user's Defense and Sp. Defense increase for a short while afterwards.
The boosted attack launches a thin stream of hot fire forward, damaging multiple enemies. Enemies will be Burned for 2 seconds afterwards
Your Defense and Sp. Defense increase by 25% for 1 second after using the boosted basic attack.
Because of Turtonator's propensity to explode, it doesn't do well in hand to hand combat, so ranged attacks are the way to go here. It's just as well, being a Fire and Dragon Type means it's got some sick burns to dish out, literally.
The boosted basic attack comes out as a singular 'beam' of hot fire, damaging multiple enemies at once, if they are in range. This fire beam Burns enemies for a short while and also increases your defenses very briefly afterwards. Not bad for a Defender, though the aiming part kind of works against Turtonator here.
Why? That has to do with its Ability, Shell Armor.
-
Ability: Shell Armor
Damage dealt to the user's backside is reduced and causes an explosion, dealing damage to all enemies in range relative to the strength of the attack. Burned enemies receive increased damage from this explosion. If a critical hit was intercepted in this way, the damage is negated and the explosion is powered up greatly.
When an attack hits Turtonator from the back, a short range explosion is set off. Any attack can set off Shell Armor, but Shell Armor will go on cooldown for 0.5 seconds before being primed again. The damage dealt by Shell Armor scales with your Sp. Attack.
Damage received from the back is reduced by 20%.
The damage of the explosion scales with the percentage of HP Turtonator loses from the intercepted attack. This calculation does not factor in defensive buffs or shields. Basically, if an intercepted attack would cause Turtonator to lose 10% of its HP, the Shell Armor explosion deals +10% damage.
Burned enemies receive 20% more damage from Shell Armor explosions.
Critical Hits intercepted have their damage negated and the Shell Armor blast deals maximum damage, capping at +100%.
In battle, Turtonator fight with their back towards the enemy. This is because its shell is highly reactive to external stimulus, due to the material the shell is made of. When sparks fly, the shell ignites, creating an explosion in the face of the attacker.
This is one of those rare positioning Abilities for Pokemon Unite, where all the power and boons of the ability will only work when Turtonator is attacked from the back by an enemy. That's what I meant when I said that its basic attack kind of works against the ability, as Turtonator has to turn to face its opponent in order to use its basic attack. I mean, I'm sure its neck is long enough for it to attack from any angle, but I don't think it can get any firepower in its breath that way, also it would look weird.
You're gonna have to learn to hold your fire during combat, as the Burn effect of your boosted basic attack is actually part of the plan of attack. The explosion made by Shell Armor deals extra damage to Burning enemies, which the boosted basic attack inflicts. It doesn't have to be the one to inflict the Burn, though, meaning Turtonator can pair well with an ally Charizard or Cinderace, supporting it from the back while the turtle fights on the front.
The explosion scales with both your Sp. Attack and your HP. The higher you Sp. Attack, the more damage the explosion deals, but the blast deals even more damage scaling with the percentage of HP Turtonator loses while activating Shell Armor. Due its defensive stats, you'll only see a mild boost in this way, as very few attacks will deal more than 10% of your HP in damage, unless you're really underleveled, which is a different, drastically worse problem to have.
There's also the fact that the Shell Armor explosions have a brief second of cooldown in between blasts, which might not sound like a big deal, until you take multiple hits all at once. Remember that the Shell Armor explosions gain a mild buff based on the percentage of HP you lose, which makes Turtonator weaker against opponents who get their damage from quantity, not quality. To put it into perspective, Razor Leaf Decidueye will have a better matchup against Turtonator than Spirit Shackle Decidueye.
Still, the ability to attack while defending is a powerful boon to have, but you have to play around with your own positioning to maximize the benefits of Shell Armor. Not to worry, as Turtonator knows how to play offense with defense.
-

At the beginning of the game, you can choose between Ember and Protect as your first move. By Level 3, you'll have learned both.
-
Move 1: Ember (Ranged)
Fires a flaming projectile that Burns the enemy, dealing damage over time. 6s cooldown.
Opposing pokemon will be Burned for 3 seconds.
It's nice to have a simple move every now and then.
Ember is a simple projectile that Burns whoever it hits. That's all there is to it, and its simplicity is rewarded with low cooldown.
The Burn effect is handy to have for when your boosted attack isn't boosted yet but there's an enemy right in your face that isn't scared of your explosive backside. The Burn lasts longer than the one inflicted by your boosted basic attack, so it's a good option even with your boosted attack ready.
It still makes you turn to face the direction you're attacking in, so it's not like you can just throw this attack out whenever. You have to hold your back to the enemy, waiting for the right moment to shoot Ember, and do so before they enter your personal space.
Man, all this careful positioning and planning, just to keep the enemy at your back. If only there was a way to keep yourself posted towards the enemy backwards.
-
Move 2: Protect (Buff)
The user raises its shell in the designated direction, holding that position for the duration of the move. Any ranged basic attack is intercepted and the explosion radius of Shell Armor is increased. 9s cooldown.
Protect makes Turtonator turn its back towards the designated direction and hold that direction for 6 seconds. During this time, Shell Armor has no cooldown and the explosion size increases by 30%.
Your Movement Speed is reduced by 50% when moving in any direction except for backwards.
Using your basic attack and other moves will still force you to turn in the direction to attack, but Turtonator will return to its original direction designation afterwards.
Because of Turtonator's explosive shell, it will always hold fast against the enemy with its back towards them. Silly as it is to say, this makes Turtonator less of a turtle and more like a porcupine or a skunk, neither of which are pleasant company when they are set off.
I don't blame them, Turtonator has a weak spot on its front, so of course it has to protect itself as much as it can. Protect fixes Turtonator's back to a designated direction for 6 seconds, during which time Shell Armor has no cooldown and the explosions are bigger. This makes Turtonator a solid defensive diversion for the enemy, but makes it vulnerable to Speedsters, since it cannot turn around while using Protect.
There's also the fact that Turtonator is still vulnerable to Hindrances while using Protect, but the consolation is that Shell Armor can be activated repeatedly, punishing mash happy Attackers and Defenders. Plus, ranged attacks can be intercepted by the shell, like basic attacks, even if they weren't aiming for you, making Turtonator a pretty effective Defender during team fights.
But the fact that you can't turn around while using Protect makes you very vulnerable to getting routed by the enemy. They don't even have to be a Speedster, a fleet-footed Attacker or All-Rounder can just run around to your front and attack without fear. Protect is another one such move that you cannot use indiscriminately, you have to read the situation and decide if and when it is a good time to use Protect, to defend yourself or your allies.
All together, the crux of your plan of attack hinges on the Shell Armor Ability, as it will only activate when taking attacks from the back. With clever application of your moves, you are effective against melee attackers and ranged attackers alike, but you do have your weak points that can be exploited.
Because you are attacking while defending, it's a little easier for Tutonator to gain EXP than other Defenders. That's to your benefit, as it lets you Level Up at a stable pace in order to evolve your moves.
-
At Level 5, Ember becomes Dragon Pulse or Flamethrower.
-
Move 1a: Dragon Pulse (Ranged)
A long stream of energy is launched outward from the user's nose, dealing damage constantly. Enemies damaged will have a mark that increases in number, which increases the damage they receive from Shell Armor. 8s cooldown.
At Level 11, Dragon Pulse becomes Dragon Pulse+.
Extends the range of the attack.
Dragon Pulse deals constant damage for 4 seconds, during which time, opposing pokemon will be marked by a number for each tick of damage received. For each mark, that opposing pokemon receives an additional 10% damage from Shell Trap when it activates. The mark is cleared afterwards, or 5 seconds afterwards if the mark isn't cleared in time.
Dragon Pulse+ lengthens the distance of the attack by 30%.
I think I know what makes Turtonator a Dragon Type. Dragons have an affinity for ores and precious metals, lending themselves to the stereotype of rich hordes of wealth and such. Turtonator is one such dragon, but instead of gold and riches, it eats sulfuric metals to build its shell. It's a different kind of rich, and one of the smellier kinds as well.
Turtonator uses up some of that combustible power from eating sulfur and expels it as a fetid gas for its Dragon Pulse move. That sounds gross, but it explains why opposing pokemon become more reactive to your Shell Armor explosions when it gets set off. Each hit of damage received from Dragon Pulse adds a counter to the enemy. The higher the counter, the more damage they receive from the Shell Armor explosion, clearing it afterwards.
Of course, the problem is how Turtonator has to turn to face the direction it is attacking to use Dragon Pulse. Basically, you're lowering your shield so that you can attack, but the counterattack damage you can potentially deal is worth the risk. The range of Dragon Pulse also makes it more effective against crowds, but exposing yourself to that many enemies at once is very risky. Better use Dragon Pulse with some backup on your side.
The alternative, Flamethrower, doesn't have such problems, though.
-
Move 1b: Flamethrower (Area)
A fireball is launched in the designated direction, creating a burning trail that lingers and deals damage constantly for a while. Enemies within the burning trail take increased damage from Shell Armor. 8s cooldown.
At Level 11, Flamethrower becomes Flamethrower+.
Extends the distance of the fire trail.
Flamethrower creates a burning trail as the projectile travels. The burning trail lingers for 4 seconds and deals continuous damage to opposing pokemon standing within.
Opposing pokemon within the burning trail receive 35% more damage from Shell Trap explosions.
Flamethrower+ lengthens the travel distance of the projectile, extending the burning trail by an additional 25%.
I've always likened a kindling flame to be the energy of life itself, as it is constantly burning with such vigor and intensity, a lingering heat ignited by the forces of nature itself. How lucky are we to have mastered this baleful power for ourselves, and not be at the mercy of fire spitting drakes like Turtonator, who could immolate us in an instant.
The burning fireball launched by Flamethrower is really hot, and not in a spicy way. It singes the ground as it travels, creating a burning zone area of effect for a short while. The burning flames deals damage continuously, just like other effects like Venusaur's Sludge Bomb or Charizard's Fire Blast, though it does not inflict actual Burns on the enemy due to the flames being propelled by gas, not explosive liquids like they were with Ember.
However, Shell Armor will still deal increased damage to enemies caught in the burning path, meaning that you no longer have to rely on a direct hit to get the damage boost. It basically means you can use Flamethrower to cast an area in damaging flames where your Shell Armor explosions will be at their most powerful, bringing ruination to melee attackers. Ranged attackers will be fine for the most part, but the projectile makes the burning trail for as long as it travels, and the fireball can pass through walls and enemies before expiring, making the area of effect much greater than expected.
The awkward part is how you still have to manage Shell Armor and your positioning while the burning field is in effect. If Protect is on cooldown, you can only threaten the enemy by keeping your back turned to them, and trying to fight back with your basic attack will leave you exposed, dropping your guard for brief moments. This can make Flamethrower ill suited to making an offensive push without using Protect, and even moreso if used to retreat, due to the placement of the burning field.
Still, it covers a wide area, and can greatly assist in defending a Goal Zone against multiple enemies. You just gotta make sure that Protect is ready to go before the enemy makes for a Hail Mary breakthrough past your defenses.
If this starts to happen too often, then you need to Level up your defenses.
-
At Level 8, Protect becomes either Shell Trap or Overheat.
-
Move 2a: Shell Trap (Buff)
The user raises its shell outward, intercepting the next attack. On hit, Shell Armor activates, greatly increasing the size of the explosion. The explosion also deals Piercing damage and Burns enemies for a while. The longer Shell Trap is active for, the greater the power of the imminent explosion. 11s cooldown.
At Level 13, Shell Trap becomes Shell Trap+.
Lengthens the duration of Shell Trap and increases the damage dealt.
Shell Trap makes Turtonator project its back in the designated direction and holds that direction for 7 seconds, much like Protect. The Movement Speed penalty is 30% for all directions except for when moving backwards.
Shell Trap increases the explosion size of Shell Armor by 150% and turns it into Piercing damage. Additionally, the damage of Shell Armor increases by 10% for each second that passes without Shell Armor being triggered. This damage boost goes away if Shell Trap ends without being activated.
This enhanced explosion occurs only once during the buff. If the explosion is set off, Turtonator will continue to hold fast in the designated direction for the duration of the buff.
The explosion Burns all nearby enemies for 5 seconds.
Shell Trap+ lengthens the duration to 8 seconds and increases the base damage by 25%.
Now, because of how volatile the chemicals in Turtonator's shell are, smart enemies will be wary of setting it off deliberately. They will try and work around the shell by attacking Turtonator from the front, or ignore the turtle to try and score in a Goal Zone. I mean, the Shell Armor explosion is much smaller than it looks, so proper spacing can neutralize the defensive presence of Turtonator.
Well, if they want to play the waiting game, they're welcome to bet it all.
Shell Trap massively boosts the damage and size of the Shell Armor explosion, the trick is to trick the enemy into setting it off. See, Shell Trap will only set off one super powered Shell Armor explosion, so throwing it out all of a sudden is one way of fending off an attack. But the power of the explosion increases passively during Shell Trap, meaning the longer it takes to set it off, the greater the impact of the blast. But savvy opponents will be wary of setting this trap off, so one way of triggering Shell Trap is to hold fast while hiding in Tall Grass, with Shell Armor building up power in secret until it's set off in an ambush.
When it comes to ambushes, there are two ways to smoke the enemy out before it happens. Some players will just walk into the Tall Grass, exposed and defenseless, hoping that there isn't actually an enemy in hiding. This is called 'Face Checking' and it's much more common than it should be. See, the alternative would be to fire off an attack into Tall Grass you suspect might have an enemy hiding within it, but this puts that move on cooldown, which will go to waste if you guess wrong. You can see why Face Checking is the more insured option here.
Well, firing off an attack into Tall Grass happens to be one of the best ways to trick the enemy into triggering Shell Trap for you. Simply walk into an unoccupied patch of Tall Grass, "accidentally" reveal yourself to the enemy, then wait with bated breath while Shell Trap is primed and ready. Of course, Sure-Hit attacks cannot actually target you while hidden, and this trick may only work once on attacks that aren't Sure-Hit, but Shell Trap isn't your only trick. You still have Dragon Pulse or Flamethrower for your offensive options, especially if the enemy would rather ignore you in favor of a nearby Objective like Regieleki.
Speaking of which, because both Dragon Pulse and Flamethrower power up the Shell Armor explosion, the resulting damage dealt through Shell Trap will be magnified with a clever combo. Also, Burning enemies receive increased damage from your explosion, which you can inflict with your boosted basic attack. Shell Trap can also Burn the enemy, but the Hindrance is inflicted after damage is dealt and the damage boost will only affect subsequent Shell Armor explosions.
That said, even with the increased explosion size, some ranged Attackers can set off the Ability without consequence due to their superior range, like Deciudeye or Inteleon. The trade off is that they do not have enough defense to tank a boosted explosion, even at full HP, but that won't matter if they attack from beyond the danger zone.
If range is the problem, Overheat is the solution.
-
Move 2b: Overheat
The user raises its shell in the designated direction, intercepting all attacks. While the shell is raised, Shell Armor will not activate, but each hit received builds up power. At the end of the move, Overheat launches a fireball out towards the designated direction, damaging and Burning enemies. 10s cooldown.
At Level 13, Overheat becomes Overheat+.
Increases the size of the fire ball.
Overheat works like Shell Trap and Protect, having Turtonator hold its back in the designated direction for 5 seconds.
For the duration of the move, Shell Armor will not activate when receiving hits, but each hit intercepted increases the power of Overheat by 10% each, with no limit. Critical Hits will still have their damage negated.
At the end of the move, Overheat launches a fire ball in the designated direction. This fireball passes through enemies and walls and reaches far. Opposing pokemon will be Burned for 5 seconds.
Overheat+ doubles the size of the fire ball projectile.
You know how the saying goes, you play with fire, you're gonna get burned. It's one of the easiest lessons in life to learn, but it speaks to the importance of fire safety. A controlled flame is a steady blaze, but if the ratio of fuel and air is imbalanced, you'll either get a snuffed flame, or a raging inferno.
Turtonator's Overheat behaves much like an overfed flame. When used, it stops Shell Armor from activating its explosive counterattack for 5 seconds, but during that time, it is still blocking hits and absorbing damage. These absorbed hits become fuel for the broiling flames within its shell, and when 5 seconds are up, the Shell Armor explosions erupts as a large fireball launching outward in the designated direction.
The whole time Overheat is building up power, Turtonator has its back held fast in the designated direction. The enemy will know that Overheat is active when Shell Armor isn't erupting with explosions on hit. Even so, whether or not Overheat does absorb damage, there will still be a large fireball launched outwards at the end of the move, dealing major damage to all enemies it hits.
The range of the Overheat fireball is not to be underestimated, as it has surprising reach and power. The downside is how you have to wait out the whole 5 seconds for the projectile to be set off, but during that wait time, Overheat can absorb attacks and build up power. This power buildup has no limit, but it is wholly dependent on the ignorance of the opposing team. Obviously, the enemy will hold their fire if Overheat is primed and active, so the move is best used during major fights where everyone's attention is divided, such as during Objective fights like Regieleki or Rayquaza.
The extra range of Overheat makes it easier to use against long range Attackers, especially during fights at an Ally Goal Zone. The only problem is that, well, there's 5 seconds where Shell Armor isn't helping you defend. This makes Overheat much more difficult to use against melee attackers, since they can just walk around the shell and attack your front. All the while, you cannot turn and your Movement Speed is reduced, so you cannot reposition yourself to a better angle while weathering attacks from opposing All-Rounders and Speedsters. And when the attack finally does come out, the fireball is very likely to miss nearby enemies that have surrounded you, trivializing your defensive efforts.
Overheat Turtonator is a Defender that crumbles against focused melee fighters, but excels in potential against ranged attacks. That said, Shell Trap threatens all opposing pokemon nearby, but is better suited to ambushes. Either way, both moves punish inattentive enemies who carelessly throw their attacks around when Turtonator is in the fight, which sort of makes Turtonator rather one-trick. Yeah, a surprise Shell Trap or Overheat only has to work once, but once that gambit is played, you aren't gonna get it again barring a lucky shot. There's gotta be some way to make it work...
We'll get to that. But first, we gotta go over the Unite Move in detail. Watch your step, now...
-
Unite Move: Triple Nitro Turtle (Area)
The user begins crawling on its back, moving at reduced Movement Speed for a short while. For the duration of the move, the pokemon absorbs and nullifies all attacks received. If an opposing pokemon steps on Turtonator's back, the pokemon slaps its explosive back with its tail, creating a massive explosion all around itself, greatly damaging and Burning opposing pokemon.
Triple Nitro Turtle sets Turtonator down on its belly for a short 3 seconds, during which time its Movement Speed is reduced by 75%.
Turtonator can intercept all ranged attacks and nullify them when they pass over its shell.
When an enemy 'steps' on Turtonator's shell, it cancels any and all actions they are taking, with a large and exaggerated '!!' popping up over their heads. Turtonator then slaps its back with its tail, making an audible clack sound, followed by the enormous explosion.
To clarify, this will cancel almost every Movement based attack and will nullify nearly all forms of Hindrance Immunity, including Unite Moves. Only 'warp' attacks like Gengar's Hex or Talonflame's Fly can safely pass over Triple Nitro Turtle.
Opposing pokemon will be Burned for 7 seconds.
The explosion can only be triggered in this way. The Unite Move will end after 3 seconds.
Each attack intercepted during this brief moment increases the damage of the resulting explosion by 10%, with no limit.
Now, I may be old, but are you old enough to hear the words 'mine turtle' and be taken back to 2012? Say hello, everyone.
Ahem, Triple Nitro Turtle may sound like a slick band name, but it's more or less Turtonator simply tripling the chemical constitution of its shell, resulting in a much bigger and much stronger explosion. However, while it does mean that Shell Armor will activate when receiving an attack from any angle, the real trick comes through when an enemy steps on its back.
The last thing you or anyone alive wants to do is to step on a landmine, figuratively and literally. While it is possible to disarm a landmine if you find one, Turtonator is not exactly a living bomb you can negotiate with. During the Unite Move, Turtonator can move about by crawling on all fours, though it is far from the picture of peak agility. It's slow while doing this, but come on, it's a turtle, cut it some slack.
If it does manage to catch an opposing pokemon, Triple Nitro Turtle will set off a massive explosion, greatly damaging the enemy as well as all opposing pokemon in a large area around itself. Any survivors will be inflicted with a lengthy Burn, so your Shell Armor explosions will continue to threaten big damage while defending. Not only that, the shock of stepping on Triple Nitro Turtle is so disruptive, it will automatically cancel all effects of whatever movement based attack the enemy was using, even if it was a Unite Move like Talonflame's Flame Sweep.
Unfortunately, Turtonator really wants to trip up an enemy with its explosive shell, so there's no way for it to manually set off the blast. Also, you only have 3 seconds to work with, so the Unite Move has to be placed in the best spot possible and at the most opportune moment.
Thankfully, the sheer size, power, and utility of Triple Nitro Turtle makes the Unite Move worth the trap, even if you do look a bit silly while waiting for the enemy to fall for the gambit. It's best used during team fights and major objective pushes, where the enemy will be zipping about all over the place, trying to get into the best position, unaware that you're Unite Move is ready to go.
The only bad part about the Unite Move is how risky it is to mistime the attack. You need to anticipate if and when the enemy will try and make for a mad dash to bypass you and your Shell Armor explosions, since the explosion will only set off when an enemy steps on your back. You can try and psyche them out when you're at Level 9, when Triple Nitro Turtle is learned, with the threat of a massive explosion. But Pokemon Unite is a team game, one filled with Shove effects, so you can partner with an ally to skip the game of chicken altogether and just wait for the enemy to get pushed towards you.
Boom goes the dynamite.
-
Achievements
KO 8 enemies with Shell Armor.
The Shell Armor Ability requires careful spacing and positioning in order to be used reliably. While its explosive counterattacks are similar in effect to Garchomp's Rough Skin Ability or the Rocky Helmet Item, Shell Armor will also passively reduce the damage of attacks received from the back, or nullify them altogether if it was a Critical Hit.
The fact that you can further increase the size and power of the Shell Armor explosions is not to be overlooked. Since it deals extra damage to Burning enemies, you have a reliable power boost with your boosted basic attack. Partnering up with other Pokemon that can Burn is a solid plus to your defensive efforts.
And since the damage scales up with your Sp. Attack, you can further increase the damage of the explosions with items like Sp. Attack Specs or Shell Bell. Not to mention the additional damage bonus boons of Dragon Pulse and Flamethrower. Put all of these effects together, and you have one terrifying territorial terrapin with an explosive temper.
As such, it's no wonder that the Achievement calls for amassing 8 KO's or more with the Shell Armor Ability, but this will come with its own set of challenges. For one, only the dim or insane players will fall to Turtonator's Shell Armor explosion multiple times in a match, and they are few and far between, believe it or not. So, in order to earn this Achievement, you have to put in the defensive effort where the Shell Armor Ability can achieve its full potential.
The key to mastering the Shell Armor Ability is to utilize one of its most powerful effects, and that would be the ability to deal damage as you are defending. No player will willingly set off Shell Armor when challenged, so you'll need to put Turtonator in situations where the enemy will have no choice but to engage you. These situations vary, but they typically occur around Objectives or team fights at key areas of the map.
Turtonator is most effective in fights where it is hard to ignore or easy to forget about, such as major scuffles where everything is happening all at once. Its volatile and reactive shell is great at punishing careless attacks being thrown about indiscriminately. You do still have to maintain your position in such a way that your shell is facing the mob fight, but that's easy enough with Shell Trap or Overheat holding your direction steady.
To simplify it, Turtonator drastically improves your team's offensive pressure just by being a part of the fight, which is something no other Defender can boldly claim. But that doesn't mean you will instantly win any and every engagement you're a part of. You still need to use your moves and basic attack carefully, since they all contribute to the power boost of Shell Armor.
Turtonator sure knows how to have fun. You could say it's having a blast. An explosion of joy, even.
-
Holowear
Pokemon with pronounced body parts are always difficult to make Holowear for, and a turtle with an explosive shell is no different. We are rather limited in what holographic clothing we can put on its body without covering its shell. Still, we must try, for the fans of Turtonator.
Starting things off, we have Cook Style Holowear, giving Turtonator a chef's hat, coat, ascot, and belt humorously overstocked with a variety of spices. Then we have Miner Style Holowear, giving it a miner's cap with a battery powered lamp, dirty shirt and rag hanging over its neck, and several sticks of dynamite in a satchel it's carrying around. Pirate Style Holowear gives it a bandanna tied on its head, scruffy shirt, raggedy shorts with a scarf belt, and a linstock strapped to its side. Saftey Style Holowear gives it a hardhat, thick safety goggles, a reflective vest, and a compact dynamite plunger strapped to a belt. And lastly, New Year Festival Style Holowear glams up Turtonator with an impressive red and gold cape dress and belt, a gilded crown, and colorful fireworks effects that follow it around during battle.
There's a noticeable theme of a love of explosions here.
-
Strategy
Defenders are defined by their ability to defend, which sounds obvious, but what does it mean to 'defend'? Are you defending by inhibiting the enemies movement? Are you defending by threatening big damage in a small area? Being a blast turtle hinders you in some areas, but greatly improves your aspects in others.
The secret to Turtonator's defensive prowess is in its explosive shell. Not only does it create explosions on reaction to any hit received from the back, but it also reduces the damage you take. It will also completely absorb Critical Hits, which greatly amplify the explosive power of Shell Armor. The caveat is that these boons only take effect when Turtonator is attacked from the back side, you know, where its shell is positioned. This makes Turtonator's defensive efforts only as good as your positioning.
The irony of having a big, reactive shell tied to your Ability means that your Ability is only active sometimes. As such, you would think that Turtonator would make for a poor Defender, since it is limited in effectiveness when going for an offensive push.
Yes, you do need to be positioned properly to take advantage of Shell Armor, but Turtonator is able to direct its shell with the use of Protect, Shell Trap, or Overheat, so direction isn't an issue most of the time. The problem is that Turtonator is not an easy pokemon to use, as you need to be constantly aware of your surroundings to be an effective Defender.
Even so, the fact that Turtonator's shell can explode, dealing damage in a wide area, from any hit when attacked from behind makes it a dangerous pokemon during team fights. Normally, savvy attackers will not incite an engagement with Turtonator if all it will do is just hold its back out to them. But there's very little you can do if Turtonator is in a situation where you have to engage it. And the aim of the game is to score points, making Goal Zones some of the most hotly contested points on the field.
At the onset of its release, Turtonator is effective against enemies who don't know how the pokemon plays, and will attack it while its shell is up, causing its Ability to take effect. At higher levels, this will not happen as often, as most players are too smart to fall for its Shell Armor shenanigans. To make Turtonator work on a competitive level, you have to force a fight at every opportunity, and maximize each engagement to the benefit of you and your team.
Shell Armor deals extra damage with its explosions based on a variety of factors. In the instant Turtonator receives damage and sets off a Shell Armor explosion, the blast deals extra damage based on the percentage of HP it lost from the attack. This can be as little as a 1% boost or as much as a 99% boost, which makes Turtonator surprisingly effective at tanking Burst Damage. Also, this calculation factors in the raw damage of the attack received, ignoring defensive buffs and shields, so it is possible to have a Shell Armor blast going over 100%, though Turtonator would need to be severely underpowered for this to happen.
It's also unfeasible, so the work around here is that, upon receiving a Critical Hit, the damage is negated and the Shell Armor explosion is set to a maximum 100% boost. Again, you do need to tank an attack on the shell, but this defensive effect can invalidate certain matchups against other pokemon who rely on crits, like Absol or Inteleon.
The Shell Armor explosions also deal 20% more damage to Burning opponents, which Turtonator can inflict with its boosted basic attack. The Burn effect doesn't last that long, so you should pair up with an ally who can also Burn, like Cinderace or Charizard. Also, while you can Burn with Ember as well, the move is forgotten at Level 5, and you won't have another method of inflicting Burn through a move until Level 8, when you learn Shell Trap or Overheat.
This is a minor sacrifice for greater damage potential, as Ember is forgotten in favor of learning either Dragon Pulse or Flamethrower. Dragon Pulse tags enemies with a mark that increases rapidly as it deals damage, but Flamethrower burns the ground, dealing passive damage for a while. The Dragon Pulse marks are cleared when the tagged enemy is caught in a Shell Armor explosion, dealing even more damage the more marks the enemy had. In contrast, the burning ground made by Flamethrower passively boosts the power of Shell Armor explosions, expanding Turtonator's defensive control of an area.
Shell Armor can be further buffed with Shell Trap or Overheat. Shell Trap deals even more damage the longer it takes for the trap to set off, but Overheat absorbs damage and converts it into power for the fireball launched at the end of the move. Both moves have different applications, but either one will be boosted by all the different effects powering up the Shell Armor explosions.
Every aspects of Turtonator's moves are designed to power up its Shell Armor explosions, which places great importance on positioning during fights. Like I said before, the Shell Armor explosions will only go off if Turtonator takes a hit from the back, which can make some engagements rather awkward. For instance, Turtonator is much slower moving while holding its shell up using Protect, Shell Trap, or Overheat, so it is much more vulnerable to ambushes than other Defenders.
Speaking of which, Turtonator has no defense against Hindrances, but that's actually far from the worst thing about it. See, the Shell Armor Ability is automatic, meaning Turtonator could be getting slapped around by every Hindrance in the game, but if one of those attacks hit the shell, it will explode without any input on your part. Also, don't forget, attacks from the back have their damage reduced, so Turtonator is actually well protected during its retreat.
Approaching is a different story, though. If Turtonator has to walk towards the enemy, it will be vulnerable to Burst Damage. This is why Protect, Shell Trap, and Overheat function the way they do for the pokemon, and allow it to walk forward with its back held out, albeit at reduced Movement Speed. Don't get it wrong, Turtonator is great at defending an Ally Goal Zone or when fighting on an opposing Goal Zone, but it is rather vulnerable on the walk in between.
Speaking of speed, Turtonator's ability to turn around is tied to its Movement Speed, which is the same for all pokemon. However, it does suffer a Movement Speed debuff when holding up its shell with Protect, Shell Trap, or Overheat in any direction other than forward. Without these moves, Turtonator must always correct its positioning during team fights to make sure that it is always attacked on the shell. As a result, Turtonator is much more vulnerable to debuffs than it is to Hindrances, as a reduction in its attacking power will also reduce the power of its Shell Armor explosions, never mind any defensive debuffs. A strong reduction in Movement Speed from a Slow Smoke can greatly reduce your ability to turn around, allowing Speedsters and All-Rounders to get in front of you.
Like flipping a turtle on its back.
Unfortunately, this turtle just so happens to excel in this kind of temperamental pressure. See, because the shell is so big, it can be hard to avoid hitting during big team fights. In a major crowd around fights for the objective, Turtonator will be responsible for a large chunk of the damage being thrown around, due to the size of its Shell Armor explosions. Not just here, but also in other big fights like opposing Goal Zones or your own Home Base Goal Zone.
One thing I gotta point out is how Turtonator, as a Defender, relies on those explosions to do big damage, but it ironically cannot be relied upon during moments where big damage is needed. For instance, if an enemy has a Score Shield, there is no way for Turtonator to deal enough damage to break the Hindrance protecting shield the enemy will have. Ironically enough, Turtonator can benefit greatly from a Score Shield of its own, since it will prevent its scores from being interrupted by granting it Hindrance Immunity. And during that moment of Hindrance Immunity, Shell Armor will still be active, meaning a weakened enemy can be KO'd by the Shell Armor explosion while you score uninterrupted. Just a funny thing to think about.
The very last thing I gotta talk about is the Unite Move, Triple Nitro Turtle. While it forces Turtonator to crawl on the ground for 3 seconds, it is blocking all attacks that cross by it. While 3 seconds is not a lot of time to work with, that's not the point of the attack. It's a trap move, requiring an enemy to step onto Turtonator's back in order to set off a massive explosion in the area all around it. Because of how grave and shocking the situation is for the pokemon, the Unite Move will cancel any and all movement based attacks, even other Unite Moves. This means that you can react to certain Unite Move attacks that are clearly telegraphed, like Talonflame's Flame Sweep, or Dodrio's Triple Trample. This Unite Move is effectively useless if used out in the open, in clear view of the enemy, but it is surprisingly effective in crowded team fights, where everyone is throwing out moves and attacks to get the upper hand, unaware that a walking blast turtle with a hair-trigger temper is prowling about, waiting for an excuse to blow up in their faces.
Steer clear of this tricky, naughty, turtle.
-
And that's Turtonator for Pokemon Unite! When I made a post for Lapras for Pokemon Unite, I gave it a similar ability in Shell Armor for some defensive power. But then Lapras got added to the game officially, which I was more than happy about, but also sad that my Shell Armor Ability idea wasn't used. No big deal, other pokemon have the Shell Armor Ability, and Turtonator was the perfect candidate for a Defender backed by an explosive Shell Armor Ability. Oh, and the pokemon itself is pretty cool too, I guess.
That'll be it from me, for now. Come back in two weeks for the next Pokemon Unite post. Here's a hint.

Until next time, see ya.
1 note
·
View note
Text
Magearna for Pokemon Unite!

Season 1
Season 2
Season 3
Prev: Iron Valiant - Primarina - Garganacl - Passimian - Incineroar - Cofagrigus - Glimmora - Galarian Stunfisk - Krookodile - Kricketune
Man made pokemon are nothing new in the series. Why, just look at Mewtwo, cloned from the cells of Mew in an effort to create the ultimate lifeform. Granted, those efforts were misguided, all things considered, but some would consider that a rousing success.
Now, a pokemon made with heart and soul, that's a different sort of power altogether. But that is the core of Magearna, figuratively and literally. It's Soul-Heart resonates with the power of love and friendship, the most powerful force in the pokemon world.
And now it is here, on Aeos Island, seeking victory through the power of teamwork. Your results may vary.
-

The thing about machines is that every design decision is deliberate. Not saying that that's true 100% of the time, but we have to suspend our disbelief when we're talking about man-made pokemon like Magearna. The designer sought to give it very high Sp. Attack and above average Defense and Sp. Defense, at the cost of Speed. Given that Magearna resembles the typical maid in occupation, it lends itself to the rare but always fun 'battle maid' stereotype you see in some anime. A servant powerful enough to defend you, and can do just about anything you request, it's no wonder Magearna was made as a special gift for someone. To that end, its varied services earn it the role of an...
All-Rounder
-
Basic Attack - Ranged/Sp. Attack
A furious volley of fairy energy is launched from the user's arm cannons. The more power Soul-Heart has, the more damage dealt.
Both of Magearna's arm cannons are used for its basic attack. The rate of fire is much higher than other pokemon, so much so that Magearna cannot move while mashing the basic attack button.
The basic attack gains a boost equal to the percentage of Soul-Heart meter the user has.
Now, I'm sure the original creator did not intend for Magearna to be made solely for battle, but it needs some way to defend itself at the bare minimum. A few laser bullet cartridges here, an overclock alternator there, maybe an octane booster or two, and, oops! You've made a war machine. No worries, it happens all the time.
At least they were smart enough to install a limiter. Magearna's basic attack launches shot after shot of fairy energy at opposing pokemon, but the damage potential is limited by the amount of Soul-Heart meter you have gained.
We'll talk about the Soul-Heart meter very soon, but I gotta point out how basic attacks normally limit your movement when you use them. That's how most of them work, very few of them keep you mobile while attacking. Magearna's basic attack is not one such ability. The rate of fire is so high that Magearna cannot move while mashing the basic attack button. It can hit rapidly and frequently enough to give Razor Leaf Decidueye a run for his money, but it will force you to become immobile if you aren't careful about over-mashing.
Fortunately, you can empower the basic attack with a bit of heart and soul. A Soul-Heart, if you will.
-
Ability: Soul-Heart
Each time a nearby pokemon is defeated, their residual soul energy is absorbed by the user, increasing its Defense, Sp. Defense, and bonus HP regained from healing effects. The more power Soul-Heart gains, the greater the boosts. While Hyper Beam, Flash Cannon, or Fleur Cannon are charging, the Ability can be activated to drastically reduce the charge time in exchange for a portion of the Soul-Heart meter, depending on the charge amount.
The user has a Soul-Heart meter under its HP bar on screen. This meter fills up as pokemon are KO'd near the user. Wild Pokemon are worth 5%-7.5% Soul-Heart meter and player pokemon are worth 10%, plus an extra 1% times their Level. The Soul-Heart meter caps out at 100%.
Fake copy pokemon like the Double Team clones made by Greninja and Meowscarada are worth 0%.
Your Defense and Sp. Defense is boosted relative to the amount of Soul-Heart meter you have. The Soul-Heart meter also adds an extra amount of HP when healed. For example, at 50% Soul-Heart meter, any healing effects Magearna receives gains an extra 50% healing power.
The Ability can be activated to skip the charge time of Hyper Beam, Flash Cannon, and Fleur Cannon, at the cost of Soul-Heart meter. For example, if the Soul-Heart ability is activated while Flash Cannon is 50% charged, the remaining 50% will be taken from the Soul-Heart meter to skip the rest of the charge time, unleashing the attack immediately. Any insufficient amount will skip a shorter amount of charge time.
The Soul-Heart meter is emptied when the user is KO'd.
Humans have been going on and on about the 'power of friendship' since the first book was written. The theme of companionship is a constant in old, great stories like The Journey to the West, The Epic of Gilgamesh, Homer's Odyssey, Shrek, and so on and so forth.
The power of friendship is one of the more palpable boons in Pokemon, as friendship makes your pokemon stronger, sometimes literally. But the creator of Magearna actually managed to isolate this power source and fortify the core of this machine, creating the Soul-Heart. Making a robot that can feel is one thing, but empowering it with the power of friendship, a power with no known limits, is a dangerous and exciting development.
As for why KO's power up the Soul-Heart, it has to do with the excitable energy of battle that is quickly lost when a pokemon faints. The residual energy of the spirit of combat is absorbed by the Soul-Heart, imparting upon Magearna the hopes and dreams of victory. That's my take on it, at least. Don't know why it works on opponents just as well. Maybe it has to do with the similar wavelength of the spirit of competition? I'm not a scientist, much less a philosopher.
Anyway! Because Soul-Heart powers up when nearby pokemon faint, Magearna passively gets a boost to its defenses and healing abilities as a fight drags on, for better or worse. However, not every KO is equal in power boosts, as Wild Pokemon are worth a paltry 5% at the minimum. The percentage scales with the amount of Aeos Energy a Wild Pokemon is worth, so a Baltoy is worth just 5%, but an Accelgor or Escavalier is worth about 6% or 7%. It goes without saying that Objective Pokemon like Regieleki and Rayquaza are worth 7.5% max, but you'll be getting more Soul-Heart power from scoring a KO on pokemon from the opposing team.
At the bare minimum, an opposing pokemon is worth 11%, as the extra amount scales to their Level. At Level 15, they are worth 25%, a whopping quarter of the Soul-Heart meter. Your defenses and healing ability increase the higher your Soul-Heart meter gets, and your basic attack becomes extra powerful as well, scaling to the meter. You don't even have to be the one to get the KO as well, you only need to be nearby when the KO happens. You can even have a high Level teammate bite the dust to greatly boost your Soul-Heart meter gain, but sacrificing a teammate is never the optimal strategy, just a contingency plan.
While these boosts are great, there is a limit to how much Soul-Heart meter you can have, which is 100%. Once you've maxed out, you cannot get any more, but you can use it up for something else. Normally, sacrificing your defensive fortitude isn't always the best play, so whatever you're using it up for better be worth it.
Well, you can't rush maid service, but what if you could?
-

At the beginning of the game, you can choose between Defense Curl and Hyper Beam as your first move. By Level 3, you'll have learned both.
-
Move 1: Defense Curl (Buff)
The user retreats into its compressed ball form, gaining a shield and becoming resistant to hindrances for a while. The user cannot use basic attacks while using Defense Curl. 9s cooldown.
Magearna changes into its compressed ball form and rolls around like an Electrode while Defense Curl is active. The move grants you a 15% shield and you become Resistant to Hindrances for 5 seconds.
Your basic attack cannot be used while Defense Curl is active. Defense Curl also cannot be canceled.
There are three pretty notorious laws concerning robots with sentience. We're not gonna look too deep into those laws, considering pokemon are a species separate from humans, but I do want to bring up the Third Law, being that it is totally allowed to preserve its own existence, within reason. Therefore, the designer of Magearna fortified its exterior with dense, durable metal to protect its complex machinery inside, and the easiest way to do that was to engineer a compressed ball form for the pokemon.
It also looks adorable doing it.
Defense Curl makes Magearna retreat into its ball form, giving it a small shield and a Hindrance Resistance buff. You'd think it'd increase its Speed or something, but no, Magearna doesn't ball like that. The move is mainly for protection, which is also why it doesn't allow you to use basic attacks while in ball form. That, and Magearna can't really peek out of its form with its arm cannons all that well.
Being able to fortify yourself is quite the defensive buffer, especially early on. But it's not the best move to start with, since it actually hinders your damage output. You need to reach Level 3 as soon as possible in order to have learned this move, and the other move, which is...
Wait, where'd you get that laser cannon??
-
Move 2: Hyper Beam (Ranged)
The user generates intense power, then unleashes it as a powerful beam a short while later. This move generates more Soul Heart power if it KO's a pokemon. 11s cooldown.
It takes Hyper Beam 5 seconds to fully charge up. The charge meter shows on the screen above your HP bar as a percentage, to visualize how much it will cost to shorten the charge with the Soul-Heart Ability. In contrast, the Soul-Heart meter will highlight how much will be depleted if activated to reduce the charge time; IE when the charge reaches 70%, the Soul-Heart meter will brighten up 30% and decrease as the charge time passes.
While charging, you can aim in any direction. When Hyper Beam is unleashed, Magearna stops in place in order to fire the beam. The attack lasts for 1 second and reaches rather far.
Your Movement Speed reduces by 50% while charging.
This attack generates 2x more Soul-Heart meter on each pokemon it KO's.
When used during Defense Curl or Gear Up, the compressed ball form flips upright and charges the attack in the designated direction, with the attack coming out of the ornamental centerpiece on Magearna's body.
What exactly is the energy being emitted by Hyper Beam? These moves have Types, but the 'Normal' Type is a poor adjective for what's effectively a rail cannon. Is it just 'pure' energy? It doesn't set anything on fire or disperse electricity, so I believe it is entirely concussive. Weird.
Well, power is power, and there's no arguing with this battle maiden. Hyper Beam scales very high off of your Sp. Attack, but the drawback is the long charge time of 5 seconds. This is not something you throw out in reaction to the enemy's presence, and no player will ever stand still long enough for you to line up your shot. All in all, an ineffective attack.
At least, not without Soul-Heart, that is.
The Soul-Heart Ability can be activated to shorten the charge time drastically. Whatever you have to give will cut the charge time down by a specific percentage, based on what you have available. For example, if you have 20% Soul-Heart meter, activating the ability will cut down the charge time by 20%, or 1 second. If the charge time is less than what you're offering, what's left over will be refunded to the Soul-Heart meter.
In the early game, you won't have a whole lot of Soul-Heart meter to use up. Assuming you're gunning down the Top or Bottom lane, there are 4 Wild pokemon to defeat for EXP, plus some extra fodder in the middle of either Lane. Just those 4 Wild Pokemon in the beginning, however, fills your Soul-Heart by a minimum of 20%, which shortens the charge time of Hyper Beam by 1 second if used.
And you don't even have to be the one to KO these pokemon either. Soul-Heart absorbs the spiritual residue of a KO, no matter who got it or if you were even in the fight at all. In the early game fight for EXP, you're always getting something out of these fights, even if you get the last hit taken from you by the enemy along with your hard earned EXP.
As such, Hyper Beam is an extremely powerful equalizer for resolving erroneous Level differences. With half or more of your Soul-Heart meter, you can surprise the enemy with a fully charged Hyper Beam powering up out of nowhere, and it will be 100% worth it, or should I say 200%.
Scoring a KO with Hyper Beam doubles the Soul-Heart meter gained from defeating opposing pokemon. However, this is one of the uncommon cases where Magearna needs to be heavily active in the fight in order to reap this benefit. If you miss the KO, you'll only get the normal amount of Soul-Heart meter gained. Hyper Beam will only double the meter gain if you KO with this move, not even an Assist will count.
The doubled meter gain will not completely refund the Soul-Heart meter you spent on shortening the charge, but the sheer size and power of the move means you will want to optimize the placement of the attack. If you manage to land multiple KO's, you'll see anywhere from a 40% to 60% gain, or even 100% if you get 5 KO's at once against the entire opposing team.
That's just a fluttering dream. Maids work within reason, they aren't genies, you know.
Before we move on, I do need to bring up the fact that Magearna is one of the more EXP hungry pokemon you'll be playing as, what with it being so rare and mythical and all. For up to Level 7, you'll be stuck with Defense Curl and Hyper Beam, so you better learn quickly how to master the Soul-Heart meter.
Maid service isn't for everyone.
-
At Level 7, Defense Curl becomes either Gear Up or Shift Gear.
-
Move 1a: Gear Up (Buff)
The user retreats into its compressed ball form, gaining a shield and becoming Immune to Hindrances for a while. The user cannot use basic attacks while using Gear Up. If Hyper Beam, Flash Cannon, or Fleur Cannon are unleashed while Gear Up is active, the size of these moves is increased. 9.5s cooldown.
At Level 11, Gear Up becomes Gear Up+.
Further increases the shield amount gained.
Just like Defense Curl, Gear Up has Magearna shift into its compressed ball form for 6 seconds, where it cannot use its basic attack and becomes Immune to Hindrances.
Gear Up gives you a 17.5% shield. The shield amount increases to 20% when the move upgrades to Gear Up+.
While Gear Up is in effect, the overall area of damage of Hyper Beam, Flash Cannon, and Fleur Cannon increase by 25%.
Gears are one of the most complicated things humans have made in the last millennium, mostly due to their odd shape. The idea of adding teeth to metal wheels must've been strange, but once we got it figured out, the industrial revolution began, leading to an explosion of technological boom that led us to where we are today.
As such, their iconic shape varies, but the sounds they make is oddly stimulating. It sounds especially so when Magearna is using Gear Up to bolster its defenses. Yes, it has to retreat into its compressed ball form to do so, but at least the move comes with Hindrance Immunity, not just a sizable shield.
It also has the added bonus of increasing the area of damage unleashed by Hyper Beam, Flash Cannon, and Fleur Cannon. Just because Magearna has morphed into a sphere, that doesn't mean it can't attack. Well, it can't use basic attacks still, but the threat of a boosted Hyper Beam is enough to ward off the enemy, especially since you can move while charging Hyper Beam.
The Hindrance Immunity is the most useful part of the move. Yeah, a big shield is nice, especially when it upgrades to give a bigger shield, but becoming unstoppable as you roll around is the best perk of the attack. You don't lose any Movement Speed while rolling around like a ball, so nothing will stop you from rolling in or rolling away from a fight, save for surprise obstacles or certain Unite Moves.
The problem is how you're sacrificing offensive power when you choose Gear Up over Shift Gear, but the defensive buffer is invaluable against burst damage. Keep in mind, your Defense and Sp. Defense are building up as the Soul-Heart meter fills up, so a sizable shield becomes even stronger with enough Soul-Heart meter backing you up. Ideally, you'll want to use Gear Up to stomach the powerful attacks thrown your way while charging Hyper Beam, before expending the rest of the meter to hasten the activation of the move.
Against bulky opponents, the defensive power isn't as useful. I mean, sure, you could foil their attempts to hinder you, but then you'll end up in a stalemate. Thankfully, you get some extra firepower by using Shift Gear instead.
-
Move 1b: Shift Gear (Buff)
The user switches to high gear, increasing its Sp. Attack, basic attack speed, Movement Speed, and can use its basic attack while moving. Its Movement Speed also normalizes while charging Hyper Beam, Flash Cannon, or Fleur Cannon. Additionally, the user can direct Hyper Beam, Flash Cannon, and Fleur Cannon when these moves are unleashed. 9.5s cooldown.
At Level 11, Shift Gear becomes Shift Gear+.
Further increases Sp. Attack, basic attack speed, and Movement Speed.
Shift Gear increases your Sp. Attack, basic attack speed, and Movement Speed by 20% for 6 seconds. Shift Gear+ increases these boosts to 30% instead.
In addition, your basic attack speed can be used while moving. You can also move at normal speeds while charging Hyper Beam, Flash Cannon, and Fleur Cannon.
When these attacks are unleashed, they can be aimed with the Right Control Stick. In the case of Flash Cannon, the landing site can be directed about an extra 50% distance outward.
In heavy duty machinery, there is a baseline of performance it is expected to operate at. It costs more energy to run at a higher power, but the secret to squeezing more torque out of your gears for less is simple, use bigger gears. It's as easy as attaching a small gear and a big gear to a spindle, but higher operating power causes wear and tear sooner than later. Therefore, these machines have a shift function similar to the manual stick in an old fashioned car, which allows the machine to shift into a higher power when the situation calls for it.
All of that is to say, Magearna has a built in overdrive mode for extreme threats. I don't know what the original designer thought Magearna needed to defend itself from, but foresight is twenty twenty, and this seems like overkill.
Also, Magearna does not retreat into its compressed ball form when it uses Shift Gear, as the gears in its body that are running into overdrive need the space in its body cavity to operate.
Anyway, Shift Gear is a powerful boost for Magearna, as it not only boosts your Sp. Attack and basic attack speed, it also increases your Movement Speed, mixing together the buffs granted by X Attack and X Speed, though not as strong individually.
The real value of the boost is how it lets Magearna move while using its basic attack, a powerful volley of shots that increase the more your Soul-Heart meter fills. This lets you strafe about while attacking, allowing Magearna to move into more optimal positions while mashing the basic attack button.
This mobility boost also extends to the charge period of Hyper Beam, Flash Cannon, and Fleur Cannon. Normally, your Movement Speed dips very low while charging these moves, but Shift Gear normalizes your speed. What that means is the boost nullifies the speed drop of those charge effects, neutralizing the Movement Speed penalty. This also means that you can then buff your speed with X Speed or another speed boosting boon from an ally, like Eldegoss' Leaf Tornado, and receive the full benefits of the boosts.
The last boon that Shift Gear provides is the ability to direct Hyper Beam, Flash Cannon, and Fleur Cannon when those attacks come out. You still become rooted to the ground, immobile, for the moment when the attack comes out, but it lets you more accurately aim the attack, especially if you just barely missed your target. Ideally, you'll want to cover more area to damage multiple enemies at once instead of relying on the directing of the attack to patch up your shoddy aiming, but hey, anything can happen in the heat of battle.
While it may seem like Shift Gear is superior to Gear Up in terms of damage, that's because it is, that's the point. While Shift Gear can put some extra damage on opposing tanks, Gear Up provides a reliable defensive boost and has a lower cooldown. Also, Magearna has no way to heal itself, so defensive builds will make the most of the boons gifted by Gear Up, whereas Shift Gear allows Magearna to deal critical damage needed to break through hardy Defenders and bulky All-Rounders.
Whether you need a defensive buffer or more firepower, this maid will always deliver.
-
At Level 9, Hyper Beam becomes either Flash Cannon or Fleur Cannon.
-
Move 2a: Flash Cannon (Area)
The user holds up one arm and begins to charge intense light energy. When unleashed, the light bomb is launched at the designated area, falling slowly. This move generates more Soul Heart power if it KO's a pokemon. 8s cooldown.
At Level 13, Flash Cannon becomes Flash Cannon+.
Increases the falling speed of the attack.
It takes 3 seconds for Flash Cannon to fully charge up. However, when Flash Cannon is unleashed, it takes an additional 2 seconds for the projectile to fall to the ground. The explosion of the attack is very large to compensate. Flash Cannon+ shortens the fall speed to 1.5 seconds.
Your Movement Speed reduces by 65% while charging.
KO's generate 3x more Soul-Heart meter.
Magearna is equipped with all kinds of weaponry, but in the interest of fairness, it is only allowed to pick a select few while in Unite Battles. One option is a mortar shell made of metallic light energy, it's not exactly covert, but big explosions rarely are.
Still, your opponents will not want to linger in the area when they see Magearna charging Flash Cannon. Not only is it a powerful attack, but it covers a wide area. It also has the shortest charge time of your moves, though 3 seconds of charging followed by 2 seconds of air time is still not all that fast, and is easy to dodge.
The utility of the move comes from the area it covers, as the long charge time means the move is allowed to compensate for this with high damage. In a heated team fight, the enemy's attention will be split among your allies, making this the best time to fire off Flash Cannon. If you manage to launch it and score a KO, the Soul-Heart meter gained will triple, making it very easy to invest in the charge time by shortening it with the Soul-Heart Ability.
But that's why the attack has 2 seconds of hang time in the air. You can shorten the charge by activating the Ability, but then the attack wouldn't be fair for the enemy if it immediately came out, being impossible to dodge. Flash Cannon+ shortens the air time, but not by much, but the move is already so powerful, even a marginal boost magnifies the effectiveness of the attack.
Just like with Hyper Beam, Flash Cannon reacts to the effective boost of either Gear Up or Shift Gear. During Gear Up, Flash Cannon creates an even bigger explosion. Given the defensive buffer of Gear Up, you can maintain a fortified defensive position while threatening explosive damage, so much so that you can even withstand damage while at low Soul-Heart meter. The idea here being that, in situations where your Soul-Heart meter is very low, any high damage output you can muster will have to come from either Flash Cannon or Fleur Cannon, but the high charge time makes you vulnerable to unrelenting attacks, which is where the defensive boons of Gear Up would come into play.
In situations against bulky Defenders and All-Rounders, Shift Gear is the superior choice, as you can break through their high HP with the damage and basic attack speed boost. It also lends itself the ability to attack from a distance, with how mobile you can get while using your basic attack. You can maintain the extra distance by directing Flash Cannon, as Shift Gear lets you push it out an extra step or two. By putting offensive pressure on the enemy without jeopardizing your own health, you're making steady progress.
Flash Cannon also has lower cooldown than Fleur Cannon, which makes it easier to use repeatedly. However, Flash Cannon cannot hope to replicate the sheer awesome power beheld by Fleur Cannon.
-
Move 2b: Fleur Cannon (Ranged)
The user generates intense fairy energy in one arm. When unleashed, the beam is fired in the designated direction, greatly damaging all enemies in range. This move generates more Soul Heart power if it KO's a pokemon. 10.5s cooldown.
At Level 13, Fleur Cannon becomes Fleur Cannon+.
Reduces the cooldown of this move.
It takes Fleur Cannon 4 seconds to fully charge. The beam is massive and reaches very far, lingering for 1.5 seconds.
Fleur Cannon+ reduces the cooldown of the move to 8.5 seconds.
Your Movement Speed reduces by 80% while charging.
KO's generate 2.5x more Soul-Heart meter.
Take Venusaur's Solar Beam, add 4 seconds of charge time before the move actually comes out. Extend it a little in length and width. Also, while it is charging, there is a slight audible gleaming sound coming from wherever Magearna is. Now, when the actual attack comes out, the enemy will be hit with a blinding ray of pink fairy energy, and there will be screaming and crying during and after the attack.
That's what Fleur Cannon is like.
The sheer size and power of Fleur Cannon makes it worth the high cooldown and charge time of the attack, and even if it wasn't, you can shorten the charge time with the Soul-Heart Ability. Of course, you still need to have a moderate amount of Soul-Heart meter to spend to shorten the charge time of the attack, but cutting it down by any amount will make it a powerful asset during fights.
Because of how similar Fleur Cannon is to Hyper Beam, a lot of what has been said applies to this move in every way, so I'm not gonna waste time repeating myself. Just keep in mind how Fleur Cannon works with Gear Up and Shift Gear. Gear Up gives you defensive power to withstand hits and charge Fleur Cannon, making it easy to guard Goal Zones. Shift Gear, in contrast, makes you more mobile and lets you aim Fleur Cannon slightly when the attack comes out, covering more space.
You can only have either Flash Cannon or Fleur Cannon, not both. You cannot combine the explosive power of Flash Cannon with the overwhelming projection of Fleur Cannon. Yes, Magearna can learn both moves normally, but it cannot combine the both of them in one attack, that's just not how it works in Pokemon.
In Pokemon Unite, that's a different story.
-
Unite Move: Soul-Heart Resonance (Area)
The user gathers fairy energy from all around itself and draws it into its arms. The fairy energy damages opposing pokemon as it is drawn in. When fully charged, the user launches a powerful projectile made of fairy energy forward in the designated direction. Opposing pokemon will be damaged by the resulting explosion, receiving increased damage the less HP they have. During the charge, the range of Soul-Heart increases and more Soul-Heart power is generated if this Unite Move KO's opposing pokemon. 133s cooldown.
The fairy energy is pulled from all around the user and appears as pink lights being drawn towards Magearna. This light show damages all enemies in a wide radius for 3 seconds.
When fully charged, a large spherical projectile made of fairy energy is launched forward. The projectile erupts in an explosion of fairy energy on hit with a wall or enemy.
The explosion deals extra damage scaling with the amount of missing HP the affected enemies have.
Normally, the Soul-Heart ability only draws in residual soul energy from nearby KO'd pokemon, but during the charging of Soul-Heart Resonance, the range widens greatly. All Soul-Heart meter gained from KO's from this Unite Move increase by 3.5x.
The Soul-Heart Ability can be activated to shorten the charge time of Soul-Heart Resonance.
Magearna is not a weapon.
It is a friend, first and foremost, and a pokemon second.
That said, friends are empowered by their loyalty and dependence on each other, so in order to protect its friends, Magearna needs power. That must be what the original creator of Magearna thought to justify the Soul-Heart Resonance attack. This protocol has Magearna gather up all the residual Soul-Heart energy from all around itself, temporarily going over capacity, before projecting it forward. The attack is dangerous from the get-go, as the volatile nature of Soul-Heart means that it deals damage as Magearna collects this mysterious energy.
And when the attack is launched, something is surely gonna get vaporized.
Soul-Heart Resonance is a very powerful attack. Normally, Magearna converts Soul-Heart energy within its body into power for its attacks, but Soul-Heart Resonance processes the fairy energy in the air at the same time it is drawn in. That is why the charge deals damage passively in a large area before the actual attack comes out. This is bad news for the enemy, as not only are the frail Attackers and Speedsters in danger of getting KO'd, but so are the All-Rounders and Defenders, because the explosive blast of fairy energy deals extra damage based on the missing HP of its targets.
The crazy part is that this charge can also be shortened by the Soul-Heart Ability. However, given that the explosion deals extra damage scaling with the amount of missing HP the enemy has, missing HP lost as a result of the charging fairy energy being drawn in, it will be up to the player on if they use this charge shortening effect or not. Maybe an important KO will get away if you don't cut the charge short, or you're in danger of getting KO'd yourself if you don't let loose the attack in time. Whether or not you have Soul-Heart meter to use, the option is there.
And if you don't, Soul-Heart Resonance grants you 3.5x more Soul-Heart meter gain if you KO a pokemon with this attack, giving you greater dividends off of just one or two KO's on the opposing team. The problem is gonna be actually landing the attack, the damaging light show is very hard to ignore, and with the way the lights flicker and draw towards Magearna, you're leaving yourself open to snipers and long range attacks like Lucario's Aura Cannon, so don't get cocky with Soul-Heart Resonance, especially if you're by yourself.
Maids usually work in teams, you know.
-
Achievements
Use Soul-Heart to shorten the charge time of Hyper Beam, Flash Cannon, and Fleur Cannon for a total of 30 seconds.
The core of Magearna's gameplay is its Soul-Heart Ability. Coincidentally, the core of Magearna is its Soul-Heart, which makes the body of the pokemon more like a mech suit by proxy.
In order to earn this Achievement, you have to use the Soul-Heart meter liberally to reduce the cooldown of Hyper Beam, Flash Cannon, and Fleur Cannon. That means you need to fill the meter first before you can spend it. Thankfully, filling it up is the easy part, as it runs on KO's. In fact, you don't even have to be the one to KO anything to fill it up, you only need to be nearby when something gets Knocked Out, though the amount of Soul-Heart meter gained varies depending on the number of Aeos Orbs the Wild Pokemon is worth, and the Level of the KO'd player pokemon.
Once you have some amount filled, you'll have to learn when and where to use Soul-Heart. Because the Achievement stipulates that you have to use one of three moves, you will always have some way to earn merit for this Achievement. I mean, you could fire off instant warning shots at no one, but given how difficult it is to regain Soul-Heart meter, you're better off fishing for KO's, especially since these attacks have a boosted refund effect when you land a KO.
Remember that Soul-Heart as an Ability is also passively boosting your defenses as well as your healing potential, so sacrificing all of it just to skip the charge of your most powerful moves is a highly risky, highly rewarding gamble. Which is why it is ill-advised to use it all up wantonly just to earn this Achievement. Magearna has no way to heal itself outside of items, but increasing its reception to healing makes it easier to support.
That said, you'll also have to learn how to time the Soul-Heart Ability to shorten the charge time of Hyper Beam, Flash Cannon, and Fleur Cannon. By that I mean learn how to quantify the charge time of these moves. In my vision, these moves will have a percentage on display underneath the HP bar when they are used, which fills up from 0% to 100%, depending on the charge time of the move used. That does mean that they will all charge at different speeds, so it might take some getting used to. Visualizing the charge percentage in this way means you'll be able to tell how much the Soul-Heart meter will be drained to shorten the charge of the attack.
Now, to be blunt, it will take something to the effect of 6 instant Hyper Beams to earn this Achievement, since your objective is to shorten the charge time of these attacks collectively by 30 seconds. That's far from ideal, and not realistic. Spending 50% of the Soul-Heart meter to halve the charge time of Fleur Cannon results in 2 seconds saved, which means you would have to do that 12 times or so to earn this Achievement.
In order to profit off of spending all of that Soul-Heart meter, you have to aim for KO's when you shorten the charge time of these attacks. Each of these moves grants a major refund of Soul-Heart meter off of a KO, but it will never be enough to fully replace what was spent, unless you KO more than one enemy with the attack. You're best bet to maximize the return on Soul-Heart is to adequately combine the range boosts of Gear Up or Shift Gear with your chosen attacking move to expand your influence, greatly increasing your likelihood of earning a KO during a team fight.
To master Magearna, you have to take this advice to heart, or should I say, to Soul-Heart.
-
Holowear
Just a reminder, 'Holowear' gets its name from the holographic articles of clothing made for the pokemon, as they are made of light so as to not impede the pokemon in any way during battles. The pokemon are 'wearing holograms', hence the tearm 'Holowear'. That's a good thing, as I'm sure regular clothing will get torn to shreds by Magearna's body when it has to transform.
Starting things off, we have the classic Cook Style Holowear, giving Magearna a cook's shirt and tie, apron, and sash with ladles and spatulas tied to it, no room for big hats, unfortunately. For a more regal flair, Fair Style Holowear sees Magearna dress like a medieval princess, with the pointy hat and flowing dress. Magical Style Holowear gives it a curved witch hat with a short brim, with its 'ears' sticking out, and a modest robe to cover its torso and ball body. Leaning more into the fantastical side of things, Celestial Style Holowear decorates its body with stars and rings, to give it a sort of heavenly vibe. Lastly, Chrono Style Holowear venerates Magearna with large clock hands pointing out from behind its head, the Roman Numerals I to XII pinned on its body in a clockwise pattern, several brass pins and coils on its body, and a toy Hoothoot on a mechanical arm clipped onto its head pointing forward, making it look like some sort of time god.
Yes, I know what the real time god looks like, but let Magearna have the moment, ok?
-
Strategy
Oh Magearna, sweet little toy, age has not weakened you or your gears in the slightest, have they? You remember how your friend would smile and laugh at your dances. You reminisce on the love felt by their hands as they cleaned your body down with a rag, polishing to a shine. Ah, but those days are gone now, but your memories persist. You remember what friendship feels like, it empowers you. Though friends are temporary, change is forever. Wield the power of friendship like a blade, and you will have the power to keep your loved ones close.
Magearna is a pokemon cursed by time. Its immortal body forces it to watch life march onward without it, like a clock. As such, its Soul-Heart ability is well suited to capturing the power of friendship of its allies and turning it into a wish, a hope for victory. When pokemon nearby are KO'd, the Soul-Heart meter is filled slightly. With this Soul-Heart meter, Magearna is capable of great things.
As an All-Rounder, Magearna is capable of heavy firepower and impenetrable defenses, but it cannot excel at either one. This is evident with its Level Up choice of Gear Up and Shift Gear, forcing it to choose between defense and offense. The choice may not always be clear, depending on the battle, so the onus is on the player to identify which move is best.
Between Flash Cannon and Fleur Cannon, the former holds a surprising amount of defensive potential. For having the shortest charge time and cooldown, Flash Cannon helps fortify Goal Zones by threatening major damage to the area it is launched at. Given its slow projectile speed, the high damage justifies the drawbacks of using Flash Cannon offensively. No opponent will dare to make for an offensive push if Magearna is nearby charging Flash Cannon.
And if Magearna has chosen Fleur Cannon instead, the entire Lane is the danger zone for the enemy.
Fleur Cannon is not an instant victory, however, due to the move's high charge time, high cooldown, and high dependency on the Soul-Heart meter in order to be used effectively. While it can be used without any charge time reduction, Magearna suffers the greatest Movement Speed penalty while using the move, without the buff from Shift Gear. If used during a team fight, an especially bold opponent can try and close the distance before the attack comes out.
In this situation, there are three things to consider. If Magearna has a sizable amount of Soul-Heart meter, the Ability can and should be activated to shorten the charge of Fleur Cannon. In this scenario, the enemy will have very little time to react to the attack, but it will force you to expend much of the meter just to skip the charge time, which would have rendered you vulnerable. If you don't have a lot of Soul-Heart meter, this will put you in a precarious position, as low Soul-Heart meter also means you aren't buffed with a lot of Defense and Sp. Defense. In contrast, if your Soul-Heart meter is nearly full, you might actually be able to stomach the oncoming attack with the defense boosts, so it might not be worth spending so much of the Soul-Heart meter in a panic.
Speaking of which, since Magearna doesn't need to KO a pokemon to generate Soul-Heart meter, only needs to be close by, it could make do with the EXP Share item to help itself and its teammate. Of course, this means forgoing the Central Area at the start of the game. Ah, but the Wild Pokemon in the Central Area are worth more Soul-Heart meter in total compared to the ones in either Top or Bottom Lane, so it's up to you on which area benefits your build and playstyle the most.
In regards to actual combat, Magearna does need not just souls for its Soul-Heart meter, but also EXP, since it gets its first evolved Move at Level 7, and then once more at Level 9. Being a Mythical Pokemon comes with its ups and downs, and being so EXP hungry can be mildly burdensome to the team if you fall behind. As such, you'll have to play dirty to score some cheap KO's to come ahead in the level curve, but this can lead to some interesting situations.
How many times has this happened to you? You're behind on EXP, so you splinter off from the pack to take on Wild Pokemon. Just as you're about to Level Up, your KO gets taken from you from an ally or enemy. It's infuriating for the average player, but for Magearna, not so much. Remember, whether or not Magearna actually lands the KO, the Soul-Heart meter will be filled. You'll lose out on the stolen EXP, but your Soul-Heart meter is filled all the same. If you've been grinding EXP for a while, you'll find yourself with a close to full amount by this point, which means that, if you choose to, you can engage the enemy with bolstered defenses, improved healing abilities, and the ability to launch a surprise Hyper Beam at your leisure. These boons can make up for the Level disparity against an overleveled enemy, but you still run the risk of getting KO'd. Still, this power is leverage for you, and well worth the risk.
But if you do get KO'd, you'll lose out on the Soul-Heart meter you've built up. That means that after biting the dust, you'll have to build it all up all over again, which means joining more fights. If it happens just before a critical moment, the lost defenses might end up losing you Rayquaza or Zapdos. Again, it's up to you on whether or not the fight is worth it, but the risk is easier when it's shared between you and a Supporter ally.
Soul-Heart increases not just your defenses, but also your healing potential. A simple Potion may become even more effective when the Soul-Heart meter is full. This also extends to items like Shell Bell, which is a small consolation for those games you join without a healing Supporter. But if you do pair up with a healer, you're gonna have to work to keep each other safe. I mean, it goes without saying, support your Supporters, but it seems so easy to forget nowadays.
The other thing Soul-Heart boosts is your basic attack, though that is a feature of the basic attack itself, not the Ability. Magearna can launch multiple projectiles through its arms with its basic attack, but these projectiles scale very low to your Sp. Attack. It's for balancing reasons, due to how many shots you can fire by mashing the basic attack button. The power boost of your basic attack is also a compelling reason to keep your Soul-Heart meter filled, as basic attacks generally never miss and cover a wide range around you. You can only hit one enemy at a time, and you're at the mercy of your basic attack settings, but it's a reliable attack when all of your other moves are on cooldown.
Now, because of how much stronger Magearna becomes the more its Soul-Heart meter fills up, it can become difficult for the enemy team to take on when it has fully powered up. A filled Soul-Heart gives Magearna increased defenses and healing ability, its basic attack power has doubled, and it can unleash its powerful cannon moves instantaneously, so what recourse is there for the enemy team?
Patience.
If Magearna has full Soul-Heart meter, it will not gain anything extra from more KO's nearby, leading to a sunk-cost fallacy. This makes Magearna strong, but also impulsive on when and where it uses its instant cannon attacks. Good Magearna players will balance the Soul-Heart meter with the potential Soul-Heart gain from getting KO's with its attacks. Great Magearna players will cash in only the necessary amount of meter to secure important attacks, to secure the refund from the KO's it gets.
Between all Magearna players, they will have to use up Soul-Heart meter for its attacks, and that moment after spending is when they are most vulnerable. Using up Soul-Heart meter reduces the defensive buffs and power for their basic attack. Granted, Magearna still hits hard and has high defensive stats without Soul-Heart, but its healing potential is also reduced, so going for the KO at this point is the most optimal plan of counterattack. Savvy players will spend their Potions just before using up the Soul-Heart meter, but against equally savvy opponents, this can quickly turn into a game of chicken, betting their HP until one folds.
Without Soul-Heart meter, Flash Cannon and Fleur Cannon turn into suspenseful attacks. The attack will deal big damage, but Magearna is just as vulnerable during the charge of these attacks. If it gets KO'd, the attack will be stifled. This makes Magearna vulnerable against opportunistic Speedsters. Even with a half full Soul-Heart meter, the enemy only needs to bait out the Soul-Heart charge attack before going in for the kill.
Of course, Magearna can defend itself with its basic attack, but this backup plan falls apart if it has to fight a 2-on-1 onslaught. Magearna also struggles against Defenders, who can power through its basic attacks and cannon moves. The faster Defenders like Crustle and Blastoise will give Magearna the run around as well, and when you add in Hindrances, it becomes very difficult for Magearna to get a leg up on the competition.
This is what I mean when I say the choice between Gear Up and Shift Gear isn't always gonna be clear cut. Magearna is notoriously vulnerable to Hindrances due to the Movement Speed penalty and charge time of its cannon attacks, so it needs clever use of Gear Up and Shift Gear to work around Hindrances. Gear Up helps it ignore Hindrances all together, but Shift Gear makes you mobile enough to dodge them. The correct choice is more nuanced than that, with moves like Charizard's Flare Blitz nullifying the agility boost of Shift Gear, but like I said, that's where the player skill comes in. Correctly identify which fight to prepare for and Magearna will serve to satisfy.
Magearna, at your service.
-
And that's Magearna for Pokemon Unite!
I was originally gonna make Magearna an EX pokemon, but then Pokemon Unite did away with the classification a few months ago. It's just a title anyway, and it's not like Magearna is so powerful that it required an EX moniker or something to that effect.
I will be having an EX pokemon in this season, though, and a properly powerful one too. Look forward to it when the season comes to a close.
Magearna marks the halfway point of Season 4. Let's keep up the pace. For the next pokemon, here's a hint.

Until next time, see ya.
3 notes
·
View notes
Text
Suicune, Alolan Raichu, and Alcremie are coming to Pokemon Unite! (and my Alcremie draft is now obsolete)

So, I woke up early to watch the Pokemon Presents and was rather excited to see new trailers and stuff, especially for Pokemon Legends ZA. When the section for Pokemon Unite came, I was expecting little, since I'm up to date on Pokemon Unite rumors and leaks.
I did not expect to see Alcremie announced officially.
That's all well and good, I'm happy for the players, especially Alcremie fans.
I just need to decide what to do about my obsolete Aclremie draft.

If you've been following my blog for my Pokemon Unite posts, you'll know I'm currently about halfway into Season 4 of my series of fan posts for pokemon I want to see in Unite. I've done a lot of posts, some of them might even be your favorite, but with so many pokemon and even more ideas sitting in my draft, it's not uncommon for my posts and drafts to become obsolete as new pokemon are added officially in Unite.
Unfortunately, Alcremie was in the line-up for Season 4. Now I have to replace it with another Supporter.
Don't mind me, just lamenting how this is happening for the first time. I mean, I'm usually up to date on rumors and leaks for Pokemon Unite, so I was taken aback when I saw the official announcement slap me in the face like a birthday cake surprise. If I had known Alcremie was in the works, I would've put in a different pokemon. Ah well, that's just how the cookie crumbles.
I'll post the obsolete draft when Alcremie is released. I had a really good idea for it as well. I could give the moves and function to another potential Supporter, but I wanna wait and see what the official version of Alcremie will be like before that.
If you want to see my Unite posts, check out my blog. If you like what you see, feel free to give me a follow. You can even send me a message requesting a specific pokemon. I'm open to all suggestions.
3 notes
·
View notes
Text
Kricketune for Pokemon Unite!

Season 1
Season 2
Season 3
Prev: Iron Valiant - Primarina - Garganacl - Passimian - Incineroar - Cofagrigus - Glimmora - Galarian Stunfisk - Krookodile
DELELELELE-WHOOOOOOP!
That's it. That's the introductory post.
What, you want more? Well, Kricketune is not averse to Encores, except it can't learn the move.
I mean, being an early game Bug that becomes irrelevant in the power scaling of the PokeDex early on is a hard knock life for any pokemon, but Kricketune is better known for a different sort of notoriety.
It's not strong, it's not bulky, we don't even know what its songs sound like. All I know is that I want to see this pokemon in Unite, and you will all hear it before you see it thanks to its easily identifiable cry.
Which sounds like DELELELELELE-WHOOOOOOOP!
-

So yeah, I wasn't kidding when I said this pokemon wasn't all that strong or tough, but that's to be expected of a pokemon you can catch early on. These early game Bugs are lucky if they see the third Gym before they are put in a PC Box for the rest of the adventure. Still, there is something to be said about Kricketune and its longevity, like a bad joke that won't die. All you ever hear about this pokemon is how funny its cry is, which is insulting. Kricketune is a musician, and it is a master of the sound waves. Sound is pretty fast, so I believe this pokemon is best suited to the role of a...
Speedster
-
Basic Attack - Melee/Attack
The user strikes with close range sound waves. If there is an active beat, attacking in time will preserve the tempo and deal increased damage, prolonging the duration of Growl, Bug Buzz, Perish Song, and any active buffs.
The sound waves are shallow, reaching out as far as the average melee basic attack range.
The basic attack has to be timed within 5 frames of the beat to increase the damage of the basic attack by 50%. Attacking on time also prolongs the duration of Growl, Bug Buzz, Perish Song, and all active buffs by 0.7 seconds.
The basic attack can maintain the tempo from certain moves, even when their effects have ended. In the case of Bug Buzz and Perish Song, the tempo will revert to normal when the effects of these moves have ended.
This basic attack is unaffected by basic attack speed modifiers.
The power of music is easy to harness when you have a built in violin in your body. Even a little baby bug like Kricketot can bring some harmonious hurt when it hits the right high note.
Of course, the music is only as good as the player, so when you use your basic attack, you need to play in time with the tempo. This is the trade-off for a Speedster to have a wide ranged Melee Attack, along with the fact that your attacks scales extremely low for a Speedster. We'll go into more detail on that later.
For now, we gotta study up on the music sheets provided for us. Any good musician knows how to play with their heart as well as their hands. Kricketune does not have hands, but I'm sure it's got at least one heart within its buggy body.
-
Ability: Run Away/Technician
Run Away (Kricketot)
Using certain moves starts a tempo which passively increases the user's Movement Speed, up to a certain limit.
Technician (Kricketune)
Using certain moves starts a tempo which passively increases the user's Attack and Movement Speed, up to a certain limit. Dealing damage perfectly on the beat grants the user temporary Invincibility. KO'ing an opposing Pokemon during an active tempo restores some HP.
When Growl, Bug Buzz, or Perish Song are used, a musical note graphic appears over your HP bar and 'jumps' in time with whatever tempo is set. Run Away passively increases your Movement Speed by 7.5% a second for the duration of the tempo, maxing out to 75%. Technician passively boosts your Attack and Movement Speed by 15% a second, maxing out to 150%.
The tempo can be maintained by using a move or basic attack within 5 frames of the beat. Growl, Bug Buzz, and Perish Song establish a tempo for a set amount of time, during which the beat is maintained even if you miss. However, when these effects end, the tempo will end if you miss a beat two times.
When you deal damage to an enemy perfectly on the beat, 1 frame within the tempo, you will become Invincible for 1.5 seconds.
KO's restore your HP by 10% when a tempo is active.
Crickets in real life are known for one thing, and that's making noise at all hours of the day, hiding annoyingly well, and quieting up when you are nearby so you can't find them until you flush them out with a water hose or something. Okay, it's multiple things, but some days you just want peace and quiet, not shrieks and riot.
Well, these bugs just can't help it. They specialize in audible arias for communication as well as for battles, and the strongest crickets will know the best songs to play. I don't mean to oversell these abilities, since Kricketune is far from an overpowered pokemon, but among its peers it's got quite the musical charm.
As such, they've always got a mellow tune playing in their heads, so when there's an active beat going on, their powers get a passive boost. For Kricketot, it's a bit of Movement Speed, but for Kricketune, it's that as well as an Attack boost. Not only that, if Kricketune uses a move perfectly on the beat, you'll become Invincible for 1.5 seconds.
It's quite the lengthy Invincibility period, but the timing is extremely strict. For reference, the tempo will extend a little bit if you use your basic attack within 5 frames of the beat, or 1/12th of a second within the beat. Pokemon Unite runs at 60FPS on Switch when docked, so this is a very tight time frame. Of course, if you're good at rhythm games, you should be able to maintain a beat. But if you're REALLY good at video games, you'll get the covetous 1 frame beat hit, granting you 1.5 seconds of Invincibility.
1.5 seconds of Invincibility doesn't really sound all that far, and it isn't, but the Ability requires a frame perfect input, which is difficult for any gamer to land. Also, you're expected to do this on Pokemon Unite, one of the laggier games on the market. Good luck with that.
On the upside, a passive boost to your Movement Speed and Attack means that you'll slowly get stronger when there's music playing in your head. However, while Growl, Bug Buzz, and Perish Song are how you're intended to set a tempo, they will not last long enough for you to reach max power. This is where the basic attack comes into play, as hitting a beat with your basic attack extends the duration of the tempo by a little bit. It's not a lot, but if you're on the mark with each press, you can keep the tempo up indefinitely, until you use another move or get incapacitated by a hindrance.
This is why the range of the basic attack is on the shallow side, even though it can hit all around itself. You have way more coverage than the average Speedster, but your base Attack is low and your moves do not scale your power very high. You need one or two lucky shots with the timing of your tempo in order to get the Invincibility buff and survive an encounter with the opposing team. That said, the basic attack is far from your strongest move, and it is not always optimal to use your basic attack to extend the tempo if the range of your other move is preferred.
Speaking of which, let's look at your instruments of choice.
-

At the beginning of the game, Kricketune will start out as Kricketot. You can choose between Pound and Growl as your first move. By Level 2, you'll have learned both.
-
Move 1: Pound (Dash)
The user jumps and pounds the ground. This move can be used repeatedly if the attack is timed to the beat of an active tempo. 3s cooldown.
The range of Pound's Dash distance is very short. It barely qualifies as a Dash attack.
The cooldown of Pound is reset if used within 5 frames of the beat of an active tempo.
Before evolving into Kricketune, this little bugger makes music by rattling its antennae. When your arms are so short they don't even qualify as body parts, you make do with what you have in order to make music. For Kricketot, the world is a drum, and it is the sticks that play a sick beat.
A shallow dash attack may not be the most impressive thing for a Speedster to have, but it makes a pretty fun noise when it hits something. And if this Move is used on the beat of an active tempo, the cooldown is reset. I was not being facetious about the drum and stick metaphor, the world is your theater, and you are the drummer with a big enough stick that the world responds to your strikes with sound.
Of course, Kricketot is a tiny little bugger, so its less big sounds making waves and more a melodious mashing of sticks and stones to make tunes and tones.
Speaking of which, let's hear what this titillating tempo sounds like.
-
Move 2: Growl (Debuff)
The user unleashes a short ranged sound wave that resembles a shrill cry. This creates an active tempo that passively reduces the Defense and basic attack speed of nearby opposing pokemon. 10s cooldown.
Growl creates sound waves that surround the user, passively reducing the Defense and basic attack speed of nearby opposing pokemon by 30%. Growl lasts for 5 seconds.
Growl also starts a tempo that plays at 120 bpm, or 2 beats a second. The tempo can continue to play out if your basic attacks are pressed in time with the beat, though the effects of Growl will expire when the move ends. The tempo will be maintained during Growl even if you miss a beat, but if the effects of Growl expire, the tempo ends after two misses. Hitting offbeat counts as a miss.
Remember, no knife-like arms means Kricketot cannot make the screeching sounds of regular crickets, at least not yet. So, what Kricketot does have going for it is an impressive set of lungs that disarm nearby enemies. It just so happens that, since Kricketot tend to act as a choir for the Kricketune superiors, they are really good at harmonizing these powerful sound waves.
Not powerful enough to deal damage, but Growl does offer a variety of boosts and boons. First off, since it is a constant hum of sound waves, it surrounds Kricketot with rebellious grumbles that weaken nearby enemies. It reduces their Defense and basic attack speed by a mild amount, which drastically improves your matchup against most pokemon at the start of the game.
Of course, your base stats are very low, and they will still be on the low side after evolving, but this is better than nothing, and you can easily work around your frailty with clever movement. At this stage, your Ability Run Away will passively boost your Movement Speed while there is an active beat going on. Growl is your only option at the beginning of the game to start a tempo, so if you've got a favorite song that plays at the same beat as Growl, you'll be tapping away with percussive persistence as the song plays out.
Just to clarify a few things, Growl actively debuffs the enemy as it is in effect, so missing beats will not end the effect prematurely. However, the tempo can be extended by your basic attack, which requires a close enough hit of the beat as it plays. Your Ability, Run Away, passively increases your Movement Speed up to a certain point, and you will only hit that cap if you keep the tempo going long enough using your basic attack. When you evolve into Kricketune, Technician will increase your Movement Speed and Attack by a greater amount, heal you for a bit of HP for each KO, and granting you momentary Invincibility if you deal damage right on the beat. That's a big 'IF' though, all things considered, and your basic attacks is far from your best option in the middle of a team fight, as you'll soon find out.
Very soon, actually. For a Speedster, Kricketune reaches its full potential a lot sooner than normal.
-

At Level 4, Kricketot will evolve into Kricketune. At the same time, Pound becomes either Fury Cutter or X-Scissor.
-
Move 1a: Fury Cutter (Dash)
The user dashes and cuts with its scythe-like forearms. This move can be used repeatedly if the attack is timed to the beat of the tempo. Repeated successful attacks increase the damage of Fury Cutter, up to a certain amount. When timed perfectly, piercing damage is dealt. 4s cooldown.
At Level 10, Fury Cutter becomes Fury Cutter+
Increases damage dealt. The damage boost and upper threshold of max damage is increased.
Fury Cutter has its cooldown reset if the attack is timed within 5 frames of the beat. If timed within 1 frame, the attack deals Piercing Damage.
Each successful repeat hit of Fury Cutter increases the damage of the move by 10%, up to 50% maximum. Fury Cutter+ increases the base damage by 30%, increases the repeat hit damage boost by 15%, and increases the maximum damage threshold to 75%.
The violin is a magnificent instrument, able to harmonize beautiful sounds when the bow is sliding across the strings. It is also on the delicate side, since those strings are wound tightly to get the resonance just right. You should never do what Kricketune is doing here, slashing and slinging its blades back and forth repeatedly and quickly, you're gonna saw the darn thing in half like that.
Kricketune graduates from sticks and drums to scythes and strings, but there are no strings on me, or on this bug. No, you misunderstand, you are the strings, and you are about to make some beautiful music when on the receiving end of Fury Cutter.
Without an active beat, Fury Cutter is a simple dash attack that cuts down enemies, but the damage scales very low, so it's not at all impressive. When Growl is in effect, though, Kricketune is filled with musical rhythm and Fury Cutter becomes the musical equivalent of a woodworking craftsman who loves their job a little too much. Fury Cutter has its cooldown reset when used on the beat of an active tempo, which not only causes the next attack to deal increased damage, but can also deal Piercing Damage if the beat was spot on, frame perfect.
Now keep in mind, Technician is passively boosting your stats while an active tempo is in effect, so the multiplying stat boosts gained through Fury Cutter will skyrocket with enough timed attacks. Also, Technician grants momentary Invincibility if Fury Cutter lands a perfect hit, which is great since this is a Dash move, and most Speedsters are allergic to crowds. But you are waging your rhythmic button presses against the reliable steady connection of Pokemon Unite, so place your bets carefully.
Of course, if your enemy likes to huddle together, that can mess with the acoustics of the music session. Shift your tune with X-Scissor instead.
-
Move 1b: X-Scissor (Area)
The user starts spinning melodically, moving around at increased Movement Speed for a while. During the attack, X-Scissor can be used to create an X shaped slash attack around the user, and can be used repeatedly if timed on the beat of an active tempo. If timed perfectly, a second X attack is made. This move has a high Critical Hit Rate. 7s cooldown.
At Level 10, X-Scissor becomes X-Scissor+.
Further increases Movement Speed and the Critical Hit Rate.
X-Scissor makes Kricketune spin melodically, having the Pokemon 'dance' as it waves its arms together as if it were playing a violin very enthusiastically. This lasts for 6 seconds and your Movement Speed increases by 20%.
Pressing the Move button again makes a large 'X' shape attack cover the area around the Pokemon, with Kricketune being in the center. Normally only one 'X' attack can be made during the move, but if used within 5 frames of the beat of an active tempo, the attack can be used again. If timed perfectly within 1 frame of the beat, a second 'X' attack is made at a skewed angle.
The Critical Hit Rate of the move is 12.5%. X-Scissor+ increases this to 16% and also increases the Movement Speed boost to 35%.
The move X-Scissor was the best thing to have happened to Bug Types, right after Tail Glow and Signal Beam, in spite of their limited distribution. I mean, sure, the move came out at the same time as Stealth Rocks, but you win some, you lose some, and sometimes you lose hard.
Well, it matters little to Kricketune, as it was born to rub its knife-like arms together, for music and for battle. I mean, disregarding its initial life stages as a Kricketot, but, you know what I mean. X-Scissor sends Kricketune into a manic melodic trance made manifest, where it spins about slowly but has its Movement Speed increased. It looks a little odd, watching it twirl about while holding its knife-like arms together, but its actually maintaining tension in its blades in preparation for the actual X-Scissor attack.
When you press the button a second time, a huge 'X' appears from Kricketune's slashing arms unleashed. This wide area attack is surprisingly big and has a high Critical Hit Rate, easily cutting down frail or weakened enemies if it hits. This by itself would make X-Scissor a decent attack to throw out as a Speedster, but Kricketune has not endured grueling hours of band practice just for one stroke. If there is an active tempo in effect, from Growl or from another evolved move, using X-Scissor on the beat lets you attack again while Kricketune is still spinning.
And if you hit the X-Scissor on the market of the beat perfectly, a second 'X' attack occurs very quickly. Given the high Critical Hit Rate of the move, you are heavily incentivized to hit on the beat as much as you can, especially since the Technician Ability makes you Invincible on a perfect hit.
Between Fury Cutter and X-Scissor, Kricketune is surprisingly well equipped to deal high damage in spite of its low base stats. That has to do with its musical synchronization guiding its attacks, which can only make Kricketune as strong as its harmonic prowess. Growl establishes an easy enough tempo to follow, but aside from that, it only debuffs enemies when they are nearby, which is not ideal for a Speedster lacking in movement options.
Of course, if your own rhythmic arithmetic is lacking, you'll find it hard to play Kricketune very well, especially when you need to level up from growling and go straight into buzzing.
-
At Level 8, Growl becomes either Bug Buzz or Perish Song.
-
Move 2a: Bug Buzz (Buff/Debuff)
The user starts humming with its wings, unleashing a powerful short ranged sonic wave all around itself, granting the user immunity to debuffs for a while. The sound waves deal damage to and debuffs the Defense of all enemies within range. While Bug Buzz is active, the tempo changes, increasing in speed. If an attack deals damage perfectly on the 4th beat, the enemy will be Stunned very briefly. 9s cooldown.
At Level 12, Bug Buzz will become Bug Buzz+.
Expands the range of the sound waves.
Bug Buzz lets loose a series of sound waves from the pokemon's insect wings, damaging nearby opposing Pokemon and reducing their Defense by 50% while within the area of effect. The user also is immune to debuffs while Bug Buzz is active. Bug Buzz lasts for 5 seconds.
Bug Buzz starts a tempo that plays at 180 bpm, or 3 beats a second. If an attack damages an enemy within 1 frame on the 4th beat, that enemy will be Stunned for 0.5 seconds.
Bug Buzz+ expands the range of the sound waves by 30%.
I never really clarified what the tempo of Growl is supposed to sound like, but that's a little difficult to convey through text. I mean, I could hyperlink a video with the theme that plays the song at the listed tempo, but that would make the post a little messy. Well, messier than it already is.
Instead, I'm gonna refer to the tempo and beats to pokemon music you may already be familiar with. The tempo set by Growl is 120 BPM, or 2 beats a second. The Pokemon Evolution theme in all mainline games follow the same BPM, so tap your foot or fingers to that bop and you'll know how to play to the tempo of Growl.
Bug Buzz, however, ups the tempo considerably, shifting the beat to 180 BPM, or 3 beats a second. Now, this tempo is a lot rarer in pokemon music themes, but if you are a fan of Kricketune, then you're probably a fan of Gen 4 and its music. As such, refer to the battle theme for the Team Galactic Boss Cyrus, or 'Battle! (Team Galactic Boss)' as it is called. That particular theme plays at 180 BPM, so look it up on your preferred medium and start tapping your foot.
You'll need a sense of rhythm to use Bug Buzz to its full potential. Once Kricketune starts humming, it becomes the center of attention for about 5 seconds. Not because it's attracting attacks to itself like the move Follow Me, it's just that the sound waves deal damage passively, they reduce the Defense of all nearby opposing pokemon while it's active, and it makes you immune to debuffs. It's kind of hard to ignore the presence of Kricketune while it's buzzing loudly, like real life crickets.
Both Fury Cutter and X-Scissor can be used repeatedly if timed in tempo with the beat, but the timing of Bug Buzz is faster than Growl, so get in tune with your sense of rhythm. Also, if you hit on the 4th beat perfectly, you'll get a short Stun effect added to the attack. This is the only way to get a Stun in Kricketune's entire moveset, so you better lock that sense of timing down.
The debuff immunity also helps you out offensively, as it prevents you from being slowed down by Slow Smoke and Speed Flux Zones. Not having to worry about Attack debuffs is also nice, but nullifying Defense and Sp. Defense boosts is not as helpful, considering how low those stats already are. By the way, your basic attack is unaffected by all modifiers, positive and negative, so that cannot be debuffed with or without the Bug Buzz.
Speaking of which, your basic attack extends the duration of all beats in effect, so you can prolong the effects of Bug Buzz with good timing. You're sacrificing a lot of range using your basic attack in lieu of Fury Cutter or X-Scissor, but perhaps the extra second of Defense debuffs will be worth it for you or an ally to secure a KO.
But if you really want range, you'll want to sing a sad song instead.
-
Move 2b: Perish Song (Buff/Debuff)
The user starts playing a somber song, reducing the basic attack speed and Movement Speed of all enemies in range for a while. While Perish Song is active, the tempo changes, reducing in speed. Additionally, the range of Fury Cutter and X-Scissor increase in range. 12s cooldown.
At Level 12, Perish Song becomes Perish Song+.
Further decreases the basic attack speed and Movement Speed of all enemies within range.
Perish Song starts a tempo that plays at 80 bpm, or 1.2 beats a second. The sound waves emitted around the user passively reduces the basic attack speed and Movement Speed of all nearby opposing pokemon by 40%. Perish Song lasts for 7.5 seconds.
While Perish Song is active, the range of Fury Cutter and X-Scissor is extended by 25%.
Perish Song+ increases the basic attack speed and Movement Speed Debuff to 55%.
Humans are plagued with emotions, and I mean that affectionately. We feel fear, anger, joy, sadness, but unlike other living organisms, we do not bottle it up. No, we'd rather die than go a day without expressing ourselves. Some people express their feelings through writing, like poetry, others through art. But most commonly, feelings are expressed through music, and no emotion hits harder and farther than a song of sadness.
The piercing stings of Kricketune's scythe arms make Perish Song reach far and wide, and the somber tones cause nearby opposing pokemon to weaken in basic attack speed and Movement Speed. It doesn't deal any damage, but the debuff enfeebles opposing pokemon, reducing their ability to fight back or run away when Kricketune is playing a sad sonata.
Also, just a quick side note, Kricketune harbors no ill feelings whatsoever when it plays, no matter what song or tempo is playing, so chalk up the lack of an 'instakill' effect of this version of Perish Song to Kricketune's overwhelming joy of playing music.
Anyway, the tempo of Perish Song is on the slow side, and it's rarer to find a Pokemon theme that uses this BPM, but there is at least one. If you've still got an open tab on your browser, look up the theme of 'Eterna City' from Pokemon Diamond/Pearl and you'll feel how low and lax this beat is.
As for the move itself, Perish Song lasts longer than Bug Buzz, to compensate for the low BPM. The song is slower, so it's easier to hit the notes on the beat in time. Not only that, it amplifies the range of either Fury Cutter or X-Scissor. With Fury Cutter, you'll be dashing for an extra bit of distance. X-Scissor will make slightly bigger X's when they are made. This is all to work around the lower BPM of Perish Song, since the tempo is slower than Growl.
Now, Perish Song is a pretty handy move to help deal with crowds or to win 1-on-1 fights that you should've lost, but don't forget about your basic attack. A slower tempo means you'll have an easier time hitting the basic attack, and each perfect note hit extends the duration of the song by a little bit. You're extending the time of Perish Song mostly for the debuff effect on opposing pokemon, but also to make it easier to hit with Fury Cutter and X-Scissor on the beat. Also, Perish Song+ strengthens the debuffs inflicted on opposing pokemon, and since Kricketune has an easy time gaining EXP, it's an upgrade you'll be able to take advantage of sooner than compared to other Speedsters.
Perish Song may not have any 'instakill' effects, but music is power, and that power is to breathe life into the air. Unless it's loud music, at that point it becomes hazardous. At least it sounds good.
-
Unite Move: Harmonious Harming
Upon activation, the pokemon starts playing a random musical solo from its home region. During the solo, the player must press the basic attack button, the Move 1, and the Move 2 button in time with the beat. Each successful input unleashes a long range sound wave that damages all enemies in range, dealing increased damage the longer the tempo is successfully held for. Its Movement Speed is also increased and the user is Immune to Hindrances for the duration of the song. 110s cooldown.
The area around Kricketune becomes flush with musical notes and a wavy music sheet line, conveying the area of effect of the Unite Move. The game volume will be modified, regardless of your current settings, in order to quiet down the environment so that a musical solo can play. After what sounds like a conductor's baton tapping to the tempo of the randomly selected song, music from the Sinnoh region begins to play, and the player must press the basic attack button, Move 1, and Move 2 button in time with the musical cues that appear. You must press the buttons within 5 frames of the beat to unleash a damaging sound wave.
The musical solo selected will be remixed excerpts from specific songs, and will last anywhere from 12 to 16 seconds. The solos will be randomly chosen from a set list, and vary in difficulty and length.
The list of musical solos include 'Battle! (Wild Pokemon)', 'Battle! (Trainer Battle)', 'Battle! (Rival)', 'Battle! (Gym Leader)', 'Battle! (Team Galactic)', 'Battle! (Team Galactic Boss)', 'Battle! (Dialga/Palkia)', 'Battle! (Azelf/Mesprit/Uxie)', 'Champion Cynthia', and 'Battle! (Champion)'. All songs are taken from Pokemon Diamond/Pokemon Pearl.
Harmonious Harming scales very low to your Attack stat, but the scaling increases by 10% for each successful press of the musical cues. The scaling maxes out to 350%.
There is a rare chance that 'Battle! (Giratina)' will play, which is an obscenely difficult solo to play through, but each note hits for max power. You'll know that this specific solo is about to play when the music notes turn dark and scraggly.
Your Movement Speed increases by 35% and you are Immune to Hindrances during the song.
Imagine your local violinist playing some music at a nearby train station or supermarket. They're playing their heart out, getting their music out into the world, and they don't even ask for money, just a collection box in front of them and a heartfelt suggestion.
Now imagine them floating from just the power of music alone, and this symphonic display of beauty quickly turns into a torrent of storm and sounds. Each chord they play causes minor damage all around them, but the sheer speed and number of chords they play causes these small attacks to build up, wreaking havoc all around. And nothing can stop them, they appear to be immune to all methods of incapacitation, save for mortal damage.
That's Kricketune, particularly when they're in the zone. I hope you're into rhythm games.
When Harmonious Harming starts, the game will quiet down enough so that Kricketune can hear the established tempo. You'll hear this as the sound of a conductor's baton tapping against a music stand. Then, musical cues will appear on screen and you are expected to hit the basic attack button, the Move 1 button, and the Move 2 button in time with the music. All the while, you are still in control of Kricketune, but it might be hard for you to direct the pokemon with the control stick as you are playing a rhythm game and chasing down the opposing team. On the plus side, you are Immune to Hindrances while Harmonious Harming is in effect, so all you have to worry about is avoiding the hard hitting attacks the enemy will throw out.
Your biggest concern is playing the accompanying music piece well enough. Harmonious Harming scales very low with your Attack stat, so a glancing blow with the musical cues will hardly put a dent in even the frailest Attacker or Speedster. Much of the damage of this move will come from the accumulating boosts from playing the music on time. Getting a perfect note however would also be a big help as Technician grants you brief Invincibility, something very handy for a wide reaching Unite Move that also increases your Movement Speed to dive into the fight with.
The problem is, there are ten possible songs Harmonious Harming will play, and each one is varied in speed, length, and difficulty. You can most definitely spend time practicing the Unite Move in the Practice Arena, and each music piece is played the exact same every single time, but when you use Harmonious Harming for real, the only way to know what song is about to play is to listen to the tempo as it starts.
Well, except for one soundtrack. If Harmonious Harming starts with an evil sounding guitar riff and the music notes and sheets turn black and scraggly, you better hope your fingers and thumb are ready for a spot of rhythm hell.
Mastering the music notes is no easy feat, but your efforts will be well rewarded. With each music note hit on the beat, the attack power of Harmonious Harming scales up, maxing out to a very high multiplier of 350%. The sooner you hit this cap, the greater the damage potential of the rest of the song. Miss a beat, however, and the multiplier resets. Hit a perfect note, you'll receive temporary Invincibility. You take the good with the bad.
The power of music is the power to touch one's soul.
-
Achievements
Max out the boost of Technician 3 times in a single match.
Do you know what separates the professionals from amateurs? Practice.
I don't mean practice as in getting something right once. I'm talking about the dedication it takes to practice something so many times that it takes more effort to get something wrong. To practice to the point where perfection becomes second nature, that is the mark of a professional.
To earn this Achievement, perfecting the tempo of your attacks must be attained through diligent training and field exercise, as well as a thorough understanding of your musical instruments. For Kricketune, that means knowing your Moves and Abilities and how they play together.
First off, Technician passively increases your Attack and Movement Speed as a tempo plays out. However, Growl, Bug Buzz, and Perish Song do not go over 10 seconds by themselves, so you'll need to extend the timing with your basic attack, which will extend the duration of the beat. That sounds easy enough, but the basic attack requires a direct hit in order to extend the tempo, which means this can only happen during combat.
The range of Kricketune's basic attack is shallow, and you're forgoing your other options during combat in order to max out Technician. Not only that, you are incentivized to use your other attacks on the beat for their bonus effects. Only a direct hit on the notes is worth it when you're using your basic attack, as that will grant you Invincibility briefly, something the other moves can also do. In certain situations, you may not have Fury Cutter or X-Scissor off cooldown, so your basic attack will be your only option, which is not the best circumstance to be in.
In order to realistically earn this Achievement, you'll have to mix together your basic attack with Fury Cutter or X-Scissor as the situation calls for it, like a one man band. If you're good enough to hit the beat frame perfect, you'll have a bit of breathing room thanks to the Invincibility. During that time, a KO will restore some of your HP that you've lost while trying to drum up your beats, so keeping the beat going for as long you can is in your best interest.
And even if you do manage to max out the Technician boost in this way, you'll have to do it all over again at least two more times in the same match in order to earn this Achievement. It won't be worth it all the time to prolong the beat with just your basic attack, unless you are really confident in your ability to hit on the beat perfectly on every single note of a tempo.
That's a big 'unless', all things considered. Remember, Frame Perfect means 1/60th of a second. Ask any gamer how small that is.
-
Holowear
For all of the funny jokes this pokemon is centered around, at its core, Kricketune has a very solid design. It has spots and lines on its body that make it resemble a violin standing upright, along with a cute mustache and antennaes that entice the viewer. For what it's worth, this pokemon makes for a remarkable model for Holowear.
So let's go all out. Starting off, Wanderer Style Holowear gives Kricketune a fancy green cloak and one of those pointy hats with the dainty feather sticking out of it. Tuxedo Style Holowear gives Kricketune a little top hat and a suit, complete with coattails and a dickey. For Sacred Style Holowear, Kricketune is wrapped in a robe, or a toga, and adorned with golden emblems and a laurel on its head. Upping the fashion standards, Pokebuki Style Holowear puts it in a fancy green kimono with a long flowing sash trailing behind it. Lastly, Concert Style Holowear gives Kricketune some round glasses, music note pins tacked onto its antennae, a big bowtie, and a grand cape emblazoned with music sheet staves and such.
What a fancy fellow, this pokemon.
-
Strategy
Now, I love music. I love listening to music. Probably one of the top three things I do in a day, next to breathing and eating. You probably like music too, especially if you're a pokemon fan. Say what you want about the games and their quality, but they rarely ever miss with their battle music.
However, to master playing as Kricketune, you have to learn how to battle WITH music. The tempo mechanic is one of the more unique playstyles I've made on this blog, which makes it hard to convey the timing and the importance of maintaining a rhythm. However, I'm sure you've got some music playing in the background, and if you can tap your foot to the rhythm of whatever is playing, then you're already halfway there to mastering Kricketune.
Unfortunately, the other half requires commitment, multitasking, proper judgement, and working under pressure. It is very hard to make a beautiful song while in the middle of a street fight with the defensive constitution of a pinata. If you can't hit your notes just right, you'll be a liability in a team fight, so think hard about if music is right for you. It isn't, for most people, so there's no shame in quitting.
If you're still willing to put in the effort, then listen carefully, because the music lesson starts now. Tap, tap, tap, the easiest tempo to follow is your own, so set a consistent rhythm and try not to deviate from the beat.
If you're actually doing this in real life, you'll quickly find that maintaining the beat is difficult, if not impossible, as the human soul craves music, and the beat you're tapping away to quickly becomes populated with extra taps and ticks and maybe even some mild beatboxing. That tells me you have the spirit of a musician, which means you've passed the initiation test.
That drive for music is what drives Kricketune, even when it starts out as a Kricketot. Of course, starting a game is difficult since you have to choose between Pound and Growl as your starting move, but neither one is effective without the other. Thankfully, Kricketot is a fast learner, and you will have evolved by the time you make it to the middle of the Lane.
That said, I do not recommend taking Kricketot to the Central Area, at least not in the beginning. Hitting the basic attack in time with the beat of Growl is one way to push for some consistent damage, but Kricketot starts with Run Away, not Technician, and does not have a way to passively boost its Attack until it evolves. This makes grinding to Level Up rather slow, and is better suited to Attackers or EXP hungry All-Rounders.
Once you've evolved, the concert can truly begin. You will need to pick between Fury Cutter and X-Scissor, but if you were able to time Pound well enough during Growl, you'll be eased into either move. Fury Cutter may seem like the more attractive option, given its low cooldown and application, but X-Scissor is a bit safer with its range and passive Movement Speed boost that you get for free without Technician active.
Briefly, I have to go over what these moves are like without an active tempo, since that is the worst case scenario for a musical Speedster like yourself, to be forced to rely on decent attacks that you cannot repeat. Fury Cutter is a weak Dash attack with a low cooldown, that's it. X-Scissor provides a mild speed boost and lets you paint a large 'X' with your knife hands once. Only once. Without an active beat, the effects of these moves can only be used once, so it's really important to establish a tempo with Growl before every major fight.
When you have a tempo active, however, these moves make some truly beautiful music. Fury Cutter gets a cooldown reset when hit on the beat, but also, each successive repeat slowly boosts the power of the move. This stacks with the passive Attack boost of Technician, which also grants Invincibility if you hit an enemy with the move with a frame perfect beat.
X-Scissor works similarly, but with a bit more safety built in. The range is great for maintaining distance, especially with the speed boost of the move and the Technician Ability. However, X-Scissor gets its value from the area it covers and misses out on the gradual damage boost that Fury Cutter has. Still, it's in the best interest of a Speedster to find the right spot to attack from, though in the case of Kricketune, acoustics also help.
Once you get the hang of both Fury Cutter and X-Scissor, it's time to graduate to a different tempo in either Bug Buzz or Perish Song. The difference between the two moves is simple; Bug Buzz sets a faster tempo, whereas Perish Song is slower. The boons provided by Bug Buzz are numerous, but the higher tempo can be demanding for some players, so Perish Song will provide a weaker buff but a wide reaching debuff to opposing pokemon to compensate.
Still, it's worth it to try out Bug Buzz for the benefits it provides. The sound waves generated passively reduce the Defense of opposing pokemon within range, which is an extremely powerful debuff for a Speedster to have. Especially so, as Technician is passively boosting your Attack as the song plays out. Not only that, a perfect hit on the 4th beat of the tempo will Stun the enemy, which will apply to your basic attack, Fury Cutter, or X-Scissor when used. A bit of a tall order, but a sense of rhythm goes a long way here.
But if you're lacking in rhythm, there's nothing wrong with relying on Perish Song instead. The sound waves reach far while the move is active, passively debuffing the Movement Speed and basic attack speed of all nearby pokemon. Not only that, your moves get some extra distance, with the exception of your basic attack, and there's a reason for that.
See, there's one very important detail that has been glossed over this entire post. Technician passively boosts your Attack and Movement Speed when there's an active tempo playing, but the tempo requires constant input in order to be maintained. Not only that, the extra effects granted to you like gaining Invincibility, resetting the use of Fury Cutter and X-Scissor, and prolonging the tempo with your basic attack, they all require a direct hit to activate. This isn't a solo act, Kricketune needs to actually hit something in order to receive these beneficial effects.
Which means Kricketune needs to be in a fight in order to get any substance out of its attacks. At least you aren't restricted in any way when fighting against Wild Pokemon, and maybe you could orchestrate things in a way where you shift from Wild Pokemon to fights with the opposing pokemon with a head start on your Technician boosts, but that's a bit unfeasible. No, most likely, you're going to lead off with either Bug Buzz or Perish Song and then play it safe with where you use Fury Cutter or X-Scissor until you get a substantial Technician boost. And keep in mind, your base stats are very low, especially for a Speedster, and your Technician boost is gradual, meaning it'll take time to gather up the power needed to greatly damage the enemy. In that time, you may get nicked by a stray attack or a spot of Burst Damage, which can easily take out a large chunk of your HP if you're not careful about where you play your song.
This makes Kricketune a pokemon with a high skill ceiling. It has great potential, can use attacks quickly and repeatedly, gets stronger the longer its songs play for, and can even become Invincible occasionally. It's just that these qualities and boons will only factor in when a skilled player has fully mastered Kricketune and its musical cues.
It's also why its Unite Move, Harmonious Harming, is structured the way it is. It may be overkill to have such a skill based move on a pokemon already plagued with skill issues for the player, but imagine if it was just a big hit. There'd be no substance to the Unite Move, and the big damage would be a crutch to lesser skilled players. No, you're gonna play a short rhythm game for the Unite Move, and you're gonna get good at it.
The very last thing I need to mention is how the 'tempo' of Bug Buzz and Perish Song actually interacts with your moves. Yes, you can extend the effect of the moves with your basic attack, but the two moves establish an effect that persists during the changed tempo. When these effects end, the tempo doesn't, that's the key word in the details here. Both Bug Buzz and Perish Song specify that they 'change' the tempo to be either faster or slower. There isn't always a tempo active for Kricketune, but these moves, as well as Growl, are what activates the tempo, like setting the needle on a gramophone. When the effects of Bug Buzz and Perish Song end, the tempo is set back to normal, and this tempo will continue on with a successful hit with an attack when used on the beat.
The tempo goes away when you miss two beats. During Bug Buzz and Perish Song, you can miss every single beat and still have the moves maintain their active effect, until they expire. When that happens, the tempo shifts back to normal, and it's up to you to keep up the pace or not.
Remember, a hit will maintain the tempo, but it will be disorientating when the tempo shifts mid-fight. This is also why the cooldown for Bug Buzz and Perish Song are on the high side, as the effects for the changed tempo can end, and the moves will go on cooldown, but the tempo can continue on with proper attack timing. If your timing is good enough, the moves will come off of cooldown while the tempo is still active. Again, you gotta account for the tempo shift if you reactivate Bug Buzz or Perish Song, but if your good enough to keep the beat going, you'll be fine.
You'll have to be, in order to bring out Kricketune's full potential. Kricketune is a pokemon that is still plagued by low stats and low powered moves, so it needs proper execution of its musical cues in order to maximize its offensive pressure. It's like how even the weakest pokemon have their own strengths that must be nurtured and tuned. A pokemon like Kricketune may not excel in battle, but it is peerless in violin play, and when that power is focused in combat, none can withstand the musical massacre that follows.
Delelelelele-whooop.
-
And that's Kricketune for Pokemon Unite! We always need more musical pokemon in the game, and I do have a soft spot for Kricketune. I mean, who doesn't? Anyone who has encountered this thing in the wild will always be impressed by that crazy cry it introduces itself with. As for its archetype, I do think it can only reach its full potential as a Speedster that relies on a rhythm game mechanic to maximize its damage, to overcome its low base stats and everything.
Anyway, that'll be it from me, for now. The next post is gonna be a doozy. Here's a hint.

Until next time, see ya.
1 note
·
View note
Text
Galarian Rapidash and the mischaracterization of archetypes

The archetype system in Pokemon Unite serves multiple functions. It characterizes a pokemon and their particular role in Unite Battles and helps convey the team structure at a glance. For example, a team with 2 Defenders or more will excel in bulk and close combat, but suffer in range. Multiple All-Rounders means the team is varied, but not specialized enough in particular avenues that they cannot prevail against hyper focused attacks like the high damage output of long range Attackers.
There are variations within an archetype, but the general idea is there. Pokemon like Cinderace and Greninja operate drastically different from fellow Attackers like Chandelure and Venusaur. And that's the fun part about these roles. Like, you know what to expect when a new pokemon is revealed to be a Supporter or a Defender, but you can't wait to see just how unique and different they are and how they play.
And then you have these mold breakers.


Now, let me clarify that I do not harbor any negativity towards these pokemon or their inclusion in Unite. The fact that these pokemon are playable in spite of their low popularity is a testament to the inclusivity of Unite and its development team.
I just have disdain towards how they went about it, that's all.
I mean, if it were up to me, I would not have made Greedent and Ho-Oh Defenders or made Hoopa a Supporter, and I definitely would not have made Duraludon an Attacker when its Defense stat is nearly as high as its Sp. Attack stat. Oh, by the way, Duraludon is classified as a physical Attacker in Unite. More power to them, but again, far from what I would've gone with.
I understand to some degree why these pokemon are classified the way they are. I know that Hoopa's portals are tantamount to its supportive play style, and how Greedent and Ho-Oh perform best when making defensive plays. I'm just thinking that there are over 1000 pokemon in the National Dex, and any one of them could have taken on the role of these mismatched pokemon. Like, Greedent uses berries for fuel for its attacks and can either stockpile berries quickly with Stuff Cheeks or book it with Covet. If we needed a fast Defender like that, you could've given the role and abilities to a pokemon like Revavroom or Coalossal, or heck, even Forretress. Let them take the mantle of a Defender while Greedent gets the All-Rounder role and a better suited set of moves.
Now, I'm just one guy who runs a blog posting fan-made movesets for pokemon joining Unite and stuff. I have the luxury of making executive decisions on every single pokemon I talk about on here, and I wouldn't have it any other way. Although, it would be nice to have a graphics department draw the pokemon and the moves they use to better convey my vision for the post, or even an animated GIF or something. That's just wishful thinking (and NOT an open invitation for work. Sorry, but I want these pokemon posts to be made with my own heart and soul put into it, otherwise it wouldn't truly be my own work. And yes, that means I will never use an AI writing tool to help me work faster. I'd rather delay a post than ever rely on a machine to do the work for me, on my honor as a writer.)
All of that is to say that the Pokemon Unite Development Team consists of multiple people who build and make tweaks to the game in the background. Each pokemon added to the game starts with a proposal, deliberation, mediation of ideas and effects, all before the hard part starts, modeling the pokemon, making the attacks, playtesting and debugging, implementation, and releasing the pokemon. My point is, every single pokemon added to the game has weeks and even months of work put into it, so each release is weighted with the hopes and dreams and well wishes of the programmers who worked tirelessly in an office at odd hours of day and night.
I'm hesitant to ever call any pokemon a 'bad' release because it disrespects the dev team as well as the programmers who did their best to get the pokemon out on time. Not to say that they haven't messed up before, but with Pokemon Unite being a live service, they have the luxury of course correcting the balance of the game when glaring issues pop up.
But this one... this one is quite the error.

If you've been on the receiving end of this glittering horse, you might've thought to yourself, 'Huh, this Speedster is a lot tankier than the others'. Hopefully those are your specific thoughts and not something profane and vulgar every time this sequin equine gave you the slip.
You aren't imagining things. Galarian Rapidash is classified as a Speedster, but it has defensive stats comparable to that of an All-Rounder. You can look it up yourself, or you can take my word for it, I am pulling these numbers up from a reliable database (up to date at the time of this writing).
Galarian Rapidash stats at Level 15 (unmodified) HP: 7800 Defense: 330 Sp. Defense: 361 Damage: 576
Compare these numbers to a fellow speedy Speedster.
Dodrio stats at Level 15 (unmodified) HP: 6300 Defense: 298 Sp. Defense: 200 Damage: 625
The horse has more HP and defenses than the hydra ostrich, but its base damage is lower, meaning Dodrio excels at ambush attacks. However, lower damage hardly matters if this thing can take a hit, shore up its defenses with a passive shield, and run away easily with Hindrance Immunity.
Oh, it gets worse. Here's the stats for Garchomp.
Garchomp stats at Level 15 (unmodified) HP: 7705 Defense: 472 Sp. Defense: 367 Damage: 516
While Garchomp has had tweaks to its stats over the years, they were made using gameplay data from Ranked Matches. Nowadays, Garchomp gets by with its Rough Skin Ability and HP stealing basic attacks to win fights.
But that doesn't justify why Galarian Rapidash has more HP and base damage over Garchomp. It's not fair that a Speedster has enough bulk to dive into crowds, deal heavy damage, and then rush back to their Goal Zone with a built in Blissey's Safeguard as a shield.
And to add insult to injury, Galarian Rapidash is a Speedster with a ranged basic attack. A RANGED basic attack. Now, I'm all for breaking the mold, but having a RANGED basic attack detracts from the rush of the Speedster play style. I certainly don't feel lithe and fleet-footed playing as Galarian Rapidash when each press of the basic attack button stalls my movement. On a pokemon like Dodrio, the basic attack does the same thing, but its boost ties into its Movement and Ability, where it becomes a sudden dash strike when full, leaning into the blazing speediness of a flighty flightless bird.

It almost feels like the Speedster archetype doesn't actually fit Galarian Rapidash. It's fast, yes, but it's also strong, bulky, and difficult to deal with. Sort of like an All-Rounder with extra speed.
Well folks, this is where I come clean about something regarding certain plumbing issues within Pokemon Unite. While most players are content to retain their ignorance regarding upcoming pokemon joining Unite, I have no such qualms feeding my curiosity with forbidden knowledge. To put it simply, there are people more talented than I am who can pull and extrapolate information, revealing content that has yet to see the light of day.
Leaks. I keep tabs of leaks through dataminers who get their information from hidden data on the Public Test Server of Pokemon Unite. As for whether I use this amorally acquired information to direct my Pokemon Unite posts, I plead the 5th, your honor.
Anyway, as you may have guessed, Galarian Rapidash was originally supposed to be an All-Rounder, before it was changed to a Speedster a month or two before release. Did they change its stats to accommodate the role change? Of course not, you saw the numbers, didn't you?

I will not pretend to know why such a drastic decision was made, nor will I defend it. I can only guess that they 'saw' the initial negative reactions to Galarian Rapidash being 'another All-Rounder' and got cold feet about the classification and switched it to a Speedster. To what end, I don't know, but not changing the stats on the way in was one of the dev team's bigger blunders.
Think of it like this. Remember what Mimikyu and Ceruledge, both All-Rounders, were like on release. Recall how difficult and powerful they were to face. The game was already saturated with plenty of All-Rounders back then, but nobody really complained about these two, did they? Nobody was mad at Mimikyu for being an All-Rounder instead of a Speedster, they were just happy to have their favorite little trick-or-treater playable in Unite, at long last.
Now, imagine if they had been released as Speedsters instead, but without any modifications to their stats. Oh sure, Mimikyu and Ceruledge have powerful movement options, but that doesn't mean they could have cut it as Speedsters with their impressive bulk. But what if the dev team changed their archetypes just because players were complaining too loudly about their being 'too many All-Rounders'?

Well, what you get is Galarian Rapidash. We could've had another All-Rounder with a ranged basic attack option. Actually, we kind of do, since they didn't change the base stats of the pokemon when they switched its archetype around. But this post was made before any major changes to its base stats were made, so we're gonna be here for a while as this glamorous draft horse bulldozes the competition like a rogue bumper car.
On that note, the fact that they made such a drastic change to a pokemon before release shows that the dev team is fully capable of making such dramatic modifications to the Unite roster. We've seen it before when they widened the range of Sylveon's Hyper Voice to what it is now, I'm sure we will see another crazy buff like that later this year.
And that includes changes to archetypes and roles. I, for one, am fine with Pokemon being recast into different play styles to adapt to a shifting meta. It would be nice to see Greedent and Duraludon becoming proper All-Rounders.


Also, there is nothing wrong with having an excess of All-Rounders in the game, as most players care about the pokemon and how they play out in Unite. Remember what I said about Mimikyu and Ceruledge being All-Rounders to no one's dismay? That's because they were fan favorites and they play with a strong sense of personality and character. Maybe you could make Ceruledge an Attacker or make Mimikyu a Defender, and while you could pick the right moves and Ability to make it work, the All-Rounder classification gives these pokemon the liberty to fulfill their potential and not be constrained by a specific archetype. They work because they are beloved.
I worry that the lackadaisical nature behind Galarian Rapidash and its changed archetype paint a grim future for Pokemon Unite, where classifications are misnomers and roles are obfuscated by misplaced stats and abilities.

Or maybe I'm overthinking things. What do you think?
3 notes
·
View notes
Text
No Pokemon Unite Post today
I've been a bit busy with life so far, so I don't have the next Pokemon Unite post ready yet.
I will, however, have a post written up later today regarding a certain horse. If you've been playing Pokemon Unite and you've been suffering in Ranked Mode, you'll know what I'm talking about.

(This particular animated GIF was made by YouTube User Khensu, one of the few remaining '.EXE' meme video makers for Pokemon Unite. I am subscribed to them and I urge you to do the same if you enjoy clip montage videos of Pokemon in Unite. If you have a moment, give them a watch and like their videos, they're kind of small time at the moment.)
1 note
·
View note
Text
Krookodile for Pokemon Unite!

Season 1
Season 2
Season 3
Prev: Iron Valiant - Primarina - Garganacl - Passimian - Incineroar - Cofagrigus - Glimmora - Galarian Stunfisk
Pokemon is a series that is as wild as it is fantastical. But that hasn't always been the case. Did you know that the series was supposed to end after Gen 2? That's why the majority of available pokemon up until Gen 3 was just some form of fantastical animal. It didn't stray too far from the original idea, which is how we got stuff like three-headed ostriches, seals with horns, poison slimes, extra cute ferrets, punchy ladybugs, and two headed giraffes.
When the staying power of pokemon was proven, they got very creative from Gen 3 and onwards. As such, we saw some repeat designs rectified with new and interesting concepts to bring the fantastical nature of the series to light. When Feraligatr came out in Gen 2, it was played safe and made a Water Type. Now that's all well and good, gators are cool, but what if it were a sand gator instead? In comes Krookodile, a sand croc, which is every bit as cool as it sounds.
So let's see what this wicked wader can do in Pokemon Unite.
-

In real life, crocodiles are sneaky ambush predators that take advantage of a vital resource point, guaranteeing that they will always have the food come to them. As such, Krookodile has pretty high Attack, as well as decently high HP and defenses. Its Speed is higher than you would believe for a sand croc to have, but these giant reptiles are well known for their burst of speed when going for the kill. Because ambush strategies seldom require much thought, it doesn't have very high Sp. Attack, but it doesn't need it. If it ain't broke, don't fix it. That's the motto of a crocodile. And also the motto of an...
All-Rounder
-
Basic Attack - Melee/Attack
Becomes a boosted attack after 4 hits. The boosted attack has the user jump forward and grab an enemy with their jaws. If successful, the enemy is bound briefly as the user bites down hard. The boosted attack deals more damage the less HP the enemy has.
The boosted basic attacks behaves like a Sure-hit Dash Attack. On a successful hit, the enemy is Bound for 0.25 seconds before damage is dealt.
The boosted basic attack deals extra damage based on the amount of missing HP the enemy has. The formula goes +2% damage for each 1% of missing HP.
If the target has Hindrance protection, the attack will still follow through, but can miss if the enemy moves out of range in time.
Nature follows the order of survival of the fittest, meaning only the strong will live to pass on their legacy. The weak or ill will most likely not survive another day, and become food for predators. I say all of that to give some flair to this basic attack, whose boosted attack effect is simply just bonus damage for each percentage of missing HP, which is something we've seen plenty of in Pokemon Unite.
It is quite slow, though, which sort of lends some extra power to the boosted basic attack. See, it takes 4 hits to boost the attack, and the lost HP turns into even more damage for the boosted basic attack when it comes out. Of course, that depends on if you can hold a fight long enough before the enemy can make a run for it.
The binding effect of the boosted attack can hold the enemy down for a bit. Since it's a Bound Hindrance, the enemy cannot use items to escape the hold. It's a very brief hold, a quarter of a second, but if you're bold enough to attack an enemy midswing, you can interrupt an attack with this bite. I mean, Krookodile is one of those bulky-All-Rounders I keep talking about.
But bulk isn't the only thing you've got going. If there's one thing crocs are known for, it's their focused power. You could call it Moxie.
-
Ability: Moxie
The user’s Attack increases when attacking an enemy whose Vision is Obscured. When a pokemon on the opposing team is defeated, the attack that KO’d the enemy increases in power until you are KO’d.
Your Attack stat increases by 70% when dealing damage to an enemy suffering from Obscured Vision, or blinded from certain attacks.
When you KO a pokemonon the opposing team, the specific attack deals increased damage by 10%. This boost stacks with multiple KO's, maxing out to 50%.
Any of your attacks can be temporarily boosted by Moxie, such as Crunch, Dig, even your Unite Move, Quaking Crash. The boost applies to all hits within the Move itself. This includes all 5 hits of your basic attack.
When Moxie is passively boosting a Move, there will be a number on it on the HUD to show the power level. Remember, it maxes out to '5' for +50%.
The power level does not transfer over too new Moves when learned.
Remember that crocodiles are ambush hunters, so Krookodile's ability to land a KO hinges on its ability to make surprise attacks count. Also, Krookodile is a Ground Type, which makes it even more dangerous since it doesn't need the water pools that real life crocodiles are dependent on.
Krookodile's idea of an ambush is to throw sand everywhere and strike at the enemy most blinded by the surprise attack. As such, its Moxie Ability powers up its Attack stat by a whopping 70% when attacking a blinded enemy. Now, of course, Krookodile knows some blinding attacks, but in Pokemon Unite proper, there are only three Moves that can blind the enemy; Gible's Sand Attack, Greninja's Smokescreen, and Chandelure's Unite Move, Ignite Midnight. The latter two are the only ones you can feasibly partner up with, but most of the time your ambush efforts will be either without these allies or by yourself.
Now, the effort will not go to waste. If you manage to land a KO, the Ability will permanently boost the killing blow by 10%. Now, when I say 'killing blow', I mean the move used to land the KO, which can be your basic attack, either of your Moves, or even your Unite Move. This Moxie boost can stack up to 5 times per move, so a full team wipe will not max out all of your moves, but can fully empower one attack if you were lucky enough to get all 5 enemies at once. Of course, the boost goes away if you get KO'd in turn, so you gotta be careful about overextending and instead look to ambush your weakened enemies. Once you've fed on enough weak enemies, then you can challenge the stronger enemies on the opposing team to claim your territory.
Rules of nature and all that.
-

At the beginning of the game, Krookodile will start out as Sandile. You can choose between Sand Attack and Bite as your first move. By Level 3, you'll have learned both.
-
Move 1: Sand Attack (Debuff)
The user buries itself in the sand for a while, slowly building basic attack power. This attack can be activated again to make the user leap out and throw sand everywhere, damaging and reducing the visibility and Defense of any enemy caught in the attack. 8s cooldown.
The pokemon is buried in visible sand for 8 seconds. This effect is purely visual and has no influence on its evasiveness in battle. However, your basic attack will gain boosts each second you are buried.
Sand Attack can be used again to throw sand everywhere, dealing damage to enemies in range and also obscuring their vision and reducing their Defense by 50% for 1.5 seconds.
If you are Thrown, Sand Attack triggers automatically, since it is technically being thrown into the air and forcibly unearthed in this way.
Since Moxie can boost the power of every single attacking effect at your disposal, Sand Attack is decidedly going to be one of your weaker options at the beginning. However, it is function over form, as you need some way to hinder the enemy's vision, as well as their defenses to effectively ambush the enemy.
The enemy will see you coming when you slither in while covered in sand, but they're probably going to keep their distance anyway, with you being a melee attacking croc and all. Still, if you manage to close the gap during Sand Attack, you can pop out of 'hiding' and throw sand everywhere. This little sand blast deals weak damage, but it blinds them for a moment and cuts a huge portion of their Defense for a short while.
What happens next is up to you. If you take your time hiding, your basic attack will increase in boosts passively, until you reveal yourself. You will benefit from being sneaky, hanging back on the sidelines while your lane partner does the fighting. Remember, your boosted basic attack deals increased damage to weakened enemies, so if you pop Sand Attack on a softened up enemy, your boosted basic attack might end up landing a KO from the combined Moxie Boost and Defense debuff.
It is a shallow range, though, so you'll have to pull off the ambush effectively from the Tall Grass, or while the enemy is distracted. Also, the sand covering does nothing to protect you from attacks, so you can still be hit from ranged attacks if the enemy sees you coming. That's why I put emphasis on this Move being ideal for surprise attacks. It's a great move to throw out midfight, but hardly effective for evasive endeavors.
By the way, do you know what time it is? I believe it's tooth o' clock.
-
Move 2: Bite (Melee)
A chomp attack that occasionally Stuns enemies. The less HP the enemy has, the more the cooldown of this move is reduced. 7s cooldown.
Bite has a 20% chance to Stun the enemy for 0.75 seconds.
The cooldown of the Move is reduced by 1 second for every 10% of HP the enemy is missing. The move cooldown is completely reset if Bite is used against an enemy with 30% or less HP.
If multiple enemies are damaged at once, the cooldown lowering effect logic responds to the enemy with the lowest HP.
If there's one thing gators are known for, it's their powerful bite. Now, Sandile is just as nippy as any other pokemon, but the species has a penchant for biting repeatedly and aggressively, what with being a Dark Type and all, and that behavior shines through in this attack.
Bite is a quick and powerful short ranged attack, but it's a difficult move to pull off since the enemy will be wary of getting too close to this little reptile. That's fine, as you're supposed to use your ambush attacks to get close to the enemy anyway. Once you're within biting distance, you're to aim for the enemy with the lowest HP.
When I say, 'lowest HP', I mean the lowest HP in percentage specifically. Not the lowest HP in numbers, it's gotta be percentage. See, suppose there's a frail Attacker within range, and you're thinking Bite might get a KO from the attack. That's reasonable, as a KO on a blinded enemy boosts the power of Bite through Moxie. However, if a Defender is low on HP nearby, they're the more favorable target. Why? Because Bite will lower its own cooldown the less HP the target has. If the enemy's HP is low enough, Bite will have its cooldown reset completely, allowing you to tear through the weakened HP bars of any opposing pokemon, frail or not.
All that biting critique also comes with an occasional chance to Stun. Incapacitating the enemy for nearly a whole second is a powerful boon in the early game, especially since attacking a weakened enemy will significantly lower the cooldown of the attack. Combining it with other cooldown reducing effects like the Energy Amplifier Item means you'll most likely hit the chance Stun once or twice before you evolve.
Speaking of which...
-

At Level 5, Sandile evolves into Krokorok. At the same time, Sand Attack becomes either Sand Tomb or Foul Play.
-
Move 1a: Sand Tomb (Area)
The user buries itself in whirling sand for a while, dealing damage continuously to nearby enemies. The user's basic attack gains boosts when damaging opposing pokemon. While buried, the user can move around, but moving hastens the duration timer of this move. Basic attacks, Bite, Crunch and Dig can be used during Sand Tomb, including your Unite Move, Quaking Crash. This attack can be activated again to Pull in all nearby enemies, Blinding enemies and reducing their Movement Speed for a short while. 8s cooldown.
At Level 12, Sand Tomb becomes Sand Tomb+.
Expands the area of effect and increases the duration of the move.
Sand Tomb creates a whirling circle of damaging sand around the user. The effect lasts for 8 seconds, but the timer doubles while moving. Your basic attack gains boosts each second while damaging enemies actively.
You are hidden within the whirling sand, but you can still be targeted by attacks during Sand Tomb. However, you can use any of your other attacks while Sand Tomb is active, including your basic attack, your other moves, even your Unite Move.
Use Sand Tomb again to turn the whirling sand into a powerful quick sand attack, Pulling in all enemies, Obscuring their Vision for 1.25 seconds, and reducing their Movement Speed by 30% for 2.5 seconds.
Sand Tomb+ expands the size of the attack by 25% and extends the duration of the move to 10 seconds.
Quicksand is made when the structural integrity of a section of land is compromised by a large basin of water deep in the ground. It causes the ground to become loose and shifty, absorbing whatever unfortunate mound of mass that happens to stumble into it. Ironically, quicksand doesn't have to be made of sand, as it can be any form of sediment, including plain old dirt.
If it just so happens to be made of sand, it's probably made from a cavity opening up deep below the surface. Or it could just be a hungry sand croc on the hunt. Or both.
Sand Tomb manipulates the sand around you to whirl with silent rage, damaging enemies within range. As it does so, you gain basic attack boosts, which is great because if this is happening, it means the enemy is within snapping distance. And that boosted attack deals extra damage the less HP they have, so Sand Tomb is technically powering up the boosted attack passively. You know, because it's dealing damage as it boosts.
Speaking of damage, the use of Sand Tomb does not prevent you from attacking normally. While the ring of rough sand razes all around you, you can use your basic attack, your other chosen move, and even your Unite Move, but more on that later. However, the sand does not protect you from damage as it's mostly just for visuals that you are hidden within the mini sandstorm. Also, the duration timer of Sand Tomb doubles while moving, cutting down 8 seconds of sandy stillness down to 4 seconds of quick quicksand.
It's not for naught, as ideally you'll want to activate Sand Tomb in the middle of a fight rather than approach with it. The fact that you have no protective cover from the move should make that clear. The whirling sand is meant to be used offensively, which is why the move has a second phase which has to be activated manually.
Using Sand Tomb once more, the sand is forcefully engulfed by the earth, Pulling in nearby enemies while also Blinding them and reducing their Movement Speed for a short while. If this where a fighting game, this finisher would be used to reposition a vulnerable enemy to be directly in front of you, allowing you to combo into another string of attacks. In this case, it's for the Moxie boosted attack of yours to let loose and finish off the enemy or enemies, since it is possible to pull in more than one unfortunate victim.
Of course, be careful that you don't pull in an enemy who is adept at escaping tricky situations like this, like Blaze Kick Cinderace or Fly Talonflame, as they can incapacitate you, fire back with a powerful hit, or both. Remember, Moxie is best used to attack and finish off weakened enemies, building up boosts until you can take on their tanks and frontliners. Be a bit selective with Sand Tomb, as difficult as it may be.
Or you can opt to play dirty.
-
Move 1b: Foul Play (Melee)
The user slings sand forward, blinding enemies within range and reducing their defenses for a short while. This attack can be used a second time, having the user deliver a brutal tail swipe, Shoving opposing pokemon away. This tail swipe deals additional damage to opposing pokemon suffering from additional Hindrances. The user's basic attack is boosted for each enemy blinded by the sand. 8.5s cooldown.
At Level 12, Foul Play becomes Foul Play+.
Throws more sand and the tail swipe becomes a sweeping tail dash attack.
Foul Play starts with a blast of sand shot forward in a shallow range in front of the pokemon. This sand shot blinds the enemy and also reduces their Defense and Sp. Defense by 75% for 1.75 seconds.
The attack can be used again to turn Foul Play into a strike with the user's tail, Shoving them away a short distance. The second strike deals an additional +50% damage to enemies who are suffering from a Hindrance each. The Vision Obscuring effect is one such Hindrance, meaning the second strike of Foul Play is already boosted if used in time before the effect wears off. You have 3 seconds to use Foul Play a second time after the initial attack.
Your basic attack gains a boost for each enemy you blinded with the sand blast.
Foul Play+ expands the area of the sand blast a little bit, covering a wider area. The second hit becomes a Dash Attack, sending you charging forward.
Pocket sand. If you get the reference, you'll be crowned king of the hill.
Dark Types are not above fighting dirty, and none is dirtier than a literal sand croc. As such, it comes natural to do whatever it takes to win, even throwing sand in the eyes of your enemy. Of course, the sand is far from the worst thing about Foul Play, as it not only blinds the enemy, but will also drastically lower their defenses briefly.
The thing is, the effective range of this dirty ploy is much smaller than Sand Attack. Think something closer in effect to Gible's version of Sand Attack, that's the range you're working with here. It's very shallow, yes, but you're going to be up close and personal with the enemy anyway, so the attack range is manageable.
Oh, but the move has a second part to it as well. Shortly after throwing sand about, Foul Play can be used again to unleash a thick tail strike forward. This tail strike deals an additional amount of damage for each hindrance the enemy is suffering from. Keep in mind, the Vision Obscuring effect counts as a Hindrance, so if the second part of the attack is used soon enough, the Foul Play attack has a guaranteed damage boost.
To recap, Foul Play blinds the enemy and reduces their defense drastically. The blind effect powers up Moxie, increasing the power of the second strike, which also gets an increase for each hindrance the enemy is suffering from. There's no limit to the amount of power Foul Play gets boosted from attacking a hindered enemy, so the damage potential of the attack scales extremely high, even for a bulky All-Rounder like yourself.
This may all sound like overkill, but Krookodile is hindered by its lack of range and movement options. It cannot feasibly get close to opposing pokemon that don't want their personal space invaded, so Foul Play will only be effective against two kinds of enemies, Defenders and opposing bulky All-Rounders. Some of the stronger Defenders can actually tank a direct hit from Foul Play, but only once, as they'll most likely have to retreat before your follow-up attacks finish them off. It's better to think of Foul Play as a wall breaker that's limited in range until it upgrades to Foul Play+, where the second strike gets some extra distance in its swing.
If you're up against a more tankier enemy, remember that Foul Play gets stronger for each hindrance the enemy is afflicted with, so your allies can contribute to the overall damage you deal. With a well timed series of hindrances, you might even one-shot an opposing Defender or All-Rounder.
Now that's teamwork. Just wait until you're actually a fully fledged gator.
-

At Level 8, Krokorok evolves into Krookodile. At the same time, Bite becomes either Crunch or Dig.
-
Move 2a: Crunch (Melee)
The user advances forward with three leaping bites, damaging nearby enemies repeatedly and occasionally Stunning them. The less HP the enemy has by the third bite, the more the cooldown is reduced. 8s cooldown.
At Level 13, Crunch becomes Crunch+.
Extends the dash attack distance.
Each bite of Crunch has the user advancing forward a little bit. Each bite has a 25% chance to Stun the enemy for 1 second. The Stun duration is reset if the chance Stun hits again.
The cooldown of the move is reduced by 1 second for every 10% of HP the enemy has lost by the time the third bite lands. This operates just like the move Bite.
Crunch+ extends the distance the user moves during each bite, extending the overall dash distance by about 20%.
Crocodiles use their big gaping jaws to grab their prey rather than biting them through, so that they can either drag the helpless victim into the water or hold them down while they spin, ripping them apart. Such acts of nature are a bit too cruel for Pokemon Unite, so instead, the grim nature of the Dark Type shines through when Krookodile chomps repeatedly with Crunch.
Crunch is a step up from Bite in every way, in that it hits three times, has much higher odds of Stunning the enemy, and even sends the pokemon rushing forward, though not by a lot of distance. And because the cooldown of the move is reduced based on the amount of missing HP the enemy has, Crunch can be surprisingly repetitive, though the requirements to fully reset the cooldown of the move is a lot stricter.
Now, because each bite has a 25% chance to Stun the enemy, this move can be a great opener in an ambush, though you'd have to be really unlucky to not get the Hindrance off. That comes with its own risk in who you target, since bulky enemies will come out of the attack with maybe 80% or 75% of their HP intact, and will retaliate in kind with everything they've got. You genuinely need at least one hit of Stun to make it out of this kind of encounter, as the enemy team will not take kindly to a melee All-Rounder who thrives in close quarters being so close by.
What you see is what you get with Crunch. Perhaps what you can't see is more to your liking if you were to pick Dig instead.
-
Move 2b: Dig (Melee)
The user burrows into the ground for a while, becoming resistant to damage and immune to hindrances. The user can move around at increased speed, shifting the ground noisily as it moves. The attack can be used again to have the user erupt out of the ground with a wide mouthed bite attack, Stunning enemies within range. The less HP enemies have, the more damage this move deals. If this Move KO's an opposing pokemon, the duration of the move is reset. Sand Tomb and Foul Play can be used during Dig. 9s cooldown.
At Level 13, Dig becomes Dig+.
The user's Movement Speed further increases while digging.
The user dives into the ground and can stay there for 6 seconds. While buried, the user cannot be targeted by attacks or affected by hindrances, but can be damaged by Moves and Unite Moves. The pokemons position is given away by a mound of erupted dirt along with its black back spikes peeking out.
Your Defense and Sp. Defense increase by 30% and your Movement Speed increases by 15% while digging. Dig+ increases this Movement Speed buff to 20%.
Dig can be used again to have the pokemon pop out of the ground with its mouth wide open before biting down, damaging nearby enemies. Affected enemies are also Stunned for 0.5 seconds. The attack deals extra damage based on the amount of HP the enemy has missing.
The Dig attack duration is reset if this move KO's an opposing pokemon.
Sand Tomb and Foul Play can be activated during Dig. In the case of Foul Play, Krookodile will erupt from the ground in order to attack, before submerging back into the dirt.
Now you're looking like a true croc. Since crocs and gators ambush from the water, the idea of one being able to ambush from the dirt, where we live, is absolutely terrifying.
Thankfully, ground shifting gators aren't real, but if they were, we'd have to watch out for Krookodile using Dig to invade our spaces and taking out our weakened allies. A Digging Krookodile is almost impossible to stop, since the move grants the grumbling gator a boost to its defenses as well as Hindrance Immunity. Also, the ground obstructs the perception of Krookodile, meaning that, while it is clearly visible as it rips through the earth, it cannot be targeted by certain moves while underground. Manual aiming attacks will work just fine, but Sure-Hit moves will not register against Krookodile.
You only have 6 seconds to move and pick the best spot for your attack for when you resurface. After 6 seconds, or when you press the Move Button once more, Krookodile pops out of the ground with its mouth wide open and chomp with such ferocious power, even those behind you will feel the sting of your jaws snapping shut. It also Stuns enemies, though it's not a long Stun, lasting for only half a second.
The real power of the move comes from landing a KO. If Dig manages to KO an enemy, Krookodile goes back into the ground and uses Dig all over again, effectively resetting the move. Now, technically Crunch will also reset its own cooldown if it KO's an enemy, or nearly takes them out, but Crunch can be interrupted by hindrances, whereas Dig can't, since the move provides Hindrance immunity. Dig also makes you move faster and you take less damage while digging, and the upgrade, Dig+, makes you slightly faster. But compared to Crunch, Dig is a lot more demanding and requires a KO if you want to reset the digging time, whereas Crunch is guaranteed to have reduced cooldown unless the third bite misses somehow.
Also, Dig cannot be used to go under walls or Obstacles. It has to do with the fact that Krookodile keeps close to the surface while digging, as its back spikes are observable while using the move. Now granted, Crunch doesn't move you through walls either, but Dig already provides you with cover, a decent movement speed boost option for rushing past enemies, as well as Hindrance Immunity, so it's got a lot going for you.
At the very least, Sand Tomb and Foul Play can be used while digging. It will look a bit funny seeing Krookodile resurface for a brief moment to throw sand before going back under, but playing dirty never looked pretty anyways. Although, it goes without saying that using Foul Play while using Dig comes with a brief flash of vulnerability, meaning you aren't protected in the split second you pop up. To put this into perspective, Slowbro's Unite Move, Slow Beam, is a Sure-Hit attacks that can only target visible enemies, which you can avoid while using Dig. But if you resurface to use Foul Play while the Slowbro Player is spamming the Unite Move Button, you'll get caught by the binding power of Slowbro's autism, and I mean that affectionately as a fellow autistic myself.
Still, the move is worth a shot as a successful KO means that the dig time is reset and also that Moxie will be boosting the Move until you are KO'd. Against a poorly constructed team of Attackers and Speedsters, Dig will very likely reach max Moxie boosts easily enough. This also goes for Crunch, but Dig has better chase potential in this case.
But crocs don't chase, they ambush. Well, Krookodile isn't a normal croc, in case you haven't noticed.
-
Unite Move: Quaking Crash (Dash)
The user leaps forward and shakes the ground with great power, dealing Piercing damage to all enemies within range. For 6 seconds afterwards, if an opposing pokemon is KO'd by the user, the cooldown of Quaking Crash is reset. Quaking Crash will also restores some of the user's HP when it KO's an opposing pokemon. 125s cooldown.
Quaking Crash deals major Piercing Damage to all enemies in a large area around the user wherever it lands.
If Quaking Crash KO's an opposing pokemon, your HP is restored by 15% for each KO.
After use, you have 6 seconds to KO an opposing pokemon. If successful, the cooldown of Quaking Crash will be reset.
As a gator, Krookodile holds within itself the indefatigable patience of an ambush hunter, silently storing power for bursts of energy for its quick and deadly strikes. But as a pokemon, that power must be tapped into in order to use moves like Earthquake. In Pokemon Unite, however, that power builds through Aeos Energy generation, building up as Krookodile fights. What happens when the awesome power of a sand croc builds and releases all at once? A deafening Quaking Crash.
Krookodile jumps forward with its powerful lower body, using its tail to propel itself off the ground, and touches down with a mighty quake. This quake disperses all of Krookodile's pent up ambush power into one ground strike, damaging all enemies nearby. The power is so great, in fact, that it deals piercing damage, gravely endangering frail and bulky enemies alike.
But that's not all. Because the ambush power is so easy for Krookodile to generate through fighting, the cooldown for the Unite Move will actually reset if Krookodile gets a KO very soon after using it. It doesn't matter if it was the Unite Move that got the KO or one of your other moves, though it has to be a credible KO, not an Assist. Not a problem, as Krookodile is very capable of picking off weakened enemies with its moves. As such, when Quaking Crash is used against fragile or weakened opposing pokemon, it is very easy to reset the cooldown, given that the Unite Move also deals piercing damage.
By itself, Quaking Crash imparts no debuffs to the enemy or boons to Krookodile when it is used, aside from the typical buff all Unite Moves grant to defense and movement. All it does when used by itself is deal piercing damage and restore HP through KO's. Oh yeah, Quaking Crash restores HP when you KO someone with it, I forgot to mention that. Well, since the Unite Move sends you jumping into the middle of a fight, the ability to heal through KO's is necessary for maintaining some form of longevity as an All-Rounder. Although, it has to be done through the Unite Move, otherwise Krookodile might get put down by the enemy team as they're fighting back.
Still, Quaking Crash helps Krookodile take over the battlefield as if it were a lagoon of fresh water, you know, because of the whole crocodile thing. But it's only as effective as your ability to combo together your moves. Quaking Crash complements the moves you choose, instead of completing it. The true power of Krookodile lies in the brutal malice in the animal controlling it.
You.
-
Achievements
Earn a 5 KO Streak by using Quaking Crash.
I wasn't being poetic about that last line either. Playing Krookodile means you have to play mean, picking off the weakened enemies in order to not only activate Moxie, but also to remove problematic enemies that will pressure your teammates.
Speaking of Moxie, keep in mind that it only boosts a move's power if that move KO'd an opposing pokemon while they were blinded. As such, it'll be difficult but not impossible to fully flesh out your moveset with Moxie boosts. You'll need a few of these boosts to get this Achievement, since a 5 KO Streak is easier with a power boost to your deadliest moves.
However, the Moxie boost resets if you get KO'd, so only the most skilful players will get this achivement. That's sort of a Catch 22, isn't it? You need KO's to power up Moxie, but each fight risks your own well-being, quashing the Moxie Boost if you make a wrong move and get KO'd. And the best time to get a 5 KO Streak is when the enemy team is present for the fight at Rayquaza, which is its own can of worms. Losing the fight here may lose you the game, but you will most definitely lose out on this Achievement until the next battle.
An ambush only has to work once.
-
Holowear
Now, here's what I've been waiting for. As a fan of pokemon in stylish clothing, Krookodile is one of the more inspirational choices for a model. However, I'm gonna have to tone things down here so that there isn't any obvious favoritism on display. Results may vary.
Starting things off, we've got Punk Style Holowear, giving Krookodile a mohawk wig, a spiky collar, a leather vest with the face of a bald human on the back, and some spiky bracelets on its arms. Then, we've got Explorer Style Holowear that gives it an explorers hat, a vest full of pockets, a backpack stuffed with supplies, and a charming little bow tie on its neck. For Wanderer Style Holowear, it wears a sharp looking hat and a big, tattered cloak that could fold around its whole body easily if it wasn't constantly billowing in imaginary wind. Outlaw Style Holowear gives it an impressive black cowboy hat, an ascot on its neck, black vest and leggings, and a toy pistol strapped to a belt. Finally, we have Pirate Style Holowear that gives it a tricorn hat, a big coat with a Krookodile skull emblazoned on the back, and a toy sword strapped to its hip.
A croc in pirate gear, sounds a lot like one of my favorite games of all time.
-
Strategy
In the Japanese version of the Pokemon mainline games, the 'Dark Type' is instead identified as the 'Evil Type'. Now, it does not literally mean that these pokemon are evil, rather they incorporate malicious behavior into their element. To put it into perspective, Light and Darkness are two halves of the same coin, and humans are equally capable of generosity and cruelty. It's called balance, and to be capable of good and evil means to be human.
Dark Types have the ability to harness the cruel nature within themselves and it manifests as a dark power for their attacks. In order to play Krookodile well, you must do the same. Is it evil? Or is it just nature? It doesn't matter, as victory must be attained no matter what.
When the game starts, it may be tempting to call the Central Area for yourself. With the passive buffs from Accelgor and Escavalier, you'll have an easy time clearing out the mobs of Wild Pokemon in order to evolve quickly. However, Moxie will only boost your moves when you KO pokemon on the enemy team, and the soonest that will happen is in the middle of either the Top or Bottom Lane. Maybe you can use the EXP lead to boost with Moxie easier, but you could also coordinate with an ally for a cheap KO. The choice is up to you, but you choose at the behest of your team. If you can play the early game well enough, you might make it to the 8:00 minute mark with a Moxie boost or two under your belt.
When you do finally come face to face with the enemy, you need to take stock of the situation, as Sandile may or may not be able to get a Moxie boosted KO depending on who's on the other side of the lane. At Level 3, all you have for damage is your basic attack, Sand Attack, and Bite, and your range and mobility doesn't really get any better than this. As such, ranged Attackers will give you problems if they keep their distance, which is why there's heavy emphasis on making ambush plays all throughout the post. As long as you get the KO, which in turn gives you Moxie power, any dirty trick is a means to an end.
Melee attackers will be easier for you to handle, unless they're Speedsters. You can snap them down with your boosted basic attack, blind them with Sand Attack, or Stun them into submission with repeated hits of Bite, but they'll almost always get away. You need the help of a teammate to deal with them, as well as long range Attackers, and usually it'll be another Attacker on your side who's best suited for such a role. Of course, you're gonna have to do your part to keep them safe, at least until you evolve.
Reaching Level 5, Sand Attack becomes either Sand Tomb or Foul Play, and this choice has less to do with who you can hit the most with a specific move, and more with who you can hit harder. Sand Tomb is surprisingly effective against groups of enemies due to the threat of being Pulled in, blinded, and suffering from a Movement Speed debuff. It doesn't protect you from damage, but it doesn't stop you from attacking normally either, as you can use Bite or even Crunch while Sand Tomb is active. Also, the attack is passively boosting your basic attack as it deals damage, which is another threat the enemy has to deal with. If they can, they will keep their distance and attack from afar, though this risks dispersing the team, at your own benefit. Sand Tomb can be used again to Pull the enemy in, meaning if you want to KO an enemy, you most likely will.
Foul Play, on the other hand, leans heavily into the surefire ambush strategy, as the combination of buffs and debuffs that take place during Foul Play makes Krookodile incredibly terrifying to bump into out of nowhere. Of course the range is shallow, so it has to rely on cheap ploys in the first place. Because you're lacking in ranged and mobility options, Foul Play is a bit overkill with the damage potential it has. If that sounds problematic, don't worry, pokemon like Buzzwole and Azumarill have a similar duality going for them; amazing up close, but lacking in covering distance.
It's not until you upgrade to Foul Play+ that you get some distance to the follow-up attack, but at that point, you've also got your other move upgraded, as well as your Unite Move, so more on that later. Although, it should be noted that Foul Play's second strike deals increasing damage the more hindrances the enemy is afflicted with. And since it leads with the Vision Obscuring Hindrance, it has an innate power boost, as mentioned before. Of course, the boost can still be compounded by other hindrances inflicted by your teammates, but it will only boost with hindrances, not debuffs, so the window of opportunity for damage will be short without proper coordination. Still, Foul Play is your best attack against Defenders and opposing All-Rounders, especially if they have the EXP lead, who can dive into your team unchallenged.
The best time to challenge the enemy All-Rounders and Defenders would be after you've amassed a few Moxie boosts. You will need to take out weakened or fragile opposing pokemon, and do so without getting KO'd yourself, but a permanent boost goes a long way, even if it's just 10%. However, the actual best time to fight would be after you've evolved, because the stats will level up to reflect your new, scaly, form. Evolving into Krookodile comes with a choice of Crunch or Dig, and both moves are as effective as they are gory.
Crunch attacks three times in a short, advancing attack, and each chomp has a small chance to Stun, along with cooldown reduction based on the HP the enemy has lost by the third hit. If the HP of the enemy has dropped low enough, Crunch will reset its own cooldown, letting you attack again instantly. Of course, if you miss, no cooldown reset for you, so try not to be so gnash happy with your mashing.
Against more agile enemies, Dig may be the better option and gives you an in versus Speedsters. See, Dig makes you a little faster, a little tougher from the defense boosts, and if you end up KO'ing an enemy with the resurface attack, Dig will reset itself, allowing Krookodile to bury again and go for another sneaky strike. You can also use Sand Tomb or Foul Play while digging, though be wary of the moments of vulnerability during Foul Play. Also, I've already mentioned this before, but you cannot dig under walls. You're also immune to hindrances, so just take the scenic route to the weakened and vulnerable enemies.
While Dig offers a variety of boons over Crunch, it doesn't compare to the raw damage potential of Crunch, especially since it will always have some amount of cooldown reduced after the fact. Dig does make you more mobile and the enemy will not be able to stop you from tunneling towards their frail teammates in the backline thanks to the Hindrance immunity the attack provides. But once you use up the resurface attack, you'll be at the mercy of the backline unless you were able to secure a KO on your way up.
While all of these attacks and effects are powerful, they're only as strong as their combinations when used in tandem with the Moxie boost, as well as the Unite Move, Quaking Crash. Now, Quaking Crash is an explosive tremor attack that covers a wide area, but by itself it only deals piercing damage and restores some HP for each KO. However, if you do get a KO within 6 seconds after use, whether from the actual attack or from a follow-up, Quaking Crash will have its cooldown reset, and you get to repeat the attack right away, boons and all. Plus, the Unite Move will also be Moxie boosted, so KO's gotten through Quaking Crash result in an additional +10% damage boost on top of the healing.
Though, if you fail to KO anything, then you'll have to wait out the normal 2 or so minutes of charging the Unite Move, not including the short bursts of charge when you KO an enemy or Score a Goal. If you don't like the idea of such a long wait, then make sure that each Quaking Crash attempt ends in a KO, or save the charge by holding back after you've reset it once or twice. You know, so that you'll have it ready for the next fight very soon after.
Quaking Crash, Crunch and Dig, Sand Tomb and Foul Play, Moxie, even the basic attack, all tie in together to make Krookodile into one cool, cruel croc. Because Moxie boosts your attack power against blinded enemies, your opening attack will almost always be Sand Tomb or Foul Play. These two moves also passively boost your basic attack, which deals extra damage based on the enemy's missing HP when boosted. This means that, after the volley of Sand Tomb or Foul Play, Crunch or Dig, and Quaking Crash, if the enemy should still stand after this assault, your boosted basic attack will have enough power to KO the enemy on hit. Of course, you're banking on them being within attack range for this to work, but crocs rarely loose their meals after they're caught, so make sure your attacks strike swift and true.
Being an ambush predator, Krookodile has little to fear up close, but it struggles against long range enemies and bulky stalwarts who can actually muscle through its overwhelming power. As strong as Moxie is, a single use of Full Heal is enough to quash the power boost you would normally get from a blinded enemy. As of this writing, Full Heal isn't a common sight in Unite Battles, but I'd imagine that if Krookodile players are using the pokemon right, you'd see an uptick in usage.
And that's not even without going into the Defenders and All-Rounders who actually can out-wrestle a gator like Krookodile. Some bulky All-Rounders can be dealt with just fine, but others with specific effects are a little more difficult to deal with, like Buzzwole and Metagross. These are the ones who also thrive in close quarters, and Krookodile cannot win a fair fight against them. Emphasis on 'fair'.
Since the Moxie boost for each move and attack is permanent until you are KO'd, easy KO's will be your main priority. It has to be a credible KO, no Assists, though Krookodile would greatly appreciate a Supporter or a Defender backing them up.
This would also put pressure on the enemy team to squash you on sight, like a lone ant, since there's no telling how many Moxie boosts they've accrued. Krookodile also has a hard time running away, especially if it uses up its moves to dive into a fight. If Dig fails to KO an enemy or your Foul Play ploy falls flat, there's very little you can do to escape save using up your Unite Move, Quaking Crash, to make a break for it, though such desperate measures rarely work out in the long run.
All the enemy team needs to do is to stick together and attack from afar, disorient the gator if necessary, then go for the KO if possible. In contrast, you need to go for cheap KO's at every opportunity, pick off the enemy one by one, take out the weakened opposing pokemon during team fights, and use your Moxie boosts to take on the Defenders and All-Rounders on the other side. It goes without saying to watch out for hindrances as well, since Quaking Crash is powerful, but leaves you vulnerable to panicky counterattacks.
That is how the croc crumbles. Because sand is crumbly.
-
And that's Krookodile for Pokemon Unite! I love that the mainline games aren't afraid to remix old ideas. Like, we didn't need another gator pokemon after Feraligatr, but I also can't imagine anything cooler than a sand croc. And that's what these posts boil down to, a grand gesture of appreciation to pokemon and Pokemon Unite. Hope you enjoyed reading!
Here's a hint for the next post.

Until next time, see ya.
2 notes
·
View notes
Text
Galarian Stunfisk for Pokemon Unite!


Season 1
Season 2
Season 3
Prev: Iron Valiant - Primarina - Garganacl - Passimian - Incineroar - Cofagrigus - Glimmora
There is a strange sentiment you'll hear among pokemon fans, old and new alike. You'll hear them complain about how 'uninspired' some pokemon can be just because they're based on real world objects. Pokemon like Magnemite, Seel, Grimer, Trubbish, Klefki, these are often the ones regarded as the pitfalls of creativity.
Personally, I think these people are missing the point. Pokemon aren't supposed to be one hundred percent original concepts, they're supposed to fill the world with fantastical ideas and creative liberties. It would actually be weird for a Japanese video game to NOT have a slime monster or mechanical being as common encounters. I bring this all up because Galarian Stunfisk emphasizes on both of these points. It is based on a flatfish, a flounder in particular, that has been turned into a living bear trap. It is both an interesting and original idea that also defies the whole 'uninspired' trope by being based off of a real world object.
And I think it deserves a fair shot in Pokemon Unite.
-

Now, I don't know if you've heard, but Galarian Stunfisk is based on the breed from Unova, where it uses its Electric Typing to zap enemies that step on it.
Also, Stunfisk is one of my favorite pokemon ironically, due to how stupid it looks. Just throwing that out there.
Because the species is so resilient from getting stepped on all the time, Galarian Stunfisk has some heft to its form. Above average HP backed by decent Defense and Sp. Defense makes it a solid tank, especially considering its Steel and Ground Typing. You would think that would make it a pretty good Defender, but it's a bit lacking in offense. Now, I know, Umbreon actually has worse offensive stats and is still a pretty solid Defender themselves, but it also has trouble dealing damage without the tricky use of Foul Play and Snarl. In fact, I'm of the opinion that Umbreon should've been a Supporter, and that's what I think Galarian Stunfisk should be. A...
Supporter
-
Basic Attack - Ranged/Attack
The user throws mud at enemies. There is a slight chance that the enemy has their vision obscured on hit.
The basic attack has a 12.5% chance to Blind opposing pokemon for 2 seconds. Affected pokemon will have a 'splattered mud' graphic appear on their head when afflicted.
On the rare occassion that the obscuring effect happens twice in a row on the same enemy, the Hindrance duration will be reset.
Being a Supporter means doing one of two things. Either you're healing the team, or bothering the enemy. If the Supporter happens to be a Ground Type that spends most of its day in the mud, you can expect it to hinder the enemy by putting some dirt in their eye.
Now, it cannot become boosted, like other basic attacks, but each sling of mud carries with it the chance to obscure the vision of the enemy on hit. It's a low 12.5% chance to be blinded, but it's something that the enemy has to be mindful of. Basically, if Galarian Stunfisk is nearby, they're at risk of losing sight of the opposing team for a whole 2 seconds. Not knowing where the enemy is can be very dangerous for pokemon with shallow HP.
Doubly so because Galarian Stunfisk is also pretty good at disappearing.
-
Ability: Mimicry
Upon activation, the user turns invisible and sets down some decoy Aeos Orbs. If used in a spot where a field berry would spawn, a decoy of that berry is set down instead. The ability deactivates when the user moves, attacks, or is damaged by an enemy.
The Ability Mimicry has to be activated by pressing in the Left Control Stick, just like Hoopa's Magician. When activated, Galarian Stunfisk will turn invisible and 2 to 3 decoy Aeos Orbs will appear.
The invisibility effect and the decoy Aeos Orbs will go away if you Move, use an attack, or receive damage.
A decoy berry will be made instead if Mimicry is used where a berry would spawn. Note that this has no effect on the respawn of the actual berry, so it's possible for the real berry to appear while you're hiding. Also, Mimicry requires you to be on top of the spot where the berry would spawn, but this area is highlighted for you while playing as Galarian Stunfisk.
Mimicry is the signature Ability of Galarian Stunfisk, and one that it shares with no other pokemon. While in the games, it is a fantastic power that lets the user change types in tandem with the terrain... it is not very good on a pokemon like Galarian Stunfisk. Basically, Ground/Steel is a very good type combo for the flat fish, and changing types with the terrain doesn't benefit the pokemon as it doesn't get a Psychic Type Move, nor a physical Electric Type move to abuse the power boost granted by Psychic and Electric Terrain. It can't even use Terrain Pulse since it's a Sp. Attack move, which is one of Galarian Stunfisk's lowest stats. This is up there on the list of weird design decisions made by GameFreak.
Thankfully, we can make it an actually useful Ability in Pokemon Unite. Since Galarian Stunfisk is adapted to hide in the mud in order to ambush prey, Mimicry has it disappear and turn invisible while also setting down some decoy Aeos Orbs. Now, these decoy orbs are fake and intangible, not like the ones Sableye makes with Feint Attack. Galarian Stunfisk is actually hiding in the ground underneath the fake Aeos Orbs, waiting for an unsuspecting victim to walk within range. To what end? You'll see.
I just need to point out that Mimicry will also make decoy berries if you use the Ability where one would spawn. I've seen attacks on Goal Zones get prolonged because the enemy would charge in to steal the Sitrus Berries on the side in order to refill their HP and then rush back to their side of the field. If an enemy where to make an uncontested score and they have taken some prior damage, they have no moral obligations to leave these berries unattended, and will more often than not take the berries anyway, just to deprive the enemy team of these free heals. If you were to anticipate this, you could catch them by surprise with Mimciry, since you can make a fake berry if you activate the Ability where one would spawn.
Of course, if the Goal Zone is broken, no more Sitrus Berries will spawn in that area. This will still work on the Salac Berries that spawn in the Central Area, and organizing an ambush on the opposing team's Speedster is a cheap but effective way to get the upper hand. Just so you know, the enemy might see through this ruse and throw out an attack at the decoy, which can expose you. You're inivisible, so Sure-Hit attacks like most basic attacks cannot target you, but they can still aim with their moves. Maybe it's for the best that you draw their fire, as forcing them to use a move to expose you puts that Move on cooldown, and Galarian Stunfisk is a lot tougher than other Supporters and can take a bit of a beating if necessary.
You still need a team to Support, and teammates to support you conversely. With what moves, we'll find out right now.
-

At the start of the game, you can choose between Mud Shot and Metal Claw as your first move. By Level 3, you'll have learned both.
-
Move 1: Mud Shot (Area)
The pokemon launches a large volume of mud in a straight line. The user becomes invisible within the mud trail. 9s cooldown.
The mud water trail travels in a straight line in the designated area. The mud lingers for 4 seconds before disappearing. You are invisible while within the area of effect.
I do not know what cruel God condemned a Ground Type to live in or near water, but at least they are thriving in spite the hardships of life. They are moisturized, flourishing, unbothered, until something steps on them.
Mud Shot creates a long puddle of murky water in the designated direction. You know how after a big rain storm, these long puddles remain on the side of the road because the infrastructure is below grade, causing degradation of the foundation of the street, creating a dip where water pools? Yeah, it's like that, I'm sure you know what I mean.
Galarian Stunfisk is a master of disguise, so it is adept at hiding in plain sight. Of course, it needs mud to do that, but still, it is a creature with a nasty set of teeth, so the enemy will surely be wary. This straight line of mud keeps you well hidden, so you can make a defensive retreat or a sneaky approach depending on where the mud trail leads. However, the mud only lasts for 4 seconds, which isn't a lot of time to run and hide, but it's meant to be used in tandem with your basic attack and your Ability, Mimicry.
Imagine, if you will, hitting the lucky 12.5% shot with your basic attack. The enemy is blinded, so you can either lay down Mud Shot, or hide with Mimicry, or both. You'll suddenly be gone and out of sight, while a teammate is hopefully distracting them with their attacks. When the enemy has forgotten all about you, that's when you pop back in with a sneak attack of your own.
What sneak attack is that? Metal Claw.
-
Move 2: Metal Claw (Dash)
The user dashes and scratches enemies with its metal fins. Damage dealt is increased the lower the enemy's HP is. If Mimicry is active, the attack triggers when an enemy is directly within range, dealing more damage. 6s cooldown.
Metal Claw deals 2% more damage for each percentage of lost HP on the target. For example, hitting an enemy at 50% HP with Metal Claw will result in +100% damage.
Metal Claw can be 'primed' during the invisibility effect of Mimicry, where it will trigger automatically against the first enemy that enters the attack radius. When triggered in this way, the base damage of Metal Claw increases by 2x. Metal Claw will go on cooldown after this or if Mimicry ends.
I'll be upfront about this, I do not like when a pokemon is designed beyond its archetype. I did not like Mr. Mime being reworked to deal stupidly high damage, I do not like Greedent being a Defender when it clearly plays more like an All-Rounder, and I would have preferred Mimikyu and Blaziken being designed as Speedsters over All-Rounders, though I understand the thought process behind their kits. So when I give a pokemon like Galarian Stunfisk an offensive attack like Metal Claw, know that I do so as a way to highlight its supportive efforts, not in spite of them.
I mean, Galarian Stunfisk is meant to be a bear trap, so it should have some bite to it. The compromise here comes in how the attack deals extra damage based on the HP of the opposing pokemon, so that Galarian Stunfisk can reliably KO a weakened opponent, but will not deal stupidly high damage against a healthy one.
Besides, nothing would feel better than tricking a low HP enemy into running for a Sitrus Berry, only to reveal that you're actually a Galarian Stunfisk in disguise and that your Metal Claw ends up finishing them off. Metal Claw can be used to dash in and KO a weakened enemy, but this dive can send you flying into the enemy team, so it better be worth the risk. Alternatively, you can attack from the invisibility trail of Mud Shot that you made during a fight, popping up after your teammates have weakened the enemy and going in for the KO with this move.
But the move is at its best when it gets primed during Mimciry. If you have the ability active, Metal Claw will kick in when an enemy is within range, and the damage dealt through this move doubles. This increases the KO range of most frail Attackers from 16% to about 22%. And as you know, Attackers are really annoying to deal with if they are allowed to get away with their potshots and kiting attacks. So if you're able to set up Mimicry in an area with high traffic, or do so while the enemy team is distracted and don't immediately smoke you out of your hiding place, you can make a surprise KO with Metal Claw by taking advantage of their ineptitude.
But not every enemy will be so easy to fool, and it isn't always the best call to go into hiding during a fight. You're a Supporter, and your efforts will be most appreciated in a fight with your most disruptive attacks, like the ones you get at Level 5.
-
At Level 5, Mud Shot becomes either Muddy Water or Bounce.
-
Move 1a: Muddy Water (Area)
A large volume of filthy water is unleashed all around the user, slowing down enemies. The user becomes invisible while within the murky water. 9s cooldown.
At Level 11, Muddy Water becomes Muddy Water+.
Further slows down opposing pokemon.
Muddy Water covers a large area which deals damage when it appears. It reduces the Movement Speed of opposing pokemon caught within by 30% and makes you invisible while within the area of effect. Muddy Water lasts for 5 seconds. The Movement Speed reduction is increased to 50% when upgraded.
The Slow Smoke Battle Item is a very powerful tool in slowing down the enemy when they are nearby, as it reduces their basic attack speed and Movement Speed by a very high amount. And since it is a Battle Item, any pokemon can equip it, which also means it needs a high cooldown to compensate.
So when a pokemon like Galarian Stunfisk has access to a move with a similar effect, it better be an improvement. Muddy Water covers a larger area than Slow Smoke, and definitely more than Mud Shot, but it lacks the basic attack reduction debuff. It also doesn't reduce the enemy's Movement Speed by as much, though it does grant you invisibility within the area of effect, just like Mud Shot. And it deals damage when it appears, so it has a bit more punch to it over Slow Smoke, especially with the 9 seconds of cooldown allowing it to be used repeatedly.
That said, you can totally use both if you are so inclined. Because Muddy Water keeps you invisible while it's active, you can attack without worrying about the enemy's Sure-Hit attacks, especially their basic attacks. And if your own basic attack manages to blind someone, you can then follow up with whatever plan you want, like activating Mimcry. Sure, it's very bold to activate the Ability out in the open while the enemy can see you, but it makes Metal Claw stronger and you have an opening while the enemy is blinded.
But maybe you want to take a more proactive approach to supporting your team.
-
Move 1b: Bounce (Melee)
The user launches upwards, then comes straight back down with a heavy thud, Stunning enemies briefly. The user is immune to damage while in the air. 3s cooldown.
At Level 11, Bounce becomes Bounce+.
A splash of dirty water is made upon landing, expanding the area of effect and Throwing enemies.
Bounce sends you straight up, leaving you invulnerable for 0.5 seconds before crashing back down. Enemies hit will be Stunned for 0.75 seconds.
Bounce+ adds a splash effect, Throwing enemies a small distance away and also expands the area of effect slightly, by 20%.
Talonflame's Fly is one of the strongest moves in Pokemon Unite, as it deals heavy damage when it comes crashing down, while also making the bird immune to damage while airborne. No matter what they do to buff Brave Bird, Fly is just so good at what it does for the Speedster.
But this is about Galarian Stunfisk, and bear traps don't work on birds. But imagine if a bear trap could also jump up to snatch birds right outta the sky, that'd be terrifying. With Bounce, Galarian Stunfisk can do just that, as it'll zoom high into the air to get at the yummy birds up in the air.
I'm making it sound like this move can get at Talonflame midflight, but no, Bounce is just heavily inspired from the fire eagle's evasive attack. Bounce sends Galarian Stunfisk into the air for half a second before it flops back down with a heavy thud. Remember, it is half Steel and almost twice as heavy as regular Stunfisk from Unova, so anyone getting hit by it will be Stunned for a while.
Just like Fly, Galarian Stunfisk is immune to damage and effects for the half second it is airborne, so it's not a lot of time to abuse. In contrast, however, it only has 3 seconds of cooldown, meaning you can Bounce again very soon after landing. You can't move while airborne, not without the help of an Eject Button Battle Item, but the brief jump makes you a falling hazard to nearby opposing pokemon.
You already know how good Talonflame's Fly is at evading damage, as well as Cinderace's Feint. Yes, Bounce is a lot less mobile, but it's way more spammable and easy to use in comparison. The attack range is smaller than Fly, but given how fast the attack is and how often it can be repeated, it's balanced out in that regard.
In the grand scheme of things, this move is only effective against Melee attackers who need to get in close, though the move is a very effective ambush attack. It's just that, since you've chosen this move over Muddy Water, your sneak attack will come from Tall Grass or during Mimicry. And even if you do get the Stun off, you'll need powerful teammates close by to capitalize on your opening.
You're a living bear trap, but you aren't able to trap down anything just yet. If you want to catch yourself some prey, you need to level up Metal Claw into something more sinister.
-
At Level 7, Metal Claw becomes either Snap Trap or Crunch.
-
Move 2a: Snap Trap (Hindrance)
The user reaches out and grabs the enemy, holding them in place and Immobilizing them. Damage is dealt continuously while the enemy is held down, with the damage increasing as the enemy's HP lowers. If Mimicry is active, the move activates when an enemy is directly within range, dealing more damage over time and Immobilizing the enemy longer. 10.5s cooldown.
At Level 12, Snap Trap becomes Snap Trap+.
Also makes the affected pokemon vulnerable to piercing damage.
Snap Trap sends Galarian Stunfisk dashing forward with its fin jaws wide open. If an enemy is hit, they are Grabbed and Immobilized for 3 seconds, during which time Snap Trap deals continuous damage. The Hindrance clears if Galarian Stunfisk is KO'd before the effect ends.
Snap Trap deals extra damage relative to the amount of HP the target has lost while Immobilized by Snap Trap, from damage dealt by you and your teammates. The damage formula is the same as Metal Claw, meaning +2% for each 1% of HP lost.
Snap Trap can also be primed during Mimicry, which has it activate automatically and target the first enemy that enters its attack range. When activated in this way, the base damage of Snap Trap doubles and the targeted enemy will be Immobilized for 4 seconds.
Snap Trap+ makes the affected enemy receive all damage as Piercing Damage while Immobilized.
This is another one of GameFreak's questionable decisions, giving Galarian Stunfisk a signature move that is NOT the same type as the pokemon that learns it. I mean, it could become a Grass Type through Mimicry by being out during Grassy Terrain, but the effort you have to go through just to make this thing work is often not worth it. Truly, Galarian Stunfisk has been cursed with life by a cruel God.
Thankfully, the Type Chart isn't a thing in Pokemon Unite, so Galarian Stunfisk can wield its full potential in Snap Trap. The move sends you rushing forward with your whole body, ready to clamp down with your metal teeth-like fins. Again, this is normally a Grass Type Move in Pokemon proper, but the only plantlike thing about it is how Galarian Stunfisk roots itself on hit with an enemy.
When you grab someone with Snap Trap, Galarian Stunfisk holds onto the ground with its tiny fins. The little ones on the side of its body, yeah, those hold itself and the enemy down while the fangs are gnashing on the enemy. Snap Trap deals damage passively for the duration of the move, and the enemy is stuck in place as the move also Immobilizes them. Now, Immobilization is a rare Hindrance in Pokemon Unite, so in case you aren't aware, the Hindrance prevents the affected enemy from moving or using Dash Moves. Pikachu's early game attack, Electro Web, is one such move that inflicts Immobilize, but it's forgotten soon enough, so you seldom see Immobilization as a Hindrance in Pokemon Unite.
As such, since Immobilization doesn't completely leave the enemy defenseless, Snap Trap can bind the enemy for a little longer than normal. They can still use projectiles or even Score a Goal if they are caught within an opposing Goal Zone, but for the moment, they are at the mercy of you and your allies. Fragile Attackers are easy pickings, but even All-Rounders and Defenders will find themselves in a pickle as Snap Trap also does increasing damage the less HP they have. And since Snap Trap deals damage passively, that amount will only increase.
Just like Metal Claw, Snap Trap can also be primed during Mimicry, which makes it even stronger. You're still a Supporter so your damage output will be on the low side, but the extra second of Immobilization can make the difference between following through an ambush for an important KO, and letting slip through the one that got away. Also, Snap Trap deals increasing damage which scales on the total amount of HP the enemy has lost while they're bound by the move. In practice, it means you can't do a lot of damage by yourself with Snap Trap, even against a weakened foe. But if an ally pitches in to the total damage you deal during Snap Trap, the gradual damage dealt snowballs, since it's counting damage dealt during the move, not just the damage you deal. In this way, Snap Trap is powerful but reliant on allies for the bulk of its damage.
But like I explained earlier, Immobilization is not the same as incapacitating an enemy, and Galarian Stunfisk can and will be attacked by the caught enemy for the duration of the move. You can probably safely hinder an enemy Speedster, since they typically rely on Dash Moves for damage and movement, but catching an enemy Attacker will be risky, since they can just as easily deal heavy damage to you before you do enough damage to them. Never hunt for dangerous game by yourself.
You know, maybe being a living bear trap isn't all it's cracked up to be, since you're just as likely to be kicked away as you are to catch an unsuspecting victim. If you find yourself getting kicked away like trash, bite their heads instead.
-
Move 2b: Crunch (Debuff)
The user lunges at enemies and clamps down on them with their whole body. While clamped, the enemy receives damage over time and has their defenses reduced. The enemy also cannot use moves nor target the user. If Mimicry is active, the attack activates when the enemy is directly within range, clamping down on the target and dealing more damage as well as reducing their Movement Speed. 9.5s cooldown.
At Level 12, Crunch becomes Crunch+.
Further reduces Defense.
Crunch sends Galarian Stunfisk flying forward with its body wide open. If it hits an enemy, it will close its body and bite down with its metal fins, like a pair of angry dentures. Galarian Stunfisk will bite and stay on the affected pokemon for 4 seconds.
While biting down on the enemy, damage is dealt continuously and their Defense and Sp. Defense is reduced by 40%.
Crunch can be primed during Mimcry, just like Snap Trap and Metal Claw, and will also automatically attack any enemy that enters the attack radius. When activated in this way, the damage dealt over time is doubled and the enemy also has their Movement Speed reduced by 30%.
Crunch+ increases the Defense and Sp. Defense reduction to 60%.
The Crunched enemy cannot use Moves nor can they target Galarian Stunfisk with their basic attack or Unite Move.
Imagine, if you will, a floating pair of iron dentures, it's flying, and angry. Now imagine it rushing towards you at high speed, and imagine what it might feel like getting bitten down on by those metals maws. Sounds painful, right? Well, good thing you understand, as that's exactly how Crunch operates for Galarian Stunfisk.
Just like Snap Trap, Crunch sends you flying forward to bite down on the enemy, but instead of rooting down and holding the enemy in place, Galarian Stunfisk attaches itself to them like an accessory, like a vengeful clip-on. Attached freeform in this way, Galarian Stunfisk hitchhikes on the enemy, all the while its steel stubble is gnashing away at the enemy.
Crunch deals damage passively over time, while also reducing their Defense and Sp. Defense, for 4 seconds. Compared to Snap Trap, the damage potential is higher at the beginning, but tapers off at the end due to how Snap Trap calculates its bonus damage over time. Still, a debuff is a debuff, and your teammates are supposed to take advantage of the reduced defenses to KO or seriously damage your victim. Also, it looks really funny watching the enemy flail around with Galarian Stunfisk latched onto their heads, heheh.
Speaking of which, the enemy suffers not just from reduced defenses, but also from Move Lock, which means they cannot use moves while Crunch is active. And even if they could, Galarian Stunfisk cannot be targeted or damaged by the victim while it's latched onto their heads. I wasn't kidding when I was comparing Galarian Stunfisk to a spiteful accessory, as it becomes basically an article of cursed clothing while attached to an enemy through Crunch. Only other opposing pokemon can target and damage Galarian Stunfisk during Crunch, whereas the victim has to retreat if they want to turn the situation around.
Now, Crunch can also be primed during Mimicry, where the move deals more damage and will also slow the enemy down when it bites down on them. However, since the enemy can still move during Crunch, it won't stop them from making a score or attacking Wild Pokemon with their basic attacks. Also, they can still use items, so if the enemy becomes intangible through Full Heal or Shedinja Doll, Crunch will be forced to end. Not to mention, the enemy can still use Unite Moves, and if they happen to use one that makes them intangible, like Charizard's Seismic Slam or Absol's Midnight Slash, Galarian Stunfisk will be forced off. And keep in mind, this is the average exchange in Pokemon Unite. The enemy can just as easily choose to walk back to their teammates and KO you when Crunch ends and you hop off the victim.
Again, you don't want to get too cocky with Crunch just because you got a bite. Big catches are never caught alone, so make sure a friend is nearby to share in the spoils of this deadly game. See, Galarian Stunfisk is a fish, so these fishing metaphors work surprisingly well.
Speaking of which...
-
Unite Move: Murky Maws (Hindrance)
The user summons a pool of mud water that envelops the area around itself, rendering it invisible. As the user moves, the mud water creates a trail that increases its Movement Speed while active. When the Unite Move is used again, its metal fins expand and bite down on an enemy, Immobilizing them and dealing damage over time. The user can drag the Immobilized enemy around until the Unite Move ends. 105s cooldown.
When the Unite Move activates, mud water is made and trails behind Galarian Stunfisk as it moves around. This effect lasts for 15 seconds.
When the Unite Move is used again, Galarian Stunfisk appears from below to bite down and bind an opposing pokemon. If successful, the enemy is Immobilized and damaged continuously while bound.
Any caught enemy can be dragged along while moving, but the mud water will stop being made. What remains will still increase your Movement Speed by 50% and make you invisible, even though your metal fins are visible to the enemy team. The invisibility effect in this case just keeps you from being targeted by Sure-Hit effects.
Do you know what is worse than a fish with giant teeth with a penchant for biting ankles? A fish with giant teeth with a penchant for biting ankles that you can't see. During Murky Maws, you can see the dirty water Galarian Stunfisk is swimming in, but not the fish itself. Watch your step.
The filthy water is made all around Galarian Stunfisk as it swims, and it lingers for the duration of the Unite Move, which is 15 seconds. As you swim into unclaimed territory, the water trails after you, so the enemy can see where you're heading. But when you stop or backpedal, the mud trail stops being made, since you're already in the filthy water. Now, your enemies have lost the bead on you and don't know where you've gone in the pool of dirty water you've been making. That lack of information gives you the perfect opening to strike, depending on how big the pool is.
Should you manage to get into position, Galarian Stunfisk can surface with a surprise attacks, clamping down on their legs with its enlarged jaws. This chomp damages the enemy, also deals damage continuously until the Unite Move ends, and even Immobilizes them, preventing them from moving or using Dash Moves until Murky Maws ends. That's not the worst of it, as Galarian Stunfisk can also use its little fins to keep swimming while it has the enemy in its jaws. Basically, you can nab an enemy and then swim your way to your teammates to serve your victim on a silver platter. Well, it's more like a canine returning to a hunter with a catch in its mouth, but the fishing metaphor doesn't exactly work here. I mean, maybe there are fisherman who use dogs? I dunno, we're getting off track here.
When you do get a bite, Galarian Stunfisk stops making the dirty water around itself. That dirty water is what makes you invisible and also gives you a Movement Speed boost while it's in effect, so whatever amount you were able to spread before the big bite is what you'll have to work with afterwards. Maybe you had the foresight to run a line from one Goal Zone to another, or connect multiple patches of Tall Grass for extra cover. Whatever shape the water takes, that's the wave you'll be riding while dragging your hapless victim towards wherever you please.
Beware the waters where wide eyes won't work.
-
Achievements
Get 30 KOs or Assists during Snap Trap or Crunch collectively.
I don't normally make the Achievement stringent on a specific move, but since Galarian Stunfisk has two identical attacks with a similar plan of attack, the measure of skill here will be how often you can contribute to a fight through tricks and traps. Basically, how useful are you in a team fight?
Both Snap Trap and Crunch hinder the enemy greatly, but they lack the overall damage potential when used by yourself as opposed to with an ally. You're a Supporter capable of taking big chunks of the enemy's HP, but that's not a guarantee for every encounter, and your big bites are meant to make it easier for the team to follow through with a KO. As such, this Achievement requires you to be a real team player, but you knew what you were signing up for when you picked to play a Supporter for this game.
Now, most enemies aren't going to want to be around Galarian Stunfisk when it has access to Snap Trap or Crunch, so you need to play around your positioning and strike from a vantage point while they're distracted or blinded. Don't forget that you can blind the enemy with your basic attack sometimes, and Mimicry lets you set up an ambush. Both of these situations can be taken advantage of individually or together in order to set up the perfect trap with Snap Trap or Crunch. Remember that these moves are stronger when primed during Mimicry.
Om nom nom nom.
-
Holowear
I'll be upfront about this, we can make Holowear for just about any pokemon, but when I told the Holo Tailor we needed a few ideas for Galarian Stunfisk they just threw their hands up in the air and left the shop, and hasn't come back since. I think it's because the idea of trying to dress up a literal bear trap fish is absurd, since its whole body plan has it close itself inward to clasp its steel teeth together. That means hats are out of the window, as well as most clothes, and large articles for decoration.
However, I know that Galarian Stunfisk has its fans out there, and by golly I'm gonna treat them right with exciting and fancy digital clothing for their favorite fish to wear.
Firstly, some Chained Style Holowear has Galarian Stunfisk wearing a spiked collar around its body, or where it's neck is supposed to be, I think, with a tag that reads it's National Dex Number. Then, with Gourmand Style Holowear, it wears a bib in the same place, but upside down, and has a fork and knife attached to its fins on the side. For some penitent pizazz, Prisoner Style Holowear gives it a black and white stripe shirt along with a ball and chain accessory tied to it. For a more lighthearted fare, Beach Style Holowear gives it swimming goggles on its face and a floaty around its body with a shark fin. Lastly, Spooky Style Holowear gives Galarian Stunfisk a Jack-o'-lantern face mask and a raggedy shirt with bits of loose straw tucked within, to give the impression that it was ripped off of a scarecrow last minute.
-
Strategy
Being a Supporter means many things, either you heal and buff your teammates, or you hinder the enemy with debuffs and traps. Very rarely should Supporters be allowed to do big damage, since that shifts the paradigm of what 'helping the team' is supposed to mean. I mean, you get it, right? The ability to unleash Burst Damage spontaneously should be reserved for Attackers and Speedsters, since access to such moves should come at the cost of durability.
Well, Galarian Stunfisk is a Supporter who can threaten big damage, but will often do so in service of the team. That's a bit strange to hear, considering what I've just said about Supporters, but Galarian Stunfisk contributes to the big picture with its own tricks.
Let me break it down. Galarian Stunfisk can bind and trap enemies with its metal jaws, which can gnash and whittle down the HP of its victims. However, these trapping effects do not completely incapacitate the enemy, which means that, depending on the situation, Galarian Stunfisk will be putting itself at risk needlessly. Examples include Snap Trap failing to prevent an enemy from attacking and defeating an Objective like Regieleki, or how Crunch will not stop an enemy from scoring a Goal.
These trapping effects are powerful, but not all that effective when Galarian Stunfisk has to support the team by itself, especially against a focused enemy. It can deal a bit of damage, and can even KO a weakened enemy, but you'll mostly encounter healthy enemies trying to make a bold move on your side of the field. And in these situations, Galarian Stunfisk is limited in what it can do for the team.
As such, Galarian Stunfisk needs teammates the same way how a team needs a Supporter to solidify their back line. If it ever gets caught by itself near a point of interest, it can hold its own against one or two enemies for a bit. The difference between Galarian Stunfisk and most other Supporters is that it can defend itself rather well thanks to its innate Stealth proficiency. With Muddy Water to help it hide in dirty, shallow, pools of water and Mimicry to help it hide in plain sight, Galarian Stunfisk chooses when to engage and where it will disappear from. Also, its basic attack aids in its disappearing act by blinding enemies, sometimes.
You're basically playing dirty, stalling for time until your teammates show up. I mean, it's fair game, since mastering Galarian Stunfisk has a lot to do with taking advantage of the blind spots you make through your abilities. It's the crux of the Mimicry Ability and solidifies your role as a Supporter, when used properly. By laying down fake Aeos Orbs, you entice the enemy into collecting them, since the whole point of Unite games is to score points in vulnerable Goal Zones.
Of course, you're not just limited to fake Aeos Orbs, you can bait enemies with fake berries as well, if you use the ability in spots where the real ones spawn. The situation varies, but if you can read where the enemy will be, you can drastically slow down their advances. Some are more obvious than others, like a weakened Goal Zone that needs just a bit more points to break, or an Objective has spawned and the enemy team is rotating to the other side of the map and is taking a shortcut through the Central Area.
Most of the time your victim won't be by themselves, but you're not as fragile as other Supporters, even without the ability to heal yourself. You can take a bit of a beating and make an escape by using Muddy Water or Bounce, or even through a lucky shot with your basic attack. These are your tools to help you hold out against the enemy team until backup arrives.
And when you do have teammates at your side, that is when your efforts are at their strongest. Everyone knows how good Slowbro's Unite Move, Slow Beam, is at singling out an enemy and rendering them vulnerable for your allies to take out, and you can do that repeatedly with Snap Trap on a much shorter cooldown timer. Of course, the difference here being how Snap Trap Immobilizes the enemy instead of completely spellbinding them, but the idea is the same. You can either set up the meanest ambush in history, or you can catch an enemy trying to retreat through a pathway you snuck into.
So to recap, both Snap Trap and Crunch can put the enemy in a dangerous predicament, but there are different applications for both moves. They're a lot stronger as attacks when charged through your Mimicry Ability, but you'll need to be quick-witted to use such a combo in the middle of a fight, where fists and fireballs are flying free. You can adapt to the situation by using Muddy Water or Bounce, and watch how the enemy reacts. Ranged Attackers cannot fight you easily while you're hiding in the dirty water and Melee Attackers can be overwhelmed by the quick and stunning Bounce attack.
You'll also need to pay attention to when an enemy is blinded by your basic attack since, again, the blinding effect occurs by chance. A blinded enemy might keep fighting, but if it's a losing battle on your end, you can very easily withdraw through hiding or aggravate the situation with Mimicry. It's a lot harder to take advantage of this boon in the middle of a team fight, so it's best to follow a procedure when you blind an enemy in either lane.
Your dirty tricks won't work as well if the enemy likes to stick together, so if that happens, ditch the whole ambush strategy and stick to an ally instead. You can overcome this also by using your Unite Move, Murky Maws, to great effect. If you thought Slowbro singling out an enemy with their Unite Move was busted, try imagining actually kidnapping an enemy and spiriting them away from their team. Now, you're still invisible within the mud trail, just like with Muddy Water slash Mud Shot, but the enemy can tell where your position is roughly by the way the Unite Move makes its muddy trail. It makes mud water as you move about, stopping once you've actually snared an enemy, at which point you will only stay invisible and have a Movement Speed buff as long as you're still within the mud trail you've made. Try drawing curvy lines near Tall Grass to expand your cover.
Lastly, in order to fully visualize how effective this living bear trap will be in Pokemon Unite, we'll need to understand what can counter its traps and tribulations. Snap Trap can be negated with Full Heal and other Hindrance clearing effects, but Crunch doesn't technically count as a Hindrance, so such effects will be not very effective. They will counter the blinding effects of your basic attack, but not the trapping effects of your Unite Move, so snap away. Maybe this can actually count as a plus to Galarian Stunfisk's overall impact on the game, as forcing the enemy to use up their Hindrance protection will weaken them should the next fight happen soon enough.
Just like I mentioned before, the so called traps will not be as effective if no one else is around to take advantage of the bound enemy. Only fragile Attackers or weakened enemies are in actual danger of getting KO'd by Galarian Stunfisk, but these enemies should never be at the front of the charge, well, the smart ones anyway. It's the job of the Defenders and bulky All-Rounders to spearhead the advance on enemy territory, as they can actually stomach a trap and surprise attack. If Galarian Stunfisk is forced to engage one such enemy by itself, it will have to play defense until an ally can provide assistance.
Just hope it doesn't take too long. There's a reason bear traps are seldom seen nowadays, and it's not for a pretty reason.
-
And that's Galarian Stunfisk for Pokemon Unite! You know how when something is so ugly it circles back around to cute? That's what regular Stunfisk is like for me and why I have a sort of fondness for the flat fish. Also how pathetic it is speaks to me on a spiritual level, so I'm one of Stunfisk's biggest fans. The Galarian form, not so much, but I have a soft spot for underdogs. I mean, it just astounds me how terrible it performs in a pokemon battle proper, and astonishes me even more that it was by deliberate design, so of course I'm gonna want to see it put in some work in Pokemon Unite.
Anyway, that'll be it from me for now. Here's a hint for the next post.

Until next time, see ya.
1 note
·
View note
Text
Glimmora for Pokemon Unite!

Season 1
Season 2
Season 3
Prev: Iron Valiant - Primarina - Garganacl - Passimian - Incineroar - Cofagrigus
Humans were blessed to have been put on this planet to look at all the cool and interesting things here, but they've also been cursed by it. Not every cool thing is safe, and not every interesting thing is useful, but what's even more tragic is that there are cool and interesting rocks every where, with some of them being hazardous to the touch.
They're rare, but toxic material can be found in the ground from time to time. Take Glimmora, for instance. It's one of the prettier Rock Type pokemon to look at, but it's also super toxic to handle. It's just well enough that it looks like a flower, because most of us know that every rose has its thorns.
Well, this poisonous pebble seeks to proliferate on Aeos Island, so let's observe what it does, from a safe distance, of course.
-
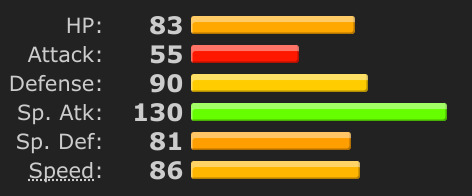
Rock Types have two things going for them, high defense, and nothing else. Yet it seems that Glimmora is a bit of a trendsetter in how its stats are aligned. With a below average defense of 83 HP, 90 Defense, and 81 Sp. Defense, it is not going to stay on the field for very long. In fact, it's so fragile, that its body is literally coming off in pieces, dropping what is known as Toxic Debris. Coupled with a sky high Sp. Attack stat, Glimmora has a reputation for being hazardous to be around. That sort of damage lends itself to the high damage potential of an...
Attacker
-
Basic Attack - Ranged/Sp. Attack
The user shoots beams of toxic energy at the opponent. Additional beams of toxic energy are fired for each piece of Toxic Debris the user has collected.
The basic attack fires a laser beam at the targeted enemy, while also dealing damage to any enemy caught in between. The basic attack has a 1 second delay between shots.
Modifying the basic attack speed will shorten the delay between shots.
An extra beam is fired for each Toxic Debris attached to the pokemon. Each extra beam deals +10% damage.
Crystals are very powerful stones, as they have the ability to refract light. To be clear, I mean bending the light spectrum specifically, not reflecting light, which is how visibility works, according to science. So it's not all that surprising that Glimmora, a living crystal, is able to manipulate the light and turn it into an attack.
By itself, the attack is pretty weak, and loses out on damage compared to regular basic attacks, since it cannot become boosted. The power of the basic attack comes from amassing crystals to bend the light beams, increasing its power even further. I mean, it makes sense, right? More crystals, more power.
You need to collect Toxic Debris to make the light beam stronger, but that's its own mess, figuratively and literally. You'll understand what I mean as we go over the ability, the power to spread Toxic Debris...called Toxic Debris. You're gonna be hearing those two words a lot.
-
Ability: Toxic Debris
The user drops Toxic Debris when damaged by opposing pokemon and when using certain moves. These pieces of Toxic Debris can be picked up to grant the user a temporary Sp. Attack boost, stacking for each piece collected. Opposing pokemon that touch the Toxic Debris will be inflicted with damage-over-time Poison that lingers for a while, stacking in effect when touching multiple shards of Toxic Debris.
A piece of Toxic Debris is dropped when the user is damaged by a hit from an opposing pokemon. There is a delay of 0.5 seconds before another piece of Toxic Debris can drop.
The Toxic Debris pieces can be picked up by the pokemon and attached to its body. Each piece of attached Toxic Debris increases your Sp. Attack by +10%. Each piece of Toxic Debris, the ones attached to the pokemon and the stray pieces on the ground, disappears after 5 seconds.
When an opposing pokemon touches a stray piece of Toxic Debris, they will be Poisoned for 5 seconds. The damage-over-time Hindrance deals weak damage but multiple times continuously. The damage dealt through the hindrance increases for each additional piece of stray Toxic Debris the opposing pokemon picks up, though the Hindrance duration will not reset.
I try to avoid giving frail Attackers defensive abilities like this, but Toxic Debris is a signature Ability, and unique powers like these have to be utilized properly to give the pokemon its character. As such, while you do not want to get hit, I made it so that each glancing blow is an opportunity to deal extra damage, hence the littering of Toxic Debris playing into your strength, and not at the expense of your survivability.
When Toxic Debris is shed, two things can happen with the dropped piece. Either you pick it up and receive a small power boost, or the enemy will step on it, resulting in a damage-over-time Poison Hindrance. The optimal situation varies, but in short, a feather tap opens up your damage potential, and it's up to you to capitalize on that. However, the ability won't work when being hit by Wild Pokemon, to avoid extraneous power boosts before a team fight starts.
Now, needing to be damaged to drop Toxic Debris may seem counterintuitive to a frail Attacker, but it's better to think of it as a small bonus for surviving a hit. There's risk and reward here, with you potentially being KO'd after collecting a lot of Toxic Debris in order to power up greatly, and the enemy potentially getting a nasty retort for letting you pick up the Toxic Debris pieces they made you drop. Even not picking up the pieces is a risk for the enemy, as not only can each piece inflict poison, but multiple pieces will magnify the Poison damage received.
It's hazardous to both ranged and melee pokemon, as you can adapt to the situation as you see fit. And each collected piece adds an extra beam to your basic attack, setting up for a glitzy light show when you've got multiple poisonous shards collected. However, the Toxic Debris isn't permanent, and will wear off gradually, bringing your damage potential back down to normal. Thankfully, this means there is no limit to the amount of Toxic Debris you can pick up, though it's unfeasible to hit infinite damage when you don't have infinite HP to lose. Your potential damage will cap at 3 or 4 seconds into a fight, provided you can reliably pick up Toxic Debris as it is dropped.
Not to worry, as Toxic Debris can be shed in other ways.
-

At the beginning of the game, Glimmora will start out as Glimmet. You can choose between Rock Polish and Acid Spray as your first move. By Level 3, you'll have learned both.
-
Move 1: Rock Polish (Buff)
The user dashes forward by smoothing out the rough edges of its body, shedding Toxic Debris. The user's Movement Speed and basic attack speed is increased for a short while. 8.5s cooldown.
Four pieces of Toxic Debris will drop to the ground at where this move was used. Your Movement Speed increases by 30% and your basic attack speed increases by 50% for 5 seconds.
It's kinda weird how Rock Type pokemon are perfectly fine with chopping off pieces of themselves for a short term power boost in battle. It's like a haircut that comes with a temporary stat buff. Keep in mind that pokemon are fictional creatures, so I'd imagine that the lost material can be reabsorbed by eating more rocks, since this species is known to stick to cave walls and consume the toxic matter hiding within.
Anyway, while Rock Polish is a simple dash forward, it comes with not only a boost to your Movement Speed and basic attack speed, but also drops some Toxic Debris for you at the spot where you dashed from. If you're trying to collect Toxic Debris, this move would make you backtrack to pick up the pieces. That might be annoying to deal with early on, but the application against Melee attackers makes up for it, as they will be beset by a minefield of poisonous pins and needles as they try to chase you down.
Against ranged Attackers, it's likely that they won't want to invade your personal space, since all that Toxic Debris can do a number on their shallow HP. That gives you plenty of free space to loop back around to pick up the Toxic Debris pieces, and going up plus 4 against an opposing ranged Attacker is a solid way to even the odds in a firefight. Plus, the basic attack speed boost works by reducing the charge time of your laser, meaning you can fire more often. If you do diligently pick up your trash after a Rock Polish, your damage potential will jump greatly, until the buff wears off.
However, the basic attack is held back by its auto target function, same as all basic attacks. If you want to hit a whole squad of enemies with some poisonous power, you better master Acid Spray.
-
Move 2: Acid Spray (Ranged)
The user gathers poison energy, then launches it in the designated direction. Opposing pokemon caught in the poison explosion will have their Sp. Defense reduced for a while. Energy is collected from Toxic Debris sitting on the ground, increasing the damage dealt. Any Toxic Debris the user has collected shortens the charge time of the attack. 8s cooldown.
Acid Spray takes 2 seconds to fully charge up before launching in the designated direction. The attack creates an explosion at the point of impact, which will reduce the Sp. Defense of all opposing pokemon caught in the blast by 50% for 5 seconds.
The power of the attack increases by +20% for each piece of stray Toxic Debris on the ground nearby when the attack is used.
The charge time of Acid Spray shortens by 0.5 seconds for each Toxic Debris piece the pokemon has collected. If enough Toxic Debris is collected to fully bypass the charge time of Acid Spray, the Move Icon will flash on the HUD.
Acid Spray can be used during Mortal Spin.
Poison Type pokemon fall into two roles in nature; either they create it to attack with, or they absorb it to build their bodies. Sometimes, they do both, as Glimmet and Glimmora are known wall clingers, taking in all the nutritious minerals, toxic or otherwise, and using it to form their pretty but poisonous petals.
I bring this up because Acid Spray is both a poison attack and a poison absorbing move, and can be influenced by the number of Toxic Debris on the field as such. Normally, Acid Spray takes two whole seconds to charge up, which is far from ideal, but at least you aren't bound to your spot as you charge the attack. You can move about while charging, which can be helpful to expand the space between you and your opponent. And while you're dodging attacks in this way, Acid Spray absorbs the poison left behind by your Toxic Debris, increasing the damage from the poisonous explosion.
Since it's plus 20% for each piece of Toxic Debris on the ground, a minimum of 5 pieces will double the damage of the resulting blast. You can increase the power of Acid Spray beyond that by dropping more Toxic Debris, as there's no limit, but again, you do not have infinite HP to lose. You can rig the number of Toxic Debris on the field by using moves like Rock Polish beforehand to boost the power of Acid Spray by a minimum of 80%, 20% for each of the four Toxic Debris shed from using the move.
However, Acid Spray owes its charge time to converting the poison in Glimmet's body into a hazardous explosive. But if you were to cover yourself in Toxic Debris beforehand, the charge time will be reduced, half a second for each piece collected. It takes 4 pieces of collected Toxic Debris to instantly reduce the charge time to 0, which incidentally is the number of pieces shed by Rock Polish.
Now comes the dilemma. Acid Spray deals more damage the more pieces of Toxic Debris there is on the field, so you can litter the ground by tanking some hits. However, you cannot tank big hits, so you should instead collect Toxic Debris to boost your power for a short-term boost. Doing so would shorten the charge time of Acid Spray, which can also inflict a 50% Sp. Defense reduction on hit. Do you collect the Toxic Debris for a shorter charge time, or leave it on the ground to power up Acid Spray, or ward off physical attackers?
You can do both, you know, but it'll require careful positioning and clever use of Rock Polish and occupying specific zones. You cannot recover HP by yourself, so you'll have to rely on healing from your Goal Zone or from your teammates to maximize your offensive and defensive potential. You can lean into one plan of attack over the other, depending on the composition of the opposing team, as an all Melee attacker team will surely struggle against Toxic Debris if you were to leave it where it falls. Likewise, ranged attackers will keep their distance, giving you enough clearance to pick up the dropped Toxic Debris and power up your Sp. Attack to win the war of attrition.
Eventually, the enemy will start to hit harder, meaning activating Toxic Debris gives you less value in return. It means you're falling behind in power, so you'll have to up your toxic trickery by evolving.
-
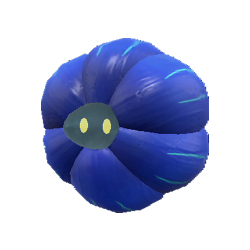
At Level 7, Glimmet will evolve into Glimmora. At the same time, Rock Polish becomes either Mortal Spin or Spiky Shield.
-
Move 1a: Mortal Spin (Buff)
The user spins rapidly while shedding Toxic Debris everywhere, dealing damage on contact. Damaging enemies inflicts damage-over-time Poison and also sheds Toxic Debris on hit. The user's Movement Speed is increased while attacking and lingers for a short while when the move ends. 7s cooldown.
At Level 11, Mortal Spin becomes Mortal Spin+.
More Toxic Debris is shed as the attack wears on.
Mortal Spin has Glimmora spin wildly like a top for 4 seconds. While spinning, your Movement Speed increases by 50% for 6 seconds.
Two pieces of Toxic Debris are shed every 0.5 seconds while spinning. Damage is dealt on contact with opposing pokemon, Poisoning them for 3 seconds. This Poison stacks with the damage-over-time Hindrance caused by Toxic Debris. Two pieces of Toxic Debris are also dropped on hit with an enemy.
Mortal Spin+ drops an extra piece of Toxic Debris every second. the pattern updates to 2 pieces, followed by 3 pieces 0.5 seconds later, before starting over.
Glimmora is one of those late-bloomer pokemon that reach their full potential a little later than other pokemon. See, that's a pun because Glimmora is flower shaped, even though it's not a Grass Type and doesn't know that many Grass Type moves, but it's sometimes called a wallflower because-because they live in caves and-and they don't get noticed much- I'm letting this metaphor run away from me.
Ahem, Mortal Spin is functionally a Poison Type Rapid Spin and is the signature move of Glimmora. However, clearing up hazards is the last thing you want to do here, since the Toxic Debris pieces dropped is your own beautiful mess. As such, in Pokemon Unite, it doesn't clear away the debris, but instead spreads them everywhere, since Glimmora is spinning so fast its loose pieces are coming off. It is way more efficient than Rock Polish as the speed boost comes with hazardous spinning that damages and poisons everyone you touch. Not just that, it also sheds Toxic Debris constantly, passively and on contact.
By itself, Mortal Spin drops a grand total of 16 pieces of Toxic Debris, though they are distributed once every 0.5 seconds. In just 1 second, you've already dropped 4 Toxic Debris pieces, equal to Rock Polish, with another 4 dropped every second, all the while your Movement Speed is boosted and you're whizzing about on the battlefield. This move is a great way to cover the ground in hazardous shards that you can either pick up or use to power up Acid Spray, which you can charge while spinning.
The move lasts for 4 seconds, but the Movement Speed buff lasts for 6 seconds, so you have a bit of a speed buffer for a short while after the move ends. However, spinning wildly and throwing toxic litter everywhere is bound to make you a target, so be prepared to get tripped up by an enemy attack. It goes without saying that getting hit with a Hindrance will cut your spinning spree short, so be careful about overextending your influence while using Mortal Spin; the Movement Speed boost may not be enough to get your out of danger if you get ambushed in enemy territory.
If you need to protect your face, you can go with Spiky Shield instead for some prickly protection.
-
Move 1b: Spiky Shield (Buff)
The user covers their face with a cluster of hazardous crystals, granting a shield. While the shield is active, the user's basic attack speed is increased. As the shield is worn down by attacks from opposing pokemon, Toxic Debris is dropped. When the shield disappears, a huge quantity of Toxic Debris is shed all at once. 11s cooldown.
At Level 11, Spiky Shield becomes Spiky Shield+.
Ranged attacks will cause the shield to eject Toxic Debris in the direction of the attacker.
Spiky Shield grants Glimmora a 15% shield. For every 2.5% of the shield destroyed by attacks, a piece of Toxic Debris is dropped. This effect stacks normally with your Toxic Debris Ability.
As long as the shield is in effect, your basic attack speed is increased by 75%. Additionally, the duration of all picked up pieces of Toxic Debris on the user is reset.
When the shield made by Toxic Debris disappears, whether it was destroyed or faded away, 8 pieces of Toxic Debris are dropped all around the user.
Spiky Shield+ causes all dropped Toxic Debris to be launched towards the Attacker when the shield is broken from ranged attacks.
When you pick up Toxic Debris, it adds a Sp. Attack boost and an extra laser to your basic attack, but that's all it does. The ability is not unlike picking up broken glass bottles and attaching them to your body hoping to deal poison damage on counterattack, so why is it just a power boost? Glimmora is trying to preserve the poison by reabsorbing the material back into its body, so the sharp bits are pointing down, into its petals, hence, no toxic thorns for defense.
Spiky Shield...does not do what you're thinking it does. It does not give you a spiky coating of toxic shards to protect yourself with. It's a different gambit, especially for a frail Attacker, as the goal is to further spread Toxic Debris more easily.
Just a quick note, shields work normally with Toxic Debris, as the shield absorbs the damage, but a hit is still a hit, so Toxic Debris is made and dropped to the ground. Basically, 0 is still a number of damage, so the Ability counters by shedding Toxic Debris on reaction. This makes shields valuable to Glimmora, but moreso the shield made by Spiky Shield, as it grants a whopping 15%.
The Spiky Shield protection is also unique in that it sheds Toxic Debris as it is being destroyed. Now, there's hardly any difference here between Spiky Shield and regular shields, but the Toxic Debris Ability has a slight cooldown in how often it can shed debris. Spiky Shield has no such limitations, so if a massive hit eats up the entire Spiky Shield, that 1 piece of Toxic Debris shed for every 2.5% of the shield loss, resulting in a total of 6 pieces of Toxic Debris. And whether or not the shield disappears because of damage or time, it'll drop another 8 pieces of Toxic Debris, which is a whole lot of Toxic Debris for the enemy team to deal with.
What you do with the Toxic Debris afterwards is up to you. You could leave it on the ground and trick some hapless fool into stepping into all of those pieces and go into a medically induced coma (poison is technically a medicine, right?). Or you could pick up all of those pieces and power up as if it were an illegal substance (man the drug metaphors are going crazy here). Either way, Spiky Shield is one way of dealing with Burst Damage, provided you can avoid the follow-up attacks when the shield goes away.
Also, Spiky Shield boosts your basic attack speed by an insane 75% while it is active. Remember, all shields are impermanent, so the boost will linger only for a little while, or less if the shield gets destroyed right away. The basic attack speed modifier only affects the delay between lasers for your basic attack, but it's still a substantial boost to work with. The other thing about Spiky Shield is that it resets the duration of all Toxic Debris pieces you have attached to your body, so that high Sp. Attack boost coming from all of your attached pieces will live longer than their expiration dates, and really amplify your basic attack.
The upgrade may or may not affect your playstyle depending on the enemy. See, if a melee attack triggers Toxic Debris, the attacker will have a high likelihood of stepping on the debris, and get poisoned as a result. Ranged Attackers won't have to worry about this and can mash away with their basic attacks. Spiky Shield+, however, will respond to such ranged attacks by chucking the dropped Toxic Debris in the direction of the attacker. It may not reach, depending on the range of the attack received, but it helps cover the field by expanding the field of toxic trash.
More Toxic Debris means more power going into Acid Spray, but the move has low power scaling, especially at this level. Don't worry, as you'll get a new move one level later.
-
At Level 8, Acid Spray becomes either Power Gem or Sludge Wave.
-
Move 2a: Power Gem (Ranged)
The user collects light energy from all around itself, unleashing it as a beam of light in the designated direction. Opposing pokemon struck by the beam will have their Sp. Defense reduced greatly for a while. Extra power is drawn from nearby Toxic Debris, increasing the damage of the beam. The more Toxic Debris you have collected, the shorter the charge time. 7s cooldown.
At Level 13, Power Gem becomes Power Gem+.
Deals increased damage.
Power Gem is released as a concentrated beam of energy that reaches far. Opposing pokemon will have their Sp. Defense reduced by 70% for 5 seconds. It takes 1.5 seconds of charge up before the attack shoots out.
Any nearby stray Toxic Debris will increase the power of this move by +15% for each piece.
The charge time of Power Gem is reduced by 0.5 seconds for each collected piece of Toxic Debris.
Power Gem+ increases the base damage by 20%
This move can be used during Mortal Spin.
Remember what I said about crystals refracting light? This move is like that, but way stronger. Of course, you're leaning more into the Rock Typing over the Poison Typing, but I'm pretty sure all rocks are hazardous to your health. Except for salt, I established that fact very well during Garganacl's post.
Power Gem functions just like Acid Spray, in that it has a charge time that can be reduced by wearing Toxic Debris and gets stronger the more pieces of Toxic Debris there are on the floor. However, the power scaling for Power Gem is slightly weaker than Acid Spray, but that's just a trick of the numbers. Power Gem has a shorter charge time of 1.5 seconds, covers way more distance, and has a shorter cooldown over Acid Spray. The improvement comes from the ease of use over damage.
Oh, and Power Gem inflicts a harsh Sp. Defense Debuff of 70% for 5 seconds, which more than makes up for the weaker base damage. And remember, this move can be augmented by Toxic Debris, which you can litter like crazy through Mortal Spin or Spiky Shield. Also, Power Gem can be used during Mortal Spin so you can keep mobile while charging up the move. Not that you are immobile while charging Power Gem, just saying that the extra Movement Speed helps out a lot in lining up your shot.
Power Gem as a move has no downside, but keep in mind that the power of the move is dependent on the amount of Toxic Debris shed. You can make Toxic Debris easily with Mortal Spin or Spiky Shield, but the rest of the litter is made at the cost of your HP, of which you don't have a lot to lose. There is an inherent balance to this attack that runs deeper than just 'laser light beam go bzzzt'.
And while the attack covers a lot of distance, it can still be dodged by fleet-footed opponents. If you want to hit absolutely everything, Sludge Wave has got you covered. Not literally, of course, unless you're in the splash zone.
-
Move 2b: Sludge Wave (Area)
The user absorbs nearby poisons to prepare to unleash a massive wave of toxic slime. The slime wave is released all around the user in a wide area, damaging enemies and inflicting a damage-over-time Poison status effect. Poison is absorbed from nearby Toxic Debris, increasing the damage dealt and the amount of damage the hindrance deals. The more Toxic Debris you have collected, the bigger the wave. 7s cooldown.
At Level 13, Sludge Wave becomes Sludge Wave+.
Shortens the charge time.
Sludge Wave takes 2 seconds to charge, but the area of influence is large, easily covering more area than a Goal Zone. Opposing Pokemon damaged by the wave will be Poisoned for 5 seconds. This Poison Hindrance stacks with Toxic Debris poisoning and it resets the duration of the damage-over-time Hindrance.
Sludge Wave can be charged during Mortal Spin.
Nearby pieces of Toxic Debris increase the damage of this move and the Poison Hindrance by +15%.
The wave increases in size by +5% for each piece of collected Toxic Debris.
Sludge Wave+ shortens the charge time to 1.5 seconds.
I'm no geologist, so I'm not 100% sure what exactly are the poisons Glimmora is absorbing from the cave walls. Is it oil? Methane? Asbestos? It comes out in a liquid form, so it's probably a chemical with a complicated scientific name.
Well, whatever it is, Glimmora can unleash a whole wave of the stuff when using Sludge Wave. It's similar to Acid Spray, with a charge time and everything, but the execution is totally different. Firstly, there is no way to shorten the charge time, unlike Acid Spray and Power Gem, but there's a reason for that.
When Sludge Wave is fully charged, it unleashes a massive wave of toxic slime out in all directions. And I mean massive, because at base power it can easily overtake a Goal Zone. The size of the attack will only increase the more Toxic Debris pieces you have collected, and there's no limit to the amount you can hold, held back only by the short hold duration of each piece. With a huge cache of debris on your person, this attack can reach further than a fully charged Dragon Pulse from Duraludon, and a glancing blow will inflict Poison, which is its own mess.
The poison Hindrance inflicted by Sludge Wave stacks with the poison inflicted through Toxic Debris, so not only do the stray pieces power up Sludge Wave, they exacerbate the poison the enemy is suffering from passively. Basically, if you trip up the enemy with multiple poisonous spikes, you can expect Sludge Wave to add to their poison problems. This spread damage, combined with the move's potential reach, justifies the long 2 seconds charge time of Sludge Wave.
The damage potential is there, you just gotta know how to work around the charge time and the dropped pieces of Toxic Debris. Just like with Power Gem, you can increase the effectiveness of Sludge Wave by utilizing Toxic Debris, but you want to do so through Mortal Spin or Spiky Shield having laid out a blanket of toxic litter first. Without those moves, you can only drop Toxic Debris by taking damage, so try to avoid being caught off-guard. Also, you can charge Sludge Wave during Mortal Spin, so you can either close the gap or get some distance before the poison wave comes out.
Now, all this time, I've been talking about Toxic Debris as if it were some sort of dangerous tripping hazard that the enemy has to watch out for. That's still true, but the opposing team isn't stupid. There are ways for them to bypass or even ignore the Toxic Debris laid out all over the ground, like Dashing Moves, teleporting moves, Hindrance immunity, or even healing off the poison damage. Basically, a competent enemy can minimize the impact of your Toxic Debris as they're attacking you.
That's when you bring out your trump card.
-
Unite Move: Venomous Vertices (Ranged)
The user creates a huge cache of Toxic Debris before launching it directly forward. The cache explodes, spilling vast amounts of Toxic Debris everywhere. Opposing pokemon touching the hazards will take more damage than normal from the damage-over-time hindrances inflicted. 115s cooldown.
A massive crystal deposit is made in front of Glimmora before launching it forward. The attack explodes on impact, scattering 16 pieces of Toxic Debris all around.
The pieces of Toxic Debris made from Venomous Vertices deal 3x more damage through their damage-over-time Hindrance. It also lasts for 7.5 seconds, as a Hindrance and as a stray piece on the ground, as well as when collected.
In case you forgot what your geometry class has taught you, a vertice is a technical term for multiple corners in a 2D or 3D shape. The singular form of the word is 'vertex', and on a jagged, venomous, crystal, there's a lot of them.
Glimmora amasses a whole cache of toxic material from the surrounding area and condenses it into stone. The toxic materials react to each other, creating crystals from the intense pressure. It only takes 0.75 seconds to make, but once the crystal cache is finished, it is launched forward. Of course, the freshly made crystals are fragile, but that's the idea, as the attack breaks down into multiple pieces of Toxic Debris, covering the ground at the impact point.
Venomous Vertices hits hard, as expected when a ball of sharp crystals is launched at high speed, but most of the damage will come from the Poison Hindrance inflicted afterwards. See, the poison from the Toxic Debris dropped is extra potent and deals 3x more damage over time than normal. And with so many pieces dropped all at once, it's gonna cause some severe health problems if you score a direct hit on the enemy team with this.
Of course, if you miss, that's still a whole lot of Toxic Debris you can freely pick up. The duration of the toxic pieces lasts a little longer than the normal Toxic Debris you drop, so you can space out collecting the bits to maximize your damage for a bit. Ideally, you'll want to pick up about 4 or 5, then leave the rest on the ground to power up Power Gem or Sludge Wave, though you can add to the power by dropping more debris through Mortal Spin or Spiky Shield. Just take stock of the situation after launching Venomous Vertices and play accordingly.
I really did just give a pokemon a sharpnel mortar shell in Pokemon Unite, huh.
-
Achievements
Deal 50,000 damage to the opposing team without getting KO'd.
All Attackers are good at one thing and one thing only, dealing damage. It's a bit demeaning for Glimmora to be saddled with an Achievement that is basically an average amount of damage for a regular Attacker. Even so, how Attackers dish out damage varies, and Glimmora has one of the more riskier methods due to its Ability, Toxic Debris.
Firstly, the stipulation here is that it only counts damage you deal in one take. If you get KO'd, the damage tracker resets, and you have to start all over again. The thing is, while Glimmora is fully capable of dealing high damage, it has to do so relying on Toxic Debris. While it can make plenty of Toxic Debris through its moves Mortal Spin or Spiky Shield, including the Unite Move, it's gonna drop most of its debris during a firefight with the opposing team, and at that point, survival is more important than damage.
To earn this Achievement, you have to take advantage of the situation whenever a lot of Toxic Debris is on the ground at once. While the Achievement wants you to do as much damage as possible before getting KO'd, it doesn't care how you do it, so you can use the Toxic Debris however you want, as long as your putting in the numbers. You can pick up the Toxic Debris and add all that power to your Sp. Attack, or leave it on the ground to trip up your enemies.
Picking the correct choice gets you KO's and easy spread damage. But picking incorrectly will squander the opportunity opened up by Toxic Debris and will have you relocating to home base forcefully.
You may not be a flower, but you still got thorns, so use them.
-
Holowear
It goes without saying that designing Holowear for humanoid pokemon is rather easy, just pick a theme and give them the appropriate clothes. However, Glimmora is far from humanoid, so whatever we come up with for this stone star has to be pretty fashionable in spite of its lack of limbs. I've done it for Starmie, I can do it for Glimmora as well.
First off, Starry Style Holowear decorates Glimmora's face with star pins, ranging from twilight purple and blue to white and yellow. Flowery Style Holowear does something similar, but covers the pokemon in flower brooches and petals. In contrast, Prickly Style Holowear places a coil of black, pointy, bramble weaving through its petals. For some natural beauty, Snowy Style Holowear puts snowflake pins all over its body, with each one being unique. Lastly, the true piece de resistance comes with Sparkly Style Holowear, bedazzling Glimmora with glittering gemstones and crystals.
Yes, all of these Holowear options are mostly pins and brooches, but it's better than nothing, and clothing is limited when the pokemon is literally a rock with a lot of stringy filaments leaking out.
-
Strategy
Glimmora's niche as an Attacker is one that it shares with its Poison Typing. By that I mean how Poison Type pokemon are known to hinder their opponents by using their poison attacks, for offense or for defense. Glimmora is no different, as most of the damage it will deal in a game of Pokemon Unite will come from its Poison Hindrance.
I've already gone over how Toxic Debris as an Ability is detrimental to you as an Attacker since taking hits is the last thing you want to do as Glimmora. Now, it's not that fragile, compared to other Attackers like Decidueye, so it can take a glancing blow from time to time. The problem is, it can't do so forever, it cannot stomach big hits without choosing Spiky Shield over Mortal Spin, and it certainly will not survive any surprise attacks or ambushes it walks into. But Toxic Debris as an Ability rewards the player for surviving dangerous situations like this, turning a disadvantageous fight around for you by utilizing the poisonous prickly pieces.
How you, the player, take advantage of the littering of Toxic Debris is where your skill will shine through. You can pick up the Toxic Debris for a temporary boost to your Sp. Attack and basic attack, or leave them there for the enemy team to deal with. Since multiple pieces of Toxic Debris will cause the Poison Hindrance to deal increased damage, where the pieces lay when they fall become hazard zones, inhibiting their approach and offensive pressure. This may be ineffective against things like Full Heal or Hindrance protection, but those effects have cooldowns, whereas Toxic Debris does not. It will always be a factor, no matter where they are or how many pieces there are.
Of course, maybe the player is way too good at warding off the enemy and is getting loads of KO's with their moves, or they just aren't getting hit as often. Maybe they're under leveled and are perishing too quickly to lay down an effective field of Toxic Debris. This can become problematic if your team is relying on stifling the opposing team's offensive pressure with big hits or dangerous field effects, which Toxic Debris can provide either way. Not to worry, as you can use either Mortal Spin or Spiky Shield to put down some Toxic Debris manually.
Since Mortal Spin makes you faster and shed pieces of Toxic Debris like crazy, it is effective against ranged Attackers as it helps you cover more ground, hide behind cover, dive in and out of crowds, and poisons opposing pokemon directly by spinning into them. Toxic Debris sheds poisonous pieces near you when the Ability is activated, so it is limited in range depending on where you are standing your ground. With Mortal Spin, this 'ground' can be anywhere you want it to be within the immediate vicinity, and is handy at directly poisoning the enemies too smart to get tripped up by the Toxic Debris scattered on the ground. And for the ones that do get pricked, the poison effect stacks, exacerbating the Hindrance. Also, the move doesn't end while charging up Power Gem and Sludge Wave, keeping you mobile and within firing range of the opposing team. More on that in a bit.
Spiky Shield provides a much safer buffer against melee attackers since the shield effect is basically the same as Toxic Debris but ramped up. It drops so many pieces of Toxic Debris as it is being destroyed, as well as when it disappears, that it basically turns the entire area around you into an environmental hazard risk. You know, the kind of areas with the rock slide warnings, which isn't unlike what's gonna happen when Spiky Shield runs out. Because the Toxic Debris is poisonous rocks. A poisonous rock slide. Yeah, you get what I mean.
These moves have cooldown, which makes them difficult to use repeatedly, especially if you want to lay down a lot of Toxic Debris at a time. However, dropping Toxic Debris through these moves is meant to be applied aggressively instead of passively. By that I mean you use the dropped pieces to establish a stronger foothold on the battlefield, encroaching on the enemy territory by threatening the enemy team with lethal poisons through the dropped Toxic Debris. It's safe for your teammates to attack from within the field of poisonous rubble, as opposing melee attackers cannot approach without getting poisoned. As for ranged Attackers, that's for you to deal with, as the Toxic Debris powers up Power Gem or Sludge Wave.
Both Power Gem and Sludge Wave threaten big damage over a large area, and both moves use the Toxic Debris scattered around on the ground as well as the bits you have collected. While Sludge Wave has an incredible reach and will poison the enemy on hit, it has a lengthy charge time of 2 seconds that cannot be reduced until it is upgraded. In contrast, Power Gem covers less area and doesn't poison, but can be charged instantly, deals heavy damage, and reduces Sp. Defense greatly afterwards. Since you're gonna be dropping Toxic Debris all the time, these moves are engineered to deal even more damage just by absorbing the power of the dropped pieces. For Sludge Wave in particular, it'll also worsen the damage dealt through the poison Hindrance.
They also have below average cooldown timers, so they are rather threatening with how often Glimmora can use them. That's why they both have a default charge up time but also have parameters that can be amplified with Toxic Debris. Like I've said before, the bits dropped through Toxic Debris are functionally a sort of reward for surviving a hit, for being a flimsy Attacker and all.
But that flimsiness is Glimmora's weakness, as with any Attacker. If Glimmora gets dropped in one hit, it'll only drop one piece of Toxic Debris. Same thing happens with getting ambushed by Burst Damage, as Toxic Debris has a short delay between dropping the toxic pieces. You could be bombarded by a hundred little hits all at once, but Toxic Debris will only drop one poisonous prickly piece at a time every 0.5 seconds, so if it takes less time than that to KO Glimmora, the ability won't be as effective.
Surviving is super important for Glimmora, as each glancing hit drops Toxic Debris. However, it's you against five opposing pokemon, so you're gonna have to watch out for pincer attacks or getting boxed in to the point where you can't escape. Remember that you have teammates to fall back on, and Glimmora loves having big stony walls to hide behind. It's one of those pokemon that would be super appreciative of having a Defender or two around to help out. The prettiest gemstones are often behind thick glass and secure protective measures, after all.
Handle with care.
-
And that's Glimmora for Pokemon Unite! This post is a little late and I apologize for that, had to deal with some family trouble but it's all good now. As for Glimmora, I thought it'd be fun to have a pokemon use field effects to cover the ground in poisonous hazards which it can then use to power itself up. I already did this for Coalossal, but that was a Defender, and Glimmora is a unique Rock Type pokemon with abnormally high Sp. Attack. Plus, more Paldean pokemon are always welcome in Pokemon Unite.
Hopefully the next post will be ready on time. Here's a hint.

Until next time, see ya.
4 notes
·
View notes
Text
Tinkaton for Pokemon Unite! (obsolete post)

It's been a while since Tinkaton has officially been added into Pokemon Unite, and while I'm glad we can all finally play as our favorite mentally deranged psychopathic blacksmith, it means that my original post for Tinkaton for Pokemon Unite is now obsolete. I'm not upset about it or anything, it's a very popular pokemon and its inclusion was a shoo-in. It was bound to happen eventually, I'm just glad I got to share my idea well before the announcement became official.
But how does the post compare to the official moveset? Let's take a look and compare it to the one I came up with. You're gonna wanna stick around for this, because Tinkaton breaks the mold with what it brings to the table, and not just because of its ability.

Speaking of which, both my post and the official moveset use Mold Breaker as the Ability, but my version is drastically different and uses a scrappy resource to power up its moves. The idea was that Tinkaton could power up to insanely high levels at the cost of its scoring potential, as its scrap shared storage space with the Score Pocket. We also had the same idea to make Tinkaton's attacks effective against enemies with a shield. But I didn't want to make another Urshifu, who was overpowered at the time the post was made, so I made the shield breaking potential dependent on the amount of scrap you picked up, which was limited by the amount of space available in your Score Pocket.
Instead, the official version granted a permanent power-up based on how many times you hit the opposing team with your boosted basic attack and your moves. This makes it so that Tinkaton can reach its full potential eventually, but when that happens is up to the player and how often they can land their hits. I mean, it's a good ability, I just think it lacks a bit of substance beyond the shield breaking potential.

We also had the same idea to give Tinkaton Gigaton Hammer. I mean, it just wouldn't be Tinkaton without the move, right? Although, both versions are similar, mine was faster but could deal more damage based on the amount of scrap used up for the attack. My idea was that this wide ranged attack was difficult to dodge, so the power and skill of the player should come through in how effectively they were able to amass scrap resources.


I'm not gonna talk about Smack Down or Thief too much since Moves gotten through Technical Machines, or TMs for short, are all fair game. I just like to stick to the natural Level-Up Move Pool when deciding a pokemon's movesets, since the character of the pokemon is the most important part of the whole post. Ironically, that does mean I HAVE to pull moves from a pokemon's TM or Move Tutor List to make the moveset work, like my Incineroar Post having Heat Crash, a Move it got from a Move Tutor, or Passimian needing Focus Blast, a famously unreliable TM Move.

I am gonna talk about Ice Hammer, though, and what it means for Pokemon Unite going forward. Believe it or not, this move has huge implications for what moves a pokemon might have for Pokemon Unite, and it even affects how my own posts will be made.
So what's the big deal? I'll tell you what the big deal is. Ice Hammer is an Egg Move for Tinkaton.
All this time, all the moves that all the pokemon in Unite have been learning and utilizing have all been moves available to them naturally, through Level-Up, through TMs, and even through Move Tutors. I remember being amused that, when Tsareena came out, it could choose between Stomp and Triple Axle, the latter of which was a Move Tutor back then, and thinking how learning Triple Axle could prevent you from evolving into Tsareena, but no, evolution rules are clearly different from the games, obviously.
But never before has an Egg Move been utilized in a pokemon's moveset. For the pokemon fans that joined the fandom during the Scarlet and Violet days, Egg Moves were a whole different process back then. Starting in Gen 2, Pokemon Gold, Silver, and Crystal to be specific, you could put two compatible pokemon in a Day Care and come back to find an egg. That egg will hatch into a baby version of the mother, with a strong possibility that its genes were inherited from both parents.

Don't think too much about the logistics of how Pokemon like Magnemite or Kangaskhan are understood in terms of egg making, they never even allude to the 'labor' of it all. Really, don't think about it. Just think of the baby pokemon. Look, she has your eyes, aww.
The process has been refined over the years, but the idea was always the same. With persistence and luck, you could eventually hatch a pokemon that was genetically superior to anything you could possibly find in the wild. All you needed was a mother to breed the specific pokemon you wanted, as well as a father to pass down exclusive moves that the baby couldn't get normally otherwise. It was time consuming, but if there's anything pokemon players have too much of, it's time.
They changed a lot of the logistics of passing down moves over the years, but back in the day, the father could pass down exclusive moves, as well as TMs if the baby could also learn it. You youngin's might be surprised to learn that TMs used to be single use, so breeding down moves in this way was the ONLY way to duplicate them. Not only that, there are some really cool Egg Moves you'd want a pokemon to have, like a Charizard or Feraligatr with Dragon Dance, but they'd have to inherit the move from a Gyarados father. Naturally, it's now easier to get moves, so these methods are obsolete, but you gotta understand that this was the only way back then.

So what does this mean for Tinkaton and pokemon newcomers in Unite? Well, given how egg making works in Pokemon Scarlet and Violet, Egg Moves are comparable to Move Tutors now, since Egg Moves can be traded between pokemon without any dirty business being done. Just share a sandwich with your posse and your dancing duck will suddenly know how to spin really fast. Heck, you can even relearn an Egg Move if you wanted to, which is a nice quality of life improvement, since, you guessed it, Egg Moves are gone forever if forgotten in the older games.
This could all change in the future, since the whole picnic thing is a cultural norm in Paldea. I understand why the whole process has been simplified, since you want players to be more competitive, but the barrier of entry is a bit high for those without a lot of time on their hands. Thankfully, it seems to be paying off, with the VGC scene alight with powerful trainers that can get a perfect team within a day.
I digress. Egg Moves are gonna be an interesting topic of discussion from here on out, since the pokemon in Unite are actually powering down to even the playing field at the beginning of each match. The whole process of leveling up comes with not only relearning stronger moves, but also evolving. It can't be too far-fetched to imagine Egg Moves are also being remembered in this same way.

Though that would imply that every new pokemon added to Unite from here on out would need to have been born with the proper Egg Move for their moveset. Considering how unfeasible that is, how not every Egg Move is vital to a potential moveset, and how we've been doing just fine without them, I'd say Egg Moves for Pokemon Unite should be included on a case-by-case basis. I mean, it could just be a Paldean thing, since like I said, Egg Moves can be learned through picnics. Maybe I'll stick to the status quo personally, thank you very much.

The very last thing I'll talk about is the official Unite Move for Tinkaton. It's a decent enough attack for the pokemon, but I believe my version is subjectively superior. Tinkaton did not have access to Smack Down at the time the post was made, so I made its whole shtick with slinging rocks into the sky its Unite Move instead. Not only was it a reliable way to deal damage from afar, it dropped loads of scrap for you to collect. There was also a slight chance that a random Corviknight would fall from the sky afterwards, though this was purely visual and would have just been a funny easter egg.
Ah well, it's best not to look a gift Rapidash in the mouth, especially if it's a Galarian variant. Now why would I bring that up? Hmm...
1 note
·
View note