
onegirlatelier
Fine Things, By Hand
Céline. Couture sewing | Historical costuming | Knitting | Other fibre arts and needlework. Original posts.
85 posts
Don't wanna be here? Send us removal request.
Last Seen Blogs


m1lkygh0stsart
M1lkyGh0st

deppresso-expresso
☆Arson, but In The Name Of Science ☆

professor-sweetpea
Sweetpea.
juuuulez
jules
Text
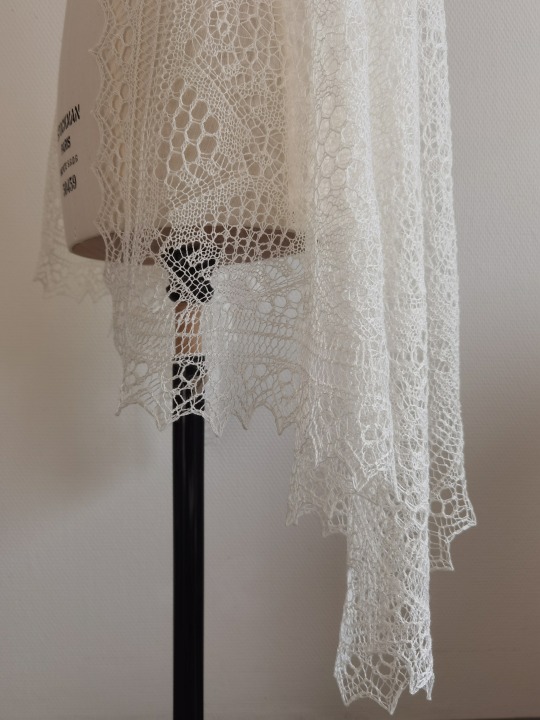
April, 2024 | Shetland lace shawl
Hi there! It’s been a while. I’ve been kept busy by all my university work…and this shawl.
The shawl is knitted to celebrate the wedding of my friend (now friends, I should say). A wedding is really the perfect excuse for all the heritage crafts and heirloom projects that might seem too serious to gift in other occasions. I did ask the recipient beforehand if she would like it, though, and I was so, so honoured that I got an enthusiastic ‘yes’. I’m sure this sentiment is shared by many makers, whatever gift they are making.
Shetland fine openwork, a knitted lace, seems to have emerged with the beginning of the reign of Queen Victoria, who championed and popularised the craft. It was probably spread from the Isle of Unst to other parts of Shetland. What surprised me the most when I first read about it was that Shetland shawls and other lace pieces were largely exported as luxury items and rarely worn by islanders themselves. Women bought yarn from spinners and knitted mostly in their homes. They then took them to local merchants and exchange the finished objects for goods or (commonly after the 1880s) money to supplement the household income. The ‘supplement’ nature of this work probably means it was not compensated as much as a job outside the home would be for the same hours and skills. Besides, it was not always easy to spin an even 1-ply yarn at 1600 metres per 100 grams. For a piece of knitting with a large ‘plain’ area (i.e. only knit stitches), the unevenness was impossible to hide but could only be discovered after the area was worked. Then the maker had to either frog (unravel) the area or continue with the risk of the whole piece not being able to sell.
Whilst it is very reasonable to point out that Shetland ladies did not usually wear this type of lace (I’ve been to the Scottish Highlands once, in summer, and it was not fine lace weather), I imagine that at least for some, it wasn’t just about making money. Some sort of fulfilment must have been from the satisfaction of having a piece ‘properly done’ by continuing and adapting a traditional pattern, technique or material. I think this sort of satisfaction is also why many modern knitters are willing to spend hundreds of hours on lacework.
Intricate handknitted lace items can still be bought today (a quick search on Etsy would show many are form eastern European countries with a long and prominent craft tradition), but many are knitted for friends or family members. It always makes me so happy to see people share the gifts they have made, whether big or small, simple or complex. I joke with my online craft friends that no handmade fibre project can claim to be so unless they have a hair or two woven into it. It is the proof of existence for the maker, who tries to go against the irregular nature of handicrafts and, at the same time, accepts it. It is about wrapping up hours, weeks or months in one’s life, along with the songs they have listened to and the perfume they have worn and the memories they have made, and putting it squarely in someone else’s hands and saying: ‘All this, for you.’
A Wedding Shawl
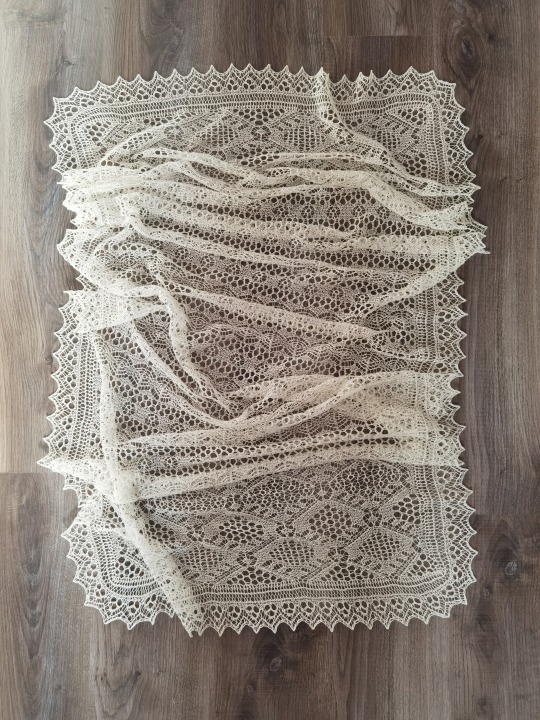
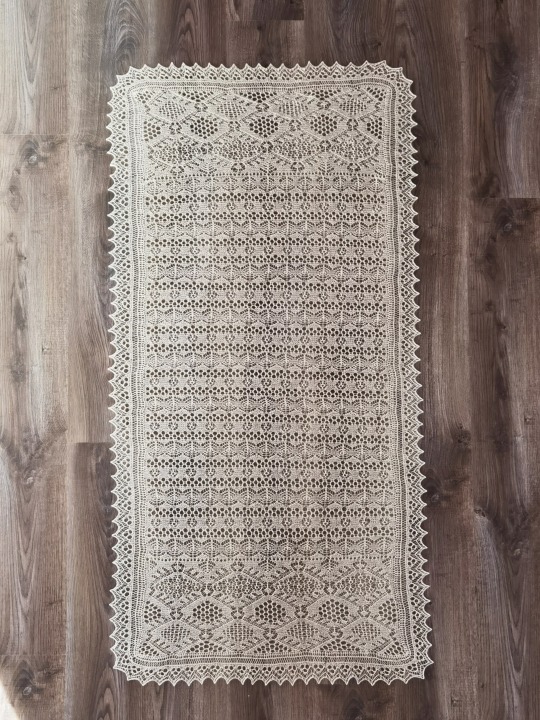
I have not read anything about there being a standard form of ‘wedding shawl’ in the Shetland tradition. However, there is definitely a category of square shawls with similar sizes and a few construction methods. The samples I’ve seen mostly measure 1.5-2m on one side and have three parts: a central panel, four borders and a strip of edging. It is worked flat in garter lace from centre out.
Neither is there a standardised yarn weight. A widely available yarn is the Shetland Supreme Lace Weight 1-ply by Jamieson and Smith, which weighs at 400m/25g. The Queen Ring Shawl examined by Sharon Miller used a yarn at 700m/25g. From my experience, if you want the shawl to be a true ring shawl (i.e. you want to be able to pull the shawl through a ring) at the size of the Queen Ring Shawl (210cm on the side), go for 700m/25g or finer.
I chose a rectangular shawl because I had very limited time, but I did enlarge it because for me, an abundance of fabric does mean an abundance of cozy happiness.
Pattern
Shell Grid and Spider Webs Puzzle, pattern No.19 in the book Shetland Knitting Lace by Toshiyuki Shimada.
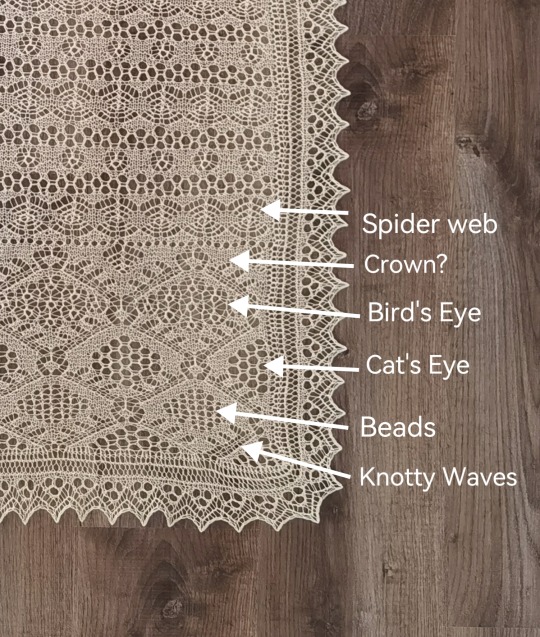
The names of the motifs are confusing. One motif (or two highly similar motifs) might just have two different names if they are produced in two different regions. Names do not mean everything, but I’ve had fun trying to match the motifs with names according to this article by Carol Christiansen at the Shetland Museum.
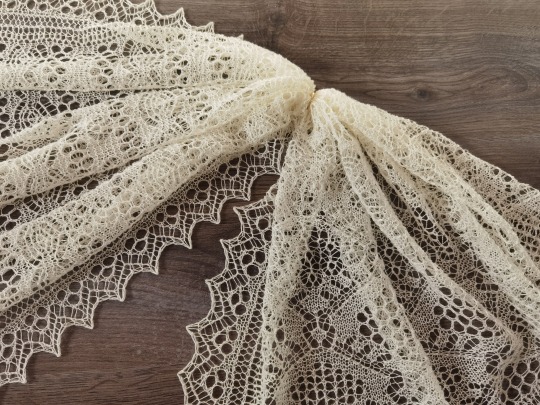
The double yarnovers (YO's) in the diamonds were called Cat's Eye, but perhaps the 'Spider Web' in the pattern name is referring to the three rows of double YO's in the centre panel. It has a really simple but effective edging.
Yarn
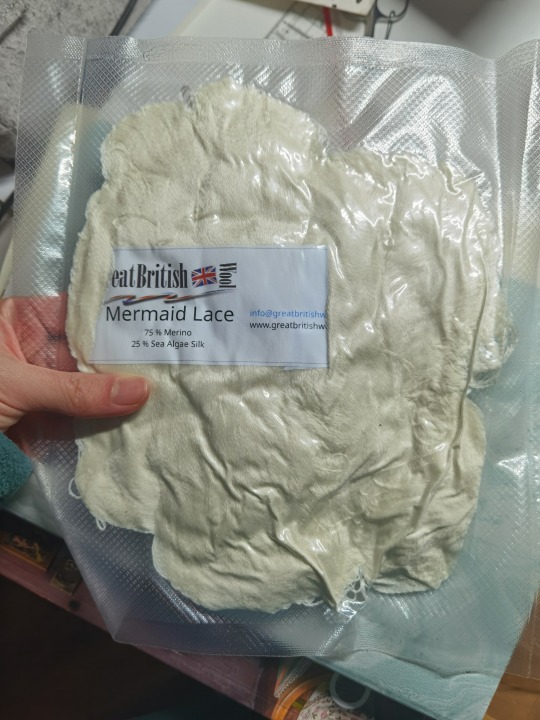
Mermaid Lace, in colourway #naturel, sold by Great British Wool in the Netherlands. This yarn is 75% merino and 25% sea algae silk. ‘Sea algae silk’ seems to be a semi-synthetic plant fibre like viscose, with algae involved as part of the raw material. (At this price point I don’t think it has anything to do with sea silk, which is fibre produced by actual shells.) The brand name for the most popular product of its type is probably Seacell.
I bought the yarn, because I had never worked with this fibre before and was curious. What I like: it was a little cheaper than a wool/silk blend and has blocked very well. The whole skein was continuous so I didn’t have to deal with a single yarn joint. What I do not like: it lacks the sheen and smoothness of real silk and doesn’t feel as strong, although it doesn’t shed. In conclusion, I’d rather use a traditional Shetland 1-ply or another natural fibre yarn.
It's also worth mentioning that whilst I prefer to support small businesses, it was disappointing to have received a 93-gram skein when I had ordered 100 grams. It was one of those days between Christmas and the New Year and I somehow did not contact the customer service, but I really should have.
Needle
2.5mm 80cm circular needles. See modification below.
Modification
This Japanese knitting book follows Japanese sizing for knitting needles. The suggested size was no. 1=2.4mm. I figured that I could use a 2.5mm since I knitted on the tighter side, and in any case it was probably okay to make the lacework a little more open by going up a needle size.
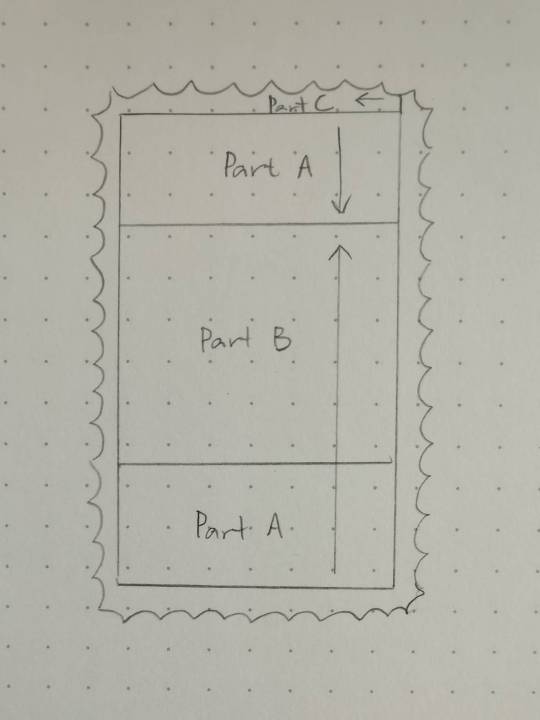
I am not going to give out the pattern, but it is probably necessary to explain the structure of this shawl. The centre is knitted first, and then an edging is knitted onto it by picking up either live stitches or the vertical edge of the centre as you go (see schematic below). The four ‘corners’ of the edging have short-row shaping to help it lay flat. I know that traditionally people can achieve this by other methods, but I haven’t tried any of those yet.
I enlarged the pattern by increasing both the width and the length. I casted on 133 stitches instead of 101 for the centre panel and knitted Part B 8.5 times instead of 5.5. The spider web pattern in Part B requires the stitch count to be (something dividable by four) plus two, so I made one central increase before the spider web to get 134 and a central decrease after it to get it back to 133. Due to the openness of the lace, the change of one stitch is not visible.
The enlargement meant I had to recalculate the edging as well, because the number of stitches available for pick-up changed. Originally, at each corner you do two repeats with four short-row shaping each. I did 1.5 repeats following the original placement of short-row shaping in order to make the total number of repeats fit the number of edge stitches on the centre panel.
The pattern says to Kitchener-stitch the last row of the edging to the provisional cast-on. It just didn’t make sense because that would be two rows too much (the Kitchener stitch row plus the provisional cast-on row). To make the number perfectly fit, I knitted only ten rows of the last repeat (there were usually twelve in each repeat). Then I Kitchener-stitched the end to the provisional cast-on, following the lace pattern. I am quite proud of this solution because it is completely invisible.
Somewhere in the pattern it said to purl (looking from the right side). It seemed strange because the rest of the lace was entirely garter. I knitted those stitches and so far I haven’t sensed a ‘mistake’.
The pattern originally calls for 45 grams of yarn. I estimated (based on the increase of stitches in the centre panel) to need about 80 grams. I ended up using 86 grams. Besides the inaccuracies in my estimation, it was probably also because I knitted much more loosely than expected as it was difficult to tension the yarn tightly at such a weight. Like I've point out in the Yarn section above, I was lucky not to have needed more than 93 grams.
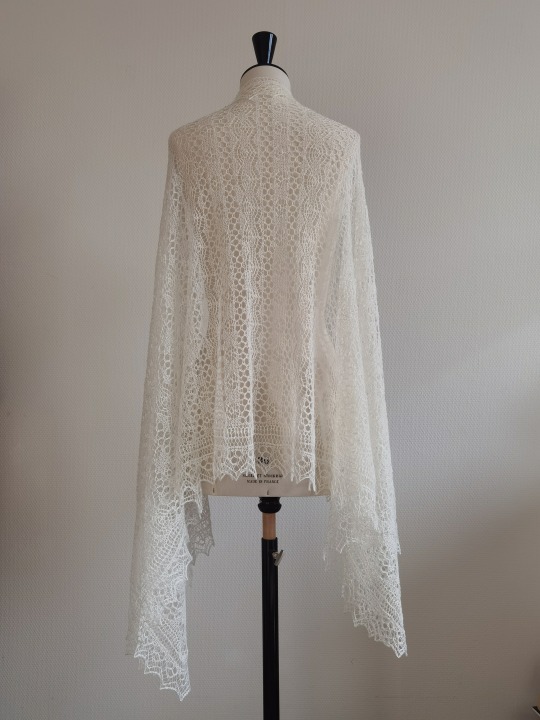
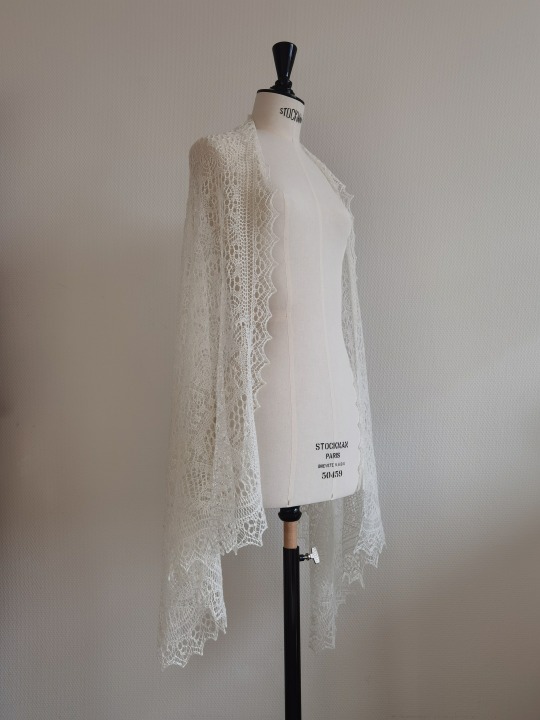
The original finished size is 53*118cm. I ended up with approximately 70*170cm.
Conclusion
This shawl took about three months of my craft time i.e. one full day every week for three months and many mornings before I had to leave for university. Knitting outside my room just didn’t work because I was a) engaged in some other activities that made it difficult to steady my hands, and b) worried about putting a white shawl on any public surface.
The pattern itself is relatively straightforward. The first difficulty was, of course, to understand the instruction written in Japanese. Google translate was horrible so I had to rely on my knitting experience. Fortunately, much of the text description was also found in graphs and charts. Then I had to get my hands used to the tiny yarn. After that, it was only fiddly when I did the edging, because I had to turn about every twelve stitches, and by that time I was handling a giant cloud of stitches on my lap. It did give me a lot of time to go over my favourite documentaries and films, and the last bit of edging was surprisingly quick!
Traditionally, Shetland shawls could be sent back to the maker for maintenance. I think it only fair for me to offer that too because I don’t want a gift to become a trouble (same as how you do not use non-machine-washable yarn for baby knits).
In general, I am very pleased with this shawl. It does pass the ring test, despite not being a traditional wedding shawl size or thickness. I do have a whole lot of actual Shetland 1-ply in my stash, so I am really looking forward to taking my Queen Ring Shawl project out of hibernation in the near future.
Reference list for Introduction
Christiansen, Carol. Shetland fine lace knitting: Recreating patterns from the past. Marlborough: Crowood, 2024.
Mann, Joanna. 'Knitting the Archive: Shetland Lace and Ecologies of Skilled Practice'. Cultural Geographies 25, no. 1 (January 28, 2017): 91–106. https://doi.org/10.1177/1474474016688911.
241 notes
·
View notes
Text
Song Camisole, intro + tutorial | December, 2023
(Text below)
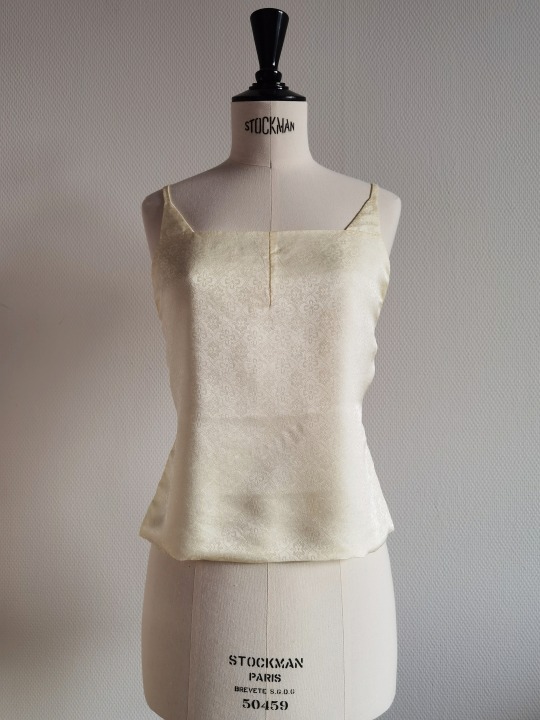


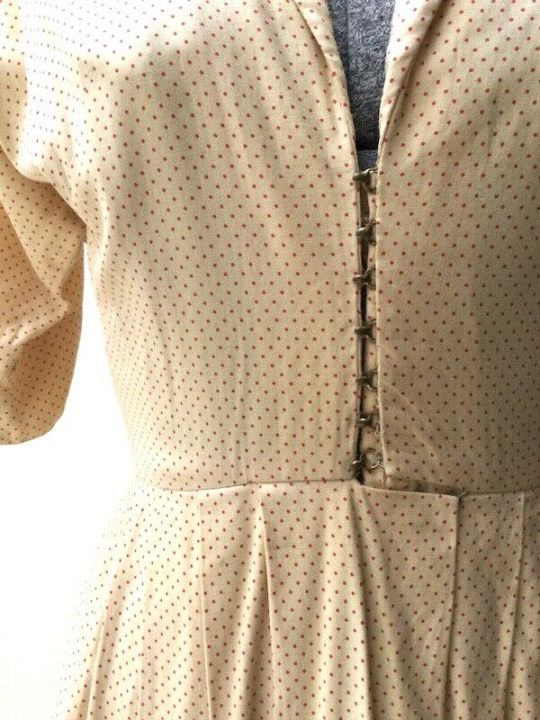
A camisole was the inner most layer of a Song lady’s outfit. Camisoles from the Song dynasty are simply named 宋抹sòng mǒ by modern historians (literal translation: Song camisole). The little camisole discussed in this post is based on the sample excavated from the tomb of Ms. Huang Sheng (full maiden name; she died at 17 in 1243 after being married for one year) in Fuzhou, China, hence it is in late Southern Song style. As far as I know, this is the only surviving sample of Song camisole in this style.
From the excavation report:
The artefact has one seam down the centre front. It has an outer layer and a lining, both in plain silk. It is 55cm long and 39-40cm wide. The shoulder ribbons are 34-35cm long, and the waist ribbons are 35-36cm long. From the report and the photograph which I can access, there doesn’t seem to be any dart. Perhaps Ms. Huang Sheng was flat-chested so a dart was unnecessary; nowadays traditional costume makers and wearers usually like a dart in the middle (usually via shaping on the CF seam) to better fit the bust.
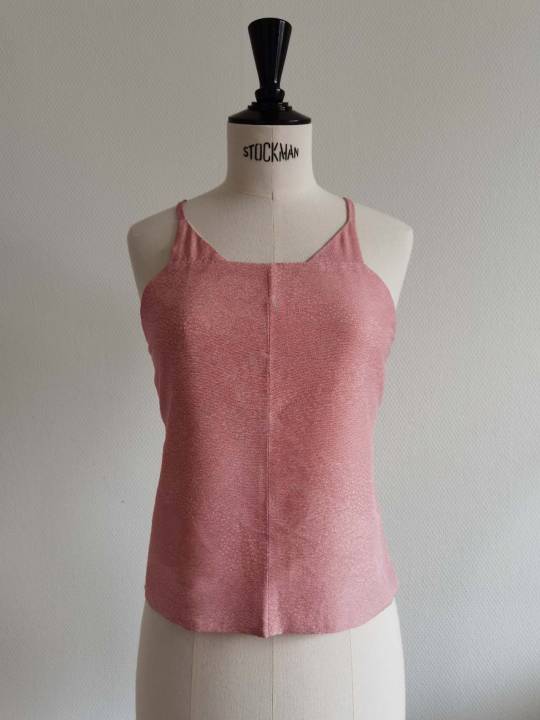
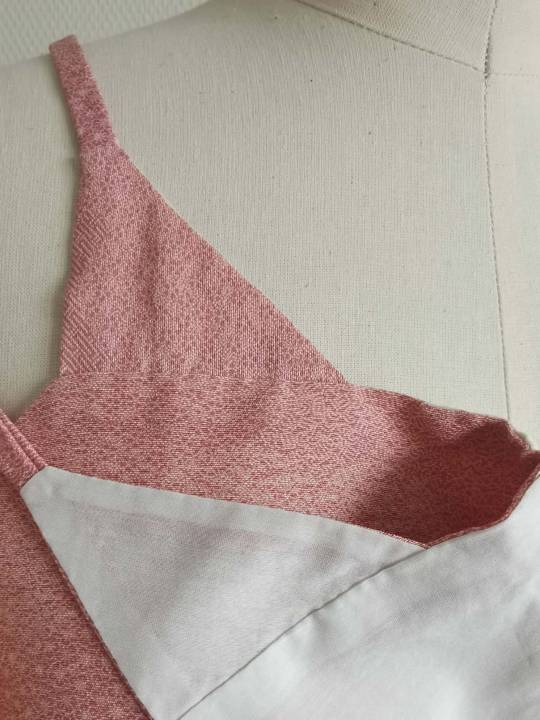
I made this pink one nearly two years ago. You might be able to see a little bit of fabric being taken in on the top of the CF seam, which is the dart/shaping I was talking about.

Below is a tutorial for making one of these. It works for smaller bust sizes – you can add darts on the sides to do a full bust adjustment.
Pattern
You need two measurements:
The front half of your chest circumference (which is NOT the full chest circumference divided by two). If you want, you can add 1~2cm of positive ease to this.
The desired length. It has to be long enough to be tucked into a skirt.
The dart (for me) is usually 1~1.5cm on each side of the CF seam. If your fabric is wide enough, you can just make a dart and eliminate the CF seam. I’m not sure why the shoulder ribbons on the artefact are so short, since the common way of wearing this camisole the ribbons need to be at least 80~90cm. The depth of the armscye apparently depends on your body shape, but it shouldn’t be too low—usually the little side loops are on the same level as the bust point or just a little bit lower. The shape and size of the little triangles depend on your taste.
All figures in the sample below fit a pretty standard European size 36 with a total height of 160cm. (EDIT!! I made a mistake. It should be European size 34 i.e. bust circumference 80)

(Also: how you would arrange the pattern pieces on a traditional kimono bolt, if using kimono silk for this.)
Fabric
You’ll want something drapey and smooth that feels nice on bare skin. I’d always recommend silk, but a cotton/silk blend or a soft cotton also works fine. For synthetic fabrics, some viscose fabrics (or their eco-friendly relatives such as tencel) could work. For the pink one I made, I used repurposed kimono silk. The yellow one is a Chinese jacquard from a blend of silk and viscose.
If you are using redeemed kimono silk (or new kimono silk) with a width of approx. 33cm, one meter is about enough. This is very convenient because one meter is a common length of kimono sleeves and you can find fabrics sold in individual lengths in stores that specialise in this. If you are using a Western fabric, you only need to consider the length of the ribbon and whether you are willing to cut it on the weft. If cutting on the warp, you’ll need one meter. (They don’t need to be cut on bias though you can.)
You also need a lining fabric for the main body. I usually use a half-half cotton/silk blend about 12momme thin (I buy it in bulk because I use it for a lot of things.)
Sewing
First, sew the ribbons.
I starched the yellow fabric for the ribbon part because it was just so slippery and refused be folded. After I starched it, I was able to fold it right side out and sew with an invisible stitch. However, I would recommend starching as little as possible and making your starch as diluted as possible, because starch can be SUPER hard to wash out and leave your silk stiff.

Sew the CF and the dart, if any, respectively for the lining and for the shell.


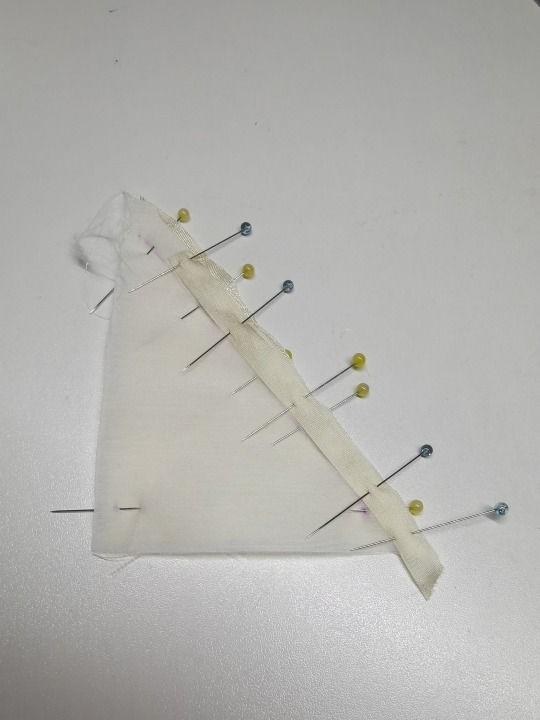
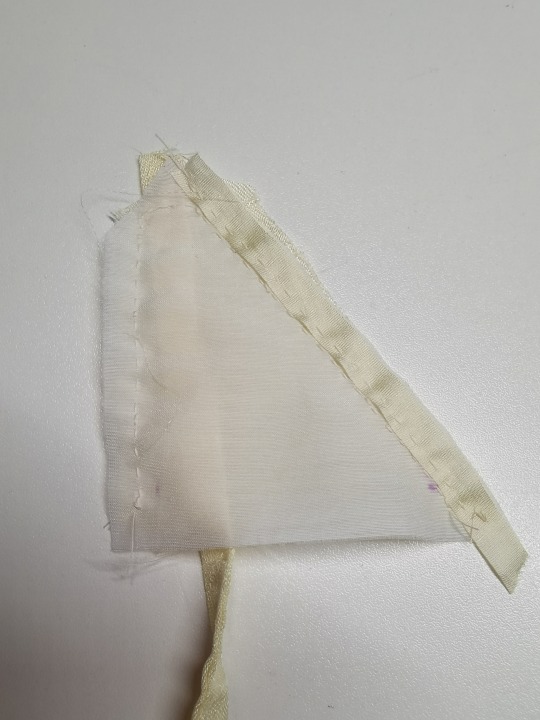
Sew the little triangles. If you cut your triangles on grain, the hypotenuse edge is likely on bias, which means it is likely to be stretched out, leading to a gaping neckline (which is a pet peeve of mine). There are two ways to prevent this. A) Since you have a lining and a shell, you can cut the lining with its hypotenuse edge on grain, so that each of the three edges of the triangle is stabilised by one layer of fabric, which is what I did for the pink camisole. B) You can add a tape to the seam allowance, which is what I’m showing in the yellow camisole. I used a thin silk ribbon (usually used for silk ribbon embroidery) and pinned it to the seam allowance, making sure not to stretch the seam so that it’s at the right length. You can sew it down to both layers of the allowance or just one.
After stablising the hypotenuse edge, you can sew the triangle by placing the fabrics right side together and sandwich the shoulder ribbon in-between. The bottom edge needn’t be sewn. Turn it right side out when you finish.
I also add tapes to the underarm edges, which are also on bias.
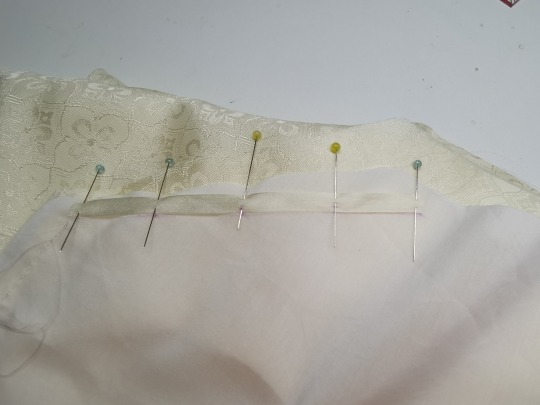
Place the body layers right side together, sandwiching the triangles, loops and waist ribbons between them (baste in place if needed). Sew all around, leaving only a small opening on the bottom edge so that you can turn the whole thing right side out.
I do a little fold for the bottom edge so that the lining fabric does not show.
I whip-stitched close the small opening. It is also possible to do an invisible stitch, if your fabric is stable enough.

And there you have it~
When I wear the camisole, it is never without an outer layer of clothing that covers my back, which is mostly for historical accuracy, and unfortunately for safety and privacy too because I can never know if someone decides to pull the ties loose. So that’s my last bit of suggestion!
71 notes
·
View notes
Text
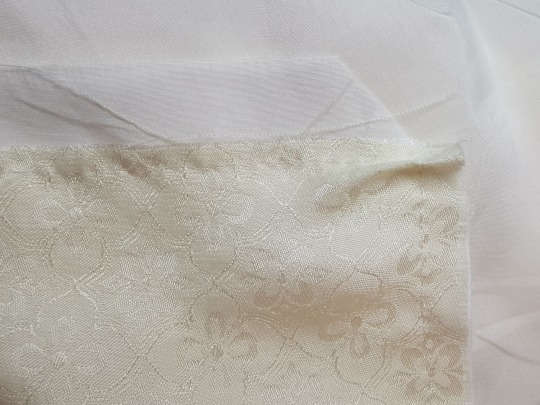
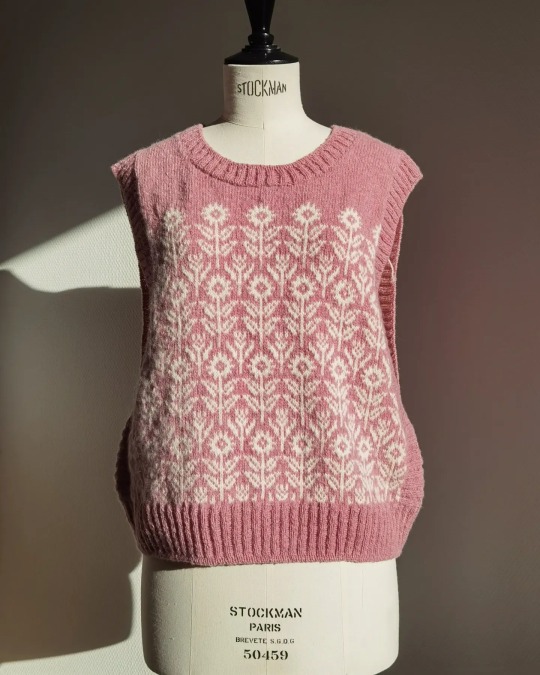
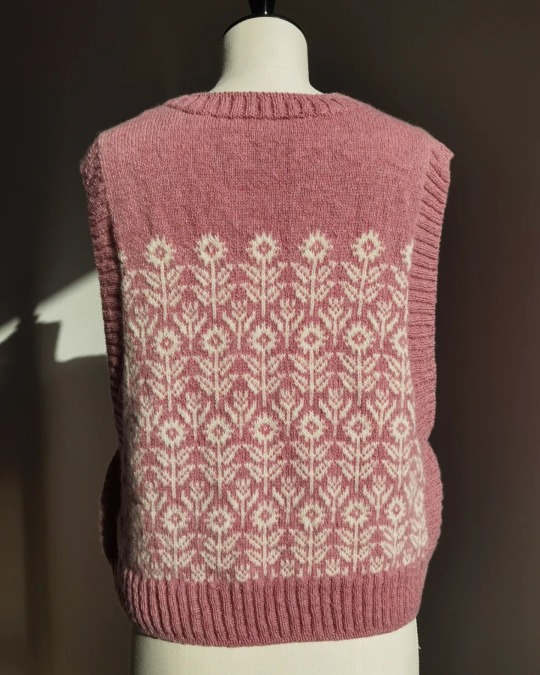
Floral vest | November, 2023

This vest is a Frankenstein of two patterns—the construction is from the Ophelia Slipover by Toshiyuki Shimada 嶋田俊之and the floral pattern from the Flower Yoke Pullover by Erika Tokai 東海えりか (@erika_tokai on Instagram). Both patterns are listed on Ravelry but only available in printed books.
Now, it is not my genius idea to piece these two together. I think it was first done by a fellow Chinese knitter and designer, who is XS KNITTING on RED and XS_KNITTING on Wechat. I have both pattern books but she did provide very detailed instructions on how to combine the two patterns for this vest. I mostly followed her notes – see modifications below.
Overview of the construction
Make a provisional cast on with a waste yarn.
Knit colourwork in the round from bottom up, ending at approx. underarm level. Decrease on the sides as instructed. You will later steek the fabric at the sides so the pattern includes the additional allowance for steeking.
Knit the front and back yoke sections flat, following the instructions for neck and shoulder shaping. (There is no armhole shaping in the yoke part.)
Sew together the front and back yoke parts, pick up stitches to make the neckband.
Reinforce the steek and cut. Pick up stitches from the steeked edges to make the side bands. Sew the bottom bit of the side bands together.
Pick up stitches to make the hem.
Needles
(all 80cm circulars)
Colourwork: 3.00mm
Yoke: 2.75mm
Neckband: 2.75mm, bind off with 2.5mm
Side bands: 2.5mm, bind off with 2.25mm
Hem: 2.75mm, bind off with 2.5mm
Yarn
Biches & Bûches Le Petit Lambswool 248m/50g, in white and light pink. This is a 2-ply woolen spun, slightly rustic but soft yarn. It softens even more after washing and blooms too, making an incredibly light but hearty fabric. I always thought it was produced in Europe since this is a French brand, but the Lambswool range is actually spun and dyed in Scotland. Hence it is a little less local than I thought (and their website doesn’t say where the wool material comes from), but I’m also happy to support Scottish mills that produce less chemically treated yarns in small batches.
Another nice thing is that each of my skeins/balls actually weighed 55g, so there was a little surplus than what I paid for.
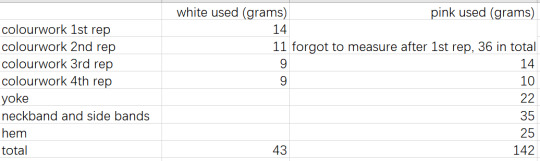
Yardage
I took detailed measurements just in case you (or future me) are worried about having enough yarn, or thinking about doing differently coloured bands, etc.
As can be seen, the bands and hem take up quite a bit of yardage.
Modifications
Colourwork
I think I followed the instructions entirely for the colourwork.
Yoke
I knitted one more row at the bottom of the front and back yokes respectively, because I somehow started from the wrong side and the pattern started from the right side. The shoulder seams are done with Kitchener stitch instead of a three-needle bind-off. Therefore I think I had about 104 rows in the yoke instead of 100 in the pattern, which means I picked up 84 stitches instead of 80 for the side band at the yoke section.
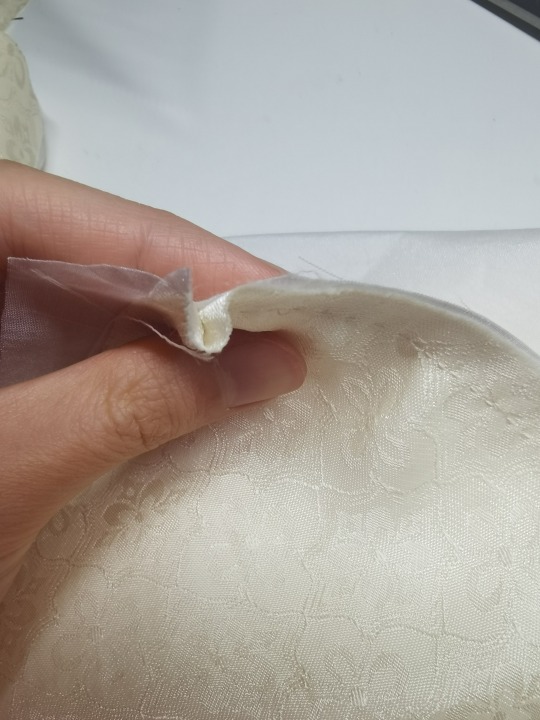
First block and felting
After I finished the yoke, the colourwork looked rather uneven. Since the yarn I used was thinner than the Shetland yarn in the pattern and I knitted the colourwork loosely to match the instructed gauge, the fabric was also quite loose and not as supple as I wanted. The good thing is that the finished garment (using the required gauge) had quite a lot of positive ease for my body measurements. So I decided to shrink the garment slightly by hand-felting it.
To felt a wool garment, you need one or more of the following: high temperature, moisture, agitation, soap. Here’s what I did to felt it as gently as possible. The half-finished main body had no live stitches at this point so I just soaked it in icy cold water as how you would normally block a knitted garment, but without soap. Then I just use my hands to agitate the fabric until I felt that it had first evened out and then tightened up. Trust me, without hot water or soap you need quite a lot of agitation to felt a garment—not just swishing it around.
I’ve also seen people putting their work into a pillow case into the washing machine on a hot drying cycle and stopping every few minutes to check if it’s felted enough. I have no confidence in operating my washing machine but you can try.
The result was satisfactory enough for me to go ahead.
Neckband
Neckband was finished with a tubular bind off with two rows, i.e. one pair, of reinforcement (the ‘tubular’ bit’). To do this, you would first use a slightly smaller needle to switch the ribbing from 2*2 to 1*1 as you knit across (see Suzanne Bryant’s video). I used a needle one size smaller but I think I could’ve gone down two sizes, as the finished neckband feels a little too loose.
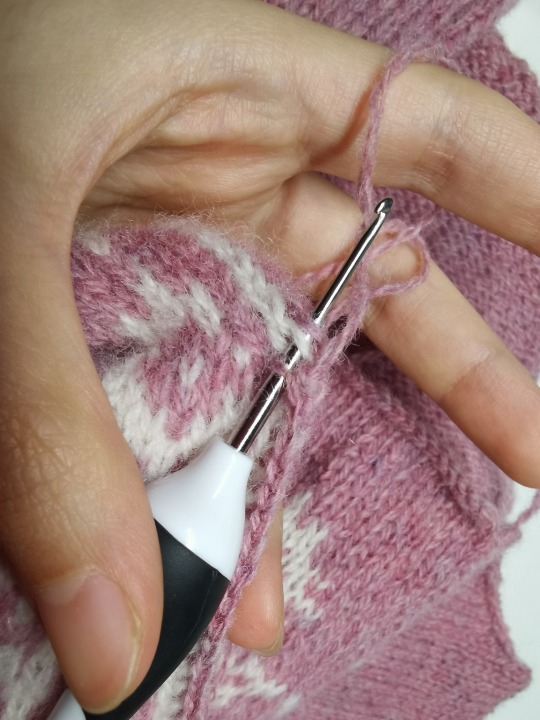
Side bands
I reinforced the fabric using the crochet method and then steeked it. Some people recommend the hook to be one size smaller than the knitting needles, but I used a 1.5mm and it worked well for me. It;s absolutely possible to steek with an even number of stitches (many tutorials say you can only do an odd number of stitches).

Using a 2.5mm circular I picked up stitch for stitch for the colourwork and 84 for 104 for the yoke. One stitch is added at either ends. There was no stitch decrease after picking up. I finished with Italian bind off which is another kind of invisible bind off like tubular bind off, just without the ‘tubular’ bit.
To do this: On the 15th row (wrong side), I knitted the first 35 sts (which were not bound off) using the 2.5mm needle in 2*2 ribbing. Then I switched to 2.25mm and switched the ribbing to 1*1 as I knitted across, and finished by knitting the last 35 sts using the 2.5mm needle again in 2*2 ribbing. On the 16th row (right side), I knitted the first 35sts in the 2.5mm needle and 2*2 ribbing as usual. Then I adjusted how I held the project so that I could pull the working yarn to the opposite side (front/back side) of the garment and start the sewn bind off from the wrong side.
It is absolutely not necessary to do all this. Some people make a very simple knitted bind off. This is purely because I want an invisible bid off and the ribbing pattern made it easier to do it this way. Also see illustration.
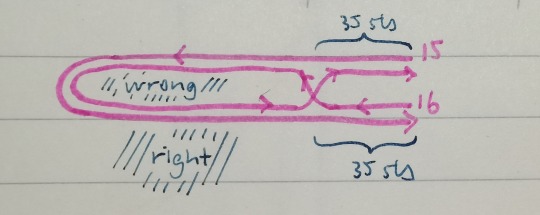
Then I Kitchener-stitched the 2*2 ribbing to make the side seam.
Hem
I took out the provisional cast on and transfer sts to a 2.75mm needle. My side bands were slightly wider than instructed so I picked up more side stitches for the hem too. 336 sts I think. I did 2*2 ribbing and finished with a tubular bind-off with four rows, i.e. two pairs, of reinforcement.
And that's it! I'm really pleased about this little vest and might make more in different colour schemes in future.
166 notes
·
View notes
Text
I'm thinking of doing a free-but-please-donate pattern/tutorial because I'm so worried and furious (but basically that'll just be a post with an extra sentence at the top?)
Who do I think I am I've never ever written a craft thing for someone else despite having constructed many things according to the wearer's specific needs and measurements, but I might give it a go anyways because otherwise it's just an idea waiting to be buried under other stuff in my head right RIGHT
#random thoughts#palestine#I mean you don't even need to take sides or even have a political opinion to do a right thing
5 notes
·
View notes
Text
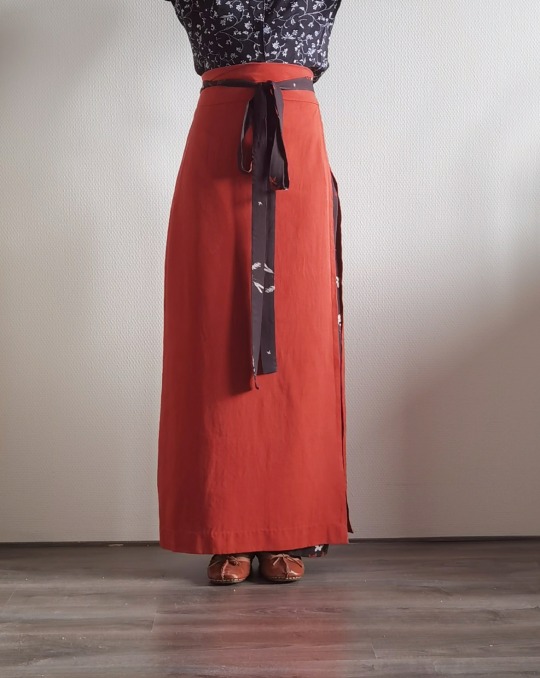
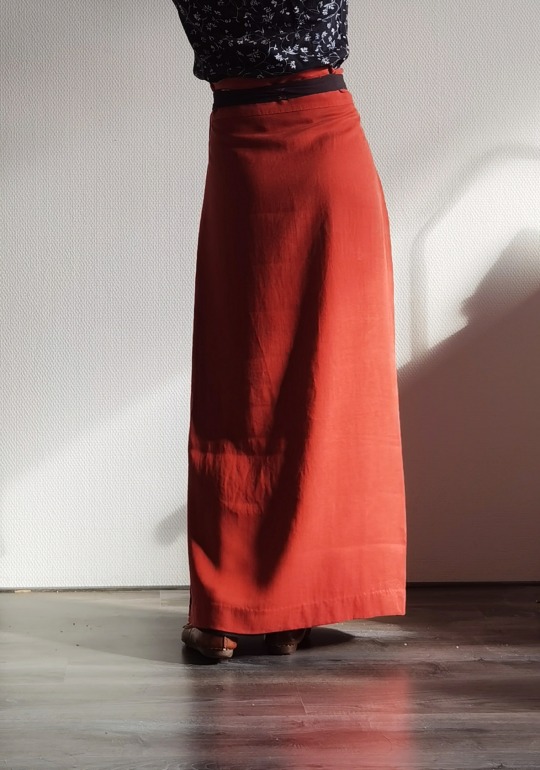
October, 2023 | Two-pieced skirt from Southern Song Dynasty (intro+tutorial)
Introduction
(Note: for now I’m not making a bibliography for this article, but if you are interested I’m more than happy to send the sources.)
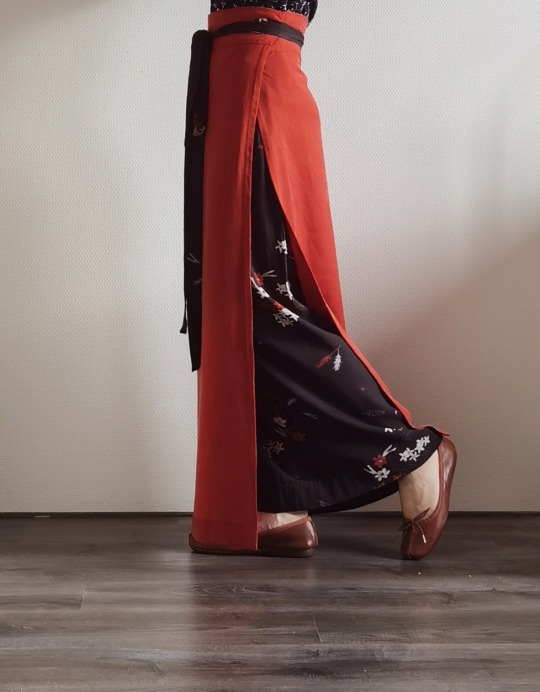
The two-pieced skirt (liǎng piàn qún) is a type of skirt from the Southern Song Dynasty (1127-1279). It is also known as xuàn qún (literal translation: circle/swirl skirt). As far I know, there are two sets of surviving samples of these skirts, one from the tomb of Ms Huang Sheng (this was her full maiden name - she died at 17, one year after getting married, in 1243) and the other from the tomb of Ms Zhou (also her maiden name - she died possibly at 35 and was buried in 1274). The main stylistic difference between these two sets of two-pieced skirts is that those of Ms Zhou had a relatively large difference between the hem and waist measurements (the hem is 15~20cm wider than the waist circumference), whereas those of Miss Huang Sheng had a small difference (approx. 10cm).
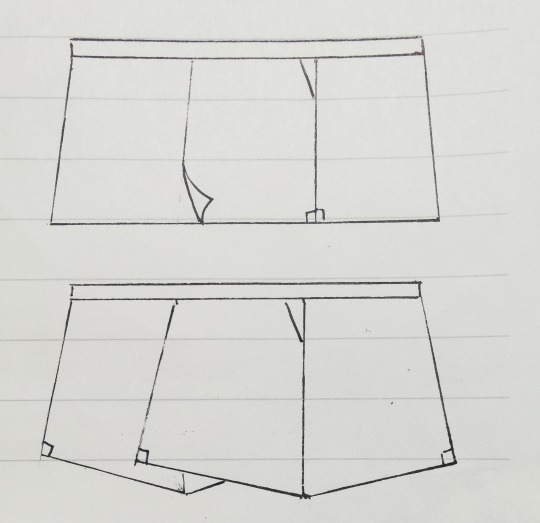
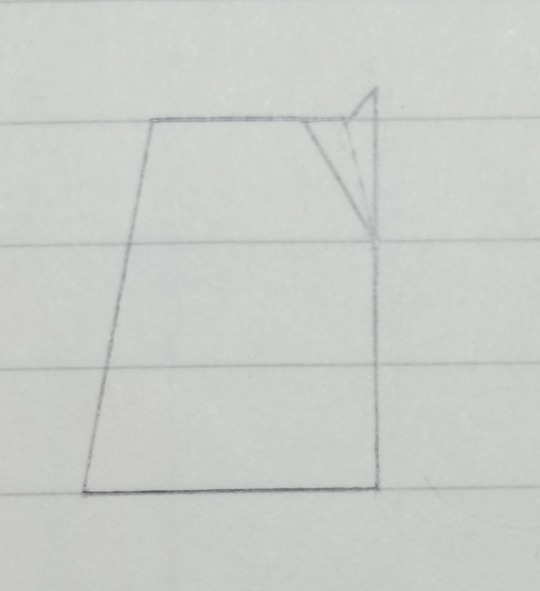
Below is a diagram showing the construction. The skirt is composed of one upper piece and one under piece. Each piece consists of two panels which are trapezoids or (roughly) rectangles. For the sake of convenience, we shall call them the centre panel and the side panel. You can see that the centre panels of the two pieces overlap, and the whole thing is fixed onto a waist band. All surviving samples have relatively wide waist bands—about 10-14cm in width. One strip on each side of the waist band is used to tie the skirt.
Pattern details
The modern common agreement is that the panels are usually right trapezoids (trapezoids with two right angles). I don’t know whether this is historically accurate, as some people think they were pentagons, but I doubt we can ever find out from what is currently available, just because the fabrics had been damaged and distorted over time. Assuming that they are right trapezoids, there are two different ways to piece the panels: you can sew the edges with two right angles together, or you can sew together the opposite edge with two non-right angles together (see diagram). They yield different results. A skirt made with the first method would have more of an A-line and more flowy. One made with the second method would wrap more snugly around the torso and give an H-shape.
You might have noticed that the centre panel is a bit wider than the side panel. This is because the centre panel would be worn in the back and the side in the front. A good starting point is to make the centre panel 10cm wider, but this of course depends on one’s body shape.
Another modern agreement is that the skirt better compliments a flat body shape with gentle curves (as has been the mainstream high-class aesthetics for the female body for a very, very long time right up to now). The most prominent issue with a difference between waist and hip measurements is that the skirt will bunch up at the lower back. To alleviate this issue, darts are used on the sides. Another way is to wear a petticoat, some underpants, or just something around the waist to enlarge the waist measurement. The skirt is not designed to accommodate a large difference between waist and hip circumferences (>30cm probably, though it starts to get difficult at 25cm).
Applying your measurements
(Numbers, when applicable, are in centimetres.)
You need your waist and hip circumferences. The skirt is usually full length. I like to make it as long as possible without the danger of tripping. It could be made shorter for thicker stiffer fabrics or a more modern look. Keep in mind that the skirt has a very high waist.
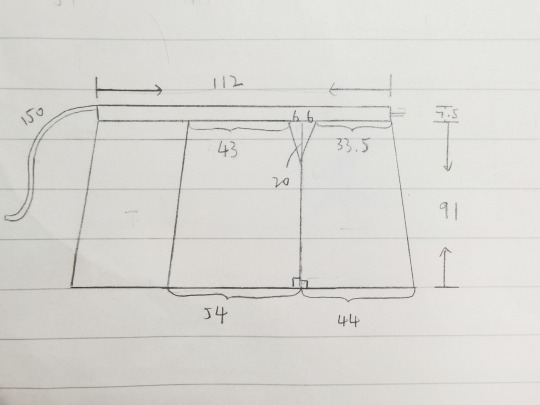
The length of the waistband is usually 1.7-1.9*waist circumference. In any case, it cannot be shorter than 1.3*hip circumference or it won’t close properly.
Now that you have the length of the waistband, you can calculate the upper edges of the panels. Let a be the length of the waistband, b the finished upper edge of the side panel. Then the finished upper edge of the centre panel is roughly b+10. Using the information discussed in the previous section, we have an equation: a=2b+b+10. This is your starting point—adjust as needed.
Triangular darts. There are a few ways to make them and this is just one of them. Let c be the width on each side of one dart. c=(hip-waist)/4. This means each dart will eliminate half of the (hip-waist) difference, and there are two darts.
c+b= total width on the upper edge of the panel. The bottom edge (i.e. the hem) of the same panel would be about 5cm wider than the upper edge.
The width of the waistband. If you would like to wear it without folding, 6-8cm is good. If wearing with a fold (which sometimes also helps reducing the bunching at the lower back), make it 10-14cm. Note that you need to cut the waistband doubling the width plus allowance.
The ties are usually 2-3cm wide. As for the length, try start from waist circumference+0.6*skirt length. I like to make it 20cm longer because I like long billowy ribbons. Like the waistband, you cut the ties doubling the width since you will fold it in sewing.
Then you would have something like this:
(measurements used: waist 65, hip 89)
Be careful that you need extra fabric because of the fold created at the dart. (You’d need less fabric if you cut away the excess fabric in the dart.)
Fabric suggestions
This is important. Very very important. Because only the right fabric is worth your time and produces the desired result.
In general, choose something soft, drapey and that conforms to your body. Two or three centimetres of difference in calculation hardly matters when you use a good silk.
Silk: a Chinese specialty called Luo is probably one of the best. Other types of soft drapey silks of medium weights are all fine. I don’t like the right side of silk charmeuse because it reflects the body curves a bit too much.
Viscose: use silk as a guide. I find that twill weave or crepe tends to be more drapey than plain weave.
Cotton/linen/wool: some of these are fine too. If using a thicker wool, only use it for the top piece and use a thin fabric for the under piece of the skirt.
An extra note on cutting out the pieces:
If you are making a skirt with contrasting colours/prints, pay attention to where you cut so that the best part of the pattern of the under piece can actually show through the slit.
Construction
Piece together the side panel and the centre panel, using French seams to make the side seam. Sew all the way from top to bottom.
Sew the dart and press it towards the back. (Alternatively, you can cut away excess fabric, or even make a pocket at the side seam.)
Do Steps 1 and 2 for both the upper and under pieces. Finish the allowances on the sides by folding twice and doing an invisible edge stitch. Leave the hem unfinished.
Lay the upper and under pieces together, baste and check fit. Sometimes the centre panel don’t overlap perfectly and that’s fine.
Finish the ties, including the shorter edge not attached to the waistband.
Sew the outer side of the waistband to the skirt panels by laying them right sides together. Press open.
Fold the waistband right sides together and sandwich the tie in between. If wearing the waistband unfolded, you need to attach the tie along the top of the waistband on the under wide and in the middle of the waistband on the upper side (see picture). Sew. Do this for both short edges of the waistband.

(You can interline the waistband if the fabric is too soft. I used a non-adhesive cotton interlining and cut it without allowance and stitched it onto the allowances of the skirt panels. Whatever method suits you should work.)
Turn the right side out and finish the inner side of the waistband by folding in the allowance and using an invisible stitch/felting stitch.
Finish the hem. For the corner, I prefer to do a three-fold corner so that I don't have to trim away the excess.
Wash and press. Et voilà!
388 notes
·
View notes
Text
Following my last post, I have been paying some attention to silk fabrics to sort of accumulate some knowledge before I actually buy or cut into anything for that project. So I found this Masterclass article which explains different types of taffeta.
Quick note of some points that matters to me:
Taffeta is defined by its weave, not material. It's a plain weave, but the threads are twisted in the weaving process to make the fabric stiff and crisp.
The article also mentions the ruffling sound as a characteristic of taffeta, with which I don't disagree, but I've read on some sewing forums that more expensive, higher-quality taffeta does not make as much noise.
The article mentions six types of taffeta. I'm sure this just covers some categories, but what is of interest is faille taffeta, which I had never heard of before. Faille is defined by weave - a very finely ribbed pattern along its grosgrain. I imagine this would make the fabric matte instead of shiny. 'Faille taffeta' seems to be usually made of wool or cotton, but a google search shows that silk faille taffeta is also possible. I'm rather curious about the drape of this fabric!
4 notes
·
View notes
Text
Film costume analysis | Daisy's red dress in The Curious Case of Benjamin Button
(mild spoiler alert!)
Intro
I have a million and one things to write about, and I have to start somewhere, and I can’t believe that no one’s done a costume analysis on this specific dress. The film (The Curious Case of Benjamin Button, dir. David Finch) came out in 2008. I was far too young back in 2008 to remember anything about the internet, so I’m not sure whether it’s because there had not developed a niche for film costumes on the internet yet or that this film was generally overlooked (imo), but there is really very little coverage of this dress on the internet. Besides, some links do not work anymore and some pages are archived.
For me, though, it has a permanent place in my mind because it’s a combination of period drama plus ballet plus contemplation on time plus the one and only Ms. Cate Blanchett. Dunno if one could ask for more in a film.
Red also happens to be my very, VERY favourite colour.
I haven’t made a Western (as in opposition to Chinese) dress for absolute ages, and I have never done a couture dress with a boned bodice. Hence I would love to grow some skills by attempting to replicate this red dress, probably making it a bit more haute couture than the original one as I imagine the industrial standards for a costume are slightly different from a couture gown.
(I cannot, for the life of me, find the current location of this dress via internet – so my best guess is that it’s in the storage of the film studio, if not in a private collection. If they put it on display I would totally book a ticket to the US okay.)
The film clip
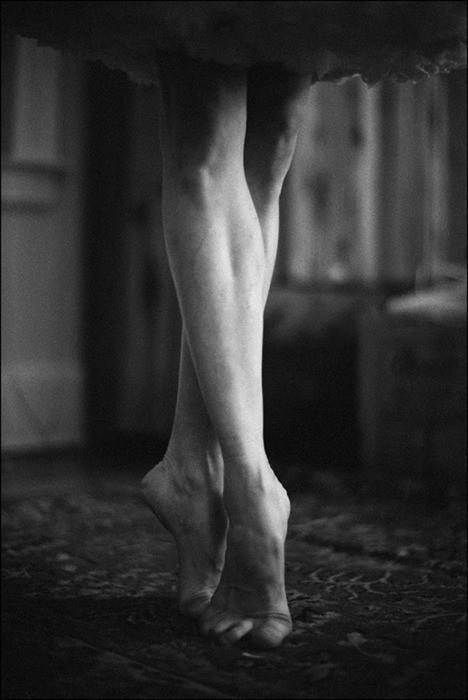
The biggest source is of course the film itself. This section of the plot starts from around 1:26:00, and the dress appears in what is called ‘the gazebo scene’ several minutes later. There is not much material because its appearance lasts maybe five minutes in total, and mostly in dim lighting and mist. Still there are a few things to be noted. (Excuse the subtitles, ahem.)
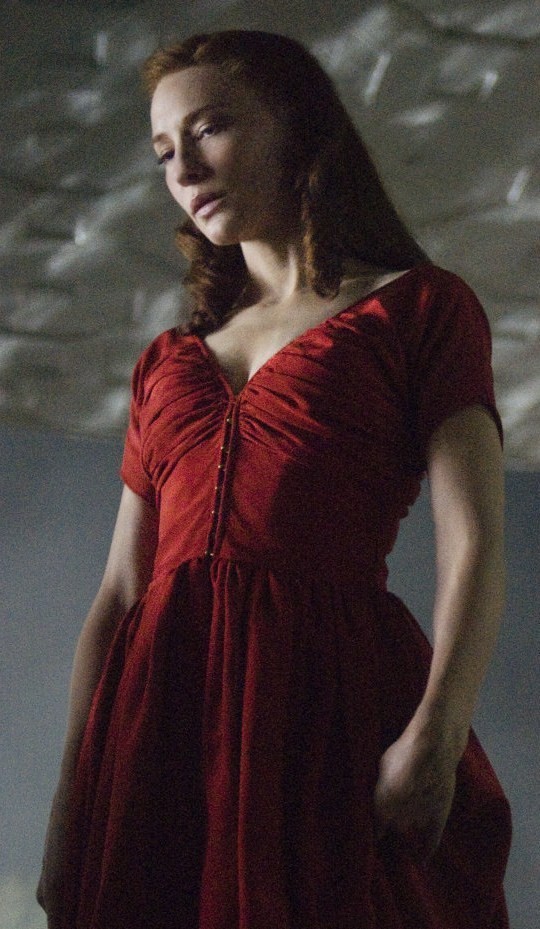
First of all, the V-shaped neckline and the V-shaped low back. I love love this style. Looking closely, you can also see the placement of gatherings along the neckline and the back.

The sleeves are in one piece with the bodice, which is known as kimono sleeves (which feels a teeny bit strange because they have little to do with actual kimono sleeves). There is some underarm wrinkles, which is totally necessary as she needs to raise her arms when dancing.

The neckline is technically not off-shoulder, but it’s really barely on the shoulders and I doubt that the shoulder area had any major supporting role in the hanging of this dress. It certainly wouldn’t for me, since I have very slope-y shoulders and a bodice like that with no inner support would slip right off. The bodice has to be boned and its weight should be distributed to the waist instead of the shoulders, if I am to keep this beautiful neckline. I think the original was likely boned anyways, as suggested by this still. However, we also know that Daisy danced in this dress and it seems flexible like a tutu bodice, which means another source of reference is tutus/ballet costumes. I know the side panels of tutu bodices (when made in non-stretchy materials) are cut on bias, as shown in this picture.

The reason for this is to make the side panels fit tightly to the dancer’s torso whilst allowing some room for movement and breathing. I’m not sure how to use this piece of information, though, because as far as I can see there are no extra seams except for the CF, CB, and side seams. Perhaps I will try structuring the boned inner support on bias, as I’ve seen actual corsets being done like that. Ultimately the goal is to make a bodice that can cling to the body without shoulder hangings.
Back to the film clip. I try to choose a suitable fabric by observing how the dress moves and reflects light. (This has a lot to do with the film lighting, on which my guesses are based, and I understand that in real life and under other types of lighting the effects could be much different.) Let me start by stating that I’m choosing a silk because if I’m going to spend all this time on this dress, it had better be made of proper good materials. (The gazebo scene is available on YT should you want to see it in action.)

First thing I’ve noticed is that the dress does not reflect the light in a sharp, shiny way. It’s easy to think that the fabric has a matte finish, especially when referring to the film clip only, but the clip from blue-ray actually suggests a subtle lustre. The fabric also does not have heavy slubs so I’m ruling out dupioni.
Secondly, the fabric feels quite solid, so no chiffon/georgette/organza.
The skirt has some volume, but we do not see a petticoat (or at least not a separate lining) when Daisy raises her leg as she dances, so the fabric has to be airy and not too drapey. This is where I’m eliminating charmeuse and crepe de chine because I feel that they are too fluid and will not hold the bell shape of the skirt.
The gathers around the bust and the waist are quite soft and delicate, and when Daisy dances we see the fabric slide gently down her leg. For these reasons I’m hesitant about taffeta. I happen to own about five metres of cheap taffeta, and I don’t know whether it’s because it’s cheap and therefore low quality, but it’s very crispy and papery, and produces ‘dry’ gathers. Perhaps the quality/hand has to do with weight too (the one I own is 19 momme and feels too thin for this project). I don’t remember ever touching an expensive and heavy taffeta, so I’m not sure if paying more could remedy the plastic feel.
The above brings me to a choice between a heavier, better taffeta and raw silk (I’ve been told that ‘raw silk’ is the English translation for soie sauvage). Currently, my plan is to make a skirt with my very cheap taffeta and go from there. I will also get samples for both taffeta and raw silk, probably from multiple sources too, because there’s no point in rushing when you are already investing this much, right?
(EDIT: looking at how soft the sleeves hang in the blu-ray clip, I'm willing to consider charmeuse, but at a heavier weight than 20 momme. Duchess is also possible but I worry that 1) it's too heavy for the gathers, 2) it's really not very affordable at the moment.)
Blu-ray behind the scenes
There is a specific section in the blu-ray in which Jacqueline West, the costume designer, talks about the costumes. She specifically discusses this dress, which is actually based on an original.
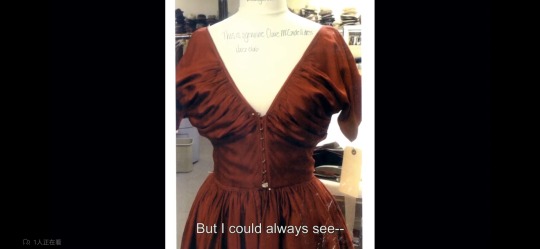
This shot wonderfully shows the front closure: seven pairs of hooks and eyes with the skirt opening almost directly in the front, though it could be slightly to the right (left side of picture). The hooks and eyes are functional. A layer of fabric from the left side extending as a modesty panel of some sort down the CF. I also noticed the shiny spots on the top of the right side opening and bottom of the left side, but I'm not sure why they were there. The writing overlapping the mannequin reads: ‘Make in deep midnight blue/This is a genuine Claire McCardell dress/Jazz club'. (David Finch had wanted to change the colour until he saw Ms Blanchett in it.)
There are also two sketches.
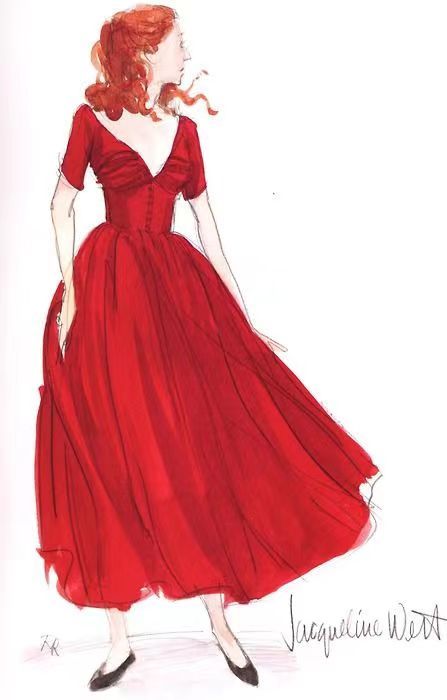
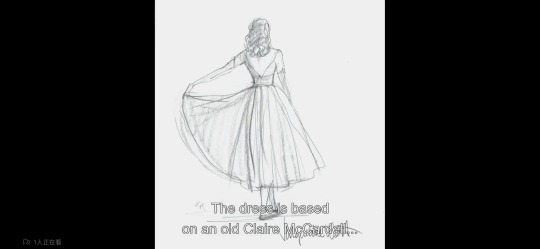
I have not seen this second one anywhere else on the internet and I’m really pleased about finding it because it illustrates so clearly the intended effect of the bodice and the skirt.
McCardell and the front closure
The Claire McCardell bit is supplemented by an ELLE interview with West. I will quote one specific question and answer from that interview:
Did you have a favorite look for Cate Blanchett's character?
The red dress has become kind of an icon piece. It was a compilation of some different Claire McCardell designs that I loved. The long ballerina-length skirt in 1947—no one else was doing that really in America. It was strictly in Europe, in France. McCardell's favorite color was red, and I put the hooks and eyes that she used on a lot of her clothing down the front as an homage to her. Those hooks aren't made anymore.
This blog article by Isaspacey also helped so much by quoting a Claire McCardell dress at an Augusta auction. The links to the auction have expired so the pictures I’m posting here are reposts from Isaspacey’s blog. (Credits probably belong to Augusta.)
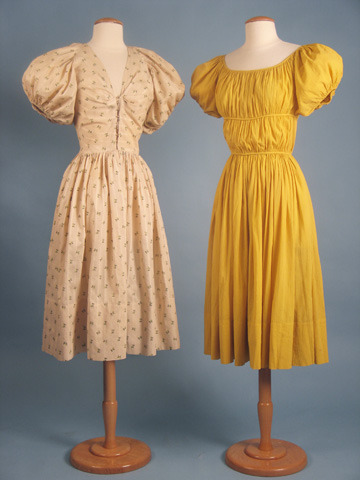
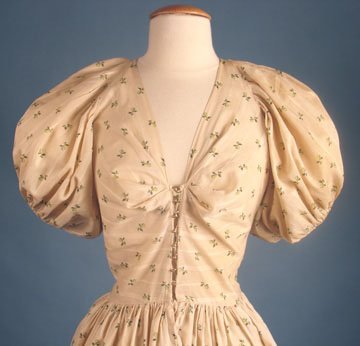
There is also another Claire McCardell dress on Ebay that has hooks and eyes down the front.
I’m going to put the pictures here just in case the link stops working (when someone buys it for $945? I mean, I would.) The pictures were presumably taken by the seller enokiworld. One of these pictures is particularly valuable, as it offers such a clear view of the hook-and-eye closure. I’m not sure about the hooks, but the eyes are sandwiched between the outer layer and an inner layer that simultaneously cover up the seam.

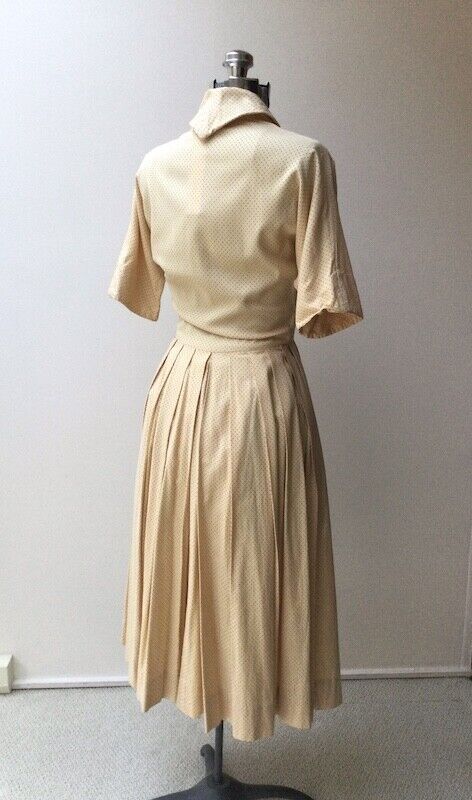
I also really like this dress because it has a dog leg closure for the skirt. I would like to use this type of closure for my replica as I feel it’s more elegant. Then I recalled this tutorial for a mid-19th century dog leg closure, which I first read many years ago for an actual 1850s dress lol. It looks very adaptable to my purpose.
Here is also a picture from an FIDM display a few years ago, showing the left side seam where the gathers are stitched down and not just floating. Also note that 1) again the fabric is not super reflective/shiny, 2) it's just so red I love it.
11 notes
·
View notes
Text
August 2023 | Dressing gown based on yukata
I wrote a while ago that I want to post more finished objects here, now that I'm trying to repair my relationship with dressmaking. It's thirty-five degrees Celsius over here and I'm having either covid or a really bad cold, so forgive me if my logic is twisted in places.
------------------~~~~~--------------------

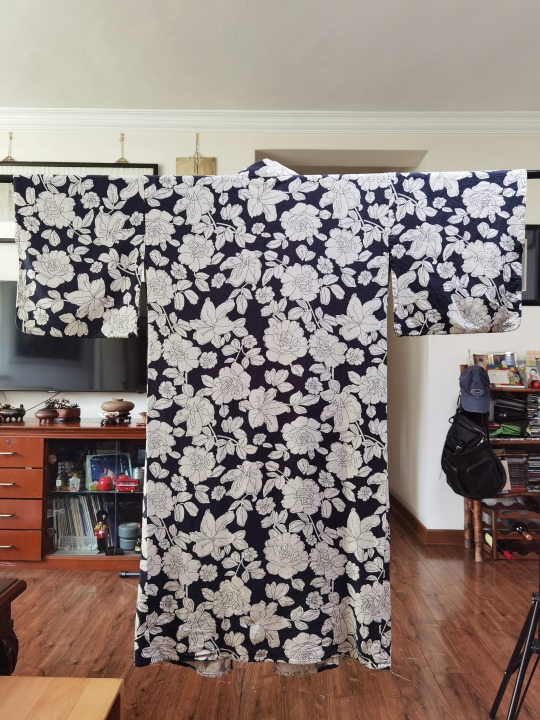
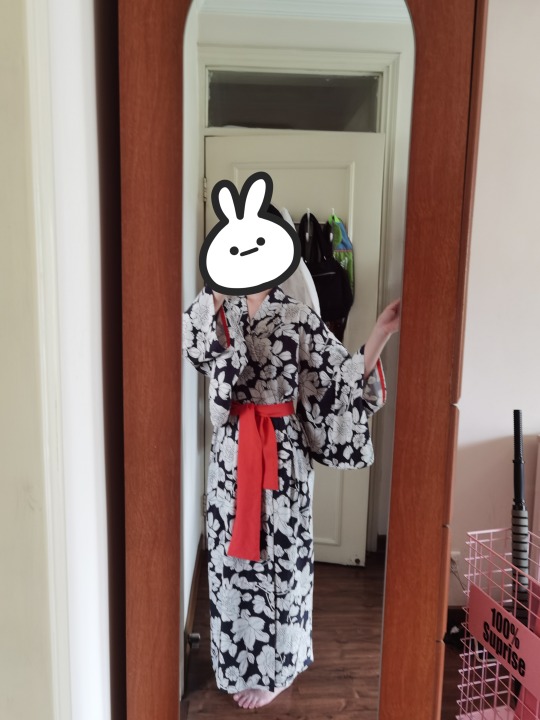
This is a dressing gown heavily inspired/pretty much based on a yukata (a lighter kimono which you wear in the summer, especially to the summer festivals). I've wanted a kimono/yukata for so long, but practicality-wise I was also in need of a dressing gown less warm than my fluffy towel one, and when I saw this fabric I had the idea to make a dressing gown that's basically a yukata but with mods because a) it was a Western fabric, b) I wouldn't be wearing it the traditional way.
I hope it's fine and not culture appropriation...and to be able to defend that, I have watched documentaries on the making of yukata in Kyoto and also examined carefully two websites containing detailed info on how to make an actual yukata. Any changes I made should hopefully be a conscious decision, and this project can be a test run for when I can afford an actual kimono roll of fabric and an occasion to wear it!
That's my reasoning. Now let's move on to the fabric...
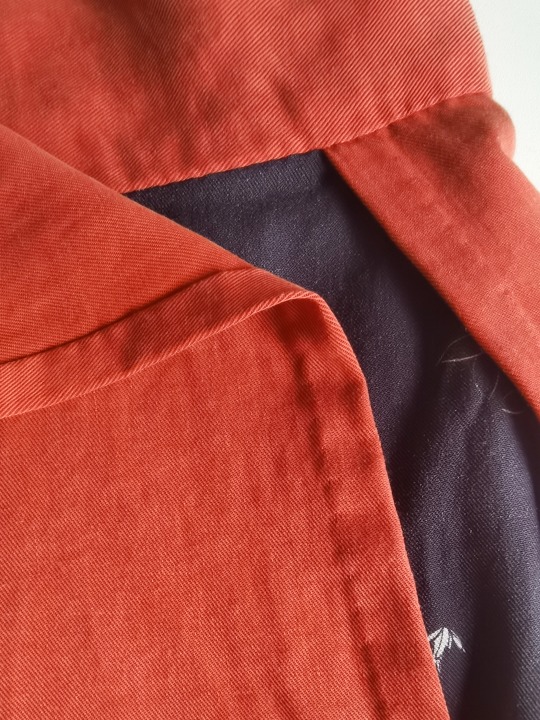
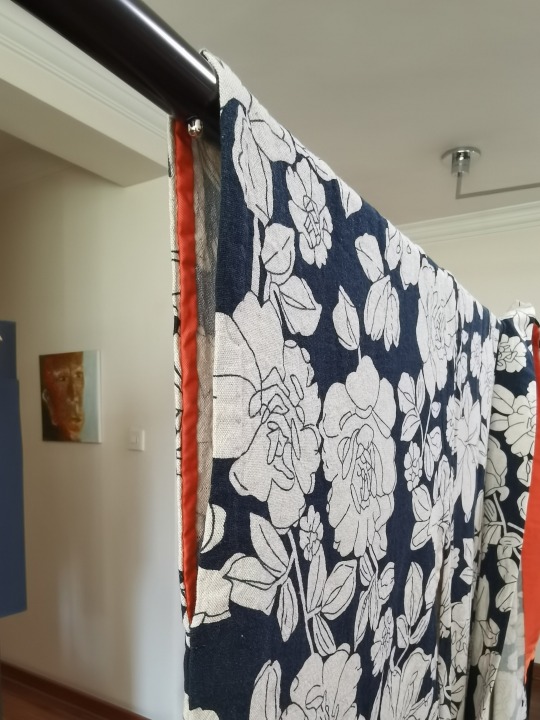
Guthrie & Ghani floral stencil print in #navy. 20%linen+80% viscose. I would NOT recommend this fabric for dressmaking unless it's for a rough outer garment. The fabric was very scratchy with linen bits, and I had to manually pull out the prickly bits as well as tumble wash it twice. I don't think it's intended for dressmaking...but I was so excited and realised it too late lol.
To help reduce the scratchiness, the shoulder lining was a cotton/silk blend. I think a thin but sturdy cotton would be a great choice but I didn't have that; I just had a lot of sheer cotton/silk blend leftover from other projects.
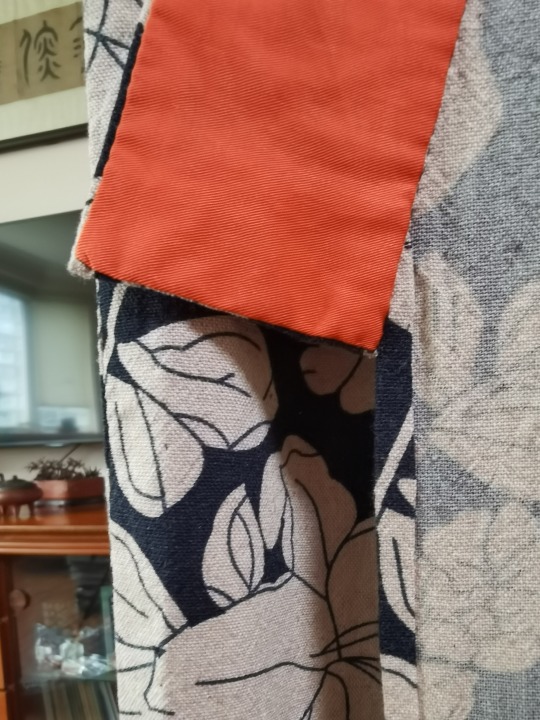
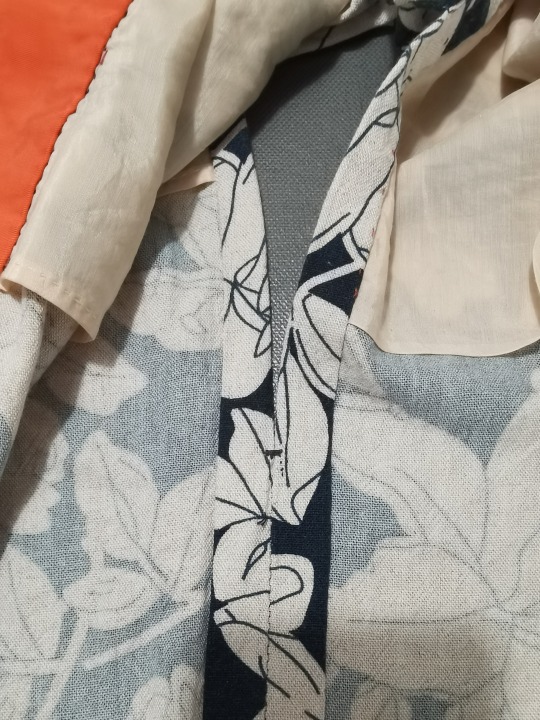
The contrasting colour facing (which is not traditional): from a scrap fabric basket of a shop, a cotton/viscose blend. It was a twill weave with that typical smooth powdery finish you get with viscose twill.
Notes/Mods:
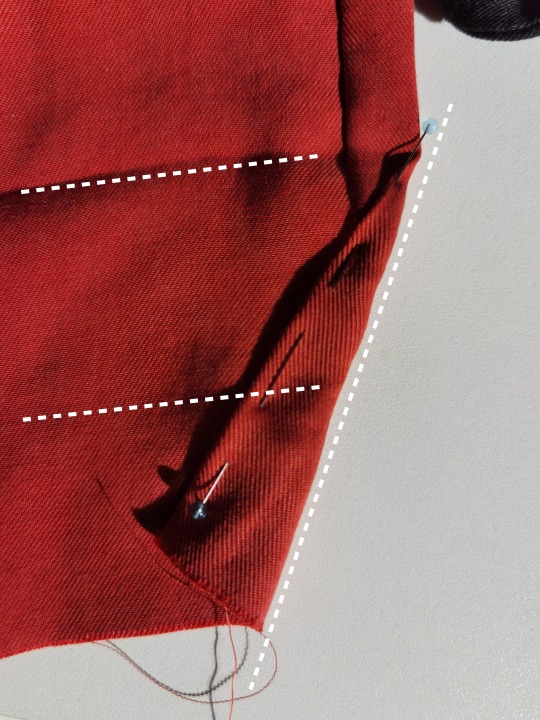
130cm on CB instead of the traditional 160cm. A yukata is quite long (equals your height) because you wear it with a triple fold at the waist, called an ohashori. This fold allows the wearer to adjust the length of the yukata i.e. where the hem hits. Since I'm not doing the ohashori, I don't need the extra length.
My fabric would actually only allow an 110cm CB if I were to cut the front and back in one piece (as is traditional), because I had only 2.2m of it. It was not cut on grain, but also there had probably been a bad shrinkage. 110cm was way too short for me. To maintain the flow of the pattern on the back, I decided to add fabric pieces directly to the bottom of the front, because there were more things going on in the front so the pattern was disrupted anyways. This way, the front and back were still largely cut in one big rectangle, which is more recyclable.
There are not separate front strips (okumi) on my gown. Usually there would be, and there would actually be some shaping for the upper body achieved through this seam between the okumi and the front body. I omitted them because a) I wouldn't have enough fabric to match patterns if I had cut them separately, and b) I wanted to reduce weight as much as possible because this fabric was so heavy.
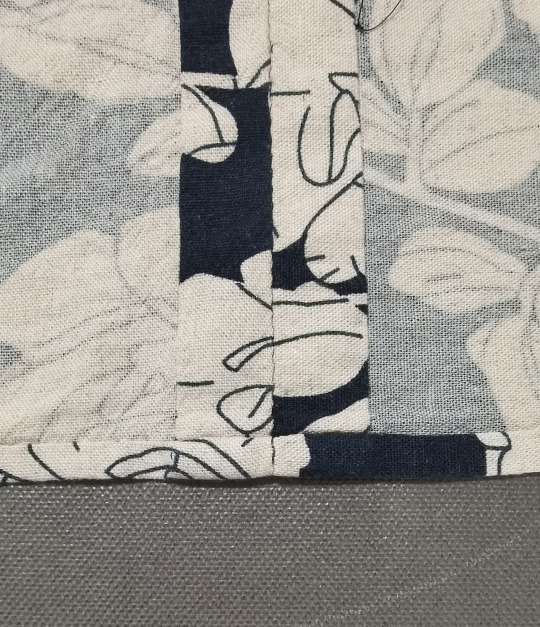
Perhaps most importantly I omitted kise. A kise is when you press open a seam, you don't press it entirely open, but leave about 0.2mm of fabric folding over the seam so that the seam is hidden. This technique is used throughout a yukata. I suppose that this helps protect the seam, since it's easier to reinforce a kise than a seam when it's worn. I omitted this again because of the fabric. Too heavy and bulky.
Since I used a Western fabric, this means I had to use different seaming methods than the traditional ones, because traditionally almost the entire yukata/kimono would be have selvage edges at seams. I could not just anchor down the seam allowance; I had to hide the raw edges neatly.
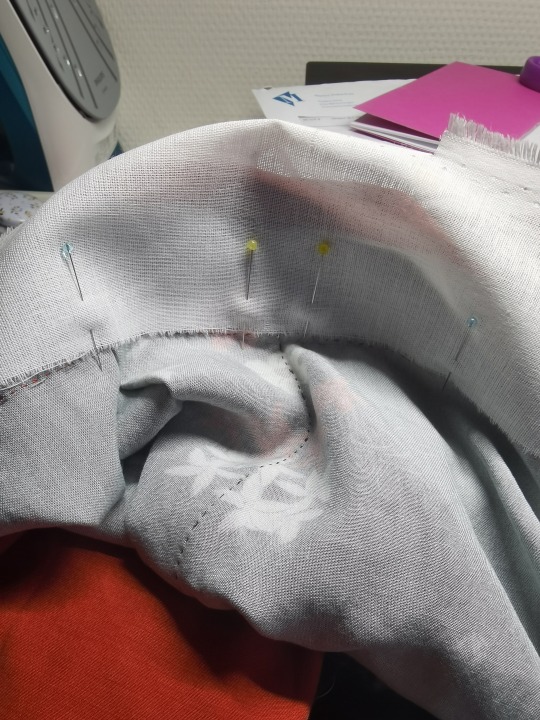
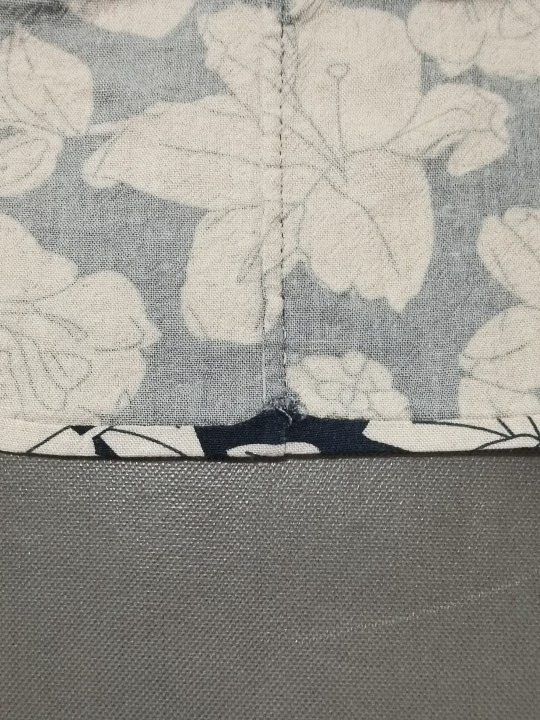
The shaping of the collar is traditional, but the construction was me. Usually you would use a long strip that's double the width of the finished collar, and fold it. I'm not sure if it's traditionally accepted to have the outer fabric and the lining of the collar cut separately. You would also need a collar reinforcement, which I omitted.
Traditionally you don't cut away any excess fabric on the front (on each side you would have two rectangular pieces of fabrics, the front body and the okumi). You just encase the excess as seam allowance in the collar. This way the fabric remains very recyclable and you can also adjust the collar for another wearer. I think this is truly a great idea, but I had to do some trimmings again to reduce bulk and weight.
Contrast colour for facing. I am pretty sure this should not be happening, because a yukata is supposed to be simple and summer-y. My mind was so dominated by the Orientalist paintings of G. H. Breitner which was a shame but the kimonos themselves were so pretty. Since I'm wearing it just for my pleasure, I added a bit of flare.
Normally, when I deal with raw edges, I whip-stitch with a tiny mark on the right side. This time I tried to do a blind stitch that leaves a tiny mark on the right side and no stitch marks on the wrong side. It is easier than I thought it would be (after lots of practice) and I might be converted.
In two or three places I just could not do a two-fold hem, so I smoothed out the fabric and did a little bit of overcasting.
I had tried the latest way of doing bar tacks and I didn't like it, so I stuck to my usual method.
Just a wide belt for now~I don't think I'll ever make an obi for it, but if this pattern is ever done on silk, I might just make a lined kimono with an obi!
10 notes
·
View notes
Text
You know how Tumblr, Pinterest, and Instagram are three different worlds and I post more on Instagram these days just because I have no idea how to show people my work here, but every time I realise I could do a search on Tumblr for ideas I am like the Instagram folks are missing out XD
2 notes
·
View notes
Text
What do I wear to The Eras Tour???
I want to make my own dress, obviously, but I also want to make it with proper good materials that can stay in my collection forever, which are probably not rain-friendly. The stadium can be either open or covered, but I'm not sure because I know many many places where she sang with the fans in the rain. And we're talking about German weather.
Options:
A solid red dress inspired by Emile Levy's Portrait de Marte Heredia, 1887.
Another red one, attempting Daisy's dress in The Curious Case of Benjamin Button. But I'm not sure, because my need to replicate it stems from my fascination with this film and one Ms Cate Blanchett, thus it does not feel particularly connected to Taylor.
I can also use the Madeleine Vionnet dress patterns I have and make a very elegant 30s look.
Something with sequins? How to even sew with sequins? I mean yeah, I will learn it if needed.
I don't like exposing much of my legs so we are looking at longer dresses with a lot of g~l~a~m~o~u~r~
#The Eras Tours#random thoughts#taylor swift#but seriously I need to make the decision early on considering my looonnng project turnover
3 notes
·
View notes
Text
1930s Qipao - a masterpost
Hey there!
I haven't posted on Tumblr (well, on this sideblog) in a long, long time. I have made plenty of things, just didn't have enough energy to write it all down in coherent sentences.
I think I'm going to make a new series though, since I don't have a blog elsewhere and I need a public space to organise my thoughts, on the making of a qipao in the 1930s style and tradition.
I have made two qipaos before (when I was still a baby to couture dressmaking) but whilst they were wearable, they were very messy with structural issues. Now that I'm a bit more experienced, I'm determined to a) make a proper toile/pattern, b) improve my pressing skills with a steam iron, and c) have nice and round fabric buttons and neat 'button legs'.
I won't have time to smooth out my notes, so I'm just going to reblog and add stuff in the thread or edit the post directly. I'm going to note down the methods I use as well as other methods I've learned about, since there are different ways to make things and each dressmaker develops their own techniques over time.
So for today I just want to share my choice of fabrics and notions.
Main fabric
'Pink sketchy retro garden rayon fabric' purchased at Guthrie & Ghani (a shop located in Birmingham, UK). The selvage reads 'AMSTERDAM by Anbo Textiles designed by Sholto Drumlanrig', so I guess that's the actual textile company and designer.
The website says the rayon is 'similar to viscose', but since rayon technically equals viscose, we don't actually know if the rayon used here is the old-fashioned stuff or a more eco-friendly version like Ecovero.
It feels very smooth with a good drape, a bit heavier than silk.
I got 2.5m which would be enough for a 120cm long qipao. A 1930s qipao has no shoulder seams so you cut the front and back in one piece, hence the length of fabric=2*(length of the garment). I only need 80cm in width for a short-sleeved qipao though. If you have a wide fabric width you can actually make two sleeveless/short-sleeved qipaos, or you can save the other half for something else!
Other fabric choices
The perfect choice would be silk. This is because silk drapes nicely and is very easy to stretch/shrink and be molded into 3D shapes. Of course you need a drapey silk, not too stiff and not too flowy.
Other natural fabrics, including cotton, linen, and wool, are all good. Cotton and linen will be harder to shape though.
Synthetic/semi-synthetic fabrics can be used too, just keep in mind that some are hard to shape, and some do not wash well. You want something that is very breathable, since it fits snugly around the neck, and drapey.
A medium, non-transparent fabric for a single-layered (or lined for colder weather) qipao. A transparent silk can be paired with a slip (which you would wear anyways if you follow the norm of the 30s).
If you plan to wash your finished garment you must choose a fabric that can be washed reasonably without fuss and pre-wash it.
Binding tape
Mine is a pre-made tape from Atelier Brunette. You can make your own with the fabric of your choice. It has to be on true bias (very important)!
I have eight metres in total, not sure how much I will end up using.
Stay tape
Super important. 99% of the resources I've read suggest fusible interfacing. A very thin but sturdy woven tape would work too. Sometimes I use strips of silk organza cut on straight grain (or leftover selvages), which is also what I plan to try for this project.
You need at least 4*(length of garment).
Sewing thread
I always use Fujix 100% cotton sewing thread. Also a thicker (maybe cheaper) thread for thread-marking and basting. If making surface decorations, silk threads would be nice. I don't feel the need to wax the Fujix threads but if using another brand/type I would certainly consider waxing.
Starch glue
Either buy some or make your own. Another soluble stabilizer would probably work too. This is used for the edges, especially at the neckline. If I didn't want to bother with a glue, I would leave the cutting until the last minute, baste with running stitches, and minimize the handling.
Interfacing
This is for button strips and the collar. I use a medium-soft cotton canvas. I know most people use a fusible interfacing, but I don't like it. Organza is not the most suitable, though if I needed a semi-transparent natural fabric for the style then it would be my best bet. You can also starch the fabric to stiffen it, but a starch glue washes out.
Also a lot of sharp pins and a trusted pair of scissors. Some people use spaghetti straps to make buttons, in which case you need a drawstring threader type of thing.
6 notes
·
View notes
Text
There are things I cannot say on Instagram or to anyone in real life, but tumblr feels okay perhaps because I was here even before everything happened.
My mother will never know how many projects I started for her only to frog them two hours later.
The things I do require a long, deep, steady stream of happiness and comfort. One moment of forgiveness is not going to sustain two weeks of stitching.
But also the things I do give me that deep steady happiness in return. This is the only good relationship I know and probably will be the only one I have, so I cannot let it be stained.
#random thoughts#sewing#knitting#your girl at the atelier is sad and not feeling safe so she babbles#craft
9 notes
·
View notes
Text

• Evening Dress.
Date: ca. 1922
Designer/Maker: Callot Soeurs
Place of origin: Paris
2K notes
·
View notes
Text
Parisian fabric stores and merceries (Part 1)
These are the fabric and haberdashery shops I visited during my first ever trip to Paris. I wrote 'Part 1' because I now know I'll be visiting fabric stores on every one of my trips to Paris haha but we cannot guarantee when Part 2 will happen.
Firstly, let me say that the staff I met were very friendly and patient with my broken French (I bet they’d rather I speak English haha, but I was determined to practice my French!) See the end of this article for some vocabulary that you might find helpful~ (Edit: I forgot to add the vocabulary. I will make a separate post on this.)
I was mainly concerned with natural silks and wools and looked at viscose and cotton fabrics for dresses too. Many of these shops did have a good range of polyester and upholstery (natural and synthetic) fabrics, though I tended to skip through these.
La Mercerie Parisienne
8 Rue des Francs Bourgeois, 75003 Paris
Mostly a mercerie. Huge range of buttons and ribbons. Fabrics, threads and yarns too (see their website). Good range of options made from natural materials. Generally it’s that kind of well-curated mercerie that is on the pricier side. But dear is it beautiful and well-stocked!
Ultramod
4 Rue de Choiseul, 75002 Paris
They have two stores opposite each other. One is a beautiful millinery shop, and the other is a mercerie. Huge range of very beautiful ribbons, though mostly synthetic. Also fabrics (thin polyester tissue fabrics) and other bits and bobs. They do carry Mokuba ribbons and receives quite some Japanese visitors for some reason (?). They have several boxes of white laces, including some antique ones that are in cotton. Most are polyester, no silk or wool.
Prices are fair, though not super cheap. Well worth a visit, especially if you are looking for millinery-related or interior décor stuff!
https://www.instagram.com/ultramodmercerieparis/
Marché Saint-Pierre
2 Rue Charles Nodier, 75018 Paris
Large fabric store in Montmartre with several storeys, with all kinds of fabrics, haberdashery and some yarns too. Silks come in several basic weaves in solid colours. Wools are in the usual wool patterns and solid colours, mostly grey and black. A few basic rainbow colours for wool crepes. They have a surprisingly nice stack of Tencel fabrics on the ground floor (coupons there too).
Decent prices for European wool. I got the last 1.65m of a medium-thick herringbone for 58 euros.
Tissus Reine
3-5 Pl. Saint-Pierre, 75018 Paris
Huge fabric store, similar to Marché Saint-Pierre, but slightly more organized and pricier (still reasonable). Good range of printed cotton (liberty and other brands) and some viscose. Silk comes in very limited weaves but if you are looking for dupioni, this is the place to go hahahaha. Most wools are 20% polyamide though you can find some pure wools too.
Atelier Brunette Condorcet
40 Rue Condorcet, 75009 Paris
A young and boutique store for plant fabrics—mostly Tencel and other environmentally friendly choices in crepe or plain weave. A very limited range of soft, subdued solid colours and prints. They produce matching buttons for their fabrics, and some other bits and bobs too. Prices are beautiful during the sale season, otherwise on the pricier side.
I have bought three pieces from this store over the time and so far am very happy with them.
Tissus Market
18 Rue du Sentier, 75002 Paris
Badly organized and a grumpy store owner. Rolls of fabrics were leant against the wall, and every metre or so you find a label on the wall saying ‘laine’, ‘coton’, ‘garbadine’, etc. Viscose and polyester fabrics are mixed even though they are very different. It does have a large range of fabrics, and after an hour of digging I managed to find a fine piece of wool. In a moment of panic I forgot to ask the exact composition but the scrawl on my receipt suggested ‘pur laine’.
Tissus de Rêve
40 Rue de Cléry, 75002 Paris
I went to this store because it had some good reviews on Google. Tiny store with mostly silks and wools. Limited colour and types, but cheap.
The region where Tissus Market and Tissus du Rêve are situated seems to be a fabric region with many tiny cramped stores with no sorting system whatsoever and lots of young people—students or young designers I assume—shopping for fabrics. Prices are generally cheap but this is also reflected by the quality.
~~~In conclusion~~~
Paris is good for plain dark-coloured wools.
2. There is only a small range of silks and in outrageous prices. Growing up in the silk-producing region of China, I am too used to the huge range of top-quality and cheap silks there and will limit myself to buying silks only when I’m home in Shanghai.
3. Silk Jacquard does not exist???
4. Colours are limited and dim, even with summer fabrics. Great if you want basic solid colours, but it’s really hard to find more nuanced colours. The exception tends to be children’s fabrics.
Maybe I missed some stores? Did I automatically filter out the more expensive places?
6 notes
·
View notes
Text
Semi-synthetic fibres and their environmental impacts
So I did a bit of reading on semi-synthetic fabrics (using plant fibres as the raw material but highly chemically processed). I see a lot of beautiful garments that I would like to buy but don’t feel comfortable doing so, because I have this feeling that natural fibres (organic cotton, linen, wool, silk) are superior. It occurred to me that the opinion was not backed by facts and so I decided to educate myself. I am not an expert, below are just some notes.
Rayon, artificial/imitation silk, and viscose are names to describe the same material.
Rayon was used to denote the ray of light in the 16th century.
Its raw material is cellulose, which is the sturdy ‘fibre’ from plants that humans cannot digest.
Manufacturing process:
Cellulose is treated with high pH caustic soda.
CS2liquifies cellulose without fundamental molecular structure
Mixture is left to ‘ripen’ with more caustic, until it turns into a viscous liquid (hence ‘viscose’) called xanthate
The liquid is forced through small nozzles into tanks of sulphuric liquid. The acid forces CS2 out of the cellulose mixture and hardens what remains, resulting in fine rayon filaments bathing in the acid.
The rayon filaments are taken out, stretched, cleaned, cut, bleached, and dyed before eing woven into fabric.
The resulting fabric is soft and drapes well, and has a silk-like lustre (though I stick to the stereotype that the lustre is not as subtle and warm as real silk).
The fibre can be mixed with other fibres, e.g. natural fibres such as wool or cotton, before weaving.
As you can tell, rayon production is a highly mechanized process carried out in large factories, meaning that it is cheap. (In fact, one of the first rayon manufacturers in Britain was Samuel Courtauld & Co.—the Courtaulds of THE Courtauld Gallery—who opened a rayon factory in Coventry and another in the US.) The cheap price helped it gain popularity during the Great Wars, which limited the supply of silk and cotton, and the Great Depression in between.
The history of rayon production is entangled with forced labour, long hours, and poor work conditions. These issues aside, rayon dust irritates the respiratory system, and the acids involved in the process (as well as caustic soda i.e. NaOH) are corrosive to fabric and human flesh. CS2 is also neurotoxic: workers were sent to hospitals and asylums because of physiological and psychological symptoms, ranging from keratitis, hallucinations, to death of respiratory failure, even when they worked in well-ventilated rooms.
Health hazards are observed even without obvious exposure to CS2. Vicky Perfect, who had worked at Courtaulds for more than ten years, remembered that women could perm their hair simply by being on the job because of the high levels of sulfur fumes in the workroom atmosphere. The explosion of the need for synthetic fabrics is also an environmental disaster: forests in Canada, the Amazon, and Indonesia are being cut down for wood pulp. Canopy, an environmental organization, estimated that 120 million trees are felled each year to produce rayon and other cellulose-based materials.
Because rayon is essentially made from cellulose, it is ripe for greenwashing (providing misleading information about how a company’s products are environmentally friendly, when in fact they are not) targeting at environmentally conscious consumers. In 2013, Amazon, Macy’s, and Sears were among the brands fined 1.26 billion dollars for labeling textiles as ‘bamboo’ when they were actually rayon. (Rayon can be made from bamboo but these two fibres are very different things.)
The manufacture of much of the synthetic fibres are outsourced to areas of the world with cheap labour and lax regulations, meaning:
workers are not paid with a fair wage,
the environment, particularly the ground water, is highly susceptible to pollution.
‘More than 80 percent of the water from underground wells used by farms, factories, and households across the heavily populated plains of China is unfit for drinking or bathing because of contamination from industry and farming’ according to a study involving 2103 underground wells, reported by Chinese media on 11 April, 2016
'Those jobs went to countries like Bangladesh and Vietnam where labor standards are so low that while apparel is the largest employer of women globally, less than 2% of these women are actually receiving a living wage.'
Some other fabrics of this category of material from cellulose:
Modal is essentially modified rayon, with a feel of cotton and many properties of cotton. It is often combined with 5% spandex (a synthetic fibre) for an extremely stretchy fabric.
Lyocell (trademark Tencel) is made from the same raw material (wood pulp), but dissolved in NMMO, not involving CS2, and is therefore considered more eco-friendly. Lyocell absorbed moisture into the fabric rather than letting it remain on the surface (like what happens with synthetics), so it’s more antibacterial and requires less washes, saving water and prolonging the lifespan of the garment. However the manufacture process does require a lot of energy and is more expensive than that of rayon.
Cupro (cuprammonium rayon) also belongs to this category of fibres made from cellulose. It can be made from cotton waste (fibres too small to be spinned into cotton) and therefore reduces waste in cotton production, though there is no guarantee that the fibres are sourced from waste. The fibres are dissolved in cuprammonium solution and extruded through tiny holes to form the fibres. The fibres are dropped into caustic soda and a series of hardening baths. I read somewhere that CS2 is involved in this process though I couldn’t find more sources to verify this.
Some improvements I know of:
With modern technology, some chemicals in the manufacture process can be recycled, though they cannot be reused forever and have to be disposed of at some point—where it needs to be treated chemically/biologically before being released.
Sourcing of the wood pulp makes a difference: according to Lenzing, an Austrian company for semi-synthetic fibres, the raw material for its Lyocell is from sustainably harvested eucalyptus trees. Eucalyptus trees can thrive on land that is not fertile enough for food crops. It’s a hearty tree that grows quickly, requires no irrigation, no treatment with pesticides, and no fertilizer. Eucalyptus trees use 20 times less water than cotton.
Some brands mentioned in my reading are H&M, Zara, Marks&Spencer, Levi’s, Tesco, Eileen Fisher, Benetton, Primark, Mango, and Walmart. Out of curiosity I also checked some of brands I like, including Uniqlo and Lululemon. Personally I am more likely to support a brand with clear (not vague!!) statements on sustainability, anti-slavery, and gender pay gaps. Though I do think you should consider the items you buy on a case-by-case basis.
I haven't had chance to read about fibres made from mushroom or orange peels yet. They are not currently used in the main stream garment sector, though.
---------------------------
Sorry for the lack of in-text citations and the messy bibliography formats, I'm tired and this is not an essay.
Blanc, Paul David, Fake Silk: The Lethal History of Viscose Rayon (New Haven: Yale University Press, 2016)
Bedat, Maxine, and Shank, Michael, ‘There Is A Major Climate Issue Hiding In Your Closet: Fast Fashion’, Fast Company, 2016 https://www.fastcompany.com/3065532/there-is-a-major-climate-issue-hiding-in-your-closet-fast-fashion[accessed 4 March 2022]
Chris Buckley, and Vanessa Piao. “Rural Water, Not City Smog, May Be China's Pollution Nightmare.” The New York Times, 2016, pp. The New York times, 2016–04-12.
Mark Anner (2020) Squeezing workers’ rights in global supply chains: purchasing practices in the Bangladesh garment export sector in comparative perspective, Review of International Political Economy, 27:2, 320-347, DOI: 10.1080/09692290.2019.1625426
Modal, Rayon, Lyocell, & Cupro: How Semi-Synthetic Fabrics Are Made & Their Properties. Naturalclothing.com. 2022. [online] Available at: <https://www.naturalclothing.com/modal-rayon-lyocell-cupro-semi-synthetic-fabric/> [Accessed 6 March 2022].
St. Clair, Kassia. The Golden Thread : How Fabric Changed History. 2018.
13 notes
·
View notes
Text
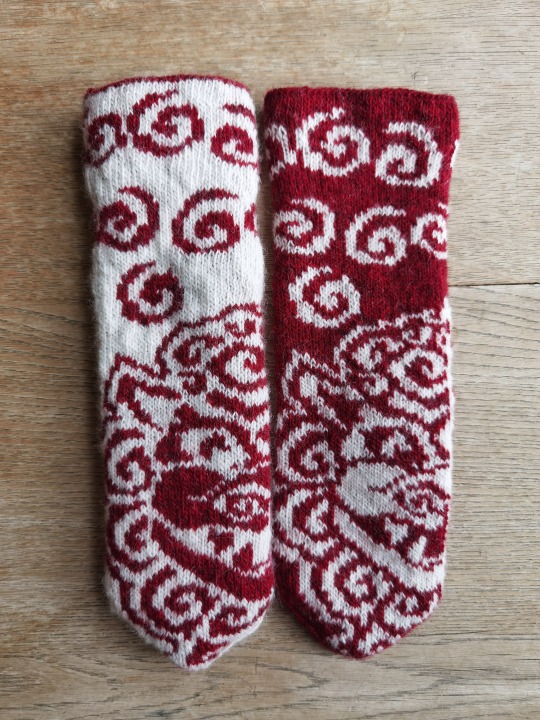
Guardian Lion Mittens | February, 2022

There is a time for everything…
I was intrigued by the pattern as soon as I saw it on Ravelry several years, but didn’t quite have the courage to knit it (nor spare money to spend on patterns) as it was knitted using laceweight yarns.
Back in January I was in a false state of hope and calmness, having my energy drained from a horrible period over Christmas, and I decided to cast on these mittens in time for the Chinese New Year. Only after purchasing the yarns and the pattern had I discovered that they were made using the double knitting method, which was new to me, and after several attempts in one night I had to admit that I wasn’t emotionally ready for a pair of mittens with a 128 stitch count. I shoved the project away into my yarn box, searching for another project that could either use this gorgeous pattern or these yarns.
Then shortly before the CNY, I made major life decisions and felt a hundred times better. I was motivated by Marceline (@marcelinewu) over on Instagram to keep making in the new year, and also saw Eva (@thecraftedspoon) mentioning trying double knitting. I felt ready to give it another go.
It was truly a labour of love. Even though now I’ve finished the mittens and love them, I still don’t think it is a particularly enjoyable pattern. My wrists hurt, my neck hurt, the nature of colourwork yarns meant they were not pleasant wrapped around my fingers—but luckily I’ve always been a product knitter rather than a process knitter. I kept going by envisioning the finished object and I’m so glad I stuck to it.
*About the name
I decided to call them Guardian Lion Mittens because of the stone lion portrayed. The pattern is named Foo Dog, which confused me because I could easily recognize the stylized animal as a stone lion, a traditional Chinese architectural ornament that stand (in pairs) in front of a building. I looked it up and think the Western translation might be due to the Japanese reference to them as 'lion dogs’ as they transmitted from China to Japan via Korea. The ‘Foo’ might be a transliteration of the word 佛 (Buddha) or 福 (good fortune) in Mandarin and some Chinese dialects. But to me, Guardian Lion seems the most authentic name and carries a good wish.

Pattern
Foo Dog Mittens by Svetlana Gordon
As I’ve written, it is not the easiest of patterns. It feels very typically ‘Russian’ for some reason, probably because the finished object is absolutely beautiful to look at but it is hell complicated to make.
(But if you like this type of patterns, be sure to check out the Ravelry page of this designer—she has so many wonderfully fantastical designs.)
The thumb: For the first mitten, I followed the instruction by placing 11 double stitches onto a spare yarn and casting on 11 new stitches to continue the main body. It was doable, but took me two hours to pick up stitches for the thumb because the cast-on edge (created by backwards loop method) with alternating colours for double knitting wasn’t the neatest for picking up stitches. Thus for the other mitten, I used my usual method by knitting the 11sts with a spare yarn, transferring the stitches back to the left hand needle, and continuing with the pattern. I only knitted 25 rows for the thumb.
I made two small changes to the pattern on the palm side too, just because I think it looks nicer this way.
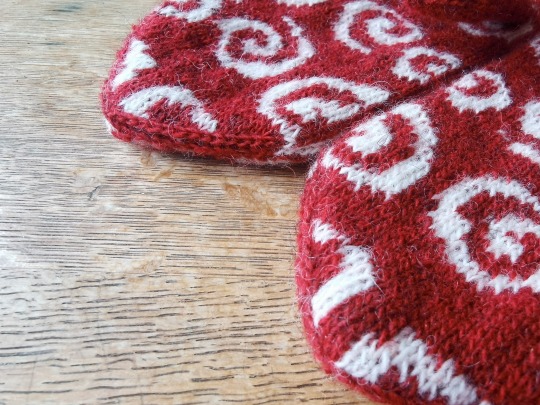
The mittens are entirely reversible and theoretically you knit the two layers exactly to the same dimensions, which is why the outer layer ends up a little stretched and the inner layer a bit scrunched up (think about making garments—a slip barely needs any ease whilst a coat needs a lot of ease!). This is especially obvious at the decreases at the finger tips, where the colour of the inner layer (white) seeps through the outer layer (red). Now that the yarns have bloomed after blocking, it is not too much of an issue for me. However at some point I might crochet a chain between the two dec stitches on each side using the red yarn to cover up the speckles of white.
(Above: the double knitting technique allows for two sides with reverse colour combos, though the inner side is wrinkly and wouldn't lay flat because the layers relaxed differently during blocking.)
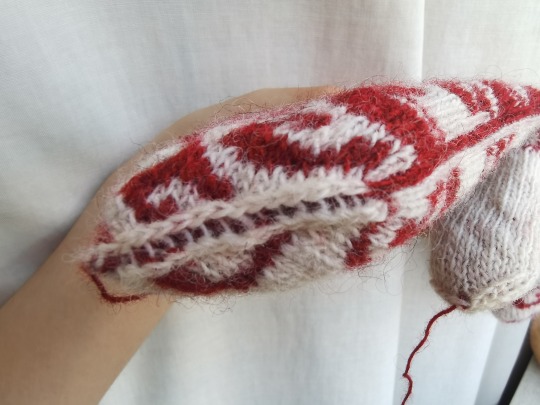

(Above three: see how obvious the laddering is on the inner side. The second picture shows the laddering on one side of the thumb solved with duplicate stitches. Fortunately, the laddering doesn't show too much on the outer side.)
Size
The pattern asked for a standard laceweight (400m/50g) and I picked a slightly heavier yarn. The pattern had only one size (18.5cm) so I was worried that my mittens were going to be very loose. Initially when I held the yarns at my normal tightness, they did create a very loose-fitting cuff. Then I actively tightened the yarns throughout the process (to the point it was difficult to slide the stitches across the needle) and this achieved the size that fits my hands snuggly. Maybe I wouldn’t have to do this if I had 1.75mm needles but the smallest I had was 2.00mm, which was what the pattern asked for.
(For reference, my palm circumference is 17.5cm.)
The mittens are also a fair bit longer than my hands, but the main body is difficult to modify because of the pattern. They are not too long, though, and still practical, so I don’t really have a problem.

Yarn
Isager Spinni
600m/100g (which can be bought in 50g cakes, but I didn’t know that when I bought them—not pleased about that!)
100% pure new wool, made at Skive Garn, Danmark and I’m assuming that it uses Scandinavian, if not Danish, wool. Non-superwash.
Colours: 0 (white) and 32s (red)
I used approx. 26g white and 30g red. The disparity might be due to the fact that the main colour for the ‘outer layer’ when knitting (I knit with the whole project in front of the needles in magic loop) requires a tiny bit more meterage. There are slight differences between the skeins too of course.
At a thicker laceweight, it doesn’t have the smoothness or fineness that I link with lace yarns. In fact, it is similar to Shetland wool and only a tiny bit less rough than Tukuwool fingering. I don’t enjoy knitting with it as much as I love silk or alpaca, but it is very sticky and good for colourwork—I didn’t catch a stitch in a dec and didn’t notice until after blocking, and it didn’t unravel at all. After blocking, it did bloom nicely and created a hearty warm fabric that was (in my opinion) quite a bit softer than Tukuwool.
It is a single ply, woolen-spun yarn, which is prone to skewing when knitted up in stockinette (Donna Eskin has a good article on this), but perhaps the tight-gauged double knitting with colourwork helps the fabric stay balanced as it is not too obvious in my finished and blocked mittens.
I’ve used Isager yarns several times and as always I think it is one of the more environmentally friendly options.
The pattern suggested Malabrigo lace, which sounds interesting as I’ve worked with it before. Whilst it was a stunning non-superwash single-ply merino lace yarn, it was soft like cotton candy and unfortunately pilled easily. I’d be very hesitant to use it for mittens as I would use merino for socks, but I do wonder if the tight gauge makes it more hardwearing.

I know that tigers and lions don’t even live in the same habitat, but I still think this is a nice project to start off the new year. Wish everyone very good fortune in the Year of the Tiger!
7 notes
·
View notes