milo [they/them] this is my blog for posting. I do metalwork, electronics, sewing &c
Last active 3 hours ago
Don't wanna be here? Send us removal request.
Text
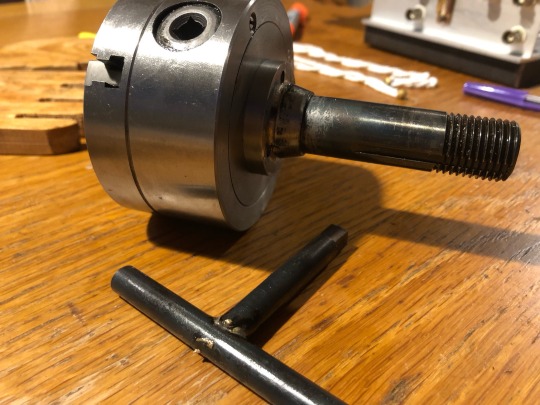
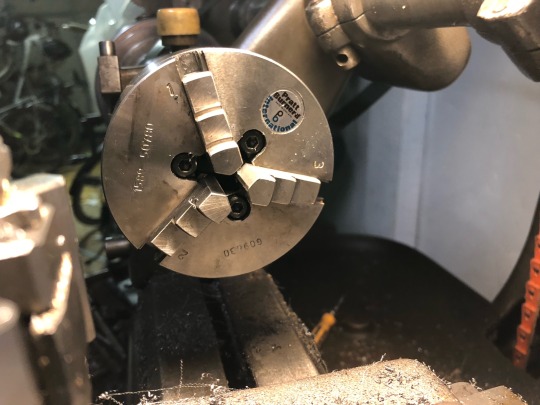
I just finished mounting this cute 80mm 3 jaw chuck on a W20 arbor for my lathe. The chuck is concentric to the arbor within 0.02mm which is not amazing but is better than the concentricity of the chuck itself so it’s fine.
Having it on an arbor is more convenient than a backplate and allows me to use it in my indexing head.
I also made the very badly finished chuck key pictured. I couldn’t be bothered to mill the square head so I just used a file.
10 notes
·
View notes
Text
Reparing a Verge Watch
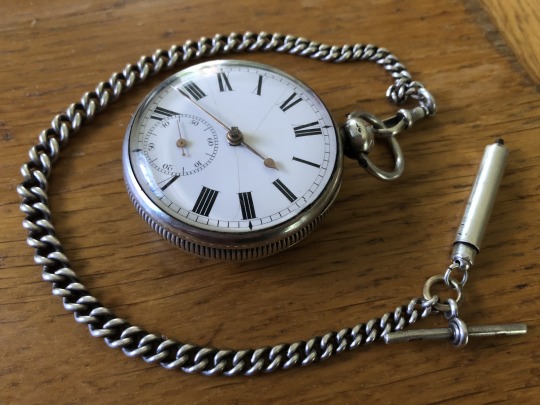
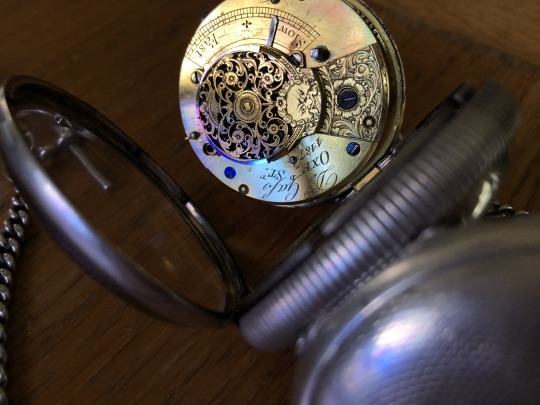
I recently repaired this english verge watch c1800. Like most watches of its age it had a laundry list of problems:
The click in the fusee was worn to the extent that it slipped, causing the cain to come of and quite possibly fly around the watch.
The screw securing the balance cock was missing, the balance was loose in the case. Presumably someone had been in the watch before me and lost it.
The balance staff was bent, see above.
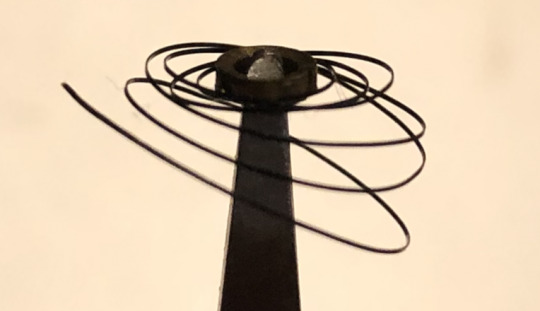
The hairspring was very badly bent, see above.
One of the case hinges had a broken pin, a corresponding dent in the back of the case suggests it was dropped.
A lot of the steel parts had significant rust, including the fusee chain.
The repair is detailed below:
The Click
The hardest part of the repair was making a new click. The worn click was no more than 2mm long in any dimension and made of 0.5mm thick spring steel with a 0.55mm pin protruding from one side. I started with a small piece of 0.6mm spring steel which I drilled a 0.5mm hole in.
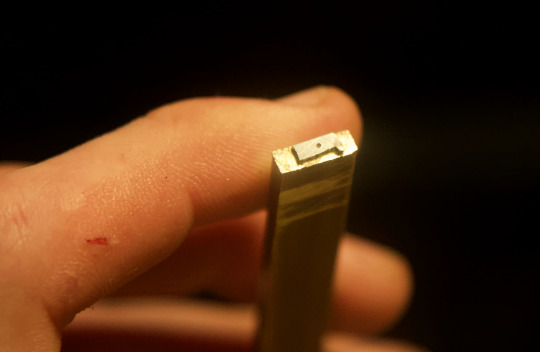
I changed the design of the click from the original in a few ways:
Made a notch for the click spring. The click spring had been bent inwards by a previous repairer and I didn't want to bend it back in case it broke by fatigue*.
Added a second tooth, totally unnecessary but there was space, it should last longer and it makes it obvious that its not an original part (I wanted it to be clear to anyone taking apart this watch in future which parts are original and which are replacements).
Increased the length of the 'heel' because there was space.
After shaping the part I enlarged the hole with a broach until a taper pin in it was a good sliding fit with the hole in the fusee.
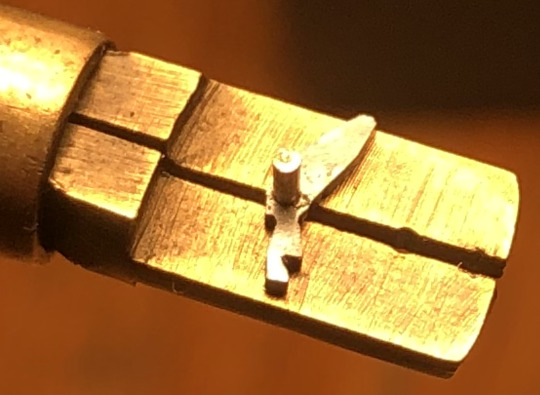
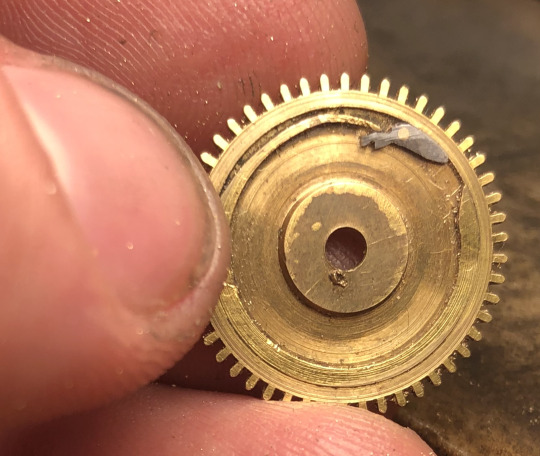
I filed the pin flush and polished the faces of the teeth with a very fine oilstone. Here is the new click installed with my thumbnail for scale.
The Case Hinge
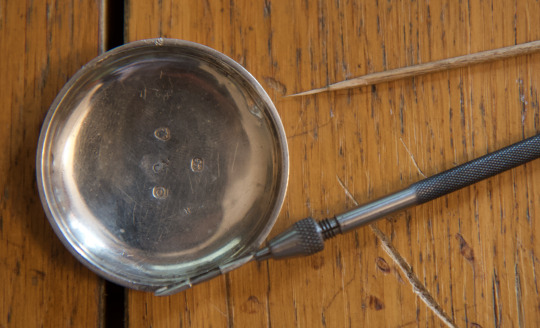
One half of the broken hinge pin was easy to drive out with a punch but the other half was stuck fast so I dissolved it in alum. I made a replacement pin from short length of spring steel wire shaped into a taper using a file.
The Rest
Everything else was pretty standard watch overhauling and is not that interesting. I have attached a picture of the hairspring before being straightened out just to show how bad it was; it took several hours to get into a useable shape. It is beyond me why anyone would leave the balance cock rattling around in a watch.
The watch now runs although it is currently gaining 10min/hr, probably due to wear on the crown wheel and palates.
*I know I could have annealed it but I wanted to do as little as possible to the watch to preserve it as much as possible.
#watchmaking#repair#I love the grinning portrait of Chronos engraved onto the balance cocks of these old watches#So I'm setting him as my profile picture
9 notes
·
View notes
Text
Making a Bullet Necklace
One of my friends coppied her entire personality appearance from Chloe Price from the videogame Life is Strange. As a birthday present, I made her a replica of Chloe's necklace from the game:

I coppied the cartridges from a screenshot into CAD. None of the dimensions are that important but they had to look identical.
I turned the three bullets from 8mm brass stock. The ogive tips of the bullets were made using a form tool I ground from an old HSS die.
Once Parted off I drilled two holes in the back of the bullets for attaching them to the necklace.

Then I soldered in a short length of copper wire, finishing the shape of the bullets.

The final step was to create the appearance of a copper jacketed bullet. I used a janky home-electroplating setup and masked the casings using parcel tape. This took a couple of attempts.

It took about two afternoons all in all.
6 notes
·
View notes
Text

High stakes sewing of my lathe belt.
The stitches are distributed across three rows to distribute the load and each of the groups of six holes is laced independently.
My lathe was designed when leather belts were standard, they are typically laced or stapled to length so can be made an arbitrary length. Thus they can be made slightly short then stretched over the pulleys, requiring no tensioner.
Because I am too lazy to make a tensioner I am continuing this tradition into the present.
4 notes
·
View notes
Text
It’s back!
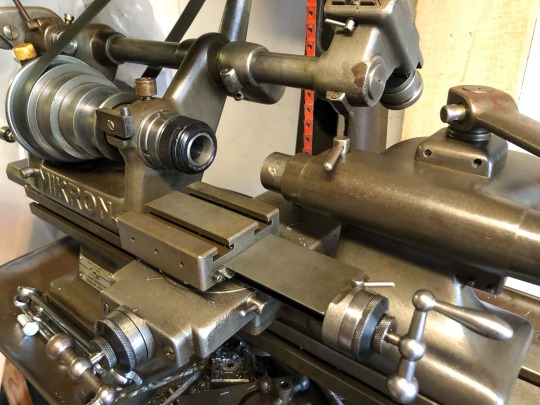
I re-installed my lathe after too long not being able to turn valuable raw stock into scrap parts and swarf. I am so happy.
My arms hurt though.
13 notes
·
View notes
Text

My first attempt at hand finishing eyelets (ignore the uneven stitching on the patch)
6 notes
·
View notes
Photo


I made a belt with eyelets along its entire length - convenient for attaching things - and a shorter strap with spikes along its length which can be worn as a collar or doubled up and used as a bracelet.
The buckles are sewn in place and all the other metal hardware is decorative. The straps are 19mm wide and 2.8mm thick so these are very stout. The ends of the straps behind the buckles are skived for comfort.
9 notes
·
View notes
Text
I carved a little sword from bone this morning. It’s the first time I’ve ever carved bone so I started with something simple.


4 notes
·
View notes
Text
blender and planned obsolescence rant
The other day I started volunteering at a local repair café. The idea is, people can bring their broken things and volunteers repair them.
First someone came in with a LED torch but the battery terminals had rusted beyond repair. Next was a lamp stand that was barely broken at all. Then came one of those early-200s CD-player radio alarm clocks, it was a pain to take apart but it turned out it just needed a new electrolytic capacitor. It went on like this for a few hours. It was very rewarding and the people who used the repair café were all quite interesting to talk to.
Then a nice anti-capitalist lady came in with her blender and explained that it had stopped working during heavy use. I started taking it apart. There were two screws at the bottom and clips about half way up but I couldn’t find what was holding it together at the top.

Since it was already broken we decided to just pry harder. I pried it open all the way around the clam-shell but it stayed together so there must have been something holding it together in the centre. I removed all the stickers but they weren’t hiding anything. I tried to pry off the buttons but they wouldn’t budge. Maybe it was glued? I tried unreasonable force, slipped and it closed on my finger spraying a little blood about. A few more people tried with increasingly excessive prying tools but ultimately failed.
By this point the owner of the blender and I wanted to know what was making it so impervious so we decided that I would take it home, saw it in half and report my findings.


It was a screw under one of the buttons. The buttons are barbed and can only be removed from the inside. Once the button had been installed at the factory, disassembly was nearly impossible.
I know designs like this are fairly common but they still really annoy me.
It gets worse:
I tested the circuit board and the motor and everything was fine except a fuse which was soldered to the PCB and inaccessible without disassembly. The fuse was the only thing limiting current to the motor so it had likely been blown when the blender was overloaded. This is bound to happen occasionally eg. when encountering a particularly thick soup.
The overload protection should have been re-usable!
A polyfuse costing <30p would likely have saved this blender from this fate. Instead after less than a year of use it encountered a thick soup, died and was impossible to repair by design.
21 notes
·
View notes
Text
I had never seen this before so I did a reverse image search and found that it’s the General Electric “Hardiman” powered exoskeleton: https://www.ge.com/news/taxonomy/term/4708
The exoskeleton was designed to amplify force by a factor of 25, while giving the operator feedback allowing them to perform relatively delicate tasks. (enormous strength with no feedback is bound to break things)
Of cause the project was unsuccessful:
‘unexplained bugs, such as what a 1971 report on the project described as “violent and uncontrollable motion by the machine” when both legs were activated, meant that the project was far from ready for rollout when it ended’

208 notes
·
View notes
Text
Unusual Zip Pull Replacement
Normally when a zip pull breaks it can be replaced easily by threading a new pull through the hole in the zipper. Some (older) zippers don’t have a through hole but rather two parallel trenches, frustrating repair. I have a vintage leather jacket with one such zip pull missing. I could have replaced the entire zip but because stitching makes permanent holes in leather I would have had to sew it in by hand which would have been a pain.
I found this loose zipper for 10p at my local haberdasher:

Liberated the pull from the zipper with a hacksaw:

Bent the pull open with toolmakers clamps:

At this point I realised the prongs which mate with the slots in the zipper were too long and too thick so I fixed this with a #2 file (not shown).
I then slotted the pull into the broken zip:

And bent it flat; fixing it in place:

The resulting fix is not quite as nice as a new zip since I mangled the pull a bit when I put it back on and damaged the nickel plating but it works well and was a lot faster than replacing the entire zip (especially given I would have probably had to do both sides since finding a precise match for a vintage ).
#zip#repair#diy#mending#Clothes#Now I realise I strictly speaking attached the pull the wrong way round
0 notes
Text
Nikon Labophot Repair
I just got a Nikon Labophot with a broken lamp holder so made these 3d-printed Ls which can be glued on to it.

Like so:

It’s not beautiful but it works fine now.
0 notes
Text

The mirrors in moving coil meters corrode over time making them hard to use but they are easily repaired. They are just a thin aluminium sheet glued to the back of the scale and can be removed with a blade. (be careful not to scratch or bend the mirror)

You can then polish the mirror and glue it back on. It looks good as new.

If the mirror originally had a protective coating it will be lost now but polished aluminium keeps its finish for a long time so it should be fine.
3 notes
·
View notes
Text
HeNe laser (driver) repair

I got this Spectra Physics 155 HeNe laser on ebay for £10 not working. It ended up being an easy repair since the only problem was that it had carbon composition resistors that had drifted off tolerance (by more than 2x in some cases). This always happens with carbon composition resistors.
Thankfully the electrolytic capacitors (also suspicious) were fine which is for the best since they are unobtainable 500v 10uF axial electrolytics.
0 notes
Text
DIY nanopositioning stage
I want a nanopositioning stage that’s less expensive than a commercial one but less rubbish than those piezo buzzer ones. I found these 1x1x5mm PZT multilayer stacks on ebay for <£10 each which work great and designed this very simple flexure for them.

The stage is driven by ±100V and has ~4µm of travel (20nm per volt). It probably doesn’t have the best repeatability because of hysteresis but I can’t measure displacements smaller than 0.2µm so I can’t characterise it.
I’m planning on adding a third piezo on the end of the beam and trying to use it in an atmospheric STM (since piezo buzzers can be used for STM I think it could work)
PS. if you make something like this add diodes to protect it from over-voltages. I fried a piezo to learn this.
1 note
·
View note