
ovenbirdonwheels
Ovenbird's Home Cooking Adventures
View My
Stats
679 posts
Don't wanna be here? Send us removal request.
Last Seen Blogs

seronefada
Looks like wings

slurring-words
graceful, ugly words

myscarythots
my scary thots

mihau-travel-exp
mihau_travel_exp

niema-dyskusja
new-wo-men
Note
Hi, i stumbled upon your steamed fish with soy sauce and I want to try it. May I know what brand of superior dark and light soy sauce you used? Thank you.
Feng He. From Ipoh.
3 notes
·
View notes
Text
Pumpkin Claypot Rice
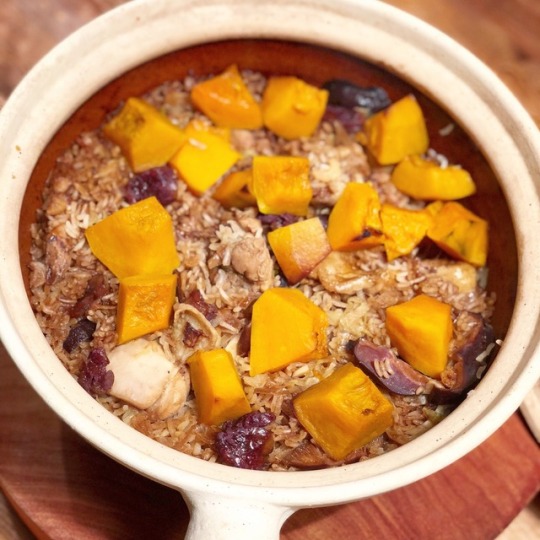
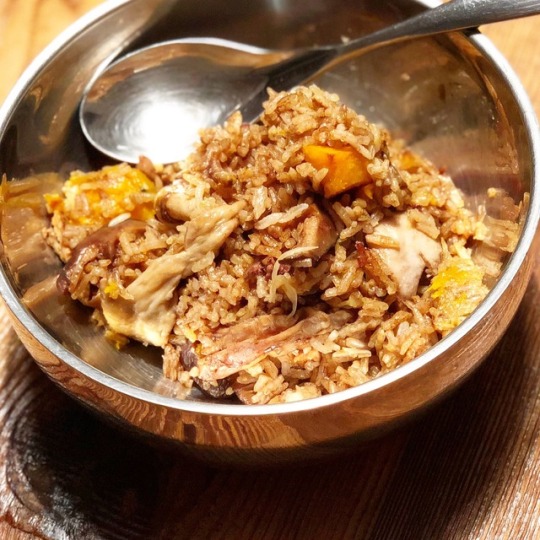

Edith loves pumpkins. We love claypot rice. So this was a marriage of interests ... a claypot cooked pumpkin rice which has all the flavours you’d find in a claypot cooked rice, plus the sweetness and goodness of Japanese pumpkins! I hope you like this recipe.
Ingredients
300g pumpkin, cubed, rubbed with 1 tbsp quality Japanese sesame oil, roasted at 190 C for 20 mins
1/2 Cup dried shrimps
4 dried shiitake, rehydrated, sliced thin
chicken skin from the neck and cavity region
1 chicken thigh, deboned, portioned
1 yuncheong (liver sausage)
1 Cup sliced Chinese cabbage
1 banana shallot, sliced
1 clove garlic, thinly sliced
2 cups rice (to 2 cups water and 1/2 cup chicken stock)
Marinating sauce for chicken
3 tbsp dark soy
2 tbsp light soy
2 tbsp oyster sauce
1 tbsp shaoxing
1 tbsp white rice wine
1 tbsp toasted sesame oil
1/2 tbsp sugar
1/2 tsp white pepper powder
1/3 tsp aged black rice vinegar
Method
Marinate the chicken parts in the marinating solution.
In a Claypot, sauté the ingredients in sesame oil in this order - shallots, dried shrimps, yuncheong, chicken skin and chicken parts (drained of marinade - set the marinade aside), cabbage, garlic then the rice right at the end. Sauté till fragrant.
Pour in the reserved marinade. Mix well.
Add the water and chicken stock. Place the pumpkin pieces, and drain the liquid and marinating sesame oil from the pumpkin into the pot.
For me, I cooked the Claypot on medium low heat for 30 minutes.
5 notes
·
View notes
Text
Japanese Kaigun Style Curry (Pork)
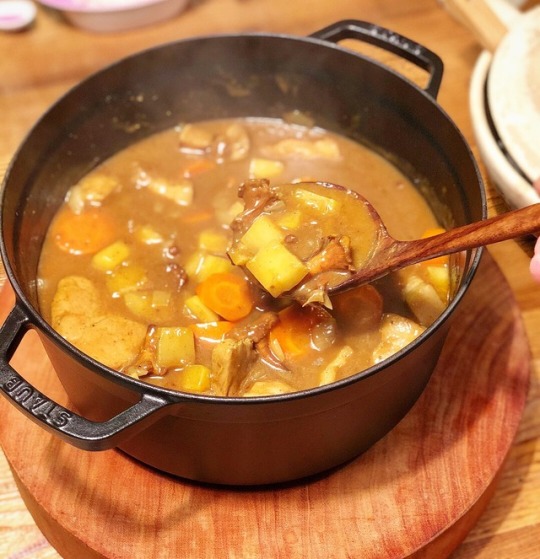


This started as an experiment to see if I could recreate the taste of Japanese curry with my own home blended curry powder. It worked so well that it’ll now be a fixture on my menu list. Goes great with pork, but really could work with almost any meat.
Ingredients
400g pork belly block, sliced
1 measure curry powder - 1.5 tbsp (plus 1/2 tsp ginger powder)
1 large apple grated
30g/ 2cm piece ginger grated
3 garlic cloves grated
1 onion, chopped
2 shallots, chopped
2 carrots, chopped, “Rangiri” style
3 potatoes, cut into chunks
Optional - shitaake mushroom
50g unsalted butter
60g All purpose flour
10g potato flour
1 liter chicken stock
1 heaping Tbsp honey
1 heaping tbsp chocolate powder
2 tbsp sugar
120ml tonkatsu sauce
Method
Melt some butter in a heavy-base pot. Brown the pork belly. Set it aside.
Sauté the root vegetables, less carrots and potatoes in the same butter and pan juices.
Add the grated ingredients.
Make a roux with the butter and flour, and add in the chicken stock
Add curry powder and chocolate powder to the pot. Stir in well. Add carrots and potatoes and meat.Add additional chicken stock if necessary.Check for liquid level and consistency
Cover cook and stir regularly to avoid the base from burning. It’ll take about 30 mins or till potatoes soft.
Make tonkatsu sauce. Stir in, and serve the curry on a bowl of hot steaming Japanese rice!
9 notes
·
View notes
Text
Braised Duck - My Hacked Version!


I’ve always wanted to make a Teochew style braised duck but with some major tweaks - less oil, a more complex braising stock that isn’t just salty sweet, and duck meat that is actually tender and not unlike how I’d roast a duck. So this is my version. It takes a bit more work, some rather “taboo” ingredients, but trust me... it’s a pot of braised duck you’d gladly eat for a few days!
Ingredients
1 standard NTUC Pasar Duck
Spice mix:
5 Star anise
2 cinnamon sticks, 4 cm
8 red cloves
3 pieces dried orange peel
6-8 Szechuan red pepper
4 shallots, 10G
12 cloves garlic, around 60g
40g old ginger (weight after peeling)
40g young ginger (weight after peeling)
80g galangal (weight after peeling)
1 large piece rock sugar (4x4cm)
2 tbsp brown sugar
Quick marinating sauce
1 cup dark soy sauce
1/2 tbsp aged Shaoxing wine (the better the wine, the better this dish will turn out)
1 tbsp Japanese roasted sesame oil
2 tbsp plain sugar
Braising sauce
2 cups dark soy
1 cup light soy
1 cup shoyu
2 cups water
500 ml chicken stock (I make my own Torigara)
1/2 cup rose wine, 1:2 cup rice wine, 1/3 cup shaoxing, 1/2 cup rose wine
Method
Salt duck with 2 tbsp course sea salt all round including cavity. RUB IT INTO THE SKIN. The pores will open up, and extra moisture will be dried in the fridge. Refrigerate for 6 hours. Later, the open pores will allow more fat to be blanched off.
Wash salt off. Cut a hole at the neck cavity. Blanch duck with boiling water quickly holding the neck. Not soak in boiling water. This is to tighten the skin and remove some oil. Go through again with a blow torch and remove any leftover feathers, while releasing more fat.
Make the quick marinating sauce. Brush whole duck, glaze quickly with blow torch. Do 3x. This will flavor the skin and remove a bit more fat. Meanwhile stuff 1 garlic 1 galangal and ginger, 1 Star anise and a cinnamon stick into the duck cavity.
Prepare braising sauce add 2 tbsp sesame oil and fry the dry ingredients until fragrant and sugar starts to caramalise. Add the marinating sauce, and the braising sauce, and bring to a rolling boil.
Slowly lower the duck into the braising stock. It should come up to halfway of the bird lying down. Cover, lower heat to medium low. Beside each side for 10 minutes before turning over, keeping the wok covered each time. Each side should have 18 minutes of braising time. Once that’s done, total about 40 minutes, remove the duck at rest it for 15-20 minutes before cutting. Meanwhile, add taupok and taukwa and braise for 10 minutes.
Serve with noodles, ladled with the braising stock, topped off with coriander, crispy shallots and spring onion. Accompanied by chili sauce, tomatoes, cucumber and cut lime.


2 notes
·
View notes
Photo
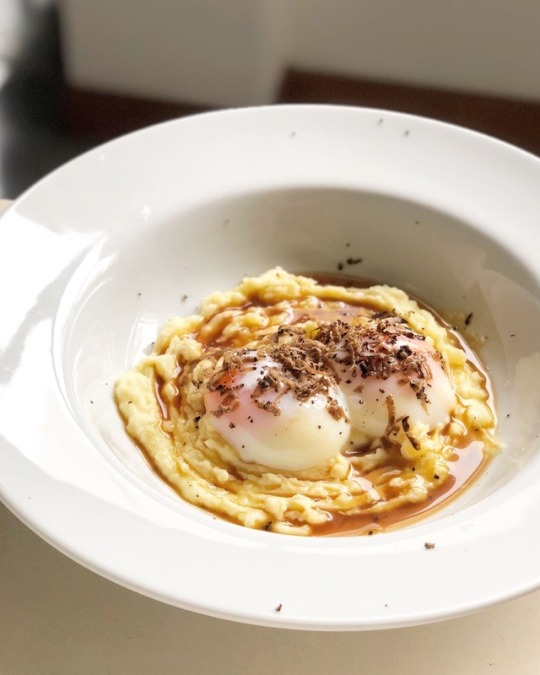
Sous Vide Eggs 62C/60mins with Mash, Dashi and Demi Glacé reduction Jus, shaved black Alba summer truffles and Aonori
Breakfast is the most important meal of the day. Yuhan loves eggs and mash. So here it is - 62 Deg C sous vide Cooke’s eggs on a bed of mash, with fresh shaved alba black truffles, and demi-glacé dashi gravy. Aonori to top it off. The trick to making this is really the 1 hour it takes to make the eggs. These are Farmer Brown’s medium sized eggs, around 63g each. When done, you just need to remove the top of the egg and the contents pour out as one whole piece. No trailing albumin. As for the jus, demi glacé makes all the difference. That’s 2kg of beef bones, 1kg of marrow bones, 2 beef shins and 500g of beef brisket blanched and browned on the oven at 200 deg C for 40 mins. Beef is then set aside. Then root veg - 2 onions, 2 celery sticks, 2 carrots, 2 leeks - are chopped and mixed in the same roasting pan to soak up the drippings from the beef, and roasted for 20 mins. Everything then goes into a stock pot with a bouquet garni (4 sprigs parsley, 3 thyme, 2 rosemary and 3 bay leaves) with some peppercorns. Separately, make a shortcut Espagnole sauce by sautéing lightly 2 French banana shallots in a sauce pan in 100g of butter. Add in a tin of tomato paste, and 500ml of red wine (Pinot Noir preferably, if you can’t get the real red Burgundy). Whisk well and integrate, and reduce the liquids by half. Combine the beef, vegetables, bouquet garni and the Espagnole sauce into a stock pot with 7 liters of water and 1.5 liters of chicken stock and bring to a boil, before lowering to a simmer. Skim off any gunk that forms. 18 hours into simmering, add 1 onion, 2 celery sticks, 1 leek and 1 carrot, all chopped, with 500ml of water into the pot and simmer for another 6 hours. Strain the stock through a chinoise or fine strainer and reduce it by half. By the end you should have roughly 3.5 to 4 liters of demi-glacé.
1 note
·
View note
Photo


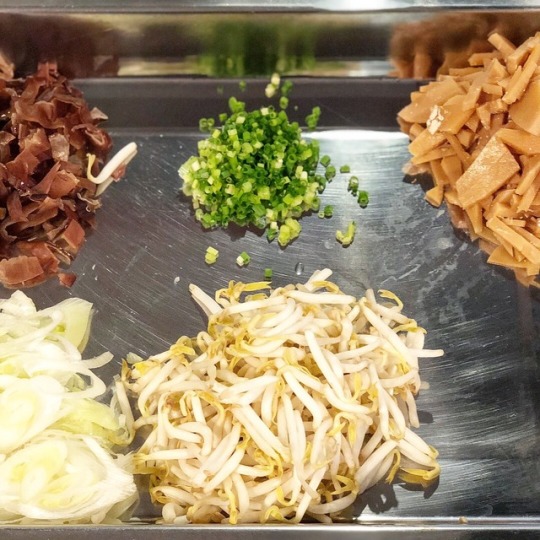
Pork Bone Broth Miso Chashu Ramen
Dinner for Day 3 is Yuhan’s confinement. Miso chashu ramen. Three words. But backbreaking hours of work put in. And that’s why we all love ramen. The bone broth, the dashi, the chicken stock, the vegetable broth, the Miso Sesame Tare, then there’s the egg, the rolled pork belly, the stewed bamboo shoots… the condiments and garnishes.
Amazingly, it’s all VERY good for a mummy undergoing confinement. And that’s why Yuhan had ramen today.
3kg pork bone, blanched, simmered in 14 liters of water for 72 hours. At the 48 hour mark, 2 liters of chicken stock, and 2 liters of dashi (Kombu, with sardine and bonito shavings), plus 4 leeks, 4 onions and 4 carrots. The whole bone broth just summers away till the third day. Then Teo rolled pork belly chashu goes into the pot for another 4 hours.
The Miso Tare is made as follows:
- 1 cup white miso (from Yaotsu)
- 1 Cup Sake
- 2/3 Cup mirin
- ¼ Cup shoyu
- ¼ Cup white sesame oil
- ¼ Cup toasted sesame oil
- 4 cloves black garlic (I used Spanish ones)
- 10 cloves garlic, grated
- 2 2 cm pieces of ginger, grated
- 1 Tbsp sugar
- 1 Cup Dashi
Assemble and simmer till warm.
Then the ramen is put together with condiments and garnishes (including black fungus, which is good for new mummies). 2-3 scoops of the bone broth, 1 small scoop of Tare.
2 notes
·
View notes
Photo
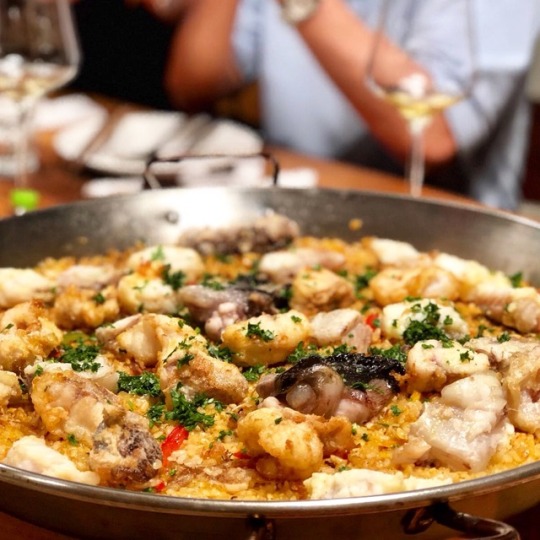

Monkfish Paella
This recipe is pretty experimental. I used the Ankimo roll as a base of the paella, mashing them up and frying it with garlic, shallots, slices of capsicums and peppers, and onions, in olive oil. Deglazed with a Friulian Sauvignon Blanc. The result is an amazingly rich, briny base of caramelised liver that forms the base of this simply paella.
The bones and fins of a whole monkfish were grilled in olive oil and salt at 190 deg C for 25 minutes. The pan drippings were added to the chicken stock and monkfish stock to be used to cook the paella later.
Monkfish tail fillets were then fried in a light tempura batter and set aside to top off the paella with the grilled monkfish fin and chopped bones. Garnish with fresh chopped parsley and served piping hot!
1 note
·
View note
Photo


Claypot Grouper Fillets in Modified “Zhuhou” Sauce
This is a mashup of two favorites of mine. Home made Zhuhou sauce, and a giant grouper. And topped off with yam to make it one delicious meal.
Ingredients
2.5kg giant grouper, filleted into 2 inch slices, heads and bones reserved
10 shallots, sliced thinly
5 garlic cloves, sliced thinly
1 yellow onion, sliced
1 thumb ginger, julienned
1 small Chinese yam, sliced into rounds
750ml chicken stock (preferably double-boiled)
500ml grouper fish head stock
2 stems of spring onions
Coriander leaves
Grouper head and bones
1 onion, chopped
2 garlic cloves, sliced
1 thumb ginger, julienned
Sesame oil
Canola oil
1 tbsp Vietnamese fish sauce
1 tbsp aged Shaoxing wine
white pepper powder
3 liters water
1 portion modified Zhuhou sauce (see below)
You will need to make chuhou sauce 柱侯酱 made from 4 tbsp hoisin sauce, 1 tbsp fermented soya bean sauce, 1 tbs black bean sauce, 1 tbsp sesame oil, 1 tbsp light and 1 tbsp dark soy, 1 tbsp each of two types of Chinese (white and shaoxing) wine, 2-3 tbsp sugar 2 tbsp rice vinegar, 1 star anise, 1 stick cinnamon, 2 pieces bay leaf, ½ tsp of crushed black pepper, and 3 cloves. If you can, add about 4 pieces of dried orange peel and a quarter of a dried mandarin orange to the spice mix as well. I find that this raises the sauce to a whole new level although it’s not conventional. Mix these ingredients in a bowl and set aside.
Start off by making the grouper fish head stock. In a pot, add 1 tbsp of sesame oil and 2 tbsp of canola oil and warm it up over medium heat. Add the chopped onion, garlic and ginger and sautee till fragrant. Add in the fish head and bones, and drizzle shaoxing wine and fish sauce over the ingredients. Brown some of the fish if possible. Then top up with 3 liters of water, and sprinkle white pepper powder. Simmer on low for an hour, and strain, reserving the liquids.
Heat up a pan with canola oil and some sesame oil. Fry the grouper fillets skin side down quickly to impart a light char. Set aside all the fillets.
In a wok, heat up some canola oil and brown the onion, shallots, garlic, and ginger. Add in the yam and stir fry till some cameralisation. Introduce the Zhuhou sauce, and fry the ingredients together in the wok until smoky and fragrant. Top up with some 200ml of water and bring to a simmer. Transfer all the contents into a large claypot.
Add the grouper fillets into the clapot. Top up with the chicken stock and grouper head stock. Add the spring onion stems, cover the claypot, and bring to a low simmer for 20 minutes. Garnish with more spring onions and coriander leaves and serve hot.
0 notes
Photo


Ankimo (Japanese Monkfish Liver Rolls)
I managed to get my hands on some really fresh monkfish liver last weekend, so I made Ankimo for the first time in my life.
The process of preparing Ankimo is pretty exacting. You’ll want about 1kg of monkfish liver to make four 15-cm long, 3-cm wide rolls. which are then steamed quickly and served with ponzu and spring onions.
Ingredients
1kg Monkfish Liver, cleaned
Sea salt (fine grained)
2 liters of 1:10 parts vinegar vs water
Cling wrap and aluminium foil
Ponzu
Spring onions
The first step is to remove the veins and membrane on the liver. This is painstakingly done by hand, with a fish tweezer. If the veins and membranes aren’t removed, they’ll become tough chewy bits in the liver after they are steamed. I also had to examine the liver closely to look out for roundworms or tapeworms which may infect the organ. Monkfish is a white fish, and having tapeworm or roundworm infestations is pretty common. Thankfully, the batch of liver I used was clear of them.
The liver is then dusted liberally with salt on both sides in a baking dish. I clingwrapped the baking dish and let the liver sit in the fridge for about 40 minutes. The salt extracts most of the liquid out of the liver, and with it, a lot of the fishiness. After this step, the liver is washed in running water, then soaked in a 1 part Japanese vinegar to 10 part water solution for 30 minutes.
Once that is done, the liver is quickly dried using a kitchen towel. Laying out a length of cling film, I arranged three pieces of the liver breadth wise, sprinkled it with sake, and rolled it into a cylindrical shape, packing it as closely and tightly as I could. an external layer of aluminium foil is then used to wrap the batons even tighter, packing the liver a few times.
The batons are then steamed in a bamboo basket for 25 minutes, before being cut into rounds and drizzled liberally with spring onions and home made ponzu. Utterly decadent and delicious!
0 notes
Photo

Stir-fried Frogs’ Legs with 3 Pepper marinade The secret of this dish is the spice mix. I blended 3 different peppers - Tibetan red, Kampot white and Kampot black - in equal proportions. The frogs’ legs are marinated overnight in a sauce consisting of dark and light soy sauce, shaoxing wine and white rice wine, sugar, sesame oil, and aged vinegar. Separately, a combined chicken and fish stock (70-30 ratio) is prepared. The legs are then stir-fried with the sauces, ingredients, lots of garlic, onions, and shallots, and slowly simmered down with the stock and some cornstarch to thicken the gravy. Garnishing is simple - just coriander leaves and spring onion. This is a quick, delicious way to prepare frogs’ legs without resorting to Chili!
0 notes
Photo


Porcini Mushroom Tea
Inspired by what I had at a wonderful 2 Michelin starred restaurant, I tried this recipe out a couple of times, including a pop-up event for 80 guests earlier in the year. It’s a lot of work, but it’s something really fun to make. And drink :)
INGREDIENTS
The Dashi
130g mirin
1kg water
40g Kombu
40g Soy sauce
115g sake
40g katsuoboshi
10g Yuzu vinegar
5g yuzu zest
4g coriander leave stem
8g young ginger
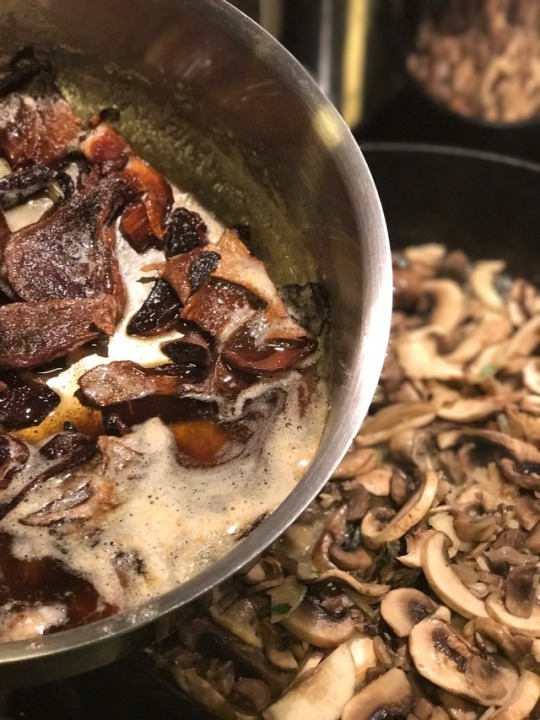
The Porcini Butter
400g butter
80g dried porcini
5g sherry vinegar
10g yuzu vinegar
5g toasted sesame seed
5g sesame oil
The Mushroom broth
30g shallots, sliced thinly
40g garlic, sliced thinly
5g young ginger, sliced thinly
250g button mushrooms, diced finely
250g button mushrooms, diced finely
200g butter
1 tbsp Japanese light sesame oil
6 sprigs thyme
5g Angelica root
1/2 tsp fennel seed, toasted
1/2 tsp coriander seed, toasted
5-6 seeds of Tibetan Red Pepper, crushed
2 blades of mace
2 piece bay leaves
750ml water
The Mushroom cream
100g Porcini butter, cooled to around 8-10 deg C in fridge (see above)
3 egg whites (room temperature)
2 egg yolks (room temperature)
1 200ml whipping cream (as cold as possible)
1 pinch sea salt
1 tsp aged (minimum 10 years) Aceto Modena (cooled down in wine fridge, around 14 deg C)
Chopped chives
Nori
Some fried garlic chips
INSTRUCTIONS
Make the dashi. Soak kombu in the water overnight in the fridge. Combine mirin and sake, and reduce by half, cooking off at high heat. Flambe it towards the end to give it a more concentrated flavor.
Bring kombu in water to just below boiling. Take off the heat, remove the kombu, strain. Add the reduced mirin/ sake solution, and the rest of the ingredients for the dashi (less the Katsuoboshi) Bring up to a low boil. Add Katsuoboshi. Once the Katsuoboshi sinks to the bottom of the liquid, turn off the heat. Let it soak for 10 minutes. Strain and set aside the dashi.
Make the Porcini butter. Melt butter over medium-low heat, add dried porcini, and rest of ingredients. Slowly cook porcini until crispy. Strain and set aside the porcini butter. Store in fridge. Watch carefully - bring down the temperature, but don’t solidify the butter. You’ll need it in liquid, cooled state later.
Make mushroom broth. Slowly sweat shallots, garlic in melted butter and sesame oil. Add mushrooms and the the spices and herbs, and saute the mushrooms till they darken in color. Add the water and the bay leave and let it slowly cook over low heat for 30 minutes. Strain and set aside.
Combine 200ml of the dashi with 600ml of the mushroom broth. Reduce by 1/2 to 400ml. Set aside on a warmer.
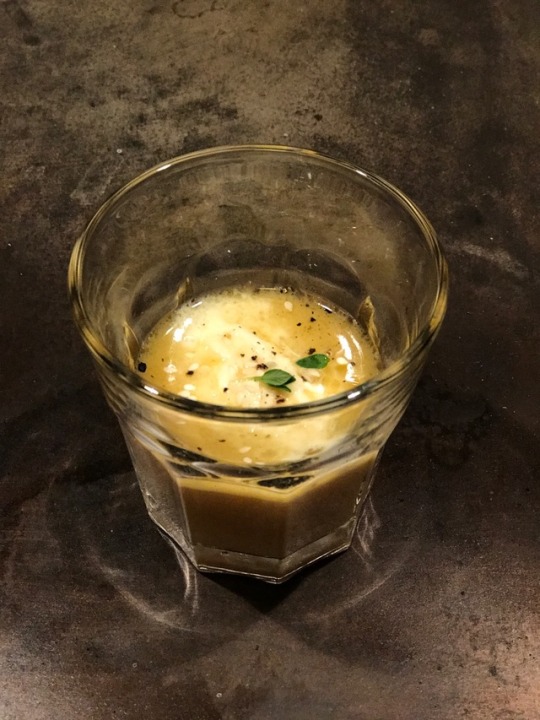
Make the mushroom cream. Combine the ingredients into a ISL INOX whipper. Charge with two bullets, shake the whipper well. Pour your mushroom-dashi broth into a small drinking glass or bowl, and slowly discharge some of the mushroom cream into each glass. Sprinkle some chopped chives and fried garlic bits, and garnish with nori. Serve!
6 notes
·
View notes
Photo


Crab Porridge
This is a deceptively easy dish to make… it’d been going on in my head for a while to make a crab porridge. Crab congee or porridge is absolutely huge in Singapore, Malaysia, HK, and basically any where on earth with populations of Chinese people and quality seafood. The problem with crab porridge is that it often tends to be sock-it-into your face heavy. Smoky, because it’s often cooked in clay pots over charcoal flames. And pretty predictable.
This recipe is really a twist on a pure crab porridge, which usually uses a dose of chicken stock and loads of crabs, if little else. The base of my recipe is really a fish stock made from cooking the heads and bones and trimmings of two Sea Breams, a chicken broth, and plenty of vegetables. The crab comes in right at the end, to flavour it, and add to a complex, light and aromatic broth. It’s cooked completely in clay pot, but not over charcoal flames.
It’s important to remember to use only FEMALE crabs, with plenty of roe as that adds to the overall flavour of the porridge.
Ingredients
For the chicken broth
1 1.2kg chicken, whole
1 tsp sea salt
4 garlic cloves, crushed, skin on
½ tsp white pepper corn
1 in ginger, sliced into thin rounds
1.7 litres of water
For the Sea Bream stock
Bones, heads, and trimmings of two sea breams (you can replace this with any white fish which aren’t overly assertive; threadfins for example)
½ yellow onion, chopped roughly
3 cloves garlic, chopped roughly
1-in ginger, sliced into thin rounds
2 tsp fish sauce
1 tsp light soy sauce
1 tbsp Shao Xing wine
2 tsp sesame oil
4 litres of water
1 tsp ground white pepper
For the Crab Porridge
2 600-700g Sri Lankan mud crabs, female, shelled, cleaned and quartered
6 1-in lengths of yellow chives
½ leek, sliced lengthwise, halved
1-in ginger, sliced into thin rounds
1 spring onion, root and stem halved lengthwise. You can also add 1/2 a chopped onion to add sweetness to the porridge
2 cups Jasmine rice, washed thrice
Ground white pepper, to taste
Coriander leaves and chopped Spring onion to garnish
Instructions
Make the chicken broth. Rub the chicken all round with sea salt, add the rest of the ingredients, and cook the chicken in a double boiler for 45 minutes over Low flame, and rest covered for 15 minutes. Strain chicken stock and set aside. You should have about 1.5 litres, or around 6-7 cups of chicken stock.
Make the sea bream stock. Add the sesame oil to a pot and bring it up to heat. Sauté the onions, garlic, ginger until lightly browned. Add the fish, and fry them. Using a blow torch, you can char some of the skin and fish head, and particularly the fatty collar cuts. Add the soy sauce, fish sauce, wine, and ground white pepper, coat the fish well. Once the fish starts char slightly, add the water. Bring it to a rolling boil, turn it to Low, cover the pot, and cook for 45 minutes. Once done, strain the stock and set aside. You should have about 20 cups or so of broth. Add another 5 cups of water to bring it up to 25 cups worth of sea bream stock.
Combine both stock into a a large pot. You should have around 30-35 cups worth of combined stock. Get your claypot ready. Wash the jasmine rice, and add the ginger, and pour in the combined stock. To start off, you’ll need 20 cups of stock to 2 cups of rice. Bring the pot to boil slowly, starting with Low heat and progressively working it up to medium. Cook the rice slowly, stirring once in a while to Ensure that the bottom doesn’t burn. Progressively add more stock, a cup at a time, until the porridge reaches your desired consistency. My favourite would be the HK congee style, which will take about 2-2.5 hours to reach, and use up 30 cups of stock at least. If you prefer the wetter porridge style, you’ll need all the stock that you’ve prepared.
Add in the crab pieces, shell first. Cover, and cook over Low heat for 15 minutes. That should be all you need to cook the crab sufficiently without overdoing it.
Remove the claypot from the heat, add the garnish and serve. Done!
0 notes
Photo

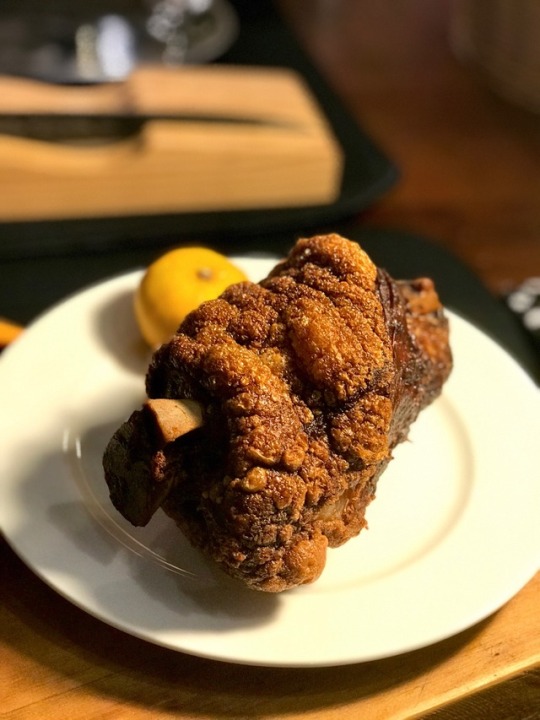


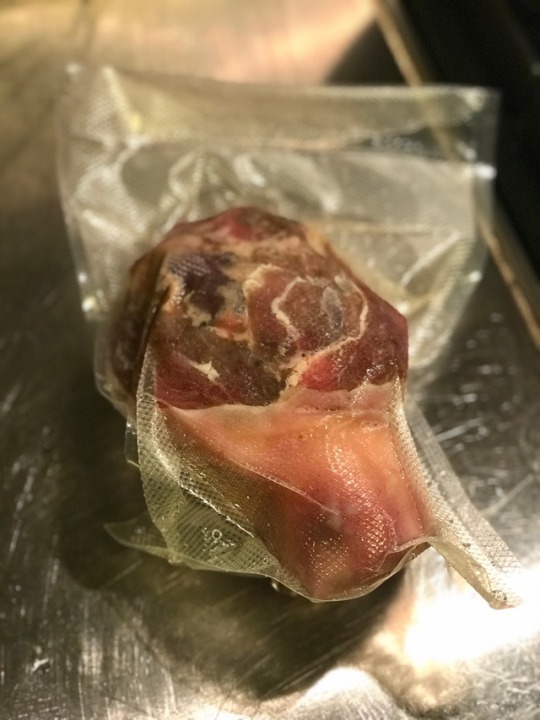
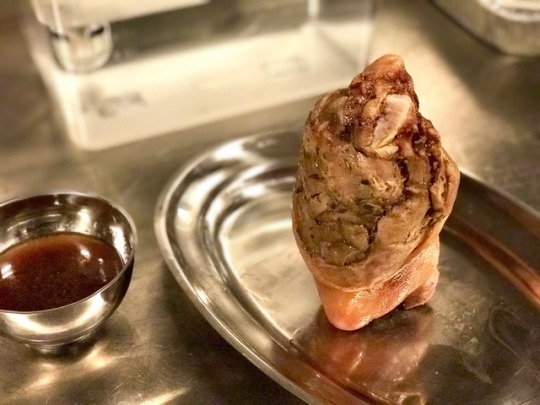
Pork Knuckle
This is something special - I’ve always loved pork knuckles. Especially the super-michelin 1-starred Suhring of Bangkok’s version. So I took a punt and decided to make my own.
~1kg Pork Knuckle - dried in the fridge over two days. Marinated with a dry rub of 1tsp coriander, 1 tsp fennel, 1.5 tsp salt, 3 garlic cloves (minced), 1 tsp sugar, 1/2 tsp red and 1/2 tsp white Kampot pepper and 1.5 tsp Yuzu oil. Bagged and into the fridge for overnight, before being sous vide at 70 deg C for 10:30hrs.
Unbagged and left to dry for another 8 hours in the fridge. The cooking juices are drained to be used later for sauce.
The knuckle is then roasted standing up in the oven at 160 deg C for slightly under an hour, before drenched slowly with hot, 180 deg C oil till the skin crunches up. Done!
0 notes
Photo
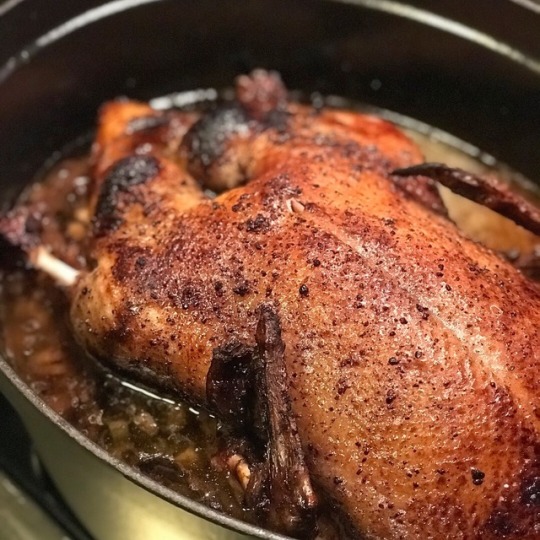

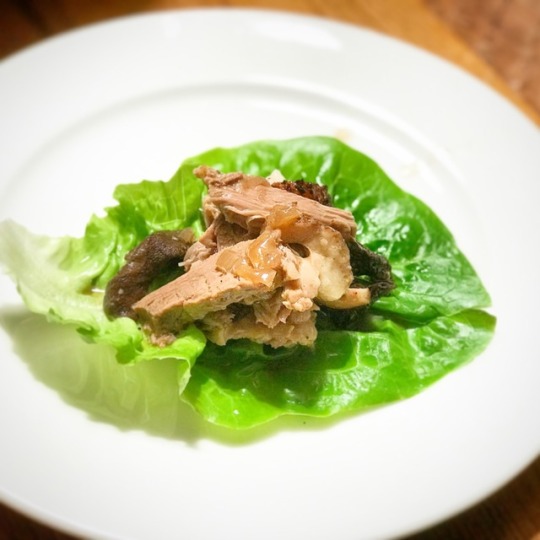
Canard en Cocotte
It’s been a while since I’ve posted a recipe. And it’s about time I put up one. This is a keeper. I got an Irish duck gifted to me by my knife supplier - yes, go figure that out. Suffice to say that they’re really nice folks. So what I did next was to thaw out the beautiful bird, dry out the bird, make a dry marinade of 6 spices, and dry marinate it for 2 days. Then I sat it on a bed of aromatics and root vegetables and booze. On the 7th day, I popped into a hot oven to brown the breast, then cooked it slow and low for a few hours.
The duck throws out plenty of fat; so after roasting, I drained the fat off, and put the bird back into the cocotte overnight before I heated it up and had it with beautiful lettuce. Simple meal all that... but utterly delicious.
Ingredients
1 Duck, around 2.5-3 KG
Dry Marinade
2 tsp red Kampot Peppers
2 tsp white Kampot Peppers
1 stick cinammon
4 cloves
2 star anise
1 tsp mace
2 tsp golden caster sugar
1.5 tsp salt
1/3 tsp ginger powder
2 tbsp 10-year or aged Shaoxing wine
1 tbsp Japanese dark sesame oil
2 thumbs ginger, crushed
4 clove garlic, crushed
Wet Marinade
1 Tamanegi onion, diced
2 shallots, diced
30g porcini mushroom, soaked
15-20g Japanese dried Bamboo shoots
4 pc dried orange peel
100ml sake
300ml chicken broth
20g chopped fresh sage
Dry out the duck thoroughly in the fridge for one or two days. A dry skin makes roasting a lot easier.
Next, blend all the dry spices for the dry marinade. Stuff the garlic and onion into the cavity of the duck, and rub the dry marinade both inside and all round the skin of the duck. Pour the shaoxing wine over the bird and rub in well. Return the duck into the fridge and let it dry out for another day.
Prepare the wet marinade and root vegetables. The wet marinade keeps the bottom half to bird moist, and as it evaporates, provides the moisture to keep the duck juicy and tasty. Add all the ingredients into a cast iron pot/ cocotte. Remove the bird from the fridge, and rest it on the wet ingredients. The liquid level should come up to about 1/3rd of the bird. Pour the sesame oil over the breast of the bird and rub in well. Return the cast iron pot/ cocotte into the fridge and let the bird dry out overnight.
The next day, turn up the oven to 200-210 deg C. Place the cocotte into the oven and roast the duck, breast up, uncovered, for 20 minutes. Turn the temperature down to 120 deg C at the 15 minute mark, and cover the pot. Roast for another 2:30 hours.
Once done, you can take the pot out of the oven. When the pot has cooled down, strain off all the rendered duck fat, and carve the flesh off the duck. Return the meat into the pot and stir well, mixing with the aromatics. Wash some lettuce leaves, and serve the duck on the lettuce as appetisers or a carbo-less main dish! Done!
2 notes
·
View notes
Photo

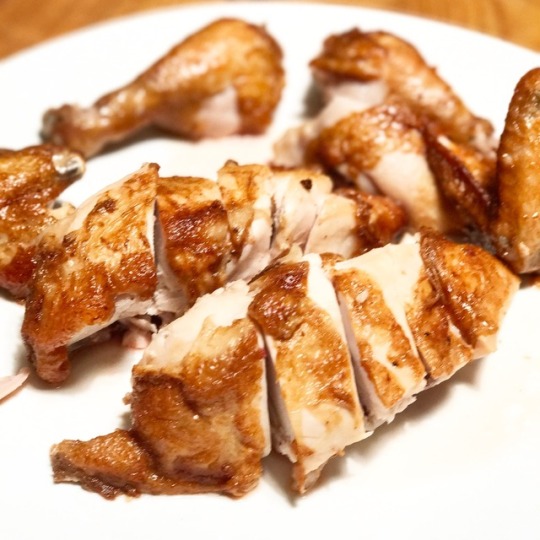


Salt-baked Chicken
(Serves 4)
I’ve always been a huge fan of salt-baked chicken. This dish is served at most Chinese wedding banquets in Singapore, and the main attraction is the complex flavors form the marinade that makes it fragrant beyond any style of chicken I know. The skin is crisp, and the flesh juicy. How to achieve all that? It’s simply a 3 stage process of marinating, baking in a salt crust, then basting the chicken with hot oil for a short time.
This is my version of salt-baked chicken. I tried it yesterday and it turned out really well. So the recipe is a keeper for now!
Ingredients
1 1.5kg chicken
5kg of coarse sea salt
250-300ml of canola or other neutral oil with high smoke point
2 sheets of baking paper, well oiled
For the Marinade
2 tsp light soy
1 tsp dark soy
¾ tbsp course sea salt (inside the tub of sea salt on top of the fridge)
½ tsp Japanese dark sesame oil (new bottle I just bought)
1 tsp Chinese rose wine
2 tsp Shaoxing wine
1.5 tsp ginger powder
1 tsp Chinese Szechuan peppers
For the Stuffing
1 piece of 2 cm old ginger, peeled, sliced into thin slices (not strip)
3 spring onion root and stem portion
½ tsp fine sea salt (inside the spice cabinet, bit bottle)
2 small piece Angelica root (dang gui), sliced
2 cloves
½ star anise
Dry chicken inside and out. Rub skin with course sea salt. Mix sesame oil, light and dark soy, rose wine, Shaoxing wine, ginger powder and Szechuan pepper. Rub the skin of the chicken with the mix.
Stuff inside of chicken with the stuffing ingredients. Keep in Ziploc bag. Wrap tightly with clip wrap and marinate for about 7-8 hours.
Remove the chicken from the ziploc, wipe off the szechuan peppers. Wrap the chicken with two sheets of well-oiled baking paper (inside and out) and tie it into a parcel with kitchen strings (see picture)
Set the oven to 212 deg C. Wet some coarse sea salt in a large, deep baking tray or a wok. Place a layer of salt about 1-2 cm thick on the bottom of the tray. Place the parcel on the salt layer, and proceed to pack salt around it until a compact crust is achieved. Roast for 50 minutes.
Bring 250-300ml of oil to about 180 deg C. Remove the chicken from the parcel and the salt crust; remove the stuffing in the cavity of the chicken. Proceed to then ladle the chicken with hot oil for about 2 minutes or so or until the skin is golden brown and crispy. Let it rest for 15 minutes before carving and serving.
0 notes
Photo
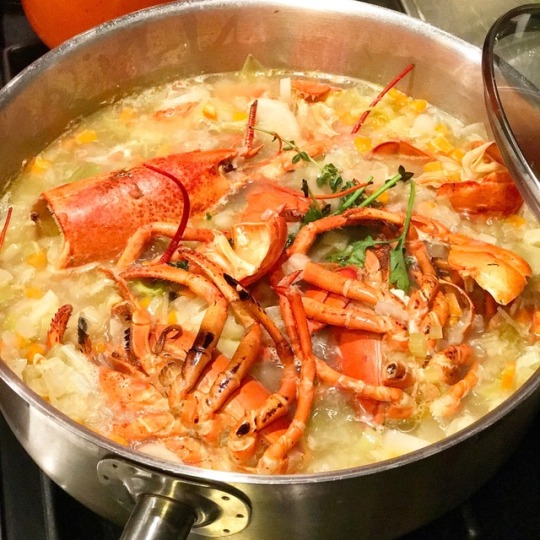


Boston Lobster Stew
(Serves 6)
I managed to buy 3 live Boston lobsters, each around 500g, from a neighborhood supermarket. And this was the easiest way I could think about cooking it - boiling the lobster, extracting the tail and claw meat, smoking the shells, and then cooking it with a mirepoix that’d been simmering for a while to coax out all the sweet juices of the lobster. It’s not really a stew, but it works really well at the end of the evening.
Ingredients
3 x 500g lobsters
2 celery stick, sliced finely
2 leeks, sliced finely
1 carrot, diced
1 onion, sliced finely
1 bunch parsley
30g butter
120ml dashi
60ml white wine
30ml Cognac
Start a fire with some charcoal, and in this case, a few slivers of camphor wood.
Boil the lobster in a pot of water for about 8 minutes. Extract the tail and claw meat. Set aside.
Grill/ smoke the lobster head and shells over the fire for about 15-20 minutes. Cover the shells with a wok dome, or any boxy cover to allow the smoke to penetrate the shells.
Prepare a mirepoix by cooking the vegetables over a low heat, and deglazing them with the white wine. Prepare the dashi, and add to the mirepoix. Drain into the mirepoix any juices from the lobster obtained when removing the meat. Add the smoked heads and shells of the lobster into the mirepoix as well, together with 500ml of the water used to boil the lobster. Reduced by half over a simmering fire.
Melt some butter over medium heat in a saute pan. Add the tail and claw meat, and flambe quickly with the cognac.
Plate the dish - arrange the lobster meat on a plate, and spoon some of the rich mirepoix and reduced stock onto them. Garnish.
Wine Suggestion: A good bottle of bubbly works with lobsters. Always!
0 notes
Photo
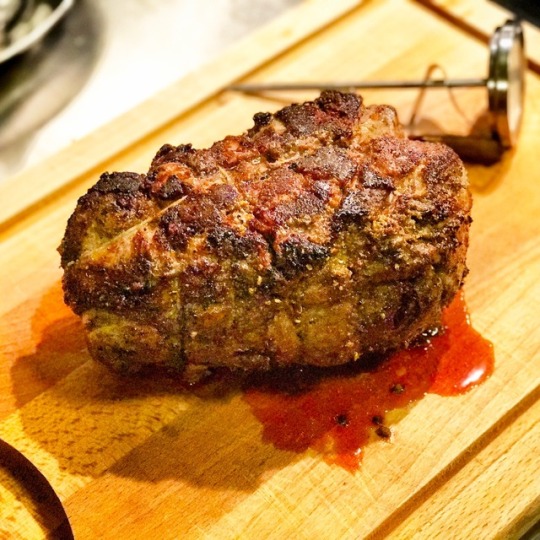
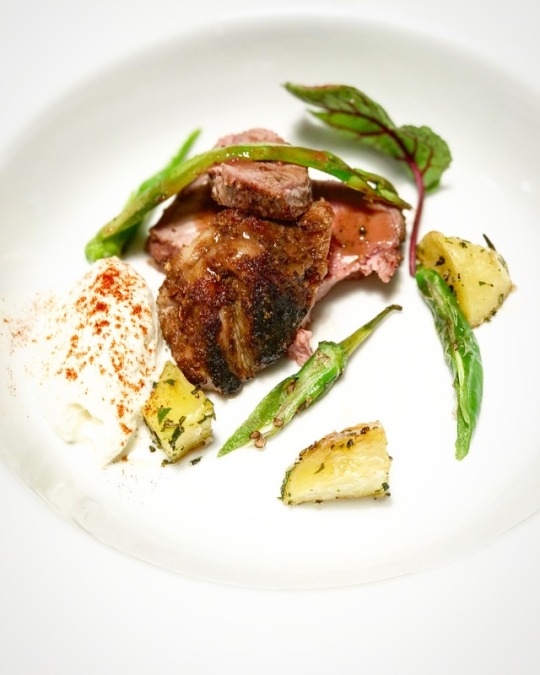
Roasted Leg of Lamb
(Serves 6)
A boneless lamb leg is a great piece of meat to roast. It’s a tender cut of meat, full of flavor, that lends itself to assertive spices. But what I learned is that it doesn’t need long cooking to finish, and overcooking it toughens the meat.
The marinade I used here was a real mash-up of nationalities - Chinese Szechuan peppers, cinnamon, and cloves, with Moroccan/ North African-influenced cumin, fennel, and coriander. I marinated the meat for about 24 hours.
To play off the spicy, smoky flavors, I made a sauce flavored with Sherry vinegar and a reduction of a robust, rustic Sangiovese-based red like Chianti Classico. I also made a cream of coconut, whipping cream, and poached Belgian Bosque pears with Gruner Veltliner, spiced with a bit of paprika.
This dish turned out to be a pretty decent dinner for me and my guests last evening!
Ingredients
1.3kg boneless leg of lamb, tied with butchers’ string
For the Marinade
1 tbsp Szechuan peppers
1 tbsp coriander seeds
1 tbsp fennel seeds
2 tbsp cumin
4 cloves crushed garlic, skin on
1 tbsp sugar
2/3 tbsp kosher salt
For the Wine Sauce
1 tbsp sherry vinegar
120ml Chianti Classico
300ml chicken stock
2 celery stick, chopped
1 carrot, diced
2 leeks, sliced
2 shallots, finely sliced
1 onion, sliced
Drippings from roasting the leg of lamb
60g butter
For the Coconut and Pear Cream
250ml whipping cream
100ml Coconut milk
100ml of strained Belgian Poached Pear in Gruner Veltiner
Marinate the lamb overnight. Score cross hatch patterns on the skin of the leg of lamb, and rub in the marinade well.
When ready to cook the lamb, start off by searing the lamb all round on a hot skillet with some oil. Next, pop it into an oven set at 165 deg C for an hour, turning once.
Prepare the wine sauce. Saute the vegetables in some butter. Add in the Chianti Classico and reduced until about 2-3 tablespoon of liquid. Ladle in the chicken stock, and reduce further, by half. Strain the liquids into a smaller pot.
Take out the lamb leg, and set aside for about 20 minutes to settle. Meanwhile, spoon out some of the pan drippings (sans the oil and fat) and add them into the wine sauce. Thicken with butter and set aside.
While the lamb is resting, prepare the rest of any vegetables you want to serve - I simply poached some delicious asparagus spears and Japanese chili in butter, and roasted some potatoes.
Make the Cream. First, peel and slice 2 conference or Bosque pears into rough chunks. Add 1 tbsp of golden caster sugar, 4 cloves, 1 star anise, and 120ml of Gruner Veltliner or Riesling wine into a pot, and cook and reduce for about 20 minutes. Strain out the liquids - about 100ml worth. Cool the liquid down quickly in the freezer. Add 100ml of this strained liquid, 100ml of coconut milk, and 250ml of whipping cream into a ISL whipper; mix well, and chill in the fridge.
When the lamb is ready to be served, carve and plate the lamb. Spoon some of the wine sauce over the meat, and foam the coconut cream, sprinkling some smoked paprika over it. Plate the vegetables, and voila! Ready to go!
Wine Suggestion: I’d opt for a merlot, but since I had a bottle of Chianti Classico already opened, I used that instead!
0 notes