
Don't wanna be here? Send us removal request.
Statistics
We looked inside some of the posts by p1-dev-skills-fedor-bortnik and here's what we found interesting.
Average Info
Notes Per Post
0
Likes Per Post
0
Reblog Per Post
0
Reply Per Post
0
Time Between Posts
1 minute
Number of Posts By Type
Text
17
Last Seen Tumblr Blogs


Fun Fact
Women make up for the other 50% of Tumblr’s audience.
Text
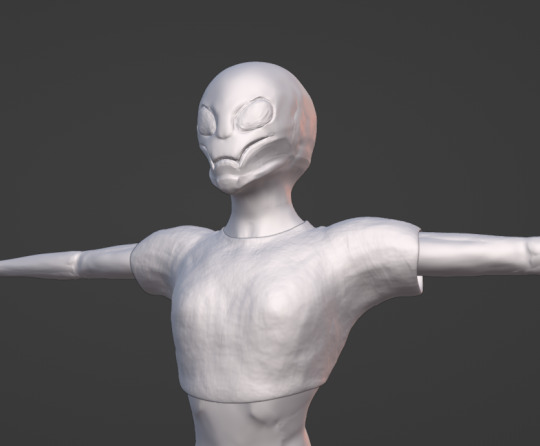
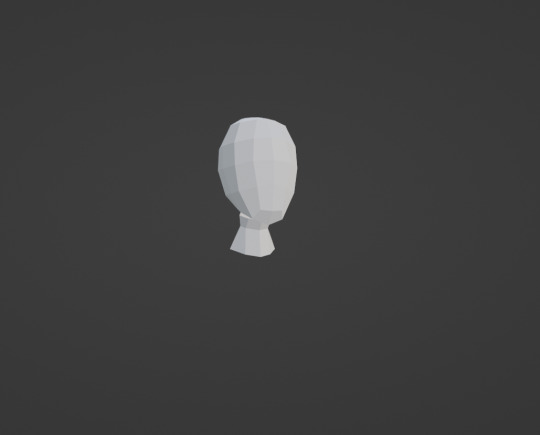
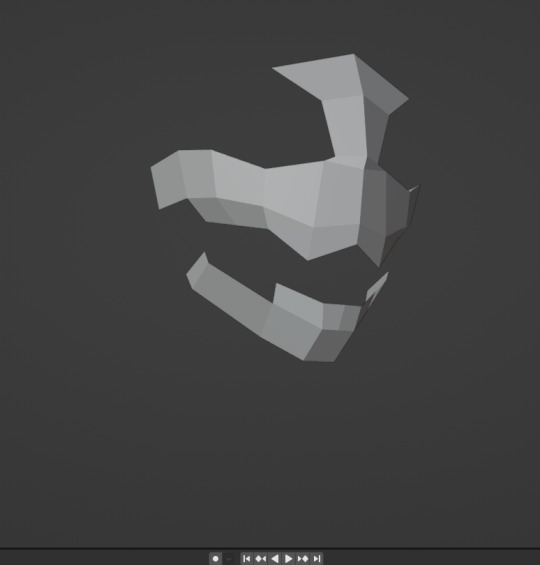
Development 2. Part 5.

The mesh is almost ready, but I still wanted to apply some extra work here and there.
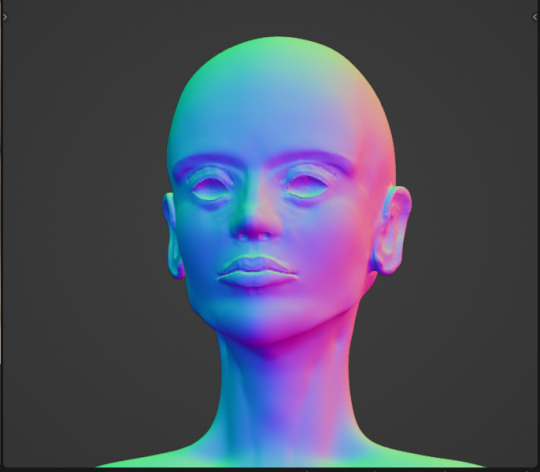
I needed a low poly model of the head so that I could practice baking. I gave myself an extra challenge and gave myself only 2 hours to do a low poly mesh of the head. It actually took me 2.5 hours, since I had to spend some time working with ears.


After that - Truly final touches, before jumping to Substance Painter.

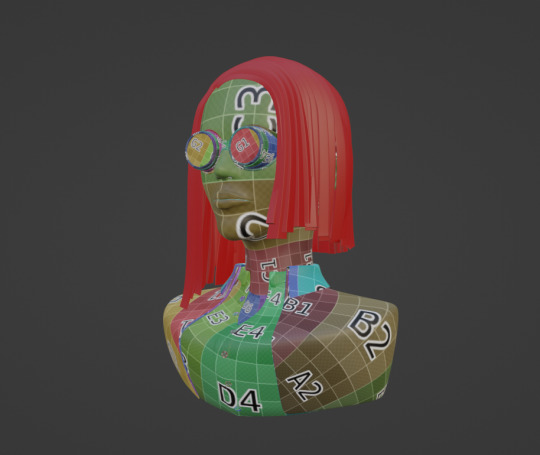
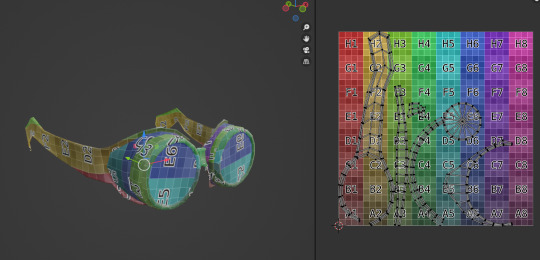
During the exporting of the project to Substance Painter - I completely forgot to do at least some form of UV-ing for the mesh. Silly me!
Also, Adobe complained about the hair model, since I forgot to convert it to mesh from the path system. Had to fix that as well.
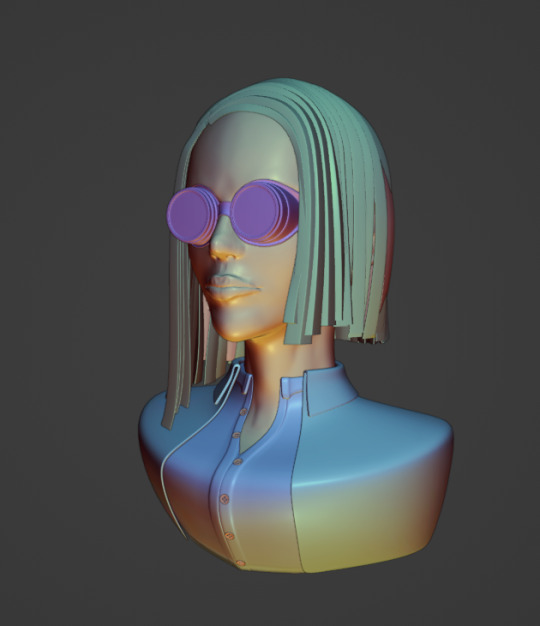
Last stretch - Working with Substance Painter!
The baking part was pretty straightforward - just select the low poly mesh and a high poly mesh, edit the edge properly, make sure some settings are on or off, and there you go!
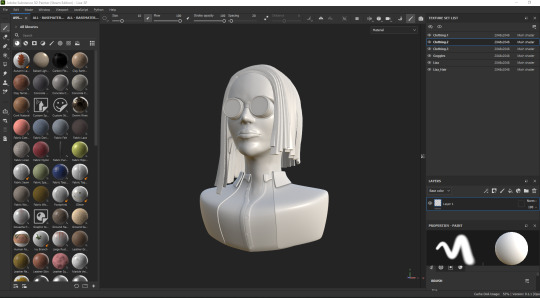
I worked around and applied some materials to the mesh. In the end - I decided to go simple on skin and hair because the mesh looked weird with too much realism. I did though work a bit extra with the glasses!
I could have done the ID system of materials back in the blender, but I forgot to do that. Silly me!
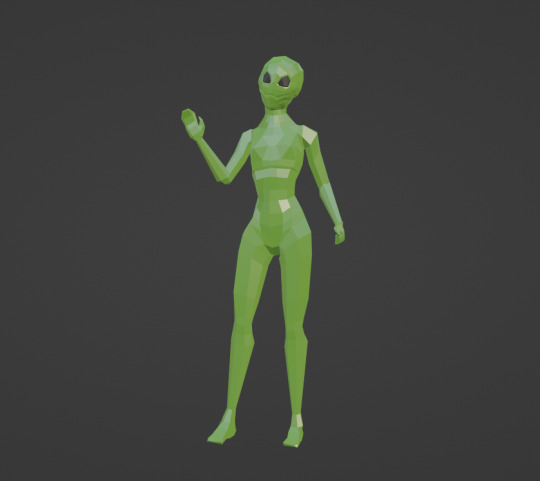
In the end, this is what I got.

References:
Adobe (2023) Substance 3D Painter 2023 [Computer program].
0 notes
Text
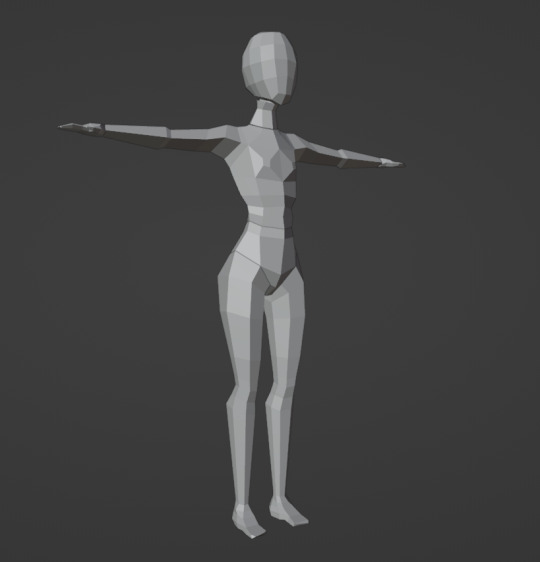
Development 2. Part 4.
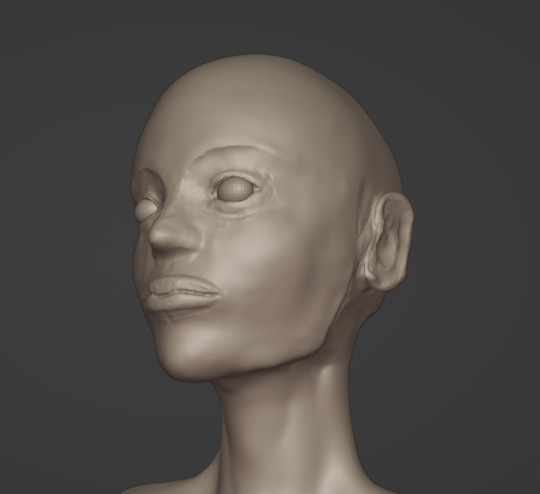
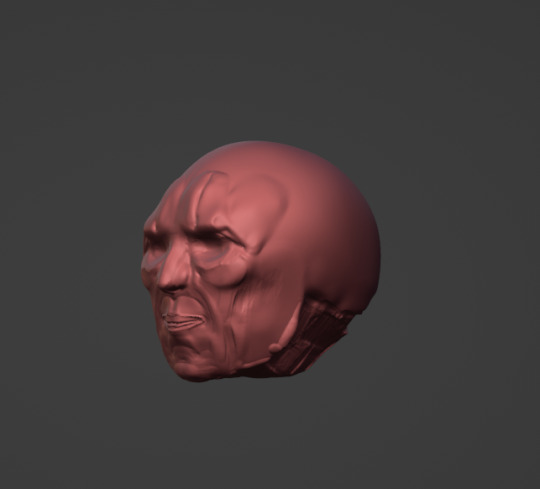
Revision, Revision and again - revision. After doing a rough version of what I wanted - I spent some extra time trying to make the face look perfect.
Most of the time I pretty much just looked at all my references and thought about the middle ground, and tried to reach for it.
I have also tried different shading options, to see the facial better and try to see the proportions differently.
After infinite sculpting, I decided to wrap it up and focus on other things - like glasses and hair.
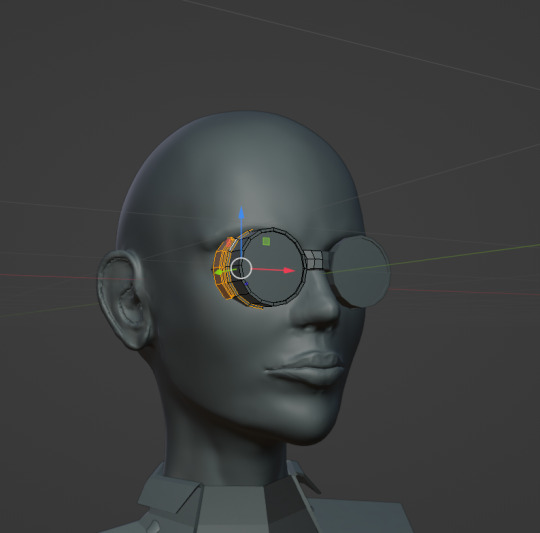
As usual. From low poly, to high poly with modifiers. I have decided to make the glasses wider and shorter, since in real life she is supposed to be an agile and reflexive enemy. And how it would be possible to be like that with tunnel vision?
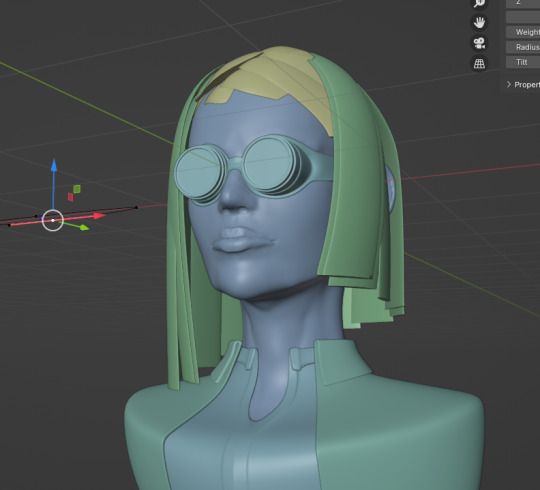
The glasses look good. It's time to work on hair style.
Did a quick research on how hairlines are made, and with that knowledge - began reworking the hair.

I quickly searched on the internet for the way to properly do the scalp of the hair, and I found a website called ArtRocket, with a blog about how to do this. (Link: https://www.clipstudio.net/how-to-draw/archives/159719)
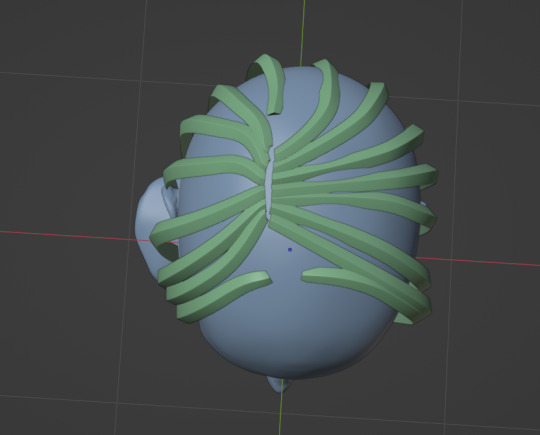
Once completed, I still had plenty of gap holes in the air. I decided to make two layers of hair - the main one, and a supportive one, which had a simple task of closing the holes.

But I will be working on hair more tomorrow and hopefully, I will wrap it all up!
Reference:
Celsys, Inc. (2023) ArtRocket Available at: https://www.clipstudio.net/how-to-draw/archives/159719
0 notes
Text
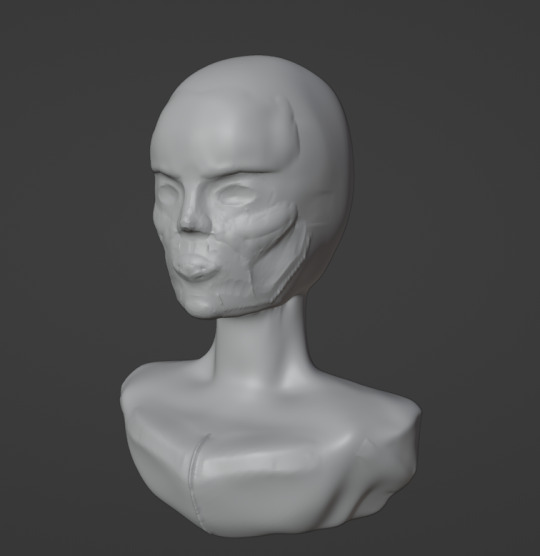
Development 2. Part 3.
I continued working on the head today.
Due to the time limit, I decided to download a high-quality sculpted head and use it as a way of reflecting on understanding what is wrong with my head.
Once I placed the head at the scene - I began almost immediately seeing the issues with my head.
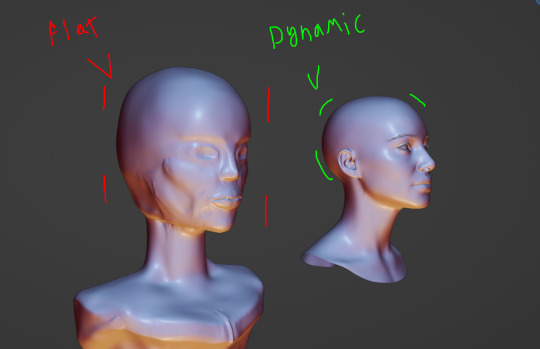
The model on the right of my work is a free sample that I downloaded from the 3D Scan Store website (Link: https://www.3dscanstore.com/blog/Free-3D-Head-Model)
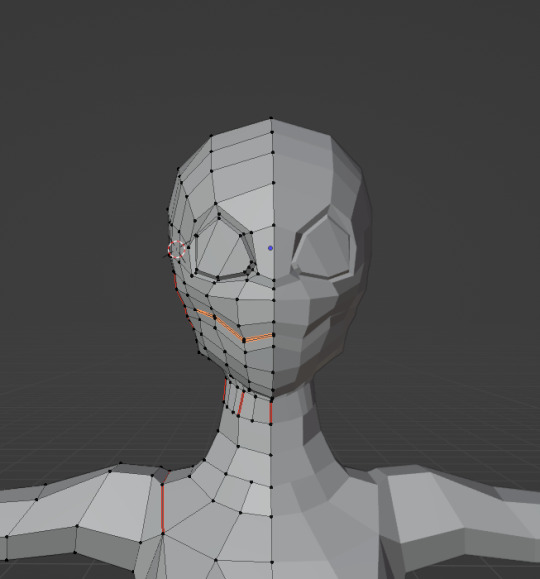
First thing first - the head of my sculpt is flat, and shelled into the head. Compared to the quality sculpt. Where you can distinguish the head, nape, eyes and face because they all have individual space on the head - everything is flat on my head.
In addition, I found some issues of the head not having any proper shape at the sides of the head - that needs fixing. With all that in mind - I began reflecting on my work and fixing these issues

Again - I tried to distinguish the face zones to understand the proportions better.
With each version, the head began to look better and better.
Once again - I spent some extra time working on some details of the face, that in the final edition would not be seen. But it's still the practice of working on the eyes, mouth and so on. It will benefit me later on.
Once I did another revision of the face, I decided to do super quick modelling of the character's hair and goggles, to help me visualise the proportions I wanted and understand where I can take it easy, and where I have to do extra quality work.

References: 3D Scan Store (2023) 'Free HD Head'. [Digital Art]. Available at: https://www.3dscanstore.com/blog/Free-3D-Head-Model
0 notes
Text
Development 2. Part 2.
I began working on the character.
The process was the usual - although I began making the face straight from the circle - without doing any low poly faces, or even building the form of a face through boxes and cylinders.

The process is slow and inefficient since I still need plenty of practice to begin forming the exact face shaping in my head.
After struggling with the first steps of sculpting, I decided to take a day break from work and continue later on.
youtube
References:
PIXXO 3D (2022) 'Tutorial: Beginners Head Sculpt | EASY In Blender; Available at: https://www.youtube.com/watch?v=SVf-UvySGqI
0 notes
Text
Development 2. Part 1.
With the second advancement project, I gave myself an objective to create a simple portrait of a character by following an AI-generated picture and not only optimise the mesh from millions of vertices to a number lower but also work on the character in Substance Painter. So, let's give it a go:
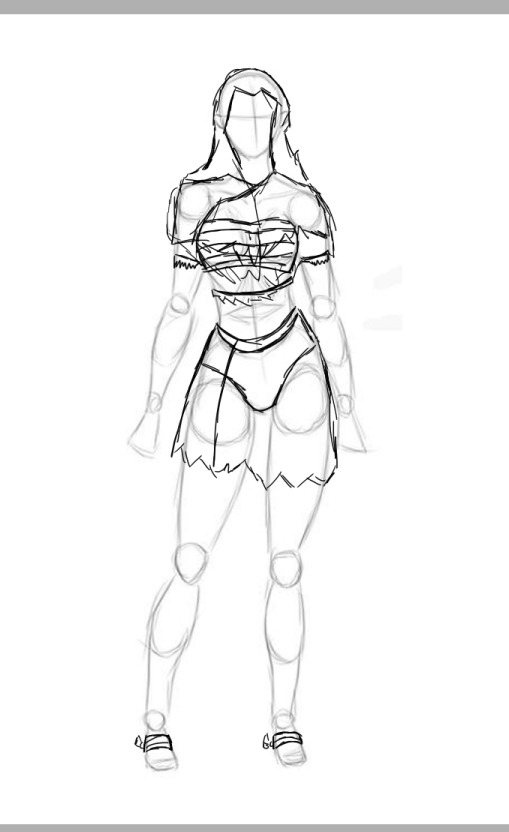
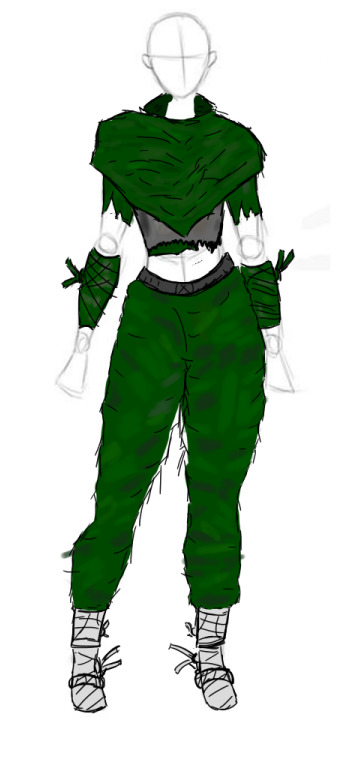
First thing first, I decided to make a red-haired woman with steampunk glasses, one of the many characters that I had in mind for a very long time.
I found some old drawings of prototypes, on how she is supposed to look like:
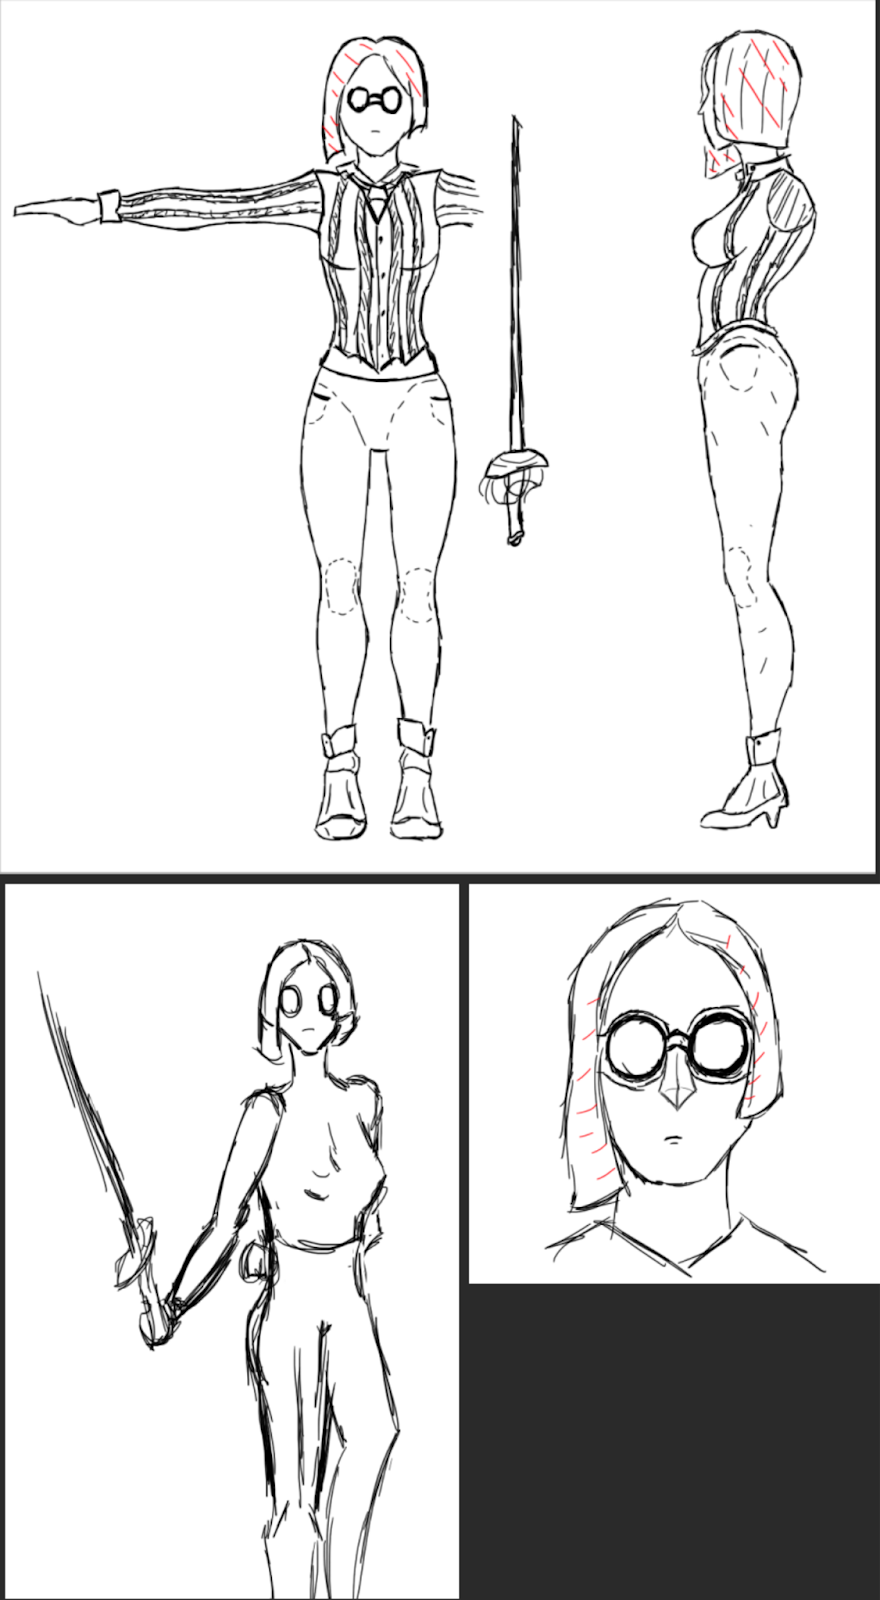
The first sketch was made by using Darkenmarr's work (2021) as a trace. Special thanks for her sketch work (Link to the original sketch: https://www.deviantart.com/darkenmarr/art/Female-Turnaround-Study-346904861)
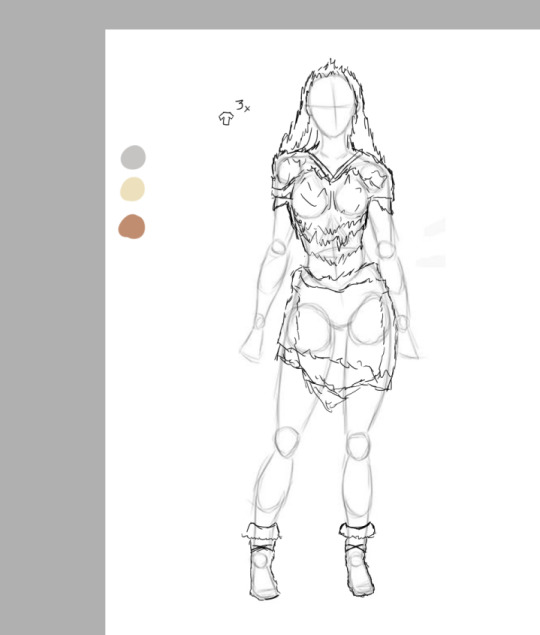
Then I decided to use some AI prompts to give me relatively the same thing but with drawing and concept art.
For the first AI engine I used Chat GPT, and honestly - it doesn't look that good.
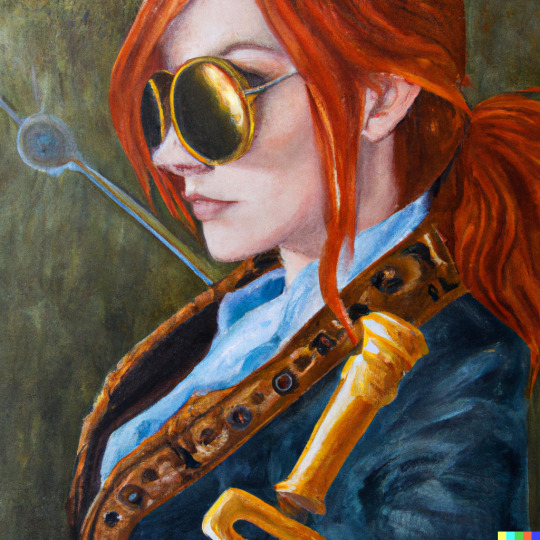
Then I decided to use another AI engine, and I enjoyed it more because it gave me more agility and choice on the generation.
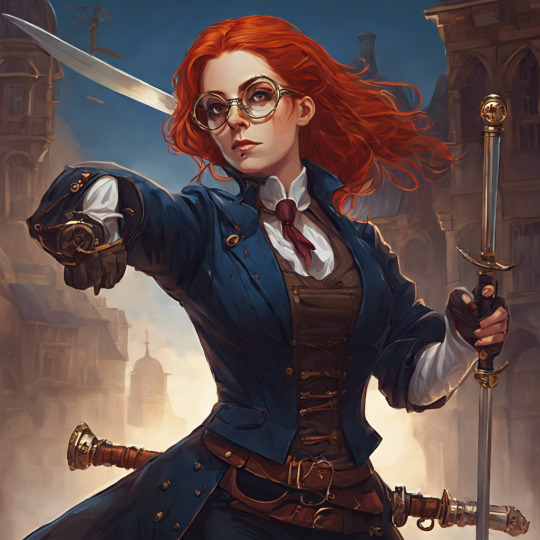
I did some tunning in wording and selecting preferred pictures, and then I got a picture that satisfied me the most:
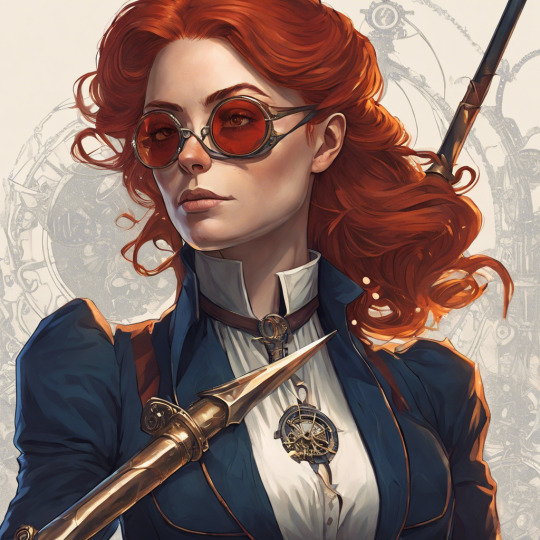
I then attempted to get the same generation, but without glasses - so that I can see clearly more on the head, but honestly - that will do for now.

I prepared the blender file with the designated folder, set up the scene - plugged in my second screen and made sure that tomorrow I would work on the project.
References:
DALL·E 3 (2023) 'A woman with red hair, a dark-blue suit with black lenses and a long rapier sword looking forward.' [Digital art]. Available at: https://openai.com/dall-e-3
Dream Studio (2023) 'A woman with red hair, a dark-blue suit with black lenses and a long rapier sword looking forward.' [Digital art]. Available at: https://dreamstudio.ai/generate
Darkenmarr (2021) 'Female Turnaround Study' [Digital art]. Available at: https://www.deviantart.com/darkenmarr/art/Female-Turnaround-Study-346904861
0 notes
Text
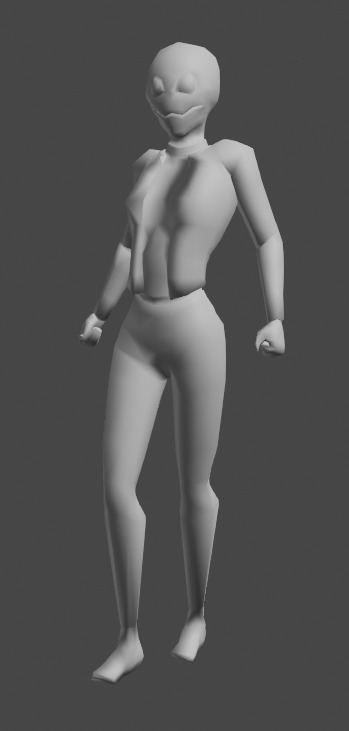
Development 1. Part 5.
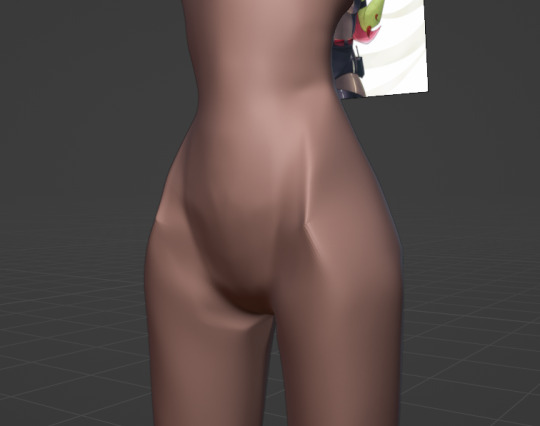
Once I finished with the rough version of the body, I began working on the clothes.
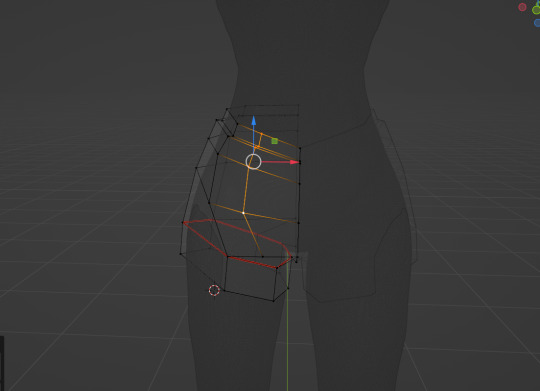
Once again - I am doing the low poly edition first to control the structure of the mesh and the initial shape, only to later on bump the subdivision modifier later and begin working on details by using sculpting techniques.
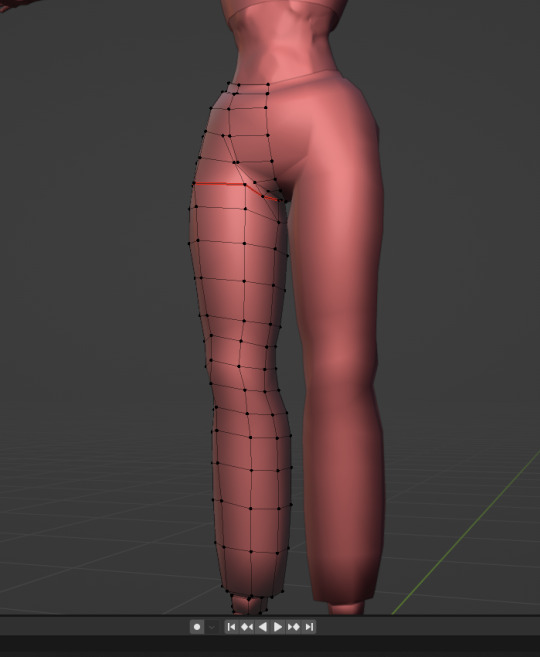
After the modifiers were set, I began using cloth brushes to make the pants.
I worked on the pants and then decided to add a hood. I decided to follow my sketches as much as possible and I added the hood itself into the clothing.
In the end, I had to finish with this character at this stage since I was already getting past my schedule.
The biggest issue I had with this project was that I completely underestimated the process of optimising the mesh with the low poly edition of the sculpt. I simply did not count that on the schedule.
With this project - I understood that I need to improve my skills in sculpting and try to optimise the sculpting by using baking techniques.
0 notes
Text
Development 1. Part 4.

Started the work today by looking at the face again, duplicated the face and began just doing some atterations to the face, with a fresh look.
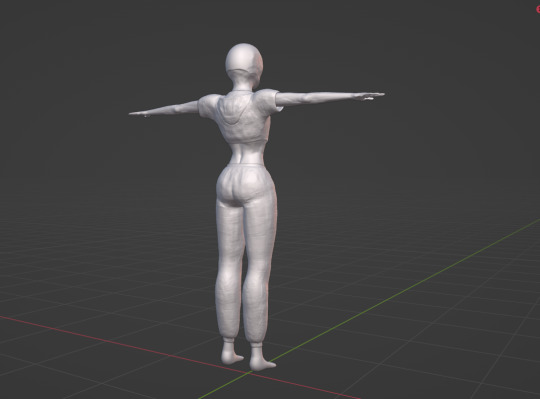
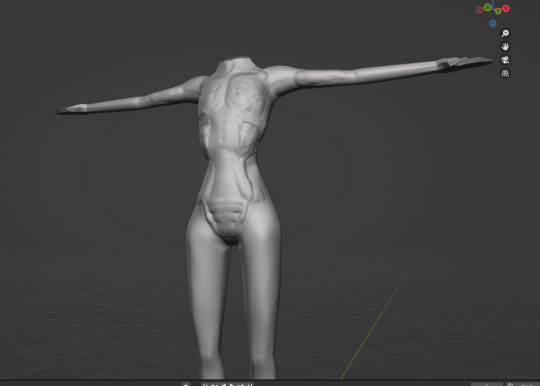
Once I felt like I did enough for now, I began working on a body.
Original low poly sculpt body, which I am about to smooth and buff.
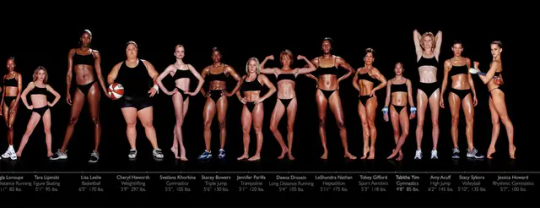
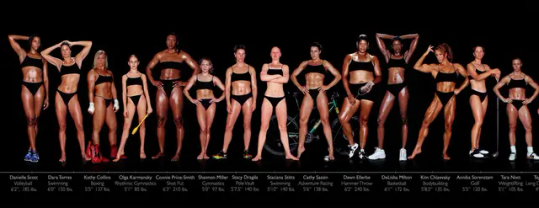
After smoothing, I got a really skinny character, and I decided to use that to my advantage to learn a bit more about muscles. Even though this character is not exactly human, I still decided to rely on human muscle anatomy, so I googled the examples of body types in various sports. I found an interesting set of pictures of various athletes in different sports. This collection was made by Howard Schatz (2002), and I decided to reference to this collection while developing muscle parts.
In addition, I found an online model of a doll with named muscles and decided to use that as well as a supportive reference. I did not download the model, but I did look at the Sketchfab model.
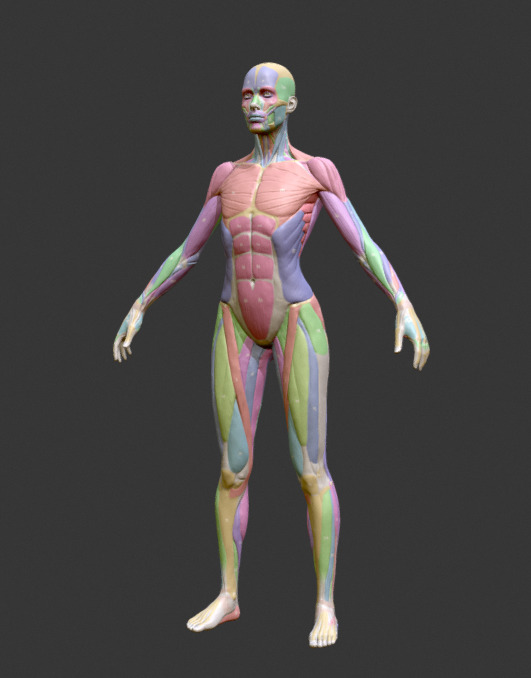

Once again, special credits to WaywardWarriorDesign for the image of a sketch. I used it to trace the body proportions, to draw muscles parts of the character. (Link for her original work: https://www.deviantart.com/waywardwarriordesign/art/Reference-Pose-5-Full-Standing-Female-833789286)
Later on, I even drew face sets on the mesh to assist in defining specific muscle parts, but unfortunately - when I upscaled the vertical resolution, the data got lost, so oh well =(
With that, I conclude this blog part.
youtube
References:
Howard Schatz (2002), Athlete. Available at: https://howardschatz.com/books/athlete/
chrisfischerart (2021) Écorché Female Musclenames Anatomy [Digital Art]. Available at: https://sketchfab.com/3d-models/ecorche-female-musclenames-anatomy-cda17af4be354c8b8375ff0b1b8a5fe5
Blender Secrets (2021) 'Blender Secrets - Face Sets' Available at: https://www.youtube.com/watch?v=M-lIY089is8
0 notes
Text
Development 1. Part 3
Today I began working on the character, starting with the face. Technically, this would be my first serious project in which majority of the work would have been done with sculping, so with that in mind - I did not expected much from myself in regards of quality. I went into the project with a clear head, planning only to explore and experience.
I came back to the low poly model of the character from the 3D printing assignment, and decided to work based on this model.

I began with the face in a pretty straightforward matter - Touch the low poly vertices a bit, to try to make it look right, and then I officially began sculping.
I applied the subdivision modifiers, smoothed the face and and made it more round to work make it work around.

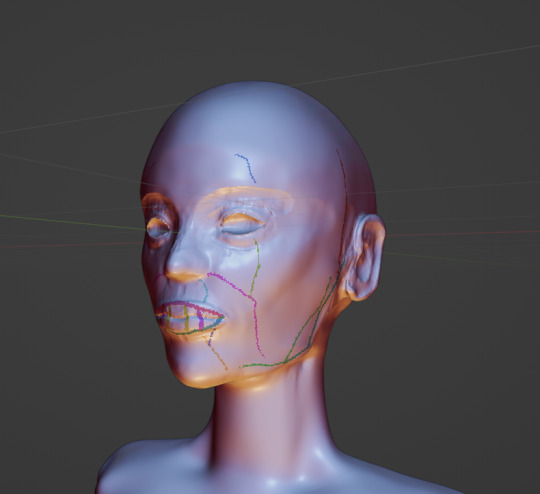
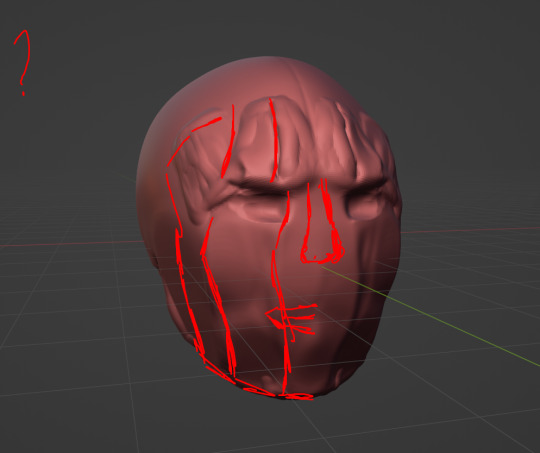
During the mid sculping, I decided to again - take a screenshot and draw on top of the picture to create indications, the zones of the face. With them I could understand more where the face should go more round, where the nose ends and so on.
One of the issues I have with my inexperience with sculping is that I am having trouble to have a clear picture of what I want with the sculpt. Because of that - I am in constant need to spend more time adjusting the sculpt here and there, until it hits me.
I really want to train the ability to sharply visualise what I want from the sculpt. But I am afraid it will take days to master that ability.
Eventually, after continuously sharpening and smoothing the face, I got a rough version of what I wanted.

Took a small break to watch something - to clear my head from looking at the model for a while. Then I came back to the work and did a final revision for the day.

0 notes
Text
Development 1. Part 2.
Today I am planning to draw more designs because I felt like the 1st design was not enough.

Special thanks to WaywardWarriorDesign for the original body sketch - I used it to draw more clothing designs (Link to the original Sketch Work: https://www.deviantart.com/waywardwarriordesign/art/Reference-Pose-5-Full-Standing-Female-833789286)
At the end of the day, I practised some more before doing sculpting for the main project. Same 1 hour rule, but this time - with a reference. I decided to not follow the references one by one, but I still used the image as a reference of where each part of the face begins and ends.
In the middle of sculpting, I realised I was having a hard time seeing the aspects of the face - So I took a screenshot and drew over the picture to make my mind and my hand distinguish the division of the face.
Reference:
WaywardWarriorDesign (2020), 'Reference Pose 5 - Full Standing Female' [Digital Art] Available at: https://www.deviantart.com/waywardwarriordesign/art/Reference-Pose-5-Full-Standing-Female-833789286
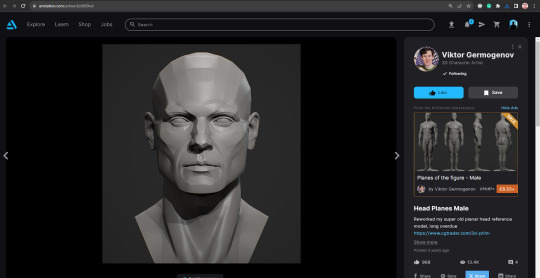
Viktor Germogenov (2021), ' Head Planes Male' [Digital Art]. Available at: https://www.artstation.com/artwork/d809nA
0 notes
Text
Development 1. Part 1.
With my first advancement project, I decided to work more on the Sia character from the 3D printing, but this time - experimented with converting the low poly model into a high poly one, by using sculpting techniques.
I decided to attempt to sculpt the face of the character and try to sculpt the body as well for a bit.
I have found some interesting references, on which I wanted to reflect on.

Made by: Aleltg (2015) (Link: https://www.deviantart.com/aleltg/art/Realistic-starbound-floran-520354235)

Made by: inualet (2017) (Link: https://www.deviantart.com/inualet/art/Floran-696281975)

Official art of a video game Starbound (2016) made by Chucklefish studio (Link to the studio: https://chucklefish.org/)

Art work made by andarix (2017). Available at: https://www.deviantart.com/andarix/gallery

Special thanks to WaywardWarriorDesign for her original work. I used it as a layer since I am not that good at drawing. (Link to original art: https://www.deviantart.com/waywardwarriordesign/art/Reference-Pose-5-Full-Standing-Female-833789286)
With that in mind, I created a first edition of how the character should look.

Later on, before wrapping it up, I decided to do some quick 1-hour sculpting practice.

No references, no pressure. Just a tutorial video and having fun and learning brushes.
youtube
References:
Potter Sculpts (2022) 'All 40+ Blender Sculpting brush EXPLAINED' Available at: https://www.youtube.com/watch?v=5iLmRwaXhtc
inualet (2017) 'Floran?' [Digital Art] Available at: https://www.deviantart.com/inualet/art/Floran-696281975
Aleltg (2015) 'Realistic starbound floran' [Digital Art] Available at: https://www.deviantart.com/aleltg/art/Realistic-starbound-floran-520354235 WaywardWarriorDesign (2020), 'Reference Pose 5 - Full Standing Female' [Digital Art] Available at: https://www.deviantart.com/waywardwarriordesign/art/Reference-Pose-5-Full-Standing-Female-833789286
Chucklefish Limited (2016) Starbound [Video game]. Chucklefish. Available at: https://store.steampowered.com/app/211820/Starbound/ andarix (2017) 'Commission: Starbound Floran by andarix on DeviantArt' [Digital Art]. Available at: https://www.deviantart.com/andarix/gallery
0 notes
Text
Lvl80 Blog. Part 3
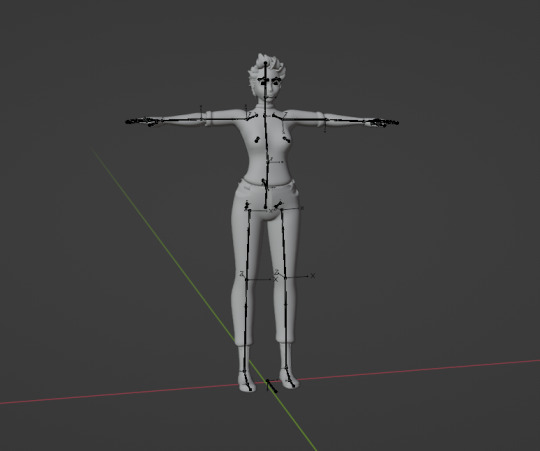
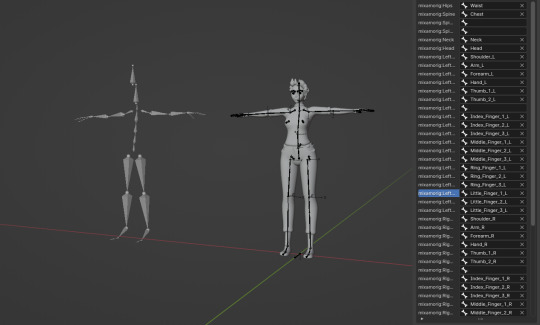
I continued learning how the Rokoko addon works, by adjusting my rig and by trying to apply the animation data transfer from source to target.
Eventually, after several issues - I noticed that most of the issues came from the arms and shoulders. I deducted the main culprit of the problem - which was that my character did an A post, rather than a T pose.
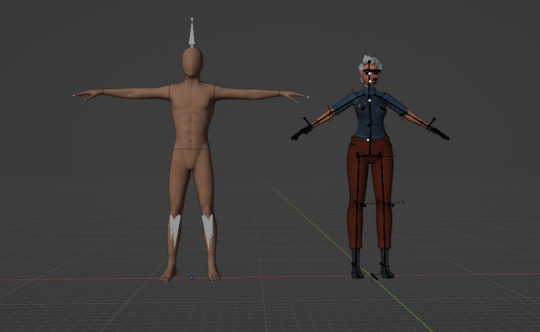
To fix that, I quickly applied the model in a T pose, assigned it as a normal pose, and repeated the process of transferring animation.
In addition - since my rig used fewer spine bones, I had to manually insert the names of the spine of the rig. And since I had fewer bones compared to the Mixamo rig - I had to make sacrifices and apply as many bones as I could, ignoring the other bones.

After forgetting to recalibrate the bone parenting and set the world scale to 1, It finally worked on an adequate level. Despite still requiring additional bone calibration (by tweaking their rest position), I was still satisfied with the job and considered it done.
The issue behind why I stopped was the fact that my rig slightly differed compared to the Mixamo rig. To fix that - I had to practically redo most of the rig, which was not worth it for now, since I still have to learn more stuff about rigging characters and look at more rigs before making a new rig generation of my character.
I reflected on this knowledge and simply re-wrote the entire experience into a guide for the lvl80 assignment.
In the end, I managed to import an animation into my rig.
youtube
References:
Adobe (2008), Mixamo. Available at: https://www.mixamo.com/#/?page=1&query=dance&type=Motion%2CMotionPack
0 notes
Text
Lvl80 Blog. Part 2
After some time, I decided to scrap the blog idea. I decided to write about how to import the animations into a custom rig in Blender.
After doing some blueprint work in the Unreal engine, at some point - the locomotion system got broken for an unknown reason. With that - the original starting animations and the model died.
I decided it would be a good idea to try to import my own model into Unreal Engine and learn the ways of how I could import animations into my rig.
Thanks to the motion class classes which I have attended recently, I already had an idea to just use the motion capture software to import the animations - and I was right! I could use the Rokoko blender addon to do that! I have watched the tutorial on YouTube, prepared my model and the source rig with the animation and just touched the settings around to see how it works.
References:
MK Graphics (2023) 'How To Use Mixamo Animations In Blender Rigify Rig' Available at: https://www.youtube.com/watch?v=_qHfUAniTM0&pp=ygU3YmxlbmRlciBob3cgdG8gaW1wb3JyIGFuaW1hdGlvbnNpbnRvIGN1c3RvbSByaWcgYmxlbmRlcg%3D%3D
0 notes
Text
Lvl80 Blog. Part 1
For this assignment, we are given a task to make a blog that would suit the lvl80 website.
80 Level is a is a publishing network that connects people of various sorts from the creative and video game industry together for mutual benefits.
On this website, you can find many trends, tips artistic blogs and interviews on stuff that is happening in the video game industry and other graphical industries.
Before writing a blog, I decided to try to write about my universe, and How I explore various digital tools to achieve my dream of making my own digital universe one day.
0 notes
Text
3D printing. Part 3
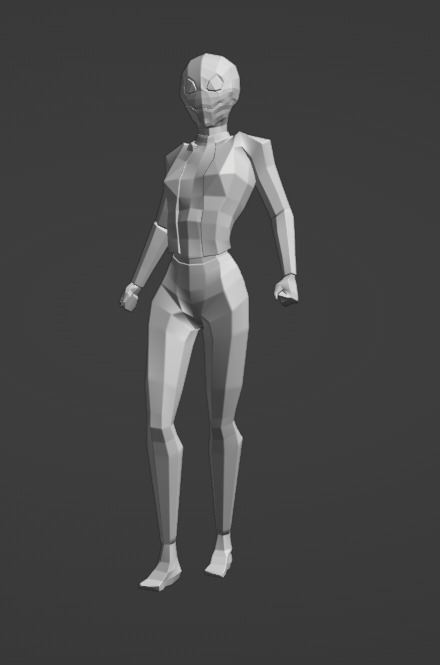
Before doing the main clothing for the character, I decided to do some posing of the character, since making the rig have weights would be a waste of time.

I did a low poly sword for the model, and I really enjoyed the pose of her holding it - just what I wanted with this ‘skin’. However - Since all the meshes were required to be connected, plus because of the size of the sword - I decided not to risk it and to not include the sword.

After finding the body style that I liked, I applied the rigged mesh as a static mesh and began working on the clothes.
Since I did each body part as a different mesh, and I maintained the resolution of the vertices - I began working on clothing by extruding faces. Once I got happy with the clothing, I just united the mesh as a whole and then connected all the vertices by various modeling methods.
To make sure that the model would work, I installed the 3D printing software and imported the model, just to be safe.
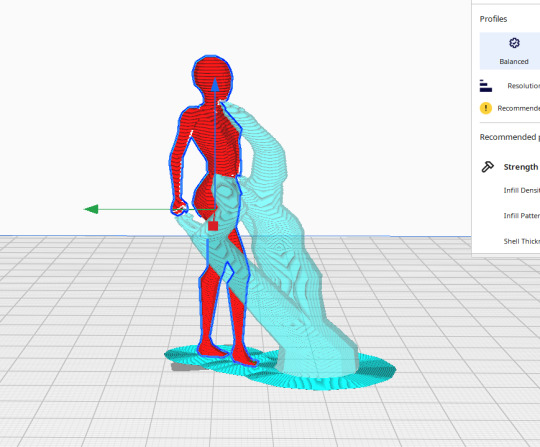
Despite in the end not adding a sword or hair to the character due to my precautions and inexperience with 3D printing, I still really enjoyed doing this project, and would be happy to see what would I get once the model gets printed. Maybe in the future, I will do more models for printing.
Now after confirming that it is theoretically possible to print it, it's ready.
0 notes
Text
3D printing. Part 2.
Before working on the model, I need to learn about how 3D printing works.
I watched some tutorials on how the export process works and what to expect to do with the model.
youtube
And after watching the video, I figured what to expect from the work:
The work must have properly arranged metrics. That should not be a problem - since the Blender has some ruler tools, and you can always adjust the metrics of the mesh.
That there can be problems with angled or T-posing meshes since they would need support
Some super thin edges might have problems due to them being too small for supports, and providing the threat to proper printing
Super small details can be an issue since the printer might not be able to print them at all.
The mesh must be attached as a whole, otherwise, it won't print properly.
With that in mind, I began working on the model, by drawing a quick sketch of what I wanted.

I drew over WaywardWarriorDesign sketch pose, since I am not good at drawing, but was interested in her sketching. (Link to original art: https://www.deviantart.com/waywardwarriordesign/art/Reference-Pose-5-Full-Standing-Female-833789286)
I quickly drew what kind of clothing I wanted for this character, and then began modeling the character herself.
I have decided to just go and do the project without too much planning, or without aiming at some specific design style since I wanted to attempt to sharpen my own artistic style.
One of the reasons why I love low poly is because it can teach you about managing the amount of vertices your character has. In addition - you learn about the topology structure of characters - their faces and so on.
Once I designed the body low poly, adjusted the mesh and verticies and got pleased with the mesh, time to do some working on detail.
I modelled the parts of the face, to create an anatomy of the character.

With that, I created the face of the character. Thanks to low poly, I can adjust the parts of the face until I become satisfied with the design.
I spent few days on thinking what type of face Sia should have - I even did a side project and made her into a sculpt.
Once I thought hard about the face, by adjusting the vertices and the number of them on the model, I decided to have quick fun and put an automatic rig on the character.
With that in mind, I am finishing this part of the blog. References:
WaywardWarriorDesign (2020), 'Reference Pose 5 - Full Standing Female' [Digital Art] Available at: https://www.deviantart.com/waywardwarriordesign/art/Reference-Pose-5-Full-Standing-Female-833789286
CG Geek (2019) '3D Printing for Beginners'. Available at: https://www.youtube.com/watch?v=8Dqo8QhuMYw
0 notes
Text
3D printing. Part 1.
With this assignment, I decided to dedicate myself more to understanding the 3D printing since I enjoyed this subject.
3D printing is a very interesting subject, and it did interest me back then - an ability to make anything in 3D world, and then just simply print it sounds crazy, since then you can make characters, objects, and not only.
For example - one guy on reddit with a nickname u/TheSameNameTwice made the constructable objects from a video game called Factorio (2016).

So why not create one of my characters, but in low poly style?
youtube
I have been thinking about one of the many characters in my world, her name is Sia. For this character, I originally got inspired by the game Starbound (2016) because of one of the races in that game.

Fan Art made by a Reddit user u/murcieligroso
I have decided to get inspired by the game and try to create my own character with that.
References:
murcieligroso (2017) 'Floran Character Request for u/Linkboy84' [Digital Art]. Available at: https://imgur.com/a/uks6B
u/TheSameNameTwice (2023) 'As promised, here's my updated belts that you can 3d print yourself!'. Reddit. Available at: https://www.reddit.com/r/factorio/comments/101ux6f/as_promised_heres_my_updated_belts_that_you_can/ UltiMaker (2015) 'Low-Poly Characters by Flowalistik - Ultimaker: 3D Printing Timelapse'. Available at: https://www.youtube.com/watch?v=9wEMw6LTFVo
0 notes
Text
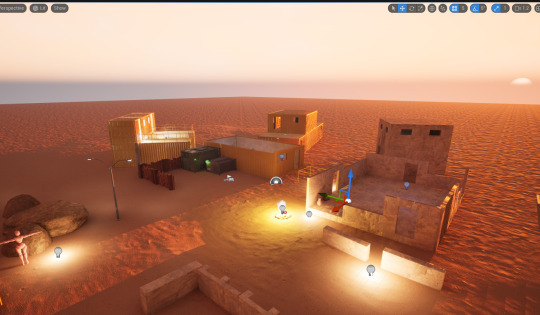
Lights and Shadows. Part 3
After practicing with Unreal Engine, I still have decided to create a quick, simple environment to test my system in.
I have revisited these contents again, and decided to practice to make simple building designs with them.

The work with modular system is rather simple - you browse the meshes that are already designed individually, and you just build structures out of them.

Before finishing up - I decided to make it more darker by using post-processing to adjust the lights. Then I played with the lights in the scene.

youtube
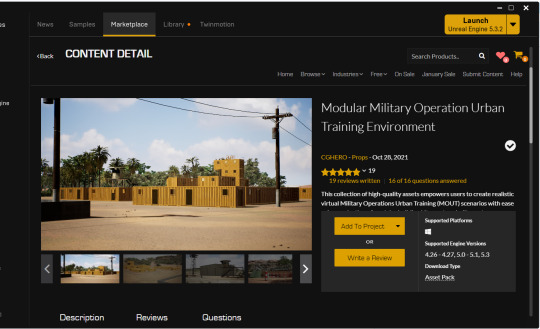
References: WorldofLevelDesign (2022) 'UE5: How to Disable Auto-Exposure (Eye-Adaptation) From Your Scene Tutorial'. Available at: https://www.youtube.com/watch?v=0etGOh-USrQ https://www.unrealengine.com/marketplace/en-US/product/modular-military-operation-urban-training-environment-arabian-pack https://www.unrealengine.com/marketplace/en-US/product/modular-military-operation-urban-training-environment
0 notes