Last Seen Blogs


ais-little-teacorner
love

bpd-thefallen
BPD thoughts
cologona
Night Creatures

e-money555-blog
E-money555
Text
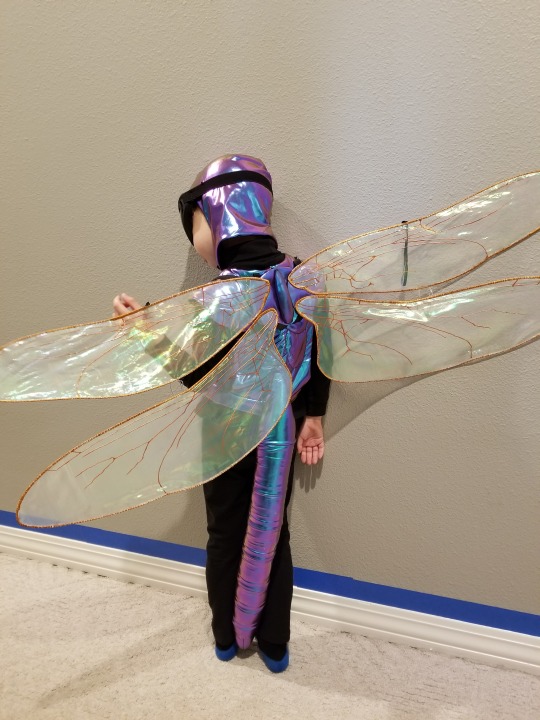
How to Make Costume Dragonfly Wings
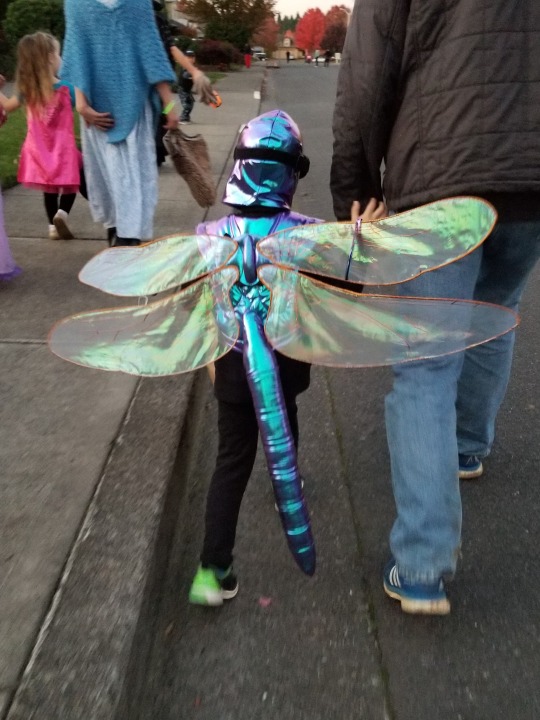
My four-year-old insisted on being a dragonfly this year for Halloween. When I couldn’t find any costume “fairy wings” that could pass for dragonfly wings, I decided to make them myself. I was pleased with how they turned out, so I thought the process was worth documenting. The same technique could be adapted to make anatomically correct wings for any insect costume.


Supplies:
Printer/scanner/copier and paper
Dark pen or marker
Craft paper or butcher paper (or removable fabric stabilizer)
Sewing thread
Invisible monofilament thread
Decorative (rayon) thread for machine embroidery
Sheer woven fabric for wings (knit fabric or netting might work but I haven’t tried it)
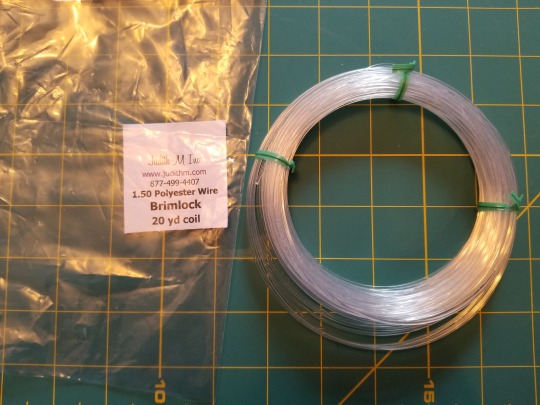
1.5 mm polyester millinery wire
Iron and pressing cloth
Fray check
Fabric marker or fabric paint
Exoskeleton fabric (I used a 4-way stretch polyester-spandex cosplay fabric)
Backing fabric (I used black quilting cotton)
Batting
Black 3/8” elastic braid
4 large sew-on snaps
8 medium sew-on snaps
Process:
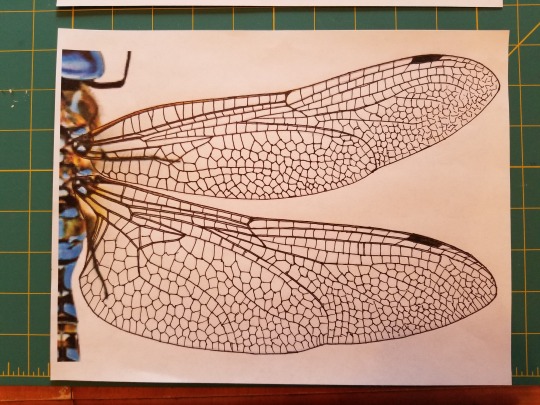
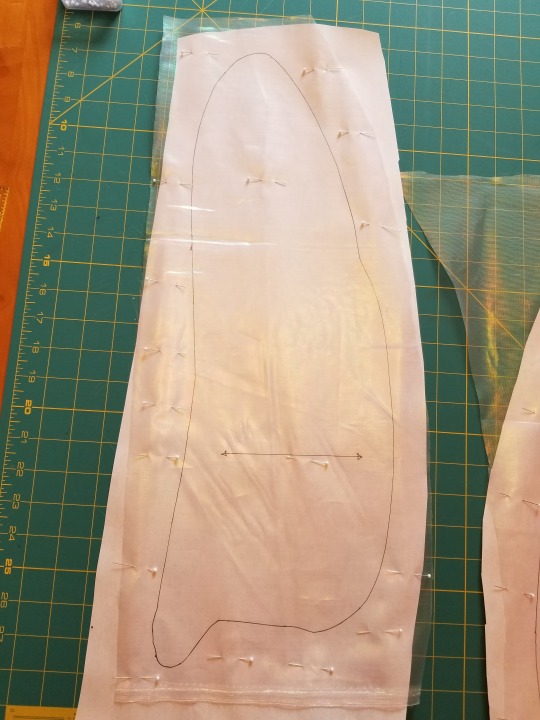
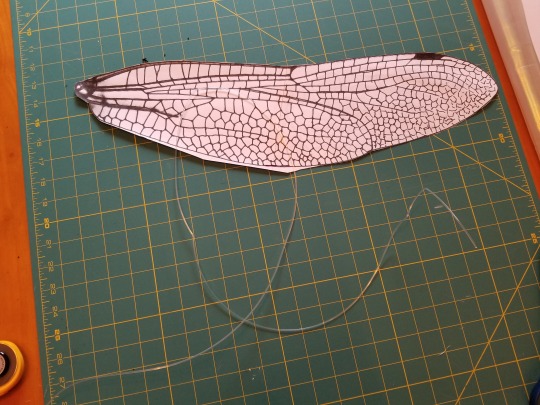
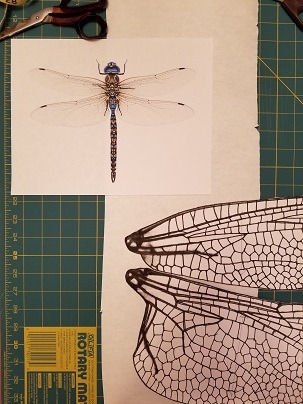
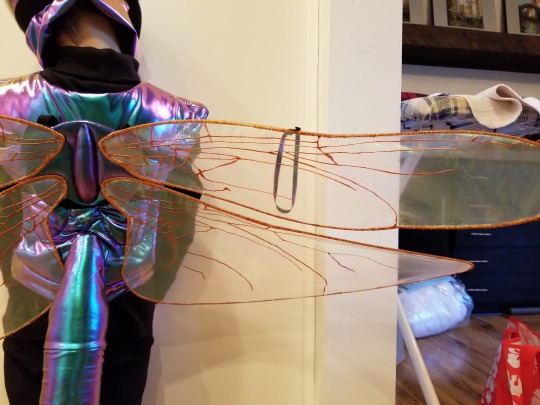
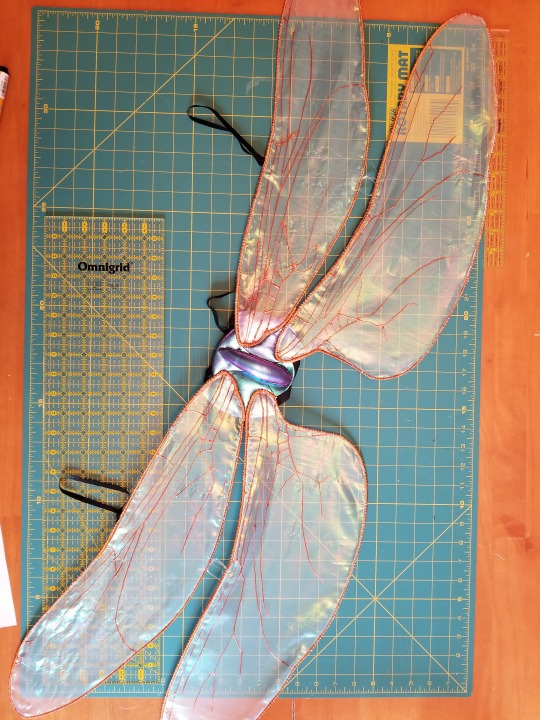
1. Find a detailed photograph of a dragonfly online. Zoom in on one pair of wings and print them on white paper. With a pen or marker, trace any details of the wings, such as the venation, that you want to add to the costume. Copy and enlarge this image to a suitable size (mine were about 18” from thorax attachment to wingtip). Make a copy of the wings that is a mirror image of the first set.
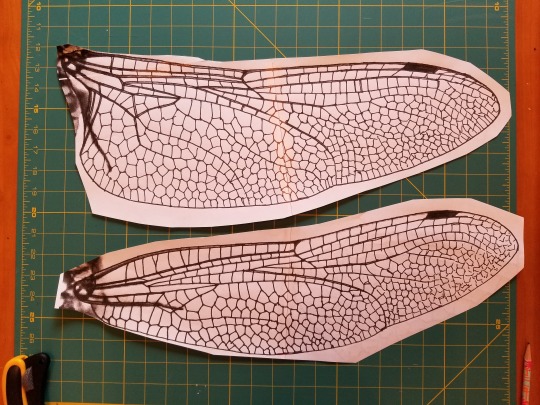
2. Cut the paper wings out along the outside edges. Add lines to indicate grain; you want the straight or crosswise grain to run along the length of the wings as much as possible so that the main body of the wings will not be on the bias. Trace each wing onto a piece of craft paper or butcher paper, making sure the grain lines are all parallel and leaving about two inches between the pieces.
3. Pin a single layer of wing fabric to the craft paper and machine baste the paper to the fabric, directly on the pattern outline, using a medium-long stitch. The basting holds the fabric in place and stabilizes it in preparation for adding the wing armature. I used white thread because these stitches will be covered later, but in retrospect, invisible monofilament would probably have been a better choice. (The pieces can be carefully cut apart before or after stitching; just make sure the fabric stays stable and on grain until you have it basted to the paper.) (Note that I used craft paper because I didn’t have any Sulky Solvy or other “real” stabilizer on hand. If you have more time than I had and are using a washable fabric, you might want to use a dissolving stabilizer here to save time and effort later.)
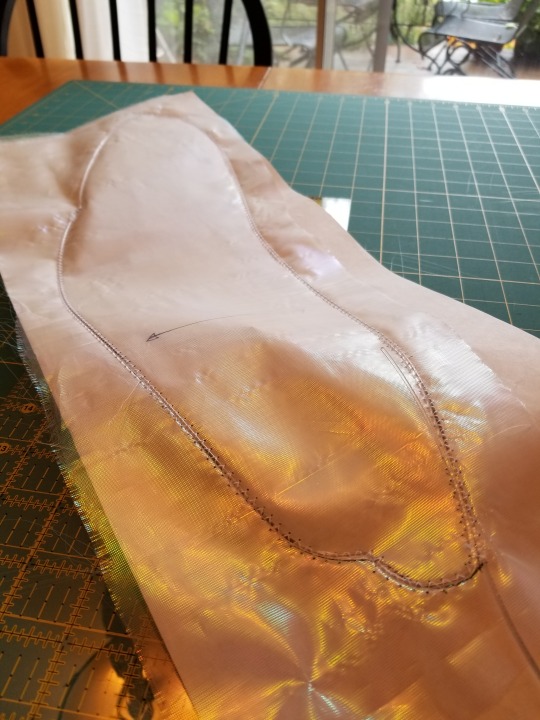
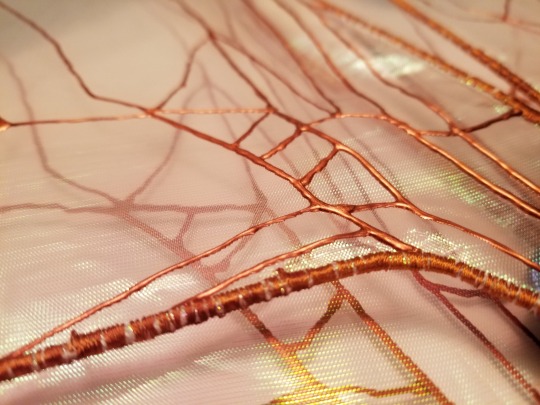
4. For each wing, cut a length of 1.5 mm polyester millinery wire equal to the circumference of the wing outline plus the distance around the wing joint area and 10-12” down the top edge of the wing. Using your original pattern piece for reference, bend the wire along the outline of the wing, so that it matches as closely as possible the outline you’ve drawn and cut around. Double the wire along the wing joint and the top edge of the wing to provide extra stability and support. The wire will not lie flat at this point, but that’s okay. Just focus on accurately placing specific bends and curves along the length of the wire. You’ll sew them in place in the next step. (Tips for working with the wire: Don’t unfasten the coil of wire all at once or you’ll have a mess to untangle. Instead, slip out one loop at a time until you have the length you need. You can gently pull and bend it in your hands to relax some of the coil before you start shaping it. I was able to bend and crimp it using just my fingers, but you might want to also use needle-nose pliers for more accurate corners and sharper angles.)
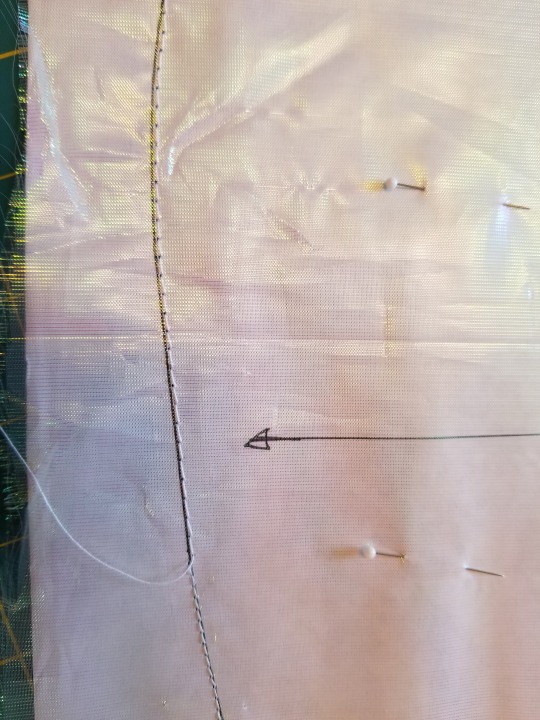
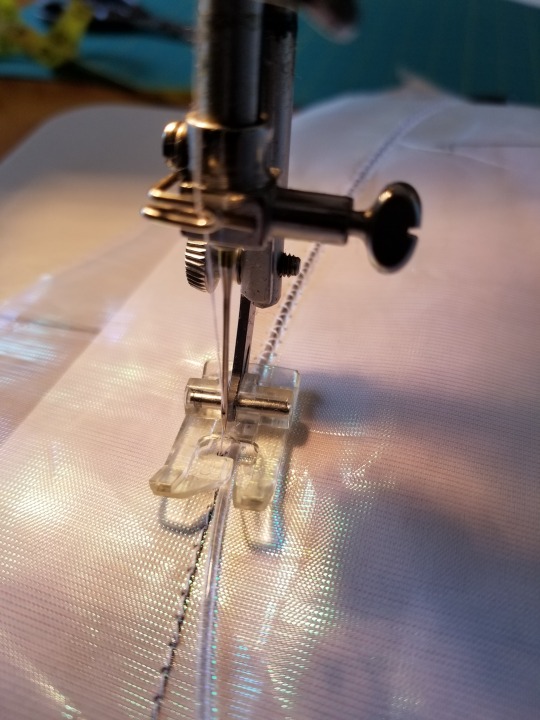
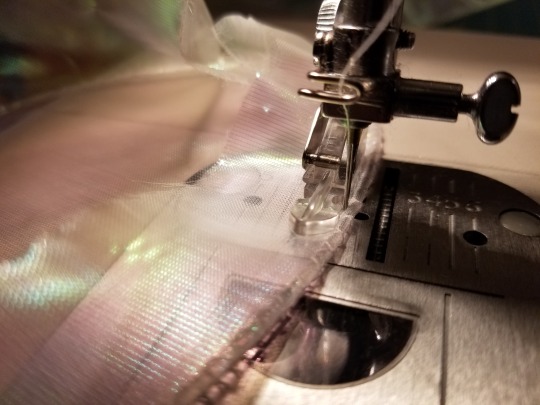
5. Set your machine to zig-zag at a stitch width that accommodates the wire without striking it with the needle. Carefully stitch the wire directly over the top of the wing outline. Keep in mind that you’ll need to switch to a wider stitch for the areas where the wire is doubled.
6. To “set” the shape of the wing armature, put a dry iron on low heat. The milliner’s supply shop where I bought my wire says that 60 seconds of 175-degree heat is sufficient to set polyester wire. I found the synthetic setting on my iron was too low, so I used a wool setting. Using a pressing cloth and being careful not to scorch or distort your fabric, press each area of the wing outline for at least 60 seconds. Don’t slide the iron back and forth; just hold it firmly in place at intervals along the wire. Let the wing cool. I weighted mine with my acrylic cutting guide as they cooled, to keep them flat.
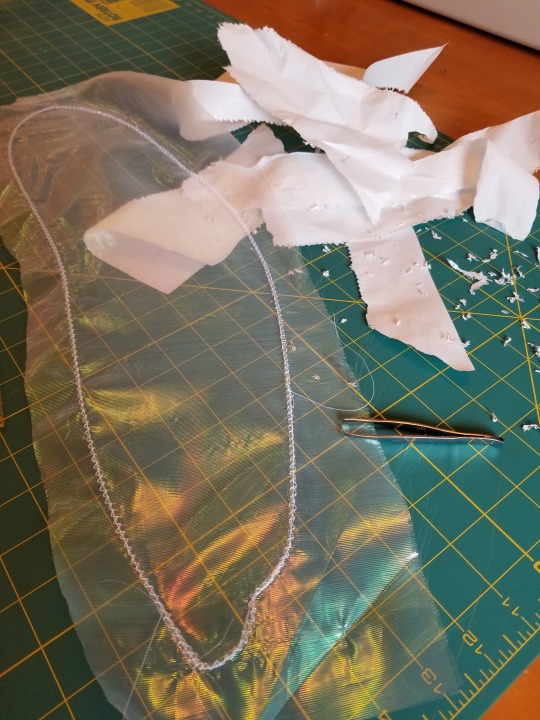
7. Carefully tear the paper away from the wing. This is where using a “real” tear-away or dissolving stabilizer might come in handy; getting the bits of craft paper out of the stitches was a royal pain and involved tweezers and lots of patience. :)
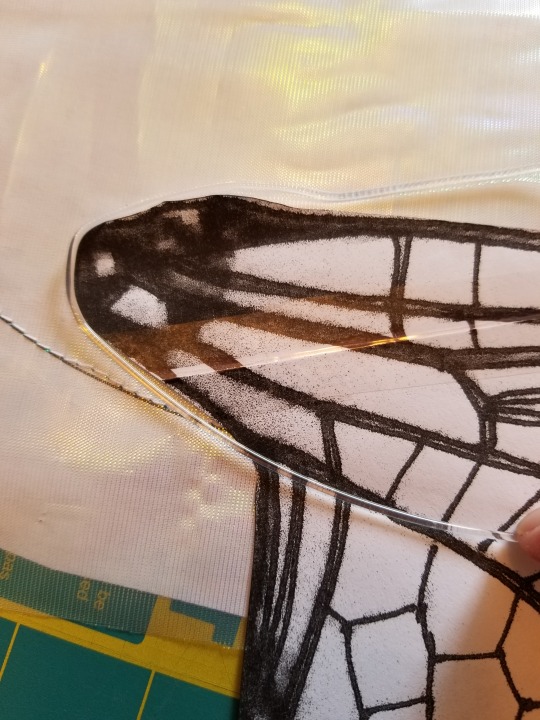
8. Put your machine back on straight stitch and install the zipper foot. With the right side of the wing facing down, fold the extra wing fabric over the wire and pull it as taut as possible without distorting or tearing it. You want to get a little tension on the wing, but not too much; your previous zig-zagging will prevent you from pulling the fabric too far. With the needle on the right side of the foot and the foot snug against the inside edge of the wire, straight stitch through both layers of fabric around the inner circumference of the wing. (Again, I used white thread, but monofilament would be appropriate here.)
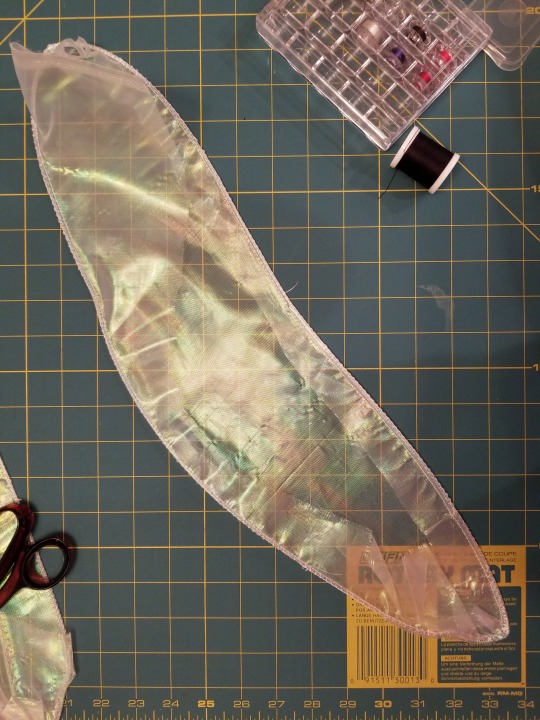
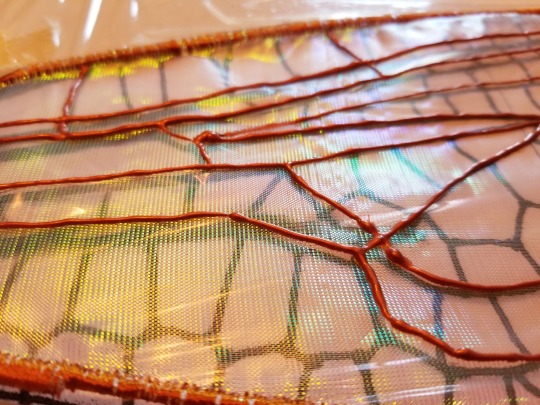
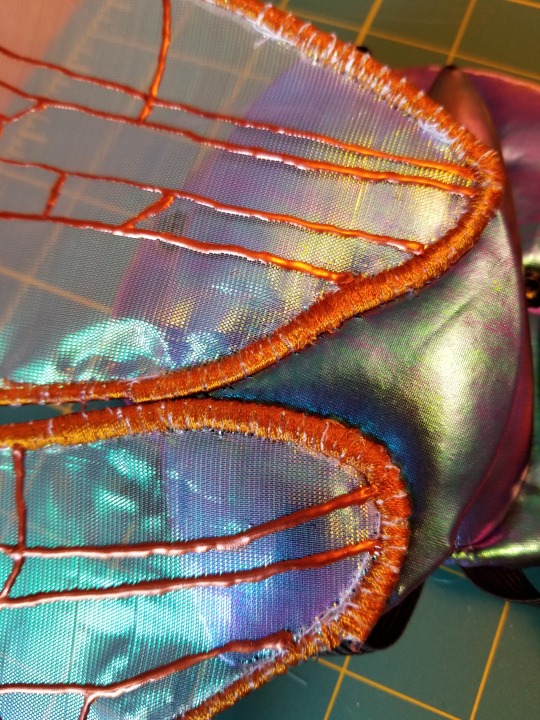
9. Reinstall the standard sewing machine foot. Using a short stitch length and a wide zig-zag setting, with the right side of the wing facing up, satin-stitch around the edge of the wing. I used cinnamon-colored rayon thread for my dragonfly wings.
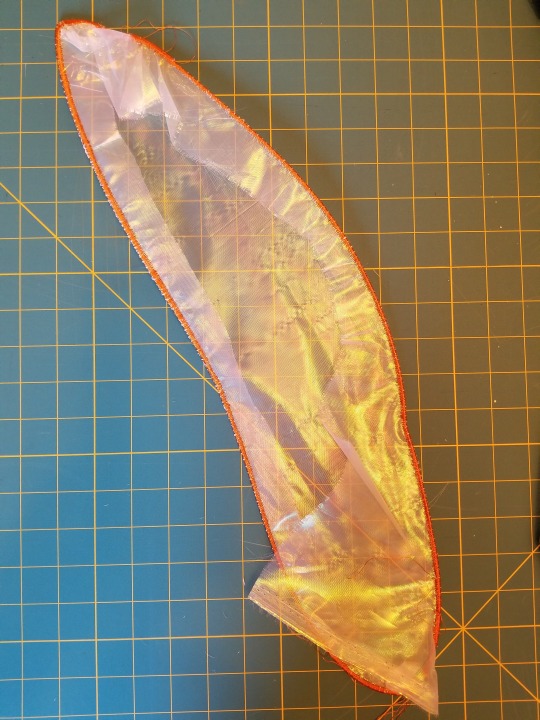
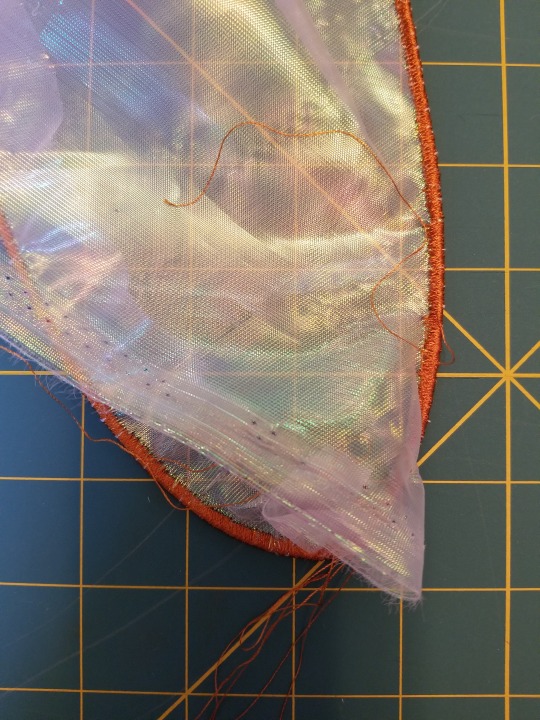
10. Apply Fray-Check to the inside edge of the satin-stitching. Trim away the extra fabric as closely as possible to the stitching, being careful not to poke a hole in your brand-new wing (applique scissors might help).
11. Lay the wing right side up over its original pattern piece and trace details onto the wing using a fabric marker, fabric paint, or other medium. You may want to experiment on a scrap first. Fabric marker was almost invisible on the organza I used, so I went with copper-colored fabric paint. (I tried to protect my pattern from bleed-through using plastic wrap, but this turned out to be a bad idea that caused the paint to smear a little on the first wing.)
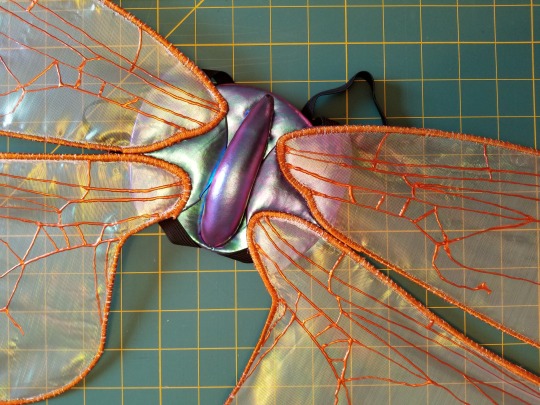
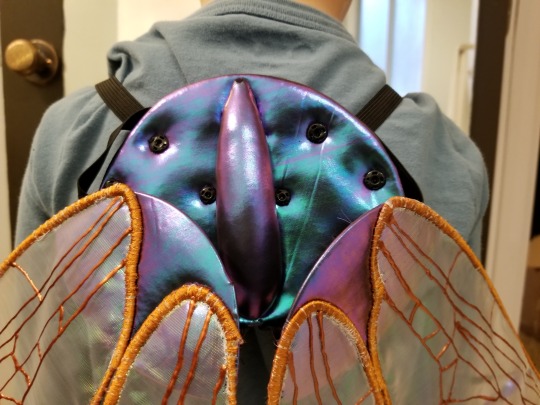
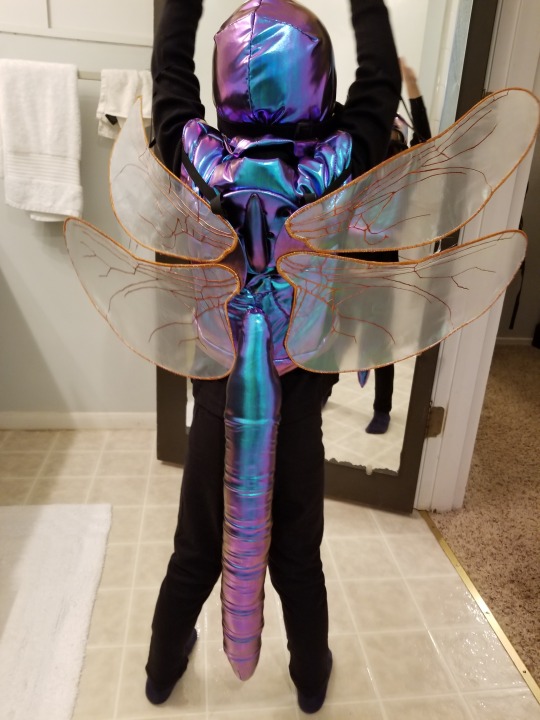
My son wanted wings that would flap (I know, I know; dragonflies don’t flap like that), but I wanted wings that would stay rigidly in place. As a compromise, I decided to make convertible wings; with a 40” wingspan, I figured he’d need to be able to narrow the costume for indoor use anyway. (NB: For wings that have to go through doorways, consider making something less than 36” across; better yet, make something not much wider than the wearer’s shoulders.) Therefore, the remaining steps will produce a set of convertible wings that can be worn upright in one place or loose with loops over the arms for flapping, either attached to an insect costume thorax or separately over regular clothes for dress-up. This process could easily be adapted to make simpler wings.

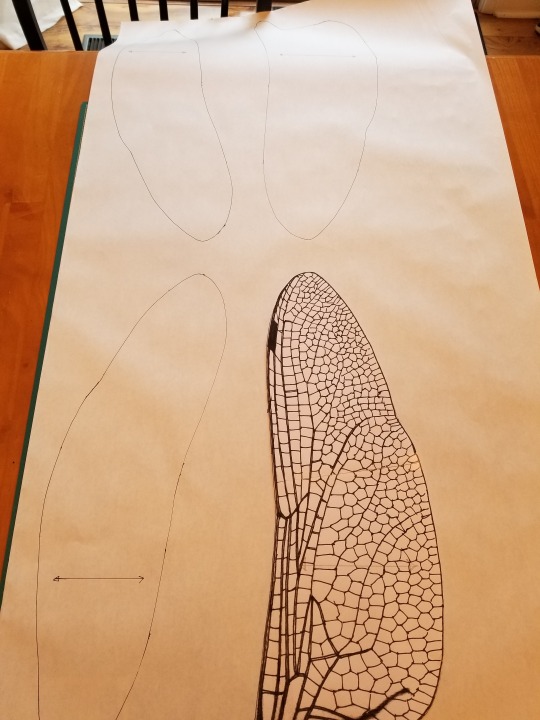
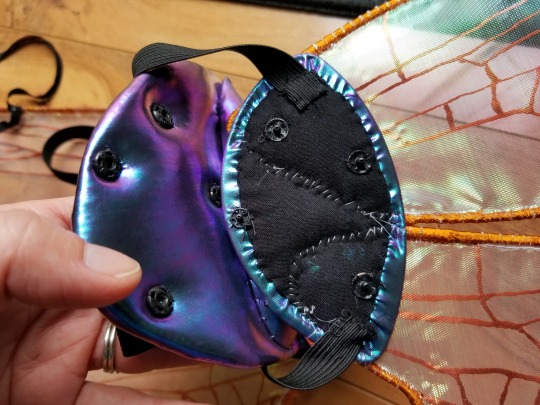
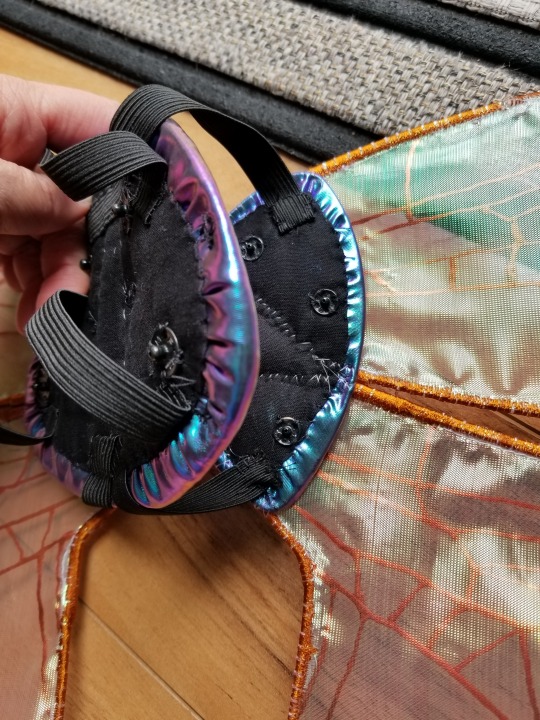
12. The wings will function as pairs, with each pair sewn to a smaller base that will later be attached to a larger base using snaps and elastic. (For fixed wings, you could just sew all four wings to one large base.) To figure out the size and shape of the two smaller wing-muscle bases, I traced the outlines of a pair of wings, positioned as I wanted them relative to the center back line and the back neckline, over the outline of the side back piece of the costume thorax. I shaped the smaller base so that its edge would intersect with the armature at the top and bottom of both wings and so that it would support the narrow “joint” portions of both wing ends. I used the original photo of the dragonfly loosely for reference. Then I sketched in the larger center-back base, shaping it to support one small base on each side of a center decorative element.
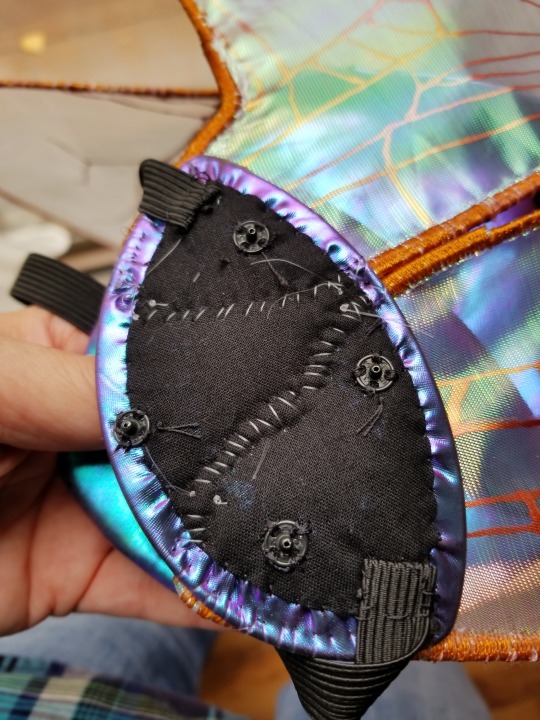
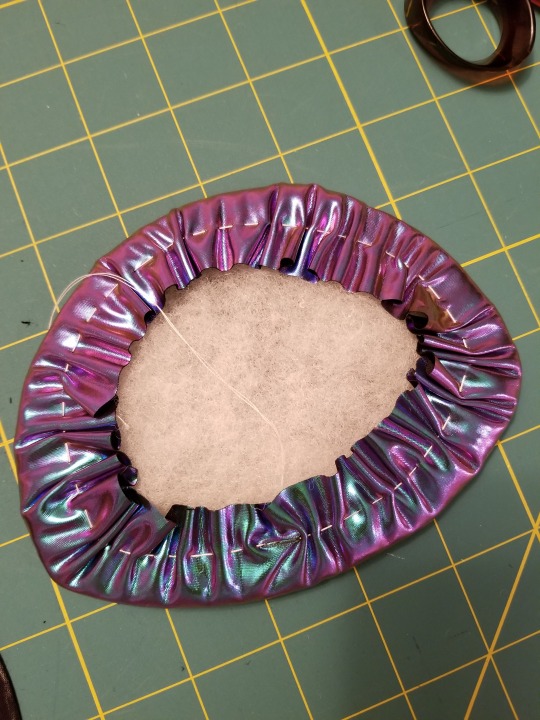
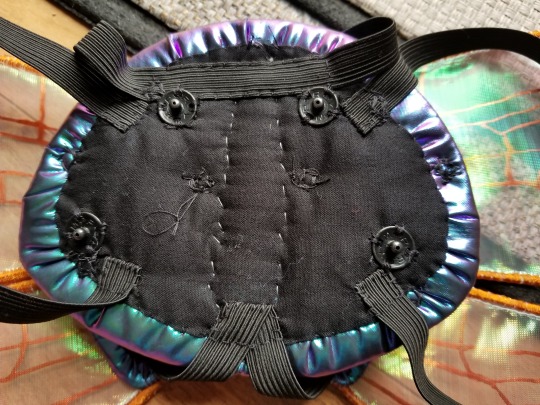
13. For each of the two small wing-muscle bases, shape a piece of 1.5 mm polyester wire to match the outline of the base and secure it into an unbroken loop (I used thread and tape but I think you can also melt it). Cut a piece of exoskeleton fabric about 3/4” larger than the loop. Cut a piece of batting and a piece of backing fabric the same shape as the loop. Lay the wire loop on the wrong side of the exoskeleton fabric, gather the edges of the fabric around the loop, and secure your stitching. Tuck the batting inside, making sure it lies flat. Clip and press under 1/4” of the backing fabric, and stitch it in place over the gathered exoskeleton fabric to hold everything in place and provide a firm foundation for stitching on the wings, snaps, and elastic.
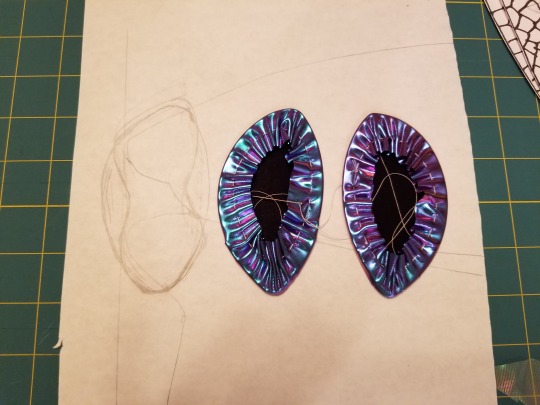
14. Make the larger center-back base in the same way as the smaller wing-muscle bases, but cut the batting 1/2” larger than the loop, and lay it on the wrong side of the exoskeleton fabric before you gather it around the wire loop. Attach any decorative elements you want on the right (exoskeleton fabric) side of the base. (I added a narrow stuffed teardrop shape with a double wire frame hidden on the inside to give additional structural support to the base.)
15. To attach the center-back base to the costume thorax, sew halves of four large snaps onto the back of the base; sew the other halves of the snaps onto the costume thorax in their corresponding positions.
16. To wear the wings without attaching them to a costume, attach two loops of 3/8” elastic to the back of the center-back base, one on each side, to extend around the wearer’s shoulders and upper arms. My loops were 15” around.

17. To attach the wings to the smaller wing-muscle bases, position one pair of wings over the right (exoskeleton fabric) side of a wing-muscle base and pin them in place. Using invisible monofilament thread, whipstitch the wings firmly in place by taking stitches over the wire armature of the wings. Add extra stitches at the points where the wire wing armature intersects with the underlying wire armature of the base. Repeat with the other pair of wings and the other wing-muscle base.
18. To hold the wings to the center-back base in “flapping” mode, cut two pieces of 3/8” elastic. The elastic will be anchored to the back of the center-back base with the four ends attached to the edges of the wing-muscle bases. One piece is for the top edge of the wing-muscle bases, the other is for the bottom edge. The top piece needs to be long enough to allow the top edges of the wings to dangle low enough to hang flat against the wearer’s back, but the bottom piece needs to be just long enough to allow the bottom edge of the wing-muscle bases to be snapped onto the center-back base, and no longer. My top piece extended about 2-1/2” or 3” beyond each side of the top of the center-back base, and my bottom piece extended about 1-1/2” beyond each side of the bottom of the center-back base. Sew the two pieces of elastic firmly to the center base first. Then sew the ends to the edges of the wing-muscle bases that are opposite the wings and closest to the center back, taking care not to twist the elastic.
19. To hold the wings to the center-back base in “fixed” mode, position the two smaller wing-muscle bases over the center-back base so that the wings extent at the desired angle. Mark the positions for four medium snaps on each wing-muscle base, placing them strategically for maximum support (e.g., one very near the center of the center-back base, one near the “outer” edge of the wing-muscle base, one near the top edge of the wing-muscle base, and one near the bottom edge). Sew the snap halves into place on the wing-muscle bases and the center-back base.

20. To allow the wearer to operate the wings in “flapping” mode, attach a narrow loop of filament or fabric to the center top edge of each top wing, large enough to go around the wearer’s arms. I used a thin strip of my exoskeleton fabric and attached it with invisible monofilament thread.
21. Optional: to further stabilize the pairs of wings and provide extra support when they’re being used in “flapping” mode, shape a small square out of a scrap of 1.5 mm polyester wire and attach it at the midpoint between each pair of wings, sewing it to the wing armatures with invisible monofilament thread.
To wear the wings in “flapping” mode, snap the center-back base onto the costume (or slip the elastic loops onto your shoulders/upper arms). Let the wings dangle from the center-back base and slip your arms through the wing loops to control the wings. To wear the wings in “fixed” mode, take your arms out of the wing loops and snap the wing-muscle bases to the center-back base. :)

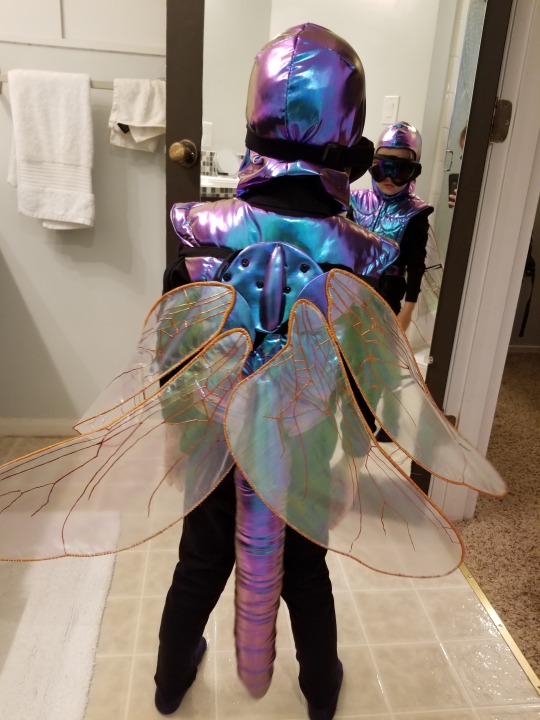
To wear the wings in “fixed” mode, snap each of the smaller wing muscle bases to the larger main base and do not use the narrow arm loops that are attached to the tops of the wings.
4 notes
·
View notes