
Statistics
We looked inside some of the posts by parttimedragonslayer and here's what we found interesting.
Average Info
Notes Per Post
24K
Likes Per Post
15K
Reblog Per Post
9K
Reply Per Post
39
Time Between Posts
2 days
Number of Posts By Type
Photo
2
Text
15
Last Seen Tumblr Blogs


Fun Fact
Kazakhstan’s Minister of Communications and Informatics has blocked the Tumblr site because it contained 60 sites of terrorism, extremism, and pornography in 2015.
Photo


On the sketchbook of 15th-century engineer Johannes de Fontana, a catalogue of designs for fantastic and often impossible inventions, including fire-breathing automatons, pulley-powered angels + the earliest surviving drawing of a magic lantern device: https://publicdomainreview.org/essay/the-dreams-of-an-inventor-in-1420
83 notes
·
View notes
Photo


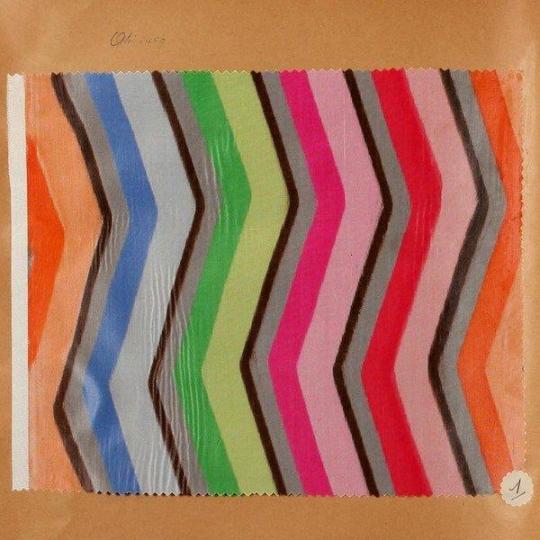

Surprisingly modern designs in this French silk sample book, circa 1900: https://publicdomainreview.org/collection/french-silk-sample-book
80 notes
·
View notes

Text
X Stitch Quick Start Guide
Fabric
You can stitch on anything you like, but for x stitch it’s going to be a lot easier if you use some kind of evenweave fabric. Evenweave is fabric where, stay with me here, the weave is even.
You want to be able to see a little, evenly spaces holes between the fibres that go up and down, and the ones that go across.
This is aida, it’s what x stitch is usually done on

Here’s some examples of other evenweave fabrics that you could also use


If it’s got evenly spaced holes, then you can x stitch on it!
Thread
The thread that you typically use for x stitch is called floss. The key feature of floss is that it can be separated out into six individual strands.

This is not floss for x stitch.

Neither is this

Cut a length of thread to start stitching with. About 40-50cm is good. Not so long that it gets tangled, not so short that you’re constantly threading needles. Now you want to separate that cut length, but grabbing three of the individual strands and separating them from the other three. This can get messy. Everyone develops their own ‘never fail’ method of separating their strands. You’ll find what works for you, but only after many tangled threads and swear words.
These three separated strands are what you will stitch with. NOTE: you will not double these over (then you would be stitching with six strands).
You can also stitch with two strands, whichever you choose, just stick with that choice for the whole project.
Needle
You can use whatever kind of needle you want or have to hand. You will find it easier if you use the right kind, but we don’t always have the choice. The most important thing for x stitch is that the needle has an eye large enough to accommodate three strands of thread.
A tapestry needle is the best kind. It has a large eye and a blunter end.

The blunt end helps us go through the holes of the fabric more easily without catching surrounding threads.
This needle has a very small eye and a very pointy point. You can x stitch with it if it’s all you have, it will just be more difficult.

How to read the pattern
X stitch patterns, or charts, are a grid that align with your fabric. Each intersection of a horizontal and vertical line on the pattern corresponds to a hole in the weave of your fabric.

Most patterns will either be coloured blocks

Or symbols

For each coloured block or symbol on your pattern, you are going to stitch and X on your fabric
Deciding where to start can be tricky.
The centre is always a good choice. Find the centre of your fabric by folding it over and noting where the middle is. Most patterns have numbers on the top and sides to help you keep track of where you are. Use the numbers to find the middle of the pattern, or just eyeball it.
Starting in the top left is also a good choice. Make sure you leave a couple of centimetres of space, don’t start your first stitch right in the corner. The fabric will fray with handling, plus you might need some excess to work with for framing or finishing, depending on what your plans are for the final piece.
Starting
Tie a knot in the end of your thread.
Don’t listen to the gatekeepers who tell you knots are bad.
Knots aren’t great, but for now, to get us going, we’re just going to use a knot. Later we learn some better ways to start.
Stitching the X
Bring your needle up through the top left corner of the square you are going to stitch

Bring your needle down though the bottom right corner or the square you are stitching

That's your first 'leg'!

Bring your needle up though the top right corner of the square you are going to stitch

Bring your needle down through the bottom left corner of the square you are stitching

Congratulations! You’ve made your first x stitch!
Find the next square and repeat.


Where it can get tricky is when you finish your X and the hole you have just brought your needle down through, is also the same place you need to bring your needle up to start the next X
When this happens you may have to change the order of how you stitch your X. Instead of starting at the top left, start at the bottom right.
The most important thing to remember is to keep your X’s going the same way. Always have the first ‘leg’ slanting \ and the second ‘leg’ slanting /. It doesn’t matter if you stitch them top to bottom or bottom to top. As long as your X’s all look the same when you’re finished it doesn’t matter how you stitch them.
Finish your thread
When your thread gets too short, finish it by flipping to the back of your fabric and sliding the needle under a few of the stitches and cutting the thread off.


Keep going until you have finished your pattern. Now you can display your finished x stitch however you like! Frame it and hang it on a wall. Stitch it onto a bag or a jacket
You're now a x stitcher!!

(You may have noticed that my heart is a little different to the one in the pattern. You are about to learn that you do not know how to count. Yes, you learned how when you were very young, but when you count while doing x stitch, suddenly you numbers no longer make sense.)
I know that buying materials for arts and crafts can get expensive, so I'd recommend checking your local thrift stores. You can usually find different kinds of even weave and floss, even if it's not the right size or colours that you want, it's great for practice and you never know what might inspire your next project.
This ended up being a lot longer than I thought, and I feel like I’ve barely scratched the surface! If anything is unclear or you need help please let me know, I’d love to help.
I really enjoyed writing this guide so if you want more there’s also a whole lot more I could go into. If this has helped you at all and you’re interested in any of the below, let me know. More suggestions are welcome!
Advanced topics
Cloth count
Stitching on high count fabric
2 over 2, 1 over 1 etc
Stitching with things other than floss
Number of strands, when to use more or less
Patterns with lots of colours
X directions
Full X’s or \\\\ then /////
How to have a neat back
Loop start
Stitch in hand vs stitch in a hoop
Framing
Edging for a patch
Backstitch
Other counted embroidery types
#cross stitch#fibre arts#x stitch#how to guide#how to cross stitch#how to x stitch#learn with me#tutorial
7 notes
·
View notes


Text
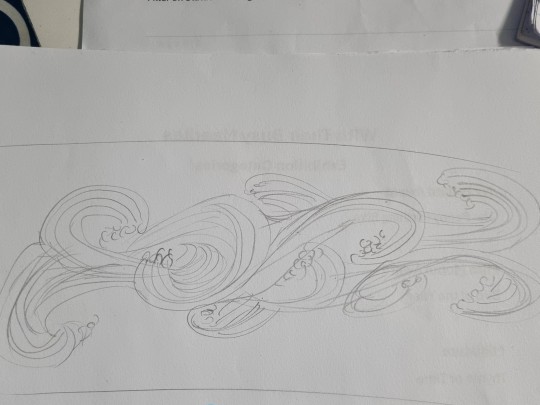
Another sketch, this one is a lot rougher, but I think I like it more wavy?

Sketching out an idea for my next embroidery.
3 notes
·
View notes
Text
Sketching out an idea for my next embroidery.
3 notes
·
View notes


Text
“Got up late and would have liked to have got up later, which is a sad moral state to be in.”
—
Arthur Conan Doyle (1859-1930) British writer and physician
1K notes
·
View notes
Text
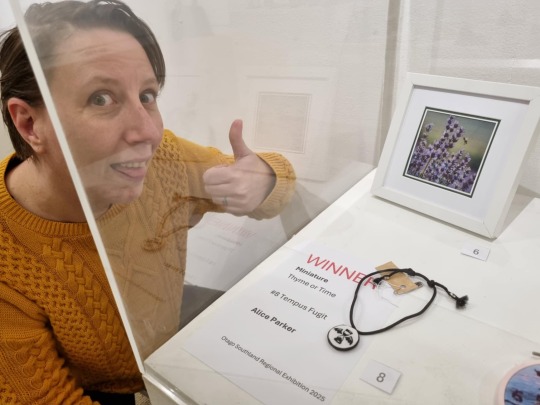
I won a thing ❤️
2 notes
·
View notes
Text

ℑ 𝔞𝔟𝔦𝔡𝔢, 𝔴𝔥𝔢𝔯𝔢 𝔤𝔥𝔬𝔰𝔱𝔰 𝔥𝔞𝔳𝔢 𝔪𝔞𝔡𝔢 𝔱𝔥𝔢𝔦𝔯 𝔥𝔬𝔪𝔢
342 notes
·
View notes
