
Statistics
We looked inside some of the posts by pauladchnd2c and here's what we found interesting.
Average Info
Notes Per Post
10
Likes Per Post
9
Reblog Per Post
0
Reply Per Post
1
Time Between Posts
12 days
Number of Posts By Type
Text
17
Last Seen Tumblr Blogs


Fun Fact
70% of Tumblr users say the Dashboard is their favorite place to spend time online.
Text
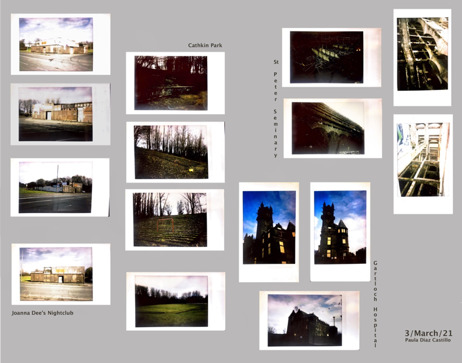
‘Paper Movies’
Log on to www.learningonscreen.ac.uk with your college email. Go to BOB (Box of Broadcasts)
Locate Genius of Photography – ‘Paper Movies’ under the FOLIO 2 playlist
On watching the excerpt from Genius of Photography episode note down your observations for the following questions.
What is the significance to us of the ‘Photographic Journey’ in the three decades from the 1950s?
In my opinion the most significant meaning of a photographic journey is to see how the world looks like in the time. I also agree with what they say in the beginning of the documentary is that any Photographic journey worth making still demands blood, sweat and tears.
Joel Sternfeld is seen using what type of camera? Why would he be using this as opposed to digital?
An 8×10 view camera.
3. Why has Robert Frank’s book ‘The Americans’ had such an impact on modern photography.
What ‘narrative’ is pervasive throughout his book?
Robert Frank's book dramatically altered how photographers looked through their viewfinders and the way Americans saw themselves. Franks point of view was a new and not so nice point of view of America society, not so glamorous, his persistent narrative is a dead optimism, once’s the show is over. The people did not receive it well at the time.
William Klein had one particular photographic outlet for the expression of his photography – How would you describe his attitude to photography?
Klein was an anarchy energy his attitude to photography is very irreverent.
Always on the offensive, he liked to provoke to the public.
What made Joel Meyerowitz reject Henri Cartier Bresson’s decisive moment concept for his New York Street Photography?
Joel says about the rhythmic of New York being too fast and chaotic with people bumping into ich other also about it sizzling energy. Its dynamic changed because Paris and new York did not have the same distribution and neither the same energy.
6. Iconic NY Street Photographers Garry Winogrand, Diane Arbus & Lee Friedlander.
English Photographer, Tony Ray Jones who was heavily influenced by the above noted the key pointers to being a successful Street Photographer ………..
Can you list them….
6.1. Be more aggressive.
6.2. Get more involve.
6.3.Talk to people.
6.4. Stay with the subject.
6.5. Be patient.
6.6. Take simpler pictures.
6.7. Do not take boring pictures.
6.8. Get in closer.
7. Why have British ‘street photographers’ gravitated to the beach as an ideal location for their subject matter?
Because they could find the beach like a stage on where classic themes were played out, to capture the essence of people in where they revelled something of themselves. The human condition and human comedy.
8. ‘Surface rather than soul’. What does that mean to you?
The documentary talk about Ed Ruscha photography saying that it was more about things rather than people, surface rather than soul.
9. The Road trips of Stephen Shore & Joel Sternfeld
Your observations:
They Sought out the extraordinary in the ordinary.
Shore: tripod camera 8x9 (steady in the same position) vs modern camera (constantly in movement). Travelling conceptually, shooting in colour and often straggling with heavy equipment.
he wanted to keep a visual diary of the trip. He started photographing every person he meet. The beds he slept in, the toilet he used, the art on the walls, every meal he ate, buildings, streets. He drove in rental cars and after a couple of day he focused on the road passing.
Sternfeld: He used to move in a camper in a quite poor state, with no much money neither much food and a few boxes of film. he says it was the most exciting time on his life, always fascinated shooting only two negatives per day even thought every second was filled.
10. Why would William Eggleston be regarded by photographers as ‘King’?
Eggleston is Known for his rich and complex colour images of the American South, that he took from the early 70s onwards of his home city Memphis and the surrounding area William. Eggleston is the king of colour photography. His pictures contain all the acute observation of a master street photographer but their brightly coloured surfaces make them unreadable. He call his pictures "democratic" adding that he is at war with the obvious.
4 notes
·
View notes


Text
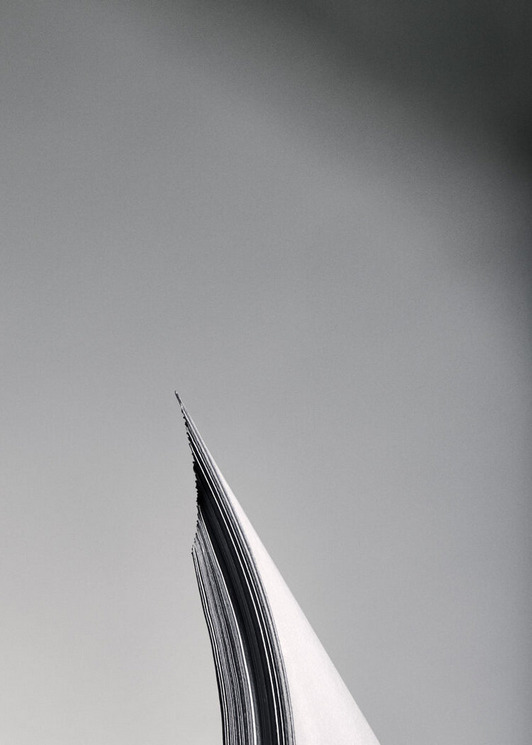
Object Exploration

Details
Select and object which has an interesting form.
Make 12 images.
Take either 1 hour or take a whole day.
Each image should be considerably different from one another.
Use your imagination!


Review
Within your reflective log/diary write 300 words of what you noticed about your object.
Some words to consider - surface, details, form, light, texture, feel, and weight.
0 notes
Text
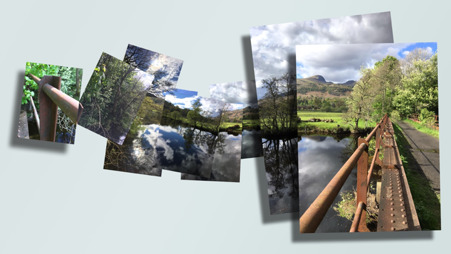
ENVIROMENT 360
Task
Make a photographic montage of an environment.
The montage should be made up of multiple images all shot whilst standing in the same spot.
Your environment can be any location, indoor or outdoor.
Be creative with how you blend, collage the images together.
Consider Scale, relationship, repetition, layout, proportions and style of blend.


Create a collage
Choose File > New to create a new blank image. Specify image size based on the desired print size (such as 8 inches x 10 inches at 150 pixels per inch on a white background).
Note: If your images differ in resolution or pixels per inch, they could display at an unexpected size in the collage image. You can use the steps below on transforming layers to resize the images appropriately. See online Help for more information about resolution.
Choose File > Open and open the first image (Image 1) to be added to the collage image. You now have the collage image and the first image (Image 1) open at the same time.
Select the Move tool. Click anywhere within Image 1, drag from the Image 1 window to the collage image window, and release the mouse button. Image 1 displays in the collage image window. Image 1 is on a new layer, called Layer 1.
Double-click the words "Layer 1" in the Layers panel and rename Layer 1 so that you can track your layers.
Close the Image 1 window so that only the collage image is open. Your Layers panel now contains a Background layer and the new layer that you renamed.
After you add your first image to the collage image, open the next image that you want to add. Repeat steps 2 through 5 to add all your images to the collage image.
Resize, reposition, and rotate the images or layers in the collage
In the Layers panel, click once on the layer that you want to adjust, to target the layer.
Choose Edit > Free Transform (Photoshop) or Image > Transform > Free Transform (Photoshop Elements).
Note: Before you transform your layer, make sure that the correct layer is targeted in the Layers panel.
Note the bounding box around the edges of the layer and the anchor points on all four corners and sides (eight total).
Resize the layer by dragging the anchor points.
Reposition the layer by clicking inside the bounding box and dragging.
Note: If a layer displays larger than the collage image, drag the layer in any direction until you can see a corner of the image. You can then transform the image using the anchor point on the visible corner.
Rotate the layer by positioning your cursor just outside the bounding box, clicking, and dragging. You can rotate the layer when your cursor changes to a curved double-headed arrow.
In the option bar at the top of the screen, click the check box to accept or commit the transformation. Or click the circle with the slash through it to cancel the transformation.
Repeat steps 1 through 3 to resize, reposition, and rotate each of the other layers in the image.
Rearrange the stacking order of the layers
To change stacking order of the layers or the way the layers overlap, drag any layer in the Layers panel above or below another layer.
https://helpx.adobe.com/photoshop/kb/create-collages-montages-photoshop-photoshop.html
Evaluation:
I did not like this brief I had been overthinking it so much and I am still no having a good idea. I decided to do a natural landscape because at least I could enjoy the walk.
I think I will try again on different locations.
0 notes
Text
RE/imagine
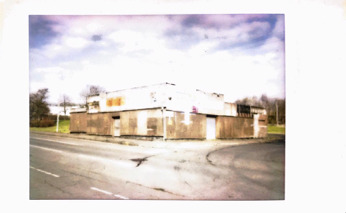
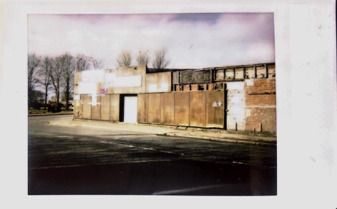
FIND a photograph. Not yours.
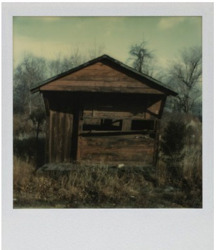
Walker Evans Abandoned House 1973-74
STUDY the photograph. What do you know about the elements of the photograph?
In 1973 Evans began to work with the innovative Polaroid SX-70 camera and an unlimited supply of film from its manufacturer. The virtues of the camera, introduced in 1972, fit perfectly with Evans's search for a concise yet poetic vision of his world: its instant prints were for the infirm seventy-year-old photographer what scissors and cut paper were for the aging Matisse. The unique SX-70 prints are the artist's last photographs, the culmination of half a century of work in photography. With the new camera, Evans returned to several of his themes—among the most important of which are signs, posters, and their ultimate reduction, the letter forms themselves. In the 1930s he had been the first American artist to draw emphatic attention to the impact of the sign in the landscape. His continuing interest in quoting the written language of commercial signs and translating them into self-sufficient pictures was fuelled by his literary ambitions and by his understanding that the essential "stuff" of the contemporary world was to be found in these often-unconscious symbols of modern life.
Object Details
Title: [Abandoned House]
Artist: Walker Evans (American, St. Louis, Missouri 1903–1975 New Haven, Connecticut)
Date: 1973–74
Medium: Instant internal dye diffusion transfer print (Polaroid SX-70)
Dimensions: 7.9 x 7.9 cm (3 1/8 x 3 1/8 in.)
Classification: Photographs
Credit Line: Purchase, Samuel J. Wagstaff Jr. Bequest and Lila Acheson Wallace Gift, 1994
Accession Number: 1994.245.135
Rights and Reproduction: © Walker Evans Archive, The Metropolitan Museum of Art
https://www.metmuseum.org/art/collection/search/272071
Does it have people in it? No. Who are those people? No people
Is it a familiar place? No. What happened there? It is a picture of and abandoned house.
Does it signify and event? No Describe the event: It is an abandoned house.
How do you FEEL about the photograph? Sad, Melancholic.
If you know nothing about the photograph, write down imagined stories, possibilities within the frame.
I imaged a poor family that they were forced to moved out because they did not have jobs nor food.
Ask others about the photograph. They did not like it, to ruin to sad, although one of my class colleague chose one of this pictures as a starting photography for the same project, that really make me feel incredibly happy.
Using the photograph as a starting point, CONSTRUCT a narrative using images of your own. Include found material if you like.
Present the images in a way that INTRIGUES the audience.


0 notes
Text
Brand portrait
Task
In your home you will have a range of brands that you have been convinced to buy!
We will have collective brands, things that we have all bought out of necessity, “fairy” washing up liquid “Colgate” toothpaste. We purchase things we need, but why do we purchase and remain loyal to certain “brands”?
We also purchase brand that are more targeted to our own demographics, things that appeal to us because of our age, hobbies, gender, jobs etc.
Consider what those brands are and think about why you buy them.
How does this link to you Brand personality?
- Explore your house for brands that you think say something about you, create a series of images of these brands, use these images, along with research images, text, colour palettes to create a multimedia mood board.
- Using your mood board as your stimulus, make ‘one’ stand-alone image that you think reflects the type of consumer you are.
Review
We will do peer led group reviews of the mood boards and final images.
Add to your reflective log/ diary any research and development that you find useful when completing the above tasks.
Reflect on What have you discovered about yourself as a consumer (200 words)

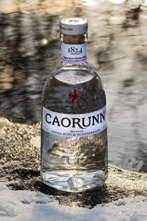
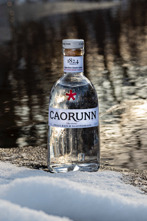

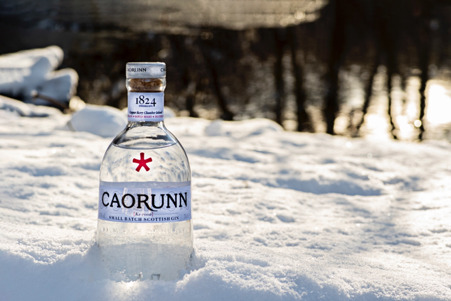

CAORUNN SCOTTISH GIN
CAORUNN is a super-premium Scottish gin handcrafted using only the finest pure grain spirit as well as traditional and foraged gin botanicals.
Carefully handcrafted in the Scottish Highlands, Caorunn expertly infuses five locally foraged gin botanicals. Artisanal and small batch, beautifully mixing the rugged charm of Speyside with the urban sophistication of modern Scotland.
Caorunn is a small batch, quadruple-distilled Scottish Gin personally crafted by one man – our Gin Master, Simon Buley. Using only the finest pure grain spirit, natural Scottish Water and 11 botanical gin ingredients, he personally crafts each and every bottle of Caorunn.
Aromatic Taste
Caorunn is an expert infusion of five locally foraged botanicals and six traditional botanicals. Caorunn is traditionally served with cool fizzing tonic and slices of red apple to highlight its aromatic flavour profile, however our gin is beautifully versatile which means it’s also perfect for any classic or contemporary cocktail.
TASTE NOTES
Caorunn is a Modern “London Dry” Gin with a dry and crisp, aromatic taste adventure and a long dry finish.
AROMA
Fresh, floral, citrus, slightly spicy and aromatic.
FLAVOUR
Clean, crisp, sweet, full bodied and aromatic.
FINISH
Invigorating, long lasting, refreshing, crisp and slightly drying.
Our handcrafted infusion is created personally by our Gin Master, Simon Buley. Each personally crafted bottle of Caorunn gin begins with the highest quality grain spirit and locally foraged Celtic botanicals. In 1,000 litre batches, the spirit is vaporised through the world's only working Copper Berry Chamber.
Simon Buley, our Gin Master
Built in the 1920's this Chamber is legacy to a time when all gin was produced using this slow, careful process. The uniquely balanced mix of 6 traditional gin botanicals and 5 hand-forged wild botanicals sourced by our Gin Master from Scottish Highlands, is spread across the four perforated trays of the copper berry chamber. The vapourised spirit slowly rises through the chamber, allowing the vapours to be saturated with sumptuous subtle fresh aromas and flavours.
Every effort has gone into making Caorunn a versatile and uplifting experience; a taste adventure that embodies contemporary, wild and sophisticated Scotland.
Balmenach Distillery
Balmenach Distillery's rugged location in the heart of the Cairngorm National Park furnishes Caorunn with the world's finest ingredients for crafting artisan gin. Crystal clear Scottish water is married with locally foraged botanicals to create a gin of supreme quality and heritage. Savoured around the world, Caorunn offers the drinks connoisseur the opportunity to embrace a wildly sophisticated gin of unrivalled quality.
The history of Balmenach Distillery is as old as it is acclaimed. One of the first distilleries in Scotland to be licensed in the production of Scotch whisky in 1824, Balmenach has been a byword for excellence for nearly three centuries.
Nestled deep in the stunning landscapes of the Scottish Highlands you'll discover the home of Caorunn. Premium and small batch, our handcrafted gin is made with the care and passion you would expect from our renowned Scottish spirit making expertise.
https://www.caorunngin.com


Dalwhinnie Winter's Gold Bottling Note
Dalwhinnie Winter's Gold is a 2015 addition to the Highland distillery's range inspired by the chilly climate up in the remote part of Scotland where their single malt Scotch whisky is distilled - as the label remarks, it was "Crafted by the Cold". It's made only with spirit that has been distilled between October and March, and interestingly enough, they suggest that you try serving this expression frozen!
Tasting Note by The Chaps at Master of Malt
Nose: Oak spice, pear skins, golden syrup and gristy malt. A touch of peach polish and chewy, sticky toffee. From the freezer it's fruitier, green apple, apple sauce, toffee apple, sultana, even redcurrant.
Palate: Very honeyed with warming peppery spices, Big Red cinnamon. From the freezer the honey is kept in check much more, as are the spices. Plenty of apple flesh and orange peel.
Finish: Allspice, nutmeg and smoky malt. From the freezer the finish is more about the spicy cinnamon and peppercorn heat that's found on the palate at room temperature.
Overall: An assertive, spicy, honeyed Dalwhinnie with enough sweetness and character to be served straight from the freezer (as intended).
Awards for Dalwhinnie Winter's Gold
Scotch Single Malt - Highland - 2017
International Wine & Spirit Competition
Dalwhinnie distillery, situated in the Highland village of Dalwhinnie in Scotland, produces Single Malt Scotch Whisky. Dalwhinnie refers to its own whisky as a Highland Whisky, as the Speyside region is wholly within the Highlands and so Speyside distilleries can be legally labelled as either Highland or Speyside under SWA regulations. A number of other Speyside distilleries also label their whisky Highland such as Macallan, Glenfarclas and Aberlour (who actually reference both Highland and Speyside on the packaging). Dalwhinnie is owned by Diageo.
The site for the distillery was chosen for its access to clear spring water from Lochan-Doire-Uaine and abundant peat from the surrounding bogs. Set in splendid mountain scenery, Dalwhinnie is the highest distillery in Scotland with a visitors’ centre at 1,154 ft (352 m) above sea level. The highest distillery is actually Braeval, in Glenlivet at 1,163 ft (354 m).
The name Dalwhinnie is derived from Gaelic word Dail Chuinnidh, which means meeting place, referring to the meeting of ancient cattle drovers' routes through the mountains.
https://en.wikipedia.org/wiki/Dalwhinnie_distillery
Reflexion about yourself as a consumer:
Myself as a customer I normally make purchasing decisions based on my experience and knowledge. While some customers make quick purchasing decisions, I need to gather information before taking action. For me is very important to choose an object based on my needs, values and interests.
I normally do my shopping in supermarkets, mostly Lidel, Aldi but in this occasion, I went to Morrison’s to get two alcoholic bottles. Both were presents for friends, so I was looking for something nice, something tasty and beautiful and also with a good price. But most important I wanted a Scotti’s high-quality product. The colours and the aesthetic were also important in the selection process, certainly I wanted to make a good impression and make my friends happy.
Dalwhinnie Winter's Gold is an awarded single malt whisky and it also is a special edition, something unique and whit recognition from an international competition. That was more than enough for convincing me into buying it. The box was beautiful and so was the bottle.
Some purchasing decisions are more important than others, the amount of effort I put into each one is different. Sometimes and based also in the nature of the purchase, the decision can be quite easy and taken in a snap, whit Caoruun Gin Was very easy.
Caorunn is a good quality and beautiful artisanal Gin at a very good price. Did have to think it too much.
0 notes


Text
Something New Research
Point of sale shots/ Product Phootography
tips:
1. Use proper lighting.
2. Use a tripod.
3. Shoot for the edit.
4. Profesional editing.
5. Take inspiration from brands you love.
6. Good composition.
7. Simple props
8. Take multiple shots from varying angles.
9. Put your product in context.
10. When in doubt, stick to a plain white background.
Some examples:


https://blendstudios.com/product-photography-london/
1 note
·
View note
Text
Something Told Research
Conceptual still life photography
Tips:
1. Choose Subjects that Speak to You
What you photograph is completely up to you. Have a search around the house to see if you can find something simple but interesting to start with. Please don’t feel like you have to take photos of fruit or flowers just because everyone else does: think outside the box without being overly ambitious.
If when you’re out and about something catches your eye, take it home with you (don’t steal it!) or make a note of it so as to remember to try photographing it in a still life context. Try to avoid reflective surfaces such as glass and metal to begin with, as they will be extremely difficult with regards to lighting. Once you’ve mastered the single object shots, try mixing it up, combine objects of contrasting shape, colour, texture and see what you can come up with.
2. Get Comfortable with Light and Lighting
Lighting doesn’t have to be expensive. I know certainly for me that a set of studio lights aren’t really within my budget, so for still life shoots I need to utilize all the light I can get my hands on, and that often means sunlight.
Remember that you have full control over the shoot, so if you want, find a room in which you can block out all natural light by using shutters or curtains, this way you will have complete control over the light upon your subject.
Using standard table lamps can work extremely well if used effectively. Be sure to try multiple positioning set ups, not all light has to come from the front of the object, side and back lighting will add interest, shadows and depth to the shot. Alternatively, choose a room that is well lit via a window, and use this to your advantage. The natural light from one side will comprehensively light your subject and you can compliment this with a lamp or reflector.
3. Get a Good Tripod and Work Your Angles
Depending on your lighting situation, you may or may not need to use a tripod and shutter release. I would recommend using these as they will allow you to observe and work with your subject matter. This set up will also allow you to use slightly longer shutter speeds than usual to ensure a small aperture allowing the image to be in focus front to back, if you so choose.
However, please don’t let a static camera stifle your creativity, it quickly gets forgotten that your camera has been sat in the same position for the whole shoot. Be sure to vary the angles and heights at which you are shooting. Otherwise, before you know it, you’ll have a whole collection of shots all take from the same point with little or know variation. Mix it up a bit. Try shooting at the level of the subject or try a bird’s eye view, looking down onto the subject, but be careful if you are moving around not to cast any shadows on your subject!
4. Get the Backdrop Right
Having a suitable backdrop for your subject matter will play a crucial role in the overall success of your shots. It’s best to keep it nice and simple, so it doesn’t interfere with your subject. A plain painted wall or a large sheet of white or plain colored paper would be ideal.
Think about how your choice of background contrasts the subject, do you want a neutral background, or are there tones that may work in complimenting the shades within your subject. For smaller objects, you may not need a backdrop as such, but instead require a surface to place the items on, for which something like black velvet is ideal, as it absorbs light and looks like a solid black surface.
5. Compose the Shot
The compositional element of your still life work is an absolutely crucial part of ensuring that your work is engaging and unique. Consider the rule of thirds, how can that be applied to your shoot to create a strong composition. Ensure there are no distractions within the frame, just the subject and the backdrop.
Be sure to vary the composition of the subject matter through the shoot and think outside the box. Where are you leading the eye within the image? Are you utilizing negative space or might it work to try and fill the frame? Engage with the subject, what are its defining features? What is it used for? Are you able to put it into context or does it work as a stand alone subject?
6. Take All Day Over It, If You Need
I often find that my mentality surrounding a shoot is dependent on the reason for the shoot. If I am simply taking photos for pleasure or for myself (as opposed to being assigned work by somebody else), I will be less stringent with ensuring that all the aspects of the shoot are as well executed as they can be. This is obviously a bad habit that am aiming to shed, but when it comes to still life photography, there is no reason not to get it right. You have as much time as you need to do a good job!
Unlike a landscape shoot, the light isn’t rapidly changing and unlike a portrait, you’re subject isn’t going to get bored of keeping still for long periods of time. Take advantage of this, set up your subject, lighting, backdrop and camera, try a few shots, then move things around a bit and have another go. If you get to a point where you feel like things aren’t going quite right, you can just leave everything set up, make yourself a cup of tea and come back to it refreshed later on.
Another advantage is that there’s no excuse not to have clean and sharp images, take time to get the lighting and focus just right. If you can get your hands on one, a macro lens will be ideal for this sort of work, however, if not, try selecting macro mode on your camera to give you the best chance of capturing the close up detail in your subject.
7. Get Inspired by the Masters
If you’re struggling with the lighting, composing or structuring of your shots, then you need to find some inspiration, and where better to look than to the original still life masterpieces of years gone by. Have a search online for renaissance still life artists and observe the elements of the pieces.
Studying these paintings will help you to think about form, shades and how the colors work together and will hopefully give you a few ideas on how you can shape your photography work to form strong and engaging images.
8. Develop Your Eye for Still Life Scenes
Now it’s time for you to have a go yourself. Find a quiet day in your schedule and set aside some time to practice. Try setting up your camera and backdrop by a suitably light spot next to a window and get snapping!
Once you’ve mastered the basics, try getting creative, experiment with camera angles, lighting angles and alternative light sources such as candles and lamps. You could even try getting creative with apertures and use a f/1.8 prime lens to achieve an artistic shallow focus. However, if you take one thing from this tutorial, let it be this: still life photography does not have to be of fruit and flowers! Find some unique and inspiring subject matter that gets you excited and start shooting!
9. Perfect Your Post-Production Process
Working with your pictures after the shoot shouldn't feel like a chore. It should be fun!
Photoshop actions are often touted as a great time-saver, but to my mind the biggest advantage they give you is a highly repeatable workflow. Instead of having to work through all the steps from scratch, and action makes a set of choices for you, then you teak and adjust to make things perfect.
https://photography.tutsplus.com/tutorials/10-tips-to-get-started-with-still-life-photography--photo-8278
Some examples:
Liam J Curtin

Dave Bradley
1 note
·
View note