
Don't wanna be here? Send us removal request.
Statistics
We looked inside some of the posts by pizzabass8-blog and here's what we found interesting.
Average Info
Notes Per Post
1
Likes Per Post
1
Reblog Per Post
0
Reply Per Post
0
Time Between Posts
3 days
Number of Posts By Type
Text
17
Last Seen Tumblr Blogs


Fun Fact
BuzzFeed published a report claiming that Tumblr was utilized as a distribution channel for Russian agents to influence American voting habits during the 2016 presidential election in Feb 2018.
Text
REVIEW: Cap’n Crunch’s Chocolate Berry Crunch Cereal
What is Cap’n Crunch’s Chocolate Berry Crunch?
It’s Cap’n Crunch’s newest creation and ode to Valentine’s Day – Chocolate Berry Crunch. According to the box, this cereal is “decadence – if you like the taste of chocolate – Love. This. Crunch.” Combining the Cap’n’s classic red crunch berries with a choco-fied version of his usual yellow lined rectangles, this is a cereal that wants to lure you seductively into its milky bowl.
How is it?
Truth be told it’s not nearly as sexy as the Cap’n wants us to think, but it’s also far from bad. The leading flavor is the very familiar nondescript fruit and sugary pop of red crunch berries, which comes along with a solid fluffy yet firm texture that soaks pretty easily in milk.
The chocolate pieces seem to be outweighed by the berries at around a 1-to-3 ratio, being much less dominant in most bites. The pieces themselves carry a mild cocoa flavor without any bitterness or sharp notes like in Cocoa Puffs. A little chocolate comes through the berry-forward mix, but even on spoonfuls of mostly crunchy rectangles, the chocolate is gentle, almost to a fault.
Is there anything else you need to know?
The chocolate pieces stay firmer and soak up less milk than the berries, which towards the bottom of the bowl creates an interesting textural contrast. I also noticed that the leftover dairy carried a more chocolaty flavor than most of the eating experience, which made for a nice finish.
Conclusion:
This is a tasty cereal that falls right in line with the things most people love and expect from Cap’n Crunch, but it isn’t anything super new or groundbreaking you need to rush out and get before some new version of the Cap lines the shelves.
Purchased Price: $2.99 Size: 12.5 oz. box Purchased at: Rating: 7 out of 10 Nutrition Facts: (3/4 cup) 100 calories, 1 gram of fat, 0 grams of saturated fat, 0 grams of trans fat, 0 milligrams of cholesterol, 160 milligrams of sodium, 22 grams of carbohydrates, 0grams of fiber, 11 grams of sugar, and 1 gram of protein.
Source: https://www.theimpulsivebuy.com/wordpress/2019/01/22/capn-crunchs-chocolate-berry-crunch-review/
0 notes
Text
Raspberry Braided Bread Recipe
Instructions
Mixing and storing dough: Mix the water, yeast, salt, eggs, honey, and melted butter in a 6-quart bowl or lidded (not airtight) food container. Mix in the flour without kneading, using a heavy-duty stand mixer with paddle, a Danish dough whisk, or spoon. If you’re not using a machine, you may need to use wet hands to incorporate the last bit of flour.
Cover (not airtight) and allow to rest at room temperature until the dough rises for 2 hours.
The dough can be used immediately after the initial rise, though it is easier to handle when cold. Refrigerate the container and use over the next 5 days.
Make the cream cheese filling: Mix the cream cheese, lemon zest, and sugar in a bowl until smooth. Set aside.
Line a baking sheet with parchment paper.
Dust the surface of the refrigerated dough with flour and cut off a 1-pound (grapefruit size) piece. (Another dough will be left over; you can make a second loaf and double the filling quantities, or refrigerate it for up to 5 days.) Dust the piece with more flour and quickly shape it into a rough ball by stretching the surface of the dough around to the bottom, rotating the ball a quarter-turn as you go.
Using a rolling pin, roll the dough out to a 1/4-inch-thick rectangle, about 9 x 13 inches. As you roll out the dough, add flour as needed to prevent sticking.
Lift the dough onto the lined baking sheet. Place the cream cheese filling down the length of the dough in a 1-inch strip in the center, and add the raspberry jam on top.
Using a pizza cutter, cut about 1/2-inch-wide strips down the each side. (See the photo). Twist and then fold the strips, left over right, crisscrossing over the filling. Lightly press the strips together as you move down the pastry, creating a braid. Cover loosely with plastic wrap and allow to rest at room temperature for 60 minutes.
Preheat the oven to 350F, with a rack placed at the center of the oven.
Brush the braided bread lightly with egg wash.
Bake the braided bread for 35 to 45 minutes, or until golden brown. Allow to cool.
Make the glaze: While the braided bread is cooling, mix together the confectioners’ sugar and cream. Add enough cream so you can drizzle the glaze from a spoon.
Once the braided bread is fully cooled, drizzle with the glaze and serve. (We made 2 loaves and froze one: to freeze, freeze on a sheet pan until frozen, then wrap in plastic wrap and place in a sealed container.)
Source: https://www.acouplecooks.com/raspberry-braided-bread-recipe/
0 notes
Text
I Tried to Eat Like an Italian Futurist and Learned that Fascism Isn't Delicious
All photos by Hedda Rysstad.
This article originally appeared on MUNCHIES Denmark.
On my right is a plate with black olives, fennel hearts, and kumquats. On my left is a rectangle consisting of sandpaper, red silk, and black velvet. From a speaker nearby thunders a cacophony of Bach’s "Goldberg Variations" mixed with the sound of an old airplane motor. My left hand slides over the rough sandpaper as I simultaneously lift a bitter olive to my mouth. I chew meditatively as a waiter spritzes a carnation-scented perfume on my neck.
This is Futurist gastronomy: the past’s vision of the future. I’m in the heart of Copenhagen with a view of Rosenborg Castle and not 1930s Turin, but I’ve nevertheless decided to recreate this avant-garde dish, "Aerofood," which is now almost 100 years old.
Before molecular gastronomy transformed the kitchen into a laboratory and so-called "gastronomic revolutions" swept our postmodern world, there was an Italian avant-garde movement turning our idea of what food can and should be on its head. They called themselves Futurists.
if you thought it was forward-thinking when Heston Blumenthal served a dish with an accompanying iPod soundtrack, then you’ve probably never been introduced to "Strawberry Breasts" (made with ricotta colored pink with Campari, with candied cherries as nipples). And if you thought it was progressive when Noma dropped live ants on their dishes, then you’ve probably never tried the Futurist dish "Hunting in Heaven" (rabbit roasted in Asti Spumante and cocoa powder, served with a spinach and juniper sauce and decorated with silver coins).Or "Ultravirile", which involves cow tongue, shrimp, lobster with zabaglione, as well as rooster combs. And that was one of the more manageable Futurist dinner courses.

Aerofood.
Like every avant-garde movement, Futurist gastronomy operated on a set of core tenets. For one, they advocated renouncing forks and knives in order to emphasize the tactile experience of the food. They also exhibited an exaggerated proclivity for perfume. Not just sprayed into the air, but sometimes directly into the food, such as in the dish "The Excited Pig," in which a stick of salami protrudes from a sauce made with coffee and eau de cologne.
At the forefront of the Futurist movement was the charismatic writer Filippo Tommaso Marinetti, who, in addition to being a visionary and gifted poet, was also what many prominent historians call a fascist prick.
As their name indicates, the Futurists held progress and technological innovation as more sacred than anything else, and in their Manifesto of Futurism, published in 1909, Marinetti declares their intention to “fight moralism and feminism” and “glorify war, the world’s only hygiene.” Not surprising, then, that Marinetti’s musings were a fundamental pillar of fascism, and that the Italian dictator Mussolini was a major adherent of this line of thinking.
Over time, however, Marinetti began to think that fascism had become toothless and reactionary, so he resolved to revolutionize the lives of his countrymen in a functional manner. Art and life were to become one, so every aspect of life was to have an artistic dimension. He thus delved into revamping Italian eating habits in the early 1930s.
Besides laying the foundation for a Futurist restaurant, the purpose of the book The Futurist Kitchen was to break free of Italy’s addiction to pasta, which he called “our absurd gastronomic religion.” Marinetti opposed all traditions, but his country’s penchant for spaghetti and ravioli was a major thorn in this aggressive provocateur’s side. Although pasta was of course “pleasant on the taste buds,” he thought it made his people “bulky, lazy, slow, and pessimistic,” qualities he did not find to be advantageous in this new era where agility, efficiency, and ceaseless progress were a goals unto themselves.
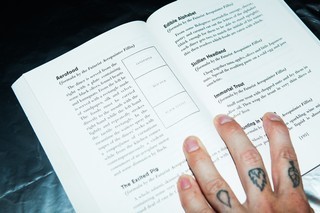
The "recipe" for Aerofood from the English translation of The Futurist Cookbook.
“Men think, dream, and act according to what they eat and drink,” proclaimed Marinetti, who wanted to make the Italian national diet more purposeful as well as more aesthetically pleasing.
He gave the restaurant a streamlined interior with aluminum-plated surfaces, and tried to center the experience on stimulating all the senses. I discover this very quickly during my attempt to recreate the Futurist dish Aerofood. The scent of perfume, the sound of airplane motors and baroque music, minimalist surroundings, rough and soft surfaces to caress while I eat, and of course the taste of the dish’s different elements. All of this plays into a sensory experience that culminates first and foremost in a state of disorientation. But progress is disorienting, so I’m sure that Marinetti would be proud.
His lofty gastronomic visions were made tangible when he and the Futurist painter Fillía opened the restaurant Taverna del Santopalato (Tavern of the the Holy Palate) in Torino on March 1931 to extensive media coverage. It was their anti-pasta stance in particular that drew journalists from near and far, but it also helped that they had connections to the fascist regime’s news publications. In any case, the dishes on the menu were so eccentric and sculptural that the press found them hard to ignore.
How about a tower of meat shooting upwards from the plate, doused with glistening honey and propped up by small meatballs made of chicken?
Or what about polyrhythmic salad, where each guest receives a music box to wind with their left hand while eating lettuce, dates, and grapes directly from the bowl with their right, and the waiter dances slowly, making “elaborate gesticulations” in front of the table until the food has been ingested?

Tactile rectangles, which are supposed to heighten the experience of eating Futurist food.
And then there’s my arrangement of olives, fennel and miniature citrus—with added noise, perfume, and tactile rectangles—all of which I’m attempting to take in. As I sit there with olives in my mouth, unable to enjoy Bach due to the airplane motor sounds thundering over it, I can’t help thinking that Futurism is a truly grotesque project. Like with so many other Futurist dishes, the overall experience is of more interest than the taste of the meal itself, because this is honestly just three types of fruits and vegetables on a plate. If this is the best that fascism could deliver, I can see why its ideology fell apart like an IKEA cabinet assembled on acid.
Like most of the Futurist body of thought, it’s mainly on paper that these dishes work. There’s something intriguing, almost sublime, about the Futurists’ worship of fleetness and progress, but it was clearly a set of thoughts that could only exist in a vacuum.
Futurism emerged during the dawning of the modern age, when democracy was taking shape and humans had discovered the miracle of flight, but before the bleaker sides of technology had revealed themselves. A time before humanity’s innocence was blown to scraps and shreds in the trenches of World War I. A time when we saw ourselves as gods and did not yet comprehend the negative influence we could have on the planet and on each other.
Marinetti never managed to eradicate the dull phenomenon of pasta, and fascism crumbled rather decisively during the decades that followed, as the world witnessed the hatred and division that its militaristic methods could lead to. Many of Marinetti’s ideas have been forgotten, but his uncompromising need for culinary experimentation lives on—and fortunately so.
Source: https://munchies.vice.com/en_us/article/d3e9zy/i-tried-to-eat-like-an-italian-futurist-and-learned-that-fascism-isnt-delicious

1 note
·
View note
Text
REVIEW: Burger King Nightmare King and Frozen Fanta Scary Black Cherry
Three years ago, Burger King unleashed its HA1loween Whopper on the masses. The steak-sauce slathered burger was really no different from the franchise’s marquee product, save one characteristic: the bun itself was pitch black. We’re talking darker than the other side of midnight or a lump of coal’s shadow. Coupled with an awesome mummy-inspired wrapper, there’s no denying that, aesthetically at least, BK hit a home run with one of the greatest seasonal fast food stunts in history.
That is, until customers started reporting some rather, uh, unsavory side effects associated with the product. And like that, the HA1loween Whopper went from being the All Hallows’ Eve junk food extravaganza of 2015 to forever being known as “that one hamburger that turned everybody’s turds turquoise.”
Well, BK has been hard at work over the last three years refining the general idea of the HA1loween Whopper, and they return this Spooktober with a steak sauce-less variation with a totally overhauled gimmick.
This time around, the revamped and rebranded Nightmare King instead comes with a glowing, algae-green bun, an extra piece of protein and a brand promise that ingesting the burger will give you ACTUAL nightmares. As in, BK even commissioned a real sleep study to prove that eating this Hallow-burger will inspire bad dreams, which has to be the single most bizarre fast food marketing hook I’ve heard of, well, probably ever.
But beyond all of the advertising hullabaloo and the empirical shock of gawping at what appears to be a radioactive Whopper, does the Nightmare King actually deliver the gustatory goods as a limited time only product?
For starters, it’s almost impossible to describe the actual color of the hamburger bun. Sorry folks, but these photos don’t do the item justice. It’s not quite a lush, verdant green; it’s more of an off-copper gold-green. If Burger King sought to make this sucker look like poisonous fungi, it nailed it out of the park.
Of course, the hamburger bun, outside of its serpent-like sheen, tastes just like any old sesame seed sandwich. It’s a missed opportunity, in my eyes; I mean, if you’re going to release a bun the same color as swamp algae, wouldn’t you want to make it taste at least somewhat like guacamole or wasabi?
Regardless, the sandwich itself — the Halloween gimmick aside — is astonishingly decent. The Nightmare King is a huge mamajama consisting of a flame-grilled beef patty, a crispy chicken patty, an absolute TON of bacon, a nice slathering of American cheese, a hearty helping of onions and a generous dollop of mayonnaise.
Needless to say, it’s a VERY filling sandwich that would be as tasty sans the reptilian-tinted bun. It wouldn’t be surprising to see BK re-release this one a little later down the line with a more traditional bun. The dressings may scream “novelty,” but rest assured this is a damn delicious burger, no matter the time of year.
Lost amid all the hubbub about the Nightmare King, though, is the fact BK has wheeled out another spooky-themed L.T.O. to mark the 2018 Samhain season. And although it ain’t getting as much publicity as the franchise’s other holiday-hued offering, the Frozen Fanta Scary Black Cherry drink is one seasonal treat you don’t want to sleep on.
Effectively a cherry-limeade slush, this thing looks and tastes the way an L.T.O. Hallow-product ought to. It has a nice, velvety, blackish-purple sheen to it, and the half tart-half fruity flavor gives it a nice Jekyll and Hyde dynamic.
And considering the Nightmare King packs a jaw-dropping 1,800-plus milligrams of sodium, you’ll DEFINITELY need to have one of these things on hand to counteract that demonic dry mouth sensation, for sure.
Purchased Price: $6.29 (Nightmare King) $1.00 (Small Frozen Fanta) Size: N/A Rating: 8 out of 10 (Nightmare King) Rating: 8 out of 10 (Frozen Fanta) Nutrition Facts: (Nightmare King) – 1,020 calories, 65 grams of fat, 20 grams of saturated fat, 2 grams of trans fat, 70 milligrams of cholesterol, 1,890 milligrams of sodium, 60 grams of carbohydrates, 2 grams of fiber, 7 grams of sugar, and 51 grams of protein. (Small Frozen Fanta Scary Black Cherry) – 120 calories, 0 grams of fat, 0 grams of saturated fat, 0 grams of trans fat, 0 milligrams of cholesterol, 65 grams of sodium, 34 grams of carbohydrates, 0 grams of fiber, 33 grams of sugar, and 0 grams of protein.
Here are a few posts that might interest you:
Source: https://www.theimpulsivebuy.com/wordpress/2018/10/26/burger-king-nightmare-king-review/
0 notes
Text
19 Non-Sandwich Lunch Box Ideas – Free Printable!
I’m sorry, the sentence “Join us here and grab your free download right away!” doesn’t make sense. There’s no link to click on and nothing to fill out, … . I do subscribe to your newsletter (and clicked on the link in the newsletter to get to this page).
Please advise! Thank you! :-)
[Reply]
Laura Reply: August 27th, 2018 at 7:34 pm
Hmmm, interesting that it seems that the form to sign up isn’t showing up for you somehow! Try clicking on this link instead to see if that helps: https://forms.aweber.com/form/19/2121858019.htm (Also, I appreciate your input into this and edited the post to include a link for others who are not able to see the sign up form!)
[Reply]
Source: http://heavenlyhomemakers.com/19-non-sandwich-lunch-box-ideas-free-printable

0 notes
Text
Chopped Wedge Salad
4 Freestyle Points 132 Calories
Classic wedge salad meets chopped salad in this easy side salad dish made with lettuce, bacon, tomatoes, blue cheese and chives with a light, Homemade Blue Cheese Dressing.
I love a good wedge salad, but I find myself chopping it up so I can get all the elements on my fork at the same time, so why not just serve it chopped!
And since I’m chopping it, I can use butter or Romaine lettuce in place of Iceberg, although any lettuce would work here. Add some grilled chicken, shrimp or fish for an easy meal or serve this as a side dish with steaks, pork chops, etc.
Variations:
Try this with red leaf or green leaf or lettuce.
If you don’t eat pork, you can use turkey bacon or omit it altogether.
If you’re not a fan of blue cheese, you can use Gorgonzola cheese.
You can replace the Blue Cheese Dressing with homemade Ranch Dressing.

Chopped Wedge Salad
Classic wedge salad meets chopped salad in this easy side salad dish made with lettuce, bacon, tomatoes, blue cheese and chives with a light homemade blue cheese dressing.
Ingredients:
6 cups chopped Romaine, Butter or Iceberg lettuce
2 small tomatoes, diced (or 1 cup halved cherry tomatoes)
5 slices cooked center cut bacon
1/4 cup crumbled blue cheese
1/2 cup Homemade Blue Cheese Dressing
chopped chives, for garnish
Directions:
Place the lettuce in a large platter, top with tomatoes, crumbled bacon, blue cheese and serve with blue cheese dressing.
Top with chopped chives.
Nutrition Information
Yield: 4 servings, Serving Size: 1 1/2 cups, 2 tablespoons dressing
Amount Per Serving:
Freestyle Points: 4
Points +: 3
Calories: 132 calories
Total Fat: 8g
Saturated Fat: 2.5g
Cholesterol: 9.5mg
Sodium: 406mg
Carbohydrates: 5.5g
Fiber: 2g
Sugar: 2.5g
Protein: 10g
All images and text ©Gina Homolka for Skinnytaste
posted August 27, 2018 by Gina
Don’t Miss a Recipe!
Get new free recipes and exclusive content delivered right to your inbox:

Source: https://www.skinnytaste.com/chopped-wedge-salad/
0 notes
Text
How to shape a couronne: Create an impressive ear without scoring
Maybe you’re an enthusiastic bread baker, but fumble a bit when it comes to shaping artisan loaves. Or you’re getting tired of slashing the same old baguettes or cross-hatched boules. Thankfully, there’s a solution. The striking couronne (crown) loaf is a joy to create, once you discover its few simple shaping secrets.
If you’ve baked with us before (in person or virtually), perhaps you’ve already experimented with shaping different bread doughs. From giant babka knots to baguettes resembling sheaves of wheat, you know how fun it is to roll, twist, and score your way to stunning loaves. That’s great! You’ll certainly delight in discovering the couronne (or crown) shaping method.
For those of you who are new to bread shaping or are daunted by the thought of stepping outside the bounds of an 8 1/2″ x 4 1/2″ loaf pan, fear not. The couronne will make you look like a pro.
Looking to expand your bread-shaping repertoire? You’ll be amazed how simple it is to shape this striking couronne. Click To Tweet
Tradition
The couronne technique comes to us from the Bordeaux region in France. Traditionally this ring-shaped loaf is composed of six to eight balls of country bread dough, blanketed by another flat disk of dough that holds the loaf together.
By process of this clever design, as the couronne bakes, the disk of dough rises away from the balls, making it seem as though the loaf was expertly scored rather than simply shaped.
Though the technique may seem complex, a few simple photos and instructions will have you well on your way to couronne success.
Prepare the dough
We’ll start by getting the dough ready for our No-Knead Multigrain Crown recipe. I really like the nutty wholesomeness of this loaf, but just about any lean (no added fat) bread dough recipe will work.
Starting the night before you’d like to bake bread, prepare your dough.
Combine the following ingredients in a large, 6-quart mixing bowl, or a large, similar capacity dough-rising bucket:
3 3/4 cups (478g) Super 10 Blend 4 1/2 cups (478g) First Clear Flour or 4 cups (482g) King Arthur Unbleached All-Purpose Flour 1 tablespoon (17g) salt 1 1/2 tablespoons (14g) instant yeast 3 cups (680g) lukewarm water 3 tablespoons (64g) honey
Mix and stir everything together to make a very sticky, rough dough. If you have a stand mixer, beat at medium speed with the paddle attachment for 30 to 60 seconds. If you don’t have a mixer, just stir with a big spoon or dough whisk until everything is combined.
Cover the bowl or bucket and transfer to the refrigerator to rest overnight, or for up to three days.
Dividing the dough
When you’re ready to make bread, generously flour a 10” to 12” ringed brotform. If you don’t have a ringed brotform, there’s a neat trick for creating a homemade version later on in this post.
Grease your hands and pull off about one-third of the dough (about 510g to 567g if you have a scale). You’ll have the opportunity to make 3 loaves out of this one batch of dough.
Place the dough onto a floured work surface, divide it into eight equal pieces, and shape each piece into a ball. Set aside seven of the balls smooth-side down (upside down). This is a good reminder that you’ll be placing the balls upside down in the brotform later.
Roll the 8th ball into a thin disk roughly 8″ in diameter.
Shape the couronne
With all the pieces of our couronne laid out, let’s shape our loaf. Brush a thin coat of oil around the perimeter of the dough disk. The separation of the disk from the balls is what creates that lovely crested ring (or “ear”) around the top of the finished loaf. The oil will prevent the balls of dough from sticking to the disk.
Next, carefully drape the disk, oiled side up, over the center hump of your mold; it should cover about 1” beyond the base of the brotform’s center hump.
Again, your brotform should be generously dusted with flour here. If not, the dough will stick to it when you try to turn it out of the mold. I can attest to that!
Now it’s time to add the dough balls. Space them evenly around the center hump, partially on top of the dough disk, smooth side down. The balls will barely touch, and the middle of the top of each ball will fall about even with the perimeter of the disk.
The final piece of shaping involves a little cutting (no slashing, I promise). Using a paring knife, cut from the center of the dough disk down to each point between two balls of dough. Wrap each triangular section of dough over its corresponding ball of dough to form a star-like pattern.
Let the dough rise
That’s it. You’re done with the shaping! Now cover the dough and let it rest until it’s a little puffy and no longer cool to the touch. Like most no-knead dough, this one doesn’t do a lot of rising. You’re mostly looking for a relaxed, non-springy reaction when you lightly press on one of the balls with your finger.
This 60 to 90 minute rest offers the perfect window to start preheating your oven to 450°F. If you’re using a baking stone – which I recommend for an extra crispy crust – place it in the middle of the oven. Then, place a shallow metal or cast iron pan (not glass, Pyrex, or ceramic) on the lowest oven rack. We’ll add hot water to the pan when the bread goes into the oven, again, for an extra crisp, crackly, bakery-style crust.
Turn out the dough
This is the moment I eagerly anticipate every time I make this loaf. It’s the moment when I get to see the result of my careful shaping and crafting.
The easiest way to do the turn out is using parchment paper. Simply lay the parchment over the loaf. It will be the easy-to-maneuver vehicle by which your sticky dough will make it to the hot oven.
Your next move, if you’re baking on a stone, is to pick your transferring weapon. I’ve always liked a baking peel, but an upside-down sheet pan also works. Both serve to help you get the loaf to the oven without burning yourself. Center the peel or bottom side of the pan over the parchment-covered loaf. With one hand under the brotform and the other in the middle of the peel or pan, swiftly flip all parts at once. Your hands will have switched positions.
Place the peel or pan back on the work surface and gently remove the brotform to reveal the loaf. Ta da!
You can use this same method if you’re baking on a pan. Center it top side down over the parchment covered loaf and follow the flipping instructions above.
Bake
Have about a cup of hot water at the ready before you open the oven.
Quickly transfer the loaf to the oven on parchment onto the hot stone, if you’re using one, or simply onto a middle rack, if it’s on a pan.
Carefully pour the hot water into the hot pan at the bottom of the oven; it’ll bubble and steam. Immediately shut the oven door to prevent the steam from escaping.
Bake the couronne for 15 to 20 minutes, until it’s a deep, golden brown and the internal temperature is at least 190°F on a digital thermometer.
Remove the loaf from the oven and transfer it to a rack to cool.
Voila! Your very own couronne.
Practice makes perfect
If you’re like me, you’ll need to practice at least a couple times to perfect your technique. The best part about this recipe is that it can make three loaves. Moreover, you have up to three days to use it. So, if your first try was not everything you wanted it to be, simply tear off another piece of dough and have another go.
Homemade brotform
Although the ringed brotform is a handy tool to have when shaping a couronne, it’s not obligatory. All you need is a 9″ round cake pan, a ramekin, and a tea towel, and your very own homemade ringed vessel will be ready in no time.
Simply place the ramekin upside down (or right side up for that matter) in the center of your 9″ pan.
Drape the tea towel over the pan and press it into the trench you’ve made around the ramekin. Now liberally dust the tea towel with all-purpose flour.
Just like that, your homemade mold is ready.
You’ll follow the same process for preparing and shaping the dough as we did for the brotform, so that’s easy. The trickiest part comes when you need to turn the dough out of your mold. It’s less tricky if you can find a ramekin and pan that are roughly the same height. This will avoid any gaps between peel or pan and the mold, making for smooth maneuverability. If you do happen to have an uneven top surface, you’ll just need to be extra careful when flipping. A steady, firm hold is all it’ll take.
Compare and contrast
In a blind side-by-side tasting, you won’t notice a difference between a loaf that was shaped in a ringed brotform and one that was shaped in its homemade cousin. The bread will be unaffected in both flavor and texture.
Visually, however, the finished loaf shaped in a homemade mold will look evenly white compared to a brotform-shaped loaf (which will show its mold’s ringed pattern). You can brush away any excess flour, but a little on the surface creates a nice contrast against what lies beneath the ear.
All told, don’t these loaves make a beautiful pair?
Couronne shaping: key takeaways
It is best to use a lean dough without enrichers like butter, oil, or milk, and/or much sugar. Bread that has added fat will have a softer crust, which will affect – in addition to the texture of the loaf – the beautiful ear that forms during baking.
Be sure to generously dust your shaping/proofing mold with flour. The last thing you want is for your beautifully crafted loaf to stick to the mold when you’re ready to bake it. Believe me, I know!
It’s good practice to brush oil around the perimeter of your dough disk. If you don’t remember, it’s not the end of the world. Your loaf just may not have the same loft to its ear.
Remember that you’re shaping this loaf upside down. What you’re seeing as you form the couronne will become the bottom of the finished loaf. You won’t see the top, so just be sure to place the dough balls in top side down.
Last but not least, don’t get discouraged. If your first loaf doesn’t turn out exactly the way you want, you have two other opportunities with this No-Knead Multigrain Crown Recipe to try again. I’ve made a countless number of couronnes, and they have all come out differently. Fear not. With these step-by-step instructions and photos, and a little practice, you’ll have the couronne down in no time.
Do you have other favorite bread-shaping techniques? We’re ever curious. Please share your tips and techniques in comments, below.
Thanks to Anne Mientka for taking the photographs for this post.
Source: https://blog.kingarthurflour.com/2018/08/20/couronne/
0 notes
Text
Clean Eating Fried Cauliflower Rice Recipe
This clean eating cauliflower fried rice recipe is a wonderful way to ring in the Chinese New Year!
Today is the beginning of the Chinese New Year! The year of the Pig, to be exact. A year that should bring wealth and prosperity. (Yes, please!) So I thought I’d offer up a little recipe that can help you celebrate!
As I’ve mentioned before, I’m not a huge rice eater. I like it, but I don’t make it much. What I make more of is cauliflower rice. I love the stuff! It’s easier on my blood sugar thanks to being lower in carbs, and the flavor is wonderful. Gotta love those veggies! So I got to work on a recipe that would replace the traditional rice dish at my Chinese New Year dinner table this year, and it was totally tasty!
FOOD SYMBOLISM:
Wondering why this dish is perfect for Chinese New Year? Here’s what the ingredients mean!
Cauliflower rice – Rice is for wealth, fertility and luck.
Carrots – Good luck.
Snap peas – Unity.
Mixed Vegetables – Family harmony
So you see, it’s a great dish all the way around! You get all that luck and wealth along with good health from eating a bunch of veggies!
Remember to subscribe to my free, Gracious Pantry Newsletter to receive all my latest recipes in your inbox! Click here to sign up!
YOU MIGHT ALSO ENJOY THESE CLEAN EATING RECIPES:
Enjoy!

CLEAN EATING CAULIFLOWER FRIED RICE RECIPE:
Clean Eating Chinese Fried Cauliflower Rice
A delicious substitute for this traditionally, carb-heavy dish!
Course: Side Dish, Vegetables
Cuisine: Chinese
Yield: 4 servings
Calories: 235 kcal
Author: The Gracious Pantry
Ingredients
1/4 cup Tamari sauce
2 tsp. rice vinegar
4 tbsp. sesame oil (divided)
12 oz. riced cauliflower (I used frozen)
4 medium garlic cloves (minced)
2 tsp. minced ginger
1/2 cup minced yellow onion
1 cup grated carrots
1 cup snap peas
1 cup thinly sliced white mushrooms
1 cup frozen peas
1/2 cup vegetable broth (on reserve if needed)
Instructions
In a small bowl, mix together the tamari sauce, rice vinegar and half the sesame oil. Set aside.
In a large skillet, warm the remaining sesame oil and add the cauliflower, garlic, ginger, onion and grated carrots to the skillet.
When all is warmed through, add in the remaining vegetables and continue to cook until everything is cooked through.
If the skillet dries out, use the reserve broth a little at a time, as needed during cooking.
Serve as a side dish with a little extra Tamari sauce if needed.
Recipe Notes
Please note that the nutrition data given here is a ballpark figure. Exact data is not possible.
Nutrition Facts
Clean Eating Chinese Fried Cauliflower Rice
Amount Per Serving (0.25 the recipe)
Calories 235 Calories from Fat 135
% Daily Value*
Total Fat 15g 23%
Saturated Fat 2g 10%
Sodium 980mg 41%
Potassium 652mg 19%
Total Carbohydrates 19g 6%
Dietary Fiber 5g 20%
Sugars 8g
Protein 7g 14%
Vitamin A 119%
Vitamin C 90.9%
Calcium 6.2%
Iron 11.2%
* Percent Daily Values are based on a 2000 calorie diet.

Source: https://www.thegraciouspantry.com/clean-eating-fried-cauliflower-rice-recipe/
0 notes
Text
What Is Burnout And How To Take Care Of Yourself
What is burnout? Most of us will experience some level of burnout in our lifetime, and nourishing yourself mentally, emotionally, and physically is key to preventing it.
Did you know that 50% of medical students, physicians in training, and practicing physicians are at significant risk of burnout? (1) It amazes me, yet I understand, the people who are giving all their energy to taking care of others, put their own wellbeing and health lower on the priority list. We’re peeling back some layers to help answer the question of what is burnout and how to tell if you have burnout.
But guess what, burnout doesn’t just affect physicians and people in the medical professional industry, it impacts all of us from entrepreneurs and business owners, to mothers, to students — burnout doesn’t discriminate.
This is why one of my favorite mantras rings so true to my lifestyle, but also I hope for all my fellow health professionals out there — you have to show up fully for yourself in order to show up for others.
You have to show up fully for yourself in order to show up fully for others.
What Is Burnout?
Burnout is defined by the World Psychiatry as “… a psychological syndrome emerging as a prolonged response to chronic interpersonal stressors on the job. The three key dimensions of this response are an overwhelming exhaustion, feelings of cynicism and detachment from the job, and a sense of ineffectiveness and lack of accomplishment. The significance of this three‐dimensional model is that it clearly places the individual stress experience within a social context and involves the person’s conception of both self and others.” (3)
From personal experience, burnout is a very real, tangible, and emotional state that touches my core. It’s very easy to pour yourself into something you love so much and are deeply passionate about building, but there’s gotta be a limit and I learned a lesson early on about this. During my second year of running the company, I had a case of burnout which included anxiety, panic attacks, mild depression, low immune function (kept getting sick), low appetite, etc. This went on for months before I knew what was happening let alone how to describe how I was feeling or get to the root cause. I was truly living a life of a one-woman-show leading a growing company, even with an amazing team, and I let my own health take the back seat while giving all my energy to this community.
I’ve been open about this experience because it’s so important we take off the filter of Instagram and social media and share what’s really happening behind the scenes — if you’re interested, you can check out this podcast interview here and here where I shared a bit about my burnout story, triggers, and how I overcame in hopes that it helps you.
I’m not just grateful I had this challenging time, but I’m so happy I experienced this because now I’m able to recognize my triggers through building the mind-body awareness of what I need, how to set boundaries, and what I do as a daily practice to keep myself grounded, focused, and feeling great. I write this article to share with you and shine a light on the importance of mental wellbeing, emotional wellbeing, spiritual wellbeing, and physical wellbeing in this world of everything digitized and a bit disconnected — if this article helps you or one of your loved ones, then I’ve done my work.
Burnout Is Bad For Our Health
Stress isn’t always a bad thing, we actually need stress for certain situations. We know too much stress in our lives is bad for our health, and if burnout is the result of chronic stress, then you guessed correctly that burnout is bad for our health too. Stress can be either a triggering or aggravating factor for many diseases and health conditions (4).
Chronic stress and our brain health
Stress doesn’t just make us feel like we have a serious case of brain fog, but it’s this “fog” of stress that decreases overall cognitive performance from decision making, paying attention, judgment, and learning (4).
Not to mention, some studies show the literal structure of our brain changes with chronic stress — including the gray matter which is responsible for higher brain functioning like decision making, thinking, and is packed with nerve cells, the other half of our brain volume is called white matter. White matter is a network of fibers that allows the brain to communicate between regions, it gets the name white matter because there’s a white myelin sheath surrounding it which is responsible for the electrical flow of signals between neurons (7).
Of course, our brain health is directly related to the health of our immune system. Our body produces cytokines in the brain during a time of psychological stress, which induces an acute phase response in our body which happens naturally when we get an infection or a wound/cut/tissue damage — but in chronic stress, we have increased levels of circulating cytokines (one of several inflammatory biomarkers).
Our mind and body are a machine, when we’re in a situation of stress (i.e. the brain thinks we’re in danger), the neuroimmune communication is set in motion as the inflammatory markers increase (i.e. the cytokines produced by stress-stimulated immune cells) tell the body we’re in stress which further makes this situation a repeating cycle. The damage comes when this cycle becomes persistent, the abnormal levels of cytokines can damage the parenchyma (i.e. the functional bulk of an organ or tissue) which can physically change the structure of our brain (8).
Chronic stress and our immune system
Stress becomes bad for our health when it’s chronic — our body has a negative feedback mechanism that controls the stress response and when you’re in chronic stress, this response doesn’t work. A resistance develops and the levels of molecular mediators of stress remain very high which then compromises our immune system and in the long term can damage organs and tissues (5).
Inflammation, which in most cases is a prelude to disease, also occurs in people who have chronic stress. The neuroimmune axis (in a nutshell, how our immune system communicates with the nervous system), gets overstimulated and breaks down which can cause immune imbalances, low-grade inflammation, hormonal imbalances, and may lead to disease such as atherosclerosis (5).
There are many known health conditions that are a result of stress and chronic stress including inflammation, cardiovascular conditions, diabetes, cancer, autoimmune issues, depression, and anxiety (8). Eating a diet rich in foods that reduce inflammation is key, but also managing stress is pivotal!
14 Potential Signs Of Burnout
Because burnout is difficult to diagnose and there are no textbook criteria for the diagnosis, some studies suggest that there they may be a biomarker used in diagnosis, DNA methylation markers might be able to show how individuals respond uniquely to stress and the psychopathology differences of burnout and other mental disorders (3).
Again, these signs and symptoms of burnout will look different for everyone but be aware and on the lookout if you or someone you love is experiencing any of the following:
Spending more time alone than your normal — avoiding activities you normally would enjoy engaging in
Experiencing emotional highs and lows, emotional instability
Feeling overwhelmed, fear, anxiety, self-doubt that’s hard to shake
Feeling “alone” and like you’re “doing it all”
Working longer hours than normal while being preoccupied with work while not at work
Not spending the time to yourself in self-reflection or activities that make you feel good and connected with yourself
Feeling very tired despite sleeping your normal hours — hard to wake up in the mornings
Feeling like you’re on a plateau with work/personal/life
Feeling detached from your beliefs, core values, and goals
Having a shorter temper than your normal
Psychosomatic feelings of health issues: hormonal imbalances, digestive issues, colds, that are difficult to identify or diagnose
Having a general feeling of “lack” — like you’re not doing enough or are enough
Experiencing panic attacks, dizziness, or increased heart rate
Feeling like you can’t think straight or have brain fog
How Do You Know If You Have Burnout?
The tricky thing about burnout is its kind of like a slow leak, it’s not as though you wake up one morning feeling burnout, it’s more of a gradual rise of these symptoms and signs which makes it more difficult for some people to realize that something is wrong in the first place. The first and most important step before you dive into self-reflection or trying to diagnose yourself is to go talk to someone — anyone from a friend to a therapist.
Burnout looks different for everyone depending on your lifestyle and causes of burnout, but take a look at some of these questions to ask yourself and gauge where you might be in the spectrum of burnout. Some of these questions were taken directly from a study from the College of Family Physicians of Canada in 2008 and the other questions are from personal experience dealing with burnout and the questions I asked myself (2).
Do you schedule and spend time with yourself?
Do you schedule and spend time with your family?
Do you eat healthy meals to nourish your body?
Do you make sleep a priority?
Do you feel excited and joyful about work and life?
Do you tend to identify or recognize yourself as a “workaholic”?
Do you make the time to engage in hobbies and activities outside of work?
Do you routinely talk about your challenges, hardships, and feelings with a friend/family member or professional?
Do you make time for exercise and movement weekly?
Do you spend time in self-reflection?
Do you place high expectations on yourself or others?
Do you emotionally react to others in highs and lows — i.e. happy to sad quickly?
Do you have a history of depression, anxiety, or overwhelm?
Do you have a history or currently have hormonal imbalances?
Do you obsessively think about work/health/one topic?
Again, this article isn’t a diagnostic tool for burnout, that’s where licensed psychologists come into play. This can start to awaken some journal prompts for you to explore your situation and reflect.
The ~ Feel Better From Burnout ~ Checklist
First, take a deep breath and know that it’s okay, you’re not alone, and there are so many lifestyle things you can do to feel better. Here are a list of items, books, resources, and foods that may also help you if/when you experience burnout.
Right now, let this be a time that you put yourself first and concentrate on making healthy choices for yourself, and getting into the routine of practicing your unique definition of self-care. This can be as simple as going to bed and waking up at consistent times to train yourself and your body on regular sleep patterns, making a couple healthy recipes you want to try or if you need help with that just as a friend or loved one to cook with you!
Here are a list of items, books, resources, and foods that may also help you if/when you experience burnout. These resources are things I personally used and still use to this day if I feel burnout coming on:
Books to read:
Power of Now — a personal favorite and for me, a life-changing book
Judgment Detox
The Alchemist
Heart Talk
Essentialism
Option B
The 7 Habits Of Highly Effective People
The Four Agreements
Daring Greatly
Feel good recipes:
How to chill out:
Find something you love to do that’s creatively stimulating — art, dance class, poetry seminar, etc.
Go outside. Breathe in the fresh air and take a hike in the woods
Get as ~ woo ~ as you want by lighting some sage, palo santo, candles, or essential oils to get some aromatherapy going
Take a bath with good smelling essential oils that make you feel good
Read some inspirational books mentioned above
Journal. Make the time to write everything that’s going on in your head, out on paper to clear your mind
Sleep at least 8 hours a night — check here for more tips on how to sleep well
Find joy in activities you like again by not placing an outcome or a measurement of achievement, just do it because you like it!
How To Feel Better After Burnout
After you feel you’ve gotten over the hump of burnout, this is one of the most beautiful times, not because you feel like a unicorn skipping on sunshine, but because you now have the self-awareness to pinpoint your mental, emotional, physical health status to then prevent future burnout.
You can now reflect and learn your unique signs of burnout and how your body is communicating with you about signs of burnout before you experience it the next time. A couple of ways to be more proactive this time around is to set clear concise boundaries with work/whatever was a trigger for causing your burnout, learning the power of saying no, reclaiming your personal alone time on the weekends or during the week, cutting down on the amount of work if possible, engaging in weekly creative activities that make you feel good, and doing things for the sake of joy without attaching an outcome for achievement with them.
If You Need Help, Talk About It.
We all need help — I’ll be the first to happily, loudly, and proudly share that what got me through my case of burnout was speaking with a my family, friends, licensed therapist, checking in with my physician regularly, and engaging in other modes of functional medicine that kept me grounded like acupuncture, meditation, yoga, and deep breathing exercises. It took multiple pillars of health and is still a daily practice.
Always remember, that you’re not alone even if it feels like you are and that nothing ever stays constant — we’re always evolving and changing, that’s true for the hard times too.
Resources:
References:
Yaribeygi H, Panahi Y, Sahraei H, Johnston TP, Sahebkar A. The impact of stress on body function: A review. EXCLI Journal. 2017;16:1057-1072. doi:10.17179/excli2017-480.
Mariotti A. The effects of chronic stress on health: new insights into the molecular mechanisms of brain–body communication. Future Science OA. 2015;1(3):FSO23. doi:10.4155/fso.15.21.
Bakusic, J., Schaufeli, W., Claes, S., & Godderis, L. (2017, January). Stress, burnout, and depression: A systematic review of DNA methylation mechanisms. Retrieved from https://www.ncbi.nlm.nih.gov/pubmed/27998510
Chronic Stress Can Damage Brain Structure and Connectivity. Psychology Today.
Mariotti A. Advances in pediatrics. The effects of chronic stress on health: new insights into the molecular mechanisms of brain–body communication. Published November 2015.
Source: https://nutritionstripped.com/what-is-burnout/
0 notes
Text
Shrimp, Peas and Rice
8 Freestyle Points 346 Calories
I love this quick and easy Shrimp, Peas and Rice dish, which can be made with white or brown rice.
Last week I shared this Shrimp, Broccoli and Orzo dish. For those of you observing Lent, I thought I would share another quick 30-minute meal using shrimp! You can see more Lenten friendly recipes here.
This dish always brings back memories of my childhood. My Dad used to make this with white rice and lots of grated cheese at the end, almost like a risotto, but not. My Dad used a lot more butter when he made it, but this lightened up version is just as delicious. The brown rice cooks in chicken broth giving it lots of flavor.
Tips and Variations:
I used converted brown rice to speed this up, which took about 25 minutes for the rice to cook. You can also make if faster with a quicker cook brown rice, if so, follow the directions on the package.
Whenever shrimp is on sale, buy a pound or two and ask them for the frozen shrimp since all shrimp sold has been previously frozen and is thawed in the store, this way you can freeze it and use it only when you need it. Note, when weighing your shrimp, peel it first. With the skin on, 1-1/4 lbs usually yields 1 pound peeled.
For variations, swap the peas out for peas and carrots or chopped mixed vegetables.
Serve this with a vegetable on the side like sauteed string beans.
Best Shrimp Recipes For Dinner:
Shrimp, Peas and Rice
I love this quick and easy Shrimp, Peas and Rice dish, which can be made with white or brown rice.
Ingredients:
1 tablespoon unsalted butter
2 cups low sodium chicken broth, canned or homemade (veggie broth for lent)
1/2 cup frozen peas
1 cup uncooked converted brown rice
4 teaspoons olive oil, divided
1-1/4 pounds peeled and deveined shrimp
2 tbsp grated Pecorino Romano cheese
1 tbsp chopped parsley, for garnish
Directions:
In a large heavy skillet melt the butter over medium heat. Add the rice and saute about 2-3 minutes.
Add the chicken broth and peas and bring to a boil. When just about all the liquid is absorbed just skimming the top of the rice, cover and reduce heat to low.
Cook, covered on low heat 20 minutes, until rice is cooked through. Shut off and let stand covered 5 minutes.
Meanwhile, in second large skillet, heat 2 teaspoons of the olive oil over medium heat until hot.
Season shrimp with salt and pepper and add to hot skillet. Cook about 2-3 minutes, until the shrimp is opaque and cooked through. Remove shrimp from pan and set aside.
Add the 2 remaining teaspoons of olive oil to the skillet on high heat and add the cooked rice, shrimp, grated cheese and parsley and saute another minute or two to slightly crisp, mixing well.
Nutrition Information
Yield: 4 servings, Serving Size: 1 1/3 cup
Amount Per Serving:
Freestyle Points: 8
Points +: 8
Calories: 346 calories
Total Fat: 8g
Saturated Fat: 3g
Cholesterol: 156mg
Sodium: 1000mg
Carbohydrates: 36g
Fiber: 3g
Sugar: 1g
Protein: 28.5g
All images and text ©Gina Homolka for Skinnytaste
posted March 22, 2019 by Gina
Don’t Miss a Recipe!
Get new free recipes and exclusive content delivered right to your inbox:
Source: https://www.skinnytaste.com/shrimp-peas-and-rice/
0 notes
Text
10 Tips For Stress-Free Holiday Hosting
Are you planning to host a dinner or a party this Holiday Season? If you are, don’t stress out about it. You can use these tips to make your hosting as stress free as possible.
#1 Put together a plan
Getting together a plan for your party will buy, help you know what you want to do, how it needs to be time, what you need to, and when you need to start the cooking.
#2 Choose a drink of the night
If alcohol is on the menu, select a cocktail you can make ahead of time. That will be the drink of the night, making it easy to prepare and serve. It will also keep your alcohol costs under control.
#3 Determine your timing
With your plans laid out, you can start putting together a timeline. When do you go shopping? When do you send invitations? When do you start cooking ahead of time? When do you order things? Knowing your timeline will make the party go smoothly
#4 Fix a favorite recipe
If you have a recipe that you are known for, make it the centerpiece of your menu. Choose a family favorite. Doing something you are familiar with will take the risk out of a culinary failure. If you want to try a new recipe, have a trial run before the party.
#5 Pre-make and buy ahead
Pre-make as much of the food ahead of time as possible. That way, the day of the party won’t be filled up with cooking. Buy food items ahead of time such as Smithfield ham or sides.
#6 Make sure you have serving platters and utensils
With your menu in mind, make sure you have serving platters and utensils. You don’t want to be scrambling at the last minute on party day. If you find yourself short, ask friends or family to borrow what you need.
#7 Plan a salt water bath to cool drinks
Putting canned soda into a salt water bath cools it down quickly. Use a cooler or large bowl as drink central.
#8 Ask someone to help the day of the party
Having an extra set of eyes on your drink cooler, snack tray, or appetizer bar will ensure it remains filled.
#9 Serve buffet style
A sit-down dinner involves a lot more work than a buffet, especially for a large gathering. Serving buffet style lets people get food as they want it. You can fill it as needed from items kept in the kitchen.
#10 Lay everything out the night before
Getting things set up the night before will take to-do items off your list for the day of the party. Get your serving platters and utensils out. Label them if you need to.
Each of these tips will help you host the best gathering with the least stress possible. Let us know the tips and tricks you use for your parties this Holiday Season.
Source: http://kissmyspatula.com/americas/10-tips-for-stress-free-holiday-hosting/
0 notes
Text
Chocolate Chip Cookie Bars
These soft and chewy Chocolate Chip Cookie Bars are great warm out of the oven or grab a square when cooled! A quick way to do chocolate chip cookies – bake dough pressed in a pan and cut into squares!
This recipe is a favorite in our home and comes straight from one of my favorite blogger people, Sheila, from Eat2Gather. With the Memorial Day weekend, I thought I’d let you in on this one in case you’re looking for an easy way to do cookies.
I like that these are baked in one pan then cut into squares as opposed to traditional cookies where you have to wait for a batch to bake before you can bake another batch (or two). This way, the cookies are done and you can cut them right away or wait for them to cool before all the kids come running to grab a square (or two). 🙂
Try these other cookie bar recipes:
S’mores Cookie Bars Roasted Marshmallow M&M Cookie Bars Cinnamon Roll Cookie Bars Oatmeal Lemon Cream Bars Seven-Layer Bars Chocolate Peanut Butter Bars
These soft and chewy Chocolate Chip Cookie Bars are great warm out of the oven or grab a square when cooled! A quick way to do chocolate chip cookies - bake dough pressed in a pan and cut into squares!
Servings 3 dozen squares, or more
Ingredients
1 cup unsalted butter at room temperature
1 1/2 cups light brown sugar
1/2 cup granulated sugar
2 teaspoons pure vanilla extract
3 large eggs
3 cups all-purpose flour
1 teaspoon baking powder
1 teaspoon baking soda
1 teaspoon salt
3 cups semi-sweet chocolate chips
Instructions
Preheat oven to 350°F. Line a large rimmed baking sheet with foil, making sure the foil hangs over the edge. Grease with nonstick spray.
In a large mixing bowl, cream together the butter and sugars until light and fluffy (about 1 minute). Stir in the vanilla and eggs, one at a time.
In a separate medium bowl, whisk together the flour, baking powder, baking soda, and salt. Add the dry ingredients to the wet ingredients and stir until just combined. Fold in the chocolate chips.
Using a large rubber spatula or wooden spoon, spread the dough onto the prepared baking sheet and spread into an even layer. The dough may be thin, but will puff and close holes during baking.
Bake for 20-25 minutes, until cooked through and edges are lightly browned. Serve warm or let cool and lift edges of foil to remove from pan to cutting board and cut into squares.
Recipe Notes
Source: Eat2Gather
The baking sheet I use is about 12x17, but I have also used other sizes. You may need to adjust the baking time depending on the size of your baking sheet.
Optional: Before baking, sprinkle regular M&M's onto top of dough and lightly press. This is one of our favorite additions!
Source: https://www.seededatthetable.com/chocolate-chip-cookie-bars/
0 notes
Text
Carrot Gnudi with Creamy Walnut Sauce
Thanks to Vitamix for sponsoring this post!
Hello lovelies! After that brief hiatus I am well and truly back. Like properly, this time, as I’ve just actually finished all my coursework and finals for university. I haven’t *officially* graduated yet but I will officially have my Food Science and Nutrition BSc degree in about a month and a half.
So now that I’m properly moved back to London I can focus on creating recipes again! And that break has given me ample time to get inspired so there’s much content in the works. I’m also going to Portland and New Mexico in a few weeks which I’m sure will inspire some future recipes. Today, however, we’re focusing on these little gnudi (pronounced nyew-dee) dudes!
You may be wondering what these are: think of them like ricotta gnocchi but less flour-y and more ricotta-y. As a result, the dough is a LOT wetter than a classic gnocchi dough and thus, they have a little clever step to help you form them; you blob the mixture into a tray generously lined with semolina and sprinkle even more semolina on top. This then sits in the fridge for 2-48 hours so that the gnudi soak up that semolina and form a light crust around the outside. This stops them falling apart when you boil them.
Usually, gnudi are plain but here I’ve used my Vitamix Ascent Series blender to blitz cooked carrots into a puree which I folded into the dough. They’re boiled and then fried in a bit of sage butter to get super criiiiispy. I made a classic Italian walnut sauce which the Vitamix is perfect for, blitzing the nuts into THE MOST smooth, luscious sauce which sits under the gnudi. I even scattered on some roasted carrot coins to add extra flavour & veg to the dish. All in all it’s a pretty easy yet impressive dish to make (so perfect for dinner parties) but it’s also fun and a bit hands-on so is great to make with kids!
Makes 35-40 gnudi (serves ~6 people as a main or 12 people as a starter)
Ingredients
For the carrot gnudi:
1250 g carrots, tops removed
250 g semolina
1 tbsp olive oil
2 medium eggs
500 g ricotta cheese
150 g plain white flour
salt + black pepper
For the creamy walnut sauce:
150 g walnuts, toasted
1 slice (~50g) bread, crusts removed
200 ml water
30 g Parmesan cheese, grated
3 tbsp extra virgin olive oil
1 clove garlic, peeled
To finish:
3 tbsp olive oil (refined)
1 tbsp unsalted butter
12 sage leaves
Instructions
Preheat the oven to 200oC (400oF). Dust two baking trays with half of the semolina.
Take 500g of the carrots and slice into 2mm thick coins. Toss on a tray with the olive oil and roast in the oven for 30-40 minutes until golden.
Make the gnudi:
Cut the remaining carrots into quarters and add to a pot of boiling water. Leave to simmer on the stove for 20-30 minutes until super soft. Drain and tip into a blender and blitz until you get a mostly smooth puree (I use the tamper stick with the Vitamix to help it all blend up). Tip the puree into a large bowl.
Line a plate with two pieces of paper kitchen towel and dump the ricotta out onto it. Cover with two more pieces of paper kitchen towel and press down to flatten the ricotta out (this is to remove lots of the moisture from the ricotta). Peel off the paper towels and tip the ricotta into the bowl. Crack in the eggs and mix together until well combined.
Add the flour and a generous pinch of salt and ground black pepper to the bowl. Gently stir together until just combined.
Use a mechanical ice cream scoop or a tablespoon to scoop up some of the mixture - you want about 2 tablespoons of dough per gnudi. Blob that onto the tray lined with semolina and repeat until all the mixture is used up. Sprinkle the remaining semolina over the top of the blobs (and you can even spoon the semolina off the tray onto the gnudi). Set in the fridge for 2 to 48 hours so they soak up the semolina.
Make the walnut sauce:
Tear the bread into small pieces and soak in the water for 5 minutes. Tip the bread and water into the jug of a blender (like a Vitamix) along with the walnuts, parmesan, olive oil and garlic. Blitz until silky smooth then season with salt and pepper, to taste.
To serve:
Bring a large pot of salted water to the boil. Lower in some of the gnudi (I think 4-5 per person is a good amount) and let simmer for 5 minutes.
Meanwhile heat the olive oil, butter and sage leaves in a large frying pan over a medium-low heat. Lift the gnudi out of the pot with a slotted spoon and gently place into the frying pan. Let cook until golden underneath (about 2-3 minutes) then flip and let the other side get golden before removing them from the frying pan along with the sage leaves.
Spread a heaped tablespoon of the walnut sauce in the bottom of the bowl. Top with the gnudi, crispy sage and the roasted carrots. You can also grate some extra parmesan on top, if desired! Eat immediately.
Recipe Notes
once the gnudi have been soaking up the semolina for at least 2 hours, you can freeze them for later: Just freeze on the baking tray for 1 hour until firm before sliding them into a sandwich bag and placing back into the freezer. You can cook them straight from frozen in 6 minutes as per usual!

Related
Source: https://topwithcinnamon.com/2018/05/carrot-gnudi-creamy-walnut-sauce.html

0 notes
Text
Pomegranate Martini
Pomegranate Martini - Easy, Beautiful and Delicious Cocktail Recipe
We are a participant in the Amazon Services LLC Associates Program, an affiliate advertising program designed to provide a means for us to earn fees by linking to Amazon.com and affiliated sites.
Source: https://toriavey.com/toris-kitchen/pomegranate-martini/
0 notes
Text
Anatomy of a Weeknight Dinner
6:50 Commuter train pulls into northern New York suburb. 7:00 Two parents drive home, walk into house, shout “hellooooooo?” Wonder where kids are. 7:01 Reminisce briefly about the days when kids were at home waiting for them. 7:02 Reminisce briefly about the days when the kids, not the puppies, jumped on mom or dad when they came home from work. 7:03 Reminisce briefly about the days when one kid ate nothing but pasta and pizza. 7:10 Dance same old dance: What do you want to eat? What are you in the mood for? I don’t know should we go out? Sure. Where? I don’t know. Are the kids even eating with us? Let’s just cook in. In case we have to pick them up. OK so what do you want to cook? I don’t know what do you want to cook. Do we have anything? 7:12 Looks in fridge, spies a bunch of kale and enough prosecco for two Aperol spritzes. Looks in pantry, spies a few cans of Great Northern white beans. 7:15 Mix up spritzes; Pretend they are still on vacation. 7:30 Sauté garlic, onion, red pepper flakes in olive oil. Adds beans, kale, herbs. Then, off heat, lemon, parm. Thinks about tossing with pasta, instead toasts some frozen baguette slices from the freezer. 7:45 Dinner.
White Beans & Kale The recipe as written makes four side dish servings. If you stretch out with a half pound of pasta, or a few baguette toasts, it serves four as a main. If it’s late August, an ear of buttery salty corn alongside of this would not be a bad thing.
4 tablespoons olive oil 1 garlic clove, halved ¼ cup finely chopped onion Kosher salt & freshly ground pepper Pinch red pepper flakes 6 ounces (about 5-6 cups) chopped kale, washed and destemmed (curly or Tuscan) 2 14-ounce cans white beans (such as cannellini or Great Northern), rinsed, drained and dried as much as possible 1 tablespoon butter Fresh thyme or chives Juice from half a small lemon (about 1 tablespoon) ¼ cup freshly grated Parmagiano Reggiano
Add 2 tablespoons olive oil to a large skillet set over medium heat then place garlic halves cut side down, swirling them to infuse the oil. Remove after about a minute, once garlic becomes fragrant. Add onion, salt, pepper, red pepper flakes and cook until onion is slightly wilted. Add kale and cook another 2-3 minutes until greens shrink. Add beans, remaining olive oil, and butter, tossing until beans are warmed through and butter has melted.
Place beans and kale in a serving bowl, and toss with lemon juice and Parm. If serving on toasts, smash them a little in the bowl so they don’t spill off the bread.
How to make an Aperol Spritz, from the back of the Aperol bottle: 3 parts prosecco, 2 parts Aperol, 1 splash soda. View of Taormina beach not included.


Source: http://www.dinneralovestory.com/anatomy-of-a-weeknight-dinner-3/
0 notes
Text
Southwest Black Bean Quinoa
This Southwest Black Bean Quinoa is the perfect Tex-Mex side dish easily prepared for serving warm or as a cold salad. Use in taco bowls or a side dish for tacos!
I first had this Southwest Black Bean Quinoa over Thanksgiving week a few years ago while I was visiting friends and family in the Midwest. My friend, Cara, introduced it to me. She told me how much she liked the flavors and I couldn’t wait to try it.
There was no doubt in my mind that Ben would like it, too. I was also excited to add another healthy side dish to our collection. I served it as a warm side dish, similar to rice, and he enjoyed it. The next day, I served it as a cold salad. It was excellent.
Another way to serve this is as a bed to slices of grilled chicken with fruit on the side. This makes for a very healthy lunch or dinner, and you feel really good afterwards. Although, without the chicken, you can also enjoy this as a vegetarian meal. Lately, however, we have enjoyed as a base for taco bowls (or as a side to tacos) with my favorite Slow Cooker Beef Barbacoa. This combination is a good one to share as a meal for new moms, too!
Ingredients
1 teaspoon vegetable oil
1 onion chopped
1 red bell pepper diced
3 cloves garlic peeled and chopped
3/4 cup uncooked quinoa
1 1/2 cups vegetable broth
1 teaspoon ground cumin
1/4 teaspoon cayenne pepper
salt and pepper to taste
1 cup frozen corn kernels
1 15 ounce can black beans, rinsed and drained
1/2 cup chopped fresh cilantro
Instructions
Heat the oil in a medium saucepan over medium heat. Add the onion and pepper, and saute until lightly browned. Mix in the garlic and heat until fragrant, about 30 seconds. Stir in the quinoa, then pour in the vegetable broth. Season with cumin, cayenne pepper, salt, and pepper. Cover, reduce heat to low, and simmer for 20 minutes.
Stir in the frozen corn and continue to simmer about 5 more minutes, until heated through. Remove from the heat and stir in the black beans and cilantro. Serve warm or cold.

Source: https://www.seededatthetable.com/quinoa-and-black-bean-salad/
0 notes
Text
Flourless Zucchini Brownies
August 25, 2018
by Kirbie
These flourless zucchini brownies are fudgy and chocolatey. They are also gluten free, grain-free, and paleo. It’s an easy one bowl recipe and a great way to use up zucchini.
A few weeks ago, I shared a recipe for zucchini brownies. It’s one of my favorite new recipes and I’ve made them several times already for friends and family. After sharing that recipe, I received several requests for a flourless version, so I went back into the kitchen to do some research. I had to sacrifice a few jars of almond butter while testing these, but I think it was worth it.
Speaking of almond butter, here’s a very real conversation I had with my husband the other day:
Me: We are out of meal prep meals. Did you make yourself a sandwich for lunch?
Him: Yes.
Me: What did you make?
Him: I made one with acorn butter. I only used the crunchy one since I know you use the smooth kind for baking.
Me: Uh… you mean almond butter?
Him: Is that what this is? Okay sure.
This guy also brought my zucchini brownies into work and then told everyone they were not brownies and when some people asked for the recipe, he linked them to my zucchini bread. *facepalm*
Taste and Texture
Back to a little more about these brownies. These brownies are not chewy but they are very chocolatey and fudgy. The chocolate flavor is even more intense the next day.
Almond Butter
One of the key ingredients to these brownies working without flour is using almond butter. Make sure to use the creamy, natural almond butter– the kind you need to stir before using, because the thicker processed almond butter may be too dry for this batter.
Almond butter is a magical baking ingredient, when mixed with eggs and a rising agent and baked, it can rise and have a cake-like structure.
Zucchini Tips
You will want to shred the zucchini using the small holes on the grater because you want very thin shreds. First, the thin shreds will almost disappear into the brownies once cooked. Second, if you choose to make thinner shreds, your zucchini will be more moist, which is needed to get the batter to the right consistency.
When I finished shredding my zucchini, it was very moist, but it did not have any pools of released water. If for some reason you are dealing with a very watery zucchini, drain out that released liquid before adding the zucchini to the batter. You want the moisture from the zucchini, but not all the liquid
1/2 cup creamy natural almond butter
1 ripe medium banana mashed
1 large egg
1/4 cup raw honey
1/2 cup unsweetened cocoa powder (do not use dutch processed)
1 tsp vanilla
1/2 tsp baking soda
1 cup finely shredded zucchini
1 cup semi-sweet chopped chocolate (to keep this strictly paleo, you can use paleo chocolate chips)
Preheat oven to 350°F. Line a 9 inch by 9 inch baking pan with parchment paper.
In a large bowl, combine almond butter, banana, egg, honey, cocoa powder, vanilla and baking soda. Mix batter until it is evenly combined. Batter will be quite dry.
Stir in the zucchini. As you continue to stir, the zucchini will release some water and you should see the batter becoming more liquid. Stir until batter is evenly mixed and no longer dry and it becomes a thick liquid batter. Stir in ½ cup chocolate.
Pour batter into prepared pan. Sprinkle surface with remaining ½ cup chocolate. Bake in the oven for about 30 minutes or until toothpick inserted comes out clean.
Allow brownies to cool before cutting and serving.
Make sure to use creamy, natural almond butter. Avoid using the thick, processed almond butter.
You will want to shred the zucchini using the small holes on the grater because you want very thin shreds. When I finished shredding my zucchini, it was very moist, but it did not have any pools of released water. If for some reason you are dealing with a very watery zucchini, drain out that released liquid before adding the zucchini to the batter. You want the moisture from the zucchini, but not any pools of water.
Recipe adapted from Running with Spoons
Nutrition Facts
Flourless Zucchini Brownies
Amount Per Serving (1 brownie)
Calories 202 Calories from Fat 108
% Daily Value*
Total Fat 12g 18%
Saturated Fat 4.4g 22%
Polyunsaturated Fat 1.5g
Monounsaturated Fat 3.7g
Cholesterol 15.5mg 5%
Sodium 83.1mg 3%
Total Carbohydrates 24.2g 8%
Dietary Fiber 3.7g 15%
Sugars 18.4g
Protein 4.8g 10%
Vitamin C 2%
Calcium 4%
Iron 6%
* Percent Daily Values are based on a 2000 calorie diet.
The nutrition information provided are only estimates based on an online nutritional calculator. I am not a certified nutritionist. Please consult a professional nutritionist or doctor for accurate information and any dietary restrictions and concerns you may have. All images and content are © Kirbie's Cravings.
Stay Connected
subscribe to receive new posts delivered to your email box:
Source: https://kirbiecravings.com/flourless-zucchini-brownies/
0 notes