podcastatthedisco
Podcast Learning Log - Matthew Shelley
Studio Recording Fundamentals 2023
30 posts
Don't wanna be here? Send us removal request.
Last Seen Blogs

besos-al-aire-sin-rumbo
Chica de metáforas ♡

enghsaid
allpinkbarbiedreamhouse

rayeatsworld
cool blog, bro.

deathwarlock
I crush the soul and drink its power
Text
Conclusion
Having begun this module with no real experience in a studio, I now feel much more prepared to try out my own projects and record in such an environment. At first, the process felt quite confusing, and often overwhelming at times, however after our first few sessions of trying out techniques I felt confident to employ these skills for our podcast.
I feel a lot more confident in my understanding of industry standard microphones and techniques - I would like to practice these more just to have a stronger grasp of other situations where they might be useful, but equally I feel that this may lie out of the scope of this module.
When in the studios, one thing I feel we could have improved on slightly was our naming system - while a strong start, the lack of microphone names made it hard to distinguish which one was used when, particularly if one or more of our group had missed the session.
In some of the later weeks, we used our spare studio time to work on our performance for a different module (due to time limitations). Had this not been the case, it would have been interesting to explore the effect of different microphones themselves on different techniques - this is something I'd like to try in future.
I now feel more confident using both Pro Tools and Logic Pro, as I did not have experience in either prior to this module. I now feel confident in my ability to do basic recording and editing in both of these DAWs, and eventually I would like to switch to Logic Pro as my DAW of choice - I really enjoy its simplicity and ease of use.
0 notes
Text
Following on - Recording and editing
With the script fully written, Jack recorded the spoken sections for the podcast and sent them to Daren to fully edit. Unfortunately due to timing conflicts, when it came time to record the podcast we did not have access to the pods. As a result, Jack recorded from home using a Blue Yeti Snowball microphone - while not being in the studios, this still proved good enough for our requirements and allowed us to complete our podcast.
0 notes
Text
Following On - Writing the script
With all of our recordings complete, I began writing the script for our podcast. This required numerous iterations, and there came various problems - the first of which was the file format - .aiff files are not easily compatible with my DAW, which made it difficult to listen to every track in its intended form. In future, I would like to work more in the pods, and use Logic Pro to listen back to the tracks.
Once I wrote a rough first draft, I sent it to the rest of the group, and Daren gave me some feedback which I used to produce a second draft. We then repeated this for a third, with Isabel rewriting the initial section. However, one drawback of this is that when rewriting Isabel changed the order of some elements - initially, each section followed the format of:
All recordings of a section -> analysis of all sections
In the rewrite, she had styled it as:
Recording -> analysis -> recording -> analysis -> recording -> analysis
As a result, I continued this for the rest of the script, however when it came time to recording Daren and Jack discussed and decided it would be better to reword it to match the original. While this was only a small issue, it did allow us to iron out problems in the script and produce a final version.
0 notes
Text
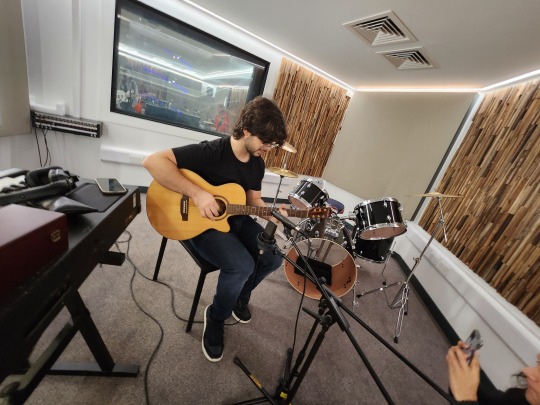
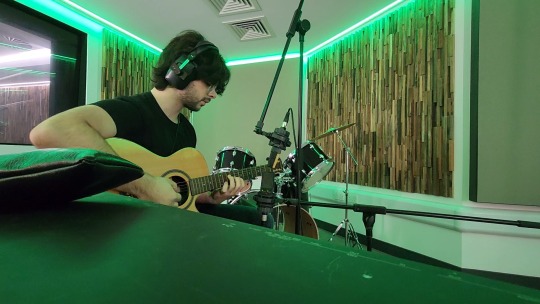
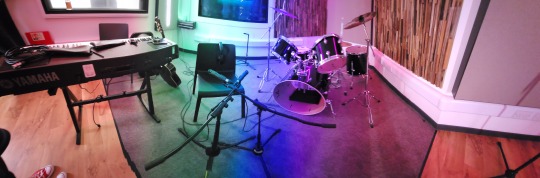
Week 9 - Practice - Recording Drums
For this session, we booked additional studio time, allowing us a full three hours to set up the microphones and try different techniques.
The setup process was fairly similar to the previous session, with Daren arranging the mics and Isabel and I plugging in the various wires. This time, it was a lot more complicated, so it was important to keep track of what went where, which I feel we did quite effectively.
We first attempted the Glyn Johns technique, as see below.
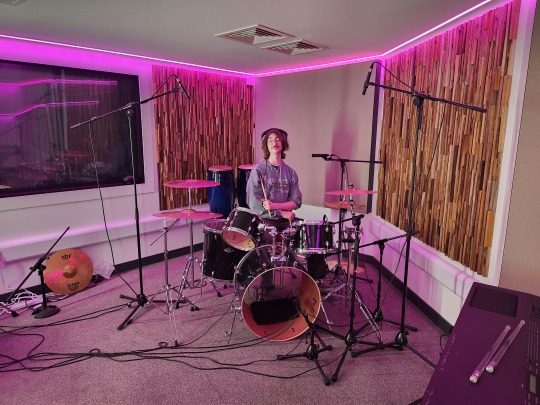
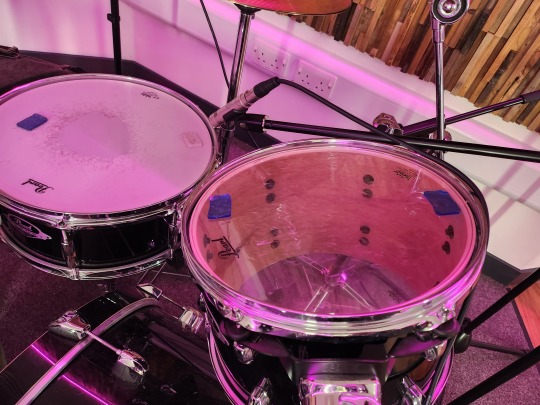
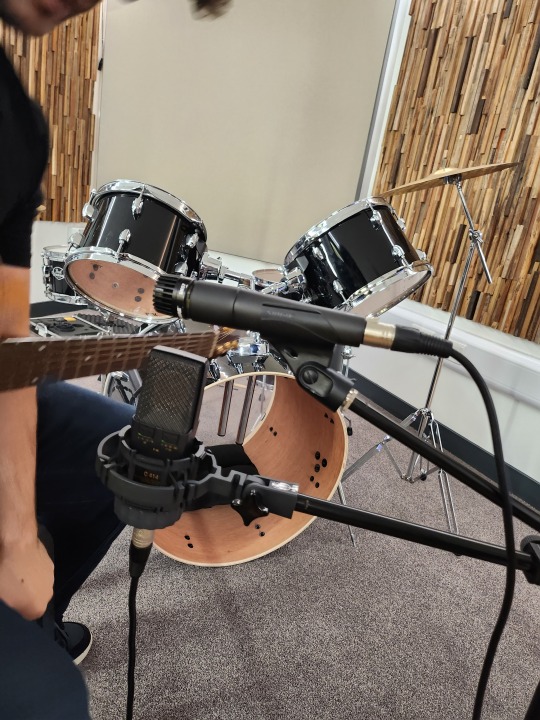
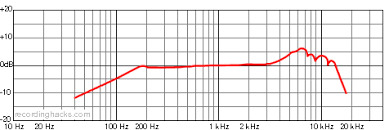
For this, we used an Audio Technica ATM250 to capture the kick, positioned just inside of the port hole and the Sontronics drum kit. For our overheads, we used Shure SM-57s. The overheads were equally distanced from the snare, as outlied in the technique.
We also used two separate mics from the drumkit for the snare, with the top one positioned far enough away from the drum that Jack wouldn't hit it while playing.
We also gave Jack a separate microphone that we wouldn't record, so he would be able to speak to us and give us direct feedback (being able to hear us through the same headphone setup as we had previously).
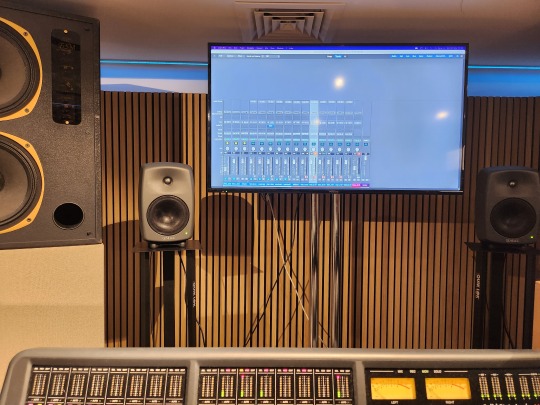
One perk of using Studio 2 for this recording was that we could see our track titles clearly labelled on the desk - this made it clear which parts were which when adjusting levels, particularly during the setup stage.
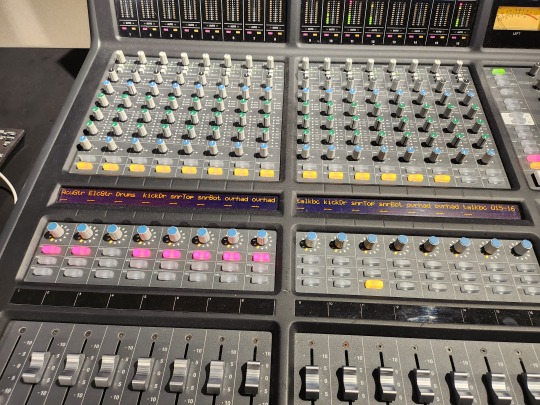
It was also useful to have the Logic sliders up on the big screen as well, as it made it easy to adjust these as we went along - this is something I definitely want to do whenever I'm in Studio 2.
With the microphones in place, I asked Jack to play a basic loop that could be repeated - Daren, Isabel and I were all in the control room for this process. We had a similar process to the acoustic guitar in terms of tempo, where it was trial and error to find one that worked. We could have alleviated this by choosing a drum loop from a song that Jack was familiar with, as it would be easier to stay in time. Once we agreed on the loop, we began recording, once again doing multiple takes.
Jack asked us to increase the sound of the metronome in his ears, and I initially struggled with this due to our inexperience in the studio - we turned it up in the Logic settings but it didn't appear to make much of a difference, and any adjustments on the physical outputs only affected the output to the headphones as a whole.
Below is the completed mix of the Glyn John's method that we used in our podcast:
Having completed the Glyn John's method, we next tried the X-Y pair - this was relatively simple to set up, and we again recorded multiple takes. Below is the completed X-Y mix we used in our podcast:
Personally, I preferred the X-Y, as it was less time consuming and produced a sharp, punchy sound. However, the Glyn John's did feature a better stereo image, which could prove useful for some projects.
Overall, this session went well, however I believe it could have benefitted from a more thorough discussion beforehand about how we wanted to approach the drums - we spent a lot of time today trying to work out what we would play and thus how we should set up the microphones around this, which could have been avoided if we had discussed more formally as a group prior. Despite this, we recorded everything necessary, and packed up in a reasonable time given how many microphones we had set up.
0 notes
Text
Week 9 - Theory - Drum Miking
Microphones
In our studios, we have access to 2 drum kits - I explored one of these briefly in my common microphones post, however there is also the AKG drum kit. This features CIOOS overheads, a D112 bass mic, and C418 snare/tom mics.
When using multiple mics, care must be taken to notice problems of phase. One position of the phase switch will always sound fuller than the other - a good rule of thumb is that if neither makes a difference, choose the one you started with.
Despite the drum mic kits being made of condensers, when close-miking a snare, a dynamic mic with a cardioid polar pattern should typically be used.
Positioning
Kick drum
When positioning the microphone for the kick, there are various techniques which will provide a different sound:
Placing it 2-4cm from the head inside the drum, off to the side of the beater, captures the click and attack of the beater.
Inside the drum in a central position, halfway to the head, provides more body.
Outside the drum with the outer head on captures a more open, boomy sound.
Snare and hi-hat
Care must be taken when positioning the snare and hi-hat mics, as these easily spill into each other.
Glyn Johns Method

This is a commonly used technique which involves creating an equilateral triangle between two mono overhead microphones and the snare drum.
Another option is the 3 point over shoulder method - this prevents room sound from getting into the microphone, and captures a similar sound to what the drummer hears.
When placing the microphones, they must not be too close to prevent the sound from developing, but not so far away that the attack of the drums is lost.
Useful Tips
Three finger method
For a balanced sound that captures the best qualities of the drum, measure three fingers between the skin and the microphone.
Tips for snare
A cardioid mic is essential, as the snare drum is located so close to the other drums, as well as the hi-hats.
The mic is generally placed between the hi-hat and the high tom - “3 fingers” (as mentioned previously) or about 5cm from the snare drum head.
When setting up the microphone, point the diaphragm directly at the head. Some minor adjustments may be necessary to eliminate bleed from the hi-hat.
Clip-on mics can be useful but can have issues - they may not be optimal on the snare if the drummer plays a lot of rim-shots, as there is a high chance of the drummer knocking them off.
Tips for toms
For mounted toms, use one or two microphones, preferably dynamics.
If using one mic, place it between the two drums about 10-15cm away from the heads.
If using two mics, place one above each tom about 3-5cm away from the head - this also applies to floor toms.
Tips for hi-hats
Often the hi-hat is not miked up separately, as snare and overhead mics pick up a lot of their signal already.
If the style of music (or drummer) warrants a separate hi-hat mic (or the sound from the other mics is not satisfactory), try a small-diaphragm condenser. One prime microphone for this task is the Earthworks TC-30K - this is particularly useful for picking up high frequencies
When placing the condenser, position it halfway between the centre and the outer edge - if too close to the end, you’ll end up with a sound accentuating the opening and closing of the hats
Similarly, placing the microphone too close to the bell produces a ringing sound.
Tips for EQ/compression
These processes usually best to leave until the mixing stage, however keeping track of points that need fixing during recording can be helpful.
EQ can be used to filter out a spill, such as a high-pass filter on hi-hats, or a low-pass filter on the kick drum. It can also be used to remove unwanted frequencies, such as a ‘boxy’ snare or ‘gongy’ cymbal.
Gating can be used to to clean up a track - this works particularly well for tom mics.
Finally, compression can be used to add power to the snare or kick.
0 notes
Text
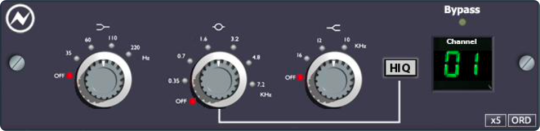
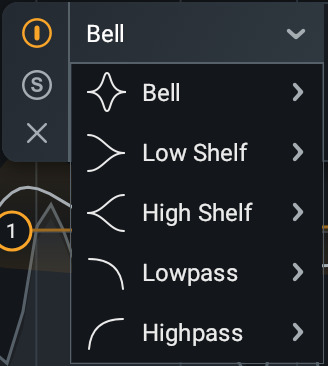
Week 8 - Theory - EQ in our studios
In our studios, we have access to a variety of equalizing equipment.
SSL XR425 EQ - Found in studio 2
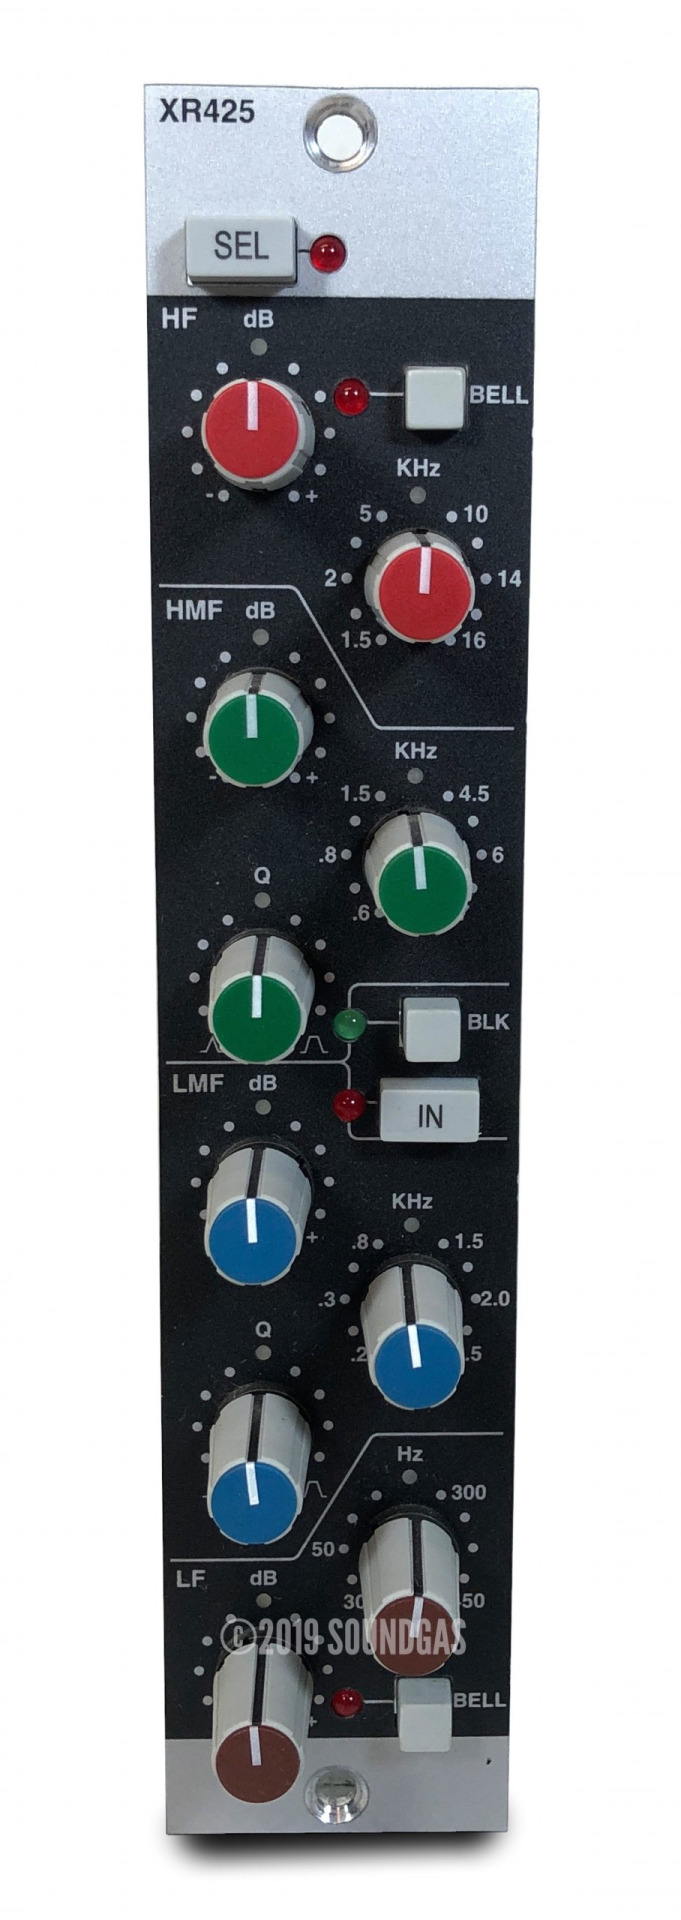
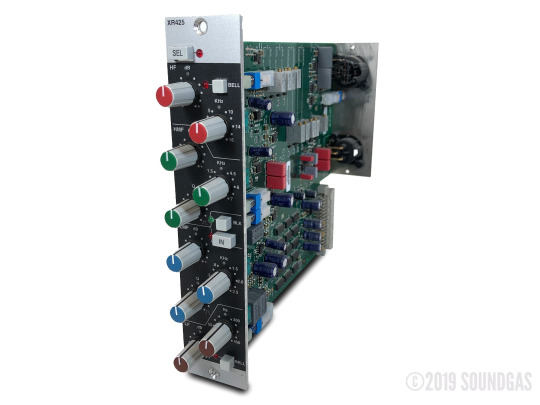
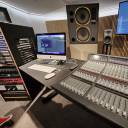
This EQ features two adjustable bandwidth controls, and has the option to change the EQ shape between a 'bell' and a 'peak'. It also features the option to mimic two different types of original circuity, the "Brown-02" and the "Black-242", with a button to switch inbetween.
Neve 1073LBEQ - Found in studio 2
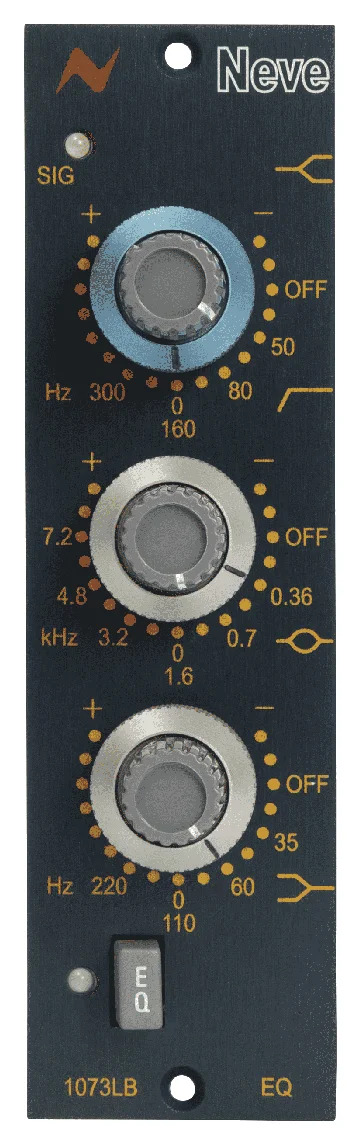
This EQ is based on the original 1073 pre-amps, which used an inductor-based EQ. This process worked by wrapping wires around a coil, which produced musical harmonics when the coils saturated. As a result of this, this component can add to the sound even without boosting or applying any particular frequencies.
Neve Genesys - Digitally controlled analogue EQs
In studio 1, the console itself features 2 types of analogue EQ, which can be digitally controlled with the screen - this moves servos in the desk itself to change the compression.
4-band 884
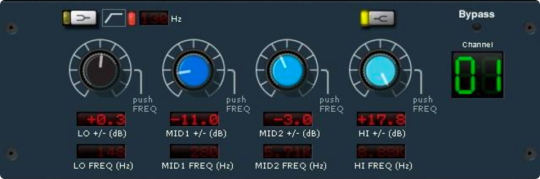
3-band 1084
This EQ typically has a more modern sound than the 884.
References:
https://soundgas.com/product/ssl-xr425-e-series-eq-module/
https://www.ams-neve.com/outboard/1073-range/1073lbeq-mono-eq-module/
0 notes
Text
Week 8 - Theory - EQ
All sounds are comprised of different frequencies, which we measure in Hertz (Hz).
As discussed previously, all music instruments have different tones due to the harmonics and overtones that make up their sound.
Equalization, more commonly known as EQ, allows us to vary how different frequencies are heard within a sound. At its simplest, we can see this in the bass and treble settings on a basic amplifier - this is known as fixed, passive EQ. These can only filter out frequencies, and cannot boost any.
3-Band active fixed EQs allow 3 set ranges to be cut or boosted - in an active EQ, the middle setting is effectively 'off', neither cutting or boosting the sound.
Graphic EQ features a wider range of frequencies that ca be manipulated, however the specific range of frequencies cannot be altered. These appear both physically and in software.
Parametric EQ, seen in many DAW plugins, allows for individual control of each frequency - commonly in the range of 20Hz to 20KHz.
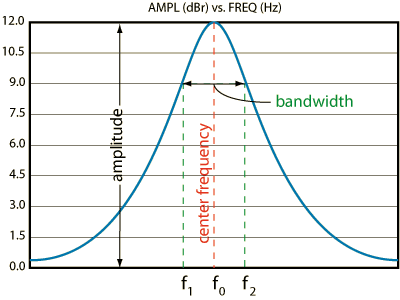
Bandwidth - 'Q'
The bandwidth at a point impacts how many of the frequencies around it will be affected, as can be seen in the image below. A wider Q will affect more frequencies around a particular frequency, while a narrow Q may only affect that frequency. When referring to bandwidth, the Q stands for "quality".
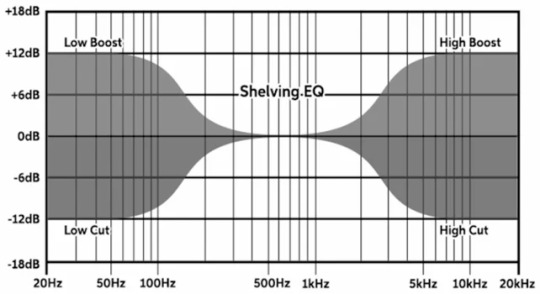
Shelving EQ
Shelving EQ refers to a technique where all frequencies below a certain point are either boosted or cut by the same amount, creating a "shelf" in the spectrum. These are particularly useful when wanting to prevent tracks from overlapping, such as removing bass frequencies from a guitar track to allow a kick drum to sit better in the mix. Conversely, a high-shelf filter could be applied to the kick to remove any unwanted frequencies and clean up the mix.
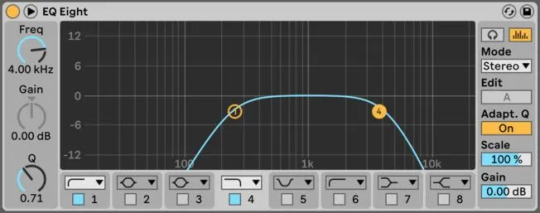
Peak EQ
Peak equalization boosts or cuts frequencies around a certain point, as can be seen in the bandwidth image above.
Filters
Band Pass Filter (BPF)
A BPF only allows a selected region of frequencies to pass between two points, generally around the centre of the range.
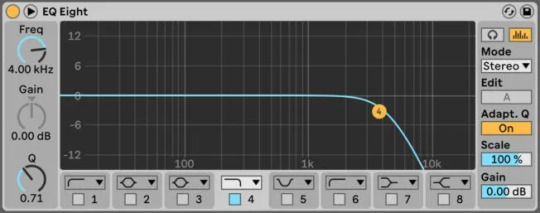
Low Pass Filter (LPF)
Only allows low frequencies to pass, cutting off the mids and highs past the roll-off point.
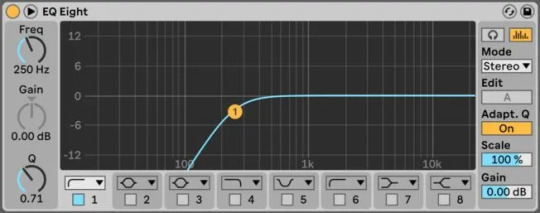
High Pass Filter (HPF)
Only allows high frequencies past, rolling off the lows and mids. This is particularly useful for removing unwanted frequencies such as bass rumble.
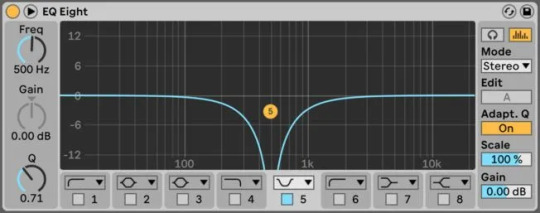
Notch Filter
Attenuates a small range of frequencies, around one specific point - useful to stop specific frequencies that may be causing unwanted sounds. This filter can also be used to produce interesting sound shaping through automation.
Useful EQ shapes
References:
https://en.wikipedia.org/wiki/Equalization_%28audio%29
https://ataea.co.uk/index.php/Shelving_EQ
https://www.ranecommercial.com/kb_article.php?article=2104
https://www.iconcollective.edu/types-of-eq
https://s3.amazonaws.com/izotopedownloads/docs/nectar300/en/eq/index.html
0 notes
Text
Week 7 - Practice - Recording stereo techniques
We recorded our stereo techniques in the same session as we did the single microphone, so everything was already set up - in this way, we could build off of what we had already done for the single microphone recordings.
To start, Daren got an additional SM-57 and I plugged it in alongside the AKG C414. He then placed this on a mic stand, and with the help of the technicians we set it up in a mid-side pair. As previously, we recorded multiple takes to ensure that we would have a usable one for the podcast.
Here are the two raw recordings from the middle and side microphones:
To produce the following output, I copied the output from the side mic and reversed its phase, panning each one to the left and right.
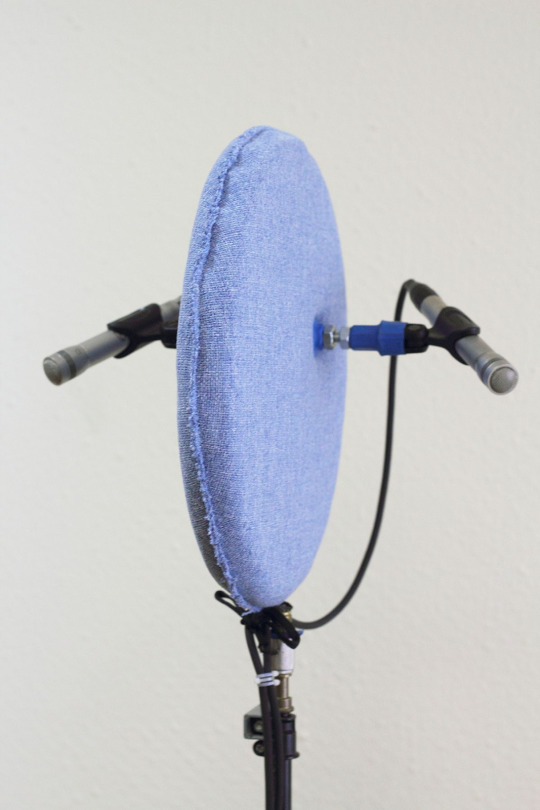
Daren then got another AKG C414, both of which were set to the figure of eight polar pattern, and configured it for a Blumlein pair. This was slightly difficult to configure due to how close the microphones had to be, and it felt very precarious to have such an expensive microphone hanging so freely, but once it was in place it was relatively easy to record.
Below are the respective bottom and top recordings, as well as the combined version.
As you can hear this technique produces a good stereo image, however due to the difficulty in setting up this would not necessarily be my preferred choice.
The last stereo technique we recorded was the X-Y pair. This involved setting up another SM-57m and arranging them on top of each other at a 90 degree angle. With the second mic stand already in place, this was relatively simple, and due to the 90 degree angle it was easy to check that it was correct.
Overall, I feel that this was a good studio session - we worked efficiently, and recorded some of the key elements for our podcast. I feel a lot more confident in applying some of these recording techniques myself. If I were to redo this session, I wouldn't change much, but I would have been more precise with the types of microphone used when naming our tracks, as I'm not yet confident enough with them to remember which we used for what recording.
0 notes
Text
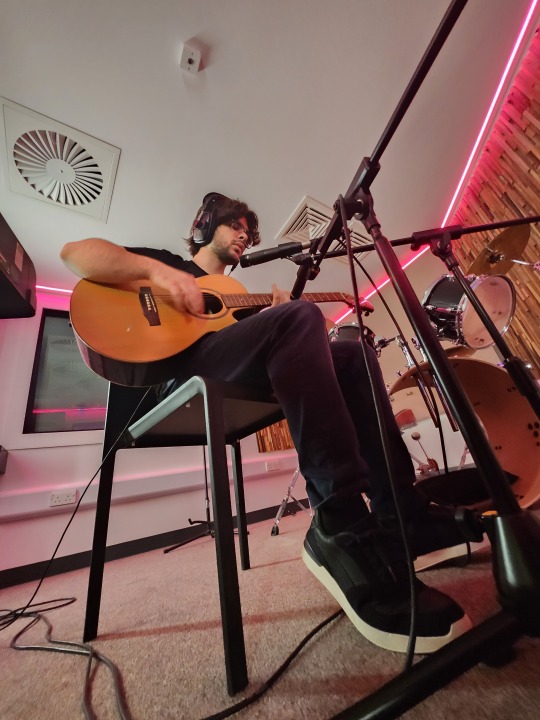
Week 7 - Practice - Recording single microphone techniques
For all of our group recording sessions, we chose to use Logic Pro as Isabel had experience using the software.
To record our acoustic guitar sections, Daren set up a microphone stand with an AKG C414 XLS. Daren sat down in the corner of the room with the guitar, and the mic was adjusted until it was 10cm away from the 12th fret of the guitar. Once this was set up, Isabel and I plugged in the microphone, and connected a set of headphones into the control room through the first port so Daren would be able to hear us talk through the console.
Before we started recording, I asked Daren to try playing along to a set metronome. Isabel then adjusted this, and we went back and forth until we found an appropriate bpm. We then asked Daren to play a riff which would be easy to repeat, and Isabel adjusted the trim on the input until it was not peaking (see below).

I then asked Daren to set the mic to cardioid, and we recorded multiple takes of this to ensure we had a good one for the podcast. For each recording, we made sure to label the track as accurately as possible, as this would make it easier to find each one later on.
After each set of takes, Daren changed the pattern on the microphone, and we repeated this for figure of eight and omnidirectional. When recording the omnidirectional take, we had to turn the trim down by 2 notches to prevent clipping, which we left in place for the remainder of the recordings.
We then repeated this process in the centre of the room, again recording cardioid, figure of eight and omnidirectional patterns.
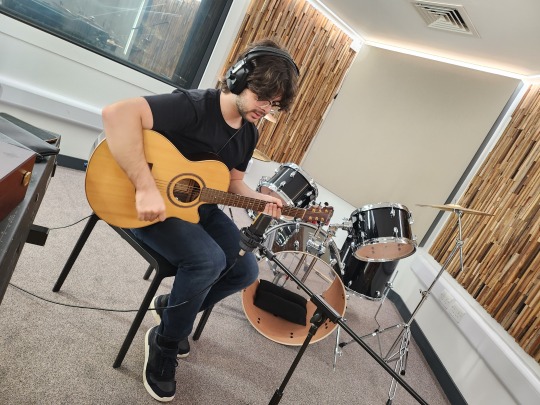
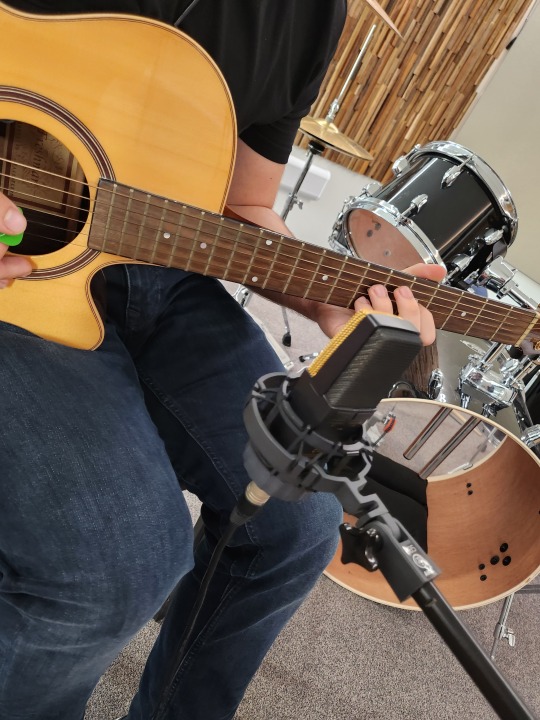
The figure of eight patter produced a far brighter sound, with the omnidirectional featuring more bass - the cardioid lies between these.
This was a good start to the session - I'm saving my final thoughts for the next post, as after this we proceeded to record stereo techniques, however this was a great opportunity to improve my confidence with single mic recording.
0 notes
Text
Week 7 - Theory - Miking guitar amps
There are many different factors which can affect a guitar amp recording.
Type of guitar amp
Different amps can vary in different ways - some have multiple speakers, which could be worth miking up separately.
Choice of microphone
Typically when recording a guitar amp, a condenser microphone is used with an omnidirectional polar pattern.
Ribbon mics are popular when recording harsher instruments, however they tend to be placed slightly further from the speaker grille, approximately a few inches, as they have a pronounced proximity effect when compared to condensers.
Room characteristics + amp position
An ambient room microphone could be a suitable choice, but only if the sound of the room itself is good.
Another thing to consider is the position of the amp in the room - raising the amp will factor in more of the room sound, which could be advantageous. Additionally, an amp on carpet will give a different sound to an amp on a wooden floor.
Distance between mic & cab
A microphone directly against the cab will solely give the output of the speaker. Moving it back approximately 30cm allows more of the environment to filter into the sound, and further distances allow the reflections of the speaker to develop and add texture to the sound.
Miking the speaker cone
When miking the speaker cone, the tone of the sound will change depending on where along the cone you record. The centre of the cone emphasises midrange and upper-mid frequencies, whether the edge reduces these. Recording between these can provide a middle ground between the two.
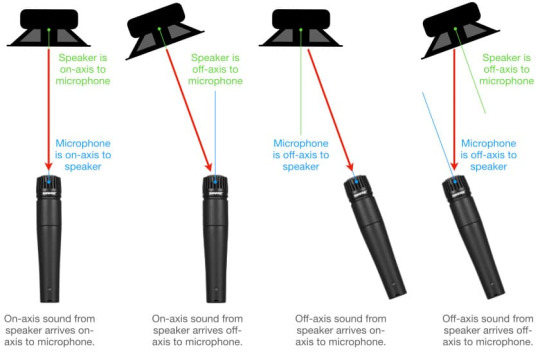
On-axis v. off-axis
In on-axis recording, the microphone is perpendicular to the front of the cab. This tends to sound brighter, however has a greater chance to cause the proximity effect.
Off-axis angles the mic to the side, which causes some roll-off of high end frequencies however reduces proximity effect, and in some cases can sound warmer. One problem with this is that it may bring in greater unwanted reflections.
Using multiple mics
When using multiple microphones, choose the first based on the tone that you're trying to achieve. Then, choose a second mic that will fill whatever is missing from the first mic.
For amps with multiple speakers, placing a microphone on each may give you more options tonally.
If available, a microphone positioned further from the amp can provide a nice ambience which pairs nicely with the dry sound from the closer mis.
Adding a rear mic
In some cases, placing a mic inside the cabinet at the back can help to recreate the sound of the room itself. If this is done, this microphone should always be out of phase with those at the front.
References:
https://www.audiotechnology.com/tutorials/microphones-polar-responses-1
0 notes
Text
Week 6 - Practice - Exploring virtual microphones
This was another week where I was unfortunately too unwell to make the studio session. As a result, I decided to return to my DAW and experiment with how different microphone simulations sounded, using Marshall Silver Jubilee 2555 (by this point, I had reached out to Softube and had my previous activation removed so I could use it on my laptop).
The plugin features two sets of microphones, dynamic and condenser, with four microphones in each. Both sets feature 2 close mics and 2 room mics, allowing for a reasonable variation in sound. The list of microphones are as follows:
Dynamic
Shure SM-76
Shure SM-57
Neumann U 87
Telefunken ELA M 251
Condenser
Neumann U 67
Neumann U 87
Coles 4038
SE Electronics RNR1
See below an image of the plugin itself.

For this test, I decided to use a guitar sample that featured more high end, which I recorded myself on a Fender Squier Stratocaster. In the plugin, I began by using the 'Classic SM-57' preset, as this opened up the microphone menu and solely turned on the SM-57. I then proceeded to create a recording for each of the solo mics, as well as a combination of the room mics panned left and right.
Dynamic Recordings
The recordings with the room mic lacked a lot of bass that the 76 recording had - the 57 had an interesting tone however on its own did not stand particularly well.
To try to create a tone that would better suit this guitar, I combined all four mics and mixed them, panning the close mics, with delay on the room mics to add depth.

Condenser Recordings
The 67 recording has a more 'full' sound than the 87, however I prefer the high-end on this microphone's track. Like the dynamic mics, I produced a mix using both of these and the room mics, which you can hear below.

Conclusion
If I were to repeat this with a practical, in-person setup, I would use a mix of condenser and dynamic microphones, as this would give me more options to manipulate the sound when mixing.
Doing this virtually does not compare to the real experience, however I feel that practicing this has proved useful for times when I may not be able to get into the studio to record a final track, but still want to produce a demo in my room - especially at uni, where I don't have access to a physical amp in my room.
0 notes
Text
Week 6 - Theory - Hardware Compressors
There are multiple types of physical compressor:
Optical
Optical compressors use a light element and an optical cell to apply compression to an audio signal. The brightness of the light is directly tied to the amplitude of the audio signal, allowing the optical cell to attenuate the output signal to meet the threshold.
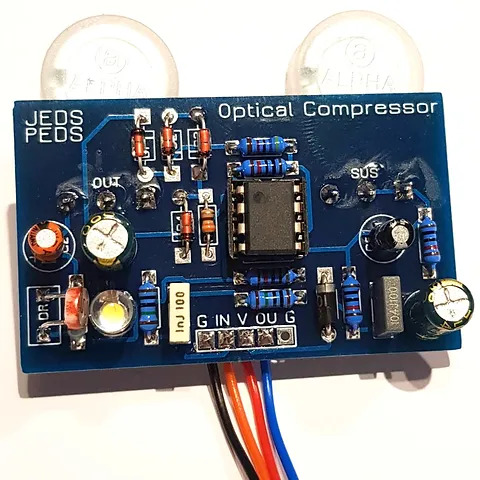
Above: An optical compressor featuring a lightbulb and optical cell.
Valve
Valve compression is one of the earliest forms - it has slower attack and release than most other forms, however provides a "vintage" sound which is sought after for its uniqueness.
References:
https://www.jedspeds.co.uk/product-page/optical-compressor
0 notes
Text
Week 6 - Theory - Compression
Compressors are used to reduce/limit the dynamic range of a sound. In essence, compressors make louder parts of a signal quieter, and quieter bits louder to produce a more even level.
The compressor originated in the film industry, where they were used to make dialogue easier to hear at an even level. In the world of music, compression helps to combat smaller variations in level in recordings of instruments or vocals. An example of this can be seen in radio stations, where the dynamic range is kept deliberately narrow to ensure it can be heard in noisy environments, such as cars.
A compressor typically has the following parameters that can be adjusted:
Knee
The knee determines the range of dB below and above the threshold where the compression changes from 1:1 to the chosen ratio.
A hard knee setting results in compression taking place immediately after the threshold is reached, whereas a soft knee applies compression gradually over a range in the signal.
Attack
Attack controls the time that the compressor takes to fully compress the signal once the threshold has been reached.
A fast enough attack setting will make the compression instantaneous, however using a slow setting gives the signal more time to vary as the compression increases.
Gain
Gain controls the amount of gain to be given to the compressed signal. It should be adjusted to normalise the signal to where it was before compression, or so that it sits properly in the mix.
Threshold
The Threshold decided the dB level where the compressor activates. If the input signal level is below the threshold, nothing will be compressed. Once the level crosses the threshold, it will be compressed according to the other parameters.
Ratio
The ratio dictates how much compression is applied once the threshold is reached. For a ratio of x:1, it means that when the input level increases by x dB, any signal above the threshold will only increase by 1 dB.
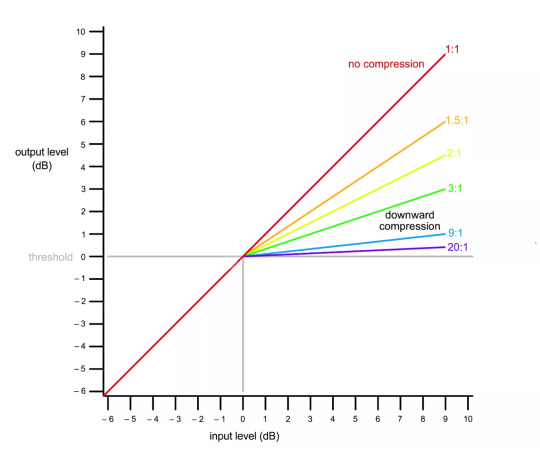
Limiting
Any compression ratio of 10:1 or over is known as limiting. This is typically used to prevent clipping.
Release
Release dictates how long the compressor takes to go back to being inactive once the level falls back below the threshold.
Short release times make the compression more flexible, however cause fast changes in gain.
Longer release times produce a more even level with less distortion, however the overall amount of compression is smaller as changes in the input cannot be compensated for as quickly.
Envelope and ASDR
The envelope, or 'shape' or a sound is important to consider when adjusting compression settings.
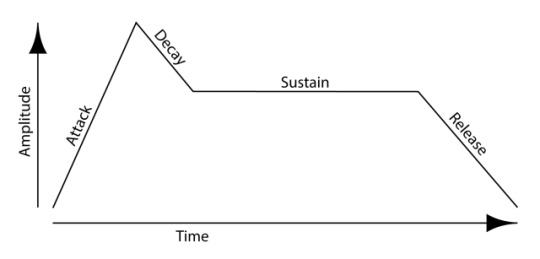
Attack
Attack time refers to the time taken for sound to reach its maximum amplitude, i.e. the beginning of the sound.
Decay
Decay determines how long the sound takes to reach its normal level after reaching maximum amplitude.
Sustain
Sustain determines how long the sound stays at its normal level.
Release
Release models how long the sound takes to stop producing a signal after stopping.
References:
https://www.izotope.com/en/learn/audio-dynamics-101-compressors-limiters-expanders-and-gates.html
https://jythonmusic.me/envelope/
0 notes
Text
Mid-process reflection
While being ill has resulted in me not having the best start to my studio experience, I still feel that I've already learnt some very valuable lessons about what it's like to work within a studio. The workflow so far has been relatively straightforward, however there are always lessons that need to be solved. I've learnt that it's useful to ask for help when necessary, as getting stuck on a problem that the technicians know how to fix wastes studio time that could be spent on the actual recording.
I would have preferred to have been in the studios more, as I feel my confidence is not quite where I'd like it to be. Particularly when it comes to handling microphones and setting everything up, I feel slightly like I'm a few steps behind everyone else.
In the next few weeks, I would like to attend more sessions and work more closely with my group - I'm especially excited to mic up a drum kit, as this is something I've never even seen attempted before.
0 notes
Text
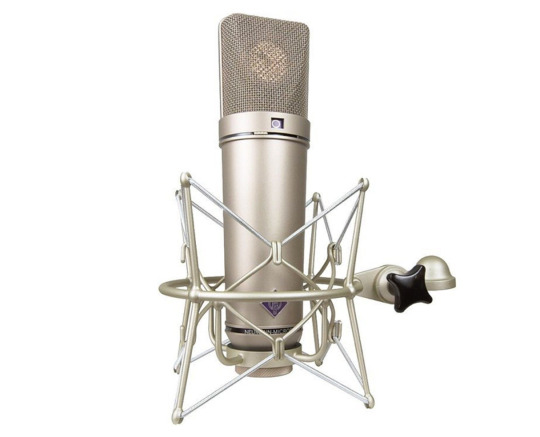
Week 5 - Theory - Reading Week - Common studio microphones
During this week, most of my group were back at home, so we did not have a studio session. While still unwell, I chose to spend some time researching what microphones were commonly found in studios - as I don't have a background in music technology, almost all of the microphones mentioned in the lectures were new to me, so I thought it would be a good idea to analyse those that we had in our studios, as well as others that may be common in others.
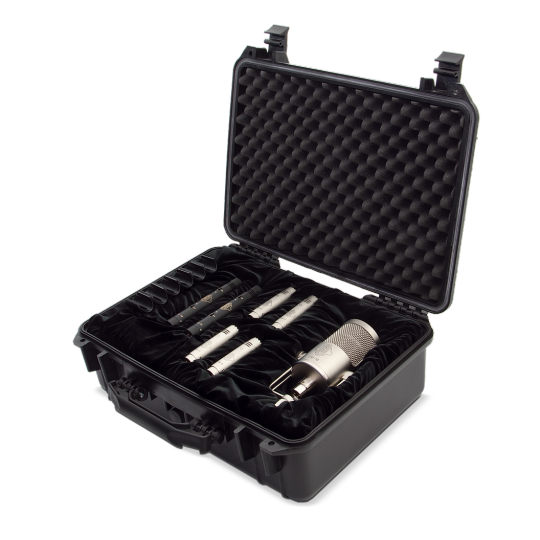
While I will not be covering them all in detail, the full list of microphones in the studios can be found on the tech list, which will be referenced at the bottom of this post.
Dynamic Microphones
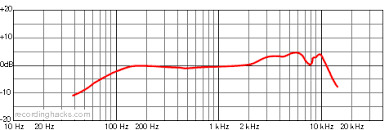
Shure SM58
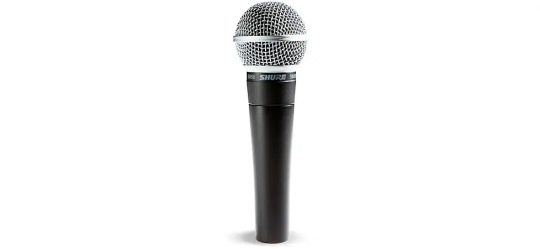
This microphone is an industry standard, aimed towards vocal recordings. It features its own shock-mount and windscreen, which makes it especially durable.
Shure SM57
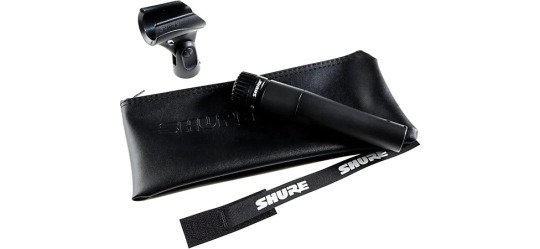
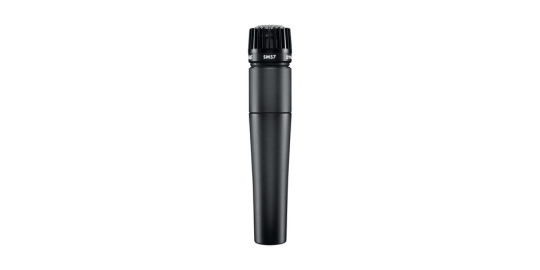
This microphone also features a shock-mount, and due to its durability is especially useful for recording snare drums. It is also particularly strong for recording guitar amps.
Ribbon Microphones
Royer R-121

This microphone uses a figure of eight polar pattern, with similar sensitivity to a dynamic microphone. This is often used for guitar amps, and blended with an SM-57.

Shure KSM353
This also features a figure of eight pattern, with strong off-axis rejection. Its durable build makes it useful for live settings, such as concert halls.
Condenser Microphones
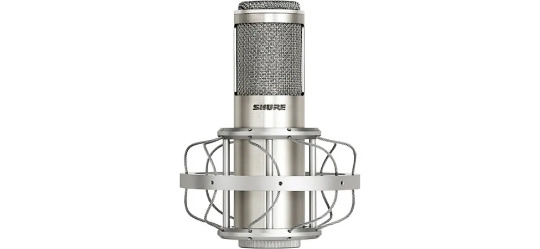
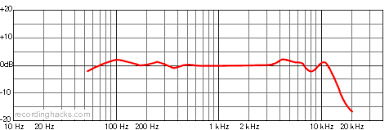
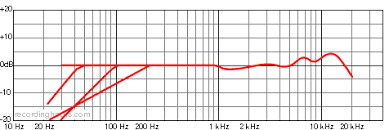
Neumann U87
This microphone is considered by some to be the standard for recording vocals thanks to its clarity and precision, and is used in various areas, from voiceovers to full vocal recordings.
AKG 414

This is a strong microphone for a variety of purposes, thanks to its clear sound and interchangeable polar patterns - with the option to mix certain polar patterns if necessary.
Drum Microphones
Sontronics Drum Pack
This drum pack is useful as it provides everything necessary to fully mic a drum kit, with a strong kick microphone and cardioid overheads to prevent spilling.
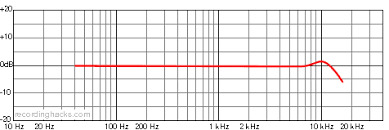
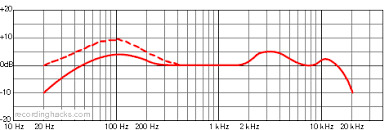
AKG D112

This microphone is a prime choice for recording kicks thanks to its low-frequency response range, with a good rise at 4KHz which adds punch to a kick recording.
Specialist Microphones
3DIO
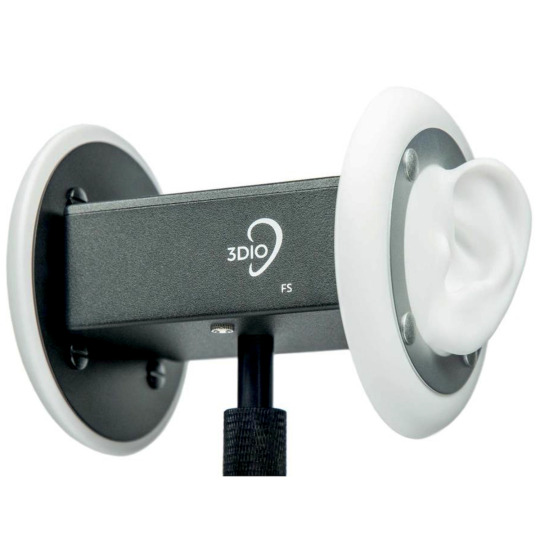
This uniquely designed microphone is designed to emulate the human ears, and thus recreate what a human would hear - this is useful for testing headphones, or recreating the sounds of a room.
Sennheiser Ambeo VR
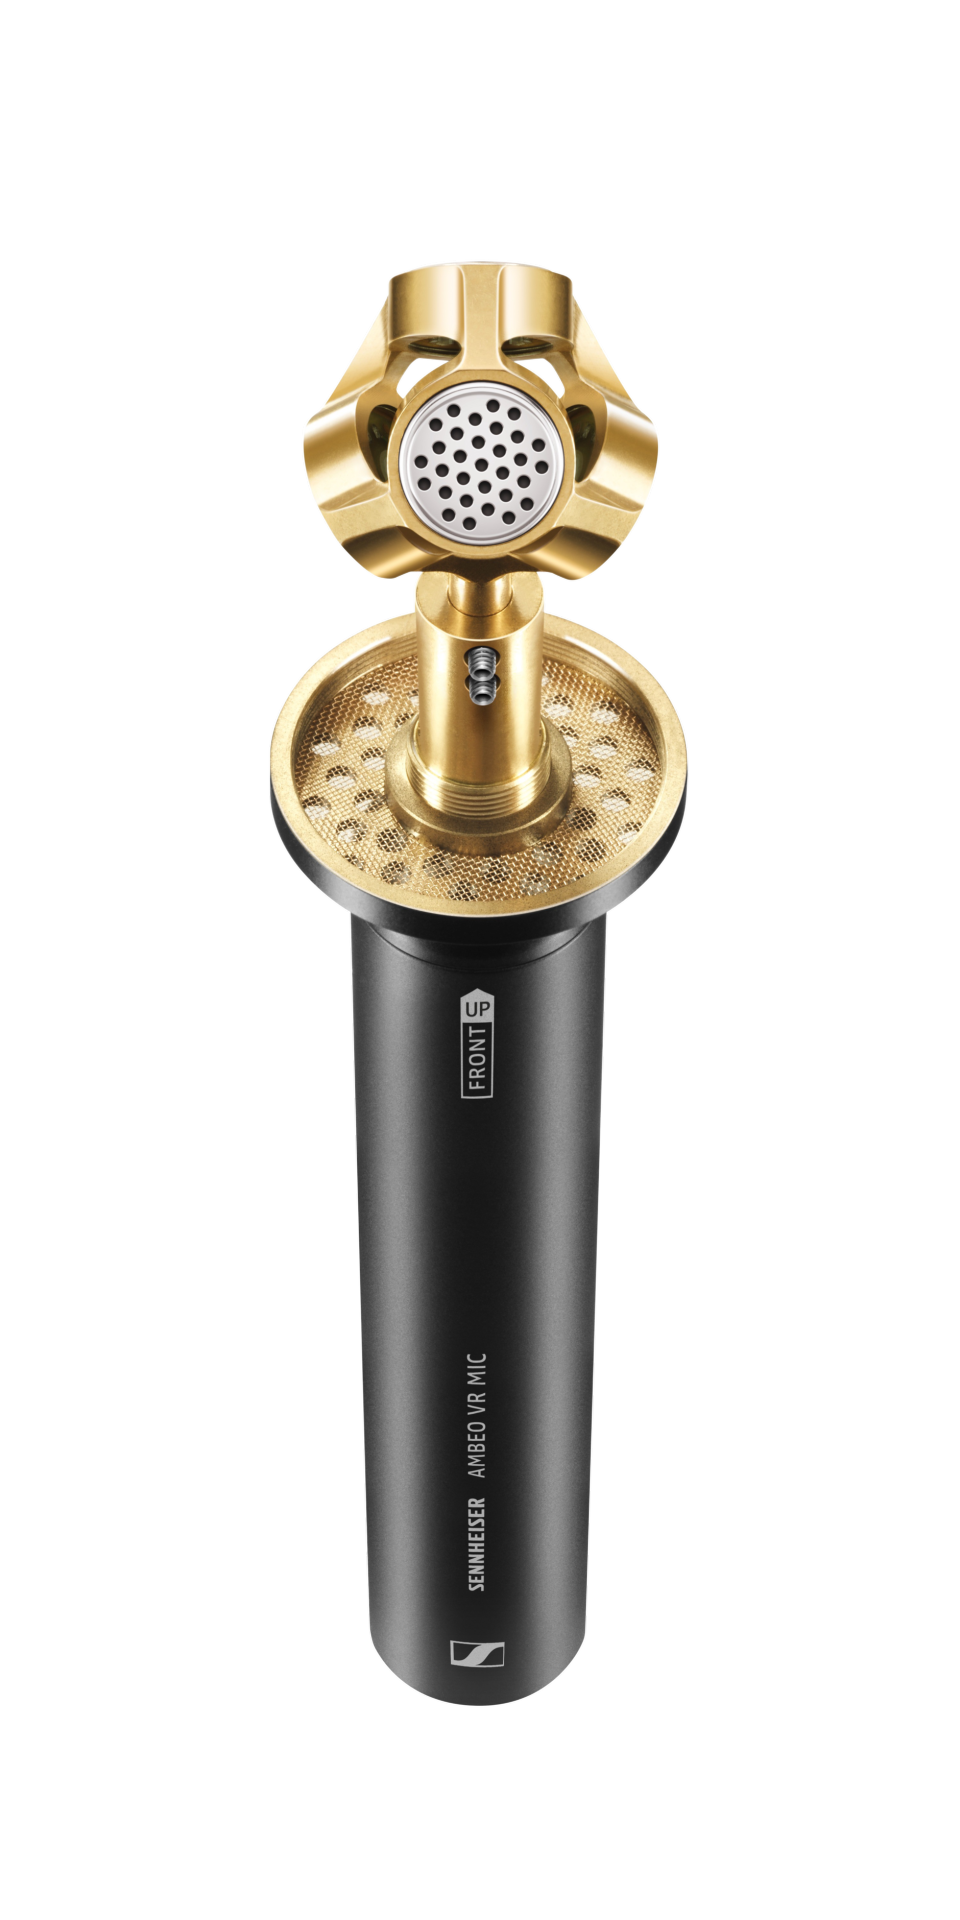
This microphone is designed, as the name suggests, to be used for VR recordings, without needing a complex multi-mic setup.
References:
https://www.uopmusicstudios.com/_files/ugd/c737d7_1436de5ca63b4a72b723083dab5b3c4c.pdf
https://www.guitarcenter.com/riffs/buying-guides/mics-and-wireless/essential-microphones-professional-recording-studios#:~:text=Two%20classic%20microphones%2C%20the%20Shure,for%20a%20particular%20audio%20source.
https://flypaper.soundfly.com/produce/the-13-most-common-mics-youll-find-in-a-studio-and-why-engineers-rely-on-them/
http://recordinghacks.com/
https://royerlabs.com/pdf/manuals/R-121manual.pdf
0 notes
Text
Week 4 - Practice - Exploring virtual amp miking
Unfortunately, it was during this week that I caught an illness that would follow me for the next few. As a result, I was unable to make it to our studio session, so I instead decided to experiment with virtual microphone placements. This was brought on as I noticed that one of my plugins, an emulation of a Marshall Silver Jubilee 2555, featured options that included an SM-57. Before this module, I didn't pay this any notice, but I now decided to see what difference adjusting the settings on this plugin would do. Unfortunately, I had a problem activating the plugin on my laptop due to a recent hard drive failure, so I instead used MLs Sound Lab's 'Amped Roots', which offered the ability to place the microphones in a virtual cab.
While not a solid replacement for practical recording, I thought that this exercise would be a good opportunity to explore guitar amp miking before our lecture on the subject.
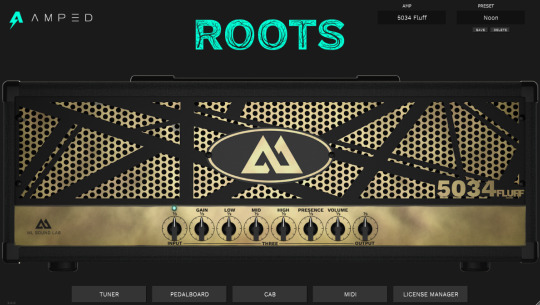
This plugin features an emulation of a 2x12 amp, and the virtual environment that the mics can be moved around in is simple and easy to navigate (see below).

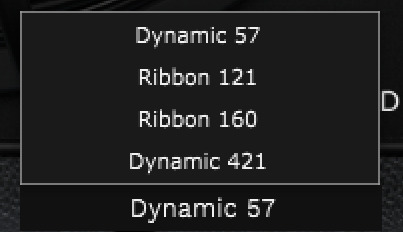
For my tests, I chose to have both speakers as Freeman M25s, and both microphones as SM-57s, as these are what we have readily available to us in the studio. For reference, the plugin also offers the Royer R-121, the Beyerdynamic M 160, and the Sennheiser MD 421.
For my first tests, I chose to experiment with the microphones placed in three different positions along the cab, and vary the distance to its maximum and minimum (as the plugin does not give any specific lengths). Below you can see the three positions of the microphone along the cab at both of these distances.
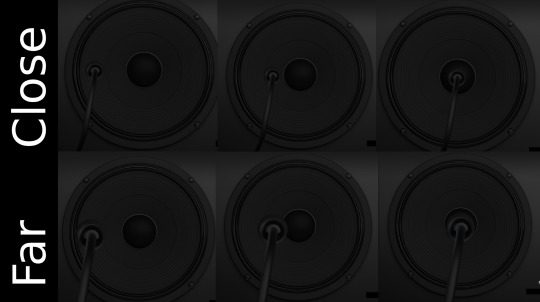
The following recordings are those with the microphone placed directly against the speaker, using a loop of the direct signal from a Westone Spectrum MX:
Next, I repeated these with the far microphone placement:
The recordings with the microphones directly against the speaker sounded far boomier than the ones at a distance, with more of the high-end getting through on the second set of recordings. To try and achieve a better overall tone, I recorded two more options using one microphone on the side and one on the centre - these both had one microphone at a distance, with one directly against the grill.
Out of these two, I prefer the first, with the side microphone close to the amp and the centre one far. This prevents the tone from sounding too muddy, as the one with the centre microphone close to the amp loses some of the high end. If I were to repeat this test again, I would record a guitar sample with a greater amount of high end to more easily see how this is affected.
0 notes
Text
Week 4 - Theory - Baffled pairs
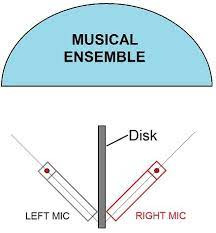
Jeklin Disk Technique
The Jeklin Disk technique, also known as the Optimum Stereo Signal technique, utilises a thick circular baffle between two mics (which would otherwise be a near coincident pair), in an attempt to emulate the separation between ears that exists in the human head.
There also exist baffles which more closely emulate the human head, with similar microphone placements.
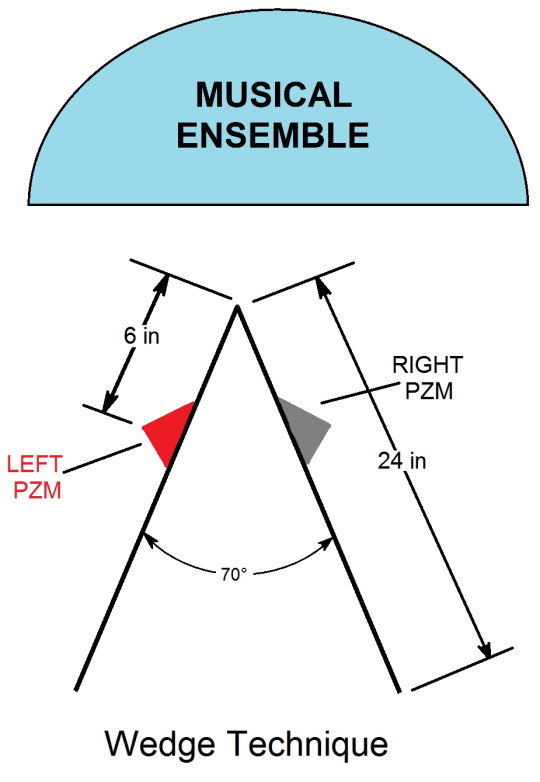
The Wedge Technique
This builds on similar principles to the Jeklin Disk, however uses a wedge baffle, and Pressure Zone Mic (PZM) a.k.a 'boundary' microphones mounted directly on the surface.
A brief exploration into boundary microphones
The main advantage of a Boundary mic is that it eliminates interference caused by sound waves being reflected in a room / through air.
A normal microphone picks up not only waves from the source but also reverberations, which can result in unnatural sound reproduction that may not be wanted in certain applications.
References:
https://lossenderosstudio.com/article.php?subject=11
0 notes