
Don't wanna be here? Send us removal request.
Statistics
We looked inside some of the posts by polinauk-blog and here's what we found interesting.
Average Info
Notes Per Post
1
Likes Per Post
1
Reblog Per Post
0
Reply Per Post
0
Time Between Posts
5 days
Number of Posts By Type
Text
9
Last Seen Tumblr Blogs


Fun Fact
In 2020, Tumblr had 29.4 million users in the US.
Text
Final steps
I successfully finished my last steps of this work and pleased to show the result. This took me quiet a lot of time to carefully combine everything together.
Connecting threads to grid

From the back, they are fixed by pink paper clips

Connecting to coils and setting up the rotation

FINAL FINAL FINAL RESULT
youtube
0 notes
Text
Rebuilding and improvements
My goal is to build presentable work which would be showed to audience.
This required me to rebuilt my origami grid and create a box to hide my wooden base and frame.
The result of my work:
Brand new iBOX Pro 2020 for covering everything:

Grid
Next hard and long step was to make a new grid. I started from sketching everything on paper:

Folding:

Placing triangles:

FINAL RESULT

Placing on box:

Result
I am really pleased with my final version of grid. It looks better than I expected :)
Final steps
My last steps are place the threads and grid and connect them to coils.
0 notes
Text
Patience and problem solving
Problems, problems, problems are everywhere...!


After successfully building the base, I combined all my details and tested my hall work. The problem that I identified that my coils for motors were not good. They easily broke because of the way how they were made - gluing. This was my biggest mistake which I learnt.
***NEVER GLUE ANYTHING. ALWAYS USE A DRILL AND SCREWS***
Rebuilding
New perfect and beautiful version of coils:


I tested my new version of coils and they worked really well.
0 notes
Text
Building the base
From my previous post, I described my next problem that I need a base where would place my motors and grid frame.
Building the prototype helped me to create a final version.
My challenges
For building such as base, I successfully accomplished my next challenge which required me to learn sawing and drilling. I also correctly measured motors size and halls and then drew them in Adobe illustrator for laser cutting machine.
This is result of my work:
Sawing

Laser cutting and drilling


Placing motors

0 notes
Text
IT IS ALIVE!!!
I am really excited to show the result before describing my work!
youtube
From previous post, I managed to create a new ides for my mechanism, build by hand all details, combine them together and test them.
After that, I attached my threads to coils and combined the mechanism with Ardruino.
This is only pulling threads from one side:
youtube
And then I did the same for the pulling back the grid:
youtube
That is how it looks from another side:

Problem
I faced the next challenge that it was not enough to attach motors by tape to the table. I went back to the lab and build a prototype how to place the motors.

Next steps:
- I want to achieve maximum grid movement. In my prototype, I only attached threads to few sides. My movements would be controlled much better, when I attach threads to more parts of the grid.
- Building the basement for holding the frame and motors. I have already done a prototype and going to continue to work on it.
- For final presentation, I am thinking to build a box to cover everything and make it looks nicer
0 notes
Text
Rethinking
I started from trying to build the frame for squeeze and unclench. My idea was to put wooden columns on both sides of grid. They would move from left to right by pulling the thread. For squeezing back, I would place the elastic in the middle of grid. This is my sketch of the idea:

I went to the shop to find elements for such as mechanism. I got some kitchen stuff and then played with them

Failure
Unfortunately, I realised that motors are not good for moving the objects and my idea with columns does not suit for this.
Trying and rethinking
I spent time to rethink how my mechanism should work. I realised that I can control my grid by attaching threads to grid and pull them like on sewing machine.
Building, sketching, laser cutting, sawing and gluing
My new idea required three things: nylon thread, coil top for motors and frame to place the grid inside.
Nylon thread
I went to the Decathlon to buy nylon thread.

Coils for motors
For coil it was not that straightforward. I could not find something suitable online and decided to build my own one with laser cutting machine. Thank you to Julien Mercier for his help.

We did some sketches together, cut everything and glued it.

The result:

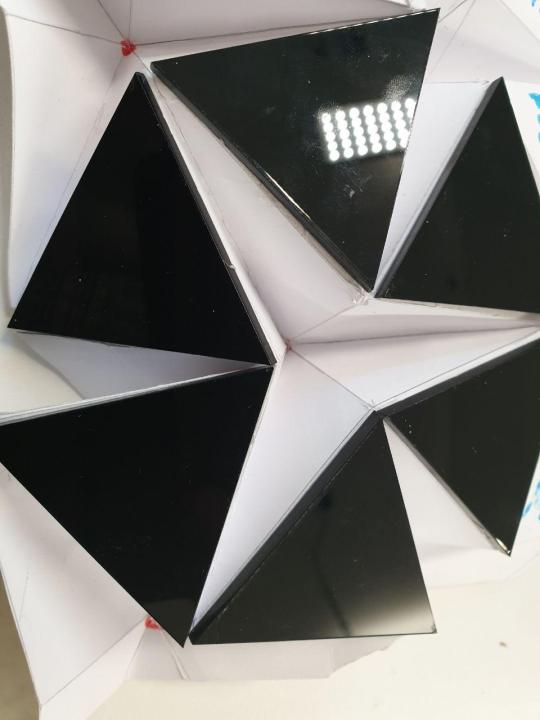
Triangles
For making grid looks better, I decided to improve the design and include black triangles on the top the grid.This also required to use laser cutting machine.
Grid frame
Even I had all my details, I could hold grid and motors at the same. I build the frame which allowed me to place the grid and control the thread movement

Placing inside the grid and attaching threads:


Realisation
I faced the problem that when I pull threads back, it moves the grid itself but not constricts triangles.
Therefore, I created the back wall which would allow me to fix this.

Hand testing
After putting most of things together, I successfully tested my idea!
youtube
0 notes
Text
Prototype development
ImGrid building
Building the grid was not straightforward and took me more time than I expected. I realised that my prototype origami grid does not look correctly as it should be. I tried to colour my sketch and make a new version. This was a result:


I could not fold my triangles because the scale of the grid was too small. My next step was to build a new one with right scale.
My next try was successful. Everything folds correctly.


youtube
Thought process of the movement of Grid
My initial idea for moving grid was to make wooden sticks which would push the grid from the back. However, my grid stricture did not suit for it because even if I connect my back triangles to the stick and then push them, my grid would not shrink back. Illustration of it:

This meant for me to rethink how mechanism should work to achieve moving process.
Realisation
I understood that my mistake was to think that the grid motion is up and down, but it is the contraction-expansion.
Therefore, my mechanism will be the frame which would move itself and squeezing or unclenching the grid.

youtube
Mechanism
After grid implementation, I have been working on frame mechanism.
Interaction with grid
My idea is that at the back of the grid there is going to be a light sensor. Light will go through the paper and frame will start unclenching the grid. It would be like a flower behaviour. When there is a lot of light, the flower bud is opened to catch more lights and then it is closing in dark time.
I bought servo motors for moving the frame and built a small prototype how motors will react to the light.
youtube
Results
- finished struggle with grid
- rethought a new mechanism
- created a new mechanism
- bought new stuff
- built an arduino prototype of mechanism
Next steps
- going to buy wood, sticks etc to build the frame itself
- place the grid inside the frame
- building the connection between motors and grid to achieve the movements
0 notes
Text
Physical Prototype
Result
Made a diagram with detailed scheme to build the final version of project and created a small paper prototype of grid.
Overall work
I got inspired by this work and would like to use the same idea for my mechanism: https://www.youtube.com/watch?v=RrZMnEqjoT0&list=PL1tfhYz6sBAxIclqxf60stlbpNUEsRjgD
In this example you can see that rectangular elements of grid are connected by cloth. At the back, there are motors attached to wooden stick which moves the cloth. I would like to use the same idea for moving. There are not any tutorials how this project was done which makes it challenging for me :) For better understanding how it would look like for my project, I drew diagrams of my grid and mechanism.

Back:

Mechanism itself:

I am going to use this example https://learn.adafruit.com/experimenters-guide-for-metro/circ04-intro which we have already done on lecture to move the grid structure. The movement of my motors will depend on light sensors.
Grid structure
My focus for prototype was to make a grid itself. For my project, I am changing the grid structure from inspiration example (link on top). Instead, I would like to use triangles shapes with paper material. From my background research before, I took this example to create my small paper prototype. https://aayushi.pb.design/computationaldesign/folding-and-unfolding-origami-tessellation
Story of making my small grid prototype
At the beginning, I spent time to sketch the grid by hand. It did not work.

After that, I printed paper and copied from there.

Then I started to make cuts and fold it


Ta dam :) I final got the right shape! And have small version of my grid for building my final one.
Next steps
- create bigger version of grid
- set up the movements of motors according to light sensors
- connect it to motors
0 notes
Text
The beginning

Dynamic facade
Project description
Nowadays, facade of building becomes as bridge between the building and the public space. Creating an interaction between the society and the facade is a new form of communication. One of the interactions could be done by tool which you can rotate and according to our movements the facade of building / grid is changing.
Core part The most existing part for me is to build grid which would interestingly move according to outputs. For my future work, I still need to make design of grid itself.
Scope I do not have any experience in designing such as grids and physical computing. However, I am really excited about this idea. The biggest challenge for me to build mechanism which would allow to move grid by mapping data from user. I believe it is quiet complex idea but I should be able to complete it by January.
Next steps For my prototype, I will cut different shapes from the cupboard and play with them. After that, I need to figure out how to link these shapes together and rotate them by dives. I have already went to laser cutting induction and for my final project I am interested to cut shapes by laser.
Research background / Inspirational projects 1. Dynamic Apeture – Pivot Dynamic building facade design with light reactive grid. Project was made by Chris Behling VIDEO - https://www.youtube.com/watch?v=qyuzqHYdQNo&t=4s
2. Touch Vision Interface [openFrameworks, Arduino, Android] Touch Vision Interface is a combination of software and hardware to allow real time manipulation of content on a remote device via touch interface on a mobile device. http://www.creativeapplications.net/android/touch-vision-interface-openframeworks-arduino-android/ VIDEO - https://vimeo.com/28792538
Geometric/pattern/ structures https://www.researchgate.net/figure/Rigid-origami-as-an-adaptive-envelope-complements-kinetic-structural-assemblies-by_fig6_274521680
https://www.pinterest.com/pin/370632244312834295/
https://aayushi.pb.design/computationaldesign/folding-and-unfolding-origami-tessellation
1 note
·
View note