
puttlesculpts
Ambitious Endeavors
Progress blog for a personally ambitious creative goal
7 posts
Last active 2 hours ago
Don't wanna be here? Send us removal request.
Last Seen Blogs

odysseus-ghost
✧.*ˏˋ°•*⁀➷ Silly little guy ✧.*

gerda-p
🌹🍃 𝔑𝔬 ℭ𝔥𝔞𝔱 🍃🌹

noithatquangan
Nội Thất Quảng An

aealqada
Untitled

ocxanman
My feelings are ineffable
Text
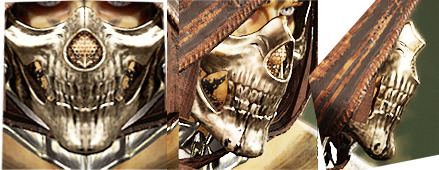
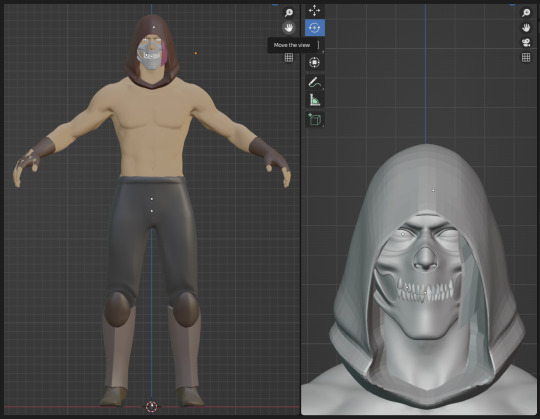
Step 6: Build the skull mask, ruminate a lot. Blender pt 5
With the hood in a good enough place to move on, I wanted to see what it would look like if I used the premade skull mask I had found. As the existence of this post implies: it didn't looks very good!
Never even took a screenshot cuz I nixed that idea so quickly. Which was great, because it was a sign that I was getting more confident in what I could do and the sudden idea of making a mask from scratch was no longer daunting. So I mads a few references and set out to "trace" the model via a flat image and editing the primitive in the isometric views:
Took a screenshot as face-on as I could but still had to skew + mirror it in PS cus ya boy's face is pretty angled. At least the profile is easy to just rotate.
Anyway, here it is with the images placed for Optimal Isometric Modeling:
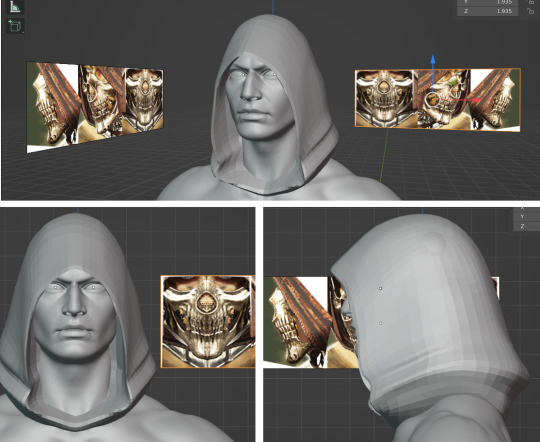
What you don't see here is the struggle to figure out the best way to actually trace things. Ya I could have watched a video, but at some point you just gotta play around with it on your own. So I ended up taking the woodcarving technique and moving all the vertices to where they needed to be at the most important angle. In this case, in Front View, where I moved everything to the exact place I needed it to be on the x/y-axis, which left most of the sculpting to happen on the z-axis.

This was ALSO the first time I ever deleted faces, something which I forgot I could do, and was much easier than my original plan of just sinking the unneeded surface into his face lol (should probably go back and do this for some of the boot parts)
The mask itself presented a pretty good set of challenges from the previous endeavors, especially with the more natural and rigid nature of bone. I feel like with the cloth of the pants/hood I was able to get away with a little less precision, as there is an inherent unpredictability to the way cloth falls which would not be too noticeable so long as I implied weight well enough (something I was conscious of and played around with :^) ), but the skull portion has a very distinct look with the shapes and shadows.
The mask also needs to be a balancing contrast to the otherwise soft nature of the surrounding cloth pieces. I am wary of my sculpts looking uncanny due to being too smooth and play doh-y (like how the Sims 3 sims looked lmaooo), which is where the skull would come in. I do plan/hope/am praying that brushes will help toward the end to give things a bit of a lived-in feel, and I know there's a way to add additional 3D textures similar to how you add 2D ones, but that was something I briefly tried to do in the past with no luck. In spite of that, I am confident I will be able to figure it out now that I've learned so much more about what I am actually doing in Blender.
With all that being said, the teeth killed me lmao
When I made the general shape of the mask, I thought about just using the mouth portion from the original model I was gonna use. However, that gave me a whole nest of problems on its own. Mainly these huge fucking clusters of vertices:
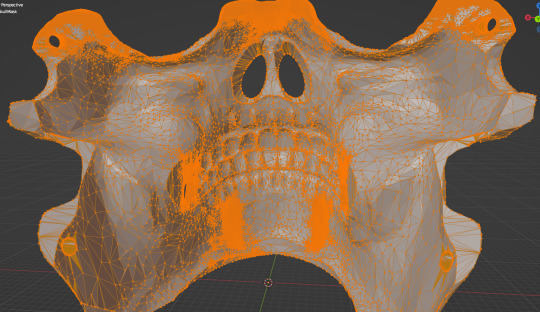
They made Blender super slow, hoping between edit/object mode was a nightmare, and applying a modifier was a guarantee like 5 minutes of no response. And I spent a good amount of time and troubleshooting trying to fix this (including decimating the geometry, attempting to remove this entire back side + extruding, mirroring, etc) but at the end of the day I just decided it wasn't worth it.
This was a major factor in my decision to started moving away from remixing existing models. I realized that I actually do care about the amount of control I have over them + with each successful part I made, it would make each borrowed one feel that much more out of place.
So major character development here: I am officially gonna axe any plans I had for borrowing models! Except for the skull pauldron, but we'll cross that bridge when we get there lol
Anyway, here are the steps I took trying to make the teeth work before decided to JUST include the teeth and do the rest of the sculpting post-print in epoxy.
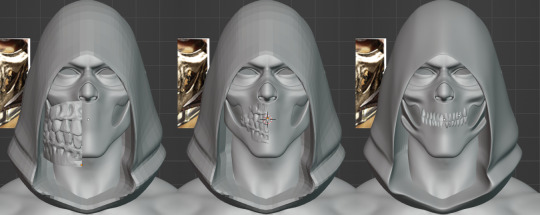
I ended up using someone else's teeth tho cus I tried making my own via extrusion (looked bad, look like those lil square gums) and sculpting.
Turns out idk what teeth look like and I could not be bothered to do the entire reference process, especially when I KNOW someone out there probably made a perfectly good set of individual teeth. And someone did!
Anyway, I refined the mask further to give it more shape and will probably continue to work on the teeth as I progress onto other pieces. Who knows, maybe I will eventually gain the skills and confident to say fuck it and just make the entire mask in 3D too.
Up next: Additional head details, maybe the straps on his chest? Gloves pt 2? The BIG cloth wraps? tbd tbh
Sneak preview of the extra details + o ya I learned how to add simple colors cuz it was getting difficult to see all the different lil light gray pieces on his head, but then I got carried away and did the whole body
#blender#sculpting#progress#d4#rogue#the colors are nice#makes him look a little less like a mannequin#but def makes it more obvious when i forget to unhide his eyeballs
0 notes
Text
Step 5: Finish pants, give up on gloves, start hood. Blender pt 4
Gave my hands a break for a few days, but still made a good deal of progress! The last thing I did before my break was to finish adding folds to the other leg of the pants. I went into it wanting to be lazy and potentially just mirroring it, but I was brave and did it all by hand.

I also went ahead and purchased a huge pack of brushes and found out my model was reeeeally tiny, but thankfully it works on vector logic so re-scaling it so the brushes didn't look terrible was a non issue. Anyway, I wanted to go crazy with them but I decided to wait until the end to apply any. My main goal for this project is to practice and learn and idk but the brushes feel equivalent to layering on textures in PS: looks great, wonderful finishing touch, but try not to rely on it to be satisfied with your work.
Next part was the gloves! TBH, the part that convinced me to step back and take a break lol

The orientation of the model made these a HUGE pain in the ass to work on + making these is where I learned the body mesh I am using isn't quite symmetrical (or is at least slightly rotated). Obviously the hand is the most complex part so I am being realistic with my expectations here so I know it's better to step away and work on another part rather than trying to claw my way through it and burn myself out and/or come to resent the project.
SO I moved on with the wonderful knowledge that I can always sculpt these IRL if I can't figure em out >:)
Tonight, I intended to block out the hood and call it a day, but I ended up finishing it lol


This is an absolutely crowning achievement for me because before I even opened Blender, I scoured Yeggi and every other STL site I could find for royalty free hoods on other figures that I could use for this project (and, idk, push it around a bit w/ the sculpt tool to make it more unique??). It's such a central part and to his silhouette and I def did not feel confident about anything made of cloth. But here we are! I definitely think it needs to be thicker as far as print quality goes, but I am thrilled with how it turned out in just one session. No part is ever finished and I am constantly updating them (especially as more and more of the figure comes together) so I am excited to see how this ends up.
Up next: Delete the "Possible Hoods" folder, be even braver than I was tonight and build a skull mask? Probably
#blender#sculpting#progress#working w/ the cube is so fun#i love slowly carving out the general shapes and then getting more and more detailed#and then smoothing at the end is just the nice finishing touch#OR it's a disaster#like how the gloves ended up#but they are supposed to be wrapped cloth anyway so lol who care
0 notes
Text
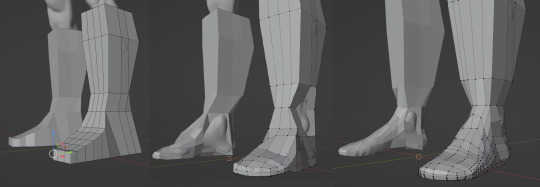
Step 4: Boot plate/knee cap & Pants. Blender pt 3

The boots are done! Used a plane and extrusion to make the plate and the knee caps. Got to experiment with the Shade Smooth some more as I wanted to preserve a crisp line down the middle, but to be otherwise smooth everywhere else. The knee caps were more of an investment than was probably necessary and I was struggling to get the shape right, but decided I no longer cared about perfecting a detail that didn't really didn't need to be knocked out the park as far as 1:1 recreation goes, which freed me up to move on.

BUT before I did, I was looking up tricks to making belts/straps and discovered the world of Blender brushes! I will probably try to make my own belt, but also, I would like to get acquainted with this new tool. I'm actually very relieved since it looks like the surface brushes will go a long way in supplementing/finishing whatever I sculpt, since I currently lack the finesse to do it all on my own.
Speaking of fabric...

I started working on the pants! It was a very welcomed change of pace lol. I wasn't sure how to approach these since they would ultimately be one piece rather than two separate ones, so I did my best to build without modifiers and to mirror on the x-axis instead. It took some getting used to but I learned that things that aren't NEAR identical will simply not be mirrored in this way, but I was actually fine with that since I don't want these too be too symmetrical. I also thought about making the top + legs as separate pieces but ended up extruding it all :^) (thus successfully putting off learning how to smoothly merge two objects by at least 1 session).
I'm really happy with the progress so far, especially on the left leg where you can see the results of fabric/folds! This was another step I fully intended to do with epoxy after it was printed, but I started to experiment with things and I think it looks pretty good. I sampled what it would look like with smoothing and it wasn't GREAT, but definitely workable. So the plan now is to block in the major shapes, establish some weight on the fabric, and supplement texture + smaller creases + details with brushes down the line.

Week 1 recap: Three blog posts and three progress check-ins. I'm really enjoying this entire process so far and am pleasantly surprised by how much I am currently able to accomplish in a medium with a fairly difficult learning curve. All about baby steps at this point.
Up next: Finish the pants, then either gloves or straps!
#blender#sculpting#progress#i'm also using a tablet now and it's much better that the mouse lmoa#my fingers were getting so sore
3 notes
·
View notes
Text
Step 3: Finishing my first sculpt! Blender pt 2
Finished up the boots, slapped on a subdivision modifier, thought, "Hmm!" as it ensmoothened within the mesh, BUT I am still feeling great about it!

I toyed with the idea of carving out the soles on the main mesh, but it wasn't looking quite right + it was difficult to work with the modifier applied (and I was too afraid to delete it since I smooshed the model around to fix some things).
Ultimately I decided to sculpt the sole & heel as a separate piece since they're made out of different materials anyway. I skipped the cube and started with a plane since the final piece was basically just gonna be a thick layer anyway, so doing this allowed me to focus on the shape without having to move two sets of vertexes whenever I needed to make a change. Once I was happy with the shape, I selected all the faces and extruded:

I was about to introduce another mirrored object to create the heel but decided to challenge myself by using extrusion again and hey, look at that, it worked out great! And is one less joint to worry about later. I gave him a lil bit of a cowboy heel out of pure indulgence + I think they look neat. I was thinking about leaving them raw and polygon-y with the idea of sanding them later cus I didn't think the softening from a subdivision modifier would give me the look I wanted, but then I realized that 1) Sanding something so small would be a pain in the butt and I don't wanna do that, and 2) I watched this video for tips on merging objects and accidentally found the perfect solution to smooth surfaces that keep a crisp edge (Shade Smooth + Auto Smoothing, my love).
Anyway, final touches including the sculpt tool to minimize the appearance of floating, and that's about it! There's going to be an armor plate + straps + a knee cap before these boots are officially done, but there is indeed a completed and identifiable object here, so I'm willing to take the victory lap early.
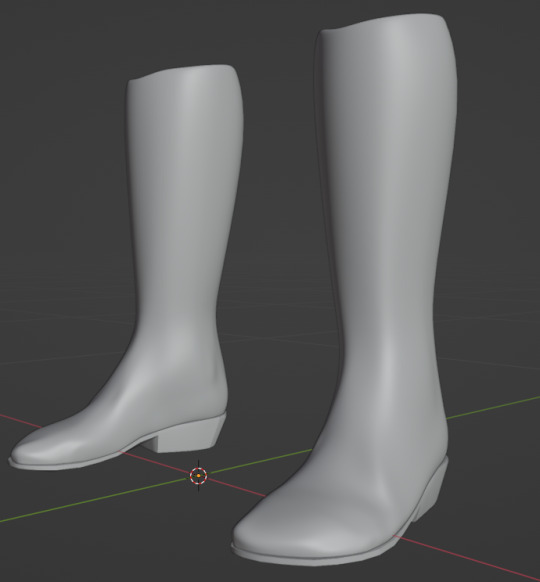
The mesh crinkled a bit from when when I rotated the toes to accommodate the heel, but I ain't mad cuz it just helps them to looks like softer leather B)
Takeaways from this are that extruding is fun & to prolly not get carried away with subdivisions lmao Also trying to sculpt from a single form will likely save me tons of heartache down the line when it comes to getting this print ready. I am trying my best to keep things neat and tidy as I go, so hopefully that all pays off.
Up next: the not so easy parts of the boot
3 notes
·
View notes
Text
Step 2: Sourcing & Blender pt 1
I don't know shit about 3D modeling!!! So I am applying my most essential skill: organically and ethically sourcing the things I cannot provide for myself.
I do actually have a fairly extensive background in hand building with clay, which is something I plan on incorporating at later steps, but I knew I wanted the base of this to be a 3D model since that would afford great flexibility and consistency. I bring this up cus I never dabbled much in CG (I tried off and on in the past, but to little success) but always wanted to be good at it. I realize it's an entirely new skill set, but thankfully there are elements to it that aren't too unfamiliar to me! You'd be surprised how much you can get away with by making subtle changes, and that is what I am banking on with the Sculpt mode in Blender.
So the first thing I sourced was this (royalty free) male body from hiflow3d on CGTrader. It's got the perfect amount of detail and a similar enough body type to my boy:
I am not shy when it comes to learning new programs and stuff, so the idea of rigging this from scratch ain't even a big deal (I actually did exactly that not too long ago, but it was on a different bodymesh and therefor not applicable to this project lmaoo).
But I say that knowing I'll be able to pull a lot of my own weight once this reaches the printing stage, which is comforting. For now it just needs to be good enough!
Here are the before and afters of his head:
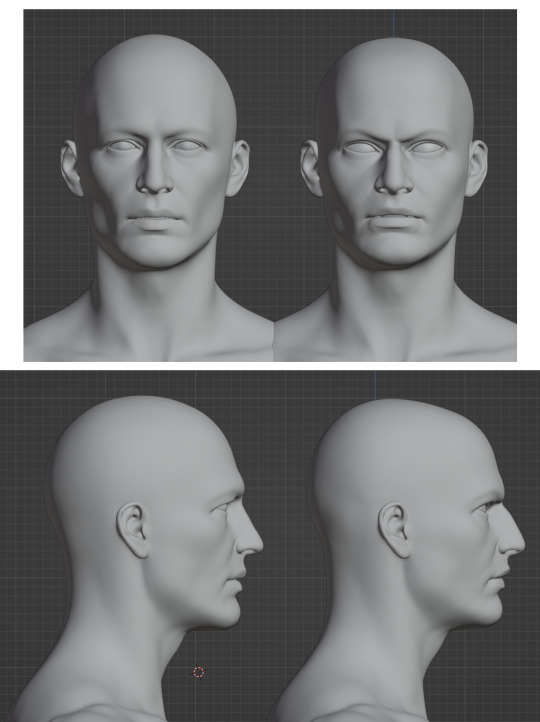
Eyes are more shaped, brows furrowed, bigger schnoz, some changes to the chin & cheek bones, more shape to the skull/forehead
It's not perfect since my knowledge of Blender and how to really and truly work with it is so shallow, but again: it's good enough. Besides which, my dude has his entire head and most of his face covered, so it doesn't have to be perfect.
At this point I was ready to start rigging and intended to do everything else in post, but then I thought about how much easier it would be to NOT sculpt boots + gloves + everything else by hand (while being symmetrical) so I am instead gonna attempt to do as much of Layer 1 as I can in Blender.
Here's my first attempt as a cube-extruded boot:

And here's the second version after I decided to try harder and to scrap the first one for being too messy and anykine:
This is obviously still a WIP since I mainly just worked on the foot part, but it's not so bad. It's repetitive but fun once you get into the grove. IDK anything about efficiency in Blender yet, but I am trying my best to look out for future Devan by keeping these faces as neat and clean as possible.
I've started to get carried away with the smoothing, but I'm not too worried about it or the clipping since I'm just gonna chop off the legs underneath anyway & subdivide + smooth the boots. I could prolly even leave the feet as big blocks and just dremmel them down once it's printed, but hey, it's good to practice new things
#diablo 4#d4#blender#sculpting#progress#i wonder if blender ppl look at this#and see the equivalent of me reaching for the grass brush in PS
0 notes
Text
Step 1: References

These are the in-game angles + the word I chose at the start to give him some character.
Next up was trying to figure out the layers of his outfit. I started out by loosely mapping them out like so:

And then immediately disregarding them as I went ahead and made two very light and low contrasted files instead. The idea was for me to be able to hand draw the layers (with call outs and ideas) without having to make my own base; especially since I'd like to keep the proportions as close as possible:

The first 'layer' is unique because I had to make him as clothes-less as possible. This was tricky since the rogues will have a wide collar and skirt when you remove their clothing by default, but thankfully I had already purchased the slutty* (*complimentary) corset which got rid of those. I also went ahead and included the pants/gloves/boots/and hood options since they would naturally be on the first layer of the figure anyway.
I have an additional collage of more outfit details (put together in my favorite collage-making program: MS Paint) but that's not very interesting.
Now that I have the layers figured out with 4 printouts and a ton of notes, the preliminary stuff was done. I consider all of this to be the sketch, and as usual, I had a lot of fun! Making the call outs was my favorite part and I enjoyed just flipping through the 4 images, but the real work had to start eventually.
Up next: Learning to sculpt and model in Blender

0 notes
Text
This year I want to challenge myself to make a figure completely by scratch by pooling together everything I know and pushing myself to learn more
Goal: Make this guy into a real life figure using a combo of known skills (3d Printing, some irl sculpting, painting minis) & new skills (3D modeling in Blender, working with textiles, mixed media)
Why: No one plays male rogue so I know I will never get merch of him lol

4 notes
·
View notes