
We want to lighten the world💡💡--solar panels, portable power stations, and just everything you want!
Don't wanna be here? Send us removal request.
Statistics
We looked inside some of the posts by qhtechnology and here's what we found interesting.
Average Info
Notes Per Post
1
Likes Per Post
1
Reblog Per Post
0
Reply Per Post
0
Time Between Posts
1 month
Number of Posts By Type
Text
11
Photo
4
Link
1
Video
1
Last Seen Tumblr Blogs


Fun Fact
Total funding amounts to $125.3M.
Text


Our latest solar products have been in Harare, Zimbabwe. Including 51.2V wall-mount LiFePO4 batteries, portable power stations, solar panels, and solar lights. They have a great performance with high-quality cells at an available good price.
If you want to see samples or are interested in purchasing, don't hesitate to contact us!
QH South Africa Shop Address: C5, Good Hope Mall, JHB
1 note
·
View note
Text

这是我在 Tumblr 上的第 2 年纪念日 🥳
0 notes
Text

Solar Event in JHB! Solar & Storage Live Africa 2024 on 18 - 20 March!
Find alternative energy solutions for your business and beat load shedding at Solar & Storage Live Africa! Meet with QH Tech and check our latest products.
Get your free ticket here: https://i.snoball.it/p/fEsY/i
0 notes
Text
Full DIY Process Of 25.6V 50Ah LiFePO4 Floor Machine Battery For Battery Assemblers
LiFePO4 floor cleaning machine is convenient for our daily lives. Floor machines require reliable and long-lasting backup power to ensure the job is complete without interruption. Lithium iron phosphate LiFePO4 batteries have longer life spans and higher energy densities. Compared with lead-acid batteries, LiFePO4 batteries are lightweight and maintenance-free. They are excellent partners for our housework and cleaning projects.
Do you want a durable LiFePO4 battery instead of a lead-acid one? Would you like to DIY your own battery? Here is the full tutorial in the following post.
*Note: It is recommended that you learn some basic knowledge about LiFePO4 batteries before assembling the battery pack. Keep safe when you are assembling the battery pack.
youtube

Material Used:
3.2V 50Ah LiFePO4 battery cells (8 pieces)
There are currently three common shapes of LiFePO4 batteries: cylindrical, prismatic, and pouch. Different shapes of batteries will have a certain impact on performance. At present, the most suitable battery DIY enthusiasts are the prismatic LiFePO4 batteries, which are very suitable for both performance and operational difficulty.
We recommend you purchase the Grade A battery with a high quality and reliable warranty.
BMS (Battery Manage System, 1 piece)
Connectors (About 8 pieces)
Others: EVA cotton, screws, ribbon cables, plastic pipes, etc.
Tool Used:
Spot Welder
Spot Welding Pen
Soldering Iron
Wire Cutter
Wire Stripper
Multimeter
Assembly Methods: 8 Series And 1 Parallel
Series(S): The way of connecting the positive and negative electrodes of two different cells is called a series connection. As a result, the voltage of the battery pack will increase while the capacity remains the same.
Parallel(P): where the positive and positive electrodes of two different cells are connected in parallel. The result is that the capacity of the battery pack increases while the voltage remains the same.
Assembly Process
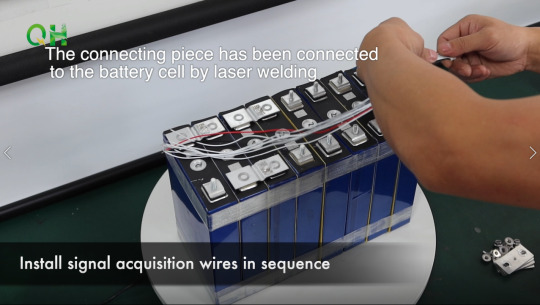
1. Install Signal Acquisition Wires In Sequence
The connecting piece has been connected to the battery cell by laser welding. Laser welding is a process used to join together metals or thermoplastics using a laser beam to form a weld.
Before we connect this group of battery cells, we should use the multimeter to check their voltage of them to ensure consistency. It is better if you have a testing device to check the internal resistance. Without testing the consistency, the battery pack may cause an accident.
Then we place them in order and fix them with fiber tape. (Made of hot melt adhesive and forms a stronger tape that is resistant to tears and has better temperature tolerance than regular tape.)
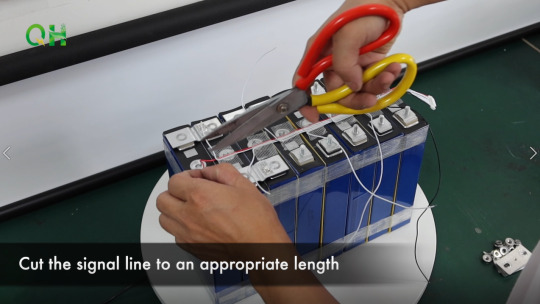
2. Cut The Signal Line To An Appropriate Length
Tidy up the messy lines, then cut them into an appropriate length.
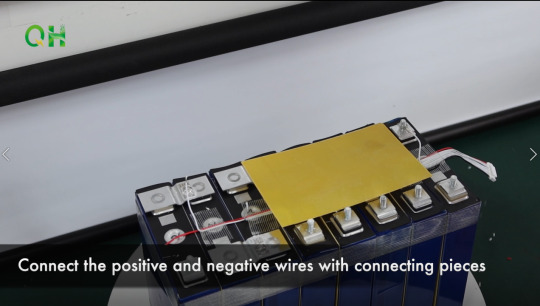
3. Connect The Positive And Negative Wires With Connecting Pieces
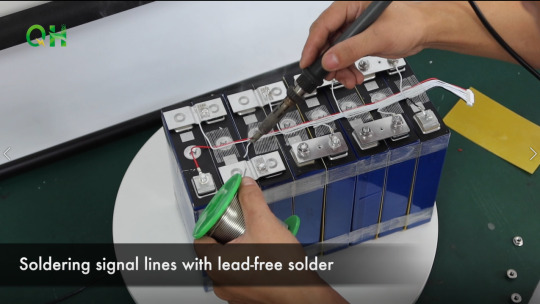
4. Soldering Signal Lines With Lead-Free Solder
Generally, leaded solder is composed of tin and lead. The advantages of using leaded solder include: being easier to bring to working temperature, being shock resistant, and having fewer internal flaws in the structure after cooling. However, lead material is harmful to the body as it’s readily absorbed. We’d better choose lead-free solder to protect our health and environment.
5. Put Battery Pack Into Shell And Fill EVA Cotton
EVA cotton can be shockproof, fireproof, and insulated, which can protect the LiFePO4 battery cells well.

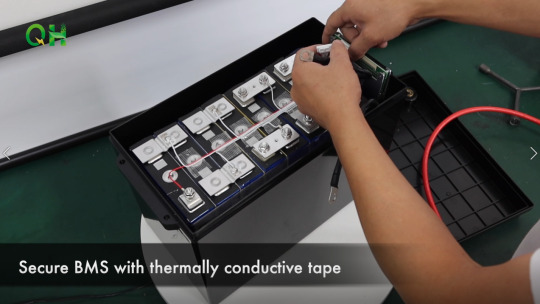
6. Secure BMS With Thermally Conductive Tape
Thermally conductive tapes are designed to provide preferential heat transfer between heat-generating electronic components and cooling devices such as fans, heat sinks, or heat spreaders. They are also used for the thermal management of high-powered LED’s which can run at high temperatures, thus increasing the efficiency and reliability of the system.
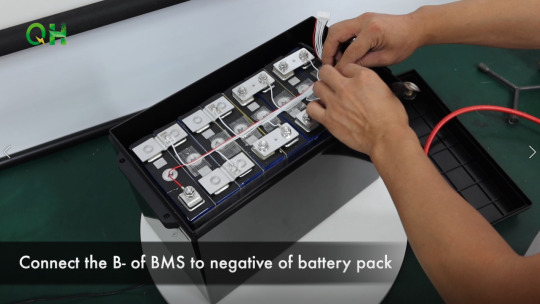
7. Connect B- Of BMS To Negative Of Battery Pack
A BMS is one of the most important elements in a LiFePO4 battery, like the brain of the battery pack. It calculates the State of Charge (the amount of energy remaining in the battery) by tracking how much energy goes in and out of the battery pack and by monitoring cell voltages, which can prevent the battery pack from overcharging, over-discharging, and balancing all the cells voltage equally.
There are two main sets of wires we need to install, the thick wires and the thin wires. The thick wires are your charging/discharging wires and the thin wires are your balance wires. Not every BMS is the same, but most are similar. Your BMS will likely have 3 thick wires or 3 pads to solder on your own heavy gauge wires. These are the B-, P-, and C- wires (or pads for adding wires). We usually start with the B- wire. We can connect the B- of BMS to the negative pole of the battery pack.
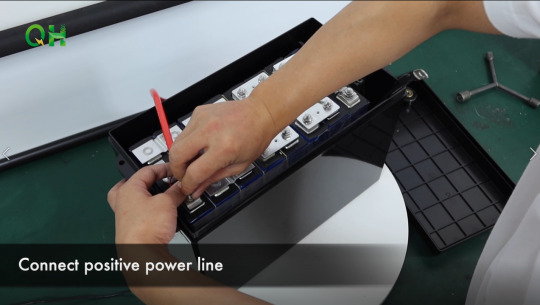
8. Connect Positive Power Line
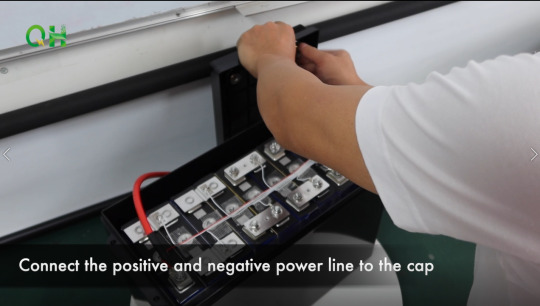
9. Connect The Positive And Negative Power Line To The Cap
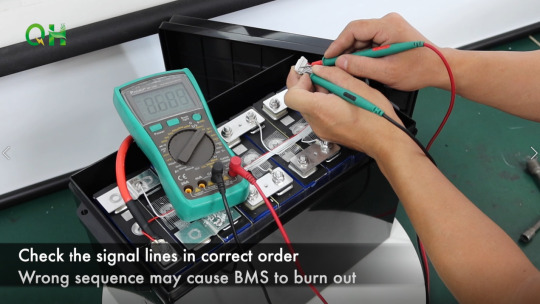
10. Check The Signal Lines In The Correct Order
The wrong sequence may cause BMS to burn out.
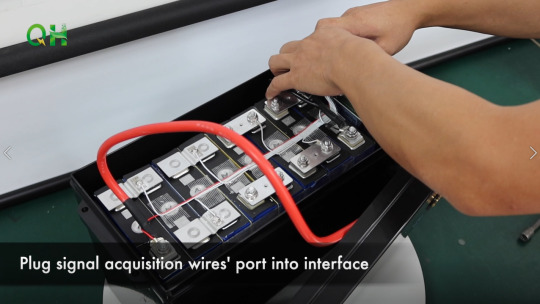
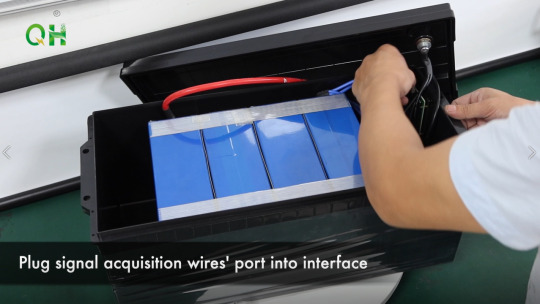
11. Plug Signal Acquisition Wires’ Port Into Interface
Battery Tests
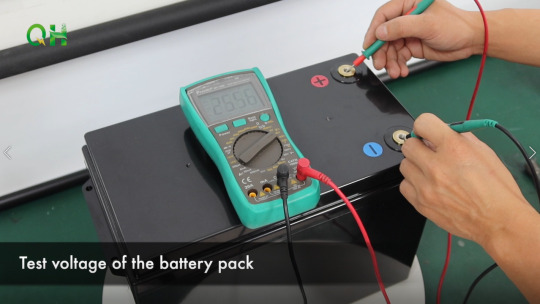
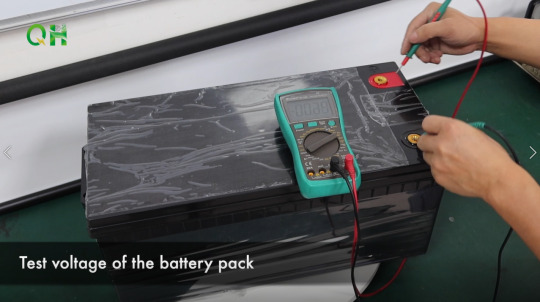
1. Test Voltage Of The Battery Pack
In these steps, we can use a multimeter to check the voltage of the whole battery pack. Attach the multimeter probes to the positive and negative battery terminals. Then we can check the voltage on the screen. The multimeter’s red probe must be connected to the positive terminal, while the black probe must be connected to the negative one.
A fully-charged battery must indicate a slightly higher voltage than the voltage listed on the battery. For instance, a 24 volts battery will indicate about 25.6 volts when it is fully charged.
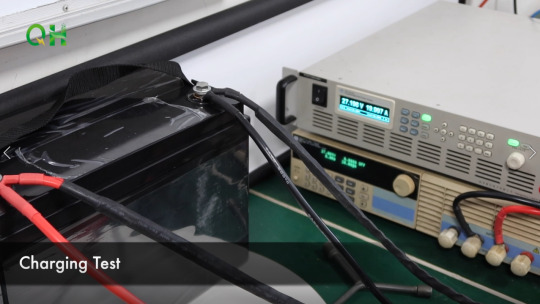
2. Charging Test
The battery capacity, or the amount of energy a battery can hold, can be measured with a battery analyzer. If you’re doing a capacity test, be sure to charge the battery until the battery reaches 100%. Then discharge the device until the battery is fully depleted. The charge and discharge rates of a battery are governed by C rates. The capacity of a battery is commonly rated at 1C, meaning that a fully charged battery rated at 50Ah should provide 50A for one hour.
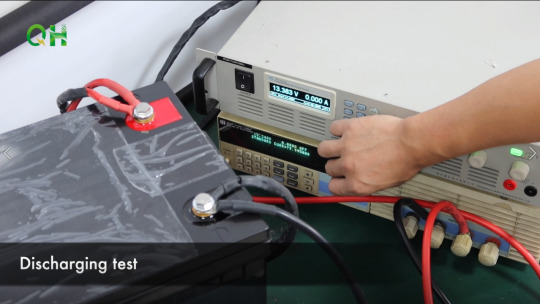
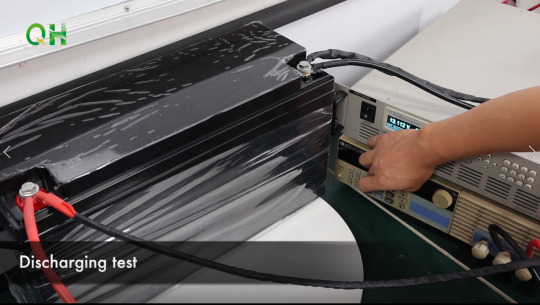
3. Discharging Test
The discharging test of the battery is very helpful to the battery cycle life and discharge performance evaluation. We can use a professional device(Such as a Programmable DC Electronic Load) to check whether the battery works well or not during the discharging process, which can protect our battery and devices for further daily use.
When testing, there are three factors we need to pay attention to the port voltage of the battery, the resistance of the wire between the battery and the electronic load, and the temperature of the battery.
Summary
Thanks for reading the full tutorial on 25.6V 50Ah lifepo4 battery assembly! It is not hard for us to build a LiFePO4 battery. Which voltage and capacity of the LiFePO4 battery do you need? Welcome to share your comments below!
0 notes
Text
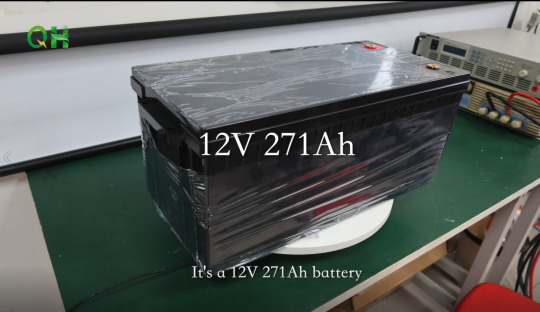
Assembling Lithium Ion Battery 12.8V 300Ah For Your Sail Boat! Step By Step!
LiFePO4 batteries have been widely used in our daily lives, such as RV, camping, solar, and wind energy storage. Compared with the lead-acid battery, the LiFePO4 battery can help you stay on the water for a longer time. With high energy density and a longer lifespan, more and more people are likely to upgrade the sailboat battery using LiFePO4 battery.
There are two types of batteries we used in a boat. One is the starting battery, which is used to start the engine, and the other one is the storage battery, which can power the devices on our boat. Our 12V 300Ah is the storage battery. It’s used to power the trolling motor and other accessories.
As a DIYer, I decided to build a 12V 300Ah LiFePO4 battery for my sailboat. I wrote the full prismatic battery pack assembly process down and share it in the following post. Hope it can help you.
*Note: It is recommended that you learn some basic knowledge about LiFePO4 batteries before assembling the battery pack. Keep safe when you are assembling the battery pack.
youtube


Material Used:
3.2V 300Ah LiFePO4 battery cells (4 pieces)
There are currently three common shapes of LiFePO4 batteries: cylindrical, prismatic, and pouch. Different shapes of batteries will have a certain impact on performance. At present, the most suitable battery DIY enthusiasts are the prismatic LiFePO4 batteries, which are very suitable for both performance and operational difficulty.
We recommend you purchase the Grade A battery with a high quality and reliable warranty.
BMS (Battery Manage System, 1 piece)
Connectors (About 4pieces)
Others: EVA cotton, screws, ribbon cable, plastic pipes, etc.
Material Used:
Spot Welder
Spot Welding Pen
Soldering Iron
Wire Cutter
Wire Stripper
Multimeter
Assembly Methods: 4 Series And 1 Parallel
Series(S): The way of connecting the positive and negative electrodes of two different cells is called a series connection. As a result, the voltage of the battery pack will increase while the capacity remains the same.
Parallel(P): where the positive and positive electrodes of two different cells are connected in parallel. The result is that the capacity of the battery pack increases while the voltage remains the same.
Assembly Process
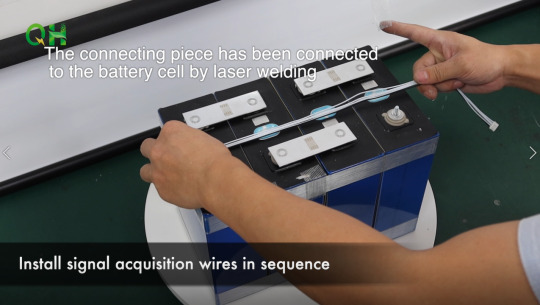
1. Install Signal Acquisition Wires In Sequence
The connecting piece has been connected to the battery cell by laser welding. Laser welding is a process used to join together metals or thermoplastics using a laser beam to form a weld.
Before we connect this group of battery cells, we should use the multimeter to check their voltage of them to ensure consistency. It is better if you have a testing device to check the internal resistance. Without testing the consistency, the battery pack may cause an accident.
Then we place them in order and fix them with fiber tape. (Made of hot melt adhesive and forms a stronger tape that is resistant to tears and has better temperature tolerance than regular tape.)

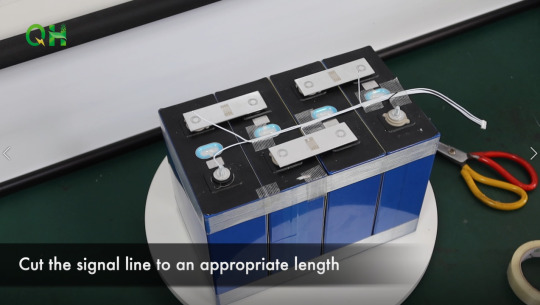
2. Cut The Signal Line To An Appropriate Length
Tidy up the messy lines, then cut them into an appropriate length.

3. Soldering Signal Lines With Lead-Free Solder
Generally, leaded solder is composed of tin and lead. The advantages of using leaded solder include: being easier to bring to working temperature, being shock resistant, and having fewer internal flaws in the structure after cooling. However, lead material is harmful to the body as it’s readily absorbed. We’d better choose lead-free solder to protect our health and environment.

4. Check The Signal Lines In Correct Order
The wrong sequence may cause BMS to burn out.

5. Put Battery Pack Into Shell And Fill EVA Cotton
EVA cotton can be shockproof, fireproof, and insulated, which can protect the battery cells well.

6. Secure BMS With Thermally Conductive Tape
Thermally conductive tapes are designed to provide preferential heat transfer between heat-generating electronic components and cooling devices such as fans, heat sinks, or heat spreaders. They are also used for the thermal management of high-powered LED’s which can run at high temperatures, thus increasing the efficiency and reliability of the system.

7. Connect B- Of BMS To Negative Of The Battery Pack
A BMS is one of the most important elements in a LiFePO4 battery, like the brain of the battery pack. It calculates the State of Charge (the amount of energy remaining in the battery) by tracking how much energy goes in and out of the battery pack and by monitoring cell voltages, which can prevent the battery pack from overcharging, over-discharging, and balancing all the cells voltage equally.
There are two main sets of wires we need to install, the thick wires and the thin wires. The thick wires are your charging/discharging wires and the thin wires are your balance wires. Not every BMS is the same, but most are similar. Your BMS will likely have 3 thick wires or 3 pads to solder on your own heavy gauge wires. These are the B-, P-, and C- wires (or pads for adding wires). We usually start with the B- wire. We can connect the B- of BMS to the negative pole of the battery pack.

8. Connect The Positive And Negative Power Line To The Cap

9. Plug Signal Acquisition Wires’ Port Into Interface

Battery Tests
1. Test Voltage Of The Battery Pack
In this step, we can use a multimeter to check the voltage of the whole battery pack. Attach the multimeter probes to the positive and negative battery terminals. Then we can check the voltage on the screen. The multimeter’s red probe must be connected to the positive terminal, while the black probe must be connected to the negative one.
A fully-charged battery must indicate a slightly higher voltage than the voltage listed on the battery. For instance, a 12 volts battery will indicate about 12.8 volts when it is fully charged.

2. Charging Test
The battery capacity, or the amount of energy a battery can hold, can be measured with a battery analyzer. If you’re doing a capacity test, be sure to charge the battery until the battery reaches 100%. Then discharge the device until the battery is fully depleted. The charge and discharge rates of a battery are governed by C-rates. The capacity of a battery is commonly rated at 1C, meaning that a fully charged battery rated at 300Ah should provide 300A for one hour.

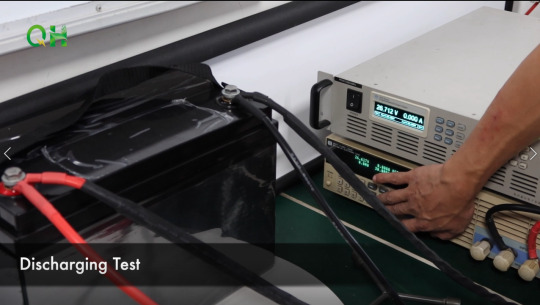
3. Discharging Test
The discharging test of the battery is very helpful to the battery cycle life and discharge performance evaluation. We can use a professional device(Such as a Programmable DC Electronic Load) to check whether the battery works well or not during the discharging process, which can protect our battery and devices for further daily use.
When testing, there are three factors we need to pay attention to the port voltage of the battery, the resistance of the wire between the battery and the electronic load, and the temperature of the battery.

Summary
Thanks for reading the post about assembling the 12.8V 300Ah LiFePO4 battery! It is not hard for us to build a LiFePO4 battery. Would you like to have a try?
0 notes
Text
Build A 12V 280Ah LiFePO4 For A Golf Cart! Full Process Of Battery Cell Assembly!
LiFePO4 batteries have lots of advantages and are becoming quite in demand in the market of trolling motors. When referring to the LiFePO4 batteries, you may compare them with the GEL batteries. For a long time, GEL batteries have played a role in our lives. Nowadays, we prefer LiFePO4 batteries.
As opposed to boats that use GEL batteries, electrical ships equipped with the 12.8Volt 280Ah lithium batteries are more economical, less polluting, and clearly better for the environment. The LiFePO4 battery has a longer life span and deep cycle times(even more than 5,000 times).
Are you a Lithium battery amateur and interested in li-ion battery pack assembly? Now we’d like to share the whole assembly process for beginners, which takes the 12.8V 280Ah LiFePO4 battery as an example.
*Note: It is recommended that you learn some basic knowledge about LiFePO4 batteries before assembling the battery pack. Keep safe when you are assembling the battery pack.
youtube

Material Used
3.2V 280Ah LiFePO4 battery cells (4 pieces)
There are currently three common shapes of LiFePO4 batteries: cylindrical, prismatic, and pouch. Different shapes of batteries will have a certain impact on performance. At present, the most suitable battery DIY enthusiasts are the prismatic LiFePO4 batteries, which are very suitable for both performance and operational difficulty.
We recommend you purchase the Grade A battery with a high quality and reliable warranty.
BMS (Battery Manage System, 1 piece)
Connectors (About 4pieces)
Others: EVA cotton, screws, ribbon cable, plastic pipes, etc.
Tool Used:
Spot Welder
Spot Welding Pen
Soldering Iron
Wire Cutter
Wire Stripper
Multimeter
Assembly Methods: 4 Series And 1 Parallel
Series(S): The way of connecting the positive and negative electrodes of two different cells is called a series connection. As a result, the voltage of the battery pack will increase while the capacity remains the same.
Parallel(P): where the positive and positive electrodes of two different cells are connected in parallel. The result is that the capacity of the battery pack increases while the voltage remains the same.
Assembly Process
1. Install Signal Acquisition Wires In Sequence
The connecting piece has been connected to the battery cell by laser welding. Before installing the signal acquisition, we checked the consistency of the battery and fixed them with fiber tape.
2. Cut The Signal Lines To An Appropriate Length
Tidy up the signal lines and tape them with fiber tape, then cut the signal lines to an appropriate length.
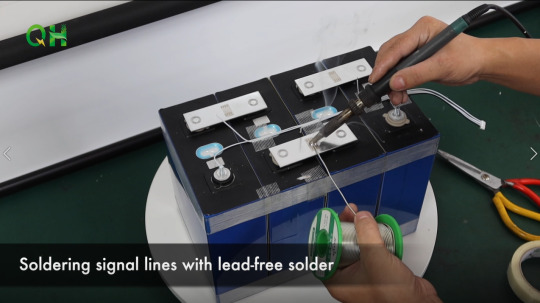
3. Soldering Signal Lines With Lead-Free Solder
Generally, leaded solder is composed of tin and lead. The advantages of using leaded solder include: being easier to bring to working temperature, being shock resistant, and having fewer internal flaws in the structure after being cooled. However, lead material is harmful to the body as it’s readily absorbed. We’d better choose lead-free solder to protect our health and environment.
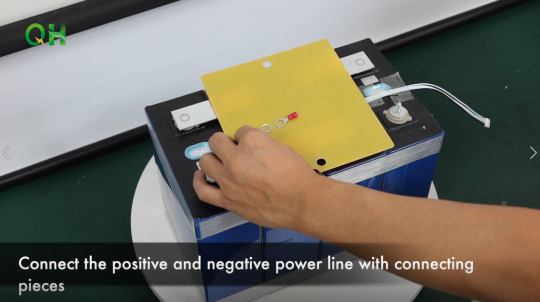
4. Connect The Positive And Negative Power Line With Connecting Pieces
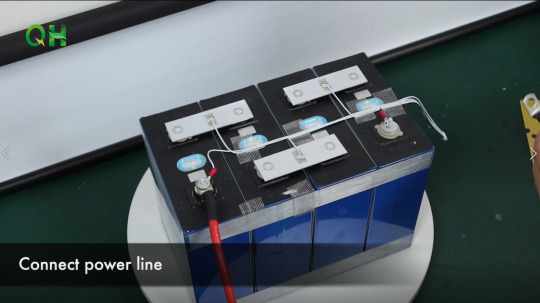
5. Connect The Power Line
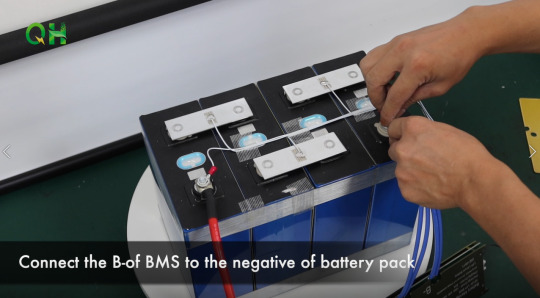
6. Connect The B- Of BMS To The Negative Of Battery Pack
A BMS is one of the most important elements in a LiFePO4 battery, like the brain of the battery pack. It calculates the State of Charge (the amount of energy remaining in the battery) by tracking how much energy goes in and out of the battery pack and by monitoring cell voltages, which can prevent the battery pack from overcharging, over-discharging, and balancing all the cells voltage equally.
There are two main sets of wires we need to install, the thick wires and the thin wires. The thick wires are your charging/discharging wires and the thin wires are your balance wires. Not every BMS is the same, but most are similar. Your BMS will likely have 3 thick wires or 3 pads to solder on your own heavy gauge wires. These are the B-, P-, and C- wires (or pads for adding wires). We usually start with the B- wire. We can connect the B- of BMS to the negative pole of the battery pack.
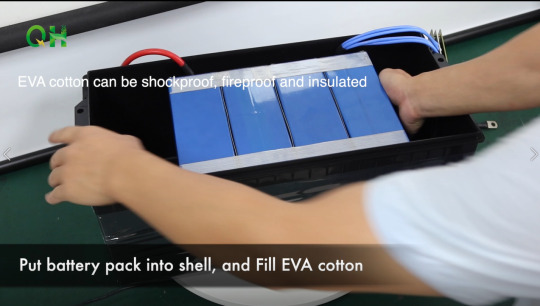
7. Put The Battery Pack Into Shell, And Fill The EVA Cotton
EVA cotton can be shockproof, fireproof, and insulated.
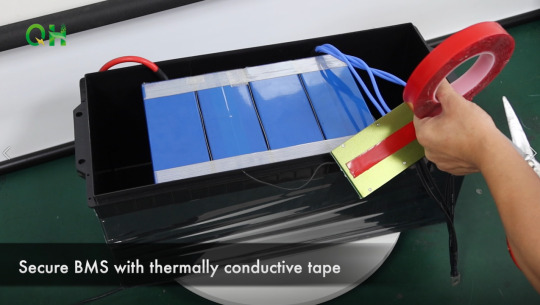
8. Secure BMS With Thermally Conductive Tape
The thermally conductive tape for battery packs keeps the BMS in place and protects them from the shock of extreme temperature changes.
Besides, these tapes provide electrical insulation, which prevents short circuits and provides a barrier to BMS.
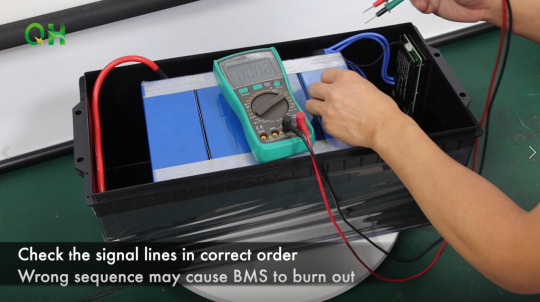
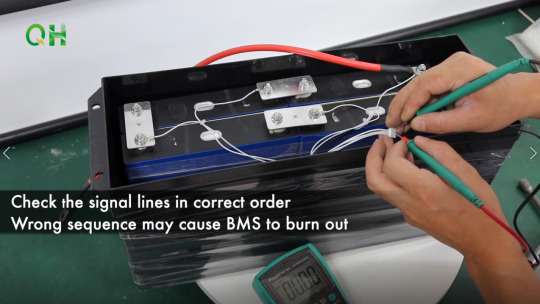
9. Check The Signal Lines In Correct Order
Pay attention, the wrong sequence may cause BMS to burn out!
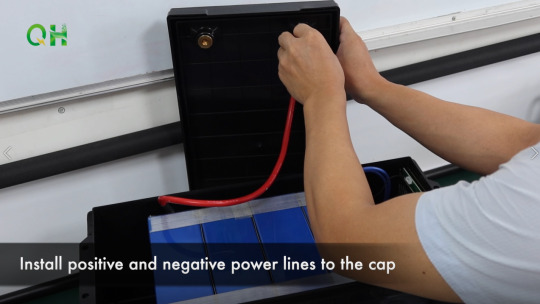
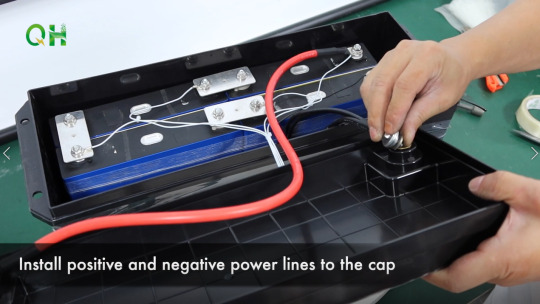
10. Install Positive And Negative Power Lines To The Cap
11. Plug Signal Acquisition Wires’ Port Into Interface
12. Fill EVA Cotton
EVA cotton can be shockproof, fireproof, and insulated.
Battery Tests
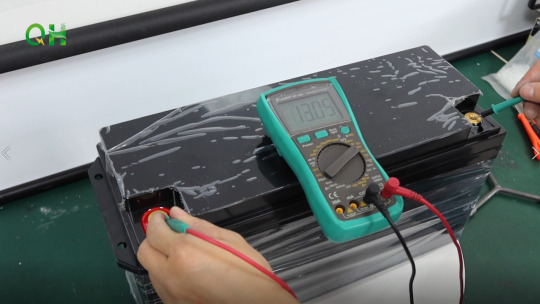
13. Test Voltage Of The Battery Pack
In these steps, we can use a multimeter to check the voltage of the whole battery pack. Attach the multimeter probes to the positive and negative battery terminals. Then we can check the voltage on the screen. The multimeter’s red probe must be connected to the positive terminal, while the black probe must be connected to the negative one.
A fully-charged battery must indicate a slightly higher voltage than the voltage listed on the battery. For instance, a 12 volts battery will indicate about 12.8 volts when it is fully charged.
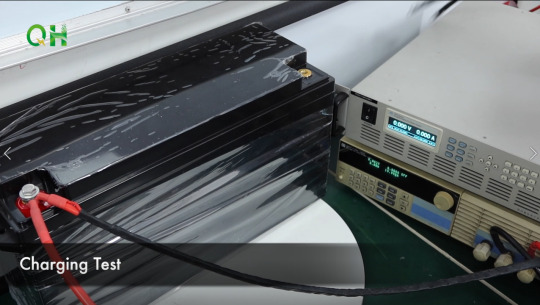
14. Charging Test
The battery capacity, or the amount of energy a battery can hold, can be measured with a battery analyzer. If you’re doing a capacity test, be sure to charge the battery until the battery reaches 100%. Then discharge the device until the battery is fully depleted. The charge and discharge rates of a battery are governed by C rates. The capacity of a battery is commonly rated at 1C, meaning that a fully charged battery rated at 280Ah should provide 280A for one hour.

15. Discharging Test
The discharging test of the battery is very helpful to the battery cycle life and discharge performance evaluation. We can use a professional device(Such as a Programmable DC Electronic Load) to check whether the battery works well or not during the discharging process, which can protect our battery and devices for further daily using.
When testing, there are three factors we need to pay attention to the port voltage of the battery, the resistance of the wire between the battery and the electronic load, and the temperature of the battery.
Summary
After assembling and testing the batteries step by step successfully, you will get your new 12.8V 280Ah LiFePO4 battery pack! It is suitable for your golf cart or other applications(such as household solar energy storage, Recreational Vehicle, Yacht, etc.)
Thanks for reading the full tutorial on assembling the 12.8V 280Ah LiFePO4 battery! It is not hard for us to build a LiFePO4 battery. Which voltage and capacity of the LiFePO4 battery do you need?
0 notes
Text
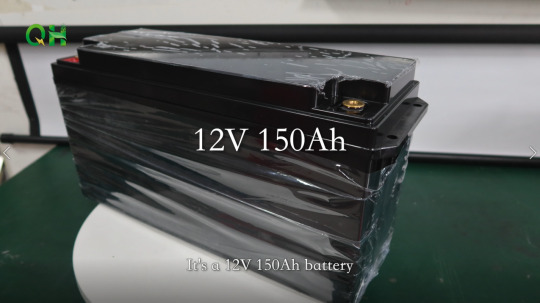
12V 200Ah Lifepo4 Battery Assembly For Off-Grid Solar Energy Storage
Do you know what is a solar battery? A solar battery is a device that is charged with energy from Solar panels. Batteries can store the electricity generated in the daytime. Solar batteries are great for those who want to be completely self-sufficient with their energy or suffer from power outages sometimes.
There are several types of the storage batteries, such as LiFePO4 batteries, GEL batteries(lead-acid), and Sodium-ion batteries. Nowadays, LiFePO4 batteries are popular in our daily life. It is non-toxic and lighter than a lead-acid battery. It shows great performance with deep cycle times and a longer lifespan.
Are you interested in the process of prismatic battery pack assembly? In the following post, we will share the assembly process of the 12V 200Ah battery pack.
*Note: It is recommended that you learn some basic knowledge about LiFePO4 batteries before assembling the battery pack. Keep safe when you are assembling the battery pack.
youtube
Materials Used:
3.2V 200Ah LiFePO4 battery cells (4 pieces)
There are currently three common shapes of LiFePO4 batteries: cylindrical, prismatic, and pouch. Different shapes of batteries will have a certain impact on performance. At present, the most suitable battery DIY enthusiasts are the prismatic LiFePO4 batteries, which are very suitable for both performance and operational difficulty.
We recommend you purchase the Grade A battery with a high quality and reliable warranty.
BMS (Battery Manage System, 1 piece)
Connectors (About 4 pieces)
Others: EVA cotton, screws, ribbon cable, plastic pipes, etc.
Tool Used
Spot Welder
Spot Welding Pen
Soldering Iron
Wire Cutter
Wire Stripper
Multimeter
Assembly Methods: 4 Series And 1 Parallel
Series(S): The way of connecting the positive and negative electrodes of two different cells is called a series connection. As a result, the voltage of the battery pack will increase while the capacity remains the same.
Parallel(P): where the positive and positive electrodes of two different cells are connected in parallel. The result is that the capacity of the battery pack increases while the voltage remains the same.
Assembly Process
1. Tied 4 Battery Cells Together With Fiber Film To Prevent Loosening
Before we connect this group of battery cells, we should use the multimeter to check their voltage of them to ensure consistency. It is better if you have a testing device to check the internal resistance. Without testing the consistency, the battery pack may cause an accident.
Then we place them in order and fix them with fiber film. (Made of hot melt adhesive and forms a stronger tape that is resistant to tears and has better temperature tolerance than regular tape.)

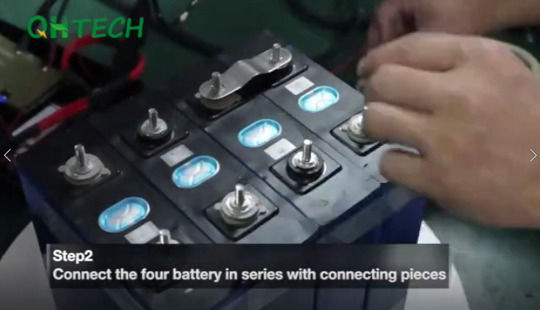
2. Connect The Four Battery In Series With Connecting Pieces
Connect the cells using the connectors in series while connecting the indicator cables to the CPM and the cells. Don’t tighten connectors and nuts too tightly.
When connecting the voltage collection lines (equalization lines), do not connect the external protection board to avoid accidental burning of the protection board.
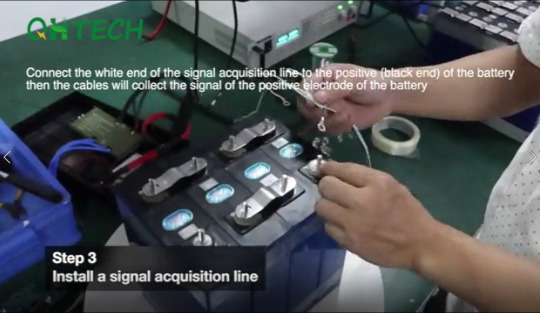
3. Install A Signal Acquisition Line
Connect the white end of the signal acquisition line to the positive(black end) of the battery then the cables will collect the signal of the positive electrode of the battery.
4. Put The Battery Pack Into The Shell
There is shockproof cotton in the shell(this cotton will be filled with the shell for fixing at the end), and the battery is placed close to one side leaving room for heat dissipation for BMS.
We can not put the battery pack into bare condition. It is a great choice to put it into a plastic shell. The plastic shell has a good insulation performance, and cells can be directly assembled into a DC high-voltage battery pack. The insulation strength is not affected by the air humidity, and the anti-lightning performance is good without grounding.

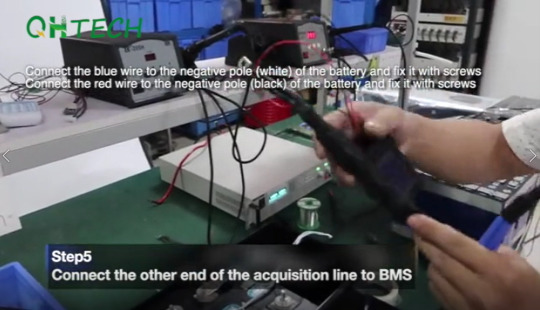
5. Connect The Other End Of The Acquisition Line To BMS
Connect the blue wire to the negative pole(white) of the battery and fix it with screws. Connect the red wire to the negative pole(black) of the battery and fix it with screws.
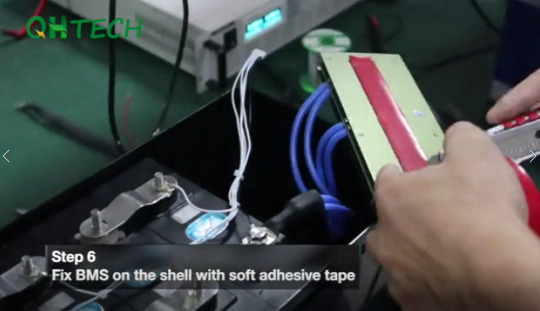
6. Fix BMS On The Shell With Soft Adhesive Tape
The soft adhesive tape for battery packs keeps the BMS in place and protects them from the shock of extreme temperature changes.
Besides, these tapes provide electrical insulation, which prevents short circuits and provides a barrier to BMS.
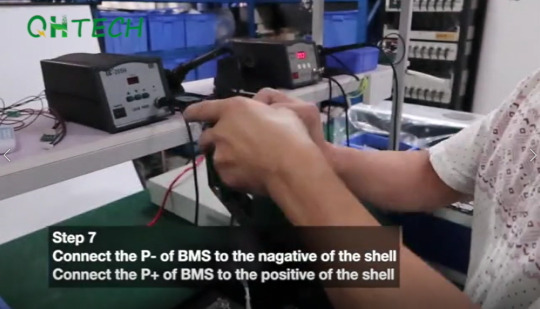
7. Connect The P- Of BMS To The Negative Of The Shell. Connect The P+ Of BMS To The Positive Of The Shell.
8. Fix The Signal Acquisition Line With Screws
Connect the cells using the connectors in series while connecting the indicator cables to the CPM and the cells. Don’t tighten connectors and nuts too tightly.
When connecting the voltage collection lines (equalization lines), do not connect the external protection board to avoid accidental burning of the protection board.

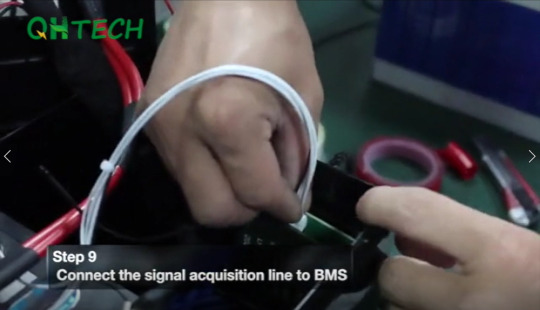
9. Connect The Signal Acquisition Line To BMS
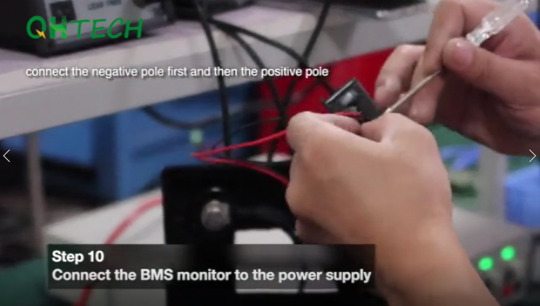
10. Connect The BMS Monitor To The Power Supply
Connect the negative pole first and then the positive pole, and the monitor will light up.
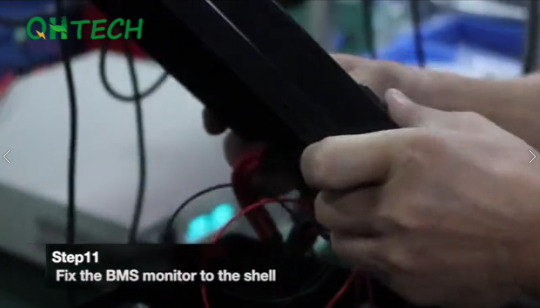
11. Fix The BMS Monitor To The Shell
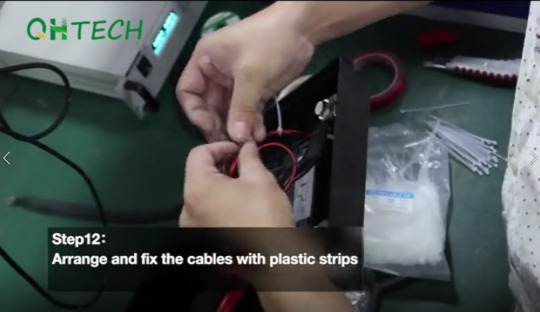
12. Arrange And Fix The Cables With Plastic Strips
13. Fix The Signal Wire With Screws With Silica Gel
To prevent the line from breaking in the process of transportation shaking.
(p.s. BMS has a signal protection function, if one line breaks the battery, it will stop working, so we should check it carefully. )

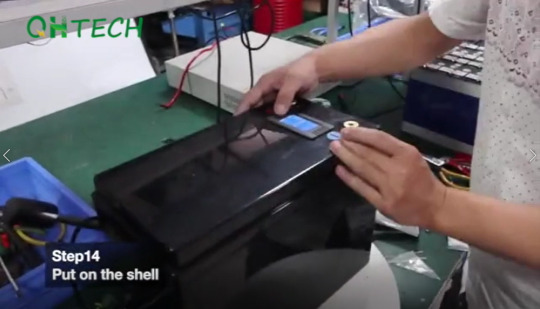
14. Put On The Shell
Congratulations! Your battery is successfully assembled. You can prepare the battery tests in the next steps.
15. Charge Test
The battery capacity, or the amount of energy a battery can hold, can be measured with a battery analyzer. Connect the black line to the negative pole, and the red line to the positive one.
The data will be displayed on the BMS display screen, such as the total voltage, current, power, SOC, etc.
After the charging test, we can make a discharging test for our battery pack. The discharging test of the battery is beneficial to the battery cycle life and discharge performance evaluation.

16. Aging Test
Lithium batteries need a high-temperature aging room for high-temperature aging. Parameters will be shown in the aging test machine. There are several advantages of aging tests, such as making the electrolyte soakage better, and the active substances in the anode and cathode materials can accelerate some side effects, which is conducive to the stability of lithium battery pack performance.

Summary
After passing the tests successfully, you will get your new battery pack and start your solar energy storage trip! 12V 200Ah LiFePO4 batteries are suitable for small-scale off-grid solar energy storage, such as using a laptop, an electrical fan, or a hair drier. It is also a professional partner for your RV trip.
Thanks for reading the full tutorial on assembling the 12.8V 200Ah LiFePO4 battery! It is not hard for us to build a LiFePO4 battery. Which voltage and capacity of the LiFePO4 battery do you need?
0 notes
Text
How To Assemble 12.8V 150Ah LiFePO4 Batteries For Trolling Motors?
LiFePO4 batteries have lots of advantages and are becoming quite in demand in the market of trolling motors. When we refer to the LiFePO4 batteries, maybe you will compare them with the GEL batteries. For a long time, GEL batteries play a role in our lives. Nowadays, we prefer LiFePO4 batteries.
As opposed to boats that use GEL batteries, electrical boats equipped with the 12.8Volt 150Ah lithium batteries are more economical, less polluting, and clearly better for the environment. The LiFePO4 battery has a longer life span and deep cycle times(even more than 5,000 times).
Are you a Lithium battery amateur and interested in li ion battery pack assembly? Now we’d like to share the whole assembly process for beginners, which takes the 12.8V 150Ah LiFePO4 battery as an example.
*Note: It is recommended that you learn some basic knowledge about LiFePO4 batteries before assembling the battery pack. Keep safe when you are assembling the battery pack.
youtube
Materials Used:
3.2V 150Ah LiFePO4 battery cells (4 pieces)
There are currently three common shapes of LiFePO4 batteries: cylindrical, prismatic, and pouch. Different shapes of batteries will have a certain impact on performance. At present, the most suitable battery DIY enthusiasts are the prismatic LiFePO4 batteries, which are very suitable for both performance and operational difficulty.
We recommend you purchase the Grade A battery with a high quality and reliable warranty.
BMS (Battery Manage System, 1 piece)
Connectors (About 4pieces)
Others: EVA cotton, screws, ribbon cable, plastic pipes, etc.
Tool Used:
Spot Welder
Spot Welding Pen
Soldering Iron
Wire Cutter
Wire Stripper
Multimeter
Assembly Methods: 4 Series And 1 Parallel
Series(S): The way of connecting the positive and negative electrodes of two different cells is called series connection. As a result, the voltage of the battery pack will increase while the capacity remains the same.
Parallel(P): where the positive and positive electrodes of two different cells are connected in parallel. The result is that the capacity of the battery pack increases while the voltage remains the same.
Assembly Process
1. Place The Batteries
Before we connect this group of battery cells, we should use the multimeter to check their voltage of them to ensure consistency. It is better if you have a testing device to check the internal resistance. Without testing the consistency, the battery pack may cause an accident.
After testing the battery cells, we can arrange our cells as shown in the picture.

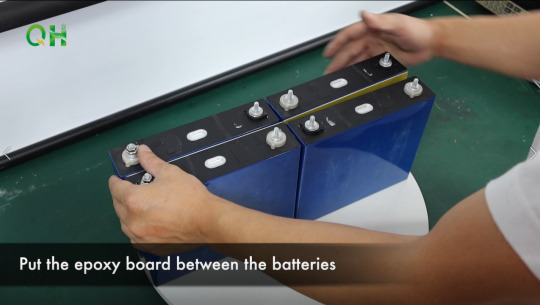
2. Put The Epoxy Board Between The Batteries
What is the epoxy board? The epoxy board is made of alkali-free E-glass cloth impregnated with epoxy resin by processing under heat and pressure. Which have extremely high mechanical strength, Insulation, heat resistance, electrical properties, and good moisture resistance properties. To protect the battery cells, we can put an epoxy board between each battery.
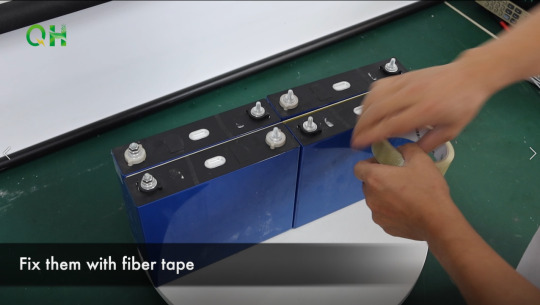
3. Fix Them With Fiber Tape
We place them in order and fix them with fiber tape.
The fiber tape is made of hot melt adhesive and forms a stronger tape that is resistant to tears and has better temperature tolerance than regular tape. It is explosion-proof and leak-proof, providing high-strength insulation protection.
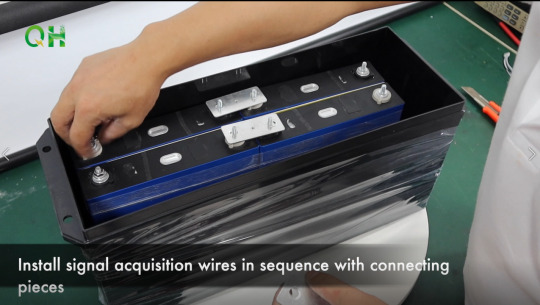
4. Install Signal Acquisition Wires In Sequence With Connecting Pieces
Connect the cells using the connectors in series while connecting the indicator cables to the CPM and the cells. Don’t tighten connectors and nuts too tightly.
When connecting the voltage collection lines (equalization lines), do not connect the external protection board to avoid accidental burning of the protection board.
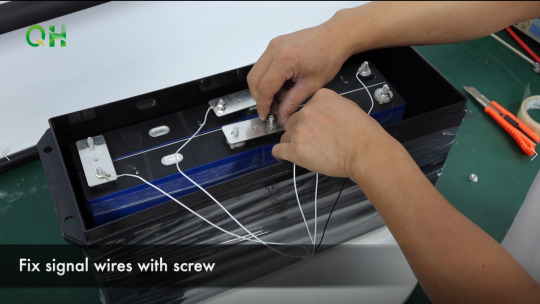
5. Fix Signal Wires With Screw
Terminal blocks are available as rows, but each terminal connects to only a single wire, which can prevent the loosening of signal wires.
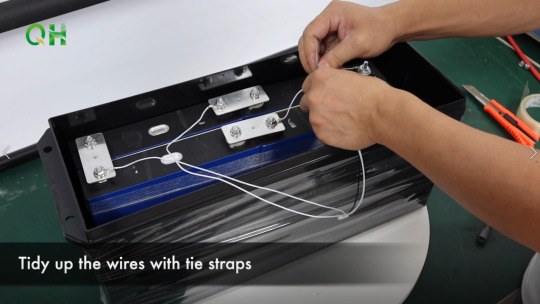
6. Tidy Up The Wires With Tie Straps
After soldering the wires (the balancing leads and the charging-discharging cables), we can tidy up the messy wires.
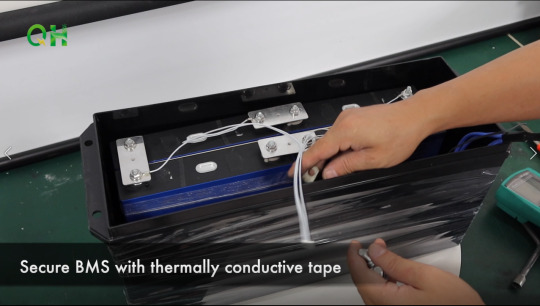
7. Secure BMS With Thermally Conductive Tape
The thermally conductive tape for battery packs keeps the BMS in place and protects them from the shock of extreme temperature changes.
Besides, these tapes provide electrical insulation, which prevents short circuits and provides a barrier to BMS.
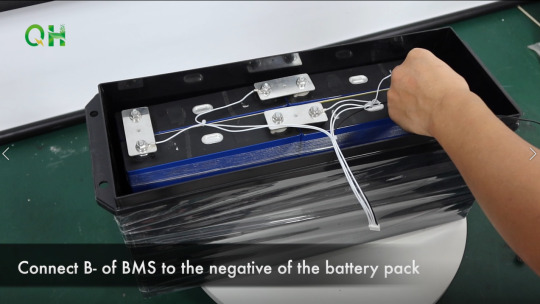
8. Connect B- Of To The Negative Of The Battery Pack
A BMS is one of the most important elements in a LiFePO4 battery, like the brain of the battery pack. It calculates the State of Charge (the amount of energy remaining in the battery) by tracking how much energy goes in and out of the battery pack and by monitoring cell voltages, which can prevent the battery pack from overcharging, over-discharging, and balancing all the cells voltage equally.
There are two main sets of wires we need to install, the thick wires and the thin wires. The thick wires are your charging/discharging wires and the thin wires are your balance wires. Not every BMS is the same, but most are similar. Your BMS will likely have 3 thick wires or 3 pads to solder on your own heavy gauge wires. These are the B-, P-, and C- wires (or pads for adding wires). We usually start with the B- wire. We can connect the B- of BMS to the negative pole of the battery pack.
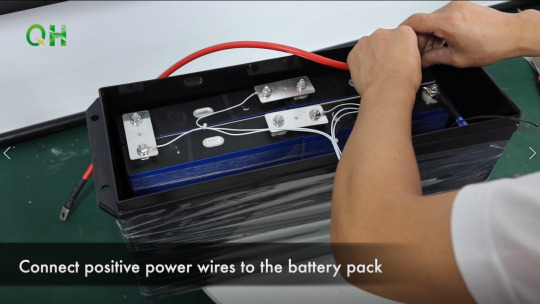
9. Connect Positive Power Wires To The Battery Pack
If you connect the negative to the ground first then current will flow through the positive terminal to your body when you connect the positive terminal but when you connect the positive terminal first then while connecting the negative terminal the current will pass through the negative to ground wire instead of your body to ground as the resistance of your body is greater than the resistance of wire path and current will always flow through the lowest resistive path. Thus always connect the positive terminal first.
10. Check The Signal Lines In Correct Order
The wrong sequence may cause BMS to burn out!
11. Install Positive And Negative Power Lines To The Cap
The total input and output ports of the battery pack are assembled. The assembly of this battery pack is almost done.
12. Plug Signal Acquisition Wires’ Port Into Interface
The signal acquisition technology can provide accurate parameters for battery balancing, SOC estimation and BMS centralized monitoring to meet the actual requirements of battery packs.
Using the signal acquisition technology, the voltage signal, temperature signal, current signal, etc. In addition, data from the battery pack CAN be transmitted to the central control unit.

13. Fill EVA Cotton
After putting the battery pack into the shells, we can fill the EVA cotton.
EVA cotton can be shockproof, fireproof, and insulated, protecting the battery pack well. It can reduce the expansion force of the battery and improve the service life of the battery.

Battery Tests
1. Voltage Test
In this step, we can use a multimeter to check the voltage of the whole battery pack. Attach the multimeter probes to the positive and negative battery terminals. Then we can check the voltage on the screen. The multimeter’s red probe must be connected to the positive terminal, while the black probe must be connected to the negative one.
A fully-charged battery must indicate a slightly higher voltage than the voltage listed on the battery. For instance, a 12 volts battery will indicate about 12.8 volts when it is fully charged.
2. Charging Test
The battery capacity, or the amount of energy a battery can hold, can be measured with a battery analyzer. If you’re doing a capacity test, be sure to charge the battery until the battery reaches 100%. Then discharge the device until the battery is fully depleted. The charge and discharge rates of a battery are governed by C rates. The capacity of a battery is commonly rated at 1C, meaning that a fully charged battery rated at 150Ah should provide 150A for one hour. The same battery discharging at 0.5C should provide 75Ah for two hours, and at 2C it delivers 300Ah for 30 minutes.
3. Discharging Test
The discharging test of the battery is beneficial to the battery cycle life and discharge performance evaluation. We can use a professional device(Such as a Programmable DC Electronic Load) to check whether the battery works well during the discharging process, which can protect our battery and devices in further daily use.
When testing, there are three factors we need to pay attention to the port voltage of the battery, the resistance of the wire between the battery and the electronic load, and the temperature of the storm.
Summary
Thanks for reading the full tutorial on assembling the 12.8V 150Ah LiFePO4 battery! It is not hard for us to build a LiFePO4 battery. Which voltage and capacity of the LiFePO4 battery do you need? Welcome to share your comment below.
0 notes
Text
How To DIY A 12.8V 120Ah Travel Trailer LIFePO4 Battery?
Do you want to start your RV traveling? A travel trailer is the least expensive way to enjoy a recreational vehicle or RV lifestyle. You can feel free with your travel arrangements. If you want to explore more landscapes, you simply unhook your trailer at the campsite and head out in your car or SUV. Large motor homes can be very clumsy and bulky to drive. That’s the reason why travel trailers are the most popular type of non-motorized RV.
We can use a storage battery to power the applications on the travel trailer. If you put several solar panels on your travel trailer, Nowadays, LiFePO4 batteries are well-known for energy storage. Lifepo4 Battery 12V can be used as a direct replacement for an AGM battery, GEL battery, or EFB battery. The 12-volt lifepo4 battery is ideal for electric scooters, wheelchairs, motorcycle starters, DC power, medical devices, LED light sources, solar power, or any other devices that use the SLA battery. 12V 120Ah LiFePO4 battery is suitable for the travel trailer and is a great replacement for a lead-acid battery.
In the following post, we will share the full process of building a 12V 120Ah LiFePO4 battery pack: from prismatic cell assembly to the final tests.
*Note: It is recommended that you learn some basic knowledge about LiFePO4 batteries before assembling the battery pack. Keep safe when you are assembling the battery pack.
youtube


Materials Used:
3.2V 120Ah LiFePO4 battery cells (4 pieces)
There are currently three common shapes of LiFePO4 batteries: cylindrical, prismatic, and pouch. Different shapes of batteries will have a certain impact on performance. At present, the most suitable battery DIY enthusiasts are the prismatic LiFePO4 batteries, which are very suitable for both performance and operational difficulty.
We recommend you purchase the Grade A battery with a high quality and reliable warranty.
BMS (Battery Manage System, 1 piece)
Connectors (About 4 pieces)
Others: EVA cotton, screws, ribbon cables, plastic pipes, etc.
Tool Used:
Spot Welder
Spot Welding Pen
Soldering Iron
Wire Cutter
Wire Stripper
Multimeter
Assembly Methods: 4 Series And 1 Parallel
Series(S): The way of connecting the positive and negative electrodes of two different cells is called series connection. As a result, the voltage of the battery pack will increase while the capacity remains the same.
Parallel(P): where the positive and positive electrodes of two different cells are connected in parallel. The result is that the capacity of the battery pack increases while the voltage remains the same.
Assembly Process
1.Place The Batteries
Before we connect this group of battery cells, we should use the multimeter to check the voltage of them to ensure the consistency. It is better if you have a testing device to check the internal resistance. Without testing the consistency, the battery pack may cause an accident.
Then we place them in order and fix them with fiber tape. (Made of hot melt adhesive and forms a stronger tape that is resistant to tears and has better temperature tolerance than regular tape.)

2. Put The Epoxy Board Between The Batteries
What is the epoxy board? The epoxy board is made of alkali-free E-glass cloth impregnated with epoxy resin by processing under heat and pressure. Which have extremely high mechanical strength, Insulation, heat resistance, electrical properties, and good moisture resistance properties. To protect the battery cells, we can put an epoxy board between each battery.

3. Fill Them With Fiber Tape
We place them in order and fix them with fiber tape.
The fiber tape is made of hot melt adhesive and forms a stronger tape that is resistant to tears and has better temperature tolerance than regular tape. It is explosion-proof and leak-proof, providing high-strength insulation protection.

4. Install Signal Acquisition Wires In Sequence
Connect the cells using the connectors in series while connecting the indicator cables to the CPM and the cells. Don’t tighten connectors and nuts too tightly.
When connecting the voltage collection lines (equalization lines), do not connect the external protection board to avoid accidental burning of the protection board.

5. Fix Signal Wires With Screw
Terminal blocks are available as rows, but each terminal connects to only a single wire, which can prevent the loosening of signal wires.

6. Tidy Up The Wires With Tie Straps
After soldering the wires (the balancing leads and the charging-discharging cables), we can tidy up the messy wires.

7. Put Battery Pack Into Shell
We can not put the battery pack into bare condition. It is an excellent choice to put it into a plastic shell. Compared with the aluminum shell, the plastic shell has a good insulation performance and is cheaper.
Most of the cases of lithium batteries are mass molded manufacturing, production of high cost, and personal customization of the case is difficult. You can look for the case on sale online and pay attention to the size.

8. Secure BMS With Thermally Conductive Tape
The thermally conductive tape for battery packs keeps the BMS in place and protects them from the shock of extreme temperature changes.
Besides, these tapes provide electrical insulation, which prevents short circuits and provides a barrier to BMS.

9. Connect B- Of BMS To The Negative Of The Battery Pack
A BMS is one of the most important elements in a LiFePO4 battery, like the brain of the battery pack. It calculates the State of Charge (the amount of energy remaining in the battery) by tracking how much energy goes in and out of the battery pack and by monitoring cell voltages, which can prevent the battery pack from overcharging, over-discharging, and balancing all the cells voltage equally.
There are two main sets of wires we need to install, the thick wires and the thin wires. The thick wires are your charging/discharging wires and the thin wires are your balance wires. Not every BMS is the same, but most are similar. Your BMS will likely have 3 thick wires or 3 pads to solder on your own heavy gauge wires. These are the B-, P-, and C- wires (or pads for adding wires). We usually start with the B- wire. We can connect the B- of BMS to the negative pole of the battery pack.

10. Install Positive Power Wires To The Battery Pack
If you connect the negative to the ground first then current will flow through the positive terminal to your body when you connect the positive terminal but when you connect the positive terminal first then while connecting the negative terminal the current will pass through the negative to ground wire instead of your body to ground as the resistance of your body is greater than the resistance of wire path and current will always flow through the lowest resistive path. Thus always connect the positive terminal first.

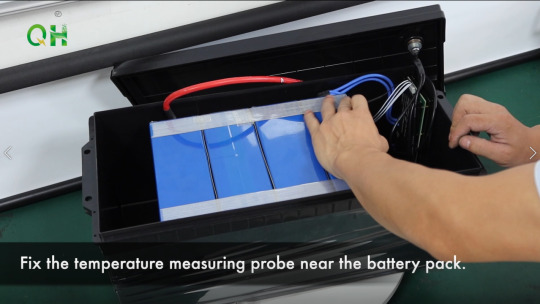
11. Fix The Temperature Measuring Probe Near The Battery Pack
Measure battery temperature with the probe. Use tape to secure it near the battery pack.

12. Install Positive And Negative Power Lines To The Cap
The total input and output ports of the battery pack are assembled. The assembly of this battery pack is almost done.

13. Fill EVA Cotton
EVA cotton can be shockproof, fireproof, and insulated, protecting the battery pack well. It can reduce the expansion force of the battery and improve the service life of the battery.

14. Check The Signal Lines In Correct Order
The wrong sequence may cause BMS to burn out!

15. Plug Signal Acquisition Wires’ Port Into Interface
The signal acquisition technology can provide accurate parameters for battery balancing, SOC estimation and BMS centralized monitoring to meet the actual requirements of battery packs.
Using the signal acquisition technology, the voltage signal, temperature signal, current signal, etc. In addition, data from the battery pack CAN be transmitted to the central control unit.

Battery Tests
1. Test Voltage Of The Battery Pack
In this step, we can use a multimeter to check the voltage of the whole battery pack. Attach the multimeter probes to the positive and the negative battery terminals. Then we can check the voltage on the screen. The multimeter’s red probe must be connected to the positive terminal, while the black probe must be connected to the negative one.
A fully-charged battery must indicate a slightly higher voltage than the voltage listed on the battery. For instance, a 12 volts battery will indicate about 12.8 volts when fully charged.

2. Charging Test
Through the test, we can check that the charging value is normal and that the battery is abnormal during the charging process. We need to pay attention to the battery charging time and charging current.

3. Discharging Test
The discharge test of the battery is beneficial to the battery cycle life and discharge performance evaluation. We can use a professional device(Such as a Programmable DC Electronic Load) to check whether the battery works well during the discharging process, which can protect our battery and devices for further daily use.
When testing, there are three factors we need to pay attention to the port voltage of the battery, the resistance of the wire between the battery and the electronic load, and the temperature of the storm.

Summary
After testing the battery, your battery is successfully assembled! Thanks for reading the full tutorial on the 12.8V 120Ah lifepo4 battery pack assembly process! It is not hard for us to DIY a LiFePO4 battery. Which voltage and capacity of the LiFePO4 battery do you need? Welcome to share your thoughts below.
0 notes
Text
How To Assemble A 12.8V 100Ah LiFePO4 Battery For Your RV?
If you want to replace your used SLA batteries for your RV, you can try a 12.8V 100Ah LiFePO4 battery pack. Compared with the traditional SLA batteries, the LiFePO4 battery shows great performance and weighs 1/3 as much. Not only we can purchase the LiFePO4 batteries in the store and online, but also build a LiFePO4 battery ourselves.
In the following post, we’d love to share you with the full tutorial of the 12.8V 100Ah LiFePO4 battery. Do you want to DIY your battery? Maybe you can learn lithium-ion battery assembly from the following post.
*Note: It is recommended that you learn some basic knowledge about LiFePO4 batteries before assembling the battery pack. Keep safe when you are assembling the battery pack.
youtube


Materials Used:
3.2V 100Ah LiFePO4 battery cells (4 pieces)
There are currently three common shapes of LiFePO4 batteries: cylindrical, prismatic, and pouch. Different shapes of batteries will have a certain impact on performance. At present, the most suitable battery DIY enthusiasts are the prismatic LiFePO4 batteries, which are very suitable for both performance and operational difficulty.
We recommend you purchase the Grade A battery with a high quality and reliable warranty.
BMS (Battery Manage System, 1 piece)
Connectors (About 4 pieces)
Others: EVA cotton, screws, ribbon cables, plastic pipes, etc.
Tool Used:
Spot Welder
Spot Welding Pen
Soldering Iron
Wire Cutter
Wire Stripper
Multimeter
Assembly Methods: 4 Series And 1 Parallel
Series(S): The way of connecting the positive and negative electrodes of two different cells is called a series connection. As a result, the voltage of the battery pack will increase while the capacity remains the same.
Parallel(P): where the positive and positive electrodes of two different cells are connected in parallel. The result is that the capacity of the battery pack increases while the voltage remains the same.
Assembly Process
1. Place The Batteries
Before we connect this group of battery cells, we should use the multimeter to check the voltage of them to ensure the consistency. It is better if you have a testing device to check the internal resistance. Without testing the consistency, the battery pack may cause an accident.
Then we place them in order and fix them with fiber tape. (Made of hot melt adhesive and forms a stronger tape that is resistant to tears and has better temperature tolerance than regular tape.)

2. Put The Epoxy Board Between The Batteries
What is the epoxy board? The epoxy board is made of alkali-free E-glass cloth impregnated with epoxy resin by processing under heat and pressure. Which have extremely high mechanical strength, Insulation, heat resistance, electrical properties, and good moisture resistance properties. To protect the battery cells, we can put an epoxy board between each battery.

3. Fix Them With The Fiber Tape
We place them in order and fix them with fiber tape.
The fiber tape is made of hot melt adhesive and forms a stronger tape that is resistant to tears and has better temperature tolerance than regular tape. It is explosion-proof and leak-proof, providing high-strength insulation protection.

4. Install Signal Acquisition Wires In Sequence
Connect the cells using the connectors in series while connecting the indicator cables to the CPM and the cells. Don’t tighten connectors and nuts too tightly.
When connecting the voltage collection lines (equalization lines), do not connect the external protection board to avoid accidental burning of the protection board.

5. Tidy Up The Wires With The Straps
After soldering the wires (the balancing leads and the charging-discharging cables), we can tidy up the messy wires.

6. Put Battery Pack Into Shell, And Fill EVA Cotton
We can not put the battery pack into bare condition. It is an excellent choice to put it into a plastic shell. Compared with the aluminum shell, the plastic shell has a good insulation performance and is cheaper.
Most of the cases of lithium batteries are mass molded manufacturing, production of high cost, and personal customization of the case is difficult. You can look for the case on sale online and pay attention to the size.
After putting the battery pack into the shells, we can fill the EVA cotton.
EVA cotton can be shockproof, fireproof, and insulated, protecting the battery pack well. It can reduce the expansion force of the battery and improve the service life of the battery.

7. Install Positive Power Wires To The Battery Pack
If you connect the negative to the ground first then current will flow through the positive terminal to your body when you connect the positive terminal but when you connect the positive terminal first then while connecting the negative terminal the current will pass through the negative to ground wire instead of your body to ground as the resistance of your body is greater than the resistance of wire path and current will always flow through the lowest resistive path. Thus always connect the positive terminal first.

8. Secure BMS With Thermally Conductive Tape
The thermally conductive tape for battery packs keeps the BMS in place and protects them from the shock of extreme temperature changes.
Besides, these tapes provide electrical insulation, which prevents short circuits and provides a barrier to BMS.

9. Connect B- Of BMS To The Negative Of The Battery Pack
A BMS is one of the most important elements in a LiFePO4 battery, like the brain of the battery pack. It calculates the State of Charge (the amount of energy remaining in the battery) by tracking how much energy goes in and out of the battery pack and by monitoring cell voltages, which can prevent the battery pack from overcharging, over-discharging, and balancing all the cells voltage equally.
There are two main sets of wires we need to install, the thick wires and the thin wires. The thick wires are your charging/discharging wires and the thin wires are your balance wires. Not every BMS is the same, but most are similar. Your BMS will likely have 3 thick wires or 3 pads to solder on your own heavy gauge wires. These are the B-, P-, and C- wires (or pads for adding wires). We usually start with the B- wire. We can connect the B- of BMS to the negative pole of the battery pack.

10. Check The Signal Lines In Correct Order
The wrong sequence may cause BMS to burn out!

11. Plug Signal Acquisition Wires’ Port Into Interface
The signal acquisition technology can provide accurate parameters for battery balancing, SOC estimation and BMS centralized monitoring to meet the actual requirements of battery packs.
Using the signal acquisition technology, the voltage signal, temperature signal, current signal, etc. In addition, data from the battery pack CAN be transmitted to the central control unit.

12. Install Positive And Negative Power Lines To The Cap
The total input and output ports of the battery pack are assembled. The assembly of this battery pack is almost done.

13. Fix The Temperature Measuring Probe Near The Battery Pack
Measure battery temperature with the probe. Use tape to secure it near the battery pack.

Battery Tests
1. Test Voltage Of The Battery Pack
In these steps, we can use a multimeter to check the voltage of the whole battery pack. Attach the multimeter probes to the positive and negative battery terminals. Then we can check the voltage on the screen. The multimeter’s red probe must be connected to the positive terminal, while the black probe must be connected to the negative one.
A fully-charged battery must indicate a slightly higher voltage than the voltage listed on the battery. For instance, a 12 volts battery will indicate about 12.8 volts when fully charged.

2. Install The Portable Strap
Whether you need to move the battery from the storage room to your RV or somewhere else, this handheld strap allows you to carry it more conveniently.

3. Charging Test
Through the test, we can check that the charging value is normal and that the battery is abnormal during the charging process. We need to pay attention to the battery charging time and charging current.

4. Discharging Test
The discharge test of the battery is very helpful to the battery cycle life and discharge performance evaluation. We can use a professional device(Such as a Programmable DC Electronic Load) to check whether the battery works well or not during the discharging process, which can protect our battery and devices for further daily use.
When testing, there are three factors we need to pay attention to the port voltage of the battery, the resistance of the wire between the battery and the electronic load, and the temperature of the battery.

Summary
Congratulations, your battery is finished! It will be your reliable partner in your RV life. Thanks for reading the full tutorial on assembling the 12.8V 100Ah LiFePO4 battery! It is not hard for us to build a LiFePO4 battery. Which voltage and capacity of the LiFePO4 battery do you need? Welcome to share your comments below!
0 notes
Text
Full Tutorial Of DIY A 12.8V 50Ah LiFePO4 Battery Assembly!
If you need a small voltage and capacity of LiFePO4 battery pack, the 12V 50Ah one is worth a try. With no acid in the lithium-ion battery, you’re able to safely mount it in any position. This makes Li-ion batteries perfect for marine, RV, campers, golf carts, travel trailers, and off-road and off-grid applications!
In the following post, we’d love to share you with the full battery pack assembly tutorial of a 12V 50Ah LiFePO4 battery. Do you want to build your own battery? Follow us and finish it step by step.
*Note: It is recommended that you learn some basic knowledge about LiFePO4 batteries before assembling the battery pack. Keep safe when you are assembling the battery pack.
youtube
Materials Used:
3.2V 50Ah LiFePO4 battery cells (4 pieces)
There are currently three common shapes of LiFePO4 batteries: cylindrical, prismatic, and pouch. Different shapes of batteries will have a certain impact on performance. At present, the most suitable battery DIY enthusiasts are the prismatic LiFePO4 batteries, which are very suitable for both performance and operational difficulty.
We recommend you purchase the Grade A battery with a high quality and reliable warranty.
BMS (Battery Manage System, 1 piece)
Connectors (About 4 pieces)
Others: EVA cotton, screws, ribbon cables, plastic pipes, etc.
Tools Used:
Spot Welder
Spot Welding Pen
Soldering Iron
Wire Cutter
Wire Stripper
Multimeter
Assembly Methods: 4 Series And 1 Parallel
Series(S): The way of connecting the positive and negative electrodes of two different cells is called series connection. As a result, the voltage of the battery pack will increase while the capacity remains the same.
Parallel(P): where the positive and positive electrodes of two different cells are connected in parallel. The result is that the capacity of the battery pack increases while the voltage remains the same.
Assembly Process
1. Place The Batteries And Fix Them With Fiber Tape
Before we connect this group of battery cells, we should use the multimeter to check their voltage of them to ensure consistency. It is better if you have a testing device to check the internal resistance. Without testing the consistency, the battery pack may cause an accident
Then we place them in order and fix them with fiber tape.
(Made of hot melt adhesive and forms a stronger tape that is resistant to tears and has better temperature tolerance than regular tape.)

2. Install Signal Acquisition Wires In Sequence With Screws
Connect the cells using the connectors in series while connecting the indicator cables to the CPM and the cells. Don’t tighten connectors and nuts too tightly.
When connecting the voltage collection lines (equalization lines), do not connect the external protection board to avoid accidental burning of the protection board.

3. Connect The Positive Wire
If you connect the negative power wire first then the current will flow through the positive terminal to your body when you connect the positive terminal. But when you connect the positive terminal first then while connecting the negative terminal the current will pass through the negative to ground wire instead of your body to the ground as the resistance of your body is greater than the resistance of the wire path and the current will always flow through the lowest resistive way. Thus always connect the positive terminal first.

4. Put Battery Pack Into Shell, And Fill EVA Cotton
We can not put the battery pack into bare condition. It is an excellent choice to put it into a plastic shell. Compared with the aluminum shell, the plastic shell has a good insulation performance and is cheaper.
Most of the cases of lithium batteries are mass molded manufacturing, production of high cost, and personal customization of the case is difficult. You can look for the case on sale online and pay attention to the size.
After putting the battery pack into the shells, we can fill the EVA cotton.
EVA cotton can be shockproof, fireproof, and insulated, protecting the battery pack well. It can reduce the expansion force of the battery and improve the service life of the battery.

5. Connect The B- Of BMS To The Negative Of The Battery Pack
A BMS is one of the most important elements in a LiFePO4 battery, like the brain of the battery pack. It calculates the State of Charge (the amount of energy remaining in the battery) by tracking how much energy goes in and out of the battery pack and by monitoring cell voltages, which can prevent the battery pack from overcharging, over-discharging, and balancing all the cells voltage equally.
There are two main sets of wires we need to install, the thick wires and the thin wires. The thick wires are your charging/discharging wires and the thin wires are your balance wires. Not every BMS is the same, but most are similar. Your BMS will likely have 3 thick wires or 3 pads to solder on your own heavy gauge wires. These are the B-, P-, and C- wires (or pads for adding wires). We usually start with the B- wire. We can connect the B- of BMS to the negative pole of the battery pack.

6. Tidy Up The Wires With Tie Straps
After soldering the wires (the balancing leads and the charging-discharging cables), we can tidy up the messy wires.

7. Check The Signal Lines In The Correct Orders
The wrong sequence may cause BMS to burn out!

8. Plug Signal Acquisition Wires’ Port Into Interface
The signal acquisition technology can provide accurate parameters for battery balancing, SOC estimation and BMS centralized monitoring to meet the actual requirements of battery packs.
Using the signal acquisition technology, the voltage signal, temperature signal, current signal, etc. In addition, data from the battery pack CAN be transmitted to the central control unit.

9. Connect Positive And Negative Power Lines To The Cap
This is the final step of the entire assembly process. Finally, the total input and output ports of the battery pack are assembled. We can prepare for the next battery performance tests.

Battery Tests
1. Test The Voltage Of The Battery Pack
In this step, we can use a multimeter to check the voltage of the whole battery pack. Attach the multimeter probes to the positive and negative battery terminals. Then we can check the voltage on the screen. The multimeter’s red probe must be connected to the positive terminal, while the black probe must be connected to the negative one.
A fully-charged battery must indicate a slightly higher voltage than the voltage listed on the battery. For instance, a 12 volts battery will indicate about 12.8 volts when fully charged.

2. Charging Test
Through the test, we can check that the charging value is normal and that the battery is abnormal during the charging process. We need to pay attention to the battery charging time and charging current.

3. Discharging Test
The discharge test of battery is very helpful to the battery cycle life and discharge performance evaluation. We can use a professional device(Such as Programmable DC Electronic Load) to check whether the battery works well or not during the discharging process, which can protect our battery and devices for further daily use.
When testing, there are three factors we need to pay attention to the port voltage of the battery, the resistance of the wire between the battery and the electronic load, and the temperature of the battery.

Summary
After testing the battery, your battery is successfully assembled! Thanks for reading the full tutorial on the 12.8V 50Ah lifepo4 battery pack assembly process! It is not hard for us to DIY a LiFePO4 battery. Please pay attention that do not use it as a starting battery.
Which voltage and capacity of the LiFePO4 battery do you need? Welcome to share your thoughts below.
0 notes
Photo


What a forgettable memory of showing our products and meeting so many friends at Solar Solutions Düsseldorf, Germany !
Do you know which exhibition we will attend in the EU? The answer will be revealed tomorrow!😉
0 notes
Link
Would You Like to Build a LiFePO4 Battery Pack By Yourself?
With great performance and deep-cycle life, the LiFePO4 battery is a well-known item for energy storage. The surging price of raw materials is proportional to the finished products. Some guys, with a huge interest in DIY, are more enthusiastic about building their own LiFePO4 packs.
It is not complicated though it sounds hard. Nowadays, LiFePO4 batteries are taking place of Lead-acid batteries, it is a great opportunity for transition.
Follow our post and assemble your LiFePO4 batteries in 7 steps. Maybe you will get interested in it!
If you want to watch the videos of battery assembling, you can click our YouTube Channel for more: https://www.youtube.com/channel/UCMHeog6BQIsNv-0Vi5VAaPQ
0 notes
Photo


Meet You in Melbourne and Sydney!
Busy meeting our customers in Melbourne after All-Energy Australia 2022. These are great opportunities to keep in touch with our partners!
Our boss and manager will go to Sydney next week. If you are interested in LiFePO4 batteries, welcome to meet us in Australia! We can make an appointment for you.
Click here and learn more: https://bit.ly/3LKWqGl
0 notes
Video
youtube
When we transition to renewable energy, we require more storage capacity. LiFePO4 Batteries are the preferred solution for energy storage. As the rising torrent of LiFePO4 batteries throughout the world, we can not ignore them in our daily lives. According to an analysis from Pareto Securities in Power & Renewable Energy Conference 2022, the storage market can outpace the EV market.
So what is the current status of the global lithium battery market? Can we seize the opportunity to reduce carbon emissions and transition to renewable energy? Let’s follow Valerie and learn more about it!
Video: https://www.youtube.com/watch?v=e-tZvxt7r1g
QH Technology: https://lifepo4-energy.com/
0 notes
Photo


ENERGAÏA — RENEWABLE ENERGY FORUM
An annual event dedicated to renewable energy industry professionals, supported by the Occitanie/Pyrénées-Méditerranée Regional Authority and organized by SPL Occitanie Events, the European Forum EnerGaïa has been accompanying the renewable energy industry for 16 years. Backed up by a content-rich program of talks, round tables, workshops, and pitches giving center stage to the expertise of key players in the sector, Forum EnerGaïa has reasserted its status as a major meeting for renewable energy professionals.
Address: Exhibition Center of Montpellier (Rte de la Foire, 34470 Pérols, France)
Time:7th and 8th December 2022
Booth Number: A12
To learn more or get a free ticket, you can visit the official websites:
EnerGaïa - Renewable Energy Forum: https://energaia.mediactive-events.com/?langue_id=2
QH Technology: https://lifepo4-energy.com/
Français
EnerGaïa, le Forum des énergies renouvelables
Événement annuel dédié aux professionnels des secteurs des énergies renouvelables, porté par la Région Occitanie / Pyrénées-Méditerranée et organisé par la SPL Occitanie Events, le Forum EnerGaïa accompagne depuis 16 ans la filière des énergies renouvelables. Adossé à un riche programme de conférences, tables rondes et ateliers mettant au centre des échanges l’expertise des acteurs clés, le Forum EnerGaïa conforte son positionnement de rendez-vous majeur des professionnels.
Adresse:Parc des Expositions de Montpellier (Rte de la Foire, 34470 Pérols, France)
Temps: 7 & 8 décembre 2022
Numéro de stand: A12
Pour en savoir plus ou obtenir un billet gratuit, vous pouvez visiter les sites officiels :
EnerGaïa, le Forum des énergies renouvelables: https://energaia.mediactive-events.com/index.php?langue_id=1
QH Technology (Français): https://lifepo4-energy.fr/
0 notes
Photo


November & December Schedule of QH
Solar Solutions Düsseldorf - Germany
𝙎𝙘𝙝𝙚𝙙𝙪𝙡𝙚:
Wednesday- 30 November 2022 (10:00–18:00)
Thursday- 1 December 2022 (10:00–18:00)
𝘼𝙙𝙙𝙧𝙚𝙨𝙨:Messe Düsseldorf — Hall 8B Stockumer Höfe — Parkplatz P2 40474 Düsseldorf
𝘽𝙤𝙤𝙩𝙝 𝙉𝙪𝙢𝙗𝙚𝙧:Hall-8B-C1
ENERGAÏA RENEWABLE ENERGY FORUM
𝙎𝙘𝙝𝙚𝙙𝙪𝙡𝙚:7th and 8th December 2022
𝘼𝙙𝙙𝙧𝙚𝙨𝙨: Exhibition center of Montpellier
𝘽𝙤𝙤𝙩𝙝 𝙉𝙪𝙢𝙗𝙚𝙧: A12
Wish you a fulfilled November and December with joy, happiness, and love! We'd love to meet you in Europe!✨
🔋To learn more, click here: https://bit.ly/3LKWqGl
0 notes