
Don't wanna be here? Send us removal request.
Statistics
We looked inside some of the posts by qrry43-projects and here's what we found interesting.
Average Info
Notes Per Post
0
Likes Per Post
0
Reblog Per Post
0
Reply Per Post
0
Time Between Posts
14 days
Number of Posts By Type
Link
1
Video
2
Photo
2
Text
3
Last Seen Tumblr Blogs


Fun Fact
Total funding amounts to $125.3M.
Link
0 notes

Text
Vacuform Table

What is it?
Vacuforming is an easy way to make plastic molds around common objects. The process involves heating plastic until soft, then using a vacuum to pull the soft plastic over an object until it has hardened. The end result is a durable plastic shape of your choice.
Examples

Star Wars Stormtrooper armor seems to be the most prolific example of hobby vacuforming. A great example can be found at
http://trooperarmor.com/
.
Other good uses include:
engineering prototypes
form-mitted masks
costume props and weapons
Components
This is a list of the parts I use for vacuforming:
4hp shopvac
household kitchen oven
oven thermometer
gloves
vacuform table and frame (I built this)
egg timer
something to form (I chose a monkey)
This image contains my entire workspace except for the shopvac.

Selecting a size
I am working with a standard kitchen oven and the size of that oven limits the size of plastic sheet I can work with. The interior dimensions of my oven are: 24.5"x17.25"x14.25". The plastic is clamped into a frame held in the oven horizontally. I've opted to make my frame 22.5"x16.0 so that there is some room to slide the sheets in and out. It then follows that the dimensions of the table are similar.
Building the table
The table itself is very similar to an air hockey table, but in reverse. Instead of blowing air through tiny holes to to lift a puck, the form sucks air through holes to pull the plastic downwards over an object or a chuck. The construction is extremely simple and I managed to build mine almost entirely out of scrap pieces of wood found in my dad's basement.
The table is pictured in the image below, however "table" may be a misleading name. My "table" is actually a box without legs of any sort. In the photo, the box is on it's side for storage.

The box is hollow with 2x4s for the edges. The bottom is made from what used to be a shelf. The top surface with the holes is made from thin particle board. The whole box is assembled with glue and screws to keep it air tight. This is important so the top does not lose suction. You can connect the vacuum before drilling surface suction holes to test air tightness and fill any cracks in the box with glue. Also, if you are going to attach a handle, make sure you do this before sealing the box. I used a drawer pull and later wrapped it in electricians tape for comfort. I found a converter nozzle for the standard shopvac tube at the hardware store. This nozzle fits nicely in a hole in the side of the box, making a tight fit.


There are 442 holes drilled in the surface at 3/4 inch spaces. The going is monotonous, but at least the wood shavings fall into the box making cleanup easy. Make sure the holes are small, but not small enough to get clogged with sawdust. I didn't find perfect spacing to be terribly relevant. If you look closely, you can see the holes begin to wander half way through.

After trying the box once, I added the weather sealant around the edges of the top. This helps seal the surface between the box and the frame.
Building the frame
The purpose of the table is to hold the sheet of plastic while it is soft. It is very much like two picture frames. These frames clamp together with the sheet of plastic between. This is the most expensive portion of the vacuform system because there are some special requirements of the frame. The frame will go in the oven along with the plastic and be heated to around 400 degrees. A hard wood will be able to tolerate these temperatures for a short time without catching on fire. I used 1x3 red oak planks.
You can see the frame below:

The oak is cut at 45 degree angles and fitted together with two different types of angle brackets. I didn't use wood glue because I'm not sure how that responds to heat. Instead, I put a screw diagonally into each corner. You can see these screws in the picture below:

I used two different angle brackets because the bottom of the frame should be flush because we are going to make an air-tight connection between that and the vacuforming box. I am sure that someone who is better at framing could implement a more elegant solution.
Once the frames were complete, I drilled six holes for bolts and wing-nuts to secure the two frames together. This turned out to be a good solution for clamping the frames together around a sheet of plastic. Another solution I came across was using piano hinges and clasps so the frame swings open.
The last element of the frame is a way in which to hold it in the oven. Since the plastic will bow out the bottom as it is getting warm, one cannot rest the frame on an oven rack. My solution was to install three hooks into the top of the frame. These hooks allowed the frame to hang suspended from an oven rack in the highest position. As most household ovens have two racks, I was able to put another rack in the lowest position which was covered in tin foil to catch the plastic if I left it in the oven too long. I found this solution to be better than building a stand.
Forming


Links
http://www.studiocreations.com/howto/vacuumtable/index.html
http://www.tk560.com/vactable4.html
http://www.largescaleplanes.com/tips/RatoMarczak/jigs/vacuumform.html
http://www.trooperarmor.com/FormingTable.html
http://www.studiocreations.com/howto/vacuumforming/
Materials Suppliers
abs white 093 4'x8': $41.38
styrene 093 4'x8': $34.76
Other Information
oven interior dimensions: 24.5"x17.25"x14.25"
Form Dimensions
22.5" x 16.0"
0 notes
Text
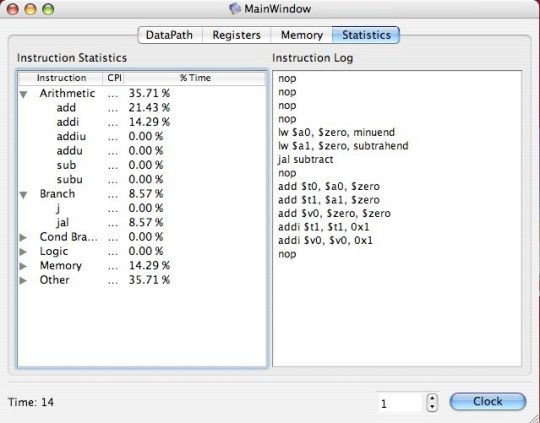
Pipeliner
Pipeliner simulates a MIPS processor at the component level. Input MIPS ASM, assemble it, then step through clock cycles inspecting each element of the processor pipeline. Written as an instructional aid for teaching computer architecture, it is implemented using SystemC for hardware emulation and QT for visualization.
View the entire MIPS pipeline including all inputs and outputs as you step through clock cycles.
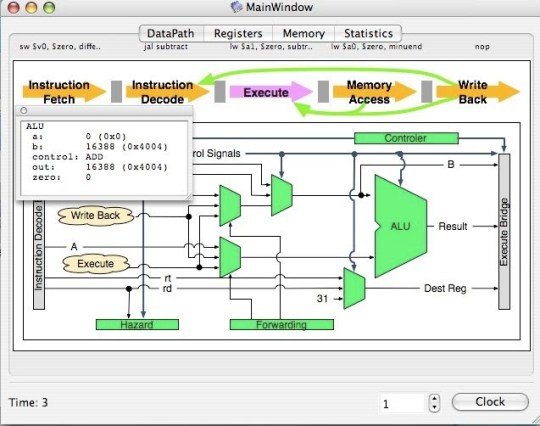
Register and memory contents is also accessible and modifiable.
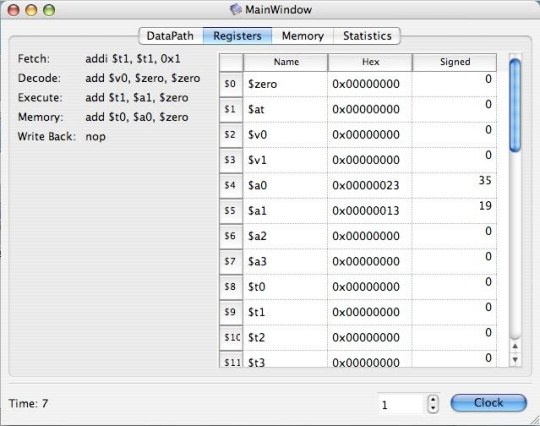
After execution, inspect the execution tree by % time spent on each command or command category.
Download Source: zip | gz
Binary: OSX (PPC)
0 notes
Text
LegoNXTRemote
This is an Objective-C framework and application for controlling LEGO Mindstorms NXT bricks over Bluetooth.
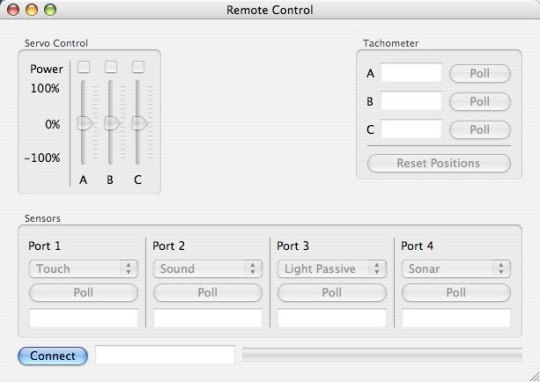
Features
Abstraction layer for polling sensors
Provides both a Cocoa API and remote control application
Capable of managing multiple LS devices (sonar, compass, etc...)
Does not require custom firmware
Does not depend on fantomSDK
Project Page
http://code.google.com/p/legonxtremote/
0 notes