
Statistics
We looked inside some of the posts by quantomeno and here's what we found interesting.
Average Info
Notes Per Post
2K
Likes Per Post
996
Reblog Per Post
536
Reply Per Post
9
Time Between Posts
1 day
Number of Posts By Type
Text
15
Photo
1
Note
1
Last Seen Tumblr Blogs


Fun Fact
The most popular pages on Tumblr are about Minecraft, GIFs, and David J. Peterson.
Text
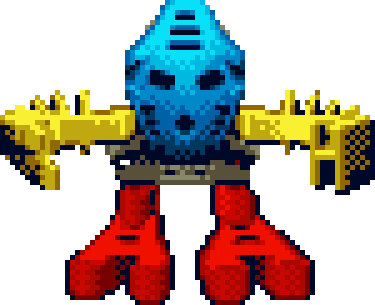
Gali. In every appearance she has, I think she stands out. She has such a nice blend of strength, elegance and wisdom that makes her really feel like an embodiment of the ocean.
Hahli. Mostly because I had fond memories of MNOGII and she was the only 2003 Matoran I had (and I probably chose her because of MNOGII). I also enjoyed her in the early parts of the Voya Nui arc, particularly the scenes with Kharzahni.
Nokama (have you noticed the pattern yet?). Beyond my water-theme bias, I do like her roles in MONGI/II and how she's the one who reveals the truth to the Matoran in the Voya Nui arc. I also have recently gained a bit of a fondness for Dume, and think he's an underexplored character, but I don't like him, so Nokama still wins.
This one is tough... I'd say the Inika, because of the whole Matoran who were pretty much already heroes becoming Toa thing. However, I feel like the Metru had better interactions and relationship growths, which makes them more interesting in that respect. The Mata/Nuva are cool symbolically, but their obstacles/growth often feel repetitive. And any other teams are too unexplored for me to like them more.
Roodaka. For all the typical reasons. I also have a soft spot for Nidhiki and his tragic backstory (which I just realise is partly thanks to Roodaka, so bonus points for her).
I really like the Kualsi, partly because I think it looks so sleek but also because I often wish I had its power so I could cross the road without waiting for the traffic lights to change.
Gali Nuva's axes. I remember as a kid I'd get these badminton racquets we had and pretend they were those axe thingys. I was about to say I also liked the staffs that the Hagah had but then I realised Norik (whose set I had) has a staff with Gali's axe as the blade, so in a way those axes still win.
There are too many to pick... maybe ussal crabs because of Pewku. But the Tahtorak and the Kanohi dragon are also really cool.
MNOG. I just really like the art style, the music and the way it shows the world of Mata Nui so well. Downfall might be my favourite book (I've said it before, but I love the opening of it). The best movie is Legends of Metru Nui. Kid me would've said Mask of Light, but LOMN has better characterisation and development of the full cast, among other things.
This is probably my only really unusual answer, but Umbra. I'm only judging sets I actually owned, and Umbra was the only titan set I got and I think he deserves more respect. Plus the roller blades are cool. I also want to give a mention to the Voya Nui Matoran because I think they're creative: they're one of the best examples of a design that tells a story.
I want to say Mahri Nui/the Pit because, you know, water theme bias and I love the '07 story year, but the city itself gets so poorly explored (and the pit kinda scared kid me) so I have to say Mata Nui (because of MNOG mostly). But Ga-Metru is definitely the place in the MU I would most like to live. It's so beautiful.
Favourite Makuta: Kojol. I don't know, but I like him. We get so few scraps of detail about him, but I like this image Mutran paints of him as arrogant and foolish. I feel like there's something there you could work with: a Makuta tasked with such an important location as Artakha had to have done something to get that role. He reminds me a bit of Sidorak. Also I think his name sounds cool.
Bionicle Reblog Meme

In celebration of the Bionicle fandom being alive and well despite the passage of time (among other things) I’m bringing back tumblr ask memes only make it a reblog meme so blogs that don’t usually get asks can still share their love of Bonkles :)
Pick and choose any/all and reblog with your:
Favorite Toa
Favorite Matoran
Favorite Turaga
Favorite Toa Team
Favorite Villain
Favorite Kanohi + Mask Power
Favorite Toa Tool
Favorite Rahi
Favorite Bionicle Media (Book, Movie, Game)
Favorite Bionicle Figure or Set
Favorite Setting / Koro / Metru / Island / etc
Any of your favorite Bionicle-related things not already mentioned in this list that you wanna share!
23 notes
·
View notes
Text
Byleth when he uses a gambit:

(for those who don't know Australian politics of the 70s, it's a reference to Gough Whitlam's election campaign)
#I think of this every time he says that voice line#Also I think I only recently realised that this line is probably a play on the fact Byleth can control time#I expect the subset of people who'd appreciate both references is vanishingly small#but I think it's funny#fire emblem: three houses
1 note
·
View note
Text
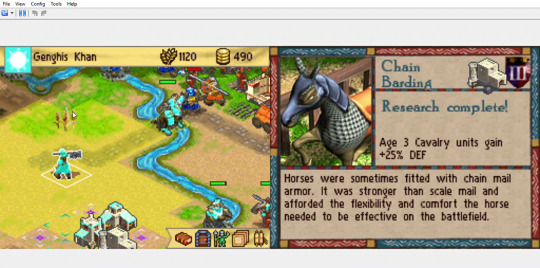
Age of Empires - Age of Kings DS: Genghis Khan Mission 3 Guide
I enjoy this mission a lot because it always keeps you on your toes. There is a lot going on and you can really play it a few different ways.
This time, it took me 41 turns to win, which is my typical time if I choose this strategy because I like to wait until day 29 to build the Wonder (which is the latest you can build it and get the extra star for completing it by day 30). More on that later though.
OK, so, like I said there are multiple ways to win this. I'm pretty sure the first time I won I did it the 'normal' way: build up in your little corner and mostly leave the other tribes to fight amongst each other, then build the Wonder and defend it by bunching up all your forces and hoping you survive long enough to win.
This time, however, I did what I like to think is the more challenging (and more fun) strategy: complete annihilation.
Because the game is not won until the Wonder has stood for 11 days (i.e. 10 full turns including the day it is built and on the start of the 11th you are awarded victory), this mission is actually the only one where you can defeat the enemy entirely and still keep playing. In some other missions you can wipe out the enemy (eg the Japan invasion mission, some of the Joan of Arc ones) but they still have a turn. In this one, if you defeat them there's no longer a 'turn' given for them to skip, so if you get rid of all of them then it will just jump straight to your turn again. It really is just you left. It's kind of funny.
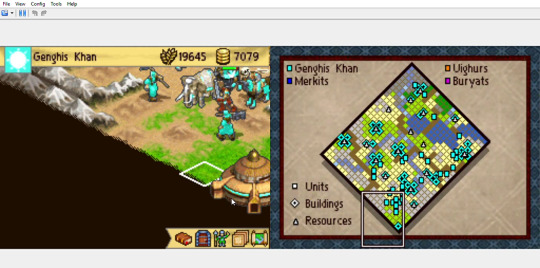
Talking about your enemies, in this mission there are three: the Merkits (blue, west), the Buryats (purple, north) and the Uighurs (orange, east). The Merkits and Buryats are actually allied, but you might not notice this because the Buryats are largely on their own little island in the north and the bridge to the centre of the map is often clogged. All of them start on the Feudal Age, while you start on the Castle Age. Which would be great, if it weren't for the fact you start with Dark Age units and no Town Centre.
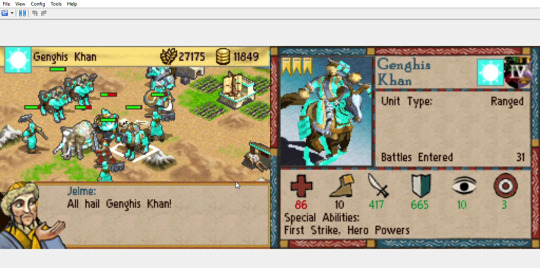
(this picture is from much later in the game. My recording didn't save because I closed my laptop lid)
I built my town right where my villager was standing when the game started. Anywhere around there is all right. Too far to the bottom corner and you'll have trouble getting units mobilised.
This picture also shows a few important things. The first is that, at the start, you should be mostly letting the other tribes just fight each other. You can, however, help keep the fight balanced so no one gets an advantage. Since the blue and the purple guys are on the same side, I would advise you attack them more, but if the orange ones are getting a little too strong you can attack them too.
(I should note briefly I always feel kind of bad attacking the Uighurs because of their current persecution so I feel I should note that this is just a game and I hold no actual ill-will towards any ethnic group depicted in this game)
That area right across that bridge is a constant warzone as all three tribes will converge there. You really should never send any unit there until you have a good hold over the south of the map. Typically, if you stay on your side of the river you'll be pretty safe. Sometimes I find they'll attack the mill I try to build on that wheat resource, but this time they didn't until I had already built up four farms.
I also don't spend too much work building up my TC. A market and a blacksmith (along with mills and mines) will give you enough research options to be able to reach the Imperial Age while giving you enough strong units to maintain a decent defence at the start.
When I get the chance, however, I do like to build a castle.
This time I built it just over the bridge in the Merkit territory. I generally build one in the south-west corner, closer to the mill down there to defend it, or I'll build one on the mountains across the ford near where I built the towns (on Uighur territory). In this game, I built a TC down that way, but often the Uighurs build a second TC close to the eastern border of the map so it's usually easier to build a castle. You can only build two TCs and that means only two castles, so it's good to spread them out.
I should note that this is very much a 'build up' map. You shouldn't extend too far without support (although castles are really enough support), and by just developing the territory you have you can eventually beat the others. You should try to limit the Merkits' expansion southwards, but otherwise it's better to avoid fighting too much. The enemies don't tend to attack you unless you get in their way.
Now, you have three extra goals: building the Wonder in 30 turns, exploring enemy territory and building four mines.
The first one is decently easy if you aren't over-extending and you can keep up a good rate of building mills and mines. Don't spend too much money on units and make sure you keep steadily researching when you can (using Genghis' Patron of the Arts power can help too. I didn't use it this time because I kept him firmly at that bridge). If you can capitalise on your enemies' infighting, you can slowly take over their territory from behind. The Merkits are the easiest since they have quite a few resources close to you that they don't capture right away. The Uighurs are easier to fight because they have an extra enemy to deal with, but it is hard to get a foothold on their land since there's really just one mine close to you which they already own and will do their utmost to keep.
The exploration achievement is a bit weird. I think it is determined by the percentage of map you can see that is considered enemy territory.
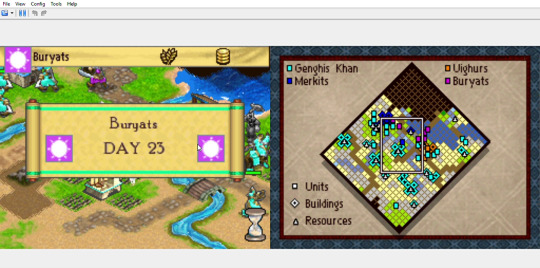
This was the map I could see when I got the message I had achieved it. As you can see, I barely explored any of the Buryat territory. The message also weirdly appears when you end the turn. It's probably possible to achieve this goal just by sending your scout cavalry out and into enemy territory right at the start, but I've never tried it.
The final goal, the four mines, is possibly the hardest. There are two mines on your side of the river: one near the Merkits and one just above that patch of grass at the bottom corner of the map. Those two are easy. The next closest ones are both very close to enemy town centres and will require a strong force to hold. There's also the one in the no man's land at the centre, but it's impossible to capture that and expect to hold it for long, so I'd ignore it.
I felt like I was pretty lucky this time, but maybe I was just quick, because often I find the enemies have built up strongly in the bottom halves of their territories. This time, however, I felt once I built that castle and then that TC on either side of the map I pretty much had no setbacks at all. But yeah, I think the key is to ensure the enemies are always fighting on too fronts so they can never dedicate too many units to fending off your incursions.
By this point I had all but defeated the Merkits and the Uighurs, and only the Buryats in the north still had any real forces. I also built a castle in the north-east corner to help support my units on that side.
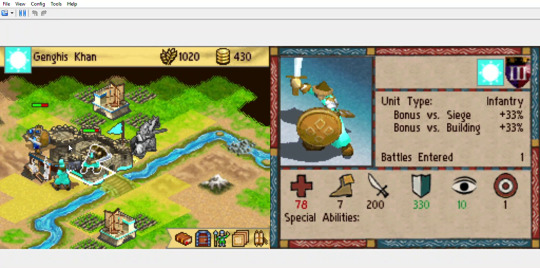
Throughout this map, I found that a few good infantry units were all I really needed at the start (I was lucky and got a Woad Raider), but I also had a few cavalry units since the enemy likes infantry and ranged units. I got a Knights Templar, which was especially useful. Even with the castles, I tended to train more longswordsmen than mangudai (mangudai are probably the least useful civ-specific unit, but being ranged and having the first-strike ability has some advantages). You want to really pummel the enemy buildings hard and keep them from rebuilding.
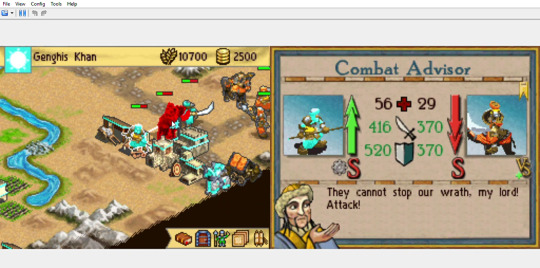
The day your Wonder is built, the Merkits and the Uighurs will get reinforcements. These are Imperial Age units (even if they are still on Castle Age) and will appear even if the two tribes were completely defeated (as they were this time). The Buryats do not get reinforcements and they're probably too far away to really cause you problems anyway.
This is the other reason I like this map: even when you have the upper hand, the enemy has a really, really strong fighting force you cannot stop. You can't let down your guard until the very end.
It is also why I wait until day 29 to build the Wonder: this way I give myself the most time possible to defeat the other tribes and the reinforcements are much less of a problem when there isn't a force already on the map for them to support.
Out of tradition, I like to build my Wonder on the bottom corner of the map.

I think it looks cool there but it's also good because it's the furthest possible spot from the enemies and it requires them to cross mountains to reach it, so it's pretty safe.
I had like 70% of my army attacking the Buryats when the reinforcements arrived (I had one paladin on the Wonder which ended up being a big help). As a result, the Merkits got really close to attacking, but I had just enough support from my town (and that paladin) to hold them back until I moved the rest of my army down.
The town in Uighur territory helped keep them occupied.
While the castle on Merkit territory was not quite so useful (since they have a set of reinforcements that appear on that road that leads to the south border, i.e. on your territory), it still helped so I could send fresh units straight to the front rather than rely just on my TC.
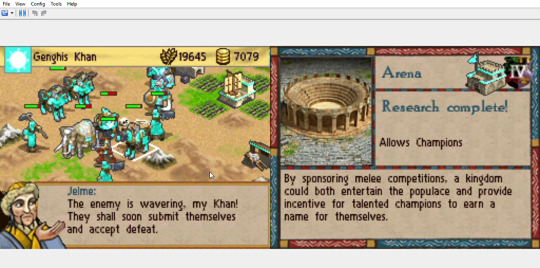
Really Jelme? Are you sure they're wavering?
But yeah, by day 38 I had defeated everyone. Jelme gives you that message when you have had the Wonder built for 8 turns; I just find it funny that the enemies literally no longer exist and yet somehow still haven't admitted defeat.
And then I just pressed 'end day' three times and then I won.
Now, for the statistics:
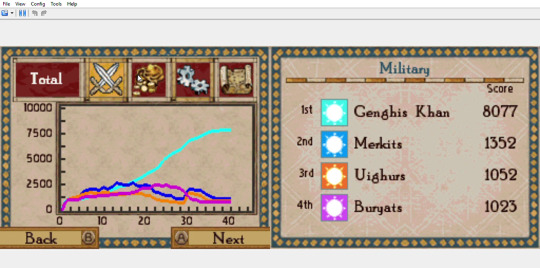
My military outperformed the others by about day 15. The key really is to just not attack too hard, because the others will keep fighting and killing each other, so as long as you build your forces you will eventually overtake them.
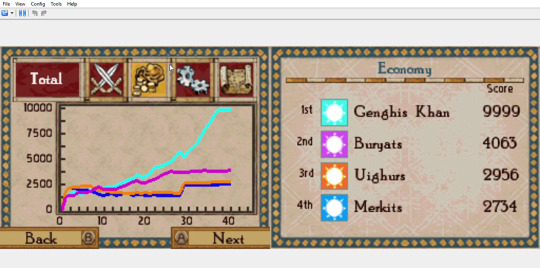
The same is true on the economy. You can see the blips where I aged up and when I built the Wonder, but otherwise I just kept increasing in resources. You want that sort of growth so you can get to the Imperial Age quickly, so try to be frugal.
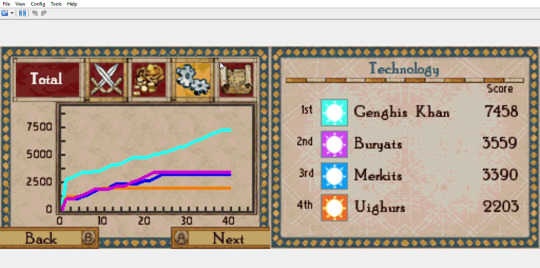
And technology was never even a competition. That plateau in the middle is from when I reached the Imperial Age. I was trying to save up for the Wonder so I stopped researching for a bit (Imperial Age tech is expensive), but eventually I realised I had enough resources to build a Wonder whenever I needed and I started researching again.
0 notes
Text
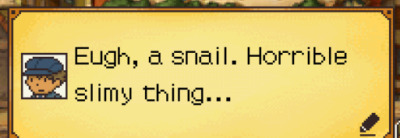

Luke caught a lil snail friend!
19 notes
·
View notes
Text
It's been almost two weeks now and I'm still thinking about Keating! The Musical. I have to talk about it.
It's often been described as the Australian equivalent of Hamilton. I've never watched Hamilton so I can't say exactly how similar they are, but other than being musicals about politicians, I'm pretty sure they're not much alike.
Keating! tells the story of former Prime Minister Paul Keating. For some context: Keating started off as treasurer under Bob Hawke and then got Hawke to retire so he could step up to be PM. He then won the seemingly unwinnable '93 election, largely by attacking the opposition's plan to implement a Goods and Services Tax. He was one of our more progressive PMs and was famous for his colourful insults (many of which are incorporated into the musical). However, Australia had been going through a recession and (due to that and other things) at the next election Keating lost in a landslide to John Howard.
The whole show's on youtube (it's not a very long musical, it's only an hour and a half):
youtube
As someone who enjoys Australian politics, it was amazing. All the references and the symbolisms... It's just so clever.
My favourite part is probably the rap battle between Keating and Hewson, followed very closely by Howard's 'Mateship' song.
Seriously, so many of the weird things in it did happen in real life (including Alexander Downer in drag). Watching it the first time I wished I had someone to watch it with so I could explain all the references and point out just how well-researched it is.
And the songs! They're all in different styles from reggae to mambo to rap to slow rock.
0 notes
Text
Wait...that's weird now that I think about it...because chutes are just regular liquid protodermis, right? It's not purified or anything, so it'd be the same protodermis that's in the silver sea. So why hunt out chutes in particular?
My initial guess would be that Nui-Rama consume protodermis more like water and they're just one of the few species that actually take the risk of drinking from the chutes (this also makes me wonder if MU species do drink liquid protodermis at all? I remember one scene where Nokama tastes the water of Mata Nui and finds it too salty to drink, so I'm going to say they do). And the chutes just happen to be an easy to find, inland source of protodermis.
The other thing is that the Chutes have only been around as long as Turaga Dume, which isn't that long in the grand scheme of things. So the Nui-Rama had to have eaten something in the interim. (also, there was no protodermis on Mata Nui, but that's a little irrelevant given the Rahi Beasts description is from the Rahagas' POV so they don't know what they're like on Mata Nui).
This all makes me believe that the Nui-Rama and Nui-Kopen hunt something else that happens to be totally unrelated to the chutes/protodermis, and the Nui Rama just happen to also like drinking from the chutes.
Bionicle Food Chain
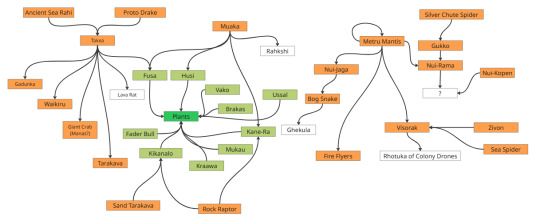
Orange = carnivore/omnivore, green = herbivore and white = unsure. Missing are the Archive Mole->Protodite, Vahki Hunter->Vahki and Crystal Climber->Ice Bat pairs.
There are still some things I need to check (I used the Rahi Beasts book initially, so some rahi that aren't in that may have info elsewhere), but I tried to avoid cases where it's not explicitly stated what species of rahi they eat. For example, Nivawk eats 'small flying rahi', but while I could make good guesses, I can't be sure it actually does eat those specific rahi. I might eventually update it to include logical guesses and more rahi.
One questionable thing was the Takea eating a giant crab in one of the books: BS01 claims it was a Manas Crab but reading the text myself, I think it's unspecified. I'm also surprised Takea (sharks) are the 'enemy' of Fusa (kangaroos), but they are.
#bionicle#but also really you can make up anything you want it's all pretty vague#your idea is also pretty interesting to think about#this is really just how I view it (and also to try to explain the protodermis thing)#(because I think I forgot about that/missed it)#I should add that in
31 notes
·
View notes
Text
Bionicle Food Chain
Orange = carnivore/omnivore, green = herbivore and white = unsure. Missing are the Archive Mole->Protodite, Vahki Hunter->Vahki and Crystal Climber->Ice Bat pairs.
There are still some things I need to check (I used the Rahi Beasts book initially, so some rahi that aren't in that may have info elsewhere), but I tried to avoid cases where it's not explicitly stated what species of rahi they eat. For example, Nivawk eats 'small flying rahi', but while I could make good guesses, I can't be sure it actually does eat those specific rahi. I might eventually update it to include logical guesses and more rahi.
One questionable thing was the Takea eating a giant crab in one of the books: BS01 claims it was a Manas Crab but reading the text myself, I think it's unspecified. I'm also surprised Takea (sharks) are the 'enemy' of Fusa (kangaroos), but they are.
31 notes
·
View notes
Text
What if he chose those colours because he's reverting to primary colours? I know Av toa are gold/white, but what if red-blue-yellow just is the 'default' colour scheme of Av-Matoran?
My headcanon is that this colour swapped version of Takua we see in Quest for the Toa is actually his canonical appearance for the 1000 years between getting out of the Matoran Sphere and crash landing into Ta-Wahi beach after summoning the Toa Mata.
Basically I think his Av-Matoran colour changing abilities got scrambled in the Matoran Sphere mind wipe, but given he had no memories of even having that ability he didn't know how to change back.
Then they got scrambled again from the mind wipe of his impact to his more familiar colours. Both times he was just lucky that he kept with Ta-Matoran colour schemes.
57 notes
·
View notes
Text
I just finished replaying Hotel Dusk again.
Some spoilery thoughts:
Judging by the timeline, the last painting Dunning made as Osterzone was the one Grace asked him to do, and 'Angel Opening a Door' is supposedly Osterzone's final painting. So, was Grace the one who commissioned AOAD? (which would really make everything kind of crazily tied together)
Which reminds me: she tells Iris to give the cassette to the artist who painted AOAD (and her calling him the man who paints angels would support the idea that AOAD was the painting she got him to make), but she doesn't know who it is. At the end Kyle works it out, but doesn't tell her to hand in the cassette to Dunning. I suppose because he knows Dunning already heard it (and probably doesn't know Kyle found it in the rubbish), but I feel like Iris should at least know that her job is done.
Also somehow I never realised till now that Bradley implies he killed Evans. I thought Mila wanted to still search for him at the end but it had been a long time since I last played.
Which reminds me: Rosa and Louis had the night off when Bradley stayed at Hotel Dusk. It's sort of implied that Dunning orchestrated this, given how unlikely it was, but then Dunning talks about drinking with Bradley and they'd never met before and he had no idea Bradley was coming. So I guess Dunning really did just make a mistake that night with their days off?
I also feel like there is a lot going on with the whole Bradley stay. He leaves the magazine and the box for Kyle to find later. Did he know Iris was going to be there? Because what else is the magazine for? (it's also mildly annoying that Kyle doesn't realise Cecily Lee is Iris and also showing people the magazine (especially Summer, who says she looks familiar) doesn't make them realise either). Or was it just another case of crazy coincidence.
But yeah there are a lot of coincidences going on. Some thing were definitely planned. Obviously, Dunning and Mila are there because of the Evans connection, so that's fine. Bradley sends Kyle there (possibly knowing Mila woke from her coma and is going there?). Louis being there is an odd coincidence and so is Jeff's Nile connection, but at least Jeff is only there because of meeting Mila, so that's kind of just timing. Louis really hits the nail on the head when he says that the painting responsible for Danny's death was right under his bedroom this whole time.
Then there's the Woodwards and Iris. Now, they're all there because of Grace and that sort of explains things. Grace sends Iris there coincidentally when Kyle is going to be there, and Kevin takes Melissa there to get clues on Grace, and she only left 6 months ago, so he and Iris being there at the same time is believable.
Summer and Helen both being there are pretty random chance though, unless Alan suggested the anniversary date was important. Helen herself is fine since the ten year anniversary was the same date as Jenny's disappearance (I think? Or at least it was the same year and that at least explains part of her being there at the right time).
This obviously is all the point. I just think it's kind of funny how coincidental it all was.
Also for some reason my game didn't let me check the old guest records for Grace's name or take Dunning's blue paint, which I definitely have done in my previous playthroughs. And it's a random thing but Dunning's notes say the guest logs are in drawer A but they're actually in what looks like drawer B. And why does he keep a dot-to-dot puzzle for the filing cabinet's code and why is it under the filing cabinet? How did it get there if it requires a crowbar to lift the cabinet? Does he store it there? That is such a random thing: it really should've been Jenny's birthday that's the code.
But yeah, as always, I love this game.
I really ought to play the sequel to Another Code...I got it on the Switch but never got around to it...
#hotel dusk: room 215#kyle hyde#this is one of those games that really makes the most of the DS console#it's so elegant and poignant I adore it
9 notes
·
View notes


Text
Okay,
What is the Worst Question you could ask a Bionicle Fan?
Can be about lore, trivia, Opinions, whatever-Go!
123 notes
·
View notes
Text
gen 3 ponyville is a communist utopia with monarchial roots. they probably had a leader and need for a government when their population either first developed or first settled, but have outgrown this need over time--my theory is that they branched off of a much larger ancient society with a higher population (maybe one connected to unicornia? maybe ponyville claimed independence from the nation that unicornia used to be, and mimiced their government structure out of a lack of awareness of other options. dragons were probably involved.) at the time of gen 3, the population is small enough for everyone in their society to know each other by name, and government buildings have either been reduced to decorations or repurposed into community establishments. people provide goods and services for fun (and at times societal pressure) with no concept of economic compensation, rather, they probably trade through favors rather than proper commerce. this is a practice that is sustainable because resources are available in surplus.
breezies are likely the indigenous people of the land ponyville is built on, but both societies are nonviolent and communal enough (as a result of a lack of natural predators) that ponies were able to move into unpopulated land and share resources and information with the native society. breezies in particular seem to have strong, bug-like communal instincts, and even less self-preservation skills than ponies, so it wouldn't surprise me that with some time for adjustment they would be accepting of their new neighbors so long as they left the populated land alone. the two societies seem to have impacted each other's cultures over the centuries, creating a oneness with nature that's stronger than what we see in unicornia, and industrial infrastructure grander than what one would expect from the breezies (breezies sleeping in cloth beds, etc.)
i need to rewatch runaway rainbow but it's interesting to me that unicorns still have a monarchy despite seemingly adopting the same moneyless "economic" structure as the ponies. i assume that their ability to support this practice comes from industrial advancements that can support a more property-based society than ponyville. since their resources are replenished through automated or magical means, rather than through careful treatment of nature and individuals providing good and services out-of-home, unicorns interact with resources with a mindset of private ownership and bartering, rather than communal ownership and gifting.
and uh pegasi like ice cream and dancing ^_^
#mlp g3#this sort of seriousness towards the world of G3 reminds me of when my sibling and I used to play with our G3 ponies#I feel like the vagueness of g3's world was actually one of its strengths: it really left things to the imagination#you could take the set personalities of the characters but throw them into any situation you wanted
75 notes
·
View notes
Text
the world of professor layton is so beautiful. I wish strangers came up to me on the street and asked me to solve their funny little puzzles
#professor layton#all you have to do is start viewing problems in life as puzzles#trying to pack a car/suitcase? Puzzle#algebra problem? Puzzle#Run over your neighbour's dog? Puzzle#jokes aside every time I have to arrange things to fit them into a tiny space I think 'all those years playing PL have paid off'
186 notes
·
View notes
Text
Life is a Fairytale
I was thinking about Barbie a Fashion Fairytale and then I thought about MLP's most fashionable pony, and one thing led to another:
#my little pony#mlp fim#rarity#barbie movies#barbie in a fashion fairytale#I'm impressed by how many of Rarity's costumes and clothes match the lyrics#some not so well but all in all I'm pretty happy#I was originally going to do get your sparkle on#but that song's lyrics weren't as fun to work with#my videos
4 notes
·
View notes
Note
(Gives you Emmy Altava to asign Pokémon to)
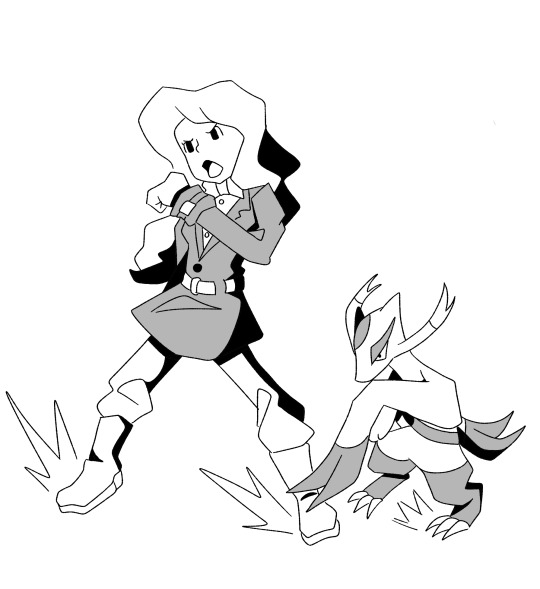
I think she would do fine with a Mienshao
48 notes
·
View notes
Text
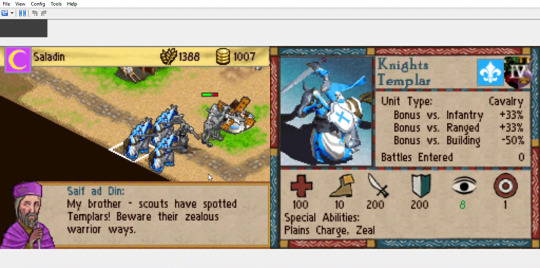
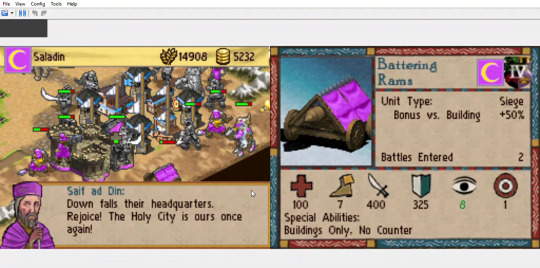
Age of Empires - Age of Kings DS: Saladin Mission 5 Guide
The Saladin equivalent of Richard's mission 6. This one is a tough one and it's probably the one mission I'm not fully convinced I've mastered. It's one of the ones I replay the least, but it is one of the most challenging missions in the game. I think it might be harder than Richard's Jerusalem and maybe even Acre (but Acre is harder to get 3-stars for).
This play through I managed to win in 35 turns (which is exactly the maximum number of turns to get all three stars) and it took about an hour and a half. It is easy to get bogged down in this one around the middle and Jerusalem itself is often a slog to besiege, but once you've gotten Ramlah and Lachish, you've all but won.
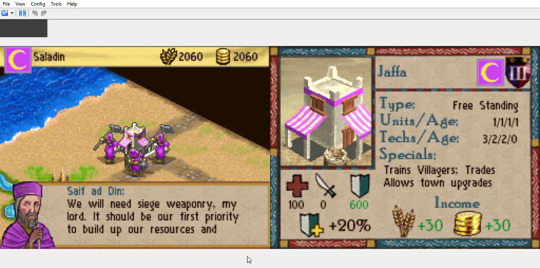
Saif ad Din tells you to do the old 'build up, then attack' method. Ignore him. It's one of the few times the game's nudges are wrong. I have never won by trying to build my towns and training forces. I think part of the problem is how close Ramlah and Lachish are to Jaffa and Ascalon. The enemy has the advantage of occupying two thirds of the map and can infringe on your territory while also building in their safe zone (I keep saying the 2/3 rule is important).
So, what you need to do is bring the fight to them straight away.
Luckily, you start off with a massive amount of resources. So send villagers out east to build two castles: one on each half of the map.

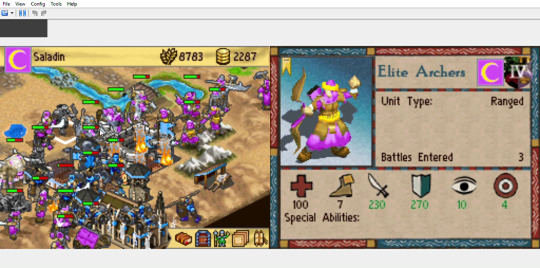
The closer to the enemy towns, the better. Both of the towns will have no enemy units on day 1, which means you can safely build even right up next to them. It's wise to send out one unit to scout so you can better plan where to place the castles. These castles will prevent the enemy from progressing further west and will provide you with an easy supply of longswordsmen (for attacking buildings and pikemen) and mamelukes (very important later, but also good for any other units since there's so much desert they'll almost always have an advantage).
I've also read of strategies where you instead build markets on day one and then attack using mercenaries (again, without really building up a proper army, just attacking from day one). The castle tactic feels safer to me, especially since the mercenaries available are very luck-dependent, but in principle it should still work as long as you attack early. I do like to build at least one market though, if only to get the trade rate reduced, and Saladin can buy cheap markets so it's a win-win. This playthrough I built one market at Ascalon and one barracks a Jaffa (for pikemen) and then much later I built a blacksmith, and that was it. You do not need to build much at the start to win. You will not be able to train much more than one or two units for a while due to your unit cap. Also, you will be struggling to pay for research for a while (the crusaders will reach Imperial age well before you do, which is a concern, but hopefully you have made a strong enough attack by that point that it won't have a big effect). As a result, town buildings are practically useless at the start except for diversifying your forces.
But seriously: attack early even if you feel completely unprepared. You need that initiative and you need to keep it going the whole way through. Send out Saladin too: with the castle to protect him, he'll be pretty safe and he can draw attention away from other units. You may be tempted to leave him at Ascalon centre so he can use his benefactor hero power to get you extra gold, but you need his strength way more than you need the gold.
Also start sending your other villager out to build mills. Don't bother with mines: your unit cap depends only on your wheat income, and you want to increase it ASAP. You can easily trade your wheat to get gold, while the cost of building a mine is high enough that it's not worth it (especially since it is so cheap to build farms). Eventually you will start wanting to build mines, but I just mean don't save up waiting to build one: if you have a choice between a mine and a farm, build the farm.
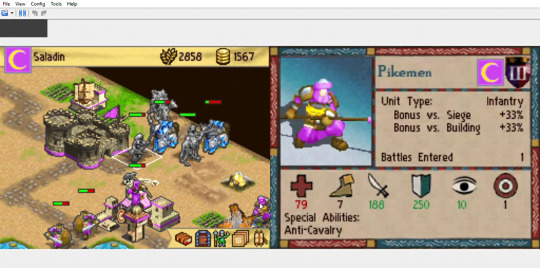
I don't actually have any specific advice for what happens next, just keep attacking and keep Saladin safe. You should definitely aim to get rid of that church in Ramlah (the north town) because enemy monks are a pain. Also, try to let your men-at-arms get killed off, because they really are just a waste of units and the sooner you replace them with longswordsmen the better.
You may find you're often being forced back to your castles and perhaps overwhelmed, but just hold your ground and eventually your unit cap will increase enough that you can mount a proper siege.
Now, this is important: Saif ad Din warns you at the start of the mission that "the Knightly Orders are sending reinforcements to aid Jerusalem". These are six kights templar, which appear in two sets: each trio at the edge of the map near each of the towns (but not Jerusalem). The first set of three shows up after you destroy one of the town centres.
Now, I knew this, but I assumed they'd appear at the same town centre as the one you just destroyed. In actuality (I think), they always spawn at Lachish first (or maybe at the opposite town to the one you destroy, I'd need to test further to be sure).
Unfortunately for me, I had just placed Saladin right in front of their spawn point...on a patch of grass...while he was at 3/4 health.
Thankfully the computer is kinda dumb (which is part of why this mission is often not that hard) and I managed to get him to safety after their turn was over, but it was a very close call.
The templars will spawn on your turn, the moment the town gets destroyed, which means if you have units in place, you can attack them before they can even do anything. This is why you need to keep a good supply of mamelukes because they can tear through templars like nothing. It also means you shouldn't completely destroy either town unless you are able to fend off three templars.
The second set of templars will appear three days later, also on your turn. This time I was prepared.
This was day 22, and I had just captured Ramlah. Once one city is captured (and you've dealt with the templars) send your units south to help the others. Mostly ignore Jerusalem for now unless units from it start coming your way. The computer built a third castle north of Jerusalem and I had one unit slowly chiselling away at that and the mine right above the city, but otherwise I didn't start my siege until Lachish was dealt with.
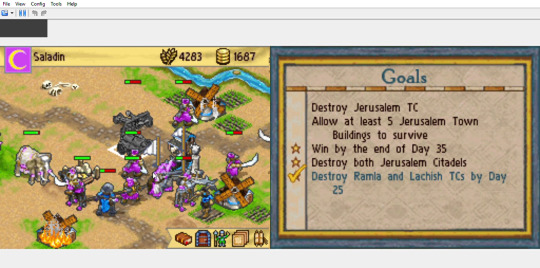
You don't need to capture the towns by day 25, just destroy the town centres. I capture them because why not? It's nice to have that extra base. (You'll also notice that you can't see my castle in the south, that's just because it's a bit further away than I usually put it: I forgot to scout first and didn't realise how far away the town was).
With both towns defeated (there are no more enemy reinforcements, by the way) you can move on to reclaiming Jerusalem.
Unlike the citadels, there is no requirement to destroy the crusaders' Dome of the Rock (the wonder), and by the time you get to it, you've probably already won, but I like to do it for the challenge (like how I'll destroy both citadels in the Richard version). If I'm really going well, I even like to build my own castles and wonder in their place (which I also like to do in the Richard version).
The computer kept training pikemen on the barracks and left the stable relatively free, and since I destroyed the south castle pretty quickly, I decided to break with tradition and attack the stable instead.
And that's that: Jerusalem is yours! I probably could've done it a little faster if I hadn't spent so much time trying to destroy the wonder (and had been a bit more aggressive in attacking the northern citadel), but I'm happy with 35 turns.
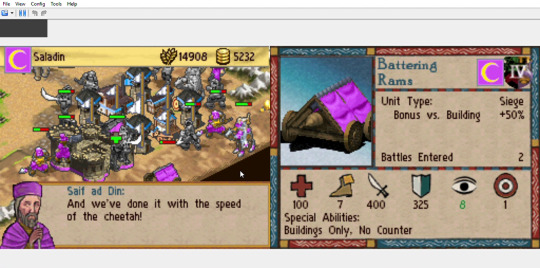
(Saif ad Din loves his cheetah analogies)
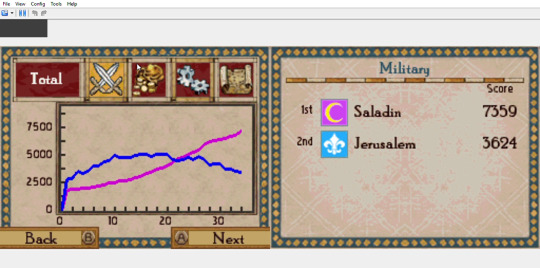
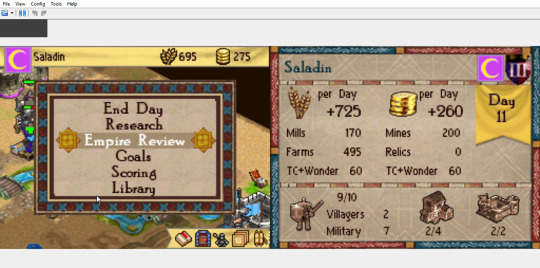
I say this every time but you can see I overtook the crusaders after roughly day 23, i.e. when I destroyed both towns, i.e. when I controlled two thirds of the map.
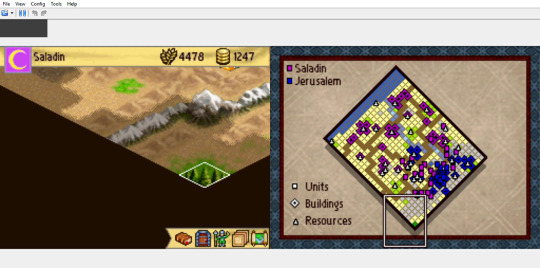
This picture was from a day or two later, but you can see how the map more or less splits into three parts: Jaffa/Ascalon, Ramlah/Lachish and Jerusalem. Once the enemy loses those two middle towns, they're forced back to Jerusalem and, like in the Richard version, you're free to build on the territory they vacate. Once they're caught there, they can only make 6 units max per day (7 if you include a villager) and can't send anything out to defend their remaining resources. As long as you keep hounding them, you really can't lose from day 25 onwards (assuming you've destroyed both towns that day and provided you don't put Saladin in an awkward spot).
It is easy to lose this mission at the start because you are at such a huge disadvantage, but with a fierce and sustained attack, it is possible to win. I'd love to know if you can win by building up your towns and army at the start. I just think there aren't enough resources nearby for it to work and you'd need to fight at some point to get to more of them, but by then the enemy would be too strong and you'll still be stuck with a unit cap maxed out with useless men-at-arms and villagers.
I should try it some time...this time the mission was easier than I remembered it being and I'd like the challenge.
0 notes
Text
#ahhhh but my dear Folsense. it’s ambiguous as to whether it’s switching from 6 to 7 or 7 to 8#either way we’ve got a four tho. which is good#why is the four also switching? who knows.
the number above the 4 looks like it has a curved edge on the bottom which suggests the number above is a 3. Which in turn suggests the number above the 7 is a 6.
since you can see the 7 and the (assumed) 6, it suggests it's moving from one to another, and so the date the game is set is in the 60s.
as to why the 4 is moving too, I would assume it's because the dial goes up by ones rather than tens. But then why is the 7 halfway if they've already gone past 70? Maybe the mechanism is just moving funny. I don't know, it's not a real time machine anyway.
the real issue is we can't be certain the clock has stopped at that date. it might actually be the 4 that is wrong.
but I mean really the game hasn't got a set year so all this speculation is pointless so we can just say it's set in 1964 and celebrate Layton's 100th birthday in two years and leave it at that.
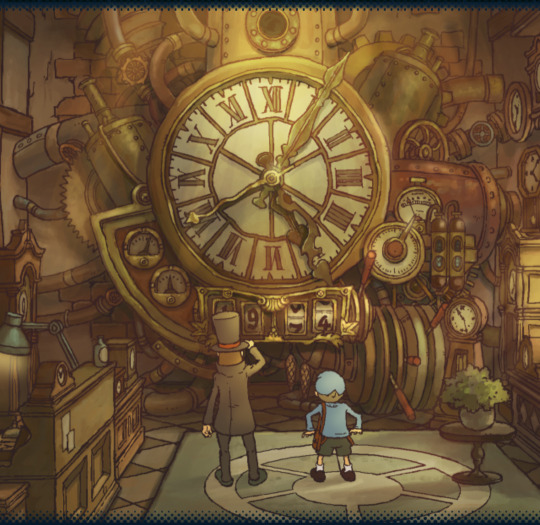
This is the "To Be Continued" image you get upon completing Diabolical Box. You can see on the dial on the far right that the numbers are switching to 1974. If this image is canon, then I think we can say that the series is set in 1964. If that's the case, Layton was born in 1927 meaning our boy's 100th birthday is in 2 years!
115 notes
·
View notes