
Don't wanna be here? Send us removal request.
Statistics
We looked inside some of the posts by quartz-components and here's what we found interesting.
Average Info
Notes Per Post
47
Likes Per Post
42
Reblog Per Post
3
Reply Per Post
2
Time Between Posts
22 days
Number of Posts By Type
Text
17
Last Seen Tumblr Blogs


Fun Fact
Tumblr Inc. is funded by 13 investors.
Text
Want to automate lighting or monitor ambient light levels? Check out our latest Arduino guide on using the TEMT6000 Ambient Light Sensor.
#ArduinoTutorial #DIY #SmartLighting #Electronics #ArduinoProjects #Arduino
1 note
·
View note
Text
Using a Knock Sensor to Detect Knocks with Arduino!
In this project, we're interfacing the KY-031 Knock Sensor with an Arduino Nano, displaying the knock count on a 16x2 LCD with I2C, and triggering an LED for visual feedback.
🔧 What You’ll Need: ✔️ Arduino Nano ✔️ KY-031 Knock Sensor Module ✔️ 16x2 LCD with I2C Interface ✔️ LED ✔️ Jumper Wires & Breadboard
💡 How It Works: The knock sensor detects vibrations, sending a signal to the Arduino. The microcontroller then updates the LCD and blinks an LED to confirm the knock was detected. Simple but effective!
🔥 Cool Applications: 🎶 DIY Drum Pad 🚪 Secret Knock Lock 🔊 Sound-Activated Projects
Check out the full tutorial and code in the tutorial!
0 notes
Text
How to Use AHT10 High Precision Digital Temperature & Humidity Sensor with Arduino
Looking to measure temperature and humidity with high accuracy using Arduino? The AHT10 sensor is a compact, I2C-based module that provides reliable data, making it perfect for IoT projects, weather stations, and smart home automation.
What You’ll Learn: ✔️ How the AHT10 sensor works ✔️ Wiring it to an Arduino board ✔️ Writing & uploading the code to get readings ✔️ Tips for stable and accurate measurements
What You Need:
AHT10 Temperature and Humidity Sensor Module
Arduino Nano
0.96 inch SSD1306 OLED Display (128x64, I2C)
Breadboard
Connecting/Jumper Wires
Arduino Nano Cable
Download the Code & Library Arduino AHT10 Temperature and Humidity Sensor Module
Watch the full tutorial on YouTube:
youtube
Follow for more DIY electronics tutorials & Arduino projects!
3 notes
·
View notes
Text
DIY Laser Tripwire Security System Using Arduino

The project consists of a laser module that continuously emits a beam aimed at a laser receiver sensor. When an object (such as a person) obstructs the laser, the receiver detects the interruption and triggers an alarm via a buzzer. This system is ideal for securing doorways, hallways, or any restricted area.
COMPONENTS REQUIRED
Arduino Uno
Laser LED Module
Laser Receiver Sensor Module
Buzzer
Jumper wires
Breadboard
Circuit Diagram

CODE
#define LASER_PIN 7
#define RECEIVER_PIN 8
#define BUZZER_PIN 9
void setup() {
pinMode(LASER_PIN, OUTPUT);
pinMode(RECEIVER_PIN, INPUT);
pinMode(BUZZER_PIN, OUTPUT);
digitalWrite(LASER_PIN, HIGH); // Laser ON
Serial.begin(9600);
}
void loop() {
int status = digitalRead(RECEIVER_PIN);
if (status == 1) { // If laser beam is blocked
Serial.println("⚠️ Intruder Detected!");
digitalWrite(BUZZER_PIN, HIGH);
} else {
Serial.println("✅ Area Secure");
digitalWrite(BUZZER_PIN, LOW);
}
delay(500);
}
youtube
7 notes
·
View notes
Text
The PAJ7620 is a highly capable gesture recognition sensor. It can detect a wide range of gestures such as up, down, left, right, forward, backward, and more. The sensor uses an array of infrared LEDs and a photodiode array to detect motion in its field of view. It communicates with a microcontroller (like Arduino) over the I2C interface, making it a versatile option for many gesture-controlled applications.
1 note
·
View note
Text
The 12V 3A Touch Sensor Switch for Mirror Light is a sleek and modern solution for controlling mirror lights effortlessly. This touch-sensitive switch provides a user-friendly on/off functionality, enhancing convenience and adding a contemporary touch to your lighting system. The built-in indicator light offers clear status visibility, and the durable construction ensures long-lasting performance. Its simple installation process makes it an excellent choice for upgrading your lighting setup.
2 notes
·
View notes
Text
youtube
DIY Sun Tracking Solar Panel Project using Arduino
Are you looking to boost the efficiency of your solar panels? A dual-axis solar tracking system is the perfect solution! Instead of a static panel, this system automatically follows the sun, ensuring maximum energy absorption throughout the day. In this blog, we'll guide you through building your own Arduino-powered solar tracker and show you how it works in action. 🎥✨
🛠️ How Does this Sun Tracking Solar Panel Project Work?
A solar tracking system adjusts the position of the solar panel in two axes (vertical & horizontal) to follow the sun’s movement. This ensures optimal solar exposure, which significantly increases power output compared to fixed panels.
Using Arduino, LDR sensors, and servo motors, we can create a system that continuously detects sunlight intensity and adjusts the panel accordingly. 🌞⚙️
🔹 Components Needed:
🔧 Arduino Uno– The brain of the system 🔧 LDR Sensors – Light intensity detectors 🔧 Servo Motors – For precise panel movement 🔧 Solar Panel – The power generator 🔧 Resistors & Jumper Wires – For connections
📝 Step-by-Step Instructions
1️⃣ Set up the Circuit: Connect LDR sensors, servo motors, and the solar panel to the Arduino. 2️⃣ Upload the Code: Use the provided Arduino sketch to program the tracker. 3️⃣ Test the System: Place it under sunlight and watch the panel follow the sun in real-time! 4️⃣ Optimize & Improve: Adjust sensor placement for better accuracy.
📌 Full Code & Circuit Diagram: https://quartzcomponents.com/blogs/electronics-projects/dual-axis-solar-tracking-system-using-arduino
🔋 Why Use a Solar Tracker?
✅ Increases energy output compared to a fixed panel ✅ Automatically adjusts for optimal sunlight exposure ✅ Enhances efficiency of solar power systems ✅ Perfect for DIY solar enthusiasts & engineers
Whether you're building a home solar system or a DIY electronics project, this Arduino solar tracker is an exciting way to improve energy efficiency!
📢 Share Your Builds!
Tried making this project? Share your solar tracker setup with us in the comments or tag us! We'd love to see your innovation. 🌍⚡
📌 Full Tutorial & Code: 👉 https://quartzcomponents.com/blogs/electronics-projects/dual-axis-solar-tracking-system-using-arduino
1 note
·
View note
Text
Like the traditional PIR sensor, RCWL-0516 is a widely popular sensor that also detects movements and is used in Alarms or for security purposes. This sensor uses a “microwave Doppler radar” technique to detect moving objects within its range. It has a sensitivity range of ~7 meters and that is very useful for multiple applications.
1 note
·
View note
Text
DB9 connector is a widely used electrical connector. Recognizable by its distinctive D-shaped metal shell and 9-pin configuration, the DB9 connector has been a staple in electronics for decades, especially for serial communication.
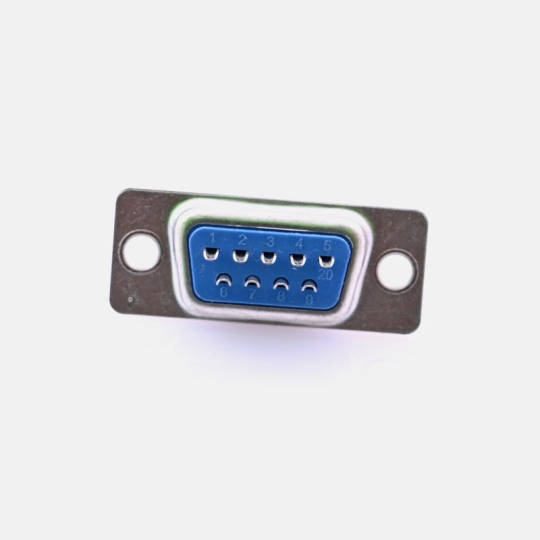
What Is a DB9 Connector?
The DB9 connector features a D-shaped shell to ensure proper orientation when connecting. The 9 pins (or sockets in female versions) are arranged in two rows, with 5 pins on the top and 4 on the bottom. This compact design is suitable for low-profile applications.
The connector comes in two main types:
DB9 Male Connector: Have pins and are typically used on cables.
DB9 Female Connector: Have sockets and are often found on equipment or devices.
Key Features of DB9 Connectors
Durable Construction: The metal shell provides mechanical strength and shields against electromagnetic interference (EMI).
Compact Design: Ideal for devices where space is limited.
Versatile Applications: Commonly used for RS-232 serial communication, connecting peripherals like mice, keyboards, and modems.
Customization: Can support different pin configurations and wiring for varied uses.
Common Applications of DB9 Connectors
Serial Communication: Widely used in RS-232 interfaces to connect computers, printers, and industrial equipment.
Automation and Control Systems: Frequently seen in programmable logic controllers (PLCs) and industrial machines.
Networking Equipment: Used in switches, routers, and legacy systems.
Testing and Prototyping: Found in diagnostic and development tools for electronics.
DB9 Pinout Diagram
Here’s a standard pinout for a DB9 connector used in RS-232 communication:

Advantages of DB9 Connectors
Reliable Connection: Secure locking mechanism ensures a stable link.
Broad Compatibility: Works with many legacy and modern devices.
Easy Maintenance: Simple design allows for straightforward repairs or replacements.
6 notes
·
View notes
Text
Whether you're building battery packs for electric vehicles, solar systems, or making energy storage systems for backup energy, LiFePO4 Battery Cells are best to deliver top-notch performance, safety, and durability. Explore of high quality selected LiFePO4 battery cells.
✅ Superior energy density ✅ Exceptional reliability ✅ Perfect for a wide range of applications
Explore now: LiFePO4 Batteries

1 note
·
View note
Text
You can build your own attendance system! With an ESP32, a fingerprint sensor, and a little creativity, you can create a fully functional Biometric Attendance System.
8 notes
·
View notes
Text
0 notes
Text
Features
SD Card Slot: Supports standard SD and microSD cards (with adapter) for data storage.
Real-Time Clock (RTC): Includes an integrated DS1307 RTC to timestamp data accurately.
Dedicated Headers: Pin headers for easy connection to Arduino and external modules.
Reset Button: Convenient reset function for debugging and testing.
Prototyping Area: Extra space for adding custom circuits or components.
Battery Backup: Keeps the RTC running during power loss (requires CR1220 battery, not included).
1 note
·
View note
Text
Specifications:
Voltage: 3.7 V
Capacity: 2000 mAh
Model: 523450
Battery Chemistry: Lithium Polymer
Battery Type: Rechargeable Power Battery
Dimensions: 5.2mmx34mmx50mm
2 notes
·
View notes
Text
FEATURES:
4.2V/3.6V Battery Charging Module
Can Charge Lithium Ion And Lithium Phosphate Battery
Adjustable Output Current
Recommended Input Voltage: 4.5V – 7V DC
Embedded Switching Regulator
Single Battery Charger Module
Programable Charge Curren Form 0.1A to 2A
Programable Precharge Current Form 10% to 100%
LED Indication
7 notes
·
View notes
Text
Features:
4-level LED lamp display power, not working state intelligent automatic shutdown;
The built-in lithium battery protection IC, over-current, overpressure, under-voltage protection;
Dual USB output ports.
Input requirements: 5V constant voltage power supply can do charge input power, the most matching charger for 5V 1A above
Requirements for rechargeable batteries:
Compatible Batteries: 18650 batteries, cell phone batteries, flat-panel batteries, MP3 batteries, etc. 3.7v-4.2V polymer Lithium battery.
6 notes
·
View notes