
Don't wanna be here? Send us removal request.
Statistics
We looked inside some of the posts by raimon-as and here's what we found interesting.
Average Info
Notes Per Post
0
Likes Per Post
0
Reblog Per Post
0
Reply Per Post
0
Time Between Posts
3 months
Number of Posts By Type
Text
2
Last Seen Tumblr Blogs


Fun Fact
BuzzFeed published a report claiming that Tumblr was utilized as a distribution channel for Russian agents to influence American voting habits during the 2016 presidential election in Feb 2018.
Text
CINE1102: Portfolio
Introduction:
This report analyses the research, design and development I have made and used to contribute to our Animation project. Our animation is about the impact that pollution has on our oceans and is meant to raise awareness about the damage plastic causes to ocean life.
This report features four parts; the ILP document, research, evaluation and finally, the portfolio.
The independent learning plan (ILP) contains my roles, learning outcomes, mark breakdown and milestone development.
The research section studies the secondary research, how I applied that research, reasons why I made the different design decisions and how it led to the final product.
The evaluation is a run-through of our ideas, how the animation production went, how the group worked, the problems that arose and how we solved them and finally, any improvements that I think I could’ve made in my work.
The portfolio showcases the post-processing volume and its components, fluid dynamics/water physics, caustics, cinematics and the final animation.
Roles:
Raimon Wenz – Unreal Engine Developer/Cinematics
Maninderpal Rajbansh – Pre-Production Artist/Animation Director
Benedict Kpaku – Character Artist/Animator
Eduardo Gal – Secondary Character Artist/Story Designer
Maris Zaharevics – Environment Artist/Designer
Darren Pagado – FX Artist/Lighting
Samuel Fagboyegun – Sound Designer
Callum Watt – Prop Artist
Individual Learning Plan
[Updated: 19/05/19] - I made a slight change in my mark breakdown scheme; the caustic lighting marks have been reduced to 10% and the cinematics were increased to 25%, but the rest of my ILP has stayed unchanged.
Overview
After I graduate, I mainly want to work on creating 3D models and since I started the course, it’s what I’ve always wanted/planned on doing. But after working on Unreal Engine last year in Games Design Principles, I was very interested in this software and am strongly considering working for a company (probably a studio that made games) that needed someone who knows how to use UE4, so the role that I have chosen for this project is to be the Unreal Engine Developer.
“Unreal Engine Developer” is too broad a term when talking about specific roles in the group, so I divided that into the primary roles and secondary roles; my primary roles are creating the fluid dynamics, post-processing volume and cinematics while my secondary roles are creating the caustic lighting and building the scene/combining projects into one project in UE4.
Since I am the UE developer, the main software I will be using is Unreal Engine 4 to create this underwater scene and probably won’t need to use any other software throughout this project. But I may need to create my own textures for the water plane and caustics materials instead of using the free ones provided by Epic Games on the Marketplace, so if I do that, then I will need to use either Photoshop or Substance Designer to create them.
All these roles require both a good understanding of Unreal Engine and oceans in real life, so I would need to study and do a lot of research on how all these different pieces work and fit together in order to create an accurate and realistic underwater scene, which will be done mostly through watching tutorials on YouTube or Pluralsight.
Roles and Learning Outcomes
My primary roles are to work on the fluid dynamics (creating water planes that represent ocean waves and making use of Gerstner Waves to simulate a more realistic ocean), post-processing (volume box that gives the screen a blue hue to simulate water, as well as having other nice effects such as depth of field, specular bloom, ambient occlusion, lens flares and more)and the cinematics (camera movements and positioning using either the Matinee tool or the Sequencer tool in UE4), while my secondary roles include creating the caustics (light rays reflecting or refracting from a curved surface that appear on the sand/ocean floor) and finally, being the UE4 scene builder (combining everyone’s work and putting them all into one project in Unreal and ensuring that everything fits together and that there are no bugs once everything has been merged, as well as creating any needed blueprints).
CINE1102 Learning Outcomes:
1. Relate disparate areas of practice together into a cognate form
2. Manage the production of a short animation
3. Experiment, using research, with advanced animation concepts
4. Demonstrate skills in advanced animation techniques (motion capture, physical simulations, dynamics etc),
5. Evaluate their work based on professional industry standard outputs and expectations
My in-depth research into the other fields (especially the one about Gerstner Waves) meet LO1 because it applies Mathematics and Physics into my field, which is Art and it puts all these into a cognate form because the equations that were used in those other fields could be directly translated and applied into Unreal’s blueprints to create the Gerstner Waves.
LO2 is met through one of my secondary roles, which is the UE4 scene builder; this learning outcome is met because doing this role would requires me to manage the pipeline in Unreal Engine by asking and checking my peers for their separate work and then combining all those into one project seamlessly.
I have met the third and fourth learning outcomes by researching about fluid dynamics/water simulations and looking at how they move in real life and trying to recreate those movements through an animation in Unreal. I also applied that research into my projects by creating multiple prototypes (while documenting each one through screenshots/screen recordings) and adding improvements in each version as I learn more and expand my knowledge on the subject as time goes by.
LO5 will be met once the we have put all the pieces together and made any final touches to make it up to par with industry standards but overall, I am very happy with my progress and of course the whole group’s progress so far. At this rate, we would be able to create an amazing final animation with a more realistic underwater scene and characters and will be looking forward to the final piece.
Mark Breakdown
I want to be marked on all five of my roles and will specify exactly what part of that role I would like to be marked on to avoid any confusion. They all have different weightings and purposes towards the final piece, but I want all of them to be marked based on the accuracy and realism of their look and feel in creating an underwater scene and I want them to be as natural and as close to the real thing as possible.
Fluid Dynamics/Water Physics – 30%
The main factor that I want to contribute towards my work will be the water plane that represents ocean waves, which will be by creating Gerstner Waves, which I have shown and explained in depth in my research portfolio. I want to be marked on the waves’ movements and aesthetics; I want the waves to move like real waves and I want there to be variation (speed/height) depending on the scene i.e. calm waves during a sad scene and perhaps raging waves during a tense moment in the story.
Post-Processing Volume – 25%
I want to be marked on the different elements that are contained within the PP volume, which are the depth of field, specular bloom, ambient occlusion, lens flares, vignette blur, screen distortion and most importantly, the colour of the volume that gives it the blue hue to replicate the colour of the ocean when viewed from underwater.
Cinematics – 25%
For cinematics, I want to be marked based on the fluidity of the camera movements, positioning and any camera cuts from scene to scene.
Caustic Lighting – 10%
As mentioned previously, caustics are the light rays reflecting or refracting from a curved surface that appear on the sand/ocean floor, so I want to be marked on how they look as well as how they move and whether they look and feel natural compared to the real thing.
Combined Final Scene – 10%
This final part refers to the look of the final scene and how well and seamless I have combined everyone’s work together into one project in Unreal, therefore everything should look like they were all made together and be the same scale and not separate i.e. no piece stands out in a negative way/be out of place and they should all help contribute into creating the simulation of an underwater scene.
Milestone Development
For future work, my next step is to add the initial assets created by my group members, mainly the god rays/particle effects that Darren created as well as building the environment by adding corals/rocks that Maris created. We may also consider creating a GitHub repository in a couple of weeks as by then, my other group mates would’ve made much more content, which they may want to add into the project themselves but then be adjusted by me later on to make sure everything fits together perfectly. I plan on finishing this on December.
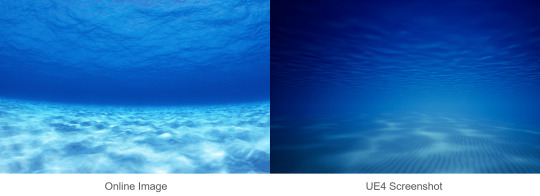
Aside from that, I will need to investigate perhaps adding a fisheye lens and whether this effect is achievable in Unreal Engine; a fisheye lens is an ultra wide-angle lens that creates this strong distortion that is intended to produce a panoramic image. I got this idea from the image above between my screenshot and the image I found online where the online image has this slight curvature whereas mine is flat and I think adding a fisheye lens would help further improve the illusion of having a camera underwater. I also plan on finishing this on December, since I expect this to be a quick addition.
I will also need to do more research on my own work to see if there are any other effects, I could add to improve my work and add more realism to create an even more convincing water simulation. The main thing I plan on doing research on is the Gerstner waves, which I discussed in depth earlier in the “Gerstner Waves” section. I plan on finishing this on January/February.
I also plan on adjusting the caustics and trying to achieve the same quality as Timothy Cole’s caustics, which I talked about earlier and will be looking around to see if there are better alternatives to what I have now. This should be finished on January too.
I will be paying close attention to the release of Unreal Engine v4.22 and for the addition of RTX support on Unreal Engine since its release is rumoured to be by the end of the year, although realistically, I wouldn’t expect it to be released until January/February next year. Once RTX support is released in 4.22, I will be installing the new version of UE4 and copy and transfer our underwater scene that we have now onto it and will be testing out the ray tracing and comparing it with our current scene in UE4 4.20 and see if there is any major difference between the two versions. If there no difference or only a small difference, then I will be keeping the current scene in version 4.20 since it won’t be worth it to spend time transferring and potentially fixing any possible bugs or incompatibility issues that may arise when using the new version of UE4 but if there is a big, noticeable difference, then I will be transferring everything onto the newer version of Unreal and fix any incompatibility issues that may come up due to them being made in an older version of Unreal. If I do go through with the transfers and the fixes for the new version, then I predict that this might take some time and may take 1-2 months to fix/finish, depending on the issues (if there are any), which will be February/March (assuming that RTX support is released in late December/early January). Although not as important as the other factors, it would still be nice to implement ray tracing into our animation for the added ‘eye candy’.
Once the animators and modellers have finished their models/animations and are ready to export as an .fbx, I will be working on implementing them into my project and putting everything together and once everything is in place, I will need to check for any errors such as missing textures or buggy animations and if I find any, I will need to try fix them and let my peers know as they may have exported it wrong or didn’t include textures, etc. Once everything is imported in Unreal and ready with no problems present, I will be ready to create the cinematics for our project and work on the camera placements/movements and ensure that we get the perfect angles for each shot of the scene and make sure that it’s appropriate for the emotions of the scene i.e. during the sad scene at the start, camera movements should be slow. I predict that these will be done by March/April, depending on the speed/workflow of the animators/modellers and any potential problems that may arise, such as the errors that I previously stated.
The deadline for this animation is on the 20th of May so I expect everything to be ready and for May, I plan on only doing the final touches to our animation, so I will be refining everything, like the values of parameters in nodes or adjusting the direction of a light slightly or fixing any last-minute problems that may come up. Once everything is finished and is of good quality and everyone is happy with how it looks, it will be time to render out the animation and export it, which shouldn’t take more than a few hours since it’s only a short animation and because Unreal renders out animations quick. After the animation has been rendered, the VFX guys (Paul, Darren, Ben) may plan on doing some final touches in Nuke for post-production and apply some minor, final changes to the animation and again, render and export it afterwards for submission.
Portfolio
Fluid Dynamics/Water Physics [30%]
Gerstner Waves
“In fluid dynamics, a trochoidal wave or Gerstner wave is an exact solution of the Euler equations for periodic surface gravity waves. It describes a progressive wave of permanent form on the surface of an incompressible fluid of infinite depth.”
Version 1

This is the basic water plane I had in the previous portfolio and it was just a Sine wave - its movements were just it going up and down as well as a panning texture.
Version 2


The water plane’s waves above moves from left to right, which means it moves more dynamically now and is starting to become a Gerstner wave.
Version 3

This is the blueprint for the Gersnter function and this material will be referenced by the Gerstner wave material throughout and it makes editing values easier as you only need to adjust the parameters (small green boxes) in the screenshot below instead of going through lots of nodes to make a small change above. The main benefit of referencing a material function (especially one that uses this many parameters) is to streamline the adjustments of values and to make this easier and quicker for me.
Sine Wave & Gerstner Wave Comparison
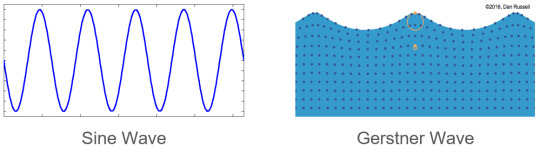
(Hailey Williams, 2017)
youtube
I created a comparison video to show the difference between a Sine wave and a Gerstner wave. The video clearly shows a big difference between the two waves and the motion of the waves from the Gerstner waves are closer to that of waves in real life, which is why I’ve been striving to achieve this effect since the beginning and didn’t want to settle with having a simple wave despite finishing the Sine wave ahead of schedule.
The Sine waves only have a simple up and down movement of the plane but the water itself looks very stiff as the plane never bends in any area, making it look very unrealistic whereas the Gerstner wave on the right has “bumps” and the plane isn’t just a flat and stiff model going up and down, but instead moves in all three axes, making it have more dynamic movements thus helping it look more believable and realistic.
The final version of the waves looks like the one on the right, except of course for the change in opacity as if I recorded the translucent plane, it wouldn’t be very visible here and will be hard to notice.
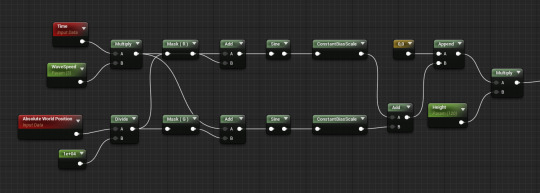
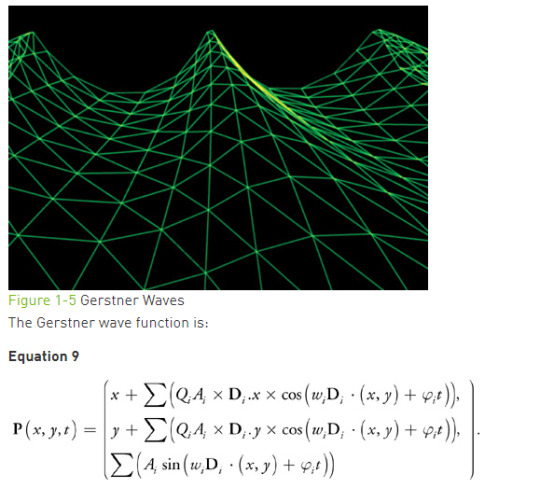
Mathematical Equation Breakdown
Since the Gerstner wave is the component that I spent most of my time on during this project, I will be going to extra detail about it, especially since there is a lot of Math and Blueprints involved and will be going through each section/node of the equation/Blueprints one by one.

(Finch and Worlds, 2007)


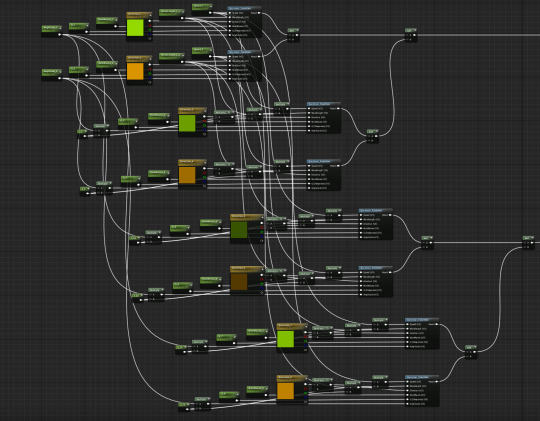
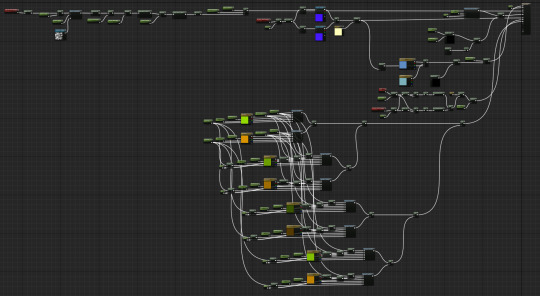
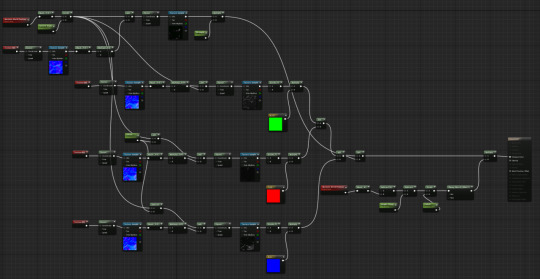
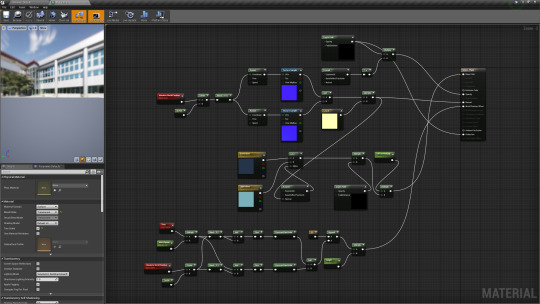
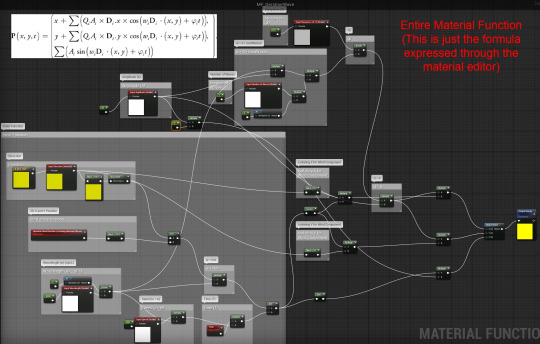
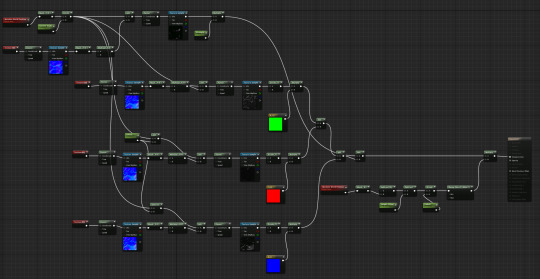
This is the complete equation shown in Blueprint form that shows the full blueprints in the Gerstner Wave Function (separate from the actual Material) which is referenced by the main Gerstner Wave material (later moved/combined to the Water Plane material). The nodes in the blueprint have been labelled according to their mathematical counterpart using the Comment node.
Key Terms
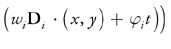
Dᵢ (Direction) – The Direction determines which way the waves are moving and is controlled by the values in the RGB (Red, Green, Blue) masks.
Wᵢ (Wavelength) – The Wavelength determines how big the gap between each wave is and how far apart each waves appear.
ഴᵢt (Speed) – The Speed determines how fast the waves move.
Qᵢ (Steepness) – The Steepness determines how steep the crests of the wave will be.
Aᵢ (Amplitude) – The Amplitude determines how high or low the waves will be.
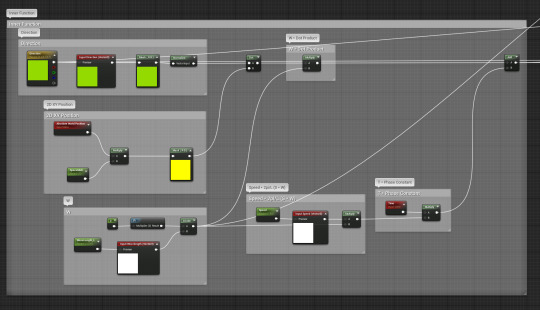
This section is the inner function and is used to multiply to the rest of the equation in the X and Y axis. It contains the direction (which way the wave flows), the wavelength (size of the gap between each wave), speed (speed of the waves) and time (how often waves are made).

The steepness and amplitude control the steepness of the crests of the waves and the height of the waves respectively. and are combined together using the multiply node, to represent the X in the equation snippet above.


The X and Y were simply just mask nodes (R [red] for X and G [green] for Y) and both left sides are connected to the Direction node from the Inner Function above and the right nodes are multiplied together to make a float to be then connected to the final output.
Blueprint Breakdown
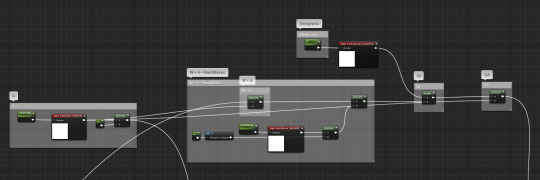
World Displacement (Gerstner Waves)
The World Displacement node is responsible for simulating Gerstner Waves; it uses multiple Gerstner Function and while they all look similar (except for the colours) from afar, if examined up close, each one actually has slight variations in the value of e.g. the number of waves or direction. This was duplicated and edited repeatedly four times (two functions for each wave group) because it gives the waves slight differences between each cycle.
Real waves rarely behave the exact same way each time (slight variations between them such as different heights, speed, etc), so by creating multiple functions, I am recreating this “chaos” and giving the waves alterations.
World Position Offset
The World Position Offset node is what makes the plane go up and down - but not to be confused with the wave up and down movement as this is just a basic movement that makes the whole plane change in Z axis whereas the Gerstner waves affect all three axis.
Its equivalent in real life would be the shoreline of e.g. a beach; water pulls and pushes towards the sand in a beach and the World Position Offset imitates this, just without the shore.
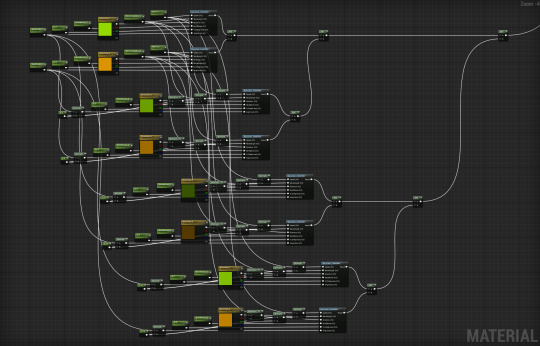
Normal

The Normal node gives the water plane the actual wave pattern that you see in the scene - without it, the water plane would simply be a basic shade of whatever colour is set in the Base Colour node.. The pattern it displays would depend on what texture in set in the texture sample (purple boxes) and I added a panner node to these so that they wouldn’t just be stagnant as waves are constantly moving and having a pattern that doesn’t move in any way would look very unrealistic.
Base Colour

This section gives the water plane its blue colour which is blended together in the Lerp node. Two hues of blue are used here, one being darker/lighter than the other and this was done to give variation between the wave colour and the lighter colour serves as a ‘highlight’ and provides colour to the darker hue. That same lighter colour is the one that appears at the “tip” of each wave peak, which is seen in some of the screenshots/videos present in this document.
If you’ll notice, it has the same nodes in the left half of the screenshot as the nodes used in the Normal node. This is because they share the nodes from the Normal node; aside from being connected directly to the Normal slot in the parent node, it is also connected to the Normal slot in the Fresnel node of the Base Colour - its purpose is to provide the Lerp with an Alpha node.
Opacity

The Opacity node changes the transparency of the water plane and helps it blend more with the scene. Water in real life is transparent (varying transparencies depending on type, location, content, etc), so I made sure that I didn’t forget to make mine transparent too. This is a very important part of the water plane because if I left this left and set the water plane to opaque, the directional light from the sun would not be able to pass through and therefore cast a big shadow below the plane, therefore making the whole scene unlit.
I came back to this and added the RadialGradientExponential node towards the end of the project because I noticed that the wave horizon looked very flat once inside the scene and since planes are unaffected by the Depth of Field, the plane edges looked strong and had to be toned down a bit. This was my solution to that problem and aside from giving it a very slight blur, it also doubles by turning the rectangular plane into a circular one - this gave the plane horizon a slight curve when viewed from inside the scene.
Roughness

The Roughness node and its elements adds a subtle effect that makes the texture, which makes it move softly along the water plane and give it some variation and also blends patches of waveform together with the Lerp node at the end. Essentially, the Roughness node makes the water very slightly murkier.
Post-Processing [25%]
Depth of Field
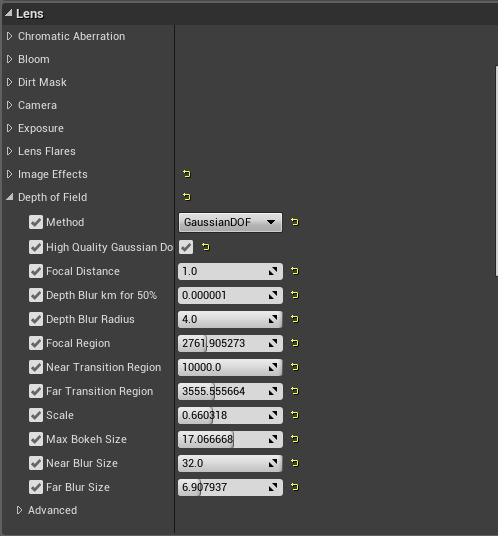
Instead of binding the depth of field to the post process volume, I moved it to the cameras instead as they had the same option and seemed to work better after a few test runs.

This was one of the screenshots from the testing phase and although present, the depth of field strength was a bit weak and barely blurred the furthest coral on the right.
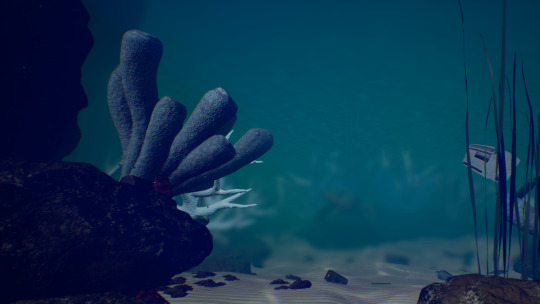
After playing around with different values, I was able to achieve the nice depth of field effect seen above, which the team was really wanted to have in place since we started the project as it helped build the atmosphere.
You may notice that the newspaper on the right is too clear despite being fairly far away - this is because the depth of field doesn’t seem to affect planes whatsoever (occurred in both the camera and post process depth of field), so there wasn’t really anything I could do about it except lower the opacity of the water plane so that it isn’t as strong, but obviously could not repeat this same step for the newspaper as the newspaper is opaque whereas the waves/water plane is translucent/see-through.
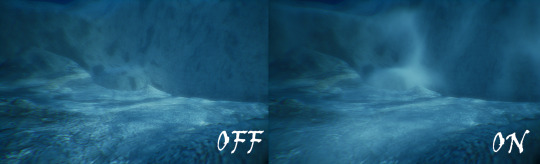
Underwater Colour/Hue

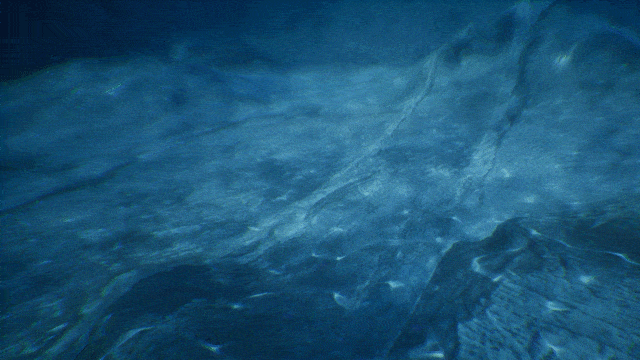
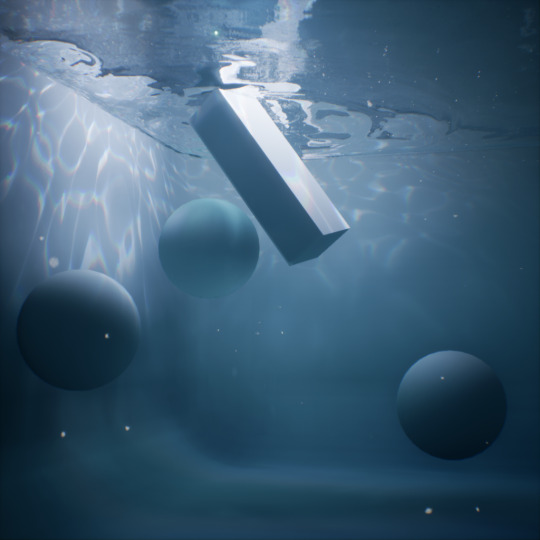
This was the underwater scene that I had showcased and presented in class (which was also posted in the previous portfolio) and I really liked the scene so far and so did the group, but we thought that the scene was too blue - since the story was about pollution, the screenshot above shows a hue of blue that you would normally see in a healthy ocean environment, so the plan was to make the ocean murkier and reduce the saturation to make the blue greyer and thus seem more fitting to a dirtier environment.
Another problem with this colour was that the hue was too strong, especially on the sand. Everything in the scene look blue and the sand should not be blue, but yellow/white-ish. The texture of the sand was of normal sand colour, so the issue was the post process volume colour, which had to be changed to make the sand pop out more and have its natural colour.
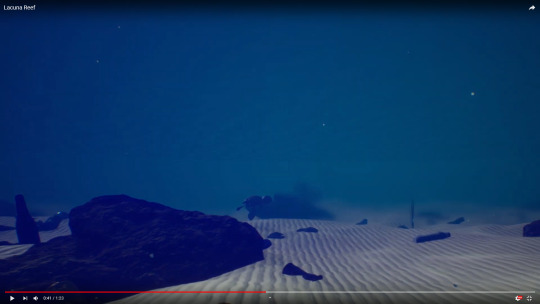
youtube
After some adjustments, I was able to import some assets from Maris and Darren to create a test scene as well as add depth of field and as seen above, the water hue is less powerful and the sand is now its normal colour instead of being blue and the water is also murkier and dirtier now, as an effect of the pollution and was made by adding atmospheric fog and exponential height fog into the scene.

It may not be noticeable, but in this scene, the water is much murkier and looks more green. This was a design choice for me as at the start of the animation, the characters are in an open, deeper space, so in real life, the ocean would be much bluer there but as the animation progresses and more pollution is seen on screen, the colour becomes less blue and headed towards green, which is an effect of the pollution (more pollution = dirtier water) and at the final scene (screenshot above), the water is dirtiest as this is the area where the largest concentration of pollution is present in the animation, so I wanted the water colour to reflect that.
Cinematics [25%]

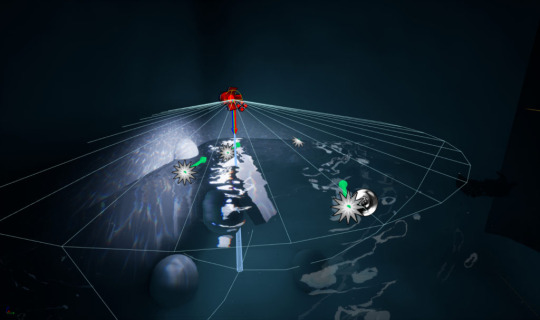
The cinematics involve all the camera movements, transitions, blurs and any other camera effects used which were made using the Matinee tool in Unreal.
The screenshot above shows all the different component in a single Matinee Actor in the scene - each bound to different assets and each having different purposes. For example; the very top of the Matinee shows the Director Group and what that does is control which camera in the scene the Matinee follows, so this tab is responsible for the camera jumps and the specific time it jumps and specific camera it jumps to were all set by me and they were used mainly as a transition tool to go from one scene in the story to the next.
Most of the Matinee tool was pretty straight forward. The movement tracks (e.g. camera moves from point A to point B) were easy to do as they simply required me to pick a time frame in the Matinee, add a keyframe and then set values on the XYZ axis or manually move the object in the scene to determine the next location of the component.

The hard part was working with the imported Alembic animations that the 3D artists made as they all have set times on when the animation plays and how long it plays for. Some animations didn’t loop seamlessly too (issues with the import to UE4), so I had to find a clever way to work around these issues. A good example of this being accomplished is in the two screenshots above where the turtle is swimming just above the ocean floor; the issue I had here was that for this specific animation, the loop wasn’t seamless and looked “jumpy”, towards the end/start, so my fix was to have two separate models playing the animation once which will have a clean motion instead of one model with a looped animation with a clunky loop. I swapped the two models by routing the turtle behind the large rock in the middle of the screen and once the turtle from the first screenshot gets behind it, its animation stops and its visibility also goes down to 0, preventing it from being seen sitting idly as the camera pans to the right. The second turtle model (same animation) then appears (visibility goes from 0 to 1) and swims normally to the next destination, which I tried to match the speed and trajectory of the first turtle by to make the swap unnoticeable.
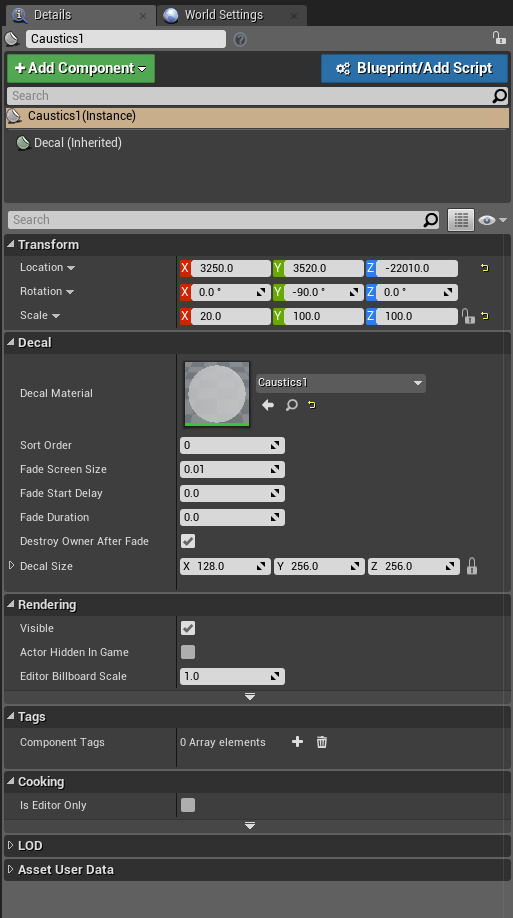
Caustics [10%]
To create my caustics, I watched a few different tutorials; each one using different techniques. I have four iterations of caustics and each one has improvements and looks better as it progresses.
The first and second versions were created last December and was included in my research portfolio but will be adding them here (along with the blueprints and accompanying comments/text) as well to show my progression from those versions to my latest one.
Version 1

“As you can see, it doesn’t look natural due to its jumpy movements, which isn’t what I wanted at all since I was imagining something that was more flowy, so I looked around for more tutorials and continued watching more tutorials of Matt Taylor as I already watched his first tutorial of a 3-part tutorial for creating an underwater scene (link: https://www.youtube.com/watch?v=W8u7GONZzoY).”
Version 2
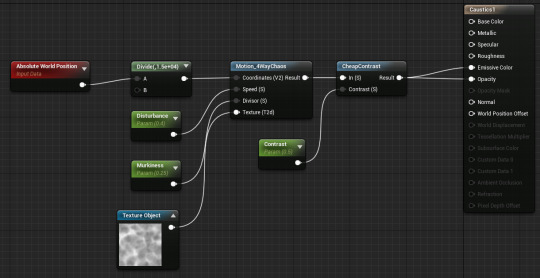
“This tutorial had a much simpler code, yet it was more effective than the previous one and it is a lot smoother and more natural, which I am happy with. I have been tweaking with the values of the caustics too just like I do with every other tutorial-based material I have created to suit my scene better and the main value that I’ve been changing is the contrast and disturbance since these two parameter nodes control how “bright” the caustics are and in the image above, I think it looks a bit too “faded” and slightly unnoticeable but I concluded that it may have been due to the texture of the landscape that was causing that look and I was right because the caustics look a lot better in the improved version, which you can see later in the “Version II” section, especially in the screenshot that’s zoomed in on the sand.”
Version 3
I made a few improvements on the second version as the caustics there were too wide and felt like it could use a lot more improvement, so I tweaked some of the values of the parameters in the blueprint above to achieve the caustics present in the screenshot above.
Version 4
The caustics still felt like they were too thick to me despite the changes made, so I decided that instead of just playing around with the values and achieving a similar result, I would try a different approach and start fresh.

(Timothy Cole, 2017)
“While doing more research and looking for inspirations and tutorials for better caustics, I came across this beautiful setup made by Timothy Cole; he created this in UE4 using materials just like I did, but his looks much better and although he doesn’t provide a step-by-step tutorial on how he created this, I will strive to replicate caustics of this quality.”

“I cheated and broke this light up into 3 lights, slightly offset from each other. Each one has the same material function, but are coloured red green and blue.”
(Timothy Cole, 2017)
“His article included a video showing the caustics in motion and the movements were pretty similar to mine, but what makes his the better than mine is that his includes the minor details such as the small rainbow coloured effects that are next to the white light and I would like to mimic that same spectrum breakup and his article says how he did this, so I will be doing that same method.”
I looked back to this example from my previous research portfolio and really wanted to achieve something similar, so I used the same method he did and used a spotlight (the previous version of caustics used a decal actor instead and worked similarly to a volume box).

These are the new blueprints that I have used for the fourth and final version of the caustics.

I successfully recreated the caustics that Cole showcased and also added the RGB colour into the mix to simulate the light spectrum/prism of the sunrays piercing the water, which greatly improved its appearance and again, helped with the realism of the scene.
Like Cole, I also duplicated the spotlights (three in each group) and changed the colour of each to blue/green/red (one per group) and moved them very slightly so that the effect is clearly shown on screen.
Animation
youtube
Evaluation
Ideas
The idea we have agreed on revolves around pollution in the ocean caused by plastic; we wanted to create something that had meaning is a serious topic because our goal in this project is to not only create a beautiful animation, but also to raise awareness on what plastic is doing to our oceans.
Production
Production during this project went quite smoothly most of the time. We did have some bumps during the early/middle stages of the project due to a conflict between members on which story fits better, how it should look, etc - mostly about the design choices but once everything has been settled, our workflow improved.
Group Work
I worked closely with most of my group members while working on this project - mainly Paul for the storyboard/animation timing, Maris for the environment building and Darren for the lighting/FX blueprints/settings, but especially Darren because aside from me, he will also be working purely inside Unreal Engine, unlike the others who will be using external packages such as Blender, Maya, Photoshop, etc.
In all my group projects that I have participated in, this was probably the one where I needed to communicate the most with other group members since I am the person who is in charge of putting everything together in Unreal, because it is important for me to know how each of their components will look so that I will be able to determine whether they fit into my scene and if they don’t then I can adjust the settings values/scale/placement/etc to make them more suitable and more compatible/seamless with the rest of the UE4 project.
Someone suggested to use Github to improve our workflow and make uploading/downloading the files easier and quicker (compared to something like Basecamp) due to the large file sizes involved in Unreal Projects (final size at the end of the project was ~3.75 GB). I believe Ed set up the Github repository and during our group meeting via phone call on Discord, I suggested that we use Sourcetree to manage their gits because I have used it in another project this year and has worked really well for me. Some members tried it but most had issues getting it running, which I tried to help them with and even recorded a “How To” video and sent it to them showing a run-through of the basics but at the end, we decided not to continue using Github because some members wanted to try another method as they weren’t too keen on anything git related as they have never used it before.
We moved on to using Google Drive, which we were all familiar with (so no issues there about how it works) and managed our Unreal files there while using Basecamp for smaller files like individual .fbx files or images. Switching to Google Drive also allowed us to access the files in university straight away whereas Sourcetree wasn’t available in Room 2001 and required an admin login to be able to install it. This resulted in the group coming into uni regularly and working together as a group, discussing game ideas, issues, suggestions, etc. It improved our productivity and made us output more work compared to each of us using our own individual computers at home.
Problems and Solutions
We only encountered a few problems throughout the project, which I have discussed in the ‘Production’ section above above the idea conflicts but only had minor problems thereafter. This was the case until (mostly) everyone was ready to import their work into my project in Unreal; we encountered a lot of problems in this stage near the end of the project - them mainly being the lighting build and errors in the baked animations (alembic files).
Lighting: Problems
I am not too clear on this problem as the members who were working on it didn’t know what happened or how to fix it but towards the middle-end of our project, we had some lighting issues where if you build the lighting in Unreal, some shadows showed up as black squares on certain angles but normal on other angles too.This shouldn’t be present in our end product as that would stand out very quickly and take away the attention of the audience from watching and enjoying our animation and instead focus on the anomalies occurring.
This problem confused me because last year when I built the project from scratch and showcased it in my previous post, I had no issues whatsoever with the lighting and was able to build the lights quickly without it causing any issues. This has also never happened to me before when I was using Unreal so my best guess is what happened is that a member accidentally changed a setting or parameter somewhere in one of the main lights in the scene or even the project settings and caused the build to not work as its supposed to.
Lighting: Solutions
As I was unsure of what caused the problem, I also was unsure of how to fix it. I consulted Darren on this as he was in charge of lighting but he was also unsure on how to fix it. We tried deleting all the lights and adding them one by one again but the issue persisted so we concluded that it must’ve been related to the project settings.
Normally, if this were the case where my project had an “unfixable” problem, I would’ve just restarted the Unreal project by creating an empty new one and migrating everything from the buggy project to the newly made one and making the necessary adjustments when importing assets e.g. reselecting/readding textures to the texture samples in the Material Blueprint. I created a fresh new project last December in fact but however, I couldn’t do this again this time as it was far too late and deep into the project to do that.
Our “solution” to this problem was to just leave the lights unbuilt as we agreed that the scene still looked nice and didn’t really notice much of a difference. The quality of the lights were still high and Darren was still happy on how his lights and fog looked despite this, so we left it unbuilt.
Baked Animations: Problems
Members who have exported baked animations in the Alembic file format have had issues when importing them into Unreal Engine; some animations/meshes were broken (e.g. missing turtle body parts) while some animations weren’t playing correctly. Ben was the main artist who had problems importing his assets because not only does it take a long time to import .abc files (~30 minutes-1 hour depending on the object), he encountered multiple problems with how his turtle looked and moved; in some of his uploads, the eye balls were misplaced and were now under his mouth, in another import, his turtle was missing its mouth.
Baked Animations: Solutions
Our solution was to first import the .abc file into a fresh, blank Unreal project and then once imported, copy the .uasset file from the folder and then drag it into the designated folder in the main project. This solved the time/waiting issue as while I was waiting for the Alembic file to import, I couldn’t work on the file at the same time as it might mess up the save file on the drive due to conflicts.
Ben later figured out how to import his meshes correctly and get their animations to play properly by doing a trial and error of importing his assets into a blank Unreal project and seeing what works and what doesn’t.
Improvements
The main improvement that I want to make in this project is the water plane; although the Gerstner waves already look good at the moment, I still think that it could be improved greatly based on the other examples I have seen e.g. https://www.youtube.com/watch?v=OQ3D0Q5BlOs | https://www.youtube.com/watch?v=2xtcQgeyRcU. In the future, if I were to work on something similar to this again, I will be aiming to have more realistic features added to the waves such as seafoam like in the examples above.
Reference
Cole, T. (2017). Working with Underwater Caustics in Real-Time. [online] 80.lv. Available at: https://80.lv/articles/working-with-underwater-caustics-in-real-time/ [Accessed 16 Nov. 2018].
DokipenTech (2016). Unreal Engine 4 Gerstner Waves Livestream. [video] Available at: https://www.youtube.com/watch?v=_y7Z0MbGOMw [Accessed 16 Nov. 2018].
Finch, M. and Worlds, C. (2007). Effective Water Simulation from Physical Models. [online] NVIDIA Developer. Available at: https://developer.nvidia.com/gpugems/GPUGems/gpugems_ch01.html [Accessed 16 Nov. 2018].
Williams, H. (2017). Tutorial: Ocean Shader with Gerstner Waves. [online] 80 Level. Available at: https://80.lv/articles/tutorial-ocean-shader-with-gerstner-waves/ [Accessed 16 Nov. 2018].
0 notes
Text
CINE1102: Research Portfolio

Introduction
This portfolio analyses all of the research I have made, which are accompanied by annotations on why I made those design choices and what was working well and what wasn’t, as well as any changes that I have made to my project based on what feedback and what I thought wasn’t working well. Along with the research, this portfolio also contains large amounts of experimentations in Unreal Engine, which I will be showing multiple examples through images or videos.
In this assignment, we were asked to form groups and come up with an idea and create and animation based on that idea. The idea we have agreed on revolves around pollution in the ocean caused by plastic; we wanted to create something that had meaning is a serious topic because our goal in this project is to not only create a beautiful animation, but also to raise awareness on what plastic is doing to our oceans.
We are also required to create a research portfolio on an idea for an animated product that focuses on any recognised specialist area of the animation process. The role I have chosen to focus on is being the Unreal Engine developer because I had a lot of fun in working on Unreal Engine last year in Games Design Principles and would love to continue working on it this year for this project.
Since our idea is based around oceans, I would need to do a lot of research to be able to create a realistic and accurate water simulations because although I am already comfortable using UE4, I have never created an underwater scene before so I immediately looked at tutorials about creating underwater scenes in Unreal as well as looking at oceans in general for reference so that I could carefully study the ocean, its movements and everything it entails. I bookmarked any related video that I could potentially use in the future and watch them when working on the next element.
Roles:
Maninderpal Rajbansh – Pre-Production Artist/Animation Director
Benedict Kpaku – Character Artist/Designer
Eduardo Gal – Secondary Character Artist/Story Designer
Maris Zaharevics – Environment Artist/Designer
Raimon Wenz – Unreal Engine Developer
Darren Pagado – FX Artist/Lighting
Samuel Fagboyegun – Sound Designer
Callum Watt – Sound Designer/Supporting Environment Artist
Mood Board
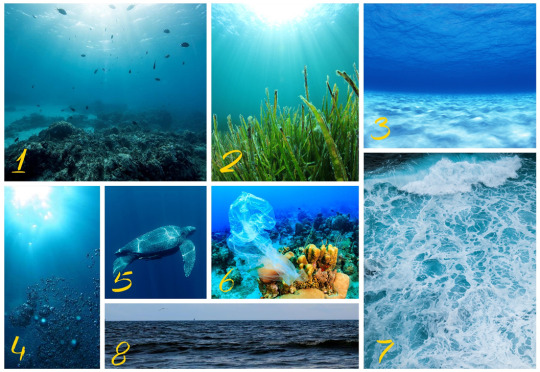
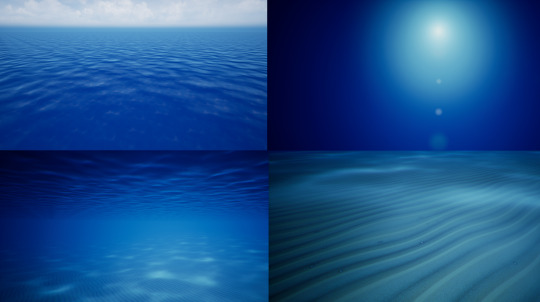
I searched online for various images and possible reference points for my initial draft of the underwater scenery and put them together to create a mood board. I chose different types of images related to the ocean and most of these helped me during the early stages of the project.
1: Polluted Ocean
I added this image of a dying/dead coral reef here because that’s what the environment of our animation is going to be due to the pollution caused by plastic. I was mainly interested in the colour scheme of this image; it had that ‘gloomy’ feel to it so I wanted to capture that in my scene by having that same colour palette of bluish-grey hues to amplify the effect that pollution has on the ocean which would not be achieved by having a colourful coral reef or a colourful environment in general.
2 & 4: God Rays
Although the god rays are more on Darren’s side of work, I still added these to my mood board. Since I am the person who is in charge of putting everything together in Unreal, I will also need to look around the different areas of Unreal that Darren is doing (which are mainly particle effects and lighting) because it is important for me to know how they will look so that I will be able to determine whether they fit into my scene and if they don’t then I can adjust the values to make them more suitable and more compatible with the rest of the UE4 project. #4 also includes bubbles, which Darren is also creating so I wanted to see how bubbles look underwater when being shined on by light from the sun.
3 & 5: Caustics
I am also creating the caustics which is why I needed to look at reference images and place them into my mood board to see how they look when being reflected onto the ocean floor, mainly sand. I also included an image of caustics being applied to a moving subject, which in this case is a sea turtle, which is perfect since the main character in our animation is also a sea turtle.
6: Plastic Bag in a Coral Reef
At first glance, it appears that the blob-shaped object on the left is just a jellyfish but after closer inspection, it is a plastic bag that is floating in the ocean and it merely resembles a jellyfish. I thought that this was interesting due to the glance value it has; while brainstorming, an idea was brought up where we could have a scene where we have a silhouette of a coral reef or a marine creature in the distance but once approached, would turn out to be plastics that are clustered together to form the shape of a marine creature or a coral reef and this image is a perfect example for that idea.
7 & 8: Ocean Waves
Waves are an important factor of any ocean scene so I made sure that I would be doing research on waves and looking for references for different types of waves and deciding which kind of wave would work for our scene; perhaps maybe use stronger waves during the climax of the story? And also perhaps use calm waves on scenes where our main character is simply just exploring the ocean. I will need to take these different scenarios in mind when choosing what height/colour/intensity of waves to use in different scenes of our animation.
Post-Processing
The post process volume arguably has the biggest impact on making a realistic underwater scene because it’s what gives the screen a blue hue to simulate water as well as having other nice effects such as depth of field, specular bloom, ambient occlusion, lens flares and more, which is why I will most likely be focusing on this factor the most in this project so that I could get the perfect balance and correct values in order to create a convincing underwater scene.
To start things off, I sculpted a placeholder landscape and moulded it to make it look like the land around a lake - although our idea was set in the ocean, this was just a first draft so I wanted to create something small just to see how things would look together and how doable this idea actually is in Unreal. I also added a Rock Basalt material that is found in the Starter Content provided by Epic to the landscape so that it wasn’t just a monotonous colour.
The next step in creating my underwater scene was to add the “water”; In order to create a convincing illusion of being underwater, I added a post-process volume into the scene and played around with the colour values for a couple of minutes to get that right shade of blue I wanted.
https://www.youtube.com/watch?v=n5UKw_Crlr4
(Matt Taylor, 2016)
https://www.youtube.com/watch?v=Gr5BDGahdEA
(Gamedev1909, 2015)
I mainly watched these two tutorials to help me create my water volume and I combined some parts from one video to the other to achieve the effect I wanted and also to see which values they used for the different variables and played around with those values to see if they would have an improvement. Matt Taylor also had other videos on his channel which have other factors that would further make the scene look more realistic which I also used for some of the sections that I will be talking about below.
Depth of Field
“Depth of field is the effect in which objects within some range of distances in a scene appear in focus, and objects nearer or farther than this range appear out of focus.”
(Joe Demers, 2007)
I added depth of field because during the animation, there will be some parts where the viewer’s attention should be targeted towards the sea turtle, so adding depth of field would be a good way to blur out the coral reef in the background and focus more on the turtle to give the scene a better sense of depth, but want to achieve a good balance in the blur strength as I prefer effects to be subtle since I will be combining multiple effects at once and I don’t want to overload the viewers with on-screen effects.
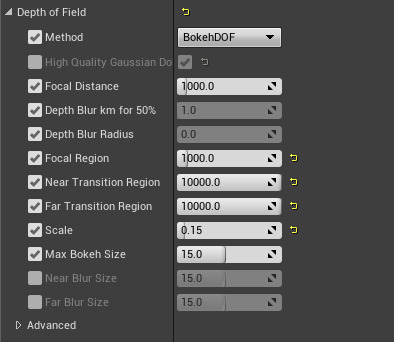
One of the main things that I noticed from those two tutorials above was that their depth of field values were too high and was causing everything to look very blurry, which is not the result I wanted so I reset the depth of field values and set my own values in the parameters and also tried out the other depth of field methods since they were using the GaussianDOF (which was too strong for my liking) and I wanted to see if the difference between each method. I liked the BokehDOF the most since the blur wasn’t too strong and it was only a subtle effect, which I really liked. These values will change over the coming months as I continue to play around with the values since I tend to always change the values of parameters every now and then to try and get a better effect, so the values I have above aren’t permanent.
Screen Distortion
youtube
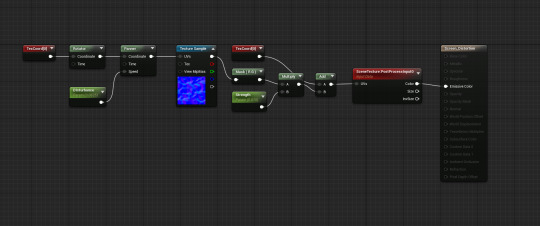
I also added a subtle screen distortion to the post processing volume which gives the screen this slight wobble effect to further help simulate the feeling of being underwater. The values can easily be changed in the blueprints which I will be changing on and off during some parts of the final animation to prevent odd looking scenes e.g. when the camera is focused on the turtle.
The screen distortion effect is only a material and it was applied to the screen by adding it as an array element to the post processing material, which means that it covers the whole screen as long as the camera is within the post process volume.
Although it isn’t really an important feature to add in the underwater scene, I really liked the effect and like the subtle impact it had but I might turn off this effect during some scenes in the cinematic, especially when the camera is focused on the sea turtle character we have since we don’t want to distort it’s shape and it might be a bit too distracting once the turtle is moving around the environment and will most likely only be kept once the turtle is off screen and the camera is just moving around the ocean. I will have to wait for Ben to finish creating an animated turtle before I can test the impact that the screen distortion material will have on the turtle, but am in no rush to do so as it is only a small, subtle effect, so I want to prioritise other more important areas first and test the bigger factors in the scene, such as the waves.
Comparison
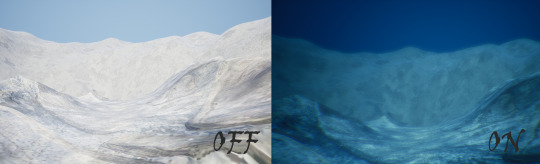
The post processing volume’s impact on the scene is clearly shown in the image above because with it turned off, there is no connection between that image and an ocean and it looks like a completely different environment but with it on, it looks a lot more like it is set underwater, although there are still a couple of things missing like the caustics and the waves but it is a good start so far.
Fluid Dynamics/Water Physics
Waves are one of the first things you see when you are in an open body of water so in order to create a convincing underwater scene, I wanted the water plane to be one of my priorities in this project. To do this, I will need to do more in depth research about fluid dynamics and water physics to create something that’s accurate and visually appealing.
(Mia Shargill, 2018)
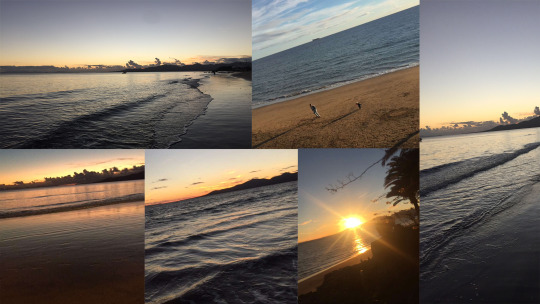
A friend of mine recently went to a beach in Lanzarote, Spain so I asked her to take some pictures of the beach and mainly the waves because it would be another good reference point for me when creating water planes.
https://www.youtube.com/watch?v=KPmRV1Z9ikY
https://www.youtube.com/watch?v=GRnKO1z4WZs
(Pub Games, 2014)
To create my initial water plane, I followed Pub Games’ two-part tutorial carefully, but just like I did in the previous tutorials for the water volume, I also played around with the values of the parameters in the nodes of the blueprint to see if I could create something that is more to my liking.
youtube
The recording above shows the water plane from my first draft. It has a spanner node in the blueprints that makes the material move from right to left. This helps it give an effect of moving water and it also has this “rise and fall” movement which can be clearly seen when up close but hard to notice when zoomed out, which improves water simulation.
The texture I am currently using is the “T_Water_N” texture from the “Water Planes” pack that is provided by Epic on the Learning Tab in the lancher and is temporary because there is something about the water plane’s texture and movement that feels a bit “off” to me, but can’t quite pinpoint which is the exact problem so it will be replaced by a different texture in the future.
Gerstner Waves
The water plane I have right now isn’t as good as I want it to be, so I looked online for more water planes to see if I could make something more convincing and realistic. I found a tutorial on YouTube and an article on Nvidia’s forum (GPU Gems) about Gerstner waves and they look much better effect than my current one, which is why I did a bit of research on this topic.
“In fluid dynamics, a trochoidal wave or Gerstner wave is an exact solution of the Euler equations for periodic surface gravity waves. It describes a progressive wave of permanent form on the surface of an incompressible fluid of infinite depth.”
(Wikipedia, 2018)

(Hailey Williams, 2017)
The image on the left shows a sine wave while the image on the right shows a Gerstner wave. A sine wave is a mathematical curve that describes a smooth periodic movement while a Gerstner wave is basically a modified sine wave, just with sharper peaks and flatter valleys and Gerstner waves are used in a lot of CG water and fluid simulations and was theorised by German-Bohemian physicist and engineer, František Josef Gerstner.
(Finch and Worlds, 2007)
There are large amounts of studies and research about Gerstner waves, fluid dynamics and water simulation that revolve around mathematics and physics and I will need to carefully study some of them, although the Math and equations that they use are very hard to understand since my background isn’t in Math, but the diagrams that they include with these equation help me understand them a bit more and I am looking for ways on how to implement these equations into an actual object.
(Hailey Williams, 2017)
After looking at a number of articles and forums, I found this blueprint screenshot on how to apply the Math from the Gerstner wave equation into my project in Unreal. Williams goes step by step through the nodes and talks about how she translated the equation and created a material so I will be looking into her project closely in the future when I change my water plane into one with Gerstner waves.

(Jerry Tessendorf, 2001)
I came accross this incredibly thorough and detailed research by Jerry Tessendorf about simulating ocean water and there in one of the pages, he talks about Gerstner waves and a similar equation is seen her and just like Williams, Tessendorf also explains the equation and splits them into parts to make it easier to understand and to tell us what each parameter means. His report also contains chapters about water volumes, caustics, god rays and Fresnel reflections (which I used in one of the nodes of my water plane material), so I will probably mention him and his research again in the next sections.
https://www.youtube.com/watch?v=OQ3D0Q5BlOs
(Ryan Brucks, 2017)
While looking more into Gerstner waves, I found this beautiful shader that Ryan Brucks created and it has a very realistic scene the way the water splashes around, the way the waves impacts the rocks and how the water moves in general. I want to achieve this level of realism in my own water plane and I hope to amaze anyone who sees my water simulation the same way I, and lots of people in the comment section on his video were amazed by his work.
https://www.youtube.com/watch?v=_y7Z0MbGOMw
(DokipenTech, 2016)
Aside from reading up on the research available online through articles, forums, documentation and more, I also want to actually create something and not just look into the theoretical side of things. To help with this, I plan on watching and recreating the Gerstner waves that YouTube user, DokipenTech has created in Unreal and like the tutorials in the post processing section, I plan on also playing around with the values of the nodes that this material will have and see if I can make any improvements and adjust everything to my liking.
Caustics
(Guardado and Sánchez-Crespo, 2007)
(Jerry Tessendorf, 2001)
Caustics result from light rays reflecting or refracting from a curved surface. They are these subtle white reflections and refractions of light which dance around the seafloor.
https://www.youtube.com/watch?v=e9KivVEy5Ck
(Dean Ashford, 2017)
To create the first version of my caustics, I followed the video tutorial above and the .gif below was my first attempt at creating caustics.
As you can see, it doesn’t look natural due to its jumpy movements, which isn’t what I wanted at all since I was imagining something that was more flowy, so I looked around for more tutorials and continued watching more tutorials of Matt Taylor as I already watched his first tutorial of a 3-part tutorial for creating an underwater scene (link: https://www.youtube.com/watch?v=W8u7GONZzoY).


This tutorial had a much simpler code, yet it was more effective than the previous one and it is a lot smoother and more natural, which I am happy with. I have been tweaking with the values of the caustics too just like I do with every other tutorial-based material I have created to suit my scene better and the main value that I’ve been changing is the contrast and disturbance since these two parameter nodes control how “bright” the caustics are and in the image above, I think it looks a bit too “faded” and slightly unnoticeable but I concluded that it may have been due to the texture of the landscape that was causing that look and I was right because the caustics look a lot better in the improved version, which you can see later in the “Version II” section, especially in the screenshot that’s zoomed in on the sand.
To apply the caustics, I created a deferred decal/decal actor into the scene and placed it onto the scene and it’s boundaries and what is affects can be adjusted by scaling and moving the box (similar to the volume boxes). But unlike the volume boxes, the deffered decal box doesn’t require you or the camera to be inside it’s bounds to be able to see the effects, so I can adjust its scale when the caustics are not needed in the scene - for example, the camera focuses on the turtle but we don’t want any caustics on it, so I can just lower the caustics so that it only affects the ocean floor and not the turtle.
And here you can see a slight difference between the two images if you have caustics on/off, although its only a small one here, but the caustics are much more noticeable in the newest version of the project.
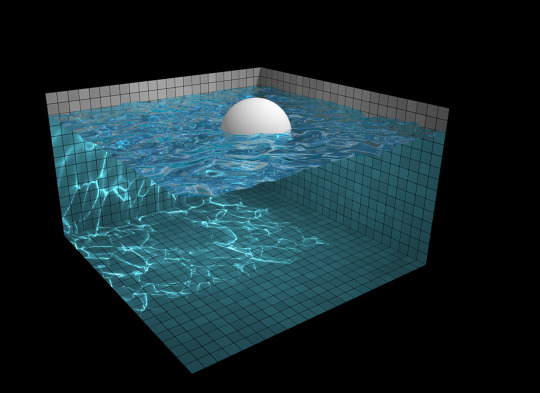
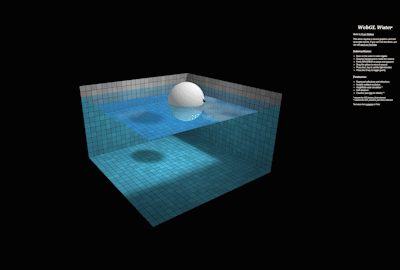
(Evan Wallace, 2011)
Above is a screenshot and a .gif from an interactive water simulation created by Evan Wallace (which can be found here: http://madebyevan.com/webgl-water/), which showcases real time fluid dynamics and caustics that adapt to the movements of the sphere that is on the water’s surface and I found this interesting because of the water plane it uses and the caustic lighting.
(Timothy Cole, 2017)
While doing more research and looking for inspirations and tutorials for better caustics, I came across this beautiful setup made by Timothy Cole; he created this in UE4 using materials just like I did, but his looks much better and although he doesn’t provide a step-by-step tutorial on how he created this, I will strive to replicate caustics of this quality.
“I cheated and broke this light up into 3 lights, slightly offset from each other. Each one has the same material function, but are coloured red green and blue.”
(Timothy Cole, 2017)
His article included a video showing the caustics in motion and the movements were pretty similar to mine, but what makes his the better than mine is that his includes the minor details such as the small rainbow coloured effects that are next to the white light and I would like to mimic that same spectrum breakup and his article says how he did this, so I will be doing that same method.
Cinematics
youtube
I created lots of cinematics in Unreal last year by using the Matinee tool but since I haven’t created any in a few months, I wanted to practice by creating a short cinematic where we explore the underwater scene using two different cameras and camera angles with a quick cut in between them as a transition. I also included one of the sound effects that Sam uploaded on Basecamp.
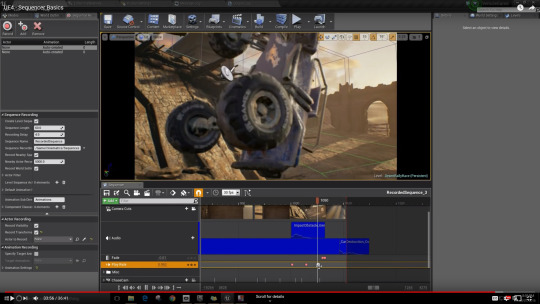
I am very comfortable using Matinee to create cinematics since I used it a lot for Games Design Principles and Interactive Storytelling last year and have gotten good results by using it, however, the Matinee tool is old and has been a legacy tool for a while now, so I was thinking that I should learn the newer, faster alternative, Sequencer.
Sequencer notably includes the capability for users to drag and drop individual shots and change their order -- like in any other digital film editing tool. Special effects can freely be turned on and off from within the tool, even if they don't appear in the real-time game world. It also allows for multi-person workflows where different users can collaborate more easily on a single cinematic.
(Christian Nutt, 2016)
(Pub Games, 2016)
Based on a few pages I’ve read about Sequencer, it’s not too different from the Matinee tool so it shouldn’t be difficult for me to use it, but since I’ve never used it before, I will still need to watch tutorials like the one above and learn how to use this new tool. Aside from watching tutorials, I will also be reading Unreal’s overview and documentation on how the tool works and how to use it properly.
Aside from learning the technical side of how cinematics work, I will also need to study how other animators create cinematics and I immediately thought of Blizzard’s cinematics; Blizzard creates beautiful cinematics for their game trailers and I would like to achieve that level of calibre as well in my own cinematics.
https://www.youtube.com/watch?v=jSJr3dXZfcg
https://www.youtube.com/watch?v=oJ09xdxzIJQ
https://www.youtube.com/watch?v=72UbFQO5-m0
(Blizzard Entertainment, 2018)
Among are just a few of the many cinematics that Blizzard has created and they will serve as an inspiration for me, as well as research, since knowing which camera angle to use or how fast the camera is moving around the scene can be an important factor in storytelling e.g. in an emotional scene, I would need to know how close and how fast/slow to zoom in on the character’s face.
Lighting
Although Darren is the one working on the lighting, I will still be the one combining it with the other elements in Unreal and according to American cinematographer who was the director of photography at Pixar:
“Lighting is an important aspect of computer cinematography, in which lights and shadows are used to convey mood and support storytelling.”
(Sharon Calahan, 1999)
Lighting coincides with cinematics and is an important aspect when telling a story, so me and Darren might work closely together for this part of the cinematic, but of course since it’s his role, I will let him be in charge of the lighting and only intervene once adding lighting to the cinematic made in Sequencer as I’ll need his opinions on what lighting works best with the particular scene.
Ray Tracing
I recently purchased the Nvidia Geforce RTX 2070 and the main selling points of the RTX cards is that they have advanced real-time raytracing and I plan on using that technology in our animation for better lighting and shadows to improve its photorealism.
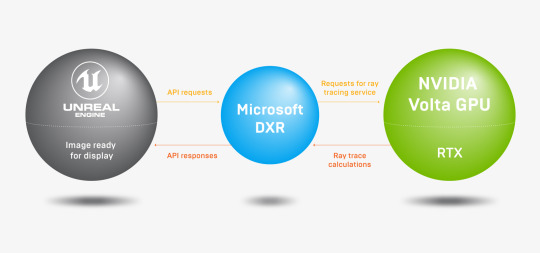
(Nvidia, 2018)
As Epic Games observes:
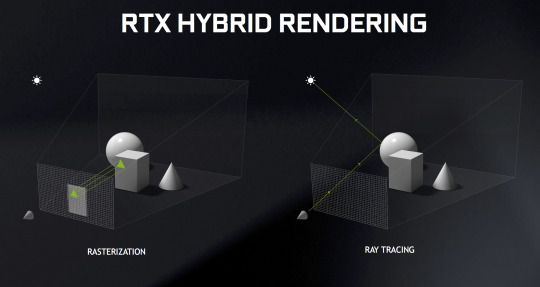
Renderers tend to use one of two methods for determining pixel color: rasterization or ray tracing. Rasterization starts with a particular pixel and asks, “What color should this pixel be?” Ray tracing works from the viewing angle and light sources and asks, “What is the light doing?”
Ray tracing works by tracing the path of a light ray as it bounces around a scene. Each time a ray bounces, it mimics real-life light by depositing color from earlier objects it has struck, and also loses intensity. This depositing of color makes the sharp reflections and subtle, realistic color variations that, for certain types of materials and effects, can only be achieved with ray tracing.
Because it mimics light’s real behavior, ray tracing also excels at producing area shadows and ambient occlusion. (Epic Games, 2018)
The text above explains how ray tracing works in more detail and also added images from Nvidia to visualise how ray tracing works. Although Nvidia and Epic have confirmed that Unreal Engine will be supporting RTX cards and make use of it’s tech in its next version (UE4 4.22), there is no official announcement yet for it’s release date, but there have been rumours on forums about it being planned to be released by the end of the year and once it is released, I would love to see if I could apply this to our animation and see if it makes it look more visually appealing.

(NVIDIA GeForce, 2018)
Shown above is a comparison taken from in-game footage of RTX being used in Battlefield V and shows what ray tracing can do in a scene; to me to image on the left where RTX is on makes the scene more ‘alive’ and makes the flames seem more real due to the reflections on the car.
Version II
Since the project I showed a while ago was just the first draft and was essentially a practice run, I wanted to add a lot of improvements and give a big upgrade to the overall look of my project because the previous one wasn’t quite good enough to my liking and although it had some resemblance to an underwater scene, it certainly wasn’t clear that it was set under the ocean but more as in a lake.
I wanted to create something closer to the images I’ve seen online and those that I’ve seen in person whenever my family goes to the beach in the Philippines during summer and create something that is as realistic and as accurate that my skills and knowledge with Unreal would allow me.
I created a whole new project using elements from my first draft, but adding improvements overall to the scene such as a better post-process volume, caustics, water plane and a newly sculpted landscape which uses a sand material that was created by Maris in Substance Painter.
I based this new scene mainly on the image on the left which was also on my mood board and tried to be as realistic and accurate as I can. I definitely preferred this new version much more than the previous one because not only was I able to create a convincing scene, it also felt like one too.
Here are some more screenshots of the current version in different angles. I have made adjustments on all the previously talked about parts (post-processing, depth of field, screen distortion, water plane, caustics) to make all of them fit in together more and work better as a whole and improve the overall aesthetic.
I plan to continue tweaking the values of the different elements in the project to further improve the looks of this project in order to create a more realistic and accurate water simulation.
Future Plans
For future work, my next step is to add the initial assets created by my group members, mainly the god rays/particle effects that Darren created as well as building the environment by adding corals/rocks that Maris created. We may also consider creating a GitHub repository in a couple of weeks as by then, my other group mates would’ve made much more content, which they may want to add into the project themselves but then be adjusted by me later on to make sure everything fits together perfectly. I plan on finishing this on December.
Aside from that, I will need to look into perhaps adding a fisheye lens and whether this effect is achievable in Unreal Engine; a fisheye lens is an ultra wide-angle lens that creates this strong distortion that is intended to produce a panoramic image. I got this idea from the image above between my screenshot and the image I found online where the online image has this slight curvature whereas mine is flat and I think adding a fisheye lens would help further improve the illusion of having a camera underwater. I also plan on finishing this on December, since I expect this to be a quick addition.
I will also need to do more research on my own work to see if there are any other effects I could add to improve my work and add more realism to create an even more convincing water simulation. The main thing I plan on doing research on is the Gerstner waves, which I discussed in depth earlier in the “Gerstner Waves” section. I plan on finishing this on January/February.
I also plan on adjusting the caustics and trying to achieve the same quality as Timothy Cole’s caustics, which I talked about earlier and will be looking around to see if there are better alternatives to what I have now. This should be finished on January too.
I will be paying close attention to the release of Unreal Engine v4.22 and for the addition of RTX support on Unreal Engine since its release is rumoured to be by the end of the year, although realistically, I wouldn’t expect it to be released until January/February next year. Once RTX support is released in 4.22, I will be installing the new version of UE4 and copy and transfer our underwater scene that we have now onto it and will be testing out the ray tracing and comparing it with our current scene in UE4 4.20 and see if there is any major difference between the two versions. If there no difference or only a small difference, then I will be keeping the current scene in version 4.20 since it won’t be worth it to spend time transferring and potentially fixing any possible bugs or incompatibility issues that may arise when using the new version of UE4 but if there is a big, noticeable difference, then I will be transferring everything onto the newer version of Unreal and fix any incompatibility issues that may come up due to them being made in an older version of Unreal. If I do go through with the transfers and the fixes for the new version, then I predict that this might take some time and may take 1-2 months to fix/finish, depending on the issues (if there are any), which will be February/March (assuming that RTX support is released in late December/early January). Although not as important as the other factors, it would still be nice to implement ray tracing into our animation for the added ‘eye candy’.
Once the animators and modellers have finished their models/animations and are ready to export as an .fbx, I will be working on implementing them into my project and putting everything together and once everything is in place, I will need to check for any errors such as missing textures or buggy animations and if I find any, I will need to try fix them and let my peers know as they may have exported it wrong or didn’t include textures, etc. Once everything is imported in Unreal and ready with no problems present, I will be ready to create the cinematics for our project and work on the camera placements/movements and ensure that we get the perfect angles for each shot of the scene and make sure that it’s appropriate for the emotions of the scene i.e. during the sad scene at the start, camera movements should be slow. I predict that these will be done by March/April, depending on the speed/workflow of the animators/modellers and any potential problems that may arise, such as the errors that I previously stated.
The deadline for this animation is on the 20th of May so I expect everything to be ready and for May, I plan on only doing the final touches to our animation, so I will be refining everything, like the values of parameters in nodes or adjusting the direction of a light slightly or fixing any last minute problems that may come up. Once everything is finished and is of good quality and everyone is happy with how it looks, it will be time to render out the animation and export it, which shouldn’t take more than a few hours since it’s only a short animation and because Unreal renders out animations quick. After the animation has been rendered, the VFX guys (Paul, Darren, Ben) may plan on doing some final touches in Nuke for post-production and apply some minor, final changes to the animation and again, render and export it afterwards for submission.
Overall, I am very happy with my progress and of course the whole group’s progress so far. At this rate, we would be able to create an amazing final animation with a more realistic underwater scene and characters and will be looking forward to the final piece.
Feedback
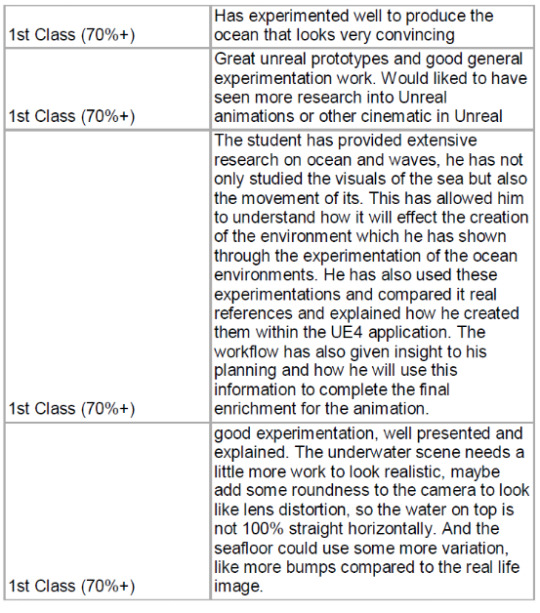
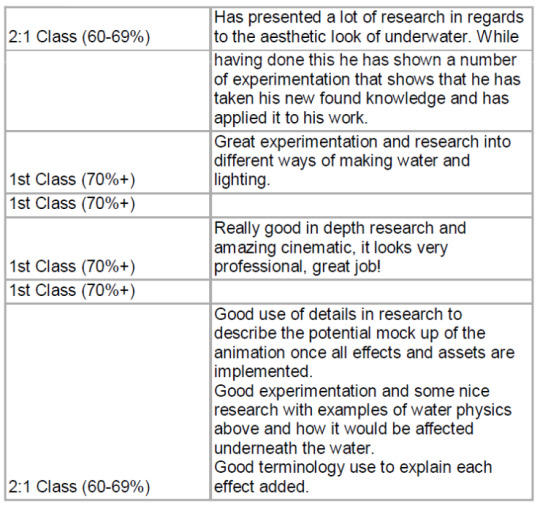
We had presentations this week where we talked about our roles and contributions to the group and showcasing any experimentations we had in front of the class and I received some valuable feedback that have given me some ideas on any improvements I can make. Although most of the feedback I have received from my peers were praises, some of them were suggestions and questions, which I will address below.
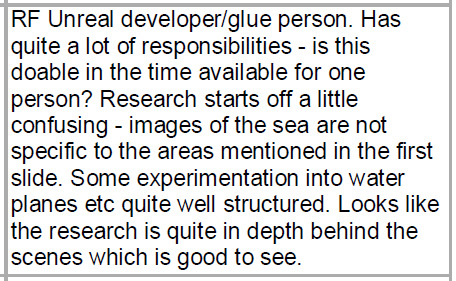
First comment I will be addressing is Ryan’s feedback since his was the first one that asked a question. To answer the first question, yes, I do believe this is all doable for me to create within the time frame we are given since I am already familiar with Unreal Engine and I am very comfortable with the software and also enjoy using the software. Based on what I’ve done so far, I am already making good progress and am already at a good level in terms of building the scene since as of now, I have already created something that is a convincing underwater scene, upon which both my teammates and most of the class have agreed with, but of course, there are still lots of places that could be improved and that would require further research and experimentations. To answer the second question/sentence, I almost always create a moodboard during the brainstorming part of the project in the early stages since it gives me ideas on what I can do and how things will look, but I may not have explained it well, which is why it might have been confusing.

This was a very good question and I should’ve added a slide in the powerpoint and explained why we chose UE4 instead of other animation packages. One reason on why we chose to use Unreal instead of other software for rendering the animation is because we were using multiple different softwares - Ben was using Blender to sculpt, rig and animate his model while Maris was using Cinema 4D to model his environment and Substance Painter to texture them and Callum, I believe, used 3ds Max to model his props, so I suggested that we try using Unreal Engine to put all these models/animations/materials/etc together created in a handful of different packages because by doing it in this way, we were all using software that we are most comfortable with instead of, for example, Ben compromising and using Maya to animate even though he is much more comfortable animating in Blender just to fit in with Ed’s animation in Maya to make everything streamlined due to everything being only in one piece of software. By creating using Unreal, we are able to keep everything streamlined but not need to make compromises as to what software to use as you can just export the models as an .fbx and import them into Unreal and work from there.
Another reason on why we chose to use Unreal Engine was that after I “sold” the idea of using UE4 to my group, we told Ryan about it and he informed us that it is an interesting idea to use Unreal instead of the usual animation packages and he also said that some studios are actually starting to use Unreal when creating TV shows and other animations so it may be a good idea to use Unreal now because if the industry moves towards that direction of primarily using Unreal for animations, it would be good for “future-proofing” as we could use this animation as part of our portfolio to show those companies that we have experience in animating in Unreal when looking for a job and since we’ve already used it beforehand to create an animation, we would have an upper hand over other potential animators since they might need to learn this software from scratch whereas we already know how to. It is also good to expand our knowledge of different software knowledge since artist need to be flexible and learn to adapt to any changes in the industry in the future because if you only know how to use one software now and it becomes redundant in the future and you are unable to adapt and learn the new software that everyone is using, you would have a really hard time finding a job in that field.
What Ryan said about the studios starting to use Unreal for creating TV shows interested me since I really enjoy using Unreal and would love to continue working on using it after we graduate. I haven’t heard of any studios using UE4 to create TV shows before so I searched online for studios that use Unreal and I found an article about a Pakistan-based studio, 3rd World Studios, creating the first ever animated feature film that was rendered entirely in Unreal Engine which is titled “Allahyar and the Legend of Markhor” (trailer: https://www.youtube.com/watch?v=162VCDUndT0). This is proof that despite Unreal Engine being a games engine, it can also be used outside games and create a film, just like 3rd World Studios did.
“Unreal has saved us months and months of rendering time. On average in a traditional pipeline, film quality renders take around 3-4 hours per frame and depending on the scene’s complexity this time can increase exponentially. In UE4, we never worried about render times.”
(3rd World Studios, 2018)
The article was an interesting read as the writer interviewed the studio on how and why they used Unreal and what benefits it provides and the studio said something that I forgot to mention before; when I finished creating a short test cinematic, the render times were much quicker in Unreal compared to other 3D packages and it will save us a lot of time once we have put together everything in Unreal and start the rendering process.
To answer the distortion comment, the video that I used to show the distortion effect was from the previous version of the project and I also bumped up the values on the speed slightly as I was worried that it might be too subtle when presented on the big monitors so I wanted to ensure that they were noticeable. The screen distortion effect looks much better in the newest and current version of the project (same one as the version that’s in the “Version II” section) and is a lot less fast/strong as it was on the presentation. As for the bubbles question, those would be particle effects, which is what Darren is working on and he also presented it, so the commenter might have missed that slide when he was presenting it. Caustics are on a decent level but I want to try create a better one if possible so I will continue working on that too and playing with the values and also do a bit more research online to see if there is a better alternative with a nice look. Finally, the lens flare is still a work in progress and was still in the early stages so I will tone that down a bit as I agree that it was a bit strong.
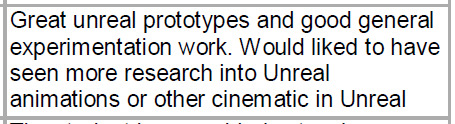
I didn’t include it in my presentation but like I said in the “Cinematics” section above, I will be doing research on the other types of cinematics that Unreal offers, especially the Sequencer since Matinee has been a legacy tool for a while now, so it’s an old method and 3rd World Studios also used Sequencer in making their film in Unreal.
“The latest version Sequencer is faster and more stable than ever and proved to be a lifesaver as we approached the end of our film’s production.”
(3rd World Studios, 2018)
I agree with this comment; the scene definitely needs more work to make it look more realistic and I am planning to achieve that roundness effect in the future which is similar to the fisheye lens that cameras have, but I will need to do research on this as I am unsure whether or not this is doable in Unreal, which I talked about more in the “Future Plans” section of this portfolio. The current seafloor isn’t the final product yet and I agree that the seafloor does need more variation, so I am planning to sculpt the landscape more to create some bumps to add some variation and prevent it from looking too flat.
Reference
Mood Board
Divetech, Inc. (2016). Mood Board Image #3. [image] Available at: http://divetechhouston.com/underwater-ocean/ [Accessed 16 Nov. 2018].
Natural Capital Coalition (2018). Mood Board Image #2. [image] Available at: https://naturalcapitalcoalition.org/the-value-of-seagrass-in-securing-a-sustainable-planet/ [Accessed 16 Nov. 2018].
Notre-Planete (2013). Mood Board Image #4. [image] Available at: https://www.notre-planete.info/actualites/3655-salinite_ocean_rechauffement_climatique [Accessed 16 Nov. 2018].
Science Daily (2018). Mood Board Image #6. [image] Available at: https://www.sciencedaily.com/releases/2018/01/180125140848.htm [Accessed 16 Nov. 2018].
Unsplash (2017). Mood Board Image #7. [image] Available at: https://unsplash.com/photos/Ok7iNxjmQ1A [Accessed 16 Nov. 2018].
Wallpapers Mug (2018). Mood Board Image #8. [image] Available at: https://wallpapersmug.com/w/wallpaper/sea-waves-calm-horizon-5k-255c5f [Accessed 16 Nov. 2018].
World Wildlife Fund (WWF) (2018). Mood Board Image #1. [image] Available at: https://www.worldwildlife.org/pages/in-nuarro-mozambique-a-partnership-for-people-and-oceans [Accessed 16 Nov. 2018].
World Wildlife Fund (WWF) (2014). Mood Board Image #5. [image] Available at: http://wwf.panda.org/wwf_news/?216410/Satellite-tracking-identifies-risk-zones-for-leatherback-turtles [Accessed 16 Nov. 2018].
Online
Allahyar and the Legend of Markhor. (2018). [film] Directed by U. Khan. Pakistan: 3rd World Studios.
Blizzard Entertainment (2016). Overwatch Animated Short | “Dragons”. [video] Available at: https://www.youtube.com/watch?v=oJ09xdxzIJQ [Accessed 16 Nov. 2018].
Blizzard Entertainment (2017). World of Warcraft: Battle for Azeroth Cinematic Trailer. [video] Available at: https://www.youtube.com/watch?v=jSJr3dXZfcg [Accessed 16 Nov. 2018].
Blizzard Entertainment (2018). Warcraft III: Reforged Cinematic Trailer. [video] Available at: https://www.youtube.com/watch?v=72UbFQO5-m0 [Accessed 16 Nov. 2018].
Calahan, S. (1999). Storytelling through Lighting: A Computer Graphics Perspective. [ebook] Pixar. Available at: http://www.cmiresearch.org.uk/uploads/2/8/9/0/28906783/storytelling_through_lighting.pdf [Accessed 16 Nov. 2018].
Cole, T. (2017). Working with Underwater Caustics in Real-Time. [online] 80.lv. Available at: https://80.lv/articles/working-with-underwater-caustics-in-real-time/ [Accessed 16 Nov. 2018].
Cowley, D. (2018). Visually Stunning Animated Feature ‘Allahyar and the Legend of Markhor’ is the First Produced Entirely in Unreal Engine. [online] Unreal Engine. Available at: https://www.unrealengine.com/en-US/developer-interviews/visually-stunning-animated-feature-allahyar-and-the-legend-of-markhor-is-the-first-produced-entirely-in-unreal-engine [Accessed 16 Nov. 2018].
Dean Ashford (2017). UE4 - Tutorial - Underwater and Caustics Part 1. [video] Available at: https://www.youtube.com/watch?v=5a0w3gcdtKg [Accessed 16 Nov. 2018].
Demers, J. (2007). Depth of Field: A Survey of Techniques. [online] NVIDIA Developer. Available at: https://developer.nvidia.com/gpugems/GPUGems/gpugems_ch23.html [Accessed 16 Nov. 2018].
DokipenTech (2016). Unreal Engine 4 Gerstner Waves Livestream. [video] Available at: https://www.youtube.com/watch?v=_y7Z0MbGOMw [Accessed 16 Nov. 2018].
En.wikipedia.org. (2018). Trochoidal wave. [online] Available at: https://en.wikipedia.org/wiki/Trochoidal_wave [Accessed 16 Nov. 2018].
Finch, M. and Worlds, C. (2007). Effective Water Simulation from Physical Models. [online] NVIDIA Developer. Available at: https://developer.nvidia.com/gpugems/GPUGems/gpugems_ch01.html [Accessed 16 Nov. 2018].
Gamedev1909 (2015). Water volume and Effects Tutorial Unreal Engine 4. [video] Available at: https://www.youtube.com/watch?v=Gr5BDGahdEA [Accessed 16 Nov. 2018].
Guardado, J. and Sánchez-Crespo, D. (2007). Rendering Water Caustics. [online] NVIDIA Developer. Available at: https://developer.nvidia.com/gpugems/GPUGems/gpugems_ch02.html [Accessed 16 Nov. 2018].
Matt Taylor (2016). Unreal Engine 4 - Water Caustics (Faking Light On the Bottom). [video] Available at: https://www.youtube.com/watch?v=W8u7GONZzoY [Accessed 16 Nov. 2018].
Matt Taylor (2016). Unreal Engine 4 Water Volume With Bubbles Walk Through. [video] Available at: https://www.youtube.com/watch?v=n5UKw_Crlr4 [Accessed 16 Nov. 2018].
Nutt, C. (2016). Unreal Engine 4's new Sequencer allows for film-style cinematic workflow. [online] Gamasutra.com. Available at: http://www.gamasutra.com/view/news/268236/Unreal_Engine_4s_new_Sequencer_allows_for_filmstyle_cinematic_workflow.php [Accessed 16 Nov. 2018].
NVIDIA Geforce (2018). Battlefield V: Official GeForce RTX Real-Time Ray Tracing Demo. [video] Available at: https://www.youtube.com/watch?v=WoQr0k2IA9A [Accessed 16 Nov. 2018].
NVIDIA. (2018). NVIDIA GeForce RTX. [online] Available at: https://www.nvidia.com/en-gb/geforce/20-series/rtx/ [Accessed 16 Nov. 2018].
Pub Games (2014). UE4 - Interior Water #1. [video] Available at: https://www.youtube.com/watch?v=KPmRV1Z9ikY [Accessed 16 Nov. 2018].
Pub Games (2014). UE4 - Interior Water #2. [video] Available at: https://www.youtube.com/watch?v=GRnKO1z4WZs [Accessed 16 Nov. 2018].
Pub Games (2016). UE4 - Sequencer Basics. [video] Available at: https://www.youtube.com/watch?v=rn6l_69cvu0 [Accessed 16 Nov. 2018].
Ryan Brucks (2017). No particles. Gerstner Wave shader + analytical splashes. [video] Available at: https://www.youtube.com/watch?v=OQ3D0Q5BlOs [Accessed 16 Nov. 2018].
Shargill, M. (2018). Playa La Peña Grande. [Photo] Tías, Lanzarote, Spain.
Tessendorf, J. (2001). Simulating Ocean Water. [ebook] pp.4-8. Available at: http://www-evasion.imag.fr/Membres/Fabrice.Neyret/NaturalScenes/fluids/water/waves/fluids-nuages/waves/Jonathan/articlesCG/simulating-ocean-water-01.pdf [Accessed 16 Nov. 2018].
Taylor, M. (2016). Unreal Engine 4 Water Volume With Bubbles Walk Through. [video] Available at: https://www.youtube.com/watch?v=n5UKw_Crlr4&list=PLogcsc-QeymRPyqOUFy06DjdDst1J-L2q&index=1 [Accessed 16 Nov. 2018].
Unreal Engine Documentation. (2018). Sequencer Overview. [online] Available at: https://docs.unrealengine.com/en-us/Engine/Sequencer/Overview [Accessed 16 Nov. 2018].
Unreal Engine. (2018). Technology Sneak Peek: Real-Time Ray Tracing with Unreal Engine. [online] Available at: https://www.unrealengine.com/en-US/tech-blog/technology-sneak-peek-real-time-ray-tracing-with-unreal-engine [Accessed 16 Nov. 2018].
Wallace, E. (2011). WebGL Water. [online] Madebyevan.com. Available at: http://madebyevan.com/webgl-water/ [Accessed 16 Nov. 2018].
Water Plane Texture. (2015). [Texture, Digital] Water Planes, Epic Games.
Williams, H. (2017). Tutorial: Ocean Shader with Gerstner Waves. [online] 80 Level. Available at: https://80.lv/articles/tutorial-ocean-shader-with-gerstner-waves/ [Accessed 16 Nov. 2018].
0 notes