
Don't wanna be here? Send us removal request.
Statistics
We looked inside some of the posts by rajowilliams-blog and here's what we found interesting.
Average Info
Notes Per Post
1
Likes Per Post
1
Reblog Per Post
0
Reply Per Post
0
Time Between Posts
12 days
Number of Posts By Type
Text
16
Last Seen Tumblr Blogs


Fun Fact
130K people were victims of a chain letter scam that affected Tumblr in May 2011.
Text
How to Adjust Brightness on Windows 10 Computers?
Windows 10 gives the user several ways for adjusting levels of brightness on their tablet, laptop, and desktop computer. Whatever you require to understand about increasing and decreasing your Windows 10 brightness has been given here. Fine tune the levels of brightness according to your liking, reduce the blue levels of light and enable dynamic lighting before sleeping.
How to Adjust the Brightness on Windows 10?
Modifying the brightness on the “Windows 10” computer is straightforward. Users require to change these settings again.
Go to the bottom right corner of the screen and choose the information in the rightmost bottom edge of display on “Windows 10” PC.
Go to the Action Center.
Swipe rightwards of the screen by using your finger.
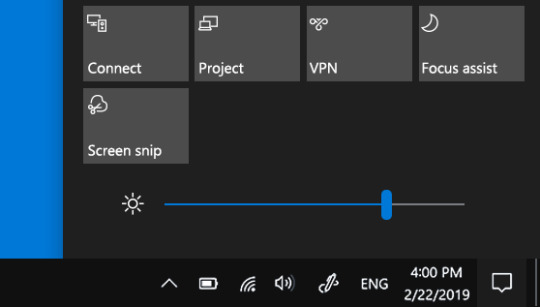
Users will view a rectangular box along with a sun symbol in the Action Center. This switch is for expanding and minimizing light in “Windows 10”. Users can choose the icon for presetting brightness of the screen. They will range from 0%, 25%, 50%, 75% and final 100%. Lowest possible brightness is 0%, while the highest being 100%. The user is good to go among each of certain preset light section. Read further if the user requires addressing some other modifications to the display brightness.
Go to the action center and tap right the button of brightness. Users will get a link named as Go to Settings. Choose it with the help of the left mouse button. If there is a touch device, then make a long press with the help of your finger. Users will get a Go to settings option after they have released the finger.
After choosing to Go to Settings, users will immediately go to the above Windows 10 light settings. It will be inside the central application of settings. There will be a straight bar with a line showing the existing level of light. Pick the line leftwards or rightwards on the bar with the help of your mouse and finger for choosing a certain level of brightness. The brightness of the screen will turn upwards or downwards when you move the line.
What is there with Windows 10’s Dynamic Brightness Setting?
There will be a case named as Change brightness automatically when lightning gets changed. Choose this box for enabling the dynamic lightning feature of Windows 10. This feature takes help of webcam for detecting levels of light.
For instance- If you are in a dark room, then the screen of your device will get dim so that it can’t hurt your eyes. If you are out on a bright day, then the screen will get brighten up itself because of the settings?
Jack Smith is a technology expert who loves to write blogs and articles about cybersecurity. He has been especially writing about the latest updates regarding mcafee.com/activate with an intention to develop the work experience of users across the globe. The blogs and articles he has written have been published in various popular e-magazines, blogs, and McAfee Activate websites.
Source: http://amcafeecomactivate.uk.com/how-to-adjust-brightness-on-windows-10-computers/
0 notes
Text
Latest Features of iOS 13
The release date of Apple’s iOS 13 has announced which is September 19, 2019, on Thursday with Dark Mode updates.

Next week, Apple is going to release iOS 13 that everyone is excitedly waiting for updates. On Thursday, September 19, your iPhone is going to change for the better. It’s big news to all iPhone users and will give benefits to users.
iOS 13 Dark mode
iOS 13 Dark mode is basically the change in white bright screen background that will update as a black and dark background. It will help users to read at night easily. There is also a QuickPath swipe keyboard coming in the news to write your things in swipe to swipe mode.
iOS 13 release date
The release date of iOS 13 is September 19, 2019, on Thursday (10 am PST). iOS 13 golden master version is available for beta testers now, iPadOS will be released onSeptember 30, 2019, on Monday.
Which devices are compatible for iOS 13?
iOS 13 is compatible with iPad Air 2 or later, iPhone SE, iPhone 6S or later, iPod touch 7th generation and new iPad mini 4. It is compatible with last 4 years iPhone or iPad. It means If you have iPhone 6, iPad Air, iOS 12, iPhone 5S, iPhone 6 Plus, iPad mini 2 or mini 3, then iOS 13 won’t support your device.
iOS features to take you ahead from the world
iPhone 11 camera features: for iPhone 11, there Camera UI buttons/wheel toggle, Holding photo shutter button to capture video and wide-angle selfies in the landscape for front camera (4K60fps video and ‘Slofies’) is going to release.
Dark Mode: for iPadOS and iOS 13 Overdue Dark Mode is coming that can change white bright into the black-and-dark-gray background. It supports all the app.
FaceTime attention correction: This feature will show your face straight in front camera during video call even though you are looking at an adjacent screen.
QuickPath keyboard: This swipe to swipe keyboard will help you to interchange, correct, and change the word, including multiple languages such as Spanish, German, English, French, Portuguese and Simplified Chinese.
“Find My” app: This will help you to find anything through your mobile. Like if you type Find my Friends, it will find your friend’s location.
Camera and Portrait mode updates: iOS 13 has come up with some beautiful Camera and Portrait mode changes like a monochromatic effect called High‑Key Mono.
Memoji stickers: This is the list of fun looking stickers in one platform that you can send through message, email, or other apps.
HomePod updates: With latest HomePod features, you can listen to songs from various stations. It is part of the iOS family where you can ask Siri to make you hear to any of song worldwide.
Undoubtedly, iOS 13 is coming up with ultimate features on September 19, and you must check out its functions.
Jack Smith is a technology expert who loves to write blogs and articles about cybersecurity. He has been especially writing about the latest updates regarding mcafee.com/activate with an intention to develop the work experience of users across the globe. The blogs and articles he has written have been published in various popular e-magazines, blogs, and McAfee Activate websites.
Source: iOS 13
0 notes
Text
How to Fix “Microsoft Excel is Not Responding” Problem on Windows 10?
Currently, some Microsoft Excel users reporting that they are facing a problem with the software. In fact, when they try to open a new file in the Microsoft Excel then it shows a message which says; the program is crashing or not responding. This problem occurs due to any numbers of causes; here we are going to discuss various fixes which will help you in fixing this problem.

However, whenever this error occurs on your screen, it will show you different messages; you could see any of the following error messages:
Excel is not responding.
Excel has stopped working.
A problem is caused the program to stop working.
Below we provide you with a few different methods which help you in fixing the Microsoft Excel is crashing or not responding problem on your Windows 10 computers. But before going further, we advise you to follow the instruction in ascending order to avoid troubles and damages, doing this, will also save lots of time.
Steps to Fix “Microsoft Excel is Not Responding
To fix this issue, you have to take a look at the following methods:
Start Excel in Safe Mode.
Disable Add-ins.
Install Latest Updates.
Method-1: Start Excel in Safe Mode.
To find out if something external is causing Microsoft Excel to shows an error message, and then one of the best options is to start it in a Safe Mode. Here how to do it:
Hit the “Control Panel” option to start the program.
Instead, open the Command Line and type “excel.exe/safe,” and press the Enter key.
Carefully check all the issue, if all the issues are resolved, then it simply means that there is a chance you may have to disable one r more add-ins if any of them are activated.
Method-2: Disable Add-Ins Individually
To disable add-ins, you need to follow the steps. They are as follows:
Firstly, click on the “File” option.
After that, click on the “Options” tab.
Next, click on the “Add-ins” option.
Now, choose “COM Add-ins” option.
Ensure that all boxes are unchecked in the list of enabled add-ins.
Then, hit the “Enter” key.
Lastly, click to close Excel.
Finally, restart your computer.
Method-3: Install All Latest Updates
Probably, your Office install has yet to get the latest updates due to some specific setting in Windows 10 computer. To confirm that you will always need to acquire the latest update. Here how to do it:
Press Windows + I keys together on your keyboard to open the Settings app.
Then, press the “Update & Security” option.
After that, scroll and click on the “Advanced” options.
Now, you will see “Give me updates for other Microsoft products when I update Windows” option, make sure that it is enabled or turn on.
Lastly, click on the “Check for Updates” option.
If any updates are available then install them and restart your Windows 10 computer and check if the crashing issue has been solved.
Jack Smith is a technology expert who loves to write blogs and articles about cybersecurity. He has been especially writing about the latest updates regarding mcafee.com/activate with an intention to develop the work experience of users across the globe. The blogs and articles he has written have been published in various popular e-magazines, blogs, and McAfee Activate websites.
Source: http://mcafeecom.uk/how-to-fix-microsoft-excel-is-not-responding-problem-on-windows-10/
0 notes
Text
How to Schedule your Windows 10 PC for Shutdown automatically
Usually, all users shut down their computer manually, but you can also schedule your computer for shutdown automatically. Sometimes you leave your computer on and go out, or maybe you forget to turn off the system at your office or any other place. That time you’ll definitely want to use this feature. Thus if you want to do this on your Windows 10 PC, then use the below given simple methods.

Some easy methods to schedule your Windows 10 PC for shutdown automatically
1. Scheduling Auto Shutdown from Run.
2. Scheduling Auto Shutdown from Command prompt.
3. Scheduling Auto Shutdown from Task Scheduler.
4. Scheduling Auto Shutdown from Powershell.
Here are the stepwise instructions to schedule your Windows 10 PC for shutdown automatically:
Scheduling Auto Shutdown from Run
This is the easiest and shortcut method to scheduling time for Auto Shutdown your Windows 10 PC. With this method, you can directly set the time for automatically shutdown system when you want. You can directly open Run command and set a time. Here is how to do this,
1. Enter ‘Run’ into the Start Menu search box.
2. And select ‘Run’ program from the results to launch Run box.
Or
Directly use the shortcut ‘Windows + R’ button on your keyboard to launch Run box.
3. Type ‘shutdown-s-t Number of seconds’ into the field front of text OPEN.
In place of Number of seconds input seconds in digit for automatic shutdown. Just like, “shutdown-s-t 1800” to shut down your computer in 30 minutes.
4. After that click on the ‘OK’ button. You’ll also see a confirmation window on your screen.
Now, your computer will shut down automatically after the set time.
Scheduling Auto Shutdown from Command prompt
This is also slightly different from the above method. You can use this method if you’re facing any problem in scheduling from the Run dialog box.
1. Enter ‘Command Prompt’ into the Start Menu search box.
2. And right-click on ‘Command Prompt’ program from the results.
3. And select ‘Run as Administrator’ to launch it.
4. Click on ‘Yes’ on the prompted window to permit Command Prompt to make changes to your device.
5. Type the same command ‘shutdown-s-t Number of seconds’.
In place of Number of seconds input seconds in digit for automatic shutdown. Just like, “shutdown-s-t 1800” to shut down your computer in 30 minutes.
6. And hit ‘Enter’.
Scheduling Auto Shutdown from Task Scheduler
1. Enter ‘task scheduler’ into the Start Menu search box.
2. And select ‘task scheduler ‘ from the results to launch.
3. Go to ‘Actions’ pane at the right side of the screen and click on ‘Create a Basic Task..’
4. Type ‘Shutdown’ in the Name field. You can give any name you want.
5. And click on ‘Next’.
6. Select an option (Daily, Weekly, Monthly, One time, etc.) for ‘When do you want the task to start?’.
7. Set a time to start the task and then click on ‘Next’.
8. Click on ‘Start a program’ in Action and again click on ‘Next’.
9. Now, click on ‘Browse..’ and navigate to ‘Disk C/Windows/System32’.
10. Select the ‘Shutdown .exe file’ and click ‘Open’.
11. Type ‘-s’ into the Add arguments field.
12. Click on ‘Next’ button.
13. At last click on ‘Finish’ to activate.
Scheduling Auto Shutdown from Powershell
1. Enter ‘PowerShell’ into the Start Menu search box.
2. And select ‘Windows PowerShell‘ from the results to launch PowerShell.
Or
Right click on ‘Start’ icon and choose ‘Windows PowerShell (Admin)’.
3. Type the same command ‘shutdown-s-t Number of seconds’.
In place of Number of seconds input seconds in digit for automatic shutdown. Just like, “shutdown-s-t 1800” to shut down your computer in 30 minutes.
4. And hit ‘Enter’.
Now, your computer will shut down automatically after the set time.
Jack Smith is a technology expert who loves to write blogs and articles about cybersecurity. He has been especially writing about the latest updates regarding mcafee.com/activate with an intention to develop the work experience of users across the globe. The blogs and articles he has written have been published in various popular e-magazines, blogs, and McAfee Activate websites.
Source
:
http://1mcafeeactivate.uk/how-to-schedule-your-windows-10-pc-for-shutdown-automatically/
0 notes
Text
How to Activate RCS Chat Feature in Google Messages
We are still using the decades-old text messaging technology that isn’t able to handle high-quality multimedia content. So finally, Google has thought about replacing the traditional messaging technology through RCS.

RCS or Rich Communication Services is the protocol replacing SMS. It makes your mobile communication more advanced than online chat app or IM service. It will remain attached to your phone number, that means you don’t need to create an online account. With RCS, you will get almost all or even more capabilities than any social media app. Here is how to activate the RCS chat feature in Google Messages.
Step 1: Check whether your carrier supports RCS
Before you get started with RCS, you should check whether your carrier supports it. Almost all major mobile networks operators, manufacturers, and OS providers support it. There are around fifty-five operators, eleven manufacturers, and two mobile OS providers.
Step 2: Download Android Messages app
So, your wireless carrier is compatible with RCS. Now you can set up your device to use the new way of messaging. Only a few messaging apps give you access to RCS chat feature. Without any doubt, Messages app by Google, which is also known as Android message, is the one that supports it. Moreover, Samsung Messages and several other apps support RCS. Many phones come with preinstalled Google (Android) Messages app. In case you don’t have in yours, then no need to worry, Google Messages can be downloaded on any Android platform. If you’ve installed the app, then you should also select it as the default message app on your device.
To download the Android Message app, search for ‘Messages’ app by Google LLC and click ‘Install’ to get the app.
Step 3: Activate the RCS chat feature in Google Messages
After downloading and setting up Google messages as your default messaging app, the only and last step left, i.e., enabling RCS in your device. Here are the steps to activate the RCS chat feature in your Messages app.
1. Start the ‘Messages’ app on your device.
2. Then touch the ‘More’ icon at the upper right corner. It will open a dropdown menu.
3. Select ‘Settings’.
4. Then go to ‘Advanced’ from the Settings screen.
5. Touch on ‘Chat features’ under advanced settings. Doing so pops a message saying that the Messages application should be connected to the Wi-Fi or data in the background in order to use the RCS chat feature.
6. Then touch on the ‘Next’ button at the bottom.
7. Now, wait for few seconds for the loading to complete.
Tip: In case loading takes time more than expected, touch on ‘GOT IT’ button at the bottom and wait for a few more minutes, you should now get a notification for activation.
Once the loading complete, RCS chat feature will activate on your device and take you back to the ‘Advanced’ settings page. If you want to check or adjust settings for the Chat feature, then again touch on ‘Chat features’ like before. Instead of the welcome screen to activate the feature, it will open Chat features settings with its entire functions. All the RCS features will be enabled by default, but you can customize them as per your needs. After you have done everything, touch the ‘Back’ button to close Message settings and go to your conversations.
Now, enjoy the new way of messaging on your device, you can now send photos, audios, videos, as well as make groups, see typing indicators, and more.
Jack Smith is a technology expert who loves to write blogs and articles about cybersecurity. He has been especially writing about the latest updates regarding mcafee.com/activate with an intention to develop the work experience of users across the globe. The blogs and articles he has written have been published in various popular e-magazines, blogs, and McAfee Activate websites.
Source: http://mmcafee.uk/how-to-activate-rcs-chat-feature-in-google-messages/
0 notes
Text
How to Factory Reset a Kindle Fire- Easy Tutorial
Want to reset your Kindle Fire but doesn’t know how to? Don’t worry. We are here to help you. In this article, you will learn how to reset an Amazon Kindle tablet with easy steps. If your tablet is misbehaving and lagging, then a factory reset can help you solve the issue. The process of resetting the Kindle Fire is a lot different than other tablets. Let’s find out the best way to reset your Amazon Kindle Fire.

How to Soft Reset an Amazon Kindle Fire
Before doing a factory reset, we recommend you go for a soft reset because sometimes it can resolve most of the issues on your tablet. Many other users have found soft reset successful in removing most of the problems. A soft reset of your device won’t affect any data and installed programs on your tablet. It will straightly reboot your Kindle Fire and the other things on your device such as preferences and settings will remain the same. Soft reset is used to treat minor lags and issues. Let’s try it out.
In order to perform a soft reset of your device, long-press the Power and Volume Down key on your Kindle Fire.
Keep holding the keys until your device turns off.
In most cases, you have to hold the keys for about 10-15 seconds.
While long-pressing those keys, if you are prompted to confirm the turn off, then hit the OK option.
If you are using first to fourth-gen Kindle Fire, then you should only long-press the Power key on your device.
After the device powers off, wait for at least a minute or more and then turn on your device again.
Now your soft reset has been completed successfully. You can check your device for the errors that you were facing before the reset. If the problems still not resolved, then follow the next process which will guide you on how to do a factory reset on your Kindle Fire.
Amazon Kindle Fire: How to Factory Reset It?- Step by Step Tutorial
This tutorial will show you how to factory reset an Amazon Kindle Fire. This process will delete your all data, installed programs, apps, and your personal information. To keep your data safe, you can take a quick backup of your device data. To do that, follow the instructions below:
Go to the Settings app on your tablet.
Then go to the Device Options.
After that, press the backup and restore option.
There you can take a backup of your data. It is a good step before proceeding with the factory reset.
Now you have done a backup of all your data. You can start the factory reset process now. Follow the ongoing instructions to accomplish the factory reset on your device:
Make sure to charge your device at least 30 %.
Now visit the Settings app on your Kindle Fire.
Then head to the Device Options
Navigate to the “Reset to Factory Defaults” option.
There you will have to press the Reset button.
Now your device will become like a new one, and will work smoothly.
Jack Smith is a technology expert who loves to write blogs and articles about cybersecurity. He has been especially writing about the latest updates regarding mcafee.com/activate with an intention to develop the work experience of users across the globe. The blogs and articles he has written have been published in various popular e-magazines, blogs, and McAfee Activate websites.
Source: http://1mcafeeactivate.uk/how-to-factory-reset-a-kindle-fire-easy-tutorial/
0 notes
Text
How to Fix 5 Most Common Network Security Threats
The threats of your personal information getting breached have grown immensely in recent years as even several MNCs got ransomware installed on their systems. Several organizations face network security-related problems without their own realization. When these issues remained unresolved, they make openings and vulnerabilities for breachers to attack an organization’s security. This can result in sensitive information getting stolen.

The issues are far too much to be covered in a single post, so here we will cover 5 of the most commonly faced network security issues anyone can face.
Issue 1: Unidentified Property on the Network
Majority of the businesses do not keep a complete record of their IT assets that are bound with their network. This is a huge issue. If the business does not know what assets are on their network, then how can they be sure that their network security is safe?
The simplest solution for this is to review all the attachments present on your network, and recognize the different platforms they perform on. You can figure out all the separate access points available on your network and which one of them needs security updates as soon as possible.
Issue 2: User Account Benefits Abused
In 2016, Harvard Business Review stated that 60% of such attacks are carried out by someone from the inside. It could be an honest mistake, as to send information on the wrong email address or to lose a device used at work. It could be an intentional leak or abuse of a user account. The issues that arise from such dealings compromise your network’s security the most.
Because these issues arise from within the organization, they are the hardest to catch and stop but here are ways for you to minimize the threat. Your company can adopt the least privilege policy that keeps the employees access privileges to the minimum. The users will only be able to access the areas and locations which are needed for the jobs and nothing more.
Issue 3: Unsecured Security Weaknesses
The businesses usually get concerned with exploits known as Zero Day. These are the exploits which are still unknown to the users; however, zero-days are not the real problem. The real problem is known unresolved vulnerabilities.
Zero-days take time for an individual to find out, so the attackers mostly stick with unresolved known weaknesses. In a report by CSO, it was found that only 54 attacks from 6300 were zero days. All the other attacks came from known issues.
The best way out of it is to manage a strict schedule for security fixes. Also, the enterprise should patch the issue as soon as it is identified.
Issue 4: Inadequate Management in IT Security
It is another common issue among enterprises. They do not get an apt amount of people in IT security management. So even if the issues are getting identifies, they still would not be able to fix them in time to stop a breach.
The only solution to the problem is to maintain a qualified security management team, with adequate people to fulfill the job.
Issue 5: Low Depth in Defenses
There will be days when no matter your efforts the attacker will breach in. But how much damage they are able to do is up to you.
The business should try to keep a secure segmentation to keep the parts separate discreetly. So even if the attacker gets through one security, they would not be able to get much of the vital information.
Keep the patches fixed, and the system organized so that your sensitive information stays safe and within your knowledge.
Jack Smith is a technology expert who loves to write blogs and articles about cybersecurity. He has been especially writing about the latest updates regarding mcafee.com/activate with an intention to develop the work experience of users across the globe. The blogs and articles he has written have been published in various popular e-magazines, blogs, and websites.
Source: https://rajowilliams.wordpress.com/2019/08/20/how-to-fix-5-most-common-network-security-threats/
0 notes
Text
How to Ensure Complete Security for Cloud and Endpoint Devices?
Since the arrival of cloud-to-device technology, there is a lot of hype among diverse business sectors to exploit the cloud’s power for boosting overall productivity, expedite processes and enhance their data storage system and security. Everyone is mad about cloud these days, which pushes for a rapid expansion of its influence in various sectors and industries from manufacturing, services to trade and marketing. However, many users have barely any idea of what endpoint security is all about. For them these endpoint devices work as an entrance point to the cloud network, which compromises the security and makes it more vulnerable than ever.

In reality, because of the unique relationship between cloud security and endpoint security, businesses need to understand such diversity and magnitude are not good for overall information security. Let’s take a quick glance at similarities between these two and find out how exactly endpoint security can prove a worthy option when it comes to safeguarding the cloud.
Businesses are adopting cloud services
The relentless march of cloud technology is nowhere close to an end. With so many types of cloud network including private cloud, public cloud, hybrid cloud and recently launched multi-cloud, the cloud technology is getting bigger and bigger with no signs of slowing down anytime soon. Massive adoption of cloud technology is starting to take a mountainous shape with millions of users creating a new account on cloud. With the cloud market expected to achieve a five-year compound growth rate of 22.5% with public cloud services reaching $370 Billion in 2022.
Since businesses are getting close to cloud services more than ever, they also need to give an equivalent share of time and effort on the security measures to keep it safe from prying eyes of hackers.
The relationship between endpoint and cloud
The cloud is like a virtual storehouse for safekeeping of your online data, but every storehouse has a door or two. Now, Endpoint devices work as doors to the cloud. The more devices you use like mobile phones, laptops, computers to access the cloud network of your organization, it becomes prone to cyber infiltration. It simply points to the fact that a single device can wreak havoc to the cloud if misused or mishandled because it leaves a vulnerable door open to unauthorized access.
To let you know, Endpoint devices are not just entrance points to the cloud network but also serves as an impregnable shield that guards the realm of data from unethical practices of cyber hacking led my master hackers.
Secure your endpoint device with McAfee security
McAfee offers the best cloud-to-device security services in the market. They have employed a team of master developers and they understand the mind-set of cybercriminals which helps them to stay ahead of such cybercriminals. The relationship between cloud and endpoint devices is vital to the businesses and McAfee ensures both are secured at all cost.
That’s the primary objective of building a holistic security solution to help working professionals protected all the time when they connected to the cloud. McAfee offers both cloud security and advanced endpoint security to help organizations safeguard their valuable data against all potential online threats.
Conclusion
In the end, I would recommend you to stay protected with McAfee cloud security solutions. If you want to know more about advanced McAfee cloud security products or endpoint security solutions, you can visit mcafee.com/activate or place a call to McAfee Customer Support Services for technical assistance.
Jack Smith is a technology expert who loves to write blogs and articles about cybersecurity. He has been especially writing about the latest updates regarding mcafee.com/activate with an intention to develop the work experience of users across the globe. The blogs and articles he has written have been published in various popular e-magazines, blogs, and websites.
Source: https://rajowilliams.wordpress.com/2019/06/06/how-to-ensure-complete-security-for-cloud-and-endpoint-devices/
0 notes
Text
How to Use Endpoint Security to Fastrack Cloud Processes?
Device security is no longer about using an antivirus. In this era, you need a layered and integrated defense that protects your entire digital world including all your devices. With McAfee’s endpoint security move your next generation products to a layered and integrated defense. The latest range of endpoint protection products can quickly scan, prevent, and remove advanced threats so that productivity isn’t compromised.

Cloud and devices have become the most crucial part of the enterprise data. However, people are unaware of the fact that these endpoint devices act as a gateway to the cloud, which makes their data more vulnerable than ever. It has become the need of the hour to extend the security from device to cloud with data visibility, advanced threat protection, and data loss prevention.
There is a sensitive relationship between cloud security and endpoint security, which makes it difficult for businesses to understand how it affects the security of the people. Let us know how these two are joined and how endpoint security works in terms of securing the cloud.
How endpoint security and cloud security co-work?
The cloud is the virtual storehouse of your information, but every storehouse has a door. Endpoint security is considered the door of the cloud as your devices are all connected to the cloud architecture implemented by an organization. If your endpoint device is misused or mishandled it could create a vulnerable gateway to the cloud and make your data compromised.
The endpoint is relevant in the world of cloud as it has a direct impact on an organization’s cloud as well as its security. A compromised endpoint could lead to major data loss. It becomes the responsibility of the businesses to check out the processes that outlines what assets users put forth. You need to open the gates of your mind while using cloud services on your device.
The cloud strategy
The cloud technology industry is immense and is not showing any signs of slowing down. It includes private cloud, hybrid cloud, public cloud, and multi-cloud, which are growing at a high pace. Cloud adoption is drawing attraction from enterprises but they should keep in mind to give preference to security. With the multi-cloud strategy, the need for security has increased devastatingly.
Modern day business has a diverse set of needs. Therefore, they have adopted either a multi-cloud strategy or a hybrid strategy in order to fulfill the growing needs of the organization along with storing a huge amount of data. This has made many security vendors to meet the modern day needs of the cloud strategy. All businesses should consider how to secure the data that has been compromised through endpoint devices or individual gateways.
Jack Smith is a technology expert who loves to write blogs and articles about cybersecurity. He has been especially writing about the latest updates regarding mcafee.com/activate with an intention to develop the work experience of users across the globe. The blogs and articles he has written have been published in various popular e-magazines, blogs, and websites.
Source: http://mcafee-com-activate.co.uk/how-to-use-endpoint-security-to-fastrack-cloud-processes/
0 notes
Text
Methods to Fix McAfee error code 0
McAfee is the best antivirus in the market which helps the individuals in many ways and it also offers the complete resolution for the errors or issues related to the security of the device and protection from the threats such as malware, virus, Trojans, etc. There are numerous times when an individual might face some kind of error or issue in the working of the product which might create issues for the individuals.

An issue in the McAfee Error Code 0 affects the device of the individual as well as it also creates issues or errors in the working of the antivirus properly. It also happens that the antivirus might not be able to catch the malware or viruses which might make the device easy to acquire for the hackers.
It is very important for the individuals to resolve the error Code 0 as soon as they can to help themselves and the device in protecting from malware, threats. To help the individuals in the process, we have provided manysteps that would allow them to fix the issue without any hassle and it would also resolve the error of the individual as soon as possible.
Causes of McAfee Installation Error
Corruption or Damage in the Windows Registry from any McAfee antivirus related program
Infection from Malware or Virus in the system which might create error or issues in Installation of McAfee antivirus.
Corrupt Download or Incomplete Installation of McAfee
Some antivirus software might have been deleted from the system by mistake
Above described are some of the reasons due to which an individual might face the McAfee Installation Error Code 0 in their McAfee antivirus. To help the individuals fix the issue, we have offered steps that would help the individuals in the process and they would also offer complete resolutions for the errors or issues.
Various Solutions to Resolve McAfee Installation Error Code 0
There are mainly two solutions through which an individual can fix the issues in the McAfee antivirus.
Solution 1: Reinstallation of Antivirus
The best method to solve the issue is by reinstalling the antivirus in the device
Generally, in the second time antivirus can be installed properly.
Solution 2: Running Pre-install Tool
To accomplish the process, you need to download the Pre-Install tools
Now, you must have a double click on the Pre-Install.exe document.
Now, you must read the notification message and click on the OK button to agree to the developments.
Once done with the complete formation, you must click on the OK button
After that, you need to restart your device
As the device is back online, you must try to reinstall the McAfee item.
You must select your preferable item and install it.
So, some of the steps are given above to execute the steps to fix the McAfee Installation Error. All the steps are provided to complete solutions for the issues related to McAfee Error 0. In case, you face some kind of error in the process then you must visit our website and get complete resolutions for the issues.
Jack Smith is a technology expert who loves to write blogs and articles about cybersecurity. He has been especially writing about the latest updates regarding mcafee.com/activate with an intention to develop the work experience of users across the globe. The blogs and articles he has written have been published in various popular e-magazines, blogs, and websites.
Source: http://mcafeecom.uk/methods-to-fix-mcafee-error-code-0/
0 notes
Text
How to Fix Norton Installation Error 8504
It is a faultless antivirus which is present in the technological world. It offers internet security and real-time scanning in such a way that no virus can break the security Armour which it offers to the system of the clients. But, in many surroundings, individuals face errors in their antivirus because technical products are prone to the errors and issues they occur due to some installation errors.

Most commonly customers face Norton Installation error 8504 which persists due to the partial installation of the antivirus or failed installation of the product. It can also persist if you have installed some security software other than Norton and are creating compatibility issues. So it is significant that you should delete all the previous security software in order to appropriately activate and install the antivirus otherwise you can also face Norton Activation Error on Mac. If you do not know how to Fix Norton Installation Error 8504 then you can follow the below-mentioned steps to solve the error.
Steps to Fix Norton Installation Error 8504
Start your windows with the administrative rights and then you have to run the Norton Remove and Reinstall tool
To do so, Visit the official website of the application and then download the Remove and Reinstall tool and save the zip file on the desktop.
Now you have to open the download folder in your default browser and then press on CTRL + J key and then double click on NRnR icon.
Now click on I agree in button on the license agreement window after reading it.
Go to the advanced options and click on remove only button and confirm your action by again clicking on remove and then hit on restart now button.
You have to follow the correct steps of the reinstallation of Norton on your PC.
Ensure that no Symantec product is present on your device before you reinstall the antivirus or if there is any other security software in your device then uninstall it first.
If you are still facing Norton error code 8504 in your device while accessing the application then you should contact the Norton customer support technical specialists to solve the issue.
Aamir Lone is a Symantec Norton expert has been working in the technology industry from the last 3 year. As a technical expert, he has written technical blogs, manuals, white papers, and reviews for many websites such as norton.com/setup.
Source: https://rajowilliams.wordpress.com/2019/06/05/how-to-fix-norton-installation-error-8504/
0 notes
Text
How to Troubleshoot Norton Error Code 1844?
Norton is one of the complete packages and also the bunch of beneficial function which carry complete security for your system from Malware, Trojan, virus as well as other online threat also. But sometime, while running Norton Security, you might encounter an error code 1844 that specifies there are some of the installation problems with your security or system software. You can then fix the error code or can contact some of the specialists of Norton antivirus.
When the error code 1844 persists, the active window software or program might be crashed and may be possible that your system crashes. Window start running slowly to mouse or keyboard input and might be also conceivable that the system freezes for a few seconds at a time more often.
Causes of Norton Error code 1844
During programmer’s code, software design, anticipating the occurrence of errors, there are no perfect designs, as errors can be expected with the best program design. Issues can happen during runtime if a certain error is not addressed and experienced during design and testing.
Runtime errors are caused by the incompatible software’s running at the same time. It may also persist because of memory issues, virus infection or bad graphics driver. Whatever the case may be, the issue must be resolved immediately to avoid issues. Here are ways to resolve the error.
Best Possible Resolution:
Clean all the temporary or junk file from your system
Undo or restore the Window system
Repair Registry entries associated with error 1844
Do full malware scan of your System
Install all the updates available on windows
You must try to Run the File Checker on the system
Uninstall and Reinstall the Norton antivirus program
Aamir Lone is a Symantec Norton expert has been working in the technology industry from the last 3 year. As a technical expert, he has written technical blogs, manuals, white papers, and reviews for many websites such as norton.com/setup.
Source: https://rajowilliams.wordpress.com/2019/05/31/how-to-troubleshoot-norton-error-code-1844/
0 notes
Text
How to Fix Norton Antivirus Error 3039, 65559?
Norton Antivirus Error 3039, 65559 persists when you face technical errors while you are downloading or installing the product of the Norton antivirus security software. This technical error appears on the Windows screen of your device due to an incomplete installation of Norton antivirus software, which can destruct the functionality of your PC.

Consequently, this has become necessary to solve this error with the essential steps mentioned on our blog. Instantaneously, we will also discuss the main causes which are responsible for the generation of this issue, the error, and the symptoms when Norton Antivirus Error 3039, 65559 persists.
Main Causes of Norton Antivirus Error 3039, 65559
Incomplete Installation: When the installation of the Norton Antivirus is not completed, then it can create this error 3039, 65559.
Deletion of Files: The loss of any folders and files even unknowingly can cause this technical trouble.
Corrupt Downloads: If you download any corrupt files on your system, then it can also cause this error.
Corrupt Windows Registry: The corruption in your Windows registry can damage your operating system and lead to the appearance of this error.
Ingress of the Malware and Viruses: The ingress of the malware and viruses can lead to corruption in your system and generates this error.
Symptoms of Norton Antivirus Error 3039, 65559
Your screen of Window can get frozen for a short time.
It can destruct Windows active program anytime
Destroy the functionality of your device
Frequent pop-up of this error on the screen of your Operating system
The functionality of your PC can get sluggish
Cannot access the Computer in a straightforward way.
Steps to Fix Norton Antivirus Error 3039, 65559
Repair the Windows registry entries linked to the Norton Antivirus Software.
Perform a complete malware and the viruses scan on your PC.
Clean up you’re the device junk with Disk Clean up
A regular updating of your device drivers
Undo all the changes in the system
Uninstall and re-install Norton antivirus software
Use Windows system file checker
Install all the updates and complete a clean installation
Aamir Lone is a Symantec Norton expert has been working in the technology industry from the last 3 year. As a technical expert, he has written technical blogs, manuals, white papers, and reviews for many websites such as norton.com/setup.
Source: https://rajowilliams.wordpress.com/2019/05/30/how-to-fix-norton-antivirus-error-3039-65559/
0 notes
Text
McAfee Parental Control – Setup and Remove your Account
In the digital world, we found that the appearance of technology is changing day by day, computers and mobile devices have been a part of our daily life. Banking activities, social networking activities all are connected with the internet through the system those which are used by us. So we need a strong antivirus with parental control on our system to escape from the cyber-crime. McAfee is a strong antivirus which includes the McAfee parental control for the better protection of your system and family.

McAfee Parental Control is a software program which offers reliable protection for the children while they are browsing to a website and ensures to use the safety popular search engines for the children.
McAfee Parental Control for mobile:
Now the use of smart-phone is common in the digital world. Mostly the teenagers and children are using the smart-phone widely. So McAfee Parental Control is broadly needed in the smart-phone device by which you can stay with a peace of mind that your children are safe. Install the McAfee family Protection for your children those who are using smart-phones. It automatically blocks the age-inappropriate sites while the child users browsing the web. If you are much conscious for your children then you can check the statistics and track your child location with the GPS feature of McAfee family parental control.
Key features of Parental Control in McAfee: Can control to access the time limit:
If you think that your child is spending much more time in a particular site which is harmful to your child then you can set the day and time limit for the website to access. Your child can access the site according to the setup day, date, and time. In this way can stop anyone to spend much more time on a particular site.
Can allow a blocking website:
In the case, if you thought that a specific blocked website is beneficial, safe for your child and your child able to access the blocked site then you can allow the blocked site in your web. Add the blocked website in the web address and put it in the filter list, after that set the permission level to allow the sit in your web.
Can search any site in any search engine:
Some of the search engines are unsafe for a specific site on the web which may be effective for site visitors. Use safe search engines for the searching of site. Google, Bing, Yahoo, are some example of popular safe search engine. You can turn on the safe searching through the help of ‘McAfee Parental Control’ by the default users.
Block the site for the age restriction:
If some blocked websites are in the allow option but not safe for the children then you can set the age limit for the website through parental control. After setting the age limit the site will automatically block when the child user will open the site.
Setting up Parental Control:
Create an administrator before facing the above problems. If the administrator is unable to set the McAfee parental control for all the member or make any mistake in creating a password in the parental control then he/ she will be responsible for all the problems. Log in to the Window through the limited use account, create a password and remember it forever. Then set up all the privacy according to your child. Remember that you can only change the setting as an administrator. The password is more important for the setting up parental control.
However, if you want to get the appropriate result of these key features in your web then activate the McAfee through the mcafee.com/activate with the McAfee activate subscription. Once you set the parental control you can then proceed to add the filter.
Pros and Cons of McAfee Parental Control:
Pros: Preserve the system from Malware, threats, and blocks the phishing attempts and works with a very simply override function.
Cons: Require instant multiple overrides on one site. Relatively charging on system resources.
Steps to reset the password of McAfee Parental Control:
Go to your McAfee account and log in to your McAfee Account through the administrative password.
Go to the homepage and select the ‘Parental Control’ tab to open it.
Select an unique administrative password.
A new page will pop-out over the homepage of ‘Parental Control’.
Type your new password and retype it again for the confirmation.
After that, it will ask for a hint and enter a hit on it.
Click on the ‘Save’ option and then click ‘Ok’.
Set up the protection for child users:
Launch the Mcafee Activate Subscription on the screen.
Click the ‘Protect’ button.
Then select an age limit that which you want to set up for the age.
Then click on the ‘Optional Setting’.
Steps to remove McAfee Parental Control:
Open your system and go to the ‘Start’ menu option.
And navigate to the ‘Control Panel’ option.
Go to the ‘Program’ option.
And select to the ‘Uninstall a program’. (Windows Vista)
Click on the ‘ Add or Remove Programs’. (Windows XP)
Search and click the ‘McAfee Parental Controls’ from the list.
Then click ‘Uninstall’ for Vista Window and ‘Change/Remove’ for XP Window.
In another way install the McAfee Removal Tool in your system and remove the McAfee Parental Control.
Setup the outside allowed time through Parental Control:
At first, verify that the time is in the AM/PM and confirm that the Time zone is properly set.
Go to the SHI home screen and click on the ‘Menu’ tab or the icon or you can swipe the bar to the left to access the ‘Menu’ icon.
Then click on the ‘Setting’ option, a setting window will open on the SHI window page.
In the setting screen, you can see your current time zone.
If the current time zone is not ok then click on the edit option (pencil icon) and change into your current time zone by sliding the menu up and down.
Jack Smith is a technology expert who loves to write blogs and articles about cybersecurity. He has been especially writing about the latest updates regarding mcafee.com/activate with an intention to develop the work experience of users across the globe. The blogs and articles he has written have been published in various popular e-magazines, blogs, and websites.
Source: http://1mcafeeactivate.uk/mcafee-parental-control-setup-and-remove-your-account/
0 notes
Text
How Does McAfee Antivirus Software run on your device?
McAfee Antivirus programming helps to defend infections from entering your computer system and execute infections that can break through the firewall. The gist for this article is to give you a broad picture of how McAfee antivirus protects you PC. To know in details, keep reading and explore the following elements.

The Virus Database
To ensure a safe working computer system, McAfee Antivirus program refreshes its infection database by utilizing a programmed web crawler that examines the Internet and recognizes vindictive programming by name, type, ruinous capacity. With that data, the product additionally checks for the best approach to erase the noxious programs.
When the sweep is finished, the program is set up to obstruct the section of malware on a PC framework or obliterate it. Once the virus is removed from the database, your system will work properly without interruptions.
The Firewall
When the infection database is refreshed, McAfee Antivirus program fortifies a PC’s firewall. Some antivirus programming isn’t prepared to keep out all dangers—particularly new and complex dangers—since all product doesn’t play out a hunt that is sufficiently careful to distinguish and deal with the Internet’s new dangers.
This isn’t the situation with McAfee Antivirus program, and this is the reason the firewall becomes invulnerable. Nothing can enter your PC framework without you giving it access, and a notice is issued at whatever point there is an apparent risk. The firewall on certain renditions of McAfee even reaches out to the Internet, so you are informed about destructive sites while you surf the web.
On the off chance that, unintentionally, you permit an infection or a worm past the firewall and into your framework by downloading a contaminated program or opening an adulterated email connection, the last line of protection is the infection examine apparatus, which finds and murders or contains malware for manual erasure.
The Virus Scan Utility
The infection examines utility quests each document on your PC framework for malware and gathers a rundown of noxious programs that you can erase toward the finish of the sweep. Most antivirus programming has this utility, however as referenced in the past areas, the outputs performed by other programming are just as compelling as their infection databases enable them to be.
The profundity of McAfee Antivirus’ database allows the program to identify and dispose of most dangers rapidly with an exhaustive output. With every one of the devices that McAfee Antivirus program has available to it, your PC ought to dependably is malware-confirmation.
Malicious causes
All alone, hard drive, movement isn’t a reason to get excited, yet in case you’re likewise encountering unexpected framework gradualness, slamming, solidifying or suspicious spring up messages, the action could be crafted by an infection. In case you are concerned, run a full infection output to check for dangers.
Conclusion
In case, you want profound information on how McAfee antivirus and firewall protection protects your internet-connected devices against malicious websites and cyber threats, you’re recommended to seek expert guidance from McAfee customer support via phone call or online chat. In addition, you can browse the URL mcafee.com/activate for additional information of McAfee products and services.
Source: https://rajowilliams.wordpress.com/2019/05/27/how-does-mcafee-antivirus-software-run-on-your-device/
0 notes
Text
Pokemon Sword And Shield Would Feature Customization!
Many sources have unveiled some details associated to Nintendo’s upcoming E3 Direct Presentation which hints that the studio is planning to disclose information associated to a number of titles namely Luigi’s Mansion 3, Fire Emblem: Three House, Animal Crossing.

But interestingly enough another leak has suggested that Pokemon Sword and Shield would allow trainers to customize their in-game avatar in the generation eight Nintendo title. The said information has come from a T-shirt contest which featured a number of competitors from Japan.
Although such a customization option has been present for all the core RPG titles since Pokemon X and Y, still it is pleasing to witness this feature finally coming to Pokemon Sword and Shield.
The above-mentioned T-shirt contest was organized by Uniqlo, who is famous for its casual wears clothing. Amongst hundreds of designs, a T-shirt titled Ocean King won which included Gyarados, Magikarp in a Totem style. This T-shirt was designed by Li Wen Pei whose design would be included in the Pokemon Sword and Shield title as a wearable item for the protagonist.
The Ocean King wearable T-shirt would be available in the in-game shop of Pokemon Sword and Shield, and Pokemon fans will be able to purchase this item using real money. Still, due to this T-shirt contest, Pokemon fans and community members are sure that the new Pokemon Sword and Shield would also include different wearable items for trainers to experience stylized look in the game.
Although it is speculated that the Pokemon title would feature sufficient amount of items and cosmetics to change the complete look of the in-game character, still many community members are stating that Niantic would possibly showcase some of the more exciting avatar wearables during the upcoming E3 2019 event.
The said T-shirt contest was brought to general eyes by posting the image of the winning T-shirt on a Twitter handle, namely Serebii.net, which even showed an in-game female protagonist wear it.
Pokemon Sword and Shield are going to bring some of the memorable landscapes to life which resembles a lot with some of the locations of Great Britain so players can expect some exciting cosmetics associated to the western culture.
Although the said game is expected to launch in the coming month of July, still the upcoming E3 2019 tech event would reveal some more detailed information associated with the title. Let’s see how the new in-game cosmetic feature improve on the player’s in-game interactions as it would definitely allow players to change their avatars according to different regions.
Jack Smith is a technology expert who loves to write blogs and articles about cybersecurity. He has been especially writing about the latest updates regarding mcafee.com/activate with an intention to develop the work experience of users across the globe. The blogs and articles he has written have been published in various popular e-magazines, blogs, and websites.
Source: https://rajowilliams.wordpress.com/2019/05/24/pokemon-sword-and-shield-would-feature-customization/
1 note
·
View note