ranchero500
The 1979 Ford Ranchero 500 Project
15 posts
Don't wanna be here? Send us removal request.
Last Seen Blogs

emazing10-the-original
Elijah Veluzat

margesimpsoncosplayer
chaotic neutral

hildcit
Hi! o/

puggoddess
i'm goofy not stupid

carduelis-art
Carduelis Art
Photo

I just received a call that my car’s warranty is about to expire. You’re about 3 ½ decades too late Mr. Telemarketer. #ranchero500 #antiqueauto #instagram
2 notes
·
View notes
Video
youtube
Here’s Doug DeMuro with an exciting look at another coupe utility: The Subaru BRAT.
(via https://www.youtube.com/watch?v=2DIS6hmQ6GY)
1 note
·
View note
Photo


Lights...camera...action! Red LEDs illuminating the gauge cluster.
0 notes
Video
youtube
(via https://www.youtube.com/watch?v=E6GsXhBb10k)
I wonder if anyone makes a high-mileage blinker fluid for classic vehicles...
2 notes
·
View notes

Text
To Do as of December 2015
Since my last to-do list, I’ve accomplished some things. Many things still remain. Some things have been added. So, as I look at my last to-do list, here is my to-done list since then:
Headlight Switch replaced. Sort of. I’ve installed a new headlight switch, though it’s not the correct switch. Not sure what the missing component is on the switch that I’ve bought, so I’ve got to keep up with the old switch and someday buy the correct switch. But, for now...I think I’ll mark this one off the list.
The CB radio has been removed. The installer’s wiring methods were questionable, but functional. (Positive wire was jammed in between a fuse and its socket. That explains why it had constant power. I haven’t decided what I’d like to replace it with, if anything. I think I’m going to mark this off of the list for now. Maybe somewhere down the road, it will return to the wishlist?
Works in progress:
Radio! I found a great deal on a Retrosound Model 2 radio on eBay. The factory radio has been removed. I’ve got to figure out the wiring, then get my tunes going!
Gauge cluster clean-up. I’m thinking I want to touch everything up while I’ve got it apart.
Clean it up real nice. Get all of the dust and gunk off of it. (This car was smoked in quite a bit.)
Paint it. Make it look shiny and new. Sure, it’ll be buried under the dash, but it’ll help me practice my spray-painting technique! lol
Replace the incandescent bulbs with LEDs. I’m strongly considering removal of the light filters and using green LEDs to keep the original light color, but to enhance the light output.
Fix that stupid clock. Haven’t decided which direction to go with it just yet. Replace with a NOS clock, possibly make what’s in there functional again, or to put a new AA-driven quartz works in the back of it. The retrosound has a clock on it, I believe, so this one might return to the back burner in a hurry! Also, I’d like to get some numbers back on my trip odometer.
Okay, not a whole heck of a lot accomplished, but hey, I’m in no huge hurry. Let’s see what is still on the to-do list:
Exterior work
Paint the body–I think I’ve settled on white paint with a hint of pink pearls in it. Something that will catch in the light and pop against the red interior.
Spray-in bedliner–ideally, I’d like to have it color-matched so that it’s as close to the white on the rest of the car. Black or dark gray would just be too much contrast, I think.
Replace window/door gaskets–this one might have to come sooner than later. I’m getting moisture in the car, and I’m pretty sure it’s leaking in from around the doors. I don’t want to have to weld a new floorpan in the car, too.
Interior work
Radio–in progress!
Gauge cluster cleanup–in progress!
Vinyl dye–I’ve got lots of wear on the vinyl on the front and lower part of the dash. The leather on top looks in pretty good shape, though it might need some dyeing in spots, too.
Chrome/mylar–might have to be accomplished with the shiniest paint I can find for now. From what I understand, the process to “chrome” plastic pieces isn’t so much a DIY job.
Maybe convert the interior footwell lights to LED? Should be cheap/easy enough.
Clean and polish the smoke/tar off of everything interior.
Re-cover seats.
Re-carpet door panels. (Seriously...everything used to be dark red inside. The floor and vinyl held its color. The seats have faded to purple. The door panel carpet has faded to orange.)
Seat belt light–perpetually on. Gotta fix that.
Seat belt buzzer–barely audible. Needs replacing. Fairly useless if the light won’t go out, though, lol.
Glove box light switch–kinda works? But not very well.
Mechanical stuffs
Engine rebuild–gonna definitely have to wait until I can pay someone who knows what they’re doing there.
Engine bay cleaning–I need to see what I’m working with if I’m gonna make it fancy under the hood, too!
Transmission work–filter & gasket replaced.
Find the fuel leak.
Cruise Control–needs some tweaking. Probably new hoses. It doesn’t hold the speed well.
Park brake–hard to apply. Releases just fine. Not sure why it won’t catch without some begging.
Why am I here on the computer? Adventure awaits! More stuff to do to the car!
1 note
·
View note
Photo

It's funny because it's ah, bigger than, ah.. [ahem] ..you know, a normal hat.
5 notes
·
View notes
Text
Headlight Switch Replacement
Day one of my Ford Ranchero ownership reminded me immediately what it means to own a FORD: Fix Or Repair Daily. I pulled the knob to turn on my headlights and my front yard was met with the dim yellow glow of my parking lamps. Headlights just weren’t happening that morning. Sadly, I parked it and reverted to my primary method of transportation, my ‘08 Mercury Milan.
Later that day, I tried the headlight switch again, and it worked just fine! My plan was to hit up the auto parts store and replace the switch on my lunch break. Shouldn’t be rocket surgery, and hopefully just a snap out, snap in sort of thing. I checked online and found the appropriate headlight switch for my vehicle, verified it among a few auto-parts stores’ websites to make sure it was the right one. Once I found a store that claimed to have the part in stock, I made my purchase. Of course, I had other things to do during lunch that day, and since my headlights happened to work, I continued on my merry way.
Fast forward a bit...I jump in the Ranchero and pull the headlight switch and, again, nada. (Or nada but the park lights, that is.) In a moment of frustration (because I wanted to cruise around in my sweet ride) I violently jiggled the switch and the lights came right on! They worked for a couple more trips, some more violent jiggling, then they worked for a couple more trips.
I finally got a moment where I had the time, so I set out to swap switches like so:
Step Numero Uno: Disconnect the battery. You don’t want to weld any parts together or see any big sparks while you’re working in tight spaces. This can cause headaches and injury. Safety first!

Step Two: Get your stuff together! I purchased the BWD S439 replacement headlight switch for just under $20. Isn’t that special?

Three: Locate the knob. There it is.

Four: Practice pressing down the little button on the bottom of the new switch. This is the release button for the shaft that goes in the light switch and turns the lights on and off. Become intimately familiar with the touch of it, because there’s no elfin way you’re going to see what you’re doing unless you’ve got a low level of x-ray vision and can peer through plastic. If you can, I’ve got some projects where that would be quite handy. Please HMU.

Fiiiive gold riiiiiiiiiings: The big moment...reach under the dash and find the light switch. Hint: it’s behind where the knob is. Pull the knob to the “parking lights” position, then press that little button on the bottom of the switch that you came to know and love in step 4. Tug on the shaft, then claim your prize!

Number 6: Unscrew the dinglehopper cup cap thingamabob from which you just delivered your baby shaft. This is the magic piece that holds the switch in place. That and a nest of random wires.

Siete: Twist and turn and navigate that old switch through tangle of wires. It’s a boy!

Step 8: Pray to Atlas for strength, then prize the clips off of either side of the switch. Not too much, though. They’re plastic and older than they are strong. One wrong move and you’re gonna end up with a big wad of duct tape under your dash. (You’ll note that my Ranchero has two connectors for the headlight switch. More on that in just a second...)

9: Compare the old and new switches. You’ll notice that they are different. Now, if you’re working with your young son on this project, this is the point where you want to give him a half-assed description of some non-existent tool. Tell him it’s very important that he bring this back in a hurry. Once he’s out of earshot, practice your blue streak of expletives because you now realize that you have the wrong part.

Number 10: Take both parts to the auto parts store like you should have done in the first place. After searching the computer for several minutes, the clerk will identify about 700 different headlight switches that are either the same as what you purchased, or made for a car roughly 25 model years newer than what you’re trying to work on. Eventually, he will find a part that they can special order. Or you can try going online yourself. Or you can go to the Ford dealership.

Eleven: Or you can just take your chances and plug in the “main” looking plug to the light switch and test it out because your buddy needs to pick up a Christmas tree which won’t fit in the back of his Chevy Sonic...even with the seats down. Re-attach the battery cable, and turn everything on. Singing of the “Hallelujah Chorus” is purely optional, but highly recommended.

And finally, number 12: because you realize that you likely have the wrong part and that extra plug was probably necessary, don’t even bother completely installing that thing back under the dash.

Your buddy’s gonna have his Christmas tree tonight! Even if you do have to reach inconveniently under the dash to turn on the headlights. Just never you mind that extra connector. It’s likely unimportant. (The jury is still out on what that’s for. Waiting to hear what my friends on the Ranchero USA forums conclude.)
Join me next time when I install a radio or something!
#project car#car project#ford#ford ranchero#headlight switch#how to#ranchero 500#1979 Ford Ranchero#to-done
0 notes
Photo


The old headlight switch and the new headlight switch are slightly different. I wonder why...
0 notes
Video
youtube
I like the way the Retrosound radio looks. This is definitely a wishlist item. I need to study the stock radio so I can pick the correct black/chrome combination. (Though I’m sure any of them would look great!)
Retrosound.com
0 notes
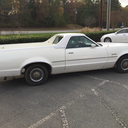
Photo


Some photos.
#1979 ford ranchero#ford#ford ranchero#ranchero 500#coupe utility#classic car#car restoration#project car#photos
4 notes
·
View notes
Text
To Do as of November 2015
Here is my current list of things that I need or want to do for the Ranchero 500:
Headlight switch (purchased, needs to be installed)
Paint the body
Get the radio working/put in a decent radio. (I need my tunes.)
Some kind of spray-in bedliner?
Engine work
Transmission work
Cruise Control
Seat Belt Light
Seat Belt Buzzer
Maybe a better CB radio?
Replace window/door gaskets
I’m sure there are more things to do...as I said, this is a growing list. I know one thing I surely need to do is get some pictures of this bad boy up on the blog!
1 note
·
View note
Text
Genesis
In the beginning, there was born an idea. “Stephen,” I said, “you need a truck. Nothing fancy, just something to haul stuff around in every now and then.”
So, I kept my eyes open in hopes of finding the perfect ride. Even when I wasn’t looking for a car, I would pick up a copy of the Triangle Auto Guide or Auto Weekly magazine, depending on which one was available at the restaurant where we were lunching.
One day, when I was piddling around on Craigslist, I ran into what I thought could be the one: A 1982 GMC Caballero. It was unique in that it was made by GMC, even though it was essentially an El Camino in many other ways. I believe the engine they had in it came from an El Camino. Someone had even decorated it with SS stickers, SS being a trim package of an El Camino, not a Caballero. It was mid-restoration. The dealer selling it had put some money into it, replacing a lot of parts on it. They let me take it on a short test drive. When I got it back to the dealership, however, one of the unused radiator ports sprung a leak, shooting steam everywhere. The more I thought about it, the more I felt like it was going to be more to bite off than I could chew. (At the time of this writing, the Caballero is, as it has been for a couple years now, still available at the dealer. I hope they plugged up that leak.)
My good friend, Ken asked me why I, being a Ford man (with the exception of the Isuzu I owned for about 11 years), didn’t look at Ford’s coupe utility: the Ranchero. I probably checked into Craigslist but didn’t see anything at the time, and I’d let the thought die out. I did, however, see lots of mid to late ‘70s F-Series pickups that I liked. Most of them were somewhere between not affordable, and not roadworthy.
Some weeks went by, and I decided to revisit the idea of a truck. This time, i found some more that I liked, in decent shape, and for a reasonable price. I also found what I’d missed before: the Ford Ranchero.
The seller had bought it for his son, but he never really took a liking to it. He had the car posted for awhile, but seemingly no one else was interested. I arranged to meet the guy and the car. I was definitely intrigued by the car. It had the classic car sound, the classic car smell, the classic car feel...I didn’t taste it, but I’m sure it would be a classic taste.
I didn’t agree on the spot to buy the car. I spent the next several days looking at Rancheros online. I found a message board dedicated to the Ranchero. I looked at some general car restoration websites. I was hooked. I had to have it.
Arrangements were made, and...cutting the story short as it needs to be, I bought the car! Antique plates are on their way to my house. It’s going to be an adventure, for sure. Buckle up and hang on!
1 note
·
View note