
rebloginginsteadofplaying
691 posts
Trying to organize my favorites here. TS2 TS3
Don't wanna be here? Send us removal request.
Statistics
We looked inside some of the posts by rebloginginsteadofplaying and here's what we found interesting.
Average Info
Notes Per Post
6K
Likes Per Post
5K
Reblog Per Post
1K
Reply Per Post
32
Time Between Posts
13 hours
Number of Posts By Type
Text
11
Photo
4
Note
2
Last Seen Tumblr Blogs


Fun Fact
Tumblr Inc. is using 66 technologies for its website.
Text
TS2 Download [Ash & Stone Pizzeria]


148 notes
·
View notes
Text
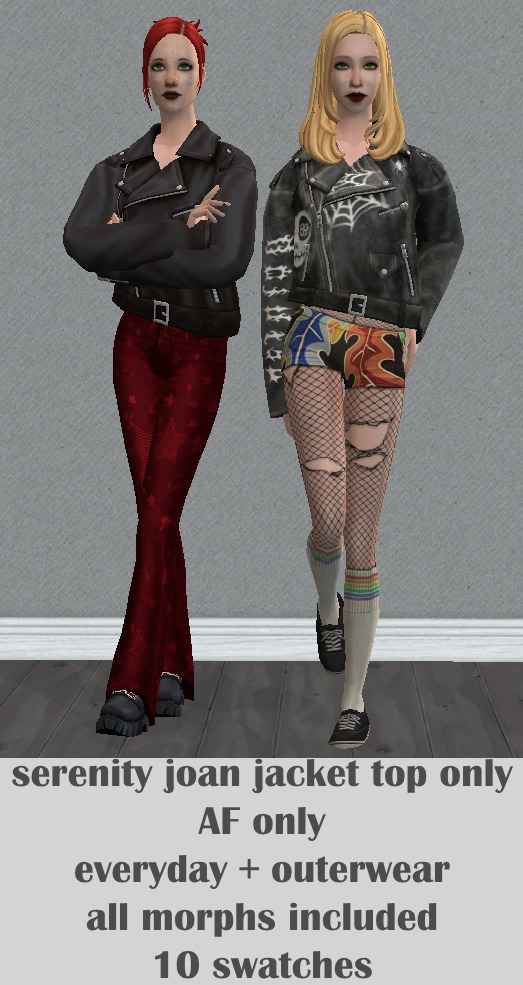
today i have a 4t2 conversion of @serenity-cc 's joan jacket as a top for you guys (requested by @hergoldenlife and @elenwewy )
it's for adult females, is enabled for everyday and outerwear and has all morphs included. there are 10 swatches
download: SFS / MF
i hope you enjoy this conversion :))
296 notes
·
View notes
Photo
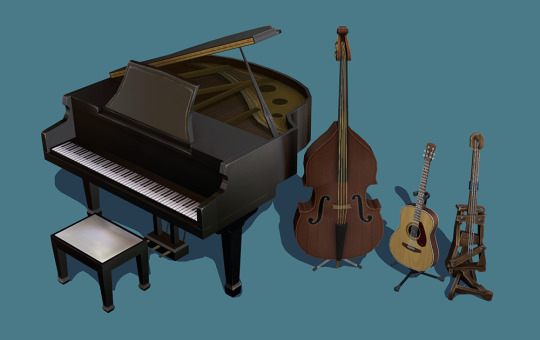
Conversions of Various TS3&4 Musical Instruments
These are functional instruments which require Uni, Freetime and Argon’s custom instruments hack.
Swatches: - TS3 Countrabass - TS4 Acoustic Guitar - TS4 Crappy Handmade Guitar - TS4 Grand Piano
Download at SimFileShare or Dropbox.
—-
Update: I finally fixed some issues with the guitar accessories. Thank you to @heathensimmer for pointing out the problem. The files have been updated at SimFileShare and Dropbox.
1K notes
·
View notes
Note

Hi where did you get these beams from?
Bom dia, como vai?
Eu usei as colunas desse conjunto Diy Build Set!
47 notes
·
View notes
Text
Pride Rocks! Collage for The Sims 2


This is a 4to2 conversion from Sims 4 Game, low poly. It's a wall lamp but you will find it in the Paintings section of Buy Mode (I thought it was a better placement).
DOWNLOAD HERE
-----------------------
If you want to support my creations, you can send me a donation with Paypal or Ko-fi ☕ If you want to ask for a Paid Commission, HERE you can find more details. Thank you ❤️
701 notes
·
View notes
Text
Update!


BubbleUp Hot Tub (Basegame) in Cluedo Woods
basically an update to the textures from this post. Links have also been updated in original post.
Download: SFS/MF
credits: EA, @shastakiss
177 notes
·
View notes
Note
Omg, your Twikkii Beach Hotel is STUNNING! I love it. any chance you'd upload the lot or share floorplans at least?

Here you go:
DOWNLOAD 'Twikkii Beach Hotel' (SFS, 48mb)
Go here for more pics
You absolutely need the Sims Life Stories content (1, 2). The Castaway stuff is also needed, but most of it is included (I think I missed the bamboo wallpaper, but maybe it's from BV? Idk).
As always, I use defaults in Cluedo woods and colors, so some things will look different in your game unless you have the same defaults installed. At the least grab the LS recolors here.
Let me know if you run into any problems.
@ts2lotmakeoverdb
83 notes
·
View notes
Text
BERLIN Altbau Front Door, Modern Elegance iSimPad and Eames Chair - for The Sims 2


These are 4to2 conversions from Felixandre and Bostyny, low poly. Ipad has also a Monique Hacked version but choose only one.
DOWNLOAD DOOR DOWNLOAD IPAD AND CHAIR
----------------------------------------
If you want to support my creations, you can send me a donation with Paypal or Ko-fi ☕ If you want to ask for a Paid Commission, HERE you can find more details. Thank you ❤️
683 notes
·
View notes
Photo

Updated 2-25-13
Here’s a MTS Is Still Down gift for my followers (100+ now, thank you!). It’s the Kinder Keep Away baby gate from the Sims 3 Store World, Aurora Skies.
Fully Functional (toddlers can’t go through the gate on their own, they have to be carried)
Base Game Compatible
Catalog Sort: Doors / $200 Polygon Counts: Faces: 1290 Vertices: 1748 Issues: You can’t use the design tool when the gate is placed on a diagonal wall. So before you place the door it needs to be the color you want it to be. I’ve gone over everything and I don’t see why it doesn’t work on the diagonal but if I figure it out later I’ll be sure to update. Fixed! Thank you mustluvcatz. Terms Of Use: You’re welcome to use this however you’d like. If you’re interested in recoloring, the original textures are available HERE. Credits: SimPE, AGS, s3pe, s3oc, Gimp 2.8, Milkshape, and EA for the meshes and textures. And thanks go to Numenor and Inge Jones as well — I never would have been able to make this functional without looking at their bhav’s first. Download @MediaFire
You can view all of my CC at my Download Gallery.
440 notes
·
View notes
Text

Hi everybody!
Today I came to bring another recolor of a kitchen countertop. I had already recolored it and when I looked for inspiration I realized that this mesh would be ideal for this result. I'm very satisfied and I believe it will be an incredible addition to the game.

Unfortunately, the handles didn't accept the recolors and the back part of the bench, which is also the same side part, looked a little strange, but I didn't want to give up the beautiful detail that remained on the side. I hope this doesn't bother you.
Finally, I found incredible mesh accessories that complemented the kitchen perfectly.

DOWNLOAD
http://www.simfileshare.net/download/5228705/
ADDON
https://www.thesimsresource.com/artists/Mutske/downloads/details/category/sims2-sets-objects/title/stylish-uppercabinets/id/747342/
https://www.thesimsresource.com/artists/Mutske/downloads/details/category/sims2-sets-rooms-kitchens/title/stylish-kitchen-apartment-life-add-ons/id/772209/
** Maxis Match object. **
I hope you like it like I did.
672 notes
·
View notes
Text

Hi everybody!
Have you noticed that I love recoloring sofas? Because I really love doing this, and I already say that my goal is to recolor all the models in the game. But I also realized that some old versions I made are very outdated, I want to renew some of them too.
Anyway, today I'm bringing you a set of the worn-out sofas we have in the game. I first thought about recoloring it with luxurious textures, with a rich look. However, the purpose of the sofa was to convey the idea of something old and old. I'm not going to say that my textures give the impression of trash, but I worked to make them appear more worn-out sofas, something like a "family heirloom sofa".
I really loved the result and I hope it serves everyone well. I also brought additional mesh that makes the set complete.


DOWNLOAD
http://www.simfileshare.net/download/5273760/
ADDON
https://modthesims.info/d/486794/wornable-add-ons.html
** Maxis recolor. **
I hope like it like I did.
122 notes
·
View notes
Text
October Living


Meshes are included
DOWNLOAD
157 notes
·
View notes
Photo


SIMsBIOTIC´s GUIDE
Rough Stuff
Brutalist architecture, or Brutalism, is an architectural style which gained popularity in the late 1950s and 1960s. It is characterized by simple, block-like structures that often feature bare building materials. Brutalist buildings are usually constructed with repeated modular elements forming masses representing specific functional zones. Exposed concrete is favored in construction. Concrete is used for its raw and unpretentious honesty. Brutalism as an architectural philosophy was often associated with a socialist utopian ideology. /source: WIKIPEDIA/
For many years Brutalist architecture was a source of controversy, its buildings described as unsightly and austere and accused of being blots on the landscape. Brutalism stands apart by its radical approach, absence of decoration and great formal freedom /source: MILK DECORATION/
Famous Brutalist architects: Eero Saarinen, Oscar Niemeyer, Frank Lloyd Wright, Zaha Hadid, Peter Zumthor, Rem Koolhaas.
GET INSPIRED 1 / 2 / 3 / 4 / 5 / 6
EDITORIAL:
Are you fascinated by Brutalist architecture as we are? Then you must design your own Brutalist building from the last century and furnished it with the Rough stuff! Here is the selection of the best design pieces to gain a raw interior.
Solar mirror
object designer: Murano
name of the set: Solar bathroom
Curio bedroom pillows
object designer: billyjean
concrete pillow cover design by simSbiotic
Bismuth console
object designer: wondymoon
converted to sims 2 by Moxxa
Roche Bobois Less is more table
object designer: @nelphaell
name of the set: Hyde Moro set
Hercules bust
object designer: simSbiotic
black marble realization by @riekus13
Pjescani san bathroom endtable
object designer: spacesims
converted to sims 2 and concrete texture by simSbiotic
Caesium shower
object designer: wondymoon
converted to sims 2 by @beautifulnerdkitty
Cable coffee table
object designer: awesims
converted to sims 2 by moxxa
concrete texture by SimsCraftsman
Concrete endtable
object designer: marcussims91
converted to sims 2 by @marioneves2
Mold Pendant Light
object designer: @meinkatz
converted to sims 2 by @nelphaell
MDS pastel - Photography
object designer: @pseudodigs
converted to sims 2 by @paisleyavenueredux
art photographies arranged by simSbiotic - SWATCH
an exclusive gift for subscribers, get it now!
Outdoor small table
object designer: @pinkbox-anye
converted to sims 2 by @cordelia-haze,
concrete realization by @riekus13 here or @msteaqueen here
Urban spiral staircase
object designer: gosik
converted to sims 2 by evanesco
Subscribe for more!
Collect small gifts for subscribers and enjoy our guide!
You are encouraged to decorate your homes with objects from simSbiotic´s guide EDITORIAL and share pictures publicly. Tag your interiors with “simSbiotic´s guide” and “@kacicka777″. We want to see your Summer cottages or Rough interiors! Also feel free to send us message with your suggestion on topic for the next guide.
Happy simming!
294 notes
·
View notes
Photo

88 Road to Nowhere in chronological order: Click
DOWNLOAD:
▶ 88 Road to Nowhere
47 notes
·
View notes
Text

» The Pleasant Vista Apartments in chronological order: Click
DOWNLOAD: » Pleasant Vista Apartments » Pleasant Vista Apartments (as house)
122 notes
·
View notes
Text
Sclera Accessory for TS2
UPDATE (2025.05.14): - Added meshes version compatible with @simnopke Heterochromia. Choose only one: original or compatible. Notice that compatible version has the same overlapping issues as Heterochromia - CAS thumbnails updated
Finally, I’m ready to present the Sclera Accessory!

What’s the point?
This accessory helps solve a long-standing issue:
In TS2, when the sclera was painted directly onto the eye texture or used as a makeup overlay, it moved along with the iris, which looked unnatural. Players had to choose between a more realistic texture and better animation compatibility.
Now you can use eye textures with just a plain or gradient white sclera, while the lacrimal caruncle and eyelash shadow are placed on the accessory texture instead.
Thus, when the eye moves, the sclera remains in place.
How it looks in motion
Close-up:
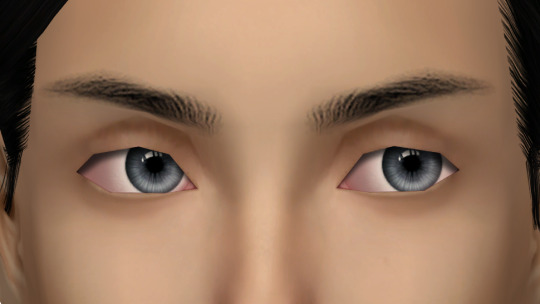

Here’s how my Sims look with and without the sclera accessory:

Details
The mesh is a separated and slightly edited part of the face mesh, which allows it to work perfectly with facial animations.
I also edited the UV map to make texturing easier.
The sclera works with any eye shape and is available for all ages and genders, including infants.
The PU-EU and BU meshes are separate files so you can easily relink your recolors for all ages.
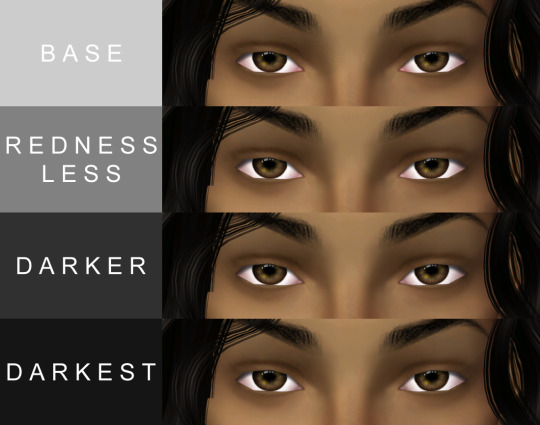
Recolors
I made 4 recolors. I wanted the texture to be something between hyper-realistic and maxis match — something in the middle. I know many of you are talented and will create even more amazing textures in different styles. Here's the PSD.

Known issues
First, I had to change the material type to StandardMaterial to make the texture’s opacity look better. Since this material type isn’t native to CAS items, it may cause transparency issues when meshes with alpha textures intersect.
Second, blue flashing fix: I didn't use a placeholder. Instead, I removed all references to the “lens” group in the mesh and texture files. I didn’t get blue flashing in testing, but if it happens, let me know and I’ll upload a fixed version.
DOWNLOAD: SFS | Box
511 notes
·
View notes
Text

By popular demand (I saw two people asking) I thought I would throw together a quick guide to using the road editor tool in the newest version of SimPE! You'll see that this is a very easy tool to use, and best of all, goof-proof. If you do mess up (you probably will) it's very, very easy to correct.
Very, very, very important to make a backup of your hood before you ever do any tinkering in SimPE! I also recommend practicing on a test hood you don't actively play in to get a feel for it before you do anything to your main hoods.

We're starting with a vanilla Strangetown. I would recommend going in your game and taking a nice overhead screenshot of the hood like this first to look at for reference of where everything is situated the way that you're used to looking at it.

2. Open SimPE, go to Tools> Neighbourhood> Neighbourhood Browser and open the hood you're wanting to work on. If you're not so familiar with SimPE, opening your hood can take some time. Touch nothing until it's loaded!

3. Once it's all loaded, from the Resource Tree list pick Neighbourhood Terrain Geometry (NHTG). Then you'll see one file populate the Resource List - click that. Make sure on the bottom that you have Plugin View tab selected.

4. Now you should see this map of your hood pop up! There are different things you can toggle, I like to check the Show Lots box when I'm editing the roads. Then click the Road Editor button on the right.

5. To be able to see better, I've pulled this Plugin View window up a bit - it may rearrange the Resource List and Resource Tree windows a bit to accommodate. You can also press the Zoom 2x button to see closer, and then you'll have to use the scroll bars to move around the map and the road editor tool.

6. The road editing tools here will be placed down in the same orientation as the map. So the two parallel roads running through Strangetown from this perspective are the vertical straight road pieces (top row, second from left).
When you select a road tool, above it will indicate which tool you have selected.
Also - I recommend having Handle Stop Signs ticked.

7. Once you have the correct type of road selected for the spot you're working on, simply click on the map - it lays it down one tile at a time. If you miss a spot like shown here, just fill it in.

8. If you want to create an intersection, first delete the section of road where the intersection will go.

9. Then choose the type of junction for the intersection you're making, and add that piece in. You'll see a red circle appear (unsure if this is because it's an intersection or because you have handle stop signs selected, but I recommend you do have that selected either way).

10. Once you're done making all your changes, click Close Editor.

11. This is the part where you save your changes! First click Commit in the top right of the editor. Then, File> Save!

12. Load your game to check! Looks pretty good with all those new roads!

13. However, we have indeed made some mistakes! Which were absolutely for illustrative purposes and not truly an accident.

14. Never fear! Simply reload the hood in SimPE - I've deleted the spot where the T-junction should go and added one in, and deleted where the road just ended abruptly and added a proper end piece.
I have not experimented with what happens if you try to build a road through hood deco - if you have, please let us know in the comments how that went!
I also have barely touched the terrain editing tools, so that's outside the scope of this tutorial.
I hope this helped!
801 notes
·
View notes