
Statistics
We looked inside some of the posts by redpandatoocute and here's what we found interesting.
Average Info
Notes Per Post
2
Likes Per Post
1
Reblog Per Post
1
Reply Per Post
0
Time Between Posts
21 days
Number of Posts By Type
Text
17
Last Seen Tumblr Blogs


Fun Fact
BuzzFeed published a report claiming that Tumblr was utilized as a distribution channel for Russian agents to influence American voting habits during the 2016 presidential election in Feb 2018.
Text
One of my favourite desserts is Tiramisu, I’ve always wanted to make it at home. So I spent a good day researching recipes. This version of Tiramisu is a hybrid of recipetineats and taste. This Italian dessert is simple to make, fun to construct, and the flavour is constantly evolving the longer it sits. This recipe keeps good in the fridge for about 4 – 5 days.
About my Recipe:
One thing I personally dislike about tiramisu is when it’s too soggy. I only dip one side of my Italian biscuits (for about 0.5 seconds), by doing it this way they don’t soak up too much coffee. I also like to add a layer of chocolate between each layer. While making this recipe, I used a very small dish, which meant I could add another layer. This is not the traditional way to make tiramisu, just my personal preference. If you want your tiramisu to have a more intense coffee flavour, soak your biscuits on both sides and soak for about 1 second on each side.
Tiramisu
A simple recipe for the perfect Tiramisu.
3 eggs (separated)
1/2 cup caster sugar
1 tsp vanilla
500 g mascarpone
1 cup black coffee
2 tbsp Kahlua
Italian lady fingers
Cocoa powder
In a large bowl, beat the egg yolks and sugar for about 8 to 10 minutes or until it the mixture changes colour from yellow to an almost white, and has slightly thickened.
Combine the vanilla and mascarpone to the mixture. Once combined, set aside.
In another bowl, whisk the egg whites until stiff peaks form.
Gently fold in 1/2 the cream mixture into the egg whites. Once combined, you can fold in the remaining cream to the mixture.
Mix coffee and liquor together. Pour in to a bowl, then quickly dip on side of the biscuits in the coffee. Line the bottom of a dish with the soaked biscuits.
Spread 1/3 of the cream, then dust with a layer of cocoa and some chocolate shavings. Repeat process, until you have three layers.
Cover the tiramisu and refrigerate for at least 4 hours.
How long can I keep my Tiramisu in the fridge for? Because this recipe has raw eggs, I would only keep in the fridge for up to 4 days.
Layers my vary depending on dish size.
making tiramisu:
By far, the most important ingredient for making this dessert are the biscuits. You need to use Italian lady finger biscuits. I used the brand Savoiardi. There is no real substitute for these biscuits. Luckily, most supermarkets sell these in the international section.
The most important ingredient.
As stated before, this recipe is super easy, simply make the cream, dip your biscuits, then begin layering. I used a small dish while making this recipe, so I had three layers, depending on your dish size, you may only achieve two layers. If so, just use a larger dish.
The tiramisu cream
The soaking station
The first layer
Spread the cream out evenly
Dust with cocoa
The final product:
As you can see, this tiramisu isn’t soggy at all. Just how I like it. The biscuits are soaked with coffee but you also get the the sweetness from the chocolate that is in between layers. Leaving in the fridge to set preferably overnight.
A three layer tiramisu.
The perfect tiramisu – not soggy at all.
Tiramisu One of my favourite desserts is Tiramisu, I've always wanted to make it at home. So I spent a good day researching recipes.
2 notes
·
View notes
Text
Chocolate Hazelnut cake
New year, new birthday cake. It’s a tradition of mine to make my birthday cake each year. This year, I was scrolling Instagram for months trying to get inspiration. I decided to go with a concrete base. To this base, I added some colours that I thought complimented the grey. Then I used this beautiful cake stencil by Caking It Up – cakingitup.com.au/product-category/cake-stencils.
This cake has 6 layers, 3 layers of chocolate and 3 layers of hazelnut. In between each layer, there is delicious Swiss meringue buttercream with white chocolate, Nutella, and finally crushed Kinder Buenos. This cake is an absolute dream. For the chocolate layer, I used the same recipe as my chocolate Oreo cake, which I will link further below. As for the hazelnut layer, this was my first time making it, so I will post the recipe below.
Hazelnut Cake
A delicious Hazelnut cake. If you're not a fan of hazelnuts, just skip one ingredient and you will have the perfect vanilla cake. I used this cake with a chocolate cake to make my hazelnut and chocolate birthday cake.
2 1/2 cups all purpose flour
1 tsp Hazelnut essence
2 1/2 tsp baking powder
1/2 tsp salt
3/4 cup unsalted butter, room temperature
1 1/2 cups sugar
3 tbsp vegetable oil
1 tbsp vanilla extract
4 large eggs
1 1/4 cups milk
Prepare three 8 inch cake pans with parchment paper and grease the sides. Pre-heat oven to 170°C.
Combine all dry ingredients in a medium sized bowl and set aside.
Add the butter, sugar, oil, hazelnut essence and vanilla extract to a large mixer bowl and beat together until light in colour and fluffy, roughly 3-4 minutes.
Add the eggs one at a time. Scrape down the sides of the bowl as needed to be sure all ingredients are well incorporated.
Add half of the dry ingredients to the batter and mix until mostly combined.
Slowly add the milk and mix until well combined. The batter will look curdled, but that’s okay.
Add the remaining dry ingredients and mix until well combined and smooth. Scrape down the sides of the bowl as needed to be sure all ingredients are well incorporated. Do not over mix the batter.
Divide the batter evenly between the cakes pans and bake for 22-25 minutes, or until a toothpick comes out with a few crumbs.
Remove the cakes from the oven and allow to cool for about 2-3 minutes, then remove to cooling racks to cool completely.
Other Recipes used to make this cake:
Chocolate Oreo Birthday Cake The above recipe is for 3x 8″ cake tins.
Swiss Meringue Buttercream To layer, crumb coat and ice a layer cake, you will need to double my Swiss meringue buttercream recipe.
Making the Cake:
Like any layered cake, make sure to let your cakes cool and trim, so you have an even surface. On a cake board, place a dollop of buttercream, this will prevent the cake from moving. Then start layering. I started with my hazelnut layer. Between each layer, add Swiss meringue buttercream, then add some Nutella, then finally add crushed Kinder Buenos. Once all layers have been placed, it’s time to crumb coat. This is done to help prevent crumbs from showing in our final buttercream. Make sure to let the crumb coat set before proceeding with the final buttercream layer.
A pool of Nutella berw each layer
Happy 26th
Chocolate Hazelnut cake
Cutting into this beautiful Chocolate Hazelnut cake.
Decorating the Cake:
To decorate this cake, I used Wilton colours (black, violet and burgundy) and the Caking It Up Harvest stencil. I also used a baby Nutella, Kinder Buenos and Ferrero Rocher. And for a final flair, I used one sheet of 23 carrot gold leaf. Adding the gold leaf really adds some finesse.
Chocolate Hazelnut cake New year, new birthday cake. It's a tradition of mine to make my birthday cake each year.
0 notes
Text
Greek New Year’s cake
What is a Vasilopita?
Vasilopita is a cake served on New Year’s Eve. There is a coin hidden within the cake, whoever finds the coin, is said to have good luck for the new year. The cake is dusted with a layer of icing sugar then decorated with the new year coming. For more information about Vasilopites, click on the following links, Origins of the Vasilopita, The Tradition of the Vasilopita
Vasilopita – Greek New Year's Cake
Vasilopita is a traditional Greek cake served at midnight on New Year’s Eve. A coin is placed in the cake, whoever finds the coin will have luck for the rest of the year.
185 g butter (room temperature )
1 1/5 cups sugar
3 eggs (divided)
pinch of salt
zest of orange
1/4 cup orange juice
100 g yoghurt
1 tsp vanilla extract
375 g self-raising flour (sifted )
Topping
icing sugar
various sprinkles
Pre-heat oven to 175°c.
Divide eggs into yolks and whites. Place the whites and a pinch of salt into a clean mixing bowl and whisk until you have stiff peaks. Once stiff peaks have formed, set mixture aside.
Using your mixer, beat the sugar and butter together until it has become creamy and fluffy. Make sure to scrape down the edges of the mixing bowl.
Add the egg yolks, one at a time, making sure the previous yolk has been fully absorbed before adding another yolk.
Add in the orange juice, zest, vanilla, and yoghurt.
Using a spatula fold in half the sifted flour and half the egg whites. Once combined, fold in the remaining flour and egg whites. The mixture will look quite thick, this is how we want it.
Butter the bottom and sides of your baking tin, and coat with a thin layer of flour, we do this to prevent the vasilopita from sticking.
Pour the mixture into a 32cm diameter tin then place a coin (wrapped with foil) into the mixture. Smooth out the top, and bake for about 50-60 minutes. Use a wooden skewer to check if the cake is done.
Once cooked, remove from the oven and let it cool completely.
Once cooled, dust with icing sugar and decorate.
MaKING THE VASILOPITA:
As stated previously, make sure all your ingredients are room temperature. This makes baking life much easier. When dividing your egg yolks and whites, be extra carful not to get any yolk into the whites. I do this by cracking the egg into the palm of my hand and letting the white naturally seperate from the yolk. There is a chance of piercing the yolk if you do this using the shells. Using your hands may be messy, but it’s better being safe than sorry.
Beat the sugar and butter until it becomes fluffy and light. The paler the mixture, the better.
Add egg yolks one at a time.
Add orange, zest and yoghurt.
Some recipes say to add the coin after baking, but my Giagia would always add the coin to the mixture before it’s baked. Simply wrap the coin in some foil and place it in the cake. With a spatula, try and smooth the top of the mixture as much as possible. Bake in the oven for about an hour, or until cooked. Use a wooden skewer to check if the cake is cooked all the way through. Simply poke the cake, if the skewer comes out clean, the vasilopita is done. Once cooked, remove it from the oven and let it cool completely before decorating. If you add the icing sugar before the cake is completely cooled, the icing will slightly melt and change colour. Decorating the vasilopita is fun, you can decorate it with chocolate, with sprinkles, or whatever you have handy. This year, we opted for sprinkles.
Add a coin wrapped in foil to the mixture
Smooth the top of the cake as much as possible before baking.
Greek New Year’s Cake
Greek New Year’s cake
Tips and tricks for the perfect vasilopita:
Make sure your butter is at room temperature.
Mix butter and sugar until the butter is fluffy and creamy and the sugar is no longer grainy. This step does take time, but it is extremely rewarding.
Whisk egg whites separately to achieve a fluffy vasilopita.
Adding the yolks one at a time, prevents the vasilopita from having an eggy smell.
If your vasilopta has a crack or slightly sinks in the middle, simply flip it and serve the bottom as the top.
To prevent cracks and sinking middles, refrain from opening the oven door while the vasilopita is cooking.
More Greek Recipes:
Galaktoboureko – Greek Custard Pie
Loukoumades – Greek Honey Puffs
Vasilopita – Greek New Year’s Cake What is a Vasilopita? Vasilopita is a cake served on New Year's Eve. There is a coin hidden within the cake, whoever finds the coin, is said to have good luck for the new year.
0 notes
Text
Cheesy Buffalo Chicken Sticks. OMG these are so delicious.
CHESSY BUFFALO STICKS:
The perfect party food, Cheesy Buffalo Chicken sticks. These buffalo stick are deep fried and crispy, they are cheesy, tangy, spicy and DELICIOUS! What are in these fried goodness? Cheese, Chicken, Buffalo sauce, and Jalapenos. Make sure you make a big batch of these delicious treats, as they won’t last. People will be coming back for seconds and thirds. Serve with a blue cheese sauce or ranch dressing.
You can pre-make these sticks and leave them in the freezer, take them out when you want to fry them and have a top-quality snack within a matter of minutes. With this recipe, I made about 20 sticks, because there were only a couple of us, I only fired up half the batch. I added the remainder into a ziplock bag and put it back in the freezer.
Cheesy Buffalo Chicken Sticks
Crunchy, Spicy, Cheesy, Creamy, Delicious.
Cheesy Buffalo Chicken mixture:
250 g cream cheese (softened )
2 cups shredded chicken
1 cup mozzarella cheese
1/2 cup buffalo sauce
1 jalapeno (diced)
1 tsp garlic powder
1 tbsp sriracha
Breading station:
4 eggs (beaten)
1/2 cup milk ((combine with eggs))
3 cups bread crumbs
2 cup flour
Vegetable oil (for frying.)
Line the baking dish with baking paper. If you are using silicon tray, you can skip this step.
In a large mixing bowl, combine all the ingredients for the mixture (cream cheese, chicken, hot sauces, cheese, garlic powder, jalapenos)
Transfer to the prepared baking dish. With a spatula smooth out the mixture, making sure it's spread out evenly. Freeze until solid, roughly 3 hours.
Remove the mixture from the tray, and cut into even slices.
Coat each stick with flour, then dredge through the eggwash, then coat with breadcrumbs. Dip once more in the eggwash and then once more in the breadcrumbs. Place on a lined baking tray.
At this stage, you can place these back in the freezer and use at a later time.
Heat a pot of oil until it reaches 190c
Place sticks in oil and fry for about a minute or until golden brown. Place on a cooling rack so all the excess oil can drip off.
Serve with blue cheese sauce or ranch.
Making the mixture:
This recipe is super easy, but put all the ingredients into a large mixing bowl then mix. Once mixed place the mixture into a try of you liking, I used two trays. One loaf tray and one muffin tray. Place in the freezer for at least 3 hours. We place the mixture in the freezer, so it can harden. This will make our life easier when it’s time to crumb our beautiful cheesy sticks.
Our ingredients
Add all the ingredients into a bowl.
Combine the ingredients, till smooth.
Add the mixture to a try and place in the freezer.
Add the mixture to a try and place in the freezer.
Crumbing our cheesy buffalo chicken sticks:
This still is super simple, though it can get messy, so maybe wear some disposable gloves. Once you have removed your frozen mixture, simply cut into even sticks. Roll the stick in the flour, egg wash, then bread crumbs. For an extra crunchy stick, place in the egg wash and bread crumbs one more time. Heat some oil in a pot, and once hot place the sticks in the pot. Cook for about two minutes or until a nice golden brown colour has been achieved.
Remove solid mixture from tray.
Remove solid mixture from tray.
Once crumbed, it’s time to fry.
Frying our cheesy buffalo chicken sticks.
Fry until golden brown.
Eating these babies:
Once removed from the oil, place on a cooling rack so the exes oil can drip off, then place on a plate. I have lined my plate with some paper towel, just to absorb more oil. Serve with a blue cheese sauce or with some ranch dressing. Make sure not to bite straight into these bad boys, as the inside will be as hot a lava 🔥
Remove from the oil and place on a cooling rack.
Serve these delicious cheesy sticks.
Cross-section of cheesy buffalo chicken stick
More Buffalo recipes?
Buffalo Chicken Pizza
Buffalo Fried Chicken Burgers
Cheesy Buffalo Chicken Sticks Cheesy Buffalo Chicken Sticks. OMG these are so delicious. CHESSY BUFFALO STICKS: The perfect party food, Cheesy Buffalo Chicken sticks.
0 notes
Text
A fresh salad, perfect for lunch and dinner.
Vietnamese Salad with Lemongrass Beef is one of my favourite Vietnamese dishes, If we ever go out for Vietnamese, I make sure to order a salad. This is an absolute treat, it’s fresh, filling, full of exciting flavours and textures. This Vietnamese Salad with Lemongrass Beef, has everything. It has vermicelli noodles, carrots, cucumber, bean sprouts, lettuce, mint, Thai basil, coriander, chilli, crunchy fried shallots and your favourite meat topping. It’s like a flavour explosion in your mouth. Crunchy from the pickled vegetables and fried shallots and chewy from the vermicelli noodles. Not only is this salad amazing to eat, it is also super refreshing. Vietnamese Salad with Lemongrass Beef is perfect for a hot summer day.
Vietnamese salad with Lemongrass Beef
This Vietnamese salad is perfect for when you are craving something delicious, but want to keep it light and healthy.
Lemongrass Beef
500 g beef
2 tbsp lemon grass paste
2 tbsp fish sauce
2 cloves garlic (minced )
1 tbsp sugar
1 tbsp oil
Salad Dressing – Nouc Cham:
1/4 cup fish sauce
1/2 cup water
1 lime (juice)
2 tbsp sugar
1 chilli (sliced)
1 tbsp rice vinegar
1 clove garlic (minced)
Salad:
1 packet vermicelli noodles
1 lettuce (sliced)
2 large carrots (julienned)
300 g bean sprouts
1 cucumber (julienned)
coriander
mint
thai basil
peanuts
fried shallots
chillies (sliced)
Marinate your beef and set aside. Add all the marinade ingredients into a bowl and mix. Put beef in the fridge and start preparing your vegetables.
Prepare all your vegetables. Julienne your carrots and cucumber, cut the lettuce into thin slices and wash the bean sprouts. Place all vegetables in separate bowls so it’s easier to plate up at the end.
Prepare the noodles (following the packet instructions). Once cooked, strain and run cold water through the noodles.
By now, you should be ready to cook the beef. Cook the pork on a hot pan (I cooked mine on the BBQ).
Plate up. First, put a serving of noodles and a bit of the dressing on the noodles, then place your vegetables, beef and herbs. Finally, add fried shallots and dressing.
If you are meal-prepping this recipe, you can put your fried shallots and dressing in small sauce containers and then add to your bowl when you are ready to eat. This way all your vegetables will stay crisp.
VIETNAMESE SALAD TIPS:
For better flavour, marinate meat for up to 3 hours.
If you intend to meal-prep this dish, make sure you keep the salad dressing separate.
If possible, use Vietnamese mint and coriander.
Removing the hulls from the bean sprouts keeps the sprouts fresher for a longer period of time.
Vietnamese sweet chilli sauce goes great with this dish.
If possible, grill the beef instead of pan frying. Grilling will give it a more intense flavour.
VIETNAMESE SALAD WITH LEMONGRASS Beef
I bought these noodles from the Asian supermarket.
Strain Noodles.
The preparation station.
The beef in this dish is the centre of attention, so you want to make sure it is prepared properly. For extra flavour, marinate the beef for up to 3 hours. This way the beef will soak up all the delicious flavours of the marinade. For this dish, I have used pre-minced lemongrass, though, using fresh lemongrass would yield far better results. As I stated above, if you can char-grill your beef, definitely do it! For convenience, I have cooked mine on the BBQ. If you cook it on the pan, make sure the pan is very hot and don’t be afraid of burning.
Slice the beef into thin slices.
Preparing the bowl. The first layer is noodles. Cook the noodles (following the packet instructions). Rinse with cold water and drizzle with some oil to avoid potential sticking. Add the carrots and the bean sprouts. Then, add the sliced lettuce, top with mint, coriander and chillies.
The perfect salad bowl.
Finally, add the main part of the dish, the beef. Top off with more chillies and fried shallots. If this dish is for your weekly lunches, don’t add the Nouc Cham just yet. Only add the salad dressing when you are ready to eat this delicious dish.
Try my other Vietnamese Salads:
Vietnamese Salad with Lemongrass Pork
Vietnamese Salad with Lemongrass Chicken
Bun – Vietnamese Salad bowl
Vietnamese Salad with Lemongrass Beef A fresh salad, perfect for lunch and dinner. Vietnamese Salad with Lemongrass Beef is one of my favourite Vietnamese dishes, If we ever go out for Vietnamese, I make sure to order a salad.
0 notes
Text
My Spooky Cheesecake with White Chocolate and Raspberry.
Don’t know what to make for Halloween? Why not make a Spooky Cheese. This Cheesecake is a New York styled baked cheesecake with white chocolate and raspberry drizzled on top. I got so many compliments for this cheesecake, everyone enjoyed it and it was all gone within a matter of minutes.
Spook Cheesecake with White Chocolate and Raspberry
A classic New York style Cheesecake with a spooky twist.
500 g cream cheese (room temperature )
300 g sour cream
165 g caster sugar
2 tbsp flour
1 tsp vanilla
2 large eggs
Biscuit base
300 g oreo cookies
75 g butter (melted)
Raspberry Blood
200 g frozen raspberries
50 g sugar
Pre-heat oven to 150°c.
Add the cookies into a food processor and add the butter. Once combined, add mixture into a springform tin and press down over the base and the side of the springform.
Put base in the fridge to set while you continue and make the filling.
Mix room-temperature cream cheese and sugar together. Once smooth, add in the flour and the vanilla.
Continue to mix, scraping down the sides of the mixing bowl if required. Add the eggs one by one. Make sure the first egg has been combined before adding the second egg.
Afterwards, add the sour cream. Once combined, remove from the mixer and set aside.
Add the mixture to the base. Cover the bottom of your springform with aluminium foil. Place the springform in a baking tray, then, fill the tray with water.
Cook Cheesecake in the oven for 1hr, or until set. (Middle still slightly jiggly).
Once cooked, open the oven door slightly and let the cheesecake sit for at least an hour before transferring to the fridge to cool (4 hours).
Toppings
To make the Raspberry blood, in a small saucepan cook down the raspberries with the sugar.
Once the raspberries have cooked down – roughly 10 minutes. After, set aside to cool.
Pass the raspberries through a sieve.
Drizzle melted white chocolate and raspberry blood on top and make a gory as possible.
The longer you leave the cheesecake to rest the better. I try to leave my cheesecake rest overnight.
If you decide to use the middle cream of the Oreo cookies, you can put less butter.
To ensure you cheesecake doesn’t stick you can line your spring-form with baking paper.
ABOUT THIS RECIPE:
A New York style Cheesecake drizzled with a rich Raspberry sauce (Raspberry Blood) and drizzled with White Chocolate. This Spooky Cheesecake with White Chocolate and Raspberry is to DIE for 😈. It is smooth, sweet, creamy and absolutely delicious. This Spooky Cheesecake is perfect for any Halloween event. I made this for a Halloween morning tea at work and it was a definite hit.
Making the cheesecake:
The trick to making the perfect New York Cheesecake, is using room temperature ingredients. Before you begin making your cheesecake, make sure you leave the cream cheese, eggs, sour cream on the bench and come to room temperature. I use a kitchen aid standing mixer, though, if you don’t have one – this can still be done with a hand mixer. Make sure to constantly scrape down the sides of the bowl with a spatula.
Add cream cheese and sugar to a bowl.
Mix until smooth.
One finally mix with a spatula.
Place cheesecake in a water bath then cook for an hr.
making the raspberry blood:
While the cheesecake is in the oven, you can make the delicious raspberry sauce. Just add all the ingredients together into a pot and bring to a boil. Then with a sieve, separate the seeds. Add sauce to a jar. This sauce can be used in many other desserts.
Cook down the frozen raspberries.
With a sieve seperate the seeds.
Add raspberry blood to a jar.
Resting and serving:
After baking the Cheesecake for roughly an 1 hour, let it sit with the oven door slightly open for another hour. After an hour has passed, move the Cheesecake from the oven to the fridge. Leave in the fridge for a minimum of four hours or overnight. For a ghoulish twist, I drizzled my raspberry sauce down the side of the cake. I also added some little spiders to add to the spooky effect, though, these aren’t edible.
Spooky Cheesecake with White Chocolate and Raspberry
What a ghoulish slice of cheesecake.
My Spooky Cheesecake with White Chocolate and Raspberry.
Try out my other cheesecakes:
New York Style Cheesecake (Game of Thrones)
Oreo Cheesecake
Spooky Cheesecake with White Chocolate and Raspberry Don't know what to make for Halloween? Why not make a Spooky Cheese. This Cheesecake is a New York styled baked cheesecake with white chocolate and raspberry drizzled on top.
0 notes
Text
Make awesome buffalo fried chicken burgers.
What inspired me to make buffalo fried chicken burgers? One of my favourite burger joints near my work specialises in fried chicken burgers. My absolute favourite burger on their menu is called the Buffalo Crispy. This is my attempt at making the Buffalo Crispy at home. This burger is super simple, it doesn’t have many ingredients, but it’s so tasty!
What does a buffalo fried chicken burger contain?
Delicious brioche buns
Fried chicken – follow my recipe – Super Crispy Fried Chicken
Cheese
Pickles
Spinach
Buffalo sauce
Japanese mayonnaise
If you are a Brisbane local – head to Lucky Egg and try out this amazing burger/sandwich. Lucky Egg is located on Brunswick Street, Fortitude Valley.
Buffalo Fried Chicken Burgers
A delicious fried chicken burger – this burger has super crispy fried chicken, spinach, cheese, pickles, buffalo sauce and mayonnaise.
fried chicken
pickles
brioche bun
spinach
buffalo sauce
Japanese mayonnaise
Cook your fried chicken. Make sure to follow my super crispy fried chicken recipe.
While the chicken is cooking, prepare your buns. Slice buns and butter, slightly toast under the grill. Roughly 1 – 2 minutes.
Once the chicken is done, rest on a tray. As soon as the chicken comes out, add a slice of cheese on top. Because the chicken is hot, it will melt the cheese.
Begin building your burger. On the bottom bun, add the mayonnaise.
On top of the mayonnaise, add the spinach. Then, add your fried chicken with cheese.
Finally, top off your burger with pickles and the buffalo sauce. Add the top bun and then you're done!
I’m not adding a large quantity of ingredients, this is totally up to your discretion. If you want to add extra, go for it. Build your ultimate fried chicken burger.
The most important step? Making the fried chicken.
Follow my Super crispy fried chicken recipe to make this amazing burger:
Soak the chicken is buttermilk for 3 hours, or overnight if possible.
Soak the chicken is buttermilk for 3 hours, or overnight if possible.
Coat your chicken with the flour mixture.
After frying let the excess oil drip off.
As noted in my recipe above, I’m not building my burger with large quantities of ingredients, it’s totally up to you. This is more of a guide than a recipe. If you want to add or remove something, go for it. That’s the beauty of making a burger. Don’t like pickles? Remove them. Want tomato? Simply add it. The world is your oyster!
I really wish I took a better photo. I realised I started staking with the wrong bun, so I had to flip the burger. That’s why my spinach is on top. Oh well – it was delicious either way. Because this burger is so calorie heavy, it’s not something you can eat frequently… Maybe a monthly treat.
Buffalo Fried Chicken Burgers
Buffalo Fried Chicken Burgers What inspired me to make buffalo fried chicken burgers? One of my favourite burger joints near my work specialises in fried chicken burgers.
0 notes
Text
Making super crispy fried chicken at home.
Treat yourself with some super crispy fried chicken at home. This fried chicken is perfect for a naughty lunch or dinner. Eat it as is with fresh hot chips or put this amazing fried chicken in an awesome fried chicken burger. When we make fried chicken at home, I make sure to use it in my fried chicken buffalo burgers.
Super Crispy Fried Chicken
Super crispy fried chicken, no need to go to KFC anymore when you have this amazing recipe.
10 pieces of chicken
Buttermilk Marinade
400 ml buttermilk
salt & pepper
3-4 cloves garlic (crushed)
1 tbsp hot sauce
Breading
1 1/2 cups flour
1 cup corn flour
2 tsp baking powder
2 tbsp paprika
salt & pepper
2 tbsp garlic powder
2 tbsp onion powder
1 tbsp dried parsley
1 tbsp dried thyme
1 tbsp dried oregano
Add chicken to a bowl or a large ziplock bag, then combine all marinade ingredients together and add it to the chicken.
Set aside in the fridge to marinade for at least 3 hours or up to 24 hours.
After marinating the chicken, begin making your breading. Add all ingredients together and whisk.
One by one, coat the chicken with the breading mixture.
In a deep pan, heat some oil. Once the oil has come to the right temperature, start adding your chicken, one by one.
Depending on the cut and thickness of the chicken, cooking time will vary.
Cook until golden brown on both sides.
Remove chicken from the oil and set to rest on a baking tray.
Soak the chicken is buttermilk for 3 hours, or overnight if possible.
Soak the chicken is buttermilk for 3 hours, or overnight if possible.
Mix all the herbs and spices in the flour. Make sure to mix well.
Coat your chicken with the flour mixture.
Once all the chicken is coated, it’s time to start frying.
Tips for maKing the perfect chicken at home:
Below I will mention some of my key tips on making the perfect fried chicken at home.
Make sure you let your chicken marinate in the buttermilk for as long as possible. I left mine for 24 hours.
Using chicken pieces that still have the bone, we’ll ensure your chicken stays juicy.
When breading your chicken, add about 3 tbsp of the leftover buttermilk to the flour. This will create little lumps of flavour.
Test if your oil is hot enough, by dipping a wooden chopstick in the oil. If the oil bubbles, it’s ready.
Make sure your oil isn’t too hot nor too cold. If it’s too hot it will burn. If too cold, it will become soggy.
After cooking, let your chicken rest on a baking rack instead on paper towels. If you use paper towels, the bottom of the fried chicken will become soggy.
Make sure you use an oil that is suitable for frying, use vegetable oil or canola oil.
Frying the chicken.
After frying let the excess oil drip off.
Make awesome fried chicken burgers.
Not a fan of fried chicken or need something a bit lighter? Why not try out some of my other chicken recipes? Click the links below for some of my other favourite chicken recipes:
Buffalo Chicken Pizza
Greek Roast Chicken with Lemon and Thyme
Vietnamese Salad with Lemongrass Chicken
Super Crispy Fried Chicken Treat yourself with some super crispy fried chicken at home. This fried chicken is perfect for a naughty lunch or dinner.
0 notes
Text
Amazing Chicken Laksa
Laksa is a spicy Malaysian soup and one of my favourite meals to order when I’m at an Asian restaurant. Laksa is amazingly delicious. It’s rich, creamy, spicy and just full of flavour. This Chicken Laksa recipe is super easy to make. You can have an amazing dinner ready in under an hour with this recipe. I have based this recipe on recipetineats recipe, but I have added some of my own flare to it as well.
Is Laksa Gluten Free?
To make this beautiful Chicken Laksa gluten-free, make sure you use gluten-free products. I used gluten-free soy sauce. My favourite brand is Kikkoman soy sauce. The laksa paste I used is also gluten-free, if you are cooking gluten-free, make sure to always check the ingredients list. The only thing I didn’t add to the gluten-free version were hokkien noodles, as I was unable to find a gluten-free option. Though, even with the one variety of noodle, this soup is still amazing.
Chicken Laksa

Want to make restaurant style laksa at home? Follow this recipe to make the perfect chicken laksa at home.
Chicken Broth
1 ltr Chicken Stock
500 ml water
6 drumsticks
Chicken Laksa
1 tbsp oil
4 cloves garlic (minced)
4 cm ginger (grated)
2 stalks lemongrass (grated)
4 chillies (chopped)
350 g laksa paste ((2 jars))
800 ml coconut milk ((2 tins))
2 tbsp fish sauce
Add-ins / Garnishes
1 packet vermicelli noodles
1 packet hokkien noodles
beansprouts
green beans (chopped in half)
tofu puffs (halved )
fresh coriander
fried shallots
chilli (sliced)
Chilli Sauce
1/2 tbsp sugar
2 tbsp soy sauce
2 cloves garlic (minced)
2 tbsp laksa paste
1 tbsp chilli paste
Chicken Broth
In a large pot, add in the chicken stock, water and drumsticks. Bring to a boil. Simmer the drumstick for about 30 minutes.
Remove the chicken from the pot and set aside. Once the chicken has cooled, strip the chicken into bite sized pieces. Set chicken pieces aside.
Chicken Laksa
In a large pot, heat the oil. Then add the garlic, ginger, lemongrass and chilli. Sauté for a 1 minute.
Next, add the Laksa paste. Ensure to stir constantly (we don't want to burn it). Cook for roughly 2 minutes.
Add the chicken broth, coconut milk and fish sauce. Simmer for 10 minutes.
Finally, add the green beans and the coconut puffs. Leave on the stove, but turn off the heat. Let the Laksa sit for about 5 minutes before serving.
Noodles
Follow packet instructions on how to prepare noodles. I soaked my noodles in boiling water.
Building your Laksa
In a large bowl, add some vermicelli noodles and hokkien noodles. Then, add some shredded chicken.
Ladle the laksa over the noodles and chicken. Top off with beansprouts, fried shallots and coriander.
For people who like their laksa extra spicy, add some chilli sauce on top as well.
Gluten-free?
You can make this laksa gluten-free by, not adding hokkien noodles. Unfortunately, I haven’t been able to find gluten-free hokkien noodles.
Make sure to use gluten-free soy sauce as well.
Making Laksa:
For this recipe, I used pre-made laksa paste. The laksa paste I used was Por Kwan Laksa Paste. I got this from my local Asian grocery. Coles and Woolworths don’t have this brand. They have other brands, but I recommend going to an Asian grocer instead. I also bought the tofu puffs from my Asian grocers.
I can’t stress enough, how easy this Chicken Laksa is to make. You essentially throw everything in the pot, then off you go.
Dice all ingredients
Fry the ginger, garlic, lemongrass and chilli
Add in the Laksa paste. Stir continuously.
Add in the coconut milk and chicken broth.
Add in the green beans and tofu puffs.
Plating up the perfect Chicken Laksa:
Make sure you prepare the noodles and the chilli sauce while you are making your broth or the laksa itself. I simply followed my noodles packet instructions on how to cook. Then, I left them soak in water to prevent them from sticking together. I also made my chilli sauce. This chilli sauce can be used in other dishes as well. So if you’re a chilli addict, you should make extra 😉.
Making the chilli sauce.
Divide noodles into a bowl.
Ladle in the delicious laksa. Top with fresh beansprouts and coriander
Add some chilli sauce and some sliced chillies for all the spicy freaks.
More Soups:
Want to try a different type of soup?
Soupa Avgolemono – Greek Chicken Soup
Korean Spicy Beef Stew
Chicken Laksa Soup Laksa is a spicy Malaysian soup and one of my favourite meals to order when I'm at an Asian restaurant.
0 notes
Text
An amazing gluten free Japanese Curry
Normally you wouldn’t need a recipe for curry as you can buy the curry blocks from nearly every supermarket nowadays. But these blocks contain gluten, so people who are celiac aren’t able to eat it. With this recipe you can make gluten free Japanese Curry at home without compromising the flavour. This is one of my favourite Japanese foods. This curry is essentially a delicious gravy with juicy pieces of chicken and soft chunks of carrots and potatoes on a bed of rice. OMG Yum!
Japanese Curry

A delicious Japanese curry made from scratch. This curry is super easy to make, you will be coming back for more.
1 large onion (diced)
3 cloves garlic (minced)
1 tbsp oil
1 kg chicken thighs (diced)
3 carrots (diced)
3 potatoes (diced)
500 ml chicken stock
1/3 cup gluten free soy sauce
2 tbsp honey
1 tbsp vinegar
Roux
100 grams butter
1/2 cup gluten free flour
4 tbsp curry powder
1 tbsp garam masala
Optional
Japanese pickled ginger
chilli flakes
In a small saucepan over medium-high heat, melt the butter. Once melted, add in the flour and stir for 2-3 minutes. Finally, add in the curry and the garam masala. Stir for another 2 minutes, then, set aside.
In a large saucepan over medium heat, add the onions, garlic and a pinch of salt. Sauté for 2 minutes. Add the roux and the chicken thighs. Mix until everything is well coated.
Add the soy sauce, honey, vinegar and stock. Stir until everything is combined.
Next, add the bite-sized potatoes and carrots to the saucepan and bring to a simmer. Set the heat low and let the curry simmer without the lid, until sauce has thickened and the potatoes and carrots have softened (roughly 45 minutes). If the sauce gets a bit too thick, add some more stock or water.
Serve with steamed rice, shredded cabbage and Japanese pickled ginger. For a more spicy curry, sprinkle chilli flakes when serving.
Making the curry:
To kick start this delicious dish off, we need to make a roux. Those blocks of Japanese Curry you can buy from the supermarkets is a roux. A roux is a mixture of butter and flour and is used in cooking as a thickening agent. We will flavour our roux with curry and garam masala.
One thing I always do before I begin cooking is to make sure I have prepared all my ingredients. Make sure to chop everything into bite sized pieces, this includes the chicken, onion, carrot and potatoes.
This recipe is super simple, there isn’t really much to it. Once all ingredients have been added, you let the curry simmer and do it’s thing. This curry will fill your house with a beautiful fragrance. It will be hard to resist!
Also, if you’re making this for dinner, start cooking the rice prior to cooking the curry. That way, both the curry and the rice will finish cooking at the same time. I cook my rice using a rice cooker.
Close up of this delicious curry
An amazing gluten free Japanese Curry
Will one plate be enough?
Japanese Curry! Yummm
Make it even better!
If you want to take this dish from a 10 to an 11. Instead of cooking the chicken within the curry, fry it separately using Japanese panko crumbs. These crumbs are delicious and when fried they become super crunchy. The crunchy chicken matches perfectly with the soft potatoes and carrots. Also, if you’re using a mild curry powder, you can add extra chilli flakes to make this curry really pop.
More Asian Recipes:
This curry is also great for weekly lunches. Trust me, you won’t ever get bored of eating this delicious meal. Though, if you are watching your calorie intake, I wouldn’t suggest eating this everyday.
More Asian style lunch and dinner ideas:
Singapore Noodles
Korean Bibimbap
Japanese Curry Normally you wouldn't need a recipe for curry as you can buy the curry blocks from nearly every supermarket nowadays.
0 notes
Text
Raspberry and White Chocolate Birthday Cake.
It’s a tradition each year for me to make my birthday cake. Last year I made an Oreo Chocolate Cake, this year I went for a Raspberry and White Chocolate Cake. This cake has layers of raspberry and white chocolate cake. I had such a great time making this cake, it was such a good learning experience, as it was the first time I made Swiss meringue buttercream, meringue kisses and white chocolate and raspberry bark. Overall, I’m very happy with how this cake turned out. I was trolling Pinterest and Instagram for months trying to come up with cake ideas.
Raspberry and White Chocolate Birthday Cake.
This cake has sprinkles and freeze dried raspberries sprinkled ontop.
This cake recipe has many components, in this post I will share the recipe for the cake itself. I will later on then post individual recipes for the meringue kisses, Swiss meringue buttercream and the white chocolate and raspberry bark. The recipe I used for this cake was from Tastemade – Raspberry White Chocolate Cake, with a few changes. I have added a white chocolate layer of cake and I also have died the raspberry layer with pink food colour.
Components of my Raspberry and White Chocolate Cake:
Lots of raspberries. For convince, I used frozen raspberries.
Lots of white chocolate.
White chocolate Swiss meringue buttercream. I will upload the recipe for this another time.
White Chocolate and Raspberry Bark. I will upload the recipe for this another time.
Meringue Kisses. I will upload the recipe for this another time.
White Chocolate Ganache for the white chocolate drip.
Sprinkles
Freeze dried raspberries
Raspberry White Chocolate Cake
My Raspberry and White Chocolate Chip Cake I made for my 25th birthday. This cake was inspired by the tastemade version.
Raspberry Cake
430 g plain flour
265 g caster sugar
3 tsp baking powder
1/2 tsp salt
125 g butter (room temperature)
2 eggs
375 ml milk
125 ml vegetable oil
2 tbsp Greek yoghurt
1 tsp vanilla extract
1 tsp raspberry flavouring
1 -2 drops pink food gel
2 cups frozen raspberries
White Chocolate Cake
430 g plain flour
265 g caster sugar
3 tsp baking powder
1/2 tsp salt
125 g butter (room temperature)
2 eggs
375 ml milk
125 ml vegetable oil
2 tbsp Greek yoghurt
1 tsp vanilla
2 cups white chocolate chips
White Chocolate Buttercream
250 g white chocolate (melted and cooled)
2 batches Swiss meringue buttercream
food gel
White Chocolate Drip
250 g white chocolate
100 ml full cream
Toppings
1/4 cup sprinkles
meringue kisses
white chocolate and raspberry bark
1/2 freeze dried raspberries
Cakes
Preheat oven to 150C. Butter and line three 8″ cake tins with. Set aside
Add the flour, sugar, baking powder and salt to a large mixing bowl and mix together until well combined.
Add the softened butter and mix on low speed until the butter has combined slightly with the flour.
In a seperate bowl add all the wet ingredients together and combine.(eggs, milk, oil, Greek yogurt, raspberry flavouring and vanilla extract). Incorporate wet ingredients with the dry ingredients and mix on low speed until no dry ingredients are showing. Scrape down the bowl and mix for another 20 seconds. It’s at this point that you can add any additional flavourings or coloured gels to the batter.
Fill three 8” cake tins with batter. Distribute the batter evenly so that everything bakes at the same time. I use a scale to weigh out the batter evenly.
Sprinkle the frozen raspberries (white chocolate chips for white chocolate layer) on top of each cake before you bake. Then with the spatula, make sure that the raspberries are covered and the batter is evenly spread out.
Cook the cakes for 30 – 40 min or until a toothpick inserted comes out clean. If the pick comes out with wet batter, bake for a further 10 min at a time until fully baked.
Cool to room temperature inside the cake tins and then chill them in the fridge overnight.
Layering and crumb coating
Trim your chilled cakes, use a cake leveler to carefully trim the crust off the top of each cake.
To begin crumb coating your cake, add a dab of frosting onto an 8” cake board or flat serving plate. Use a small spatula to spread the frosting around before adding the first cake layer. Gently press down to make sure it’s stuck to the buttercream. This way your cake won’t slip off.
Add buttercream to a piping bag and pipe buttercream onto the cake. Use a small offset spatula to smoothen out the frosting before you sprinkle white chocolate shavings, freeze dried raspberries and cracked meringue kisses. Then add the next layer of cake (white chocolate layer). Repeat with the remaining layers.
Add more frosting around and top and sides of the cake. Use the small spatula to smoothen out the top and sides of the cake, taking care to fill in any gaps in between each layer of cake.
Make sure to add straws to help your cake be stable.
Use a cake scraper and smoothen out the buttercream on the sides and top. Get it as neat as you can. This should just be a neat, thin layer of frosting which is aimed at trapping any cake crumbs so that random bits of cake crumbs don’t show up on the final layer of frosting. Chill for 2 hours or overnight.
Add a final layer of frosting on the outside of the cake by repeating the process. Chill for 2 hours.
White Chocolate Drip
Heat Cream in the microwave, once warm add the white chocolate chips and stir until the chocolate has melted.
Add the chocolate to a squeeze bottle and drizzle over the sides of the cake.
Decorating the Cake
With some buttercream and a piping bag, decorate the top of the cake and along the sides. I used a closed star piping tip.
Add some white chocolate shards, meringue kisses and sprinkle some crushed freeze dried raspberries and your favourite sprinkles to top of the cake.
The above steps apply for both cakes. In total, you will have 6 layers, 3 raspberry layers and 3 white chocolate layers.
Making the Raspberry and White Chocolate Cake:
Making the cake batter:
For this cake, I followed Tastemades recipe, with some alterations of my own. Some of the modifications made, was adding a white chocolate layer. I died my raspberry layer with pink gel food colouring. Kick off this recipe by adding the dry ingredients together in a large bowl. Add in room temperature butter and mix on a low speed, until the butter has incorporated with the flour. In a seperate bowl or container, combine all wet ingredients together. Once combined, pour wet ingredients into the mixer and mix on a medium high speed for roughly 3 minutes. Afterwards, with a spatula, scrape the side and mix one final time. As this cake has two different layers, you will need to do this again for the second batch of cake. The steps are exactly the same for both layers, the only difference is the ingredients (white chocolate chips or frozen raspberries).
Add all dry ingredients and butter together.
Mix until you can’t see anymore butter.
Add the wet ingredients and mix until well combined.
Baking the cakes:
Once your cake batter is prepared, butter and line three 8″ cake tins. I traced the baking tin circumference with a pencil, then simply cut around the baking paper. That way, you have the exact measurements of the baking tray. I made these cakes in two batches. When the first three layers were cooked, I then cooked my white chocolate layers. Evenly divide the batter between the three tins, I used a cooking scale to weigh each tin. That way, I can be certain that it has been evenly distributed. Once divided, add the extras in. If you are making the raspberry layer, add the raspberries. If you are making the white chocolate layer, add the white chocolate. Afterwards, with an offset spatula, level the cakes. My cakes took about 30 minutes to cook, this may vary depending on the oven. To check if your cakes are cooked, simply prick with a toothpick. If the toothpick comes out clean they are ready.
Butter and line your baking trays
Add mixture to the baking tray. Smooth out the top.
Do the same for the white chocolate layer.
Prick your cakes with a toothpick to check if they are cooked.
Cool with cooking rack.
Layering and Crumb coating the cakes:
Once both cakes have cooled, you can begin to stack/layer/build your amazing cake. Because these cakes are cooked in 8″ tins and cooked on such a low heat, there isn’t really a need to trim them. But, if you notice that they have risen, trim them with a cake trimer or a serrated knife. Once all cakes are level, add a tsp of buttercream to a cake board, then add your first layer. Slightly press the cake down, by doing this you are making sure the two stick together. Add each layer, alternating between the flavours, adding buttercream between them so everything sticks together. When all layers have been placed, get three straws and push them into the cake, the straws will help support the cake. With a cake scraper, scrape the excess buttercream from the cake. This is called crumbed coating and it helps stick everything in place. Afterwards, set the cake in the fridge for 2 hours then you can add the final layer of buttercream. Smooth it out with the cake scraper, then set in the fridge for another two hours.
Add butter, one tablespoon at a time. Slowly slowly, you’re getting closer to the best buttercream.
Start stacking the cake layers
In between each layer, sprinkle freeze dried raspberries, white chocolate and meringue
Apply the final layer of buttercream and go crazy with decorating.
White Chocolate Raspberry back and Vanilla Meringue Kisses.
Decorating the cake:
Finally it’s time to decorate. I think this is the best part of this recipe, you can go absolutely crazy. I used a white chocolate ganache for the white chocolate drip, then I added meringue kisses, white chocolate and raspberry back finally topped with freeze dried raspberries and a handful of various sprinkles. Overall, I was very pleased with how this cake turned out. Though, it was a nightmare to cut.
Happy Birthday Fotini
Raspberry and White Chocolate Cake It's a tradition each year for me to make my birthday cake. Last year I made an…
0 notes
Text
Want to make the smoothest and yummiest buttercream for your cupcakes or cakes? Swiss Meringue Buttercream, is without the doubt the best buttercream. Don’t feel intimidated by the name, this buttercream is super easy to make. I did a bunch of research to find the best Swiss Meringue Buttercream recipe, and after lots of recipes and youtube videos, I have come out with a super simple and easy recipe.
Raspberry Swiss Meringue Buttercream
Swiss Meringue Buttercream

A super simple Swiss Meringue Buttercream, this buttercream is silky smooth and delicious. What more could you ask for.
6 egg whitese
600 g sugar
500 g butter (room temperature )
Separate your egg whites from your yolks in mixing bowl. Place the bowl over a pot of water. Make sure the water doesn’t touch the mixing bowl. (double boiler method)
Add the sugar to the egg whites, with a whisk mix them together. Gently gently whisk for about 3-4 minutes or until the sugar has completely dissolved. To check if the sugar has dissolved, run two finger through the mixture, then rub the finger together. If you feel sugar granules, keep whisking.
What you want to do is whisk until the sugar is completely dissolved. The best way to check that it’s dissolved is by running it through two fingers. If you can’t feel the sugar granules then it’s time to take it off the stove.
Once all the sugar has dissolved, add the egg whites to the bowl of a stand mixer. Whisk on high speed for about 4-5 minutes. The mixture will become thick and glossy and will begin to cool.
Begin adding the room temperature butter, one tablespoon at a time. Make the butter is fully combined before adding the next tablespoon. Don’t be afraid if the consistency looks odd, it will come back together. Just keep whisking.
After all your butter has been added, add some vanilla extract, and if you’re making a flavoured buttercream or coloured, now is the time to also add the food colour or flavouring. Mix on low speed to mix in and then mix on high speed for another 5 minutes.
Once the frosting has come together, has gone pale in colour (if you’re making vanilla) and is nice and fluffy then it’s done!
Keep buttercream at room temperature if using the same day. If not, transfer to an airtight container and refrigerate up to 3 days or freeze up to 1 month. Just bring to room temperature then mix with the paddle attachment.
Tips for making the best Swiss Meringue Buttercream:
Don’t throw out the egg yolks, you can make a really yummy custard with them.
Use your thumb and your index finger to check if the sugar is full dissolved, just dip both fingers into the mixture then rub them together. If you can still feel sugar granules, you need to keep whisking.
Once the pot has come to a boil, low the temperature to a low simmer.
Before adding your egg whites and sugar to the mixing bowl, wipe everything down with a clean cloth and a splash of vinegar.
Make sure the egg white and sugar has cooled down before adding the butter. If the mixture is too hot, the butter will melt.
Seperate the eggs in a seperate container first. If you get any egg yolk in your whites, you will have to start again.
To make your vanilla buttercream pale, just keep whisking. The longer you whisk for the paler the buttercream.
Gently cook egg whites and dissolve sugar over boiling water
Transfer egg white and sugar mixture to your mixing bowl.
Make sure the butter is room temperature, to test just press your finger into the butter.
Add butter, one tablespoon at a time. Slowly slowly, you’re getting closer to the best buttercream.
This buttercream, is now my go to buttercream for cakes and cupcakes. You can make the buttercream and flavour you want. Simply add the flavouring once all the butter has been incorporated. Below, I have made vanilla bean Swiss Meringue Buttercream, UGH – absolutely delicious. After you have finished making the buttercream, simply add to a pipping bag and start decorating.
Vanila bean Swiss Meringue Buttercream.
The smoothest buttercream out there.
I used two batches of this Buttercream, to crumb and frost my 6-layer Raspberry and White Chocolate Birthday Cake.
Swiss Meringue Buttercream Want to make the smoothest and yummiest buttercream for your cupcakes or cakes? Swiss Meringue Buttercream, is without the doubt the best buttercream.
0 notes
Text
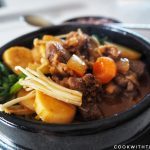
Serve with Rice and enjoy
Korean food is one of my favourites to try make at home. I always try to recreate my favourite dishes. Sometimes it works, sometimes it doesn’t. I can assure you this works. This is my reversion of Korean Spicy Beef Stew. This stew is fairly easy to make and is an extremely yummy dish. It has everything in it, beef, potatoes, carrots, zucchini, onions, mushrooms, tofu and spring onions. It is a filling and hearty meal.
Korean Spicy Beef Stew
A delicious Korean stew. This stew is bold, packed with vegetables and delicious. It will become one of your favourites.
Spicy Beef
250 g Beef (thinly sliced)
1 cloves garlic (minced)
1 tsp sesame oil
1 tsp sugar
1 tbsp Korean chilli powder
1 tbsp Korean red pepper paste
1 tbsp soy sauce
1 tsp Korean bean paste
Stew
1 carrot (chopped)
1 onion (chopped)
1 sping onion
200 g soft tofu
1 potato (chopped)
1/2 zucchini (chopped)
1/2 cup enoki mushrooms
1/2 cup bean sprouts
To prepare the meat, add all the marinade ingredients together in a bowl and combine. Once combined add the meat, making sure the marinade covers all of it. Leave in the fridge overnight.
Bring a stone bowl up to a high heat. Drizzle some sesame oil to the bowl and add the meat. Cook the meat for 2 minutes then add the chopped potatoes and spring onions.
Once the meat is cooked and the potatoes slightly softened and in the rest of the vegetables (onions, carrots and zucchini)
After 5 mins, cover with water. Add the tofu to the bowl and cook for another 10 – 15 minutes.
Once the liquid has slightly thickened, turn off the heat. The stew is ready.
Top with bean sprouts, enoki mushrooms and spring onions.
This recipe is for two stone bowls, simply halve the ingredients between two bowls.
Making Korean Spicy Beef Stew
As always, the most import thing in quick and easy cooking is having all your ingredients prepared before you start cooking. This way you aren’t running around the kitchen like a headless chook. For the perfect stew, you will need good quality meat. I have used thinly sliced wagyu, I bought this from the Asian grocery store. For more flavour marinate this overnight, if possible.
Good Quality Beef – Thinly sliced
Marinate the beef with Korean chilli powder, garlic, soy sauce and some sesame oil
Prepare other ingredients
Now the fun bit begins, cooking time! I used a stone bowl for this stew. If you don’t have a stone bowl, you can use a regular old pot. You should be able to find stone pots at the Asian grocery store, Ebay or Amazon.
You want your pot nice and hot before you add your meat in. I like to add my potatoes to the pot fairly early, so they can soak up the delicious flavours the meat releases. After the meat has browned add in the rest of the vegetables. Once they get a nice colour, top with water then add the tofu. I like using silky soft tofu in my stews, as I like the tofu to melt in my mouth. Once the liquid has slightly thickened, your stew is ready. Top with bean sprouts, enoki mushrooms and spring onions. The heat from the pot, means the stew will continue to cook.
Add the meat to the stone bowl
After the meat has browned add in the potatoes and spring onions
Add the rest of your vegetables
Cover with water then add the tofu
Once the tofu has cooked and become soft the stew is ready
Top with enoki mushrooms, bean sprouts and spring onion
The stew is now ready, serve with some steaming rice. This meal will leave you feeling warm, full and satisfied. Korean Spicy Beef Stew is one of my absolute favourite dishes to eat on a cold day.
Korean Spicy Beef Stew
Serve with Rice and enjoy
Enjoy this delicious stew
more korean food?
Korean Bibimbap
Spicy Pork Bibimbap
Korean Spicy Beef Stew Korean food is one of my favourites to try make at home. I always try to recreate my favourite dishes.
0 notes
Text
Korean Spicy Bibimbap
When I’m sick of eating chicken and rice for lunches, I mix things up. I make beef and rice. Jokes aside, this Korean lunch is delicious. I could never get bored of eating Bibimbap, there is nothing dull about this dish. It is full of flavours, veggies and overall goodness. If you like spicy food like me then you must try my Spicy Korean Beef Bibimbap. Treat yourself to this delicious lunch or even make this dish for dinner. Never had bibimbap or don‘t know what it is? Click the link to read further about bibimpbap – Bibimbap.
Spicy Beef Bibimbap

Korean Spicy Beef Bibimbap
3 cups brown rice
1 cup black rice
Spicy Beef
500 g beef (sliced)
2 tbsps gochujang
1 tbsp gochugaru
1 tbsp soy sauce
2 cloves garlic
1 tsp sesame oil
Bean Spourts
250 g fresh bean sprouts
1 clove garlic (minced)
1 spring onion (thinly chopped)
1/2 tsp sesame oil
1 tsp sesame seeds
Spinach
250 g fresh spinach
1 tsp sesame seeds
1/2 tsp sesame oil
1 clove garlic (minced)
Onions
1 large onion (sliced)
1 tbsp soy sauce
1/2 tsp sesame oil
Shitake Mushrooms
150 g shitake mushrooms (sliced)
1/2 tsp sesame oil
1 tbsp soy sauce
1 clove garlic (minced)
Carrots
3 large carrots (sliced)
1/2 tsp sesame oil
Gochujang sauce
3 tbsp gochujang
3 tbsp water
thinly sliced spring onions
1 clove garlic (minced)
1 tsp sesame seeds
Start preparing all your vegetables. Wash and slice all your vegetables. All vegetables should be thinly sliced. Achieve this by using a mandolin slicer, which will halve the prep time. Prep all ingredients in separate bowls, when we serve our bibimbap we want all the vegetables to be separate.
Slice your beef and then add the gochujang, garlic and soy sauce. Mix everything together then set aside in a bowl to marinate.
Start cooking your rice, I use a rice cooker. Cook rice according to instructions on the packet.
Start cooking all your vegetable components. (see vegetable steps below)
After you have finished all your vegetable components, it’s time to start cooking the spicy beef. In a pan, add some oil and cook. Once cooked, remove from the pan and sprinkle with sesame seeds.
Make your Gochujang sauce, in a small bowl or jar add all sauce ingredients together and mix well. If you think your sauce is too thick, add some water to thin it out.
Start dividing the rice into bowls, once you have added the rice you can then start building your bibimbap.
Over the rice, start adding small portions of all the vegetables into the bowls, making sure that they don’t overlap and you can clearly see each vegetable and all it’s glory. Add some spicy beef to the top of the bowl.
Sprinkle with sesame seeds and some gochujang sauce.
Spicy Beef
In a pan, add a drizzle of sesame oil and cook your marinated beef.
Once cooked, remove from the pan and sprinkle with sesame seeds. Set aside until needed for plating.
Bean Sprouts
Boil some water in a medium sized pot, we will use this to blanch our bean sprouts. I like mine with a bit of a crunch, so, I blanched them for 1 minute. If you like them softer, blanch up to 2 minutes.
Remove from the water then strain well (keep the water). Add to a bowl, then combine with minced garlic, thinly sliced spring onions and sesame oil. Set aside until needed.
Spinach
With the same pot you blanched your bean sprouts, blanch the spinach until wilted.
Strain the water from a pot. With your hands remove the excess water from the spinach. Season with sesame oil, seeds and garlic. Set aside, until needed.
Carrots
In the pan add you cooked the beef, add another drizzle of sesame oil and sautè your julienned carrots.
Add the salt and continue cooking for around 2 minutes. I like my carrots to have a bit of a crunch. If you like them softer, cook for 3-4 minutes. Set aside, until needed.
Shiitake Mushrooms
In the same pan, add some sesame oil and cook your thinly sliced shiitake with garlic and soy sauce.
Cook for roughly 2 mins and then set aside in a bowl.
In this recipe, I used brown rice. You can use either white or brown rice.If you aren’t confident in julienne and chopping the ingredients, a mandolin slicer is the perfect tool.
Making Korean spicy beef bibimbap
To make this dish stand out, you need to give your meat some love. Marinate your beef for as long as possible. I marinated my meat for 1 hour, but this marinade can be left overnight. Like every dish I cook, it’s important to have everything prepared before you actually start cooking. You don’t want to be running around doing other things while cooking, this way you can avoid accidentally burning your food.
Thinly slice the beef, the thinner the better
Marinate the meat for as long as possible
Cook the meat, make sure you keep all the juices.
Prepare all your ingredients. I use a mandolin to slice my carrots.
Wash all your ingredients.
Perfect Bean Sprouts.
Making the mushrooms
I haven’t take photos of myself cooking the other vegetables, as it’s pretty simple. All you need to do is saute the carrots, onions and shiitake mushrooms. The bean sprouts and the spinach have been blanched. Season each ingredient with a drizzle of sesame oil. Build your bibimbap; add each cooked ingredient individually and add it to the container or bowl. Make sure you don’t mix the veggies together (if you care about appearance).
Close up of my Spicy Beef Bibimbap
9 servings of my Bibimbap
Delicious Korean food
Want more Korean food? Look at some of my other Korean food recipes:
Korean Bulgogi Bibimbap
Spicy Pork Bibimbap
Spicy Beef Bibimbap When I'm sick of eating chicken and rice for lunches, I mix things up. I make beef and rice.
0 notes
Text
Honey Balsamic Chicken weekly lunches
Honey Balsamic Chicken weekly lunches
Something different for lunches this week.
I haven’t posted anything for a while now and I thought I’d share this week’s meal-prep. This week, we wanted to try something different. So we decided to do something completelydifferent. Normally my meal-prep recipes are Asian-style cuisine. Today, we mixed it up and made Honey Balsamic Chicken instead. This chicken is sweet and savoury, and…
View On WordPress
0 notes
Text
We made Buffalo Chicken Pizza
We made Buffalo Chicken Pizza on the weekend, and oh my goodness – it was delicious. The dough for this pizza was made from scratch. It took longer to make, but the time and extra effort was totally worth it. I will post the recipe for the dough some other time. This post is about all the toppings I used to make this beautiful pizza.
Buffalo Chicken Pizza

Buffalo chicken pizza with fresh fresh baby spinach, a whole bunch of mozzarella with a drizzle of ranch sauce on top. One word – YUM.
pizza dough
1 chicken breast
1/3 cup buffalo sauce
1 cup fresh baby spinach
1 tbsp pizza base sauce
1/2 cup shredded mozzarella
1/4 fresh mozzarella
ranch
Add the pizza sauce to the base and evenly spread out.
Add the buffalo chicken. It's ok if there is extra sauce, just add it to the pizza.
Sprinkle with the shredded cheese and add the fresh spinach.
Place the fresh mozzarella on top of the pizza in slices.
Cook in a very hot oven for about 10 – 15 minutes
Once out of the oven, drizzle some ranch on top of the pizza.
Making the dough:
As I said previously, we made this dough from scratch. We made this pizza dough with some mother dough and active dry yeast. What is mother dough? Mother dough, also known as bread starter or pre-ferment, is the basis of bread. Mother dough is normally used when making sour-dough. The dough itself was fairly easy to make, it was a bit time consuming though, as you have to let the dough rest. The best thing about making pizza at home? Everyone trying their hardest to make the perfect base. I was unable to make a circular base, mine had more of a circle/rectangle shape, though it doesn’t matter – it still tasted damn delicious. My preference for my pizza base is to keep it on the thinner side, so I was lifting and stretching. I even tried to do a pizza flip like the experts (didn’t really work) until I had the thickness I wanted. Though, in the end I strayed from the perfect circle pizza I had in my mind.
Mix different flours and salt together with a dough hook.
After flours are combines, create a well.
Combine well.
Pour liquid into flour mixture.
Start to kneed, make sure to kneed on a floured surface.
Let the dough site and rise for 1-2 hours.
Assembling the Avengers Pizza:
While I was waiting for the dough to rest, I pre-cooked my chicken for the Buffalo Chicken Pizza. How I made the chicken? I simply pan-cooked some butterflied chicken breast. Once cooked, I thinly sliced it and added my buffalo sauce.
On my circular rectangle pizza, I add a thin layer of pizza sauce, my buffalo chicken, some shredded mozzarella, some fresh baby spinach and some fresh mozzarella. Cook the pizza in a pre-heated oven set to 250c fan-forced. We wanted the oven as hot as possible when cooking the pizza. We cooked it for about 10 – 15 minutes. Once we took it out of the oven, the cheese was bubbling, it was hard to resist. Waiting for the pizza to cool down was far too hard.
Cook some chicken and thinly slice. Add a generous amount of buffalo sauce.
Add a thin layer of pizza sauce to the base of the pizza.
Add your sliced buffalo chicken.
Sprinkle with shredded mozzarella and fresh baby spinach.
Add some fresh mozzarella.
Remove pizza from oven once cooked.
Drizzle some ranch dressing on top.
If you like blue-cheese sauce, you could drizzle some blue cheese sauce onto the pizza instead of ranch dressing. I’m not a fan of blue cheese, so I opted for the ranch. My mouth is drooling, just thinking about it. 🤭🤭
We made out pizza dough using the following recipe: https://www.theperfectloaf.com/sourdough-pizza-dough-and-recipes/
Want some other yummy party food ideas?
Jalapeño Poppers
Tirokafteri – Spicy Feta Cheese
Buffalo Chicken Pizza We made Buffalo Chicken Pizza on the weekend, and oh my goodness - it was delicious. The dough for this pizza was made from scratch.
0 notes
Text
Today was Greek Easter, which means lots and lots of meat. We Greeks love our lamb. 🐑🐑🐑
Easter is all about food for us Greeks. We love our food, and there is no better way to celebrate Easter, than to have a big get together with family and delicious food. This year, my Dad put lamb on the spit. It was slow cooked for 4 hours. It was so delicious. Good job Dad, the lamb was absolutely amazing.
Greek Easter Lamb on the spit
Slow cooked for 4 hours over charcoal
Cooking the lamb on the spit.
Still cooking – Greek Easter Lamb
Making the whole street smell like lamb.
Serving the lamb.
First in best dressed.
Greek Easter at the house with Lamb on the spit, roast potatoes, Greek salad, Moussaka, smoked chicken wings, spinach and feta puffs and char-grilled bread. So much food. 😍😍😍
Recipes:
Moussaka Best baked potatoes
Greek Easter Sunday – Easter Lamb Today was Greek Easter, which means lots and lots of meat. We Greeks love our lamb. 🐑🐑🐑
0 notes