
Statistics
We looked inside some of the posts by rgbemblem and here's what we found interesting.
Average Info
Notes Per Post
0
Likes Per Post
0
Reblog Per Post
0
Reply Per Post
0
Time Between Posts
7 days
Number of Posts By Type
Text
17
Last Seen Tumblr Blogs


Fun Fact
Tumblr was created by web developers David Karp and Marco Arment.
Text
How to install car wheel lights?

1. Preparations
a. Confirm the hub light type
- Magnetic/Adhesive: Attaches or sticks directly to the surface of the wheel without removing the tire (suitable for temporary use).
- Embedded: The tires need to be removed and the light bar embedded in the inside of the hub (more stable, but complicated to install).
- Orifle type: Powered by a valve, it is simple to install but may be less bright.
b. Tools and materials
- Wheel light kit (including strip, controller, wiring harness, etc.)
- Screwdrivers, wrenches, crowbars, 3M glue
- Cable ties, electrical tapes, insulating tapes
- Jacks (if the tires need to be removed)

2. The installation steps
Solution 1: Magnetic/Adhesive Hub Lights (Easy Installation)
a. Clean the hub
- Wipe the surface of the hub with alcohol to make sure there is no oil and dust so that it can be firmly attached or adsorbed.
b. Fix the light strip
- Attach the light strip along the inside or outside of the hub and press to make sure it sticks firmly (if it is magnetic, it is directly attached to the metal hub).
c. Cable routing
- Hide the power cord along the inside of the suspension or wheel arch and secure it with a cable tie to avoid contact with moving parts.
d. Connect the power supply
- Usually connected to a 12V cigarette lighter or battery, make sure that the circuit is waterproof (a fuse can be installed).


Solution 2: Recessed Wheel Lights (Professional Installation)
a. Remove the tires
- Lift the vehicle with a jack and remove the tires to expose the inside of the hub.
b. Install the strip light
- Insert the LED light strip into the inner groove of the wheel hub (some models need to be perforated) and fix it with 3M glue or screws.
c. Wiring & Controller
- Thread from the hub to the chassis and connect to the controller (waterproofing required).
- The controller can be installed in the engine compartment or in the car, and the power supply is connected to the battery (the positive and negative poles need to be correct).
d. Test & Reset
- Test the lights before putting the tires back on to make sure the wiring harness is not pulled when the tires are turning.


3. Precautions
a. Security
- Avoid lights that interfere with the driver's vision or others (some countries have regulatory restrictions on the color/brightness of wheel lights).
- Make sure the line is away from hot or moving parts such as brake discs, suspensions, etc.
b. Waterproof and dustproof
- Use waterproof glue to seal wiring, especially areas on the inside of the hub that are prone to splashing.
c. Power supply mode
- It is recommended to connect to the ACC power supply (the light will turn on after the vehicle starts) to avoid battery power loss.
d. Debugging
- Some hub lights are controlled by APP, and the light mode (such as breathing, flashing, etc.) needs to be adjusted synchronously.
4. Frequently Asked Questions
- The light is not on: Check whether the fuse and wiring are loose and whether the power supply is energized.
- Unstable light: It may be that the voltage is unstable or the contact is poor, it is recommended to install a voltage regulator.
- Falling off problem: The adhesive type is easy to fall off at high temperatures, so it can be fixed with screws instead.
If you are not familiar with the operation of the circuit, it is recommended to install it in a professional modification shop to avoid damaging the vehicle circuit or affecting driving safety.
0 notes
Text
From Past to Present – A Brief Overview of the Development of the Chevrolet Silverado Introduction
The Chevrolet Silverado, a cornerstone of General Motors’ pickup truck lineup, has been a symbol of American work and ruggedness for decades. Since its inception, the Silverado has evolved from a simple work vehicle to a technologically advanced, comfortable, and powerful machine that caters to a wide range of consumer needs. This blog post will take you through the journey of the Chevrolet Silverado, from its early days to its current status as one of the most popular trucks on the market.

The Birth of a Legend: The Early Years (1998-1999)
The Chevrolet Silverado was introduced in 1998 as a successor to the Chevrolet C/K series, which had been in production since the 1960s. The Silverado was designed to be more aerodynamic and to offer improved comfort and convenience features without compromising its core strength and durability. The first-generation Silverado came in various configurations, including regular, extended, and crew cab models, catering to different consumer preferences.
The Silverado’s design was a significant departure from its predecessor, featuring a more rounded and modern aesthetic. It boasted a fully-boxed frame, which provided increased torsional rigidity and improved towing and hauling capabilities. Under the hood, the Silverado offered a range of engines, from a 4.3-liter V6 to a powerful 7.4-liter V8, ensuring that there was a Silverado for every job.
The Silverado’s interior was also a step up from the C/K series, with better materials and more comfortable seating. The truck was equipped with features such as air conditioning, power windows, and a stereo system, which were considered luxuries in a pickup truck at the time.
The Silverado’s first few years saw it quickly gain popularity among consumers, establishing itself as a reliable and capable workhorse.

The Second Generation: Refinement and Innovation (2000-2006)
The second-generation Silverado, introduced in 2000, built upon the success of the first model, refining its design and adding new features. The exterior was updated with a more aggressive look, featuring a larger grille and more pronounced fender flares. The interior was also revamped, with improved ergonomics and a higher-quality cabin.
One of the most significant changes for the second-generation Silverado was the introduction of the Vortec engine family. These engines were more fuel-efficient and produced more power than their predecessors, while also being cleaner and more environmentally friendly. The Vortec engines ranged from a 4.8-liter V8 to a 8.1-liter V8, giving consumers a variety of choices based on their needs.
The second-generation Silverado also saw the introduction of the Crew Cab model, which featured four full-size doors and a roomier interior, making it more family-friendly and versatile. This model was particularly popular among those who needed a truck for both work and personal use.
The Silverado’s success continued throughout the second generation, with the truck becoming a staple in the pickup truck market.

The Third Generation: A New Era (2007-2013)
The third-generation Silverado, introduced in 2007, marked a significant departure from previous models. The truck’s design was more streamlined and modern, with a focus on aerodynamics and fuel efficiency. The interior was completely redesigned, with a higher-quality cabin and more advanced features.
The third-generation Silverado introduced the EcoTec3 engine family, which was more fuel-efficient and powerful than the Vortec engines. These engines included a 4.3-liter V6, a 5.3-liter V8, and a 6.2-liter V8, and were designed to provide optimal performance while reducing emissions.
The third-generation Silverado also saw the introduction of the MyLink infotainment system, which allowed drivers to connect their smartphones to the truck’s audio system. This was a significant step forward in terms of technology and connectivity in a pickup truck.
The third-generation Silverado was also the first to offer the innovative Crew Cab Max model, which featured a longer wheelbase and more interior space, making it one of the most spacious trucks on the market.
The Silverado’s third generation was a testament to Chevrolet’s commitment to innovation and improvement, further solidifying the truck’s position as a leader in the pickup truck market.

The Fourth Generation: Pushing the Boundaries (2014-Present)
The fourth-generation Silverado, introduced in 2014, took the truck to new heights in terms of design, technology, and capability. The exterior was more chiseled and modern, with a focus on aerodynamics and strength. The interior was completely overhauled, with a premium cabin that featured high-quality materials and advanced technology.
The fourth-generation Silverado introduced the High Feature V8 engine, which was more powerful and efficient than any engine that had come before it. This engine was available in a 5.3-liter and a 6.2-liter version, and was designed to provide optimal performance while reducing emissions.
The fourth-generation Silverado also saw the introduction of the MultiPro Tailgate, which was a game-changer in terms of functionality. This tailgate featured six different positions, allowing for easier loading and unloading of cargo.
The fourth-generation Silverado was also the first to offer the trailering technology, which included features such as a rearview camera and trailer sway control, making it easier and safer to tow heavy loads.
The Silverado’s fourth generation has been a resounding success, with the truck continuing to be one of the most popular and respected pickup trucks on the market.

Conclusion:
The Chevrolet Silverado has come a long way since its introduction in 1998. From its humble beginnings as a workhorse to its current status as a technological marvel, the Silverado has continually evolved to meet the needs of its consumers. With each generation, Chevrolet has pushed the boundaries of what a pickup truck can be, making the Silverado not just a truck, but a symbol of American innovation and ruggedness. As we look to the future, it’s clear that the Chevrolet Silverado will continue to be a leader in the pickup truck market, setting the standard for others to follow.
0 notes
Text
Why Are the Buick’s Door Lights Not Working?
Before you start replacing parts or calling a mechanic, it’s essential to understand the common reasons why your Buick’s door lights might not be functioning. Here are some of the most frequent causes:

Check Fuses
The first step in diagnosing any electrical issue in your Buick is to check the fuses. Blown fuses are a common cause of malfunctioning car door lights. Locate the fuse box and inspect the fuses related to the interior lights. If you find a blown fuse, replace it with one of the correct amperage rating and see if that resolves the issue.
Door Ajar Switch
A faulty door ajar switch can prevent the interior lights from turning on when a door is opened. This switch is responsible for signaling the body control module to activate the lights. To test if the switch is functioning correctly, you can use a multimeter to check for continuity when the door is open and closed.
Body Control Module
If the fuses and the door ajar switch are in good condition, the problem might lie with the body control module. This module controls the power to the interior lights, among other functions. If it’s faulty, it may need to be replaced. However, this is a more complex and costly fix, so it’s best to rule out other issues first.
Headlight Switch
Some Buick models allow you to control the interior lights with the headlight switch. Ensure that the switch is in the correct position, especially if your model has a setting to turn the lights on manually.
Manual Override
It’s also worth checking if there’s a manual override button for the dome lights. If this button is accidentally depressed, it could prevent the lights from working as intended.
Scan for Codes
Using a diagnostic scan tool can help you check for error codes related to the interior lights. This can help pinpoint the exact cause of the issue, making the repair process much more straightforward.
Test for Power
Finally, if you’ve checked all the above and still have no luck, use a multimeter to check for power at the interior light sockets and the orange wire from the body control module to the interior lights. Lack of power here could indicate a wiring issue or a problem with the body control module.
How to Buy Buick Door Lights?
Once you’ve determined that the issue is with the light bulb itself, it’s time to replace it. When buying new door lights, you have several options. You can opt for the original replacement lights, which will seamlessly integrate with your vehicle. However, if you’re looking for something more unique, you can explore door lights with a projected Buick logo.

These projected logo lights are designed to mimic the original door light functionality while adding a cool feature that displays the Buick logo on the ground when you open the door. They are almost identical to the original ones and can be easily installed with a plug-and-play design, making the upgrade straightforward.
How to Replace Your Buick Door Lights?
Replacing your Buick door lights is a relatively simple process that you can do yourself with a few basic tools. Here’s a step-by-step guide:
Gather Your Tools: You’ll need a flat pry tool to gently pry open the old door light.
Remove the Old Light: Carefully insert the pry tool into the gap of the door light and gently pry it open. Once open, you can remove the old bulb.
Install the New Light: Take your new door light and plug it into the socket. Make sure it’s securely in place.
Test the New Light: Close the door and test the new light to ensure it’s working correctly.

Conclusion
Troubleshooting and replacing your Buick’s door lights doesn’t have to be a daunting task. By following the steps outlined in this post, you can diagnose and fix the issue, or upgrade to a set of door lights with a projected Buick logo that adds a unique touch to your vehicle. Remember, if you’re ever in doubt, it’s always best to consult with a professional mechanic to avoid any potential damage to your Buick. Happy driving!
#car door light#car door light logo projector#car accessories#car upgrade#led car light#car parts#car maintenance
0 notes
Text
How To Install LED Car Badge Light?
The installation process for LED car badge lights can vary depending on the specific design of the badge and the vehicle it's being installed on. However, here are general steps that can guide you through the installation process:

1.Gather the Necessary Tools: Before beginning the installation, make sure you have the required tools, which may include a screwdriver, pliers, and wire strippers.
2.Prepare the Badge and Wiring: If the LED badge light comes with wiring, ensure that the wires are properly prepared, with insulation stripped from the ends to allow for electrical connections.
3.Locate a Power Source: Identify a suitable power source for the LED badge light. This may involve connecting to the vehicle's existing wiring, such as the parking lights or a dedicated power source.

4.Mount the Badge: Position the LED badge light in the desired location on the vehicle's grille or front panel. Some badges may require drilling for mounting, while others may attach using adhesive or existing fasteners.
5.Connect the Wiring: If the LED badge light requires wiring, connect the positive and negative leads to the power source. It's important to ensure that the wiring is securely connected and properly insulated to prevent electrical issues.

6.Test the Light: Once the wiring is connected, test the LED badge light to verify that it functions as intended. This step ensures that the installation was successful and that the light illuminates properly.
7.Secure the Wiring: After testing the LED badge light, secure the wiring to prevent it from coming loose or getting damaged while driving.
8.Adjust and Fine-Tune: Make any necessary adjustments to the positioning of the LED badge light to ensure it's aligned correctly and provides the desired illumination.

It's important to note that specific installation instructions can vary based on the manufacturer and model of the LED car badge light. Always refer to the product's installation manual or instructions provided by the manufacturer for detailed guidance. Additionally, if you're unsure about any aspect of the installation process, it's advisable to seek professional assistance or consult with a qualified automotive technician.
0 notes
Text
How to Master Car Maintenance Tips and Keep Your Car Shining Like New
As an important part of modern life, cars not only provide us with a convenient way of travel, but also are reliable partners in our daily lives. However, to keep your car in good condition, regular maintenance is essential. This article will provide you with a comprehensive car maintenance guide to help your car always maintain its best performance.

Importance of car maintenance
Car maintenance not only prolongs the life of the car, but also ensures driving safety and improves the driving experience. Through regular inspections and maintenance, potential problems can be discovered and resolved, preventing small problems from turning into major failures.
Basic maintenance items
Replace the engine oil and oil filter: Regularly replace the engine oil and oil filter to keep the engine clean and reduce wear.
Check the brake system: Including the inspection of the brake disc, brake pads and brake fluid to ensure the normal operation of the brake system.
Tire inspection: Including the tire pressure, wear and tire balance to ensure driving stability and safety.
Battery maintenance: Check the battery voltage and electrolyte level to ensure the normal operation of the starting system

Seasonal maintenance tips
Spring maintenance: clean the air filter, check the wipers and water tank to prepare for the rainy season and high summer temperatures.
Summer maintenance: check the air conditioning system, replace the coolant, and ensure that the vehicle can maintain good performance even in high temperatures.
Autumn maintenance: replace the antifreeze, check the battery and lighting system to prepare for winter.
Winter maintenance: check the heating system, replace the engine oil suitable for low temperatures, and ensure that the vehicle can start normally in cold weather.

Advanced maintenance items
Engine in-depth maintenance: Regularly perform in-depth engine maintenance to clean carbon deposits and improve fuel efficiency.
Suspension system inspection: Check the shock absorbers and suspension components to ensure smooth driving of the vehicle.
Transmission maintenance: Regularly replace the transmission oil to ensure smooth operation of the transmission.
Body care: Including waxing and polishing of the paint, as well as cleaning and maintenance of the interior.
Maintenance Schedule and Records
Establishing a reasonable maintenance schedule and keeping detailed records of each service can help owners better understand their vehicle’s condition and prevent future repair issues.
Summarize:
Maintaining your car is more than just a wash; it requires comprehensive care, demanding both attentiveness and consistent effort from car owners. Beyond regular maintenance, we can also give your car’s interior and exterior a complete makeover, breathing new life into your beloved vehicle. Interested in LED lighting parts? Then hurry and **click here to explore!** This website boasts a comprehensive selection of LED lighting parts, including cool illuminated door sills, dazzling car logo lights, and captivating interior ambient lighting – we have it all!

0 notes
Text
How to Customize Your Own Car LED Lights

Ever wanted to install LED car interior lights in your car but found store-bought strips aren’t quite right? Here’s your guide to creating perfect-fit lighting yourself!
The big question: How do you safely cut LED strips?
First things first: LED strips are flexible circuits with tiny lights powered by low-voltage electricity. They need careful handling when cutting to keep working properly.
What You’ll Need
Flexible LED strips
Measuring tape or ruler
Sharp scissors/craft knife
Connector clips (no-solder option)
Electrical tape or heat wrap
Power adapter & voltage tester

Step 1: Measure Twice
Check where you want lights in your car (footwells, dash, doors). Measure carefully, remembering to account for any control boxes or connectors.
Step 2: Find the Chop Lines
Look for scissor icons or copper dots – these safe cutting spots usually appear every 3-5 LEDs. Never cut between these marks!
Step 3: Make the Cut
Use sharp tools for clean cuts through the copper pads. Ragged edges can cause electrical issues.

Step 4: Connect the Dots
Clip-on connectors are easiest for beginners – just match + and – symbols. Pros can solder for more permanent connections.
Step 5: Secure Properly
Two installation types exist: 1) Wedge-style (test fit with a credit card first) 2) Stick-on (may fall off in heat/cold). We recommend wedge-style for durability.
Step 6: Test Before Final Fixing
Plug in and check all sections light up. Use your voltage tester to confirm good connections.
Step 7: Fix Any Issues
If lights flicker or won’t turn on: check reversed wires, loose connections, or if your power supply matches the strip’s needs.
Step 8: Final Touches
Tuck wires neatly and secure everything in place. Trim any leftover strip (using Step 2 method).

Important Safety Tips
Disconnect car battery before working
Watch for hot soldering tools
Wear safety glasses when cutting
Final Note
With some patience and our guide, you can create pro-looking custom lighting! Remember: Go slow, double-check connections, and enjoy your new ride glow-up!
#car interior lights#car fiber optic lights#car ambient lights#led car light strips#car upgrade#car DIY#car decoration
0 notes
Text
Which Chevy Rides Do Teens Dig Most? (And Why They’re Killing It)

For teens, wheels aren’t just about getting around—they’re freedom passes, personality badges, and social media flexes. Chevy‘s sweet spot between wallet-friendly pricing, decent horsepower, and street cred keeps it topping teen wishlists. Let’s check out the models you’ll spot in every high school parking lot and figure out why they click so well with the under-20 crowd.
Teen Garage Hall of Fame: Top 3 Chevys
Chevy Camaro
This beast’s ripped body and growling engine make cafeteria arrival an event. While the V6 (275+ HP) gives enough juice for parking lot showoffs, it’s the Bumblebee-from-Transformers cool factor that really sells. TikTok racing clips and used models starting around $25k let teens feel like rebels without breaking the family bank. Pro tip: Backseats exist… barely.

Chevy Malibu
The sensible sneaker of cars. New at $23k or pre-loved around $15k, it’s got parents nodding yes to Apple CarPlay and 32 MPG while teens dig the sleek dashboard selfie backdrop. It’s basically the “cool chaperone” of first cars—safe enough for mom, slick enough for Snapchat.
Chevy Trailblazer/Equinox
These SUVs (starting at $22k) are basically Instagram adventure mobiles. AWD? Check. Room for surfboards? Check. High-up seats for seeing-and-being-seen? Double check. Parents get safety brownie points, teens get #VanLife vibes without the actual van.
Why Chevys Own Teen Driveways
1. Bang-for-Buck Swagger
Camaro’s base model saves $10k vs. a Mustang GT—more cash for gas money and drive-thru runs. Trailblazer packs more tech than Honda HR-V without the price hike. Perfect for babysitting money budgets.
2. Retro Cool Meets TikTok Ready
Chevy plays the nostalgia card (hello, Camaro’s ’60s roots) while staying fresh. Viral engine rev challenges and SUV camping hacks keep these rides trending. Even Fortnite skins get in on the action—because digital flex matters too.
3. Parent-Teen Truce Machines
Malibus come with collision warnings to calm nervous parents. Camaros have actual backseats (sorta) for carpool cred. SUVs double as hand-me-downs for college moves. Everybody wins.

4. Customization Playground
Want to add neon underglow to your Camaro? There’s a YouTube tutorial for that. Plasti-dip your Malibu’s rims for $50? Done. Chevys are basically automotive Lego sets for teens with part-time jobs.
If I Were 17 Again…
That Camaro roar would totally tempt me for Friday night cruises. But real talk? The Trailblazer’s backseat for crew hangouts and trunk space for pizza deliveries would probably win. Chevys get it—whether you’re the class clown, study hall nerd, or wanna-be influencer. Choose your fighter based on your bank account and how many followers you need to impress.
0 notes
Text
What do you need to prepare for a road trip?
Vehicle Preparation Checklist Before a Long-Distance Self-Drive Trip: Safety and Comfort Both Essential
Long-distance self-driving trips are a way to explore scenic views and enjoy freedom, but the condition of your vehicle directly affects the smoothness and safety of your journey. Before setting off, thorough vehicle preparation is necessary to make your trip safer and more relaxed.

1.Basic Safety Checks: Avoid “breaking down halfway”
Tire Inspection
o Tire Pressure: Adjust according to the vehicle manual to the standard value (including the spare tire). Both over- and under-inflation can cause blowouts.
o Wear and Damage: Check for bulges, cracks, or excessive wear; replace tires in advance if necessary.
o Wheel Alignment and Balancing: Prevent pulling to one side or shaking during long drives.
Fluid Levels
o Engine Oil: Ensure quantity is sufficient and oil is not degraded; consider changing before the trip.
o Coolant, Brake Fluid, Windshield Washer Fluid: Check levels; especially when traveling to cold areas, replace with low-temperature windshield fluid.
o Transmission Fluid: If nearing maintenance interval, change in advance.
Braking System
o Replace brake pads if thickness is below 3mm; check brake discs for severe wear.
o Brake fluid water content over 3% affects braking performance—replace promptly.
Lights and Battery
o Ensure all lights (headlights, turn signals, brake lights) are functioning properly.
o If battery voltage is below 12V or it has been in use over 3 years, have it tested or replaced.

2.Emergency Tools: Backup for Unexpected Situations
Onboard Tool Kit: Spare tire, jack, warning triangle, fire extinguisher, reflective vest (required by law).
Emergency Equipment: Tow rope, jumper cables, air pump, portable power bank (jump starter), window breaker, first aid kit.
Special Scenario Gear: Snow chains (winter), recovery boards (sand/mud), entrenching shovel.
3.Maintenance and Servicing: Must Do Before Departure
Comprehensive Service: Conduct one week before departure, focusing on belts, spark plugs, air filters, and other wear parts.
Air Conditioning System: Clean or replace filters to prevent odors and bacterial growth.
uel Management: Keep the tank adequately filled, plan refueling stops in advance to avoid running out of fuel in remote areas.

4.Other Detailed Preparations
Documents and Insurance: Bring vehicle registration, driver’s license, insurance policy; confirm insurance coverage (such as for out-of-area incidents).
Electronic Devices: Update navigation system, download offline maps; check dashcam functionality.
In-Car Comfort: Prepare lumbar supports, neck pillows, sunshades, garbage bags to enhance long-distance driving comfort.
Conclusion
The charm of self-driving trips lies in the unknown scenery, but vehicle preparation must be “known and controllable.” Spending a few hours on checks and planning not only helps avoid risks but also reduces anxiety and increases ease on the road. For long car trips, it's also important to keep the air clear and comfortable in the car!

0 notes
Text
Why is the Chevrolet Traverse So Popular?
A Deep Dive Into America’s Family-Friendly SUV

The Chevrolet Traverse debuted in 2008 as a 2009 model-year vehicle, positioning itself as a midsize three-row SUV designed for families seeking space, comfort, and versatility. Now in its third generation (launched in 2018 and refreshed in 2024), the Traverse remains in production and continues to dominate the competitive family SUV market.
Vehicle Type: 3-row midsize SUV with seating for up to 8 passengers.
Target Audience: Families, outdoor enthusiasts, and drivers prioritizing cargo space and passenger comfort.
Price Range: Starts at 35,800∗∗forthebaseLStrim,risingto∗∗35,800∗∗forthebaseLStrim,risingto∗∗54,000 for the premium High Country trim.
Sales Performance: Consistently ranks among Chevrolet’s top sellers, with over 130,000 units sold annually in the U.S. (2022–2023 data).
Current Generation: Third generation (2018–present), featuring updated tech, safety systems, and a rugged Z71 off-road trim option.

Let’s take a look at why Traverse is a bestseller.
1. Spacious, Family-Centric Design
The Traverse’s 121.7 cubic feet of cargo space (with seats folded) and 98.5-inch wheelbase make it one of the most roomy SUVs in its class. Features like:
Slide-&-Stow second-row seats for easy third-row access.
17 cup holders and configurable storage bins.
Standard tri-zone climate control for passenger comfort. These details cater perfectly to families, road-trippers, and carpoolers.
2. Strong Value for Money
Compared to rivals like the Honda Pilot or Toyota Highlander, the Traverse offers more standard features at a lower price, including:
Chevy Safety Assist: Standard automatic emergency braking, lane-keeping assist, and adaptive cruise control.
Infotainment: An 8-inch touchscreen with wireless Apple CarPlay/Android Auto on most trims.
Powertrain: A reliable 3.6L V6 engine producing 310 hp, paired with a 9-speed automatic transmission.
3. Towing Capability
With a 5,000-pound towing capacity (when properly equipped), the Traverse appeals to adventurers hauling boats, trailers, or campers—a rare feat in the family SUV segment.
4. Safety and Reliability
The Traverse earns top marks from the NHTSA (5-star overall rating) and IIHS, thanks to robust crash-test performance and advanced driver aids. Its proven GM LWB platform also ensures long-term durability.

5. Modern Tech and Comfort
Recent updates include:
Wireless charging and Wi-Fi hotspot connectivity.
HD Surround Vision camera system for tight parking spots.
Premium Bose audio and ventilated front seats (higher trims).
6. Bold, American Styling
Chevrolet’s design language—muscular lines, a wide grille, and optional 21-inch wheels—gives the Traverse a rugged yet refined look that stands out against boxier competitors.
The Chevrolet Traverse thrives because it balances practicality with affordability, offering families a dependable, tech-savvy SUV without compromising on space or power. Its continuous updates (like the 2024 refresh with enhanced driver-assist features) keep it competitive, while Chevrolet’s strong dealer network and reputation for reliability solidify its appeal. Whether hauling kids, gear, or trailers, the Traverse remains a go-to choice for drivers who want “everything and the kitchen sink” in one versatile package.🚙💨
0 notes
Text
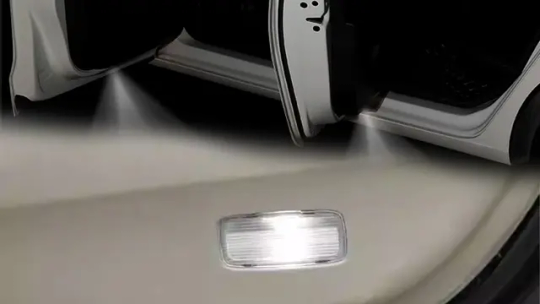
A Plug-and-Play Buick Door Projector Light

Transform your vehicle's entryway with a stunning and personalized touch! Discover how upgrading your Buick door lights to projector lights can enhance functionality and style.
What is the Function of a Puddle Light?
Puddle lights, often referred to as door lights, serve a practical purpose: they illuminate the ground below your car door when it’s opened. This feature helps prevent accidents by making it easier to see underfoot in low-light conditions. Puddle lights not only improve safety but also add a touch of sophistication to your vehicle, showcasing your Buick’s style even before you step inside.

Convert Ordinary Luminous Buick Door Lights into Logo Projector Lights
Elevate your Buick’s aesthetic by converting those standard luminous door lights into logo projector lights! This upgrade allows you to showcase personalized displays every time you open your door. The installation process is straightforward—just plug and play! You don’t need to be a car enthusiast or a tech guru; anyone can complete this transformation with minimal effort.
Which Door Light is Suitable for Your Car Model?
Selecting the right door light for your Buick can be a bit tricky because specific compatibility data may not always be available. However, we provide various size specifications for door lights to help guide your choice. Before purchasing, make sure to measure your existing door light size to ensure a perfect fit.

Customize Personalized Logos, Not Just Car Logos
Why stop at a simple car logo when you can customize your door projector light with a unique logo or even a photo? Whether it’s a favorite symbol, your company logo, or a family photo, the possibilities for personalization are endless. Make a statement every time you open your car door!
RGB Provides Reassuring Guarantee Services
At RGB, we stand by our products. Our door projector lights come with a 30-day money-back guarantee and a one-year warranty to ensure your satisfaction. If you’re not happy with your purchase or encounter any issues, you can be confident knowing support is just a call away.
Summary
Transform your Buick into a reflection of your personality and style with customizable door projector lights. Enjoy the perfect blend of functionality, safety, and expression. I wish you the best in modifying your car to fit your unique vision! Happy driving!
0 notes
Text
Wired LED Door Sills vs. Battery-Powered LED Door Sills: Which Upgrade Is Right for You?

Your car’s thresholds are more than just steps—they’re the first contact points that set the tone for your driving experience. LED illuminated thresholds add a touch of luxury, enhance night-time safety, and make every entry feel like a red carpet moment. However, when choosing between hardwired LED door sills and battery-powered LED door sills, the decision isn’t just about style—it’s about practicality, installation effort, and long-term value. Let’s break down the main differences to help you choose the perfect upgrade.
Power and Installation
Hardwired LED Thresholds
Direct Connection: Hardwired into your car’s electrical system (e.g., dome light circuit or ignition).
Basic Wiring Skills Required: Involves tapping into existing circuits, routing wires through the door panels, and securing connections. This may take 20-60 minutes to remove interior panels.
Automatically Illuminates when Door is Open: Syncs with your car’s existing lighting system.

Battery-Powered LED Thresholds
Wireless Design: Powered by replaceable button batteries.
Simple Installation: Peel-and-stick adhesive installation, requiring no tools or wiring; installs in about 5 minutes per door, making it ideal for rental cars or non-permanent modifications. Battery-powered thresholds are triggered by motion sensors to turn the lights on and off.
Brightness and Performance
The battery version of LED scuff plates has moderate brightness due to battery capacity limitations. In contrast, hardwired versions draw power directly from the car battery, providing stable, high-intensity illumination.
The lighting effect of LED thresholds can create a comfortable atmosphere inside the car, especially during long journeys, as the soft glow helps people feel more relaxed. Combining LED lights with other interior lighting systems can create a more attractive visual effect, making each ride more enjoyable.
Whether you’re a DIY enthusiast or a busy driver seeking instant appeal, LED thresholds can make every entrance a statement.
0 notes
Text
What is Car Interior Lighting and Why Do We Need It

Whether you are traveling through the vast urban jungle or on a winding mountain road, every drive is not only a pursuit of the destination, but also a refined journey of comfort and safety. In this journey, the car interior lighting, a seemingly insignificant but crucial detail, is quietly playing the role of brightening your mood and protecting your safety.
What is interior lighting?
Interior lighting, as the name implies, refers to the lighting system provided inside the car and the lighting accessories that can be added to the interior of the car. It not only includes the basic main lighting, but also covers decorative lighting such as ambient lighting, welcome door light, and luminous floor mats to enhance the driving experience. These lights create a safe and warm in-car environment for drivers and passengers through carefully designed light source layout and color control.
The main lighting is usually set on the roof to ensure that passengers can clearly see the interior environment and help them easily find what they need in the dark. The ambient light adjusts the atmosphere in the car according to the driver’s mood or driving mode by changing color and brightness, making every trip a visual feast; the welcome light projects a unique light and shadow effect when the door is opened, showing personality and taste.

Why do you need interior lighting?
First, good interior lighting can ensure that the driver can still clearly see the dashboard, control panel and surrounding environment at night or in low light conditions, reducing operational errors and improving driving safety. Secondly, decorative lighting such as ambient lighting can create different situational modes such as romance, relaxation or vitality by adjusting the color and intensity of light, allowing passengers to enjoy a more personalized and comfortable experience during the journey.
Cars are no longer just a means of transportation, but also an extension of personal style. Interior lighting, especially ambient lighting and welcome lighting, has become an important way to show the owner’s unique taste and personality. Today’s car owners pay more attention to personalization and customization, and the color of interior lighting can be adjusted according to personal preferences. Choosing the right ambient lighting can show the owner’s unique style and enhance the overall fashion sense of the car.
Today, as technology and design advance together, interior lighting has far surpassed the traditional lighting function. It has become a bridge connecting the driver and the vehicle, and an indispensable warm companion on the journey. Choosing high-quality interior lighting accessories is not only an investment in safety, but also a reflection of the pursuit of high-quality life.
0 notes
Text
How to wash a car correctly?

The Correct Steps for Washing a car
Rinse off the mud and sand When using a high-pressure water gun to clean the car, start from the top and work your way down to wash off the mud and sand from the surface. Then clean the back of the car, and finally the lower part. Pay attention to washing off the mud stuck on the wheels, brake discs, fenders, and grille.
Spray car wash liquid After rinsing the car body with a high-pressure water gun, it’s time to apply car wash liquid. Spray the car wash liquid evenly on the body, then use a multi-functional high-pressure car wash machine or hand wash to wipe it off evenly. Do not use laundry detergent or soap.
Wipe the body with a car wash sponge Use a car wash sponge to wipe the car wash liquid off the body, then rinse the car clean with a high-pressure water gun.
Remove stains Carefully remove any remaining stains on the body using a degreaser.
Dry the body After removing the stains, rinse off all the car wash liquid with clean water. Then dry the car body, ensuring there are no water marks left behind.
By mastering these washing steps and correctly using a high-pressure washer, you can efficiently maintain your beloved car and contribute to energy conservation and environmental protection.

Misconceptions about Car Washing
Washing the car in strong sunlight Avoid washing the car under intense sunlight because cold water on a sun-exposed car can damage the paint. Moreover, washing in bright sun can create a lens effect with water droplets, causing localized high temperatures on the paint layer. Over time, this can make the paint lose its shine. Therefore, during summer, choose shaded areas or wash early in the morning or late in the evening.
Using laundry detergent to wash the car Many car owners opt for everyday household cleaning agents instead of professional car cleaners. This habit is not recommended as the varying pH levels of these household cleaners can corrode the car’s paint.
Washing the car too frequently Excessive washing can accelerate paint oxidation, resulting in a dull and lackluster appearance. Typically, washing once a week is sufficient.
Directly using a high-pressure water gun or cloth Many car owners begin by using a high-pressure water gun to rinse the car and then proceed to slowly wipe it clean. However, this too is a misconception. After driving for a while, the car surface accumulates dust and small particles. If these are not rinsed off with plain water before using a high-pressure water gun or cloth directly, these particles can cause friction on the paint surface, damaging it.
Washing the car during the rainy season In the rainy season, some car owners refrain from washing their cars thinking that rainwater has already cleaned it. This is incorrect as rainwater is acidic and if left unwashed, it can corrode the paint surface or even the car chassis, leading to vehicle malfunctions.
These are the correct steps for washing a car and how to do it properly. We hope this information is helpful to everyone.
0 notes
Text
Protect Your Car’s Door Sills With No-Wiring Illuminated Door Sill Steps

With the continuous development of automobile technology, the door sill protection pedal is also constantly improving. Now more and more cars use the door sill protection pedal with luminous logo at the threshold position. This kind of protection pedal can not only protect the door sill from being scratched It can also play a very good warning role when getting on the car at night. Illuminated door sills are easy to install and easy to use, and can be used on all car models.
Luminous logo door sill guard is installed on the car sill to protect the car door sill from being scratched or damaged.
Gorgeous and functional
The luminous logo door sill guard is a kind of protection pedal that can well protect the car door sill from being scratched. This glowing logo door sill is installed on the door sill of the car and has a very good decorative effect. The light comes on when the door is opened. The beautiful lights play a welcoming role and provide passengers with a good ride experience.

Easy to install
The luminous logo door sill protective pedal is easy to use, just fix the led logo door sill on the car sill. Each door sill plate is powered by a set of 4 AA batteries. The switch of the car led door sill is controlled by a small magnet. Small magnets are attached to the bottom of the door, aiming at the area of the control switch when the door is closed. In this way, we can realize that it lights up when the door is opened and turns off when the door is closed.
Special fit
Lighted door sill are generally installed on the door sill of the car, so it is necessary for special cars. RgbEmblem has been focusing on car decorative lights for nearly 10 years. For car lovers, they are professional and reliable. Browse their website and you can know that each of their products contains almost all models. You can search your car brand and go to find the led threshold for your car.

High quality and safe
The automotive industry is one that places great emphasis on quality and safety. In addition to considering quality, safety must also be considered, which is a truth that everyone understands. If you cannot guarantee the safety of your own car, then the car you buy may have many potential safety hazards. The wiring-free luminous door sill does not need to be broken to install, which is simple and convenient, and greatly improves the safety of automobile electricity use. A new car will not void its warranty.
Customizable
The size of the led door sill depends on the model and can be customized according to the needs of customers. If you can’t find the model of your car on the website, you can contact customer service for customization. The customer provides a drawing or takes a photo of the front and sends it to the customer service with the length and width attached. Not only the size can be customized, but also the logo, color, etc. can be customized. If your vehicle is 24V, don’t worry, RgbEmblem is professional, they can tailor it for you.
0 notes
Text
Personalized Car Decoration Luminous Logo Multi-Color Chevrolet Car Sill Pedals

Car decoration is very popular now, no matter what profession or age car enthusiasts have a personality and interesting soul. We not only pursue the performance and comfort of the car, but also like to change the appearance of the car to achieve our own favorite look. Generally, we will buy traditional car door sill plates to protect car door sills from wear and tear. Maybe we can show more different elements while protecting the threshold of the car?
LED car door sill have been around for a long time. This kind of product is already a hot seller in RGBEMBLEM. RGBEMBLEM has been selling led car sill enter guard for many years. Rgbemblem illuminated sill plates are customized according to each car door sill. Strict control is carried out from drawing to production, and continuous adjustments are made according to customer feedback to achieve the best quality and user experience.
As a Chevrolet car owner, when we want to customize a different Chevrolet door sill protector, I highly recommend going to RGBEMBLEM to have a look. RGBEMBLEM chevrolet door sill plates have a variety of models, such as hot-selling camaro lighted door sills. Even if you can’t find a model that suits your model, you can send messages or emails to their customer service at any time for consultation. More than LOGO can be customized, if you have other more requirements. Please don’t be shy, send it directly to customer service to ask if it can be customized. They will even appreciate your idea very much.

If you have experience in car maintenance or modification, it is recommended to choose the car power supply version of the led logo car door sill scuff plate, it looks more professional, shares a power supply line system with the car, and is perfectly integrated with the car. If you are a novice or your car has just been purchased. I recommend that you choose the battery powered version of the door sill guards. This installation does not need to break the wires, and there is no need to worry about damaging the car or affecting the car warranty.
Buy your favorite color and customize your favorite logo. When you install the illuminated door sills on the car, you can see the lighted logo when you open the door, which is a very pleasant thing. Some car enthusiasts often take illuminated sill plate to car shows. The colorful flowing lights and the personalized logo give people a very explosive visual effect.
#car decoration#led car door sill#car party#car show#car lights#chevrolet#car upgrade#car accessories
0 notes
Text
How to Connect LED Car Floor Mats to Your Car’s Music System

Transforming your vehicle’s interior with LED car floor mats is a fantastic way to add a dynamic ambiance that responds to the music you play. Lighting up your car’s interior to the beat of your music is a fun way to enhance your driving experience. LED car floor mats that sync with your tunes can make every ride feel like a party.
Understanding Your LED Car Floor Mats
Before you begin, ensure your LED floor mats come with a music sync feature. This function allows the lights to respond to the audio signals from your car’s music system.
Prepare the tools you will need
To connect your LED car floor mats, you’ll need:
LED car floor mats with a music sync function.
An audio source (your car’s stereo system).
An audio cable (RCA or AUX, depending on your car’s output and the mat’s input).
A power source (car cigarette lighter adapter).
Step 1: Position the Floor Mats
Place the LED car floor mats in the footwells of your car, making sure they are clean and free from dust or debris to ensure proper adhesion.
Step 2: Identify the Audio Output
Determine the type of audio output your car stereo system has. Common types include:
AUX (3.5mm audio jack)
RCA outputs (red and white connectors)

Step 3: Connect the Audio Cable
Plug one end of the audio cable into your car stereo’s audio output.
Connect the other end of the cable to the LED car floor mats’ controller or audio input.
Step 4: Power Up the Mats
If using a cigarette lighter adapter, plug it into your car’s power outlet.
Turn on your car’s ignition to power the LED mats.
Step 5: Configure the Music Sync
Turn on your car’s music system and select a song with a clear beat.
Find the music sync setting on the LED mat’s controller. This may be labeled as “Music Mode,” “Beat Sync,” or “Sound Activated.”
Activate the music sync feature to allow the mats to respond to the music.
Step 6: Test the Connection
Play a song with a strong beat to test the synchronization. Observe if the LED lights are pulsing in time with the music.
Step 7: Troubleshoot If Necessary
If the LED mats are not syncing correctly:
Check all connections to ensure they are secure.
Verify the audio source is playing music at an adequate volume.
Consult the LED mat’s user manual for troubleshooting tips.
Ensure the mats are clean and making proper contact with the car floor.
Step 8: Enjoy Your Synchronized Light Show
Once everything is set up and working, enjoy the immersive experience of lights that dance to the rhythm of your music.
Conclusion
Connecting your LED car floor mats to your car’s music system is a straightforward process that can greatly enhance the ambiance of your vehicle. With the right setup, you can create a personalized light show that responds to the beat of your favorite songs. So go ahead, hit the road, and let your car’s interior come alive with every note.
0 notes
Text
Winter Car Cleaning Tips for Your Chevrolet

As winter arrives, the picturesque snowy landscapes can be refreshing, but for car owners, the cold and snow present significant challenges for cleaning and maintaining their vehicles. Chevrolet cars, known for their outstanding performance and stylish appearance, are beloved by many owners. However, keeping your Chevrolet looking great and performing well during winter requires some essential techniques. Here are some practical tips to help you keep your Chevrolet looking as good as new in the cold weather!
Choose the Right Time to Wash Your Car
With low winter temperatures, washing your car can easily lead to ice formation, so selecting the best time for a wash is crucial. It is advisable to wash your car on sunny afternoons when temperatures are relatively higher. This way, your car will dry more quickly after washing, reducing the likelihood of ice forming. Also, avoid washing your car during rain or snowstorms, as these conditions can cause unnecessary damage to the paint.
Use Warm Water for Washing
When washing your car in winter, avoid using cold water. Cold water not only freezes easily but can also make dirt and salt on the paint surface more stubborn and difficult to remove. It is recommended to use warm water, as it effectively dissolves dirt and salt, while also preventing frost from forming on the car’s surface, minimizing damage. However, be careful not to use water that is too hot, as it can harm the paint.
Choose Specialized Car Wash Soap
When washing your car in winter, opt for specialized car wash soap. These soaps typically contain antifreeze components, allowing them to remain fluid in low temperatures and effectively removing dirt and salt from the car’s surface. Avoid using overly alkaline soaps, as they can corrode the paint.
Pay Attention to Underbody Cleaning
During winter driving, the underbody of your car can easily accumulate salt and dirt, which can affect driving performance and lead to corrosion. Make sure to focus on cleaning the underbody of your vehicle during washes to eliminate these potential hazards.

Focus on Detail Cleaning
In addition to washing the car’s exterior, pay attention to detail cleaning in areas such as window seals, door frames, and fuel caps. These areas can easily accumulate dirt and salt, and if not cleaned promptly, can cause damage to the vehicle. Special attention should also be given to unique parts of Chevrolet vehicles, such as the grille and wheel rims, using appropriate cleaners and tools.
Don’t Neglect Interior Cleaning
Cleaning the interior of your car is just as important as the exterior. Winter often brings mud and snowmelt into the cabin, so it is advisable to vacuum and wipe down the interior regularly to maintain a clean and comfortable environment.
Dry the Car Promptly
After washing, promptly dry your car with a soft towel. Avoid using rough towels or sponges to prevent scratching the paint. Be sure to dry areas where water can accumulate, such as door seams and window seals, to prevent ice formation that could cause damage.
Wax for Paint Protection
Winter weather can be dry, causing the car’s paint to lose its shine. Therefore, it is recommended to regularly wax your Chevrolet. Waxing creates a protective layer that shields the paint from dirt and salt, while also making the surface smoother and shinier.
Conclusion
While winter presents challenges for cleaning and maintaining your Chevrolet, mastering the right methods and techniques can help keep your vehicle looking great and performing well throughout the season. We hope these winter cleaning tips for your Chevrolet will be helpful, allowing your car to shine all winter long!
0 notes