
Don't wanna be here? Send us removal request.
Statistics
We looked inside some of the posts by rjrajbir-blog and here's what we found interesting.
Average Info
Notes Per Post
1
Likes Per Post
1
Reblog Per Post
0
Reply Per Post
0
Time Between Posts
7 days
Number of Posts By Type
Photo
1
Text
11
Last Seen Tumblr Blogs


Fun Fact
There were a total of 171.5 billion posts on Tumblr in 2019.
Photo
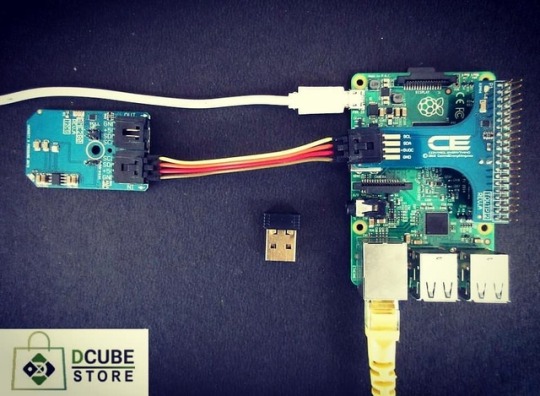
Bad #weather always looks worse through a #window. We've always been interested in #monitoring our local #weather and what we see out of the window. We also wanted better control over our heating and A/C system. Building a #personal_weather_station is great #learning experience. #local #weather #monitoring #learning #new #ideas #measuring #temperature #humidity #pressure #bme280 #sensor #raspberrypi #i2c #sheild #internetofthings #tech #technology #java #electronics For more information you can visit the links given below www.dcubestore.com www.dcubetechnologies.com https://www.instagram.com/p/B21meWHglFm/?igshid=wxu54ys1aask
#weather#window#monitoring#personal_weather_station#learning#local#new#ideas#measuring#temperature#humidity#pressure#bme280#sensor#raspberrypi#i2c#sheild#internetofthings#tech#technology#java#electronics
0 notes
Text
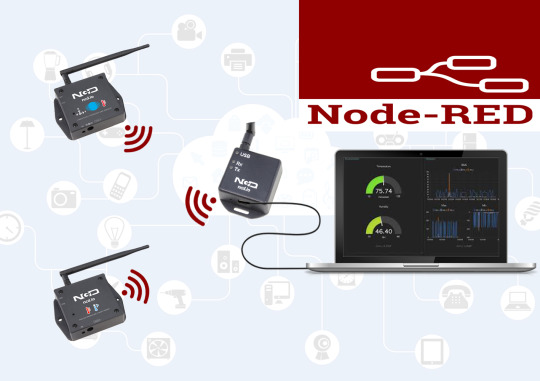
Displaying Sensor Data in Node-RED Dashboard
The manufacturing and production needs of 21’s century global trade are growing at an extraordinary pace, developing commercial demanding situations that rely upon sensors for absolution. The trifecta of 24-hour international manufacturing needs, reliable real-time asset tracking, and the high aid value required to manipulate assets in far off places have led to the emergence of the economic IoT and its adoption of wireless sensors. Sensors are necessary for harsh business settings; the key lies in choosing the precise sensor.
Hardware and Software Required
Hardware
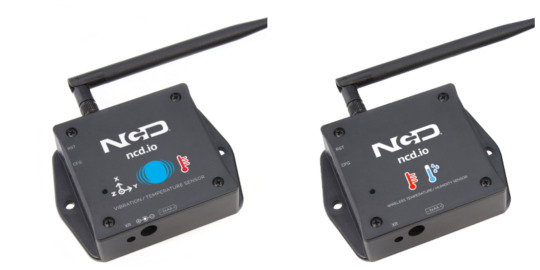
NCD Long-range Wireless Temperature and Humidity Sensor
NCD Long-Range Wireless Vibration and Temperature sensor
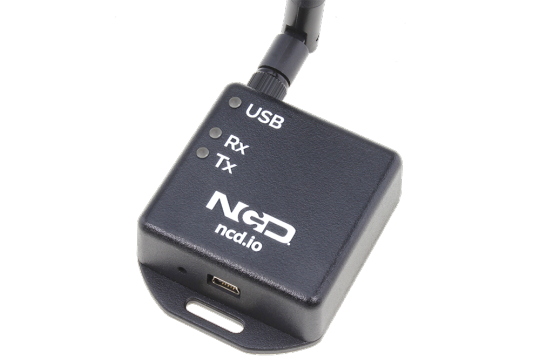
NCD 900HP-S3B Long-Range Wireless Mesh Modem with USB Interface
Software
Node-RED
Introducing NCD’s Long Range variety of commercial IoT wireless Temperature/Humidity and Vibration/Temperature sensor, boasting as much as a 2-mile range using a wireless mesh networking architecture. Incorporating a 16-bit Vibration/Temperature sensor and a Temperature/Humidity sensor, these sensor transmits pretty accurate vibration, temperature and humidity statistics at user-defined intervals.
These sensors can be powered with 2 AA batteries and can work up to 500, 000 wireless transmissions, a 10 years battery life may be expected relying on environmental situations and the data transmission intervals.
Optionally, these sensors can be externally powered, making it the best choice for wireless data tracking tool for the commercial equipment. Information can be transmitted to a PC, a raspberry pi, to Losant IoT cloud, Microsoft® azure® IoT, and an embedded machine all at the identical time.
To send these wireless sensors’ data to any system as we discussed above, we need a 900HP-S3B Wireless Modem.

Plug the 900HP-S3B USB Mesh Modem into your computer and then install the required drivers. The 900HP-S3B modem will mount as a COM port on your PC.
In this tutorial, we are learning how to display these sensors data in Node-RED dashboard. So, first of all, we have to install Node-Red.
Installing Node-Red
Now you will be having your sensors in running mode, we need to use that data efficiently.
At first of all, you’ll have to install Node-RED.
Once it’s done, you need to start your command line or Power Shell for Windows users, and then navigate the same to the directory where “Node-RED” is installed.
Now type the command given below in your terminal.
npm i ncd-red-wireless node-red-dashboard
This will install the required nodes to receive data from your wireless sensors and you can start Node-RED once it’s done.
To start node server, you need to write node-red in the command prompt or terminal and then press enter.
Assuming at this point you’ve started up Node-RED, you should be able to open a browser and navigate to http://localhost:1880, this will open the flow builder that is the heart of the Node-RED experience.
youtube
Steps to build the flow
As you have started node-red, you'll be viewing a large blank flow with a list of nodes on the left side, which is known as the palette.
Now type ncd in the search bar of the palette, go ahead and drag a Wireless Gateway node over to your flow canvas to get started.
Finding your wireless Sensors
The next element we want to do is configure the node, when you first add it you’ll note that there is a small triangle at the top right corner, next to a blue dot, that triangle indicates that the node needs extra configuration, the blue dot indicates that the node has no longer but been deployed as part of the flow.
Double click on the node to open up the configuration options.
Click on the pencil icon next to the Serial Device field to configure your USB router, which will open the 2nd configuration panel that will be having a few options.
Click on the magnifying glass next to the Serial Port field and select the port that corresponds with your router, then click the “Add” button on top.
The serial device subject will now be populated based totally on that selection, and you may click “done”, you currently have direct access to your wireless sensors!
youtube
If you want to see the data that your wireless sensors are sending in, you can attach debug node to your wireless gateway.
Working with the data
Now out of your wireless sensors, data is gathered and it will be the output of the “debug” tab, this "debug tab" is placed on the right sidebar which will be subsequent to the information tab. To see the information is available to hit the reset button. In node-red, records will be passed among nodes in a JSON packet. When the msg object comes into the debug tab you may make bigger it to view the overall list of information that comes with it. This will be useful in case you need to check that which all sensors are being added in. The other issue this node gives is an easy way to interchange your router to the network identity that devices in configuration mode document on, simply hit the button on the left of the node and the tool will switch to the configuration network, hit it once more to return it to listening mode.

Adding the wireless sensors
Grab a Wireless device Node from the palette and drag it onto the flow, double click on it to get it configured.
Click on the magnifying glass next to the Serial Port field and select the port that corresponds with your router, then click the “Add” button on top.
Click on the pencil icon next to the Serial Device and Serial Device for Config, now fields will now be populated based on that selection.
Select the Sensor as Temperature and Humidity or Vibration and click done.
youtube
You’ll notice this automatically sets the sensor type for you, you can also give it a name to make it easier to identify.
Node-RED Dashboard
Provides the ability to create a UI using the flow builder, provides charts, graphs, and a number of other visual elements we can use to display data, along with nodes to trigger a flow using user input. We will use some of these nodes to display the data from your wireless sensors.
Let’s check it out! There is a tab on the top right that says “Dashboard”.
On the top right of that tab is the little “new window” icon, click on it to view your UI.
youtube
Output
Node-RED Flow
[{"id":"2b202371.51803c","type":"ncd-wireless-node","z":"567e6d06.afbf84","name":"","connection":"e23241e4.e6b9d","config_comm":"b6b09e51.3f42","addr":"","sensor_type":"8","auto_config":"","node_id":0,"delay":300,"destination":"0000FFFF","power":4,"retries":10,"pan_id":"7FFF","change_enabled":"","change_pr":"0","change_interval":"0","cm_calibration":"60.6","bp_altitude":"0","bp_pressure":"0","bp_temp_prec":"0","bp_press_prec":"0","amgt_accel":"0","amgt_mag":"0","amgt_gyro":"0","impact_accel":"0","impact_data_rate":"4","impact_threshold":25,"impact_duration":1,"activ_interr_x":1,"activ_interr_y":2,"activ_interr_z":4,"activ_interr_op":8,"filtering":0,"data_rate":5,"time_series":0,"reading_type":1,"x":60,"y":480,"wires":[["f32912c4.8a4a7"]]},{"id":"e23241e4.e6b9d","type":"ncd-gateway-config","z":"","name":"","comm_type":"serial","ip_address":"","tcp_port":"2101","port":"COM6","baudRate":"115200","pan_id":"7fff","rssi":false},{"id":"b6b09e51.3f42","type":"ncd-gateway-config","z":"","name":"","comm_type":"serial","ip_address":"","tcp_port":"2101","port":"COM6","baudRate":"115200","pan_id":"7fff","rssi":false}]
0 notes
Text
Sending data of Wireless Vibration and Temperature to Google sheets
Introducing NCD’s Long Range IoT Industrial wireless vibration and temperature sensor, boasting up to a 2-mile range the use of a wi-fi mesh networking structure. Incorporating a precision 16-bit vibration and temperature sensor, this device transmits incredibly accurate vibration and temperature records at consumer-described durations.

For the duration of Power-Up, this vibration sensor learns “normal” base-line vibration from the monitored device. This base-line vibration is subtracted from regular sampled vibration readings to improve applicable vibration data. Preferably, the monitored device must be off even as the sensor is mastering. Once the sensor stabilizes and starts sending information, the device/equipment being monitored can be powered on. This business IoT wireless vibration sensor samples 3-axis of vibration data for 100ms after which calculate RMS, maximum, and minimal vibration readings. This sensor combines these records with temperature data in a data packet and transmits the result to modems and gateways in the wi-fi variety. Once the transmission is complete, the vibration sensor is going lower back to sleep, therefore minimizing power consumption.
Powered by using just 2 AA batteries and operational life of 500,000 wireless transmissions, a ten years battery life can be expected relying on environmental conditions and the data transmission interval. Optionally, this sensor may be externally powered, making it a perfect choice for wireless vibration monitoring device for industrial equipment. With an open communication protocol, this sensor transmits hardware-encrypted data that may be included with just about any control system or gateway. Data can be transmitted to a laptop, a raspberry pi, to Losant IoT cloud, microsoft® azure® IoT, and an embedded gadget all at the equal time. Sensor parameters and wireless transmission settings can be modified using labview® tracking software on a computer pc.

Long-Range Wireless Mesh Modem with USB Interface

Setting up Node-Red.
The sensor and Zigmo/Router come pre-programmed and work out of the box. In this section, we will set up a sensor and Zigmo link and start receiving data on our PC.
Resources Required
IoT Long Range Wireless Vibration and Temperature Sensor with power source Battery Or External DC.
Zigmo/Router for PC
Googlesheets
PC/Laptop with an OS installed or Any IoT Embedded Device
Steps to install NODE-RED
Now that you have sensors running, we need a way to do something useful with that data.
First of all, you’ll have to install Node-RED.
Once that’s done, you’ll need to enter your command line, or Power Shell for Windows users, navigate to the directory Node-RED is installed in.
Now type “npm i ncd-red-wireless node-red-dashboard“. This will install the nodes required to receive data from your wireless sensors and you can start Node-RED once this is done.
To start node server write node-red in the command prompt or terminal and press enter.
Setting up the nodes
Assuming at this point you’ve started up Node-RED, you should be able to open a browser and navigate to http://localhost:1880, this will open up the flow builder that is the heart of the Node-RED experience.
Steps to build the flow
At this point you’ll be viewing a large blank flow with a long list of nodes on the left-hand side, this sidebar is called the palette.

Go ahead and drag a Wireless Gateway node over to your flow canvas to get started.

ncd-red-wireless Provides the nodes that manage the serial connection, parse incoming sensor data, filter it by specific parameters, and allow you to configure the wireless sensors.
Finding your wireless sensors
Once you’ve added the node you’ll be able to view the info tab, which contains information about the node’s functionality, this tab is well-populated for most node-red packages and contains valuable information, many times you will not need to view any other documentation outside of the info tab, so keep it in mind while you are building your flows if you have a question about how a node works. The next thing we need to do is configure the node, when you first add it you’ll notice that there is a small triangle on the top right corner next to a blue dot, the triangle indicates that the node needs additional configuration, the blue dot indicates that the node has not yet been deployed as part of the flow.
Double click on the node to open up the configuration options.

Click on the pencil icon next to the Serial Device field to configure your USB router, this will open a second configuration panel that only has a few options.

Click on the magnifying glass next to the Serial Port field and select the port that corresponds with your router, then click the “Add” button on top. The Serial Device field will now be populated based on that selection, and you can click “Done”, you now have direct access to your wireless sensors! To view the data coming in.

Now go back to your palette and type “debug” into the search field at the top, grab one of these nodes and drag it to the right of your Wireless Gateway

Double click on it and change “msg.” to “complete msg object” click done

Now draw a line between the two nodes, and click “Deploy” on the top right of the window...

Working with the data
Now out of your wireless sensors data is gathered and it is output to the “debug” tab, this “debug tab” is placed within the right sidebar subsequent to the information tab. To see the information are available in to hit the reset button. In node-red records is surpassed among nodes in a JSON packet. When the msg object comes into the debug tab you may make bigger it to view the overall list of information that comes with it. This is extraordinarily useful in case you need to quickly see which sensors are checking in. The other issue this node gives is an easy way to interchange your router to the network identity that devices in configuration mode document on, simply hit the button on the left of the node and the tool will switch to the configuration network, hit it once more to return it to listening mode. Once we get the wi-fi tool nodes set up, they may be set to routinely configure a sensor whilst it enters configuration mode, so it’s always available to maintain such gateway nodes present at the flow for speedy configuring a device.

Adding the wireless sensors
We need to separate wireless sensor records domestically in order that we are able to display it, we could use a switch node to split out the messages from the gateway based totally on the mac address with or sensor type, but as I referred to, the wireless nodes truly incorporate extra functionality for configuring the sensors, so we’ll start with them to give you an extra entire image of how those structures can work. In case you haven’t already seen packets coming in from both of your sensors, cross in advance and hit the reset button on the only that hasn’t stated. While a sensor assessment in thru any serial device configuration node, the mac address and kind of sensor is cached in a pool so we are able to quickly find it for the duration of this next step.
Grab a Wireless Node from the palette and drag it onto the flow, double click on it to get it configured.

Select the serial device from the drop-down that you used for the Wireless Gateway, now click the magnifying glass next to “Mac Address” and select one of the available options.


You’ll notice this automatically sets the sensor type for you, you can also give it a name to make it easier to identify. As noted in the info tab, the Serial Device for Config field is optional, and we won’t worry about it right now. The node you have just added effectively works as a filter on incoming sensor data, only passing through data for the mac address, or sensor type if no mac address is present.
Now go back to your palette and type “debug” into the search field at the top, grab one of these nodes and drag it to the right of your Wireless Gateway.

Double click on it and click done.

Adding Function Nodes
The function node is used to run JavaScript code against the msg object. The function node accepts a msg object as input and can return 0 or more message objects as output. This message object must have a payload property (msg.payload) and usually has other properties depending on the proceeding nodes.
Now grab a “function” node from the palette, and place it to the right of the Vib/Temp node.

Double click on the node to edit the function node.
Here you have to write a little javascript code to create a condition.

msg.payload = {}; msg.payload.rms_x = parseFloat(msg.data.sensor_data.rms_x); msg.payload.rms_y = parseFloat(msg.data.sensor_data.rms_y); msg.payload.rms_z = parseFloat(msg.data.sensor_data.rms_z); msg.payload.max_x = parseFloat(msg.data.sensor_data.max_x); msg.payload.max_y = parseFloat(msg.data.sensor_data.max_y); msg.payload.max_z = parseFloat(msg.data.sensor_data.max_z); msg.payload.min_x = parseFloat(msg.data.sensor_data.min_x); msg.payload.min_y = parseFloat(msg.data.sensor_data.min_y); msg.payload.min_z = parseFloat(msg.data.sensor_data.min_z); msg.payload.temperature = parseFloat(msg.data.sensor_data.temperature); return msg;
Now Add “http request” node from the palette.

If you double click on it edit http node, you’ll see a “URL” field, here you have to enter the respective link of the google sheet.
Now create a google sheet to store the values of vibration and temperature.
Steps to create a google sheet.
First, open up your browser and type www.google.com and sign up in google account if you haven’t signed in, then click on the six dots on the left of your picture.

Now click on “Drive” to open the google drive.

Click on New>More>Google Forms>Blank Form.

Here you’ll see an untitled form.

Now edit question as RMS_X and click on the “+” button to add another question for other values of vibration and temperature.

Now click on the Three dots beside your picture as shown in the picture below.

Now click on the “Get pre-filled link”.

Now enter random values to Vibration and Temperature fields and click Get link as shown in the figure.

Now paste that link in notepad.

Edit that link as shown in the picture below.

Now go back to form and click on RESPONSES and then click on the google sheet icon as shown in the picture below.

Create a new spreadsheet.

Here you can visualize the values of vibration and temperature.

Now go back to node-red and double click on http request node to edit it, then copy the URL from the notepad that you have saved and paste it in the URL field as shown in the figure.

You can also attach debug node to check the output the http node.
Now connect all the wires.

Click on Deploy button to get them out on the google sheet.

OUTPUT
Now to go google spreadsheet and you’ll see values are coming.


Node-RED Flow
https://github.com/ncdcommunity/IoT-Long-Range-Wireless-Vibration-and-Temperature-Sensor-to-GoogleSheet-using-Node-RED/blob/master/node_red_flow.json
0 notes
Text
Sending Wireless Vibration and Temperature Sensor Data to Excel Using Node-RED
Things used in this project
IoT Long Range Wireless Temperature Humidity Sensor with power source Battery Or External DC.
Zigmo/Router for PC
XAMPP
PC/Laptop with an OS installed or Any IoT Embedded Device.
Story
Introducing NCD’s Long Range IoT Industrial wireless vibration and temperature sensor, boasting up to a 2-mile range the use of a wireless mesh networking structure. Incorporating a precision 16-bit vibration and temperature sensor, this device transmits incredibly accurate vibration and temperature records at consumer-described durations.

For the duration of Power-Up, this vibration sensor learns “normal” base-line vibration from the monitored device. This base-line vibration is subtracted from regular sampled vibration readings to improve applicable vibration data. Preferably, the monitored device must be off even as the sensor is mastering. Once the sensor stabilizes and starts sending information, the device/equipment being monitored can be powered on. This business IoT wireless vibration sensor samples 3-axis of vibration data for 100ms after which calculate RMS, maximum, and minimal vibration readings. This sensor combines these records with temperature data in a data packet and transmits the result to modems and gateways in the wireless variety. Once the transmission is complete, the vibration sensor is going lower back to sleep, therefore minimizing power consumption.
Powered by using just 2 AA batteries and operational life of 500,000 wireless transmissions, a ten years battery life can be expected relying on environmental conditions and the data transmission interval. Optionally, this sensor may be externally powered, making it a perfect choice for wireless vibration monitoring device for industrial equipment. With an open communication protocol, this sensor transmits hardware-encrypted data that may be included with just about any control system or gateway. Data can be transmitted to a laptop, a raspberry pi, to Losant IoT cloud, microsoft® azure® IoT, and an embedded gadget all at the equal time. Sensor parameters and wireless transmission settings can be modified using labview® tracking software on a computer pc.

Long-Range Wireless Mesh Modem with USB Interface

Setting up Node-Red
The sensor and Zigmo/Router come pre-programmed and work out of the box. In this section, we will set up a sensor and Zigmo link and start receiving data on our PC.
Resources Required
IoT Long Range Wireless Vibration and Temperature Sensor with power source Battery Or External DC.
Zigmo/Router for PC
PC/Laptop with an OS installed or Any IoT Embedded Device
Steps to install NODE-RED
Now that you have sensors running, we need a way to do something useful with that data.
First of all, you’ll have to install Node-RED.
Once that’s done, you’ll need to enter your command line, or Power Shell for Windows users, navigate to the directory Node-RED is installed in.
Now type “npm i ncd-red-wireless node-red-dashboard“. This will install the nodes required to receive data from your wireless sensors and you can start Node-RED once this is done.
To start node server write node-red in the command prompt or terminal and press enter.
Setting up the nodes
Assuming at this point you’ve started up Node-RED, you should be able to open a browser and navigate to http://localhost:1880, this will open up the flow builder that is the heart of the Node-RED experience.
Steps to build the flow
At this point you’ll be viewing a large blank flow with a long list of nodes on the left-hand side, this sidebar is called the palette.

Go ahead and drag a Wireless Gateway node over to your flow canvas to get started.

ncd-red-wireless provides the nodes that manage the serial connection, parse incoming sensor data, filter it by specific parameters, and allow you to configure the wireless sensors.
Finding your wireless sensors
Once you’ve added the node you’ll be able to view the info tab, which contains information about the node’s functionality, this tab is well-populated for most node-red packages and contains valuable information, many times you will not need to view any other documentation outside of the info tab, so keep it in mind while you are building your flows if you have a question about how a node works. The next thing we need to do is configure the node, when you first add it you’ll notice that there is a small triangle on the top right corner next to a blue dot, the triangle indicates that the node needs additional configuration, the blue dot indicates that the node has not yet been deployed as part of the flow.
Double click on the node to open up the configuration options.

Click on the pencil icon next to the Serial Device field to configure your USB router, this will open a second configuration panel that only has a few options.

Click on the magnifying glass next to the Serial Port field and select the port that corresponds with your router, then click the “Add” button on top. The Serial Device field will now be populated based on that selection, and you can click “Done”, you now have direct access to your wireless sensors! To view the data coming in.

Now go back to your palette and type “debug” into the search field at the top, grab one of these nodes and drag it to the right of your Wireless Gateway

Double click on it and change “msg.” to “complete msg object” click done

Now draw a line between the two nodes, and click “Deploy” on the top right of the window...

Working with the data
Now out of your wireless sensors data is gathered and it is output to the “debug” tab, this “debug tab” is placed within the right sidebar subsequent to the information tab. To see the information are available in to hit the reset button. In node-red records is surpassed among nodes in a JSON packet. When the msg object comes into the debug tab you may make bigger it to view the overall list of information that comes with it. This is extraordinarily useful in case you need to quickly see which sensors are checking in. The other issue this node gives is an easy way to interchange your router to the network identity that devices in configuration mode document on, simply hit the button on the left of the node and the tool will switch to the configuration network, hit it once more to return it to listening mode. Once we get the wi-fi tool nodes set up, they may be set to routinely configure a sensor whilst it enters configuration mode, so it’s always available to maintain such gateway nodes present at the flow for speedy configuring a device.

Adding the wireless sensors
we need to separate wireless sensor records domestically in order that we are able to display it, we could use a switch node to split out the messages from the gateway based totally on the mac address with or sensor type, but as I referred to, the wireless nodes truly incorporate extra functionality for configuring the sensors, so we’ll start with them to give you an extra entire image of how those structures can work. In case you haven’t already seen packets coming in from both of your sensors, cross in advance and hit the reset button on the only that hasn’t stated. While a sensor assessment in thru any serial device configuration node, the mac address and kind of sensor is cached in a pool so we are able to quickly find it for the duration of this next step.
Grab a Wireless Node from the palette and drag it onto the flow, double click on it to get it configured

Select the serial device from the drop-down that you used for the Wireless Gateway, now click the magnifying glass next to “Mac Address” and select one of the available options.


You’ll notice this automatically sets the sensor type for you, you can also give it a name to make it easier to identify. As noted in the info tab, the Serial Device for Config field is optional, and we won’t worry about it right now. The node you have just added effectively works as a filter on incoming sensor data, only passing through data for the mac address, or sensor type if no mac address is present.
Now go back to your palette and type “debug” into the search field at the top, grab one of these nodes and drag it to the right of your Wireless Gateway

Double click on it and click done.

Adding Function Nodes
The function node is used to run JavaScript code against the msg object. The function node accepts a msg object as input and can return 0 or more message objects as output. This message object must have a payload property (msg.payload) and usually has other properties depending on the proceeding nodes.
Now grab a “function” node from the palette, and place it to the right of the Vib/Temp node.

Double click on the node to open up the edit options.
Here you have to write little javascript code to create a condition, so at particular temperature value email alert will be sent to the respective email id

var rms_x = msg.payload.rms_x;var rms_y = msg.payload.rms_y;var rms_z = msg.payload.rms_z;var max_x = msg.payload.max_x;var max_y = msg.payload.max_y;var max_z = msg.payload.max_z;var min_x = msg.payload.min_x;var min_y = msg.payload.min_y;var min_z = msg.payload.min_z;var temperature = msg.payload.temperature;var d = new Date();var time = d.toLocaleTimeString();var m ={'Time':time, 'RMS_X':rms_x, 'RMS_Y':rms_y, 'RMS_Z':rms_z, 'MAX_X':max_x, 'MAX_Y':max_y, 'MAX_Z':max_z, 'MIN_X':min_x, 'MIN_Y':min_y, 'MIN_Z':min_z, 'Temperature':temperature};return {payload:m};
Now grab a CSV node from the palette and place it to the right of the function node, it will convert the values CSV format i.e comma-separated values.

Now double click on it and type the column names separated by comma and output as “a message per row” as shown in the picture below.

Now go back to your palette and type “file” into the search field at the top, grab the one which shows “Writes msg.payload” to store the values and place it right to the CSV node. You can also attach the debug node to check the out of the file node.

Double click on it to edit the file node, enter the file name where you want to store the values as shown in the figure.

Now connect all the wires and click on the deploy button.


OUTPUT
Now you can check the excel output

Node-RED Flow
[{"id":"196a9fe1.7ccfd","type":"tab","label":"Flow 10","disabled":false,"info":""},{"id":"7d4721bf.a16ae","type":"ncd-gateway-node","z":"196a9fe1.7ccfd","name":"","connection":"dd330f73.d38c4","x":120,"y":80,"wires":[["7c4cff18.6dec1"]]},{"id":"8afeb9de.1b6c58","type":"ncd-wireless-node","z":"196a9fe1.7ccfd","name":"","connection":"22543864.0ebf38","config_comm":"4fd1b36a.f61a0c","addr":"","sensor_type":"8","auto_config":true,"node_id":0,"delay":"900000","destination":"0000FFFF","power":4,"retries":10,"pan_id":"7FFF","change_enabled":"","change_pr":"0","change_interval":"0","cm_calibration":"60.6","bp_altitude":"0","bp_pressure":"0","bp_temp_prec":"0","bp_press_prec":"0","amgt_accel":"0","amgt_mag":"0","amgt_gyro":"0","impact_accel":"0","impact_data_rate":"4","impact_threshold":25,"impact_duration":1,"activ_interr_x":1,"activ_interr_y":2,"activ_interr_z":4,"activ_interr_op":8,"filtering":0,"data_rate":5,"time_series":0,"reading_type":1,"x":80,"y":240,"wires":[["c98be87e.aa1ff8","5a9846ac.6f6408"]]},{"id":"7c4cff18.6dec1","type":"debug","z":"196a9fe1.7ccfd","name":"","active":false,"tosidebar":true,"console":false,"tostatus":false,"complete":"payload","targetType":"msg","x":460,"y":80,"wires":[]},{"id":"c98be87e.aa1ff8","type":"debug","z":"196a9fe1.7ccfd","name":"","active":false,"tosidebar":true,"console":false,"tostatus":false,"complete":"false","x":260,"y":400,"wires":[]},{"id":"5a9846ac.6f6408","type":"function","z":"196a9fe1.7ccfd","name":"Function","func":"var rms_x = msg.payload.rms_x;\nvar rms_y = msg.payload.rms_y;\nvar rms_z = msg.payload.rms_z;\nvar max_x = msg.payload.max_x;\nvar max_y = msg.payload.max_y;\nvar max_z = msg.payload.max_z;\nvar min_x = msg.payload.min_x;\nvar min_y = msg.payload.min_y;\nvar min_z = msg.payload.min_z;\nvar temperature = msg.payload.temperature;\nvar d = new Date();\nvar time = d.toLocaleTimeString();\nvar m ={'Time':time, 'RMS_X':rms_x, 'RMS_Y':rms_y, 'RMS_Z':rms_z, 'MAX_X':max_x, 'MAX_Y':max_y, 'MAX_Z':max_z, 'MIN_X':min_x, 'MIN_Y':min_y, 'MIN_Z':min_z, 'Temperature':temperature};\nreturn {payload:m};","outputs":1,"noerr":0,"x":280,"y":240,"wires":[["61edf644.9b33e8"]]},{"id":"61edf644.9b33e8","type":"csv","z":"196a9fe1.7ccfd","name":"","sep":",","hdrin":true,"hdrout":"","multi":"one","ret":"\\n","temp":"Time,RMS_X,RMS_Y,RMS_Z,MAX_X,MAX_Y,MAX_Z,MIN_X,MIN_Y,MIN_Z,Temperature","skip":"1","x":490,"y":240,"wires":[["85aa32da.0c053"]]},{"id":"85aa32da.0c053","type":"file","z":"196a9fe1.7ccfd","name":"Excel_Output","filename":"\"C:\\Users\\dcube\\Desktop\\node-red vibration sensor\\Excel\\Output.xlsx\"","appendNewline":true,"createDir":true,"overwriteFile":"false","encoding":"utf8","x":690,"y":240,"wires":[[]]},{"id":"dd330f73.d38c4","type":"ncd-gateway-config","z":"","name":"","comm_type":"serial","ip_address":"","tcp_port":"2101","port":"COM6","baudRate":"115200","pan_id":"7fff","rssi":false},{"id":"22543864.0ebf38","type":"ncd-gateway-config","z":"","name":"","comm_type":"serial","ip_address":"","tcp_port":"2101","port":"COM6","baudRate":"115200","pan_id":"7fff","rssi":false},{"id":"4fd1b36a.f61a0c","type":"ncd-gateway-config","z":"","name":"","comm_type":"serial","ip_address":"","tcp_port":"2101","port":"COM6","baudRate":"115200","pan_id":"7fff","rssi":false}]
0 notes
Text
Wireless Vibration and Temperature to MySQL using Node-RED
Things used in this project
IoT Long Range Wireless Temperature Humidity Sensor with power source Battery Or External DC.
Zigmo/Router for PC
XAMPP
PC/Laptop with an OS installed or Any IoT Embedded Device.
Story
Introducing NCD’s Long Range IoT Industrial wireless vibration and temperature sensor, boasting up to a 2-mile range the use of a wireless mesh networking structure. Incorporating a precision 16-bit vibration and temperature sensor, this device transmits incredibly accurate vibration and temperature records at consumer-described duration.

For the duration of Power-Up, this vibration sensor learns “normal” base-line vibration from the monitored device. This base-line vibration is subtracted from regular sampled vibration readings to improve applicable vibration data. Preferably, the monitored device must be off even as the sensor is mastering. Once the sensor stabilizes and starts sending information, the device/equipment being monitored can be powered on. This business IoT wireless vibration sensor samples 3-axis of vibration data for 100ms after which calculate RMS, maximum, and minimal vibration readings. This sensor combines these records with temperature data in a data packet and transmits the result to modems and gateways in the wi-fi variety. Once the transmission is complete, the vibration sensor is going lower back to sleep, therefore minimizing power consumption.
Powered by using just 2 AA batteries and operational life of 500,000 wireless transmissions, a ten years battery life can be expected relying on environmental conditions and the data transmission interval. Optionally, this sensor may be externally powered, making it a perfect choice for wireless vibration monitoring device for industrial equipment. With an open communication protocol, this sensor transmits hardware-encrypted data that may be included with just about any control system or gateway. Data can be transmitted to a laptop, a raspberry pi, to Losant IoT cloud, microsoft® azure® IoT, and an embedded gadget all at the equal time. Sensor parameters and wireless transmission settings can be modified using labview® tracking software on a computer pc.
Long-Range Wireless Mesh Modem with USB Interface

Resources Required
IoT Long Range Wireless Vibration and Temperature Sensor with power source Battery Or External DC.
Zigmo/Router for PC
PC/Laptop with an OS installed or Any IoT Embedded Device
Setting up XAMPP
XAMPP is most prevailing, free an open-source cross-platform which is one solution to run your web services. XAMPP is developed by ApacheFriends which released in May 2002. XAMPP Stands for Cross-Platform(X), Apache(A), MySQL(M) also Sometimes (M) refers to MariaDB, PHP(P) and Pearl(P).
xampp allows you to work on a local server and test local copies of websites using PHP code and MySQL databases. Once xampp is active, you can access your local copy with a browser using an URL like http://localhost/ or http://127.0.0.1/
Downloading and Installing XAMPP
Go to XAMPP web site and download the installer based on your operating system. Installation should be similar to a normal software installation you do in your operating system.
When installing, there would be an option to select whether you want to run Apache and MySQL as services. If you chose it, Apache and MySQL will start at system boot-up which may not need if your computer is tight with memory resources or if you are not doing PHP development frequently. You can change these settings after installation.
Starting Apache and MySQL
Go to the location where you installed XAMPP (usually C:\Program Files\xampp) and double click on XAMPP Control Panel (xampp-control.exe). This will bring you the following screen. Click on Start buttons next to Apache and MySQL for starting them.

Now open up your browser and type http://localhost/ or http://127.0.0.1/

This will open up the following page. Click on the phpMyAdmin.

This will bring you the following screen. Now click on the “New” button as shown in the picture below to create a new database.

Now create a new database as shown in the picture below.

Now create a table to visualize data as shown in the picture below.

Now name the first column as “id”.

Now scroll to the right side of the screen you will see “A_I Comments” i.e. Auto Increments and it is used setting primary key which uniquely identifies each record within the table. Click on the checkbox below it.

This will bring you the following screen. Now click on the “Go” button.

Now enter the values of other columns Name = rms_x, Type = DECIMAL, Length/Values = 10,2(i.e up to 2 decimal points) and similarly for all other values and in the last column, you can show created time and click on the save button as shown in the picture below.

Now click on your database name to expand it and it will show your table name, then click on it to view how data is shown, as shown in the picture below.

That’s all with the setting up of XAMPP.
Setting up Node-Red.
The sensor and Zigmo/Router come pre-programmed and work out of the box. In this section, we will set up a sensor and Zigmo link and start receiving data on our PC
Steps to install NODE-RED
Now that you have sensors running, we need a way to do something useful with that data.
First of all, you’ll have to install Node-RED.
Once that’s done, you’ll need to enter your command line, or Power Shell for Windows users, navigate to the directory Node-RED is installed in.
Now type “npm i ncd-red-wireless node-red-dashboard“. This will install the nodes required to receive data from your wireless sensors and you can start Node-RED once this is done.
To start node server write node-red in the command prompt or terminal and press enter.
Setting up the nodes
Assuming at this point you’ve started up Node-RED, you should be able to open a browser and navigate to http://localhost:1880, this will open up the flow builder that is the heart of the Node-RED experience.
Steps to build the flow
At this point you’ll be viewing a large blank flow with a long list of nodes on the left-hand side, this sidebar is called the palette.

Go ahead and drag a Wireless Gateway node over to your flow canvas to get started.

ncd-red-wireless Provides the nodes that manage the serial connection, parse incoming sensor data, filter it by specific parameters, and allow you to configure the wireless sensors.
Finding your wireless sensors
Once you’ve added the node you’ll be able to view the info tab, which contains information about the node’s functionality, this tab is well-populated for most node-red packages and contains valuable information, many times you will not need to view any other documentation outside of the info tab, so keep it in mind while you are building your flows if you have a question about how a node works. The next thing we need to do is configure the node, when you first add it you’ll notice that there is a small triangle on the top right corner next to a blue dot, the triangle indicates that the node needs additional configuration, the blue dot indicates that the node has not yet been deployed as part of the flow.
Double click on the node to open up the configuration options.

Click on the pencil icon next to the Serial Device field to configure your USB router, this will open a second configuration panel that only has a few options.

Click on the magnifying glass next to the Serial Port field and select the port that corresponds with your router, then click the “Add” button on top. The Serial Device field will now be populated based on that selection, and you can click “Done”, you now have direct access to your wireless sensors! To view the data coming in.

Now go back to your palette and type “debug” into the search field at the top, grab one of these nodes and drag it to the right of your Wireless Gateway.

Double click on it and change “msg.” to “complete msg object” click done.

Now draw a line between the two nodes, and click “Deploy” on the top right of the window...

Working with the data
Now out of your wireless sensors data is gathered and it is output to the “debug” tab, this “debug tab” is placed within the right sidebar subsequent to the information tab. To see the information are available in to hit the reset button. In node-red records is surpassed among nodes in a JSON packet. When the msg object comes into the debug tab you may make bigger it to view the overall list of information that comes with it. This is extraordinarily useful in case you need to quickly see which sensors are checking in. The other issue this node gives is an easy way to interchange your router to the network identity that devices in configuration mode document on, simply hit the button on the left of the node and the tool will switch to the configuration network, hit it once more to return it to listening mode. Once we get the wireless device nodes set up, they may be set to routinely configure a sensor whilst it enters configuration mode, so it’s always available to maintain such gateway nodes present at the flow for speedy configuring a device.

Adding the wireless sensors
we need to separate wireless sensor records domestically in order that we are able to display it, we could use a switch node to split out the messages from the gateway based totally on the mac address with or sensor type, but as I referred to, the wireless nodes truly incorporate extra functionality for configuring the sensors, so we’ll start with them to give you an extra entire image of how those structures can work. In case you haven’t already seen packets coming in from both of your sensors, cross in advance and hit the reset button on the only that hasn’t stated. While a sensor assessment in thru any serial device configuration node, the mac address and kind of sensor is cached in a pool so we are able to quickly find it for the duration of this next step.
Grab a Wireless Node from the palette and drag it onto the flow, double click on it to get it configured.

Select the serial device from the drop-down that you used for the Wireless Gateway, now click the magnifying glass next to “Mac Address” and select one of the available options.


You’ll notice this automatically sets the sensor type for you, you can also give it a name to make it easier to identify. As noted in the info tab, the Serial Device for Config field is optional, and we won’t worry about it right now. The node you have just added effectively works as a filter on incoming sensor data, only passing through data for the mac address, or sensor type if no mac address is present.
Now go back to your palette and type “debug” into the search field at the top, grab one of these nodes and drag it to the right of your Wireless Gateway.

Double click on it and click done.

Adding Function Nodes
The function node is used to run JavaScript code against the msg object. The function node accepts a msg object as input and can return 0 or more message objects as output. This message object must have a payload property (msg.payload) and usually has other properties depending on the proceeding nodes.
Now grab a “function” node from the palette, and place it to the right of the Vib/Temp node.

Double click on the node to open up the configuration options.
Here you have to write little javascript code to create a condition, so the data is sent to the MySQL database.

rms_x = msg.payload.rms_xrms_y = msg.payload.rms_yrms_z = msg.payload.rms_zmax_x = msg.payload.max_xmax_y = msg.payload.max_ymax_z = msg.payload.max_zmin_x = msg.payload.min_xmin_y = msg.payload.min_ymin_z = msg.payload.min_ztemperature = msg.payload.temperaturemsg.topic = "INSERT INTO vibration_temperature ( `rms_x`, `rms_y`, `rms_z`, `max_x`, `max_y`, `max_z`, `min_x`, `min_y`, `min_z`, `temperature`) VALUES ( "+ rms_x +", "+ rms_y +", "+ rms_z +", "+ max_x +", "+ max_y +", "+ max_z +", "+ min_x +", "+ min_y +", "+ min_z +", "+ temperature +");"return msg;
Now you have to add “MySQL” node to store data, check your palette if it is present there or you can click on the three bars present right side of deploy button as shown in the picture below.

Now click on the “Manage palette” button.

Now search for MySQL and click on the ‘install’ button as shown in the picture.

Once it's done, you’ll see “mysql” node is present in the palette.
Now grab the “mysql” node from the palette and double click on it to open up configuration options.

Write your database name as you created earlier and give a name to it, then click on the pencil icon next to the Database to edit sqldatabase node.

Now add User = root i.e by default in the xampp and password is blank. You can also create user and password enter that here, then enter your database name and time zone(optional) and then click update and done.

Now you’ll see your database node shows connected, Now connect all the wires as shown in the picture.

Now hit the deploy button and you’ll database node shows “ok”, its means data is sending.

OUTPUT
Here you can visualize the data coming in.

Node-RED Flow
https://github.com/ncdcommunity/Sending-IoT-Wireless-Vibration-and-Temperature-data-to-MySQL/blob/master/node_red_flow.json
0 notes
Text
Email Alerts of Vibration and Temperature using Node-RED
Things used in this project
IoT Long Range Wireless Temperature Humidity Sensor with power source Battery Or External DC.
Zigmo/Router for PC
PC/Laptop with an OS installed or Any IoT Embedded Device.
Story
Introducing NCD’s Long Range IoT Industrial wireless vibration and temperature sensor, boasting up to a 2-mile range the use of a wireless mesh networking structure. Incorporating a precision 16-bit vibration and temperature sensor, this device transmits incredibly accurate vibration and temperature records at consumer-described durations.

For the duration of Power-Up, this vibration sensor learns “normal” base-line vibration from the monitored device. This base-line vibration is subtracted from regular sampled vibration readings to improve applicable vibration data. Preferably, the monitored device must be off even as the sensor is mastering. Once the sensor stabilizes and starts sending information, the device/equipment being monitored can be powered on. This business IoT wireless vibration sensor samples 3-axis of vibration data for 100ms after which calculate RMS, maximum, and minimal vibration readings. This sensor combines these records with temperature data in a data packet and transmits the result to modems and gateways in the wireless variety. Once the transmission is complete, the vibration sensor is going lower back to sleep, therefore minimizing power consumption.
Powered by using just 2 AA batteries and operational life of 500,000 wireless transmissions, a ten years battery life can be expected relying on environmental conditions and the data transmission interval. Optionally, this sensor may be externally powered, making it a perfect choice for wireless vibration monitoring device for industrial equipment. With an open communication protocol, this sensor transmits hardware-encrypted data that may be included with just about any control system or gateway. Data can be transmitted to a laptop, a raspberry pi, to Losant IoT cloud, Microsoft® azure® IoT, and an embedded gadget all at the equal time. Sensor parameters and wireless transmission settings can be modified using LabView® tracking software on a computer pc.
Long-Range Wireless Mesh Modem with USB Interface

Setting up Node-Red
The sensor and Zigmo/Router come pre-programmed and work out of the box. In this section, we will set up a sensor and Zigmo link and start receiving data on our PC.
Resources Required
IoT Long Range Wireless Vibration and Temperature Sensor with power source Battery Or External DC.
Zigmo/Router for PC
PC/Laptop with an OS installed or Any IoT Embedded Device
Steps to install NODE-RED
Now that you have sensors running, we need a way to do something useful with that data.
First of all, you’ll have to install Node-RED.
Once that’s done, you’ll need to enter your command line, or Power Shell for Windows users, navigate to the directory Node-RED is installed in.
Now type “npm i ncd-red-wireless node-red-dashboard“. This will install the nodes required to receive data from your wireless sensors and you can start Node-RED once this is done.
To start node server write node-red in the command prompt or terminal and press enter.
Setting up the nodes
Assuming at this point you’ve started up Node-RED, you should be able to open a browser and navigate to http://localhost:1880, this will open up the flow builder that is the heart of the Node-RED experience.
Steps to build the flow
At this point you’ll be viewing a large blank flow with a long list of nodes on the left-hand side, this sidebar is called the palette.

Go ahead and drag a Wireless Gateway node over to your flow canvas to get started.

ncd-red-wireless Provides the nodes that manage the serial connection, parse incoming sensor data, filter it by specific parameters, and allow you to configure the wireless sensors.
Finding your wireless sensors
Once you’ve added the node you’ll be able to view the info tab, which contains information about the node’s functionality, this tab is well-populated for most node-red packages and contains valuable information, many times you will not need to view any other documentation outside of the info tab, so keep it in mind while you are building your flows if you have a question about how a node works. The next thing we need to do is configure the node, when you first add it you’ll notice that there is a small triangle on the top right corner next to a blue dot, the triangle indicates that the node needs additional configuration, the blue dot indicates that the node has not yet been deployed as part of the flow.
Double click on the node to open up the configuration options.

Click on the pencil icon next to the Serial Device field to configure your USB router, this will open a second configuration panel that only has a few options.

Click on the magnifying glass next to the Serial Port field and select the port that corresponds with your router, then click the “Add” button on top. The Serial Device field will now be populated based on that selection, and you can click “Done”, you now have direct access to your wireless sensors! To view the data coming in.

Now go back to your palette and type “debug” into the search field at the top, grab one of these nodes and drag it to the right of your Wireless Gateway.

Double click on it and change “msg.” to “complete msg object” click done.

Now draw a line between the two nodes, and click “Deploy” on the top right of the window...

Working with the data
Now out of your wireless sensors data is gathered and it is output to the “debug” tab, this “debug tab” is placed within the right sidebar subsequent to the information tab. To see the information are available in to hit the reset button. In node-red records is surpassed among nodes in a JSON packet. When the msg object comes into the debug tab you may make bigger it to view the overall list of information that comes with it. This is extraordinarily useful in case you need to quickly see which sensors are checking in. The other issue this node gives is an easy way to interchange your router to the network identity that devices in configuration mode document on, simply hit the button on the left of the node and the tool will switch to the configuration network, hit it once more to return it to listening mode. Once we get the wi-fi tool nodes set up, they may be set to routinely configure a sensor whilst it enters configuration mode, so it’s always available to maintain such gateway nodes present at the flow for speedy configuring a device.

Adding the wireless sensors
we need to separate wireless sensor records domestically in order that we are able to display it, we could use a switch node to split out the messages from the gateway based totally on the mac address with or sensor type, but as I referred to, the wireless nodes truly incorporate extra functionality for configuring the sensors, so we’ll start with them to give you an extra entire image of how those structures can work. In case you haven’t already seen packets coming in from both of your sensors, cross in advance and hit the reset button on the only that hasn’t stated. While a sensor assessment in thru any serial device configuration node, the mac address and kind of sensor is cached in a pool so we are able to quickly find it for the duration of this next step.
Grab a Wireless Node from the palette and drag it onto the flow, double click on it to get it configured.

Select the serial device from the drop-down that you used for the Wireless Gateway, now click the magnifying glass next to “Mac Address” and select one of the available options.


You’ll notice this automatically sets the sensor type for you, you can also give it a name to make it easier to identify. As noted in the info tab, the Serial Device for Config field is optional, and we won’t worry about it right now. The node you have just added effectively works as a filter on incoming sensor data, only passing through data for the mac address, or sensor type if no mac address is present.
Now go back to your palette and type “debug” into the search field at the top, grab one of these nodes and drag it to the right of your Wireless Gateway.

Double click on it and click done.

Adding Function Nodes
The function node is used to run JavaScript code against the msg object. The function node accepts a msg object as input and can return 0 or more message objects as output. This message object must have a payload property (msg.payload) and usually has other properties depending on the proceeding nodes.
Now grab a “function” node from the palette, and place it to the right of the Vib/Temp node.

Double click on the node to open up the configuration options.

Here you have to write little javascript code to create a condition, so at a particular value, an email alert will be sent to the respective email id.
if (msg.payload.temperature > 28) { node.send({ topic: "Subject: System .... ", payload: "Temperature:" + msg.payload.temperature,})}if (msg.payload.rms_x > 300) { node.send({ topic: "Subject: System RMS_X value has been exceeded ", payload: "RMS_X:" + msg.payload.rms_x, });} if (msg.payload.rms_y > 50) { node.send({ topic: "Subject: System RMS_Y value has been exceeded ", payload: "RMS_Y:" + msg.payload.rms_y, });} if (msg.payload.rms_z > 100) { node.send({ topic: "Subject: System RMS_Z value has been exceeded ", payload: "RMS_Z:" + msg.payload.rms_z, }); }if (msg.payload.max_x > 500) { node.send({ topic: "Subject: System MAX_X value has been exceeded ", payload: "MAX_X:" + msg.payload.max_x, });}if (msg.payload.max_y > 50) { node.send({ topic: "Subject: System MAX_Y value has been exceeded ", payload: "MAX_Y:" + msg.payload.max_y, });}if (msg.payload.max_z > 0) { node.send({ topic: "Subject: System RMS_x value has been exceeded ", payload: "MAX_Z:" + msg.payload.max_z, });}if (msg.payload.min_x < 0) { node.send({ topic: "Subject: System MIN_X value has been exceeded ", payload: "MIN_X:" + msg.payload.min_x, });}if (msg.payload.min_y < 0) { node.send({ topic: "Subject: System min_y value has been exceeded ", payload: "MIN_Y:" + msg.payload.min_y, });}if (msg.payload.min_z < (-150)) { node.send({ topic: "Subject: System MIN_Z value has been exceeded ", payload: "MIN_Z:" + msg.payload.rms_x, });} return;
You can edit values as our own.
Now grab an output email node from the palette and place it to the right of the Vibration and Temperature node.

The Email node provides both input and output of emails.
Now double click on it and open up the email edit node and add “email-id” of the person at first field whom you want to send the email alerts and then also add “email-id and password” of that person from where you want to send alerts as shown in the picture below and click done.

Now draw all the wires and click deploy as shown in the picture.

OUTPUT
Now you will see emails are sending. You can also check on the respective email ID.


There is another method, in which you can send vibration and temperature emails separately.
The steps are the same up to function node
Now double click on the function node to edit the function node. Now the code for this function node is.

if (msg.payload.rms_x > 300 && msg.payload.rms_y > 50 && msg.payload.rms_z > 100 && msg.payload.max_x > 500 && msg.payload.max_y > 50 && msg.payload.max_z > 0 && msg.payload.min_x < 0 && msg.payload.min_y < 0 && msg.payload.min_z < -150) { msg.topic = "Subject:System Vibration has been exceeded."; msg.payload = "Vibration: [rms_x:" + String(msg.payload.rms_x)+",rms_y:"+ String(msg.payload.rms_y)+",rms_z:"+ String(msg.payload.rms_z)+",max_x:"+ String(msg.payload.max_x)+",max_y:"+ String(msg.payload.max_y)+",max_z:"+ String(msg.payload.max_z)+",min_x:"+ String(msg.payload.min_x)+",min_y:"+ String(msg.payload.min_y)+",min_z:"+ String(msg.payload.min_z)+"]"; return msg;}
Now grab another node from the palette for temperature values

Now double click on the function node to edit the function node.
Now grab an email node from the palette
Now edit it like, you have done above.
Connect all the wires then click the “Deploy” button.

Output
This is the output of the vibration value.

This is the email alert of temperature value.

If you see no emails are sending or “sending failed," go to Google account and you’ll see security issue find.


Click on it and allow “Third-party access” to the apps as shown in in the figure.

If you still not getting emails, you can also check your spam folder.
Node-RED Flow
[{"id":"f8c5fd9c.087c9","type":"tab","label":"Flow 8","disabled":false,"info":""},{"id":"afeb6491.17a1a8","type":"ncd-gateway-node","z":"f8c5fd9c.087c9","name":"","connection":"fbb36648.bd10f8","x":130,"y":80,"wires":[["9d04b930.791128"]]},{"id":"aae4d5fb.e9e9b8","type":"ncd-wireless-node","z":"f8c5fd9c.087c9","name":"Vibration/Temperature","connection":"38428cea.affba4","config_comm":"4e4864b9.8d96ec","addr":"","sensor_type":"8","auto_config":true,"node_id":0,"delay":"900000","destination":"0000FFFF","power":4,"retries":10,"pan_id":"7FFF","change_enabled":"","change_pr":"0","change_interval":"0","cm_calibration":"60.6","bp_altitude":"0","bp_pressure":"0","bp_temp_prec":"0","bp_press_prec":"0","amgt_accel":"0","amgt_mag":"0","amgt_gyro":"0","impact_accel":"0","impact_data_rate":"4","impact_threshold":25,"impact_duration":1,"activ_interr_x":1,"activ_interr_y":2,"activ_interr_z":4,"activ_interr_op":8,"filtering":0,"data_rate":5,"time_series":0,"reading_type":1,"x":120,"y":260,"wires":[["6b784ab9.c502f4","1b373014.106e7"]]},{"id":"9d04b930.791128","type":"debug","z":"f8c5fd9c.087c9","name":"","active":false,"tosidebar":true,"console":false,"tostatus":false,"complete":"true","targetType":"full","x":470,"y":80,"wires":[]},{"id":"6b784ab9.c502f4","type":"debug","z":"f8c5fd9c.087c9","name":"","active":true,"tosidebar":true,"console":false,"tostatus":false,"complete":"payload","targetType":"msg","x":330,"y":400,"wires":[]},{"id":"6ae18c2b.bcdfd4","type":"e-mail","z":"f8c5fd9c.087c9","server":"smtp.gmail.com","port":"465","secure":true,"tls":true,"name":"[email protected]","dname":"email","x":710,"y":260,"wires":[]},{"id":"1b373014.106e7","type":"function","z":"f8c5fd9c.087c9","name":"Function","func":"if (msg.payload.temperature > 28) {\n node.send({\n topic: \"Subject: System .... \",\n payload: \"Temperature:\" + msg.payload.temperature,})\n}\n\nif (msg.payload.rms_x > 300) {\n node.send({\n topic: \"Subject: System RMS_X value has been exceeded \",\n payload: \"RMS_X:\" + msg.payload.rms_x,\n });\n} \n \nif (msg.payload.rms_y > 50) {\n node.send({\n topic: \"Subject: System RMS_Y value has been exceeded \",\n payload: \"RMS_Y:\" + msg.payload.rms_y,\n });\n} \nif (msg.payload.rms_z > 100) {\n node.send({\n topic: \"Subject: System RMS_Z value has been exceeded \",\n payload: \"RMS_Z:\" + msg.payload.rms_z,\n }); \n}\n\nif (msg.payload.max_x > 500) {\n node.send({\n topic: \"Subject: System MAX_X value has been exceeded \",\n payload: \"MAX_X:\" + msg.payload.max_x,\n });\n}\n\nif (msg.payload.max_y > 50) {\n node.send({\n topic: \"Subject: System MAX_Y value has been exceeded \",\n payload: \"MAX_Y:\" + msg.payload.max_y,\n });\n}\n\nif (msg.payload.max_z > 0) {\n node.send({\n topic: \"Subject: System RMS_x value has been exceeded \",\n payload: \"MAX_Z:\" + msg.payload.max_z,\n });\n}\n\nif (msg.payload.min_x < 0) {\n node.send({\n topic: \"Subject: System MIN_X value has been exceeded \",\n payload: \"MIN_X:\" + msg.payload.min_x,\n });\n}\n\nif (msg.payload.min_y < 0) {\n node.send({\n topic: \"Subject: System min_y value has been exceeded \",\n payload: \"MIN_Y:\" + msg.payload.min_y,\n });\n}\n\nif (msg.payload.min_z < (-150)) {\n node.send({\n topic: \"Subject: System MIN_Z value has been exceeded \",\n payload: \"MIN_Z:\" + msg.payload.rms_x,\n });\n} \nreturn;","outputs":1,"noerr":0,"x":420,"y":260,"wires":[["6ae18c2b.bcdfd4"]]},{"id":"fbb36648.bd10f8","type":"ncd-gateway-config","z":"","name":"","comm_type":"serial","ip_address":"","tcp_port":"2101","port":"COM6","baudRate":"115200","pan_id":"7fff","rssi":false},{"id":"38428cea.affba4","type":"ncd-gateway-config","z":"","name":"","comm_type":"serial","ip_address":"","tcp_port":"2101","port":"COM6","baudRate":"115200","pan_id":"7fff","rssi":false},{"id":"4e4864b9.8d96ec","type":"ncd-gateway-config","z":"","name":"","comm_type":"serial","ip_address":"","tcp_port":"2101","port":"COM6","baudRate":"115200","pan_id":"7fff","rssi":false}]
[{"id":"f8c5fd9c.087c9","type":"tab","label":"Flow 8","disabled":false,"info":""},{"id":"afeb6491.17a1a8","type":"ncd-gateway-node","z":"f8c5fd9c.087c9","name":"","connection":"fbb36648.bd10f8","x":130,"y":80,"wires":[["9d04b930.791128"]]},{"id":"aae4d5fb.e9e9b8","type":"ncd-wireless-node","z":"f8c5fd9c.087c9","name":"Vibration/Temperature","connection":"38428cea.affba4","config_comm":"4e4864b9.8d96ec","addr":"","sensor_type":"8","auto_config":true,"node_id":0,"delay":"900000","destination":"0000FFFF","power":4,"retries":10,"pan_id":"7FFF","change_enabled":"","change_pr":"0","change_interval":"0","cm_calibration":"60.6","bp_altitude":"0","bp_pressure":"0","bp_temp_prec":"0","bp_press_prec":"0","amgt_accel":"0","amgt_mag":"0","amgt_gyro":"0","impact_accel":"0","impact_data_rate":"4","impact_threshold":25,"impact_duration":1,"activ_interr_x":1,"activ_interr_y":2,"activ_interr_z":4,"activ_interr_op":8,"filtering":0,"data_rate":5,"time_series":0,"reading_type":1,"x":120,"y":260,"wires":[["6b784ab9.c502f4","5bc72290.6827bc","7857311.70715d"]]},{"id":"9d04b930.791128","type":"debug","z":"f8c5fd9c.087c9","name":"","active":false,"tosidebar":true,"console":false,"tostatus":false,"complete":"true","targetType":"full","x":470,"y":80,"wires":[]},{"id":"6b784ab9.c502f4","type":"debug","z":"f8c5fd9c.087c9","name":"","active":true,"tosidebar":true,"console":false,"tostatus":false,"complete":"payload","targetType":"msg","x":330,"y":400,"wires":[]},{"id":"7857311.70715d","type":"function","z":"f8c5fd9c.087c9","name":"Vibration","func":"if (msg.payload.rms_x > 300 && msg.payload.rms_y > 50 && msg.payload.rms_z > 100 && msg.payload.max_x > 500 && msg.payload.max_y > 50 && msg.payload.max_z > 0 && msg.payload.min_x < 0 && msg.payload.min_y < 0 && msg.payload.min_z < -150) {\n msg.topic = \"Subject:System Vibration has been exceeded.\";\n msg.payload = \"Vibration: [rms_x:\" + String(msg.payload.rms_x)+\",rms_y:\"+ String(msg.payload.rms_y)+\",rms_z:\"+ String(msg.payload.rms_z)+\",max_x:\"+ String(msg.payload.max_x)+\",max_y:\"+ String(msg.payload.max_y)+\",max_z:\"+ String(msg.payload.max_z)+\",min_x:\"+ String(msg.payload.min_x)+\",min_y:\"+ String(msg.payload.min_y)+\",min_z:\"+ String(msg.payload.min_z)+\"]\";\n return msg;\n}\n","outputs":1,"noerr":0,"x":420,"y":200,"wires":[["6ae18c2b.bcdfd4"]]},{"id":"5bc72290.6827bc","type":"function","z":"f8c5fd9c.087c9","name":"Temperature","func":"if(msg.payload.temperature>25)\n{\nmsg.topic = \"Subject:System temperature has been exceeded.\";\nmsg.payload = \"Temperature:\" + String(msg.payload.temperature);\nreturn msg;\n}","outputs":1,"noerr":0,"x":430,"y":340,"wires":[["6ae18c2b.bcdfd4"]]},{"id":"6ae18c2b.bcdfd4","type":"e-mail","z":"f8c5fd9c.087c9","server":"smtp.gmail.com","port":"465","secure":true,"tls":true,"name":"[email protected]","dname":"email","x":710,"y":260,"wires":[]},{"id":"fbb36648.bd10f8","type":"ncd-gateway-config","z":"","name":"","comm_type":"serial","ip_address":"","tcp_port":"2101","port":"COM6","baudRate":"115200","pan_id":"7fff","rssi":false},{"id":"38428cea.affba4","type":"ncd-gateway-config","z":"","name":"","comm_type":"serial","ip_address":"","tcp_port":"2101","port":"COM6","baudRate":"115200","pan_id":"7fff","rssi":false},{"id":"4e4864b9.8d96ec","type":"ncd-gateway-config","z":"","name":"","comm_type":"serial","ip_address":"","tcp_port":"2101","port":"COM6","baudRate":"115200","pan_id":"7fff","rssi":false}]
0 notes
Text
Node-red with Vibration and Temperature Sensor
Things used in this project
IoT Long Range Wireless Temperature Humidity Sensor with power source Battery Or External DC.
Zigmo/Router for PC
PC/Laptop with an OS installed or Any IoT Embedded Device.
Story
Introducing NCD’s Long Range IoT Industrial wireless vibration and temperature sensor, boasting up to a 2-mile range the use of a wi-fi mesh networking structure. Incorporating a precision 16-bit vibration and temperature sensor, this device transmits incredibly accurate vibration and temperature records at consumer-described durations.

For the duration of Power-Up, this vibration sensor learns “normal” base-line vibration from the monitored device. This base-line vibration is subtracted from regular sampled vibration readings to improve applicable vibration data. Preferably, the monitored device must be off even as the sensor is mastering. Once the sensor stabilizes and starts sending information, the device/equipment being monitored can be powered on. This business IoT wireless vibration sensor samples 3-axis of vibration data for 100ms after which calculate RMS, maximum, and minimal vibration readings. This sensor combines these records with temperature data in a data packet and transmits the result to modems and gateways in the wireless variety. Once the transmission is complete, the vibration sensor is going lower back to sleep, therefore minimizing power consumption.
Powered by using just 2 AA batteries and operational life of 500,000 wireless transmissions, a ten years battery life can be expected relying on environmental conditions and the data transmission interval. Optionally, this sensor may be externally powered, making it a perfect choice for wireless vibration monitoring device for industrial equipment. With an open communication protocol, this sensor transmits hardware-encrypted data that may be included with just about any control system or gateway. Data can be transmitted to a laptop, a raspberry pi, to Losant IoT cloud, Microsoft® azure® IoT, and an embedded gadget all at the equal time. Sensor parameters and wireless transmission settings can be modified using LabView® tracking software on a computer pc.
Long-Range Wireless Mesh Modem with USB Interface
Setting up Node-Red
The sensor and Zigmo/Router come pre-programmed and work out of the box. In this section, we will set up a sensor and Zigmo link and start receiving data on our PC.
Steps to install NODE-RED
Now that you have sensors running, we need a way to do something useful with that data.
First of all, you’ll have to install Node-RED.
Once that’s done, you’ll need to enter your command line, or Power Shell for Windows users, navigate to the directory Node-RED is installed in.
Now type “npm i ncd-red-wireless node-red-dashboard“. This will install the nodes required to receive data from your wireless sensors and you can start Node-RED once this is done.
To start node server write node-red in the command prompt or terminal and press enter.
Setting up the nodes
Assuming at this point you’ve started up Node-RED, you should be able to open a browser and navigate to http://localhost:1880, this will open up the flow builder that is the heart of the Node-RED experience.
Steps to build the flow
At this point you’ll be viewing a large blank flow with a long list of nodes on the left-hand side, this sidebar is called the palette.

Go ahead and drag a Wireless Gateway node over to your flow canvas to get started.

ncd-red-wireless Provides the nodes that manage the serial connection, parse incoming sensor data, filter it by specific parameters, and allow you to configure the wireless sensors.
Finding your wireless sensors
Once you’ve added the node you’ll be able to view the info tab, which contains information about the node’s functionality, this tab is well-populated for most node-red packages and contains valuable information, many times you will not need to view any other documentation outside of the info tab, so keep it in mind while you are building your flows if you have a question about how a node works. The next thing we need to do is configure the node, when you first add it you’ll notice that there is a small triangle on the top right corner next to a blue dot, the triangle indicates that the node needs additional configuration, the blue dot indicates that the node has not yet been deployed as part of the flow.
Double click on the node to open up the configuration options.
Click on the pencil icon next to the Serial Device field to configure your USB router, this will open a second configuration panel that only has a few options.

Click on the magnifying glass next to the Serial Port field and select the port that corresponds with your router, then click the “Add” button on top.

The Serial Device field will now be populated based on that selection, and you can click “Done”, you now have direct access to your wireless sensors! To view the data coming in.

Now go back to your palette and type “debug” into the search field at the top, grab one of these nodes and drag it to the right of your Wireless Gateway.

Double click on it and change “msg.” to “complete msg object” click done.

Now draw a line between the two nodes, and click “Deploy” on the top right of the window...

Working with the data
Now out of your wireless sensors data is gathered and it is output to the “debug” tab, this “debug tab” is placed within the right sidebar subsequent to the information tab. To see the information are available in to hit the reset button. In node-red records is surpassed among nodes in a JSON packet. When the msg object comes into the debug tab you may make bigger it to view the overall list of information that comes with it. This is extraordinarily useful in case you need to quickly see which sensors are checking in. The other issue this node gives is an easy way to interchange your router to the network identity that devices in configuration mode document on, simply hit the button on the left of the node and the tool will switch to the configuration network, hit it once more to return it to listening mode. Once we get the wi-fi tool nodes set up, they may be set to routinely configure a sensor whilst it enters configuration mode, so it’s always available to maintain such gateway nodes present at the flow for speedy configuring a device.

Adding the wireless sensors
We need to separate wireless sensor records domestically in order that we are able to display it, we could use a switch node to split out the messages from the gateway based totally on the mac address with or sensor type, but as I referred to, the wireless nodes truly incorporate extra functionality for configuring the sensors, so we’ll start with them to give you an extra entire image of how those structures can work. In case you haven’t already seen packets coming in from both of your sensors, cross in advance and hit the reset button on the only that hasn’t stated. While a sensor assessment in thru any serial device configuration node, the mac address and kind of sensor is cached in a pool so we are able to quickly find it for the duration of this next step.
Grab a Wireless Node from the palette and drag it onto the flow, double click on it to get it configured.

Select the serial device from the drop-down that you used for the Wireless Gateway, now click the magnifying glass next to “Mac Address” and select one of the available options.


You’ll notice this automatically sets the sensor type for you, you can also give it a name to make it easier to identify. As noted in the info tab, the Serial Device for Config field is optional, and we won’t worry about it right now. The node you have just added effectively works as a filter on incoming sensor data, only passing through data for the mac address, or sensor type if no mac address is present.
Now go back to your palette and type “debug” into the search field at the top, grab one of these nodes and drag it to the right of your Wireless Gateway.
Double click on it and click done.

Displaying up the Vibration/Temperature
These nodes for the wireless sensors output a msg object with all of the same information as the Wireless Gateway node, just in a slightly different format, the Sensor Data itself is sent in the msg.payload, which is what most nodes use to interact with the msg itself.
Grab a “split” node from the palette, and place it to the right of the Vib/Temp node.

Double click and check the box under Object that says “Copy key to”, this will split the msg into multiple objects, one for each property in the payload, and set the topics for those new msgs to the property names.

Now add a “switch” node, this will allow us to send each msg to a specific part of the flow, one to handle RMS, and one to Max, one to Min and one to temperature.

In the first field change “payload” to “topic”, Click on the “==” and select “matches regex”, in the field next to it type “rms_.”, this means “match a string that contains rms_ followed by any character (.) as many characters as are available (*).

Click on add button to add a new row and follow the last step, replacing “rms” with “max”, and then one more time with “min” and at last one more row for temperature type “temperature” next to the “==”. This will split our incoming payloads into 4 sections to be routed to ui, each containing the appropriate values for all 3 axes and temperature.

Next let’s add a “chart” from the palette for RMS, copy it two times for MAX and MIN and also add “gauge” for temperature.

Now double click on first chart node and set the Group to “[Current]Vibration” and set the Label to RMS as shown in the picture.

Now double click on second chart node and set the Group to “[Current]Vibration” and set the Label to MAX as shown in the picture.

Now double click on third chart node and set the Group to “[Current]Vibration” and set the Label to MIN as shown in the picture.


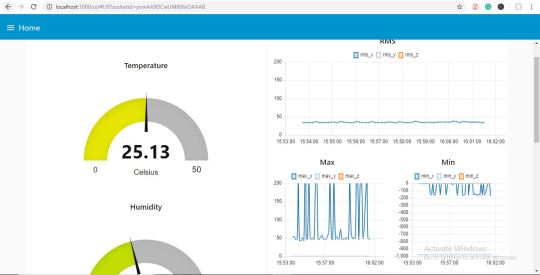
Next for the gauge node set the Label to “Temperature”, and the Value format to “{{value | number:2}}”, and the Units to “Celsius” you can alter the range to the minimum and maximum expected temperature, I’m using 0 and 50.

Now draw wires from the Vibration/Temperature node to the split node, from the split node to the switch node, and from the switch node’s first (top) output to the RMS Chart node, and from the switch node’s second output to the MAX chart, and from the switch node’s third output to the Min chart, and from the switch node’s fourth output to the temperature gauge.

Once that’s done click deploy.

NODE-RED DASHBOARD
Provides the ability to create a UI using the flow builder, provides charts, graphs, and a number of other visual elements we can use to display data, along with nodes to trigger a flow using user input. We will use some of these nodes to display the telemetry from your wireless sensors.
Let’s check it out! There is a tab on the top right that says “Dashboard”.

On the top right of that tab is the little “new window” icon, click on it to view your UI.

It is likely that the gauges aren’t displaying any information, because no sensor data has been reported since you deployed the flow, click the reset button on your temperature/humidity sensor to force it to check-in and your gauges should jump up. You should now have real-time data displaying!
NODE-RED DASHBOARD OUTPUT
Now as the value of vibration and temperature increases and decreases new data available inside the various variable.
RMS/MAX/MIN Output

MAX/MIN Output

Temperature Output

Node-Red JSON Flow
https://github.com/ncdcommunity/Node-red-with-IoT-Long-Range-Vibration-and-Temperature-Sensor/blob/master/node_red_temp_vib_flow.json
0 notes
Text
Sending IoT Long Range Wireless Temperature and Humidity Sensor Data to Google sheet
Things used in this project
IoT Long Range Wireless Temperature Humidity Sensor with power source Battery Or External DC.
Zigmo/Router for PC
PC/Laptop with an OS installed or Any IoT Embedded Device.
Story
Introducing NCD’s long-range wireless temperature humidity sensor, boasting up to a 28 Mile range using a wireless mesh networking architecture. Incorporating the Honeywell HIH9130 temperature humidity sensor transmits highly accurate temperature and humidity samples at user-defined intervals.
The on-board temperature sensor is rated for -25°C to 85°C or -13°F to 185°F and the humidity sensor is rated for 0 to 100% RH. It can be powered by just 2 AA batteries and an operational lifetime of 500, 000 wireless transmissions. Battery life can be extended up to 10 years depending on environmental conditions and the data transmission interval. Optionally, this sensor may be externally powered.
With an open communication protocol, this IoT wireless temperature humidity product can be integrated with just about any control system or gateway. Data can be transmitted to a PC, a Raspberry Pi, to Microsoft Azure® IoT, or Arduino. Sensor parameters and wireless transmission settings can be changed on the go using the open communication protocol providing maximum configurability depending on the intended application.
The long-range, price, accuracy, battery life and security features of Long Range Wireless Temperature Humidity Sensor make it an affordable choice which exceeds the requirements for most of the industrial as well as consumer market applications.
Setting up Node-RED
The sensor and Zigmo/Router come pre-programmed and work out of the box. In this section, we will set up a sensor and Zigmo link and start receiving data on our PC.
Steps to install Node-RED
Now that you have sensors running, we need a way to do something useful with that data.
First of all, you’ll have to install Node-RED.
Once that’s done, you’ll need to enter your command line, or Power Shell for Windows users, navigate to the directory Node-RED is installed in.
Now type “npm I ncd-red-wireless node-red-dashboard“. This will install the nodes required to receive data from your wireless sensors and you can start Node-RED once this is done.
To start node server write Node-RED in the command prompt or terminal and press enter.
Setting up the nodes
Assuming at this point you’ve started up Node-RED, you should be able to open a browser and navigate to http://localhost:1880, this will open up the flow builder that is the heart of the Node-RED experience.
Steps to build the flow
At this point you’ll be viewing a large blank flow with a long list of nodes on the left-hand side, this sidebar is called the palette.

Go ahead and drag a Wireless Gateway node over to your flow canvas to get started.

ncd-red-wireless Provides the nodes that manage the serial connection, parse incoming sensor data, filter it by specific parameters, and allow you to configure the wireless sensors.
Finding your wireless sensors
Once you’ve added the node you’ll be able to view the info tab, which contains information about the node’s functionality, this tab is well-populated for most Node-RED packages and contains valuable information, many times you will not need to view any other documentation outside of the info tab, so keep it in mind while you are building your flows if you have a question about how a node works. The next thing we need to do is configure the node, when you first add it you’ll notice that there is a small triangle on the top right corner next to a blue dot, the triangle indicates that the node needs additional configuration, the blue dot indicates that the node has not yet been deployed as part of the flow.
Double click on the node to open up the configuration options.

Click on the pencil icon next to the Serial Device field to configure your USB router, this will open a second configuration panel that only has a few options.

Click on the magnifying glass next to the Serial Port field and select the port that corresponds with your router, then click the “Add” button on top. The Serial Device field will now be populated based on that selection, and you can click “Done”, you now have direct access to your wireless sensors! To view the data coming in.

Now go back to your palette and type “debug” into the search field at the top, grab one of these nodes and drag it to the right of your Wireless Gateway.

Double click on it and change “msg.” to “complete msg object” click done.

Now draw a line between the two nodes, and click “Deploy” on the top right of the window...

Working with the data
Now out of your wireless sensors data is gathered and it is output to the “debug” tab, this “debug tab” is placed within the right sidebar subsequent to the information tab. To see the information are available in to hit the reset button. In Node-RED records is surpassed among nodes in a JSON packet. When the msg object comes into the debug tab you may make bigger it to view the overall list of information that comes with it. This is extraordinarily useful in case you need to quickly see which sensors are checking in. The other issue this node gives is an easy way to interchange your router to the network identity that devices in configuration mode document on, simply hit the button on the left of the node and the tool will switch to the configuration network, hit it once more to return it to listening mode. Once we get the wi-fi tool nodes set up, they may be set to routinely configure a sensor whilst it enters configuration mode, so it’s always available to maintain such gateway nodes present at the flow for speedy configuring a device.
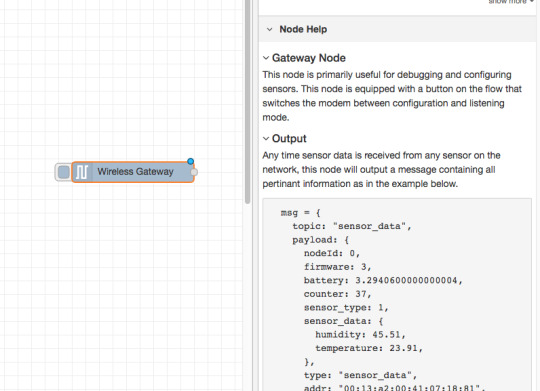
Adding the wireless sensors
we need to separate wireless sensor records domestically in order that we are able to display it, we could use a switch node to split out the messages from the gateway based totally on the mac address with or sensor type, but as I referred to, the wireless nodes truly incorporate extra functionality for configuring the sensors, so we’ll start with them to give you an extra entire image of how those structures can work. In case you haven’t already seen packets coming in from both of your sensors, cross in advance and hit the reset button on the only that hasn’t stated. While a sensor assessment in thru any serial device configuration node, the mac address and kind of sensor is cached in a pool so we are able to quickly find it for the duration of this next step.
Grab a Wireless Node from the palette and drag it onto the flow, double click on it to get it configured.

select the serial device from the drop-down that you used for the Wireless Gateway, now click the magnifying glass next to “Mac Address” and select one of the available options.


You’ll notice this automatically sets the sensor type for you, you can also give it a name to make it easier to identify. As noted in the info tab, the Serial Device for Config field is optional, and we won’t worry about it right now. The node you have just added effectively works as a filter on incoming sensor data, only passing through data for the mac address, or sensor type if no mac address is present.
Now go back to your palette and type “debug” into the search field at the top, grab one of these nodes and drag it to the right of your Wireless Gateway.

Double click on it and click done.

Adding Function Nodes
The function node is used to run JavaScript code against the msg object. The function node accepts a msg object as input and can return 0 or more message objects as output. This message object must have a payload property (msg.payload) and usually has other properties depending on the proceeding nodes.
Now grab a “function” node from the palette, and place it to the right of the Temp/Hum node.

Double click on the node to open up the configuration options.
Here you have to write little javascript code to create a condition, so the temperature and humidity values will be written in the excel.

Now Add “http request” node from the palette.

If you double click on it edit http node, you’ll see a “URL” field, here you have to enter the respective link of the google sheet.
Now create a google sheet to store the values of temperature and humidity.
Steps to create a google sheet.
First, open up your browser and type www.google.com and sign up in google account if you haven’t signed in, then click on the six dots on the left of your picture.

Now click on “Drive” to open the google drive.

Click on New>More>Google Forms>Blank Form.

Here you’ll see an untitled form, Give it some title as shown in the picture.

Now edit question as Temperature and click on the “+” button to add another question for humidity.

Enter question as Humidity to take humidity values.

Now click on the Three dots beside your picture as shown in the picture below.

Now click on the “Get pre-filled link”.

Now enter random values to temperature and humidity fields and click Get a link.

Now paste that link in notepad.

Edit that link as shown in the picture below.

Now go back to form and click on RESPONSES and then click on the google sheet icon as shown in the picture below.

Create a new spreadsheet.

Here you are able to see a new spreadsheet, then give it some name as shown in the pictures below.

Here you can visualize the values of temperature and humidity.

Now go back to node-red and double click on http request node to edit it, then copy the URL from the notepad that you have saved and paste it in the URL field as shown in the figure.

You can also attach debug node to check the output the http node.
Now connect all the wires.

Click on Deploy button to get them out on the google sheet.

OUTPUT
Now to go google spreadsheet and you’ll see values are coming.

Code
node_red_flowJSONHere you can download the JSON file of theFlow
[{"id":"92f30be3.3a0078","type":"tab","label":"Flow 7","disabled":false,"info":""},{"id":"866b699f.a2bd78","type":"ncd-gateway-node","z":"92f30be3.3a0078","name":"","connection":"258e5fea.00897","x":130,"y":60,"wires":[["21995762.9035e8"]]},{"id":"229131a1.83a27e","type":"ncd-wireless-node","z":"92f30be3.3a0078","name":"","connection":"c92dec1c.7fc9","config_comm":"50e22a9e.060f74","addr":"","sensor_type":"1","auto_config":"","node_id":0,"delay":300,"destination":"0000FFFF","power":4,"retries":10,"pan_id":"7FFF","change_enabled":"","change_pr":"0","change_interval":"0","cm_calibration":"60.6","bp_altitude":"0","bp_pressure":"0","bp_temp_prec":"0","bp_press_prec":"0","amgt_accel":"0","amgt_mag":"0","amgt_gyro":"0","impact_accel":"0","impact_data_rate":"4","impact_threshold":25,"impact_duration":1,"activ_interr_x":1,"activ_interr_y":2,"activ_interr_z":4,"activ_interr_op":8,"filtering":0,"data_rate":5,"time_series":0,"reading_type":1,"x":120,"y":200,"wires":[["b18f406a.4096c","5f33b485.de23dc"]]},{"id":"21995762.9035e8","type":"debug","z":"92f30be3.3a0078","name":"","active":false,"tosidebar":true,"console":false,"tostatus":false,"complete":"true","targetType":"full","x":350,"y":60,"wires":[]},{"id":"5f33b485.de23dc","type":"function","z":"92f30be3.3a0078","name":"","func":"msg.payload = {};\nmsg.payload.temperature = parseFloat(msg.data.sensor_data.temperature);\nmsg.payload.humidity = parseFloat(msg.data.sensor_data.humidity);\nreturn msg;","outputs":1,"noerr":0,"x":350,"y":200,"wires":[["b767a18e.49953"]]},{"id":"b767a18e.49953","type":"http request","z":"92f30be3.3a0078","name":"","method":"GET","ret":"txt","paytoqs":true,"url":"https://docs.google.com/forms/d/e/1FAIpQLScXkrmzylTmf7PF9hbLOhSuPTqY3aWvtUCxsDBYbHu8gFS9ww/formResponse?usp=pp_url&entry.709938653={{payload.temperature}}&entry.1914503780={{payload.humidity}}","tls":"","proxy":"","authType":"basic","x":570,"y":200,"wires":[["3fd243af.cc72fc"]]},{"id":"3fd243af.cc72fc","type":"debug","z":"92f30be3.3a0078","name":"","active":true,"tosidebar":true,"console":false,"tostatus":false,"complete":"true","targetType":"full","x":730,"y":300,"wires":[]},{"id":"b18f406a.4096c","type":"debug","z":"92f30be3.3a0078","name":"","active":false,"tosidebar":true,"console":false,"tostatus":false,"complete":"true","targetType":"full","x":230,"y":380,"wires":[]},{"id":"258e5fea.00897","type":"ncd-gateway-config","z":"","name":"","comm_type":"serial","ip_address":"","tcp_port":"2101","port":"COM6","baudRate":"115200","pan_id":"7fff","rssi":false},{"id":"c92dec1c.7fc9","type":"ncd-gateway-config","z":"","name":"","comm_type":"serial","ip_address":"","tcp_port":"2101","port":"COM6","baudRate":"115200","pan_id":"7fff","rssi":false},{"id":"50e22a9e.060f74","type":"ncd-gateway-config","z":"","name":"","comm_type":"serial","ip_address":"","tcp_port":"2101","port":"COM6","baudRate":"115200","pan_id":"7fff","rssi":false}]
0 notes
Text
Sending data of wireless Temperature and Humidity sensor to Excel
Things used in this project
IoT Long Range Wireless Temperature Humidity Sensor with power source Battery Or External DC.
Zigmo/Router for PC
PC/Laptop with an OS installed or Any IoT Embedded Device.
Story
Introducing NCD’s long-range wireless temperature humidity sensor, boasting up to a 28 Mile range using a wireless mesh networking architecture. Incorporating the Honeywell HIH9130 temperature humidity sensor transmits highly accurate temperature and humidity samples at user-defined intervals.
The on-board temperature sensor is rated for -25°C to 85°C or -13°F to 185°F and the humidity sensor is rated for 0 to 100% RH. It can be powered by just 2 AA batteries and an operational lifetime of 500, 000 wireless transmissions. Battery life can be extended up to 10 years depending on environmental conditions and the data transmission interval. Optionally, this sensor may be externally powered.
With an open communication protocol, this IoT wireless temperature humidity product can be integrated with just about any control system or gateway. Data can be transmitted to a PC, a Raspberry Pi, to Microsoft Azure® IoT, or Arduino. Sensor parameters and wireless transmission settings can be changed on the go using the open communication protocol providing maximum configurability depending on the intended application.
The long-range, price, accuracy, battery life and security features of Long Range Wireless Temperature Humidity Sensor make it an affordable choice which exceeds the requirements for most of the industrial as well as consumer market applications.
Setting up Node-RED
The sensor and Zigmo/Router come pre-programmed and work out of the box. In this section, we will set up a sensor and Zigmo link and start receiving data on our PC.
Steps to install Node-RED
Now that you have sensors running, we need a way to do something useful with that data.
First of all, you’ll have to install Node-RED.
Once that’s done, you’ll need to enter your command line, or Power Shell for Windows users, navigate to the directory Node-RED is installed in.
Now type “npm I ncd-red-wireless node-red-dashboard“. This will install the nodes required to receive data from your wireless sensors and you can start Node-RED once this is done.
To start node server write Node-RED in the command prompt or terminal and press enter.
Setting up the nodes
Assuming at this point you’ve started up Node-RED, you should be able to open a browser and navigate to http://localhost:1880, this will open up the flow builder that is the heart of the Node-RED experience.
Steps to build the flow
At this point you’ll be viewing a large blank flow with a long list of nodes on the left-hand side, this sidebar is called the palette.

Go ahead and drag a Wireless Gateway node over to your flow canvas to get started.

ncd-red-wireless Provides the nodes that manage the serial connection, parse incoming sensor data, filter it by specific parameters, and allow you to configure the wireless sensors.
Finding your wireless sensors
Once you’ve added the node you’ll be able to view the info tab, which contains information about the node’s functionality, this tab is well-populated for most Node-RED packages and contains valuable information, many times you will not need to view any other documentation outside of the info tab, so keep it in mind while you are building your flows if you have a question about how a node works. The next thing we need to do is configure the node, when you first add it you’ll notice that there is a small triangle on the top right corner next to a blue dot, the triangle indicates that the node needs additional configuration, the blue dot indicates that the node has not yet been deployed as part of the flow.
Double click on the node to open up the configuration options.

Click on the pencil icon next to the Serial Device field to configure your USB router, this will open a second configuration panel that only has a few options.
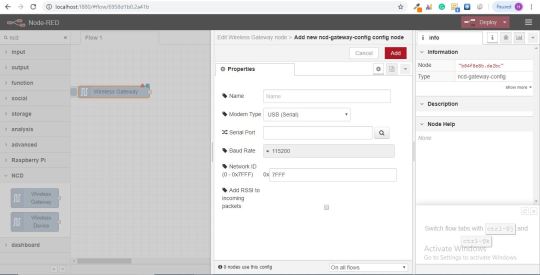
Click on the magnifying glass next to the Serial Port field and select the port that corresponds with your router, then click the “Add” button on top. The Serial Device field will now be populated based on that selection, and you can click “Done”, you now have direct access to your wireless sensors! To view the data coming in.
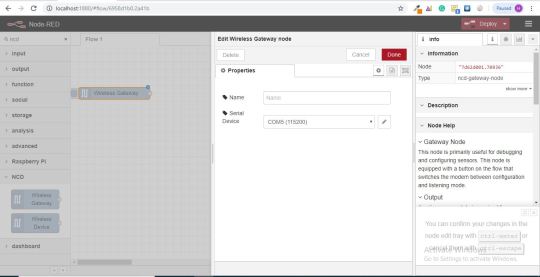
Now go back to your palette and type “debug” into the search field at the top, grab one of these nodes and drag it to the right of your Wireless Gateway.

Double click on it and change “msg.” to “complete msg object” click done.

Now draw a line between the two nodes, and click “Deploy” on the top right of the window...

Working with the data
Now out of your wireless sensors data is gathered and it is output to the “debug” tab, this “debug tab” is placed within the right sidebar subsequent to the information tab. To see the information are available in to hit the reset button. In Node-RED records is surpassed among nodes in a JSON packet. When the msg object comes into the debug tab you may make bigger it to view the overall list of information that comes with it. This is extraordinarily useful in case you need to quickly see which sensors are checking in. The other issue this node gives is an easy way to interchange your router to the network identity that devices in configuration mode document on, simply hit the button on the left of the node and the tool will switch to the configuration network, hit it once more to return it to listening mode. Once we get the wi-fi tool nodes set up, they may be set to routinely configure a sensor whilst it enters configuration mode, so it’s always available to maintain such gateway nodes present at the flow for speedy configuring a device.

Adding the wireless sensors
we need to separate wireless sensor records domestically in order that we are able to display it, we could use a switch node to split out the messages from the gateway based totally on the mac address with or sensor type, but as I referred to, the wireless nodes truly incorporate extra functionality for configuring the sensors, so we’ll start with them to give you an extra entire image of how those structures can work. In case you haven’t already seen packets coming in from both of your sensors, cross in advance and hit the reset button on the only that hasn’t stated. While a sensor assessment in thru any serial device configuration node, the mac address and kind of sensor is cached in a pool so we are able to quickly find it for the duration of this next step.
Grab a Wireless Node from the palette and drag it onto the flow, double click on it to get it configured.
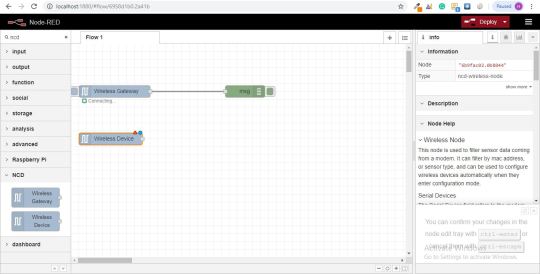
select the serial device from the drop-down that you used for the Wireless Gateway, now click the magnifying glass next to “Mac Address” and select one of the available options.
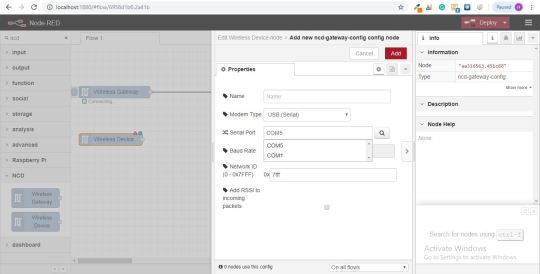

You’ll notice this automatically sets the sensor type for you, you can also give it a name to make it easier to identify. As noted in the info tab, the Serial Device for Config field is optional, and we won’t worry about it right now. The node you have just added effectively works as a filter on incoming sensor data, only passing through data for the mac address, or sensor type if no mac address is present.
Now go back to your palette and type “debug” into the search field at the top, grab one of these nodes and drag it to the right of your Wireless Gateway.

Double click on it and click done.
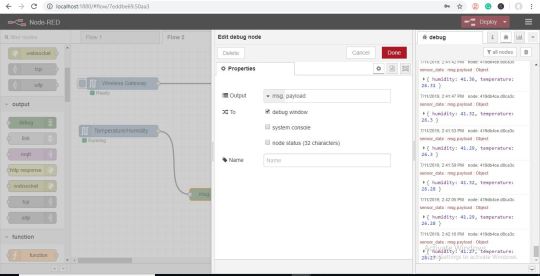
Adding Function Nodes
The function node is used to run JavaScript code against the msg object. The function node accepts a msg object as input and can return 0 or more message objects as output. This message object must have a payload property (msg.payload) and usually has other properties depending on the proceeding nodes.
Now grab a “function” node from the palette, and place it to the right of the Temp/Hum node.
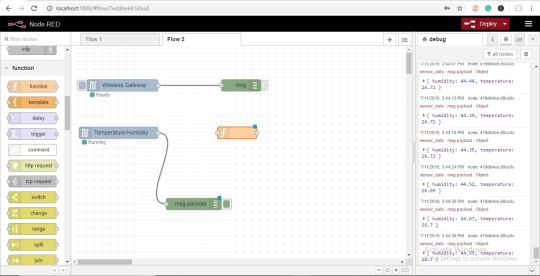
Double click on the node to open up the configuration options.
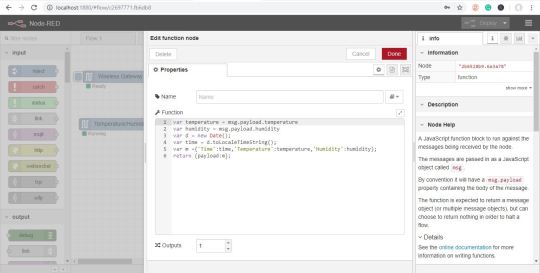
Here you have to write little javascript code to create a condition, so the temperature and humidity values will be written in the excel.
Now grab a CSV node from the palette and place it to the right of the function node, it will convert the values CSV format i.e comma-separated values.
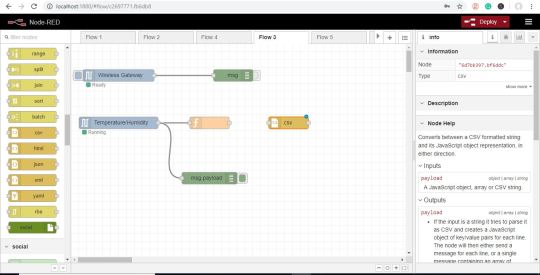
Now double click on it and type the column names separated by comma and output as “a message per row” as shown in the picture below.
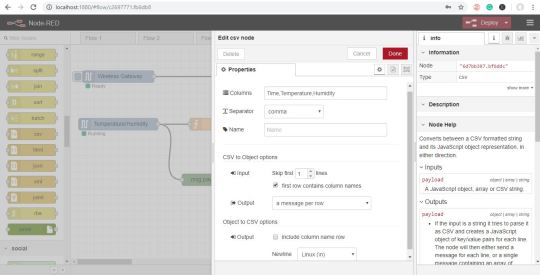
Now go back to your palette and type “file” into the search field at the top, grab the one which shows “Writes msg.payload” to store the values and place it right to the CSV node. You can also attach the debug node to check the out of the file node.
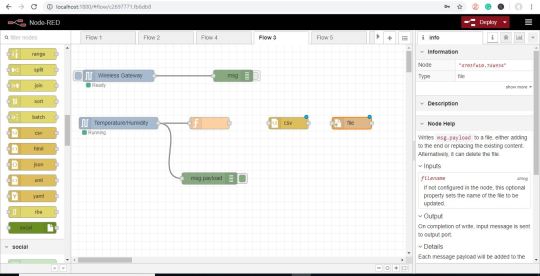
Double click on it to edit the file node, enter the file name where you want to store the values as shown in the figure.
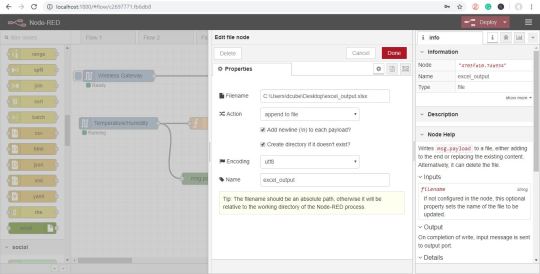
Now connect all the wires and click on the deploy button.
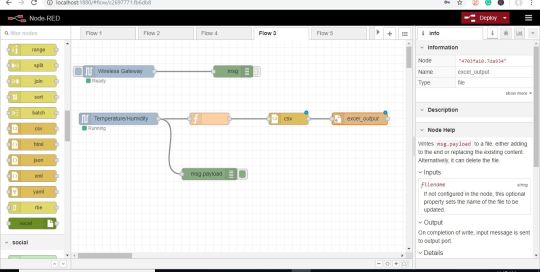
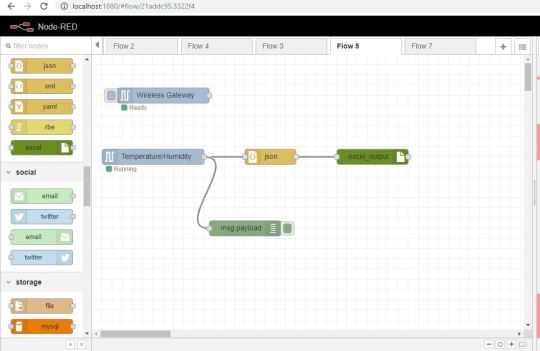
OUTPUT
Here you can check the excel output.
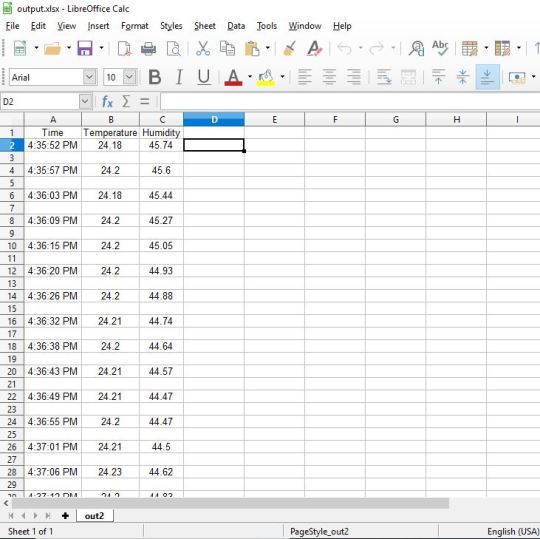
Node-red_flow_json
[{"id":"c2697771.fb6db8","type":"tab","label":"Flow 3","disabled":false,"info":""},{"id":"2ecc9d14.42a2a2","type":"ncd-gateway-node","z":"c2697771.fb6db8","name":"","connection":"7cc0565b.898ba8","x":120,"y":80,"wires":[["f0354fde.82ef1"]]},{"id":"f0354fde.82ef1","type":"debug","z":"c2697771.fb6db8","name":"","active":false,"tosidebar":true,"console":false,"tostatus":false,"complete":"true","targetType":"full","x":410,"y":80,"wires":[]},{"id":"176a6bea.9967a4","type":"ncd-wireless-node","z":"c2697771.fb6db8","name":"","connection":"3a63a78.66c7858","config_comm":"be3e53dd.346c8","addr":"","sensor_type":"1","auto_config":"","node_id":0,"delay":300,"destination":"0000FFFF","power":4,"retries":10,"pan_id":"7FFF","change_enabled":"","change_pr":"0","change_interval":"0","cm_calibration":"60.6","bp_altitude":"0","bp_pressure":"0","bp_temp_prec":"0","bp_press_prec":"0","amgt_accel":"0","amgt_mag":"0","amgt_gyro":"0","impact_accel":"0","impact_data_rate":"4","impact_threshold":25,"impact_duration":1,"activ_interr_x":1,"activ_interr_y":2,"activ_interr_z":4,"activ_interr_op":8,"filtering":0,"data_rate":5,"time_series":0,"reading_type":1,"x":120,"y":200,"wires":[["2b6528b9.6a3a78","390e7f7.e94e48"]]},{"id":"2b6528b9.6a3a78","type":"function","z":"c2697771.fb6db8","name":"","func":"var temperature = msg.payload.temperature\nvar humidity = msg.payload.humidity\nvar d = new Date();\nvar time = d.toLocaleTimeString();\nvar m ={'Time':time,'Temperature':temperature,'Humidity':humidity};\nreturn {payload:m};","outputs":1,"noerr":0,"x":350,"y":200,"wires":[["6d7bb397.bf6ddc"]]},{"id":"390e7f7.e94e48","type":"debug","z":"c2697771.fb6db8","name":"","active":true,"tosidebar":true,"console":false,"tostatus":false,"complete":"payload","targetType":"msg","x":350,"y":340,"wires":[]},{"id":"6d7bb397.bf6ddc","type":"csv","z":"c2697771.fb6db8","name":"","sep":",","hdrin":true,"hdrout":"","multi":"one","ret":"\\n","temp":"Time,Temperature,Humidity","skip":"1","x":550,"y":200,"wires":[["4703fa10.7da934"]]},{"id":"4703fa10.7da934","type":"file","z":"c2697771.fb6db8","name":"excel_output","filename":"C:\\Users\\dcube\\Desktop\\excel_output.xlsx","appendNewline":true,"createDir":true,"overwriteFile":"false","encoding":"utf8","x":730,"y":200,"wires":[[]]},{"id":"7cc0565b.898ba8","type":"ncd-gateway-config","z":"","name":"","comm_type":"serial","ip_address":"","tcp_port":"2101","port":"COM6","baudRate":"115200","pan_id":"7fff","rssi":false},{"id":"3a63a78.66c7858","type":"ncd-gateway-config","z":"","name":"","comm_type":"serial","ip_address":"","tcp_port":"2101","port":"COM6","baudRate":"115200","pan_id":"7fff","rssi":false},{"id":"be3e53dd.346c8","type":"ncd-gateway-config","z":"","name":"","comm_type":"serial","ip_address":"","tcp_port":"2101","port":"COM6","baudRate":"115200","pan_id":"7fff","rssi":false}]
Also, there is another way to send the data to excel by using “JSON” node and “excel” node.
First of all, close the terminal or command prompt if you were doing with the above method.
Then you have to install excel node to store the data.
So you’ll need to enter your command line, or Power Shell for Windows users, navigate to the directory Node-RED is installed in.
Now type “npm install node-red-contrib-excel“. This will install the “excel” node required to store data from your wireless sensors and you can start Node-RED once this is done.
To start node server write node-red in the command prompt or terminal and press enter.
Now open a browser and navigate to http://localhost:1880 to open the flow builder.
Now the steps are the same up to adding the wireless sensor.
To build the flow same as shown above up to adding the wireless sensor.
Then grab the JSON node from the palette and place it right to the Temperature/Humidity node.
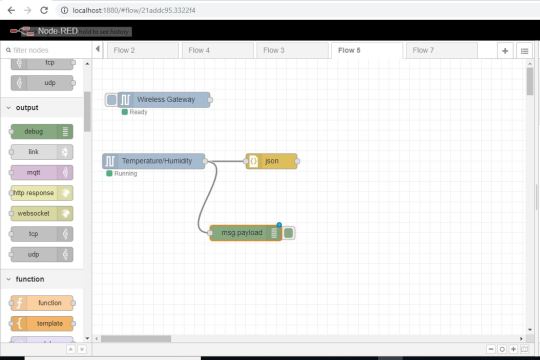
Double click on it edit JSON node, edit it as shown in the picture below and click done.
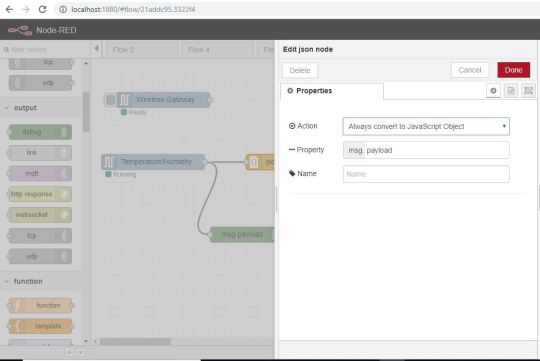
Now grab the “excel” node that you have installed from the palette and place it to the right of “JSON” node.
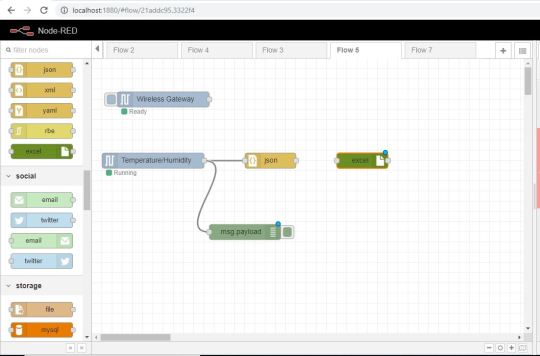
Double click on it to enter the file name where you want to store the temp/hum data and click done.
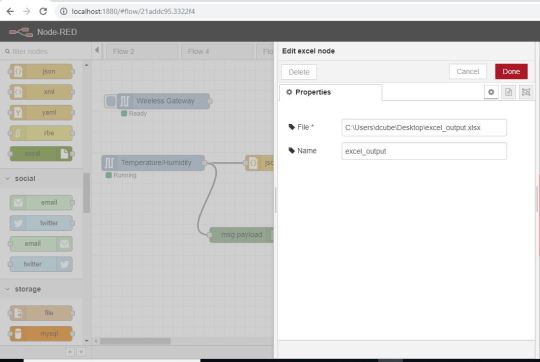
Now connect all the wires and hit the “deploy” button.
OUTPUT
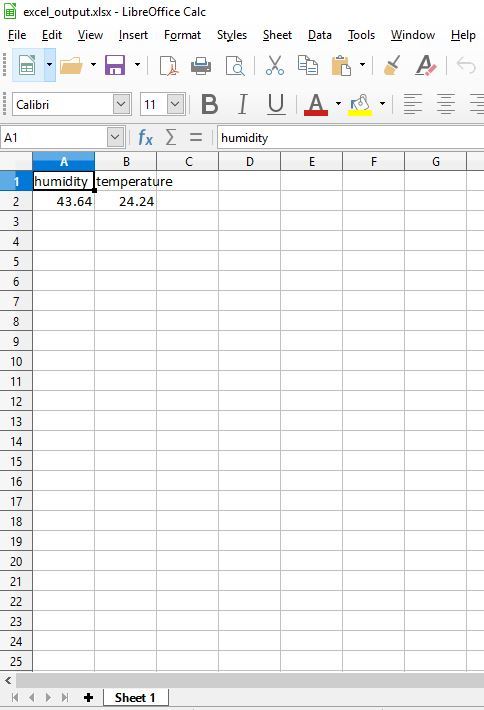
But the limitation with excel node is that it overwrites the data in a single row.
Node-red Flow Excel node
[{"id":"21addc95.3322f4","type":"tab","label":"Flow 5","disabled":false,"info":""},{"id":"df396104.3078b","type":"ncd-gateway-node","z":"21addc95.3322f4","name":"","connection":"b2933c2.fec5dc","x":140,"y":80,"wires":[[]]},{"id":"b938e310.ba4ef","type":"ncd-wireless-node","z":"21addc95.3322f4","name":"","connection":"220af376.1c24cc","config_comm":"fb46f24e.c4341","addr":"","sensor_type":"1","auto_config":"","node_id":0,"delay":300,"destination":"0000FFFF","power":4,"retries":10,"pan_id":"7FFF","change_enabled":"","change_pr":"0","change_interval":"0","cm_calibration":"60.6","bp_altitude":"0","bp_pressure":"0","bp_temp_prec":"0","bp_press_prec":"0","amgt_accel":"0","amgt_mag":"0","amgt_gyro":"0","impact_accel":"0","impact_data_rate":"4","impact_threshold":25,"impact_duration":1,"activ_interr_x":1,"activ_interr_y":2,"activ_interr_z":4,"activ_interr_op":8,"filtering":0,"data_rate":5,"time_series":0,"reading_type":1,"x":120,"y":200,"wires":[["169f12eb.2edaad","47ed6c99.4d9f54"]]},{"id":"169f12eb.2edaad","type":"json","z":"21addc95.3322f4","name":"","property":"payload","action":"obj","pretty":false,"x":350,"y":200,"wires":[["d98f712.f8b199"]]},{"id":"47ed6c99.4d9f54","type":"debug","z":"21addc95.3322f4","name":"","active":true,"tosidebar":true,"console":false,"tostatus":false,"complete":"payload","targetType":"msg","x":300,"y":340,"wires":[]},{"id":"d98f712.f8b199","type":"excel","z":"21addc95.3322f4","name":"excel_output","file":"C:\\Users\\dcube\\Desktop\\excel_output.xlsx","x":550,"y":200,"wires":[[]]},{"id":"b2933c2.fec5dc","type":"ncd-gateway-config","z":"","name":"","comm_type":"serial","ip_address":"","tcp_port":"2101","port":"COM6","baudRate":"115200","pan_id":"7fff","rssi":false},{"id":"220af376.1c24cc","type":"ncd-gateway-config","z":"","name":"","comm_type":"serial","ip_address":"","tcp_port":"2101","port":"COM6","baudRate":"115200","pan_id":"7fff","rssi":false},{"id":"fb46f24e.c4341","type":"ncd-gateway-config","z":"","name":"","comm_type":"serial","ip_address":"","tcp_port":"2101","port":"COM6","baudRate":"115200","pan_id":"7fff","rssi":false}]
0 notes
Text
Sending-Data-of-IOT-Wireless-Temperature-and-Humidity-Sensor-to-MySQL
We are using here NCD’s Temperature and Humidity sensor, but the steps stay the equal for any of the NCD product, so if you have other NCD wireless sensors, experience free to observe alongside besides. By means of the stop of this text, you need to have a stable understanding of how to set up the sensors, configure node-red, and see the data on a dashboard like the one pictured right here.

IoT Long Range Wireless Temperature and Humidity Sensor
Introducing NCD’s long-range wireless temperature humidity sensor, boasting up to a 28 Mile range using a wireless mesh networking architecture. Incorporating the Honeywell HIH9130 temperature humidity sensor transmits highly accurate temperature and humidity samples at user-defined intervals.
The on-board temperature sensor is rated for -25°C to 85°C or -13°F to 185°F and the humidity sensor is rated for 0 to 100% RH. It can be powered by just 2 AA batteries and an operational lifetime of 500,000 wireless transmissions. Battery life can be extended up to 10 years depending on environmental conditions and the data transmission interval. Optionally, this sensor may be externally powered.
With an open communication protocol, this IoT wireless temperature humidity product can be integrated with just about any control system or gateway. Data can be transmitted to a PC, a Raspberry Pi, to Microsoft Azure® IoT, or Arduino. Sensor parameters and wireless transmission settings can be changed on the go using the open communication protocol providing maximum configurability depending on the intended application.
The long-range, price, accuracy, battery life and security features of Long Range Wireless Temperature Humidity Sensor make it an affordable choice which exceeds the requirements for most of the industrial as well as consumer market applications.

Long-Range Wireless Mesh Modem with USB Interface
Zigmo Wireless Communication Mesh Networking is simply the hottest wireless technology of our time period. It’s fast, it’s very easy to use, highly reliable, and self-healing. Three components are required for the ZigBee Mesh Network, the Coordinator ©, the Router (R) and the Endpoint (E). Your computer can speak to a ZigBee Mesh Network using a Coordinator. Think of the Coordinator as the interface to a Wireless Mesh Network. NCD Coordinators are equipped with a USB Interface. This Zigmo mounts as a Serial Port on your computer, and you will develop software that sends Serial commands at 115.2K Baud. The primary job of a router is to bridge the wireless gap between your computer (the Coordinator) and the device (Endpoint). If the Coordinator cannot speak to the Endpoint device because it is out of range, a Router can be used to bridge the two devices together. Endpoints are simply devices. With regard to NCD products, Endpoints can be relay controllers, data collection devices, PWM devices, and much more.

Resources Required
IoT Long Range Wireless Temperature Humidity Sensor with power source Battery Or External DC.
Zigmo/Router for PC
XAMPP
PC/Laptop with an OS installed or Any IoT Embedded Device.
Setting up XAMPP
XAMPP is most prevailing, free an open-source cross-platform which is one solution to run your web services. XAMPP is developed by ApacheFriends which released in May 2002. XAMPP Stands for Cross-Platform(X), Apache(A), MySQL(M) also Sometimes (M) refers to MariaDB, PHP(P) and Pearl(P).
XAMPP allows you to work on a local server and test local copies of websites using PHP code and MySQL databases. Once XAMPP is active, you can access your local copy with a browser using an URL like http://localhost/ or http://127.0.0.1/
Downloading and Installing XAMPP
Go to XAMPP web site and download the installer based on your operating system. Installation should be similar to a normal software installation you do in your operating system.
When installing, there would be an option to select whether you want to run Apache and MySQL as services. If you chose it, Apache and MySQL will start at system boot-up which may not need if your computer is tight with memory resources or if you are not doing PHP development frequently. You can change these settings after installation.
Starting Apache and MySQL
Go to the location where you installed XAMPP (usually C:\Program Files\xampp) and double click on XAMPP Control Panel (xampp-control.exe). This will bring you the following screen. Click on Start buttons next to Apache and MySQL for starting them.
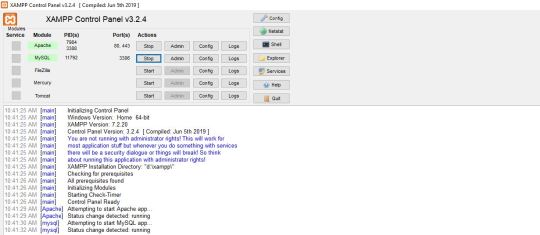
Now open up your browser and type http://localhost/ or http://127.0.0.1/
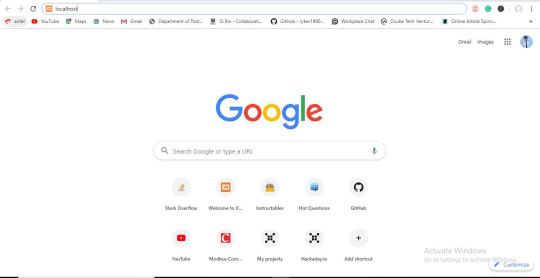
This will open up the following page. Click on the phpMyAdmin.
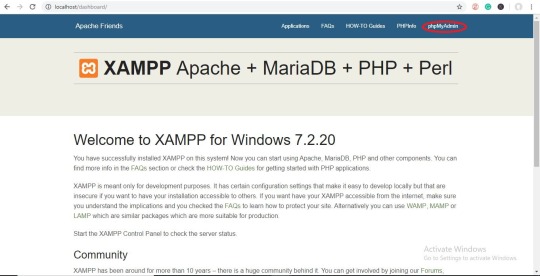
This will bring you the following screen. Now click on the “New” button as shown in the picture below to create a new database.

Now create a new database as shown in the picture below.
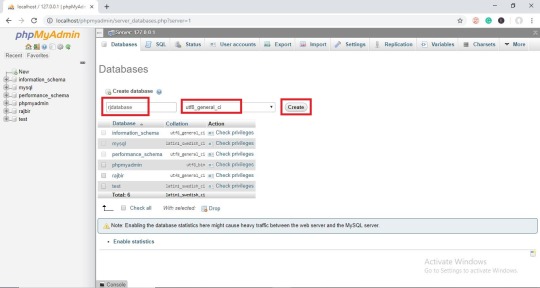
Now create a table to visualize data as shown in the picture below.

Now name the first column as “id”.
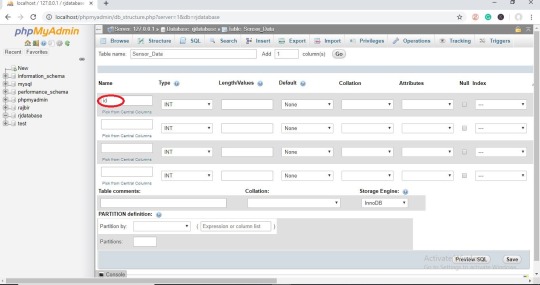
Now scroll to the right side of the screen you will see “A_I Comments” i.e. Auto Increments and it is used setting primary key which uniquely identifies each record within the table. Click on the checkbox below it.
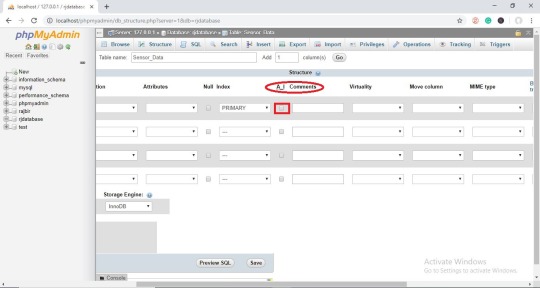
This will bring you the following screen. Now click on the “Go” button.
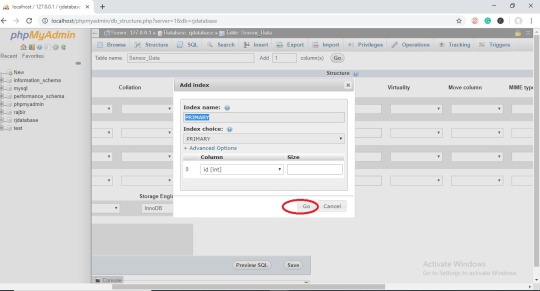
Now enter the values of other three columns Name = temperature, Type = DECIMAL, Length/Values = 10,2(i.e up to 2 decimal points) and similarly for humidity and in the last column you can show created time and click on the save button as shown in the picture below.
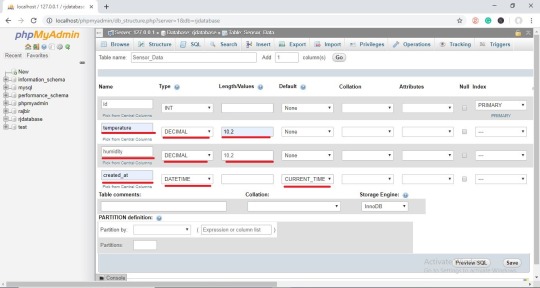
Now click on your database name to expand it and it will show your table name, then click on it to view how data is shown, as shown in the picture below.
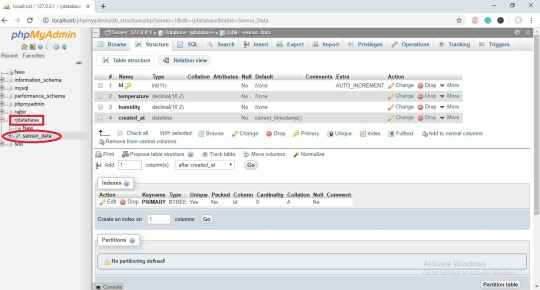
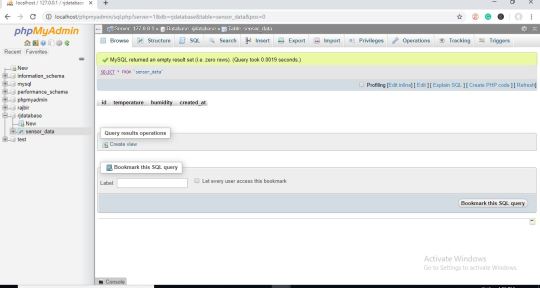
That’s all with the setting up of XAMPP.
Setting up Node-Red.
The sensor and Zigmo/Router come pre-programmed and work out of the box. In this section, we will set up a sensor and Zigmo link and start receiving data on our PC.
Steps to install NODE-RED
Now that you have sensors running, we need a way to do something useful with that data.
First of all, you’ll have to install Node-RED.
Once that’s done, you’ll need to enter your command line, or Power Shell for Windows users, navigate to the directory Node-RED is installed in.
Now type “npm i ncd-red-wireless node-red-dashboard“. This will install the nodes required to receive data from your wireless sensors and you can start Node-RED once this is done.
To start node server write node-red in the command prompt or terminal and press enter.
Setting up the nodes
Assuming at this point you’ve started up Node-RED, you should be able to open a browser and navigate to http://localhost:1880, this will open up the flow builder that is the heart of the Node-RED experience.
Steps to build the flow
At this point you’ll be viewing a large blank flow with a long list of nodes on the left-hand side, this sidebar is called the palette.

Go ahead and drag a Wireless Gateway node over to your flow canvas to get started.
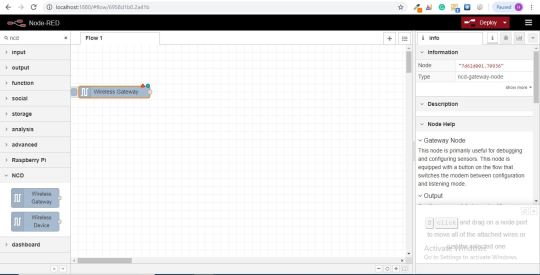
ncd-red-wireless Provides the nodes that manage the serial connection, parse incoming sensor data, filter it by specific parameters, and allow you to configure the wireless sensors.
Finding your wireless sensors
Once you’ve added the node you’ll be able to view the info tab, which contains information about the node’s functionality, this tab is well-populated for most node-red packages and contains valuable information, many times you will not need to view any other documentation outside of the info tab, so keep it in mind while you are building your flows if you have a question about how a node works. The next thing we need to do is configure the node, when you first add it you’ll notice that there is a small triangle on the top right corner next to a blue dot, the triangle indicates that the node needs additional configuration, the blue dot indicates that the node has not yet been deployed as part of the flow.
Double click on the node to open up the configuration options.
Click on the pencil icon next to the Serial Device field to configure your USB router, this will open a second configuration panel that only has a few options.
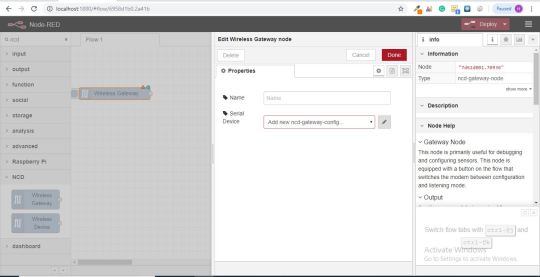
Click on the magnifying glass next to the Serial Port field and select the port that corresponds with your router, then click the “Add” button on top.

The Serial Device field will now be populated based on that selection, and you can click “Done”, you now have direct access to your wireless sensors! To view the data coming in.

Now go back to your palette and type “debug” into the search field at the top, grab one of these nodes and drag it to the right of your Wireless Gateway.
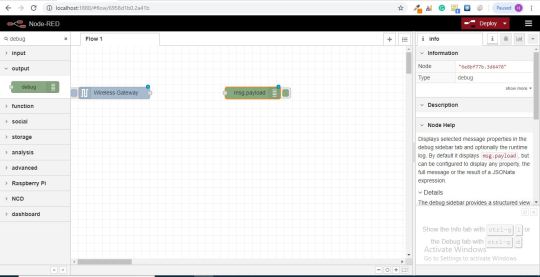
Double click on it and change “msg.” to “complete msg object” click done.
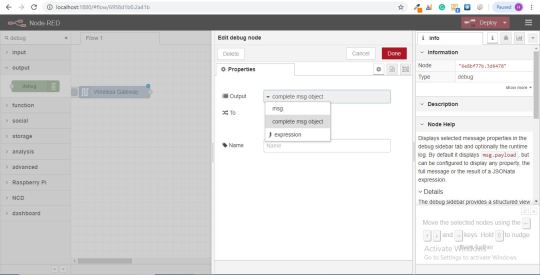
Now draw a line between the two nodes, and click “Deploy” on the top right of the window...
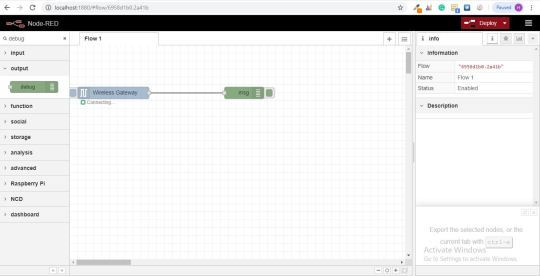
Working with the data
Now out of your wireless sensors data is gathered and it is output to the “debug” tab, this “debug tab” is placed within the right sidebar subsequent to the information tab. To see the information are available in to hit the reset button. In node-red records is surpassed among nodes in a JSON packet. When the msg object comes into the debug tab you may make bigger it to view the overall list of information that comes with it. This is extraordinarily useful in case you need to quickly see which sensors are checking in. The other issue this node gives is an easy way to interchange your router to the network identity that devices in configuration mode document on, simply hit the button on the left of the node and the tool will switch to the configuration network, hit it once more to return it to listening mode. Once we get the wi-fi tool nodes set up, they may be set to routinely configure a sensor whilst it enters configuration mode, so it’s always available to maintain such gateway nodes present at the flow for speedy configuring a device.

Adding the wireless sensors
we need to separate wireless sensor records domestically in order that we are able to display it, we could use a switch node to split out the messages from the gateway based totally on the mac address with or sensor type, but as I referred to, the wireless nodes truly incorporate extra functionality for configuring the sensors, so we’ll start with them to give you an extra entire image of how those structures can work. In case you haven’t already seen packets coming in from both of your sensors, cross in advance and hit the reset button on the only that hasn’t stated. While a sensor assessment in thru any serial device configuration node, the mac address and kind of sensor is cached in a pool so we are able to quickly find it for the duration of this next step.
Grab a Wireless Node from the palette and drag it onto the flow, double click on it to get it configured.

Select the serial device from the drop-down that you used for the Wireless Gateway, now click the magnifying glass next to “Mac Address” and select one of the available options.

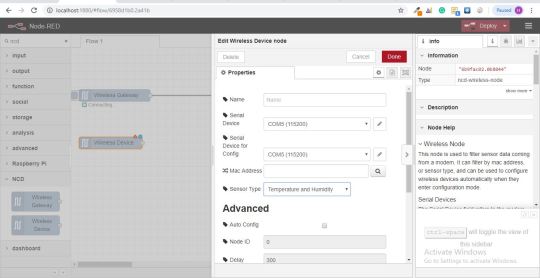
You’ll notice this automatically sets the sensor type for you, you can also give it a name to make it easier to identify. As noted in the info tab, the Serial Device for Config field is optional, and we won’t worry about it right now. The node you have just added effectively works as a filter on incoming sensor data, only passing through data for the mac address, or sensor type if no mac address is present.
Now go back to your palette and type “debug” into the search field at the top, grab one of these nodes and drag it to the right of your Wireless Gateway.
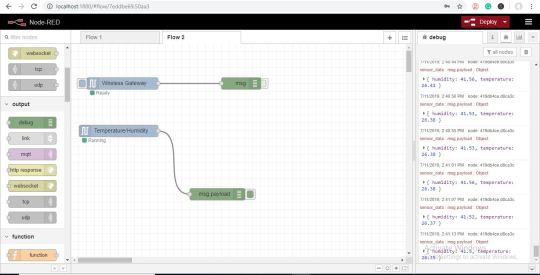
Double click on it and click done

Adding Function Nodes
The function node is used to run JavaScript code against the msg object. The function node accepts a msg object as input and can return 0 or more message objects as output. This message object must have a payload property (msg.payload) and usually has other properties depending on the proceeding nodes.
Now grab a “function” node from the palette, and place it to the right of the Temp/Hum node.
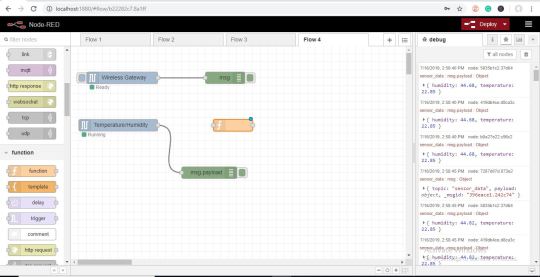
Double click on the node to open up the configuration options.
Here you have to write little javascript code to create a condition, so the data is sent to the MySQL database.
Now you have added “MySQL” node to store data, check your palette if it is present there or you can click on the three bars present right side of deploy button as shown in the picture below.
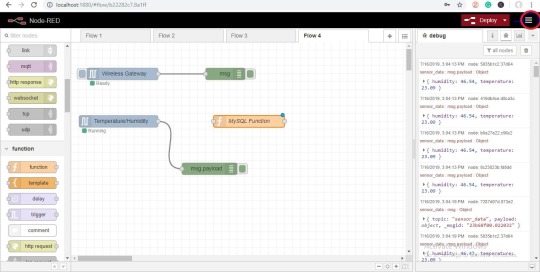
Now click on the “Manage palette” button.
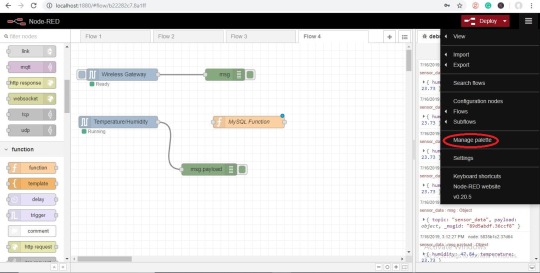
Now search for mysql and click on the ‘install’ button as shown in the picture.
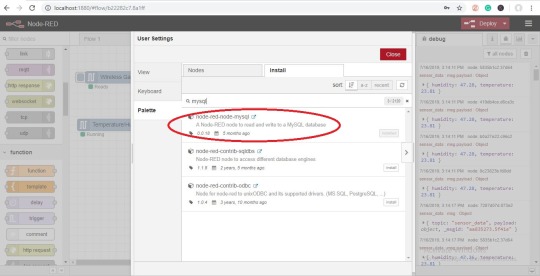
Once it is done, you’ll see “mysql” node is present in the palette.
Now grab the “mysql” node from the palette and double click on it to open up configuration options.
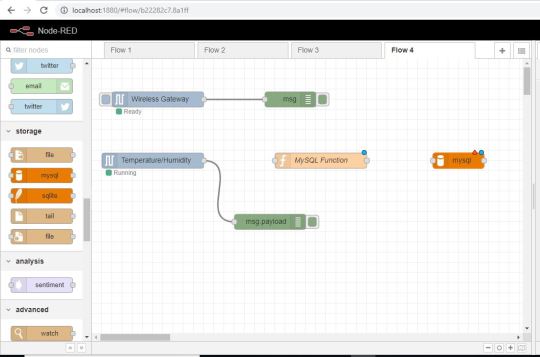
Write your database name as you created earlier and give a name to it, then click on the pencil icon next to the Database to edit the sqldatabase node.
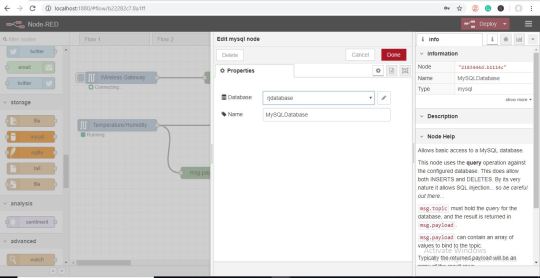
Now add User = root i.e by default in the xampp and password is blank. You can also create user and password enter that here, then enter your database name and time zone(optional) and then click update and done.
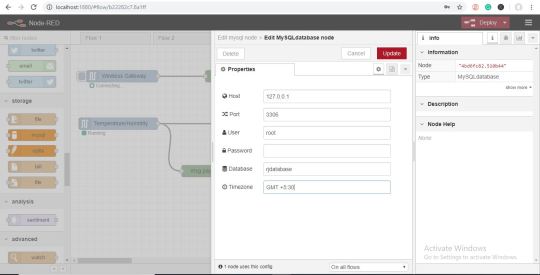
Now you’ll see your database node shows connected.
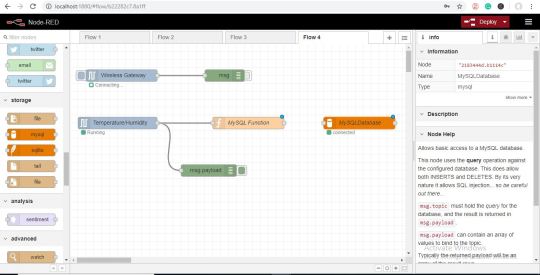
Now connect all the wires as shown in the picture.
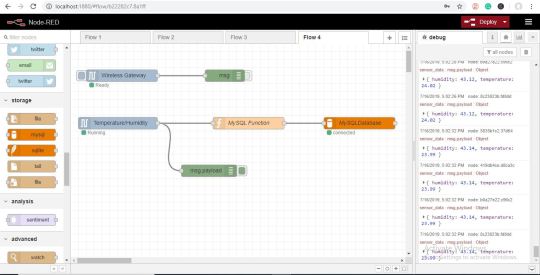
Now hit the deploy button and you’ll database node shows “ok”, its means data is sending.
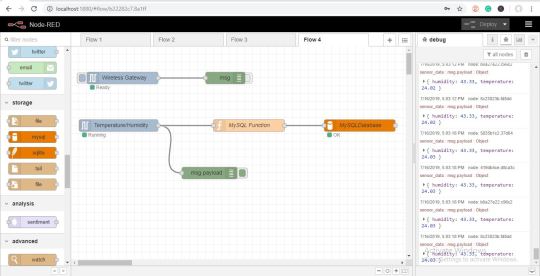
OUTPUT
Here you can visualize the data coming in.
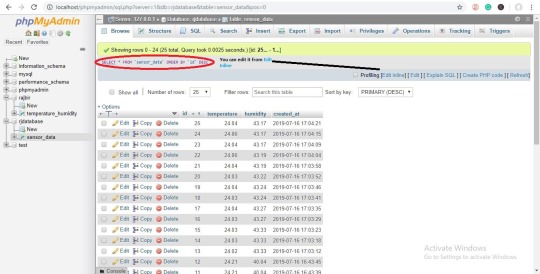
Node_Red_FLOW
https://github.com/ncdcommunity/Sending-Data-of-OT-Wireless-Temperature-and-Humidity-Sensor-to-MySQL/blob/master/node-red%20Sql_flow.json
0 notes
Text
Creating Email Alerts of NCD Wireless Temperature and Humidity Sensor Using Node-Red
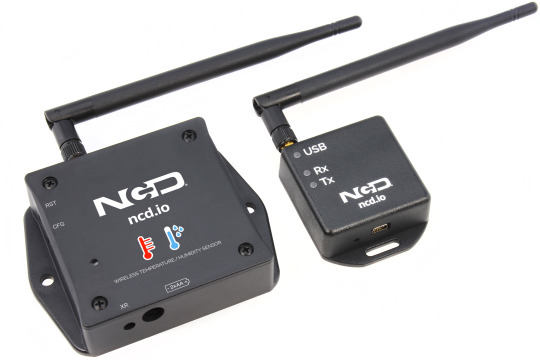
Things used in this project
Hardware components:
National Control Devices IoT Long Range Wireless Temperature Humidity Sensor

National Control Devices 900HP-S3B Long Range Wireless Mesh Modem with USB Interface

Software:
Node-red
Introduction
Introducing NCD’s long-range wireless temperature-humidity sensor, boasting up to a 28 Mile range using a wireless mesh networking architecture. Incorporating the Honeywell HIH9130 temperature-humidity sensor transmits highly accurate temperature and humidity samples at user-defined intervals.
The onboard temperature sensor is rated for -25°C to 85°C or -13°F to 185°F and the humidity sensor is rated for 0 to 100% RH. It can be powered by just 2 AA batteries and an operational lifetime of 500,000 wireless transmissions. Battery life can be extended up to 10 years depending on environmental conditions and the data transmission interval. Optionally, this sensor may be externally powered.
With an open communication protocol, this IoT wireless temperature humidity product can be integrated with just about any control system or gateway. Data can be transmitted to a PC, a Raspberry Pi, to Microsoft Azure® IoT, or Arduino. Sensor parameters and wireless transmission settings can be changed on the go using the open communication protocol providing maximum configurability depending on the intended application.
The long range, price, accuracy, battery life and security features of Long Range Wireless Temperature Humidity Sensor makes it an affordable choice which exceeds the requirements for most of the industrial as well as consumer market applications.
Steps to install NODE-RED
Now that you have sensors running, we need a way to do something useful with that data.
First of all, you'll have to install Node-RED.
Once that’s done, you’ll need to enter your command line, or Power Shell for Windows users, navigate to the directory Node-RED is installed in.
Now type “npm i ncd-red-wireless node-red-dashboard“. This will install the nodes required to receive data from your wireless sensors and you can start Node-RED once this is done.
To start node server write node-red in the command prompt or terminal and press enter.
Setting up the nodes:
Assuming at this point you’ve started up Node-RED, you should be able to open a browser and navigate to http://localhost:1880, this will open up the flow builder that is the heart of the Node-RED experience.
Steps to build the flow:
At this point you’ll be viewing a large blank flow with a long list of nodes on the left-hand side, this sidebar is called the palette.

Go ahead and drag a Wireless Gateway node over to your flow canvas to get started.

ncd-red-wireless Provides the nodes that manage the serial connection, parse incoming sensor data, filter it by specific parameters, and allow you to configure the wireless sensors.
Finding your wireless sensors:
Once you’ve added the node you’ll be able to view the info tab, which contains information about the node’s functionality, this tab is well populated for most node-red packages and contains valuable information, many times you will not need to view any other documentation outside of the info tab, so keep it in mind while you are building your flows if you have a question about how a node works. The next thing we need to do is configure the node, when you first add it you’ll notice that there is a small triangle on the top right corner next to a blue dot, the triangle indicates that the node needs additional configuration, the blue dot indicates that the node has not yet been deployed as part of the flow.
Double click on the node to open up the configuration options.
Click on the pencil icon next to the Serial Device field to configure your USB router, this will open a second configuration panel that only has a few options.

Click on the magnifying glass next to the Serial Port field and select the port that corresponds with your router, then click the “Add” button on top.

The Serial Device field will now be populated based on that selection, and you can click “Done”, you now have direct access to your wireless sensors! To view the data coming in.

Now go back to your palette and type “debug” into the search field at the top, grab one of these nodes and drag it to the right of your Wireless Gateway.

Double click on it and change “msg.” to “complete msg object” click done.

Now draw a line between the two nodes, and click “Deploy” on the top right of the window.

Working with the data
Now out of your wireless sensors data is gathered and it is output to the “debug” tab, this "debug tab" is placed within the right sidebar subsequent to the information tab. To see the information are available in to hit the reset button. In node-red records is surpassed among nodes in a JSON packet. When the msg object comes into the debug tab you may make bigger it to view the overall list of information that comes with it. This is extraordinarily useful in case you need to quickly see which sensors are checking in. The other issue this node gives is an easy way to interchange your router to the network identity that devices in configuration mode document on, simply hit the button on the left of the node and the tool will switch to the configuration network, hit it once more to return it to listening mode. Once we get the wi-fi tool nodes set up, they may be set to routinely configure a sensor whilst it enters configuration mode, so it’s always available to maintain such a gateway node present at the flow for speedy configuring a device.

Adding the wireless sensors
we need to separate wireless sensor records domestically in order that we are able to display it, we could use a switch node to split out the messages from the gateway based totally on the mac address with or sensor type, but as I referred to, the wireless nodes truly incorporate extra functionality for configuring the sensors, so we’ll start with them to give you an extra entire image of how those structures can work. In case you haven’t already seen packets coming in from both of your sensors, cross in advance and hit the reset button on the only that hasn’t started. While a sensor assessment in thru any serial device configuration node, the mac address and kind of sensor is cached in a pool so we are able to quickly find it for the duration of this next step.
Grab a Wireless Node from the palette and drag it onto the flow, double click on it to get it configured

select the serial device from the drop-down that you used for the Wireless Gateway, now click the magnifying glass next to “Mac Address” and select one of the available options.


You’ll notice this automatically sets the sensor type for you, you can also give it a name to make it easier to identify. As noted in the info tab, the Serial Device for Config field is optional, and we won’t worry about it right now. The node you have just added effectively works as a filter on incoming sensor data, only passing through data for the mac address, or sensor type if no mac address is present.
Now go back to your palette and type “debug” into the search field at the top, grab one of these nodes and drag it to the right of your Wireless Gateway

Double click on it and click done

Adding Function Nodes
The function node is used to run JavaScript code against the msg object. The function node accepts a msg object as input and can return 0 or more message objects as output. This message object must have a payload property (msg.payload) and usually has other properties depending on the proceeding nodes.
Now grab a “function” node from the palette, and place it to the right of the Temp/Hum node.

Double click on the node to open up the configuration options.
Here you have to write little javascript code to create a condition, so at particular temperature value, an email alert will be sent to the respective email id.

Another really cool feature of the flow builder is copy+paste, click on the function node you just added and click ctrl+c (cmd+c on a mac), then cntl+v, now you have a second function node.

Now double click on it to change the Label to Humidity and write some javascript code to create a condition to send email alert at particular humidity value and click done.

Adding the email-node:
The Email node provides both input and output of emails.
Now grab an output email node from the palette and place it to the right of the Temperature and Humidity node.

Now double click on it and open up the email edit node and add "email-id" of the person at first field whom you want to send the email alerts and then also add "email-id and password" of that person from where you want to send alerts as shown in the picture below and click done.

Now draw all the wires and click deploy as shown in the picture.

Now you will see emails are sending. You can also check on the respective email-id.

Output:

This is the email alert of temperature value.

This is the email alert of humidity value.

If you see no emails are sending or "sending failed", Go to google account and you'll see security issue find.


Click on it and allow "Third party access" to the apps as shown in in the figure

If you still not getting emails, you can also check your spam folder.
Node-Red Flow
0 notes
Text
IoT Long Range Temperature And Humidity Sensor Using node-red

Things used in this project:
Hardware components
National Control Devices IoT Long Range Wireless Temperature Humidity Sensor
National Control Devices Long Range Wireless Mesh Modem with USB Interface
Software apps
LabView UtilityNode-Red
Node-Red
Story
Introducing NCD’s long-range wireless temperature-humidity sensor, boasting up to a 28 Mile range using a wireless mesh networking architecture. Incorporating the Honeywell HIH9130 temperature-humidity sensor transmits highly accurate temperature and humidity samples at user-defined intervals.
The onboard temperature sensor is rated for -25°C to 85°C or -13°F to 185°F and the humidity sensor is rated for 0 to 100% RH. It can be powered by just 2 AA batteries and an operational lifetime of 500, 000 wireless transmissions. Battery life can be extended up to 10 years depending on environmental conditions and the data transmission interval. Optionally, this sensor may be externally powered.
With an open communication protocol, this IoT wireless temperature humidity product can be integrated with just about any control system or gateway. Data can be transmitted to a PC, a Raspberry Pi, to Microsoft Azure® IoT, or Arduino. Sensor parameters and wireless transmission settings can be changed on the go using the open communication protocol providing maximum configurability depending on the intended application. The long range, price, accuracy, battery life and security features of Long Range Wireless Temperature Humidity Sensor makes it an affordable choice which exceeds the requirements for most of the industrial as well as consumer market applications.
Steps to Send Data to LabView Utility
At first, To visualize the data, we need a Labview utility application.
To use this UI, you will need to install the following drivers:
Install run time engine from here for 64-bit driver and 32-bit driver.
Install NI Visa Driver.
Install Labview Run time serial driver and LabVIEW Run-Time Engine.
Getting started guide for this product.
Setting Up Node-Red.
Now that you have sensors running, we need a way to do something useful with that data.
First of all, you’ll have to install Node-Red.
Once that’s done, you’ll need to enter your command line, or Power Shell for Windows users, navigate to the directory Node-RED is installed in.
Now type “npm I ncd-red-wireless node-red-dashboard“. This will install the nodes required to receive data from your wireless sensors and you can start Node-RED once this is done.
To start node server write node-red in the command prompt or terminal and press enter.
Steps to Build the Flow:
Step 1: At this point, you’ll be viewing a large blank flow with a long list of nodes on the left-hand side, this sidebar is called the palette.

Step 2: Go ahead and drag a Wireless Gateway node over to your flow canvas to get started.

NCD-red-wireless Provides the nodes that manage the serial connection, parse incoming sensor data, filter it by specific parameters, and allow you to configure the wireless sensors.
Step 3: Finding Your Wireless Sensors:
When you’ve delivered the node you’ll be able to view the info tab, which contains records about the node’s capability, this tab is well populated for maximum node-red packages and consists of treasured statistics, often you will now not want to view any other documentation outdoor of the info tab, so hold it in thoughts even as you’re building your flows when you have a question approximately how a node works. The next element we want to do is configure the node, when you first add it you’ll note that there is a small triangle at the top right corner next to a blue dot, the triangle indicates that the node wishes extra configuration, the blue dot indicates that the node has no longer but been deployed as part of the flow.
Double click on the node to open up the configuration options.
Click on the pencil icon next to the Serial Device field to configure your USB router, this will open a second configuration panel that only has a few options.

Step 4: Click on the magnifying glass next to the Serial Port field and select the port that corresponds with your router, then click the “Add” button on top.

Step 5: The Serial Device field will now be populated based on that selection, and you can click “Done”, you now have direct access to your wireless sensors! To view the data coming in.

Step 6: Now Go Back to Your Palette and Type “debug” Into the Search Field at the Top, Grab One of These Nodes and Drag It to the Right of Your Wireless Gateway.

Step 7: Double Click on It and Change “msg.” to “complete Msg Object” Click Done.

Step 8: Now draw a line between the two nodes, and click “Deploy” on the top right of the window.

Step 9: Working with the data
Now out of your wireless sensors data is gathered and it is output to the “debug” tab, this “debug tab” is placed within the right sidebar subsequent to the information tab. To see the information is available to hit the reset button. In node-red records is surpassed among nodes in a JSON packet. When the msg object comes into the debug tab you may make bigger it to view the overall list of information that comes with it. This is extraordinarily useful in case you need to quickly see which sensors are checking in. The other issue this node gives is an easy way to interchange your router to the network identity that devices in configuration mode document on, simply hit the button on the left of the node and the tool will switch to the configuration network, hit it once more to return it to listening mode. Once we get the wi-fi tool nodes set up, they may be set to routinely configure a sensor whilst it enters configuration mode, so it’s always available to maintain such gateway nodes present at the flow for speedy configuring a device.

Step 10: Adding the wireless sensors
we need to separate wireless sensor records domestically in order that we are able to display it, we could use a switch node to split out the messages from the gateway based totally on the mac address with or sensor type, but as I referred to, the wireless nodes truly incorporate extra functionality for configuring the sensors, so we’ll start with them to give you an extra entire image of how those structures can work. In case you haven’t already seen packets coming in from both of your sensors, cross in advance and hit the reset button on the only that hasn’t started. While a sensor assessment in through any serial device configuration node, the mac address and kind of sensor is cached in a pool so we are able to quickly find it for the duration of this next step.
Grab a Wireless Node from the palette and drag it onto the flow, double click on it to get it configured.

Step 11: select the serial device from the drop-down that you used for the Wireless Gateway.

now click the magnifying glass next to “Mac Address” and select one of the available options.

You’ll notice this automatically sets the sensor type for you, you can also give it a name to make it easier to identify. As noted in the info tab, the Serial Device for Config field is optional, and we won’t worry about it right now. The node you have just added effectively works as a filter on incoming sensor data, only passing through data for the mac address, or sensor type if no mac address is present.
Step 12: Displaying Up the Temperature/Humidity:
These nodes for the wireless sensors output a msg object with all of the same information as the Wireless Gateway node, just in a slightly different format, the Sensor Data itself is sent in the msg.payload, which is what most nodes use to interact with the msg itself.
Grab a “split” node from the palette, and place it to the right of the Temp/Hum node.

Step 13: double click and check the box under Object that says “Copy key to”, this will split the msg into multiple objects, one for each property in the payload, and set the topics for those new msgs to the property names.

Step 14: Now Add a “switch” Node, This Will Allow Us to Send Each Msg to a Specific Part of the Flow, One to Handle Temperature, and One Humidity. in the First Field Change “payload” to “topic”, Next to the “==”, Type “temperature”.

Step 15: Then click the “+add” button at the bottom left, in the new field type “humidity”. As you can see each of these has a unique number to the right, this number indicates which output the msg will be sent to when it matches the condition.

Step 16: Next let’s add a “gauge” from the palette.

Step 17: set the Label to “Temperature”, and the Value format to “{{value | number:2}}”, and the Units to “Celsius” you can alter the range to the minimum and maximum expected temperature, I’m using 0 and 50.

Another really cool feature of the flow builder is copy+paste, click on the gauge you just added and click ctrl+c (cmd+c on mac), then cntl+v, now you have a second gauge, double click on it to change the Label to Humidity, the Units to RH, and the range to 20 and 80.

Step 18: Now draw wires from the Temperature/Humidity node to the split node, from the split node to the switch node, and from the switch node’s first (top) output to the temperature gauge node, and from the switch node’s second output to the humidity gauge.

Once that’s done click deploy.
Step 19: NODE-RED DASHBOARD:
Provides the ability to create a UI using the flow builder, provides charts, graphs, and a number of other visual elements we can use to display data, along with nodes to trigger a flow using user input. We will use some of these nodes to display the telemetry from your wireless sensors.
let’s check it out! There is a tab on the top right that says “Dashboard”.

Step 20: on the top right of that tab is the little “new window” icon, click on it to view your UI.

It is likely that the gauges aren’t displaying any information, because no sensor data has been reported since you deployed the flow, click the reset button on your temperature/humidity sensor to force it to check in and your gauges should jump up. You should now have real-time data displaying!
Step 21: NODE-RED DASHBOARD OUTPUT:
Now as the temperature and humidity increases and decreases new data available inside the various variable.

Node_red_flow
Below is an export of the complete dashboard setup I built for these wireless sensors.
https://github.com/ncdcommunity/Ncd-Long-Range-Temperature-and-Humidity-Sensor-with-Node-Red/blob/master/node%20red%20flow.json
1 note
·
View note