
Don't wanna be here? Send us removal request.
Statistics
We looked inside some of the posts by robertomessi311-blog and here's what we found interesting.
Average Info
Notes Per Post
0
Likes Per Post
0
Reblog Per Post
0
Reply Per Post
0
Time Between Posts
9 hours
Number of Posts By Type
Text
17
Last Seen Tumblr Blogs


Fun Fact
Kazakhstan’s Minister of Communications and Informatics has blocked the Tumblr site because it contained 60 sites of terrorism, extremism, and pornography in 2015.
Text
Five-Minute DIY Sweater Vase Project


I finally took down my Christmas decorations.
I put it off as long as I could, but Valentine's Day was looking at me with a scolding face.
There's seriously nothing worse than getting chastised by a holiday.
After the boxes were packed and the twinkling lights were put away and the halls were undecked, it all looked clean.
And fresh.
And ready for a new year.
But truth?
It looked a little empty.
So I took 1/12 of an hour and a thrift store bargain and came up with this.
A five-minute DIY sweater vase project.

I started with a random set of vases I had around the house.
They don't have to match.
No one will notice when they are wearing their sweaters.

I found three cream sweaters at the thrift store.
You may have some sweaters around your house that might work, too.
The rest of the sweater might look a little awkward, but just make sure the arms are cute.

Place your vase next to the arm of the sweater to measure.
Add six additional inches in case the sweater stretches.
(total aside: don't worry if you mess it up-the sweater has another arm.)
Then cut the sweater arm off from the rest of the sweater.

Pull the sweater arm onto your vase.
Straighten the seam in the back.
And then?
Just cut to fit, leaving a small hem at the bottom.

Then just tuck the hem under at the bottom.
You could also add a little bit of fabric glue to hold it in place.
Then?

Fill it with water and add branches.
Place the vases at different heights.
I used books to stack and arrange them.

That's it.
Here are a few tips I learned along the project way:
1. Know your vases before you pick your sweater. Some sweaters are looser and some are tighter weave. You want to make sure your sweater won't overstretch.
2. Mix up the weaves of your sweaters to make the display even cozier.
3. I also thought it might be cute to add a pom pom to the top or front of the vase.
4. Cream sweaters are pretty, but you could add color and pattern, too.

Hello 2019.
Best five minutes I've spent this year.

PS I've been getting so many e-mails from so many of you who are interested in starting a blog.
It must be all those New Year's resolutions.
I want to help, so I'm opening up FOUR slots for a one-hour consult.
Want to start a blog?
Want to grow your business?
Want to bring a product to market?
I'm all ears and here to help.
Here are the details on cost and what the consult offers and reviews of some individuals I've consulted with.
Just e-mail me at [email protected].
Here's to the BEST 2019 EVER.
The post Five-Minute DIY Sweater Vase Project appeared first on Thistlewood Farm.
0 notes
Text
5 Ways to Cook Vegetables

Preparing vegetables will always demand some extra time and care. However, these days we're all trying to get more vegetables into our daily lives. Knowing more general ways to cook them only works in our favor.
The transformation from raw to cooked never ceases to inspire and once you learn the overall cooking processes, you can tackle any vegetable like a pro. Below is just a start of ways you can experiment with vegetables but hopefully this inspire more vegetable cooking in your kitchen.
Blanching
Blanching is a quick cooking process that involves submerging vegetables in boiling water for a short period of time. This process helps vegetables lose that extreme crispy bite that might be too much for some meals. Blanching works great for items like asparagus, broccoli and cauliflower but can also be great for greens.
How to blanch
To blanch, bring a pot of salted water to a boil with a bowl of ice water nearby. Drop in your prepped vegetables and let them cook for only a few minutes. The timing will depend on the heartiness of what you're cooking. Spinach will take around 30 seconds while broccoli could be minutes. You want them to still be bright, colorful, and crisp but not crunchy. Strain the vegetables and transfer to the ice bath.
How to use blanched vegetables
I like to use blanched vegetables for vegetable cakes, stir fries, or if I plan on pan-frying the vegetables after blanching. Getting blanching under your fingers is also a good thing to have in your pocket if you ever plan on freezing vegetables (which helps seal in color, flavor, and nutrients.)
Example uses blanched vegetables:
Broccoli Melts Broccoli Pesto Pasta Garlicky Yogurt Green Beans

Roasting
One of my favorite ways to cook harder vegetables like squash is by tossing them in oil and salt and popping them in a 425˚F oven. Let them roast under high heat for 30, 40, 50 minutes - I never really set a timer I just check them occasionally with a fork to test for softness and some good coloring.
How to use roasted vegetables
Roasting vegetables is a great way to lock in flavor and have a bit of char-flavor to the items. Roasted vegetables are perfect as a side but I love adding them to all kinds of meals including pizza toppings, tacos, pasta, and salads.
Example uses roasted vegetables:
Sweet Chili Roasted Sweet Potato Spring Rolls Roasted Tomato Sauce Einkorn Risotto with Roasted Asparagus Chili Roasted Broccoli

Steaming
I often times forget about this option when I am preparing vegetables. When I think about cooking a sweet potato or a hard winter squash, I sometimes get mentally cornered into thinking that turning on the oven is the only way to get the job done.
Steaming takes a fraction of the time, and is easier to clean up because there is no greasy oil or crusty bit of veg stuck to the pan. I highly recommend picking up a steaming basket. This makes steaming a bit easier because you can lift the vegetables out at the end of steaming.
How to steam vegetables
For steaming, all the vegetables should be roughly the same size, to cook evenly. Place about 1” of water in the bottom of a pot. This water should not touch the steaming basket, though. Bring that water to a boil, add your vegetables, turn the heat to a simmer, cover, and cook until the vegetables are just-tender. The vegetables should be bright in color still (similar to blanching).
Remove the steaming basket and run the vegetables until cold water to stop the cooking process then season as desired! Steamed vegetables do well when finished with fats like olive oil, homemade aioli, or other types of rich sauces.
How to use steamed vegetables
Steamed vegetables make for great side dishes. I also like to use steaming if I plan on pureeing something into a sauce or soup. You could also use as a filling for enchiladas, frittatas, or grain bowls.
Example uses steamed vegetables:
Carrot Baked Barley Risotto (calls for roasting but could use steamed carrots) Sweet Potato Pasta (calls for roasting but could use steamed sweet potato cubes) Sweet Potato Mac and Cheese (calls for boiling but could use steamed sweet potatoes)

Sautéing
I used to be intimidated by the term sauté - I thought you were only doing it right if you managed to toss the food from your pan up into the air and back into the pan again with a graceful yet incredibly strong wrist action (luckily that's not so).
How to sauté vegetables
Sauté simply means to fry something quickly in a little hot fat. Cut your vegetables into evenly sized pieces, heat a pan with some oil or ghee, and toss in the vegetables. Coat them in the hot fat, and let the magic of fat and heat work wonders. Shoot for even coloring and frequent stirring until everything is tender and ideally caramelized or tastefully browned.
How to use sauteéd vegetables
Sautéed vegetables work well if you're already making a meal on the stove-top. Tacos, grain bowls, and egg skillets are all great ways to use sautéed vegetables.
Example uses sauteéd vegetables:
Pan Fried Turnips White Beans and Potatoes in Spicy Tomato Sauce Green Bean Stir Fry Vegetable Lo Mein
Pickling
This isn't necessarily a 'cooking method' but the fermentation nerd side of me can't overlook the ease and fun of quick pickling vegetables. There is no canning required, just some vinegar, salt, sugar, and spices if you wish. There are many different variations on pickling, which can be found along with instructions here.
How to use quick pickles
Quick pickles are great on sandwiches, as a topping for salads/grain bowls, or as a simple snack. Many different vegetables work well as quick pickles- just play around and find what you like!
Example uses pickled vegetables:
Hummus Sandwich with Pickled Carrots Avocado Romain Wedge Salad with Pickled Radish Caramelized Onion and Cheese Toast with Quick Pickles

continue reading
The post 5 Ways to Cook Vegetables appeared first on Naturally..
0 notes
Text
Top 6 Tips to Improve Your Home's HVAC Energy Efficiency

Are you in need of energy efficient HVAC tips that will help you save money and the environment in the process? January is a great time of the year to evaluate the energy costs of your home and make the necessary adjustments to keep your home comfortable and operating in the most cost efficient way.

0 notes
Text
Top 10 Posts of 2018

I always get a little nostalgic at the beginning of a new year and enjoy reflecting back on the year that has past. As always, I continue to be amazed at the opportunities that this blog provides for our family and I'm so grateful for everyone that has supported me on this blogging journey. This blog would be nothing without YOU!
Top Blog Posts of 2018
I'm continuously looking for ways to improve the blog and serve you guys better. It totally makes my day when you email me or comment on my posts and I absolutely LOVE getting your input. Since I don't always hear from you though, I often look at what posts are the most popular and try to plan some additional blog content around those topics. Sometimes it surprises me!
This year, many of your favorite cleaning tips and organization posts from years' past continue to stay in the top 10, along with a couple of fun holiday projects. The home decor posts didn't quite make it into the top 10 but they were close! So here they are – the top 10 blog posts of 2018!
Number 10: The January Decluttering Challenge
If you're ready for a clean and decluttered start to the new year, join in my January decluttering challenge! I know many of you joined me last year and I hope even more join in this year. The post has been updated with all of the 2019 free organization printables for you, so feel free to join in. It's never too late!
Number 9: Family Binder Budgeting Printables
If you're looking to get your budget on track after the holidays, these printables are a great way to keep track of where your money is going. Get started on the road to financial success!
Number 8: Turkey Treats
These little turkey treats have been a Thanksgiving favorite for a few years now and they've received over 15 million views on my Facebook page!
Number 7: Eleven Daily Habits to Keep Your House Clean and Tidy
It can be hard to keep up with all of the daily cleaning around your house, but these simple habits can make it so much easier!
Number 6: How to Clean Upholstered Chairs and Other Upholstery
If your upholstery is looking stained and dingy, give these cleaning tips a try. You'll be amazed at how clean they can get!
Number 5: How to Remove Burned Food from Pots
This is always a favorite – especially after the holidays! This tip works great for really bad burned on food as well as just a good pot cleaning after a busy cooking season.
Number 4: Ten Things to Clean After the Flu
No one likes it when the flu comes to visit! Follow these cleaning tips to get your home clean and disinfected, and help it from spreading to everyone else in the household.
Number 3: Popsicle Stick Sleds
These are one of my favorite craft projects and I love seeing how everyone puts their own spin it! I even added some popsicle stick skis this year!
Number 2: How to Organize Bills – Bill Payment Tracker Printables
I've used these bill tracking printables for a few years now and I have found them SO helpful! Now that many of our bills are just sent electronically I find them even more helpful to keep track of what I have {and haven't!} paid.
Number 1: How to Clean your Washing Machine
This post has been my number one post for 4 years running! There are lots of helpful tips to get your front loader looking and working its best. You might just love your front loader again!
And there you have it – the top 10 blog posts of 2018! Thank-you again for such a wonderful year and I look forward to connecting with you more in the year ahead. As always, please let me know if there are any specific post ideas that would be helpful for you. I love to hear from you and I hope that we can continue to build this little community together.
Top Home and DIY Bloggers Best Posts
If you're looking for more home and DIY inspiration, please take a minute to check out my DIY and Home blogger friends' top posts from 2018! This is the very best the web has to offer and you're sure to find some amazing ideas!
TIDBITS | Miss Mustard Seed | Farmhouse on Boone | Maison De Pax | A Burst of Beautiful
Simply Designing | Bless'er House | Taryn Whiteaker Designs | Designthusiasm | Unskinny Boppy
Live Laugh Rowe | Kendra John Designs | House by Hoff | So Much Better With Age | Life On Virginia Street
ZDesign At Home | Town and Country Living | Shabbyfufu | Happy Happy Nester | Stacy Risenmay
Cherished bliss | Clean and Scentsible | anderson + grant | The Happy Housie | Summer Adams
Decor Gold Designs | Maison de Cinq | Seeking Lavender Lane
The post Top 10 Posts of 2018 appeared first on Clean and Scentsible.

0 notes
Text
Top Reasons to Plan Your Spring Landscaping in Winter
In landscaping, winter means spring. The more you plan ahead, the sooner spring will arrive outside your home. Plus, you'll get to spend the season enjoying your outdoor space rather than working on it. Picture it now: You're soaking up the sun on that first warm day-reading and lounging, rather than pulling and planting. If that's not enough to get you inspired, here are the top reasons to start planning your spring landscaping in winter.
Better Scheduling By the time the whispers of spring being in the air begin, your favorite landscape architect's schedule has probably filled up considerably. If you have a design-build project in mind-such as a patio, poolscape or outdoor kitchen-winter is the ideal time to book your desired company and a time frame that is convenient for you.
Pass the Time During the long stretch of winter, we all daydream about the reward of spring and summer. The problem is that doing so tends to make winter feel even longer. Instead of wishing, we can be working-and when we're spending winter working on your vision for when spring finally arrives, the time can fly like you never thought possible. Trust us and try it!
Enjoy the Process Using winter as the prep window for spring also allows you to take your time and enjoy the creativity that comes with landscaping. You can be deliberate with your decisions around plants, hardscaping and other features, without feeling like you're losing the few months of warmth we're entitled to as New Jerseyans. If you wait until spring is in full swing to get started, you could very well find yourself looking to the following spring-a full year down the road-as the one for which your space will be ready to host a bright and sunny get-together.
First to See Spring When you plan ahead, you'll have little to do in April other than wait for that blissful feeling in the air to arrive and embrace the natural beauty that follows. Ready to turn this winter into spring planning? Contact High Tech Landscapes today!
The post Top Reasons to Plan Your Spring Landscaping in Winter appeared first on Hightech Landscapes.
0 notes
Text
Crochet Cat Bed- How to Make a Cat Bed with Chunky Crochet
You kitties will love this crochet cat bed made with super-soft chunky yarn. This free cat bed pattern can be completed in just an hour. All you need is thick yarn from the craft store and a giant crochet needle. This crochet cat bed is a purrr-fect project for beginner crocheters. Read on to learn how to make one yourself!
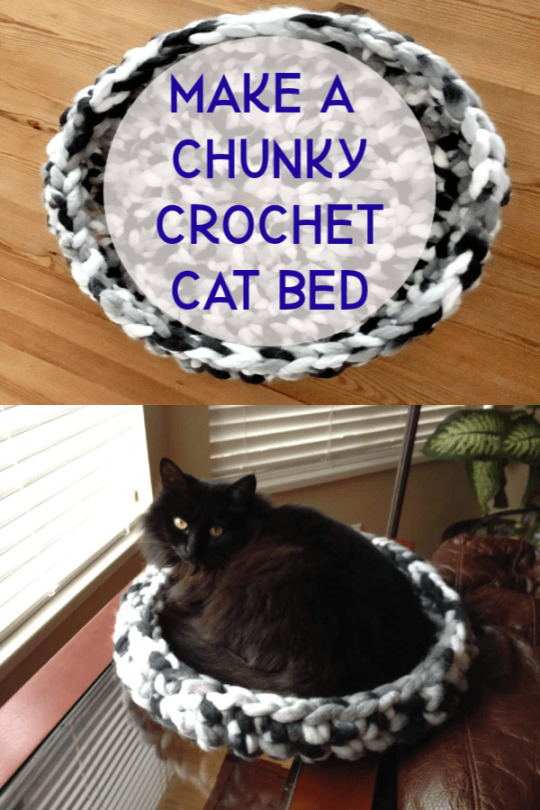
Crochet Cat Bed
Hey Gnomies,
Today I'm sharing a cute cat bed that I made for my mom and dad's kitties. The cute cat you see above is Flo and she is the sweetest little cat. For this project I used the Ginormous (actual name) yarn from Michaels and a gigantic crochet hook.

Giant yarn for crochet cat bed
This cat bed uses a similar pattern to the crochet face scrubbie I shared recently.
The thing I love about crochet is that once you have learned some of the basic stitches, you can come up with all sorts of cool projects just by modifying the patterns that you already know.
Supplies for crochet cat bed:
1 skein of Ginormous yarn
1 giant crochet hook
I bought the yarn and hook at Michaels. They had an area in the store devoted to the giant yarn, crochet and knitting supplies over the holidays but you can purchase it through my amazon link below:
.The following are affiliate links. We are a participant in the Amazon Services LLC Associates Program, an affiliate advertising program designed to provide a means for us to earn fees by linking to Amazon.com and affiliated sites. Thank you for being part of Crafty Little Gnome
Giant Crochet Yarn

Buy It Now
Giant Crochet Hook

buy it now
You may also like: Diy Dog Proof Litter Box

Directions for crochet cat bed:
Chain two and double crochet 5 times into the first chain.
Slip stitch and chain two.
Double crochet into each of the chains.
Once your work your way around, slip stitch and chain two again.
Double crochet into each of the chains.
Repeat rows until the bottom of the cat bed is as wide as you would like it. I made mine just over 12 inches.
Next, instead of crocheting twice into each stitch, just double crochet once. This will give the bed “sides” and make it taller instead of continuing to get wider.
Once it's tall enough, about 3 rows high, finish off the top edge with single crochet.
You may also like: DIY Dog Dry Shampoo
If you need help with the crochet stitches, here is a video I found on YouTube to help you out:
youtube

finished crochet cat bed

At first I was concerned that the cat bed would not be big enough, then I remembered that cats like to jam themselves into tiny boxes and other small spaces. If you aren't sure, err on the side of making it too small. That will be sure to attract your favorite cat.

This is my old cat Mylo. This picture is about 10 years old. Way back in the day when I lived in my old apartment he decided my file folder was a great place to take a nap.
DIY Crochet Cat Bed Q&A:
How do you know what size crochet hook to use?
Use the hook size recommended in your crochet pattern. Always check your gauge with a swatch. Change to a smaller hook if your stitches are too loose or a larger hook if they are too tight.
How do you introduce a cat to a new bed?
Observe where your cat likes to sleep. Paying attention to where your cat likes to sleep will help you find a good spot for its bed.
Place the bed in a low traffic area.
Put some of her toys in the new bed.
Elevate the bed or go with a perch if your cat likes height.
Try a new spot if your cat ignores its bed.
How do I get my cat to sleep in her bed?
Once your cat steps into the bed, hold a treat over his head until he sits down. Praise him and give him the treat when he does. Leave some treats in your cat's bed so he is tempted to come back to it. You can also try sprinkling catnip in the bed to get your kitty interested in it.
{"@context":"http:\/\/schema.org","@type":"HowTo","name":"Crochet Cat Bed- How to Make a Cat Bed with Chunky Crochet","author":{"@type":"Person","name":"adrienne"},"datePublished":"2019-01-09","yield":"1 Cat Bed","description":"Make a DIY crochet cat bed from chunky giant yarn.","about":"Fiber art and sewing","image":["https:\/\/www.craftylittlegnome.com\/wp-content\/uploads\/2017\/01\/IMG_0017.JPG-1-e1484183925554-720x720.jpeg","https:\/\/www.craftylittlegnome.com\/wp-content\/uploads\/2017\/01\/IMG_0017.JPG-1-e1484183925554-720x540.jpeg","https:\/\/www.craftylittlegnome.com\/wp-content\/uploads\/2017\/01\/IMG_0017.JPG-1-e1484183925554-720x405.jpeg","https:\/\/www.craftylittlegnome.com\/wp-content\/uploads\/2017\/01\/IMG_0017.JPG-1-e1484183925554-735x551.jpeg"],"performTime":"PT1H","totalTime":"PT1H","tool":["Giant crochet hook"],"supply":["Chunky yarn"],"step":"Chain two and double crochet 5 times into the first chain.\nSlip stitch and chain two.\nDouble crochet into each of the chains.\nOnce your work your way around, slip stitch and chain two again.\nDouble crochet into each of the chains.\nRepeat rows until the bottom of the cat bed is as wide as you would like it. I made mine just over 12 inches.\nNext, instead of crocheting twice into each stitch, just double crochet once. This will give the bed \"sides\" and make it taller instead of continuing to get wider.\nOnce it's tall enough, about 3 rows high, finish off the top edge with single crochet."}
Yield: 1 Cat Bed
Crochet Cat Bed- How to Make a Cat Bed with Chunky Crochet

Print
Make a DIY crochet cat bed from chunky giant yarn.
Active Time 1 hour
Total Time 1 hour
Difficulty Intermediate
Estimated Cost 15
Materials
Chunky yarn
Tools
Giant crochet hook
Instructions
Chain two and double crochet 5 times into the first chain.
Slip stitch and chain two.
Double crochet into each of the chains.
Once your work your way around, slip stitch and chain two again.
Double crochet into each of the chains.
Repeat rows until the bottom of the cat bed is as wide as you would like it. I made mine just over 12 inches.
Next, instead of crocheting twice into each stitch, just double crochet once. This will give the bed "sides" and make it taller instead of continuing to get wider.
Once it's tall enough, about 3 rows high, finish off the top edge with single crochet.
Notice: Undefined index: mv_create_affiliate_message in /home/craftyl8/public_html/wp-content/plugins/mediavine-create/lib/views/v1/shortcode-mv-create-products.php on line 9
© adrienne
Project Type: Fiber art and sewing
Have you tried making a DIY crochet cat bed? Please share your tips in the comments!
The post Crochet Cat Bed- How to Make a Cat Bed with Chunky Crochet appeared first on Crafty Little Gnome.
0 notes
Text
15 Winter Cabins That Make The Most Out Of The Snowy Season
There's something uniquely comforting and charming about spending time in a small cabin when it's freezing cold outside. Winter cabins make us feel warm and cozy plus they're almost always situated in remote regions with gorgeous views which provides the perfect environment in which to recharge our batteries, to relax and to enjoy quality time with our loved ones (or alone) before returning to our busy everyday lives. We searched far and wide and we selected our favorite winter cabins from around the world to share with you today.
Given the fact that winter cabins are often situated in remote areas or only used for shorts periods of time throughout the year, the issue of security can be a valid concern. When building the Delta Shelter, studio Olson Kundig found a great way to deal with this problem. The cabin was build on stilts and has metal shutters which allow it to become completely sealed and secured when the owner is away. In addition to that, it has a modern and cool design with lots of appealing features. The cabin is located in Mazama, US.
Due to strict architectural guidelines in this beautiful Alpine valley in Manigold, France, Studio Razavi Architecture didn't really have a lot of freedom when designing this winter cabin. Still, the team managed to make the most of the circumstances, opting for a traditional style overall and allowing the cabin to seamlessly blend in with the other local structures while maintaining its own unique character.
If there's one thing mountain cabins are famous for, that would be the views. A lot of modern cabins feature large windows which maximize these views but other less conventional design strategies are sometimes used as well. This holiday retreat near Geilo, a village in Norway is a perfect example. The region is known for its ski resorts and there's actually an open terrain unfolding right next to this cabin so the team at Reiulf Ramstad Arkitekter came up with a design which separates the building into several volumes, each with a distinct orientation.
Rather than standing out, this lovely winter cabin from Lillehammer, Norway manages to blend into the landscape and to keep a low profile all while taking full advantage of its surroundings and the beautiful views they provide. The structure is designed by studio Vardehaugen and is inspired by snowbound cabins. The design blurs the boundaries between architecture and nature, bringing the inhabitants closer to their surroundings and allowing them to feel like an actual part of the mountain.
Situated in a quiet residential area north of Whistler in Canada, this A-frame cabin is surrounded by other chalets and retreats featuring similar designs, most of them dating back to the 1970s. This particular winter cabin was designed by Scott & Scott Architects and has a modern vibe inside and out and that allows it to stand out and to showcase its distinct character without actually contrasting too much with its surroundings.
The winter cabin designed by studio Delordinaire has a very special way of making its inhabitants feel immersed in nature. The cabin was built on stilts and the elevated structure actually forms an open and protected outdoor space which is a very unusual ground floor area. Out here, below the actual cabin, there's an outdoor stove and a space which allows one to enjoy the snowy views and to spend time outside while being protected from the elements. The cabin is located in Quebec, Canada.
This is actually an all-year cabin, a charming and peaceful retreat located near Ål village in Norway. Residents can enjoy hiking in the summer and skiing in the winter on the nearby tracks. The cabin was designed by Reiulf Ramstad Arkitekter who were careful to take advantage of the site's unique topography and views.
As with any other type of structure, the location is very important for a winter cabin and just in relation to the views but also to the topography and any other advantages the site may offer. The mountain retreat designed by Filter Arkitekter in Sirdal, Norway sits on a very steep terrain and the architects used that in their favor to embed the building into the landscape in a literal sense. It's a great way to merge nature and architecture.
Can you believe this A-frame cabin was actually built in the '60s? It has such a chic and timeless vibe and recently it's been remodeled and converted into a cozy winter retreat. It was a project completed by designers Chad and Courtney Ludeman of Postgreen Homes. The cabin is located in New Jersey, along Maurice River. It has large openings which let in natural light and inside it's organized into a double-height atrium, a loft bedroom and a basement area.
Sleeping in a cabin is definitely a nice experience but sleeping in a cabin that's up in the trees is even better. A while ago the Treehotel in northern Sweden just got a new addition designed by Snøhetta. The hotel is actually a collection of six treehouse-inspired cabins, all providing magnificent views and perfect observation points for admiring the Northern Lights. This cabin sits 10 meters above the forest floor, supported by 12 columns.
Cabana Sapte is a cozy cabin situated in the Fagaras Mountain, in Romania. It's been completely remodeled in 2017 and can sleep up to 12 people in five bedrooms. The glazed side allows panoramic views and an abundance of natural light to enter the cabin while the wooden floors and pitched roof create a warm and cozy ambiance inside.
The minimalist design and the selected palette of materials and finishes all lead to one objective: to create a cabin which is able to blend into the landscape and to communicate with nature and its immediate surrounds in a seamless and natural manner. This become possible thanks to studio CARGO Architecture. The cabin is located in the Petite-Rivière-Saint-François region of Canada.
This cabin is quite different than everything else we showed you so far. Its modern appearance makes it more suitable to call this a hut rather than a cabin. Located in Flims, Switzerland, this site used to be occupied by an old cabin and stable combo, which were taken down after being abandoned for a period of time. A new cabin was built in the same place as the old one. Its design and character preserve and charm of the original structures, featuring a timber log structure and massive concrete walls. This was a project by Selina Walder and Georg Nickisch.
Inspired by the freedom and adventure which define snowboarding as an experience in itself, this winter cabin is located in a remote region on the northern end of Vancouver Island in Canada. It was designed by studio Scott & Scott Architects and manages to almost seamlessly blend into the surroundings thanks to the grey exterior and wooden accents.
The last winter cabin that caught our eye lately was designed by Alp'Architecture Sàrl and is located in Bagnes, Switzerland. Originally this used to be a small barn which was extended into a residence by annexing a series of new volumes at the back of the building. It was all done with minimal impact on the overall appearance and structure of the cabin or its facades.
The post 15 Winter Cabins That Make The Most Out Of The Snowy Season appeared first on Home Decorating Trends - Homedit.
0 notes
Text
What Should be Your Cleaning Schedule
How can you make a house cleaning schedule? Cleaning schedules can help you to know what needs to be cleaned and how often it should be cleaned. A good house cleaning schedule makes it a lot easier to set with daily, weekly, monthly and yearly cleaning tasks. A cleaning schedule is an easy and effective way of maintaining all equipment regularly. Some items in a cleaning schedule require to be cleaning more than once a day, for example, kitchen cleaning, garbage of our house. Other items can be done once a week like home furniture cleaning, dust cleaning etc. In weekly cleaning, you can schedule bedroom cleaning as a major part. If you want to schedule your home cleaning with a maid cleaning service you can follow this.

The post What Should be Your Cleaning Schedule appeared first on .
0 notes
Text
Glowing Christmas Lights Night Tour

There's nothing more magical then twinkling Christmas lights and this marks the fourth year of sharing my glowing Christmas lights night tour that positively sparkles. Cozy up by my roaring fire and enter this magical winter wonderland. Don't miss the end of this post where I link to 20 other bloggers who are sharing their […]
The post Glowing Christmas Lights Night Tour appeared first on Kelly Elko.

0 notes
Text
GOLDEN GLOBES 2019
A word of warning!!!! If you are one of those who doesn't care to hear negative opinions or doesn't believe one's $10,000 dress deserves any criticism or critiquing, then you should just close this up and come back in a few days when I publish a fabulous story about a house in Beverly Hills. You've been warned!To me, the 2019 Golden Globes fashion show was a huge disappointment. Maybe I was


0 notes
Text
And My Word of the Year Is…
As I get older, I've become much more comfortable with easing into a new year rather than kicking things off the second the clock strikes midnight. There's something about that first week of January, where my mind is clear and the past year is behind me, that makes it the perfect time for me to thoughtfully and intentionally set out my goals. Along with that comes my favorite part of the new year: Choosing my word.

For those who may not be familiar with the practice, the idea is to decide on a word that sets the tone for the year ahead. My favorite words are those that can have more than one meaning – but that doesn't always work out. Most importantly, it should align or even help boost the focus on your goals or resolutions.
Last year, my word was simplify. It was a word that helped me make decisions about adding more to my plate (or rather, not adding more to my plate), purging extra stuff in my life (literally and figuratively) and simply getting back into a routine after back to back years of big projects (hello, kitchen remodel and wedding!).
And while it was certainly a relief to focus on a lot of mini updates around the house, getting settled into our new studio, and having more downtime, by the end of the year I felt a little… well, directionless. Words can be funny like that.
When choosing my word for this year, I started by listing not only words that currently resonate with me, but also the goals I want to achieve. From there, it became fairly clear the overall direction that things were going in. Here was my list of finalists for 2019: Act, Expand, Refine, Focus, Explore, Motivate, Energize, Push.
It's not hard to spot the trend here, right?! But before I tell you what my word is, I want to give you a little perspective on where it's coming from.

When I moved in with my husband a few years ago, for the first time in my adult life I felt stability. And I fought it. I loved being independent. I could make my own decisions about where to invest my time and money, and always had the option to dream as big as I wanted to without worrying about repercussions because they would only affect me. Looking back now, I think I fought it because I was scared of what would happen if I relaxed a little bit. Slowed down that hustle.
And then last year – it happened. I flipped. I embraced the idea of not having to constantly work so hard. I also had to find more time in my schedule for things like making dinner at a scheduled time. Picking my step-daughter up for her drum lessons. I found time to work out (yay!) and take naps with my dog on the sofa (oh, the luxury!).
But, somewhere in my quest to Simplify and find balance in life, I maaaay have tipped the scales too far in the opposite direction. Settling into a more manageable workload made me wary of taking on more challenging opportunities. Partially because after living through a kitchen remodel and planning a wedding, I was terrified of screwing with our routine and creating a more stressful environment in the house again. And partially because I was so exhausted by my newfound wife and step-mom duties that mentally and creatively I just couldn't motivate myself.
For someone who thrives on challenge and change in every other aspect of life, it was quite the shock to end up here. In my version of lazy. But I was kind of enjoying it. Until I wasn't.
In the latter part of last year, I started to feel really stuck. I couldn't make decisions. I didn't know what I wanted, but I definitely wasn't happy. I was going through the motions. I might even say, I was mildly depressed. Of course I had moments of delight and creativity, but overall I was not in a good place. And it took these last few weeks of finally having enough downtime, sleep and introspection to figure out why.
Giving myself more flexible time last year both helped me and hurt me.

That sentence is an an entire essay in itself, but here's what it boils down to: When I'm feeling fulfilled creatively through work, then I'm happier all around. And that fulfillment comes through collaborating on exciting partnerships, challenging myself with new ideas or projects, and having measurable goals. Last year, there wasn't much of this, and without it I simply lost direction and motivation.
Let me be clear about something though: some of that downtime was very needed and did result in better habits. I don't see last year as a failure or even a waste of time. I may have swung my 'balance' pendulum a bit too far in the opposite direction for a little while, but I'm hoping that means I can take the lessons learned from being on both sides of that pendulum and really nail it when it comes to finding my happy medium in 2019. After all, isn't that what life is all about? We learn, we grow, we do better.
So, back to that word.
After concluding that I'm definitely a gal who thrives under pressure, but also having learned from the past that I can't go following every idea or my business, my word for 2019 is…. Focus.
I think we can all agree that life can get insanely distracting. I find myself very easily getting sucked into mindless social media scrolling, or bouncing from one task to another without feeling like I'm actually getting anything done. Feeling overwhelmed is a pretty common emotion for me, but the very act of using the word Focus in the past 10 days has already helped me to become more disciplined.
I'm actively creating structure around my time that's boosting my productivity immensely, and laying this foundation is going to come in quite handy when attempting to achieve some of the larger goals I've laid out for myself this year. (Which I will be posting about next week!)
Do you pick a word for yourself every year? I'd love to hear what it is!
The post And My Word of the Year Is… appeared first on coco kelley.
0 notes
Text
Develop Your Landscaping Plan
It's cold outside, and most of our landscapes are quiet and at rest at this time of year. But like many,, you probably always have landscaping plans in your head. Winter is the perfect time to do some dreaming and planning and put those thoughts on paper. It's also a great time to start making plans with your landscaping company. Well-thought landscaping plans can help achieve successful results and save money.
How Can I Put Together a Landscaping Plan?
Start with a list. Write down the features you currently have in your outdoor space and landscape. Then write down the additional things you want; anything from a patio to a pool, a storage shed or a playground, or simply adding some plants.
Map it out. Think about the layout of your property and where different features might go. Sketch out a rough plan, leaving room for suggestions from your landscaping company. The University of Missouri offers some great suggestions for making a plan, including separating public areas like the front of your house from private areas for family activities and service areas like trash cans and storage sheds. Think about where things should go in relation to your house; asking how each area would effectively function. Then draw your landscape as is and overlay the features you'd like to see. It's an exciting process.
Here are just a few features to consider as you sketch your map:
Plantings
Walkways
Patios and entertainment spaces
Privacy features and shade trees
Vegetable and flower gardens
Sheds and outbuildings
Pools, pergolas and pavilions
Fire pits and grilling areas
Outdoor lighting
Think long-term. When you talk with your landscaping professionals, share your long-term goals and ideas even if you can't make them happen right away. This helps us develop your property in a more holistic way. For example, if you think you might want outdoor lighting down the road, it's best to go ahead and add conduits for electrical lines now. Saving you from tearing up hardscapes or plantings later just to install the lighting. Once your landscaper has the big picture, they can help you break things down into bite-sized chunks and move forward step by step, as your budget allows.
Find The Right Partner. As you consider your long-term landscaping goals, be sure to find a partner who is ready to work with you to make your ideas become a reality. You want a company that will listen to your goals, desires and concepts while at the same time bringing their extensive professional experience into play. It's important to find a partner who can look at the big picture but also make things happen in the short-term by helping you prioritize and work out a schedule.
Think About a Budget and Payment Plan. At Epling, we encourage clients to think big, but we also understand the role that budgeting plays when designing a landscape. We work with clients whose budgets vary, from wanting to get it all done at once and fast track multiple projects to those who need to take things one step at a time, phasing the project. Our experienced staff will help you find the approach that works best for you.
Create Your Landscape Plan with Epling
At Epling, helping clients plan and achieve their goals for their outdoor space is one of our favorite parts of the job. From beating back the jungle and getting on a routine lawn care schedule to decorative plantings for a perfect entryway to attractive, family-friendly patios and play areas, our team can help you take your landscape from a dream to a reality on the schedule that works best for you.
0 notes
Text
Elevate Your Style With These Kitchen Floor Tile Ideas
Image:

We'll warn you now: these kitchen floor tile ideas aren't for the faint of heart.
Tile isn't something you can easily change out, and making a bold commitment isn't for everyone. If you want to create a unique, eye-catching look in your kitchen, though, tile will make a major statement.
Here are 3 ways to go bold with kitchen floor tiles, with real-life examples.

Photo Credit: Theguardian.com
Go Big
Big tile? Big impact. If you go in this direction, however, limit your color choices-- the size already makes a statement, so keep it to larger patterns and a maximum of two colors for a look that's bold without being overwhelming.

Photo Credit: Granadatile.com
If you aren't sure how much of an impact the flooring makes, check out these images-- one with the kitchen flooring in place, another with the floor edited out, so you can truly see how the tile changes the entire feel of the kitchen. Without the bold flooring, these kitchens don't stand out. It's the floor tile that sets them apart.

Photo Credit: Theartofdoingstuff.com
Choose small but powerful
The opposite is true for smaller tiles-- you can go with two or more colors, or choose more intricate kitchen floor tile patterns.

Photo Credit: CountryLiving.com
Get a real feel for the impact of small but mighty floor tile by comparing these images:

Photo Credit: Domino.com
Take inspiration from nature
The natural grooves and wave patterns in natural stone creates a unique texture that can soften the look of your kitchen while still giving it a unique vibe.

Photo Credit: futuristarchitecture.com
See the difference in the feeling of the space by comparing these images:

Photo Credit: futuristarchitecture.com
Every detail in a kitchen combines to create the overall impact, but when choosing standout features, many homeowners often overlook the floor. So if you want to go bold, beautiful and unique, explore your flooring options.
Do you have a unique kitchen floor tile pattern? Share it with us over on Facebook!
Category:
Design Trends
0 notes
Text
4 Ways to Deal if You Want to Be Debt-Free but Your Partner Keeps Spending
When you get married or combine finances with someone, you may think that tackling debt will be easier than doing it on your own.
Then you find out your partner has no intention of paying off debt or being involved with finances.
Cool.
But if this is you, don't worry. Just because the love of your life isn't driven to get rid of debt right now, it doesn't mean they never will be.
I admit that I wasn't on board with paying off debt when my then-fiance “suggested” it to me.
I came from a background where we always had money to pay the bills but never enough for anything else. So when I was finally making my own money, I wanted to use it to live, not to pay my $52,000 of student loan debt.
But many people overcome their aversions to paying off debt and end up being just as motivated as their significant other.
Here are some tips for bridging that gap.
4 Strategies for When Your Partner Doesn't Care About Being Debt-Free
These tips may not speed up the journey, but they are the best way to get to freedom from debt if you don't want to sleep on the couch the whole way.
1. Slow Down and Rethink Your Approach
If the fact that your partner doesn't want to think about finances frustrates you, sit down, take a deep breath and think about why.
A lot of people have negative emotions and experiences tied to money.
Talking about finances can be a trigger for someone whose parents fought about money. If someone never had enough money for small pleasures growing up, they might go into defense mode if you tell them you want to stop spending money and sell their stuff.
And the thought of debt itself can be a heavy mental burden, especially when life is throwing more problems into the mix. It takes time, persistence and understanding to find out what the root of your partner's hesitation is and how to work through it.
2. Talk About the Future

My husband knows that I'm a goal-driven person, so he asked me what my goals for the future were. He got me thinking about how freedom from debt could help me achieve my goals faster.
Make sure your partner's goals and wants are heard. Share your own wants, and talk about how your goals and your partner's goals can work together. Your partner may not have concrete goals right now, but they surely have something they want. Maybe they want to travel, buy a boat, stay at home with kids or pursue a passion.
Anything they want to do in the future is going to have a financial component. And once you've identified it, you'll be able to sit down and talk about that. But as with the first recommendation, take it slowly.
3. Plan a Road Trip
If your partner will no longer listen to you about finances, don't force it.
They still need to hear it, just not from you. That's where podcasts and audiobooks can come in for the assist. And there's no better way to have your partner's uninterrupted ear than playing them in the car.
That's how Budgets Made Easy creator Ashley Patrick was able to get her husband on board.
“I attempted budget meetings, but he wasn't interested,” Ashley said. “He was content letting me handle it all. The biggest thing that fully got him on board was playing Dave Ramsey podcasts in the car. Especially when I did it on a long road trip. Hours of Dave Ramsey helped change his mindset.”
She and her husband paid off $45,000 in 17 months, and Ashley now provides financial coaching through Dave Ramsey's Ramsey Solutions.
4. Be an Example They'll Want to Follow
While you're waiting for your partner to join the team, make sure they know what the game looks like.
You can continue to budget, pay off debt and be wise with your spending even if your partner isn't. Sometimes they just need to see that it can be done.
As you do this, take into consideration what they value and want. Maybe you think Topgolf is a waste of money, but your husband loves going once a month. Put it in the budget to show him that the process is only as restrictive as you make it.
At the end of the day, being debt-free isn't the goal: having financial freedom is. And if you want your partner to be part of that, it might take some patience and perseverance. But it's worth it - not just financially - to get on the same page and head in the same direction with your goals.
Jen Smith is a staff writer at The Penny Hoarder. She was reluctant at first, but once she got on board, she and her husband paid off $78,000 of debt in two years. See more of her story and debt-payoff tips on Instagram at @modernfrugality.
This was originally published on The Penny Hoarder, which helps millions of readers worldwide earn and save money by sharing unique job opportunities, personal stories, freebies and more. The Inc. 5000 ranked The Penny Hoarder as the fastest-growing private media company in the U.S. in 2017.
The Penny Hoarder Promise: We provide accurate, reliable information. Here's why you can trust us and how we make money.
0 notes
Text
Owlet Smart Sock Review

Overall Rating
4.5/5
Mobile notifications
Heart rate and oxygen tracking
Financing options
Check Price on Amazon
Quick Review
Owlet's smart sock is the answer to parental paranoia about whether or not your baby's doing okay-especially overnight and during nap time. This innovative baby health monitor tracks oxygen levels, heart rate, and sleep patterns. And all it takes to get that valuable data is a little sock that wraps around your baby's foot.
Our safety experts fought over the chance to try the Owlet with their bambinos, and Scott was the lucky winner. He tested the Owlet Smart Sock 2 with his daughter, Isla, for several weeks to find out how easy it is to work with, if the tracking is accurate, and whether or not his girlie would keep it on her foot. See the results of his test below-and our recommendations for using the Owlet with your little one.
“For me, with my first one, in the middle of the night I would be like, 'Okay, I'm just going to go in there and make sure that he's breathing.' And they're so still. I'd just put my hand on their chest to make sure, but try not to wake them up. That's one thing that the Owlet does really, really well.”
Scott, dad and product tester (his baby pictured below)

How We Evaluated the Owlet Smart Sock
After the big fight scene over who got to test the Owlet, one lucky Safewise safety expert took it home and tried it out on his daughter. While Scott and his wee one figured everything out, the rest of us got to work researching everything we could find about the Owlet Smart Sock. We looked at the history of the product (we tested the Smart Sock 2.0), the pricing, customer feedback, and expert reviews. I also conducted an interview with parents who relied on the sock for the life of their infant. You can find more details about how we review products on our methodology page.
Owlet Pricing and Specifications
Owlet Smart Sock 2 Price $299.99 Financing Starting at $25/month Technical Requirements Wi-Fi connection Guarantees 45-day Peace of Mind Guarantee Warranty 1 year Check Price on Amazon

How the Owlet Smart Sock Stacks Up
When my kids were babies, I hovered obsessively over their cradles looking for signs of life. It may sound morbid, but I've never met a parent who didn't do the same thing at least once. Let's face it-when you become a parent, those wee ones take over. And you want to do everything you can to make sure they stay in charge for a long, long time.
Enter the Owlet Smart Sock. This ingenious device does all the obsessive hovering for you. And it actually knows what to look for. If I'd had the Owlet, I'd have gotten a lot more (well, a bit more) sleep in those early months with my new baby. And everything about the Owlet sock is designed with your baby's needs in mind, from the lullaby alert to the soft, adjustable construction of the sock itself.
Our tester, Scott, put the Owlet through its paces and came out a big fan. But because he used it with his second child, he felt it wasn't as life changing as it could have been. For parents who aren't newbies, the smart sock makes the most sense if there are health concerns in play-especially with such a big price tag.
“The price is high, so with me having a child that was in all regards healthy, I didn't necessarily feel a need for it. But I also tested it on my second child. If this were my first child, and if I had really understood how the Owlet works, I may have purchased it. And it likely would have been worth the price for my well-being.”
Scott, dad and product tester

Price and Contract
The good news is there's no monthly subscription or long-term contract required with the Owlet Smart Sock, but the bad news is a steep up-front price. The Owlet costs around $300, which is pricey for a baby monitor that doesn't include video or audio. But that's just a one-time cost, and Owlet offers no-interest financing options if you'd rather spread out the payment. Plus, you don't have to purchase any extra equipment-everything you need comes in the box.
Owlet Financing Options Monthly Payment Repayment Period $25 12 months $50 6 months $100 3 months
The company also includes its 45-day Peace of Mind Guarantee with every Owlet Smart Sock purchase. That means if you don't love it within the first 45 days, you can return it for a full refund, no questions asked. And if you're a bargain shopper, Owlet sells refurbished smart socks for about $100 less than a brand new setup. Refurbished sensors and base stations have to pass a 13-point inspection before they can be sold. And you won't get used socks-the refurbished kit includes three brand-new socks.
Pros
One-time purchase
No contracts
Financing available
Peace of Mind guarantee
Cons
Expensive price tag

Tech and Equipment
There is some assembly required. The Owlet sensor isn't in the sock when you unpack the system, but it's easy to slip it in. It comes disassembled so you can use the right-sized sock-you're going to have to change it when the baby grows anyway, so it's helpful to learn how to install it from the start.
It's apparent that Owlet spent a lot of time considering the needs of infants and new parents. The base station communicates primarily with light-you won't find blaring sirens or piercing beeps here. It has five different status notifications that use different colors of pulsing, blinking, flashing, and static light to let you know what's going on with your baby. And when it does make noise, the Owlet base station plays a lullaby.
You can also get notifications on your smartphone with the Owlet app. The app was easy for Scott to use and understand (and this is a guy who's in a constant battle with his Spotify app).
What's in the Box
3 Owlet socks (sizes 0–18 mos.)
Sensor
Base station
Charging cords
Setup instructions
Quick reference guide
Warranty

Owlet Socks
This adjustable sock holds the sensor and wraps around your baby's foot to take heart and oxygen readings.

Smart Sock Sensor
This pulse oximeter tracks oxygen levels and heart rate.

Base Station
The base station communicates with the sensor and app to collect data and send alerts.
You can use the Owlet app to check live readings from your baby when they're wearing the sock. But if you want historical oxygen and heart rate information you need to download the Connected Care app. We think it's worth it to have two apps, though. One of the most helpful things in the Connected Care app is the trended sleep data. You can see exactly what's going on when your baby's in dreamland, which is helpful if you're in the midst of sleep training or if you're trying to decide how and when naps are most effective.

Pros
Unpacks easily
Keeps baby comfy
Includes 3 sock sizes
Provides live data
Reports health and sleep history
Cons
Requires some assembly
Uses a different app to track historical health and sleep data

Features and Usability
Overall the Owlet Smart Sock is easy to use and delivers what it promises. Setup is fairly simple, and the mobile app is easy to navigate, even for a sleep-deprived parent. Best of all, Owlet's notifications are gentle instead of jarring. Owlet helps both you and your infant get better sleep-you because you're not worried, and the baby because you're not disrupting their slumber to make sure they're okay. And it's nice to know that if Owlet sends an alert for something nonemergency like a low battery, it won't act like your smoke alarm.


Owlet Setup and Use
Getting the smart sock up and running was “doable” though not strictly easy, according to our tester, and Owlet has numerous resources to make it that way.
“One thing that's nice is that I was already feeling really hesitant when I opened the box, but then they have these guides. And you immediately open up the app on your phone, and the app gives you step-by-step instructions and a video. So it was very doable -I don't know if easy is the right word, but I was pleased with the instructions.”
Scott, dad and tester

Like nearly all smart products, the Owlet uses your home Wi-Fi network to communicate among the sensor, the base station, and the app. Scott was pleased with how easy the Wi-Fi setup went.
“When I set up a lot of Wi-Fi connected things, I assume there's going to be some errors, it usually takes a few times, but not with this. Of course I had to get the passwords for my router and my Wi-Fi network ready, but once it was connected, it worked just fine. It synced up on the first try-to my surprise.”
Scott, dad and tester
The trickiest thing about using the sock is wrangling the baby. Owlet uses pulse oximetry to monitor your baby's heart rate and oxygen level. That's just a scientific way to say that the sensor is taking the baby's pulse to get the information it needs. But to take the pulse, the sensor has to be placed on the back of the baby's pinky toe.

Whether or not this placement will be challenging depends on you and your little one. Scott and his baby girl didn't struggle at all. In fact, he said that he was surprised by how much she didn't react, “It was like she didn't even know the sock was there.” But I remember my own wriggling wee ones, and I'm sure that getting things lined up correctly would have been a challenge.
Because the socks come disassembled and in three different sizes, they can seem a little complicated. But with instructions both on the socks and in the app, Scott says, “It's pretty hard to mess it up.” While Owlet advises that most errors with the product come from the user, Scott didn't run into any issues or alerts that he had done it wrong.
Owlet Alerts and Notifications
One of the most unique things about the Owlet is that it takes a gentle approach to alerts. As we mentioned before, there's no clanging or screeching that would scare the heck out of parents and the baby-not to mention how it would wake everyone up.
Scott particularly liked that alerts about a low battery or connection problem (re: wiggling baby) aren't startling. Instead of getting an alarm, the base station light turns red and it plays a lullaby. But you need to make sure to keep the base station in your sightline or you'll miss out. If you want freedom from the base station, use the Owlet app for notifications.

Even though our test didn't turn up any health alerts, we know a couple who relied on the Owlet when they brought their baby home from the hospital with health concerns.
“As first time parents, our lives were turned upside down when we brought our little boy home on oxygen. Stress and worry continued when it was time to transition him off of supplemental oxygen and his oxygen level monitors. At this point, we quickly began looking for options to help ease the transition.
“Purchasing an Owlet was easily the best decision we could've made! We tested the Owlet against our hospital grade pulse oximeter and were greatly satisfied with its accuracy. Noninvasively and conveniently monitoring his oxygen levels while he slept gave us confidence and immense peace of mind.”
Lyndsay, mom and Owlet user
Pros
Quick, simple setup
Gentle lullaby alert for errors
Excellent tutorials/instructions
Easy-to-use app
Cons
Placing sensor can be tricky
The Bottom Line
We loved the Owlet Smart Sock and we think you will too. This smart baby health monitor is what parents have needed for generations. No more obsessively watching to make sure your baby is breathing-with the Owlet all you need to do is check the app or look at the base station for a status report. For the price, we think it's a splurge for parents who already know the drill or have an infant with no apparent health issues. The Owlet is much more applicable to first-time parents or parents of a baby with health concerns.
Pros
Easy setup
No contracts
Excellent instructions and online support
Live health data
Peace of mind
Cons
Costs a lot
Requires some assembly
Uses two apps
More Ways to Stay Safe (and Sane) With a New Baby
Smart Baby Gadgets for New Parents
Baby Proof It: A Room-by-Room Guide to Securing Your Home
Best Baby Monitors
Baby Proof Your Home With Help From These 6 Gadgets
Best Nanny Cams
Jump To
Pricing and Specifications
How Owlet Stacks Up
Price and Contract
Tech and Equipment
Features and Usability
Bottom Line
The post Owlet Smart Sock Review appeared first on SafeWise.
0 notes
Text
Grandfather Says: My Life as a Soldier

Original oil painting by: Grandfather's wife
Grandfather says he was a soldier once, in the Army during Korean War times.
Grandfather had developed a lot of stamina on his high school track team and, independent cuss that he was (and is), he stood during basic training forced march rest periods. Eventually cadre got annoyed and ordered him to sit down.
Grandfather remembers thinking: I won, you (expletive deleted). But, he was ordered to the front of the column to carry the guide-on, when the graduating class marched before the Commanding Officer's reviewing stand.
After secondary training as a topographic surveyor, he served on the island of Mindanao in the Philippine Islands.

Grandfather with a civet that had been eating the survey party's chickens.
The instrument tower is in the background. Grandfather was detailed on this mountain, waiting for semi-permanent fog to clear from a line of sight to a target on another mountain twenty miles away. He was there for five months, before the magic moment arrived.
The civet was taken at midnight with the sidearm on his belt, a .22 rimfire Colt match target pistol, sent to him from the states by Grandmother-to-be.
But, when Grandfather was on survey party traverses through overgrown terrain, the monkey rode on Grandfather's shoulder. He sensed anything that needed attention - for example, snakes. Mindanao enjoys the residency of all three species of Cobra.

It wasnt all duty, duty, duty …
***
About the Author: RD Blakeslee is an octogenarian from West Virginia who built his net worth by only investing in that which can be enjoyed during acquisition and throughout life, as opposed to papers in a drawer, like stocks and bonds. You can read more about him here.
Photos: Courtesy of the Blakeslee Family

0 notes
Text
Don't Let Your Goals Fizzle Out! – 5 Reasons Goals Fail, and What You Can Do To Make Yours Succeed
It's become a yearly ritual for many: Set ambitious goals for the New Year, tackle them enthusiastically for a few weeks, and then give up on them completely by March.
This is a vicious cycle that encourages you to feel bad about yourself, and feel as though you'll never get out of your rut.
Whether you are setting goals for your finances, or whether you are attempting to substantially improve your life, the yearly attempt (and subsequent failure) associated with resolutions can be frustrating.
If you're ready to break the cycle, it helps to understand why you fail, and what you can do to create success in your life.
Here are 5 Reasons Goals Fail - and What You Can Do to Overcome the Pitfalls of Resolution-Setting and Succeed This Year:
1. Your Goal Ignores Reality
Too often, we have high-flown ideas of what we can become with just the right goal.
Unfortunately, this often leads to setting unrealistic goals.
While it would be great to pay off $35,000 in debt this year, the reality is that you aren't likely to accomplish that goal if you make $40,000 a year. You're going to need to make major sacrifices in terms of what you spend on, and you're going to have to come up with ways to make more money.
The same is true of losing weight, going back to school, or any number of goals that you might set.
Your goals need to be grounded in the reality of where you are right now and what you can reasonably hope to accomplish by the end of the year. Honestly evaluate the situation, and figure out what you can actually do. You can still set stretch goals that require you to push yourself a little bit, but you still need to be realistic.
Your resolutions need to be achievable.
Without achievable goals, you eventually give up when you realize the futility of your efforts. You don't want that to happen, so create realistic goals, and set realistic benchmarks that you can use to measure progress throughout the year. You'll be more likely to stay motivated to reach your goal.
2. Your Goal Focuses on a Process, Rather than a Result
In the past, my fitness goals have included things like, “swim for 30 minutes three times a week” or “kickbox for 20 minutes a day.” While those are specific goals that are, in fact, achievable, they focus on a process instead of a result.
What if I don't feel like kickboxing today? What if my son is sick and I have to stay home instead of driving to the pool?
It's easy to be defeated by the process, whether I stop swimming after 15 minutes, I only go twice a week, or I don't go at all. The same is true of money goals or any other goals.
If you focus too much on some sort of process that you have to complete to be successful, you are less likely to follow through with your resolution for a sustained period of time.
Instead of focusing on the process, focus on the end result.
What result are you trying to achieve? Maybe I want to reduce my waist size by three inches or lose 10 pounds. That result doesn't rely on a specific process. Maybe I change my eating habits so that I have less junk food in my diet. Or, instead of getting hung up on whether or not I made it to the pool, I ride the stationary bike if I can't get out of the house.
When you focus on a result, and what it takes to achieved that desired objective, you are more likely to stick with your resolutions. You can substitute different actions and behaviors that can offer the same result over time.
This works with money, as well.
Instead of saying that you want to put $458.33 each month into your retirement account, you can say that you want to be in a position to max out your IRA by the end of the year. This doesn't require that you put $458.33 each month without fail from the beginning; it means that you build up to that over the course of the year. At the end of the year, you'll have a result: You'll be set up to max out your IRA. However, you do this by making gradual changes, either spending less or earning more (or doing both) and gradually increasing what you set aside.
Focus on the end result, and break it down so that you are looking at the big picture, rather fretting about the process.

3. Your Goals are Too Vague
One of the main pieces of advice that goal-setting gurus offer is that you should be specific.
If your goal is to “get healthy” or “save money,” chances are that you are going to fail at some point.
What, specifically, would make you healthier? Do you want to bring your cholesterol down to a certain (realistic) level? Would you like to increase your lean muscle mass by a specific amount? What are you saving money for? Do you want to save up $5,000 for a family vacation? Are you planning to save up $15,000 for a down payment on a house?
Really think about what you want to accomplish with your goals. Be specific.
Without some sort of specific goal, you have no way of knowing how much progress you have made, or how to tell when you've accomplished your objective. Don't forget, though, that you do want to keep the overall result in mind. If you haven't quite reached the exact and specific goal you have set, but you are still in line with the general result you want by the end of the year, that's still a win. You can keep working on it moving forward.
Set realistically specific goals, and make sure to break your goals down into smaller, bite-sized chunks that can be digested by you as you move forward. That way, you can measure your progress along the way and stay excited about what you've achieved. Being able to see your progress can create good feelings that encourage you to do even more to reach your goals in the future.
4. You Get Hung Up on Time Limits for Your Goals
One of the big reasons that your New Year's resolutions are likely to fail is that you get too hung up on time limits.
While a brand new year is a great time for reflection, and a good time to set goals, the reality is that you don't have to limit yourself to a year to reach your goals. The idea behind setting goals is to make a true improvement in your life, not create some mad dash to a finish line.
If you get hung up on time limits for the accomplishment of your goals, you are more likely to make sweeping changes that last for only a short time before you revert.
In order for goals to truly improve your life, you have to be able to assimilate them into your lifestyle. Even if your goal is to run a half-marathon in a certain period of time, the reality is that, as you work toward achieving that goal, you make changes in your life that are likely to “stick,” as long as you approach it as a long-term journey, rather than something you have to accomplish by a certain date.
Once you achieve a goal like that, you can tweak it for the next goal.
Your goal-setting should be more about improving your life so that you create long-term habits, rather than encouraging you to do something and then stop once the goal is reached. Don't get hung up on having something done by the end of the year. Instead, focus on the result, and work toward it consistently. It might take you two years to save up your desired down payment for a home, but that's ok.
And, once you do reach your specific goal, make sure you have another goal to replace it with and take advantage of the good habits you have been building up.
Once you have enough for a down payment, you can set a new goal to build up your emergency fund, contribute to a retirement account, or set up a college fund for your children.
The idea is to keep improving, so you want to build on your successes for the next big goal.
5. You Set Too Many Goals
One of the biggest reasons that you fail at your goals is that you set too many.
Just as you aren't likely to see solid results from multi-tasking, you are unlikely to see the results you want if you set too many goals at once.
This ties into number four. Instead of setting a whole bunch of goals, pick one or two major goals to be working toward at a time. Once you have achieved one of your goals, have something else to be working toward. You should be focusing on bigger goals that can be broken down into manageable and measurable steps. That way, you are actually improving your life and creating habits that result in long-term life success and satisfaction.
Don't overwhelm yourself with all of the things you should be doing.
Instead, think of the most important one or two things you want to accomplish first, and then create plans to tackle those items. Then, move on to a new goal. Don't limit yourself by time, either. If you finish a goal in August, start working on a new goal - even though it isn't a new year. View it as a journey, and you'll be more likely to make steady progress.
Here's what Leo Babauta, author of the popular blog zenhabits.net says about forming one habit at a time:
Habit change is difficult, even with just one habit. If you do more than one habit at a time, you're setting yourself up for failure. Keep it simple, allow yourself to focus, and give yourself the best chance for success. Btw, this is why New Year's resolutions often fail - people try to tackle more than one change at a time.
Other Tips for Succeeding with Your Goals
As you work on overcoming the stumbling blocks often associated with goal setting, there are a few other tips to keep in mind. Staying motivated can be difficult, even if you can see the positive changes and progress that you are making in your life.
Here are some other strategies you can employ to help you succeed at your goals:
Make it public: Sharing your goal with others can create an incentive to succeed. It adds a layer of accountability to your efforts. Even if you just share it with two or three people who can be your “accountability buddies” and check up on you from time to time, the fact that you know that others are watching to see your progress can keep you motivated.
Join a group: It can help to join a community with similar goals. You can receive support and encouragement from those who are taking the journey with you. It can also be a good way to get insight into tricks and tips that can help you with your specific goal. Having that support system can keep you motivated, even during the toughest of times.
Put your money where your mouth is: Make a bet. Studies conducted by the founders of the goal-setting web site Stickk.com found that when money is on the line, people were more likely to stick with their goals. If you have a financial consequence associated with your failure, you are more likely to succeed, if just to avoid the financial hit you'll take. Of course, this is counterproductive if you can't afford the consequence. It should be something that's painful, but not devastating to you.
Work with someone: This is similar to making it public and joining a group. Find a buddy who has the same goal as you. This works especially well if you have a significant other or a family. You can all work together, encouraging each other. And when you reach your joint goal, you can all celebrate together. Any journey is more fun and fulfilling when you have others to come with you, and celebrate with you.
Glen's note on Goals: One thing I find critical in setting successful goals is to make doing the goal as easy as possible. Back in 2007 I set a goal to run the NYC Marathon. As part of my training I had to do one long run every week. This meant waking up early on the weekends to get my run in. There was no way I was going to wake up early and start bumbling around getting ready to run. I had to have a plan before-hand or I'd be lazy and not go. So by Friday afternoon every week I made sure to map out my miles for my long run. I'd chart a course to make sure I'd get the required distance in. This gave me a specific direction for my runs and it eliminated the decision of where to run when I woke up. To further help me in my groggy morning state I also made sure to have my running clothes set aside as well as my water bottle(s) for the run. This way I could wake up, get ready, and get out of the house. If I left myself with too much thinking and preparation in the morning I KNOW I would have gotten too lazy to head out.
We can make financial goals easier too.
Tools like Quicken can help you plan out goals and track them. Setting up automatic savings and investing takes the thought out of putting money away for your goals.
Know your tendencies and build plans into your goals to make sure you stay on top of your intentions.
Final Word On Making Your Goals Succeed
There's no reason to let goal-setting get you down. Change the way you approach your resolutions, and there is a good chance that you will see more success this year - and in the years to come.
Where have you failed at goals? Where have you succeeded? Share your stories in the comments!
Bonus to help you with your goals and habits: Here's Google's Matt Cutts talking about trying new things for 30 days.
youtube
And here's Jerry Seinfeld's “Don't break the chain” motivation and productivity technique (via Lifehacker): Jerry Seinfeld's Productivity Secret
Copyright © Free From Broke - A Personal Finance Blog Please visit for more great content!
Don't Let Your Goals Fizzle Out! – 5 Reasons Goals Fail, and What You Can Do To Make Yours Succeed

0 notes