
Don't wanna be here? Send us removal request.
Statistics
We looked inside some of the posts by samgibbsnarrative and here's what we found interesting.
Average Info
Notes Per Post
1
Likes Per Post
1
Reblog Per Post
0
Reply Per Post
0
Time Between Posts
23 hours
Number of Posts By Type
Text
17
Last Seen Tumblr Blogs


Fun Fact
BuzzFeed published a report claiming that Tumblr was utilized as a distribution channel for Russian agents to influence American voting habits during the 2016 presidential election in Feb 2018.
Text
Critical evaluation on my project
Now we have come to the end of the project it is time to evaluate our project. This will be split up into different sections. This includes what new things I have learned, What I hoped to have achieved by the end of the project, What I managed to achieve during the project, What caused me not to be able to achieve my goals and How I would change it next time, What when wrong during the project and why, What I would do differently next time, What went well about my project and finally what I would take from this project and carry through to the next project.
What new things have I learned:
In this project I have managed to learn loads more new things inside of widgets which is good. This project has expanded my knowledge of using widgets inside of unreal. Up until this project I have been scared to create a game which was made just with widgets due to me not having much knowledge. However Widgets are a lot easier than I though and I hardly needed any help with my game. Another thing I have learnt and explored in this project is character design and pose’s. At the beginning of this project I had only a little experience in drawing people digitally. However this was only face portraits and not full body drawings. Through practice and exploration I managed to make some character designs which I am very happy with.
What I hoped to have achieved by the end of the project:
By the end of the project I had hoped to achieve the end of the first day of my game. With the full game expanding over a week in the characters life I felt like that reaching the end of the first day was going to be achievable. I also hoped to of had all of my characters drawn up and the characters for the first day placed into the game. I also hoped to of added in some background music into my game.
What I managed to achieve during my project:
In my game although I didn't manage to create the whole of the first day as well as drawn up all my character. I feel like that I did good for the time frame I had. The stuff I managed to achieve was getting half of the first day completed, 3 of the characters drawn up, I also managed to start progress on the side scroller aspect of the game. However I managed to made some character design sheets for my game which I didn't plan to make. I also managed to start making pose’s for my character such as the hall monitor when he catches you.
What caused me to not be able to achieve my goals and how I would change it next time:
I would say many things have caused my to not be able to achieve my goal. Firstly I set a goal that was too big. I set a goal too big for my project which meant that achieving the goal of course was a lot harder. Also due to me being ill, Busy with work as well as semi stressed I haven't been doing a lot of work at work at home. I feel like that I need to not rely me working loads on the project at home to achieve my goals. I also need to focus more at college as I easily get distracted. Towards the end of the project I have started to bring in some big earphones to wear as I work in order to block out and distractions from my friends.
What went wrong during the project and why:
Not a lot of things went wrong during this project. One of course begin again that I have overloaded my work load. I aimed to big for this project and need to aim for a smaller goal next time. I also think that the widget stuff was most likely more complicated than it needed to be however I made it in a way which I understood so I knew that I could work on it by myself without needing help from Sam.
What I would do differently next time:
Next time I would make my goal smaller as well as make my own backgrounds for my game. If I had made my own backgrounds for the game then I would of been able to publish it to itch.io in order to get feedback as well as being able to have people play test it. I would also plan my time better as well as trying to do some more work at home on the project.
What went well about my project:
A lot went well about my project and I am quite happy with the outcome I have come oo. I have managed to get halfway through the first stage and have managed to make the user interface really nice. With the ability to have the buttons fade in and out during the text change means that it gives the player a chance to read the text before faced with a choice. I also really like how it fades between images when the setting changes instead of it just quickly changing. I also think that the character design went well aswell
What I will take from this project and apply to the next project:
There are quite a few things I will take from this project and use on other projects. Firstly I am going to do a lot more research than I used to do. In this project I did a lot more research before deciding what I was going to create. This made sure that I chose the right thing to create instead of just rushing ahead. I will also take forward all my new widget knowledge and try to add more widget stuff into my future games. I will also take my new skills in character design and creation forward into new projects. This can include maybe making some promotional art for my games.
0 notes
Text
Critical evaluation on my choice of audience

Now I am going to be doing a critical look into my audience research and decide whether I would make a game for this sort of audience again. My game does have an audience however I feel like anyone could play the game whether they are young or old. With the game being a basic branching narrative game I would also have to add that my audience are probably going to be people who enjoy games such as telltale games,Until Dawn, Life is strange. However for the text based style of the game people who play games such as Headliner, Dream Daddy Simulator, Doki Doki literature club and Danganronpa.
Would I make something for this sort of audience again:
I feel like that I would make a game for this sort of audience again. This is however mainly due to the audience being quite broad and including lots of different groups of people. However I feel like that I could expand my audience more for different projects. I haven't taken into consideration people who have limited mobility who may not be able to use a mouse to play the game. How could I edit my game in order to make it playable to this sort of audience.
What I could have done better:
Now we need to think about what could of gone better when making the game for our audience. Firstly I feel like I should of done a tad bit more research into the audience however gaining the information for the audience such as surveys are quite hard to create and distribute out on the internet. Another thing that I could of done better is researching my audience sooner. In all honesty I didnt think about researching my audience until it was mentioned to me. I feel like my audience is made based around my game instead of my game being made based around my audience.
How was it working with this audience:
Although we had some downs when it came to our audience wwe also had some ups. For example I would class myself as an audience member.Whether this means playing the game myself or even watching a youtube video of someone else playing the game. This means that it made the game easier to make and design.However this cam mean that I am biased, In order to fix this I would need people to play the game and give me feedback, However due to the whole COVID situation I haven't been able to have people play test my game and not being able to upload the game to itch.io hasn't helped.
What went well :
Quite a few things went well. I can happily say that I managed to make a game which caters to my audience. I really think that the game has the right style and story for my sort of audience to enjoy. With more work on the game I feel like that the side scroller part will also be really good for the audience, especially if I manage to incorporate some environmental storytelling into the game.
1 note
·
View note
Text
Publishing my game to itch.io and making a one sheet.
Now we are coming to the end of the project I need to think about how we could possibly progress forwards with the game. I don’t means this in a way such as how we could develop the game more but more as how we would advertise the game and get it out to our target audience. This includes things such as publishing the game to something such as itch.io as well as creating a one sheet for the game.
Creating a One sheet:
Now we are going to be going forward and developing a one sheet for our game.We need the one sheet to advertise to our audience. We also need the one sheet to represent the sort of themes and vibes the game has. This is important as the player needs to know what sort of style and vibe the game has.
Example:
Here is an example of a one sheet that I will be using as a guide. This was created by my lecturer sam for one of his game which he gave as an example. I really like how it features the character art as well as the fact that the parts that go behind the text go pixel liike. This is to represent that the game is actually a pixel art game.
Development:
Here is a snapshot of me using the reference and making my one sheet. I have added in my character art into my one sheet. Although I only have one character in a pose I feel like the other art I did should be included.

The outcome:
Here is the outcome of the one sheet. I added in the rainbow as the game is based around the main Character Eron being gay. With the rainbow being a representation of the gay pride flag.
Publishing to itch.io:
Now we come to the situation of publishing the game to itch.io. As much as I would love to publish the game to get the feed back of players. I unfortunately can't due to the background art not being mine. However if I had created my own backgrounds for the game then I would be able to publish it. Maybe in the future I will be able to publish the games to itch.io if I make my own backgrounds.
0 notes
Text
Starting work on my free roam.
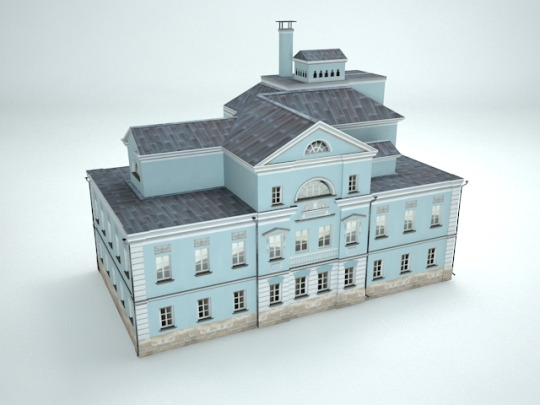
Now I am starting to work on my side scrolling aspect of my game. I will most likely only get a tad bit into this and not very far due to us coming towards the end of the project. I am going to be getting all my models for free from the internet as I don’t really have time to be creating 3d models of a town. I managed to find this little pack of houses online which I thought looked really good which are free to use. Here are some nice images of the buildings showing them off. I thought that they are really nicely textured and just as a background for my side scroller aspect I feel like that they would do fine for what I need them for.
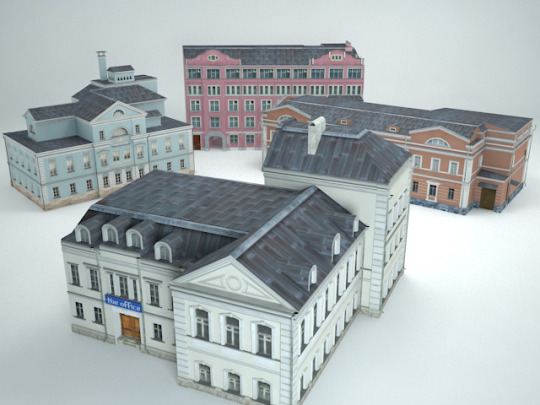


Now I have these downloaded as FBX files I can now impirt them into my game and add them to my sidescroller aspect. I can use the same buildings in different rotations in order to give the illusion that there are multiple different models.
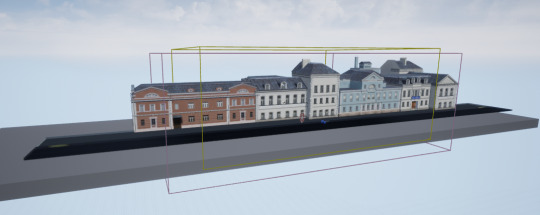
View inside unreal:
Here is the view of the side scroller being put together. In this image you can see 2 white building which although they look different are actually just the same building but at a different orientation. I also edited the material of the brown building a bit and got rid of the really bad looking blue brick. Instead I just replaced it with a nice white/cream colour which looks pretty good.
View inside game:
This is the view inside the game and I think that it is good. It may look like the scale of the building is too small compared to the person but that is because the window he is stood in front off is further back than the other windows. I hope to add in the players house as well as the school into the side scroller as this part currently is mainly to simulate the walk to school.

0 notes
Text
What software am I using and why?
When creating a project we need to think about what software is best to suit out project as well as why we are using them. This could include what unique features the software can provide to aid our project or simply down to the fact about whether it is free and if I know how to use it or not. Here I will be stating what software I used as well as why I used it and how it benefited my project.
Twine:
Firstly we have Twine. This is a new piece of software that I used in this project. Basically twine is a piece of software which is really good for visually laying out as well as developing branching narrative. In this software you can also play through the narrative you have created. This was really good to use for my narrative project as it helped me lay out my narrative design clearly and easily. This piece of software made planning out my story easier as I struggle to create a branching narrative in something such as work or straight into unreal.
Would I use this again?
When creating a game which uses branching narrative again I would definitely use this piece of software. However if I was doing a linear story I probably wouldn't use this and would most likely use something such as google documents to plan out the story.
Unreal:

Next we are using Unreal. I am using unreal as It is a software which I can really understand and code in. Unreal had a pre made 3D side scroller blueprint which made starting the base of my game a lot easier. If I hade used Unity however I would have had to start it from scratch in a coding language I am not familiar with. This would of made the project a lot harder for me which is why I am happy I decided to work with Unreal. Another good reason why I used unreal is due to my game being mainly done in widgets I have previous experience with using the widgets in unreal. This is another reason why using unreal is a better option for the project. Finally due to Sam teaching in unreal as well as the Unreal community being big it means getting help from Sam as well as looking up tutorials is a lot easier.
Would I use this again?:
I would absolutely use this again and plan to use this for all of my projects. This is the software I plan to specialize in as I really get along with it well as well as understand how the coding works. I can also access this at home as well as college easily meaning it is really convenient and easy for my to use.
Photoshop:

Another piece of software I have used in the project of course is photoshop. I used this to make multiple things in my project such as my text box and my character designs. I find photoshop really good to use and although it isn't a free piece of software I think that it is worth paying for as it is really good to use. It is easy to use as well has a lot of setting and tools which are very helpful for projects.
Would I use it again?:
I would absolutely use it again as I am so used to all of the tools and feel like I have a good understanding of how to use it. I also think that it is a good software which can be used to produce very good quality as well as professional levels of work.
0 notes
Text
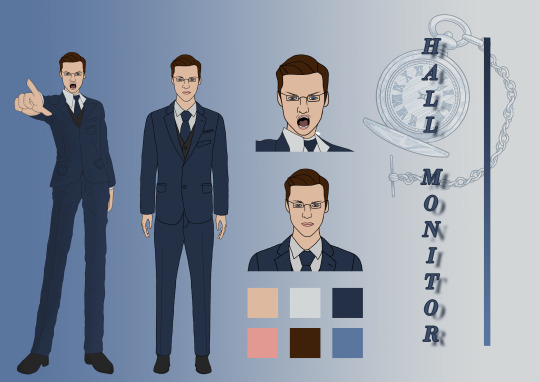
Character sheets
I have decided to create some character sheets for the characters I designed. This is so I could display them well which means that I can if wanted put them on a nice portfolio. I only managed to get 3 characters drawn up and coloured in. I am really pleased with how the characters ended up as this was my first proper time doing character design. On the character sheet I have the drawing of the character and in the hall monitors case a pose he has done. I also added in a color pallet for the character.
Hall monitor:
This is the hall monitor and while creating the character sheet I have stuck to using the same colours from his colour pallet. I have in the background a pocket watch as I feel like he is the kind of person who would constantly be checking the time like the the rabbit from alice in wonderland. This is a really nice character sheet for my hall monitor as I got to also add in a nice pose for him.
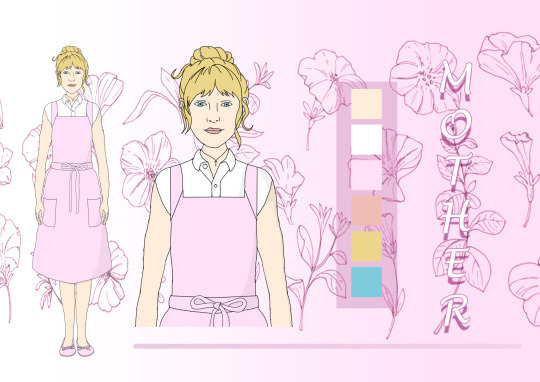
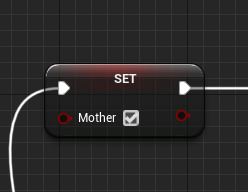
Mother:
The second character sheet I got to do was the mother character sheet. This is the first character you would see in the game. I am quite happy with the way she turned out but wish that I was able to draw her in a few different pose’s . I quite like the colour pallet she ended up with and think they fit the pure and innocent feeling of her personality. I added the flowers in the background just as an added bit of decoration.
Main character:
This is the sheet for the main character. Although that in the game you don't see the main character I still decided to draw him and do him a character sheet as I feel like it would just be a nice feature to have. Some players like to be able to see what the main character they play as look like and other don't like to know what the character looks like and would rather see themselves as the character.

0 notes
Text
Quick Time Events in Unreal.
Why have quick Time events in games:
Many games are starting to use quick time events in their game play but a really good question to ask is why. Well some of the reasons for using quick time events in your game is so that the player is able to do cooler things within a cutscene as well as make them feel like they are contributing to the cutscene instead of just watching.
Games that use quick time events:
Heavy rain:

Heavy rain is a game which is well know for its quick time events. Whether used during a fight scene or a scene where the player is driving. These events make sure to keep the player on edge and alert at all times. Not only does heavy rain use buttons for their quick time events but they also use the analogue sticks aswell. When the quick time event starts it shows up as a button on the screen as seen in the image. Then inside the circle it does a little time which indicates how long you have left to complete the quick time event. I think the way this is displayed is really well done. Although the button design is very simple I think that it fits the game. I also like the fact that it gives the player a little count down.
Guitar hero:

Now we move onto guitar hero which is a game mainly of quick time events. When talking about quick time events Guitar hero really didn't come to mind initially until I did some research into it games which contain quick time events. I think that Guitar hero is an amazing game and does quick time events really well. Not only do you have to press the button on the screen but the player also has to press the strum button. I feel like guitar hero is where quick time events get to the extreme and most difficult.
Sonic unleashed:
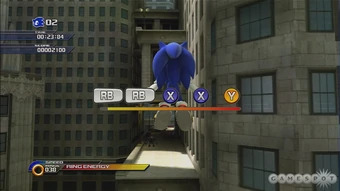
Sonic unleashed is a game which uses quick time events. With the game already being very fast passed I think that this is a really good feature as it could throw the player off if they aren't expecting it. In this game if you pass the quick time event it can either save your life or can lead the player to take a short cut. The use of quick time events is used really well in this and may be liked by most players. However some players might not like the use of quick time events as it kind of breaks the fluidity of the game play.
God of war - ascension:

God of war Ascension is one of the first games to really incorporate quick time events properly. The reason why they use the quick time events is because realistically the player wouldn't be able to defeat the hydra without them. When the player hits the quick time event it put them in a cutscene where the main character does things which the player wouldn't be able to achieve. Adding in the quick time events during the cutscene makes the player feel like they are contributing to the scene when they aren't actually contributing much.
How to set up quick time events in Unreal:
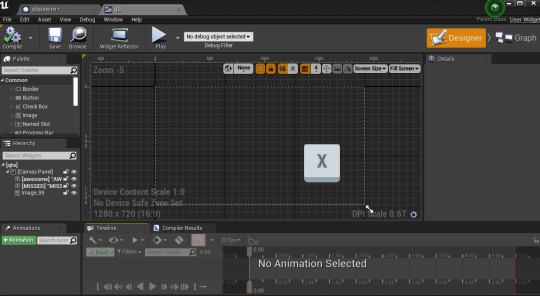
Now we get to the fun part of trying to set this system up in unreal. Firstly we need something which is going to trigger the quick time event. For this I am going to set it up so once you walk over a button/ platform it will set off the quick time event. To set this up I just used a basic actor blueprint. Popped a cube in their which I made into a platform and added a box collider to it.
Then we need to go ahead and make the widget that is going to contain what is displayed on screen when the quick time event is triggered. To do this we need to make a widget which has an image of the button the player needs to press. In this case I am using the X button. In here I also have 2 text box’s set up which say either AWESOME! or MISSED!. These are underneath the button and have a render opacity of 0 currently so aren't visible.
Now that we actually have a widget set up we can go back into the quick time event trigger and add in a piece of code which basically has it set up so that when the player walks over the trigger it will create the widget and add it to the viewport.

Now we have that set up we can go into the player character and set it up so when the player presses the X key it will then set a variable named “pressed” to true. This variable will be used in our widget code.

This is the most complicated bit of code out of it all. Basically what this code does is when the event construct is fired off (aka the widget is made) it will then cast to the first person character. Then it has a delay of 5 seconds which givers the character 5 seconds to press the X key. Once the 5 seconds is up it will then check whether the variable of “pressed” is true or false. If the pressed variable is true then it will get rid of the x button image and show the text which says AWESOME!. However if the pressed variable is false then it will get rid of the x button image and display the MISSED! text.

Here is a video of the quick time event working. In the first run through I pressed the X button and in the second run through I don't press the X button:
youtube
0 notes
Text
Where is my game up to?
With the project slowly coming to an end I have come to realize that I have put a bit too much on my plate and trying to get the first day of my project complete was going to be quite a big ask. I feel like I would of been closer to my goal if unexpected things didn't happen such as me being off sick as well as being too busy to get as much done at home than I thought I would. However the stage that my game/ project is up too I am quite happy with. It has the base foundation for my game and creating the rest of the game would just be me carrying on with what I am doing and not really learning anything new.
So the real question is where is my game up to right now?
Currently I have the script written up to when our character heads into class. However due to it taking me longer than expected to get the coding as well as the art work done for the game I only have it programmed up to when the player leaves the house and is about to go into the side scrolling perspective of the game.Here is a video of some of my game.
youtube
In the video I try to show off how my game contains different transitions between scenes. I decided to have it so that the scene fades instead of quickly switches so that it looks a bit nicer. I also have the buttons fade in and out between choices/scene changes in order to make the game feel more fluent than jumpy.I want the game to feel smooth.
0 notes
Text
Designing and creating a mother character.
Now as I have gotten some of my story done I also know that another character which appears in the game so far is the Mother of the main character. The main characters are both very christian and try to be perfect citizens. In order to accommodate this I think that the mother character would try and dress nicely aswell and try to take on a stay at home mother kind of style. For this first I decided to go and do some research into what kind of clothes,Hair and accessories the mother would have. I tried to go for nice simple outfits and hairstyles to accommodate the sort of style the mother character would have. I put all the reference images I found and popped them into a mood board.
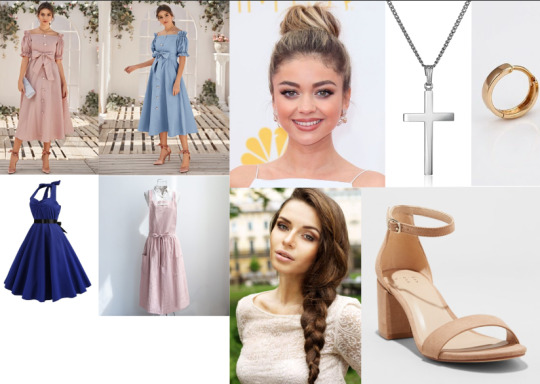
Once I had my mood board done I then worked on some concept sketches for the mother which had her in different clothing as well as different Hair styles. Having multiple choices makes it better for deciding what the character should be like. Its always good to explore different possibilities for the character. Once we had the sketches done both me and my friends decided that the 3rd sketch was the most fitting for the type of personality the mother character has.
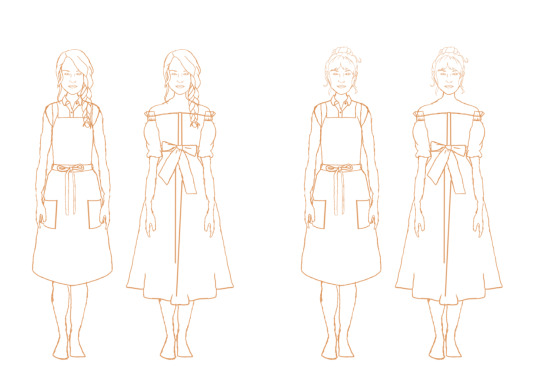
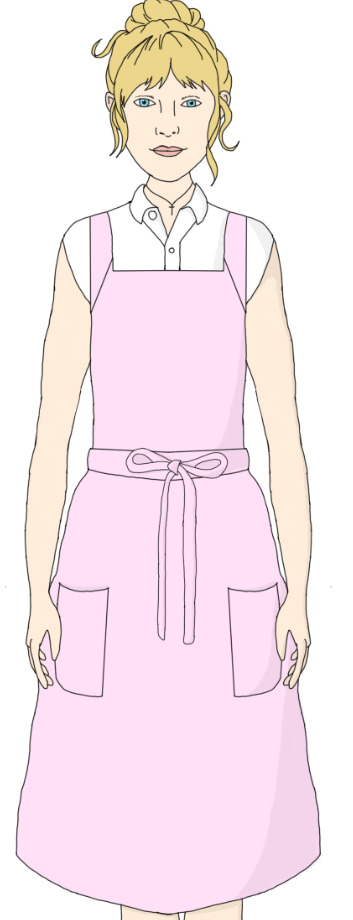
With that chosen I can then go ahead and work on finishing up the character. This means adding in the line work as well as the color. For this I have her to be the kind of woman who has a liking to white and pastel pink clothing. I also feel like that she would keep her naturally blonde hair un dyed as she isn't going to be a fan of hair dye.
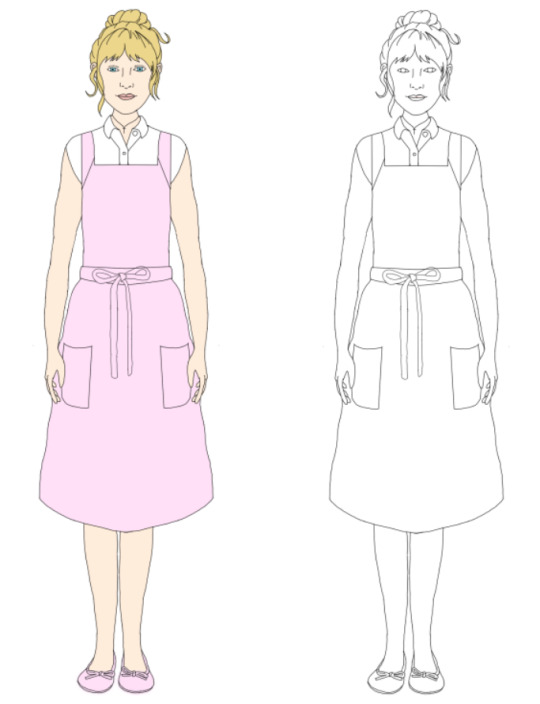
I then went in and added in some basic shading just to give it a little bit of depth and dimension. The shadows are on the right because when shes in her first scene the lighting will be coming from the left.
0 notes
Text
Update on the project 01/12/20

Today I have decided to take a quick 10 minutes to refer back to my plan of the next couple of weeks. This is because I feel like although all parts of my plan are hopefully going to be done by the end of the project I dont think I have really delegated enough time to each part of the plan. For example I planned yesterday “To do more work on my unreal elements aswell as getting more of the dialogue system in place. I also wanted to work on getting characters added to my widgets”. However unfortunately the hall monitor pose took longer than I expected meaning that I didn't get to work more on my dialogue let alone adding the character into the widgets. This is mainly my fault as I had hopes to of gotten the characters draw up during the week so I had them all prepped and ready for when I came into college. However I want able to get the poses done at home during last week.
Here is the original plan I had set out:
Week 1 (This week):
Monday: On the Monday I plan to do more work on my Unreal elements. Starting to get more of a dialogue system in place as well as adding in my characters into the widgets.
Tuesday: I plan to start work on adding in a town into my side scroller aspect of my game as well as having an animated character for the player to use.
Wednesday: Add in characters walking around in the background of the side scroller part. I can also work on adding in background music and sound effects into my game.
Week 2:
Monday: Here I want to start drawing up the mother and father characters into the game as well as starting to do different facial expressions for characters.
Tuesday: Here I want to start working on doing different poses for my characters in order to make them fit into the scene better
Wednesday: I will be at college so would like to continue working on the Unreal narrative part of my game.
Week 3:
Monday: Here I want to start looking at the finishing details of the game such as a main menu as well as putting together some character design sheets to go in my portfolio.
Tuesday: Here I want to just polish up my game and give it a few test runs. Here I will be making any final changes to my game.
I feel like that this plan needs changing up and instead of splitting it into days I think I need to make it more simpler and outline what I wish to have done by the end of the week
Plan redo:
Week 1 (This Week):
This week I hope to get to the stage where both poses of the mother and hall monitor ( The only characters who show up currently in my story). I also wish to get all dialogue done to the point where the character is then able to go into the side scrolling aspect of the game.
Week 2:
This week I hope to get is so that the side scroller has more detail to it such as buildings and a new look for the character you will be walking around as. If possible I would like to add in some random characters just strolling up and down the street just to make it seem more realistic.
Week 3:
This final week I want to be looking into adding in the little details as well as finishing up the scenes that my story has progressed up to. The little things I wish to add are things such as background music and sound effects.
0 notes
Text
Background blur when talking to characters?
While working on the development of the hall monitor pose and testing it out with he example scene I decided to Experiment with the scene. I thought that in order to pull focus towards the character who is speaking to you should the background be blurred in order to make the character really stand out in the foreground. Here is the scene normally.
Then inside of Photoshop using the Filters tab I then was able to go and blur the background. I feel like this really made the character stand out more and made it somewhat look more 3d as in the whole scene as a bit more depth to it. When talking to people they said they preferred it blurred and that it was better than how it looked originally.

One thing I then decided to go and do is that the part where the text box goes over the characters pose I decided to go and blue that piece of the character. This means that if text goes over it then it will be easier for the player to read.

0 notes
Text
hall monitor posses
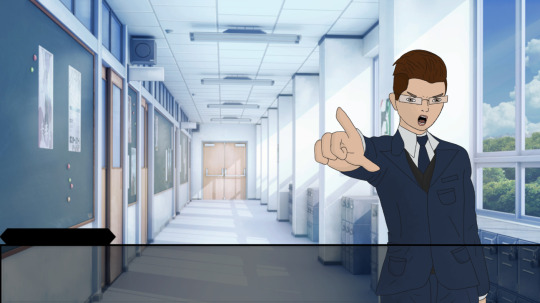
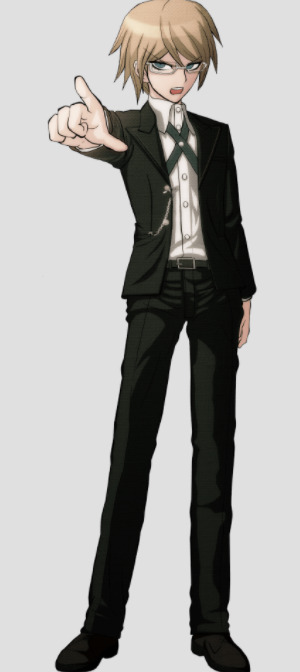
Now we have come to the stage where their is enough work done to my game to ab able to go and add in some of the other characters. Firstly I decided to start off with the Hall monitors poses as I knew that he was going to be quite a difficult one to do and I was right. It took me all day to eventually produce a pose which not only I was happy with but also looked well and fit in with my games style. For this pose I wanted a pose where the hall monitor catches you for being late. For this I wanted one to have him shouting and pointing at the player. For this I uses Byakuya Togami from Dangonrompa as reference. This is because his poses I feel would fit well with the character. This is the pose which I used as reference for my hall monitors pose.
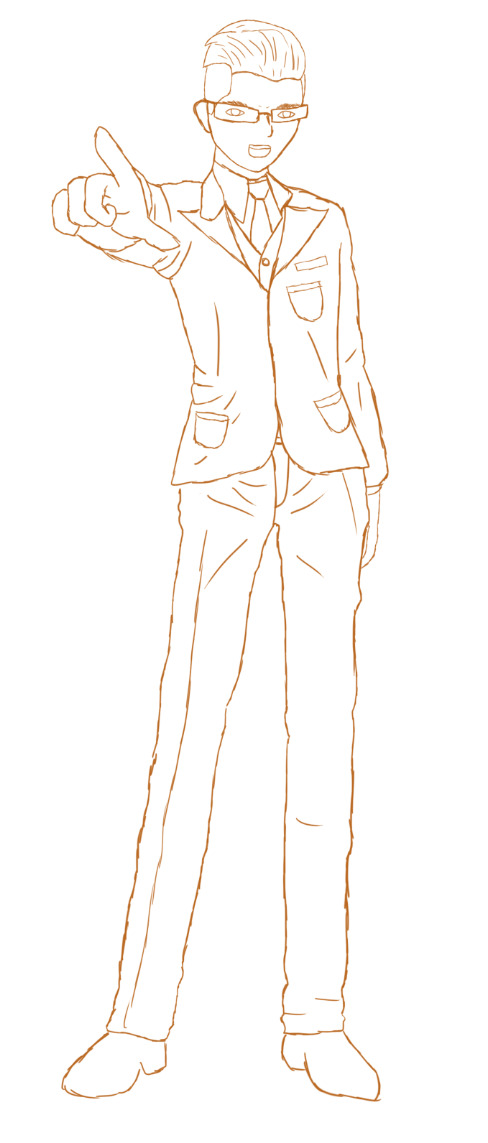
Now I had my reference picture I could then go ahead and start working on my basic sketch. All basic sketches I do in either blue of orange in order to make it easier to tell the difference between the line work and the sketch work.I did the line work and in all honesty I thought that it looked okay and even though it didn't look like an exact copy of the hall monitor I designed I thought that it was fine.
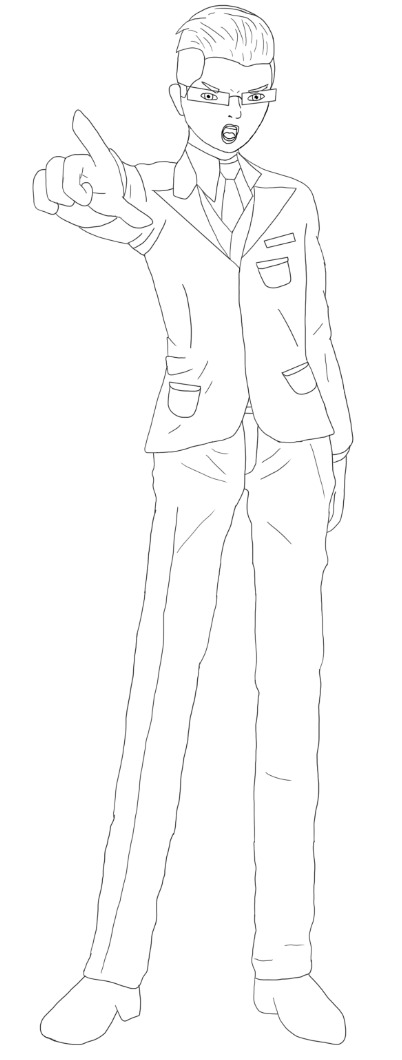
Once the sketch was done it was time to do the line work. I did the line work and decided to change the mouth and eyebrows to really get across the expression he is anger and is shouting at the main character.
Finally was the stage of going and adding in the color as well as the shading. When coloring the hall monitor in I wanted to use the same sort of blue as the Prefects in Bully scholarship edition do. This makes him look more formal as well as stand out from all the other students.

Here is the finished products once I finished all the coloring and shading of the character. When on a blank photoshop document the art looks fine and would be perfect for other types of game styles.
However once he was put into the example game scene then it became more clear that he wasn't really going to fit into the style of the game. He was just too simple and cartoon like to really fit in with the style of the game as the scenes although not super realistic still have some realistic quality to them

With that in mind I decided to go back to my original design of the prefect and just try to alter the drawing a little in order to have the hall monitor point at you. This more realistic look is what I hoped would fix things and have them fit more into the game. However once I put him into the game although he fit better than the original design something was just a bit off. Then I had an idea.

My idea was that the face and facial expression of the second hall monitor design was perfect and really fit in with not only the game but the character. However the posing of the first deign was more dynamic and fitting to how I feel like he would stand. So with this in mind I took the face and head of the second design and put it onto the body of the first design.

I then went and put this into the scene and decided that it was perfect. It really fit in and gave the hall monitor some character. Im quite pleased and happy with this result and think that the pose fits in well.

0 notes
Text
Picking up objects in Unreal
Today in lesson we are going to be going though the process of coding in the ability to pick up objects as well as rotate them. This can be used in games such as Until dawn and Fallout where the player picks up and item and inspects it. There are 2 different ways we can do this.
Physics Constraint:
To start this off we are going to go into the first person character blueprint. In here we are going to delete the gun code which allows the player to shoot the gun. We are deleting this as we wont be needing it.Then we go into the view port of the First Person Character and set the gun and hands to being hidden in game. We are doing this in order to have more space on our screen.
Once this is done inside of the view port we now need to add 2 things. A static mesh which will act as our “hands” as well as a physics constraint. The reason we have the static mesh to act as our “hands” is because we need 2 objects ion order to use a physics constraint due to the way it works. The way it works is that it constrains 2 things together. We need to have the physics constraint be the child of the static mesh we are using.

In the details panel of the physics constraint we need to set the Angular and linear limits to free.We also need to tick the linear and angular motors. Once ticked we then need to change the values. The motors bring the object back to us when we move.

Now we have that done we now need to go into the static mesh and set it as hidden in game. This is so that the player doesn't see it when they start playing the game.

Now that is done we now need to set it so that the player doesn't collide with it. To do this we are going to go into the static mesh collision setting. Here we are going to set it to custom and tick all the options to be ignore.

Now we are going to make 3 functions. These are going to be called Drop item, Trace item and Grab item. The reason we are using functions is because they make our code a lot neater as well as they are reusable.
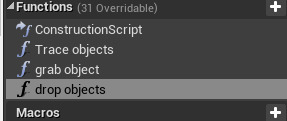
Once we have the functions made we are then going to make a new variable called held object. This variable is going to store the type of item which is being held. This means that the variable type needs to be a primitive component.

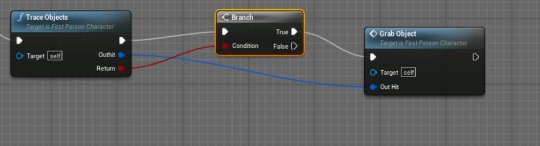
Now we have this all set up we can now start on all the code. We are going to use the input action fire node as it basically is already set up for us. Out of the node we are then going to be plugging it into an is valid with the input object being our object held variable. What this basically does is check if we have something in our held object variable or if it is empty. If it has something in the variable then it will go through the is Valid path. Then it will do into the drop object function we have. In short when we press left click and we are holding an item then it will drop it. If the held object variable is empty then it is not valid. What it will then do is go into the trace object function aka look for an object to pick up. Then it will go into the pick up object function to pick up the object.
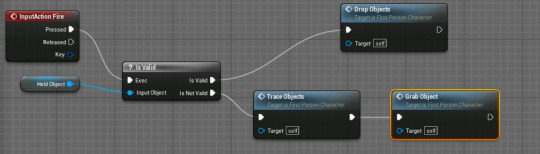
Now we have that set up we can go into the trace item function. Here we are going to set up the code which when activated will shoot a line trace in order to find an object for us to pick up. For this we come out of the function and get the Linetraceforobjects node. In here we need to set the start point to be from the first person camera’s location. To get this we get the first person camera and then do get relative location. Now we also need to set an end point for our line trace. To do this we need a new float variable. Here I have called it view distance and set the value to 1000. Then what we do is get the forward vector of our camera (as we only look forward) and times is by the value of our view distance float. this makes it so we have a limited range on what we can pick up as well meaning you have to get within a certain reach to pick it up. What we then do is also have to add it to the cameras location so that the line trace comes out of the players eyes. For the object type we then need to make an array with the option being set to physics body.
Once that is set up we then need to create a return node.These are used to be able to transfer information from one function to another. In this return node we want t add in 2 outputs which are Out hit (Hit result variable type) as well as Return (Boolean variable type). These should match up with the Linetraceforobjects.


Once that is done we need to go into the pick up object function and add in an input into it which is also going to be an out hit (hit result variable type). Once this is set up and you go into the event graph we can then take the out hit out of the trace object function and plug it into the grab object function.
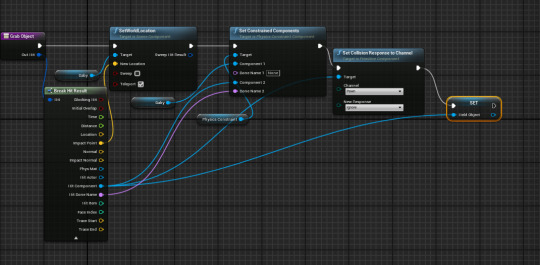
Inside the grab object we now need to set it up so that the person can pick up objects once the line trace has detected them. To do this we drag off of the out hit and click break. This breaks it down and will give us all the information we need. From here we then need a setworldlocation. What this will do is get the static mesh we have set as the “hands”. It will then set it to the location to the object we have detected in our line trace. What the next node does is that it takes the 2 things in which you wish to constrain together and constrains them together. Here we set the component 1 as our “hands” and then component 2 is the hit component from the break.Next we use a set collision response channel node. In here we have the target set as the hit component , channel is set as pawn and collision is set to ignore. This is so us the player cant collide with it. Then finally we set the held object to be the results of the hit component.
Now in order to drop the item is very simple. To do this we have it so that the collision of the object is set back to world static so we can collide with it once its dropped. Then we use the Break constraint node which breaks the constraint from the physics constraint. Then at the end it sets the held object to nothing as we are no longer holding anything.

Will I be using this in my project and why?:
For my narration project I will not be using this. This is due to my game not needing a mechanic like this as it is a side scrolling game. It is also mainly a text game where the players have little free down to walk around and wont be picking up items.
0 notes
Text
Starting to add in multi choice.
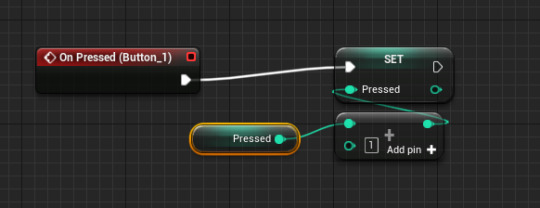
Now that I have the dialogue and some of the images done I can now start to experiment with making the start to my narrative. Here I have decided to try and program it myself.This way it means I can work on it at home without having to rely on Sam to help me code it. So firstly I had to think of a way to make this work. To do this I have it set up so that it knows what section you are on depending on certain variables such as button clicks as well as some variable such as if the mother has come into your room. Firstly we need to set it up so that when you click each button it adds 1 to each button press. To do this I have it so that when you click the button it will add one to the corresponding variable of either pressed1 for button 1 or pressed 2 for button 2.
From there we can now do our dialogue. This is a lot more manual that the way I feel sam hoped to show me but I don't mind manually doing it. This does however mean it will take a lot more time to do. The way this works is that the branch checks to see how many times each button has been clicked and it will do the corresponding section depending on what's been clicked.

In some situations we have it so the button presses are the same value. In order to differentiate them I am adding in variables which correspond with what happens in the scene. For example in one scene your mother comes in so i have a variable set up which gets ticked for that scene.
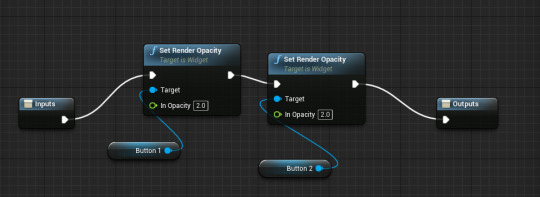
Now we have this set up we now have a basic dialogue system, However I have added in some more features to make the game look better as well ass run better.This includes different backgrounds as well as having the buttons disappear and reappear so the player has time to see the text before being faced with a decision. To code the buttons disappearing and reappearing was pretty east. I have it so that when the buttons disappear I just set there render opacity to 0 using the set render opacity nodes.Here is setting them to fade out where the opacity is set to 0.

Here is bringing the buttons back by setting their opacity back to 1.
Then we move on to the changing of backgrounds. To make it more fluent I wanted to have it so the changing between different backgrounds isa fade instead of it instantly just changing. To do this I have it set so that the render opacity from the starting image gradually gets reduced. To make sure that it needs to change backgrounds I have a variable which when the image needs to change gets set to true. Then in this piece of code we have a branch which will check whether the variable is true of false. This checks on an event tick.
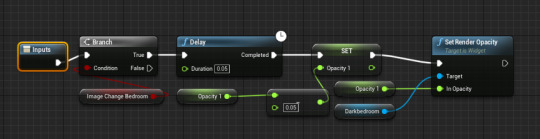
Then once that is done we then go into the code for making the second image light up. For this we have it so that it has a branch to check whether the opacity of the first image is 0 or less. This is so we know that it has finished fading out. Then we proceed to slowly increase the opacity of the second image.
To do the rest of my narration code has just been a lot of copy and pasting code and then making some changes to them. due to it being like this I am not going to be making tumblr posts about every bit of code as it basically is the same stuff over and over again.
0 notes
Text
Adding in the button designs
Now in our game we need to start working on our buttons for our game. I want these to fit in with the game so I have just altered the text box design and am using them. I have made 2 different buttons. A darker one for when the button is normal and then a lighter version so when the player hovers over the button it is highlighted to indicate which one they are hovered over.
When making these I first made my buttons in my widget in photoshop. Once made I then took the dimensions of the button in pixels and made a photoshop document to the same size. Then I made my buttons in this document so that they are to the correct size for the buttons in my widget.


0 notes
Text
Creating a scene for the beginning of the game
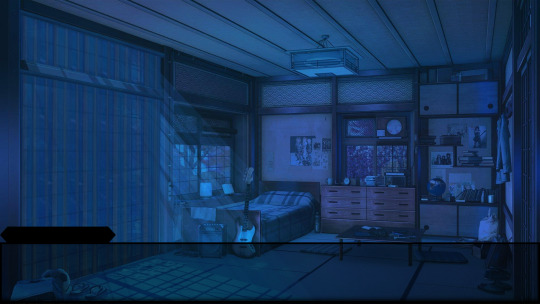
Now we have started working on our characters we now need to look into making the scenes in which our characters will show up in. For this I have already done some research into how different games have there text box’s for their characters as well as how they present their decision buttons to the player. In the end I really like the look of how the game Black closet does it and decided to design something very similar. Firstly I went and started work on designing my text box’s. I managed to find a really nice reference and use that as a guide.
In this image the text box at the bottom is the one I used as a reference and the one ontop is the one that I made myself. I know they are very similar but I think that once put on my scenes then it will really fit in.
Now I have my Text box made I need to test it on some of the backgrounds that my game uses. First I need to get some backgrounds for my game.
Backgrounds:
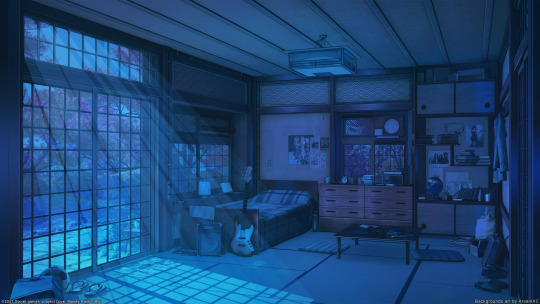
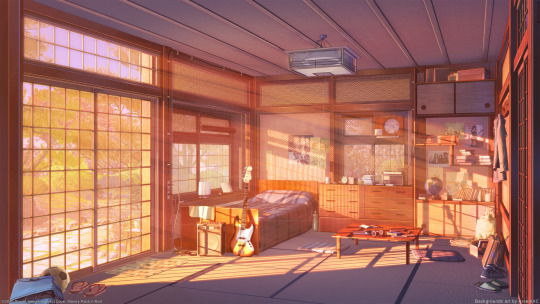
For the backgrounds I new that I wouldn't have enough time in this project to go and make my own backgrounds, If I had more time for my project I would of worked on making my own backgrounds. However I have decided to just go ahead and use some images from the internet. These backgrounds were all made by the same artist Arsenixc which is good as they all have the same style and fit together.

Adding the text box into my scene:
Now we have the background sorted we now just need to see how the text box looks with the background. To do this I just put the background and the text box inside of photoshop and made the text box the right size for the screen. I made this in a photoshop document with a size of 1920 pixels by 1080 pixels which is the normal size for a computer screen. This means it will also fit in our widget very well.
0 notes
Text
Midpoint
So here we are. We are at the midpoint of our project and in all honesty it came a lot faster than expected. However I feel like I am making good progress so far and up to this day I feel like I have got quite a lot done. Here is what I have got done so far:
Main character drawn
Hall monitor drawn
Half of the day 1 narration done and put in a csv file
Some scenes for my game such as edroom,kitchen and school.
Some widget stuff done such as text, choice buttons and button designs.
Some Ui design done including the speech box
Is it doable:
Now the main question is, is this project do able. I feel like the project is do able but it is going to require a lot of time and effort as well as concentration to pull it off in time. This project is the project I have most been invested in. I am very happy with the progress so far as well as the style of the game. If however it is not fully do able I still feel like I can present something which is playable even if you cant complete it.
0 notes