
Don't wanna be here? Send us removal request.
Statistics
We looked inside some of the posts by saskia1404 and here's what we found interesting.
Average Info
Notes Per Post
1
Likes Per Post
1
Reblog Per Post
0
Reply Per Post
0
Time Between Posts
26 seconds
Number of Posts By Type
Text
17
Last Seen Tumblr Blogs


Fun Fact
Tumblr is available in 18 languages.
Text
Widget Animation

When you first start my game, a widget will display your objectives on screen for a certain amount of time (5 seconds).
To do this, I first downloaded a font I liked from a font website. I chose one that would match the adventure/ fantasy feel of my game. I had to create a new widget blueprint to code this font to have animations in my game.
To get my font into unreal, all I had to do was drag and drop the file into the content browser. Then I added text into the designer tab and wrote what I needed.

Next I added a new animation and gave it a name. I wanted my text to ‘fade out’.

Next I went to the timeline. Here, I could add key frames and durations and other transformations that would make my text move. On the timeline, I added a track. This would link to the text box. Next I would add a ‘sub tract’, and add ‘render opacity’. This would make it so my text would fade out. Adding key frames would allow me to add the times I’d like the fading out too.

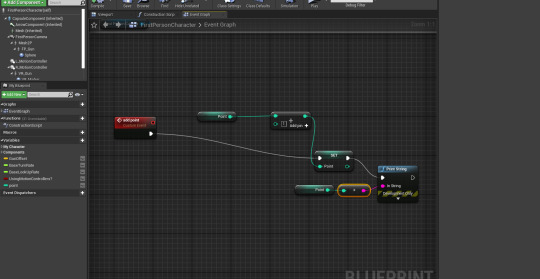
Here is the coding (which I’m bad at). This is in the blueprints of the first person character, since we want our text to be shown to the player. Creating a widget and giving it a variable would be what allows the program to know what it’s showing or ‘grabbing’ , and the viewport is what would display it on the, well, viewport.

Here are the finished blueprints for my widget that will show up in game.

0 notes
Text
Researching Voxel Games + My Work on Magica Voxel
Voxel art is a type of art form where 3D models are just constructed out of 3D cubes called voxels. Voxels represent a value on a 3D, regular grid in a three dimensional space. They are points that we can see in a 3D space.
One of the most famous games known, Minecraft, uses voxels to store terrain data. However, it does not use voxel rendering techniques, and instead it uses polygon rendering to display each voxel as a cubic block. This in turn gives us the block look we all know too well.
Another well known voxel game is Crossy Roads. The looks of the game are very simplistic, as it consists of small cubes within a 3D space - voxels. The concept of the game is just to tap and move forward until you eventually get killed. You can collect different types of animals and characters to use
A quick something I did using the program:

0 notes
Text
Quit/ Reset game level code

To reload or reset a level in a game, this is the code that is needed. Under the level name, you’ll need to fully write out whatever the level is called, including all capitals and spaces.

If you want to quit the game, this is the code that has to be used. It is pretty self explanatory. If you just want a specific character to exit, the link it to ‘specific player’. If no player is specified, player 0 will be exited from the game. Ignoring platform restrictions is used for phones or consoles such as PS4 - PS4 games should never quit. Enabling this will make it so that your game will quit no matter what, but it can be denied from app stores if this is the case.
0 notes
Text
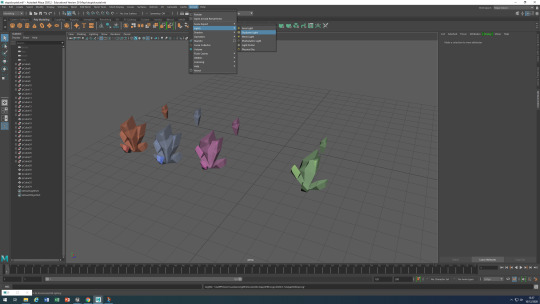
Animating and Key Frames in Maya

In Maya, you can create animations by going to the animation tab at the top of the screen.

When you click the animation tab, this is what it looks like in the original ‘Maya Classic’ workspace. Changing the workspace to animation is optional, but it is a lot easier to work with keyframes in the animation workspace IMO.
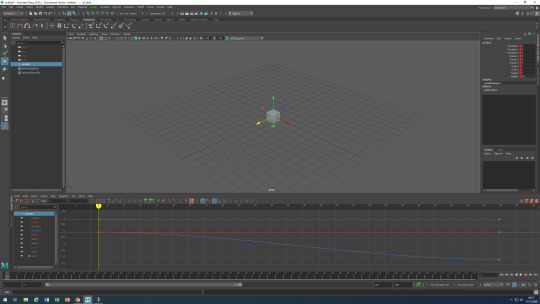
When you change the workspace to animation, this is the screen you’ll see. At the bottom is where you can set keyframes over a set duration of time.


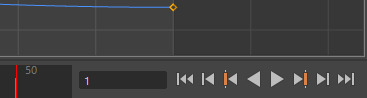
At the top of the screen, there is a button that looks like a plus sign. Clicking this will add a keyframe to wherever the time indicator is on the graph editor. After this, moving the time indicator from where it starts to a new place, such as 50, will make it so that you are able to place a new keyframe. After changing the time indicator and adding a new keyframe using the plus button at the top of the screen, using translation tools, you can move the cube however you want. Simply sliding it from one position to another is okay.
From here, you can press play to watch your ‘animation’. This is a very basic way to animate.
0 notes
Text
OBS and YouTube

In OBS, to start recording your screen, you first need to display your screen. Going to source -> display capture will allow you to show and see whatever is on your computer screen. Down in the bottom right, there are a few options such as ‘Start Streaming’ and ‘Start Recording’. As soon as start recording is pressed, it will start to record your screen.
Next, going to file and ‘Show Recordings’, I can find where my recording was saved, and I can move it from the C drive into my own hard drive. From here, I can upload any recordings onto YouTube.

In the settings, we can adjust the audio. There are many different audio options, and you can change things such as the channel and how loud the audio will be.

0 notes
Text
Automatic Material
An automatic material will place different textures when at different angles and slopes. It uses a slope value and a blend value to mix two different textures together. Create a new material, drag in textures and make the textures first. Afterwards, the next thing to do will be to create a LERP. LERP’s have a graph with a slope, and so it mixes textures A and B. Next, adding a WolrdAlignBlend mixes colours and has variety of different parameters we can change within.

The two main will be Blend Sharpness and Blend Bias. We want to promote both of these to a parameter, and create a new material instance - this allows us to easily drag and change values in the material instance, so we can visibly see the changes to our landscape.

Parameters ^

These are the two parameters within the material instance. The smaller the numbers, the easier it is for the two materials to blend together better. Hitting apply will update all changes onto the landscape for you to see.
Next, applying the material to the landscape. As the landscape is increased, a mixture of rock and grass will be used on different slopes.

We can also create a layer blend if we want to paint on these textures individually. This will help to further detail our land and place textures wherever we want them, after the main chunk have been placed by the auto material.
0 notes
Text
Photoshop Cutting Tools

In photoshop, the Marquee tool is used to create a selection in the form of what you select. It can create a selection in the form of a rectangle, an elliptical shape, and single rows and columns. It is useful for only deleting a certain part of an image you want, or keeping any painting you do within the selected area.

The magic tool wand is useful for a variety of things. For example, if you click on a certain area of an image, you can delete only an area with a certain colour - this is useful for deleting background on images you have. The magic tool wand specifically selects parts of an image based on colour and tone, unlike other selection tools that select based off edges and pixels.

The lasso tool is used to make freehand selections, unlike the marquee tool. This allows the user to specifically select whatever they want, and they can duplicate, delete or colour in whatever they select. It is very similar to the marquee tool, but it just allows more versatility by offering the user to just select whatever they want, without being limited to certain shapes.
0 notes
Text
Best Game Environments - imo
1) One level environment that really got me interested in the game was definitely Genshin. In Genshin, the level art and environment is really what stood out to me. Before, I never really liked the stylised look that some games had, I preferred realism, but after seeing Genshin I had changed my mind. The environment and things within the game aren’t too detailed, but somehow, the designers made it look like there was a lot more to it than there actually was. My favourite place is probably Liyue, which is Chinese inspired. The simple buildings and the pretty nature scenery is what really interests me. The lighting, too, adds so much to the world. It was like a breath of fresh air to play something a lot different to other mainstream games.


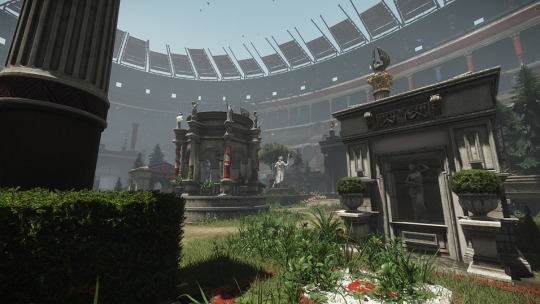
2) Another game I remember for it’s environment was Ryse; Son Of Rome. I saw this game a while back on our old Xbox and I decided to play it as there weren’t too many interesting games at the time. I mainly remember really enjoying how detailed the environment was, and the effects within the game. I also really liked the Rome feeling to the game, as I really like ancient roman architecture. The forest/ nature scenes and details were super nice too. Overall, it was a super pretty and well detailed level, and the attention to detail made the environments really stand out.
3) One other game I have been playing recently is Ghost Recon Breakpoint. This is a game that stood out to be environment wise, as one of the first things I noticed specifically was how detailed the moss and small plants looked. Instead of completing objectives and missions, I would usually stray away from my friends to admire how nice certain parts of map looked. It is very rich in terms of plants, and the environment is well designed as the landscapes definitely look photo realistic at times. A lot of detail was put into the environment, and that is why I love this one so much.

1 note
·
View note
Text
Mood board for my level

Here is the mood board for my level. The main concepts of my level revolved around ancient over grown ruins and crystals. I prefer nature over more city-like levels when it comes to designing, so I really wanted to do a level around forests and such. I thought of this concept on the spot, really, so I chose something generic that I could add to my game, as the game concept and mechanics don’t appeal to me as much as art. And so, I decided to make crystals the main theme of the puzzle in my game. The idea was to have big crystals that were unique in a way, and when they’re shot, they drop a shard that you are required to get to get out.
Next are pictures of ancient ruins I really loved and wanted my game to look/ feel like. I liked the rubble and pillars within a forest kind of scene, and so I wanted to make my level like this. There is also a picture of a forest I found and liked, so I used it for inspiration too.
0 notes
Text
Evaluation
- What went well
I think that the whole level art/ designing went okay - I stumbled upon some issues such as the whack landscape, and how it looked unnatural. Other than this, I enjoyed laying out the level with detail and different assets. So overall, the process of making the level itself went well (apart from right at the end).
- What could have gone better
Having a more detailed landscape with better textures would be great - most of the maps ended up stretched out and they looked unnatural. Possibly adding in more things too, such as audio and more mechanics, a main menu etc..
Also, definitely preventing my level from grouping assets and saving, so I don’t have to rush and redo the entire level in just a few days.
- What will you be doing differently next time
When I next work on a 3D level, I will make sure to improve my landscaping, as this became an issue when I started adding objects into my level (very unnatural). I will also try to learn how to prevent the tiling effect with textures to avoid the ground looking unnaturally stretched. Furthermore, I will try to learn some more things that will help me improve my level or coding, and possibly look into how to make my own foliage.
0 notes
Text
Destroying items and spawning

Here is the code within the first person projectile (bullet). I wanted the main crystal to be destroyed whenever my bullet hit it, so I gave it a tag so that the bullet destroyed the correct object when it was hit. Then I linked ‘other’ to the target so that the program knew what it was checking for. Adding a branch would give it a condition, and if it was true, it would spawn a crystal shard. Coming out of ‘spawn actor’, I would link it to destroy actor, so that when the shard is spawned, the crystal is destroyed. Linking ‘other’ to it too, would indicate what needs to be destroyed.

Using the drop down and linking it to blueashard would allow for me to decide where it would spawn upon being spawned. Linking ‘hit location’ to ‘spawn transform location’ would make it so that the shard would be spawned wherever the bullet hit, and not in a random location at point 0,0.
In settings and plugins, within physics, there would be a plugin to make the crystal shatter into pieces whenever it is destroyed.
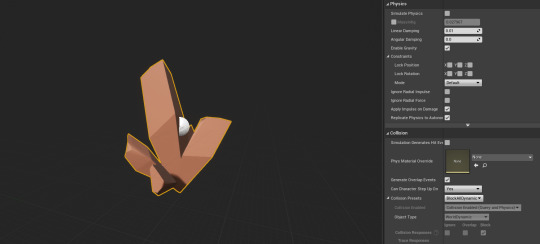
Collision presets was changed to ‘BlockAllDynamic’.

Within the new mesh that had the destroy physics, enabling impact damage and increasing the explode amount would make it shatter.

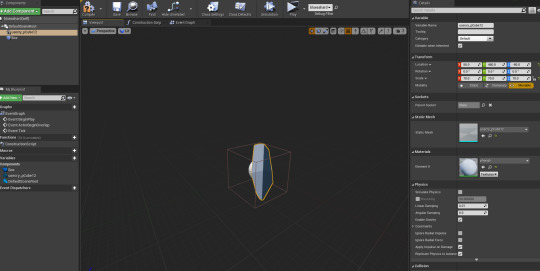
In the shard, enabling gravity and stimulating physics would allow for the crystal to drop to the floor and roll.
0 notes
Text
Health Pick Up Moodboard and Picking up items
In my game, instead of having ammo pickups, I planned to have a different kind of pickup. This would be a crystal shard that is dropped from certain crystals, and the player would need a certain amount of the crystals to get out of the level (all within my mood board plan for my game).
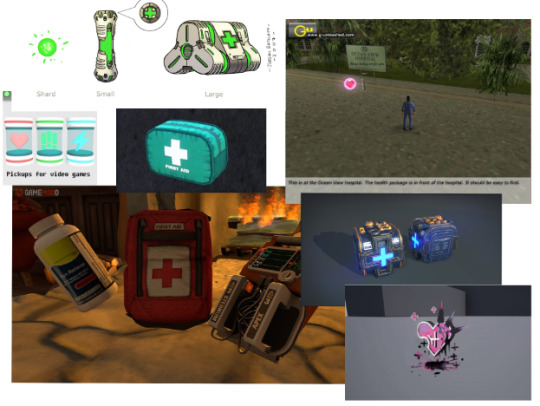
This is a mood board full of different health pick ups within different games. Health pick ups can have lots of different designs and forms that they come in.
For whatever item I want to pick up (crystal shard), I add a component and then add a collision box.

Within the event graph of the item you want to pick up, you start with the event overlap node. This is used so that whenever the player overlaps the item, and event is fired off. Casting it to a first person character will essentially be the items blue print ‘talking’ to the first person. This way, the first person can give the item information it doesn’t have (such as the points). If the character is first person, the item is destroyed (actor). Add points fires off the event in the first person blueprint.
In first person blueprint, I added a new variable called ‘points’. This will be what the player gets whenever the player picks up the item (crystal). ‘Point’s is set, and an integer + integer node is used to add points. After, the value of points is set, and printed on the screen.
0 notes
Text
Final Week Prep
- High priority
In my game, the things I would like to finish off would definitely be the main level and basic gameplay mechanics. As someone who is more interested in level art and design, I would like my main level to be finished. I would also like my main gameplay mechanics (killing enemies, healing etc..), as there wouldn’t really be much to do if I left these out of my game.
- Low priority
My low priority would be making a few more assets and texturing them with a few images online. I could do this, but it would most likely be a bit more time consuming, so I may leave it out this time.
- Not going to do
I am most likely going to leave out audio in my game. Audio is not an important aspect in my game, and as I said before, I’m more towards working on the looks and art of my game. I will probably leave out making textures from scratch too, as this is very time consuming, and will most likely not look to great.
0 notes
Text
Arnold and Design Sheets
Arnold - Autodesk, is a program used for feature length animation and visual effects. It is an advanced ray tracing renderer.


These are two examples of design sheets. Design sheets are mainly used for character design in a game. They usually include drawings and concepts of outfits, front and behind views, different facial expressions, accessories and a full body image. 3D modelers can use these sheets to help make a 3D character based off of the 2D character design sheets.

This is my shipping container that has been rendered by Arnold. There is a perspective view, a top and side view and a bottom view.
In Maya, going into the Arnold tab, then light and sky dome light, will set up lighting so that my objects can be rendered properly (without a light I would have a black screen after rendering).
Then, clicking this button:

will open a new window and render the object in the viewport. Here are some examples of my own crystals being rendered in Arnold:
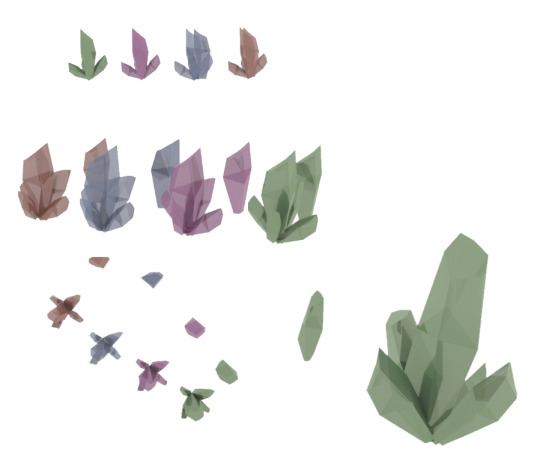
I still prefer the not rendered version, as the lighting feels too extreme and they look off in Arnold.

0 notes
Text
Shipping Container
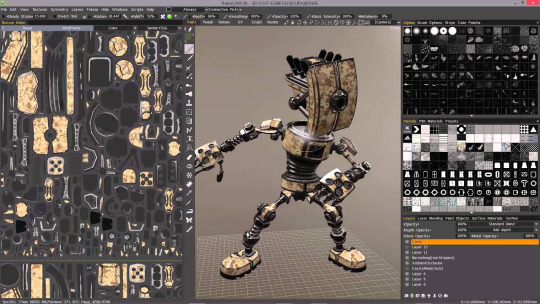
We made a shipping container using both Photoshop and Maya. We were given the shipping containers model and UV, and what we needed to do was import the UV into photoshop to edit it.

Here, in photoshop, is my UV with different images to make the texture for the shipping container. Using drawing tablets, we could add lettering and other small details to make the container look rusted and old. By adding different layer modes to layers, such as multiply, I could change how an image or how the graffiti looked. Changing the opacity would also change how much you could see of the image.
After applying a material and changing it to an image, and importing the finished UV map from photoshop, here was the final result of my shipping container:

Here is a mood board highlighting most things that are found on normal shipping containers and ones with graffiti. Most shipping containers have details about what is in the container, how heavy it is etc. A lot too, also have company logos on them and warning signs, such as ‘heavy’. More of the older containers have rust on them, too. A lot also have crammed graffiti on the sides to make it look cool. All of these gave me a good idea of what I should add on my container; graffiti, a company logo, rust and information and warnings about what is inside.

0 notes
Text
UV Maps
A UV map is a 2D image that has been painted and then projected onto a 3D model to make the texture of said object; UV is the flat representation of the surface of a 3D model. The process of creating a UV map is called UV unwrapping. The U and V stand for the horizontal and vertical axis on the 2D image.
Some examples of UV maps and UV unwrapping:

0 notes
Text
Game Level Design Research
GTA V
The level in GTA V is a large, open world map. In terms of graphics, it is realistic. The design is something I don’t like as much, as a fair bit of the map revolves around a city. The map takes a long time to travel and explore fully because of how big it is, but it is fun to almost live in a similar world to yours, except you’re a criminal and you mess with the government. In terms of graphics, they are good for 2013. I do like the level of detail that has gone into the game, such as the worn away feeling in the cities and surrounding neighborhoods. Down to little holes in the pavement and the litter around the city, every small detail makes it feel more realistic and alive.

Subnautica
The level design in subnautica is drastically different from the one in GTA V. The world is a massive open ocean, where a majority of the time you’re underwater. The ocean in the game is filled with big alien sea monsters you have to either kill or avoid. The design is done well, as there is an eerie feel when you’re alone in a vast open empty body of water. Even when you’re not alone, there is a feeling of unease. I do like the underwater scenery, especially the sea floor and the aquatic plants. Something so plain above the surface becomes something unique and pretty beneath.

Genshin Impact
This is a game I have been playing too much recently. At first glace I thought the graphics of the game were super pretty and it really appealed to me. A lot of the objects are low poly/ nowhere near as detailed as the other games, but it works so well. The stylised look of the game is what really interests me, and it’s refreshing, Liyue is a region in the game, and my favourite, as I love the design of the land. The tall mountains and the rural landscape are what I love the most, and everything is very bright and colourful. It is based around China, and the buildings and trees and plants look very pretty. The lighting really ties into making the game look very nice for a mobile game.

0 notes