
Don't wanna be here? Send us removal request.
Statistics
We looked inside some of the posts by sebpfmpp2 and here's what we found interesting.
Average Info
Notes Per Post
0
Likes Per Post
0
Reblog Per Post
0
Reply Per Post
0
Time Between Posts
4 days
Number of Posts By Type
Text
17
Last Seen Tumblr Blogs


Fun Fact
Forty percent of Tumblr users are between the ages of 18 to 25.
Text
Programming: Player
The PlayerCam is the most important part of the game serving as the player's character and controlling the second half of the movement in the game as well as most interactions.
The PlayerCam is split into 8 sections, starting with the "Beginplay" section, which sets up the initial camera and widgets along with the functions to disable some of the game's guides
The next most important system starts at the "Inherit camera variables" section where the current BlendToActor's variables are taken in by the player to adjust things like their camera as well as setting the camera's rotation in order to create the free look effect.
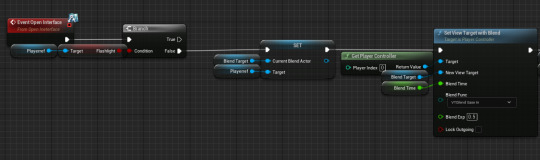
Next, the system splits into the the "Interact" section and the "Flick system check" section. The "Interact" section allows the player to activate the "open" interface which allows them to interact with various objects which have that system like cabinets, doors, items etc.
The "Flick system check" works by sensing the current position of the mouse based off of the screen's current resolution, it then uses this position to check if the mouse is within a tenth of either the top, bottom, left or right of the screen, if they are, the correct event is fired corresponding to which section of the screen the mouse was in.
This leads to the "Flick movement system" section which takes the current BlendToActor's variables for connected cameras, if the current BlendToActor has a camera in the direction the player had their mouse in, the player is moved to that camera with a small pause to account for the transition.
The last 3 sections are separate and can be used remotely basically any time. The simplest of the three is the "Misc" section which contains 3 small systems; The x input which hides the SoftBlendAimActors, the escape input which pauses the game and the "ToggleInventory" custom event which brings up the player's inventory further explained below.
The next section is the "Flashlight control" section which allows the player to switch the flashlight on and off, is responsible for draining the flashlight's battery and controls the flashlight's cooldown when appropriate
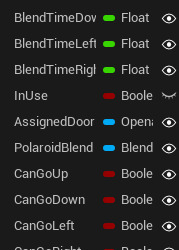
The last section is the longest - the "Polaroid system" section. First a check is made if the player has enough polaroids, then, an animation starts playing where the camera is brought up to the player's face and activated. If the current BlendToActor has an assigned polaroid camera, it will switch to that camera and center the player's cursor, then if that camera has an assigned door, that door will be opened if it is closed, next, the polaroid photo trace function is played a maximum of 50 times, this function essentially fires a trace towards a random location roughly around the cursor until it hits something at which point it will tell whatever has been hit that it has been detected by the polaroid. Then a few cosmetic changes take place like the flash activating, the HUD fading out temporarily and the flash slowly fading out, lastly the amount of polaroids the player has is subtracted, their camera goes back to the original BlendToActor if it switched and the corresponding door is closed if it has one.
Inventory
The inventory is made up of 4 slots, each of which works identically to the others.

When a slot is selected, it does different things depending on what is in it; If it is empty nothing happens, if it is a battery, 2 things can happen; if the player's current battery is at or below the throwaway threshold the battery in the inventory will simply override the current battery and the slot will be emptied, however if that is not the case, the batteries instead swap, placing the current battery in the inventory and placing the inventory battery into the player, in both cases a cooldown is activated before the flashlight can be used. Otherwise if the slot contains a polaroid it will simply add as many polaroids it can into the player's hand up to a limit of 3 at which point clicking the slot will do nothing.
Each slot also has a delete button which allows you to trash whatever item is currently in the slot which simply works by clearing the variable.
Overall, there were surprisingly little problems with every part of the player, the only major issues being unable to switch between UI only mode and game only mode which forced me to use the game and UI mode which lead to needing roundabout solutions to stop the player from moving when they're in the inventory. Other than that I'm extremely happy with how this turned out and its ease of creation as it led me to create more features than I originally thought.
0 notes
Text
Programming: Interfaces
Interfaces are essentially premade events that can be placed on blueprints that other blueprints can then try to detect, making an easily implementable event that can be used by multiple blueprints and have the same effect in one blueprint but a different effect in another blueprint along with the ability to do a certain set of actions.
Throughout the project this new discovery of interfaces has proved very useful to me and I use what I've learned from them in many aspects of the game.
0 notes
Text
Programming: Enemy- Lurk
The "Lurk" enemy is the only enemy I had time to create during the development period.
Lurk works by moving between predetermined positions using a move interval. In the "Become Active" section, Lurk's movement interval is determined by taking 1 divided by the world delta seconds multiplied by anywhere from 10 to 20 seconds. This calculation is done so that Lurk moves the same regardless of the user's framerate, by using the 1/world delta seconds we can get the current framerate of the game and base the interval off of that.
In the "Decrease movement interval" section, the move interval is decremented in multiple ways; by default, it simply goes down by 1 every tick, if the door it is monitoring is open, it moves 3 times faster - removing a total of 3 every tick and lastly if the Alarm clock is currently in use, a further 5, for a total of 8, is decremented, which is the absolute fastest Lurk can move.
There is a way to stop its progression however. In the "Increase Aggression/ movement interval" section, if the player is watching the monster with the flashlight on, the movement interval stops decreasing and instead starts slowly increasing by 1 per tick, however, another variable called "Aggression" increases by 1 per second. When aggression hits its goal, determined by 10/Difficulty, the player is killed using the function in the "Kill" section, which sets the player's camera in front of lurk and shakes it, before sending the player to the death screen.
The "Move/Kill" section triggers whenever the movement interval hits 0. When that happens, a check is made to see if there is another lurk linked to the current one, if there is, then the next lurk is activated and the current one is deactivated, otherwise if there is no linked Lurk that means that the current Lurk is the last one in the sequence and it kills the player instead, going back to the "Kill" section.
Finally, the "Flashed" section triggers whenever the player uses their polaroid to take a valid picture of Lurk, upon which Lurk deactivates and has to wait until he can respawn.
Overall I'm pretty happy with how it turned out, with no major issues during development. Although it could've been more refined with some added animations and some more VFX to not make it seem like its just teleporting, those are just visual issues and mechanically I'm pretty happy with it.
0 notes
Text
Programming: Polaroid photo system
The polaroid picture taking mechanic was something that was planned to be done but that I didn't have a chance to finish because I needed to focus on more important features of the game. As things stand this mechanic works, but the photos aren't saved between replays like they're meant to.
The photo system works by spawning the CamSnap which takes a render of what's currently on screen and saves it into the game instance.

This would then be used by the Photo actor which would be given the rendered texture and turn it into a material.

The system works but only during the current playthrough, the photos don't persist like they're meant to.
Obviously I'm not quite satisfied with the outcome of this but since it was an entirely cosmetic feature I don't feel too bad leaving it unfinished.
0 notes
Text
Maya modelling: Enemy
The enemy requires a 3D Model, therefore a day was spent making one.
Warning graphic descriptions.
The enemies in the game are supposed to be based off of people who have died in various ways and so that was taken into consideration. Lurk is an enemy who is supposed to represent a person who was kidnapped and starved, along with decapitated, hence their missing head. in order to represent starvation, Lurk was modeled to be very skeleton-like, with a more defined and deformed skeletal structure. The skeletal look correlates with how people use skeletons during events like Halloween and with how skeletons are portrayed as scary.
There were also plans to make the enemy's depiction of decapitation more clear, with a more realistically severed neck, however I felt like that might be too graphic for some audiences.
0 notes
Text
Programming: Core gameplay
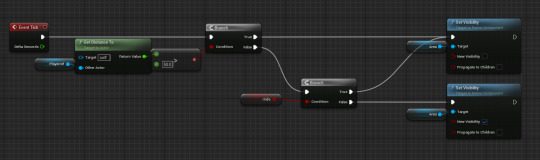
The Alarm clock is the main way to progress the night and the win condition for the game. By default it simply counts up by one every second.

The clock uses a system that converts seconds to minutes and minutes to hours manually for easier tracking. Once 6 hours are reached, the night ends and the player is taken to the victory screen.
The main mechanic lies in when the player interacts with the clock. Upon interacting, the counter starts accelerating time. This is done by using a delay with a length of the variable "rate" which gets shorter and shorter. One problem with this system is that it is limited by the user's framerate so in order to counteract this, when the rate goes low enough, instead of adding seconds to the timer, minutes are added instead while the seconds field is simply constantly changed to give the illusion of time passing.

Example.

The game's menu doesn't anything too special with the exception of the option of disabling the pre-game tutorial which is a feature that uses a variable stored in the game instance, essentially saving the user's option between attempts.
Tutorial enabled

Tutorial disabled

The level blueprint is used for starting the game, right now it does nothing but this is where conditions to starting the game would go.

The gamemode is what controls the spawning of the enemies in the game. Every set interval it checks if the enemies can be spawned and tries to spawn one if all conditions are met e.g. if the selected monster isn't currently active, and each enemy has a chance to not spawn depending on its currently set difficulty.

With the exception of the framerate limitation in the alarm clock's code there were very few complications. The only thing I'd like to add is a way to save the tutorial disable button between play sessions and not just between attempts, otherwise I'm quite satisfied with these.
0 notes
Text
Programming: Item spawner and items
In preparation to creating the enemy, I created the item spawning system so that there is a need to manage resources.
There are two resources the player has to manage: batteries and polaroids which are used for navigation and fending off enemies respectively. Because of the fact that both of these are essential, I needed to make a system that both spawned them randomly and with a guarantee so that the player can't die due to the game not spawning enough items.
There are two ways the ParentSpawner can spawn an item: general spawn and specific spawn. General spawns happen anywhere between 10 and 60 seconds and can spawn either a polaroid or a battery with an equal chance at a random spawn location marked by the SpawnLocation actor which has no code.

A specific spawn happens when the player needs a resource. When the player gets to 0 polaroids, a polaroid spawns on the map, a polaroid cannot spawn this way again until a polaroid is picked up. Similarly, a battery has a higher chance to spawn each frame the less battery the player has.

The items themselves simply go through every slot in the players inventory until either they find one they can fit into, or they find an empty one.
The polaroid will check how many polaroids the player is currently holding, if it is less than 3 then it will simply add 1 polaroid to the player's held ones, otherwise it will check every inventory slot, 3 polaroids can be held in each slot so it will search for either a stack of less than 3 polaroids or an empty slot, whichever one it will find first, otherwise it will simply open the player's inventory if it can't find an available slot.

This process repeats for all 4 slots
A similar process happens for the batteries, however since you can only hold one battery per slot, it only checks for empty slots and only changes the player's current battery if it is lower the battery throwaway threshold which is a value that when reached or below, automatically throws that battery away when it is unequipped.

Though this looks complicated, it is much less complex than it looks and overall didn't take that much time or effort with little to no issues.
There are improvements that could be made on it, for example the polaroids could look for slots with polaroids already in them first so that they don't use up empty spaces when there are stacks of polaroids that are not full or the batteries could automatically replace other batteries which are at the throwaway threshold however I am happy with how they work regardless.
0 notes
Text
Programming: Openables
There are many cabinets and doors that can be opened in the game that both the player and the enemies can affect.
Both the doors and cabinets work off of the same parent blueprint. These include:
Closet doors, openable window, bedroom door
2 TV stand cabinets, 4 Desk cabinets
These work by alternating between open and closed which rotates the object by a set number which can be changed in each individual openable, as well as being able to set its opening speed. Openables can also be assigned a partner, so that things like double doors in the closet can both open at the same time rather than having to be opened separately.
In order to get the enemy to interact with them, a separate opening animation with its own parameters is made that can be activated by the enemy.
The last openable object is the drawer which works off of its own blueprint as instead of rotating, it needs to move a component, though it works off of the same alternating principle.
The drawer simply works by transforming the bottom shelf between a start position and an end position which are actually invisible components which can be adjusted.

Overall this was another relatively easy addition with few to none hiccups and I am happy with how it works and its range of customization.
0 notes
Text
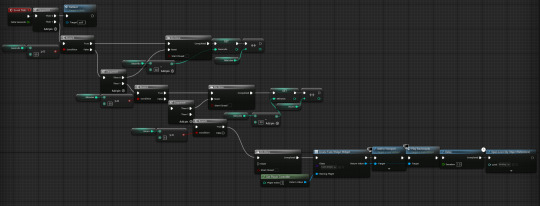
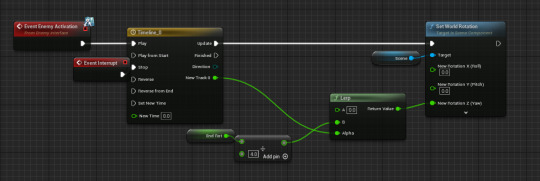
Programming: TV system
The TV system is a setup for another enemy that could be programmed in after the lurk enemy if I have enough time for it. Currently it doesn't do anything except display what its linked camera is showing, but the idea for the "Dread" enemy would be that the TV activates and a timer starts where the player has to find the remote to turn the TV off before the timer runs out as the enemy gets closer and closer to the screen before killing the player when the time runs out.
(The TV displaying the "Lurk" enemy)
0 notes
Text
Maya modelling: Items
Two very simple models for item to use in gameplay
Polaroid
Battery
0 notes
Text
Programming: Cameras
In the game, the player moves between a set of predetermined locations rather than having free movement, this is done by using cameras called "BlendToActor"s which are stationary cameras with a rotation limited to their front.
Though these cameras are the core movement mechanic, they don't do much by themselves. All these cameras really do is rotate slightly based on the position of the mouse, simulating the character looking around using the Soft Blend aim function at the end with some checks to see whether it should be used or not.

Instead of doing much themselves, they are populated with many variables which are given to the player in order to personalize each camera.
There are 2 ways to move between these cameras, one is located in the player and the other uses another actor called the "SoftAimBlendActor".
The SoftAimBlendActor simply acts as a highlighted area that can be clicked on in order to move to its corresponding camera using an "interface"

The only other feature of these areas is that they become invisible when they are far enough away from the player.
This was a pair of actors that had to be constantly adjusted throughout the project to facilitate new features like blocking the player from moving in certain directions when an area was closed off, changing the strength of the flashlight or having a temporary camera to switch to, however excluding additions, there was no problems setting them up as their code itself is pretty simple.
0 notes
Text
Maya modelling: Outside room
Originally this week would be used for modelling the outside of the room, however, seeing how much time it took to make the room itself, I have decided to use this time to refine a few pieces of the room and get started on coding, however I did still try to greybox the outside of the room so that there is at least a point of reference to my vision
The outside would be mostly intended for enemy mechanics that are progressive or to give visual indicators that enemies are active.
As this is the last week I have assigned to 3D modelling here is the most recent completer version of the room.
0 notes
Text
Maya modelling: Gameplay elements
The gameplay elements refer to set pieces which were made with a specific function in mind or that will be programmed to do something. These were more challenging to model as many of them had moving components which meant extra modelling of their insides for the player to see like hinges or miscellaneous objects within shelves, such small set pieces caused these to take much longer to model and some of them were altered multiple times to facilitate functions, though there were very little actual issues which had to be resolved.
This is a list of all gameplay objects, their purpose and proposed functions within the game.
desk, dresser, TV stand - to create a full range of motion - the TV stand and dresser are on opposite sides at the back of the room and have 5 openable containers and the desk is at the front of the room also with 5 inspectable locations making the player move around the whole room rather than being able to stay in one spot, The shelves and cabinets would be used for spawn locations for items and enemies to appear in.
Window and room door, closet door - to create a full range of motion - they are similarly spaced out to the previous three for the same purpose, for enemies/to create a sense of unease through uncertainty - These would act as spawn points for enemies however, they would speed up an enemies progress when open so they must be closed, creating an environment where the player doesn't know if they're safe or not because of the closed doors.
Beds - for enemies/to make the player feel like there is no safe space - though they won't actually have any code themselves, the beds will be spawn points for many enemies and items along with being the main place of the player's focus with the main way to pass the time there.
TV - for enemy/s, serves as distraction, generates noise, timed event; gives the player a sense of panic - The TV would be off by default, occasionally switching on to create static which would generate a lot of noise preventing the player for hearing sound cues, along with being a spawn point for an enemy which would require the player to find the TV remote and switch it off before the enemy reached the camera.
Alarm clock - core gameplay mechanic, discourages AFK gameplay style - The main way to pass the time would be to look at the alarm clock which would speed up the passage of time since the night would end at 6AM, though it would be technically possible to pass the night without using it, it would take 6 hours of playing. While using it enemies would move at a faster rate, making the player balance defense and progressing the night.
Room (vent) - for enemy, keeps the player vigilant - This would serve as a spawn point for an enemy that would destroy the alarm clock which would keep the player on their toes to defend themselves.
0 notes
Text
Maya modelling: Basic elements
The basic elements of the room refer to elements that are not used in gameplay and are made either for visual density or environmental storytelling. Throughout the process of modelling these, there was little to no problems, except for things that were modelled using physics, for example the bed's bedsheets colliding into themselves or the clothes not retaining their shape when exported, however these were easy fixes like changing collision settings or duplicating the clothes through a different method.
Here is a list of all the non-gameplay models and their purpose;
Glow in the dark stars - Navigation in the dark
Toy gun and bullets type 1 and type 2, dart board, sticky hand, blocks: type 1 type 2 type 3 type 4 type 5 type 6 type 1S type 2S - Visual density, environmental storytelling (blocks are used to spell out some character's names)
Stools - functionality (allows me to line up the player's camera at the correct height to keep the player's height consistent), environmental storytelling (there are two of them, showing two children live there)
Corkboard decor - visual density, environmental storytelling/lore (the papers and post it notes would contain drawings/messages from both the characters giving an insight into the story and their personality/relationship, the post it notes are in different colors according to what character used them and the papers are stuck up using differently colored pins, if these were textured, they'd be signed by whoever made them for purposes of accessibility)
Stockings, pants, dress, sweater, trash, trashcans, crayon type one, type two and type three - visual density, environmental storytelling (mostly used to show the disorganized nature of the characters)
lamp, bed, curtains, extension plug, coat hanger, shoe rack, - Visual density, logical set pieces AKA. things you would expect in an occupied room
laptop, roomba and its dock, Suitcase, speaker, Wi-Fi router, - Visual density, environmental storytelling (Pieces of equipment you usually wouldn't find in a child's bedroom, used to show off that their family is likely more well off than average financially.
shelf stack - Visual density (would be filled with other minor objects like toys or figures)
0 notes
Text
Maya modelling: Gameplay effect considerations
After establishing how the room will present the personality of its inhabitants, it is important to plan out how you will model the room form a gameplay perspective. Since the point of my game is for enemies to blend in with their environment, said environment needs to be visually dense, so that the player must pay closer attention to their surroundings in order to find the enemy, this can be done through the previously mentioned toys, clothes and other such clutter scattered around the room.
After establishing the style, you need to consider the method. Since the player is playing as a child, I have decided to model each object to their real life scale so that the correct viewpoint can be created for the player when the camera is placed at a childlike height.
The next important consideration is making sure you create areas or features that are easily exploitable by my enemies to blend in or hide, so that when you create your enemy, you have somewhere to put them rather than having them out in the open which would defeat the purpose of the theme of the game.
Lastly, possibly the most important thing, is to make sure everything is visually and audibly accessible. For example if there is a gameplay part where one must distinguish colors, there should be a way to distinguish them in another way for people that are colorblind or when something changes visually in the game, to put in a sound que and vice versa, making sure there are visual cues for audible changes.
0 notes
Text
Maya modelling: Personality considerations
There are many things that must be considered when making someone's bedroom as it acts as their own personification, a bedroom oftentimes directly reflects the inhabitant's personality.
The most important factor is how many people live in the bedroom, in this case that number is two, therefore you must consider where the room differs from one person to the other as well as both individual's tendencies, in order to do this, you must understand the person that bedroom belongs to. After thinking about the personality I'd want these characters to have, I decided that the two children that live there would have ADHD, as a person highly likely to have it myself and someone who has regular contact with such people, it made it easier for me to picture and imagine what they'd do.
I have decided to make the room disorganized or messy in order to show the common short attention span and procrastination, the room should be scattered with things like toys and clothes to show their unwillingness to start cleaning up as children often do. The room should also contain things that will facilitate the children's hyperfocus, AKA activities that take concentration like drawing, games or videos, for that purpose I could add a TV and a laptop along with crayons and scattered pages, which also led me to realizing there needs to be a place for them to store such things, in which case a desk and a corkboard could be useful and since there are two children, it could be a double desk. The children also need a place to sleep and store clothes. For the bed, I've decided to go with a bunk bed to save space for gameplay elements, I could make their bedsheets disorganized to yet again show procrastinative tendencies which I could then also use for gameplay elements. In order to save space, I'll make a walk in closet, which could be a space to store a roomba so that the children don't have to clean the room themselves.
Aside from representing their personality, I also have to represent their age and the fact that there is two of them, this could be done through things like step stools to reach the window, which there could be two of and two different types of clothes scattered around the room.
After compiling together a few more ideas, this is a moodboard I created to represent my vision.

0 notes


