
Shane is a Senior Software Engineer at Google working on internationalization libraries and standards. He is chair of TC39-TG2, the i18n subcommittee for ECMAScript, and sits on the ICU technical committee. He maintains many open-source projects with a vision that software should be built to advance the lives of people around the world. Learn more at www.sffc.xyz.
Don't wanna be here? Send us removal request.
Statistics
We looked inside some of the posts by sffc-xyz and here's what we found interesting.
Average Info
Notes Per Post
16
Likes Per Post
14
Reblog Per Post
2
Reply Per Post
0
Time Between Posts
4 months
Number of Posts By Type
Text
7
Last Seen Tumblr Blogs


Fun Fact
Tumblr has 16.74 million mobile monthly users in the US.
Text
Comparing Linux Environments on macOS Host
Running a Linux VM from my MacBook Pro is how I spend much of my time during software development. In this post, I compare multiple solutions to this problem, with a focus on how they perform with I/O operations.
Background
On my MacBook Pro, my preferred setup for software development is to use Mac-native development tools like Sublime Text 3 or VSCode paired with a Linux VM running in the background.
Modern virtual machines have near-native performance on CPU and Memory. However, shared folders between the host and VM continue to be a major bottleneck. There are many ways that different providers attempt to solve the problem of shared folders, and this is what my benchmarks were focused on. Below, I call the different approaches to shared folders "filesystem adapters".
Methodology
All tests were run on a mid-2015 MacBook Pro with a 2.8 GHz Intel Core i7 running macOS 10.14.6.
Environments
The following environments were tested:
Multipass: Solution from Canonical, the makers of Ubuntu, to spin up quick Ubuntu Server instances. On macOS, it uses HyperKit for its virtualization environment and SSHFS for its file system adapter.
$ multipass --version multipass 1.6.2+mac
Docker Desktop for Mac, gRPC FUSE: Like Multipass, Docker Desktop for Mac also sits on top of HyperKit. However, it uses a custom filesystem adapter called gRPC FUSE. Extensive discussion about the pros and cons of this adapter can be found in this GitHub thread.
$ docker --version Docker version 20.10.6, build 370c289
Docker Desktop for Mac, osxfs: This is an older filesystem for Docker Desktop for Mac, which is intended to be replaced by gRPC FUSE.
Vagrant: Vagrant is not itself a virtualization environment; it must sit on top of one. However, Vagrant ships its own filesystem adapter based on NFS, which makes it interesting to benchmark.
Note that the Vagrant version used in testing is a bit old, and it sits on top of VMware 8.
$ vagrant --version Vagrant 2.1.1
VMware Fusion: One of the two main commercial virtual machine environments for macOS hosts. VMware Fusion uses HGFS as its filesystem adapter.
VMware Fusion versions 8.5.10 and 11.5.7 were both tested.
Parallels Desktop 16: The other of the two main commercial virtual machine environments for macOS hosts. Parallels Desktop mounts shared directories under /media/psf.
Parallels Desktop was tested under both the Apple Hypervisor and the Parallels Hypervisor, yielding similar results. The data shown in the following section uses the Parallels Hypervisor.
Benchmarks
The following benchmarks were run. All commands were run within a filesystem shared with the host as described above.
fio --ioengine=libaio:
This is a standard way to measure I/O performance. Source: GitLab Docs
$ fio --randrepeat=1 --ioengine=libaio --direct=1 --gtod_reduce=1 --name=test --bs=4k --iodepth=64 --readwrite=randrw --rwmixread=75 --size=512M --filename=fio_test
fio --ioengine=sync:
This variant of the above command was tested as well, because --direct=1 is not supported in all of the filesystem adapters being tested.
$ fio --randrepeat=1 --ioengine=sync --direct=0 --gtod_reduce=1 --name=test --bs=4k --iodepth=64 --readwrite=randrw --rwmixread=75 --size=128M --filename=fio_test
Create and read 1000 files:
This is a quick and dirty test of filesystem performance using Bash. Source: GitLab Docs
$ mkdir test; cd test $ time for i in {0..1000}; do echo 'test' > "test${i}.txt"; done $ time for i in {0..1000}; do cat "test${i}.txt" > /dev/null; done $ cd ..; rm -r test
Unzip CLDR JSON:
This is an I/O-heavy operation; the zip file expands to over 20k files and directories.
$ wget https://github.com/unicode-org/cldr-json/releases/download/39.0.0/cldr-39.0.0-json-modern.zip $ time unzip -q -d cldr-39.0.0-json-modern cldr-39.0.0-json-modern.zip
Results
The results are plotted below. You can click on each chart to access an interactive version.
Control Measurements
For comparison, the tests were run on native macOS as well as the native VM filesystem (rather than the shared directory). The results were much better than any of the ones shown above, so I did not plot them on the same charts. Note that the units on the measurements are greater than the units in the charts above.
Async IOPS Read: 28.3k (Parallels)
Async IOPS Write: 9.4k (Parallels)
Async Bandwidth Read: 111 MiB/s
Async Bandwidth Write: 36.9 MiB/s
Sync IOPS Read: 27k (macOS), 10.8k (Parallels)
Sync IOPS Write: 89.9k (macOS), 3.6k (Parallels)
Sync Bandwidth Read: 1055 MiB/s (macOS), 42.3 MiB/s (Parallels)
Sync Bandwidth Write: 351 MiB/s (macOS), 14.1 MiB/s (Parallels)
Create 1000 Files: 0.273 s (macOS), 0.029 s (Parallels)
Read 1000 Files: 2.343 s (macOS), 0.856 s (Parallels)
Unzip CLDR JSON: 4.477 s (macOS), 2.089 s (Parallels)
Idle Memory
A bit of data on the idle memory usage of the virtual machines was collected. These measurements are from the Memory value in Activity Monitor reported after all other tests were complete.
Multipass: 1.80 GB
Docker: 3.68 GB
Parallels: 3.56 GB
VMware 11: 4.04 GB
Note: I would take these numbers with a grain of salt, since they may not be comparing apples to apples, except perhaps to note that Multipass is quite a bit lower than Docker despite the fact that the two have similar underpinnings.
Conclusion
In every benchmark, Parallels has the fastest filesystem adapter, and Docker gRPC FUSE is fairly consistently the slowest. All the others fall somewhere in the middle, with VMware and Vagrant generally performing faster, and Multipass and Docker osxfs generally performing slower.
However, native performance, both on the host and within the virtual machine's virtual filesystem, is orders of magnitude faster than any of the VM shared filesystems for I/O operations. I hope that additional work can be done to improve performance of shared filesystems from a macOS host to a Linux guest.
What do you think? Did I make fair comparisons? What other options should I add to my benchmarks? Let me know in the comments below!
1 note
·
View note
Text
Why You Should Not Parse Localized Strings
As a programmer, it is natural to think of data as a series of one-to-one relationships between string identifiers and objects in a computer. Many standard libraries in programming languages allow for round-tripping between strings and objects, including JSON, ISO-8601 date strings, and URL encode/decode. So, if you can create a localized string, such as with .toLocaleString() in ECMA-402, why can't you parse that string back to an object using a function like .fromLocaleString()?
The answer comes down to the fact that i18n is fundamentally different from data interchange. This document lays out why you should not parse localized strings and the best practices for what to do instead.
Parsing Is Not a Science
What is the number represented by the localized string "1,004"? How about the date represented by the localized string "08/07/06"?
If you grew up in the United States, the answer is "one thousand and four" for the number and "August 7, 2006" for the date. However, in different regions and different languages, the answers differ!
en-US (US English) | one thousand and four | August 7, 2006
en-ZA (South African English) | one and four thousandths | July 6, 2008
es-419 (Latin American Spanish) | one thousand and four | July 8, 2006
es-ES (Castilian Spanish) | one and four thousandths | July 8, 2006
zh (Chinese) | one thousand and four | July 6, 2008
zh-HK (Chinese in Hong Kong) | one thousand and four | July 8, 2006
Table compiled from the Common Locale Data Repository (CLDR): number symbols, date patterns
This table is just scratching the surface on the complexity of parsing localized strings.
User Language !== Device Language
As smart devices expand around the world, we are observing that users set their device locale to something other than their first language. For example, a Hindi speaker in India may have their device set to US English, even if they are more fluent in Hindi than in English. (My colleague Luke Swartz gave an excellent talk on this subject at the 41st Internationalization and Unicode Conference.)
As a result, it is not safe to simply use the device's locale to disambiguate user input. For example, a user from Chile may have typed "08/07/05" with the intent to mean July 8, 2005, but if they had their phone set to US English, we would interpret it as August 7, 2005.
There Is No One-to-One Mapping
When producing formatted output (such as with .toLocaleString()), the library picks a single sensible output format to use. However, in reality, there are many ways to express the same thing.
All of the following strings refer to the same date:
October 21, 2020
October 21, 2 Reiwa
3 Heshvan 5781
3 Cheshvan 5781
3 Marcheshvan 5781
10/21/20
21/10/20
2020/10/21
21.10.2020
3.2.5781
This list doesn't include typos, punctuation differences, and even more additional formats and calendar systems.
Locale Data Changes Over Time
Most of the time, there is no official format for numbers and dates in a particular locale. CLDR attempts to reflect common usage based on newspapers, government documents, and user feedback. However, common usage can and does change over time! This means that if "08/07/06" parsed as July 8, 2006 one day, after you update your locale data (such as when you update Chrome), it could parse as July 6, 2008 the next day.
When formatting strings, such as in ECMA-402's .toLocaleString(), this change in behavior is okay, because you should only be displaying the string to the user and nothing more. However, when parsing strings, you are probably going to be taking the result and passing it into your business logic, which disseminates the uncertainty into many more places.
Computational Complexity
Let's suppose that we know the user's actual locale, and that we have the data to parse different variations of localized strings. Even then, we still have the problem of computational complexity.
When passing around strings as an interchange format, they may have to be serialized and deserialized multiple times in multiple different environments. If every step along the way requires a complex locale-sensitive parsing algorithm, this can significantly increase latency. Much more efficient is to use an industry standard interchange format (discussed below).
How to Avoid The Need to Parse
When programmers want a parseLocaleString, we find that they usually fall into one of two buckets.
Parsing User Input: Here, the string originated from a human user, and the programmer wants to use locale information to parse it into a JavaScript object like Date or Number.
Data Interchange: Here, the string originated from a computer algorithm, such as .toLocaleString(), and the programmer wants to round-trip the string back into a proper JavaScript object.
In both of these situations, the problem of parsing can usually be avoided entirely.
Parsing User Input
Rather than attempting to parse a free-form string, the best practice is to use a proper input mechanism to accept user input directly into a machine-readable format. For example, in HTML, you can use <input type="number">. iOS, Android, and desktop OSes have similar built-in UI widgets you can use. Using built-in widgets means that users have a consistent experience across the platform and don't need to learn the nuances of input in each app.
If your platform's built-in input mechanisms are insufficient, such as when you wish to have more control over the user experience, use an open-source, off-the-shelf, i18n-ready input component. These are available in Angular, React, Vue, Android, iOS, and most other industry-standard front-end frameworks. When evaluating your options, make sure the component's documentation discusses internationalization; if you can't find it mentioned, then you probably shouldn't use that component; just go to the next search result.
Not only are number and date pickers a better user experience, but they also allow the user to react when the thing they entered is wrong. For example, if the user intended to enter July 6, but the date picker is showing June 7, they can correct it, whereas if you do string parsing behind the scenes, the user has no opportunity to fix a mistake.
For apps with heavy data entry, such as spreadsheets and calendars, developers and designers often want to use date parsing to make the input easier. I argue that this is still fundamentally the same problem space: a properly internationalized free-form date parsing library may be used as an implementation detail of this journey, but only so long as the parse results are presented to the end user for validation.
If you still feel the urge to implement your own input component, think again, especially if you haven't worked in the i18n field before and are unfamiliar with the unique problems that will arise.
Data Interchange
If a machine generated the string you are trying to parse, it means that the original machine-readable form must have also existed at some point in time. Localized strings are not an interchange format. Instead, you should use an industry-standard interchange format, such as ISO 8601 for dates and times (such as "2020-02-21"), or scientific decimal notation for numbers (such as "1.23E4").
If the localized strings are stored someplace like a database or spreadsheet, you should consider storing the localized string alongside an interchange-valid format, and after you do that, you should reconsider whether you really need to store the localized string in your database at all.
Right Tool for the Job?
Parsing of localized number strings is not completely without valid use cases. For example, in data mining and natural langauge understanding, you may find yourself with large amounts of unprocessed text, and you need to parse numbers out of it. In this situation, you probably want a "best effort" parser, and accuracy comes not from each individual sample but from the collective dataset.
In situations like this, you should look at making a custom parser specific for your use case. What you come up with depends greatly on what assumptions you can make about your specific dataset. In addition, you may want to consider presenting the parse results to a human for verification.
Conclusion
I hope you found this blog post useful. If so, please consider following my blog and/or Twitter, @_sffc. Thanks!
1 note
·
View note
Text
Why You Should Use git pull --ff-only
Git is a simple, elegant version control system. Like many great things, if you are new to Git, it takes trial and error before you can come to appreciate its power and simplicity.
Having introduced Git to many dozens of people, first as a teaching assistant and now as a professional software engineer, I have seen many of the mistakes that Git novices commonly make. Often, there is one root cause: Git trying to be helpful and performing operations on your repository that you did not intend.
In this blog post, I will advocate for using the --ff-only option for git pull, and furthermore setting it as the default option for git pull. If you get nothing else out of this blog post, it should be that running the following simple command will save you many headaches as a novice Git user.
$ git config --global pull.ff only
Why the default Git Pull is a Problem
The description of git pull in git pull --help looks rather harmless.
Incorporates changes from a remote repository into the current branch.
However, what the command actually does is explained in the next sentence.
In its default mode, git pull is shorthand for git fetch followed by git merge FETCH_HEAD.
There's the problem: git pull performs a merge, which often creates a merge commit. Therefore, by default, pulling from the remote is not a harmless operation: it can creates a new commit sha that didn't exist before! I find that this behavior confuses Git novices, because what feels like it should be a harmless download operation actually changes the commit history in unpredictable ways.
Consider the following situation. You have committed work on your local branch, and someone else made a new commit that is only on remote.
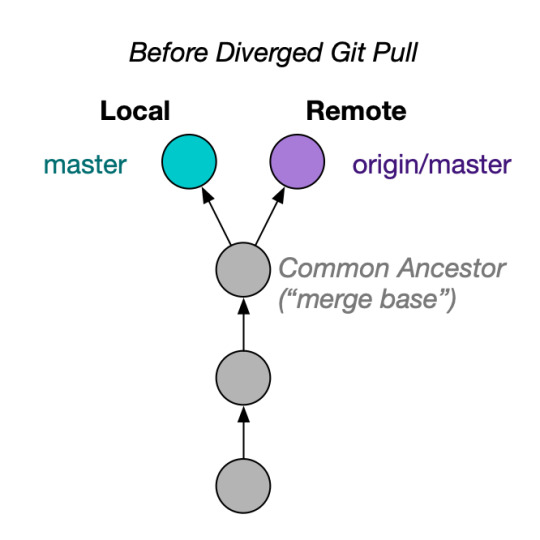
If you run git pull or git pull origin master, you end up with this:

Another problem is when you are on a different branch. If you have my-branch checked out, and you run git pull origin master, this does not simply update your local master. Instead, Git will happily merge origin/master into your branch!
How Git Pull --ff-only Works
Fortunately, Git gives us an option that prevents the accidental creation of new shas in your repository. With git pull --ff-only, Git will update your branch only if it can be "fast-forwarded" without creating new commits. If this can't be done (if local and remote have diverged), git pull --ff-only simply aborts with an error message:
$ git pull --ff-only upstream master # ... fatal: Not possible to fast-forward, aborting.
When this happens, inspect why the branches diverged. Sometimes, you may discover that you made a mistake, like trying to pull master into a local branch. In cases where you really did intend to create a merge commit, you can now follow with git merge. By doing this, you perform the "downloading" and the "committing" in two different steps, which helps mentally separate these two operations.
Why use --ff-only over --rebase
Another popular setup is to use the --rebase option for git pull instead of --ff-only. Visually, if local and remote had diverged, git pull --rebase gives you something like this:
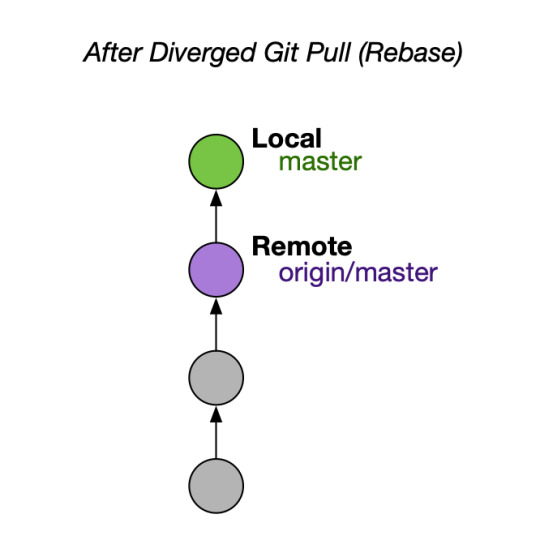
Many people consider this a clean outcome. Although the outcome is cleaner than the default, I still recommend --ff-only. --rebase can permanently mutate the history of your current branch, and often it does it without asking.
Conclusion
By using --ff-only, you can be confident that no matter what the state is of your local repository, you will not change the version history. Separating the download from the commit creation makes Git easier to swallow.
If you are convinced, configure your Git client to always use --ff-only by default, so you get this behavior even if you forget the command-line flag!
$ git config --global pull.ff only
If you learned something from this post, please follow me on Twitter and/or post a comment below. Thanks!
14 notes
·
View notes
Text
Operational Tranformation in Redis
Originally posted on March 8, 2016.
Operational Transformation (OT) is a widely used algorithm for merging changes to the same file from two simultaneous users. It is used as a base for Google Docs and countless other real-time text editing programs.
There are only a few open-source implementations of OT, though, which means that we as developers are a lot more limited. One choice is ot.js, which is designed to run in the browser and Node.JS. Unfortunately, it is limited in the sense that the documents being edited are stored in the memory of the server process, so ot.js will not work out of the box across server restarts or with a clustered server setup.
In this blog post, I explain an approach to using OT through Redis, the popular high-performance server-side key-value store, including an implementation of OT in Redis's scripting language, Lua. The methods illustrated here are used in practice by thousands of Octave Online users every day.
Background: How ot.js Works
In ot.js, every change made by a user corresponds to a list of operations. That list of operations is designed to transform a base string into the new string. There are three types of operations: insert, delete, and retain. When reconciling the list of operations, OT creates a new, empty string, and prepares to read in the base string with a "caret" at the first character. When it reads an operation, it does the following:
delete (negative integer): Some number of characters at the caret are deleted. The caret is moved forward that many characters without copying.
retain (positive integer): Some number of characters at the caret are retained. The caret is moved forward the corresponding number of characters, which each character copied into the new string.
insert (string): A string of text is inserted. The inserted string is appended to the new string. The caret in the base string is not moved.
As an example, suppose we started with the string, Hello, world!, and let's suppose that our list of operations was:
[ 7, "Earth", -5, 1 ]
We start with an empty string. The first operation says, "keep the first 7 characters". We move the caret ahead 7 places, and our new string becomes Hello,.
The second operation says, "insert 'earth' at the current location". The caret stays in place, and our new string becomes Hello, Earth.
The third operation says, "remove the next 5 characters". The caret moves ahead, and our new string remains the same.
The fourth operation says, "keep the next character". The caret, which, in case you haven't been keeping track, is pointing to the exclamation mark, is moved ahead one more character, and the exclamation mark is copied into the new string, making Hello, Earth!. Since this was the last operation, we are now finished.
Where things get interesting is when two people change the document at the same time. How to you merge their changes together? The way that ot.js handles this is by associating a "document version" with each operations list. If two operations lists A and B reference the same document version, then ot.js performs some math to efficiently transform list B to reference the document version after list A would have been applied, giving it the name operational transformation. The magic behind the transformation is beyond the scope of this post, but it's rather easy to understand if you read through the source code.
Redis Architecture Overview
You have two users, Alice and Bob, editing a text file together. Alice is in New York, and is connected to a datacenter in US-East. Bob is in Paris, and is connected to a datacenter in Europe. Each datacenter is running a copy of your server application. However, both copies of the application query the same Redis database.
When Alice makes a change to the file, her change gets sent to the US-East datacenter, which is promptly forwarded to the Redis database. Redis performs the OT magic to merge Alice's change with any changes Bob may have recently made. Then, Redis broadcasts Alice's transformed change to the Europe datacenter, which forwards it to Bob.
The Code
I'm going to assume that you have ot.js set up on the client side and attached to some sort of text editor, either a bare textarea or something more sophisticated like an ACE Editor. I'm also going to assume that you are transmitting operations over some sort of socket connection to your server on ot.js's "sendOperation" callback.
In this example, I present Node.JS code, but your server doesn't need to be running Node.JS; it could be anything (Tornado, PHP, Rails, …) as long as it supports Redis and some way to quickly send messages back and forth to the client.
Below is a function that should be run on the server whenever a user makes a change to the document. It calls a pseudo-function called "runRedisScript", which should perform an "EVAL" operation on the Redis server. You could use redis-scripto, for example, to manage your Redis scripts.
function onOtChange(docId, opsJson, revision) { runRedisScript( 4, "ot:" + docId + ":ops", "ot:" + docId + ":doc", "ot:" + docId + ":cnt", "ot:" + docId + ":sub", opsJson, revision ); };
So, what we're doing is to run our Redis script (which I will show you soon). It uses four channels:
ops: A List containing JSON strings of every operation performed on the document.
doc: An up-to-date copy of the document, useful if you need to persist the document across sessions.
cnt: The latest revision number.
sub: A channel for Redis pub-sub notifications of new operations against the document.
Here is the code for the Redis script that will be run.
local ops = cjson.decode(ARGV[1]) local rev = tonumber(ARGV[2]) local ops_key = KEYS[1] local doc_key = KEYS[2] local sub_key = KEYS[3] local cnt_key = KEYS[4] -- Load any concurrent operations from the cache local concurrent = redis.call("LRANGE", ops_key, rev, -1) -- Transform the new operation against all the concurrent operations if concurrent then for i,cops in pairs(concurrent) do ops = transform(ops, cjson.decode(cops)) end end -- Save the operation redis.call("RPUSH", ops_key, cjson.encode(ops)) redis.call("INCR", cnt_key) -- Load and apply to the document local doc = redis.call("GET", doc_key) if type(doc)=="boolean" then doc="" end doc = apply(doc, ops) redis.call("SET", doc_key, doc) -- Publish to the subscribe channel redis.call("PUBLISH", sub_key, cjson.encode(ops))
First, we read the arguments. Then we load the concurrent operations lists from the ops key. Then we perform the OT magic. Then we save the new operation into the ops key, update the other keys, and publish the operation to the sub channel.
Where is the implementation of transform and apply, you ask? You can find it in my Gist in the file ot.lua.
Back in Node.JS, now, all we need to do is broadcast the operation to all clients. We can make a Redis client to subscribe to the "sub" channel, and whenever something comes through that channel, we broadcast it through all the websocket connections. When the operation gets to the client, we can apply it to the document by calling ot.js's "applyServer" command (or, if applicable, "serverAck" on the client that first produced the operation).
Caveat: UTF-8 Support
For the most part, my ot.lua is transcribing from ot.js. However, one thing that I discovered through that process is that Lua has really crappy support for unicode! Lua, which only knows about single-byte characters, would do ugly things like split multibyte characters in half. To solve this problem, I had to include some UTF-8 code that is capable of correctly calculating string length and substrings.
Caveat: Expiring Keys
In addition to the transform and apply operations, my Gist also contains the rest of the Lua code from this post, with the bonus feature of supporting ops lists that expire after a certain amount of time. This helps keep the amount of data stored in Redis is constant over time. When running the scripts, you should pass in additional arguments corresponding to the number of seconds to keep operations alive in the cache. A couple of minutes should be more than enough time.
Conclusion
I hope that this approach to using a Redis cache as an Operational Transformation server proves useful. OT sounds scary, but it really isn't.
If you like this post, let me know by commenting below!
0 notes
Text
Optimized Images in Jekyll
Written for Gist posted on June 17, 2018.
Jekyll is a popular static site generator. If you're like me, you want the Jekyll build step to output a fully optimized version of your site; in particular, you want your image files to be compressed for the web. However, the default Jekyll build copies image files directly without optimizing them.
To solve this for my site, I put together a small drop-in plugin (see Gist) that runs your images through popular image optimization utilities via image_optim. Unlike other solutions I've found on the internet, this does not overwrite the original image files, so you can keep the lossless images in your repo.
If this was useful to you, let me know by starring the gist!
0 notes
Text
Writing a Custom Camera Plugin for PhoneGap
Originally posted on January 3, 2014.
PhoneGap (the brand name of Apache Cordova) is a great tool for writing cross platform mobile applications. With JavaScript and rendering engines getting faster by the minute, we're quickly approaching the time when many apps can be written exclusively on the web platform without needing to dive into Objective-C and Java for iOS and Android.
Like all great things in life, though, PhoneGap has its limitations. For example, the abstraction away from Cocoa Touch means that the UI of your application is not automatically updated with new versions of iOS. But perhaps the most clearly defined limitation is the integration with native components. PhoneGap does a good job of abstracting things like contacts and the accelerometer, but it struggles with native components that require more than just an API.
In this blog post, I will dive into one of these native components: the camera. I will explain the limitations behind PhoneGap's out-of-the-box implementation of the camera, the steps you need to take to implement a custom camera overlay in iOS, and some tips and tricks along the way.
This tutorial applies to PhoneGap 3+. The plugin specification changed with the introduction of PhoneGap 3.0, so you will need a different tutorial if you intend to support older versions of PhoneGap.
I assume that you are competent in JavaScript and Objective-C, and that you are developing on a Mac with Xcode installed. Since the iOS simulator does not have a camera at the time of writing, you will also need a physical iOS device for testing. If at any time you get lost or your code doesn't work, you can refer to a working copy of CustomCamera on GitHub.
Let's get started!
The Default PhoneGap Camera
The default PhoneGap camera plugin has a clean JavaScript interface. From a developer's point of view, capturing a photo is as easy as one command:
$ phonegap local plugin add org.apache.cordova.camera
…followed by a few lines of code:
navigator.camera.getPicture(function(imagePath){ document.getElementById("photoImg").setAttribute("src", imagePath); }, function(){ alert("Photo cancelled"); }, { destinationType: navigator.camera.DestinationType.FILE_URI });
However, from the end user's point of view, things are not quite as slick. On iOS, a modal opens with the same camera overlay as the native UI. They can choose an image from their preexisting photo albums, or they can snap a new one. They are then brought to a screen where they can preview the photo and choose to retake it. Finally, when they submit the image, the modal closes and the JavaScript callback is evaluated.
This is fine for an app where the camera is not a core feature, but for apps where the user spends a significant amount of time taking photos, the default PhoneGap camera might not give a good user experience (UX).
Writing the PhoneGap Plugin
We can make a custom user experience by writing a PhoneGap plugin. The folks at Apache have improved the plugin API and its documentation substantially in the past few months, but there is still a definite learning curve.
I'm going to do my best to walk you through the process of creating a camera plugin for iOS.
Step 1: Create an empty PhoneGap project
The first thing we need to do is to create a new empty PhoneGap project and add iOS support. If you have the PhoneGap Command Line Interface installed, you just need to run:
# NOTE: Change com.example.custom-camera to something else unique to your organization. $ phonegap create custom_camera com.example.custom-camera CustomCamera $ cd custom_camera $ phonegap local build ios
The last line creates the iOS project directory at custom_camera/platforms/ios.
Step 2: Write the JavaScript bindings
It will make our lives easier if we write the JavaScript bindings for our plugin right up front. Make a new JavaScript file at custom_camera/www/js/custom_camera.js. Put in the following code:
var CustomCamera = { getPicture: function(success, failure){ cordova.exec(success, failure, "CustomCamera", "openCamera", []); } };
cordova.exec is an automagic function that lets us call an Objective-C method from JavaScript. In this case, it will create an instance of CustomCamera and call openCamera on that instance. We will write the CustomCamera class in Objective-C in the next step.
Notice how we made our API very close to PhoneGap's camera API. This is optional. At the end of the day everything boils down to cordova.exec.
Let's also create a button that we can tap to run the above function. Modify custom_camera/www/index.html and add the following inside the div.app tag:
<button id="openCustomCameraBtn">Open Custom Camera</button> <img id="photoImg" style="position: fixed; top: 0; width: 50%; left: 25%;" /> <script src="js/custom_camera.js"></script> <script> document.getElementById("openCustomCameraBtn").addEventListener("click", function(){ CustomCamera.getPicture(function(imagePath){ document.getElementById("photoImg").setAttribute("src", imagePath); }, function(){ alert("Photo cancelled"); }); }, false); </script>
Finally, don't forget to tell PhoneGap to copy the new files into our iOS project directory.
$ phonegap local build ios
Step 3: Set up the Xcode Project
If you run the above app on your iOS device, you will get an error telling you that the CustomCamera class is not defined. This is where we get to start diving into the Objective-C.
Open up the Xcode project located at custom_camera/platforms/ios/CustomCamera.xcodeproj. Press ⌘N, make a new Objective-C class for Cocoa Touch, name the class CustomCamera, and (this is important!) inherit from CDVPlugin. Save it in the Classes folder and the Classes group.
In the previous step, we told our JavaScript to call the openCamera method on an instance the CustomCamera class. We need to declare this method. Make your interface in CustomCamera.h look like this:
// Note that Xcode gets this line wrong. You need to change "Cordova.h" to "CDV.h" as shown below. #import <Cordova/CDV.h> // Import the CustomCameraViewController class #import "CustomCameraViewController.h" @interface CustomCamera : CDVPlugin // Cordova command method -(void) openCamera:(CDVInvokedUrlCommand*)command; // Create and override some properties and methods (these will be explained later) -(void) capturedImageWithPath:(NSString*)imagePath; @property (strong, nonatomic) CustomCameraViewController* overlay; @property (strong, nonatomic) CDVInvokedUrlCommand* latestCommand; @property (readwrite, assign) BOOL hasPendingOperation; @end
And wait, what the heck is CustomCameraViewController? It's the class that will handle the UI side of the plugin. Cordova will instantiate an instance of CustomCamera, which in turn will instantiate an instance of CustomCameraViewController as we will see later.
Press ⌘N again, make another new Objective-C class for Cocoa Touch, name it CustomCameraViewController, but this time inherit from UIViewController. I recommend creating a XIB file. Save it in the Classes folder.
The interface in CustomCameraViewController.h should look something like this:
#import <UIKit/UIKit.h> // We can't import the CustomCamera class because it would make a circular reference, so "fake" the existence of the class like this: @class CustomCamera; @interface CustomCameraViewController : UIViewController <UIImagePickerControllerDelegate, UINavigationControllerDelegate> // Action method -(IBAction) takePhotoButtonPressed:(id)sender forEvent:(UIEvent*)event; // Declare some properties (to be explained soon) @property (strong, nonatomic) CustomCamera* plugin; @property (strong, nonatomic) UIImagePickerController* picker; @end
Now we need to make the button that, when tapped, calls the takePhotoButtonPressed method. To do this, open the XIB file with CustomCameraViewController.h still open, make a button on the screen, and Control-Drag the button from the XIB file onto the method in the header file.
Gotta say it's a decent GUI that Apple put together!
We also need to add code to custom_camera/platforms/ios/config.xml in order to make PhoneGap see our plugin. Add the following lines somewhere inside the widget tag:
<feature name="CustomCamera"> <param name="ios-package" value="CustomCamera" /> </feature>
With the header files and XIB out of the way, we need to dive into the guts of the Objective-C.
Step 4: Write the hard core Objective-C
The primary API for interacting with the camera in iOS is the UIImagePickerController. We will be instantiating an instance of UIImagePickerController, configuring it to fill the whole screen, and opening it as a modal in front of the web view. When UIPickerController tells us that an image has been captured, we will save it as a JPEG file, tell JavaScript the file name, and close the camera modal. While the details of UIImagePickerController are beyond the scope of this blog post, it should be relatively straightforward to follow along with the code.
Let's start by writing the implementation for our CustomCameraViewController class, in CustomCameraViewController.m. Please read along with the comments.
#import "CustomCamera.h" #import "CustomCameraViewController.h" @implementation CustomCameraViewController // Entry point method - (id)initWithNibName:(NSString *)nibNameOrNil bundle:(NSBundle *)nibBundleOrNil { self = [super initWithNibName:nibNameOrNil bundle:nibBundleOrNil]; if (self) { // Instantiate the UIImagePickerController instance self.picker = [[UIImagePickerController alloc] init]; // Configure the UIImagePickerController instance self.picker.sourceType = UIImagePickerControllerSourceTypeCamera; self.picker.cameraCaptureMode = UIImagePickerControllerCameraCaptureModePhoto; self.picker.cameraDevice = UIImagePickerControllerCameraDeviceRear; self.picker.showsCameraControls = NO; // Make us the delegate for the UIImagePickerController self.picker.delegate = self; // Set the frames to be full screen CGRect screenFrame = [[UIScreen mainScreen] bounds]; self.view.frame = screenFrame; self.picker.view.frame = screenFrame; // Set this VC's view as the overlay view for the UIImagePickerController self.picker.cameraOverlayView = self.view; } return self; } // Action method. This is like an event callback in JavaScript. -(IBAction) takePhotoButtonPressed:(id)sender forEvent:(UIEvent*)event { // Call the takePicture method on the UIImagePickerController to capture the image. [self.picker takePicture]; } // Delegate method. UIImagePickerController will call this method as soon as the image captured above is ready to be processed. This is also like an event callback in JavaScript. -(void) imagePickerController:(UIImagePickerController *)picker didFinishPickingMediaWithInfo:(NSDictionary *)info { // Get a reference to the captured image UIImage* image = [info objectForKey:UIImagePickerControllerOriginalImage]; // Get a file path to save the JPEG NSArray* paths = NSSearchPathForDirectoriesInDomains(NSDocumentDirectory, NSUserDomainMask, YES); NSString* documentsDirectory = [paths objectAtIndex:0]; NSString* filename = @"test.jpg"; NSString* imagePath = [documentsDirectory stringByAppendingPathComponent:filename]; // Get the image data (blocking; around 1 second) NSData* imageData = UIImageJPEGRepresentation(image, 0.5); // Write the data to the file [imageData writeToFile:imagePath atomically:YES]; // Tell the plugin class that we're finished processing the image [self.plugin capturedImageWithPath:imagePath]; } @end
Now let's write the implementation for the CustomCamera class, in CustomCamera.m.
#import "CustomCamera.h" @implementation CustomCamera // Cordova command method -(void) openCamera:(CDVInvokedUrlCommand *)command { // Set the hasPendingOperation field to prevent the webview from crashing self.hasPendingOperation = YES; // Save the CDVInvokedUrlCommand as a property. We will need it later. self.latestCommand = command; // Make the overlay view controller. self.overlay = [[CustomCameraViewController alloc] initWithNibName:@"CustomCameraViewController" bundle:nil]; self.overlay.plugin = self; // Display the view. This will "slide up" a modal view from the bottom of the screen. [self.viewController presentViewController:self.overlay.picker animated:YES completion:nil]; } // Method called by the overlay when the image is ready to be sent back to the web view -(void) capturedImageWithPath:(NSString*)imagePath { [self.commandDelegate sendPluginResult:[CDVPluginResult resultWithStatus:CDVCommandStatus_OK messageAsString:imagePath] callbackId:self.latestCommand.callbackId]; // Unset the self.hasPendingOperation property self.hasPendingOperation = NO; // Hide the picker view [self.viewController dismissModalViewControllerAnimated:YES]; } @end
Of special note is the hasPendingOperation property on the CDVPlugin. This is an undocumented property that, when true, prevents the web view from being released from memory (garbage collected) while the camera view is open. If the web view were to be released from memory, bad things would happen: the app would essentially restart when the camera view closed, and the image data would never reach JavaScript.
Step 5: Test drive
Phew, that was a lot of Objective-C! But does it work?
Hook up your iOS device to your computer. If you haven't yet set up a provisioning profile, do so now. (For more information on connecting your device to Xcode, ask Google.) Build and run the app on your device from within Xcode. Tap the button to open the camera, then tap the button to snap the photo. The camera overlay should close, and you should see your image within the WebView!
The UI could obviously use some improvement, but the guts of the plugin are all there now.
Bundling the PhoneGap Plugin
In a crunch, you could stop right here and write the rest of your PhoneGap code inside your CustomCamera project. But the better practice is to give our plugin some metadata that we can use to include it in whichever project we want with a click PhoneGap command.
Step 6: Write plugin.xml
The metadata for PhoneGap plugins is stored in plugin.xml at the root of the project directory. Make custom_camera/plugin.xml with the following markup. More detail can be found in the PhoneGap docs.
<?xml version="1.0" encoding="UTF-8"?> <plugin xmlns="http://apache.org/cordova/ns/plugins/1.0" xmlns:android="http://schemas.android.com/apk/res/android" xmlns:rim="http://www.blackberry.com/ns/widgets" id="com.example.custom-camera" version="0.0.1"> <name>Shopeel Camera</name> <description>PhoneGap plugin to support a custom camera overlay</description> <author>Shane Carr and others</author> <info> This plugin was written with the tutorial found at: http://codrspace.com/vote539/writing-a-custom-camera-plugin-for-phonegap/ </info> <js-module src="www/js/custom_camera.js" name="CustomCamera"> <clobbers target="navigator.CustomCamera" /> </js-module> <engines> <engine name="cordova" version=">=3.1.0" /> </engines> <platform name="ios"> <!-- config file --> <config-file target="config.xml" parent="/*"> <feature name="CustomCamera"> <param name="ios-package" value="CustomCamera" /> </feature> </config-file> <!-- core CustomCamera header and source files --> <header-file src="platforms/ios/CustomCamera/Classes/CustomCamera.h" /> <header-file src="platforms/ios/CustomCamera/Classes/CustomCameraViewController.h" /> <source-file src="platforms/ios/CustomCamera/Classes/CustomCamera.m" /> <source-file src="platforms/ios/CustomCamera/Classes/CustomCameraViewController.m" /> <resource-file src="platforms/ios/CustomCamera/Classes/CustomCameraViewController.xib" /> </platform> </plugin>
Customize plugin.xml with your plugin details, file names, and so on.
Step 7: Specify the JavaScript binding
PhoneGap plugins treat the JavaScript file we made like a module. This means that custom_camera.js will be evaluated in a sandbox, and we need to specifically expose properties in order for us to use them.
Take note of the following lines in plugin.xml:
<js-module src="www/js/custom_camera.js" name="CustomCamera"> <clobbers target="navigator.CustomCamera" /> </js-module>
What this means in English is "include custom_camera.js and bind its module.exports to navigator.CustomCamera". If you've used Node.JS, you are probably familiar with module.exports. All we need to do is to add the following line to the bottom of custom_camera.js:
module.exports = CustomCamera;
Now, in applications in which we include our plugin, we can open the custom camera view with navigator.CustomCamera.getPicture().
Step 8: Deploy the plugin
We are finally ready to include our plugin in our real PhoneGap project!
Installing the default PhoneGap camera was as easy as:
$ phonegap local plugin add org.apache.cordova.camera
Guess what: our own custom camera plugin ain't much harder to install!
$ phonegap local plugin add /path/to/custom_camera
You can also give phonegap local plugin add a path to your Git repo.
$ phonegap local plugin add https://github.com/vote539/custom-camera.git
Conclusion
We now have a very basic, working PhoneGap plugin for iOS!
The next steps would include:
Add support for Android, Blackberry, Windows Phone, and all other targeted platforms. You would first need to add said platform to your PhoneGap project, then you would need to refer to the documentation for PhoneGap and your desired platform about how to implement a camera. Don't forget to modify plugin.xml once you're ready!
Package your plugin for the community. This might be as easy as plugman publish /path/to/custom_camera. Before you do this, make sure that you use a real reverse URL identifier for your plugin, rather than com.example.xyz.
If this tutorial helped you, let me know by posting a comment below!
0 notes
Text
Welcome!
This is the second home of my blog, which was started in 2013 on the now-defunct codrspace.com. I will copy some of my more popular posts from the original blog to here, and you can access most of the rest on archive.org, a site that is a blessing for all of us.
Old Posts
Here are the original descriptions of most of my old blog posts, along with links to those posts on archive.org. I did not include the two posts that I have copied here in their entirety.
Mushroom Monster: 3-Line Solution in Julia
The first question in Round 1A of the 2015 Google Code Jam is a great example of a problem that can be solved very easily in just a few lines of Julia.
Installing Cilk Plus on OS X
Cilk Plus is a language extension to C++ that gives convenient parallel programming constructs, like spawn and sync. Installing it on OS X is fairly simple.
CSRF Protection in Django Tastypie
Overall I have ben pleased with the way that Tastypie implements a RESTful API for Django. However, it leaves one major security hole unpatched: cross-site request forgeries (CSRF). In this short blog post, I will describe how to enable CSRF protection in your Tastypie project.
Sencha Touch Record View Update Pattern
Sencha Touch automatically updates dataviews associated with a store when the store changes. However, there doesn't seem to be a similar mechanism in place for views associated with just one record. In this blog post I'll go over a design pattern that implements a MVVM-like pattern in Sencha Touch.
Nested Models and Collections in Backbone.js
One of Backbone.js's biggest weaknesses is its lack of support for nested collections and models. There are several projects (see below) that provide implementations on how to solve this design problem. In this short post, I will document a very lightweight home-grown approach I use in some of my Backbone.js projects that might be of some use to you.
Installing Node.js and npm via nave in One Line
There is a gist with a variety of options on how to install Node.js and npm on a *nix system. I have never found any of the options particularly elegant: they require that you either build Node from source or else manually make symlinks and stuff. I therefore present a one-line solution.
Funneling Socket.IO to NSSocket
You have written an awesome Node.JS application with Socket.IO, and you have computationally intensive callbacks associated with the server side end of a Socket.IO connection. One solution to make your application more scaleable is to delegate those callbacks to a separate server; you can then easilly add more computational power by simply cloning more instances of your computational "back" server while keeping just one "front" server for your HTTP interface.
In this blog post, I will demonstrate how to delegate your Socket.IO callbacks to another server, all without needing to rewrite your existing codebase.
0 notes