
Statistics
We looked inside some of the posts by shaggybeetlearttutorialdump and here's what we found interesting.
Average Info
Notes Per Post
161K
Likes Per Post
112K
Reblog Per Post
49K
Reply Per Post
145
Time Between Posts
32 minutes
Number of Posts By Type
Text
8
Note
2
Last Seen Tumblr Blogs


Fun Fact
Tumblr has a low social media market share in South America.
Text

a G.I. Joe in a world of kens (or is it the other way around??)
#mac P mcdonald#mac mcdonald#gay mac rules#god i love him#its always sunny in philadelphia#it’s always sunny#iasip#iasip fanart#my art
2 notes
·
View notes
Text

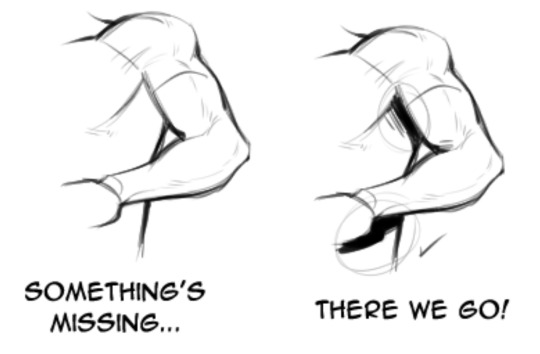
“Drawing techniques to get better shape of male muscles”
Source: Twitter
192 notes
·
View notes
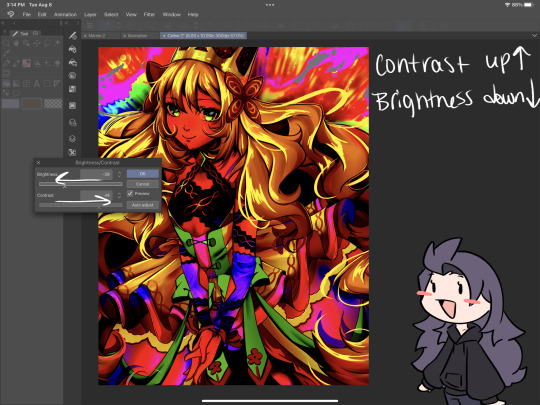
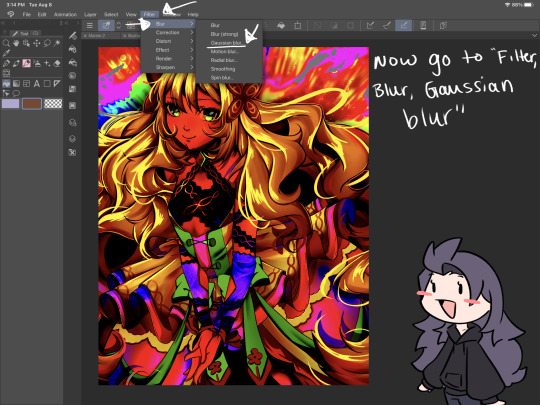
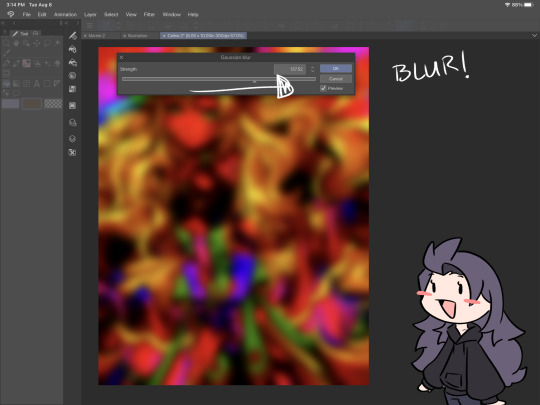
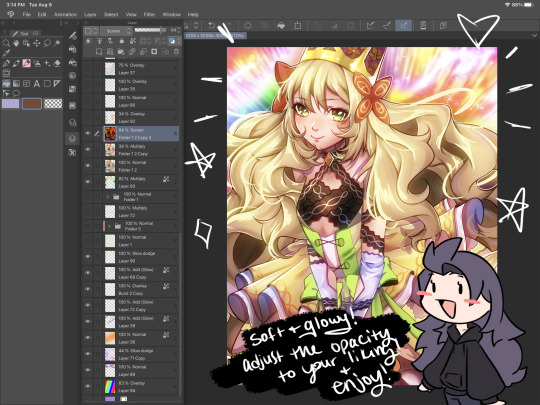
Text
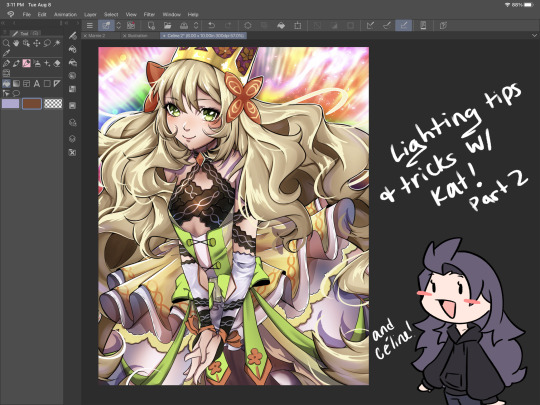
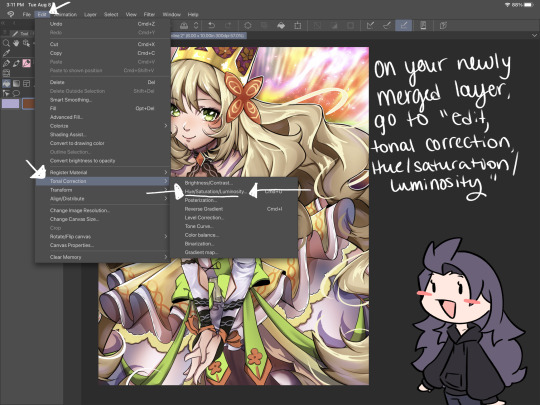
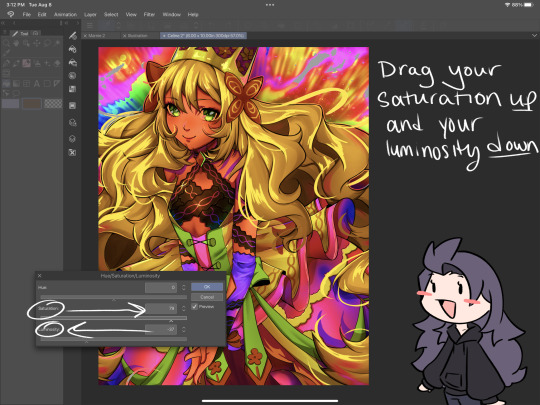
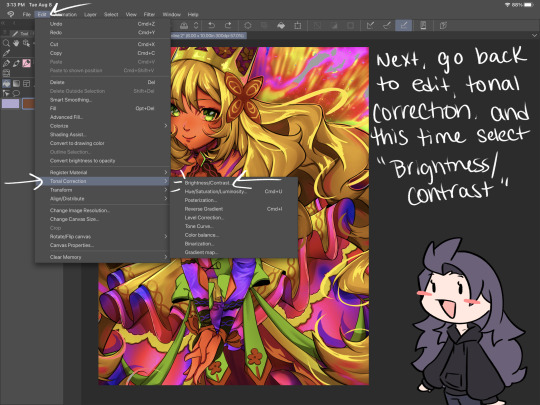
I’ve got 2 more lighting tips today: first one is something I call “soft rendering.” It gives that fuzzy, 90’s anime feel! I hope you all enjoy it! I’ll post the second lighting tip tonight!


521 notes
·
View notes
Text
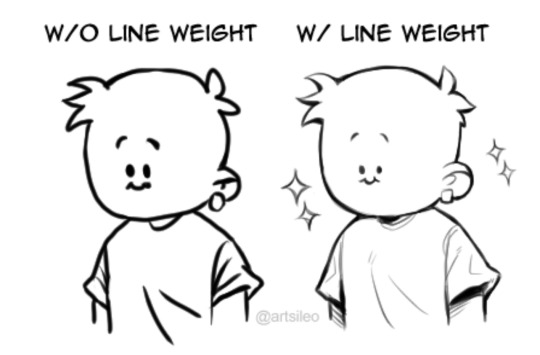


You don’t suck at Lineart, you’re just not familiar with line weight👍🏼!
71K notes
·
View notes
Text
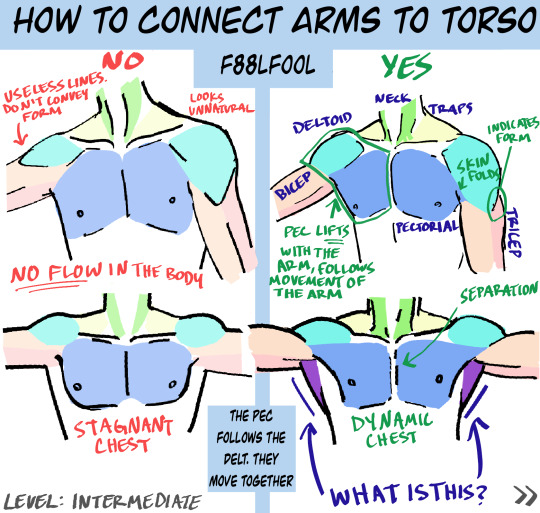

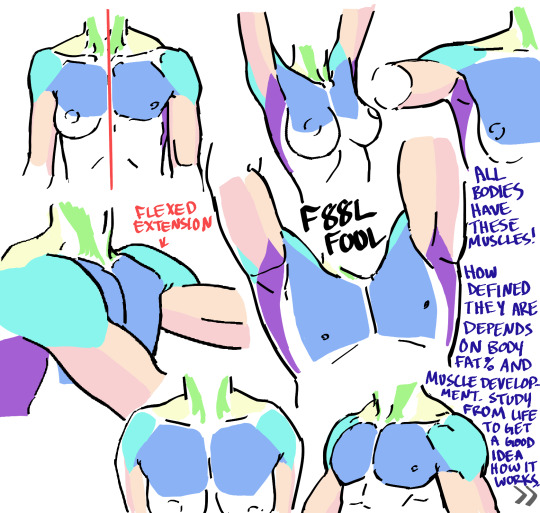
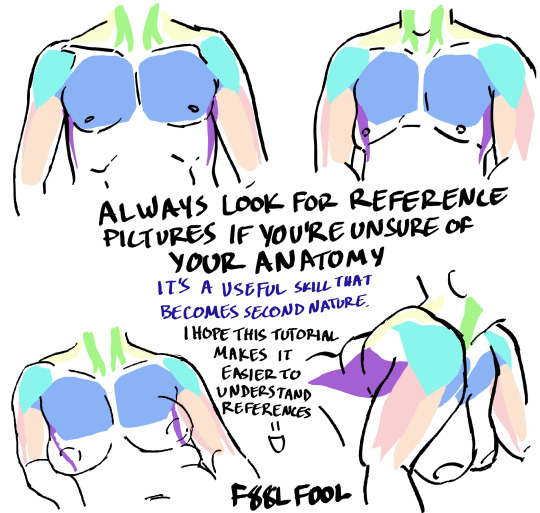
My first anatomy tutorial. How I connect arms to the torso. Simplified the muscles for better comprehension
PS. Pectoral is misspelled as “pectorial” in the picture. Don’t make that mistake haha
And I’d love to see the art made from using these as reference, you can message or tag me.. whatever you want
Edit: The extended names of the muscles:
Neck - Sternocleidomastoideus
Traps - Trapezius
Lats - Latissimus Dorsi
30K notes
·
View notes
Note
Looking at your recent commissions, those backgrounds are soo pretty!! Do you have any tips for backgrounds? I always struggle with them :>
aAA many many thanks!!
backgrounds can absolutely be a struggle but they don't have to be! they just require a little more creative planning~!
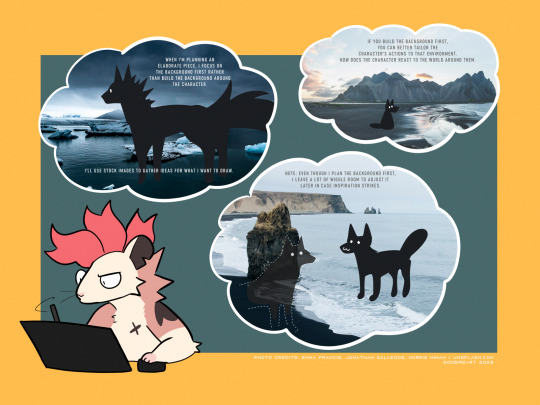
whether it be a commission or a personal drawing, if I'm building an elaborate art piece i focus on establishing the background First.
the background is the stage for your character! planning the background first will make it easier to tailor the character's actions and how they interact with the environment around them.
planning the background first can be the difference between your character standing awkwardly front and center with the setting going on behind them, or actually participating in their environment.

if i'm super stumped for background ideas, i browse stock image sites to get inspiration. sometimes it helps to doodle on an image to generate some ideas - kinda like you're playing with JPEGs like dolls.
that said - while i'm pinpointing WHAT i want to draw, i keep the ideas loose. i don't want to focus on the itty-bitty details until i've got the overall aesthetic and layout in mind, as i might get inspired to add something in later!
THUMBNAILING
if you're planning a big piece it can be helpful to break it down into something bite-sized before you go all in and start lining or painting. these are "thumbnails" - fast little sketches that establish the scene in a way that doesn't consume a lot of time or effort. it's also great as a little perspective exercise as a treat.
here i decided i want to draw a character walking home in a back alley street. with these photo references in mind, i can plan a layout and how the character will act in the scene. is this a candid shot? are they posing cutely? are they looking down at us in a tense way? there are many ideas to be had!
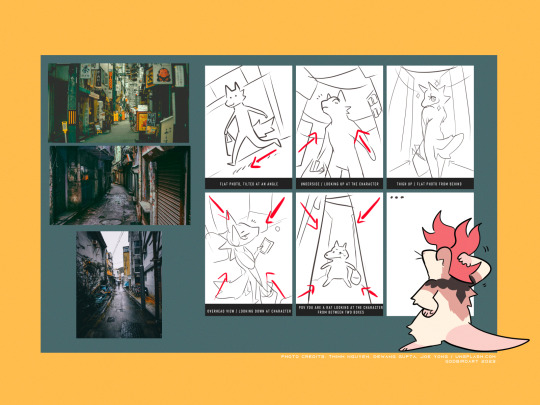
after you've chosen the layout / vibe for your idea, you can scale up your thumbnail to your preferred canvas size and start fleshing out the details. be sure to keep referring to your reference images to get additional ideas, such as storefronts, items, props etc!
3D MODELS
If you're trying to create a unique environment that photo references simply cannot help you visualize, 3D models exist! This gives you that ability to rotate / scale things for better visualization. Clip Studio has a vast catalogue of 3D models to download For Free that you can fiddle around with. i know there are many 3D builder sites out there as well, though i've never made use of them so i'm afraid i cannot recommend any off the top of my head. hell, you can even use the Sims game to design a setting and go from there!
also if anyone is going to come into my house and say 3D models are cheating: they are not. using a 3D model to better grasp an angle or get a better idea for perspective is not cheating. using 3D models to help plan the environment in your art is not cheating. they are no different than brushes; these are tools made to HELP YOU. use them!
PERSPECTIVE
perspective and angles can make a HUGE difference in the art piece. there's nothing wrong with static long shots! if that's what you want to draw, do it!! there's no right and wrong here!
but if you're finding your work to be a little robotic and stiff, slap an angle in there. consider an overhead view. these same techniques are applied to photography and film! nothing wrong with wide shots, but every once in a while it can help to throw in a dutch angle.
if there is one note i'd like to leave off on, it's that your backgrounds do not have to be 100% accurate-to-life to be Good. unless realism is something you're really striving for in your style, don't feel compelled to nitpick every brick and leaf in your art. us artists can tend to over-prune our work until our art looks a little bare and soulless. flaws can give your work character, and that's often a lot more appealing than how accurate the scale ratio between background building A and building B are [again, unless you WANT to go for that realistic look then you can fuss over those details all you like].
i hope this helped a little! MY APOLOGIES FOR MAKING IT SO LONG AH
631 notes
·
View notes
Text
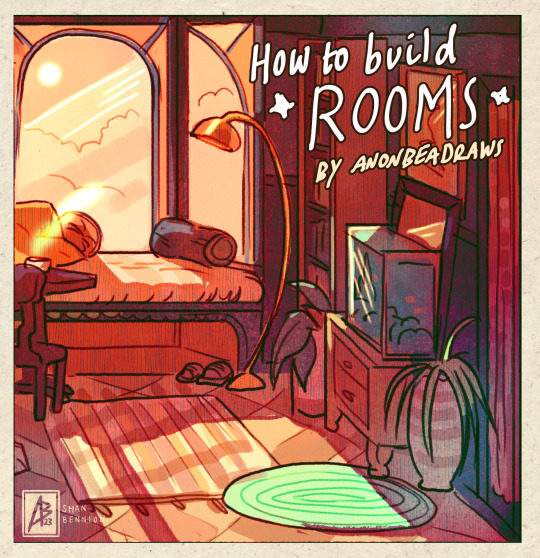
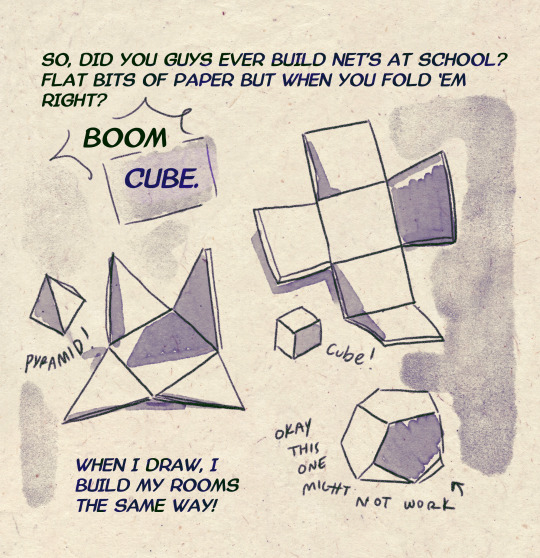
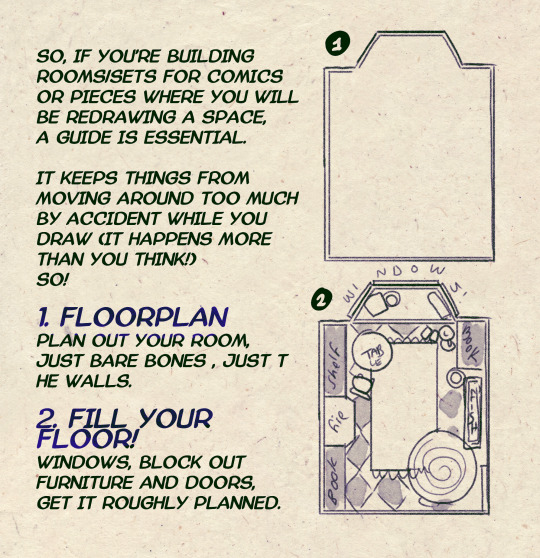
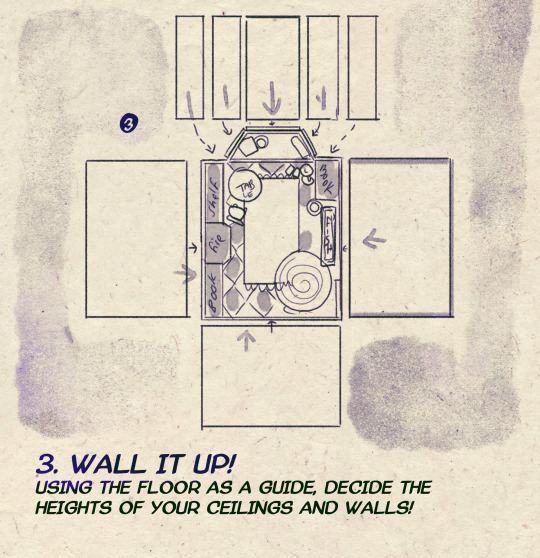


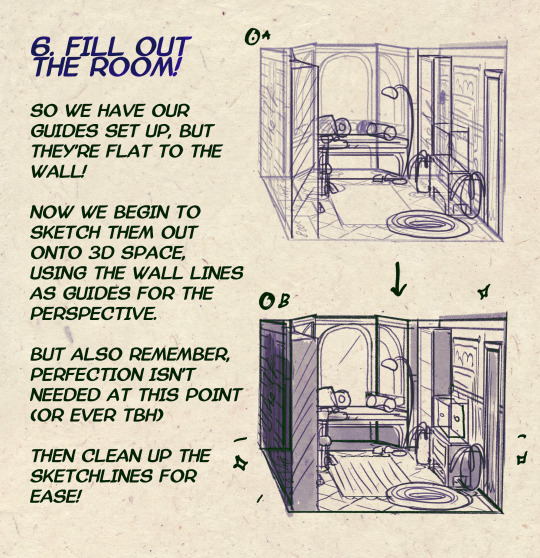

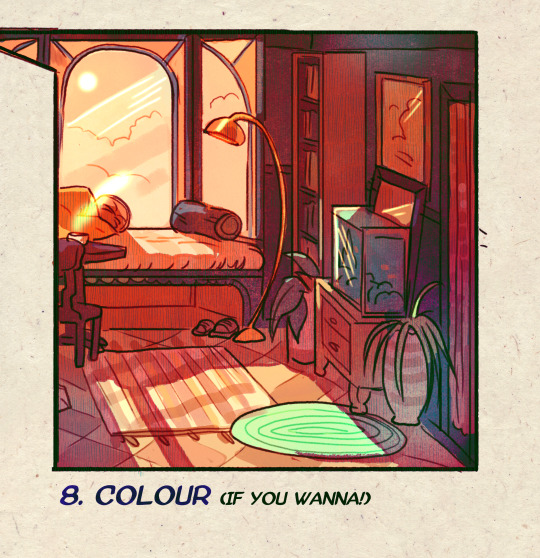
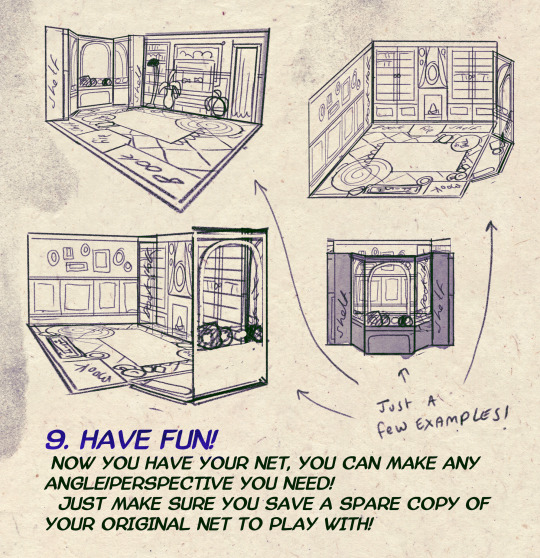
I made a Room Building tutorial! Lemme know if it helps! 🧡
Tip me here| Commission info here!
42K notes
·
View notes
Text
How to draw short hair from the back by Buboo
10K notes
·
View notes
Note
i love love love the way you paint back lighting!! do you have any tips/ a step by step for the way you do it?
ended up making a whole painting just to break it down and explain my general process for subjects lit from behind so heres that + a timelapse!
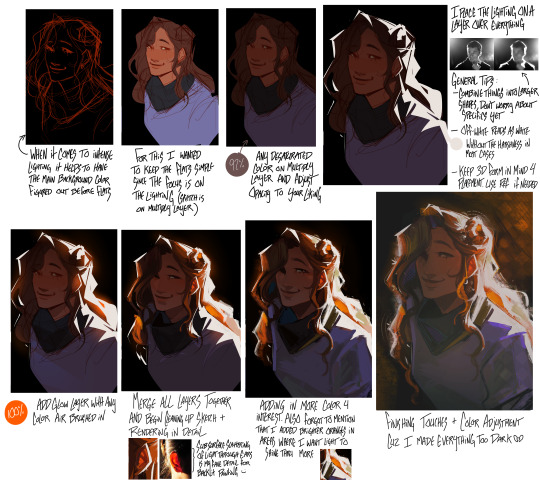
main thing for drawing anything with a strong light source behind is to make the main subject Darker and more desaturated to convey that the light is behind them rather than to their sides (face cant be properly lit if the light is behind). Also making the Main highlight the brightest hue in the image helps to intensify it. I tend to use teeth/eyes as a good comparison point

some people have a tendency to make the sclera white out of habit but darkening that+ the rest of the whites helps the image read as Darker compared to the brighter highlight
7K notes
·
View notes
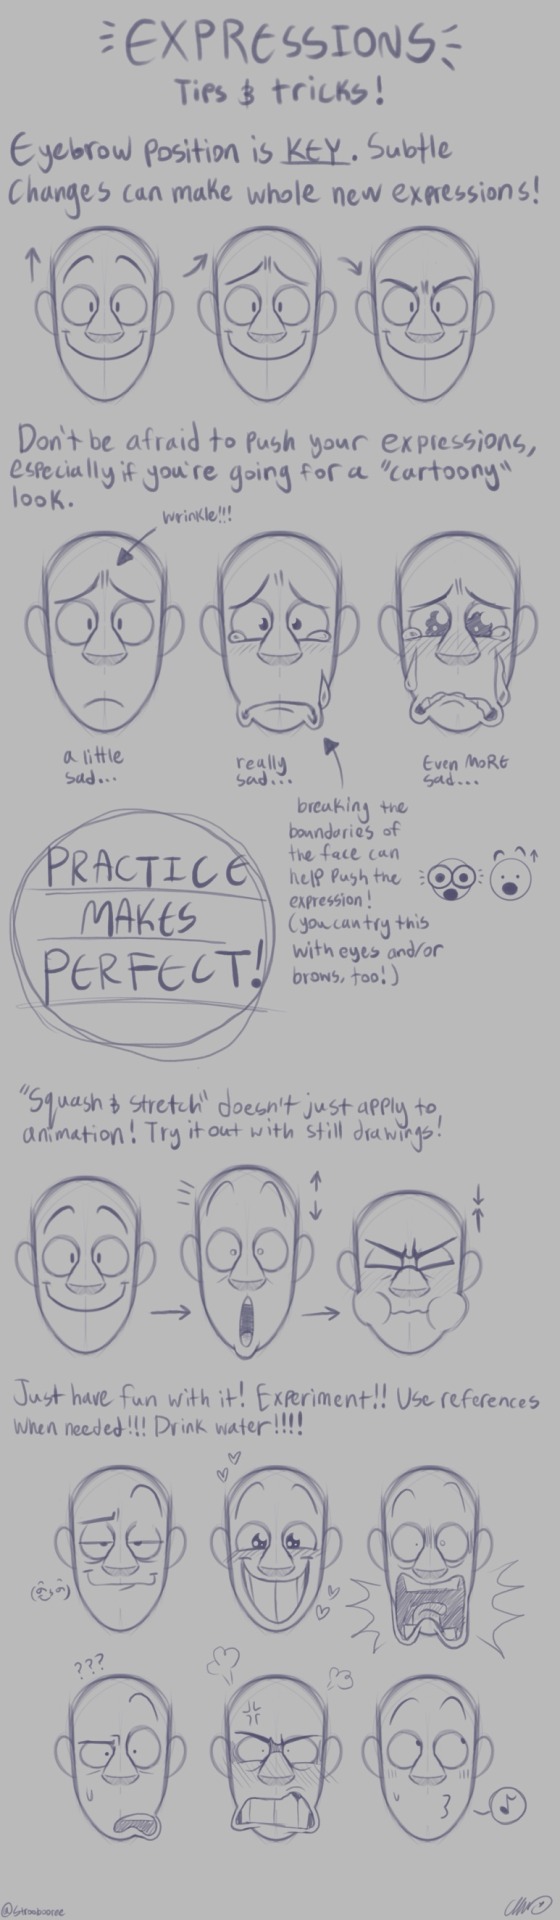
Text
A couple tips for drawing expressions I made just for funsies. Keep in mind that this might not be helpful for people with more “realistic” artstyles, but I hope it’s at least helpful for some people!! :)
948 notes
·
View notes