
Don't wanna be here? Send us removal request.
Statistics
We looked inside some of the posts by shelfnovel12-blog and here's what we found interesting.
Average Info
Notes Per Post
0
Likes Per Post
0
Reblog Per Post
0
Reply Per Post
0
Time Between Posts
3 days
Number of Posts By Type
Text
17
Last Seen Tumblr Blogs


Fun Fact
Tumblr.com is the 103rd most visited website in the world.
Text
3 Myths about Being an Organized Cook
Myth 1. Being organized is boring
I used to think being organized killed spontaneity.
And freedom.
But now I know the opposite is true…
Being organized actually creates freedom.
How?
By having systems and plans in place it frees up your mental bandwidth.
And time.
So you get the benefit of delicious healthy meals.
Without effort.
And still have time and energy to enjoy the other spontaneous fun things in life.
Myth 2. You have to spend hours in the kitchen.
My students often tell me that a lack of time is their biggest challenge.
But if you’re organized…
You don’t need huge chunks of time.
Because organization allows you to be more efficient with the time you have.
Myth 3. Being Organized is something you’re born with
I used to think I wasn’t an organized person.
And I couldn’t change that.
But over the years, as I’ve developed habits and strategies to help me eat well, I actually learned to become organized.
And I’ve taught others to do the same.
Like reading, it’s a skill.
If I can learn it.
So can you.
Then join me for the 30-Day Simple Kitchen Reboot.
It will help you get organized.
And simplify your approach to eating well.
It’s available as a free bonus for all members of my Simple Meal Plans.
CLICK HERE to learn more.
Oh and…
Have fun in the kitchen this week
With love, Jules x
ps. To celebrate the launch of the reboot, I’m going to be holding some live QnA sessions in September for all members of Simple Meal Plans.
So make sure you join before then :)
It’ll be fun!
Tags: organization, simple
Source: https://thestonesoup.com/blog/2019/08/22/organized-myths/
0 notes
Text
The Only Oatmeal Cookies I’ve Ever Liked!
Oatmeal cookies have always been one of my least favorite types of cookies until I recently figured out how tasty they are with chocolate chips instead of raisins! I did not originally realize that the raisins were my issue, or that, at the same time, my 13-year-old daughter LOVES oatmeal raisin cookies, and apparently the raisins are her favorite part!
A Healthy Oatmeal Cookie Recipe
So, I asked her to come up with a homemade version that is 100% whole-grain, doesn’t have a ridiculous amount of sugar, and has chocolate chips in at least half of the batch for me. She succeeded in coming up with a very tasty recipe that has me thinking that I may just have a newfound love for oatmeal cookies! The oatmeal gives the cookie a little more crunch than your typical chocolate chip cookie, without having to add in nuts (which some people are allergic to or just don’t like in cookies).
Now, of course with any amount of sugar, these are technically a “rule-breaking” treat, but we think that’s okay on occasion—especially when it’s made-from-scratch and everything else about it is whole-grain.
Every December I go to a Cookie Exchange party with my friends, and I like to bring something different that I can also share on the blog. This year, this recipe is the winner! It’s nice to finally be able to enjoy an oatmeal cookie.
Oatmeal Cookies (with raisins and/or chocolate chips)
Adapted from Joy of Cooking by Sydney Leake
Print
Instructions
Preheat oven to 350 degrees F.
In a large bowl, whisk together the flour, baking soda, baking powder, salt, cinnamon, and nutmeg.
In another large bowl, use an electric mixer (or stand mixer fitted with a whisk) to cream the butter and sugar together. Mix in the eggs and vanilla.
Turn the mixer down to low and slowly add the flour mixture to the butter mixture. Stop and use a spatula to scrape the sides as needed. Fold in the oats.
Divide the dough in half between the two bowls. Fold the raisins into one half and the chocolate chips into the other half.
Spoon out the cookie dough about 3 inches apart onto an ungreased baking sheet (lined with parchment, if desired) and bake one sheet at a time until golden brown, 8 to 12 minutes. Alternatively, you can bake both sheets at the same time on convection.
Source: https://www.100daysofrealfood.com/healthy-oatmeal-cookies-recipe/
0 notes
Text
10 Common IBS Myths
In this article, I discuss 10 myths that have been popularized in the media that pertain to your gut health. Get cozy folks, this one’s another long one.
Throughout my experience with IBS, I have come across some information that when put into practice alleviated, worsened, or had no effect on my symptoms. In my post My Journey with Gut Health, I discuss some of the diet and lifestyle choices I employ to manage my IBS symptoms.
I thought I would take a moment to dispel some common misconceptions about IBS that I see floating around the internet. Hopefully doing so will save some of you some time and pain. The biggest takeaways I hope you get from this post is you aren’t alone, it’s likely not all in your head, and you don’t have to live with IBS forever.
Before we start, please do keep in mind I have no medical training or formal background in nutrition. Everything I share is based on podcasts or articles I have read by qualified professionals, and my own experience.
Always proceed with caution when making any change to your diet or lifestyle. The last thing you need is to go down a rabbit hole from which emergence is difficult.
Let’s get in there. Here are 10 IBS Myths worth debunking.
1.) IBS IS ALL IN YOUR HEAD
Many doctors in the Western medicine field have reacted to the SIBO and Candida craze with the same opposing force with the opinion that IBS is a made up illness by those who need attention. For some people, maybe.
The consensus in the alternative healthcare field (and is becoming more widely accepted in the Western medicine world) is IBS often stems from a bacterial, mold, yeast, fungal, or parasitic infection. It can also be caused by food intolerance or stress (we’ll get to that in a second), but in many cases where symptoms are chronic, the root cause of the issue is an infection.
The exact type of infection can be difficult to pin down and they can also be difficult to treat depending on the source and severity of the infection. The best way to go about treating IBS is to go to a doctor who specializes in gut health and focuses on discovering and treating the bugs causing the symptoms.
While Western doctors do use some lab tests to test for various types of bacteria, yeast, fungus, and parasites, the tests used don’t cover a whole spectrum of pathogens. In addition, the sample often falls in the hands of a lab technician who isn’t specifically trained to look for GI pathogens. In this sense, lab tests can be extremely inaccurate…to the extent that you can hand a lab a parasitic tapeworm and test negative for parasites and ova. It really is that bad.
My recommendation to anyone with IBS or even non-GI related mystery health ailments is to see an alternative or functional medicine doctor who is skilled at uncovering the root cause of the disease. If you’re like me, and you require ultra science in order to believe anything, you can still see a GI specialist in addition to a functional medicine doctor. There is no harm in tackling your health from all angles so that you gain a sharper understanding.
IBS Symptoms Can Be Caused By:
Gut Dysbiosis (a bacterial, fungal, yeast, or parasitic infection)
Stress and emotional trauma
Food intolerance
A vitamin/nutrient deficiency
Dehydration
Over-exercise
Is there a psychological and mindset component to IBS? Absolutely. Those who are chronically stressed or carry emotional trauma often have chronic gut issues. Chronic duress puts your body in a continuous compromised state where healing from physical ailments is challenging.
Here’s where things get tricky. What came first – the chicken or the egg? Is it the chronic stress that welcomes and harvests the infection? Or, is it the infection that causes the emotional and psychological stress?
All this to say, IBS is often the result of an infection or food intolerance and is very much real. IBS can be a manifestation of emotional issues in the cases where patients convince themselves they have unwanted visitors when comprehensive lab results from a well-qualified doctor confirm there is no infection.
There is a known link between the state of your gut and the state of your mind. Information is passed from gut to brain stem through the vagus nerve. In this sense, those who have chronic gut issues often have low energy or depression, which can then affect behavior.
The goal of all lifeforms is to stay alive. The harmful bugs in your gut will send information to your brain, telling you what to feed them. This is why those with gut issues often need to go against their intuition when it comes to food – what their body is telling them is actually coming from the pathogenic visitors in their gut. Those with IBS or autoimmune disease (myself included) often yearn for sugar and carbs when the gut visitors are fighting to survive and thrive.
If you’re interested in this topic, listen to THIS PODCAST from Dr. Ruscio.
The best way of going about IBS is to see a doctor who is trained in discovering and treating harmful gut visitors in order to uncover the root source of the symptoms.
HORMONES AND GUT HEALTH
What is so interesting is hormonal imbalances and gut dysbiosis often work in tandem. Why? If your hormones aren’t working the way they should, you may be chronically constipated (even if you’re pooping every day!), which means you aren’t properly eliminating bad estrogen. When estrogen is reabsorbed in your body and your gut creates a breeding ground for bacterial, fungal, yeast, or mold overgrowth. Once your balance of hormones is thrown off, it is easy for a cycle of GI symptoms to perpetuate.
Women who make a point of balancing their hormones often find relief with GI symptoms. If you are a female who is experiencing GI issues, depression, anxiety, low energy, low libido, and/or skin issues, it is worth seeing an endocrinologist to have your hormones tested.
2.) SUGAR ALCOHOLS ARE “HEALTHIER” THAN REGULAR SUGAR:
The sugar alcohol industry has blown up in tandem with the keto diet. In theory, because there is no actual sugar in sugar alcohols, they should not feed gut bacteria, right? In theory, because there is no actual sugar in sugar alcohols, they shouldn’t raise your blood sugar, right? The real answer, like so many answers, is it depends on who you are.
Sugar alcohols can be one of the worst non-food foods you can put in your body if you have gut dysbiosis, and even if you have diabetes. And it isn’t the sugar (or lack thereof), it’s the composition of the food.
People who have a compromised gut lining or autoimmune condition have a difficult time properly breaking down sugar alcohols. Part of the sugar alcohol may be digested, whereas the indigestible portion putrefies in the already inflamed gut lining, thereby causing gas, bloating, diarrhea, or an autoimmune flare.
What I have found to be fascinating is although sugar alcohols are by design not supposed to raise your blood sugar, they can cause blood sugar spikes in those who have a difficult time processing them. I fall into this group of individuals. My blood sugar spikes when I consume sugar alcohols to the extent that I’m better off consuming raw organic cane sugar or pure maple syrup.
Some folks do fine with specific types of zero-sugar sweeteners, trulia and stevia being two that have been generally accepted as somewhat okay for the majority of people without gut issues. Some folks find they have a sweet spot where they can consume a certain amount of any sugar alcohol but anything beyond that specific amount breaks a threshold and then they experience gas. Some people (like me) can’t touch any form of zero-sugar sweetener at all, period end.
I want to be clear: The sugar alcohol craze is not Keto’s fault. If you’re going to do keto, be sure you’re still making wise choices, like not over-doing it on dairy (which is highly inflammatory for many individuals) or leaning on non-nourishing non-food foods like sugar alcohols.
If you have a sensitive GI or suffer from chronic gut dysbiosis, do yourself a favor and stay away from sugar alcohols entirely.
Want to learn more about sugar alcohols in general? I found this article from The Healthy Home Economist to be helpful.
3.) BANANAS. A CAUTIONARY TALE.
Bananas have been a recommended cure for stomach ache for decades. Some folks find a lot relief after eating a banana. In fact, with the right individual, bananas can help form healthier stools; however, with folks who suffer from constipation and gas (IBS-C), bananas can cause flares.
During the times my gut health is great, I can put ½ a banana in my smoothie and feel just fine. But if I’ve been eating other foods that are high in FODMAPs, I can’t get away with this. Bananas happen to be one of my biggest triggers of gas, so while unripe bananas are considered fine on a FODMAP elimination diet, I steer clear of them regardless when my GI is upset.
If you are sensitive to sugar or fructose specifically, it’s best to avoid the high sugar fruit like bananas, peaches, apples, etc.
4.) THE MORE FIBER THE BETTER
Those of you have IBS are always told to eat a ton of fiber. In theory, maybe! Fiber encourages water to enter the gut and adds bulk to the stool, both of which are helpful for regular digestion. But if you have gut dysbiosis (an imbalance of bad bacteria in your gut), even the healthiest forms of fiber will kick up IBS symptoms and can cause fatigue, gnarly gas and bloating.
Some folks are so sensitive to plant matter, in fact, that they eat a primarily carnivorous diet. In Robb Wolf’s podcasts with Amber O’Hearn, and Mikaila Peterson both ladies discuss how they found relief from autoimmune symptoms by eating an entirely plant-free diet.
Fiber feeds both good bacteria and bad bacteria. If you have bacterial overgrowth, be mindful about the amount and type of fiber you consume so that you aren’t giving the bad bacteria the upper hand. You’re aiming for Low-FODMAP sources of fiber, and even still make sure you limit the amount you eat. I find too much fiber, particularly on an empty stomach, can cause gas for me.
In the last decade or so, there has been an uptick in folks who experience IBS symptoms who have transitioned to a Paleo Diet. Why? When you eat Paleo, you by default consume more plant matter, including high-FODMAP vegetables. While most people feel amazing on a Paleo diet, some folks (myself included) must stick with the lower FODMAP whole foods to keep their gut bugs under control.
During the times you’re going through an IBS flare, you may find some relief if you avoid eating raw vegetables. Instead, go for bone broth and Low-FODMAP cooked vegetables, like zucchini, carrots and spaghetti squash. Because they are tough and fibrous, raw vegetables irritate your gut lining and can worsen your symptoms.
Cruciferous vegetables like cauliflower, brussels sprouts, and kale, are highly fermentable, so it is best to avoid them. When going through a flare, aim for soft, bland foods. Think steamed or sauteed or steamed Low-FODMAP veggies, or a brothy soup.
When I have a flare, I make soup with chicken bone broth, chicken, white rice, carrots, and zucchini. That’s it – no onions, garlic, or celery. I love the way it tastes and it seems to soothe my GI every time.
5.) CELERY JUICE CURES ALL WOES
Hard no.
If you’re experiencing IBS symptoms and you read an article that suggests celery juice is the alpha omega for good digestion and stellar health and longevity, HALT! Proceed with caution. Celery is one of the highest FODMAP vegetables and for many people causes IBS flares. Sure, the juiced version removes the fiber, but the basic fermentable carbohydrate remains.
The worst IBS symptoms I have ever experienced came after drinking celery juice. I, too, read the research, thought celery juice would cure me of all my woes, dove in head-first, drank my 16 ounces, and proceeded to have the worst gas of my life. Seriously, people…I wanted to escape my body. Giving the celery juice the benefit of the doubt, I tried again on multiple occasions in lower amounts with the same result.
If you have IBS and want to try it, go for it…just please do me a solid and test it first by drinking 6 ounces instead of the recommended 16. If you feel incredible, up the ante to maybe 10 ounces and go from there. You don’t need to go balls deep in celery juice just because the rest of the interweb is.
6.) ALL GRAINS ARE ALL THE BAD
Some people have a strong digestive aversion to all grains. Some folks tolerate specific grains, some folks can pound basically all the grains ever and feel like the champion of the universe. Grains are arguably the most controversial and also highly individualistic food groups.
Not all grains are created equally, not all grains are high in FODMAPs, and not all people react adversely to grains.
I find white rice or sprouted brown rice to be completely fine with my digestive system. If I eat too much rice, of course I’ll see the same response anyone would after eating too much carbohydrate (water retention, puffiness, brain fog).
A little rice actually seems to help my digestive system move things along due to the resistant starch. I am sensitive to all potatoes, including sweet potatoes, so rice is my choice source for starch and carbohydrate.
Learn more about rice in my recent blog post, Is Rice Paleo?. I discuss the difference between white and brown rice, how your body processes it, and who rice may be ideal for versus who should avoid it.
In my cookbook, Paleo Power Bowls, I include recipes that contain (queue scary horror flick music: rice). I was concerned about doing so, because some paleo purists say ALL GRAINS should be avoided ALWAYS. In my personal experience, rice can be very nourishing when prepared properly. But that is me.
In general, most grains (particularly gluten-containing grains) should be avoided by those who have IBS, IBD, or other autoimmune disease. And not necessarily because of the gluten! For some who have a wheat sensitivity, the sensitivity is not with the gluten (protein) it is with the type of carbohydrate. I fall into this category, as my digestive issues are exacerbated by food that are high in FODMAPs.
To summarize, not all grains are created equally, and which grains work for you is a matter of your unique DNA and gut microbiome.
7.) THE MORE EXERCISE THE BETTER
Should everyone, including folks with IBS prioritize exercise? Absolutely! I highly, highly recommend you get some form of exercise daily, even if it’s just a 20-30 minute walk. Exercise increases your body’s mitochondria and also enhances mitochondrial function. Mitochondria transforms food energy into cellular energy, thereby improving your body’s ability to produce energy.
This not only makes you feel your best but also increases your energy level, decreases your body’s inflammation, decreases your brain fog, increases your lifespan (so long as you aren’t an ultra athlete), detoxifies your body, and so so much more.
Where I caution you with exercise, is if you have an obsessive personality like me, and tend to exercise too vigorously. Continuous vigorous exercise in and of itself can cause IBS symptoms. Like all things in life, work smarter, not harder.
If you exercise too much, your body is in fight or flight mode and isn’t able to put energy toward healing your GI. In addition, if you sweat profusely regularly, you may be depleting your body of electrolytes, causing dehydration, which in turn can cause constipation. So make sure you’re getting adequate sodium, magnesium and potassium, and drinking enough water.
Find your sweet spot. Blood flow is important. Over-exercising can lead to chronic stress on your body, which prohibits it from healing. The goal is to stress your body out just enough to where the proper signals are being transmitted to heal and repair.
If your body is already fighting a condition, you don’t want to be in a state of constant damage where your body can’t keep up with the amount of chronic stress you give it.
8.) YOU SHOULDN’T EAT A LOW-FODMAP DIET LONG-TERM
I can’t even begin to tell you how much anxiety this one has caused me in the past 6 months. I have read article after article and listened to podcast after podcast that purported a Low-FODMAP diet should not be your long-term solution to alleviating IBS symptoms.
To make a very long story short, you can breathe easy, because it is fine to eat a Low-FODMAP diet long-term.
And here’s why.
The concern about eating a limited diet is in turn having a limited gut microbiome. The thought is you want your gut microbiome to be as diverse as possible. YOU GUYS, THIS IS TRICKY.
On the one hand, it is important for your gut to be colonized with a wide array of bacteria (this is why you should take a probiotic that is rich in many, many types of good bacteria, not just one or a few strains). HOWEVER, on the other hand, you can have an incredibly diverse gut microbiome and still suffer from health issues, AND you can have an incredibly diverse gut microbiome and eat an incredibly limited diet.
I had a conversation with Robb Wolf on this topic, and the two biggest takeaways were 1.) Some of the healthiest tribes in the world eat very little variety, and yet their longevity is through the roof and they’re largely disease-free. and 2.) Folks with celiac disease have very diverse gut microbiomes, and yet: they’re celiac.
In addition, during a recent visit to my GI doctor, I asked if eating a low-FODMAP diet long term would cause problems for me and the answer was absolutely not. There is no problem with avoiding foods that cause fermentation in your gut, which causes IBS symptoms.
Again, refer back to the two ladies I mentioned earlier who eat a carnivore diet and yet have superb blood work.
To summarize: It is perfectly fine to eat a Low-FODMAP diet long-term, and it is perfectly fine to eat a diet that is low in variety. The things you want to pay attention to are they way you feel and your blood work.
9.) NUTS, SEEDS AND INFLAMMATION
In theory, nuts and seeds are very nutrient dense. They contain protein, healthy fat, and minerals. The trouble is, the phytates and lectins in nuts and seeds (which are designed to protect them through digestion so that they can continue to thrive when pooped out) make them very difficult to digest.
Those whose digestive systems are ironclad may not notice any belly upset, but those who have a damaged GI (leaky gut) will notice pain and inflammation when they eat nuts or seeds above a certain amount.
All flours, including gluten-free and grain-free flours can be particularly tough on those who have compromised gut lining. Flours can irritate an already inflamed lining and can also seep through the intestinal wall in those with leaky gut. Those who have digestive issues will find some relief when they avoid all forms of flour. Additionally, those with autoimmune disease may find less inflammation or flares when they limit their intake of nuts and seeds.
In general, if you’re going to make nuts and seeds a regular part of your diet, it is best to sprout them first. The sprouting process removes most of the phytates and lectins and makes the nutrients more bioavailable.
10.) CALORIC INTAKE, FASTING, AND A WORLD OF “SHOULDS”
For decades, a 2,000 calorie diet with 3 meals a day has been what is considered “normal” and recommended in the healthcare community. This isn’t just an IBS myth, it’s an overall myth. Everyone’s caloric needs are different, just as everyone’s macro needs are different. Bodybuilders need upwards of 5,000 calories per day. Someone like me needs closer to 1,500.
Similarly, intermittent fasting can be incredibly healing for those with gut issues (it is a regular part of my gut health practice), but does not bode well with everyone, and also may be something you can only do – well – intermittently.
Don’t glue yourself to intermittent fasting if your body is screaming at you. Don’t feel like you HAVE to eat when you aren’t hungry.
Suffice it to say, there is a large disparity in the way of caloric and macronutrient requirements. Both overeating and chronic under-eating can cause digestive issues. The key is to pay attention to your body’s changing needs and not try to out-smart it.
In a society where people are constantly feeling anxiety about food and are micromanaging their diet and bodies, there are two sides to the Volume of Food Consumption coin. Those who believe they need to constantly under-eat in order to be a valuable human, and those who constantly eat too much because they worry if they don’t eat enough they will be seen as having an eating disorder.
Remember to fuck the noise and find a sustainable lifestyle that works for you. My humble opinion is the worst thing the wellness community does for people who have a “healthy relationship with food,” is turn healthy behavior into neurotic behavior.
Stay true to yourself…all opinions be damned…including your own.
Intuitive Eating
I discuss Intuitive Eating at length in my cookbook, Paleo Power Bowls, but I thought it appropriate to touch on it here.
The concept of intuitive eating and food freedom has become the new buzz over the last couple of years. Should you listen to your body? YES! However, most people must eliminate processed foods (primarily refined high carbohydrate food and sugar) before the gut can send accurate signaling to the brain.
As mentioned before, sugar and carbohydrate feed gut bacteria, which are vying for survival. Not to mention, sugar is one of the most addictive substances on the planet. Without healing your gut and ridding your body of reliance on sugar, your body’s intuition becomes skewed.
The great news is your body is incredibly smart. Once addictive and inflammatory foods are eliminated, your body does really know what it needs. I can’t stress the importance of forging your own path when it comes to diet, exercise, and wellness. Your health and wellbeing lifestyle will look entirely different from most people you know, because everyone’s wellness path looks different.
In Conclusion…
I hope this helps! Trust your instincts. Do your research, listen to the qualified voices. Build your team of healthcare professionals who are constantly researching and adapting their treatment plans according to good science. At the end of the day, only make changes when they are right for you.
xo
Source: https://www.theroastedroot.net/10-common-ibs-myths/

0 notes
Text
Dirty Chai Tapioca Pudding with Oatmeal Raisin Cookie Crumble
Dirty chai tapioca pudding is topped with gluten-free oatmeal raisin cookie crumble and makes a deliciously aromatic and decadent dessert.
P-U-D-D-I-N-G!!
Lover or a hater? I feel like people are pretty opinionated on pudding. I love the stuff. That said, I love it on it’s own. I don’t love it in a pie. No, pies are for fruit, not creamy fillings. Nope, nope, nope.
Throw things like rice and tapioca in there and people get even more worked up about it. I truly don’t get the tapioca haters. That texture is just FUN! At least I think so. Guess that’s probably why I love chia pudding too (pumpkin chocolate chia pudding or pumpkin pie chia pudding parfaits anyone?).
*This post is sponsored by Udi’s Gluten Free, a 2017 partner of Running to the Kitchen.
Basically, the more texture, the merrier in my eyes. Or mouth.
My mother-in-law is the rice pudding queen. I’ve made it before but don’t do so often (this creamy orange spiked wheatberry pudding is the closest thing to it on here) because hers is really just the best.
Except for that one time she made it with salt instead of sugar. It was years ago when we lived in Florida, my brother was visiting and she was so excited to have another mouth to feed. He and Ulysses took the first spoonful and watching my brother’s face transform into disgust while he tried to disguise it for politeness sake was one of the most comical moments of my life. I, thankfully, hadn’t tried my serving yet.
She’s redeemed herself since then but that my friends, is why you keep food items in (appropriately) labeled containers.
I’ve purchased some obscure ingredients doing this thing called food blogging for the last 6+ years but weirdly, tapioca pearls were never one of them up until recently. With a half opened box of them though this dirty chai tapioca pudding came to be.
I feel like this isn’t something I should admit but I had no clue what dirty chai meant up until a few weeks ago. Julie made these brownies and it was like the angels started singing and the heavens opened up. Espresso AND chai combined? Um, yes.
I want that combination in drink form, in brownie form, in pudding form and basically any other form it wants to take because YUM.
I decided I wanted to take the texture thing even further with this dirty chai tapioca pudding and crumble my favorite Udi’s Gluten Free soft baked cookie on top – oatmeal raisin.
Remember these maple cashew chocolate chip cookie milkshakes from back in the summer? Well, I do love those Udi’s cookies too but if you ever give me a choice when it comes to cookies between traditional and soft baked, I’m going soft baked all the way, always.
They bring even more fun to each bite of this dirty chai tapioca pudding. It’s equal parts aromatic, coffee buzzed and sweet (it’s also dairy free!) and I think all you pudding lovers (minus the texture weirdos) will love it.
Dirty chai tapioca pudding is topped with gluten-free oatmeal raisin cookie crumble and makes a deliciously aromatic and decadent dessert.
Prep Time 1 hour 10 minutes
Total Time 1 hour 35 minutes
Ingredients
1/2 cup tapioca pearls
3/4 cup brewed espresso
1 1/4 cup unsweetened almond/coconut milk
1 1/2 teaspoon chai tea
1 teaspoon vanilla extract
3 tablespoons maple syrup
pinch kosher salt
4 Udi's Gluten Free Soft Baked Oatmeal Raisin Cookies, crumbled
Instructions
Place tapioca pearls in a small bowl, cover with cold water and let soak for at least 1 hour.
Drain tapioca and set aside.
Place almond/coconut milk in a small pot over medium heat and bring to a simmer. Place chai tea in an infuser and let steep in the pot with the milk over low heat for 5 minutes.
Remove tea infuser and discard. Add the brewed espresso, vanilla, maple syrup and salt to the pot, whisk to combine.
Add the tapioca pearls, increase heat to medium and stir frequently over a low simmer until pudding thickens and tapioca turns from white to clear, about 20-25 minutes.
Pour the pudding mixture into 4 containers. Top each with the cookie crumbles and serve. Alternatively, refrigerate pudding to serve chilled and top with the cookie crumbles before serving.
Source: https://www.runningtothekitchen.com/dirty-chai-tapioca-pudding/

0 notes
Text
How to Throw a Beer Tasting Party + Soft Pretzel Rods with Beer Mustard Recipe
I’ve teamed up with World Market to bring you an easy guide to throwing your own craft beer tasting party. Complete with recipes, printable beer tasting sheets, and beer recommendations. I was able to get everything I needed, from the table side cooler, to the glassware, to the meats and cheeses at my local World Market in Woodinville, Washington.
This is a sponsored post, all ideas, words, and opinions are my own.
How to Throw a Beer Tasting Party
Invitations: Choose a diverse mix of people, but keep it on the small side, too many guests and the party isn’t manageable. Eight to ten people seem to work best. Don’t let the “doesn’t drink beer” designation deter you from inviting anyone. Tell all guests to keep an open mind, sample everything that’s poured and reserve judgments for after sampling, not before. Most likely, your guests will like something, and it will surprise them.
Teardrop tasting glasses, Wood Charcuterie Board
Beer selection. Choose a theme, pick beers that correspond. There are more beer styles in the world (over 100) than are manageable in one tasting, having a variety is important but don’t try to offer every style in existence. For instance, if you have an Oktoberfest theme, choose beers that are brewed in Germany, or in a German style and try to be diverse in what you choose to serve. Try to grab at least one beer in each of these categories that fit your theme: malty, hoppy, wild fermented, barrel aged, clean (pale lagers, pilsners, cream ale, Kolsch).
Teardrop tasting glasses
Glassware. A small but massively important detail that shouldn’t be overlooked, glassware can make a monumental difference when serving beer. Choose small glasses that offer just enough beer for each guest to sample the beer. Your goal is for each beer to be sipped, savored and considered, not chugged. I use these Teardrop tasting glasses from World Market, the shape is perfect for beer and the size works well for sampling.
Assorted Crackers, Cheddar Wheel , Brie Wheel, Smoked Gouda, Charcuterie Sampler, Cheese Knives, Wood Charcuterie Board, Blue Villa Table runner, Appetizer Plates
Food. It’s incredibly important to any party, but essential with a beer tasting. It’s a way to balance the flavors and explore pairings. More importantly, eating is essential when drinking as a way to stay in control. You want to serve a few things that pair well with a variety of beers and that can sit at room temperate for a while. Cheese, crackers, charcuterie, and pretzels are simple staples to add to your table. Instead of trying to make everything yourself, strive to just make one or two dips or dishes to serve and plan to buy everything else. It’ll ease the stress of the party considerably.
Retro Cooler, Blue Villa Table runner
Serve. Give each guest a glass, a notes sheet, and pour the beers one at a time. Allow the guest to sip, record notes (like with this PRINTABLE SHEET!), nibble on food and enjoy before moving on to the next beer. Have each guest pour any unfinished beer and rinse the glasses (a large bottle of water and an ice bucket will do the trick) before moving on to the next beer.
Dimpled Steins
Pints. Once all the beers have been samples, pass out larger pint glasses for your guest to pour a larger amount of their favorite brew. Compare notes, linger over food, and enjoy the rest of the evening.
Weck Jar, Charcuterie Board, Leaf Napkin
Throwing an Oktoberfest party? Check out my Oktoberfest Party Post on the World Market blog!
Ingredients
2 ½ cups flour
1 tablespoon sugar
1 envelope (2 ¼ teaspoons) rapid rise yeast
1 cup beer
1 teaspoon kosher salt
2 tablespoon oil
1 tablespoon unsalted butter
10 cups water
¼ cup baking soda
1 tablespoon coarse salt
2 tablespoons melted butter
Instructions
Add the flour, sugar and yeast to a stand mixer. Mix until just combined. Heat the beer to 120°F (always defer to the liquid temperature listed on the package of yeast, regardless of what the recipe says. Your yeast package says 105°F? Heat the liquid to that temperature) add the beer to the stand mixer, mixing until all the flour has been moistened.
Add the salt and oil, beat until the dough comes together and gathers around the blade. Transfer to a lightly oiled bowl, cover and allow to rise until doubled in size.
Add the dough to a lightly floured surface, cut into 12 equal sized portions.
Roll each portion into an 8-inch log, add the pretzel rods to a large baking sheet that has been covered with parchment paper.
Preheat the oven to 425°F.
Add the water to a large pot, bring to a boil. Stir in the baking soda.
A few at a time carefully add the pretzels to the boiling water for 30 seconds, place back onto the baking sheet.
Brush with melted butter, sprinkle with salt.
Bake for 10-12 minutes or until dark golden brown.
http://thebeeroness.com/2018/09/10/beer-tasting-party/
I used: World Market Brown Mustard Seeds, World Market Ground Mustard, De Nigris Organic Apple Cider Vinegar With Honey, Coarse Sea Salt, WeihenstephanBeer
Weck Jar, Charcuterie Board, Leaf Napkin
Ingredients
½ cup brown mustard seeds
¼ cup yellow mustard seeds
¼ cup yellow mustard powder
½ cups apple cider vinegar
½ cups malty, low hop beer such as a Belgian ale or brown ale
1 teaspoon ground turmeric
2 tablespoons honey
3 tablespoons dark brown sugar
Directions
In a small bowl stir together both types of mustard seeds, mustard powder, vinegar, and beer. Cover and set in a cool, dry place for 12 to 24 hours or until all the liquid has been absorbed.
Stir in the remaining ingredients. Add to a blender, pulse until blended but some whole grains are still intact.
Transfer to an airtight container, refrigerate until ready to use.
http://thebeeroness.com/2018/09/10/beer-tasting-party/
Copyright �© TheBeeroness.com
Shop the Post: Retro Cooler | Appetizer Plates| Cheese Knives| Napkins| Leaf Napkin| Wood Basket| Wood Charcuterie Board| German Sausages| Sea Salt| Assorted Crackers| Cheddar Wheel | Brie Wheel| Blue Villa Napkin| Smoked Gouda| Weck Jar| Honey Apple Cider| Gherkins| Teardrop tasting glasses| Mustard Seeds| Sauerkraut| Blue Villa Table runner| White serving bowl| Bottle| Charcuterie Sampler| Dimpled stein
Source: http://thebeeroness.com/2018/09/10/beer-tasting-party/
0 notes
Text
Because, Cheer
I’m feeling the holidays this year. Not in the red and silver tchotchke sense, but for the cheer. The lightness of being. The thoughtfulness that seems on the slight uptick, even in errands and work and travel. Of course, it goes without saying that LIFE IS NOT ABOUT THE STUFF and consumerism = yuck, but I’m putting cynicism on the shelf this season. I’m angsty all year about society and technology and social injustice and and and and and... the list of things induce a palm to forehead gestures is long. In any case, the whole gift thing has gotten pretty polarizing over the years, but I’m going on a hunch that most of us will find ourselves in the position of giving and receiving this year. Here are a few good feel-good ideas for humans who like to read, eat, and savor the moment.
Yotam Ottolenghi: a master of the craft, in every sense of the word. I finally got my copy of Plenty More –– it’s the kind of cookbook you get through and think, does it get better than this? I think this collection is the perfect gift for a cook who loves daring and true recipes.
I’ve been head over heels for these gorgeous, American-made knives from New West Knifeworks since 2012. I send the Superbread knife out as gifts to clients, and my mom has requested a Santoku under the tree this year.
This “everything” bag from Winter Session, a colorado company, doubles as my market tote and travel bag. Pricey, but indestructible. I’ve had mine for two years and I anticipate it will last another decade.
Not Without Salt Cookie Mix… Does this even need introducing? The inimitable Ashley Rodriguez is at it again with this killer cookie chocolate chip cookie mix. I ordered two and went through them both in a week. Yeah, THAT good.
If a fire came roaring up over our hill, I’d grab a hard-drive of photos and our It’s OK pennant from Secret Holiday Co. It has hung in our 22nd Street bedroom, St. Paul living room, and now lives in our mountain kitchen. I’ve gifted the Be Brave and Yes banners before and still will yet. Simple daily reminders that, yes, life is crazy, but things are pretty darn good.
If it’s possible to choose a favorite work of Anne Lamott, it’s HELP THANKS WOW. A quick, soul-quenching read that leaves me feeling like I just took a giant exhale.
Quitokeeto Modern Steamer, where utility and elegance coalesce. Just like Heidi, shop owner, herself, I appreciate this tool for it’s understated beauty and practical application.
Heritage, by Sean Brock. I became a mega-fan of Brock’s after seasons 1 & 2 of Mind of a Chef, then planned a quick trip to Charleston to visit McCrady’s and Husk (heaven is his “On Top of Ol’ Sierra Madre” cocktail) and experience the way he honors and preserves the culinary history of the South.
I’m head over heels with my Stitch & Hammer apron and this half apron from Food52. This linen number is pretty cute, too.
Level with yourself about how many bags of coffee you really go through in a month and get fresh-roasted parcels delivered at your doorstep before you run out. My friends at Brown Water Coffee donate a fraction of each purchase to sustainable water projects in Nicaragua, how cool is that?
Is there a better way to sip whiskey than with a fancy hunk of ice? I think not.
I’d love to share my experience at Mama O’s (that’s Oprah Winfrey) Life You Want Tour a few weeks back, but I’m still marinating in the feel-good vibes I walked away with. In the meantime, I think her new release “Things I Know For Sure” makes a great stocking stuffer or addition to a homemade gift for your favorite girlfriends.
I’m in love with this irreverent, quirky 13×19″ print that reads: “I eat no gluten, sugar, dairy, saturated fat, or processed foods… I do, however eat men, women, and small children.” I have a few others from Retrowhale that complete the series. Still trying to figure out the best place to hang these in the new place.
Photos shouldn’t live on your computer. Artifact Uprising makes it easy to honor memories shared and captured with photo books, prints, and cards. Bonus: the folks behind the brand are the REAL deal. We were gifted wedding prints earlier this year, which I adore, and plan on paying it forward to my sister-in-law when she gets her photos in. AU is offering Happyolks readers 10% off any purchase with the following Discount code: BLGHY14.
These Lunar Calendars are for your “woo woo” friend or family member. Both beautiful in aesthetic and chock-a-block with astral insight, I love these calendars as they remind us that life, like the earth, rises and falls, waxes and wanes, and that there is always a new chance to try again.
Produce as a stocking stuffer? I think yes. I love the preserves from Mm Local, locally grown, organic products from Colorado farmers harvested and canned at the peak of ripeness. I can’t live without the spicy mustard or kale kimchi.
Get yourself (or a loved one that you see often) a turntable and play the 180′ South album while cooking. I love the balance of soulful, meaty, and light songs and the energy they create in the background while entertaining. Sample here.
The 9 quart Le Creuset Dutch Oven is my kitchen workhorse. Expensive, yes, but wholeheartedly worth the investment and sure to make anyone’s eyes light up wrapped up under the tree. From soups to braising, to quick sautes, there is nothing this sucker can’t do.
Source: http://happyolks.com/because-cheer/
0 notes
Text
The Number One Question About the Candida Diet
Almost every time I begin work with someone, whether as an individual client or part of one of my programs, one of the first questions I get asked is, “When can I go back to eating my normal diet?”
This makes total sense, of course: when you’re diagnosed with candida or told that you have to cut multiple foods from your diet, you’ll naturally feel upset and worried about all the delicious ingredients and dishes you may miss. Food is a major source of enjoyment, comfort, nourishment and more in our society, and we are definitely attached to our favorites (I certainly know that I am!).
In today’s video, I discuss why this question may not be the most helpful when it comes to success on your anti-candida diet, and other questions you can ask instead that will more effectively help you to live well and, ultimately, reach your health goals when following an anti-candida program.
Think about it: you started this diet to improve your health. Why not do everything you can to ensure you stick with it so you can succeed–and thrive?
Question: What was the first thing you thought of when you heard you’d have to follow an anti-candida diet and change the way you eat?
Highlights:
RECLAIM is back! Learn to love the foods that help you heal, and stick with it. Apply here.
The most common question I get asked from people when they’re diagnosed with candida
Why this question prevents you from being successful on the diet
How to learn to be happy and accepting of your new diet
Two types of students I used to teach–and what that means for you
Why your view of the future may be sabotaging your success on the diet
Negative implications associated with this question
A much better question to ask that will support your health and success
All about the RECLAIM program (open for applications!)
Resources:
Disclosure: Links in this post may be affiliate links. If you choose to purchase using those links, at no cost to you, I will receive a small percentage of the sale.
Subscribe for health information, products and promotions about healthy eating and holistic living, and recipes without sugar, gluten, eggs or dairy! Click here to subscribe to RickiHeller.com via email. You’ll receive emails sharing information and recipes as soon as they’re posted, plus weekly updates and news about programs and upcoming events. A healthy lifestyle CAN be sweet!
Source: https://www.rickiheller.com/2019/01/the-number-one-question-about-the-candida-diet/
0 notes
Text
Healthy Vegetarian Meal Plan 06.09.2019
A healthy vegetarian meal plan including nutritious seasonally-inspired meals. Print out the grocery list to gather all your groceries in one go!
Happy weekend to you! What are you up to? More importantly, have you checked out the Paleo Strawberry Almond Butter Blondies I posted this week? They will change your life!
And if you’re looking for a tasty and easy breakfast recipe, be sure you have a look at my Sheet Pan Pancake Recipe I developed for Yummly – preparing pancakes in a sheet pan is all the rage! And for a good reason – they’re so simple to prepare!
On this week’s vegetarian meal plan: One-Pot Tomato Basil Quinoa, Pepper and Paneer Curry, Vegan Stuffed Shells, Spring Green Pasta with Basil-Mint Pesto, Vegan Black Bean Tacos with Summer Vegetables.
Enjoy!
Sunday
One-Pot Tomato Basil Quinoa from Making Thyme for Health
Prep Ahead Tip: Comes together quickly but cashew ‘ricotta’ can be prepped up to 3 days in advance.
Vegan/Gluten-free Substitutions: Recipe is vegan and gluten-free.
Monday
Pepper and Paneer Curry from Eats Well With Others
Prep Ahead Tip: This recipe comes together quickly, though the vegetables can be chopped ahead of time.
Vegan/Gluten-free Substitutions: Swap out tofu for the paneer to make this vegan (roast or fry it before hand to ensure it’s crisp!). It is already gluten free.
Tuesday
Vegan Stuffed Shells from Hummusapien
Prep Ahead Tip: Entire recipe can be prepped in advance.
Vegan/Gluten-free Substitutions: Recipe is vegan. Use GF shells for GF.
Wednesday
Spring Green Pasta with Basil-Mint Pesto from The Roasted Root
Prep Ahead Tip: Prepare the pesto sauce up to 5 days in advance.
Vegan/Gluten-free Substitutions: Recipe is vegan and gluten-free.
Thursday
Vegan Black Bean Tacos with Summer Vegetables from She Likes Food
Prep Ahead Tip: Recipe only takes 30 minutes to make.
Vegan/Gluten-free Substitutions: Recipe is vegan and GF.
Click HERE to print the shopping list!

Source: https://www.theroastedroot.net/healthy-vegetarian-meal-plan-06-09-2019/
0 notes
Text
Think Spring with These Seven Sheet-Pan Recipes
Spring hits, and for most of us, everything feels a little easier. Double down on that feeling and break out your sheet pans. Those, too, make life simpler. We’ve posted a few of our favorite recipes utilizing this key kitchen player before. Now, though, we want to get down to the brass tacks of spring cooking. Just pick the greenest, freshest, berry-est items at the market, and get cracking. Nothing makes weeknight cooking faster than a baking sheet (unless it’s the Instant Pot).
1. Roasted Beet Salad
Beets need just a splash of olive oil and salt and a hat of aluminum foil on a baking sheet to transform into golden- or ruby-hued beauties. Pick whichever beets look best to you, combine them with greens such as watercress or baby arugula, and pair them with a creamy element such as goat cheese. This recipe is a delicious starting point.
2. Granola with Fresh Berries
Granola can be dreadfully expensive at the grocery store, but is such a snap to make on your own at home. You want old-fashioned rolled oats, which have the best texture for this recipe. They need a sweetener, some crunch (the nuts or seeds of your choice), and some time in the oven or under the broiler. Then they’re ready to layer with blueberries or strawberries, yogurt, and honey or maple syrup. If you thought hearty oats were just for winter, this is an excellent way to make them feel lighter.
3. Roasted Carrots
Fresh carrots from the farmer’s market are extraordinary creatures. Look for the rainbow varieties, and snap them up if you see them, but know that even the “regular” orange and golden ones shimmer with sweetness when roasted. They’re enormously flexible; they favor flavors as esoteric as harissa and maple syrup and as simple as salt and olive oil. However you decide to cook them (some ideas are here, and readers love this recipe), a baking sheet will more often than not make your work much easier. Once they’re cooked, consider dressing them, as you might a meat entrée. Maybe lemon juice and yogurt, seasoned with salt and pepper, and garnished with fresh cilantro. Or labneh, if you’ve dusted them with a spice mix such as za’atar.
4. Chicken and Preserved Lemon Skewers
If you’ve never marinated chicken in yogurt before, let today be the day you finally give it a whirl. The yogurt flavors and tenderizes the meat at one, and if you throw lots of yummy, smoky spices into the marinade, too, you’ll have a powerfully potent dish. Take this recipe, for example: The bird marinates in a yogurt bath spiced with cumin, turmeric, paprika, saffron, and cinnamon, and then threads on to skewers. Preserved lemons are there for a kick, saltiness, and citrus pungency. Asparagus nestles on to the same baking sheet about halfway through the cooking process. The result is a one-dish meal you could even serve to company, it looks so good.
5. New Potatoes
Young potatoes of any variety, such as these fingerlings, are called “new potatoes.” According to The New Food Lover’s Companion, these “haven’t had time to convert their sugar fully into starch, and consequently have a crisp, waxy texture and thin, undeveloped wispy skins.” What that means for you is that they’re equally delicious boiled or roasted, and you won’t have to peel them. Make the most of a hot oven by sidling them right next to carrots, as in this recipe, or other seasonal favorites such as asparagus.
6. Shrimp and Broccoli Rabe
We’re big fans of getting the protein and veggies right next to each other on one sheet pan whenever possible. Just keep the seasoning uniform, and you’re off to the races. Garlicky, lemony broccoli rabe, to which you’ll add shrimp after a few minutes of cooking, is a great example. This recipe is ready in half an hour and can hit the dinner table alongside rice, bread, polenta, or whatever starch you’re craving.
7. Puff Pastry Tart with Asparagus and Burrata
Of all the tricks up a good home cook’s sleeve, storebought frozen puff pastry is one of the most popular. You can take it right out of the freezer when you first get home, take off your coat, turn on the oven, pull out the asparagus, blanch it, and layer everything on the pastry shell. If you have the burrata this incredible recipe calls for, great. If not, use mozzarella, goat cheese, or ricotta. Puff pastry isn’t color-by-numbers so much as it is a blank canvas: It makes every kitchen artist feel like a culinary genius.
Source: https://blog.williams-sonoma.com/7-sheet-pan-recipes-for-spring/
0 notes
Text
Pringles’ new flavors taste like our 2 favorite comfort foods
Pringles is known for creating wacky new flavors, having tried everything from Top Ramen to Thanksgiving dinner. Now, they’ve rolled out two new varieties: Bacon and Mac ’n Cheese, both of which will be available exclusively at Dollar General. The Daily Meal staff got a chance to try them for ourselves, and we had some opinions.
The Best Discontinued Snack Foods From the Decade You Were Born
The Bacon Pringles were honestly pretty good. They didn’t really have any of the meaty taste of bacon, but we figured that was probably a good thing. Instead, they had a salty, smoky, umami-kicked flavor we really enjoyed. One of our editors who eats mostly vegetarian appreciated that there was no actual bacon in the product, which is par for the course with the vast majority of bacon-flavored foods.
The Mac ’n Cheese Pringles were also a hit. They tasted a little cheesy and a little like cooked pasta — leaving us wondering how on earth Pringles made a potato chip taste like pasta. Whatever sorcery they employed, it worked out well. No one hated these. One editor, who actually prefers Kraft Mac and Cheese over homemade, noted that it tasted like the kind of mac and cheese that comes from a box, orange powder and all. The downside to these Pringles was that they left us craving some real mac.
If you want to get your hands on these Pringles, you have to act fast — they’ll only be around through August. You can also vote for your favorite of the two by tweeting “Bacon” or “Mac ’n Cheese” along with the hashtag #PringlesEntry to @Pringles and @DollarGeneral. If you do, you’ll be entered to win Dollar General gift cards and other Pringles-themed prizes.
Our favorite? Mac ’n Cheese. We’re adding a can of those to our list of guilty pleasure foods we won’t apologize for loving.
Source: https://www.thedailymeal.com/eat/pringles-new-flavors-bacon-mac-cheese/071819
0 notes
Text
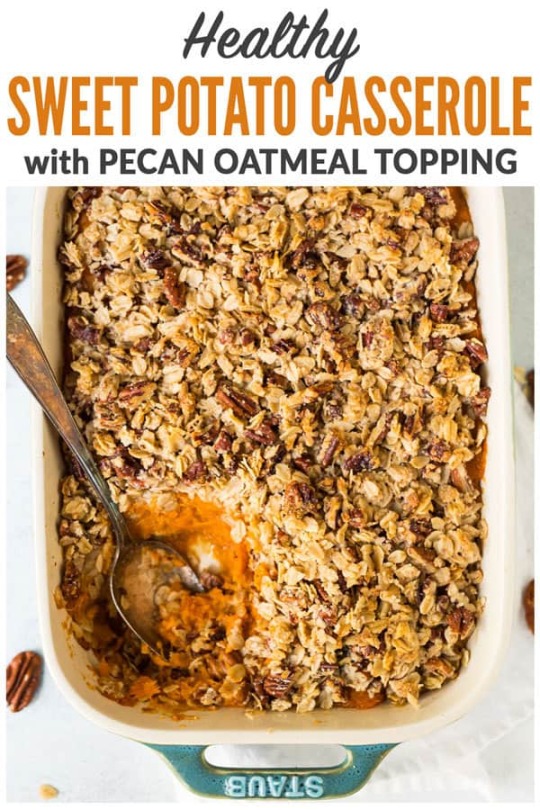
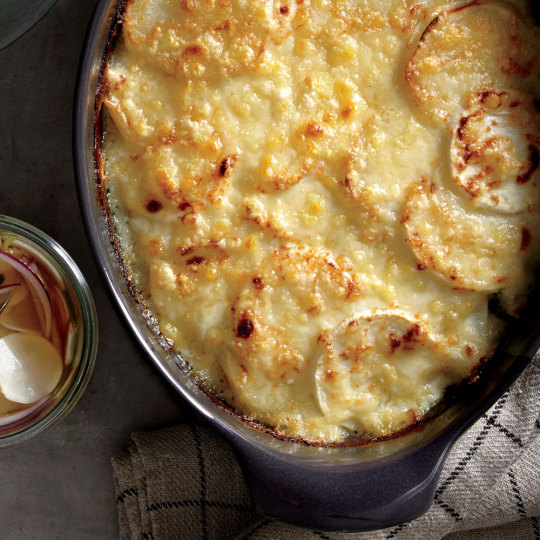
Healthy Sweet Potato Casserole
Every Thanksgiving, I call dibs on bringing the sweet potatoes. It’s not out of the kindness of my heart, though I will always willingly and enthusiastically contribute to a meal, nor is it because sweet potato casserole is showiest. It’s because sweet potatoes are my favorite, and I am rather, erm, particular about them. This Healthy Sweet Potato Casserole recipe is the one! It’s the ideal balance of sweet and savory, the oatmeal topping maintains a traditional feel but is refreshingly unexpected, and it’s both vegan and gluten free, meaning everyone at the table can have a giant scoop.
Truth be told, when I first made this Healthy Sweet Potato Casserole, I was not in the market for a new sweet potato recipe. For years, I’d made and loved my mom’s Glazed Sweet Potatoes with Whiskey Pecans. It and Rosemary Bacon Mushroom Stuffing are my two favorite Thanksgiving side dishes to the extent that after the meal, I hide a container of them in an undisclosed location for my own personal consumption.
I really am selfish when it comes to the sweet potatoes, it seems!
Fortunately, this Healthy Sweet Potato Casserole can easily serve a crowd, so there’s plenty to go around and fill a secret container or two. You will love it just as much at the feast itself as you will leftover the next day.
My two tricks to setting this healthy sweet potato dish apart from others you’ve tried are vanilla beans and a crunchy pecan oatmeal topping. The vanilla flavor is subtle but surprising. Guests might not be able to guess what it is, but they will absolutely go back for more.
In the topping department, marshmallows are not my thing at dinner (sorry if you were hoping for a healthy sweet potato casserole with marshmallows!), but I do solemnly believe that every good casserole deserves a special topping, and this pecan oatmeal one is superb.
The savory crunch of the oats and pecans is an ideal counterpoint to the velvety vanilla sweet potatoes. It vaults this healthy sweet potato casserole straight into the holiday side dish stratosphere.
As I mentioned, in addition to being gluten free (just make sure you used certified gluten free oats like these in the oatmeal topping), this Healthy Sweet Potato Casserole is vegan. Instead of using butter and heavy cream, I used unsweetened vanilla almond milk and coconut oil, along with a light touch of maple syrup for extra flavor.
With the additional flavor dimension from the vanilla and maple, I didn’t miss the butter. The filling is still plenty creamy and decadent.
(If making the recipe vegan isn’t a priority, you could try this Healthy Sweet Potato Casserole with honey instead, and yes, it works with butter too.)
I’ll be hosting Friendsgiving again this year, our first “official” party in our new home! In addition to the turkey, I’ll be continuing my tradition of making this Healthy Sweet Potato Casserole. Now you know why.
Last year’s record: I ate two servings of the casserole at dinner and one the next morning (if you’re looking for a healthy sweet potato breakfast casserole, try this one with a extra maple syrup and vanilla Greek yogurt). In a final act of self preservation, I moved what little remained to our garage refrigerator, hoping the distance would encourage me to eat something besides healthy sweet potato casserole for a meal. It didn’t work.
Since our move, we no longer have a garage refrigerator, so guess who’s eating this Healthy Sweet Potato Casserole for dinner, breakfast, and lunch? She’s pretty excited about it. Try this recipe, and you will be too!
Recommended Tools to Make Healthy Sweet Potato Casserole
Healthy Sweet Potato Casserole with Oatmeal Topping. This will be your new favorite sweet potato recipe! Creamy, decadent, vegan, and gluten free!
Course: Side Dish
Cuisine: American
Keyword: Easy Casserole Recipe, Healthy Sweet Potato Casserole, Healthy Thanksgiving Side, Vegan Sweet Potato Casserole
Servings: 10 servings (1 9x13-inch casserole)
Calories: 386 kcal
Author: Erin
For the Pecan Oat Topping:
1 1/3 cups old-fashioned rolled oats gluten free if necessary
1 cup roughly chopped pecans untoasted
1/2 cup almond meal**
1/4 teaspoon ground cinnamon
1/4 teaspoon kosher salt
5 tablespoons melted coconut oil
1 tablespoon pure maple syrup
Preheat the oven to 375 degrees. Lightly grease a 9x13-inch casserole dish or other 3-quart casserole dish and set aside.
Prick the sweet potatoes all over with a fork, then place them on a baking sheet lined with foil or a silpat mat. Bake until the potatoes are fork tender, about 1 hour or so, depending upon the size of your potatoes. Remove from the oven and let sit until cool enough to handle, about 5 minutes. Peel and discard the skins (they should come off easily with your fingers), break the potatoes in large chunks with a fork, then place the chunks into the bowl of a standing mixer fitted with the paddle attachment or a large mixing bowl.
While the potatoes bake, pour the almond milk in a small saucepan. Split the vanilla beans, scrape the seeds into the pan, then add the empty pods to the pan too. Bring to a very gentle simmer over medium heat for 5 minutes, stirring occasionally. Do not let the almond milk boil. Remove from heat and let the vanilla steep while the potatoes continue baking.
Remove the vanilla bean pods from the saucepan, then pour the almond milk and vanilla bean specs into the bowl with the sweet potato chunks. Add the melted coconut oil, cinnamon, salt, nutmeg, and white pepper.
Mash the potatoes together with the milk and spices (or beat gently with a mixer or your paddle attachment or run though a food mill) until fairly smooth with some texture remaining. Taste and add additional salt/pepper as desired. Transfer to the prepared baking dish. With the back of a rubber spatula, press and smooth into a single layer.
In a separate bowl, combine the topping ingredients—oats, pecans, almond meal, cinnamon, salt, coconut oil, and maple syrup—until moist and evenly mixed. Sprinkle over the sweet potatoes.
Bake until the topping is toasted and fragrant and casserole is warmed through, about 20 minutes. Serve warm.
*You can substitute 2 tablespoons pure vanilla extract for the vanilla beans, but the flavor will not be as rich and you lose the pretty specks. **To make your own almond meal, pulse whole, raw almonds in the food processor until they form fine crumbs. Do not over process, or you will have almond butter instead. Make it ahead: Casserole can be prepared up through Step 5 one day in advance. Store refrigerated with plastic wrap over the top of the dish. Let come to room temperature prior to baking.
Pecan oat topping adapted from my Cherry Blackberry Crisp
Nutrition Facts
Healthy Sweet Potato Casserole
Amount Per Serving (1 g)
Calories 386 Calories from Fat 162
% Daily Value*
Total Fat 18g 28%
Saturated Fat 9g 45%
Sodium 242mg 10%
Total Carbohydrates 52g 17%
Dietary Fiber 9g 36%
Sugars 10g
Protein 7g 14%
* Percent Daily Values are based on a 2000 calorie diet.
This post contains some affiliate links, which means that I make a small commission off items you purchase at no additional cost to you.
posted in Casseroles/Bakes, Christmas, Dairy Free, Fall, Gluten Free, Healthy Savory Dishes, Recipes by Diet, Recipes by Occasion, Recipes by Season, Recipes by Type, Side Dishes, Thanksgiving, Vegan, Vegetarian, Winter

Source: https://www.wellplated.com/healthy-sweet-potato-casserole/
0 notes
Text
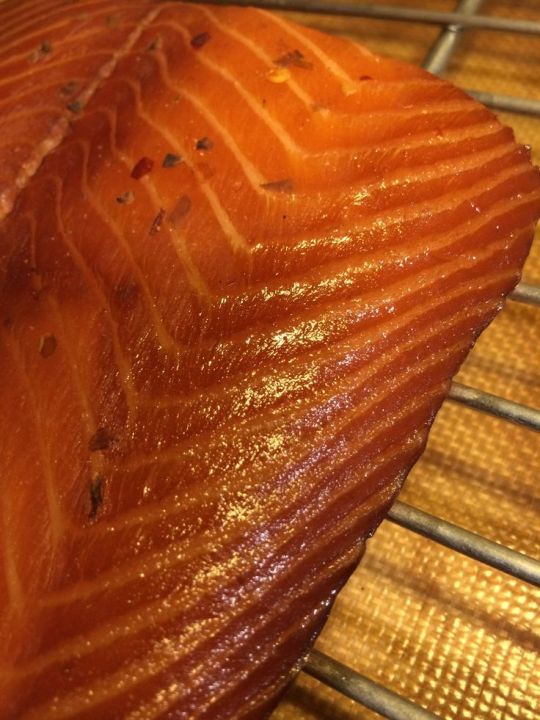
Pan-Fried Trout with Pecans and Brown Butter
Pan-Fried Trout with Pecans and Brown Butter Recipe - Chowhound
PREVIOUS: Brown Butter Hasselback Potatoes (Accordion... NEXT: Buttermilk and Brown Butter Waffles
Ingredients (7)
4 trout fillets (4 to 6 ounces each)
kosher salt and freshly ground black pepper
1/2 cup all-purpose flour, for dredging
8 tablespoons (1 stick) unsalted butter
1/2 cup thinly sliced pecans
juice of 1 lemon, plus wedges for serving
2 tablespoons finely chopped parsley leaves
Nutritional Information
Calories531
Fat38.96g
Saturated fat16.12g
Trans fat0.92g
Carbs14.16g
Fiber1.82g
Sugar0.57g
Protein31.35g
Cholesterol139.57mg
Sodium461.06mg
This is Southern food maven Amber Wilson’s New Orleans-inspired take on trout amandine, in which toasty pecans replace the almonds. With brown butter, parsley, and lemon juice, they make an easy yet elegant topping for pan-fried trout. This dish is simple enough to make on a weeknight, but refined enough for company—and you could even cook it in a skillet over a campfire by the lake, preferably with fish you’ve recently caught from those same waters. Still, it’s fantastic with store-bought fillets too.
For another way to make this mild, sweet fish, get our Campfire Trout with Herbs and Bacon recipe.
Instructions
1Season both sides of the fillets with salt and pepper. Place the flour in a shallow bowl. Dredge both sides of the fillets in the flour, shaking off the excess.
2In a large cast iron or heavy-bottomed skillet, melt 4 tablespoons of the butter over medium-high heat. Just as the butter melts, add the fillets and cook on each side until golden brown, about 3 minutes per side. Transfer the fish to 4 warm serving plates.
3Add the remaining 4 tablespoons butter to the skillet and reduce the heat to medium-low. Swirl the pan and cook just until the butter begins to brown. Add the sliced pecans and stir constantly until gently toasted, about 3 minutes. Take off the heat and add the lemon juice and parsley. Spoon the sauce over the fish and serve with lemon wedges.
From the book: FOR THE LOVE OF THE SOUTH by Amber Wilson. Copyright © 2018 by Amber Wilson. Reprinted courtesy of Harper Design, an imprint of HarperCollins Publishers.
Recommended from Chowhound
') else $('.f_req').remove(); ) $(document).on('change', '.Newsletter-checkbox .inp_chk', function() var checked = $("input.inp_chk:checked").length; if( checked == 0 ) $('.f_req').remove(); $('.Newsletter-checkbox').append('
Please check the opt-in box to acknowledge that you would like to subscribe.
'); return false; else $('.f_req').remove(); ) var clickev = is_mobile ? 'touchend' : 'click'; $(document).on(clickev, '.f_req', function() $('.f_req').remove(); ) $(document).on('click', '.fr_fw_nl_frm .bt_t:not(.processing)', function(e) $(this).addClass('processing'); var emailFilter = /^([+a-zA-Z0-9_.-])+@(([a-zA-Z0-9-])+.)+([a-zA-Z0-9]2,4)+$/; if( !emailFilter.test($('.inp_t').val()) ) $('.f_req').remove(); $('.fr_fw_nl_frm').append('
Please enter a valid Email
'); $(this).removeClass('processing'); if ( emailFilter.test($('.inp_t').val()) && $('.inp_t').val().length > 2 ) var checked = $("input.inp_chk:checked").length; if( checked === 0 ) $('.f_req').remove(); $('.Newsletter-checkbox').append('
Please check the opt-in box to acknowledge that you would like to subscribe.
'); $(this).removeClass('processing'); return false; else $('.Newsletter-checkbox').remove(); subemail = $('.inp_t').val(); acqsource = $('.acqsource').val(); $('.fr_fw_nl_frm').html("
Thanks for subscribing!
").addClass('okm'); $('.f_req').remove(); var newsLetterSubmit = $.ajax( type: 'POST', url: "/profile/public_subscription/?email="+subemail+"&acqsource="+acqsource, dataType: "text", success: function(data) //do nothing ); nlAfterSubmit(); ) );
Source: https://www.chowhound.com/recipes/pan-fried-trout-pecans-brown-butter-32088
0 notes
Text
Pork Panini – Flashback Friday
If you have leftover slices of pork sitting around your house, then you need this recipe.
This is basically a panini version of a cuban sandwich. The mayo is what really makes the sandwich amazing. You can also find a bonus recipe with this for a apple, ham and brie panini sandwich also. Both would make a quick and easy dinner or lunch!
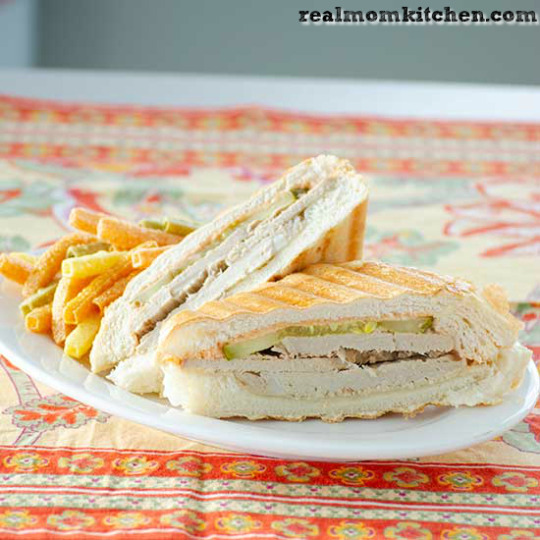
Pork Panini
Source: https://realmomkitchen.com/24457/pork-panini-flashback-friday/

0 notes
Text
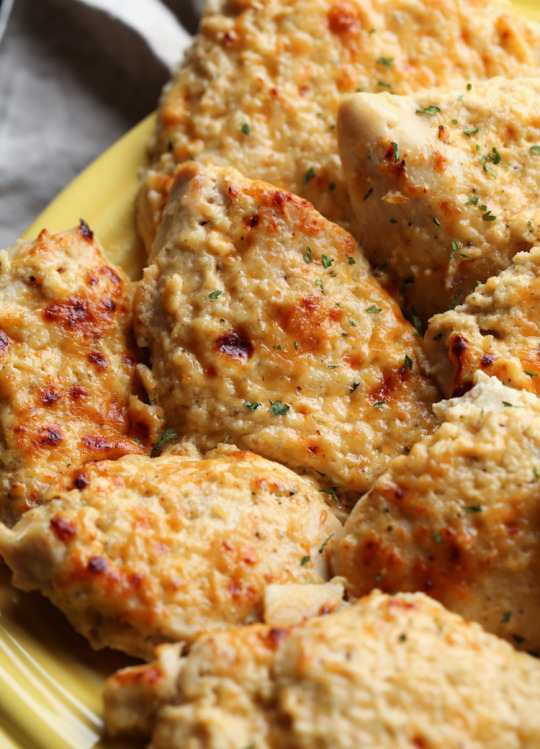
Minute Steaks with Quick Chive Butter

Minute Steaks with Quick Chive Butter
I’ve become a little obsessed with flavoured butters in the last few months. Ever since I realized that I can just quickly make them without having to do it in advance and refrigerate it before using – like so many recipes tell you to do.
The only thing is you need to have your butter at room temperature so will need to think ahead a little (unless you’re happy giving cold butter a quick zap in the microwave). I’ve also been loving chives at the moment as a way to get those lovely complex onion-y flavours without actually using non-FODMAP friendly onions.
These days I pretty much only cook minute steaks. It is a little bit of a hassle to bash out the steaks before cooking but then the steaks cook in (literally) a minute on each side AND they are super tender and tasty. It’s really worth the effort.
The chive butter works beautifully with steak but is also amazing on chicken, fish, roast veg, fried eggs, mushrooms or eggplant ‘steaks’. Also thinking it would be lovely on burgers.
Ingredients
80 g (3oz) salted butter, at room temp
2 tablespoons chives finely chopped
1 tablespoon parsley finely chopped
2 teaspoons lemon juice + extra lemon to serve
2 steaks
1 large bag baby spinach or green salad to serve
Instructions
Mash together butter, chives, parsley and 2 teaspoons lemon juice in a small bowl. Allow to stand while you cook the steaks.
Heat a frying pan or BBQ on a high heat. Slice each steak into 3 pieces then using your fist, a meat mallet, a small saucepan or a metal potato ricer, bash each piece of steak out so it is less than 1cm (1/3in) thick. Rub each piece of steak with oil on both sides and season with salt.
Sear steaks in your super hot pan for 1 minute each side or until browned and still a little pink in the middle. Divide steaks between two warm plates.
If using baby spinach return the pan to a medium heat and add the spinach. Cook, stirring for a minute or until the leaves are about 1/2 wilted but some still whole. Remove from heat and add a squeeze of lemon. Divide cooked spinach between two plates.
If using salad, skip the wilting step and serve the fresh leaves on your plates.
Smear chive butter over the hot steaks and enjoy asap!
WINE MATCH: A favourite glass of red such as a cool climate shiraz or syrah.
Variations & Substitutions
vegetarian – tofu, large flat mushroom ‘steaks’ or eggplant ‘steaks’ instead of the butter.
dairy-free – make a herb oil by infusing chives & parsley in 1/3 cup extra virgin olive oil.
more substantial (carb lovers) – potatoes (roast, steamed or mashed) or crusty bread to soak up the lovely buttery steak juices.
more substantial (low carb) – add roast nuts like almonds, walnuts or hazelnuts. Use more butter. Or serve with some extra low carb veg like roast cauliflower or steamed broccoli.
different protein – great with chicken breasts or thighs (just bash out as per the steak). The herb butter is also fab with any pan fried fish.
different herbs – tarragon, thyme, basil or any combination is good.
Prepare Ahead
Not really. The butter can be made in advance and either refrigerated for up to 2 days or frozen. And then allowed to come to room temperature before you cook. But the steak is really best when hot from the pan. Leftovers will keep in the fridge for up to 2 weeks or can be frozen.

More Steak Recipes
Have fun in the kitchen!
With love, Jules x
Tags: butter, chives, dinner, lemon, minute steak, simple, spinach, steak
Source: https://thestonesoup.com/blog/2018/12/04/minute-steaks-chive-butter/
0 notes
Text
Rice Noodles with Nuoc Cham, Herbs, & Crispy Tofu
When the heatwave hit earlier this week, I craved these noodles. I first ate them years ago while working at Fork, where the chef, Thien Ngo, would whip them up for lunch almost daily during the hottest weeks of the summer. We would eat them on the little back patio, an oasis of peace and cool, where they disappeared in no time, Thien’s always with a glass of wine “for digestion.”
Those noodles were so. damn. good. This is partly because Thien always used fresh rice noodles, which he purchased from a shop called Ding Ho near Reading Terminal Market, where they were made daily and sold in large sheets, folded and wrapped in oily cellophane to prevent them from drying out. If Thien ever disappeared midmorning, chances were he had snuck out on his bike to pick up the noodles, which he stashed in the plastic take-out bag on the shelf beneath his work station.
I always marveled at how efficiently Thien worked. Before chopping an herb or slicing a vegetable, he would throw a sauté pan over a burner set over low heat to warm up, ready for anything he might need to crisp or cook. And in no time, all of the other elements would materialize: the dressing, nuoc cham, the spicy, sweet, sharp condiment ubiquitous at nearly every Vietnamese meal; the chopped herbs, a mix of cilantro and Thai basil; the julienned vegetables, often cucumbers and carrots; and some sort of meat, often shrimp, which he would throw into his warm pan, heat now cranked to high, with oil, garlic and chilies.
When everything was ready, he unwrapped the noodles, sliced them into wide strips, and piled them into bowls. He then topped each heap of noodles with the various herbs, vegetables and meat, before pouring the dressing over top. He never tossed everything together all at once—we tossed with chopsticks as we ate, which kept the vegetables crisp and the herbs fresh. These noodles made me sweat—Thien made the nuoc cham very spicy—but somehow I always finished feeling refreshed.
With every heatwave we get, I think of these noodles, and Thien, too, who sadly is no where to be found. Thien was often difficult to work for, and he had issues, the extent of which I never learned, but there was so much good, too—good stories, good food, good drink, and really, really good noodles. Here’s to that.
Here’s a visual how-to guide:
Cook the rice noodles for 4-6 minutes or according to package instructions.
Drain and rinse under cold water.
For the nuoc cham, chop garlic and chilies:
Add fresh lime juice…
… along with sugar, fish sauce, and water.
Slice scallions and toss with …
… the cooked noodles, chopped herbs, and julienned cucumbers.
Toss noodles with nuoc cham and protein of choice, see recipe for details.
Print
<![CDATA[ .tasty-recipes-image float: right; .tasty-recipes-print-button background-color: #666677; display: inline-block; padding-left: 1em; padding-right: 1em; padding-top: 0.5em; padding-bottom: 0.5em; text-decoration: none; a.tasty-recipes-print-button color: #FFF; a.tasty-recipes-print-button:hover color: #FFF; .tasty-recipes-rating.tasty-recipes-clip-10 -webkit-clip-path: polygon(0 0, 10% 0%, 10% 100%, 0% 100%); clip-path: polygon(0 0, 10% 0%, 10% 100%, 0% 100%); .tasty-recipes-rating.tasty-recipes-clip-20 -webkit-clip-path: polygon(0 0, 20% 0%, 20% 100%, 0% 100%); clip-path: polygon(0 0, 20% 0%, 20% 100%, 0% 100%); .tasty-recipes-rating.tasty-recipes-clip-30 -webkit-clip-path: polygon(0 0, 30% 0%, 30% 100%, 0% 100%); clip-path: polygon(0 0, 30% 0%, 30% 100%, 0% 100%); .tasty-recipes-rating.tasty-recipes-clip-40 -webkit-clip-path: polygon(0 0, 40% 0%, 40% 100%, 0% 100%); clip-path: polygon(0 0, 40% 0%, 40% 100%, 0% 100%); .tasty-recipes-rating.tasty-recipes-clip-50 -webkit-clip-path: polygon(0 0, 50% 0%, 50% 100%, 0% 100%); clip-path: polygon(0 0, 50% 0%, 50% 100%, 0% 100%); .tasty-recipes-rating.tasty-recipes-clip-60 -webkit-clip-path: polygon(0 0, 60% 0%, 60% 100%, 0% 100%); clip-path: polygon(0 0, 60% 0%, 60% 100%, 0% 100%); .tasty-recipes-rating.tasty-recipes-clip-70 -webkit-clip-path: polygon(0 0, 70% 0%, 70% 100%, 0% 100%); clip-path: polygon(0 0, 70% 0%, 70% 100%, 0% 100%); .tasty-recipes-rating.tasty-recipes-clip-80 -webkit-clip-path: polygon(0 0, 80% 0%, 80% 100%, 0% 100%); clip-path: polygon(0 0, 80% 0%, 80% 100%, 0% 100%); .tasty-recipes-rating.tasty-recipes-clip-90 -webkit-clip-path: polygon(0 0, 90% 0%, 90% 100%, 0% 100%); clip-path: polygon(0 0, 90% 0%, 90% 100%, 0% 100%); .tasty-recipes-nutrition ul list-style-type: none; margin: 0; padding: 0; .tasty-recipes-nutrition ul:after display: block; content: ' '; clear: both; .tasty-recipes-nutrition li float: left; margin-right: 1em; @media print .tasty-recipes-no-print, .tasty-recipes-no-print * display: none !important; .tasty-recipes border: 5px solid #b7cfb2; margin-top: 6em; margin-bottom: 4em; .tasty-recipes-print-button display: none; .tasty-recipes-image-shim height: 69.5px; clear: both; .tasty-recipes-entry-header background-color: #b7cfb2; color: #FFF; text-align: center; padding-top: 35px; padding-bottom: 1.5em; padding-left: 2.5em; padding-right: 2.5em; .tasty-recipes-entry-header.tasty-recipes-has-image padding-top: 0px; .tasty-recipes-entry-header .tasty-recipes-image float: none; text-align: center; transform: translateY(-115px); margin-bottom: 1em; /* Decide if we need this */ .tasty-recipes-entry-header .tasty-recipes-image img -webkit-border-radius: 50%; -moz-border-radius: 50%; border-radius: 50%; border: 5px solid #b7cfb2; height: 150px; width: 150px; display: inline-block; .tasty-recipes-entry-header h2 font-size: 2em; font-weight: 400; text-transform: lowercase; margin-bottom: 0; text-align: center; color: #FFF; margin-top: 0; padding-top: 0; padding-bottom: 0; .tasty-recipes-has-image .tasty-recipes-entry-header h2 margin-top: -115px; .tasty-recipes-entry-header hr border: 1px solid #FFF; background-color: #FFF; margin-bottom: 1em; margin-top: 1em; .tasty-recipes-entry-header div.tasty-recipes-rating text-decoration: none; border: none; .tasty-recipes-entry-header .tasty-recipes-rating:hover text-decoration: none; .tasty-recipes-entry-header div.tasty-recipes-rating font-size: 1.375em; display: block; .tasty-recipes-entry-header .tasty-recipes-rating p margin-bottom: 0; .tasty-recipes-entry-header span.tasty-recipes-rating margin-left: .25em; margin-right: .25em; color: #FFF; .tasty-recipes-entry-header .rating-label font-style: italic; color: #FFF; font-size: .6875em; display: block; .tasty-recipes-entry-header .tasty-recipes-details margin-top: 1em; .tasty-recipes-entry-header .tasty-recipes-details ul list-style-type: none; margin: 0; .tasty-recipes-entry-header .tasty-recipes-details ul li display: inline-block; margin-left: .5em; margin-right: .5em; font-size: 1em; line-height: 2.5em; color: #fff; .tasty-recipes-entry-header .tasty-recipes-details ul li.author, .tasty-recipes-entry-header .tasty-recipes-details ul li.total-time display: none; @media only screen and (max-width: 520px) .tasty-recipes-entry-header .tasty-recipes-details .detail-icon height: .8em; margin-top: .4em; .tasty-recipes-entry-header .tasty-recipes-details ul li font-size: .875em; line-height: 1.75em; @media only screen and (min-width: 520px) .tasty-recipes-entry-header .tasty-recipes-details .detail-icon height: 1em; margin-top: .6em; .tasty-recipes-entry-header .tasty-recipes-details ul li font-size: 1em; line-height: 2.5em; .tasty-recipes-entry-header .tasty-recipes-details .tasty-recipes-label font-style: italic; color: #FFF; margin-right: .125em; .tasty-recipes-entry-header .tasty-recipes-details .detail-icon vertical-align: top; margin-right: .2em; display: inline-block; .tasty-recipes-entry-content padding-top: 1.25em; .tasty-recipes-entry-content .tasty-recipes-buttons margin-bottom: 1.25em; margin-left: 1.25em; margin-right: 1.25em; .tasty-recipes-entry-content .tasty-recipes-buttons:after content: " "; display: block; clear: both; .tasty-recipes-entry-content .tasty-recipes-button-wrap width: 50%; display: inline-block; float: left; box-sizing: border-box; .tasty-recipes-entry-content .tasty-recipes-buttons a text-transform: uppercase; text-align: center; display: block; color: #FFF; background-color: #b7cfb2; font-size: 1em; line-height: 1.375em; padding-top: 1em; padding-bottom: 1em; font-weight: bold; margin-top: 0; border: none; border-radius: 0; text-decoration: none; .tasty-recipes-entry-content a img box-shadow: none; -webkit-box-shadow: none; .tasty-recipes-entry-content .tasty-recipes-buttons a:hover background-color: #979599; text-decoration: none; .tasty-recipes-entry-content .tasty-recipes-buttons img vertical-align: top; .tasty-recipes-entry-content .tasty-recipes-buttons img.svg-print, .tasty-recipes-entry-content .tasty-recipes-buttons img.svg-pinterest height: 1.25em; margin-right: .375em; margin-bottom: 0; background: none; display: inline-block; @media only screen and (min-width: 520px) .tasty-recipes-entry-content .tasty-recipes-button-wrap:first-child padding-right: .625em; .tasty-recipes-entry-content .tasty-recipes-button-wrap:last-child padding-left: .625em; @media only screen and (max-width: 520px) .tasty-recipes-entry-content .tasty-recipes-button-wrap width: 100%; .tasty-recipes-entry-content .tasty-recipes-button-wrap:nth-child(2) padding-top: 1em; .tasty-recipes-entry-content h3 text-transform: uppercase; font-size: .75em; color: #979599; margin-bottom: 1.5em; .tasty-recipes-entry-content h4 font-size: 1em; padding-top: 0; margin-bottom: 1.5em; margin-top: 1.5em; .tasty-recipes-entry-content hr background-color: #EAE9EB; border: 1px solid #EAE9EB; margin-top: 1em; margin-bottom: 1em; .tasty-recipes-entry-content .tasty-recipes-description, .tasty-recipes-entry-content .tasty-recipes-ingredients, .tasty-recipes-entry-content .tasty-recipes-instructions, .tasty-recipes-entry-content .tasty-recipes-keywords padding-left: 1.25em; padding-right: 1.25em; .tasty-recipes-entry-content .tasty-recipes-description p margin-bottom: 1em; .tasty-recipes-entry-content .tasty-recipes-ingredients ul, .tasty-recipes-entry-content .tasty-recipes-instructions ul list-style-type: none; margin-left: 0; margin-bottom: 1.5em; padding: 0; .tasty-recipes-entry-content .tasty-recipes-ingredients ul li, .tasty-recipes-entry-content .tasty-recipes-instructions ul li margin-bottom: .625em; list-style-type: none; position: relative; margin-left: 2.5em; line-height: 1.46; .tasty-recipes-entry-content .tasty-recipes-ingredients ul li:before, .tasty-recipes-entry-content .tasty-recipes-instructions ul li:before background-color: #b7cfb2; -webkit-border-radius: 50%; -moz-border-radius: 50%; border-radius: 50%; height: .5em; width: .5em; display: block; content: " "; left: -1.25em; top: .375em; position: absolute; .tasty-recipes-entry-content .tasty-recipes-ingredients ol, .tasty-recipes-entry-content .tasty-recipes-instructions ol counter-reset:li; margin-left: 0; padding: 0; .tasty-recipes-entry-content .tasty-recipes-ingredients ol li, .tasty-recipes-entry-content .tasty-recipes-instructions ol li list-style-type: none; position: relative; margin-bottom: 1em; margin-left: 2.5em; line-height: 1.46; .tasty-recipes-entry-content .tasty-recipes-ingredients ol li:before, .tasty-recipes-entry-content .tasty-recipes-instructions ol li:before content:counter(li); counter-increment: li; position: absolute; background-color: #b7cfb2; -webkit-border-radius: 50%; -moz-border-radius: 50%; border-radius: 50%; height: 1.45em; width: 1.45em; color: #FFF; left: -1.25em; transform: translateX(-50%); line-height: 1.5em; font-size: .6875em; text-align: center; top: .1875em; @media only screen and (max-width: 520px) .tasty-recipes-entry-content .tasty-recipes-ingredients ol, .tasty-recipes-entry-content .tasty-recipes-instructions ol margin-left: 0; .tasty-recipes-entry-content .tasty-recipes-notes padding: 1.25em; background-color: #EDF0F2; .tasty-recipes-entry-content .tasty-recipes-notes ol counter-reset:li; margin-left: 0; padding: 0; .tasty-recipes-entry-content .tasty-recipes-notes ul margin-left: 0; padding: 0; .tasty-recipes-entry-content .tasty-recipes-notes p, .tasty-recipes-entry-content .tasty-recipes-notes ul li, .tasty-recipes-entry-content .tasty-recipes-notes ol li background-color: #FFF; padding-left: 1.5625em; padding-right: 1.5625em; padding-top: 1.25em; padding-bottom: 1.25em; position: relative; -webkit-clip-path: polygon(20px 0, 100% 0, 100% 100%, 0 100%, 0 20px); clip-path: polygon(20px 0, 100% 0, 100% 100%, 0 100%, 0 20px); margin-bottom: 1.5em; @media only screen and (min-width: 520px) .tasty-recipes-entry-content .tasty-recipes-notes p, .tasty-recipes-entry-content .tasty-recipes-notes ul li, .tasty-recipes-entry-content .tasty-recipes-notes ol li padding-left: 2.5em; .tasty-recipes-entry-content .tasty-recipes-notes p:before, .tasty-recipes-entry-content .tasty-recipes-notes ul li:before content: "i"; display: block; background-color: #b7cfb2; -webkit-border-radius: 50%; -moz-border-radius: 50%; border-radius: 50%; height: 1.3em; width: 1.3em; font-size: .75em; line-height: 1.3em; text-align: center; color: #FFF; position: absolute; left: 1.167em; top: 1.9em; .tasty-recipes-entry-content .tasty-recipes-notes ol li:before content:counter(li); counter-increment: li; position: absolute; background-color: #b7cfb2; -webkit-border-radius: 50%; -moz-border-radius: 50%; border-radius: 50%; height: 1.45em; width: 1.45em; color: #FFF; left: 2em; transform: translateX(-50%); line-height: 1.5em; font-size: .6875em; text-align: center; top: 2em; .tasty-recipes-entry-content .tasty-recipes-notes p:last-child margin-bottom: 0; .tasty-recipes-entry-content .tasty-recipes-keywords background-color: #EDF0F2; padding-bottom: 1em; padding-top: 1em; .tasty-recipes-entry-content .tasty-recipes-keywords p font-size: 0.7em; font-style: italic; color: #979599; margin-bottom: 0; .tasty-recipes-entry-content .tasty-recipes-keywords p span font-weight: bold; .tasty-recipes-nutrifox text-align: center; margin: 0; .nutrifox-label background-color: #EDF0F2; .tasty-recipes-nutrifox iframe width: 100%; display: block; margin: 0; .tasty-recipes-entry-content .tasty-recipes-nutrition padding: 1.25em; color: #b7cfb2; .tasty-recipes-nutrition .tasty-recipes-label font-style: italic; color: #FFF; margin-right: .125em; font-weight: 400; .tasty-recipes-nutrition ul text-align: center; .tasty-recipes-nutrition li float: none; display: inline-block; line-height: 2em; .tasty-recipes-entry-footer background-color: #b7cfb2; padding-top: 1.5625em; padding-bottom: 1.25em; padding-left: 2.5em; padding-right: 2.5em; text-align: center; .tasty-recipes-entry-footer .tasty-recipes-footer-content display: inline-block; .tasty-recipes-entry-footer img width: 65px; .tasty-recipes-entry-footer h3 color: #FFF; font-size: 1.25em; line-height: 2.25em; margin-top: .5em; margin-bottom: .125em; padding: 0; line-height: 1em; .tasty-recipes-entry-footer p margin-bottom: 0; color: #FFF; font-size: .75em; .tasty-recipes-entry-footer p a color: #FFF; text-decoration: underline; box-shadow: none; border-bottom: none; .tasty-recipes-entry-footer:after content: " "; display: block; clear:both; @media only screen and (max-width: 520px) .tasty-recipes-entry-footer h3 margin-top: .5em; margin-bottom: .5em; .tasty-recipes-entry-footer text-align: center; @media only screen and (min-width: 520px) .tasty-recipes-entry-footer img float: left; .tasty-recipes-entry-footer h3, .tasty-recipes-entry-footer p margin-left: 90px; clear: none; text-align: left; /* Print view styles */ .tasty-recipes-print-view font-size: 11px; background-color: #fff; .tasty-recipes-print-view .tasty-recipes-print-button display: inline-block; .tasty-recipes-print padding:0; font-size: 11px; .tasty-recipes-print-view .tasty-recipes margin-top: 1em; .tasty-recipes-print .tasty-recipes-entry-header background-color: inherit; color: inherit; padding-bottom: 0; padding-left: 1em; padding-right: 1em; padding-top: 1em; .tasty-recipes-print .tasty-recipes-entry-header .tasty-recipes-image float: right; transform: none; .tasty-recipes-print.tasty-recipes-has-image .tasty-recipes-entry-header h2 margin-top: 0; .tasty-recipes-print .tasty-recipes-entry-header h2 color: inherit; margin-bottom: .5em; .tasty-recipes-print .tasty-recipes-entry-header hr display: none; .tasty-recipes-print .tasty-recipes-entry-header span.tasty-recipes-rating color: #000; .tasty-recipes-print .tasty-recipes-entry-header .tasty-recipes-details ul padding: 0; clear: none; .tasty-recipes-print .tasty-recipes-entry-header .tasty-recipes-details ul li line-height: 1.5em; color: #000; .tasty-recipes-print .tasty-recipes-entry-header .tasty-recipes-details .detail-icon display: none; .tasty-recipes-print .tasty-recipes-entry-content img max-width: 50%; height: auto; .tasty-recipes-print .tasty-recipes-entry-content .tasty-recipes-ingredients ul li, .tasty-recipes-print .tasty-recipes-entry-content .tasty-recipes-ingredients ol li margin-bottom: 0.25em; line-height: 1.1; .tasty-recipes-print .tasty-recipes-entry-content .tasty-recipes-instructions ul li, .tasty-recipes-print .tasty-recipes-entry-content .tasty-recipes-instructions ol li margin-bottom: 0.5em; line-height: 1.1; .tasty-recipes-print .tasty-recipes-entry-content .tasty-recipes-ingredients ul li:before, .tasty-recipes-print .tasty-recipes-entry-content .tasty-recipes-instructions ul li:before top: 0.3em; .tasty-recipes-print .tasty-recipes-entry-content .tasty-recipes-ingredients ol li:before, .tasty-recipes-print .tasty-recipes-entry-content .tasty-recipes-instructions ol li:before top: 0; .tasty-recipes-print .tasty-recipes-entry-content .tasty-recipes-notes p, .tasty-recipes-print .tasty-recipes-entry-content .tasty-recipes-notes ul li, .tasty-recipes-print .tasty-recipes-entry-content .tasty-recipes-notes ol li padding-top: 0; padding-bottom: 0; background-color: #EDF0F2; clip-path: none; .tasty-recipes-print .tasty-recipes-entry-content .tasty-recipes-notes p:before, .tasty-recipes-print .tasty-recipes-entry-content .tasty-recipes-notes ul li:before top: 0; clip-path: none; margin-bottom: 0.5em; @media print .tasty-recipes-print .tasty-recipes-entry-footer img display: none; .tasty-recipes-print .tasty-recipes-source-link text-align: center; ]]>
Description
These noodles are inspired a dish a chef I worked for in Philadelphia often made for lunch during the summer.
If you like video, you can watch a how-to in Instagram stories.
Notes:
Nuoc cham is a spicy, sweet, sharp condiment ubiquitous at nearly every Vietnamese meal. When using it as a dipping sauce, as here, you can omit the water.
In place of shrimp or other meat (see story above), I made Sarah Jampel’s crispy sesame tofu on Food52 ages ago and absolutely loved it. I adjusted the recipe here slightly for simplicity: instead of using 2 teaspoons soy sauce, I use 2 teaspoons of the nuoc cham dressing, and I omit the sesame oil. If you wish to follow her original recipe, do so here. For some visual guidance on pressing tofu, see this post.
If tofu isn’t your thing, grilled or sautéed shrimp would be delicious as would really any protein you like: I’d serve them with grilled chicken thighs, skirt steak, or pork tenderloin, to name a few.
I like to slice cucumbers on a mandoline, but if that scares you, simply slice them thinly using your knife. Carrots or radish or daikon would all be nice here, too. A sprializer is a good tool for this as well and also less scary than using a mandoline.
Ingredients
for the nuoc cham dressing:
1/4 cup sugar
1/3 cup fish sauce
1/3 cup fresh lime juice, plus more to taste
2 to 3 garlic cloves, sliced or minced
2 red Thai chilies or serrano or jalapeño peppers, thinly sliced
1/2 cup water
squirt Sriracha, optional
for the tofu:
14-oz block extra-firm tofu, pressed if you have time
2 tablespoons oil such as peanut, vegetable or olive
2 teaspoons nuoc cham dressing, see notes
1 tablespoon corn starch
1 tablespoon panko
1 tablespoon sesame seeds
for the noodle dish:
8 oz dried rice noodles
6 scallions, thinly sliced, white and green parts
1 cucumber or carrot or other vegetable, thinly sliced, see notes
herbs: cilantro, mint, Thai basil (if you can find it), thinly sliced
nuoc cham dressing to taste
crispy tofu or other protein of choice, see notes
Instructions
Make the nuoc cham dressing: In a medium bowl, whisk together the sugar, fish sauce, and lime juice until the sugar is completely dissolved. Add the garlic, chilies, and water. Add Sriracha, if using. Taste and adjust flavors if necessary with more lime or hot chilies. Set aside.
To make the tofu: Heat the oven to 400° F and line a sheet pan with parchment paper. Cut the tofu into 1/2-inch cubes and place in a bowl. Add the oil, nuoc cham, corn starch, panko, and sesame seeds, and stir to coat. Spread the tofu onto the baking sheet, leaving excess dressing behind. Bake for 30 to 40 minutes, flipping halfway through, until golden and crisp on top and bottom.
To assemble the noodles: Fill a large pot of water and bring it to a boil. Boil according to package instructions, typically 4-6 minutes. Drain and rinse until cold water. Transfer noodles to a large bowl. Add the scallions, cucumbers or other vegetables, herbs, and dressing to taste. Toss. Add more dressing if necessary. Add tofu or other protein and toss again.
Source: https://alexandracooks.com/2018/08/30/rice-noodles-with-nuoc-cham-herbs-crispy-tofu/
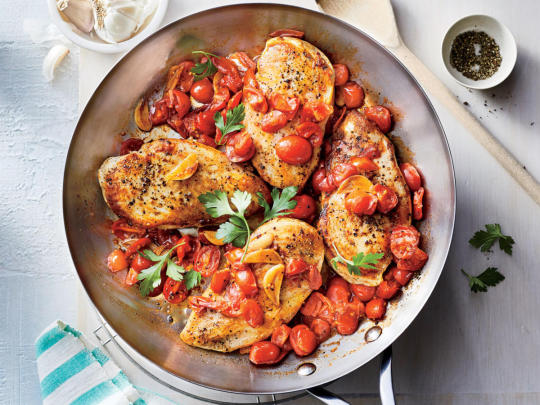
0 notes
Text
the most delicious cheese & onion quiche
September in Heritage month in South Africa and the focus is all around where we come from and for me, this translates into the types of recipes I grew up with that make me remember my late mother. I wanted to make something using Cheddar and butter that immediately transported me back to my childhood and a recipe my mom would make, and cheese and onion quiche is one of those dishes. Nothing complicated, just the sweetness of butter-braised onions and the sharpness or mature Cheddar baked into a quiche, which was so very popular in the seventies.
My mom died when I was 18 so I couldn’t get her recipe nor could I find it in any of her recipe books she kept, but when I think of iconic South African cooks and heritage recipes I immediately turn to one of my many Ina Paarman cookbooks for inspiration. In her book ‘Cook with Ina Paarman’ which I have owned for as long as I can remember, she has a recipe for cheese & onion quiche and it’s exactly how I remember my mom’s version tasting. I’m not sure if she would have added cheese to her quiche pastry, but since you want to make this as cheesy as possible it is the right way to go. The pastry is, in fact, the same recipe Ina uses for her cheese straws, so whatever is left over from making the quiche (it makes a little more than the recipe requires) – bake up a few straws. I added finely chopped rosemary and thyme to give the pastry and the quiche a slight herbaceous note.
Kerrygold is an Irish butter and cheese producer that make the most delicious products using milk from cows that freely graze on all that lush green grass. It’s packed with creaminess and is of top quality like all their products which are produced in Ireland and imported to over 90 countries in the world. I am obsessed with aged Cheddar and there 24 months aged Cheddar is the one I go for. It’s also the one I used in this recipe because the cheese is such a central flavour component of this quiche, you don’t want to skimp and use anything but the best. Kerrygold products do not contain any artificial additives and only use natural ingredients “Because Taste is Everything”
I wish my mom was still around so she could see what I do now, I know she would be very proud.
Please let me know in the comments below what recipe reminds me of YOUR heritage?
Recipe – makes one 25cm quiche (slightly adapted from Ina Paarman)
Cheese Pastry
250g flour
pinch of cayenne
1 tsp salt
2 tsp chopped herbs (rosemary & thyme) – optional
1 tsp Dijon mustard
150gm Kerrygold butter
1 cup (100g) grated Kerrygold 24 month mature Cheddar
1 egg yolk
¼ cup cold water
Cheese & onion quiche filling
2 large brown onions chopped
1 Tbsp olive oil
2 Tbsp Kerrygold butter
1 – 2 cloves garlic, crushed
2 large free-range eggs
½ cup crème fraiche
½ cup milk
¼ tsp cayenne pepper
1tsp Dijon mustard
1/2 tsp salt
¼ tsp ground white or black pepper
1 cup grated 24 months mature Kerrygold Cheddar
Preheat the oven to 180C / 350 F.
You can make this by hand using a pastry cutter or in a food processor.
Sift the flour and add this to the bowl of the food processor with the salt and cayenne and give it a 3-second mix.
Add the rest of the ingredients except the water and process briefly until just blended. Add the cold water while the motor is running and until the mixture just comes together into a dough. Tip this onto a well-floured surface and knead briefly to form a ball of dough.
Roll this out to about 3mm thick and line the base of a 25cm quiche tin (this will be a little over half the dough). Allow some of the dough to hang over the sides and then trim. It will shrink back during baking. Prick the surface area of the pastry with a fork.
Blind bake the pastry case by scrunching up a piece of baking paper then placing this on top of the pastry. The scrunching makes it easier to reach into the corners. Fill the case with any dried bean, rice or pasta (or pastry beans if you have these) and then bake for 10 minutes. Remove from the oven and remove the paper and filling. Return the pan to the oven and bake for a further 5 – 8 minutes until it has crisped up and starts turning a golden brown.
While the pastry is baking blind, make your filling for the quiche.
Heat the butter and olive in a non-stick frying pan and once it starts bubbling add the onion and sauté them for about 10 minutes over a low heat and until the onions are soft but not brown. Do not caramelize them. Add the garlic and set aside
In a bowl whisk the eggs with the crème Fraiche, milk and spices.
When the pastry comes out the oven, sprinkle ¾ of the cheese across the base then spread the onion mix on top of that. Gently our over the egg mixture and finally sprinkle the remaining cheese over the quiche. Bake for 35 minutes until golden brown and firm.
*This post is proudly sponsored by Kerrygold
Find me on Instagram
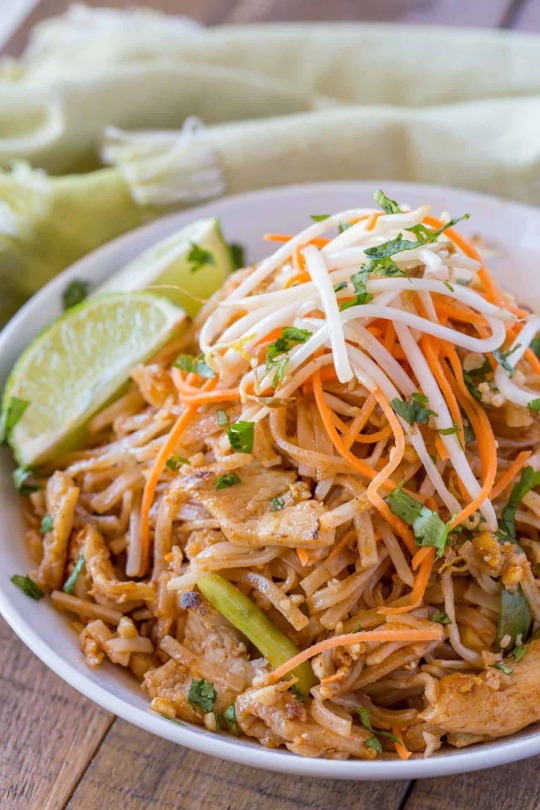
Source: https://drizzleanddip.com/2018/09/04/the-most-delicious-cheese-onion-quiche/
0 notes
Text
Rose Sangria
This Rose Sangria recipe is an easy way to serve a fun summer-y cocktail at a party without having to individually make drinks for each guest. Make this sangria using rosé wine flavored with summer fruit ahead of time and check one thing off your to-do list. It’s refreshing, festive and so delicious.
Rose Sangria Recipe
Are you ready for your favorite new summer cocktail? Rose Sangria is here, and it’s going nowhere all summer long! Of course, we love our FROSÈ recipe, but sometimes you need a big pitcher of a drink you make ahead so you can enjoy your evening with friends.
When entertaining, the last thing you want to do is be stuck by the bar making cocktails all night long. I’ve done it, I do it sometimes, but let’s be real, it’s not ideal. A pitcher of your favorite drink is perfect, so you can actually enjoy your evening, too! We love this pitcher of rosè sangria because it’s fruity, refreshing, and the perfect sangria recipe that everyone will love.
To make Rosè Wine Sangria you need:
A Pitcher
Serving Glasses
A Mixer (to keep that sangria mixed well, mine comes in my bar set)
Your favorite Rosè
Fresh fruit
Orange Liquor
Honey or simple syrup of choice
Seltzer
Ice, for serving
And a few other optional, special touches to customize (see below)!
What I love about this rose sangria recipe is that it’s customizable! You can switch up the fruit you add, the liquor, and you can swap the optional liqueurs, too! It’s a fun, colorful drink that can work with basically any dinner menu.
How far in advance should sangria be made?
Sangria should be made at least 2 hours before serving, so all the fruit can mix well with the rest of the ingredient and so that it can have time to chill! Sangria gets better and better as it sits, so even 6-12 hours ahead will be great.
Tips for Making the Best Rose Sangria Recipe:
Keeping your sangria cold: Add frozen fruit to keep your sangria cold once removing it from the refrigerator, without watering it down with tons of ice!
When to add the ice: Just before serving, stir sangria again and pour into glasses over ice cubes.
Fresh Fruit on hand: Have additional fresh fruit on hand to add to your sangria, so your not just serving soggy alcohol-soaked fruit. Spoon fruit into each glass before serving.
Picking your wine: Wine, of course, is the center of this cocktail, so choose a wine that is fruity but dry. You don’t need to pick anything too fancy! I like Whispering Angel or La Vielle Ferme.
Other favorite cocktail recipes:
Ingredients
Base Sangria:
1 (750-ml) bottle rosé wine of choice
1/4 cup (2 ounces) Cointreau or Triple Sec
1 cup seltzer water
Juice of 1 lemon
2 oranges, 1 sliced and 1 juiced
2 tablespoons honey or simple syrup, more as desired
1 cup strawberries, sliced 1 cup
1/2 cup fresh raspberries
Ice, for serving
Optional Add-Ins:
1/4 cup vodka of choice
1 cup balled watermelon pieces
1/2 cup diced peaches
Fresh mint leaves
Directions
1. Place all the ingredients in a pitcher at least 2 hours before serving, and up to 6 hours.
2. Stir to combine. Taste and add additional sweetener as desired.
3. Place ice into glasses. Pour in the sangria and serve!
Recipe Notes
If you want to prepare this the day ahead of time, you can mix all of the ingredients together except the fresh fruit and ice. Add the fruit 2 hours before serving.
Want to keep it cold in a pitcher without diluting the flavor? Use frozen fruit in place of ice cubes.
Make your watermelon balls using a melon baller!
You can substitute gin or tequila in place of vodka
Loading nutrition data...
There may be affiliate links in this post! By clicking on them, or purchasing recommended items I may receive a small compensation, at no cost to you! However, I only recommend products I absolutely love and use in my own home! Thank you for supporting Lexi's Clean Kitchen when you shop! See my privacy policy for more information about this, the information we save, and more!

Source: https://lexiscleankitchen.com/rose-sangria/
0 notes