
Don't wanna be here? Send us removal request.
Statistics
We looked inside some of the posts by shelyold and here's what we found interesting.
Average Info
Notes Per Post
0
Likes Per Post
0
Reblog Per Post
0
Reply Per Post
0
Time Between Posts
3 hours
Number of Posts By Type
Photo
17
Last Seen Tumblr Blogs


Fun Fact
Tumblr’s reach among the 26-to-35-year-olds in the US is 11%.
Photo

Each time I think I’ve seen them all, I come across another extraordinary fuchsia. And it’s not just Fuchsia magellanica hybrids anymore, either. You’ll find new cultivars from species previously known only in their native range. Some fuchsias are humble, with simple flowers in single colors. Others are huge, full, and multicolored. Some collapse at the first sign of frost, and others can handle a good amount of freezing weather. You can find them in upright types or with trailing habits. We link to vendors to help you find relevant products. If you buy from one of our links, we may earn a commission. There are literally thousands of cultivars and dozens of species of fuchsia. This list merely scratches the surface of the marvels that are out there. There are new ones constantly hitting the market, too. If you ever stumble across a new cultivar at a nursery or farmers market, grab it. I’ve discovered some new plants bred by local hobbyists that don’t appear on any list I can find that I just adore. Here are the 17 different species, hybrids, and cultivars we’re going to discuss in this guide. They include some of the most popular, as well as some of the most interesting and exciting new types on the market: 17 Favorite Fuchsia Varieties Fuchsia can be broadly categorized as either hardy or tender, and upright or trailing. Some fuchsia lovers further separate hardy types into hardy and very hardy. Very hardy types start blooming earlier in the year, in either May or June, and can grow reliably in Zones 7 to 9. Hardy types start blooming in June or July and can handle Zones 7 to 9, but may need some protection during long periods below freezing. Our guide to growing fuchsia provides cultivation instructions if you need a referesher. Fuchsia flowers are made up of sepals, tubes, and a corolla. The tube is the part that sits just below the ovary, which is the part that will become a berry as the flower matures. The sepals are the outer petals that emerge from the tube. Finally, the corolla is the frilly skirt of petals that sits underneath the sepals. There are also filaments, aka anthers, the little string-like parts that dangle out of the corollas. These can be unremarkable, or they can add a beautiful contrast to the rest of the plant. Flowers can be single, which means they have four petals, semi-double, which indicates five to seven petals, or double, with eight or more petals. Most of the fuchsias on this list (and in general) are F. magellanica hybrids, but we’ll call out those that aren’t. 1. Angel Earrings I have to admit, I can picture the flowers in this cascading series adorning the ears of the most stylish angels. All of these plants can survive the winter as far south as Zone 10, so they’re tender perennials, and they’re all self-cleaning. They’re also extremely heat tolerant. Photo via Alamy. The Angel Earrings series includes several different cultivars. ‘Cascading,’ which has a trailing habit, can grow 20 inches tall and two feet wide. The semi-double blossoms are a combination of fuchsia pink and vivid violet, though the anthers will fade to pinkish white as the flower matures. ‘Dainty’ is an upright type with semi-double flowers topped with red tubes and sepals surrounding a skirt of reddish-violet petals. It grows about two feet tall and a foot wide. ‘Double Red’ has double blossoms with pink sepals and frilly white corollas. It’s similar in size to ‘Cascading.’ 2. Bracelinae I think F. bracelinae is destined to become much more popular thanks to its tough and hardy nature. This Brazilian native is extremely hardy, down to Zone 7, and features reddish-pink single flowers on an upright bush that can grow five feet tall. It’s much more resistant to drought and fungal diseases than many other commonly cultivated varieties of fuchsia. 3. Dollar Princess If you’ve picked up a magenta and purple fuchsia in a hanging basket at a big box or home supply store, chances are good it was ‘Dollar Princess.’ This ultra-popular hybrid cultivar isn’t the biggest or the hardiest, but it’s a consistent winner that will perform all season long. This double-flowering, trailing type is cold hardy down to Zone 8 and its deep purple petals and crimson tubes with long, curving crimson sepals are instantly identifiable. It will grow to a mounding 18 inches tall and just a bit wider. 4. Caramel Blue ‘Caramel Blue’ is full of interesting elements. The tube on the semi-double flowers is white, flowing into extremely long white sepals with faintly green tips. Underneath is a skirt of deep-sea-like blue-violet petals gently cupping distinctive red filaments, all framed by deep green foliage. The plant has an upright, mounded growth habit, reaching 19 inches tall and wide. It’s a tender perennial, growing well down to Zone 9, though it will survive in Zone 8 with some winter protection during long periods of freezing temperatures. 5. Creeping Fuchsia It used to be difficult to find creeping fuchsia (F. procumbens) outside of its native New Zealand, but it’s popping up in more and more nurseries in the US – and thank goodness for that! The plant looks quite different from your usual fuchsia. It grows close to the ground, only reaching a few inches tall, but spreads over three feet wide. The blossoms are held upright, and they have yellow tubes capped with red and green sepals. There’s no visible skirt, just bright red and purple filaments that triumphantly jut out of the top. It’s the only plant among all the species and hybrids that has yellow coloring. The leaves are different, too. They’re more round, with a heart shape rather than being ovate. They’re also quite petite. The berries that follow the flowers are bright red, large, and juicy. They’re some of the best-tasting fuchsia berries that you’ll find. The plant is hardy to Zone 8. 6. Foxgrove Wood ‘Foxgrove Wood’ has gained widespread attention because it’s exceptionally hardy. It can survive down to Zone 7a without any protection at all. It’s an upright type with a symmetrical, bushy growth habit. It will reach 24 inches tall and equally wide when mature. But I think it would be worth growing even if it wasn’t super hardy. The apple green leaves frame the colorful semi-double flowers perfectly. Each flower has a rose-pink tube and sepals, with the sepals curling sharply upward so they almost touch the tube. It looks like a crown on the lavender-blue petals. The bright red filaments add an extra punch of color. As the flowers age, they fade to a pale pink. 7. Galadriel Not only is ‘Galadriel’ as beautiful as some sort of mythical creature from a fairytale, but it’s mysterious, as well. Photo via Alamy. Sound like a strange thing to say about a flower? For some reason that breeders don’t yet understand, ‘Galadriel’ can either have single blossoms with creamy white tubes, red-tipped sepals, and blood-red petals, or it can have pale red tubes with red-striped sepals and red petals, also with single blossoms. It doesn’t matter what growing conditions you give it, it just depends on whether you pick a clone with white or pale red tubes. If you have your heart set on one or the other, make sure to buy a plant that’s in bloom so you can tell what you’re getting. Otherwise, let it be a magical surprise. This one has an upright growth habit and is hardy to Zone 8. It has a lovely mounding shape and can reach two feet tall and wide. 8. Lady in Black ‘Lady in Black’ is pretty incredible solely for her burgundy sepals and tubes with nearly black-purple petals. That’s enough to recommend her, but then you find out how tall she can grow, and it’s a whole ‘nother story. Photo via Alamy. This hybrid is half-hardy and will thrive down to Zone 8, but what sets her apart is that she can climb nearly six feet tall in a single growing season. You’ll definitely need a trellis or fence for this one to climb up. Then, sit back and enjoy the extremely dense flowering. One plant can be cloaked in over 500 blossoms. If you’ve ever lamented that your fuchsia plants never grow as tall as you’d like, this is the solution. 9. Marinka With reddish-pink tubes, sepals, and corollas, the double flowers on ‘Marinka’ are distinct because of their simplicity. But don’t mistake simple for boring. This tender trailing type is extremely floriferous and vigorous. When it’s happy, you can hardly see the foliage for the flowers. Though it won’t come back year after year anywhere north of Zone 9, you can overwinter it indoors and enjoy the vibrant hues year after year. It’s perfect for a small spot, since it usually stays under six inches tall and only spreads to about 18 inches. It’s a reliable rebloomer even if you don’t deadhead it religiously. Learn more about deadheading fuchsia in our guide. 10. Shadow Dancers Shadow Dancers is a series of tender fuchsias that can grow as far north as Zone 9 as perennials. The trailing plants grow about a foot tall and 18 inches wide. ‘Maria’ has deep reddish-pink tubes and sepals, with cupped, semi-double corollas embracing pink filaments. The sepals stand out, literally, because they extend flat, so they look like little helicopter blades ready to spin each flower into the sky. ‘Betty’ has bright red tubes and sepals, with a white or pale pink skirt. The sepals are much shorter and rounder. ‘Violette’ has a similar shape, only with soft pink tubes and sepals, and a deep purple skirt. ‘Marcia’ features reddish blossoms with violet petals. 11. Sparky Sparky is an F. procumbens hybrid, crossed with ‘Thalia,’ and it combines all the cool characteristics of the two. It carries its single, purple-red and violet flowers upright at the end of the stems and, as with its creeping parent, the corolla isn’t visible. This plant isn’t creeping, though. It’s an upright type, with violet and green ovate leaves. It’s also more cold hardy than its F. procumbens parent and can thrive down to Zone 7. You’ll sometimes see this one listed as ‘Lady’s Eardrops,’ but several fuchsias go by this name. 12. Swingtime ‘Swingtime’ is a popular hybrid that will have you dancing for joy. Not only is it hardy with a trailing habit, but it has large, contrasting double blossoms in red with a white skirt. While it’s usually rated hardy to Zone 8b, if you keep an eye on it and protect it during extended freezes, it can survive the winter in Zone 7b. The plant can reach up to a foot tall and two feet wide, and is draped in masses of flowers from July until frost. It’s a hybrid cross of ‘Titanic’ and ‘Yuletide,’ two favorites. 13. Sylvia Barker When I moved to the Pacific Northwest, I quickly discovered that gardeners here take their fuchsias seriously, and one that seemed to inhabit every enthusiast’s garden is ‘Sylvia Barker.’ After growing one in my own space, I realized why. So here are the technical details: This trailing type is extremely floriferous, with long white tubes and extremely long white sepals that embrace the scarlet red corolla. It grows about 18 inches tall and wide, and is very hardy. Now for the part where I wax poetic. Fuchsias all attract hummingbirds by the dozen, but the little fliers seem particularly enamored with ‘Sylvia Barker.’ There are always so many visiting my plant that it seems as if they’re a permanent fixture. The many flowers tend to cluster on the bottom half of the plant, so it almost looks like it’s wearing a poofy dress of white and red blossoms. When grown in a basket, it’s like the plant is positively dripping with petals. 14. Tricolor F. magellanica var. macro ‘Tricolor’ is one of the rare fuchsias that people grow for the foliage. The flowers are just a bonus. Photo via Alamy. The foliage on this upright, very hardy plant is variegated with white, pink, and green on red stems. You need to keep it in full sun to get the full effect, so it’s really best for gardeners in areas with cooler summers. When in bloom from summer to the first frost, the five-foot-tall plant will feature single flowers with red tubes, long red sepals, and purple corollas. 15. Voodoo We all love fuchsias because of how floriferous they are, but imagine one with blossoms bigger than the breadth of your palm. Photo via Alamy. Part of the new generation of giant fuchsias, the magenta and purple blossoms on ‘Voodoo’ are a full four inches across. It looks like someone took a fuchsia plant and just blew it up, triple-sized. The downside is that it’s only hardy to Zone 9, so you’ll definitely want to cut it back and bring it indoors during the winter. Read our guide for fuchsia overwintering tips. It will grow up to six feet tall (with support) and a foot or two wide. 16. White Eyes All eyes will be on ‘White Eyes,’ whether you grow it in a hanging basket or trailing over a garden wall. The bushy plant grows 12 feet high and 24 inches wide, and is covered in double flowers that feature red sepals and tubes, and frilly white skirt petals with red filaments sticking out. The flowers are some of the fullest you’ll find. Plant ‘White Eyes’ in Zone 7b and up as a perennial, or Zone 8a and up if you’re growing yours in a container. Keep an eye out for its counterpart, ‘Dark Eyes,’ which has all the same characteristics with dark purple corollas capped by rose pink tubes and sepals. 17. Windchimes Windchimes is a series of upright fuchsias created with the idea of drawing in a new generation of fuchsia fans. It was bred by Green Fuse Botanicals to have a mounding, upright growth habit with large, double flowers. The sepals tend to be extra long and curl slightly upwards. Photo via Alamy. Flowers come in red and white, white on white, pink and white, and rose and purple. Each cultivar grows to about 15 inches tall and just a bit wider, and it will be constantly covered in flowers from summer through the first frost, even without deadheading. So Many Fuchsias, So Little Time I can easily see how people become obsessed with collecting fuchsias. They’re incredibly pretty and there are so many to choose from. Just when I think I’ve found a favorite (‘Lady in Black,’ currently), another one comes along that captures my heart. Are any of these options calling your name? Let us know what you’re going to plant in the comments. If you chance on something new and exciting, be sure to share that, too. I hope this guide helped you narrow down your selection. Once you bring it home, there are lots of other guides that you might find useful in keeping your fuchsia happy: © Ask the Experts, LLC. ALL RIGHTS RESERVED. See our TOS for more details. Originally published May 7, 2023. Last updated July 24, 2025. Uncredited photos: Shutterstock. !function(f,b,e,v,n,t,s) if(f.fbq)return;n=f.fbq=function()n.callMethod? n.callMethod.apply(n,arguments):n.queue.push(arguments); if(!f._fbq)f._fbq=n;n.push=n;n.loaded=!0;n.version='2.0'; n.queue=[];t=b.createElement(e);t.async=!0; t.src=v;s=b.getElementsByTagName(e)[0]; s.parentNode.insertBefore(t,s)(window, document,'script', ' fbq('init', '176410929431717'); fbq('track', 'PageView'); Source link
0 notes
Photo

While the growing season of most veggies comes to an end, there are bunch of vegetable plants that can be planted in August for bountiful harvest in the fall. You just need to be picky while sowing seeds based on climatic conditions in your region. Below listed are 19 such vegetables that actually thrives when planted at this time of year. These hardy varieties make the most of August’s unique growing conditions. The transition from summer heat to autumn coolness creates an ideal environment where plants can establish strong root systems without the stress of extreme temperatures. Many of these crops actually prefer the gentler conditions that late summer provides. Success with August planting comes down to smart garden management and timing. Choose varieties suited to your local climate, provide adequate water during establishment, and be ready to shield young plants from weather extremes. This strategic approach to late-season planting ensures your garden continues producing fresh vegetables well into fall. 19 Vegetables to Plant in August It’s end of July and if you’re pining hopes for fall harvest, then August is the month to plant your cool season veggies. As the soil is still warmer, which helps in seed germination, you can expect a mature plant before the first hard frost. To be successful with your August veggies, prepare the garden bed by adding old compost and perlite to the garden soil. Adding cocopeat and perlite helps to improve water retention ability of the growing medium. Choosing the right vegetable plant variety is vital for faster harvest. Also Read: 13 Easy Vegetables to Grow in Summer 1. Kale Kale has quickly become a staple in American kitchens, not just for its rich flavor but for its outstanding nutritional profile. Once considered a specialty green, it’s now celebrated by home gardeners everywhere for its hardiness and versatility. What’s more, kale can keep producing fresh leaves well into the cooler months—no wonder it’s called a superfood! If you’re looking to boost your health right from your backyard, there’s no better time to plant your own kale and join the homegrown green revolution. To plant, sow kale seeds about 1/4–1/2in deep, spacing them 12–18in apart so that mature plants have ample room. After planting, water thoroughly, then keep the soil consistently moist but not soggy; mulching helps lock in moisture and discourage weeds. When the leaves reach 6–8in long, harvest the outer leaves using scissors, always leaving the center of the plant intact. This way, your kale can keep providing fresh leaves into the fall and even early winter 2. Spinach Spinach grows best when sown directly into outdoor garden beds or large containers, as this encourages strong, upright growth from the start. Prepare the area with loose, fertile, and well-drained soil, mixing in plenty of compost or organic matter to boost nutrients. Choose a spot that receives at least 4–6 hours of sunlight each day, though partial shade during hot afternoons will help prevent bolting. Sow spinach seeds about 1/2 inch deep, spacing them 2–4 inches apart—this gives each plant enough room for broad leaves to develop. Water thoroughly after sowing, and keep the soil consistently moist (but never soggy); mulching helps conserve moisture and keeps roots cool. Harvest the outer leaves with scissors when they reach 4–6 inches long, leaving the inner leaves and center intact so the plant can keep growing. With this method, you can enjoy a steady supply of fresh, healthy spinach throughout the cooler months. 3. Bok Choy Bok choy thrives when sown directly into outdoor garden beds or large containers, as this minimizes root disturbance and ensures rapid growth. Prepare the spot with loose, rich, well-drained soil, incorporating compost or organic matter for best results. Choose an area that receives at least 4–6 hours of sunlight daily, though partial shade in the afternoon is helpful in hot climates to prevent bolting. Sow bok choy seeds about 1/2 inch deep, spacing them 6–12 inches apart to give each plant enough room for wide leafy heads and thick stems. Water well after planting, then keep the soil consistently moist but not soggy; mulch can help retain even moisture and keep weeds down. Harvest outer leaves when they’re young and tender, or cut the whole head at the base once it reaches 8–10 inches tall. This method allows you to enjoy crisp, flavorful bok choy well into the cooler fall months. Check this: 19 Vegetables for Your Winter Garden 4. Cauliflower Cauliflower thrives when started in late summer for a fall harvest, as it prefers cool, steady temperatures and consistent moisture. Its compact heads need nutrient-rich, loose soil and moderate sunlight—some afternoon shade is helpful in hot regions to prevent the heads from becoming discolored or loose. Start seeds indoors about 4–6 weeks before your target planting date and transplant seedlings outdoors after 3–4 weeks once they’re 3–4 inches tall, or sow directly 1/2 inch deep if your autumn is long and cool. Space cauliflower plants 18–24 inches apart in rows to allow good airflow and head development. Water regularly so the soil stays evenly moist but never saturated, and mulch well to conserve moisture and regulate soil temperature. To keep the heads white and tender, once a head is about 2 inches across, gently tie the outer leaves loosely over it (“blanching”). Harvest the head while it’s still tight and firm, before it starts to separate, cutting it at the base with a sharp knife. 5. Arugula Arugula is a fast-growing green with a spicy, peppery flavor, ideal for harvesting in the cooler days of fall. It’s well-suited for garden beds, containers, and even window boxes, performing best in moist, loose, fertile soil with some afternoon shade in the hottest climates. Direct sow arugula seeds about 1/4 inch deep and 1–2 inches apart; thin seedlings to 4–6 inches apart for larger leaves. Keep the soil consistently damp, using mulch to prevent it from drying out and to reduce temperature swings. Begin harvesting young leaves as early as three weeks after sowing, cutting the outer leaves first to keep the plant producing. Continue harvesting while the leaves are young and before flower stalks form, as older or bolting plants can taste bitter. 6. Swiss Chard Swiss chard is robust and productive, yielding brightly colored stems and deep green leaves from late summer until frost. It does best in rich, well-drained soil, receiving 4–6 hours of sunlight daily, but tolerates some shade. Sow seeds 1/2 inch deep, 4–6 inches apart, then thin seedlings to 8–12 inches for mature plants. Water consistently to keep the soil moist—mulching around plants helps maintain steady moisture and reduces weeding. Begin harvesting outer leaves when they reach 6–8 inches, cutting with scissors to encourage regrowth from the center. Apply compost midseason and remove old leaves to keep plants healthy and productive late into autumn. 7. Turnips Turnips grow quickly, producing tender roots and flavorful greens that are perfect for cooler autumn conditions. Enrich the soil with compost before planting to achieve sweet, mild roots, and provide a full-sun site for best results. Direct sow seeds 1/4 inch deep, then thin seedlings to 4 inches apart so each root has room to size up. Water evenly, aiming to keep the soil moist but not soggy; mulching helps retain moisture and discourages weeds. Harvest roots when they reach 2–3 inches across for tenderness; turnip greens can be picked earlier for fresh eating. Succession sow every 2–3 weeks for a steady supply through fall. 8. Bush Beans Bush beans mature fast and love the warmth lingering from summer, demanding lots of sun and loose soil enriched with compost. Unlike pole beans, they don’t require staking, making them an easy late-season crop. Direct sow seeds 1 inch deep and 2–3 inches apart in rows about 18 inches apart. Water thoroughly after planting and then whenever the top inch of soil is dry, especially during pod development. Harvest beans when pods are bright green and snap easily—picking regularly ensures long-lasting production. Weed regularly so young plants are not outcompeted, and avoid wetting foliage to prevent disease. 9. Mustard Greens Mustard greens are fast-growing and thrive when sown for a fall harvest, delivering spicy, flavorful leaves for salads and cooking. They appreciate moist, nutrient-rich soil and grow well in both beds and containers. Sow seeds 1/4 inch deep, thinning young plants to 5 inches apart once they have two sets of true leaves. Keep soil moist to encourage lush growth and mild flavor—too little water can make leaves tough and bitter. Harvest leaves when they’re 4–8 inches long, starting with outer leaves and leaving the center for continued growth. For an extended harvest, sow new seeds every couple of weeks well into fall. 10. Cilantro Cilantro grows best in cool, moist weather and bolts (flowers and goes to seed) quickly in heat, making late summer ideal for fall harvests of fragrant leaves. It prefers fertile, well-drained soil and some afternoon shade if it’s still hot. Direct sow seeds 1/4 inch deep and 6 inches apart, thinning as needed for airflow. Water consistently to keep the soil moist but not soggy, mulching helps regulate soil moisture and temperature. Harvest outer leaves early and frequently, leaving the central stem to regrow; for a steady supply, sow new batches every 2–3 weeks. If plants bolt, let a few go to seed and save fresh coriander for the kitchen. 11. Lettuce Lettuce grows rapidly in the cooling temperatures of late summer and fall, thriving in loose, compost-rich soil with consistent moisture. In hot weather, it benefits from afternoon shade to prevent bolting. Scatter seeds on the soil surface, cover lightly with soil or fine compost, and keep the bed consistently moist. Thin seedlings to 4 inches apart for leaf types, 6–12 inches for head types. Harvest as soon as leaves are large enough to eat, picking outer leaves first for baby greens or cutting whole heads for salads. Re-sow every 2 weeks to maintain a steady harvest. 12. Peas (Green & Sugar) Peas love cooler weather for flowering and pod set and should be sown as late as possible in zones where autumn stays mild. Their roots prefer well-drained, deeply dug soil and their climbing varieties need a trellis or netting. Sow seeds 1 inch deep and 2 inches apart along a support system. Water deeply at sowing, then maintain even soil moisture as the plants grow. Pick pods as soon as they fill out and before they harden on the vine—regular picking keeps plants producing. Mulch beds well to keep roots cool and weeds down. 13. Kohlrabi Kohlrabi is a quick and rewarding cool-weather crop, valued for its crisp, mild, swollen stems. It’s happiest in rich, evenly moist, well-drained soil with full sun. Sow seeds 1/4 inch deep, thinning to 4 inches apart as seedlings establish. Provide steady moisture to avoid woody bulbs—mulching is highly effective for this. Harvest stems when they reach 2–3 inches in diameter for best flavor and tenderness; don’t wait too long as old bulbs get tough. Remove lower leaves as needed to prevent disease and keep the patch tidy. 14. Radishes Radishes are among the fastest maturing fall vegetables, ready to harvest just 3–4 weeks after sowing in cool, damp soil. They can be grown in almost any garden bed or container with loose, friable soil. Sow seeds 1/2 inch deep, spacing about 1 inch apart; thin as they grow to allow roots to expand. Water evenly for crisp roots and avoid letting soil dry out for best results. Harvest roots when firm and of usable size; if left too long, they can become woody or pithy. Successively sow new rows every two weeks for continued harvests. 15. Mizuna Mizuna is a resilient Japanese salad green that thrives in cool weather and can even take light frosts. It loves moist, fertile soil and is well-suited for succession planting. Scatter or direct sow seeds in rows, thinning to 2 inches apart for baby greens or 6 inches apart for full heads. Maintain steady soil moisture with regular watering or mulch. Begin harvesting when outer leaves reach 3–4 inches, snipping fresh leaves to encourage more. If flower stalks form (bolting), harvest the whole plant for stir-fries or let it self-seed. Also Read: 30 Best Vegetables to Grow in Buckets, Bags or Containers 16. Beets Beets are sweet and tender when grown as a fall crop, developing their best flavor as nights cool in late summer. Loose, well-dug, compost-enriched soil is ideal for root expansion. Sow seeds 1/2 inch deep, spacing 1–2 inches apart, then thin established seedlings to 3–4 inches apart. Water regularly and mulch to maintain soil moisture. Harvest beets at 2–3 inches across for the sweetest roots, and enjoy tender greens from early thinnings. Avoid using fresh manure, as it encourages only leafy growth. 17. Broccoli Broccoli planted in late summer can produce tight, tasty heads before frost arrives. It needs rich, well-drained soil high in organic matter, and benefits from steady moisture. Start seeds indoors 4–6 weeks before transplanting, or direct sow if fall is long and cool; space plants 18–24 inches apart. Water deeply after transplanting and mulch for cool roots and weed suppression. Harvest main heads just before the florets separate, and leave plants to produce side shoots for later pickings. Check plants regularly for caterpillar pests and use row covers for protection. 18. Carrots Carrots love deep, loose soil and cool days for developing sweet, straight roots. Even coverage with boards or light cloth after sowing helps retain moisture and keep soil cool for better germination. Sow seeds 1/4 inch deep, spaced very thinly; thin to 2–3 inches apart when seedlings appear. Water thoroughly and keep soil consistently moist but never soggy. Harvest carrots when roots are 1/2–1 inch across depending on the variety; avoid over-maturity as they can get woody. Mulch after seedlings are established to prevent weeds and retain cool soil temperatures. 19. Cabbage Cabbage thrives best when it matures in cooling autumn weather, producing dense, crisp heads with a sweet flavor. Rich, well-fertilized, moist soil and a sunny spot are key for success. Start seeds indoors and transplant after 3–4 weeks (space plants 12–24 inches apart), or direct sow in long-season areas. Water thoroughly and consider using mulch to preserve moisture. Harvest when heads are firm and fully formed; don’t leave to over-mature or they may split. Rotate crops every year to reduce risk of pests and diseases. Also Read: How to Dry Fresh Basil Naturally? Conclusion Planting vegetables in August offers a great opportunity to extend your growing season and enjoy a bountiful fall harvest. With cooler temperatures on the horizon, many fast-growing and cold-tolerant crops like lettuce, radishes, kale, and broccoli thrive when started this month. Whether you’re sowing seeds directly into the soil or transplanting seedlings, choosing the right varieties ensures a productive garden well into autumn. By taking advantage of August’s warmth and planning for the coming cool weather, you can keep your garden thriving and your table full of fresh, nutritious produce. Khaja Moinuddin, a computer science graduate, finds joy in gardening and homesteading. Join him on this blog as he shares his experiences in homesteading, gardening, and composting Source link
0 notes
Photo

Soil temperature can be critical for seed germination, so it is important to know which vegetables you can sow directly outdoors and which ones need to be started indoors first. Here are some tips on starting direct sow vegetables from seed and which ones to plant right in the ground. Soil temperature is key when it comes to germination. Vegetables that need cool soil should be sown directly in the garden to get their best start. You’re going to see a pattern on this list of direct sow vegetables. LOTS of Brassicas and root vegetables. These plants don’t mind a little bit of cold, which allows you to get them right in the ground and germinate without any extra heat or attention. Another thing you’ll notice is that many of these plants have shorter maturity times. They don’t require getting a jump start by growing indoors and will reach maturity within a shorter growing season. For this reason, many of these direct sow vegetables are great for succession planting. I really encourage you to check out my post on succession planting to learn how you can stagger your harvest to grow more food for longer. If you’re ready to get planting, then let’s dive into all the vegetables to direct sow. Some of these plants may even act as perennial vegetables. I know Swiss chard comes back the next season in some cases. Expert Tips for Starting Direct Sow Vegetables from Seed Plant root vegetables in fertile, well-drained soil that has been sifted to remove any stones or hard debris that will obstruct the root growth (and make funny-shaped veggies). Sow seeds according to the plant depth and spacing as recommended on the seed packet for each variety. Carrot and radish seeds are quite small, and beet seeds come in clusters, so it will be necessary to thin out your plants when they grow. You can do this by cutting (not pulling) out the weakest seedlings, leaving the strongest lots of room to grow a yummy root. Keep seeds moist while they germinate. Once sprouted, ensure they get lots of sun (eight hours per day) and water (don’t let them dry out on hot days). As they grow, they will push up their shoulders from the ground, so mound soil around them periodically. Plant root veggies in spring and summer for a fall harvest, or plant over-wintering varieties in late summer for a winter harvest. Vegetables to Direct Sow This list of direct sow vegetables is not definitive. Many of these can also be started indoors if that’s your preference. There are many more too that you could direct sow, but these are the most popular vegetables you may be wishing to grow in your garden. Arugula You wouldn’t want to start arugula indoors as it would be a waste of time! Arugula will germinate quite quickly and easily outdoors. You can direct sow beginning 6 weeks before the last frost. As soon as the ground is workable, get those seeds in the ground. At about 4-8 weeks, they’ll be mature and ready to harvest. Then, you can plant some more! Arugula is a great fall crop because it likes the cool temperatures. It will likely bolt in the summer heat. Bush and Pole Beans You can start beans indoors, but it really isn’t worth the effort and space to do so. Direct sowing them is simple and easy to do. The seeds germinate quickly, especially in warm soil. Direct sow them just after the last frost. Most varieties take about 54-70 days to reach maturity. Make sure you give your beans something to climb up as it grows. Beets While you can start them indoors, you have to be careful not to disturb the roots of beets when you transplant them. Since they’re an easy vegetable to direct sow, I just skip the indoors part altogether. You can plant them 3 weeks before the last frost to get a spring harvest. They take about 35-60 days to reach maturity. If you want to speed up germination, you can soak the seeds in lukewarm water overnight before you sow them. Besides the root, beet leaves are also tasty and tender. Broccoli Broccoli is a cool season lover, which makes it an ideal candidate for direct sowing. However, broccoli isn’t the easiest crop to grow for beginners. Broccoli can be planted 4 weeks before the last frost. But with some cold protection, you can extend that to a couple of weeks earlier. They take 80-100 days to reach maturity, so getting that head start could make a big difference. Cabbage Keep in true Brassica fashion, cabbage thrives in cool temperatures. You can direct sow cabbage four weeks before the last frost date. For another succession of cabbage, make sure to get the cabbage in the ground 12 weeks before the first frost date. This will give you a nice fall harvest. Depending on the variety, cabbage takes 50-100 days to mature. Members of the cabbage family taste better after a frost. Carrots Carrots are one of the absolute easiest vegetables to direct sow, and it’s not recommended to start them indoors. You can begin to direct sow 6 weeks before the last frost. Plant new carrot seeds every 3 weeks to stagger the harvest. Thin them as needed. At the end of the season, carrots actually get sweeter after a frost. Plant them 8 weeks before the first frost for a fall and even winter harvest of carrots. Carrots come in many more colours than just orange. Experiment a little with the seeds you buy! Cauliflower Is that another Brassica on this list? You betcha. You can direct sow cauliflower after the last frost. Heat can cause cauliflower to bolt, so take this into account when planning your harvest. Depending on the variety, it takes 50-100 days for cauliflower to reach maturity. If you live in a cool climate, sow seeds 12 weeks before the first frost for an extra fall harvest. Corn It’s about time we added some direct sow vegetables to this list that like the heat. Sweet corn should only be directly sowed, so don’t waste your precious time by starting them indoors. Plant the corn about a week after the last frost. You may want to consult your seed packet, as this can vary slightly based on the variety of corn. Corn can take anywhere from 68 to 120 days to reach maturity depending on the variety. Cucumber Another warm climate fan, cucumbers can be started indoors or can be considered a direct sow vegetable. If you want to plant them outside directly, do so 2 weeks after the last frost. Make sure to plant vining cucumbers away from other plants and place them next to a trellis or fence where they can grow. Cucumbers take 55-60 days to reach maturity. Cucumbers require a support structure and can take up quite a bit of space in the garden. Garlic Though technically not a seed to direct sow, garlic is a vegetable that you’re going to start right in the ground. Garlic is much different than many of the other vegetables on this list because you’ll plant the cloves in the fall, about 2 weeks before the first frost. Garlic then sits through the winter and produces garlic scapes in the spring. It isn’t until late spring or early summer that the garlic is ready to be pulled. Halloween and warding off vampires are great reminders that it’s time to plant garlic. Kale I don’t know why there are so many kale haters out there because I think the leaves are delicious. It’s also incredibly easy to grow. Another member of the Brassica family, kale likes cool temperatures. You can start kale outdoors 2-4 weeks before the last frost, as soon as the ground is workable. Kale will get sweeter after a frost too, so don’t be scared to plant them at the end of summer too. Kale takes about 50 days to reach maturity. Lacinato kale is a great heirloom variety often referred to as Dinosaur Kale due to its large size. Kohlrabi Kohlrabi is also known as a turnip cabbage, which really explains its appearance. It’s one of the more odd-looking members of the Brassica family. It can be either purple or green and is about the size of an orange once mature. You can direct sow kohlrabi vegetable seeds 2 weeks before the last frost when the ground is workable. It takes 50 days to reach maturity, so plant some more up until 8 weeks before the first frost date. Lettuce Lettuce is one of my favourite foods to grow since it’s so darn easy to do. Truly, you should never buy it from the store in the growing season because it’s so simple to keep a steady supply of it. Plant lettuce seeds 6 weeks before the last frost, utilizing season extenders to your advantage. After the last frost, sow them as needed every other week to keep a steady supply of leaf lettuce. Most leaf lettuces only take 3 weeks to reach maturity. Onions Onions aren’t too temperamental, doing well in both warm and cool environments. They’re very much a leave me alone kind of vegetable. All you have to do is plant them and pull them when you’re ready to harvest them. In cool climates, plant onions in the spring. In warm climates, you can plant them as early as the fall and into the winter. Harvest them early to have scallions, and the longer you leave the others, the bigger the onion will be. Peas Peas do not like their roots to be disturbed, which can make transplanting peas that were started indoors difficult. So why not direct sow them instead? Easy peasy. Plant your peas 4 weeks before the last frost date. Peas don’t like heavy heat, so you want them in as early as possible. They take anywhere from 50-70 days to reach maturity. Snow peas are flatter than garden peas but still have a great crispness. Potatoes Potatoes are not grown from seed but rather seedling potatoes. These are small potatoes that have been specifically picked out to encourage sprout growth. Plant potatoes 3 weeks before the last frost date in warm climates and direct sow at last frost in cold climates. If the cold is longer than anticipated, frost can kill the upper layer of foliage. But don’t worry, the potatoes will likely show brand-new growth in just a few days. Radish Radishes are up there with lettuce for some of the speediest vegetables, reaching maturity in 21-60 days. This makes them a popular choice for succession planting. Begin direct sowing radish vegetable seeds 6 weeks before the last frost date. Keep planting them every other week right up until 4-6 weeks before fall’s first frost. Spinach Spinach is a super green that’s pretty simple to grow yourself. Direct sow spinach 6 weeks before the last frost date or as soon as the soil is workable. Spinach also has a super quick maturity rate, taking 24-50 days. Plant more at the end of summer so you have more spinach, a cool weather lover, to harvest in the fall. Swiss Chard I always sing the praises of Swiss chard as it remains a staple in my garden and my salads. Plus, it’s by far one of the prettiest vegetables around and could easily pass as an ornamental due to its vibrant hues. You can direct sow Swiss chard seeds after the last frost has passed. Swiss chard takes about 24-60 days to reach maturity, but you can use it as a cut-and-come-again crop that will continue to produce well into the fall. You can enjoy Swiss chard as a small leafy green or let it grow large into leaves with stalks. Frequently Asked Questions About Direct Sowing What does direct sowing mean? To direct sow vegetables means you will plant the seeds right outside in your garden, skipping the step of starting them indoors. Some plants, mostly those that like heat or have a long growing season, need to be started indoors in order to germinate and get a jump start on the growing season. If started too late, they might not reach maturity in time to be harvested before the cool weather comes back.Vegetables that can be direct sown don’t need the fuss of being started indoors and can go right outside. They will germinate and reach maturity with mother nature’s natural conditions. What is the difference between sow and transplant? Sow by definition is planting the seeds of a plant or crop. Transplant is when you take seedlings that have either been grown indoors or come from a garden centre and move them outside and plant them in your garden or a new pot. Are there any benefits to direct sowing? Many! Direct sowing saves you time and resources. You don’t have to buy any extra seed starting materials like pots, potting soil, grow lights, heat mats, etc since you pluck them right in the ground.Starting seed indoors also requires a lot more care and attention rather than direct sowing them outside. You have to ensure they’re getting sunlight, enough air circulation, must harden them off, then plant them a second time outside. More Tips for Growing Food A city girl who learned to garden and it changed everything. Author, artist, Master Gardener. Better living through plants. Source link
#PLANTS_AND_SEEDS#FREQUENTLY_ASKED_QUESTIONS#GARDEN#GROWING_FOOD#MONTH_MAY_WEEK_5#ROOT_VEGETABLES#SEED_STARTING#SEED_STARTING_SERIES#SOW#THERAPY#VEGETABLES
0 notes
Photo

Key Points Before adding any fertilizers, test your soil to see what's missing and what to add.Choose between organic and synthetic fertilizers, or use a mix of both.Fertilize at the right time of year to give trees the best impact—or risk causing more problems, like pests. Fruit tree fertilizer isn’t one-size-fits-all—especially if you want a harvest worth bragging about. Before you feed your trees, it’s important to understand what your soil needs, what your tree is asking for, and how to apply nutrients responsibly. Here, we talked with gardening experts about the best fertilizers for fruit trees—from time-tested compost to targeted organic meals—and how you can effectively apply them. Start With a Soil Test Before you start, the most crucial step is testing your soil. “Start with a lab soil test,” says Mary Jane Duford, master gardener and permaculture designer. “It will show what's missing and give clear instructions on what to add.” A soil test evaluates macronutrient levels (nitrogen, phosphorus, and potassium), soil pH, organic matter, and sometimes micronutrient availability. “The pH of the soil controls how available nutrients are to plants, even if they're present in ample quantities,” says Jonathan Foster, a horticulturist at the University of Maine Cooperative Extension. Experts recommend contacting your local cooperative extension service for a professional test. From there, you can make a more informed decision on which fertilizer would most benefit your fruit trees. Organic vs. Synthetic Fertilizers Before choosing a fertilizer, it's important to understand the differences between organic and synthetic varieties. Each has its advantages, depending on your goals and the needs of your soil and trees. “Synthetic fertilizers have a larger, quicker impact, but disappear rapidly in soil and rain. Plants get a big, windfall burst of nutrients that they usually respond to very well, but anything they can't quickly use pretty much runs off into groundwater,” says Foster. They’re easy to apply, widely available, and deliver visible results fast—especially for nitrogen-hungry fruit trees. By contrast, organic fertilizers—like compost, blood meal, fish emulsion, and feather meal—release nutrients slowly as they break down. “They either stay in the soil as a natural time release or decompose into organic matter,” he adds. This improves the soil’s texture, water retention, and microbial life, creating long-term benefits for the tree. Timing “Most fruit plants are fertilized in spring at flowering time,” says Jon Traunfeld, director of the home and garden information center at the University of Maryland Extension. Leslie Halleck, a certified professional horticulturist, recommends waiting three months before the first application. You can use a root stimulator in the meantime. Citrus trees are a different story entirely. “They are typically fertilized during the active growth season—spring, summer, and fall—with a 2-1-1 ratio or a 1-1-1 ratio fertilizer," she says. Which Should You Choose? Synthetic fertilizers can provide a quick boost, especially when correcting a known nutrient deficiency. But for ongoing maintenance, many experts recommend organic fertilizers. This is because they release their nutrients more slowly, so there's less of a risk of overfeeding—and they help protect the soil biology. Whatever you choose, use it intentionally: “Anyone just impulse purchasing a jug of fertilizer and soaking it around without precision is wasting the majority of it," says Foster. "It's problematic financially, horticulturally, and ecologically.” Whether you're looking for quick or long-term results, there are many options to choose from. Balanced Granular Fertilizer A balanced granular fertilizer, like 10-10-10 or 12-12-12, offers the same amount of nitrogen (N), phosphorus (P), and potassium (K). It’s a solid go-to when you don’t have a soil test yet, or when your trees need across-the-board support. “While they are not targeted towards any specific nutrient deficiency, these fertilizers ensure no major nutrient is lacking and are a good place to start," adds Duford. Since this is a synthetic fertilizer, look for slow-release versions to avoid overfeeding. “Too much can produce overly succulent growth that's attractive to insect pests,” warns Traunfeld. Application Halleck recommends using this fertilizer in early spring, four to six weeks before bud break. This will help support shoot, flower, and fruit development. “It wouldn’t hurt to choose a fertilizer with a little calcium added as well,” she notes. Scatter the fertilizer evenly under the tree's canopy, but keep it away from the trunk. Then, water it in well. “The entire root zone should be fertilized ... not just the area closest to the trunk,” Traunfeld adds. Compost or Aged Manure These natural, organic soil amendments provide a gentle blend of nutrients, enhance soil structure, and promote microbial health. “It’s a long-term management dose that slowly maintains both macronutrients and, most of the time, micronutrients," says Foster. "It improves soil quality in other ways as it decomposes in place.” Plus, compost won't risk burning tree roots like a synthetic fertilizer might. Keep in mind, though, that this fertilizer's nutrient content can vary widely, depending on the source. Application Apply once a year, either in late fall or early spring. Spread a 2- to 3-inch layer across the root zone, but keep it a few inches away from the trunk. Compost can also be used year-round as mulch. “Topdress by applying 1/2 to 1 inch of compost under the tree’s canopy or dripline each year,” Traunfeld says. Fertilizers applied to nearby turf grass can also indirectly benefit the tree. Blood Meal Blood meal is a fast-acting organic fertilizer made from dried animal blood. It’s packed with nitrogen, with an NPK of 12-0-0, and acts quickly. “Use blood meal if a tree has pale older leaves or weak shoot growth," says Duford. "These signs often point to nitrogen deficiency." It does have a distinct smell though, so use it cautiously in enclosed gardens. Application Apply in early spring as new growth begins. Scatter it under the canopy (not against the trunk), and mix lightly into the top inch of soil. For midseason boosts, use a smaller dose. Scratch it gently into the top layer of soil and water it in well, advises Foster. It works fast, but it can burn plants if it's not used in the proper amount. Feather Meal Feather meal is a slow-release organic fertilizer made from processed poultry feathers that have been dehydrated into a powder. It’s a rich nitrogen source, typically with an NPK ratio of around 12-0-0, but it can be slow to take effect. It’s ideal for fruit trees that need a long-lasting boost of nitrogen. This fertilizer is less likely to burn plants than fast-acting ones, but results will take longer to appear. Use it when you’re seeking a season-long feed, not just a quick correction. Application Apply feather meal in early spring under the drip line, lightly cultivating it into the top few inches of soil. Its slow-release nature makes it particularly well-suited for young trees, as well as those growing in sandy or nutrient-depleted soils. Bone Meal Bone meal is made from ground and dehydrated animal bones. Its typical NPK ratio is around 3-15-0. “Fruit trees don't need a lot of phosphorus, but they cannot grow well without it,” says Duford. Bone meal provides a slow-release source of phosphorus, which supports strong root systems and early fruit development. “Phosphorus doesn’t move easily in the soil,” she notes. That’s why it’s best to add bone meal during planting and mix it directly into the root zone. Since phosphorus accumulates in soil over time, don’t apply it regularly unless a test shows a deficiency. Too much can block the uptake of other essential nutrients, like calcium and magnesium. Application Scratch bone meal into the soil near the root zone, being careful not to disturb the roots of established trees. Fish Emulsion Fish emulsion is a liquid organic fertilizer made from processed fish waste. It typically has an NPK ratio of around 4-1-1 or 5-2-2. “Fish emulsion is fine to use,” says Traunfeld. “The nutrients are available more quickly to plants. Since it's mixed with water and applied as a liquid fertilizer, it must be applied more than once per season.” “[It's] a broader, milder fertilizer than the meals above," says Foster. However, "Excess usage will result in waste washing out.” However, keep in mind that while fish emulsion is effective, it does have an odor. “If you're sensitive to smells, perhaps consider something else,” he says. Apply on cool days or just before rain to help dissipate the scent. Application Dilute fish emulsion according to label instructions and apply as a soil drench around the tree’s drip line. Reapply every few weeks during the growing season—especially for young or nutrient-deficient trees. Plant-Based Meals Alfalfa meal and soybean meal are both plant-based, organic fertilizers that gently boost nitrogen. Alfalfa meal typically has an NPK of 2-1-2, while soybean meal is around 7-2-1. According to experts, these meals are reliable, sustainable choices for gardeners who prefer vegetarian options or who want to avoid animal byproducts. They're a “good, plant-based source of nitrogen, with slightly lower impact,” says Foster. They help improve soil structure and feed microbial life while also delivering essential nutrients. Alfalfa meal may contain viable seeds, so keep an eye out for unintended sprouts. Both fertilizers are best used when soil temperatures are warm enough to support microbial activity. While not as potent as animal-based options, they are steady performers and a great supplement to compost or aged manure. Application Apply either meal in early spring. Spread under the canopy and work it lightly into the soil. Alfalfa meal can also be brewed into a compost tea. Soybean meal decomposes gradually, making it an ideal option for long-term soil health. Fertilizer Spikes Fertilizer spikes are pre-measured sticks that release nutrients slowly into the soil. “Many gardeners choose spikes because they don't require measuring or spreading,” says Duford. “This makes them simple to use and popular for low-maintenance care.” “One drawback is the uneven nutrient distribution,” she notes. Traunfeld adds that spikes tend to concentrate nutrients in a small area and may not feed the full root zone. Application Insert spikes near the tree’s drip line (not right at the trunk) in spring and again in fall, if needed. Follow label instructions closely. Boron and Zinc Micronutrient Supplements Small amounts of boron and zinc can have a significant impact on fruit set and growth. “Some fruit trees struggle to absorb micronutrients in soil with high pH or excess calcium,” says Duford. “Boron and zinc are two of the most important nutrients for fruit tree health.” Boron Application If a soil test confirms low boron, mix 1 tablespoon of Borax into 2 gallons of water and apply under the canopy in early spring or fall. “Too much can poison the tree,” Duford warns. Zinc Application Zinc is best applied as a foliar spray. Alternatively, mix a small amount of zinc sulfate into the root zone soil and water it in. “Do not exceed the recommended dose,” Duford adds. Source link
0 notes
Photo

This post may contain affiliate links. Read my full disclosure policy. This pesto pasta is a go-to summer dinner you can throw together in minutes (especially if you’ve made the pesto ahead). Pesto pasta just screams 80s and 90s—back when pesto sauce was on every restaurant menu and suddenly felt very gourmet. But trends aside, it’s a classic for a reason: when done right, it’s fresh, flavorful, and the easiest way to turn a box of pasta into a really satisfying dinner. This version is made with walnuts, fresh basil, garlic, Parmesan, and good olive oil, all blended into a vibrant green sauce that comes together in minutes. The pesto can be made ahead (it keeps for a week in the fridge or a few months in the freezer), so all you really have to do at dinnertime is boil the pasta. I like it with spaghetti, but just about any shape works. Serve it as-is or dress it up with grilled chicken, shrimp, or slow-roasted cherry tomatoes. Add a simple Caprese salad and some garlic bread, and dinner’s done. What You’ll Need To Make Pesto Pasta Walnuts: Add rich, nutty flavor to the pesto. Toasting them first isn’t essential, but it deepens their flavor and makes the dish taste more complex if you have time. Just spread them on a baking sheet and pop them in a 350°F oven for 7 to 10 minutes, or until fragrant. Garlic: Raw garlic adds bold, punchy flavor to the pesto sauce. Always use fresh cloves—not the pre-minced stuff in jars, which can taste dull and metallic. Fresh Basil Leaves: Gives the sauce its signature flavor and vibrant green hue. For the brightest color, use young, tender leaves and blend the pesto just until smooth. Save a few small leaves to toss on top before serving. Extra Virgin Olive Oil: Blends into the pesto to create a rich, silky texture. Since the flavor really comes through, use a good-quality oil—Lucini and California Olive Ranch are both solid picks for supermarket brands. Parmigiano-Reggiano: Stirred into the pesto for sharp, salty depth and also great for sprinkling over the pasta just before serving. Be sure to use the real deal—look for the name stamped on the rind if buying a wedge, or make sure it’s labeled “Parmigiano-Reggiano” if already grated. Pasta: Any shape works, but I love how long noodles like spaghetti or linguine twirl and cling to the pesto. That said, short shapes like fusilli or gemelli also work well because their curves catch the sauce in every bite. Jump to the printable recipe for precise measurements Step-By-Step Instructions Step 4: Serve. Divide the pasta among bowls and top with extra Parmigiano-Reggiano and a few fresh basil leaves, if you like. Serve right away while it’s warm and saucy—enjoy! More Pesto Recipes You May Like Print Pesto Pasta A simple pesto pasta recipe that delivers big flavor—perfect on its own or topped with grilled chicken, shrimp, or roasted veggies. Servings: 4 to 6Prep Time: 15 minutes minutesCook Time: 15 minutes minutesTotal Time: 30 minutes minutes Ingredients US CustomaryMetricFor the Pesto⅓ cup walnuts, toasted (see note)2 large cloves garlic, roughly chopped2 cups packed fresh basil leaves½ teaspoon salt¼ teaspoon freshly ground black pepper⅔ cup extra virgin olive oil½ cup grated Parmigiano-ReggianoFor the Pasta1 pound (16 oz) pasta, any shape (I like spaghetti best)Salt and freshly ground black pepperParmigiano-Reggiano, optional for servingFresh basil leaves, optional for serving InstructionsBring a large pot of generously salted water to a boil. Add the pasta and cook until al dente according to package instructions. (Heads up: When the pasta is done cooking, you’ll need to reserve some of the cooking water; I like to set out a liquid measuring cup near the colander as a visual reminder because it’s easy to forget!)Meanwhile, make the pesto: Place the walnuts and garlic in the bowl of a food processor fitted with a steel blade. Process until coarsely chopped, about 10 seconds. Add the basil, salt, and pepper and process until mixture resembles a paste, about 1 minute. With the processor running, slowly pour the olive oil through the feed tube and process until the pesto is thoroughly blended. Add the Parmigiano-Reggiano and process a minute more. Reserve 1 cup of the cooking water, then drain the pasta in a colander. Add the pasta back to the pot and toss with the pesto and ½ cup of the cooking water. If the pasta seems dry, add more of the water little by little until the consistency seems right. Taste and adjust seasoning, if necessary, then serve topped with grated cheese and fresh basil, if desired. NotesNote: Toasting the walnuts isn't essential, but it brings out their flavor. To toast them, preheat the oven to 350°F. Arrange the walnuts on a baking sheet in a single layer. Bake, checking frequently, until lightly toasted and fragrant, 7 to 10 minutes. Transfer immediately to a plate to cool. Make-Ahead/Freezer-Friendly Instructions: The pesto can be made ahead and refrigerated for 1 week or frozen for up to 3 months. Store in a tightly sealed jar or airtight plastic container, covered with a thin layer of olive oil. This seals out air and prevents the pesto from oxidizing (which can turn it an unappetizing brown color). Nutritional Information is based on 6 servings. Nutrition InformationCalories: 589kcalCarbohydrates: 59gProtein: 16gFat: 33gSaturated Fat: 6gCholesterol: 8mgSodium: 299mgFiber: 3gSugar: 2g This website is written and produced for informational purposes only. I am not a certified nutritionist and the nutritional data on this site has not been evaluated or approved by a nutritionist or the Food and Drug Administration. Nutritional information is offered as a courtesy and should not be construed as a guarantee. The data is calculated through an online nutritional calculator, Edamam.com. Although I do my best to provide accurate nutritional information, these figures should be considered estimates only. Varying factors such as product types or brands purchased, natural fluctuations in fresh produce, and the way ingredients are processed change the effective nutritional information in any given recipe. Furthermore, different online calculators provide different results depending on their own nutrition fact sources and algorithms. To obtain the most accurate nutritional information in a given recipe, you should calculate the nutritional information with the actual ingredients used in your recipe, using your preferred nutrition calculator. This site uses Akismet to reduce spam. Learn how your comment data is processed. Source link
0 notes
Photo

Key Takeaways Discolored patches in yellow or brown shades could hint at an unhealthy lawn.Grubs, pests, and weeds can contribute to a lawn that's sparse, patchy, or full of holes.Focusing on soil, a good watering schedule, aeration, and pest management to keep a healthy lawn. With so many components of a backyard, it's sometimes easy to overlook your grass. While it's true that some signs that your lawn is unhealthy are more obvious (hello, brown patches), some aren't as noticeable. "A healthy lawn requires the right balance of what I call a SWAP (soil health, watering schedule, aeration and pest management) program," says landscape expert Greg Cuoco. "An unhealthy or stressed lawn is likely due to a problem in one of these areas." If you've noticed something different in how your lawn is looking or feeling, there's a good chance it might need extra support. Here are eight signs to look out for and solutions for managing each issue. Meet the Expert Greg Cuoco is the CEO of The Difference Landscapes, a New Hampshire-based landscape design, installation and maintenance firm. Dan Deins is the owner and operator of Natural Green Lawn Spraying, a professional lawn care company based in Florida. Patchy Brown and Yellow Spots Credit: The Spruce / K. Dave One of the most obvious signs of an unhealthy lawn is the appearance of patchy spots in various colors. To begin care, Cuoco says to rake these areas, then aerate and reseed them. You can also add topsoil to support their growth. However, if this doesn't work, it could mean there's a different problem under the surface, "If the patchy spots are irregular in shape or size, this could mean it's a pest problem and insecticide is needed," he says. "If it’s easy to lift up a brown patch, it’s a telltale sign of grub infestation at the roots, which is treated with insecticide." If you notice a pattern to the patches, a fungi could be causing trouble, in which case fungicides, baking soda, or neem oil are useful, he adds. Want more gardening tips? Sign up for our free gardening newsletter for our best growing tips, troubleshooting hacks, and more! Too Much Thatch Credit: PaulMaguire / Getty Images Thatch is a normal part of your lawn and is a mixture of organic matter. However, too much of it can cause trouble. "A small amount is healthy compost, but more than 1/2 inch of thatch will rob your soil and roots of needed nutrients and water," says Cuoco. To keep it at the right level, you'll want to learn how to dethatch your lawn, usually about once a year. Cuoco also recommends raking, fertilizing, mowing, watering regularly, and aerating. Spongy Texture Credit: Roman Overko / Getty Images Lawn expert Dan Deins notes that if areas of your lawn that look particularly spongy or matted down, this is probably an indication that something is wrong. "If you walk across the yard and see footprints linger, or notice weeds taking over in certain spots, that's an alarm bell, too," he says. This is often caused by a build up of thatch or by overwatering. To prevent it, dethatch and aerate. For spongy lawns due to watering, set a consistent watering schedule and install a drain if necessary to prevent a soggy lawn from ruining your backyard. Weeds Everywhere Credit: Catherine McQueen / Getty Images A few weeds here and there is really no big deal, but when they start appearing all over your lawn, issues arise. Cuoco notes that weeds can steal the nutrients, water, and sunlight your grass needs to stay healthy. The best solution depends on the type of lawn weeds that have invaded—for instance, dandelions hint at compacted soil (for which Cuoco says aeration is necessary). For removing any type of weed, it's best to tackle both the plant itself and the root system. If weeds continue to crop up, it might be time to consider herbicides to get rid of them for good. Thin Grass or Bare Patches Credit: Iuliia Bondar / Getty Images Nothing is more frustrating than putting effort into growing a lush lawn, only to find thin patches of grass growing and various bare patches. Luckily, it's not impossible to fix. "Get a soil test to learn soil pH and identify nutrient deficiencies, and then add the appropriate fertilizer or compost," says Cuoco. "Aerate the grass and be sure to follow the recommended mowing schedule for your grass type." Watering your lawn is also a key point to adjust. Rather than a few short showers throughout the week, he suggests a longer soaking, giving your lawn around 1 to 1.5 inches of water a week. All of this should help grass grow thicker and more consistently. Wilting and Brittle Grass Credit: Jena Ardell / Getty Images Even if you think your watering schedule is top-notch, Cuoco points out it might not be working for your lawn. This leads to grass that's wilting or looks brittle. "Set a watering schedule based on your soil type, grass type, climate, and time of year (i.e., more frequent watering in spring and summer, less hydration in fall and winter)," he says. He also recommends watering at the right time. This is usually between 4a.m. and 10a.m., especially during hotter months. Watering any later than this doesn't give your lawn a chance to absorb the moisture, as it'll quickly evaporate, leading to a lot of waste. The same can be said if you have a sprinkler system. "A good starting point is to check the lawn’s watering routine and make sure the sprinklers aren't missing spots or overdoing it," says Deins. "I’ll often pull up a small section of sod to check root health and see what’s really going on under the surface." Grubs or Holes Credit: Photosampler / Getty Images Holes all throughout your lawn are an obvious sign that something is amiss. "It could mean the soil isn't draining right or there's heavy thatch," Deins says. "You might also notice ants or other insects setting up shop, which sometimes points to underlying issues like root rot or too much moisture." He also says that a change in color (such as a gray haze) or a mushy texture can point to grubs and other pests. These usually attack from down below, making them harder to catch. "I recommend going with organic treatments like beneficial nematodes for grubs, or compost tea for soil health," he says. "I’ve found that adjusting mowing height and changing up your mowing pattern can help the grass bounce back, too." Short Roots Credit: Penpak Ngamsathain / Getty Images If your lawn is lacking height, it might mean it's not getting enough water or nutrients. A shorter height then leads to other risks, especially when it's hot out. "Shorter roots make grass more sensitive to drought and high temperatures," says Cuoco. To keep the length healthy, try to avoid over-mowing in the summer and keep on top of a consistent watering schedule. As mentioned, avoid watering in the afternoon. Lawn Care Tips to Try Year-Round Mow less during the summer. Maintain the length of your lawn in the summer to keep it healthy.Use the screwdriver test. Cuoco says if you can insert a screwdriver 4–6 inches into your lawn easily, your soil is well aerated. If not, it's likely compacted.Rotate your routine. Deins says to switch up your mowing pattern and length and alternate organic treatments to keep it resilient.Remove fallen leaves. Cuoco says to clear leaves in the fall before they get wet or freeze over. "Ideally, rake dry leaves as dew, rainfall, and light snow wreak havoc on leaf piles, creating a suffocating blanket over your lawn that attracts all sorts of pests and disease," he says.Overseed your lawn in the fall. Cuoco says growing conditions are better, and the spring season will bring healthier grass.Reduce mowing in winter. Your lawn will go dormant, so it's best to limit how often you mow. Source link
0 notes
Photo

When I find my favorite summer salad on the menu, I have no choice but to indulge. The combination of roasted deep red beets, goat cheese, and mixed greens with a balsamic dressing is just delicious. With a patch of soil or even a large container, one does not need to visit their local café to have this easy-to-prepare dish. Beets, or beetroot (Beta vulgaris) as they are known in Europe, are a cool-season root vegetable packed with essential nutrients, fiber, vitamins B9 and C, manganese, potassium, and iron. Consisting of 87% water, they are less than 60 calories per cup. Delicious eaten raw, they are most often cooked or pickled. The tender greens are also a tasty addition to your evening’s salad. If you’ve been a beet-hater since their earthy taste hit your palate during childhood, it’s time to try these nutrient-dense veggies again. Starting beets from seed No, it doesn’t take one seed that large to create one small beet. Beet “seeds” are actually clusters of two to four seeds fused together. Photo: Saxon Holt Numerous beet varieties are in catalogs, with color being their most distinguishing characteristic. While most are round, some are cylindrical or shaped like turnips. You will find red to be the most common color, with yellow, white, pink, and purple varieties also available. Tolerant of the cold, they thrive in both spring and fall, being able to survive frosts and near-freezing temperatures. Best grown by direct-seeding in their beds, they do not like to be transplanted. Rows should be 12 to 18 inches apart and seeds planted 1 to 2 inches apart. If you are short on space, plant them in 2- to 3-foot squares, and keep the spacing even to maximize your production. Sow at least two seeds per space, as germination can be low, but don’t go overboard. Each wrinkly beet “seed” is actually a cluster with two to four seeds inside. Once your plants reach a height of 4 to 5 inches, thin the plants to 3 to 4 inches apart. Pinch or cut off the excess seedlings, leaving it to form a single beet root. Do not disturb the soil by pulling the plants. Which beets are the best? My first attempt was with a prepackaged mix of red, gold, striped, round, and cylindrical varieties, and they were all wonderful. These are some good ones for you to try. The world of beets is just as diverse and interesting as tomatoes, peppers, or any of your other favorite edibles. Photo: Saxon Holt The best beet varieties Red beets Detroit Dark Red beet. Photo: BriannaWalther, CC BY-SA 3.0, via Wikimedia Commons Globe shaped with a solid, deep red flesh, red beets are full of rich flavor. Detroit Dark Red has red-tinged tops and is recommended for sowing late in the season for winter storage. When looking for a multipurpose beet, Bull’s Blood will do all you ask. Frost hardy, it’s ideal temperature for growing is 50 to 85°F, and it matures in only 50 days. This beet is considered a gourmet addition to salads when picked in the baby stage, and the greens can also be selectively harvested for a burst of color. An heirloom variety, one of its parents is the ancient Crapaudine beet. Boltardy is one of the most popular and best-known beets in the United States and United Kingdom. Boasting a sweet flavor and a tender, solid, dark red flesh, it’s a great option for roasting, pickling, and eating raw in salads. For a steady supply of these all season long, plant seeds every two weeks, from March to mid-July. Learn More:When to Harvest VegetablesLesser-Known Root VegetablesBeets: The Double-Duty Vegetable Cylindra beet. Photo: Anna Richard, iStock Chefs favor ingredients that offer uniformity and ease of preparation. The heirloom beet Cylindra fits that need perfectly. With roots 5 to 6 inches long and 1 to 2 inches wide when mature, they are easy to process, with a fine texture and sweet taste. The oldest beet variety still in use is Crapaudine. Beloved in French markets and kitchens, it is typically roasted over a charcoal fire, allowing its thick skin to slip off. It has one of the deepest, earthiest, and most savory flavors of any beet. It keeps well over the winter in cool storage with no loss of taste but is so exceedingly difficult to grow. If you are up for a challenge, this is one to try. Yellow beets Touchstone Gold beet. Photo: courtesy of Marti Neely Golden beets are a bit sweeter than the red varieties and non-staining when you prepare them. With bright green tops, Touchstone Gold has consistently round roots, smooth skin with a bright orange exterior, and golden flesh. When cooked, the gold color is retained. For good yield and flavor, the heirloom cultivar Golden Detroit has a smooth orange skin and gold interior. A variation of Detroit Red, it is milder and sweeter than its red relative. Pink beets Chioggia beet. Photo: nadiasphoto, iStock An Italian beet with candy cane rings of flesh, Chioggia is yet another heirloom variety that adds visual interest to any dish. Sweet and mild, the colors fade to pink when cooked. When sliced paper thin, they are beautiful on a salad and delicious as a snack. It’s difficult to pick just one or even a couple of varieties. That’s why we need farmer’s markets—to fill the gaps our garden doesn’t provide. Whichever one you try, you won’t be disappointed. No room in the garden? A large container will give you enough space to get started. If you find a winner I haven’t mentioned, let us know. Find more information on beets and other root vegetables: Discuss this article or ask gardening questions with a regional gardening expert on the Gardening Answers forum. And for more Midwest regional reports, click here. Marti Neely, FAPLD, owns and operates Marti Neely Design and Associates in Omaha, Nebraska. Fine Gardening Recommended Products Razor-Back Potato/Refuse Hook Fine Gardening receives a commission for items purchased through links on this site, including Amazon Associates and other affiliate advertising programs. Johnny’s Selected Seeds Connecta® Cultivation Kit Fine Gardening receives a commission for items purchased through links on this site, including Amazon Associates and other affiliate advertising programs. Choose the right tool head for the job and switch out quickly with a simple push-button release. Includes the Connecta receiver, Connecta Collinear 4 head, Connecta Collinear 7 head, Connecta Contour Wire 4 head, Connecta Contour Wire 6 head, a sustainably harvested oiled ashwood handle, and a stainless-steel carrying clip. Gardener's Supply Company Summerweight Fabric Plant Cover Fine Gardening receives a commission for items purchased through links on this site, including Amazon Associates and other affiliate advertising programs. Ideal for summertime pest control, this garden cover effectively screens out Japanese beetles, potato beetles, cabbage worms, leaf miners, carrot flies and most vine borers. It transmits 97.6% of the light to your plants without allowing heat build-up, and it provides cold protection down to 41° F, to extend your growing season. Source link
0 notes
Photo

Wrapping up the growing season with a fabulous display of fall foliage, many trees and shrubs offer an unsurpassed showing of vibrant, colorful leaves – including my favorite color of the season, orange. From tall shade trees to compact shrubs, many species provide warm tones of deep amber, fiery flame orange, and bright pumpkin to close out the growing season. The intensity of the autumn colors is typically determined by environmental factors such as the soil they’re planted in and variations in regional air temperatures and hours of sunlight. Photo by Lorna Kring. We link to vendors to help you find relevant products. If you buy from one of our links, we may earn a commission. So for ideas and inspiration, it’s always a good idea to check out what gives a good showing in your neighborhood, local parks, and municipal plantings. And to get your Halloween on, have a look at our choice of 13 of the best trees and shrubs with outstanding orange fall colors! Here’s the lineup: 13 Trees and Shrubs with Outstanding Orange Fall Foliage 1. American Sweetgum Native to temperate regions of eastern North America, Mexico, and Central America, American sweetgum (Liquidambar styraciflua), aka red gum, star-leaved gum, and storax, is a highly popular ornamental. The star-shaped leaves are a rich, glossy green, and in autumn, produce large swaths of intense colors in tones of burgundy, orange, purple, scarlet, and yellow. And the spiny seed pods are a favorite source of forage for songbirds, chipmunks, and squirrels. American Sweetgum Sweetgums are superb when planted in rows or as standalone specimens, and grow in an attractive, pyramid shape reaching 60 to 75 feet high and 40 to 50 feet wide. Trees are hardy in USDA Zones 5 to 9. American sweetgum is available in #3 containers at Nature Hills Nursery. 2. Black Chokeberry Native to eastern North America, chokeberry (Aronia melanocarpa) is a rugged, tough, and durable clump-forming shrub providing three seasons of beautiful ornamental interest. The cultivar ‘Viking’ produces large clusters of showy white flowers in spring that develop into highly nutritious bunches of shiny black berries that ripen in late summer. In fall, the glossy, dark green leaves give way to striking displays of deep burgundy, brilliant orange, purple, and vermillion. ‘Viking’ Black Chokeberry Shrubs have a tidy, upright, and rounded form, and grow three to six feet tall and wide. Hardy in Zones 3 to 9. ‘Viking’ can be found at Nature Hills Nursery in #3 containers. 3. Black Gum Another native of eastern North America, the black gum (Nyssa sylvatica), aka black tupelo or sour gum, is terrific as a shade tree. The cultivar ‘Wildfire’ adds a unique twist with new foliage that emerges a striking ruby-red. Leaves stay bright red for weeks before maturing to a dark, glossy green over summer and finish the season with an incredible mixed palette of pumpkin orange, purple, scarlet and bright yellow. The delicate, nectar-rich blossoms that appear in May and June are a favorite of honeybees. In early fall, small black drupes form which provide an important food source for many birds, chipmunks, and squirrels. ‘Wildfire’ Black Gum The pyramidal to round trees grow to a mature height of 30 to 50 feet tall with a spread of 20 to 30 feet. Hardy in Zones 4 to 9. You can find ‘Wildfire’ available at Nature Hills Nursery in #2 and #3 containers. 4. Flameleaf Sumac Sumacs (Rhus spp.) grow on every continent except Antarctica, but the tough North American native known as flameleaf or winged sumac (R. copallinum) gives the best, blazing hot fall colors. The tropical looking, slender-branched trees grow in small clusters, producing dense spires of creamy white, upright flowers throughout summer, attracting numerous pollinators. In fall, the narrow, serrated leaves glow in shades of fiery orange and flame red, and the reddish brown berries provide a winter food source for many songbirds. Flameleaf Sumac With an open, spreading growth habit, flameleaf sumac trees grow six to 12 feet high and 10 to 20 feet wide and are hardy in Zones 4 to 9. Native flameleaf sumac is available in #3 containers at Nature Hills Nursery. 5. Fothergilla Fothergilla (Fothergilla major) is an easy-care, showy shrub with fragrant, honey-scented white flowers in spring that attract butterflies and hummingbirds. The cultivar ‘Mount Airy’ has an open, upright shape with leathery, blue-green foliage that takes on handsome tones of gold, orange, and reddish-purple as fall advances. ‘Mount Airy’ Fothergilla Excellent as specimen plants, these tidy shrubs grow five to six feet tall with a spread of four to five feet and are hardy in Zones 5 to 10. ‘Mount Airy’ shrubs can be found at Nature Hills Nursery. Learn more about caring for fothergilla here. 6. Japanese Maple Japanese maples (Acer palmatum) are tough and beautiful, with delicate, lacy leaves and cascading branches that give them a graceful, weeping form. A. palmatum ‘Orangeola’ serves up a double helping of vivid colors. In spring, new foliage emerges as a flaming fire red that takes on deeper tones of green and maroon in summer – maroon in full sun with green in the shady underlayers. Fall brings another color change as the foliage first transitions into burgundy then finishes with a show of fiery orange. ‘Orangeola’ Japanese Maple Trees grow to a mature height of six to 10 feet with a similar spread, and are hardy in Zones 5 to 9. You can find ‘Orangeola’ plants at Maple Ridge Nursery. Learn more about Japanese maples here. 7. Japanese Persimmon With sweet, crunchy fruit that can be eaten straight from the tree, the Japanese, or Asian persimmon, Diospyros kaki ‘Fuyu’ has plenty of ornamental appeal as well. It features a handsome, open profile with a mature height of 18 to 20 feet and spread of 12 to 15 feet. In spring, fragrant white blossoms are highly attractive to many pollinators including butterflies and hummingbirds, and fruits mature to bright orange. Grown in full sun, the ovate foliage starts out a bright lime green that deepens over the summer, then produces exceptional fall finery in shades of brilliant orange and fiery reds. ‘Fuyu’ Japanese Persimmon Drought resistant once established, trees are hardy in Zones 7 to 10. ‘Fuyu’ is available at Nature Hills Nursery in #3 and #5 containers. Learn more about growing persimmons in our guide. 8. Red Sunset Maple Red maples (Acer rubrum) are native to central and eastern North America. They are beloved for their spectacular fall colors, and are often the first to turn once cool temperatures arrive. Red Sunset®, aka ‘Franksred’ is a fast growing cultivar that features shiny green leaves and strong, symmetrical branches that grow in a pyramidal shape. Uniform, deep tones of vibrant orange-red provide superior fall color. ‘Franksred’ Red Sunset Maple These iconic trees are beautiful for shade, growing 40 to 60 feet tall with a width of 25 to 35 feet. Hardy in Zones 4 to 8. ‘Franksred’ can be purchased at Fast Growing Trees. Learn how to plant and grow red maples here. 9. Serviceberry A large, shrubby fruit tree, the serviceberry (Amelanchier), aka Juneberry, shadbush, and Saskatoon berry, gives three seasons of interest. Spring brings masses of pink buds opening to frothy white flowers that develop into tasty purple to black berries. Similar to blueberries, the early summer fruit provides a feast for songbirds and chipmunks. There are several native Amelanchier species throughout North America – and the natural hybrid ‘Autumn Brilliance’ (A. x grandiflora) dazzles with fall color. In autumn, the round, blue-green leaves give way to a glowing display of luminous amber, orange, and ruby red. ‘Autumn Brilliance’ Serviceberry These tough, hardy trees have an open, rounded shape and reach a height of 20 to 25 feet and spread of 15 to 20 feet. Hardy in Zones 3 to 9. ‘Autumn Brilliance’ is available at Nature Hills Nursery in a variety of sizes. Find tips on growing serviceberry bushes here. 10. Shumard Oak Tall and stately, the long-lived Shumard oak tree (Quercus shumardii) is native to eastern North America and renowned for its spectacular fall colors. A towering shade tree with a pyramidal shape, large acorns drop in fall and provide a prime foraging source for game birds, songbirds, chipmunks, squirrels, and other wildlife. In autumn, the dark green, lobed leaves finish the season with a fantastic display in tones of deep orange red and russet. Shumard Oak Highly adaptable for urban areas and landscapes, mature trees reach 75 to 90 feet high and spread 40 to 60 feet. Hardy in Zones 5 to 9. Shumard oaks are available in a variety of sizes at Fast Growing Trees. 11. Smoketree Indigenous only to small pockets of central and southern USA, smoketree (Cotinus obovatus) is a whimsical and highly ornamental shrubby tree with some of the best fall colors. In spring, the leathery, egg-shaped foliage is a cool blue-green, and summer brings masses of wispy flowers, like bright red to mauvy-pink puffs of smoke. With the arrival of fall, the foliage ignites into a sensational mixed palette of coral orange, lemon yellow, lime, and raspberry. Smoketree The small, rounded trees grow 20 to 30 feet tall with a spread of 20 to 25 feet and the seeds feed numerous bird species. Hardy in Zones 4 to 8. Smoketree can be found at Nature Hills Nursery in #3 containers. 12. Spirea Spirea shrubs are highly adaptable and versatile, with many cultivars providing fine fall colors. Spirea japonica ‘Little Princess,’ is a small shrub that makes an outstanding specimen plant or low border. Dreamy clusters of foamy pink flowers appear in late spring, and with regular deadheading, plants rebloom readily throughout summer. Summer’s light green leaves deepen in color as temperatures drop, then take on striking, burnished tones of coppery orange in fall. ‘Little Princess’ Spirea The rounded, spreading shrubs grow two to three feet tall with a width of four to five feet and are hardy in Zones 4 to 9. ‘Little Princess’ is available at Fast Growing Trees. Learn more about how to grow spirea here. 13. Sugar Maple With fall colors as sweet as maple syrup, the sugar maple (Acer saccharum) is the primary tree used for syrup making, and it’s native to the hardwood forests of northeastern North America. Sugar maples make beautiful shade trees, with a handsome oval shape and dense crown, growing to a mature height of 60 to 75 feet and spreading 40 to 50 feet. Sugar Maple They can be grown in full to part sun, and in fall, the distinctive, five-lobed leaves put on a spectacular display in vibrant shades of burnt orange, red, and yellow. Hardy in Zones 3 to 8. Six- to seven-foot sugar maples are available at Fast Growing Trees. Maple Sugaring Kit And if you’d like to try your hand at making syrup, pick up a maple sugaring kit – like this one available at Lehman’s. Bright, Bold, and Beautiful From towering oaks to compact spirea, our selection of trees and shrubs are an excellent way to finish off the season with a bright, bold, and beautiful splash of orange foliage! !function(f,b,e,v,n,t,s) if(f.fbq)return;n=f.fbq=function()n.callMethod? n.callMethod.apply(n,arguments):n.queue.push(arguments); if(!f._fbq)f._fbq=n;n.push=n;n.loaded=!0;n.version='2.0'; n.queue=[];t=b.createElement(e);t.async=!0; t.src=v;s=b.getElementsByTagName(e)[0]; s.parentNode.insertBefore(t,s)(window, document,'script', ' fbq('init', '176410929431717'); fbq('track', 'PageView'); Source link
0 notes
Photo

As cute as deer are, they’re not always a welcome sight in the garden. One moment your hosta is there, the next moment it’s gone. These tips will help you keep deer out of the garden and maybe, just maybe, save your beloved hosta (and host of other plants). Deer need to eat 6-8 lbs of fresh green growth every day—one deer could easily wipe out your garden and barely call it breakfast. Bulbs and tender plants are like candy to deer, where they can completely decimate an entire shrub’s budding foliage and all those tulip plants you so painstakingly planted last fall. For many areas, deer populations are actually on the rise. Due to the rise of urban areas, we’ve pushed many species out of their natural habitat, especially predators. The deer thrive, often continuing to live in these suburban and rural areas. They’re even considered detrimental to other species as they chow down on the foliage in forested areas, damaging the habitat and food source of other animals. Deer are a fundamental part of the food chain and many ecosystems, but they can certainly be a major frustration for gardeners. Today, we’re going to look at exactly what deer eat and how you can actually use that to your advantage. Tulips and many other bulbs are favourites for deer to munch on. What Is a Deer-Resistant Plant? Many plants are labelled as “deer resistant” to market them. This term can be a little misleading, as deer will eat just about any kind of plant. It just depends on how desperate they are. Deer-resistant plants will not be their first choice for food, but they will still eat them if they’re hungry and can’t find better options. Deer prefer buds and bulbs, choosing to eat tender growth whenever possible. The deer in your area will also prefer native plant species, since that’s what is naturally in abundance and what they’re used to. Unfortunately, this means that non-native plants are marketed as deer resistant, and people will gravitate towards them even though they’re not beneficial to the local ecosystem (such as all those local pollinators and songbirds). The time of year also plays a part. In the winter, there are fewer scrumptious things for the deer to be feasting on. In fact, the bacteria in their stomach shift in the winter to allow them to eat bark and other more fibrous foods they wouldn’t normally eat. As lovers of buds and bulbs, they will be ravenous in the spring when all the tender plants are beginning to emerge. In the summer, there is lots for them to eat and they’re less likely to feast on your garden when they have so many options around them. Many native plants are, unfortunately, big deer fodder. Deer-Resistant Plants to Grow While they still may feast on these plants, these deer-resistant plants are more likely to put up a fight in the garden. Fuzzy and soft foliage such as lamb’s ear, yarrow, Siberian bugloss, lady’s mantle, poppies, ageratum, or bunny tail. Prickly and pokey plants, such as sea holly, globe thistle, bear’s breeches, or barberry. Herbs and plants with strong flavour and taste, such as sage, lavender, chive, allium, mint, dill, thyme, Russian sage, or salvia. Other plants that deer tend to avoid include peonies, bleeding heart, daffodil, spurge, false indigo, foxglove, boxwood, most begonias, and most grasses. Soft plants like yarrow are often deer resistant. Deer Fence: The First Line of Defence The best way to keep deer away from your property is to build a deer fence around the perimeter. This is where you build a fence tall enough to prevent the deer from jumping over. Deer can jump up to 12 ft. when they’re in stressed situations, but won’t often jump higher than 8 ft. when they’re just rummaging for food. Deer will try their best to go under and even through a fence. While plastic fencing may work for a year or so, the deer will eventually figure out how to get through it. Metal fencing is the most durable and long-lasting way to make a deer fence. The problem with deer fences is that they’re a lot of work and money to make. They’re also not the most attractive for home gardens. This solution is often best for those with larger properties and high-value goods they want to protect. Building a Wildlife Hedge to Keep Deer Out Another option is to build a wildlife hedge as a living fence. The key is to use brambles, plants that are thorny and dense, such as blackberry, salmonberry, or raspberry. They work as a great natural barrier to keep deer and other animals out of your garden. As a bonus, it also provides a little haven for small critters like rabbits or squirrels to hang out in. To help with keeping the deer out, make the outside of your property barrier on the other side of the wildlife hedge a deer buffet. Here are some plants that deer LOVE: Give them something to feast on outside, and they will be less likely to try and break through the brambles to your side. Small-Scale, Inexpensive Solutions For us urban and suburban gardeners, we can still deal with deer and their feasting on precious greens. When building a full-on wildlife hedge or tall fence isn’t an option, there are a few other tricks you can try. To immediately get them out of the way, you can try installing automatic sprinklers and lights to scare them any time they set foot in the area. Look for a taller sprinkler and move it around every few days to target a different portion of the garden for maximum efficiency. If you have a few precious plants, wrap them in a wire cage to protect them, though I understand this isn’t always the prettiest option. Physical barriers, including netting and row covers, are the best at keeping deer away. And once again, you can willingly give the deer something to feast on. Dedicate a portion of the garden to native species and those plants listed above that deer love to munch on. Hopefully, this allows them to stay clear of your green prized possessions. Automatic sprinklers are one of the best, inexpensive solutions for small yards. Keeping Deer Out of the Garden FAQs Will coyote urine keep deer away? I haven’t heard of predator urine actually working well enough to keep deer away. If a spray is the route you want to take, there are many commercial deer repellents that would be a more effective option. The trick to the repellents is to use them often, applying at least once a week and every time after it rains. These work best as a secondary defence. What is the best homemade deer repellent? Many commercial sprays rely on the scent of rotten eggs to work. If you’re feeling up to it, you can include rotten eggs in my pest deterrent spray recipe as a deer deterrent. Other good ingredients to include are hot peppers and garlic. Do coffee grounds keep deer away? There is no scientific evidence to suggest that coffee grounds keep deer away, but it is often touted as a homemade recipe. The theory is that the smell is so strong and pungent to the deer that they avoid the area. Other Tips to Help With Garden Pests A city girl who learned to garden and it changed everything. Author, artist, Master Gardener. Better living through plants. Source link
0 notes
Photo
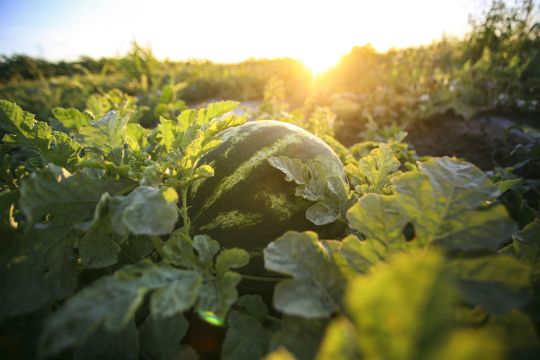
A perfectly ripe watermelon should be sweet, juicy, and packed with a fruity flavor that brings to mind backyard barbecues and summertime picnics. But if watermelons are harvested too early or grown in less-than-ideal conditions, they may not develop the desired sugary-sweet flavor. To ensure your harvest meets your standards, these tips walk you through everything you need to know to grow sweeter watermelons, from seed to harvest. Save your favorite Better Homes & Gardens recipes in one place using MyRecipes. Just click the save icon (with a heart!). 1. Choose Sweeter Varieties Some watermelon varieties are known to be sweeter than others, and if it’s sweetness you’re after, these are the watermelons to grow. Varieties like ‘Charleston Grey,’ ‘Bradford,’ ‘Crimson Sweet,’ and ‘Sultan’ are particularly esteemed for their high sugar content, but there are other tasty types of watermelons to try. Just keep in mind that to produce fruit, seedless watermelons will need to be planted alongside seeded varieties (referred to as pollenizers or watermelon pollinator plants). 2. Pick a Sunny Location The most important factor that determines how sweet watermelons will be when harvested is the amount of heat and sun the plants are exposed to during the growing season. Long periods of cool and cloudy weather make watermelons less sweet, while lots of hot sun will cause the plants to produce more sugars and more flavor. Of course, gardeners don’t have much control over the weather. But you can set your watermelon plants up for success by growing them in full sun locations that receive at least eight hours of direct light per day. Covering the soil with black plastic sheeting also makes the soil warm up faster and may be helpful if you’re experiencing a cooler-than-average summer. 3. Enhance the Soil Some plants handle nutrient-poor soil, but watermelons are heavy feeders that need rich, well-draining, and slightly acidic soil to grow well. Testing your soil and mixing a few inches of compost into the area before planting is a must if you want watermelons to thrive. You can also experiment with growing melons in DIY melon pits filled with food scraps and other organic waste that will fuel the rapid growth of watermelon vines. 4. Plant at the Right Time Watermelons are heat-loving plants that don’t tolerate cold weather and should only be planted outdoors after the risk of frost has passed. Still, it’s important not to sow watermelon seeds too late. These plants need to do most of their growing during the hottest part of summer to produce the sweetest fruit. Watermelons take 85 to 95 days to maturity. If your growing season does not offer at least three months of warm weather (including warm nights above 60°F), you may need to start the seeds indoors. In a warmer climate, sow watermelon seeds outdoors about one to two weeks after the risk of frost has passed. 5. Water Well With a name like “watermelon,” it’s no surprise that watermelon plants need regular watering and should be provided with about 1 to 2 inches of water per week. Once your plants set fruit, it's best to dial back on watering and to withhold all water two weeks before you intend to harvest your plants. Watering too much when the fruit is developing tends to dilute the sugars in watermelons and make them less sweet. 6. Fertilize Regularly Growing watermelons in soil that’s been enriched with compost or a melon pit makes your plants support healthy plant growth, but it is not enough. Watermelons are such heavy feeders that they will need extra fertilizer as they grow. Feed watermelons about once every six weeks with a granular fertilizer, or every two weeks with a liquid fertilizer. Note that application rates vary depending on the product; always read the label instructions. 7. Prevent Fungal Issues Powdery mildew and other fungal plant diseases often occur when the air gets humid and watermelon plants are grown too closely together. Although these issues are rarely fatal to watermelon vines, they potentially make plants less productive and lower the quality of the fruit. Following proper spacing guidelines and watering watermelons at the soil line instead of overhead minimizes some fungal problems. However, you may also want to preventatively treat watermelon leaves with a weekly application of milk spray if mildew is a recurring problem in your garden every season. To make your own milk spray for powdery mildew, blend 40% milk with 60% water in a garden sprayer and fully saturate your watermelon plants with it once a week. 8. Prune Wisely For the most part, it’s best to avoid pruning watermelon vines as removing leaves interferes with the plant’s ability to photosynthesize and produce the sugars that make watermelons sweet. However, pruning some of the extra flowers and fruit off your plants channels the plant’s energy into making the watermelons that remain a little sweeter. Wait until your plants have three to four watermelons developing on a vine, then prune away any flowers and fruit that develop on the vine afterwards. 9. Watch for Pests Just like mildew issues, pests stress watermelon plants and make it harder for the vines to produce big and tasty fruit. Keep an eye on your plants to detect any pest issues early. To control aphids and spider mites, spray the plant with a strong blast of water from the hose, or use insecticidal soap. A natural way of pest control is to use flowers and scented herbs as companion plants for watermelons. They repel pests and attract beneficial insects that feed on them. As a bonus, many flowering companion plants also attract pollinators and help to ensure your watermelon vines set fruit. 10. Know When to Harvest Pick watermelons when they’re perfectly ripe to get the best flavor, as the fruit doesn’t continue to ripen off the vine. You’ll know your watermelons are ripe and ready when: Their rinds become dull.The bottom of the fruit turns from white to yellow.The vines begin to brown.The watermelon produces a dull thunking sound if you tap on it with your knuckles. When all these boxes are checked, the watermelon is ready to be harvested. Cut it off the vine with a sharp knife and eat it as soon as you can for the best and sweetest flavor. Source link
0 notes
Photo

By: Shelly Posted: Jul 25, 2025 Millionaire pie is a cool and creamy icebox pie filled with sweet crushed pineapple, maraschino cherries, crispy pecans, and coconut. It’s decadent, fruity, and exactly the no-bake dessert to make ahead for a gathering! If there’s one pie they’ll be begging you to bring to the cookout this summer, this is it. And if you’re looking for more delicious ways to give your oven a break, try this strawberry lemon icebox pie and creamy marshmallow chocolate pie. Originating in the Southern states, millionaire pie is a creamy no-bake pie named after its rich, decadent filling of whipped topping, crunchy pecans, and crushed pineapple. Also known as billionaire’s pie or billion-dollar pie, it takes minutes to prepare, and you don’t even need the oven! This recipe takes it to the next level with sweet maraschino cherries and coconut folded in, for even more decadence in every bite. Why You’ll Love This Millionaire Pie Recipe Thick, sliceable filling. I include tangy lemon juice in this recipe. Combined with the sweetened condensed milk, it helps thicken the filling for smoother slices. Everyday ingredients. This millionaire pie tastes like a million bucks, but you make it in minutes from everyday pantry ingredients. The recipe originated in the 1930s and uses ingredients like sweetened condensed milk and canned pineapple, so it’s relatively affordable, too. No baking. Maybe best of all, this recipe needs zero baking and just a few minutes to prep. This pie does need time to chill afterward, so it’s the perfect dessert to make ahead. It’s great any time of the year, too. Just add the whipped cream topping before serving. What You’ll Need Depending on who you ask, the recipe we’re making today is a billionaire pie, since it contains cherries and coconut. Either way, you’ll find some quick notes on these and the other ingredients below. Scroll down to the recipe card for the printable ingredients list with amounts. Graham Cracker Crust – You can make an easy graham cracker crust from store-bought or homemade graham crackers, crushed into fine crumbs. If you’re short on time, a store-bought graham cracker crust works perfectly, too. Crushed Pineapple – Make sure to drain the canned pineapple well to avoid a watery filling. Sweetened Condensed Milk – Not to be confused with regular condensed or evaporated milk, which is unsweetened. Maraschino Cherries – Chop up the cherries and reserve 1 tablespoon of the juice. Another option is to replace the cherries with homemade cherry pie filling. Shredded Coconut – This can be sweetened or unsweetened, toasted or plain. Pecans – Alternatively, swap the pecans for crunchy chopped walnuts instead. You can also leave them out to make this pie nut-free. Lemon Juice – I highly recommend freshly squeezed lemon juice, since you’ll add a fair amount. You’ll taste the difference. Whipped Cream – Divided, for the pie filling and as a topping. You can use homemade whipped cream or store-bought. A tub of thawed Cool Whip will also work. How to Make Millionaire Pie Whether I’m looking for a no-bake recipe for a summer gathering or an easy Thanksgiving dessert that I can make ahead of time, millionaire pie has it covered. And it’s SO easy to make! Follow the steps below, and scroll to the recipe card for the printable instructions. Combine the filling ingredients. Fold in the whipped cream. Make the filling. Start by combining drained, crushed pineapple with sweetened condensed milk, and fold in the cherries, coconut, pecans, lemon juice, and cherry juice. Mix well, then gently fold in 1 ½ cups of whipped cream. Fill the crust. Chill, then decorate and serve! Refrigerate. Spread the pie filling into a prepared graham cracker crust. Press a sheet of plastic wrap directly against the surface of the pie to seal it, and place it into the fridge. This pie should chill for at least 4 hours, but it’s best to chill it overnight. Decorate and serve. When you’re ready to serve, unwrap the pie and garnish the top with fresh whipped cream and maraschino cherries. Recipe Tips Don’t skip the lemon juice. Lemon juice helps the pie filling set, so please do not skip it or try to substitute it in this recipe. Chill the pie for long enough. It’s ideal if you can leave this millionaire pie in the fridge overnight, but make sure it has at least 4 hours to chill so it sets up properly. If you slice into it too soon, the servings will be soupy. Use full-fat ingredients. I recommend full-fat sweetened condensed milk and whipped cream for the silkiest, creamiest pie filling. Lower-fat ingredients contain more water, and the pie may not set up properly. How to Store Refrigerate. Keep this millionaire pie covered airtight in the fridge when you’re not serving it, so the filling stays firm. Freeze. To freeze the pie, leave off the whipped cream topping and press a layer of plastic wrap directly against the top of the pie. Then, wrap the whole pie in a second layer of plastic wrap or foil. Freeze for up to 2 months, and thaw the millionaire pie in the fridge before serving. Print clock clock iconcutlery cutlery iconflag flag iconfolder folder iconinstagram instagram iconpinterest pinterest iconfacebook facebook iconprint print iconsquares squares iconheart heart iconheart solid heart solid icon Description Millionaire pie is a decadent and fruity no-bake pie filled with sweet crushed pineapple, maraschino cherries, crispy pecans, and coconut in a creamy filling. 1 9-inch Graham Cracker Crust 15 ounces Crushed Pineapple, drained well 14 ounces Sweetened Condensed Milk 1 Cup Maraschino Cherries, chopped 3/4 Cup Shredded Coconut 1/2 Cup Pecans, chopped 1/4 Cup Lemon Juice 1 Tablespoon Maraschino Cherry Juice 8 ounces Whipped Cream, divided Combine the crushed pineapple, sweetened condensed milk, cherries, coconut, pecans, lemon juice, and cherry juice in a large bowl. Stir well to mix. Add 1 ½ Cups of whipped cream and gently fold it into the mixture. Spread the pie filling into a graham cracker crust. Cover the top with plastic wrap and refrigerate for at least 4 hours (overnight is better). Immediately before serving, decorate the top with additional whipped cream and cherries. Want To Save This Recipe?Find more recipes like this: Source link
#KITCHEN_AND_DINING#COCONUT#DESSERT#EASY#GRAHAM_CRACKER_CRUST#MARASCHINO_CHERRIES#MILLIONAIRE#NOBAKE#PECANS#PIE#PINEAPPLE#SWEETENED_CONDENSED_MILK#WHIPPED_CREAM
0 notes
Photo

How often should the microwave be cleaned? Knowing how regularly to clean any appliance goes a long way toward keeping it clean — and making the task easier to complete! If your microwave is used frequently, it should be cleaned at least once a week as part of your usual routine. If a microwave is cleaned regularly, it shouldn’t be difficult to wipe away any food residue or grease. You should also give the microwave a wipe down if you cook something very messy. Marinara sauce is a common culprit! Thick sauces tend to splatter inside microwaves, milk tends to boil over, and spills can happen at any time. Dealing with the mess immediately is much faster and easier than letting it dry. Why Should You Keep Your Microwave Clean? We’re going to tell you the best ways to clean a microwave, but first, here are some facts and figures that explain why you should keep your microwave clean at all times. Leaving old food spills in your microwave can damage the microwave over time. Each time you heat a new item, the spill heats up too and can harm the inner workings, requiring you to buy a new microwave. Dirty microwaves may harbor up to 100 different types of bacteria or more. While heat kills most bacteria, it’s still not a good idea to put uncontaminated food into a contaminated appliance. The CDC estimates that 53,300 people are hospitalized for food-borne illnesses every year, and approximately 931 of those die of these illnesses. What you should take from this is that it’s not only aesthetically better to keep your microwave clean, it’s also better for your health. How to clean the microwave You can use any all-purpose or DIY cleaning solution to clean your microwave. Simply spray the inside of the appliance, wait a few minutes, and wipe all surfaces with a microfiber cloth. The removable glass turntable can be cleaned in the same way, or if it’s very grubby, wash it in the sink with some dish soap. Don’t use cleaners that are too harsh inside your microwave — remember, you’re going to eat the food that’s cooked in there. Bleach can damage the microwave surfaces, or leave an unpleasant residue behind. If you use any commercial cleaner, it’s always a good idea to give the microwave a final clean with fresh water once the stains and dried food have been dealt with. Don’t forget the microwave door! If the window is looking greasy, use dish soap to cut through the buildup and make your microwave look like new again. How to clean the microwave with vinegar White vinegar is a great all-purpose cleaner that is gentle on your microwave but tough on dirt. Vinegar is also a powerful odor neutralizer, so if your kids burned a bag of popcorn in the microwave, vinegar can make the smell go away. Knowing how you clean a microwave with vinegar and water means you’ll always have a cleaning solution available when you need one. You’ll need: ½ cup water ½ cup white vinegar Microwave-proof bowl Microfiber cloth Step 1: Mix the water and vinegar in the microwave-proof bowl. Place inside the microwave and heat on high until the water is boiling. You’ll know this has happened when you see steam condensing against the door. Step 2: Turn the heat off and let the microwave steam for 5 minutes. Step 3: Open the door and carefully remove the bowl. Wipe down the microwave with the microfiber cloth. This method works because the hot water and vinegar break down and loosen stains, making them easy to wipe away. You can also clean a microwave with apple cider vinegar using the same method. Pro Tip: Microwaves distribute heat unevenly — how many times has your food been cold in one spot and scorching in another? — and sometimes water can get superheated, creating a dangerous reaction when it’s disturbed. While this is very unlikely, you can make heating water in the microwave safer by: Always using a microwave-safe, uncovered bowl Placing a non-metal item like a wooden toothpick in the water Heat in bursts of 1-2 minutes, and stir the water in between Gently tap the side of the bowl before moving to disturb the water How do you clean a microwave with lemon? If you don’t have any white vinegar at hand, the old lemon in the back of your fridge just became a cleaning superstar. In fact, any citrus fruit will do the trick, because citrus fruits contain a natural solvent called D-limonene that can easily cut through grease. You’ll need: 1 cup water 1 citrus fruit (lemon, lime, grapefruit, orange) 2 tablespoons white vinegar (optional) Microwave-proof bowl Microfiber cloth Step 1: Cut up the citrus fruit and combine it with the water in a microwave-safe bowl. Squeeze the fruit a little to add the juice to the water. If you have white vinegar to hand, you can add a couple of tablespoons to the mixture as well, although it isn’t necessary for this solution to work. Step 2: Heat the mixture in the microwave in bursts of 1-2 minutes, until the water boils and steams. Step 3: Leave to steam with the door closed for 5 minutes. Step 4: Wipe down the microwave with a microfiber cloth. Now you know how to clean a microwave with lemons! Related: Why not clean your other small appliances at the same time? Find out how to clean your iron now! How to clean a microwave with baking soda Baking soda is amazing. It can cut through grease and break up even the toughest dried-on foods. Here are our favorite baking soda microwave cleaning hacks. How to clean a greasy microwave with baking soda ¼ cup baking soda 2-3 tablespoons water Sponge Make a paste by adding water to the baking soda to achieve the desired consistency. Use a sponge to apply the paste to the door and interior surfaces of the microwave and scrub in circular motions to cut through grease and remove stains. How to clean a microwave with vinegar and baking soda ½ cup baking soda ½ cup white vinegar Spray bottle Microfiber cloth This method is best for stubborn, dried-on stains. First sprinkle the baking soda generously across the stain. Put the vinegar in a spray bottle and apply to the baking soda. Allow the mixture to fizz for 5-10 minutes, and then clean with a microfiber cloth. Pro Tip: Vinegar can be corrosive, so make sure to wash out the spray bottle after use, and run clean water through the mechanism to prevent any damage. How to clean a microwave with a bad smell using baking soda ½ cup baking soda Microwave-safe bowl If your microwave needs freshening up, you can remove odors by placing half a cup of baking soda inside it between uses. Remove it once the smell has gone (1-2 days), or keep baking soda in your microwave as a general deodorizer. Just switch it out once a week so it remains effective at absorbing odors. Pro Tip: You can also use baking soda to clean a glass top stove. How to clean a dirty microwave: Solutions to use All-purpose cleaner White vinegar and water White vinegar and baking soda Citrus fruit and water Citrus fruit, water, and white vinegar Water and dish soap How to clean microwave filters Now you know how to clean inside the microwave, it’s time to consider other areas you should clean. Most over-the-range microwaves have two filters — a charcoal filter to reduce odors, and a grease filter to prevent buildup in the exhaust fan mechanism. Both should be cleaned and/or replaced on a regular schedule. Charcoal filters are usually located under the top vent panel. You’ll probably need a screwdriver to remove the panel to get to the filter. These filters should typically be changed every 6 months, but consult your microwave owner’s manual for specific instructions. Grease filters are located on the underside of the microwave, and are easier to access. These filters should be washed once a month to remove accumulated grease. It’s easy to remove a grease filter, just slide it out of its housing. Then submerge it in a sink full of hot water, dish soap, and ¼ cup baking soda. Let the filter soak for 10-15 minutes, and then clean with a scrubbing brush, taking care not to bend the metal. Dry the cleaned filter and slide it back into position. How to clean a microwave vent The vent is located at the top front of the microwave. If you look above the door, you’ll probably notice the air holes for the vent. To access it, you’ll have to unscrew the top plate. Turn off the microwave at the wall before you start, and check your owner’s manual for precise instructions. Clean the vent by spraying an all-purpose cleaner onto a microfiber cloth and cleaning the vent. Don’t spray cleaner directly into the vent itself! If some areas are hard to reach, use Q-Tips dampened with a little cleaning solution. Related: Now your microwave is clean, it’s time to clean your granite counters too! How to clean sponges in a microwave Microwaves are great for zapping bacteria, and that means they can help keep your sponges clean and germ-free. Simply saturate your sponges with water and place in a microwave-safe dish. Heat on high for 1 minute (standard scrub sponges) or 2 minutes (cellulose sponges). Let them stand for a couple of minutes to cool, and then squeeze out the water. In Conclusion Cleaning your microwave doesn’t have to be difficult. You can use any food-safe cleaner or DIY solution. And once you’re done, you can use your microwave to clean and sanitize your cleaning materials, ensuring your whole home is hygienically fresh. FAQ About Cleaning Microwaves How often should I clean my microwave filter Our Pros recommend cleaning spills as soon as they occur. Thoroughly clean the interior of your microwave once a week and clean the filters once a month for the best results.1 Can I use cleaning scrubs and abrasives to remove food spills from my microwave? You can but you should only use gentle abrasives, or a homemade scrub made of baking soda and water or lemon juice. Anything that’s overly abrasive may scratch glass microwave plates or stainless steel and there’s no way to undo that damage.2 Is it safe to disinfect my microwave with bleach? We don’t recommend it. Bleach may leave behind toxic fumes if not properly rinsed away after cleaning. Since microwaves are difficult to rinse, bleach isn’t the best choice. Bleach can also damage plastic parts inside a microwave. We suggest sticking with more natural disinfecting substances such as vinegar.3 Citations 1 Copeland, B. (2025, February 19). How to Clean Your Microwave the Right Way and How Often to Do It. Retrieved July 16, 2025, from 2 Tipnut (1, January 1). Gentle Abrasive Scrubs to Tackle Scum & Dried Crusty Gunk. Retrieved July 16, 2025, from 3 Van Terheyden, P. (2024, August 9). 5 things never to clean your microwave with – and what professional cleaners use in their homes instead. Retrieved July 16, 2025, from Source link
0 notes
Photo

If you are a bug magnet like I am, you will appreciate this (dare I say) life-changing project! Make these DIY citronella candles and experience for yourself how well an effective mosquito-repellent candle can work! I especially appreciate that these candles are made with all-natural materials, with no toxic harmful ingredients included. If you are anything like me, the summer months are the perfect season to spend time outside. In typically cooler climates like where I live, the long, warm summer days are perfect for gardening and soaking up the sun outside. There’s just one tiny problem: mosquitoes. I don’t know what it is, but mosquitoes seem to absolutely love me (that love is not returned!). Mosquitoes leave me with large, itchy welts as they feast in the morning and evening hours. Ugh! Thankfully, after years of experimenting and lots of trial and error, I have developed a few methods for keeping these pests at bay naturally. One of my favourite methods are these DIY citronella candles. This post will cover… Even made out of recycled materials, these citronella candles can look really cute. Do Citronella Candles Really Work? I originally published this post in 2016, and since then, there’s been a lot of discussion surrounding the topic of citronella candles and their effectiveness for repelling mosquitoes. Lately, several articles have been published citing a study claiming citronella candles don’t work. However, that’s not what the study actually shows. The studies say if you are trying to protect yourself from Zika, Malaria, or other mosquito-borne illnesses, you should not rely upon a citronella candle. I completely agree with this! If you are going somewhere where those diseases are heavily present, or if you are at higher risk, I would not rely on citronella to keep you safe. That being said, if you are out in your garden, or on your patio having a glass of wine, and you put a few of these candles around to protect your space, they can be effective. Not because mosquitoes are disgusted by the smell, but rather because it can help mask your scent. As you burn the candles, it consistently releases the oil into the air, which keeps your scent hidden. Citronella candles have about a 40% effective rate. The studies have shown that citronella candles work about 40% of the time. This means that 60% of the time, you may end up with bites. I’d still much rather use an all-natural bug spray in combination with citronella candles to reduce the chances of getting bitten than dose myself in DEET and chemicals daily just to prevent bites. Is it 100% effective? No. But, when used in combination, I think it can be an effective ally in the fight against mosquitoes. That’s why I arm myself with a combination of citronella candles, my mosquito-repelling container garden, and my DIY bug spray that uses natural essential oils. This combination is an effective one-two punch that keeps those pesky mosquitoes far, far away without exposing myself (and my garden!) to any harmful chemicals. I use citronella candles, especially at night, when the heat has died down and the mosquitoes come out. Other Scents to Use in Citronella Candles Truth be told, I’m personally not overly crazy about the smell of citronella, but I’ll happily deal with it to avoid performing a constant ridiculous-looking dance of smacking myself to kill the flying pests. While the most effective candles will still be primarily citronella, feel free to add a few other fragrances. To make the candles smell better to me (but still effective), I have played with adding a couple of additional scents to my latest batch of citronella candles, such as: You may have to experiment a bit and see which combination you like best, but that’s part of the fun of making DIY candles. More herby and other citrus scents pair best with citronella. How to Make Citronella Candles With a few simple, natural ingredients and just a little bit of time, you will have your own mosquito-repellent candles to use all around your yard! Materials If you’re using recycled containers, ensure they’re clean and dry before starting. Make It! 1. Add the wicks to the center of your can or container. The best way I have found to use this is with a hot glue gun. Make sure to press the wick down firmly (and carefully as the hot glue can burn). If you are using a larger container, you can add two or three wicks spaced apart around the center. Don’t skip this step. Otherwise, your wick will be moved and float around. 2. Assemble your double boiler and add wax or old candles in small pieces. Don’t worry so much about bits of wick or other specks in the wax, as you won’t see them in the candles when they are done. This is a great project to reuse your old candle wax. 3. Heat the wax over medium heat until it is completely melted. This won’t take too long. Stir every once in a while to help it melt evenly. Break up larger wax chunks so they melt faster. 4. When the wax is melted, it’s time to add the fragrance. Add 1 oz of citronella oil per pound of wax and augment the scent with 0.5 oz of other scents per pound. If you prefer just citronella, you can use 1.5 oz per pound. Add in fragrance after the wax has melted so you don’t burn off the fragrance. 5. Let the wax cool slightly and carefully pour into containers. I can usually gently maneuver my wicks to stay in the center as the wax cools, but if you are having trouble, secure the wicks with a chopstick or clothespin to keep them in line. If you want the wicks perfectly center, use a clothespin or wind them around a bamboo skewer to hold them in place. 6. Allow your candle to cure for 48 hours undisturbed before burning. Trim the wick to about 1/4 inch before you light it. Then, once it’s lit, let the candle burn so that there is a full, wide pool of wax before you blow it out. This is how you get an even burn for the life of the candle. The first light of a new candle is important, as it will ensure it remains even for the remainder of the candle’s life. Citronella Candle-Making: Helpful Tips If you are new to making candles (or making citronella candles), take a quick look at these helpful tips to ensure success with your efforts: Be careful not to disturb them too much and set them in a warm place to cool. Cooling slowly and completely will create the best looking candles. If you get a depressed area around the wick when cooled, warm up some more wax and pour it into the void. Decorate your citronella candles by wrapping them in burlap, twine, and/or yarn. Store them near the garden, deck, or patio so you can quickly light up when the pests start buzzing around. Use a few citronella candles around your entertaining area for maximum effort. Re-Use Old Supplies to Save Money Even though this project is fairly inexpensive, there are costs involved—and ways to save a little money. Here are some helpful tips to help you save a little when making your citronella candles. Reuse Containers You may notice from the pictures that these mosquito-repellent candles are in cans. I love this project because making citronella candles in cans is not only a great, natural way to keep mosquitoes at bay, but it’s also a great recycling project that reuses your cans. Plus, it’s a simple and inexpensive project, much like the soy beeswax jar candles I made not too long ago. I love using old metal cans for this project. They don’t even have to be shiny. Rusty ones look amazing! However, if you don’t have any cans, you can also use glass jars. My only caution when using glass is to avoid using very large jars. I recommend keeping them to pint-size or smaller so that the glass doesn’t break when the hot wax heats up the jar. Don’t have any cans available? Try making your citronella candles in terracotta pots this summer. I store my unused candles in this outdoor tote, which is great decor itself. Reuse Old Wax The cost of wax is the most costly part of this project. If you want to cut down costs, scrape old wax out of previously used containers and melt it back down for your new candles. Tip: If you want to try this, freeze your containers with old wax overnight, then the next morning, take a butter knife and carefully peel the wax away from the edges of the container. You’ll likely have chunks coming out at a time! Wrap your candles in yarn, twine, or burlap for extra cute decor. FAQ About Making Homemade Citronella Candles What kind of citronella oil do you use? I use citronella essential oil. You can get it fairly inexpensively at candle shops or online. You can also use fragrance oils, which tend to be cheaper and are less “clean,” but you will still get the job done. What is the wax to citronella ratio? I add 1 oz of citronella oil per pound of wax, and then add in 0.5 oz of other scents of my choice. If you’re going to use just citronella oil as your scent, you can do 1.5 oz of it. How can I stick wicks to the bottom of the can? I just use a hot glue gun to keep my wicks secure to the bottom of the container. If you do not have a hot glue gun, you can use wick stickers as well. I hope that this guide helps you to make your own citronella candles easily! I even like the look of a plain, rusty can! More Ways to Stop Mosquitoes DIY Citronella Candles My guide showing you how to make citronella candles from upcycled tin soup cans, recycled candle wax and natural citronella oil. 1. Using the hot glue gun, affix the wicks to the bottom of the cans and press it firmly into the center.If you are using a larger can, add two or three wicks spaced apart around the center.2. Assemble your double boiler and add wax or old candles in small pieces. Don’t worry so much about bits of wick or other specks in the wax as you won’t see them in the candles when they are done.3. Heat over medium heat until the wax is completely melted.4. When the wax is melted, it’s time to add the fragrance. Add 1 oz of citronella oil per pound of wax and augment the scent with 0.5 oz of other scents per pound.5. Let the wax cool slightly and carefully pour into containers. I can usually gently maneuver my wicks to stay in the center as the wax cools, but if you are having trouble, secure the wicks with a chopstick or clothespin to keep them in line.6. Allow your candle to cure for 48 hours undisturbed before burning. Then, when you fire it up, let the candle burn so that there is a full, wide pool of wax before you blow it out. It is said that candles have a memory, so it’s best to let the first burn set the tone for all the rest. A city girl who learned to garden and it changed everything. Author, artist, Master Gardener. Better living through plants. Source link
0 notes
Photo

Euonymus alatus and E. atropurpureus Burning bush, Euonymus alatus, is a potentially invasive non-native woody shrub in the Celastraceae family. It’s related to the native burning bush, E. atropurpureus, as well as native bittersweet, Celastrus scandens and its highly invasive non-native counterpart, C. orbiculatus. E. alatus grows in USDA Hardiness Zones 4 to 8 and can reach heights of 15 to 20 feet with a spread of eight to 12 feet. Compact varieties may be as small as six to eight feet tall and four to six feet wide. We link to vendors to help you find relevant products. If you buy from one of our links, we may earn a commission. Aptly named, burning bush’s claim to fame is the show-stopping scarlet hue of its autumn foliage. Read on to learn more about this controversial shrub and how to cultivate it safely in regions where it is permitted. Here’s what I’ll cover: Across almost half of the United States, from the Northeast to the South and Midwest, E. alatus is classified as invasive. In some states, like Massachusetts and New Hampshire, it is actually banned, as it has the potential to spread prolifically via seed dispersal. There are numerous Euonymus species related to E. alatus and many of them have invasive tendencies as well. Quick Look Common name(s): Burning bush, winged euonymus, winged burning bush Plant type: Woody deciduous shrub Hardiness (USDA Zone): 4-8 Native to: Asia, eastern North America Season: Fall Exposure: Full sun Soil type: Loose, rich, well-draining Soil pH: 6.0-7.5, slightly acidic to neutral Time to maturity: Up to 10 years Mature size: 6-20 feet high by 4-12 feet wide Best uses: Border, formal or informal hedge, foundation planting, privacy screen, specimen Taxonomy Order: Celastrales Family: Celastraceae Genus: Euonymus Species: Alatus, atropurpureus Why are we going to talk about how to grow an invasive plant? Because for more than half of our US-based readers and a great many of our international ones, E. alatus is not considered problematic. Please check with your local agricultural extension to determine if there are restrictions on planting non-native burning bushes in your region before attempting to do so. For gardeners in regions with restrictions, you can grow an alternative species, a burning bush that’s native to the eastern United States, E. atropurpureus. You may find it is often called the eastern or American wahoo. This native species is very similar to its non-native cousin, with the same cultural requirements and size. A dull red shade, this plant’s best feature is its ornamental fruit. E. atropurpureus thrives in Zones 3 to 7, and supports biodiversity and local wildlife. Mature dimensions are 12 to 20 feet tall and 15 to 25 feet wide. For our readers in locales without restrictions, you have the option to plant either type. The showy burning bush, E. alatus, is of Asian origin, and was likely imported to North America in the 1860s to be used as an ornamental garden specimen. In addition to burning bush, E. alatus is also known as winged euonymus, winged burning bush, or winged spindle tree, because of a unique feature of the stems. They have flattened extensions like little propellers, which are described as corky and wing-like. Historically, Euonymus stems were prized for use as knitting needles and thread spindles, hence the common name. What wasn’t clear when these plants arrived on our shores was that they would jump their manicured beds via self-sowing, and over time, North American birds consume the fruits and contribute to widespread seed distribution. Fast-forward to today, when nearly half the nation has experienced disruption to native plant life thanks to this deceptive autumn beauty that makes it impossible for endemic species to compete for survival. Again, I’d like to reiterate the importance of contacting your local agricultural extension for advice and information about possible restrictions before planting. Prior to their spectacular autumnal display, burning bushes have elliptical green leaves, and nondescript greenish-yellow blossoms appear in early spring. In addition to their fall colors, burning bushes have pinkish pendant or hanging fruits that open like flower petals to reveal orange-red arils containing black seeds. While they may have had a historical role in Native American medicine, the fruits are toxic and should not be consumed by people or pets. As the weather cools in the fall, the green foliage of summer shades to scarlet. The fruits drop off, scattering seeds that will sprout next year. This deciduous shrub then drops its leaves, revealing bare “winged” stems that add structural and textural interest to the coming winter landscape. Now, let’s look at how to grow a shrub at home. How to Grow Burning bush makes a striking standalone specimen, especially when cloaked in its signature scarlet. It also makes an eye-catching focal point when it stands in contrast to green shrubs in a mixed group. The dense branches make an outstanding formal or informal hedge when planted around patios and along property perimeters. E. atropurpureus has airier branches that are suited to informal, unmanicured hedging. And if you need to soften the sharp edges of architectural elements, like walls and fences, burning bush fits the bill, merging garden spaces and building materials with dramatic effect. Where it is not classified as invasive, you can let shrubs of either species naturalize to create an expansive drift that explodes into a profusion of crimson every fall. Light E. alatus and E. atropurpureus grow best in full sun to part shade. These species can tolerate full shade, but the color will not be as vibrant. In rare instances, burning bushes may not turn red. We cover this in a separate guide. Soil The ideal soil is of average quality, drains well, and has a pH of 6.0 to 7.5. However, a variety of soils and pH levels may be tolerated, provided the drainage is good. You can work in some well-rotted compost at planting time to add nutrients as well as promote drainage and moisture retention. Water Transplanted cuttings and nursery plants need consistent moisture after planting but should never be in soggy ground. Once established, provide an inch of supplemental water per week in the absence of rain – or when the soil is dry two inches down. Mature shrubs have above average drought tolerance. Fertilizing In spring, apply a balanced, all-purpose, slow-release granular fertilizer per package instructions. I usually sprinkle it in a ring around mine, and then lightly water it into the soil. Cultivars to Select If you buy a non-native shrub, you will receive a cultivated variety that has been developed from one or more species for landscaping use. There is one sterile cultivar available, described below, but any of the others will self-sow. Here are three varieties to consider in regions where they are not prohibited: Chicago Fire E. alatus ‘Timber Creek,’ aka Chicago Fire®, is an outstanding specimen with some of the brightest leaves you’ll find. Chicago Fire Like the glowing embers of an autumn bonfire, the scarlet foliage of this type adorns branches that rise to mature heights of eight to 10 feet with a spread of six to eight feet. Find Chicago Fire® plants at Nature Hills Nursery in #3 containers. Compactus E. alatus ‘Compactus’ aka ‘Compacta’ lives up to its name as a smaller version of this fall favorite. Topping out at a moderate six to eight feet tall with a spread of four to six feet, this type offers the small-space gardener the opportunity to enjoy a specimen planting that won’t overwhelm a garden scheme. ‘Compacta’ Find ‘Compacta’ plants from Nature Hills Nursery in #3 containers. Fire Ball Seedless Fire Ball Seedless™ is a sterile cultivar ideal for cultivating in regions where the species is legal but there is concern about it spreading. Note that if E. alatus is banned in your region you will not be able to grow this one, even though it won’t spread. Bred by horticulturalists at North Carolina State University, Fire Ball Seedless™ was released to market in 2025. Fire Ball Seedless™ You can find plants in one-quart and two-gallon containers available at Fast Growing Trees. And check out our guide to growing Fire Ball Seedless, a sterile burning bush for more information. Pruning and Maintenance E. alatus, and its native counterpart E. atropurpureus, are low-maintenance garden residents. Use clean pruners to cut off any dead or dying branches so your shrub can refocus its efforts on feeding the healthy ones. Prune off any damaged branches and remove all debris, to avoid attracting and harboring pests and pathogens. In addition, you may want to prune your shrubs to maintain a formal hedge, or remove wayward branches such as those that block a walkway, for example. And if naturalizing plants via self-sowing is not what you have in mind, you’ll want to be vigilant about plucking unwanted seedlings in the spring. Propagation Although the burning bush produces seeds, cultivated varieties may not reproduce “true,” resulting in progeny that varies in quality and physical traits. In addition, propagating seeds is the slowest way to start a new shrub. Faster and better ways to begin are with softwood cuttings or starter plants purchased from a nursery. Here’s how: From Cuttings In early summer, when the first flush of new growth is well underway, you can take cuttings from the growing tips of an established shrub for rooting. Use clean pruners to snip off a length of stem that’s about four or five inches long. Pinch off the lower leaves so that the bottom three inches of the stem are bare. Dip the freshly cut stem into rooting hormone powder. Fill a six-inch-deep, well-draining container about three-quarters full with a sterile potting medium. Make a three-inch-deep hole in the center of the potting medium with a pencil or dibber. Place the dipped stem in the hole and tamp the medium securely around it. Water well, and thereafter whenever the top two inches of the soil feel dry. Use a moisture meter to help with this task. Tamp the soil down and water until it drips out the bottom of the container. Water a second time, and when the draining stops, place the pot in a sunny place, either indoors or outdoors. When you see new growth, that means rooting is successful and you can transplant it into the garden. Transplanting Early spring and fall are the best times to plant rooted cuttings or nursery shrubs. To transplant, use a long-handled, pointed garden shovel that you can step on. Dig a hole at least twice as wide and twice as deep as the pot the shrub is in. Work the shrub out of its nursery pot, and gently loosen the roots. Place the root ball into the hole so that the crown is slightly above ground level. Refill the hole, taking care to keep the shrub vertical. Tamp down and water well. To plant a single shrub, choose a location with room for a mature spread of eight to 12 feet. If you’re going to create a hedge, closer spacing of five to six feet is acceptable. If you have black walnut trees, don’t worry. This shrub tolerates juglone toxicity. Apply a three-inch layer of mulch in a circle around the shrub after planting. Pests and Disease When it comes to anticipating issues with insects and pathogens, there are few to worry about with E. alatus. In the event of severely dry conditions, spider mites may pose a threat. You can read about detecting and controlling spider mites here. Taking care of infestations is important, especially as they may spread diseases with their piercing mouthparts. Conditions that are too wet may also invite trouble, in the form of a disease called twig blight. This condition causes the thinnest stems at the tips of woody plants to die back. It is caused by parasitic fungi in the Cytospora genus that overwinters in plant debris. It may be accompanied by chlorosis, or yellowing of the leaves. Pruning off affected branch portions and treating with a fungicide early in the season can help to stop the spread. Also, Euonymus plants in general are prone to powdery mildew, a fungal condition that is treatable with a copper-based fungicide. As for native E. atropurpureus, there are also few pest and disease concerns. One pest that favors it is scale, a sap-sucking insect that secretes sticky honeydew, leaving a trail that is prime breeding ground for a fungal condition called sooty mold. You can learn more about scale here. And finally, you might want to read up on deterring deer, because they find the foliage of both E. alatus and E. atropurpureus to be very appetizing. A Fall Extravaganza If non-native E. alatus is not banned in your region, plant one as a focal point, or mass several for privacy, and set your autumn landscape ablaze with their vibrant red foliage. If you live in a locale where E. alatus is prohibited for its invasiveness, or even if you don’t, consider planting native E. atropurpureus instead, and help support biodiversity and wildlife that depend upon endemic plants for their survival. If you grow burning bushes and would like to share your thoughts, or if you have any questions that we can help with, please leave us a message in the comments section below. And for more information about growing woody shrubs in the landscape, check out these guides next: © Ask the Experts, LLC. ALL RIGHTS RESERVED. See our TOS for more details. Originally published September 3, 2021. Last updated July 26, 2025. Product photos via Fast Growing Trees and Nature Hills Nursery. Uncredited photos: Shutterstock. !function(f,b,e,v,n,t,s) if(f.fbq)return;n=f.fbq=function()n.callMethod? n.callMethod.apply(n,arguments):n.queue.push(arguments); if(!f._fbq)f._fbq=n;n.push=n;n.loaded=!0;n.version='2.0'; n.queue=[];t=b.createElement(e);t.async=!0; t.src=v;s=b.getElementsByTagName(e)[0]; s.parentNode.insertBefore(t,s)(window, document,'script', ' fbq('init', '176410929431717'); fbq('track', 'PageView'); Source link
0 notes
Photo

In this post, we’ll explore the features, uses, and styles of singlets and tank tops, as well as guide you to some versatile and eco-friendly options at the All Cotton and Linen online store, where you can find everything from short sleeve tees to crop tops. 1. What Is a Tank Top? A tank top is a sleeveless, collarless upper garment with a simple design, worn by both men and women. Known for its versatility, it comes in various styles and is often made from breathable materials like cotton or polyester. Variety of Styles: Tank tops come in a range of necklines and strap designs, from scoop necks and V-necks to racerback, halter, and spaghetti straps. Their diverse styles and designs make them suitable for casual wear, workout attire, or as layering pieces. Fit Options: Unlike singlets, which are always tight-fitting, white tank tops can either be fitted or loose, allowing for a broader range of comfort levels and style preferences. Everyday Uses: Tank tops are ideal for pairing with shorts, jeans, or leggings, making them a staple in many people’s wardrobes. They can also be worn under sheer shirts, cardigans, or jackets, offering practical layering options. For instance, if you’re looking for casual yet chic summer wear, a tank top paired with shorts or skirts offers both style and comfort. During colder months, layering a black tank top under sweaters or blazers can add an extra layer of warmth. 2. What Is a Singlet? The singlet is typically a tighter, more form-fitting sleeveless garment with roots in athletic wear. It is especially popular in the United Kingdom and Australia, where the term is more widely used than in North America. Singlets are designed to stay close to the body, which makes them ideal for athletic activities, and they are commonly worn by athletes in sports such as wrestling, track and field, and triathlon. Design and Fit: Singlets are always tight-fitting to ensure ease of movement and comfort during intense physical activities. They are commonly made of stretchable materials like nylon, spandex, or lycra, allowing them to flex and conform to the body. Athletic Origin: Singlets were initially designed as athletic wear and remain popular among wrestlers and track-and-field athletes. Wrestling singlets, in particular, often come in a one-piece design with shorts attached to a sleeveless top. This one-piece construction prevents the garment from riding up during physical exertion. Style Variations in Wrestling Singlets: Wrestling singlets come in different cuts, like the high cut, FILA cut, and low cut, to suit different comfort and exposure preferences. These cuts range from covering most of the torso to more revealing designs, and are often mandatory uniforms in wrestling. You May Also Like The Comfort Factor: Why Women Love Rib Knit Tees 3. Key Differences Between Tank Tops and Singlets a) Fit and Comfort Tank tops may have a loose or tight fit, offering more variety and suitability for both casual and semi-formal wear. Singlets, by contrast, are tight-fitting and designed to stay in place even during rigorous physical activities. Their close fit minimizes drag, making them ideal for sports. b) Purpose and Usage Tank tops are popular casual wear and are perfect for layering or pairing with other clothing. They are versatile and suitable for almost any casual occasion. Singlets are primarily used for athletic purposes, especially in competitive sports. They are practical for athletes as they don’t restrict movement and are unlikely to shift during performance. c) Cultural Differences in Terminology In North America, “tank top” is the standard term, while “singlet” is associated with wrestling attire. In Australia and the UK, a singlet can refer to a general sleeveless top (similar to a tank top) or an athletic, one-piece outfit for wrestling. 4. Style Tips: When to Wear a Tank Top or Singlet Tank Top Styling Tips Casual Looks: A loose tank top pairs well with jeans, shorts, or skirts for a relaxed vibe. For an edgier look, try pairing a cropped tank top with high-waisted pants. Sports and Fitness: Tank tops are also popular in athletic settings and can be worn for yoga, jogging, or gym workouts. Pair them with leggings or athletic shorts for a functional and fashionable gym look. Layering Piece: During fall and winter, wet tank tops make great underlayers for sweaters, blazers, and jackets. Singlet Styling Tips Athletic Wear: Singlets are made for sports, especially in events that require a full range of motion, like track and field or wrestling. Summer Basics: In warm climates, a singlet worn as an outer garment can provide comfort, especially in lighter colors or moisture-wicking materials. Read More: How to Wear a Baggy T-Shirt for Women 5. Finding the Perfect Sleeveless Garment: Why Choose Sustainable Options? Choosing eco-friendly options for high neck tank tops and singlets not only supports a greener planet but also provides a quality, comfortable choice for your wardrobe. At All Cotton and Linen, you’ll find an assortment of short sleeve tees, crop tops, and tank tops made from natural materials. The benefits of opting for cotton-based fabrics include: Breathability: Cotton is naturally breathable, making it ideal for summer wear. Comfort: Organic cotton is gentle on the skin and doesn’t irritate, unlike some synthetic materials. Sustainability: Organic cotton is eco-friendly, supporting environmentally responsible fashion choices. Read Related: How to Cut a T-Shirt into a Tank Top for Women 6. Where to Buy Quality Tank Tops and Singlets Online For a stylish, comfortable, and eco-friendly wardrobe update, check out All Cotton and Linen’s collection: Women's T-Shirt: Perfect for casual outings and can be layered with square neck tank tops for a unique look. Crop Tops: For those seeking a trendier look, crop tops offer a fashionable alternative. Tank Tops: Available in different cuts and sizes for all body types and preferences. In conclusion, crochet tank tops and singlets are two distinct sleeveless options, each with its unique fit, purpose, and cultural significance. v neck tank tops provide flexibility in fit and style, making them a go-to for casual wear, sports, and layering. Singlets, on the other hand, serve the athletic world with their form-fitting design, offering practical functionality and ease of movement. For those interested in sustainable options, All Cotton and Linen provides a range of tank top with built in bras and other apparel crafted from organic cotton. Perfect for every season, these sleeveless garments can add a stylish, breathable, and eco-conscious choice to any wardrobe. Source link
0 notes
Photo

Like twinkling stars fallen from the night sky, fireflies fill our summers with wonder and nostalgia. As a kid I would spend hours trying to catch them, just to hold them reverently in my cupped hands for a closer look at their blinking glow. Now I watch from my porch on balmy summer evenings and wonder if my young brain exaggerated their numbers, or if there really are fewer in my area than there used to be. Some of the mysteries that fascinated me as a child have been answered: Though we fondly call them “fireflies,” “glowworms,” and “lightning bugs,” they aren’t flies, worms, or bugs. Lampyridae, as they are scientifically known, are a family of beetles that consists of more than 2,000 different species. They thrive in moist woodlands, and near rivers and riparian buffers, like my hometown full of creeks and marshes along the James River. Most species glow, and it’s believed that this acts as a warning to predators in larvae, which can be poisonous or inedible. Adult fireflies use it as a kind of Morse code, allowing species to recognize each other and mate. During the day, adult fireflies can look as unassuming as any other beetle. Photo: Michel Langeveld, CC BY-SA 2.0, via Wikimedia Commons The mystery of their growing absence, though, lingers unsolved in the back of my mind as I pull the encroaching summer weeds and watch dusk settle around my garden. Are fireflies disappearing? I’m not the only one who’s been seeing fewer fireflies. The Florida intertidal firefly (Micronaspis floridana) in coastal Florida and Bethany Beach firefly (Photuris bethaniensis) in Delaware are two species currently threatened with extinction. Though an overall decline is suspected, more studies are needed to determine exactly how many species of firefly are disappearing and how fast. A 2021 study found that 14% of firefly species were threatened, but more than 50% of species lacked sufficient data to draw any conclusions (Source). The decline in firefly populations is thought to be due to four main factors: habitat loss, pesticide use, climate change, and light pollution. Fireflies aren’t alone, either; these critical factors are negatively impacting many types of insects. So what can we do to help? Gardens are important habitats for fireflies and other insects A biodiverse border of yucca, Joe Pye weed (Eutrochium purpureum, Zones 4–9), and other southeastern native plants provides a perfect micro-habitat for local insects. Photo: Cheyenne Wine Although much of firefly habitat loss is caused by large-scale issues like climate change, residential development, and the loss of wetlands, there are things that we can do at home to ensure that our gardens and yards are safe spaces. These tips aren’t just good for fireflies; they can also help support butterflies, moths, bees, dragonflies, ladybugs, and other beneficial insects. Allow shade trees to grow, which will help retain moisture in the area. Plant biodiverse garden beds that provide plenty of hiding spaces for insects. Leave leaf litter in wooded and untraversed areas so larvae can hide. Allow deadheads and other dead herbaceous plant matter to remain through the winter so insects can shelter from freezing temperatures. Use nonchemical methods of pest control, such as handpicking pest insects and vacuuming or hosing them off. Follow safe and controlled methods for pesticide application when its use is unavoidable, like the steps outlined in ‘A Least Toxic Approach to Pesticides.’ Preventing light pollution to support fireflies Decreasing light pollution not only allows us to see fireflies better, but allows them to better see food, predators, and each other. Photo: Sushantk2212, CC BY-SA 4.0, via Wikimedia Commons Earlier I compared fireflies to twinkling stars. Unfortunately, they have more than glowing in common. As light pollution increases, real stars are also disappearing from view. An abundance of artificial light brightens our nights, shielding our view of space and making it harder for predominantly nocturnal species like fireflies, moths, and crickets to find food, hide from predators, and locate each other to mate. Restoring the darkness to our nights will require a widespread effort across each community, town, or city, but that shouldn’t deter you. The steps to reducing light pollution are actually relatively easy. Here are ways you can get started today: Remove unnecessary outdoor lights or turn them off when not in use. Choose motion sensor–activated lights over ones that stay on. Use downturned covers or shades for lights that direct them only toward intended areas, like sidewalks. Replace blue and white outdoor light bulbs with warmer ones. Close curtains indoors at night to prevent light shining outside. Become a dark sky–friendly home through DarkSky International. Encourage friends, family, and local businesses to do the same. Final thoughts Even a narrow strip of ground can be turned into an insect-friendly flower bed. This pollinator garden in a commercial area shows a planting of coneflowers, black-eyed Susans, and tickseed. Photo: Cheyenne Wine Once you’ve taken these steps to support fireflies and other beneficial insects in your garden, there’s one important thing to remember: Doing so will inevitably increase the number of new, unexpected, and sometimes unwanted insects in your garden. It’s all part of curating a space that facilitates life. An abundance of insects is a sign of a healthy garden, and while you don’t have to love every insect you encounter, achieving a peaceful coexistence with the tolerable ones will benefit your local ecosystem and help to maintain our planet’s biodiversity for generations to come. Find more ways to support insects and wildlife in the Southeast: Discuss this article or ask gardening questions with a regional gardening expert on the Gardening Answers forum. And for more Southeast regional reports, click here. Cheyenne Wine is a writer and gardener with experience in the plant nursery industry. She currently helps promote conservation efforts through the Virginia Department of Conservation and Recreation. Fine Gardening Recommended Products The Crevice Garden: How to make the perfect home for plants from rocky places Fine Gardening receives a commission for items purchased through links on this site, including Amazon Associates and other affiliate advertising programs. A crevice garden replicates the environmental conditions of mountain tops, deserts, coastlines, and other exposed or rocky places on earth. These striking garden features provide perfect conditions for the plants native to these far-off places, bringing the cultivation of these precious gems within everybody’s reach. Planting in a Post-Wild World: Designing Plant Communities for Resilient Landscapes Fine Gardening receives a commission for items purchased through links on this site, including Amazon Associates and other affiliate advertising programs. Featuring gorgeous photography and advice for landscapers, Planting in a Post-Wild World by Thomas Rainer and Claudia West is dedicated to the idea of a new nature—a hybrid of both the wild and the cultivated—that can nourish in our cities and suburbs. Source link
0 notes
Photo

Prominent for its long flowering time, drought tolerance and ability to thrive in different climatic conditions, black-eyed susan is one among the popular flowering plants in the US and Canada. With it’s golden-yellow petals and dark center, rudbeckia hirta instantly brightens up backyard. As mentioned, this perennial plant is hardy, require low-maintenance, and keeps blooming for weeks, attracting bees, butterflies, and admiring glances. If you’re looking to fill the corners of your backyard garden, then propagating Black-eyed Susan is an excellent way to do it without spending a dime. There’s more than one way to get more Black-eyed Susans in your garden. You can grow them from seeds, propagate them by dividing or even try rooting a few cuttings—whatever works best for you, it’s pretty easy either way. Before you jump to propagation techniques, it is essential to go through growing needs of this flowering plant. Growing Requirements of Black-Eyed Susan Black-eyed Susan thrives best in full sun, needing at least 6–8 hours of direct sunlight daily. While it can tolerate partial shade, the plant tends to produce fewer blooms in lower light conditions. If you’re aiming for a vibrant show of golden flowers, choose a sunny spot in your garden or yard. When it comes to soil, Black-eyed Susan isn’t very picky. It prefers well-drained soil but can tolerate clay, sandy, or even rocky soils. For best results, aim for moderately fertile ground with a neutral to slightly acidic pH (around 6.0 to 7.0). Amending the soil with compost can give young plants a nice boost, especially when planting from seed or transplanting divisions. Water-wise, this hardy perennial is quite drought-tolerant once established. During the first few weeks after planting, make sure to keep the soil consistently moist to help roots settle in. After that, you can dial it back—watering only during prolonged dry spells or when the top inch of soil feels dry. Black-eyed Susan also benefits from a bit of spacing. Give each plant about 12 to 18 inches of breathing room to allow good air circulation, which helps prevent mildew and fungal problems. With the right mix of sun, soil, and occasional water, you’ll have a low-maintenance bloomer that keeps giving season after season. How to Propagate Black-Eyed Susan Through Division? Division is one of the most reliable and preferred methods for propagating Black-eyed Susan because it not only helps multiply your plants quickly but also rejuvenates older clumps that may have become crowded or less productive. This method is especially useful if you already have a mature plant that’s been in the ground for a few years and you’re looking to fill more spaces in your garden with minimal effort and no extra cost. The best time to divide Black-eyed Susan is in early spring just as new growth begins, or in early fall when the flowering season has ended but the soil is still warm. Dividing in these seasons gives the roots time to establish before facing extreme weather conditions. Here’s a step-by-step guide to help you do it right: Also Read: How to Propagate Coneflower? Step 1: Choose the Right Plant Look for a mature Black-eyed Susan that has grown into a large clump and appears overcrowded or has reduced blooming. Plants that are about 3–4 years old are perfect candidates for division. Step 2: Water the Plant Water the plant thoroughly a day before dividing. This helps soften the soil and reduces root stress during the process. Step 3: Dig It Up Use a shovel or garden fork to carefully dig around the base of the plant. Start about 6 inches away from the crown to avoid damaging the roots. Gently lift the entire clump out of the ground. Step 4: Separate the Clumps Shake off or wash away excess soil from the root ball to see the natural divisions. Using your hands or a clean garden knife, separate the plant into smaller sections—each with healthy roots and at least one or two growing shoots or crowns. Step 5: Replant Immediately Choose your planting spots ahead of time. Dig holes that are wide enough to spread the roots out and deep enough to place the crown level with the soil surface. Space them 12 to 18 inches apart to allow room for future growth. Step 6: Water and Mulch Water the newly planted divisions thoroughly to help settle the soil around the roots. Apply a layer of mulch around the base to retain moisture and keep weeds down. With this method, not only do you get more Black-eyed Susans to brighten up your yard, but you also give the original plant a fresh start. It’s a simple weekend project with long-term rewards in the garden. Propagating Black-Eyed Susan Through Cuttings While not as commonly used as division or seed-starting, propagating Black-eyed Susan through cuttings is an easy and rewarding method—especially for gardeners who enjoy hands-on propagation. This technique is great for multiplying newer hybrid varieties that you want to replicate exactly, as cuttings produce clones of the parent plant. Stem cuttings are best taken in late spring to early summer when the plant is actively growing but hasn’t yet begun full flowering. Soft, green, non-flowering shoots make the best candidates for rooting. Step 1: Select a Healthy Stem Choose a healthy, non-flowering stem that’s around 4–6 inches long. It should be soft and green—not woody or brittle. Using sterilized garden scissors or pruning shears, make a clean cut just below a leaf node. Step 2: Remove Lower Leaves Strip off the leaves from the bottom half of the cutting, leaving a few leaves at the top. This helps reduce moisture loss and encourages the plant to focus on root development. Step 3: Dip in Rooting Hormone (Optional) Though optional, dipping the cut end of the stem in rooting hormone powder or gel can speed up the rooting process and improve success rates—especially if you’re new to propagation. Step 4: Plant the Cutting Fill a small pot or tray with a well-draining potting mix—something light like a mix of peat and perlite or vermiculite. Poke a hole with a pencil or stick and insert the cutting, gently firming the soil around it to keep it upright. Step 5: Maintain Humidity To keep humidity high, cover the pot with a plastic bag or place it in a mini greenhouse or propagation dome. Just make sure the plastic doesn’t touch the leaves—use sticks or supports if needed. Step 6: Keep Moist and Warm Place the pot in a bright location with indirect sunlight. Keep the soil moist but not soggy, and avoid direct sun which can overheat the cutting. In about 2–3 weeks, you should see signs of new growth, indicating roots are forming. Step 7: Transplant When Ready Once the cutting develops a strong root system (usually after 4–6 weeks), it can be carefully transplanted into a larger pot or directly into the garden. While this method requires a little more patience and care, it’s a great way to multiply your plants and experiment with propagation. Plus, it gives you the satisfaction of seeing a whole new plant grow from just a single snip! Also Read: How to Get Desert Rose to Bloom? Propagating Black-Eyed Susan Through Seeds Growing Black-eyed Susan from seeds is one of the easiest and most budget-friendly ways to expand your garden. This method is especially appealing because it allows you to start fresh batches each year or naturalize large areas with beautiful golden blooms. Whether you’re using seeds harvested from your own plants or purchased from a nursery, propagation by seed is simple and rewarding. You can start Black-eyed Susan seeds either indoors in early spring or sow them directly outdoors once the danger of frost has passed. These hardy plants are fast growers and usually bloom in their first year if started early enough. Step 1: Gather or Buy Seeds If collecting seeds from your garden, wait until the flower heads have dried out on the plant. Snip them off, break them apart, and store the seeds in a cool, dry place until you’re ready to plant. Store-bought packets work just as well and often come with helpful instructions. Step 2: Start Indoors (Optional) To get a head start, sow seeds indoors about 6–8 weeks before your last expected frost. Use seed trays or small pots filled with a light, well-draining seed-starting mix. Scatter the seeds over the surface and press them lightly into the soil—Black-eyed Susan seeds need light to germinate, so don’t bury them deeply. Step 3: Keep Moist and Warm Mist the soil gently to keep it evenly moist and place the trays in a warm, bright location. Ideal germination temperature is around 70°F (21°C). Seedlings should begin to emerge in 7 to 14 days. Step 4: Harden Off and Transplant Once the seedlings have developed a few sets of true leaves and outdoor temperatures are consistently warm, harden them off by placing them outside for a few hours each day, gradually increasing their exposure to the elements. Then transplant them into the garden, spacing them 12–18 inches apart. Step 5: Direct Sowing Outdoors Alternatively, you can sow seeds directly into garden soil once the risk of frost is over. Loosen the soil, rake it smooth, and scatter the seeds across the surface. Press them gently into the soil and water lightly. Thin seedlings later to avoid overcrowding. This method is great for creating natural-looking garden beds, wildflower patches, or large drifts of color. Once established, many varieties of Black-eyed Susan will self-seed, giving you cheerful blooms year after year with very little effort. Check this: How to Propagate Peperomia Obtusifolia? When do Black-eyed Susans bloom? Black-eyed Susans typically bloom from mid-summer through early fall, usually starting around June or July and continuing into September or even October, depending on your local climate. The bright, daisy-like flowers last for several weeks and are excellent for attracting bees, butterflies, and other pollinators. Regular deadheading (removing spent blooms) can extend the flowering period even further. What’s the best time to propagate Black-eyed Susan? The ideal time to propagate Black-eyed Susan depends on the method. For division, early spring or early fall is best—when the plant is either just waking up or winding down for the season. If you’re taking cuttings, aim for late spring to early summer when the plant is actively growing. Seeds can be started indoors in early spring or sown directly outdoors after the last frost. Do Black-eyed Susans come back every year? Yes, many varieties of Black-eyed Susan, particularly Rudbeckia fulgida and Rudbeckia hirta, are perennials or short-lived perennials that return year after year. Even annual or biennial types often self-seed readily, so you may see new plants popping up in your garden each season without having to replant them. Proper care and occasional division can keep them healthy and blooming for years. Conclusion Propagating Black-eyed Susan is simple and rewarding, whether you do it through division, cuttings, or seeds. Division gives fast results, cuttings help clone specific varieties, and seeds are perfect for covering large areas. No matter which method you choose, you’ll end up with more of these cheerful, low-maintenance blooms brightening up your garden. Khaja Moinuddin, a computer science graduate, finds joy in gardening and homesteading. Join him on this blog as he shares his experiences in homesteading, gardening, and composting Source link
0 notes